side stack and split stack -...
TRANSCRIPT

Luminette® Privacy Sheers
Owner’s Guide
Side Stack And Split Stack

2
INTRODUCTION
THANK YOU for purchasing Luminette® Privacy Sheers from Hunter Douglas. This product has been custom built using the highest quality materials. When properly installed in your window, Luminette Privacy Sheers will provide a lifetime of beauty and performance.
Before You BeginInstallation has been designed to be as simple as possible. Please review the instructions to acquaint yourself with all of the procedures.
If you need any assistance with operation or adjustments, call the Hunter Douglas Customer Information Center at:
1-888-501-8364
CONTENTS
Introduction ...............................................................................................................2
INSTALLATION INSTRUCTIONS ........................................................................3
Materials Included ......................................................................................................4
Getting Started ...........................................................................................................5
Step 1: Unpack The Sheer ..........................................................................................6
Step 2: Attach The Mounting Brackets .......................................................................7
Step 3: Attach The Fabric Panel(s) ............................................................................14
OPERATING INSTRUCTIONS ...........................................................................17
Test Sheer Operation ................................................................................................18
Removing The Softrak™ Headrail And Sheers ...........................................................19
Troubleshooting Procedures .....................................................................................21
Care And Cleaning ...................................................................................................23
Notes .......................................................................................................................27

3
INSTALLATION INSTRUCTIONS

4
MATERIALS INCLUDED
Luminette®
Fabric
Sof Trak™
Headrail
Velcro® Swivel Plate
CeilingMount
BracketSpacer Block With Bushings
ExtensionBracket
(Optional)
Extension Bracket Cover (Optional)
InstallationBracket
Faceplate
Tilt ReductionPinion Clip
Extension BracketBase Cover(Optional)
Left Stack Shown
EndTreatment
Rivet
Vane
Wand

5
GETTING STARTED
Remove From PackagingRemove the Luminette® Privacy Sheers from the package. Keep all the packaging until the unit operates to your satisfaction. Check that you have all the necessary parts for your installation.
Tools And Fasteners NeededFlat blade and Phillips screwdrivers
Level
Needlenose pliers
Measuring tape
Pencil
Power drill, ¼" hex driver, and drill bits
Razor utility knife
You will also need fasteners designed to work with your specific mounting surface. Hex head screws (1¼") are supplied.
NOTE: The hex head screws (included) must contact wood studs for secure mounting. Otherwise, use wall anchors, fasteners such as expansion, toggle bolts, or molley bolts (not included). For metal surfaces, pre-drill the holes and use sheet metal screws (not included).
■
■
■
■
■
■
■
Mounting Surface Fastener
No. 6 Hex Head Screws (Provided)
Wall Anchors, Expansion Bolts(Not Provided)
Sheet Metal Screws(Not Provided)
Wood
Drywall, Plaster
Metal

6
STEP 1: UNPACK THE SHEER
Make sure you have clean hands or wear disposable gloves when handling Luminette® fabric. Select an area in your home where the sheer can be laid flat. Avoid draping the sheer over furniture or folding the sheer, to minimize wrinkling.
One or more Luminette sheers may be packaged in a carton.
The fabric panels are rolled around a cardboard tube. Do not remove the protective wrapping until Step 3.
Remove the SofTrak™ headrail system and mounting hardware from inside the carton.
Remove the foam supports from the tilt shaft inside the headrail. Rotate the supports in either direction until they can be pulled off.
NOTE: With wider sheers, the SofTrak headrail may be shipped separately.
■
■
■
■

7
STEP 2: ATTACH THE MOUNTING BRACKETS
Mounting RequirementsFor proper operation, the SofTrak™ headrail must be mounted level. Use a level to check that the mounting surface is even on an inside mount and that the bottoms of the installation brackets are level and aligned on an outside mount. If necessary, shim the brackets to ensure level mounting.
Number Of Brackets NeededThe number of mounting bracket units provided with each sheer depends upon the ordered width, as shown in the chart below.
Ordered Width Number Of Units
Up to 40" 2
401/8"-70" 3
701/8"-96" 4
961/8"-155" 6
1551/8"-192" 8
A mounting bracket unit can be any combination of the following:
One ceiling mount bracket
One spacer block with one faceplate
One extension bracket and cover with one ceiling mount bracket
Bracket SpacingBracket spacing is the same for outside mounts, inside mounts, and ceiling mounts.
Place two brackets on the mounting surface so their centers are 3½" in from the ends of the SofTrak headrail.
Space additional brackets, if supplied, evenly between the two end brackets. Use all the mounting brackets recommended (see chart, above).
Measure and mark all bracket positions.
■
■
-
-
-
■
■
■
■
31/2" Space Evenly
SofTrak Headrail
Space Evenly
Bracket
31/2"

8
OUTSIDE MOUNTS
Bracket PlacementThe top of the sheer aligns with the top of the installation bracket, not the removable tab. The tab serves as a spacer to prevent the brackets from being mounted too close to the ceiling.
For proper operation, the sheer must clear all obstructions, including window cranks, handles, and moldings. Replace protruding window cranks with T-cranks.
Use additional spacer blocks or extension brackets if more than ½" clearance is needed.
Bracket Attachment
Faceplate With Spacer Block(s) – Up To 2" Clearance
Attach the spacer block to a flat, vertical mounting surface at least 1⅛" high.
Insert the screws through the opening on the front of the spacer block. Slide one bushing over the end of each screw prior to securing the spacer block to the mounting surface.
Three additional ½" spacer blocks may be attached to add 1½" of clearance.
Hook the top of the faceplate to the spacer block and snap into place.
■
■
■
■
■
■
■
RemovableTabs
Faceplate
SpacerBlock
11/8"
11/8" Minimum FlatVertical Surface
Bushing
RemovableTabs
SpacerBlock
9
1"
61/4"Minimum:
Fully Recessed Depth
1" Minimum: Inside Mount Depth
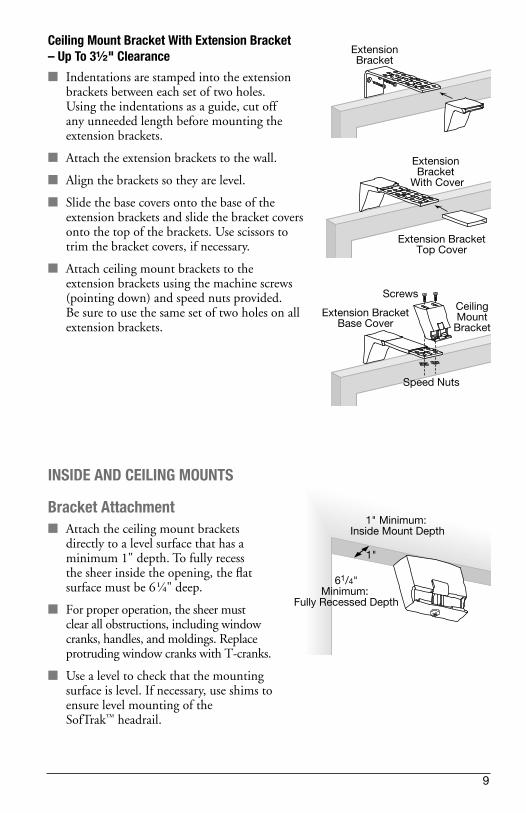
Ceiling Mount Bracket With Extension Bracket – Up To 3½" Clearance
Indentations are stamped into the extension brackets between each set of two holes. Using the indentations as a guide, cut off any unneeded length before mounting the extension brackets.
Attach the extension brackets to the wall.
Align the brackets so they are level.
Slide the base covers onto the base of the extension brackets and slide the bracket covers onto the top of the brackets. Use scissors to trim the bracket covers, if necessary.
Attach ceiling mount brackets to the extension brackets using the machine screws (pointing down) and speed nuts provided. Be sure to use the same set of two holes on all extension brackets.
■
■
■
■
■
Screws
Extension Bracket
With Cover
Extension BracketBase Cover
Extension BracketTop Cover
Extension Bracket
Speed Nuts
CeilingMount
Bracket
Screws
Extension Bracket
With Cover
Extension BracketBase Cover
Extension BracketTop Cover
Extension Bracket
Speed Nuts
CeilingMount
Bracket
Screws
Extension Bracket
With Cover
Extension BracketBase Cover
Extension BracketTop Cover
Extension Bracket
Speed Nuts
CeilingMount
Bracket
INSIDE AND CEILING MOUNTS
Bracket AttachmentAttach the ceiling mount brackets directly to a level surface that has a minimum 1" depth. To fully recess the sheer inside the opening, the flat surface must be 6¼" deep.
For proper operation, the sheer must clear all obstructions, including window cranks, handles, and moldings. Replace protruding window cranks with T-cranks.
Use a level to check that the mounting surface is level. If necessary, use shims to ensure level mounting of the SofTrak™ headrail.
■
■
■
10
Snap Off
Shim
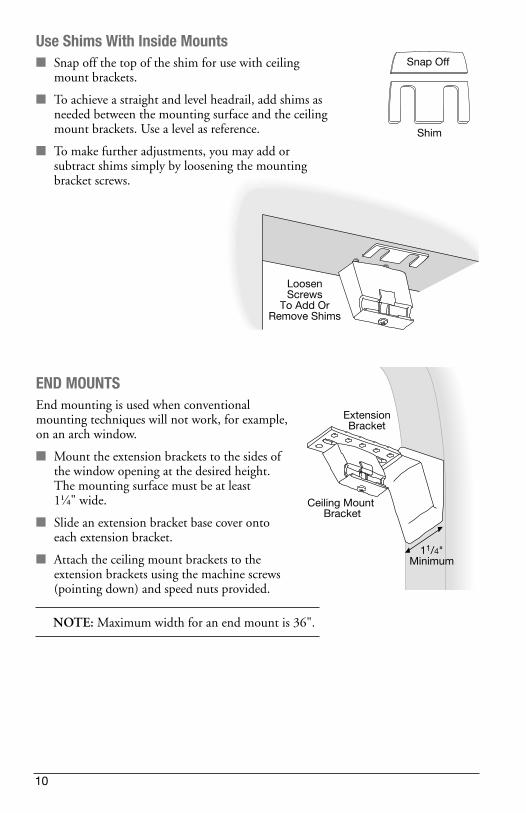
Use Shims With Inside MountsSnap off the top of the shim for use with ceiling mount brackets.
To achieve a straight and level headrail, add shims as needed between the mounting surface and the ceiling mount brackets. Use a level as reference.
To make further adjustments, you may add or subtract shims simply by loosening the mounting bracket screws.
■
■
■
LoosenScrews
To Add Or Remove Shims
END MOUNTSEnd mounting is used when conventional mounting techniques will not work, for example, on an arch window.
Mount the extension brackets to the sides of the window opening at the desired height. The mounting surface must be at least 1¼" wide.
Slide an extension bracket base cover onto each extension bracket.
Attach the ceiling mount brackets to the extension brackets using the machine screws (pointing down) and speed nuts provided.
NOTE: Maximum width for an end mount is 36".
■
■
■
ExtensionBracket
11/4"Minimum
Ceiling Mount Bracket

11
Install The SofTrak™ HeadrailGrooves on the back of the SofTrak™ headrail are designed to snap into the locking tab on the faceplate and ceiling mount bracket.
Tilt the front of the headrail (the side with the tilt reduction pinion clips) up so the top groove fits into the locking tab on each installation bracket.
With the top groove in place on all brackets, tilt the headrail down so the bottom groove fits into the tabs on the installation brackets.
After positioning/adjusting the SofTrak headrail, lock the headrail into place by tightening the tab screws on the bottom of the brackets until they are just snug.
Use Shims With Outside MountsRemove the headrail.
Leave the shim intact for use with spacer blocks/faceplates.
Visually check along the length of the SofTrak headrail for any bending or bowing.
If there is any bowing from side-to-side, add shims as needed to straighten the headrail.
After reinstalling the headrail, perform another visual check to be sure you have corrected the bowing.
■
■
■
■
■
■
■
■
■
Tilt Down
SofTrakHeadrail
LockingScrew
Tilt Up LockingTab
SofTrakHeadrail
LoosenMountingScrews
RemoveFaceplateAnd Any
AdditionalSpacer Blocks
InsertShim(s)
Shim

12
3"
3"
ActiveEnd Cap
(Wand Side)
ActiveEnd Cap
(Wand Side)
Brackets
31/2" 31/2"
31 /2"
31 /2"
Position The SofTrak™ HeadrailAfter the SofTrak™ headrail is installed into the installation brackets, check the clearance at each end.
NOTE: The fabric stacks at the “active end.” The recommended amount of clearance varies according to mounting style and application, as shown below.
Inside Mounts And Wall-To-Wall Outside Mounts
NOTE: After positioning/adjusting the SofTrak headrail, lock the headrail into place by tightening the tab screws on the bottom of the brackets until they are just snug.
Corner And Bay WindowsFor normal bracket placement, mount the installation brackets 6½" from the corner (3" from the corner to the end of the headrail plus 3½" in from the end of the headrail).
If spacer blocks or extension brackets are used for extra clearance, add the amount of extra clearance to the 6½" (3" plus the amount of extra clearance).
For bay windows, mount according to previously measured deductions plus 3½" in from the end of the headrail.
■
■
■
Split Stack Design – Minimum Clearances1/4"
Active End Active End
1/4"
Right Stack Design – Minimum Clearances3/4"
Passive End Active End
1/4"
Left Stack Design – Minimum Clearances1/4"
Active End Passive End
3/4"

13
Side-By-Side (Abutted) Installations
There are three options for side-by-side installations: an active end cap next to an active end cap, an active end cap next to a passive end cap, or a passive end cap next to another passive end cap.
Correct spacing between end caps allows for proper swivel arm operation. See the illustrations below for proper sheer placement.
Be sure to measure the spacing from end cap to end cap, not from the swivel arms.
A simulated split stack (the fabric opens in the center) is the same as a passive/passive side-by-side installation.
NOTE: After positioning/adjusting the SofTrak™ headrail, lock the headrail into place by tightening the tab screws on the bottom of the brackets until they are just snug.
■
■
■
ActiveEnd Cap
PassiveEnd Cap
Swivel Arm
1"
ACTIVE/PASSIVE
PassiveEnd Cap
Passive End Cap
Swivel ArmSwivel Arm
11/2"
PASSIVE/PASSIVE
ActiveEnd Cap
ActiveEnd Cap
ACTIVE/ACTIVE
1/2"Active
End CapPassiveEnd Cap
Swivel Arm
1"
ACTIVE/PASSIVE
PassiveEnd Cap
Passive End Cap
Swivel ArmSwivel Arm
11/2"
PASSIVE/PASSIVE
ActiveEnd Cap
ActiveEnd Cap
ACTIVE/ACTIVE
1/2"

14
STEP 3: ATTACH THE FABRIC PANEL(S)
PreparationsUse the wand to rotate the tilt reduction pinion clips perpendicular to the headrail.
Pull the cord to move the fabric carriers to the fully stacked position.
Remove the protective wrapping from the fabric, but do not unroll it from the cardboard tube.
Stand the tube on end on a clean surface with the header at the top. Position the tube at the end of the SofTrak™ headrail where the fabric stacks.
If the tube is too long to stand on end, trim it with a sharp razor knife. Do not cut the fabric. Do not unroll the fabric until you begin attaching the vanes to the pinion clips.
■
■
■
■
■
Tube
FabricPanel
FabricHeader
15
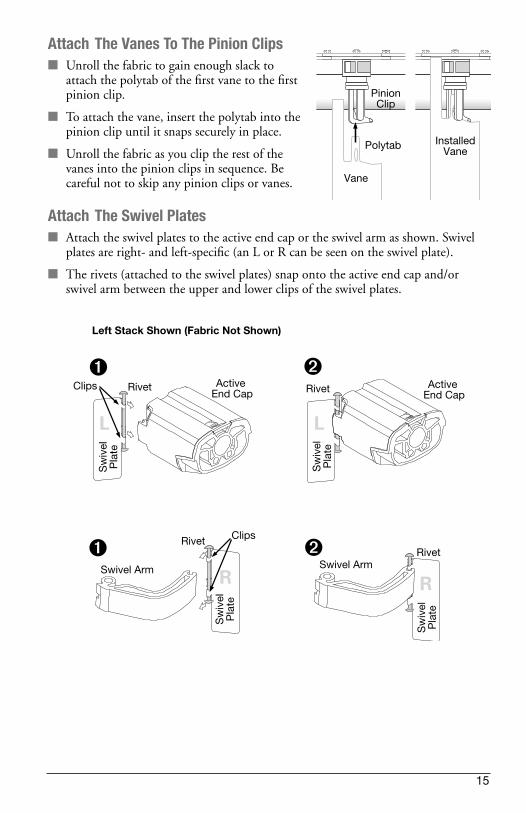
Attach The Vanes To The Pinion ClipsUnroll the fabric to gain enough slack to attach the polytab of the first vane to the first pinion clip.
To attach the vane, insert the polytab into the pinion clip until it snaps securely in place.
Unroll the fabric as you clip the rest of the vanes into the pinion clips in sequence. Be careful not to skip any pinion clips or vanes.
Attach The Swivel Plates Attach the swivel plates to the active end cap or the swivel arm as shown. Swivel plates are right- and left-specific (an L or R can be seen on the swivel plate).
The rivets (attached to the swivel plates) snap onto the active end cap and/or swivel arm between the upper and lower clips of the swivel plates.
■
■
■
■
■
Vane
PinionClip
Polytab InstalledVane
Rivet
Rivet
Swivel ArmRivet
Swivel Arm
Active End Cap Rivet Active
End Cap
L L
R R
Left Stack Shown (Fabric Not Shown)
Clips
Clips
Sw
ivel
Pla
te
Sw
ivel
Pla
te
Sw
ivel
Pla
te
Sw
ivel
Pla
te
�
�
�
�
16
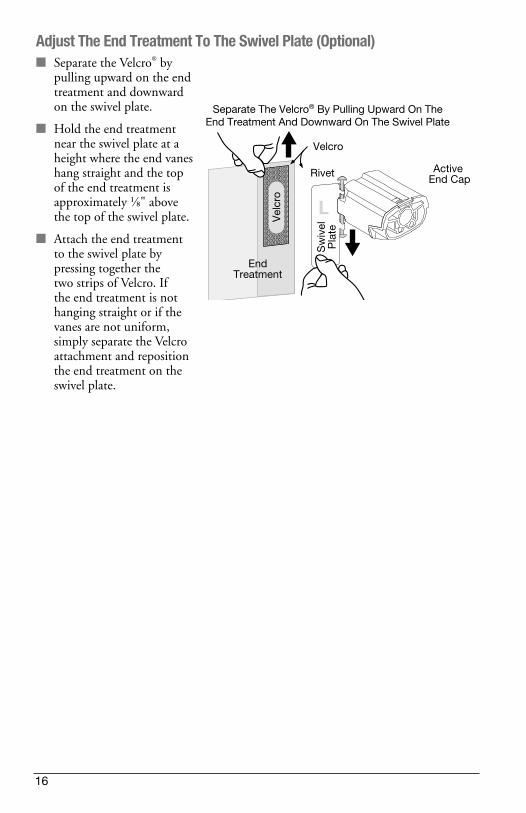
Adjust The End Treatment To The Swivel Plate (Optional)Separate the Velcro® by pulling upward on the end treatment and downward on the swivel plate.
Hold the end treatment near the swivel plate at a height where the end vanes hang straight and the top of the end treatment is approximately ⅛" above the top of the swivel plate.
Attach the end treatment to the swivel plate by pressing together the two strips of Velcro. If the end treatment is not hanging straight or if the vanes are not uniform, simply separate the Velcro attachment and reposition the end treatment on the swivel plate.
■
■
■
Separate The Velcro® By Pulling Upward On The End Treatment And Downward On The Swivel Plate
Vel
cro
Velcro
EndTreatment
Rivet Active End Cap
L
Sw
ivel
Pla
te

17
OPERATING INSTRUCTIONS

18
TEST SHEER OPERATION
Traverse The Sheer
NOTE: The tilt reduction pinion clips must always be perpendicular to the SofTrak™ headrail before traversing it.
Use the operating cord to traverse the sheer. Observe the fabric carriers’ complete range of motion as you use the cord to traverse the carriers back and forth across the window opening. They should move easily and not stick or jam at any point along the SofTrak headrail.
Tilt The VanesUse the tilt wand to tilt the vanes. With the fabric carriers fully traversed across the headrail, rotate the wand to tilt the pinion clips to the left and right to observe their closure. They should be synchronized, opening and closing easily.
■
■

19
REMOVING THE SOFTRAK™ HEADRAIL AND SHEERS
Remove The Fabric
NOTE: Make sure you have clean hands or wear disposable gloves when handling Luminette® fabric. Select an area in your home where the sheer can be laid flat. Avoid draping the sheers over furniture or folding the sheers to minimize wrinkling.
To remove the fabric from the headrail:
Traverse the sheer to the fully stacked position.
Detach both end treatments from the ends of the headrail, as shown.
Remove the fabric from each pinion clip by holding the top of the vane, near the polytab, and pulling down and to the left.
Lay the fabric flat on a clean, level surface with the vanes facing in the same direction.
If the original tube is available, gently roll the fabric onto it, making sure the fabric stays straight. Do not roll the fabric too tightly.
■
■
■
■
■
InstalledVane
Vane
PinionClip
Removing The Fabric Vanes
Separate The Velcro® By Pulling Upward On The End Treatment And Downward On The Swivel Plate
(STD L and RTW R Swivel Plate Shown)
Vel
cro
Velcro
EndTreatment
Rivet Active End Cap
Sw
ivel
Pla
te

20
Rotate Counter-clockwise
SofTrakTM
HeadrailLockingScrew
Tilt Up LockingTab
SofTrakHeadrail
Remove The HeadrailLoosen the locking screw on the bottom of each installation bracket.
With the fabric removed, rotate the headrail clockwise until the bottom releases from the brackets.
Once the bottom releases, pull the headrail out from the brackets and remove.
■
■
■

21
TROUBLESHOOTING PROCEDURES
Problem Solution
The sheer does not traverse, or does not traverse easily.
Tilt the vanes to the opened position before traversing.
Check that the mounting brackets are level, their front edges are aligned, and there are no obstructions to the movement of the fabric (i.e., the cord is not caught in the brackets).
■
■
The sheer end treatment does not hang straight.
Separate the Velcro® strips by holding the top of the vane, near the polytab, and pulling down and to the left with the end treatment swivel plate. Reposition the end treatment on the swivel plate. Repeat as necessary until the end treatment hangs straight. See page 16.
■
The vanes do not rotate or they rotate incorrectly.
Check that the sheer is fully traversed.
Check that there are no obstructions to the movement of the vanes. Replace protruding window cranks with T-cranks.
■
■
A vane does not hang correctly.
Check that the vane is completely inserted in the pinion clip. See page 15.
■
A vane is out of alignment.
Using the wand, first rotate the vanes all the way to one side and then all the way to the other. The vane(s) will automatically realign.
Manually turn the pinion clip to align with the remaining pinion clips.
■
■
The two fabric panels on a split stack sheer don’t quite meet in the center.
While up to a ¼" gap is within product tolerances, you can usually ensure that the two lead vanes meet in the center by cupping them with your clean hands and rounding them along the length of the fabric.
■

22
Problem Solution
The end treatment arm does not swing around the end cap.
On inside mounts, check that there is clearance between the end of the headrail and the window casement. See Position The SofTrak™ Headrail, page 12.
■
Cord tension is incorrect. Wand does not hang straight or cord is too loose.
Raise or lower the cord tether to adjust cord tension.
Using a .050 hex key, loosen the set screw in the wand lock. Raise the tether to decrease tension; lower the tether to increase tension. Tighten the set screw and check the adjustment.
■
■
SetScrew
WandLock

23
CARE AND CLEANING
Luminette® Privacy Sheers are as durable as they are beautiful. With proper installation and care, they will provide many years of beauty and performance.
The sheer, valance, and vane fabric are 100% polyester. They are resilient, anti-static, and dust resistant. Periodic cleaning is recommended to help keep Luminette Privacy Sheers looking like new. For all cleaning applications, sheers should remain hanging to minimize handling, wrinkling, or puckering.
NOTE: Disposable gloves should be worn when handling sheers.
CAUTION: Keep all cleaning solutions away from the SofTrak™ headrail system. Never submerge the headrail.
Routine CleaningUse a feather duster for regular light dusting.
For more thorough dust removal, a hand-held vacuum with low suction may be used. When vacuuming, avoid pulling or stretching the fabric.
Start in the upper left corner and work across the sheer using short horizontal strokes while steadying the fabric with your free hand. Each stroke should be approximately the width of two to three vanes. Do not use long horizontal or vertical strokes, as these actions will crease the fabric. Continue to the bottom of the sheer.
Do not use a brush attachment or rigorous vacuuming since either could distort the sheer fabric.
Electrostatic Cleaning
CAUTION: Do not use electrostatic cleaning devices such as Swiffer™ or Pledge Grab-it™ on any Luminette Privacy Sheers.
Spot-CleaningTo reduce the potential for permanent staining, spots should be treated and cleaned as soon as possible with a clothing stain pre-treatment solution.
Apply a pre-treatment solution to a clean, white cloth.
Support the fabric from behind using another clean, dry cloth. Clean the spot using a gentle blotting action. Avoid rubbing the fabric since any abrasive action may cause it to distort.
Let the area air dry.
After the area is dry, remove excess solution by blotting it with distilled or bottled water applied to another clean cloth.
■
■
-
■
■
■
■
■

24
Deep CleaningFor deep cleaning Luminette® Privacy Sheers, both injection/extraction and ultrasonic cleaning methods are recommended.
CAUTION: Always use a professional with experience cleaning Luminette sheers to avoid damaging the product. Do not dry clean Luminette sheers.
Injection/Extraction Method
Professional injection/extraction cleaning injects a heated cleaning solution into the fabric and extracts the dirty solution in the same motion. This process is done in the home.
Have your professional set and maintain their cleaning solution just below steaming.
Vacuum the sheer following the instructions under “Routine Cleaning” on the previous page.
Make sure stains are pre-treated to maximize the benefits of cleaning.
When cleaning the vanes, use a 3" upholstery tool and start at the center of the sheer. Clean one vane at a time from top to bottom working out toward the edge of the sheer. Repeat for the other half of the sheer.
NOTE: Both sides of each vane on Luminette Evening Star® room-darkening sheers need to be cleaned. This is not necessary on regular Luminette sheers.
Clean the face fabric from the front of the sheer using a 4" upholstery tool. Close the vanes to the right. Start in the upper left corner, and using short, horizontal strokes (about the width of three vanes), move across the sheer. Clean from the top to the bottom.
Allow the sheer to dry in the fully traversed position with the vanes opened.
Steam out any wrinkles.
Ultrasonic Method
Professional ultrasonic cleaning is a process in which the sheer fabric is inserted into a tank of cleaning solution and then subjected to high frequency vibrations. Dirt is loosened from the fabric and carried away in the cleaning solution. This process is done outside the home.
Ensure the supplier’s ultrasonic tank is long enough to accommodate the full length of the sheer without folding the fabric or vanes.
Ensure the sheers are rolled onto a tube when being transported to and from the home. This reduces the chance of wrinkling and damage.
Specify water that does not exceed 90ºF be used throughout the process.
■
■
■
■
■
■
■
■
■
■

25
CAUTION: If water temperatures exceed 90ºF, oxidation will damage the room-darkening vanes of Luminette Evening Star sheers.
Make sure stains are pre-treated to maximize the benefits of cleaning.
Hang sheers immediately after cleaning with the vanes open and the loops evenly spaced. Allow the sheer to drip dry completely.
Wrinkle And Crease RemovalBoth the hand and steam machine methods described below are suitable for wrinkle and crease removal. The hand method is more appropriate for smaller areas.
Hand Method
Rotate vanes to the fully opened position.
Apply warm distilled or bottled water to a clean, white cloth.
Support the fabric from behind using another clean, dry cloth.
Blot the wrinkle or creased area with the wet cloth.
Let the area air dry.
Steam Machine Method
Rotate vanes to the fully opened position.
From behind, direct the steam (maximum temperature 102ºF) from a portable steam machine to penetrate the sheer fabric.
Use slow, short vertical movements. Begin at the top of the sheer and work your way down. Several passes over the creased area may be needed.
Let the area air dry.
■
■
■
■
■
■
■
■
■
■
■
A Note About TextilesLike any work of textile art, whether an antique tapestry or hand-spun sheer, the fabric is subject to slight variations.
The fabric will change as its position changes.
Minor wrinkles, puckers, or other variations can appear and are inherent to this textile product. Slight puckers in the sheer fabric may be most noticeable when the sheer is traversed across the opening after having been in the stacked position for a period of time. If desired, the sheer may be steamed to minimize these minor variations. Steam from the rear side of the fabric whenever possible.
Such variations, like those just mentioned, are normal, acceptable quality.
■
■
■

26
Additional Product EnhancementsSheer Luminette® face fabric is available by the yard in 123" widths (most styles) for creating such accessories as top and side treatments, specialty shapes, table rounds, and bed skirts.
Add coordinating Silhouette® window shadings where applicable. Our Counterparts® program lists coordinating colors to make it easy to use both window fashions in the same room.
■
■

27
NOTES

PCN135103381 Rev. 4/06
© 1997, 2006 Hunter Douglas Inc. ® Registered trademark of Hunter Douglas Inc. ™Trademark of Hunter Douglas Inc. Patented in the U.S. and foreign countries. Other U.S. and foreign patents pending.
Swiffer™ is a trademark of Procter & Gamble Company. Pledge Grab-it™ is a trademark of SC Johnson. Velcro® is a registered trademark of Velcro Industries.
Questions? In the United States, call the Hunter Douglas Customer Information Center at
1-888-501-8364
In Canada, call your Hunter Douglas Customer Service Representative at
1-800-265-1363
Visit our Web site at hunterdouglas.com