silect software’s · pdf filesilect software’s mp author is a management pack (mp)...
TRANSCRIPT

Silect MP Author for Microsoft
System Center Operations Manager
Silect Software’s
MP Author
User Guide
September 2, 2015

MP Author User Guide 1
Copyright © 2015 Silect Software, Inc. All rights reserved. Unauthorized reproduction or distribution prohibited
Disclaimer The information in this document is furnished for informational use only, and is subject to change without
notice. Silect Software, Inc. assumes no responsibility or liability for any errors or inaccuracies that may
appear in this document.
The information contained herein is the property of Silect Software, Inc. and is strictly confidential. Except
as expressly authorized in writing by Silect Software, Inc., the holder of this document shall keep all
information contained herein confidential. Except as expressly authorized in writing by Silect Software,
Inc., the holder is granted no rights to use, reproduce, or otherwise disclose or disseminate the
information contained herein.
Copyright © 2015
Silect Software, Inc.
6333 Rideau Valley Dr. N
Manotick, Ontario K4M 1B3
Canada
www.silect.com

MP Author User Guide 2
Copyright © 2015 Silect Software, Inc. All rights reserved. Unauthorized reproduction or distribution prohibited
Contents Contents ......................................................................................................................................... 2
Preface ........................................................................................................................................... 3
About Silect Software’s MP Author User Guide ..................................................................................................... 3
Audience .................................................................................................................................................... 3
Document conventions .............................................................................................................................. 3
Command syntax ................................................................................................................................... 3
Notes, tips and cautions ........................................................................................................................ 4
Chapter 1 ........................................................................................................................................ 5
About Silect MP Author ............................................................................................................................................ 5
Hardware and software requirements ........................................................................................................ 5
Chapter 2 ........................................................................................................................................ 7
Installing and configuring Silect MP Author .......................................................................................................... 7
Prerequisites .............................................................................................................................................. 7
Installing Silect MP Author ......................................................................................................................... 7
To troubleshoot the installation .................................................................................................................. 8
Configuring Silect MP Author ..................................................................................................................... 8
Uninstalling Silect MP Author..................................................................................................................... 8
Chapter 3 ...................................................................................................................................... 10
Working with Silect MP Author .............................................................................................................................. 10
Creating New Management Packs .......................................................................................................... 10
Customizing Existing Management Packs ............................................................................................... 19
Management Pack Options...................................................................................................................... 39
Chapter 4 ...................................................................................................................................... 44
Getting Technical Support ..................................................................................................................................... 44
Self–Service Support Portal ..................................................................................................................... 44
Electronic Support ................................................................................................................................... 44
Premium Support ..................................................................................................................................... 44
Other Resources ...................................................................................................................................... 44

MP Author User Guide 3
Copyright © 2015 Silect Software, Inc. All rights reserved. Unauthorized reproduction or distribution prohibited
Preface
About Silect Software’s MP Author User Guide The Silect Software’s MP Author User Guide describes how to install, configure, work with and
troubleshoot MP Author for use with Microsoft System Center Operations Manager. It contains the
following chapters:
About Silect MP Author
Installing and configuring Silect MP Author
Working with Silect MP Author
Getting Technical Support
Audience This document is intended for the following users:
Network planners
Installers
Administrators
Operators
Maintenance personnel
Document conventions This document uses bold to identify the following:
File and directory names, as follows:
For details, refer to the readme.txt file.
User interface names, titles, buttons, and tabs, as follows:
To display the Open dialog, choose File, Open... Command names, as follows:
To display a list of available diagnostics, use the show diag list command.
Command syntax Table 1: Command syntax rules describes the command syntax rules used in this document.
Table 1: Command syntax rules
Syntax format Description
Bold Commands and keywords. Enter command line arguments
that are in bold exactly as written.
<variable> Variables. You must substitute a value for command line
arguments that are enclosed in angle brackets.
[ optional_keyword ] Optional keywords or <variables>. Enter command line

MP Author User Guide 4
Copyright © 2015 Silect Software, Inc. All rights reserved. Unauthorized reproduction or distribution prohibited
[<optional_variable>] arguments that are enclosed in square brackets, if desired.
{ a | b | c }
{<a> | <b> | <c>}
Required alternate keywords or <variables>. You must
choose one command line argument enclosed within the
braces. Choices are separated by vertical (OR) bars.
[ a | b | c ]
[<a> | <b> | <c>]
Optional alternate keywords or <variables>. Choose one
command line argument enclosed within the braces, if
desired. Choices are separated by vertical (OR) bars.
Notes, tips and cautions Notes and cautions are used to alert you to important information or risks.
Notes
Notes use the following convention:
Note Take note. Contains important and helpful information.
Tips
Tips use the following convention:
Tip Review and consider. An alternative or faster method is being suggested.
Cautions
Cautions use the following convention:
CAUTION! Be careful. In this situation you might do something that could result in a service
interruption, or the loss of data.

MP Author User Guide 5
Copyright © 2015 Silect Software, Inc. All rights reserved. Unauthorized reproduction or distribution prohibited
Chapter 1
About Silect MP Author Silect Software’s MP Author is a management pack (MP) design, development and customization
software program for Microsoft System Center Operations Manager 2012 (SCOM). It allows users to
create completely new MPs, or customize existing MPs—whether they are provided by Microsoft or by
other third-party vendors.
This chapter provides an overview of the functionality of Silect MP Author. It contains the following
sections:
Hardware and software requirements
Hardware and software requirements This section describes the Silect MP Author hardware and software requirements as well as the
supported operating language.
Supported Operating Systems Silect MP Author is available for the following operating systems:
Operating system Supported releases
Microsoft Windows OS
(recommended x64)
Windows 7, 8, 8.1, 10
Windows 2008 SP2
Windows 2008 R2
Windows 2012
Windows 2012 R2
Microsoft System Center System Center 2012
System Center 2012 SP1
System Center 2012 R2
Note Silect MP Author does not support clustered configurations or provide support for virtualized
applications.
Hardware Requirements Silect MP Author hardware requirements are as follows:
Minimum 100 MB hard drive space.
Minimum 4 GB Ram.
x64 architecture processor highly recommended.
Software Requirements Before installing Silect MP Author, ensure that you have satisfied the following software prerequisites:

MP Author User Guide 6
Copyright © 2015 Silect Software, Inc. All rights reserved. Unauthorized reproduction or distribution prohibited
System Center Operations Manager Console—2012 or above must be installed
Management Pack Requirements To create or customize Microsoft management packs (MPs), you will need to refer to file based copies of
the core management packs that are distributed with Operations Manager 2012. Silect MP Author
includes the initial sets of management pack included with Operations Manager 2012, SP1, and R2.
These are located in the ManagementPacks folder in your Silect MP Author installation folder.
The management packs updated by the CU updates should be available in the following folder on your
management server (assuming it’s mapped to drive S:).
S:\Program Files\Microsoft System Center 2012 R2\Operations Manager\Server\Management Packs for
Update Rollups
Support for Languages The Silect MP Author program is only available in US English. However, knowledge (both vendor and
company) can be authored in many languages.

MP Author User Guide 7
Copyright © 2015 Silect Software, Inc. All rights reserved. Unauthorized reproduction or distribution prohibited
Chapter 2
Installing and configuring Silect MP Author This chapter describes the requirements and procedures for installing, configuring and uninstalling Silect
MP Author. It contains the following sections:
Prerequisites.
Installing Silect MP Author.
Configuring Silect MP Author.
Uninstalling Silect MP Author.
Prerequisites This section describes the Silect MP Author software and management pack prerequisites. Silect MP
Author can only be used with Microsoft System Center Operations Manager 2012.
Software prerequisites.
Software Prerequisites
Before installing Silect MP Author, ensure that you have satisfied the following software prerequisites:
System Center Operations Manager Console—2012 or above must be installed
Installing Silect MP Author This section describes the high-level steps to complete installation, verification of the installation, and
troubleshooting the installation.
To install Silect MP Author Step 1 Run the MP Author installation file on a computer that meets the software prerequisites
described in Prerequisites. If the User Account Control dialog appears, click Yes.
Step 2 Click Next on the Welcome screen.
Step 3 The EULA dialog box appears. Select the I accept the terms of the License Agreement
option then click Next.
Step 4 Select the folder where Silect MP Author will be installed. The default folder is C:\Program
Files\Silect\MP Author\. Click Next.
Step 5 The Ready to Install dialog box appears. Click Install to continue the Silect MP Author
installation.
Step 6 If Silect MP Author installs successfully, the Completing the Silect MP Author Setup
Wizard dialog box appears. Click the Finish button to complete the installation of Silect
MP Author.
MP Author User Guide 8
Copyright © 2015 Silect Software, Inc. All rights reserved. Unauthorized reproduction or distribution prohibited
To troubleshoot the installation If the installation did not complete successfully and errors were encountered, please ensure the System
Center Operations Manager console is installed and can properly run on the system where Silect MP
Author is being installed. Next check that all prerequisites identified at the beginning of this chapter have
been met. If both of these items are verified, please see the Getting Technical Support section.
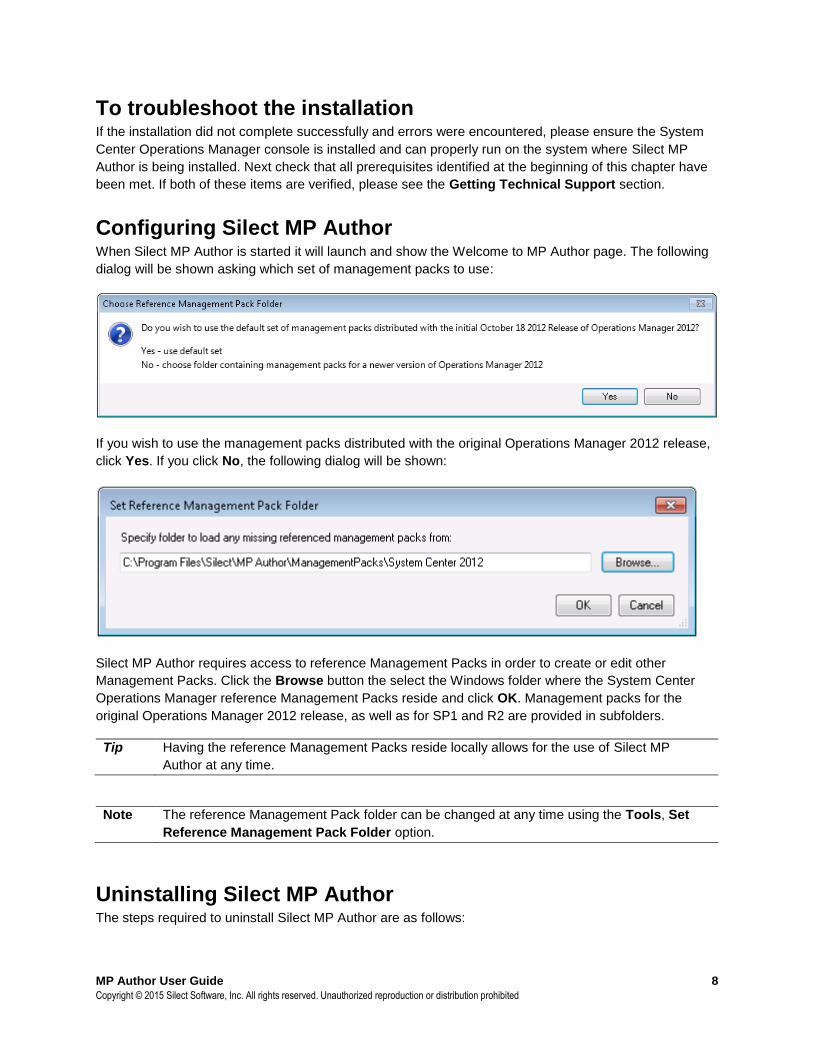
Configuring Silect MP Author When Silect MP Author is started it will launch and show the Welcome to MP Author page. The following
dialog will be shown asking which set of management packs to use:
If you wish to use the management packs distributed with the original Operations Manager 2012 release,
click Yes. If you click No, the following dialog will be shown:
Silect MP Author requires access to reference Management Packs in order to create or edit other
Management Packs. Click the Browse button the select the Windows folder where the System Center
Operations Manager reference Management Packs reside and click OK. Management packs for the
original Operations Manager 2012 release, as well as for SP1 and R2 are provided in subfolders.
Tip Having the reference Management Packs reside locally allows for the use of Silect MP
Author at any time.
Note The reference Management Pack folder can be changed at any time using the Tools, Set
Reference Management Pack Folder option.
Uninstalling Silect MP Author The steps required to uninstall Silect MP Author are as follows:

MP Author User Guide 9
Copyright © 2015 Silect Software, Inc. All rights reserved. Unauthorized reproduction or distribution prohibited
Step 1 Start the Control Panel and select the Add / Remove Programs option (Programs and
Features on some versions of Windows).
Step 2 Select Silect MP Author then right-click and select the Uninstall option.
Step 3 A dialog box will appear asking Are sure you want to uninstall Silect MP Author? Click
Yes to uninstall.
Step 4 If User Account Control asks if you want to allow this, click Yes to continue.
Step 5 Silect MP Author will be removed from your list of installed programs.

MP Author User Guide 10
Copyright © 2015 Silect Software, Inc. All rights reserved. Unauthorized reproduction or distribution prohibited
Chapter 3
Working with Silect MP Author This chapter describes how to work with Silect MP Author. It contains the following sections:
Starting Silect MP Author.
Creating new management packs.
Customizing existing management packs.
Management Pack Options
Starting Silect MP Author
Once Silect MP Author has been installed, it will be added to the All Programs list and as well a shortcut will be added to the desktop on the system where it is installed. This section describes how to start Silect MP Author and how to troubleshoot if Silect MP Author doesn’t start properly.
Note Before starting the Silect MP Author console for the first time ensure the location of the
Reference Management Packs is known.
To Open the Silect MP Author Console
Step 1 Click the Start menu and select All Programs then locate and open the Silect, MP
Author folder and click MP Author.
Step 2 The Silect MP Author console should appear and the Welcome to MP Author page will be
displayed.
To Troubleshoot Silect MP Author Startup Problems If there are errors or problems when starting Silect MP Author please ensure the hardware and software
prerequisites are met including the installation of the System Center Operations Manager console on the
system where Silect MP Author is installed. Once these prerequisites are met please see the section
entitled Contacting Technical Support for further assistance.
Creating New Management Packs There are a number of scenarios where the creation of a new Management Pack (MP) is required. For example an MP may not exist for a specific application you need to monitor with Operations Manager. Or perhaps the MP the came with a system you are managing is not meeting your needs and a new MP with more (or less) information can optimize the management of the system. Silect MP Author supports a wizard-based MP creation capability. You will be guided through creating the key elements of an MP and when the wizard completes you can further modify the MP to meet your requirements. In virtually all cases the Management Pack Creation Wizard allows you to browse the

MP Author User Guide 11
Copyright © 2015 Silect Software, Inc. All rights reserved. Unauthorized reproduction or distribution prohibited
application or system you are building the MP for which provides an easier, more accurate means of defining the necessary MP elements.
Tip Before starting the Management Pack Creation Wizard ensure you have network access to
the system or application you are creating an MP for.
Note It is recommended to have a separate file folder structure for each MP that you plan on creating.
To Start the Management Pack Creation Wizard
Step 1 From the Silect MP Author console click the New toolbar icon or go to File, New
Step 2 The Management Pack Creation Wizard Introduction screen will be displayed. Click Next.
Step 3 Input manifest information for the Management Pack including name, version and a
description. Click Next.
Step 4 Specify or use the Browse button select an existing folder to be used as the Management
Pack working folder. Click Next.
Note It is recommended to have a separate file folder structure for each MP that you plan on creating.
Step 5 The Add References dialog will be displayed and a default set of referenced MPs will be
displayed. If new referenced MPs need to be added click the Add Optional References
button and choose additional reference MPs. Click Next.
At this point you will be asked to select an MP Template to further assist the creation of a new
Management Pack. You are given three choices:
Empty Management Pack: Select this option if you are a more advanced user and would like to
work with an empty MP with minimal details required by the wizard. The Empty Management
Pack template requires the user to manually configure all elements of the MP.
Single Server Application: Select this option to create a new MP that targets a single
component (application or Windows Service etc.).
Distributed Application: Select this option to create a new MP that targets a distributed
application. Distributed applications typically have a back-end database, service middle tier and a
client front-end.
Follow the appropriate section below that corresponds to the type of MP you are creating.
Empty Management Pack
This option is for an advanced user who wants to manually create all elements of an MP. To create a new
empty MP follow these steps:
Step 1 From the Select the MP Template to Use wizard select the Empty Management Pack
option. Click Next.
Step 2 At the Create the Management Pack wizard screen click Finish.
At this point a new MP will be created and you will be returned to the Silect MP Author designer window
to manually make changes to the MP.

MP Author User Guide 12
Copyright © 2015 Silect Software, Inc. All rights reserved. Unauthorized reproduction or distribution prohibited
Single Server Management Pack
This option is for an advanced user who wants to create an MP for a simple application or system
consisting of a single component. To create a new Single Server MP follow these steps:
Step 1 From the Select the MP Template to Use wizard screen select the Single Server
Application option. Click Next.
Note You will next be guided through the creation of Targets and Monitors for your Single Server MP.
Step 2 At the Define the Role (Target) the MP will monitor select the appropriate setting used to
discover the application. Choices are Registry Setting, Script Setting or WMI Setting
Follow the appropriate section below that corresponds to the type of Role being added to the MP.
Creating a New Registry Target A Registry Target is used to identify the existence of an application or system using a registry entry or
value. To create a new registry target:
Step 1 At the Define the Role (Target) the MP will monitor wizard screen click Use Registry
Setting
Step 2 Next you will be prompted to enter the name of a machine to browse the registry to help
define the new registry target. Enter the name of a machine or click the Browse button to
browse the network. Click Next.
Tip Browsing a computer where the application or system you want to monitor is installed will help create the objects in the new MP.
Step 3 Click the Browse button to open the registry on the machine specified earlier. Navigate
thru the registry settings to find the setting or settings you want to include for targets. Add
additional mandatory and optional properties as required. Click Next.
Step 4 Enter a name for the new Registry Target. Click Next.
Step 5 Choose the base class to use for this new role. Click Next.
Step 6 Choose to enable (default) or disable this new registry discovery. Click Next.
Step 7 Choose the target class to run this discovery against. Click Next.
Step 8 If you have multiple settings, enter the expression you want to use for the target. You can
use a logical expression or simply check the existence of a registry key. Click Next.
Step 9 Enter the discovery schedule. By default it will run once / day. Click Next.
Step 10 Review the settings and click Finish to complete the creation of the new Registry Target.
When you have completed adding a new Registry Target you will be returned to the Management Pack
Creation Wizard. Click Next to create Monitors to be added to the MP. See the sections below on adding
monitors to the MP.
Creating a New Script Target A Script Target is used to identify the existence of an application or system using the results of running a
script. To create a new script target:

MP Author User Guide 13
Copyright © 2015 Silect Software, Inc. All rights reserved. Unauthorized reproduction or distribution prohibited
Step 1 At the Define the Role (Target) the MP will monitor wizard screen click Use Script Setting
Step 2 Enter the name of the script or use the Browse button the find the script that will be used to
determine the target.
Step 3 You can optionally add parameters to the script. Click the Add button to add a parameter
to the script. Repeat to include as many parameters as required. Click Next.
Step 4 You can add optional properties for the new class. Click the Add button to add a property.
Click Next.
Step 5 Enter a name for the new Script Target. Click Next.
Step 6 Choose the base class to use for this new role. Click Next.
Step 7 Choose to enable (default) or disable this new script target. Click Next.
Step 8 Choose the target class to run this discovery against. Click Next.
Step 9 Enter the discovery schedule. By default it will run once / day. Click Next.
Step 10 Review the settings and click Finish to complete the creation of the new Script Target.
When you have completed adding a new Script Target you will be returned to the Management Pack
Creation Wizard. Click Next to create Monitors to be added to the MP. See the sections below on adding
monitors to the MP.
Creating a New WMI Target Setting A WMI Target is used to identify the existence of an application or system using information form the WMI
database. To create a new WMI Target:
Step 1 At the Define the Role (Target) the MP will monitor wizard screen click Use WMI Setting
Step 2 Next you will be prompted to enter the name of a machine to browse the WMI database to
help define the new WMI Target. Enter the name of a machine or click the Browse button
to browse the network. Click Next.
Tip Browsing a computer where the application or system you want to monitor is installed will help create the objects in the new MP.
Step 3 Click the Browse button to open the WMI database on the machine specified earlier.
Navigate thru the WMI database to find the class you want to use for the WMI Target
setting.
Note These next steps will help create a WQL statement used for the WMI Target. This can be entered manually as well.
Step 4 Select an appropriate namespaces in the Step 1 - Select namespace/class window. Click
the Retrieve button to retrieve instances of the selected object.
Step 5 Select an appropriate record in the Step 2 - Select a record window. This will extract all
possible properties for the record.
Step 6 Select an appropriate property in the Step 3 - Create Query Definition window. Check the
properties to include them in the 'WHERE' clause. These checked properties, taken
together, must uniquely identify a record.
Step 7 Select (highlight) the properties whose value needs to be verified
Step 8 Click the Add button.
Step 9 Repeat steps 4-8 as needed to define other WMI Target settings. Click OK.
Step 10 Click Next.

MP Author User Guide 14
Copyright © 2015 Silect Software, Inc. All rights reserved. Unauthorized reproduction or distribution prohibited
Step 11 Add optional properties for the new Target by clicking Add. Click Next when you have
completed adding optional properties. Step 12 Enter a name for the new WMI Target. Click Next.
Step 13 Choose the base class to use for this new role. Click Next.
Step 14 Choose to enable (default) or disable this new WMI Target discovery. Click Next.
Step 15 Choose the target class to run this discovery against. Click Next.
Step 16 Enter the discovery schedule. By default it will run once / day. Click Next.
Step 17 Review the settings and click Finish to complete the creation of the new WMI Target.
When you have completed adding a new Registry Target you will be returned to the Management Pack
Creation Wizard. Click Next to create Monitors to be added to the MP. See the sections below on adding
monitors to the MP.
At the Define the Monitors for this MP wizard page click New and select the appropriate type of monitor to
add to the MP. Choices are Database Monitor, Event Monitor, Performance Monitor, Script Monitor,
Service Monitor and Web Site Monitor.
Follow the appropriate section below that corresponds to the type of Monitors being added to the MP.
Creating a New Database Monitor
A Database Monitor is used to determine the health state of a database component either on its own or
part of a larger application or system. To create a new Database Monitor:
Step 1 At the Define the Monitors for this MP wizard screen click New then New Database
Monitor
Step 2 Next you will be prompted to enter a database connection string. Click Edit to browse and
edit SQL connection information. If you want to run a SQL query as part of this monitor
click the Query String to Execute (Optional) check box and enter an appropriate SQL
statement. Next specify the SQL timeout value. Click Next.
Tip Browsing a computer where the application or system you want to monitor is installed will help create the objects in the new MP.
Step 3 Select the Polling Interval to determine the frequency of polling the monitor.
Select Connection Time warning and error thresholds.
If you have specified a SQL query as part of this monitor, specify the Query Time and
Fetch Time thresholds. Click Next.
Step 4 Enter a name for the new Database Monitor. Click Next.
Step 5 Specify the Watcher Nodes for this monitor. You can use the default machine name or
browse for other watcher nodes. Click Next.
Step 6 Review the settings and click Finish to complete the creation of the new Database
Monitor.
When you have completed adding a new Database Monitor you will be returned to the Define the
Monitors for this MP wizard screen. You can choose to create another Monitor or you can complete the
creation of the MP by clicking Next.
Creating a New Event Monitor

MP Author User Guide 15
Copyright © 2015 Silect Software, Inc. All rights reserved. Unauthorized reproduction or distribution prohibited
An Event Monitor is used to determine the health state of an application or system based on Event Log
entries. To create a new Event Monitor:
Step 1 At the Define the Monitors for this MP wizard screen click New then New Event Monitor
Step 2 Next you will be prompted to enter the name of a machine to browse the Event Log to help
define the new Event Monitor. Enter the name of a machine or click the Browse button to
browse the network. Click Next.
Tip Browsing a computer where the application or system you want to monitor is installed will help create the objects in the new MP.
Step 3 Select the Event Log for this Monitor from the drop-down list of Event Logs.
Next enter the expression to evaluate event log entries. By default you will be prompted for
an Event ID number and optionally an Event Source.
Select the Target for this Monitor from the drop-down list of Targets.
Select the Parent Monitor from the drop-down list of Parent Monitors.
Click Next.
Step 4 Specify either a wait time before resetting the health state of this monitor or specify an
event used to reset the health state. Click Next.
Step 5 Enter a name for the new Event Monitor. Click Next.
Step 6 Specify the health state for each of the detected conditions. Click Next.
Step 7 Optionally choose to create an Alert for this monitor including Priority, Severity and
Message test. Click Next.
Step 8 Review the settings and click Finish to complete the creation of the new Event Monitor.
When you have completed adding a new Event Monitor you will be returned to the Define the Monitors for
this MP wizard screen. You can choose to create another Monitor or you can complete the creation of the
MP by clicking Next.
Creating a New Performance Monitor A Performance Monitor is used to determine the health state of an application or system based on
Windows performance information. To create a new Performance Monitor:
Step 1 At the Define the Monitors for this MP wizard screen click New then New Performance
Monitor
Step 2 Next you will be prompted to enter the name of a machine to browse the Windows
Performance Monitor to help define the new Performance Monitor. Enter the name of a
machine or click the Browse button to browse the network. Click Next.
Tip Browsing a computer where the application or system you want to monitor is installed will help create the objects in the new MP.
Step 3 Select the Windows Performance Monitor Object, Counter, Instance and Sampling Rate
to define this monitor.
Select the Target for this Monitor from the drop-down list of Targets.
Select the Parent Monitor from the drop-down list of Parent Monitors.
Optionally create a rule to collect performance data.
Click Next.

MP Author User Guide 16
Copyright © 2015 Silect Software, Inc. All rights reserved. Unauthorized reproduction or distribution prohibited
Step 4 Enter a name for the new Performance Monitor. Click Next.
Step 5 Specify the thresholds for each of the detected conditions. Click Next.
Step 6 Optionally choose to create an Alert for this monitor including Name, Priority and Severity.
Click Next.
Step 7 Review the settings and click Finish to complete the creation of the new Performance
Monitor.
When you have completed adding a new Performance Monitor you will be returned to the Define the
Monitors for this MP wizard screen. You can choose to create another Monitor or you can complete the
creation of the MP by clicking Next.
Creating a New Script Monitor
A Script Monitor is used to determine the health state of an application or system based on the results of
running a script. To create a new Script Monitor:
Step 1 At the Define the Monitors for this MP wizard screen click New then New Script Monitor
Step 2 Enter the name of the script or use the Browse button the find the script that will be used to
determine the target. You can optionally add parameters to the script. Click the Add button
to add a parameter to the script. Repeat to include as many parameters as required Click
Next.
Step 3 Select monitor states and criteria. Click Next.
Step 4 Select the Target for this Monitor from the drop-down list of Targets.
Select the Parent Monitor from the drop-down list of Parent Monitors.
Click Next.
Step 5 Enter a name for the new Script Monitor. Click Next.
Step 6 Specify the schedule to run the Script Monitor. Click Next.
Step 7 Optionally choose to create an Alert for this monitor including Name, Priority and Severity.
Click Next.
Step 8 Review the settings and click Finish to complete the creation of the new Script Monitor.
When you have completed adding a new Script Monitor you will be returned to the Define the Monitors for
this MP wizard screen. You can choose to create another Monitor or you can complete the creation of the
MP by clicking Next.
Creating a New Service Monitor A Service Monitor is used to determine the health state of an application or system based on the state of
a Windows service. To create a new Service Monitor:
Step 1 At the Define the Monitors for this MP wizard screen click New then New Service Monitor
Step 2 Next you will be prompted to enter the name of a machine to browse installed services to
help define the new Service Monitor. Enter the name of a machine or click the Browse
button to browse the network. Click Next.
Tip Browsing a computer where the application or system you want to monitor is installed will help create the objects in the new MP.

MP Author User Guide 17
Copyright © 2015 Silect Software, Inc. All rights reserved. Unauthorized reproduction or distribution prohibited
Step 3 Select the Target for this Monitor from the drop-down list of Targets.
Select the Parent Monitor from the drop-down list of Parent Monitors.
Select the Windows Service to monitor.
Click Next.
Step 4 Enter a name for the new Service Monitor. Click Next.
Step 5 Specify the health states for the various service states. Click Next.
Step 6 Optionally choose to create an Alert for this monitor including Name, Priority and Severity.
Click Next.
Step 7 Review the settings and click Finish to complete the creation of the new Service Monitor.
When you have completed adding a new Service Monitor you will be returned to the Define the Monitors
for this MP wizard screen. You can choose to create another Monitor or you can complete the creation of
the MP by clicking Next.
Creating a New Web Site Monitor A Web Site Monitor is used to determine the health state of a web service component either on its own or
part of a larger application or system. To create a new Web Site Monitor:
Step 1 At the Define the Monitors for this MP wizard screen click New then New Web Site
Monitor
Step 2 Next you will be prompted to enter the URL of the web server to monitor and polling
interval. Click Next.
Step 3 Enter a name for the new Web Site Monitor. Click Next.
Step 4 Specify the Watcher Nodes for this monitor. You can use the default machine name or
browse for other watcher nodes. Click Next.
Step 5 Review the settings and click Finish to complete the creation of the new Web Site Monitor.
When you have completed adding a new Web Site Monitor you will be returned to the Define the Monitors
for this MP wizard screen. You can choose to create another Monitor or you can complete the creation of
the MP by clicking Next.
Select the Rollup Algorithm to use. Worst Of is the most common. Click Next.
Review the settings and click Finish to complete the creation of the new management pack.
Distributed Application Management Pack
This option is for an advanced user who wants to create an MP for an application or system consisting of
a front-end or client component, a middle-tier component and a back-end or database component. The
Distributed Application wizard will guide you through the creation of Targets used to discover these
components and Monitors used to determine the health of these components.
The wizard sequence is as follows:
Create Targets
Step 1 Create Targets for Front-End (at least one Target must be defined)
a. Create Registry Targets;
b. Create Script Targets;

MP Author User Guide 18
Copyright © 2015 Silect Software, Inc. All rights reserved. Unauthorized reproduction or distribution prohibited
c. Create WMI Targets;
Step 2 Create Targets for Middle-Tier (this step is optional)
a. Create Registry Targets;
b. Create Script Targets;
c. Create WMI Targets
Step 3 Create Targets for Back-End (at least one Target must be defined)
a. Create Registry Targets;
b. Create Script Targets;
c. Create WMI Targets
Create Monitors:
Step 4 Create Monitors for Front-End (at least one Monitor must be defined)
a. Create Database Monitors
b. Create Event Monitors
c. Create Performance Monitors
d. Create Script Monitors
e. Create Service Monitors
f. Create Web Site Monitors
Step 5 Create Monitors for Middle-Tier (this step is optional)
a. Create Database Monitors
b. Create Event Monitors
c. Create Performance Monitors
d. Create Script Monitors
e. Create Service Monitors
f. Create Web Site Monitors
Step 6 Create Monitors for Back-End ( at least one Monitor must be defined)
a. Create Database Monitors
b. Create Event Monitors
c. Create Performance Monitors
d. Create Script Monitors
e. Create Service Monitors
f. Create Web Site Monitors
For complete information on creating Targets, please refer to these sections:
Create Registry Targets
Create Script Targets
Create WMI Targets
For complete information on creating Monitors, please refer to these sections:
Create Database Monitors
Create Event Monitors
Create Performance Monitors
Create Script Monitors

MP Author User Guide 19
Copyright © 2015 Silect Software, Inc. All rights reserved. Unauthorized reproduction or distribution prohibited
Create Service Monitors
Create Web Site Monitors
Customizing Existing Management Packs
Silect MP Author provides the ability to edit existing unsealed Management Packs (MPs). MP objects can
be added, removed and edited using Silect MP Author.
To edit an MP, from the Silect MP Author console click Open or click File, Open, From File or click File,
Recent to open a recently opened MP. The MP will be opened in the designer window. Folders or
containers that represent different types of MP objects will be displayed along the left hand side (the left
pane) of the console. Information about a selected object will be displayed in the middle pane and the
properties of a selected object will be displayed in the right-hand pane. For example:
To make changes to the MP, right-click the appropriate object container and select the appropriate
options. For example, for MP features such as importing into Operations Manager, right-click on the top
level node in the left hand tree and select the appropriate option. To view options associated with an
object container right click on that container.
For specific details on adding or editing MP components, please see the sections below.
Adding and Editing Folders
Folders are used by Operations Manager to organize and present information in the Operations Manager
Console. To add a new Folder to a MP, follow these steps:

MP Author User Guide 20
Copyright © 2015 Silect Software, Inc. All rights reserved. Unauthorized reproduction or distribution prohibited
Step 1 Open an unsealed MP by clicking Open or click File, Open, From File or click File,
Recent to open a recently opened MP
Step 2 When the MP has been opened, right-click the Folders container and select Create New
Folder.
Step 3 Select the name of the parent folder from the drop-down and click Next
Step 4 Enter the name and description for the new folder and click Next.
Step 5 Review the settings and click Finish to create the new folder.
To save these changes, click the Save toolbar button or select File, Save
To edit a folder, follow these steps:
Step 1 With the MP already opened, click the Folders container to view the folders currently
defined in the MP.
Step 2 Right-click one of the folders displayed and select:
a. View / Edit XML to edit the underlying XML,
b. Delete… to remove the folder,
c. Properties… to view detailed properties of the folder.
Step 3 Or click on one of the folders and change the properties which are not greyed out in the
Properties View/Edit window.
To save changes, click the Save toolbar button or select File, Save
Adding and Editing Targets Targets are used by Operations Manager to discover the components of an application or system. To
create a new Target, follow these steps:
Step 1 Open an unsealed MP by clicking Open or click File, Open, From File or click File,
Recent to open a recently opened MP
Step 2 When the MP has been opened, right-click the Targets or Discoveries container and select
one of the available options:
Create New Registry Target

MP Author User Guide 21
Copyright © 2015 Silect Software, Inc. All rights reserved. Unauthorized reproduction or distribution prohibited
Create New Script Target
Create New WMI Target
Refer to the appropriate section below for details on creating each type of Target.
Creating a New Registry Target A Registry Target is used to identify the existence of an application or system using a registry entry or
value. To create a new registry target:
Step 1 At the Define the Role (Target) the MP will monitor wizard screen click Use Registry
Setting
Step 2 Next you will be prompted to enter the name of a machine to browse the registry to help
define the new registry target. Enter the name of a machine or click the Browse button to
browse the network. Click Next.
Tip Browsing a computer where the application or system you want to monitor is installed will help create the objects in the new MP.
Step 3 Click the Browse button to open the registry on the machine specified earlier. Navigate
thru the registry settings to find the setting or settings you want to include for targets. Add
additional mandatory and optional properties as required. Click Next.
Step 4 Enter a name for the new Registry Target. Click Next.
Step 5 Choose the base class to use for this new role. Click Next.
Step 6 Choose to enable (default) or disable this new registry discovery. Click Next.
Step 7 Choose the target class to run this discovery against. Click Next.
Step 8 If you have multiple settings, enter the expression you want to use for the target. You can
use a logical expression or simply check the existence of a registry key. Click Next.
Step 9 Enter the discovery schedule. By default it will run once / day. Click Next.
Step 10 Review the settings and click Finish to complete the creation of the new Registry Target.
Creating a New Script Target A Script Target is used to identify the existence of an application or system using the results of running a
script. To create a new script target:
Step 1 At the Define the Role (Target) the MP will monitor wizard screen click Use Script Setting
Step 2 Enter the name of the script or use the Browse button the find the script that will be used to
determine the target.
Step 3 You can optionally add parameters to the script. Click the Add button to add a parameter
to the script. Repeat to include as many parameters as required. Click Next.
Step 4 You can add optional properties for the new class. Click the Add button to add a property.
Click Next.
Step 5 Enter a name for the new Script Target. Click Next.
Step 6 Choose the base class to use for this new role. Click Next.
Step 7 Choose to enable (default) or disable this new script target. Click Next.
Step 8 Choose the target class to run this discovery against. Click Next.
Step 9 Enter the discovery schedule. By default it will run once / day. Click Next.
Step 10 Review the settings and click Finish to complete the creation of the new Script Target.

MP Author User Guide 22
Copyright © 2015 Silect Software, Inc. All rights reserved. Unauthorized reproduction or distribution prohibited
Creating a New WMI Target A WMI Target is used to identify the existence of an application or system using information form the WMI
database. To create a new WMI Target:
Step 1 At the Define the Role (Target) the MP will monitor wizard screen click Use WMI Setting
Step 2 Next you will be prompted to enter the name of a machine to browse the WMI database to
help define the new WMI Target. Enter the name of a machine or click the Browse button
to browse the network. Click Next.
Tip Browsing a computer where the application or system you want to monitor is installed will help create the objects in the new MP.
Step 3 Click the Browse button to open the WMI database on the machine specified earlier.
Navigate thru the WMI database to find the class you want to use for the WMI Target
setting.
Note These next steps will help create a WQL statement used for the WMI Target. This can be entered manually as well.
Step 4 Select an appropriate namespaces in the Step 1 - Select namespace/class window. Click
the Retrieve button to retrieve instances of the selected object.
Step 5 Select an appropriate record in the Step 2 - Select a record window. This will extract all
possible properties for the record.
Step 6 Select an appropriate property in the Step 3 - Create Query Definition window. Check the
properties to include them in the 'WHERE' clause. These checked properties, taken
together, must uniquely identify a record.
Step 7 Select (highlight) the properties whose value needs to be verified
Step 8 Click the Add button.
Step 9 Repeat steps 4-8 as needed to define other WMI Target settings. Click OK.
Step 10 Click Next.
Step 11 Add optional properties for the new Target by clicking Add. Click Next when you have
completed adding optional properties. Step 12 Enter a name for the new WMI Target. Click Next.
Step 13 Choose the base class to use for this new role. Click Next.
Step 14 Choose to enable (default) or disable this new WMI Target discovery. Click Next.
Step 15 Choose the target class to run this discovery against. Click Next.
Step 16 Enter the discovery schedule. By default it will run once / day. Click Next.
Step 17 Review the settings and click Finish to complete the creation of the new WMI Target.
To save these changes, click the Save toolbar button or select File, Save
Editing a Target To edit a Target, follow these steps:
Step 1 With the MP already opened, click the Targets container to view the targets currently
defined in the MP.
Step 2 Right-click one of the targets displayed and select:
a. View / Edit XML to edit the underlying XML,
b. Delete… to remove the target,

MP Author User Guide 23
Copyright © 2015 Silect Software, Inc. All rights reserved. Unauthorized reproduction or distribution prohibited
c. Properties… to view detailed properties of the target.
Step 3 Or click on one of the targets and change the properties which are not greyed out in the
Properties View/Edit window.
To save these changes, click the Save toolbar button or select File, Save
Editing Discoveries
Discoveries are used by Operations Manager to discover things to manage. To edit Discoveries in an MP
follow these steps:
Step 1 Open an unsealed MP by clicking Open or click File, Open, From File or click File,
Recent to open a recently opened MP
Step 2 When the MP has been opened, click the Discoveries container to view the discoveries
currently defined within the MP.
Step 3 Right-click one of the discoveries displayed and select:
a. View / Edit XML to edit the underlying XML,
b. Create / Edit Knowledge to edit the knowledge associated with the discovery,
c. Delete… to remove the discovery,
d. Properties… to view detailed properties of the discovery.
Step 4 Or click on one of the discoveries and change the properties which are not greyed out in
the Properties View/Edit window.

MP Author User Guide 24
Copyright © 2015 Silect Software, Inc. All rights reserved. Unauthorized reproduction or distribution prohibited
To save these changes, click the Save toolbar button or select File, Save
Adding and Editing Rules Rules are used by Operations Manager to collect information about components of an application or
system. To add a new Rule to an existing MP, follow these steps:
Step 1 Open an unsealed MP by clicking Open or click File, Open, From File or click File,
Recent to open a recently opened MP
Step 2 When the MP has been opened, right-click the Rules container and select one of the
available options:
Create New Event Rule
Create New Performance Rule
Create New Script Performance Rule
Refer to the appropriate section below for details on creating each type of Rule.
Creating an Event Rule An Event Rule is used to collect information from the Windows Event Log. To create a new Event Rule
follow these steps:
Step 1 Enter the name of a machine to browse the Event Log to help define the new Event Rule.
Or click the Browse button to browse the network. Click Next.
Tip Browsing a computer where the application or system you want to monitor is installed will help create the objects in the new MP.

MP Author User Guide 25
Copyright © 2015 Silect Software, Inc. All rights reserved. Unauthorized reproduction or distribution prohibited
Step 2 Select the Event Log for this Rule from the drop-down list of Event Logs.
Next enter the expression to evaluate event log entries. By default you will be prompted for
an Event ID number and optionally an Event Source.
Select the Target for this Monitor from the drop-down list of Targets.
Click Next.
Step 3 Enter a name for the new Event Rule. Click Next.
Step 4 Optionally choose to create an Alert for this rule including Priority, Severity and Message
test. Click Next.
Step 5 Specify the schedule to run Event Rule. Click Next.
Step 6 Review the settings and click Finish to complete the creation of the new Event Rule.
To save these changes, click the Save toolbar button or select File, Save
Creating a New Performance Rule A Performance Rule is used to collect Windows Performance information. To create a new Performance
Rule:
Step 1 Enter the name of a machine to browse the Windows Performance Monitor to help define
the new Performance Rule. Or click the Browse button to browse the network. Click Next.
Tip Browsing a computer where the application or system you want to monitor is installed will help create the objects in the new MP.
Step 2 Select the Windows Performance Monitor Object, Counter, Instance and Sampling Rate
to define this rule.
Select the Target for this Rule from the drop-down list of Targets.
Click Next.
Step 3 Enter a name for the new Performance Rule. Click Next.
Step 4 Optionally create a view for this rule, and/or save to the data warehouse. Click Next.
Step 5 Specify the schedule to run Performance Rule. Click Next.
Step 6 Review the settings and click Finish to complete the creation of the new Performance
Rule.
To save these changes, click the Save toolbar button or select File, Save
Creating a New Script Performance Rule A Script Performance Rule is used to capture performance information. To create a new Script
Performance Rule:
Step 1 Enter the name of the script or use the Browse button the find the script that will be used to
determine the target. You can optionally add parameters to the script. Click the Add button
to add a parameter to the script. Repeat to include as many parameters as required Click
Next.
Step 2 Enter the Object, Counter, Instance and Value mappings. Click Next.
Step 3 Select the Target for this Rule from the drop-down list of Targets.
Step 4 Enter a name for the new Script Rule. Click Next.
Step 5 Optionally create a view for this rule, and/or save to the data warehouse. Click Next.

MP Author User Guide 26
Copyright © 2015 Silect Software, Inc. All rights reserved. Unauthorized reproduction or distribution prohibited
Step 6 Specify the schedule to run the Script Rule. Click Next.
Step 7 Review the settings and click Finish to complete the creation of the new Script
Performance Rule.
To save these changes, click the Save toolbar button or select File, Save
Editing Rules To edit a Rule, follow these steps:
Step 1 With the MP already opened, click the Rules container to view the Rules currently defined
in the MP.
Step 2 Right-click one of the rules displayed and select:
a. View / Edit XML to edit the underlying XML,
b. Create / Edit Knowledge to edit the knowledge associated with the rule,
c. Delete… to remove the rule,
d. Properties… to view detailed properties of the rule.
Step 3 Or click on one of the rules and change the properties which are not greyed out in the
Properties View/Edit window.
To save these changes, click the Save toolbar button or select File, Save
Adding and Editing Monitors
Monitors are used by Operations Manager to the state or conditions of an application or system. To add a
new Monitor to an existing MP, follow these steps:

MP Author User Guide 27
Copyright © 2015 Silect Software, Inc. All rights reserved. Unauthorized reproduction or distribution prohibited
Step 1 Open an unsealed MP by clicking Open or click File, Open, From File or click File,
Recent to open a recently opened MP
Step 2 When the MP has been opened, right-click the Monitors container and select one of the
available options:
Create New Database Monitor
Create New Event Monitor
Create New Performance Monitor
Create New Process Monitor *
Create New Script Monitor
Create New Service Monitor
Create New Web Site Monitor
Create New Dependency Rollup Monitor *
Create New Aggregate Rollup Monitor *
* Feature available only in Silect MP Studio.
Refer to the appropriate section below for details on creating each type of Monitor.
Creating a New Database Monitor A Database Monitor is used to determine the health state of a database component either on its own or
part of a larger application or system. To create a new Database Monitor:
Step 1 Right click on Monitors and select Create New Database Monitor
Step 2 Next you will be prompted to enter a database connection string. Click Edit to browse and
edit SQL connection information. If you want to run a SQL query as part of this monitor
click the Query String to Execute (Optional) check box and enter an appropriate SQL
statement. Next specify the SQL timeout value. Click Next.
Tip Browsing a computer where the application or system you want to monitor is installed will help create the objects in the new MP.
Step 3 Select the Polling Interval to determine the frequency of polling the monitor.
Select Connection Time warning and error thresholds.
If you have specified a SQL query as part of this monitor, specify the Query Time and
Fetch Time thresholds. Click Next.
Step 4 Enter a name for the new Database Monitor. Click Next.
Step 5 Specify the Watcher Nodes for this monitor. You can use the default machine name or
browse for other watcher nodes. Click Next.
Step 6 Review the settings and click Finish to complete the creation of the new Database
Monitor.
To save these changes, click the Save toolbar button or select File, Save
Creating a New Event Monitor An Event Monitor is used to determine the health state of an application or system based on Event Log
entries. To create a new Event Monitor:
Step 1 Right click on Monitors and select Create New Event Monitor

MP Author User Guide 28
Copyright © 2015 Silect Software, Inc. All rights reserved. Unauthorized reproduction or distribution prohibited
Step 2 Next you will be prompted to enter the name of a machine to browse the Event Log to help
define the new Event Monitor. Enter the name of a machine or click the Browse button to
browse the network. Click Next.
Tip Browsing a computer where the application or system you want to monitor is installed will help create the objects in the new MP.
Step 3 Select the Event Log for this Monitor from the drop-down list of Event Logs.
Next enter the expression to evaluate event log entries. By default you will be prompted for
an Event ID number and optionally an Event Source.
Select the Target for this Monitor from the drop-down list of Targets.
Select the Parent Monitor from the drop-down list of Parent Monitors.
Click Next.
Step 4 Specify either a wait time before resetting the health state of this monitor or specify an
event used to reset the health state. Click Next.
Step 5 Enter a name for the new Event Monitor. Click Next.
Step 6 Specify the health state for each of the detected conditions. Click Next.
Step 7 Optionally choose to create an Alert for this monitor including Priority, Severity and
Message test. Click Next.
Step 8 Review the settings and click Finish to complete the creation of the new Event Monitor.
To save these changes, click the Save toolbar button or select File, Save
Creating a New Performance Monitor
A Performance Monitor is used to determine the health state of an application or system based on
Windows performance information. To create a new Performance Monitor:
Step 1 Right click on Monitors and select Create New Performance Monitor
Step 2 Next you will be prompted to enter the name of a machine to browse the Windows
Performance Monitor to help define the new Performance Monitor. Enter the name of a
machine or click the Browse button to browse the network. Click Next.
Tip Browsing a computer where the application or system you want to monitor is installed will help create the objects in the new MP.
Step 3 Select the Windows Performance Monitor Object, Counter, Instance and Sampling Rate
to define this monitor.
Select the Target for this Monitor from the drop-down list of Targets.
Select the Parent Monitor from the drop-down list of Parent Monitors.
Optionally create a rule to collect performance data.
Click Next.
Step 4 Enter a name for the new Performance Monitor. Click Next.
Step 5 Specify the thresholds for each of the detected conditions. Click Next.
Step 6 Optionally choose to create an Alert for this monitor including Name, Priority and Severity.
Click Next.
Step 7 Review the settings and click Finish to complete the creation of the new Performance
Monitor.

MP Author User Guide 29
Copyright © 2015 Silect Software, Inc. All rights reserved. Unauthorized reproduction or distribution prohibited
To save these changes, click the Save toolbar button or select File, Save
Creating a New Process Monitor (Silect MP Studio only) A Process Monitor is used to determine the health state of an application or system based on whether a
process is running or not running. To create a new Process Monitor:
Step 1 Right click on Monitors and select Create New Process Monitor
Step 2 Next you will be prompted to enter the name of a machine to browse the processes to help
define the new Process Monitor. Enter the name of a machine or click the Browse button to
browse the network. Click Next.
Tip Browsing a computer where the application or system you want to monitor is installed will help create the objects in the new MP.
Step 3 Select the process desired to define this monitor.
Select the Parent Monitor from the drop-down list of Parent Monitors.
Click Next.
Step 4 Enter a name for the new Process Monitor target. Click Next.
Step 5 Enter a name for the new Process Monitor discovery. Click Next.
Step 6 Specify the discovery schedule. Click Next.
Step 7 Enter a name for the new Process Monitor monitor. Click Next.
Step 8 Specify whether the process is to be running, and the number of processes, or whether it
must not be running. Click Next.
Step 9 Optionally choose to create an Alert for this monitor including Name, Priority and Severity.
Click Next.
Step 10 Review the settings and click Finish to complete the creation of the new Process Monitor.
To save these changes, click the Save toolbar button or select File, Save
Creating a New Script Monitor A Script Monitor is used to determine the health state of an application or system based on the results of
running a script. To create a new Script Monitor:
Step 1 Right click on Monitors and select Create New Script Monitor
Step 2 Enter the name of the script or use the Browse button the find the script that will be used to
determine the target. You can optionally add parameters to the script. Click the Add button
to add a parameter to the script. Repeat to include as many parameters as required Click
Next.
Step 3 Select monitor states and criteria. Click Next.
Step 4 Select the Target for this Monitor from the drop-down list of Targets.
Select the Parent Monitor from the drop-down list of Parent Monitors.
Click Next.
Step 5 Enter a name for the new Script Monitor. Click Next.
Step 6 Specify the schedule to run the Script Monitor. Click Next.
Step 7 Optionally choose to create an Alert for this monitor including Name, Priority and Severity.
Click Next.

MP Author User Guide 30
Copyright © 2015 Silect Software, Inc. All rights reserved. Unauthorized reproduction or distribution prohibited
Step 8 Review the settings and click Finish to complete the creation of the new Script Monitor.
To save these changes, click the Save toolbar button or select File, Save
Creating a New Service Monitor A Service Monitor is used to determine the health state of an application or system based on the state of
a Windows service. To create a new Service Monitor:
Step 1 Right click on Monitors and select Create New Service Monitor
Step 2 Next you will be prompted to enter the name of a machine to browse installed services to
help define the new Service Monitor. Enter the name of a machine or click the Browse
button to browse the network. Click Next.
Tip Browsing a computer where the application or system you want to monitor is installed will help create the objects in the new MP.
Step 3 Select the Target for this Monitor from the drop-down list of Targets.
Select the Parent Monitor from the drop-down list of Parent Monitors.
Select the Windows Service to monitor.
Click Next.
Step 4 Enter a name for the new Service Monitor. Click Next.
Step 5 Specify the health states for the various service states. Click Next.
Step 6 Optionally choose to create an Alert for this monitor including Name, Priority and Severity.
Click Next.
Step 7 Review the settings and click Finish to complete the creation of the new Service Monitor.
To save these changes, click the Save toolbar button or select File, Save
Creating a New Web Site Monitor A Web Site Monitor is used to determine the health state of a web service component either on its own or
part of a larger application or system. To create a new Web Site Monitor:
Step 1 Right click on Monitors and select Create New Web Site Monitor
Step 2 Next you will be prompted to enter the URL of the web server to monitor and polling
interval. Click Next.
Step 3 Enter a name for the new Web Site Monitor. Click Next.
Step 4 Specify the Watcher Nodes for this monitor. You can use the default machine name or
browse for other watcher nodes. Click Next.
Step 5 Review the settings and click Finish to complete the creation of the new Web Site Monitor.
To save these changes, click the Save toolbar button or select File, Save
Creating a New Dependency Rollup Monitor (Silect MP Studio only)

MP Author User Guide 31
Copyright © 2015 Silect Software, Inc. All rights reserved. Unauthorized reproduction or distribution prohibited
A Dependency Rollup Monitor is used to roll up the health state of an application or system from low level
components to a higher level component. To create a new Dependency Rollup Monitor:
Step 1 Right click on Monitors and select Create New Dependency Rollup Monitor.
Step 2 Select which health categories you wish to create Dependency Rollup monitors for. More
than one can be selected. Select the rollup policy (Worst Of is most common). Click Next.
Step 3 Select the Relationship from the drop-down list of relationships. The relationship
determines what rolls up to what. Click Next.
Step 4 Enter a name for the new Dependency Rollup Monitor. Names will have the category
added automatically (if not present). Click Next.
Step 5 Optionally choose to create an Alert for this monitor including Name, Priority and Severity.
Click Next.
Step 6 Review the settings and click Finish to complete the creation of the new Dependency
Rollup Monitor. If more than one category was selected, a dependency rollup monitor will
be created for each category.
To save these changes, click the Save toolbar button or select File, Save
Creating a New Aggregate Rollup Monitor (Silect MP Studio only) An Aggregate Rollup Monitor is used to roll up the health state of several unit monitors into a single
parent monitor. To create a new Aggregate Rollup Monitor:
Step 1 Right click on Monitors and select Create New Aggregate Rollup Monitor.
Step 2 Select which health categories you wish to create Aggregate Rollup monitors for. More
than one can be selected. The categories are also used to select which unit monitors can
be rolled up by the wizard. Select the rollup policy (Worst Of is most common). Click Next.
Step 3 Select the Target from the drop-down list of targets. The target is also used to select which
unit monitors can be rolled up by the wizard. Click Next.
Step 4 Enter a name for the new Aggregate Rollup Monitor. Names will have the category added
automatically (if not present). Click Next.
Step 5 Optionally choose to create an Alert for this monitor including Name, Priority and Severity.
Click Next.
Step 6 If the current MP has unit monitors with the same target, and of any of the selected
categories, the wizard will present a list of eligible unit monitors. You may select (check)
those that you want to be re-targeted to the new aggregate monitor. You may also chose to
have the alerts from the unit monitors disabled so the only alerts are raised by the
aggregate monitor.
Step 7 Review the settings and click Finish to complete the creation of the new Aggregate Rollup
Monitor. If more than one category was selected, an aggregate rollup monitor will be
created for each category. Any selected unit monitors will also be re-targeted to the new
Aggregate Rollup Monitor and alerts will be disabled (if requested).
To save these changes, click the Save toolbar button or select File, Save
Editing a Monitor To edit a Monitor, follow these steps:

MP Author User Guide 32
Copyright © 2015 Silect Software, Inc. All rights reserved. Unauthorized reproduction or distribution prohibited
Step 1 With the MP already opened, click the Monitors container to view the Monitors currently
defined in the MP.
Step 2 Right-click one of the monitors displayed and select:
a. View / Edit XML to edit the underlying XML,
b. Create / Edit Knowledge to edit the knowledge associated with the monitor,
c. Delete… to remove the monitor,
d. Properties… to view detailed properties of the monitor.
Step 3 Or click on one of the monitors and change the properties which are not greyed out in the
Properties View/Edit window.

MP Author User Guide 33
Copyright © 2015 Silect Software, Inc. All rights reserved. Unauthorized reproduction or distribution prohibited
To save these changes, click the Save toolbar button or select File, Save
Adding and Editing Views Views are used by Operations Manager to surface information about the health or operation of an
application or system. To add a new View to an existing MP, follow these steps:

MP Author User Guide 34
Copyright © 2015 Silect Software, Inc. All rights reserved. Unauthorized reproduction or distribution prohibited
Step 1 Open an unsealed MP by clicking Open or click File, Open, From File or click File,
Recent to open a recently opened MP
Step 2 When the MP has been opened, right-click the Views container and select one of the
available options:
Create New Alert View
Create New Dashboard View
Create New Event View
Create New Performance View
Create New State View
Refer to the appropriate section below for details on creating each type of View.
Create New Alert View An Alert View provides information about alerts within the Operations Manager environment. To create a
new Alert View:
Step 1 At the Management Pack Alert View wizard screen specify the Folder name and the
Category for the new Alert View. Click Next.
Step 2 Select the Target for this View from the drop-down list of targets.
Select the Severity from the drop-down list of severities.
Select the Priority from the drop-down list of priorities.
Select the Resolution State from the drop-down list.
Select the Alert Source from the drop-down list of available Alert sources.
Click Next.
Step 3 Enter a name for the new Alert View. Click Next.
Step 4 Review the settings and click Finish to complete the creation of the new Alert View.
To save these changes, click the Save toolbar button or select File, Save
Create New Dashboard View
A Dashboard View provides a single pane to look at several other views. To create a new Dashboard
View:
Step 1 At the Management Pack Dashboard View wizard screen specify the Folder name and the
Category for the new Dashboard View. Click Next.
Step 2 Select the Target for this View from the drop-down list of targets.
Next select the Dashboard Configuration. Choices include anything from a 1 x 1
dashboard grid to a 3 x 3 grid.
The click each empty cell in the grid and select the View to be displayed in that cell from
the drop-down list of Views.
Click Next.
Step 3 Enter a name for the new Dashboard View. Click Next.
Step 4 Review the settings and click Finish to complete the creation of the new Dashboard View.
To save these changes, click the Save toolbar button or select File, Save
Create New Event View

MP Author User Guide 35
Copyright © 2015 Silect Software, Inc. All rights reserved. Unauthorized reproduction or distribution prohibited
An Event View provides information about events within the Operations Manager environment. To create
a new Event View:
Step 1 At the Management Pack Event View wizard screen specify name of the computer to
browse for events as well as the Folder name and the Category for the new Event View.
Click Next.
Tip Browsing a computer where the application or system you want to monitor is installed will help create the objects in the new MP.
Step 2 Select the Target for this View from the drop-down list of Targets.
Add the Event IDs to be included in the new Event View.
Click Next.
Step 3 Enter a name for the new Event View. Click Next.
Step 4 Review the settings and click Finish to complete the creation of the new Event View.
To save these changes, click the Save toolbar button or select File, Save
Create new Performance View A Performance View surfaces information about performance data from within the Operations Manager
environment. To create a new Performance View:
Step 1 At the Management Pack Performance View wizard screen specify name of the computer
to browse for performance counter definitions as well as the Folder name and the
Category for the new Event View. Click Next.
Tip Browsing a computer where the application or system you want to monitor is installed will help create the objects in the new MP.
Step 2 Select the Target for this View from the drop-down list of Targets.
Select one or more of the following: Rule, Object, Counter and Instance
Click Next.
Step 3 Enter a name for the new Event View. Click Next.
Step 4 Review the settings and click Finish to complete the creation of the new Performance
View.
To save these changes, click the Save toolbar button or select File, Save
Create New State View
A State View surfaces information about state data within the Operations Manager environment. To
create a new State View:
Step 1 At the Management Pack State View wizard screen specify the Folder name and the
Category for the new State View. Click Next.
Step 2 Select the Target for this View from the drop-down list of Targets.
Select one or more Severities from the list.
Select the Maintenance Modes to report.

MP Author User Guide 36
Copyright © 2015 Silect Software, Inc. All rights reserved. Unauthorized reproduction or distribution prohibited
Optionally, specify a filer with wildcards to only display matching display names.
Click Next.
Step 3 Enter a name for the new State View. Click Next.
Step 4 Review the settings and click Finish to complete the creation of the new State View.
To save these changes, click the Save toolbar button or select File, Save
Editing Views
To edit a View, follow these steps:
Step 1 With the MP already opened, click the View container to view the views currently defined in
the MP.
Step 2 Right-click one of the views displayed and select:
a. View / Edit XML to edit the underlying XML,
b. Delete… to remove the view,
c. Properties… to view detailed properties of the view.
Step 3 Or click on one of the views and change the properties which are not greyed out in the
Properties View/Edit window.
To save these changes, click the Save toolbar button or select File, Save
Adding and Editing Classes (Silect MP Studio only) Classes are used by Operations Manager to describe objects or components. MP Author will normally
create classes when creating a Target (class and discovery), but there are cases where you wish to
create a class without a discovery. To add a new Class to a MP, follow these steps:

MP Author User Guide 37
Copyright © 2015 Silect Software, Inc. All rights reserved. Unauthorized reproduction or distribution prohibited
Step 1 Open an unsealed MP by clicking Open or click File, Open, From File or click File,
Recent to open a recently opened MP
Step 2 When the MP has been opened, right-click the Targets container and select Create New
Class.
Step 3 If desired, specify a set of additional properties for the class. These will be in addition to the
properties defined by the base class. Click Next.
Step 4 Specify the base class for the new class. You can also specify whether the new class is to
be Abstract, Hosted, or a Singleton (availability of choices depends on the base class and
whether any key properties were defined). Click Next.
Step 5 If a Hosted class was specified, select the hosting class and click Next.
Step 6 Enter the name and description for the new class and click Next.
Step 7 If a Hosted class was specified, but no applicable hosting relationship was found, the
wizard will create the hosting relationship. Enter the name and description for the hosting
relationship and click Next.
Step 8 Review the settings and click Finish to create the new class.
To save these changes, click the Save toolbar button or select File, Save
To edit a class, follow these steps:
Step 1 With the MP already opened, click the Targets container to view the classes currently
defined in the MP.
Step 2 Right-click one of the classes displayed and select:
a. View / Edit XML to edit the underlying XML,
b. Delete… to remove the class,
c. Properties… to view detailed properties of the class.
Step 3 Or click on one of the classes and change the properties which are not greyed out in the
Properties View/Edit window.
To save changes, click the Save toolbar button or select File, Save

MP Author User Guide 38
Copyright © 2015 Silect Software, Inc. All rights reserved. Unauthorized reproduction or distribution prohibited
Adding and Editing Relationships (Silect MP Studio only)
Relationships are used by Operations Manager to describe the relationship between objects or
components. Relationships are also used to specify Dependency Rollup monitors. To add a new
Relationship to a MP, follow these steps:
Step 1 Open an unsealed MP by clicking Open or click File, Open, From File or click File,
Recent to open a recently opened MP
Step 2 When the MP has been opened, right-click the Relationships container and select Create
New Relationship.
Step 3 Specify the type of the relationship. Note that Hosting relationships are often best created
using the Create New Class wizard. Click Next.
Step 4 Specify the source and target classes for the relationship. Click Next.
Step 5 Enter the name and description for the new relationship and click Next.
Step 6 Review the settings and click Finish to create the new relationship.
To save these changes, click the Save toolbar button or select File, Save
To edit a relationship, follow these steps:
Step 1 With the MP already opened, click the Relationships container to view the relationships
currently defined in the MP.
Step 2 Right-click one of the relationships displayed and select:
a. View / Edit XML to edit the underlying XML,
b. Delete… to remove the relationships,
c. Properties… to view detailed properties of the relationship.
Step 3 Or click on one of the relationships and change the properties which are not greyed out in
the Properties View/Edit window.
To save changes, click the Save toolbar button or select File, Save

MP Author User Guide 39
Copyright © 2015 Silect Software, Inc. All rights reserved. Unauthorized reproduction or distribution prohibited
Management Pack Options There are a number of options available for Management Packs that you work with within Silect MP
Author. To access the available options, open an MP then right-click the MP name at the top of the tree
structure in the left hand side of the console.
The following MP options are available:
View/Edit XML… *
Edit References…
Check For Missing Display Names…
Verify…
Run Best Practice Analyzer…
Seal…
Deploy…
Compare *
Document *
Test… *
View Reference Tree *
View Summary *
* Feature available only in Silect MP Studio.
The following sections describe how to use each of these features.
Edit References MPs reference information and libraries in other MPs. To add a reference to an MP follow these steps:
Step 1 Open an unsealed MP by clicking Open or click File, Open, From File or click File,
Recent to open a recently opened MP.
Step 2 Right-click the MP name at the top of the tree on the left hand side of the console.
Step 3 Select the Edit References… option
Step 4 Click the Add… button
Step 5 Click one or more MPs (use the CTRL click option to multi-select) the click OK when done.
Step 6 Click Close
The new references will be added to the MP. To save these changes, click the Save toolbar button or
select File, Save
To remove a reference from an MP follow these steps:
Step 1 Open an unsealed MP by clicking Open or click File, Open, From File or click File,
Recent to open a recently opened MP.
Step 2 Right-click the MP name at the top of the tree on the left hand side of the console.
Step 3 Select the Edit References… option
Step 4 Select one or more references from the list

MP Author User Guide 40
Copyright © 2015 Silect Software, Inc. All rights reserved. Unauthorized reproduction or distribution prohibited
Step 5 Click the Remove button
Step 6 Click Close
The references will be removed from the MP (if no elements are using these references). To save these
changes, click the Save toolbar button or select File, Save
To change the alias of a reference in an MP follow these steps:
Step 1 Open an unsealed MP by clicking Open or click File, Open, From File or click File,
Recent to open a recently opened MP.
Step 2 Right-click the MP name at the top of the tree on the left hand side of the console.
Step 3 Select the Edit References… option
Step 4 Select one references from the list
Step 5 Click the Edit… button
Step 6 Enter the new alias in the Edit Reference dialog and press OK
Step 7 Click Close
The references alias will be renamed in the MP. To save these changes, click the Save toolbar button or
select File, Save
Check For Missing Display Names Management Pack elements all have a display name which is shown in the Operations Manager console.
If the display name is missing, the Identifier is usually shown, but these cannot be localized. Display
names should be provided to give the best user experience. To check for missing display names follow
these steps:
Step 1 Open an unsealed MP by clicking Open or click File, Open, From File or click File,
Recent to open a recently opened MP.
Step 2 Right-click the MP name at the top of the tree on the left hand side of the console.
Step 3 Select the Check For Missing Display Names option.
Step 4 A list of any missing display names will be shown. Select each you wish to edit and click
Edit. You can add missing Display Names and Descriptions. Click OK when done.
Step 5 When finished, click Close.
The new display names and descriptions will be added to the MP. To save these changes, click the Save
toolbar button or select File, Save
Verify MPs created or edited within Silect MP Author can be verified before being imported into Operations
Manager. To verify an MP follow these steps:
Step 1 Open an unsealed MP by clicking Open or click File, Open, From File or click File,
Recent to open a recently opened MP.
Step 2 Right-click the MP name at the top of the tree on the left hand side of the console.
Step 3 Select the Verify option
MP Author User Guide 41
Copyright © 2015 Silect Software, Inc. All rights reserved. Unauthorized reproduction or distribution prohibited
The MP will be verified and any problems or issues will be identified and a detailed message will be
provided.
Note The Verify command will complain about Classes and Relationships in unsealed MP’s.
These warnings can usually be ignored.
Run Best Practice Analyzer MPs created or edited within Silect MP Author can be run through the Microsoft MP Best Practices
Analyzer before being imported into Operations Manager. To run the MPBPA on a MP follow these steps:
Step 1 Open an unsealed MP by clicking Open or click File, Open, From File or click File,
Recent to open a recently opened MP.
Step 2 Right-click the MP name at the top of the tree on the left hand side of the console.
Step 3 Select the Run Best Practices Analyzer option
Step 4 You will be asked to choose the location for your report, select your preferred option.
The MP Best Practices Analyzer will be run and the results will be displayed.
Seal MPs created or edited within Silect MP Author can be sealed before being imported into Operations
Manager. To seal an MP follow these steps:
Step 1 Open an unsealed MP by clicking Open or click File, Open, From File or click File,
Recent to open a recently opened MP.
Step 2 Right-click the MP name at the top of the tree on the left hand side of the console.
Step 3 Select the Seal option
Step 4 Provide the name of the folder where the sealed MP will be saved, the name of the Key
File as well as the Company name. Click OK
The MP will be sealed using the information provided. If you choose the default values, then the MP will
be sealed using a Silect MP Author specific license, which should not be considered secure enough to
use for anything other than testing purposes.
Deploy MPs created or edited within Silect MP Author can be deployed directly to Operations Manager. To
deploy a MP follow these steps:
Step 1 Open an unsealed MP by clicking Open or click File, Open, From File or click File,
Recent to open a recently opened MP.
Step 2 Right-click the MP name at the top of the tree on the left hand side of the console.
Step 3 Select the Deploy option
Step 4 Specify the name of the Operations Manager server to connect to. If different credentials
are required enter them in this dialog as well.
Step 5 Click Add.
The MP will be deployed to Operations Manager.

MP Author User Guide 42
Copyright © 2015 Silect Software, Inc. All rights reserved. Unauthorized reproduction or distribution prohibited
Compare (Silect MP Studio only) MPs can be compared to other MPs to determine the differences. To compare a MP follow these steps:
Step 1 Open an unsealed MP by clicking Open or click File, Open, From File or click File,
Recent to open a recently opened MP.
Step 2 Right-click the MP name at the top of the tree on the left hand side of the console.
Step 3 Select the Compare option, followed by selecting where the second MP is located.
Step 4 Use the browser to identify the second MP. Click OK.
A new window will open showing the differences between the two MPs.
Document (Silect MP Studio only) MPs can be documented by producing an HTML report or an Excel spreadsheet. To document a MP
follow these steps:
Step 1 Open an unsealed MP by clicking Open or click File, Open, From File or click File,
Recent to open a recently opened MP.
Step 2 Right-click the MP name at the top of the tree on the left hand side of the console.
Step 3 Select the Document option, followed by selecting the type of document to create.
Step 4 For Excel, use the browser to specify where to store the Excel document. Click OK.
A new window will open documenting the MP.
Test (Silect MP Studio only) MPs can be tested before deployment to determine what to expect in production. This is an advanced
feature. See the MP Studio documentation for details.
View Reference Tree (Silect MP Studio only)
MPs reference other MPs to provide classes, relationships, monitor types, etc. To view the reference tree
of a MP follow these steps:
Step 1 Open an unsealed MP by clicking Open or click File, Open, From File or click File,
Recent to open a recently opened MP.
Step 2 Right-click the MP name at the top of the tree on the left hand side of the console.
Step 3 Select the View Reference Tree option.
A new window will open showing the reference tree for the MP. Click on each MP to see the relationships
for that MP. Right click for more options.
View Summary (Silect MP Studio only) MPs can contain numerous elements such as rules, monitors, discoveries, etc. To view the summary of a
MP follow these steps:
Step 1 Open an unsealed MP by clicking Open or click File, Open, From File or click File,
Recent to open a recently opened MP.
Step 2 Right-click the MP name at the top of the tree on the left hand side of the console.
Step 3 Select the View Summary option.

MP Author User Guide 43
Copyright © 2015 Silect Software, Inc. All rights reserved. Unauthorized reproduction or distribution prohibited
A new window will open showing a summary for the MP.

MP Author User Guide 44
Copyright © 2015 Silect Software, Inc. All rights reserved. Unauthorized reproduction or distribution prohibited
Chapter 4
Getting Technical Support
Silect MP Author users have several options for technical support.
Self–Service Support Portal Users can access FAQs, training videos and other Silect MP Author support information at:
http://www.silect.com/mp-author-support
Electronic Support A ticketed support system is also available for registered users who cannot find the information required
to help them address their issue on the Silect MP Author support portal (http://www.silect.com/mp-author-
support). Registered users can email [email protected] with the following information:
- A detailed description about the problem
- The Silect MP Author log files (located via the View – MP Author Log Folder menu item)
- Screen shots if applicable
- Silect MP Author version information
Response times are not guaranteed using this support service.
Including the log files corresponding to the time period that the problem occurred, will improve the ability
of support to help with your problem.
Premium Support Silect Software also makes a pay-based premium support service available. This service provides
telephone and electronic support with guaranteed response times. For more information on Premium
Support please go to http://www.silect.com/mp-author-support
Other Resources Additional support for management pack authoring is available on http://mpauthorcommunity.com/