simatic batch getting started parts 1 to 4 - siemens ag · getting started parts 1 to 4 manual ......
TRANSCRIPT
s
Contents
Part 1: Introduction Part 2: Quick Start Part 3: Creating an Equipment Phase with SFC and BATCH Interface Blocks
Part 4: Creating an Equipment Phase with an SFC Type
SIMATIC
SIMATIC BATCH Getting Started Parts 1 to 4 Manual Video Sequences Along with this Getting Started, there are video sequences in which you can follow the step-by-step instructions as they are performed. After installing SIMATIC BATCH, the video sequences are in the sbvideob.zip file in the ...\SIEMENS\BATCH\Manual folder. The names of the video sequences match the chapter numbers in the manual.
Note The name of the sample project is incorrect in some of the screenshots: the project name should be "Zen33_01" instead of "Zdt33_01".
Edition 01/2005 A5E00364255-01

Copyright Siemens AG 2005 All rights reserved
The reproduction, transmission or use of this document or its contents is not permitted without express written authority. Offenders will be liable for damages. All rights, including rights created by patent grant or registration of a utility model or design, are reserved. Siemens AG Bereich Automation and Drives Geschaeftsgebiet Industrial Automation Systems Postfach 4848, D- 90327 Nuernberg
Disclaimer of Liability
We have checked the contents of this manual for agreement with the hardware and software described. Since deviations cannot be precluded entirely, we cannot guarantee full agreement. However, the data in this manual are reviewed regularly and any necessary corrections included in subsequent editions. Suggestions for improvement are welcomed. Siemens AG 2005 Technical data subject to change.
Siemens Aktiengesellschaft A5E00364255-01
Safety Guidelines
This manual contains notices intended to ensure personal safety, as well as to protect the products and
connected equipment against damage. These notices are highlighted by the symbols shown below and
graded according to severity by the following texts:
! Danger indicates that death, severe personal injury or substantial property damage will result if proper precautions are not taken.
! Warning indicates that death, severe personal injury or substantial property damage can result if proper precautions are not taken.
! Caution indicates that minor personal injury can result if proper precautions are not taken.
Caution
indicates that property damage can result if proper precautions are not taken.
Notice
draws your attention to particularly important information on the product, handling the product, or to a particular part of the documentation.
Qualified Personnel
Only qualified personnel should be allowed to install and work on this equipment. Qualified persons
are defined as persons who are authorized to commission, to ground and to tag circuits, equipment, and
systems in accordance with established safety practices and standards.
Correct Usage
Note the following:
! Warning This device and its components may only be used for the applications described in the catalog or the
technical description, and only in connection with devices or components from other manufacturers
which have been approved or recommended by Siemens.
This product can only function correctly and safely if it is transported, stored, set up, and installed correctly, and operated and maintained as recommended.
Trademarks
SIMATIC®, SIMATIC HMI® and SIMATIC NET® are registered trademarks of SIEMENS AG.
Third parties using for their own purposes any other names in this document which refer to trademarks
might infringe upon the rights of the trademark owners.

SIMATIC BATCH Getting Started A5E00364255-01 iii
Contents
Part 1: Introduction 1 Batch Processes 1-2
1.1 Technical Process Categories.........................................................................1-2 1.2 Characteristics of Continuous and Batch Processes ......................................1-4 1.3 Practice: Where is this Used? .........................................................................1-5 1.4 Branches for SIMATIC BATCH .......................................................................1-7 1.5 Origins of Batch Production: The Kitchen........................................................1-8 1.6 The Cook - Working Environment and Working Procedures...........................1-9 1.7 Batch Terminology.........................................................................................1-10 1.8 The Kitchen: Master Recipes – Header Data................................................1-11 1.9 The Kitchen: Master Recipes – Procedure (procedural rules) ......................1-12 1.10 The Kitchen: What is Required of the Automation ........................................1-13 1.11 The Kitchen: Automation Concept.................................................................1-14 1.12 Automation Concept- New Approach ............................................................1-15 1.13 Separation of the Automation Level and Recipe Level .................................1-16 1.14 ISA S88.01 - Physical Model .........................................................................1-17 1.15 Procedural Control Model ..............................................................................1-18 1.16 Implementation – Physical and Procedural Model ........................................1-19 1.17 S88.01 Model – PCS 7 ..................................................................................1-20 1.18 Workflow in the Kitchen: Order - Master Recipe - Process Cell....................1-21 1.19 Classification of Batch Process Cells ............................................................1-22 1.20 SIMATIC BATCH: Customer Benefits ...........................................................1-24
Part 1: Quick Start
Description of the Model..........................................................................................................2-5
Chapter 1 Retrieving the Project....................................................................................2-8
Chapter 2 Configuring the BATCH Server and BATCH Client..................................2-12
Chapter 3 Opening the Plant View...............................................................................2-15
Chapter 4 Creating the Batch Process Cell ................................................................2-16
Chapter 5 Type Definition of the Plant Hierarchy According to ISA S88.01 ...........2-17
Chapter 6 Assigning the "EPH" Batch Category .......................................................2-22
Chapter 7 Generating the Type Description in the Batch Types..............................2-25
Chapter 8 Compiling the PLC, OS and Batch Process Cell Data .............................2-27
Chapter 9 Downloading the Batch Process Cell Data ...............................................2-32
Chapter 10 Downloading the PLC to PLCSim ..............................................................2-34
Chapter 11 Starting the OS.............................................................................................2-38
Chapter 12 Starting the BATCH StartCoordinator .......................................................2-40
Contents
SIMATIC BATCH Getting Started iv A5E00364255-01
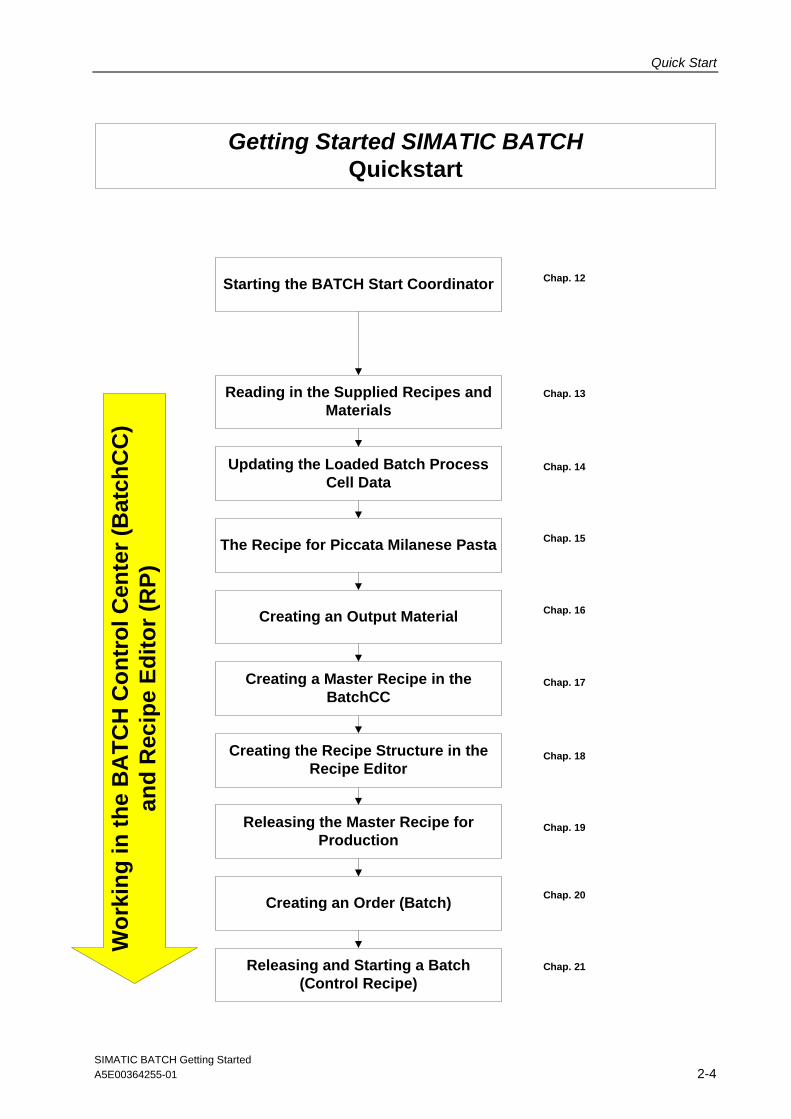
Chapter 13 Reading in the Supplied Recipes and Materials.......................................2-43
Chapter 14 Updating the Loaded Batch Process Cell Data ........................................2-45
Chapter 15 The Recipe for Piccata Milanese Pasta .....................................................2-46
Chapter 16 Creating an Output Material .......................................................................2-47
Chapter 17 Creating a Master Recipe in the BatchCC.................................................2-48
Chapter 18 Creating the Recipe Structure in the Recipe Editor.................................2-50
Chapter 19 Releasing the Master Recipe for Production............................................2-73
Chapter 20 Creating an Order (Batch)...........................................................................2-75
Chapter 21 Releasing and Starting a Batch (Control Recipe) ....................................2-78
Part 3: Creating an Equipment Phase with SFC and BATCH Interface Blocks
Chapter 1 Task/Implementation Concept .....................................................................3-5
Chapter 2 Expanding the Plant Hierarchy ....................................................................3-9
Chapter 3 Configuring the Control Module Level (Valve V1)....................................3-11
Chapter 4 Configuring BATCH Interface Blocks for the Control Commands and Process Value Transfer .......................................................................3-13
Chapter 5 Creating an SFC...........................................................................................3-18
Chapter 6 Connecting the Batch Control Commands with the SFC........................3-27
Chapter 7 Compiling and Downloading the CPU and OS .........................................3-30
Chapter 8 Generating Batch Types .............................................................................3-33
Chapter 9 Compiling, Transferring the OS and Downloading Batch.......................3-35
Chapter 10 Expanding the Unit Faceplate in the WinCC Explorer .............................3-39
Chapter 11 Expanding a Recipe.....................................................................................3-41 Part 4: Creating an Equipment Phase with an SFC Type
Chapter 1 Task/Implementation Concept “Ventilate”..................................................4-4
Chapter 2 Creating the SFC Type “Ventilate” ..............................................................4-8
Chapter 3 Creating Sequencers...................................................................................4-13
Chapter 4 Expanding the Plant Hierarchy ..................................................................4-21
Chapter 5 Creating Instances of the SFC Type “Ventilate” for Pot_1 .....................4-25
Chapter 6 Compiling and Downloading PLC, OS, and Batch ...................................4-29
Chapter 7 Expanding the Unit Faceplate in the WinCC Explorer .............................4-30
Chapter 8 Expanding a Recipe.....................................................................................4-32

Contents
SIMATIC BATCH Getting Started A5E00354255-01 v
Contents
SIMATIC BATCH Getting Started vi A5E00364255-01

Introduction
SIMATIC BATCH Getting Started A5E00364255-01 1-1
SIMATIC BATCH Getting Started
Part 1
Introduction
Introduction
SIMATIC BATCH Getting Started A5E00364255-01 1-2
1 Batch Processes
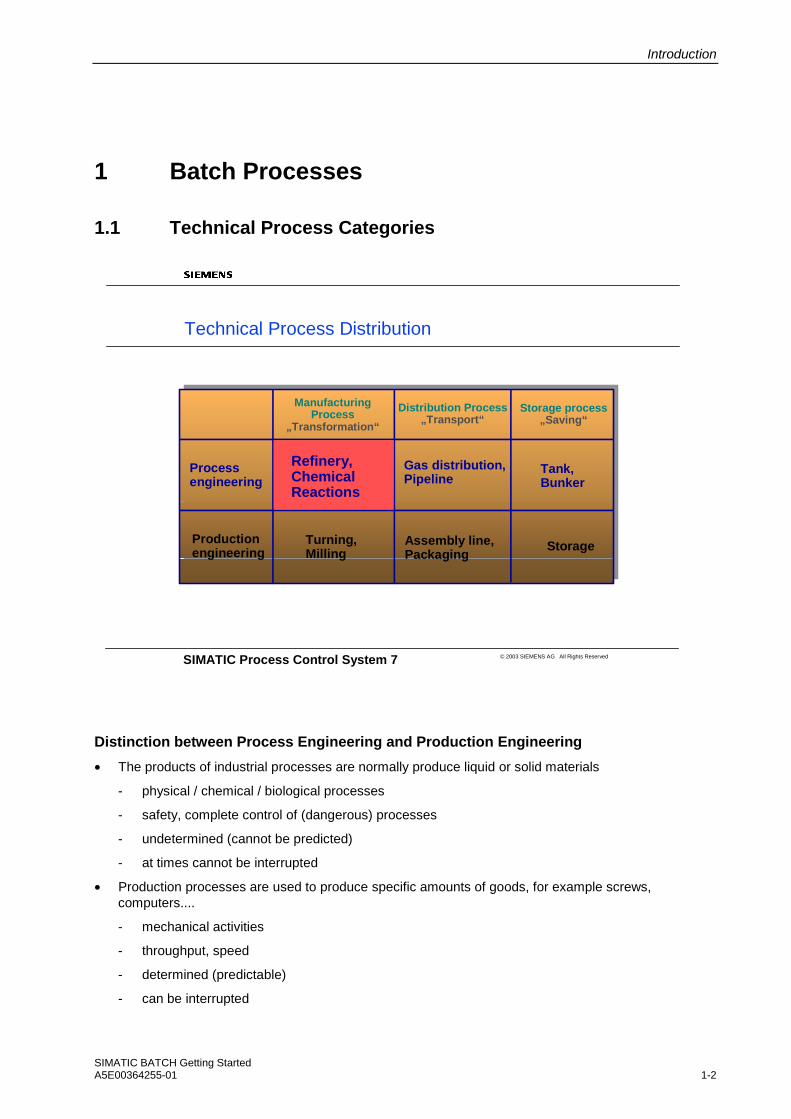
1.1 Technical Process Categories
Distinction between Process Engineering and Production Engineering
• The products of industrial processes are normally produce liquid or solid materials
- physical / chemical / biological processes
- safety, complete control of (dangerous) processes
- undetermined (cannot be predicted)
- at times cannot be interrupted
• Production processes are used to produce specific amounts of goods, for example screws, computers....
- mechanical activities
- throughput, speed
- determined (predictable)
- can be interrupted
SIMATIC Process Control System 7 © 2003 SIEMENS AG All Rights Reserved
Technical Process Distribution
Process engineering
Production engineering
Turning, Milling
Gas distribution, Pipeline
Assembly line,Packaging
Tank, Bunker
Storage
ManufacturingProcess
„Transformation“
Distribution Process„Transport“
Storage process„Saving“
Refinery, Chemical Reactions

Introduction
SIMATIC BATCH Getting Started A5E00364255-01 1-3
Division within Industrial Processes
• Continuous process
- started up once and then operated continuously over a longer period of time
- Synonym: Continuous flow process
- Examples: Ammonia synthesis, ethylene production
• Discontinuous process (batch process)
- produces the product in individual batches
- Synonym: Batch process
Examples: Production of plastics, paints, fertilizers

Introduction
SIMATIC BATCH Getting Started A5E00364255-01 1-4
1.2 Characteristics of Continuous and Batch Processes
The main difference between batch and continuous processes is in production.
In a batch process, specific quantities of product are produced so that they can be uniquely identified.
Recipes contain not only the setpoints of the relevant process variables and product quantities but also describe the method or procedure used to make the product.
In a continuous process, the sections of plant are specialized for their particular task.
In a batch process, the same section of plant can be used more than once by different batches (shared resources).
Quite often, you will find a mixture of these two processes in which continuous and batch processes are linked together or in which smaller sections of a batch process are handled by an intermediate stage operating continuously.
SIMATIC Process Control System 7 © 2003 SIEMENS AG All Rights Reserved
Conti and Batch Characteristics
✔Limited product amounts✔Low product volumes✔Recipe processing✔Frequent recipe changes ✔Different products on same system✔Often only partially automated ->
manual intervention✔Production Know-How is integrated in
the cycles (recipes)
BatchBatch
Chemical Reactor Group
✔Continuous Product Flow✔Large Product Volumes✔Set value processing✔Rarely changes to the system✔Single product systems✔Balance states✔Seldom manual intervention✔Automation contains the
Production Know-How
ContiConti
Evaporators
VacuumPan
Evaporator
LT
PT
PIC
Condenser
to Hot Well
LIC
DT
DRC
Product
PTPIC
Steam
Water
CondensateFeedFeed

Introduction
SIMATIC BATCH Getting Started A5E00364255-01 1-5
1.3 Practice: Where is this Used?
The production sequences are described in recipes that reflect the manufacturing process. In contrast to typical continuous applications or production engineering applications, the production sequence is not expressed in the automation solution but is described in a "Recipe".
The production sequences can be adjusted to new products. It is by no means the case that automated production always produces the same thing, but rather various end products can be produced whose manufacturing processes are specified in different recipes. These are constantly optimized both in terms of parameter settings and the production sequences themselves.
In production, it is often vital that the sequences can be documented to allow them to be reconstructed. This is important for quality assurance and to identify defects.
For many end customers it is decisive that they can adapt the production sequences themselves to different products allowing them to introduce new products or to modify existing workflow sequences. This should be possible for the operating personnel without needing to call in system specialists. It should not be necessary to make changes to the programmable controller itself but rather in the recipes describing the manufacturing process.
During actual production as described in a recipe, the following question often arises: "Where will production take place?“. Generally there is more than one production facility capable of performing the same production sequence (for example several production lines). It should therefore be possible to assign the production sequences to different production facilities. This ability must also be included in the system functionality and must not require modifications to the automation program.
SIMATIC Process Control System 7 © 2003 SIEMENS AG All Rights Reserved
Practice: Where is this used ?
BatchBatch
Chemical Reactor Group
Consider examples for Batch / Conti Processes
Production cycles
are written in "Recipes"
can be modified for new products
are continuously optimized
are logged
are created / modified by operating personnel
can run on different units
Manage various products (on the same plant)
Introduction
SIMATIC BATCH Getting Started A5E00364255-01 1-6
Notes:
Introduction
SIMATIC BATCH Getting Started A5E00364255-01 1-7
1.4 Branches for SIMATIC BATCH
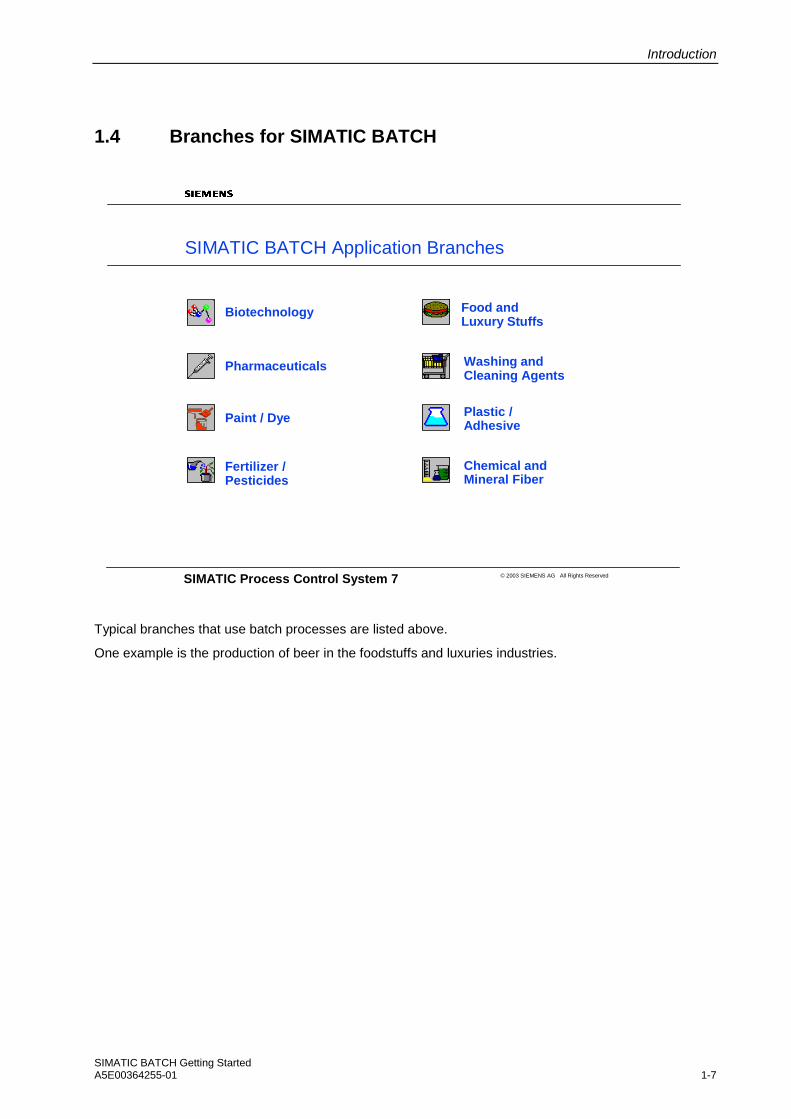
Typical branches that use batch processes are listed above.
One example is the production of beer in the foodstuffs and luxuries industries.
SIMATIC Process Control System 7 © 2003 SIEMENS AG All Rights Reserved
SIMATIC BATCH Application Branches
Biotechnology
Pharmaceuticals
Paint / Dye
Fertilizer / Pesticides
Food and Luxury Stuffs
Washing andCleaning Agents
Plastic / Adhesive
Chemical and Mineral Fiber
Introduction
SIMATIC BATCH Getting Started A5E00364255-01 1-8
1.5 Origins of Batch Production: The Kitchen
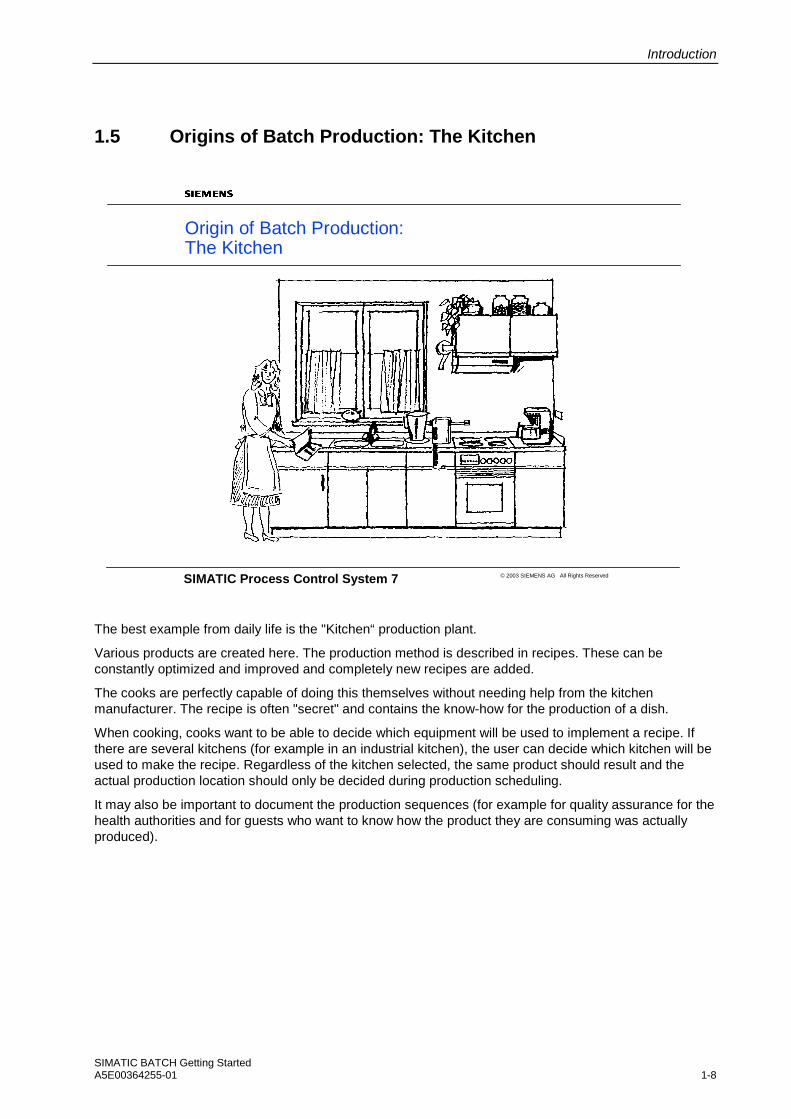
The best example from daily life is the "Kitchen“ production plant.
Various products are created here. The production method is described in recipes. These can be constantly optimized and improved and completely new recipes are added.
The cooks are perfectly capable of doing this themselves without needing help from the kitchen manufacturer. The recipe is often "secret" and contains the know-how for the production of a dish.
When cooking, cooks want to be able to decide which equipment will be used to implement a recipe. If there are several kitchens (for example in an industrial kitchen), the user can decide which kitchen will be used to make the recipe. Regardless of the kitchen selected, the same product should result and the actual production location should only be decided during production scheduling.
It may also be important to document the production sequences (for example for quality assurance for the health authorities and for guests who want to know how the product they are consuming was actually produced).
SIMATIC Process Control System 7 © 2003 SIEMENS AG All Rights Reserved
Origin of Batch Production:The Kitchen
Introduction
SIMATIC BATCH Getting Started A5E00364255-01 1-9
1.6 The Cook - Working Environment and Working Procedures
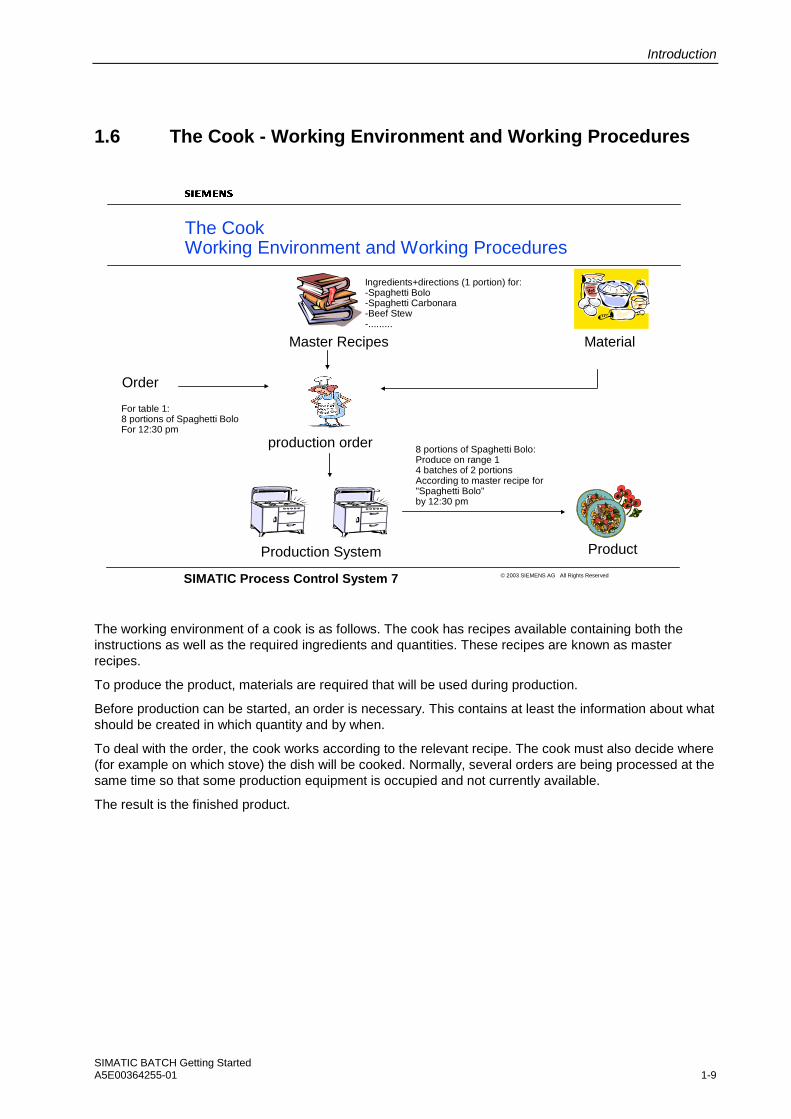
The working environment of a cook is as follows. The cook has recipes available containing both the instructions as well as the required ingredients and quantities. These recipes are known as master recipes.
To produce the product, materials are required that will be used during production.
Before production can be started, an order is necessary. This contains at least the information about what should be created in which quantity and by when.
To deal with the order, the cook works according to the relevant recipe. The cook must also decide where (for example on which stove) the dish will be cooked. Normally, several orders are being processed at the same time so that some production equipment is occupied and not currently available.
The result is the finished product.
SIMATIC Process Control System 7 © 2003 SIEMENS AG All Rights Reserved
The CookWorking Environment and Working Procedures
Order
For table 1: 8 portions of Spaghetti BoloFor 12:30 pm
production order
Production System
Master Recipes
Ingredients+directions (1 portion) for:-Spaghetti Bolo-Spaghetti Carbonara-Beef Stew-.........
Material
8 portions of Spaghetti Bolo:Produce on range 14 batches of 2 portionsAccording to master recipe for"Spaghetti Bolo"by 12:30 pm
Product
Introduction
SIMATIC BATCH Getting Started A5E00364255-01 1-10
1.7 Batch Terminology
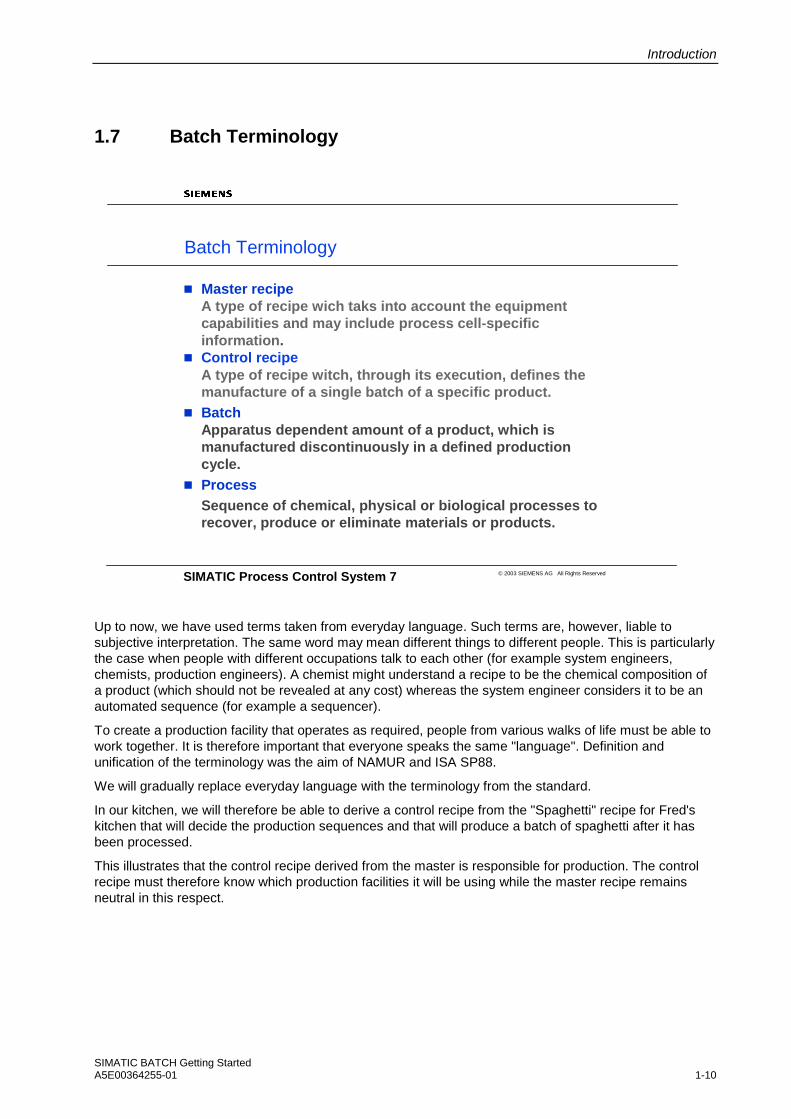
Up to now, we have used terms taken from everyday language. Such terms are, however, liable to subjective interpretation. The same word may mean different things to different people. This is particularly the case when people with different occupations talk to each other (for example system engineers, chemists, production engineers). A chemist might understand a recipe to be the chemical composition of a product (which should not be revealed at any cost) whereas the system engineer considers it to be an automated sequence (for example a sequencer).
To create a production facility that operates as required, people from various walks of life must be able to work together. It is therefore important that everyone speaks the same "language". Definition and unification of the terminology was the aim of NAMUR and ISA SP88.
We will gradually replace everyday language with the terminology from the standard.
In our kitchen, we will therefore be able to derive a control recipe from the "Spaghetti" recipe for Fred's kitchen that will decide the production sequences and that will produce a batch of spaghetti after it has been processed.
This illustrates that the control recipe derived from the master is responsible for production. The control recipe must therefore know which production facilities it will be using while the master recipe remains neutral in this respect.
SIMATIC Process Control System 7 © 2003 SIEMENS AG All Rights Reserved
Batch Terminology
Master recipeA type of recipe wich taks into account the equipment capabilities and may include process cell-specific information.Control recipeA type of recipe witch, through its execution, defines the manufacture of a single batch of a specific product.BatchApparatus dependent amount of a product, which is manufactured discontinuously in a defined production cycle.ProcessSequence of chemical, physical or biological processes torecover, produce or eliminate materials or products.
Introduction
SIMATIC BATCH Getting Started A5E00364255-01 1-11
1.8 The Kitchen: Master Recipes – Header Data
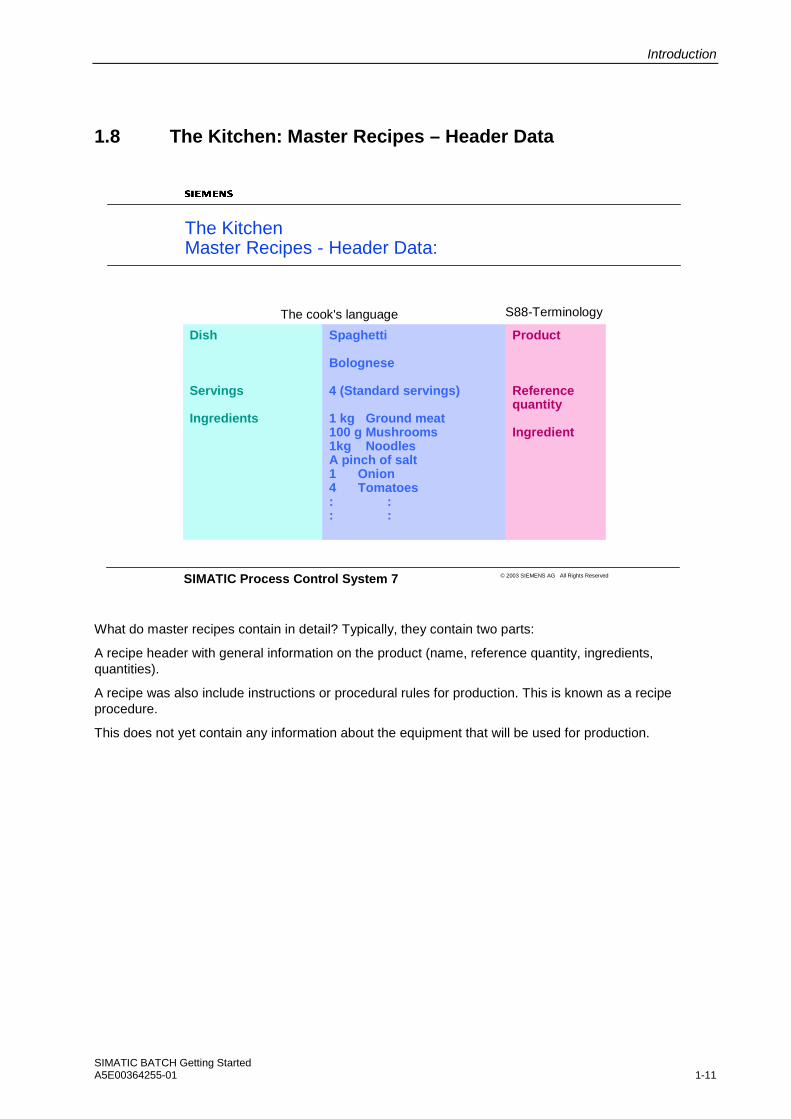
What do master recipes contain in detail? Typically, they contain two parts:
A recipe header with general information on the product (name, reference quantity, ingredients, quantities).
A recipe was also include instructions or procedural rules for production. This is known as a recipe procedure.
This does not yet contain any information about the equipment that will be used for production.
SIMATIC Process Control System 7 © 2003 SIEMENS AG All Rights Reserved
The KitchenMaster Recipes - Header Data:
Dish
Servings
Ingredients
Spaghetti
Bolognese
4 (Standard servings)
1 kg Ground meat 100 g Mushrooms 1kg Noodles A pinch of salt 1 Onion 4 Tomatoes : : : :
Product
Referencequantity
Ingredient
S88-TerminologyThe cook's language

Introduction
SIMATIC BATCH Getting Started A5E00364255-01 1-12
1.9 The Kitchen: Master Recipes – Procedure (procedural rules)
The recipe procedure forms the instructions for production. It is divided into various sections (unit recipes). The unit recipes themselves are made up of recipe operations.
We could, for example describe the production of Bolognese sauce required to produce Spaghetti Bolognese in a unit recipe for Bolognese. We can further refine this procedure by detailing the steps in recipe operations. In the unit recipe for Bolognese sauce, would therefore start with the "Prepare“ recipe operation. During the preparation, the input materials onions and tomatoes are chopped, ground meat is weighed and put in a pan.
At this stage, use of the term pan or pot is still generalized. These are references to the production facilities that will be required. In the language of the standard, these are known as unit classes. The master recipe itself is nevertheless "neutral" in terms of the units; in other words there is still no mention of the unit that will actually be used for production (for example Fred's kitchen and, Fred's favorite pot).
SIMATIC Process Control System 7 © 2003 SIEMENS AG All Rights Reserved
Master Recipes – Procedure (procedural rules)The Kitchen
Instructions1. Make Bolognese
2. Cook noodles
3. Add spices
4. Taste
Onions and tomatoes Chopand put in Pan,Weigh the ground meat andadd it
Pan to Setting 6heat
Put the lid on the panand let simmer for 1 hour
.....
.....Pot
.....
..... Pan
Procedural RulesPartial recipe 1
ROP 1: Preparations
ROP 2: Heating
ROP 3: Simmer
Partial recipe 2
Partial recipe 3
Sample
Introduction
SIMATIC BATCH Getting Started A5E00364255-01 1-13
1.10 The Kitchen: What is Required of the Automation
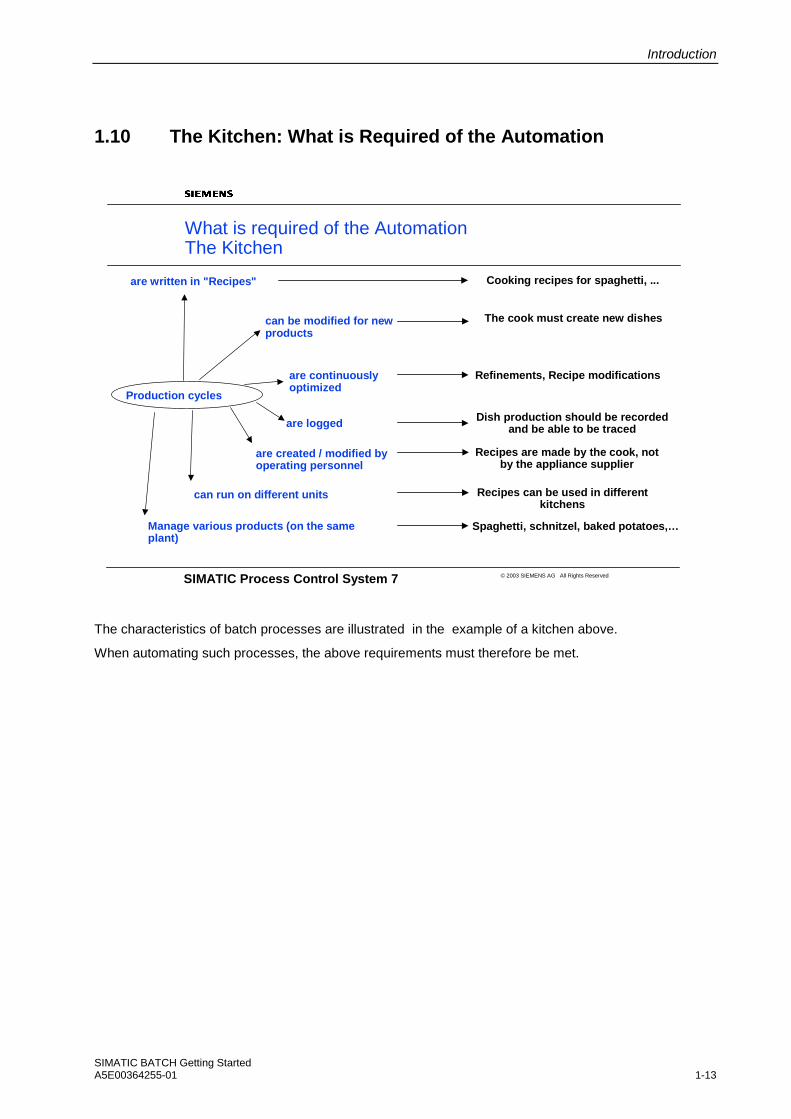
The characteristics of batch processes are illustrated in the example of a kitchen above.
When automating such processes, the above requirements must therefore be met.
SIMATIC Process Control System 7 © 2003 SIEMENS AG All Rights Reserved
What is required of the AutomationThe Kitchen
can be modified for new products
are continuously optimized
Production cycles
are written in "Recipes"
are logged
are created / modified by operating personnel
can run on different units
Manage various products (on the sameplant)
Cooking recipes for spaghetti, ...
The cook must create new dishes
Refinements, Recipe modifications
Dish production should be recordedand be able to be traced
Recipes are made by the cook, not by the appliance supplier
Recipes can be used in differentkitchens
Spaghetti, schnitzel, baked potatoes,…
Introduction
SIMATIC BATCH Getting Started A5E00364255-01 1-14
1.11 The Kitchen: Automation Concept
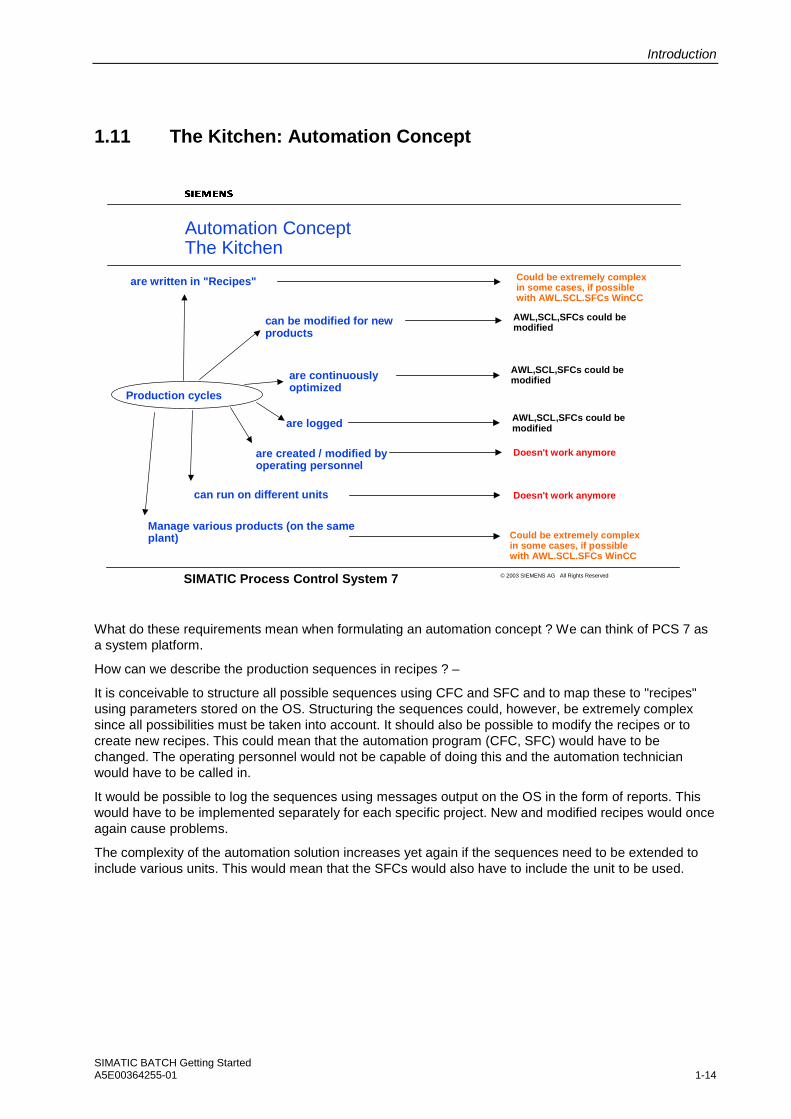
What do these requirements mean when formulating an automation concept ? We can think of PCS 7 as a system platform.
How can we describe the production sequences in recipes ? –
It is conceivable to structure all possible sequences using CFC and SFC and to map these to "recipes" using parameters stored on the OS. Structuring the sequences could, however, be extremely complex since all possibilities must be taken into account. It should also be possible to modify the recipes or to create new recipes. This could mean that the automation program (CFC, SFC) would have to be changed. The operating personnel would not be capable of doing this and the automation technician would have to be called in.
It would be possible to log the sequences using messages output on the OS in the form of reports. This would have to be implemented separately for each specific project. New and modified recipes would once again cause problems.
The complexity of the automation solution increases yet again if the sequences need to be extended to include various units. This would mean that the SFCs would also have to include the unit to be used.
SIMATIC Process Control System 7 © 2003 SIEMENS AG All Rights Reserved
Automation ConceptThe Kitchen
can be modified for new products
are continuously optimized
Production cycles
are written in "Recipes"
are logged
are created / modified by operating personnel
can run on different units
Manage various products (on the same plant)
Could be extremely complexin some cases, if possiblewith AWL.SCL.SFCs WinCC
AWL,SCL,SFCs could bemodified
AWL,SCL,SFCs could bemodified
AWL,SCL,SFCs could bemodified
Doesn't work anymore
Doesn't work anymore
Could be extremely complexin some cases, if possiblewith AWL.SCL.SFCs WinCC

Introduction
SIMATIC BATCH Getting Started A5E00364255-01 1-15
1.12 Automation Concept- New Approach
A new approach is required to reduce the complexity, and this is achieved by separating the automation level from the recipe level.
We assume that the physical structure of the process cell remains the same and that only the sequences change. We can therefore implement the process cell-specific parts in the program or controller and map the sequences in a "recipe system" that can be manipulated during operation. This is where the master recipes are created and maintained.
Control recipes are derived from the master recipes and these access the programmable controller.
SIMATIC Process Control System 7 © 2003 SIEMENS AG All Rights Reserved
Automation ConceptNew Approach
✔Separation of Automation and Recipe
Instructions 1. Make Bolognese
2. Cook noodles
3. Add spices
4. Taste
Onions and Tomatoes Chop and put in Pan, Weigh the ground meat and addit as well
RecipesProcess Cell
Control recipe

Introduction
SIMATIC BATCH Getting Started A5E00364255-01 1-16
1.13 Separation of the Automation Level and Recipe Level
In the process cell, we can create a structure consisting of units (scales, pan, mixer,..). These, in turn, have equipment phases such as weighing dosing etc.
The phases can have parameters such as the quantity parameter of the dosing equipment phase.
This is all mapped in the programmable controller. Here, the term process cell model is used. This represents the "tool box" for the author of the master recipe.
Within the master recipe, the units along with their equipment phases are used to compose the sequence.
Based on the example of Bolognese sauce, this means that the mixer is necessary. This provides the equipment phases filling, mixing, chopping. The first step is to put an onion into the machine. This is followed by four tomatoes. These are then chopped for one minute, etc.
SIMATIC Process Control System 7 © 2003 SIEMENS AG All Rights Reserved
Automation ConceptNew Approach
✔Separation of the Automation level and Recipe level
Instructions1. Make Bolognese
2. Cook noodles
3. Add spices
4. Taste
Cooking machine:Insert 1 onion and 4tomatoes Chop for 1 min. ...
Master RecipesProcess Cell (Kitchen)
Dosing weighing instrumentWeigh (amount)Material dosing (amount)
Cooking machineFill (amount)Mix (duration)Chopping (duration)
Pan Heat (Temp.)Fill...
control recipe
Manualintervention
Pan:Fill with water Heat to (90°)Insert noodles Wait 10 min.Drain
Manualintervention
Introduction
SIMATIC BATCH Getting Started A5E00364255-01 1-17
1.14 ISA S88.01 - Physical Model
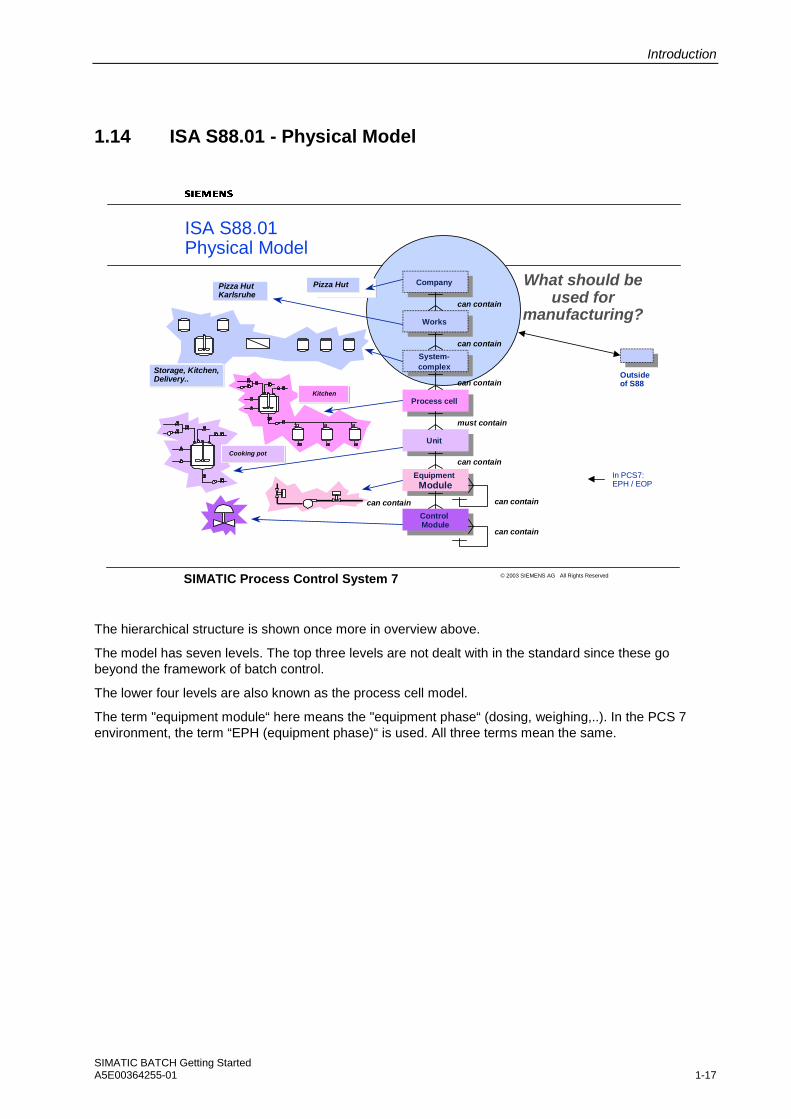
The hierarchical structure is shown once more in overview above.
The model has seven levels. The top three levels are not dealt with in the standard since these go beyond the framework of batch control.
The lower four levels are also known as the process cell model.
The term "equipment module“ here means the "equipment phase“ (dosing, weighing,..). In the PCS 7 environment, the term “EPH (equipment phase)“ is used. All three terms mean the same.
SIMATIC Process Control System 7 © 2003 SIEMENS AG All Rights Reserved
Outside of S88
ISA S88.01Physical Model
Pizza Hut Karlsruhe
Pizza Hut CompanyCompany
WorksWorks
System-complex
System-complex
Process cellProcess cell
UnitUnit
EquipmentModule
EquipmentModule
ControlModule
ControlModule
can contain
can contain
can contain
can contain
can contain
can contain
can contain
must contain
What should be used for
manufacturing?
Kitchen
Cooking pot
Storage, Kitchen, Delivery..
In PCS7: EPH / EOP
Introduction
SIMATIC BATCH Getting Started A5E00364255-01 1-18
1.15 Procedural Control Model
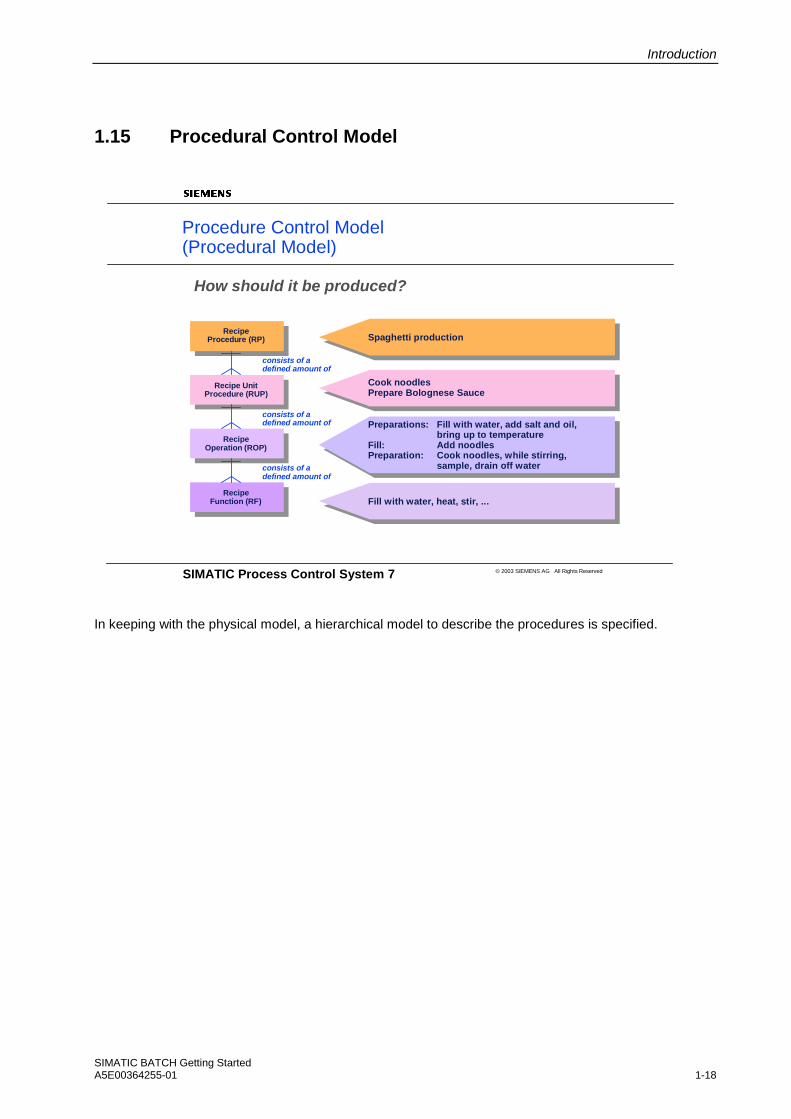
In keeping with the physical model, a hierarchical model to describe the procedures is specified.
SIMATIC Process Control System 7 © 2003 SIEMENS AG All Rights Reserved
Procedure Control Model(Procedural Model)
How should it be produced?
Recipe Procedure (RP)
Recipe Procedure (RP)
Recipe UnitProcedure (RUP)
Recipe UnitProcedure (RUP)
Recipe Operation (ROP)
Recipe Operation (ROP)
Recipe Function (RF)
Recipe Function (RF)
Spaghetti production Spaghetti production
Cook noodles Prepare Bolognese Sauce
Cook noodles Prepare Bolognese Sauce
Preparations: Fill with water, add salt and oil, bring up to temperature
Fill: Add noodles Preparation: Cook noodles, while stirring,
sample, drain off water
Preparations: Fill with water, add salt and oil, bring up to temperature
Fill: Add noodles Preparation: Cook noodles, while stirring,
sample, drain off water
Fill with water, heat, stir, ... Fill with water, heat, stir, ...
consists of adefined amount of
consists of adefined amount of
consists of adefined amount of
Introduction
SIMATIC BATCH Getting Started A5E00364255-01 1-19
1.16 Implementation – Physical and Procedural Model
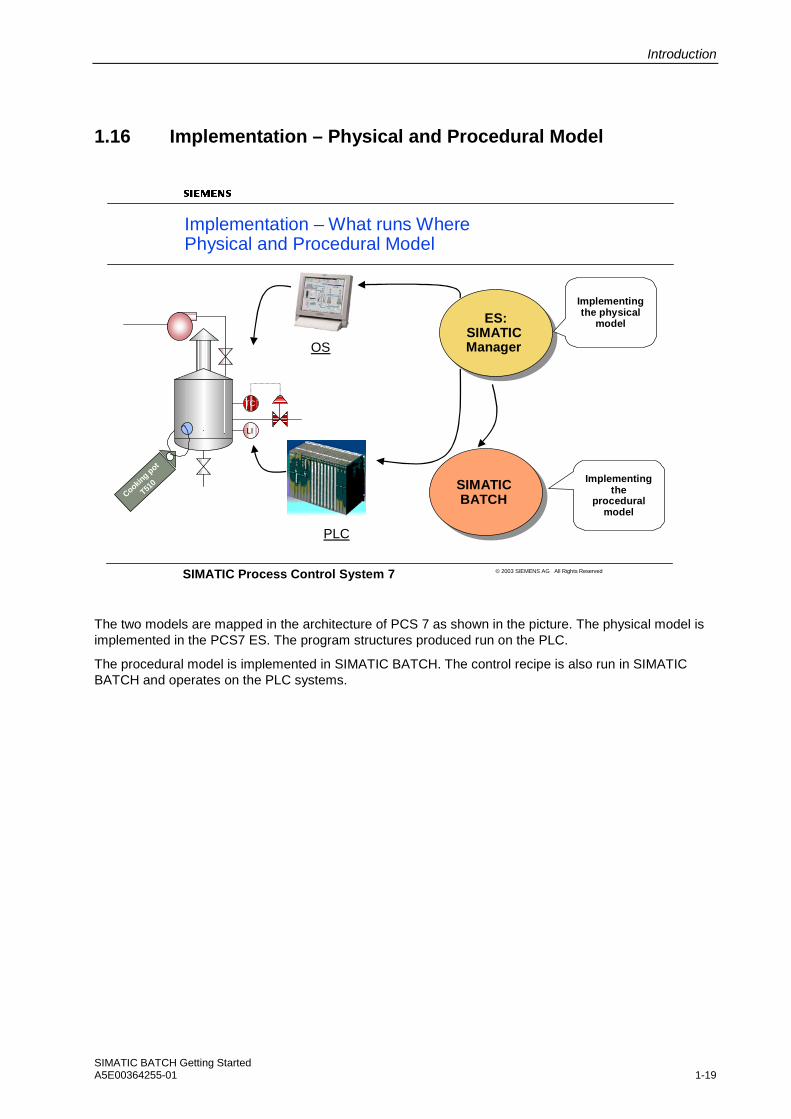
The two models are mapped in the architecture of PCS 7 as shown in the picture. The physical model is implemented in the PCS7 ES. The program structures produced run on the PLC.
The procedural model is implemented in SIMATIC BATCH. The control recipe is also run in SIMATIC BATCH and operates on the PLC systems.
SIMATIC Process Control System 7 © 2003 SIEMENS AG All Rights Reserved
Implementation – What runs WherePhysical and Procedural Model
LI
Cooking p
ot
T510
TC
PLC
ES:SIMATICManager
ES:SIMATICManager
SIMATICBATCH
SIMATICBATCH
Implementing the physical
model
Implementing the
procedural model
OS
Introduction
SIMATIC BATCH Getting Started A5E00364255-01 1-20
1.17 S88.01 Model – PCS 7
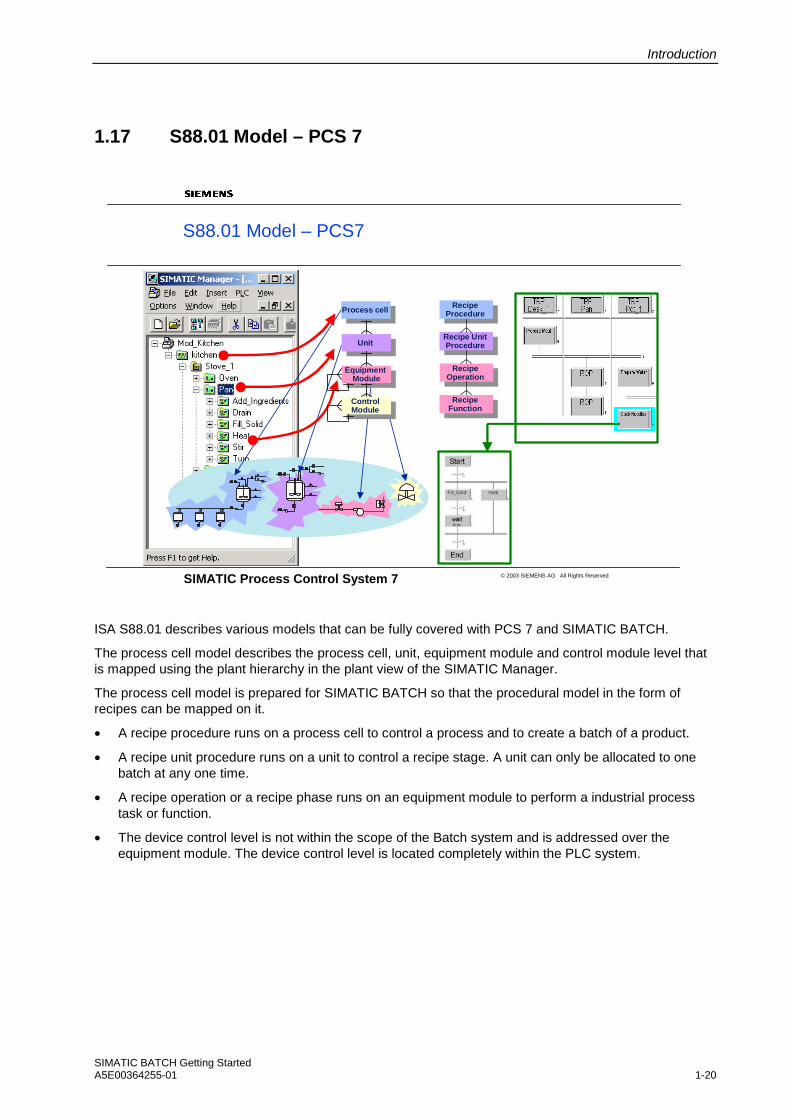
ISA S88.01 describes various models that can be fully covered with PCS 7 and SIMATIC BATCH.
The process cell model describes the process cell, unit, equipment module and control module level that is mapped using the plant hierarchy in the plant view of the SIMATIC Manager.
The process cell model is prepared for SIMATIC BATCH so that the procedural model in the form of recipes can be mapped on it.
• A recipe procedure runs on a process cell to control a process and to create a batch of a product.
• A recipe unit procedure runs on a unit to control a recipe stage. A unit can only be allocated to one batch at any one time.
• A recipe operation or a recipe phase runs on an equipment module to perform a industrial process task or function.
• The device control level is not within the scope of the Batch system and is addressed over the equipment module. The device control level is located completely within the PLC system.
SIMATIC Process Control System 7 © 2003 SIEMENS AG All Rights Reserved
S88.01 Model – PCS7
Process cell Process cell
Unit Unit
Equipment Module
Equipment Module
Control Module
Control Module
Recipe Operation
Recipe Operation
Recipe UnitProcedure
Recipe UnitProcedure
Recipe Procedure
Recipe Procedure
Recipe Function
Recipe Function

Introduction
SIMATIC BATCH Getting Started A5E00364255-01 1-21
1.18 Workflow in the Kitchen: Order - Master Recipe - Process Cell
Mike puts in an order for three portions of Piccata Milanese. The order is for table 5 and should be ready in 40 minutes.
The master recipe "Piccata“ is available for production. It describes the process for one portion. Two pans are required.
To create three portions at the same time, six pans are therefore needed. This means that three control recipes must be created (each occupying two pans). Each control recipe produces one batch of Piccata.
If six pans are free, the cook can start the three control recipes at the same time (as shown in the picture).
If only two pans are free, the three batches can only be produced one after the other.
SIMATIC Process Control System 7 © 2003 SIEMENS AG All Rights Reserved
Working Procedures in the KitchenTask-Master Recipe-Process Cell
Instructions 1. MakeBolognese
2. Cook noodles
3. Addspices
4. Sample
Onions and Tomatoes Chop and put in Pan, Weigh the groundmeat and add itas well
Master recipeProcess cell
For Peter:4x Spaghetti fortable 1
For Paul:4x Wiener Schnitzel for table 3
Order
Spaghetti Bolognese, Picatta... For Mary: 3x Picatta Milanese for table 5 in 40 min
Pans 1-6 Pans 7-12
Pans 13-18 Pans 19-24
Recipe "Picatta" makes 1 portion in 2 pans
For 3 Picatta, I need 3 batchesin 6 pans
Pans 7-18 are free -> Portion1-> Pan 7,8 -> Portion2-> Pan 9,10 -> Portion3-> Pan 11,12 = 3 batches which correspondswith 3 control recipes
Start controlrecipe
Introduction
SIMATIC BATCH Getting Started A5E00364255-01 1-22
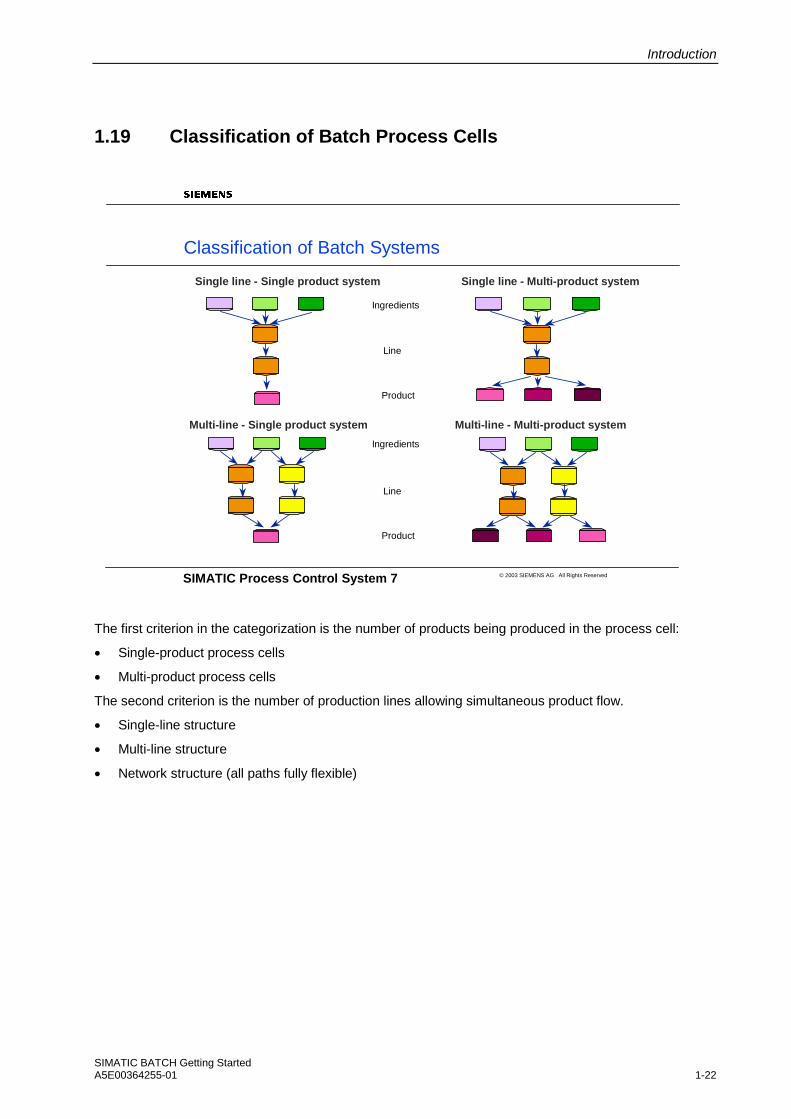
1.19 Classification of Batch Process Cells
The first criterion in the categorization is the number of products being produced in the process cell:
• Single-product process cells
• Multi-product process cells
The second criterion is the number of production lines allowing simultaneous product flow.
• Single-line structure
• Multi-line structure
• Network structure (all paths fully flexible)
SIMATIC Process Control System 7 © 2003 SIEMENS AG All Rights Reserved
Classification of Batch Systems
Single line - Single product system Single line - Multi-product system
Multi-line - Single product system Multi-line - Multi-product system
Ingredients
Line
Product
Ingredients
Line
Product

Introduction
SIMATIC BATCH Getting Started A5E00364255-01 1-23
With its scalability, SIMATIC BATCH is suitable both for smaller process cells as well as for large complexes that are now possible with V6. While the previous version was restricted in terms of the numbers of servers (only one OS server), V6 allows up to 11 OS servers to be used.
The complexity increases with the number of products and the number of lines. With SIMATIC BATCH, you can automate multi-line, multi-product process cells.
For small process cells that manufacture only one product on one line and do not require flexible recipes, the user has the choice between a PCS 7 solution and the use of SIMATIC BATCH.
The essential issue here is the license costs compared with the engineering effort to create the solution.
SIMATIC Process Control System 7 © 2003 SIEMENS AG All Rights Reserved
Classification of Batch Systems
small large
simple
medium
Simple to complex ...
Small to large
complex
SIMATIC
BATCH
SIMATIC
BATCH
or PCS7 S
olution
Introduction
SIMATIC BATCH Getting Started A5E00364255-01 1-24
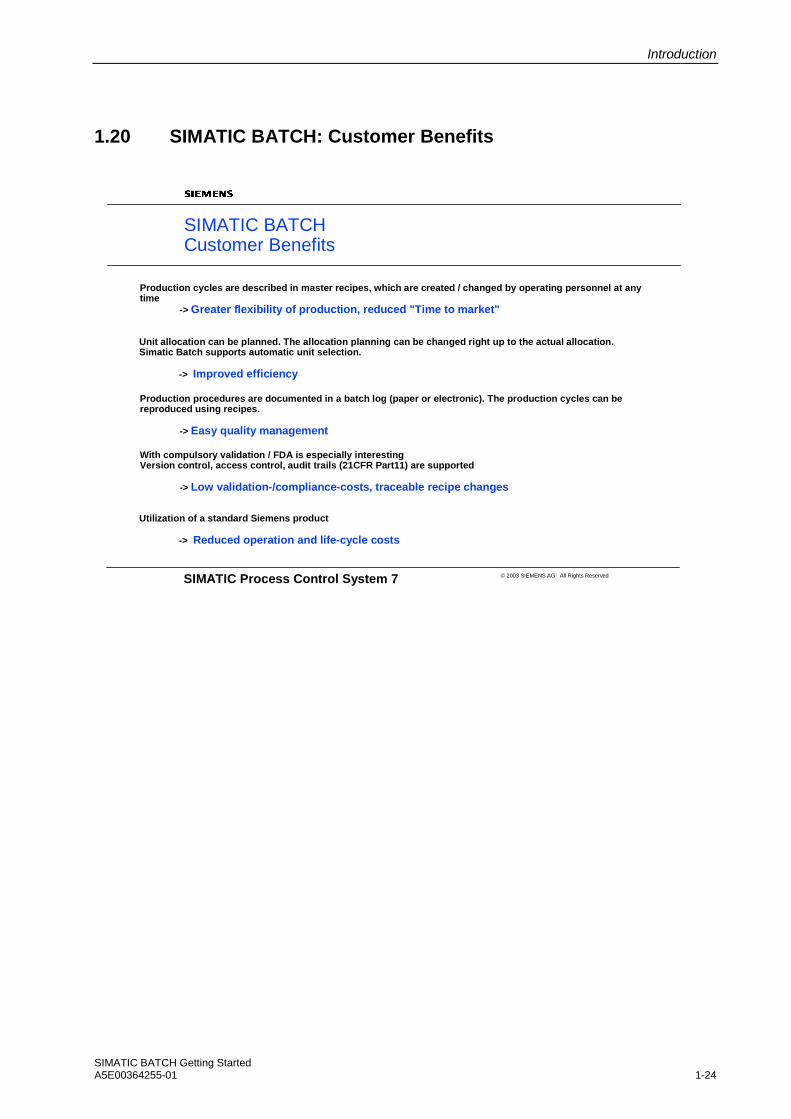
1.20 SIMATIC BATCH: Customer Benefits
SIMATIC Process Control System 7 © 2003 SIEMENS AG All Rights Reserved
SIMATIC BATCHCustomer Benefits
Utilization of a standard Siemens product
-> Reduced operation and life-cycle costs
Production cycles are described in master recipes, which are created / changed by operating personnel at any time
-> Greater flexibility of production, reduced "Time to market"
Unit allocation can be planned. The allocation planning can be changed right up to the actual allocation. Simatic Batch supports automatic unit selection.
-> Improved efficiency
Production procedures are documented in a batch log (paper or electronic). The production cycles can be reproduced using recipes.
-> Easy quality management
With compulsory validation / FDA is especially interestingVersion control, access control, audit trails (21CFR Part11) are supported
-> Low validation-/compliance-costs, traceable recipe changes

Quick Start
SIMATIC BATCH Getting Started A5E00364255-01 2-1
SIMATIC BATCH Getting Started
Part 2
Quick Start

Quick Start
SIMATIC BATCH Getting Started A5E00364255-01 2-2

Quick Start
SIMATIC BATCH Getting Started A5E00364255-01 2-3
Getting Started SIMATIC BATCHQuickstart
Retrieving the Project
Configuring the BATCH Server andBATCH Client
Opening the Plant View
Creating the Batch Process Cell
Type Definition of the Plant HierarchyAccording to ISA S88.01
Assigning the "EPH" Batch Category
Generating the Type Description in theBatch Types
Compiling the PLC, OS and BatchProcess Cell Data
Downloading the Batch Process CellData
Wo
rkin
g w
ith
th
e S
IMA
TIC
Man
ager
Downloading the PLC to PLCSim
Starting the OS
Chap. 1
Chap. 4
Chap. 2
Chap. 5
Chap. 8
Chap. 7
Chap. 6
Chap. 11
Chap. 10
Chap. 9
Chap. 3
Quick Start
SIMATIC BATCH Getting Started A5E00364255-01 2-4
Getting Started SIMATIC BATCHQuickstart
Reading in the Supplied Recipes andMaterials
Updating the Loaded Batch ProcessCell Data
The Recipe for Piccata Milanese Pasta
Creating an Output Material
Creating the Recipe Structure in theRecipe Editor
Releasing the Master Recipe forProduction
Wo
rkin
g in
th
e B
AT
CH
Co
ntr
ol C
ente
r (B
atch
CC
)an
d R
ecip
e E
dit
or
(RP
)
Creating an Order (Batch)
Releasing and Starting a Batch(Control Recipe)
Starting the BATCH Start Coordinator
Creating a Master Recipe in theBatchCC
Chap. 13
Chap. 16
Chap. 15
Chap. 14
Chap. 17
Chap. 19
Chap. 18
Chap. 12
Chap. 21
Chap. 20

Quick Start
SIMATIC BATCH Getting Started A5E00364255-01 2-5
Description of the Model
Process cell
Drain
Fill_Solid
Turn
Drain
Fill_Solid
Temp
Add_Ingredient
Stir
Turn
Drain
Fill_Solid
Temp
Add_Ingredient
Stir
Drain
Fill_Solid
Temp
Add_Ingredient
Stir
Drain
Fill_Solid
Temp
Add_Ingredient
Stir
Drain
Fill_Solid
Temp
Unit
Equipment modules
Desk Pan Pot 1 Pot 2 Pot 3 Oven

Quick Start
SIMATIC BATCH Getting Started A5E00364255-01 2-6
PH View in the SIMATIC Manager The process cell model is prepared for SIMATIC BATCH so that the procedural model in the form of recipes can be mapped on it.
A recipe procedure runs on a process cell to control a process and to create a batch of a product.
A recipe unit procedure runs on a unit to control a recipe stage. A unit can only be allocated to one batch at any one time.
A recipe operation or a recipe phase runs on an equipment module to perform a industrial process task or function.
The device control level is not within the focus of the Batch system and is addressed over the equipment module. The device control level is located completely within the PLC system.
Process cell
Unit
Equipment modules
Control Module
Recipe Operation
Recipe Unit Procedure
Recipe Procedure
Recipe Phase
Quick Start
SIMATIC BATCH Getting Started A5E00364255-01 2-7
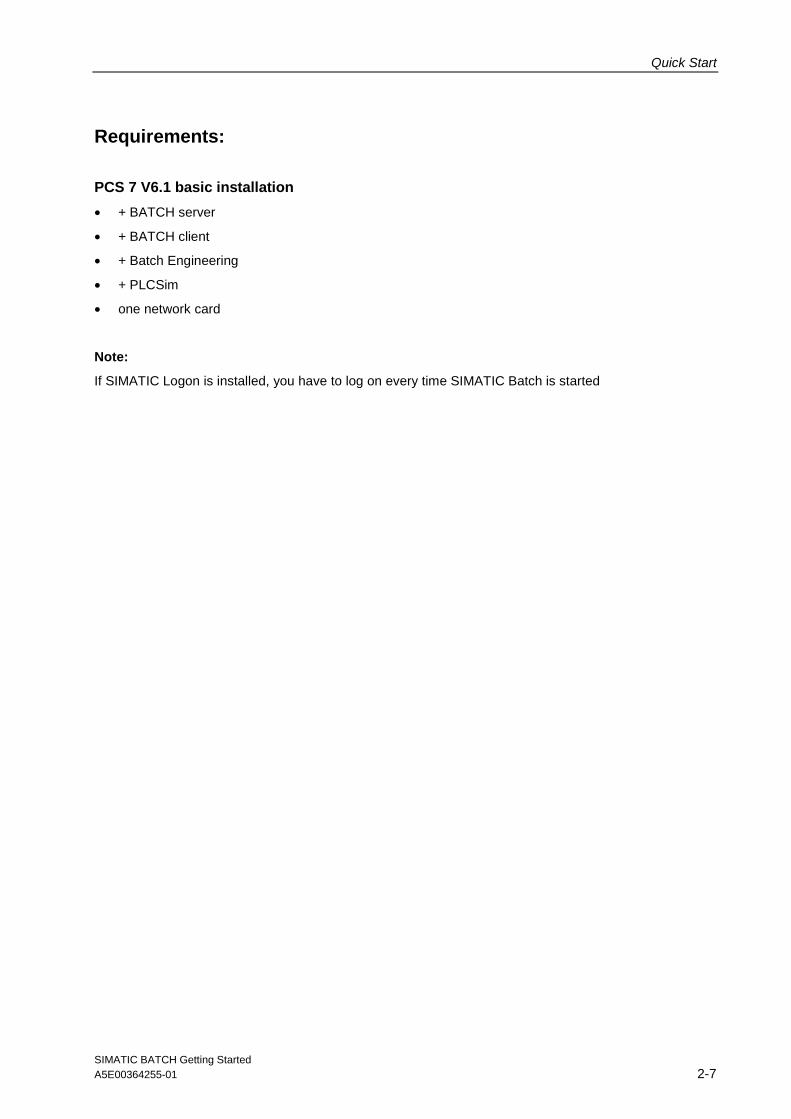
Requirements:
PCS 7 V6.1 basic installation
• + BATCH server
• + BATCH client
• + Batch Engineering
• + PLCSim
• one network card
Note:
If SIMATIC Logon is installed, you have to log on every time SIMATIC Batch is started

Quick Start
SIMATIC BATCH Getting Started A5E00364255-01 2-8
Chapter 1 Retrieving the Project
1. Retrieve the project (the archived project is called zEn33_01.zip and is located in ..\Siemens\STEP7\examples) and save the project in ..\Siemens\STEP7\S7Proj.

Quick Start
SIMATIC BATCH Getting Started A5E00364255-01 2-9
2. Select the “Server” PC station in the component view and open the object properties. Enter the actual name of your computer in “Computer name”.
You can check the name of your computer as shown below

Quick Start
SIMATIC BATCH Getting Started A5E00364255-01 2-10
The batch process cell data for the entered computer name generated on the ES will be loaded later.

Quick Start
SIMATIC BATCH Getting Started A5E00364255-01 2-11
3. Change the computer name in the WinCC Explorer to the name of your computer.
Quick Start
SIMATIC BATCH Getting Started A5E00364255-01 2-12
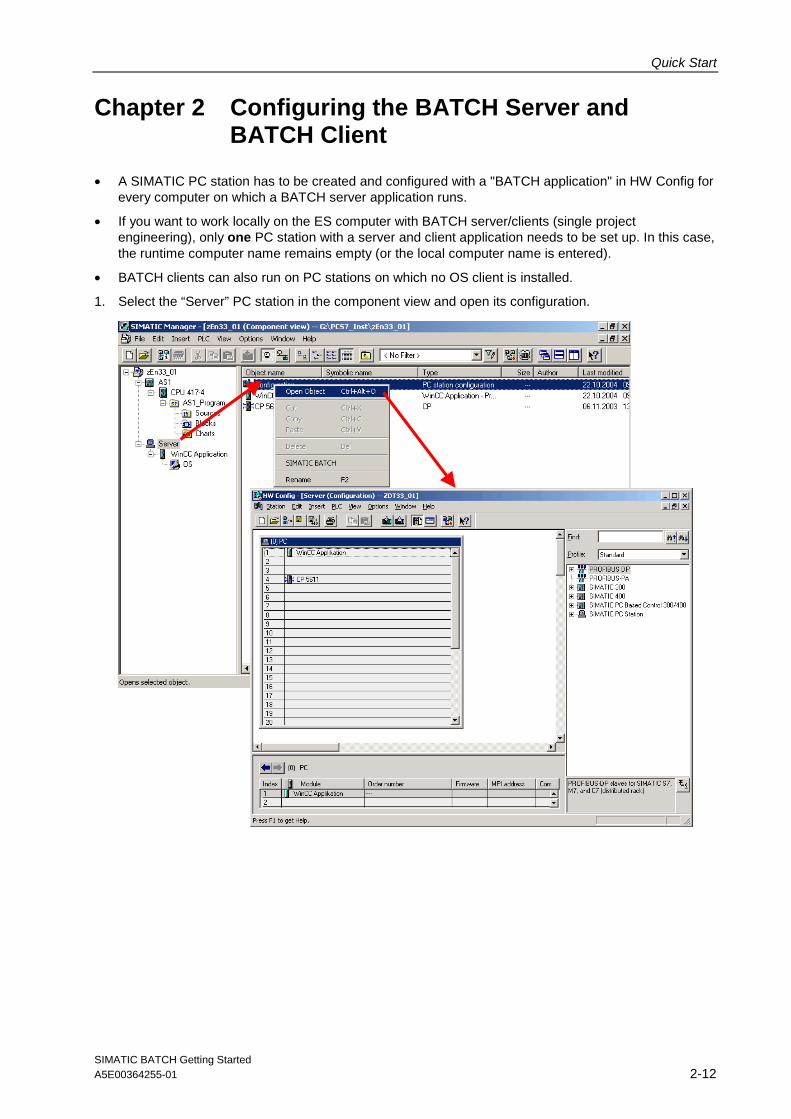
Chapter 2 Configuring the BATCH Server and BATCH Client
• A SIMATIC PC station has to be created and configured with a "BATCH application" in HW Config for every computer on which a BATCH server application runs.
• If you want to work locally on the ES computer with BATCH server/clients (single project engineering), only one PC station with a server and client application needs to be set up. In this case, the runtime computer name remains empty (or the local computer name is entered).
• BATCH clients can also run on PC stations on which no OS client is installed.
1. Select the “Server” PC station in the component view and open its configuration.
Quick Start
SIMATIC BATCH Getting Started A5E00364255-01 2-13
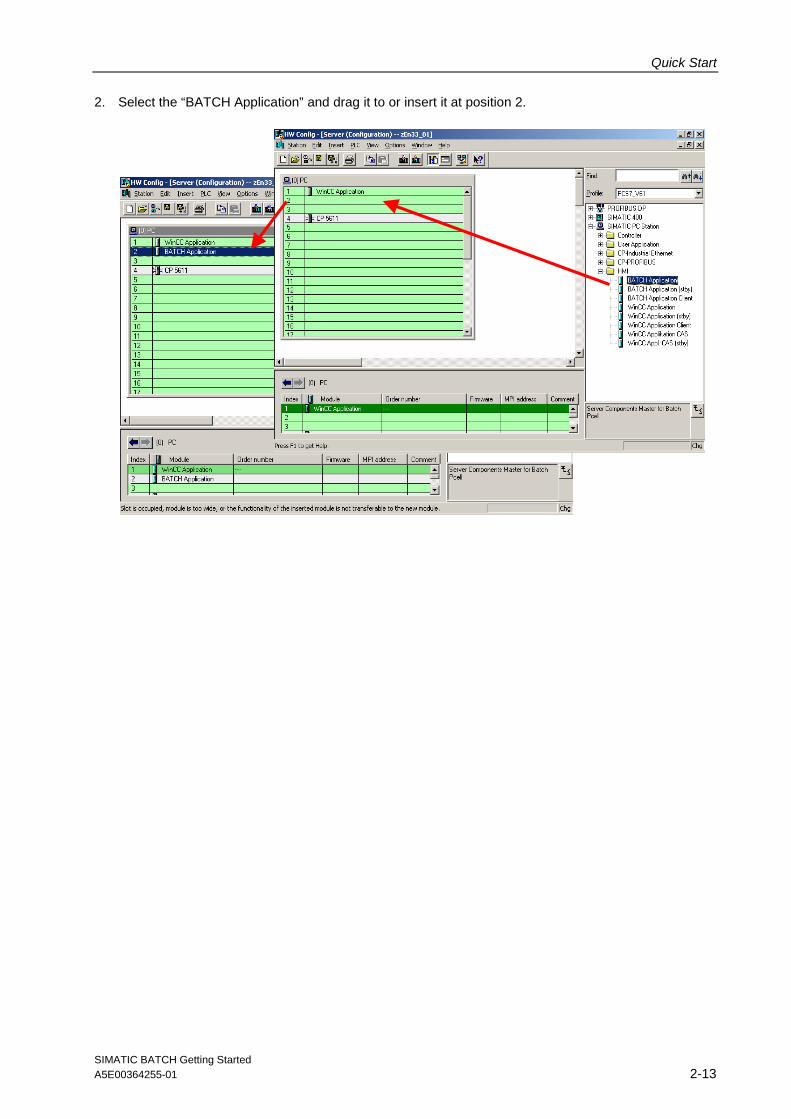
2. Select the “BATCH Application” and drag it to or insert it at position 2.

Quick Start
SIMATIC BATCH Getting Started A5E00364255-01 2-14
3. Select the “BATCH Application Client” and drag it to or insert it at position 3.
4. Save and compile the hardware configuration of the “Server” PC station with the newly added BATCH applications.
5. Close HW Config.
Quick Start
SIMATIC BATCH Getting Started A5E00364255-01 2-15
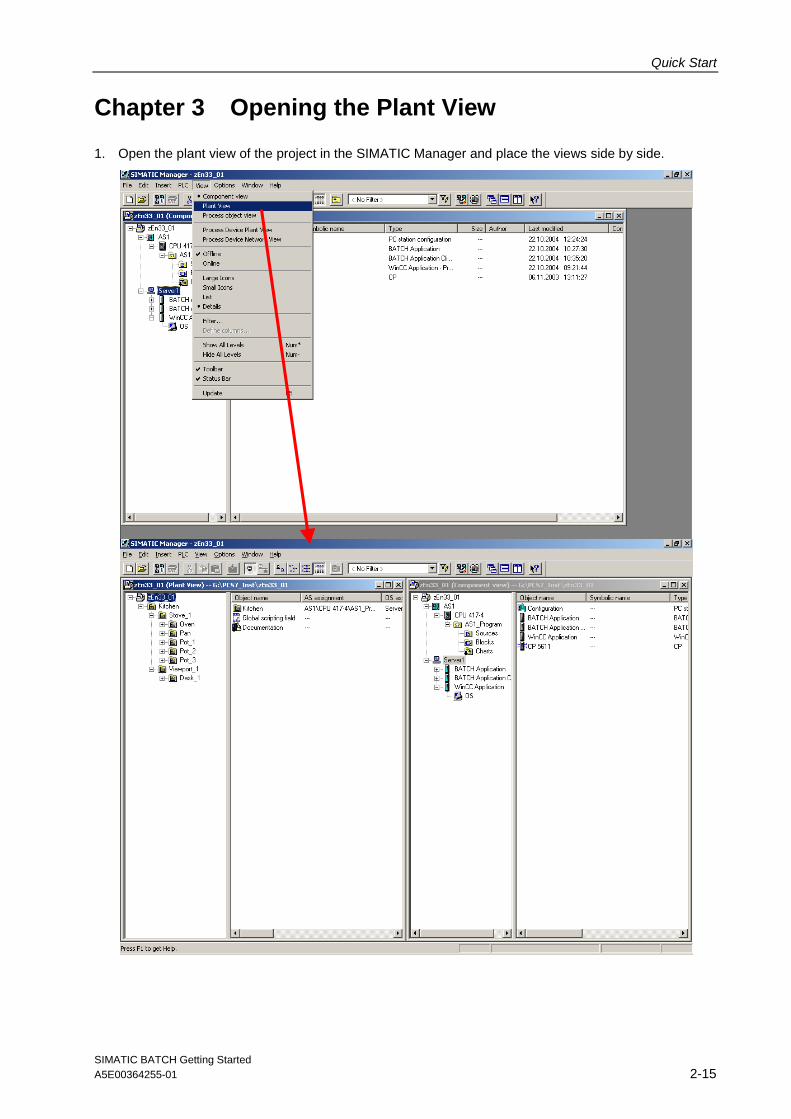
Chapter 3 Opening the Plant View
1. Open the plant view of the project in the SIMATIC Manager and place the views side by side.
Plant View Component View
Quick Start
SIMATIC BATCH Getting Started A5E00364255-01 2-16
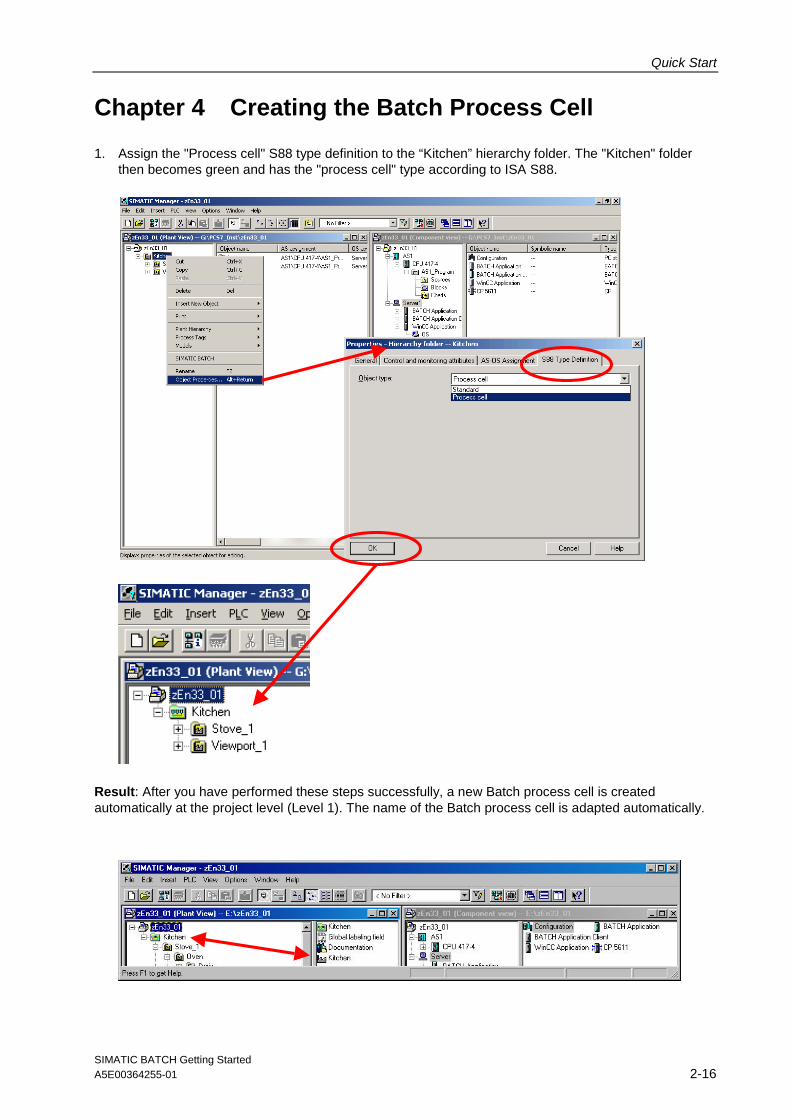
Chapter 4 Creating the Batch Process Cell
1. Assign the "Process cell" S88 type definition to the “Kitchen” hierarchy folder. The "Kitchen" folder then becomes green and has the "process cell" type according to ISA S88.
Result: After you have performed these steps successfully, a new Batch process cell is created automatically at the project level (Level 1). The name of the Batch process cell is adapted automatically.
Quick Start
SIMATIC BATCH Getting Started A5E00364255-01 2-17
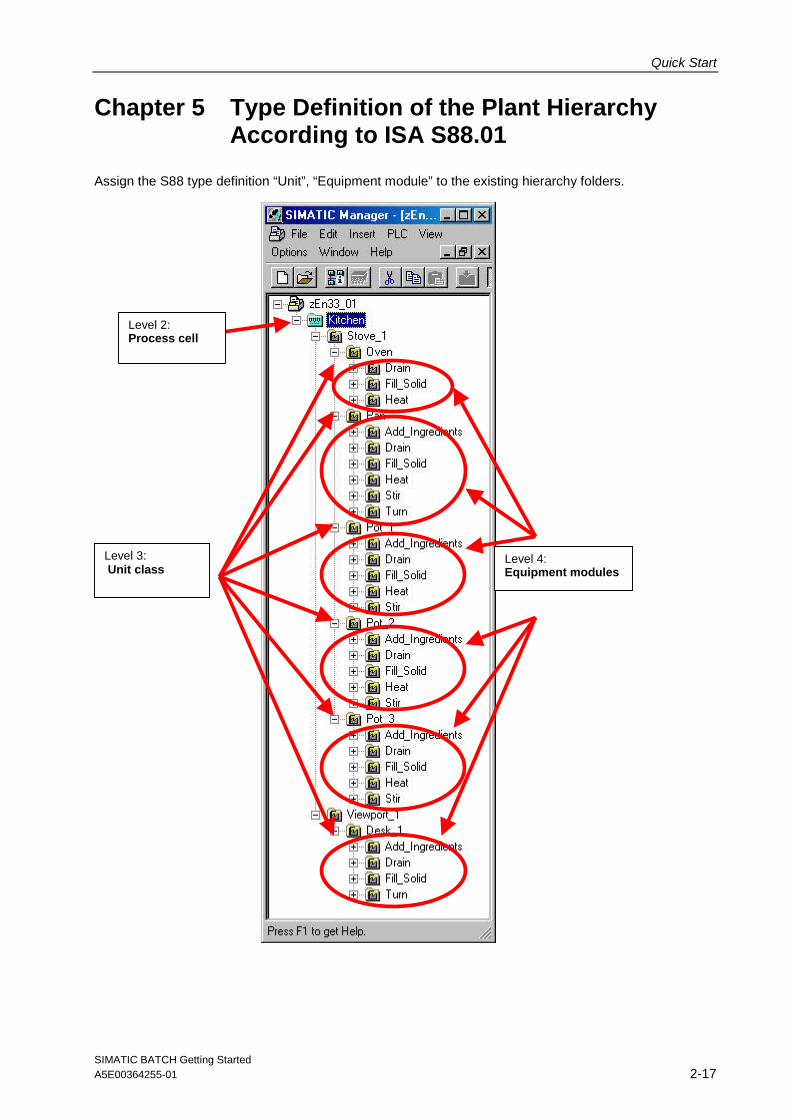
Chapter 5 Type Definition of the Plant Hierarchy According to ISA S88.01
Assign the S88 type definition “Unit”, “Equipment module” to the existing hierarchy folders.
Level 3: Unit class
Level 4: Equipment modules
Level 2: Process cell
Quick Start
SIMATIC BATCH Getting Started A5E00364255-01 2-18
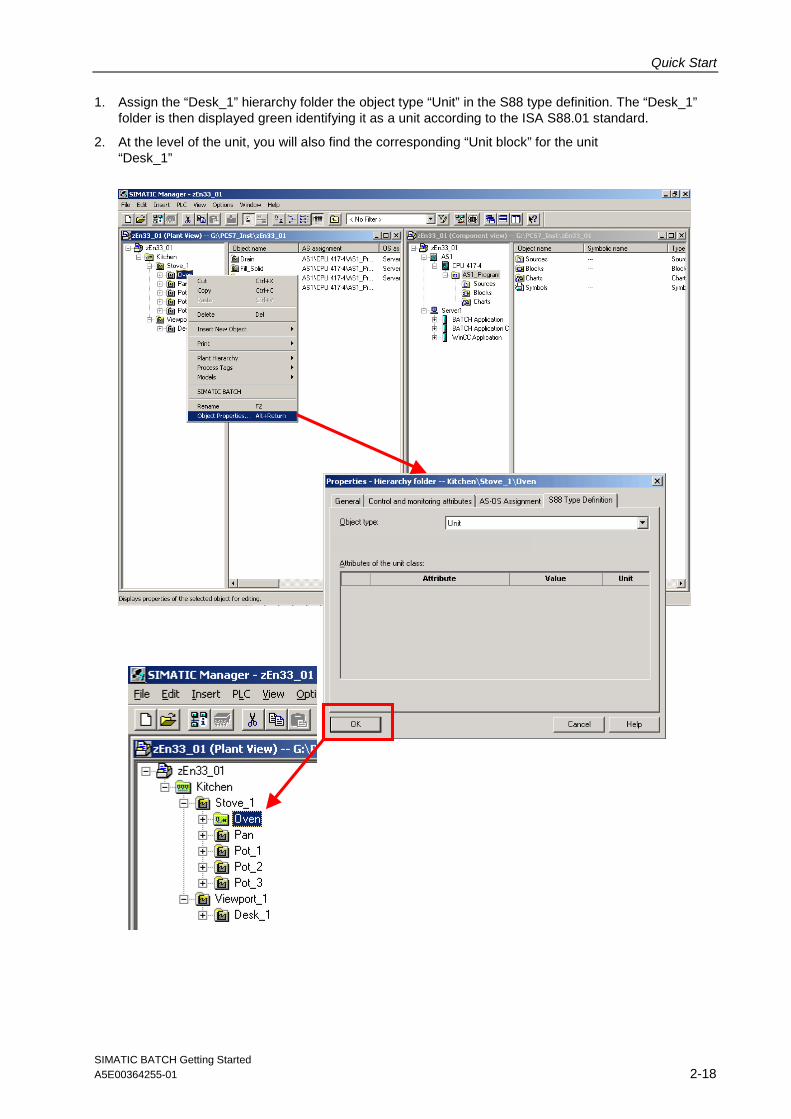
1. Assign the “Desk_1” hierarchy folder the object type “Unit” in the S88 type definition. The “Desk_1” folder is then displayed green identifying it as a unit according to the ISA S88.01 standard.
2. At the level of the unit, you will also find the corresponding “Unit block” for the unit “Desk_1”
Quick Start
SIMATIC BATCH Getting Started A5E00364255-01 2-19
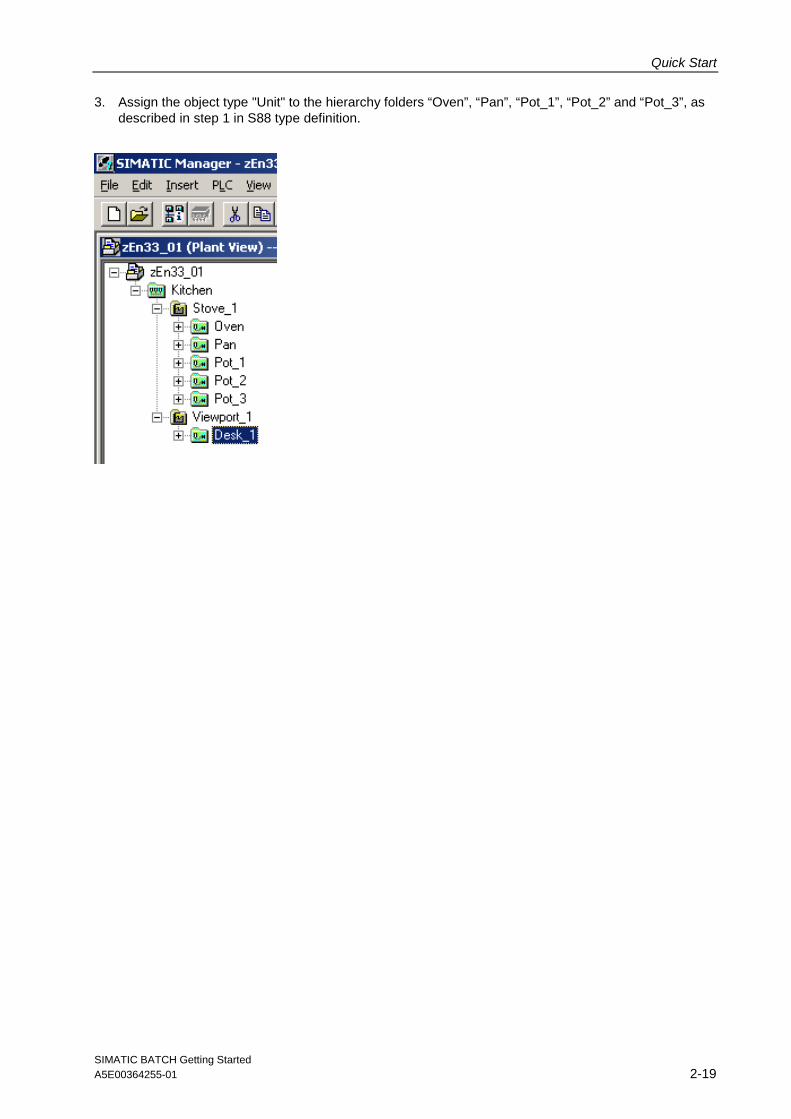
3. Assign the object type "Unit" to the hierarchy folders “Oven”, “Pan”, “Pot_1”, “Pot_2” and “Pot_3”, as described in step 1 in S88 type definition.

Quick Start
SIMATIC BATCH Getting Started A5E00364255-01 2-20
4. Assign the object type "Equipment module" to the “Drain” hierarchy folder below Kitchen/Stove_1/Oven in S88 Type Definition. The “Drain” folder is then displayed green and identified as an equipment module according to the ISA S88.01 standard.
At the level of the equipment modules, you will find the instances of the SFC types and/or the Batch interface blocks (IEPH, IEPO, IEPAR_xxx).

Quick Start
SIMATIC BATCH Getting Started A5E00364255-01 2-21
5. Assign the object type "Equipment module" to the hierarchy folders shown on page 5 (Description of the model) as equipment modules in the S88 type definition as explained in step 3.

Quick Start
SIMATIC BATCH Getting Started A5E00364255-01 2-22
Chapter 6 Assigning the "EPH" Batch Category
Assign the "EPH" Batch category to the existing SFC types. As a result, the information relevant to S88.01 is created automatically during subsequent type generation.
You will find the existing SFC types (Heat, Stir, Drain, Fill_Solid, Turn and Add_Ingredient) in the component view in the chart folder of the PLC.

Quick Start
SIMATIC BATCH Getting Started A5E00364255-01 2-23
1. Open the “Heat” SFC type.

Quick Start
SIMATIC BATCH Getting Started A5E00364255-01 2-24
2. Assign the "EPH" Batch category to the “Heat” SFC type.
3. Assign the "EPH" Batch category to the remaining SFC types “Stir”, “Drain”, “Fill_Solid”, “Turn” and “Add_Ingredient” as explained in steps 1 and 2.
4. Close the SFC Editor.

Quick Start
SIMATIC BATCH Getting Started A5E00364255-01 2-25
Chapter 7 Generating the Type Description in the Batch Types
As the basis for creating recipes in SIMATIC BATCH, the type description of the process cell must be generated and synchronized with the block instances of the CFC charts.
Type Description of a Process Cell
Type Editing Options and Results
Data types The system specifies the standard data types floating point number, integer, string, input material, output material, material (V4), and Boolean.
You can also create your own data types and modify their properties.
Units of measure You can create new units of measure and change their properties.
Operation types, phase types and process tag types
To allow recipe creation purely on the basis of types, types have to be specified without existing block instances.
1. Operation types: Type information of the equipment operations (EOP)
2. Phase types: Type information of the equipment phases (EPH)
3. Process tag types: Type information of the TAG_COLL blocks
Operation types, phase types and process tag types can be assigned control strategy parameters.
Quick Start
SIMATIC BATCH Getting Started A5E00364255-01 2-26
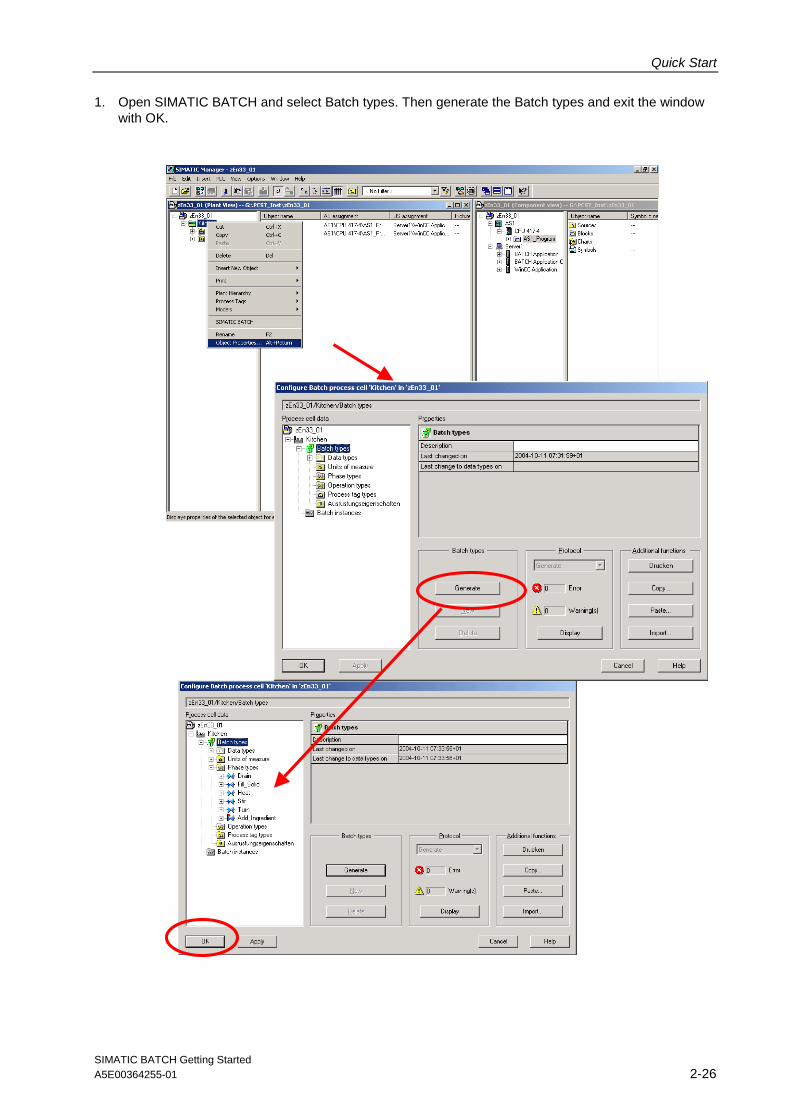
1. Open SIMATIC BATCH and select Batch types. Then generate the Batch types and exit the window with OK.

Quick Start
SIMATIC BATCH Getting Started A5E00364255-01 2-27
Chapter 8 Compiling the PLC, OS and Batch Process Cell Data
1. Open any CFC chart and compile the entire program for the PLC.
2. Close the CFC Editor.

Quick Start
SIMATIC BATCH Getting Started A5E00364255-01 2-28
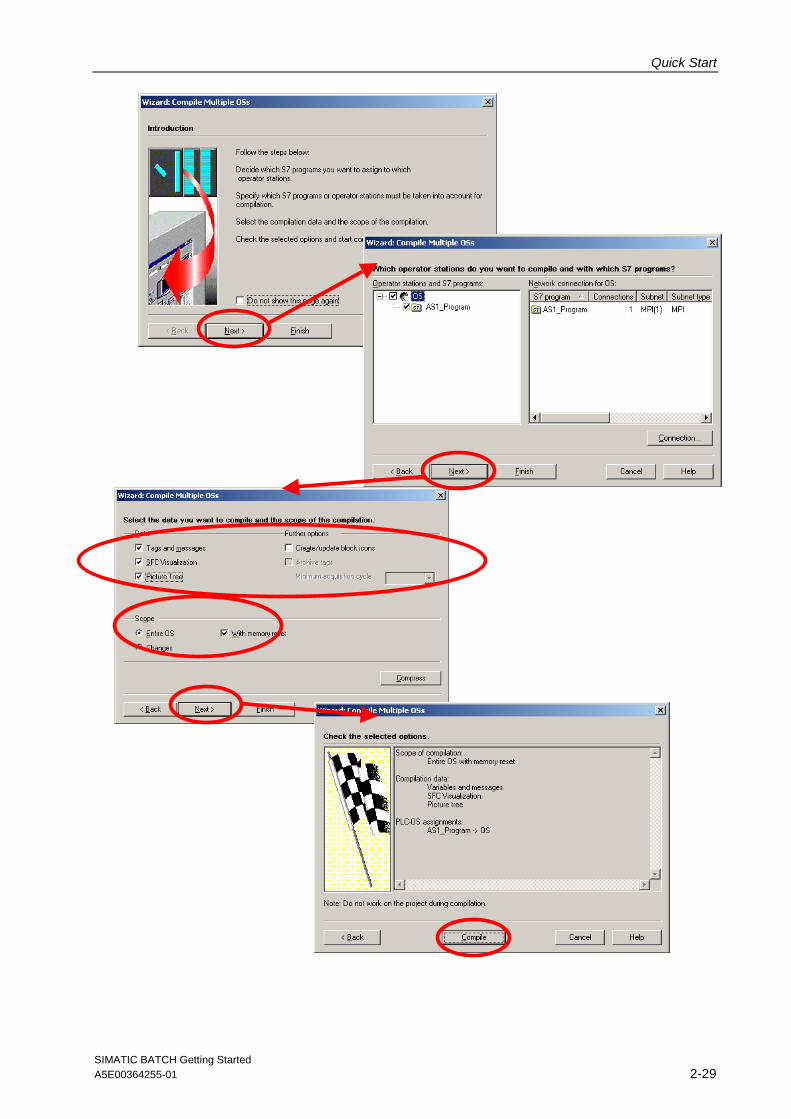
3. Compile the entire OS with memory reset.
Quick Start
SIMATIC BATCH Getting Started A5E00364255-01 2-29
Quick Start
SIMATIC BATCH Getting Started A5E00364255-01 2-30
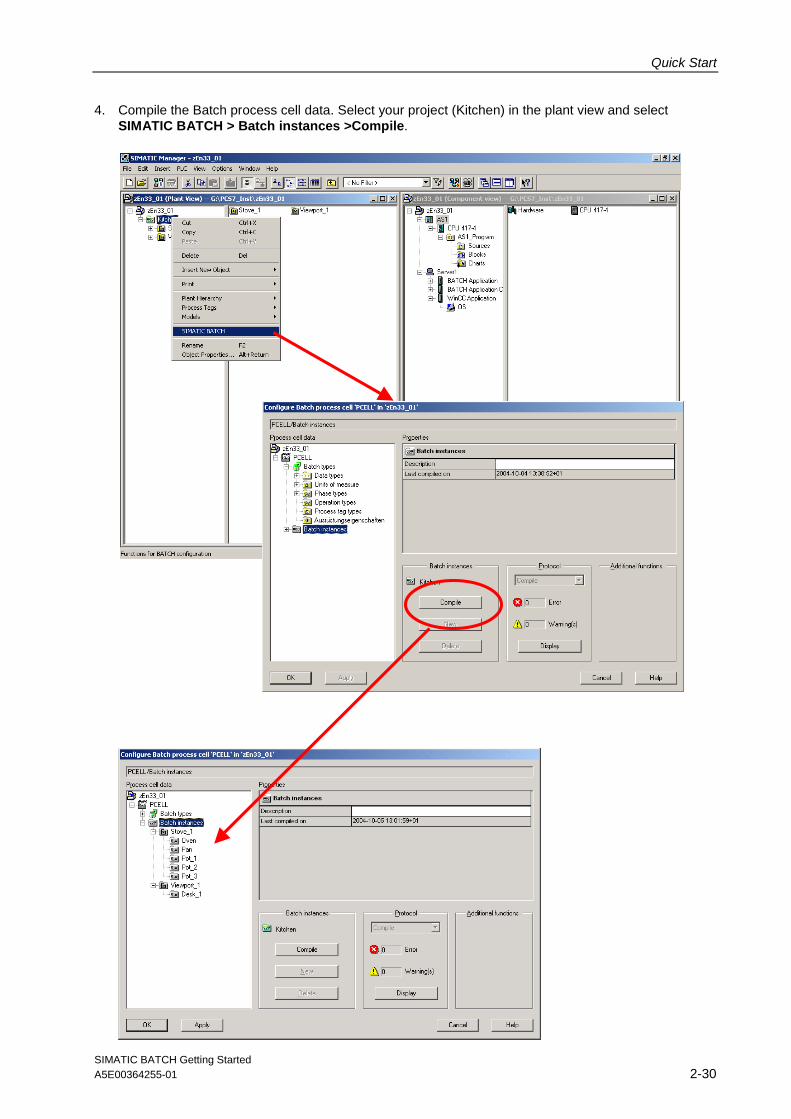
4. Compile the Batch process cell data. Select your project (Kitchen) in the plant view and select SIMATIC BATCH > Batch instances >Compile.
Quick Start
SIMATIC BATCH Getting Started A5E00364255-01 2-31
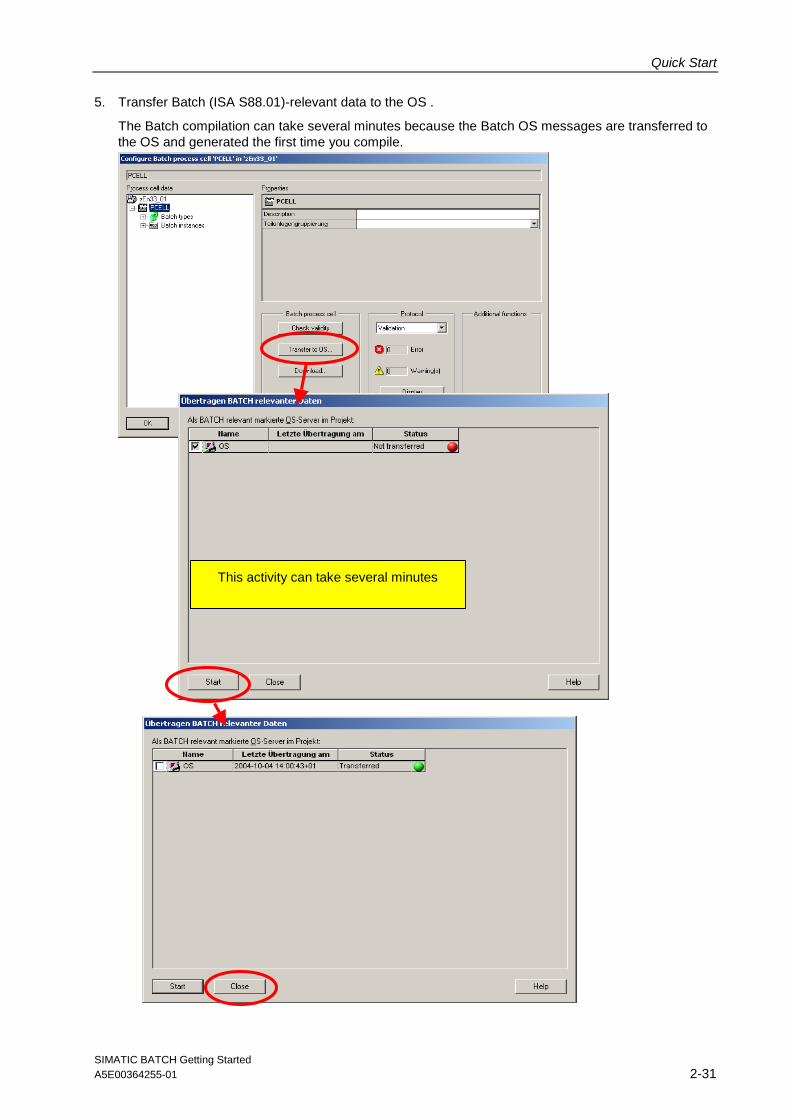
5. Transfer Batch (ISA S88.01)-relevant data to the OS .
The Batch compilation can take several minutes because the Batch OS messages are transferred to the OS and generated the first time you compile.
This activity can take several minutes
Quick Start
SIMATIC BATCH Getting Started A5E00364255-01 2-32
Chapter 9 Downloading the Batch Process Cell Data
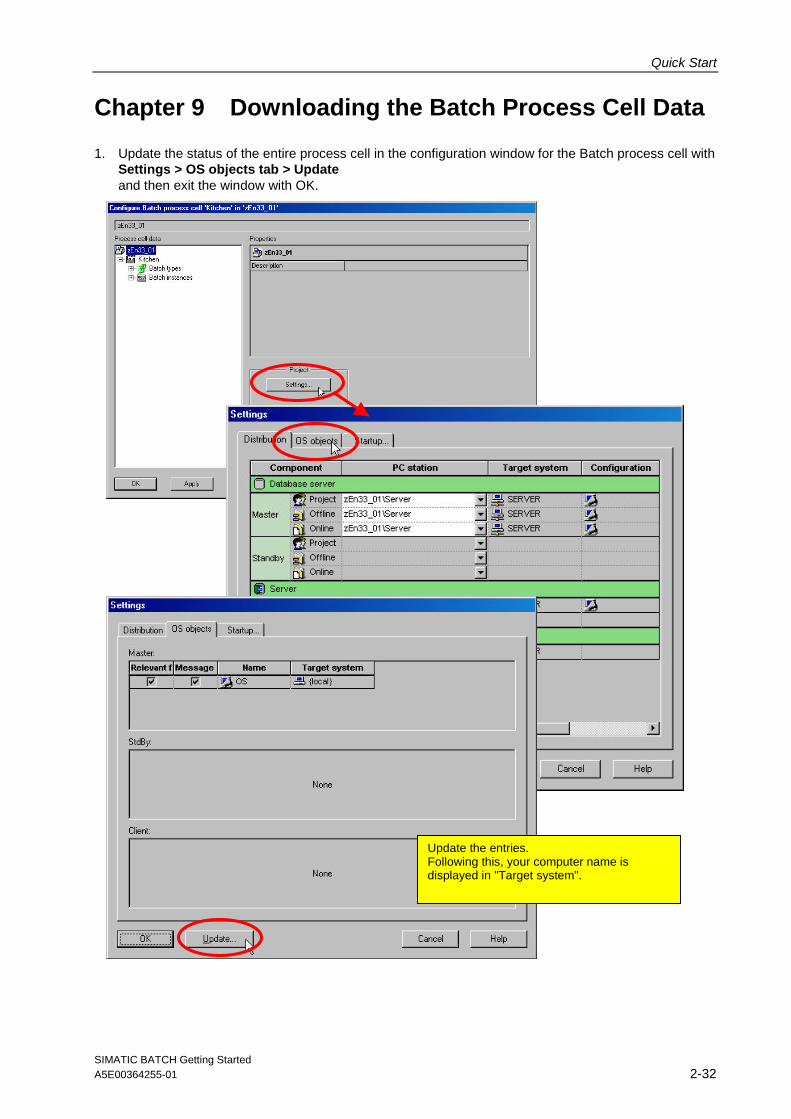
1. Update the status of the entire process cell in the configuration window for the Batch process cell with Settings > OS objects tab > Update and then exit the window with OK.
Update the entries. Following this, your computer name is displayed in "Target system".

Quick Start
SIMATIC BATCH Getting Started A5E00364255-01 2-33
2. Download the generated Batch process cell data to the BATCH server and BATCH client. In your case, the BATCH server and BATCH client are on the same computer.
3. Exit the "Configure Batch process cell" dialog with OK.

Quick Start
SIMATIC BATCH Getting Started A5E00364255-01 2-34
Chapter 10 Downloading the PLC to PLCSim
Download the PLC data compiled in the SIMATIC Manager to the “PLCSim” simulation program.
For this Getting Started, the “Station Configuration Editor” is ignored, because the PLC is simulated with PLCSim and the ES, the OS server, and the BATCH server are located on a single workstation (on the same computer).
1. Start PLCSim from the SIMATIC Manager.

Quick Start
SIMATIC BATCH Getting Started A5E00364255-01 2-35
2. Download the hardware configuration to PLCSIM.
3. Close HW Config.

Quick Start
SIMATIC BATCH Getting Started A5E00364255-01 2-36
4. Open a chart from the project and download the charts to PLCSim.
5. Close the CFC Editor.

Quick Start
SIMATIC BATCH Getting Started A5E00364255-01 2-37
6. Start PLCSim with “RUN-P”.
7. Save the simulation you have downloaded so that it is not lost when you close PLCSim.
If you close PLCSim without saving, you have to repeat steps 1 to 5 the next time you work with PLCSim.
Saved PLCSim data can be put directly into Run by opening the saved file.

Quick Start
SIMATIC BATCH Getting Started A5E00364255-01 2-38
Chapter 11 Starting the OS
1. Open the WinCC Explorer of the OS. Create a user with suitable privileges in the User Administrator.
Note
Open the OS-ProjectEditor and click on "OK". This serves to configure the WinCC runtime interfaces and the alarm system.

Quick Start
SIMATIC BATCH Getting Started A5E00364255-01 2-39
2. Start the OS in runtime; the first startup can take several minutes.
Quick Start
SIMATIC BATCH Getting Started A5E00364255-01 2-40
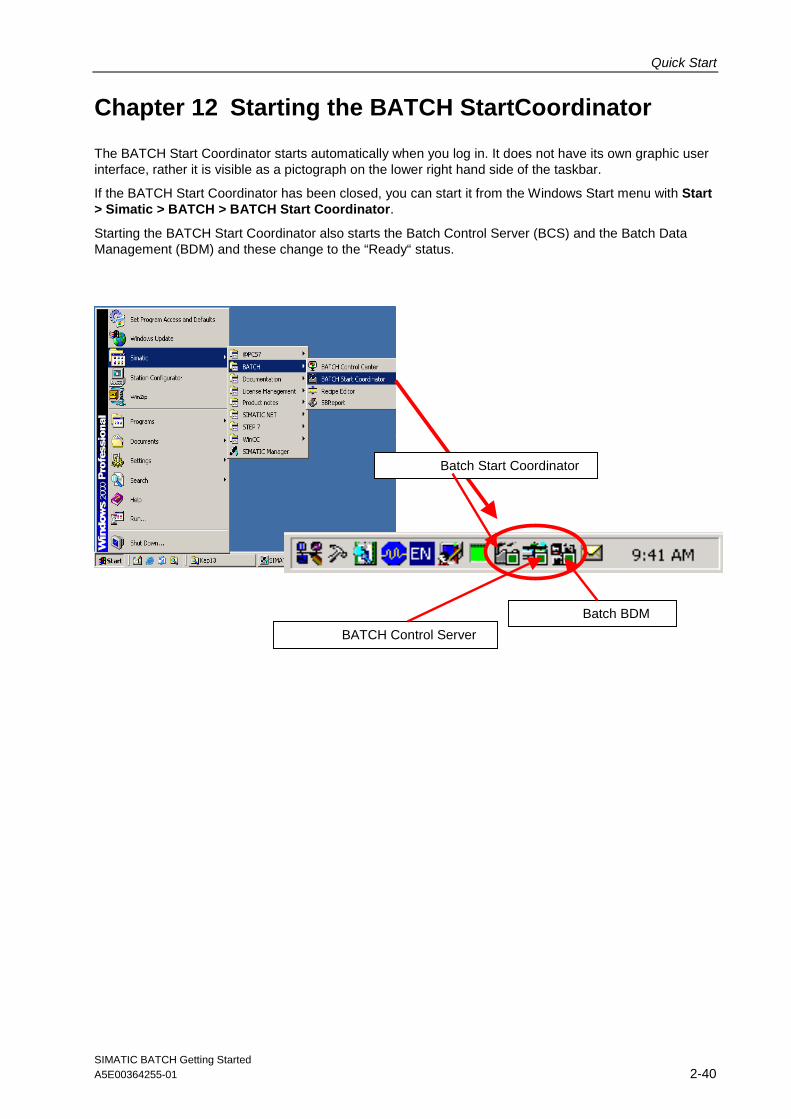
Chapter 12 Starting the BATCH StartCoordinator
The BATCH Start Coordinator starts automatically when you log in. It does not have its own graphic user interface, rather it is visible as a pictograph on the lower right hand side of the taskbar.
If the BATCH Start Coordinator has been closed, you can start it from the Windows Start menu with Start > Simatic > BATCH > BATCH Start Coordinator.
Starting the BATCH Start Coordinator also starts the Batch Control Server (BCS) and the Batch Data Management (BDM) and these change to the “Ready“ status.
Batch Start Coordinator
BATCH Control Server
Batch BDM

Quick Start
SIMATIC BATCH Getting Started A5E00364255-01 2-41
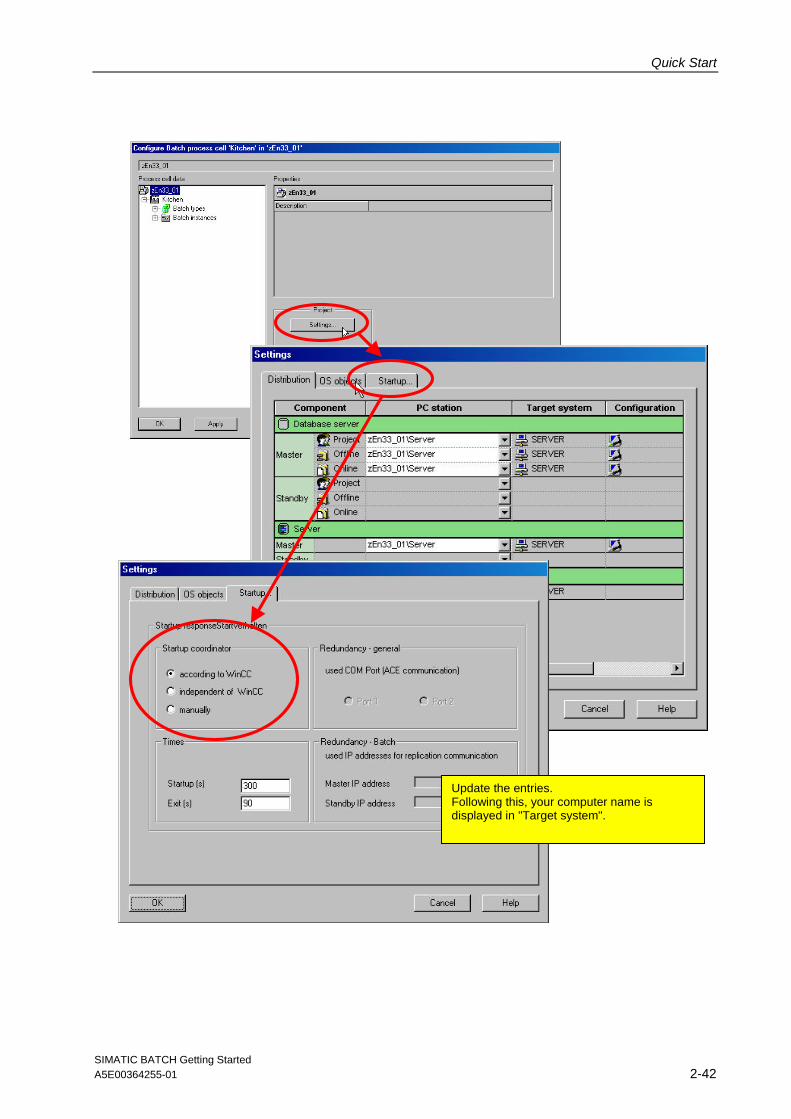
Using the system tray icon, you can configure the start-up behavior of SIMATIC BATCH. There are three different start-up options for the Batch Start Coordinator (right-click on the Start Coordinator):
• “start SIMATIC BATCH automatically after starting WinCC“,
• “start SIMATIC BATCH independent of WinCC“ and
• “start SIMATIC BATCH manually”
1. Select the “start SIMATIC BATCH automatically after starting WinCC” option. The BATCH applications (BCS, BDM) start up automatically after WinCC starts and they change to the “Running“ status.
All Batch applications are started
Quick Start
SIMATIC BATCH Getting Started A5E00364255-01 2-42
Update the entries. Following this, your computer name is displayed in "Target system".

Quick Start
SIMATIC BATCH Getting Started A5E00364255-01 2-43
Chapter 13 Reading in the Supplied Recipes and Materials
Read in the supplied recipe database for this project.
1. Open the Batch Control Center (BatchCC).
After restarting the BatchCC, the window looks different. The windows Shortcuts, Control and Message window are opened.
The Batch Control Center is the central component for
• batch scheduling
• batch control
• management of all Batch-relevant data
• libraries, master recipes, formulas, materials
• permission management

Quick Start
SIMATIC BATCH Getting Started A5E00364255-01 2-44
2. In Batch Control Center, restore the supplied XML file.
Browse to the supplied sb_gs1_b.XML file
Quick Start
SIMATIC BATCH Getting Started A5E00364255-01 2-45
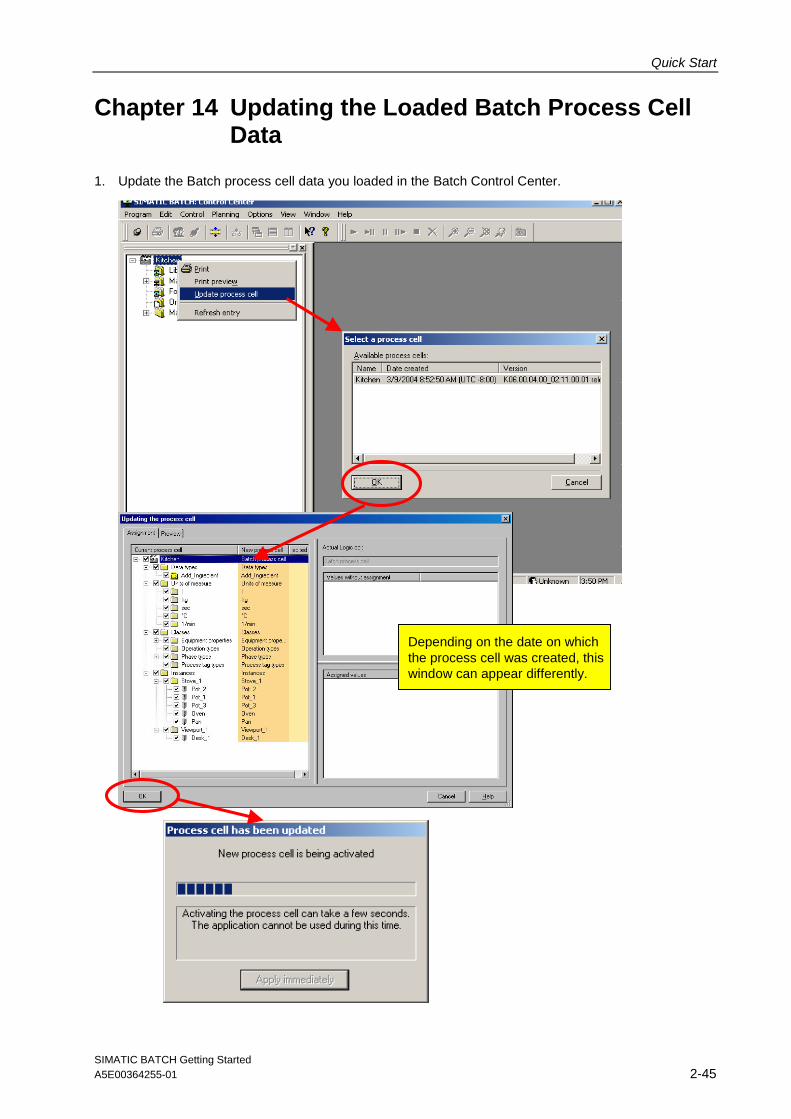
Chapter 14 Updating the Loaded Batch Process Cell Data
1. Update the Batch process cell data you loaded in the Batch Control Center.
Depending on the date on which the process cell was created, this window can appear differently.

Quick Start
SIMATIC BATCH Getting Started A5E00364255-01 2-46
Chapter 15 The Recipe for Piccata Milanese Pasta
Meal Quantity
Ingredients
Piccata Milanese 2.9 Kg (reference quantity)
100 ml oil
1.9 kg pasta
50 g salt
50 g pepper
1 kg tomato sauce
Instructions
1. Prepare water
2. Cook pasta
3. Prepare sauce (while cooking pasta)
…
…
7. Completed
Fill a pot with 3 liters of water, add 100 ml of oil and a pinch of salt, heat to 100°
Put 1.9 kg of pasta in the boiling water and cook for 6 minutes
Put 1 kg of tomato sauce in a pot, heat to 40° and stir for 5 minutes
Add salt and/or pepper to flavor
Serve pasta and sauce

Quick Start
SIMATIC BATCH Getting Started A5E00364255-01 2-47
Chapter 16 Creating an Output Material
At the beginning, you have to define the materials and as an option the qualities for input materials/output material for SIMATIC BATCH once.
Define the materials in the list boxes displayed in the subsequent dialogs for recipe creation and batch planning. Materials and qualities have to also be assigned a unique code (for example an internal company code). This code can, for example, be used to specify setpoint output and process value input at the interface blocks or SFC types to identify the material or product. To write recipes, data about the materials have to be defined. Input and output materials with various qualities can be created. These are created in the BatchCC in the Materials folder in the process cell you have read in.
1. Create a new output material with the name “Piccata Milanese” and the material code “47” and place it in the "Dish/Product" folder.
Quick Start
SIMATIC BATCH Getting Started A5E00364255-01 2-48
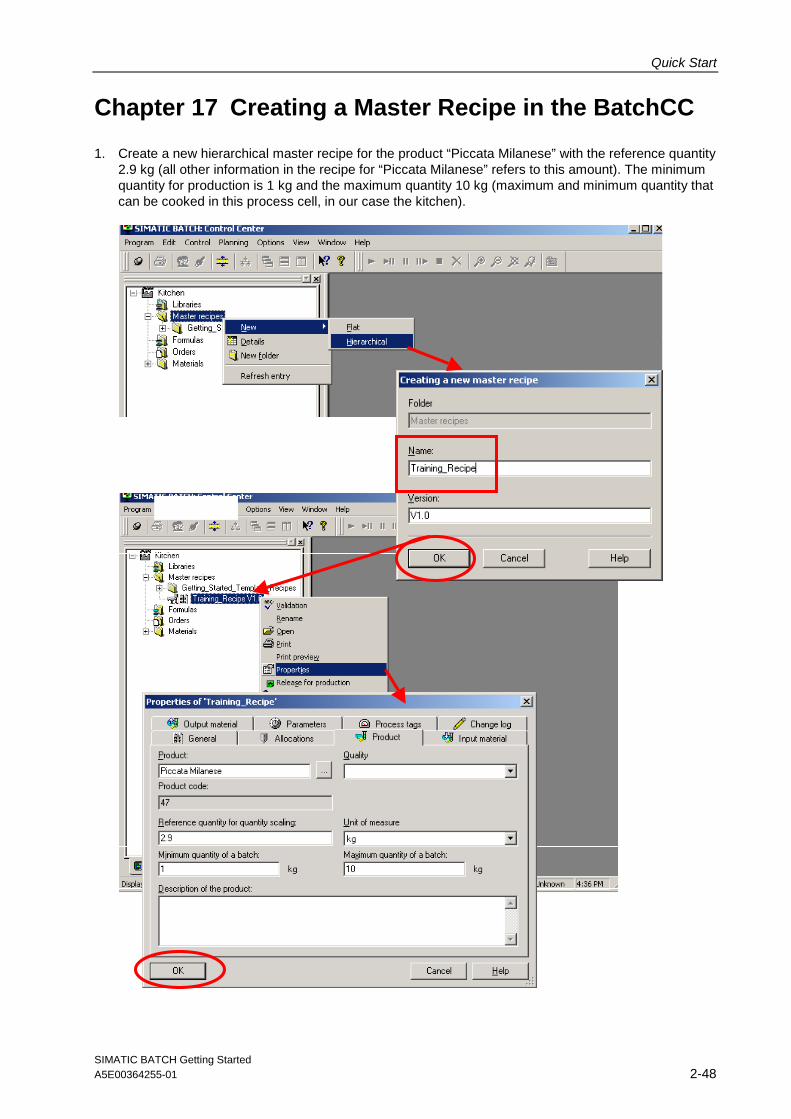
Chapter 17 Creating a Master Recipe in the BatchCC
1. Create a new hierarchical master recipe for the product “Piccata Milanese” with the reference quantity 2.9 kg (all other information in the recipe for “Piccata Milanese” refers to this amount). The minimum quantity for production is 1 kg and the maximum quantity 10 kg (maximum and minimum quantity that can be cooked in this process cell, in our case the kitchen).

Quick Start
SIMATIC BATCH Getting Started A5E00364255-01 2-49
2. Define the main product (here Piccata Milanese) as output material
Quick Start
SIMATIC BATCH Getting Started A5E00364255-01 2-50
Chapter 18 Creating the Recipe Structure in the Recipe Editor
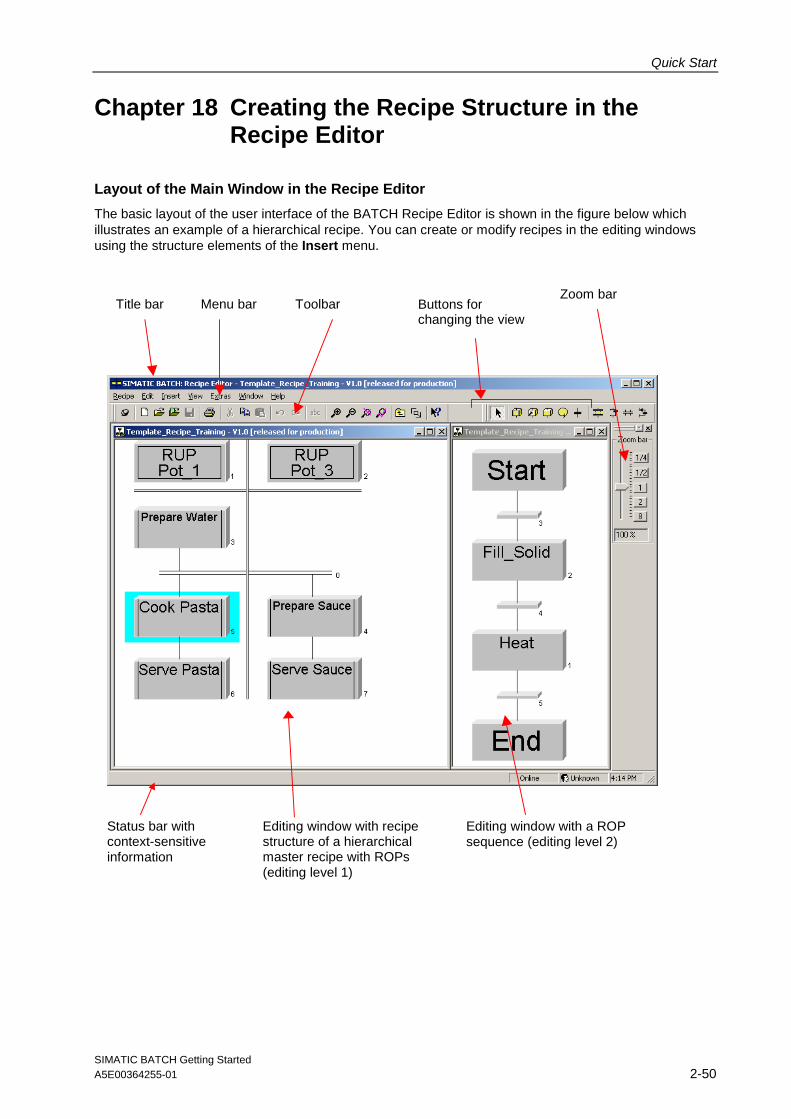
Layout of the Main Window in the Recipe Editor
The basic layout of the user interface of the BATCH Recipe Editor is shown in the figure below which illustrates an example of a hierarchical recipe. You can create or modify recipes in the editing windows using the structure elements of the Insert menu.
Title bar Toolbar Buttons for changing the view
Menu bar
Status bar with context-sensitive information
Editing window with recipe structure of a hierarchical master recipe with ROPs (editing level 1)
Editing window with a ROP sequence (editing level 2)
Zoom bar

Quick Start
SIMATIC BATCH Getting Started A5E00364255-01 2-51
Basic Representation of the Hierarchy in the BATCH Recipe Editor
The schematic below shows the basic representation of the hierarchical structure when editing with the BATCH Recipe Editor. The structure of a hierarchical recipe is edited at two levels (editing level 1 and 2).
Editing Level 1
Editing level 1 is intended for the plant view in which the processes of several cells can be synchronized. A recipe unit procedure (RUP) is made up of recipe operations (ROPs). To structure the process, you can use double lines to synchronize. This allows you to synchronize the timing of ROPs in different units.
Editing Level 2
Editing level 2 is used to create ROP sequences. An ROP sequence begins with a Start step. The Start step is followed by a transition that defines the start conditions. Every ROP sequence ends with an End step. A transition that defines the end condition precedes every end step.
ROP
ROP
ROP
ROP
START
Editing Level 1 Recipe Procedure (RP)
(with Recipe unit procedure (RUP 1 ...))
ROP
RPH
RPH RPH
Editing Level 2 Recipe Operation
(ROP)
START
END
RUP 2RUP 1
END
ROP

Quick Start
SIMATIC BATCH Getting Started A5E00364255-01 2-52
Implementation in the BATCH Recipe Editor
1. Recipe unit procedure (RUP 1) with recipe operations (ROPs)
A RUP is always shown within a column, i.e. the ROPs are arranged vertically.
Editing level 1
Synchronization line between RUPs
ROP sequence with the SFC structure elements, steps, transitions, branches etc.
2. Recipe unit procedure (RUP 2) with recipe operations (ROPs)
Editing level 2

Quick Start
SIMATIC BATCH Getting Started A5E00364255-01 2-53
Tools for Creating the Recipe Structure
The recipe editor has tools for the simple creation of recipe structures such as:
• Inserting S88 procedure elements such as recipe unit procedures (RUP), recipe operations (ROP) and recipe phases (RPH)
• Instead of a recipe operation, a referenced library operation (Lib-ROP) can also be inserted
• Inserting operator instructions or operator dialogs
• Inserting transitions
• Inserting simultaneous sequences
• Inserting alternative sequences
• Inserting synchronization lines
• Inserting loops
Quick Start
SIMATIC BATCH Getting Started A5E00364255-01 2-54
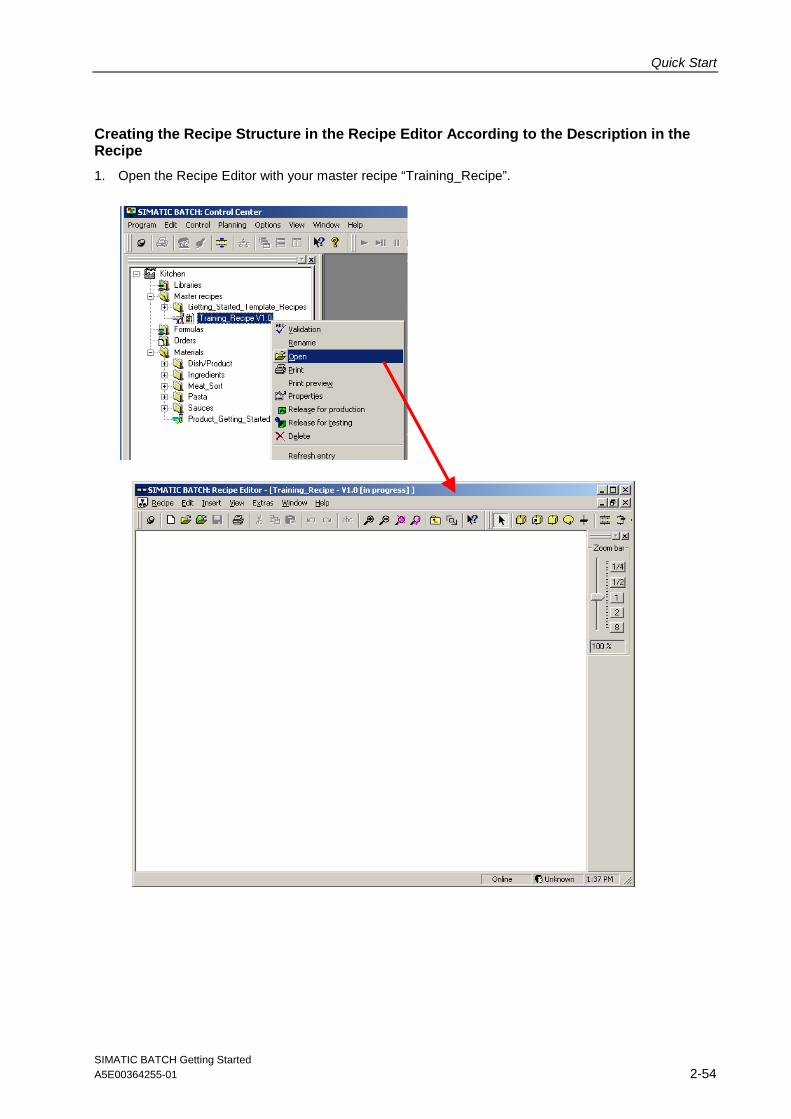
Creating the Recipe Structure in the Recipe Editor According to the Description in the Recipe
1. Open the Recipe Editor with your master recipe “Training_Recipe”.

Quick Start
SIMATIC BATCH Getting Started A5E00364255-01 2-55
2. Using the tools and the recipe description, create the dish “Piccata Milanese”.
The diagram on this page and the accompanying video will help you (Notes on storing and labeling videos are available on the first page of this manual).
ROP: Prepare water (while frying)
Put 3 liters of water in a pot and add 100 ml of oil and a pinch of salt. Then heat to 100 °C.
ROP: Cook Pasta
Put 1.9 kg of pasta into boiling water and boil for 6 minutes.
ROP: Prepare sauce (while boiling pasta) Put 1 kg of tomato sauce into a pot.
Heat to 40 °C for 5 minutes while stirring. Add salt and pepper to flavor.
Unit (RUP) Pot_1
Unit (RUP) Pot_3
Quick Start
SIMATIC BATCH Getting Started A5E00364255-01 2-56
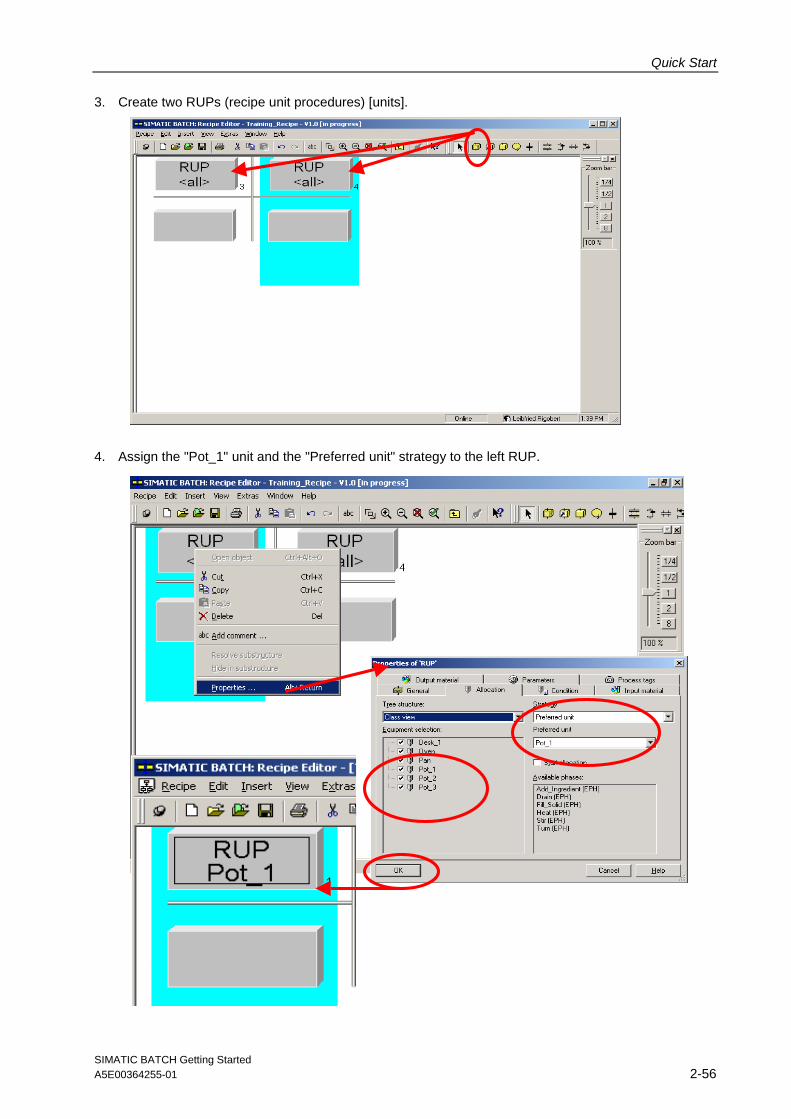
3. Create two RUPs (recipe unit procedures) [units].
4. Assign the "Pot_1" unit and the "Preferred unit" strategy to the left RUP.

Quick Start
SIMATIC BATCH Getting Started A5E00364255-01 2-57
5. Assign the "Pot_3" unit and the "Preferred unit" strategy to the right RUP.

Quick Start
SIMATIC BATCH Getting Started A5E00364255-01 2-58
6. Insert the relevant ROPs (recipe operations).
Quick Start
SIMATIC BATCH Getting Started A5E00364255-01 2-59
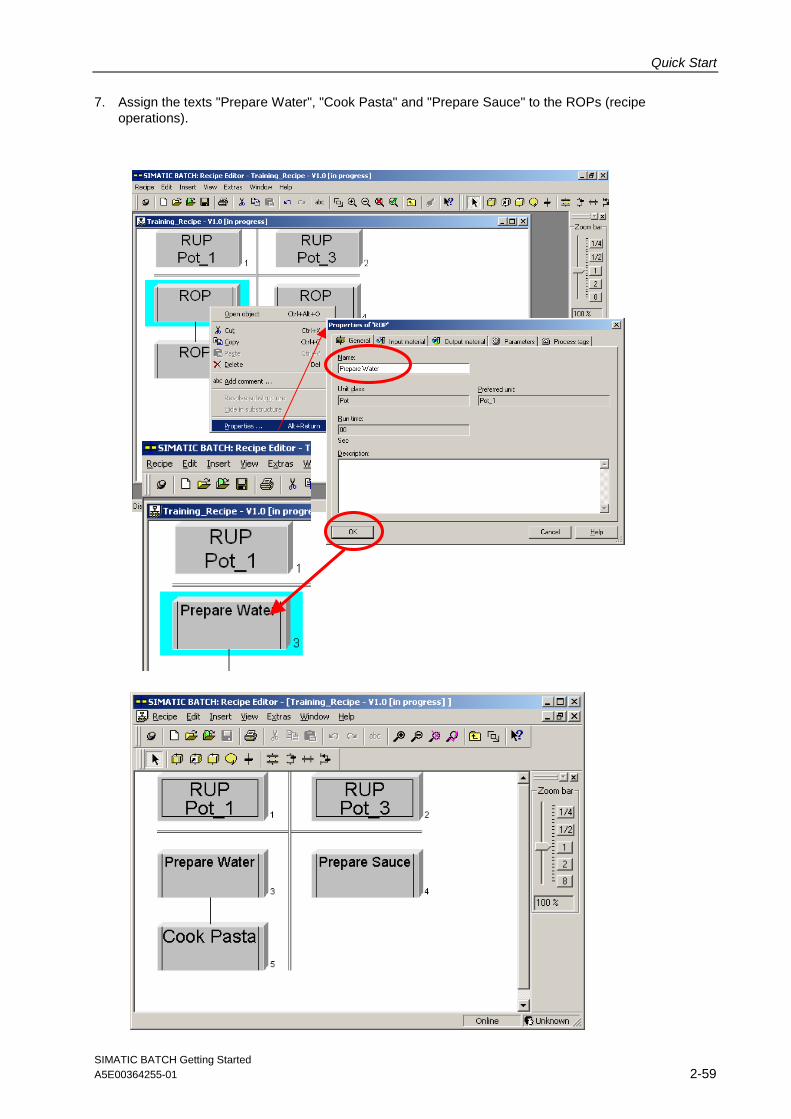
7. Assign the texts "Prepare Water", "Cook Pasta" and "Prepare Sauce" to the ROPs (recipe operations).
Quick Start
SIMATIC BATCH Getting Started A5E00364255-01 2-60
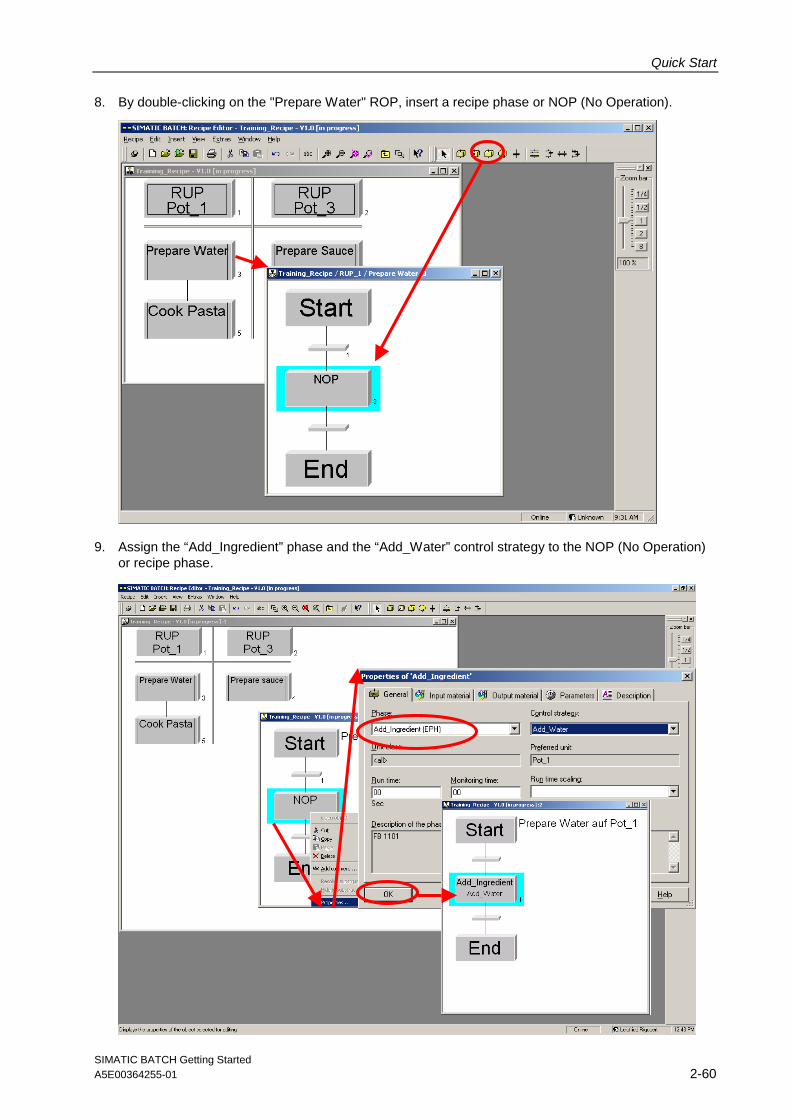
8. By double-clicking on the "Prepare Water" ROP, insert a recipe phase or NOP (No Operation).
9. Assign the “Add_Ingredient” phase and the “Add_Water” control strategy to the NOP (No Operation) or recipe phase.

Quick Start
SIMATIC BATCH Getting Started A5E00364255-01 2-61
10. Assign the values and information for the input materials and parameters of the “Add_Ingredient” phase.
The input material “Li_quantity” has to be assigned the material, in this case water, and the amount to be filled, here 3 l.
Note:
Here, and in all the phases, the "Simutime" parameter is used for simulation (it has no influence on the runtime behavior of phases in a batch).

Quick Start
SIMATIC BATCH Getting Started A5E00364255-01 2-62
11. Insert a simultaneous sequence and 3 NOPs.

Quick Start
SIMATIC BATCH Getting Started A5E00364255-01 2-63
12. Add the “Add_Ingredient” recipe phase with the “Add_Oil” control strategy and assign the "Oil" material to the “Li_quantity” input material and a quantity of “0.1 l”. For the simulation time specify value of “5” sec.
13. Add the “Heat” recipe phase and assign the value "100 °C" to the "Temp" parameter. For the simulation time specify value of “300” sec.
14. Within the simultaneous sequence, and a further “Add_Ingredient” recipe phase with the "Add_Salt" control strategy below the "Add_Ingredient" recipe phase and assign the material "Salt" and the quantity "0.01 kg" to the "Li_quantity" input material. For the simulation time, specify a value of “5” sec.

Quick Start
SIMATIC BATCH Getting Started A5E00364255-01 2-64
15. Complete the "Cook Pasta" ROP according to the recipe description for “Piccata Milanese.”

Quick Start
SIMATIC BATCH Getting Started A5E00364255-01 2-65
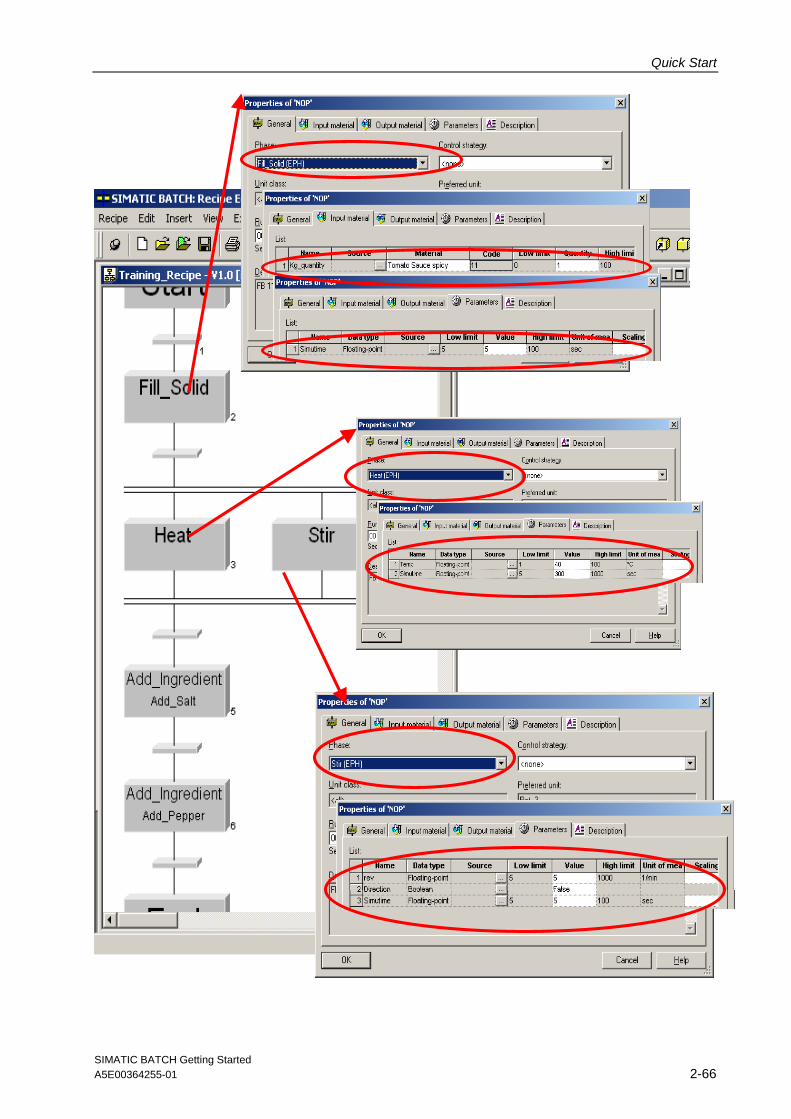
16. Complete the "Prepare Sauce" ROP according to the recipe description for “Piccata Milanese.”
Quick Start
SIMATIC BATCH Getting Started A5E00364255-01 2-66

Quick Start
SIMATIC BATCH Getting Started A5E00364255-01 2-67
Quick Start
SIMATIC BATCH Getting Started A5E00364255-01 2-68
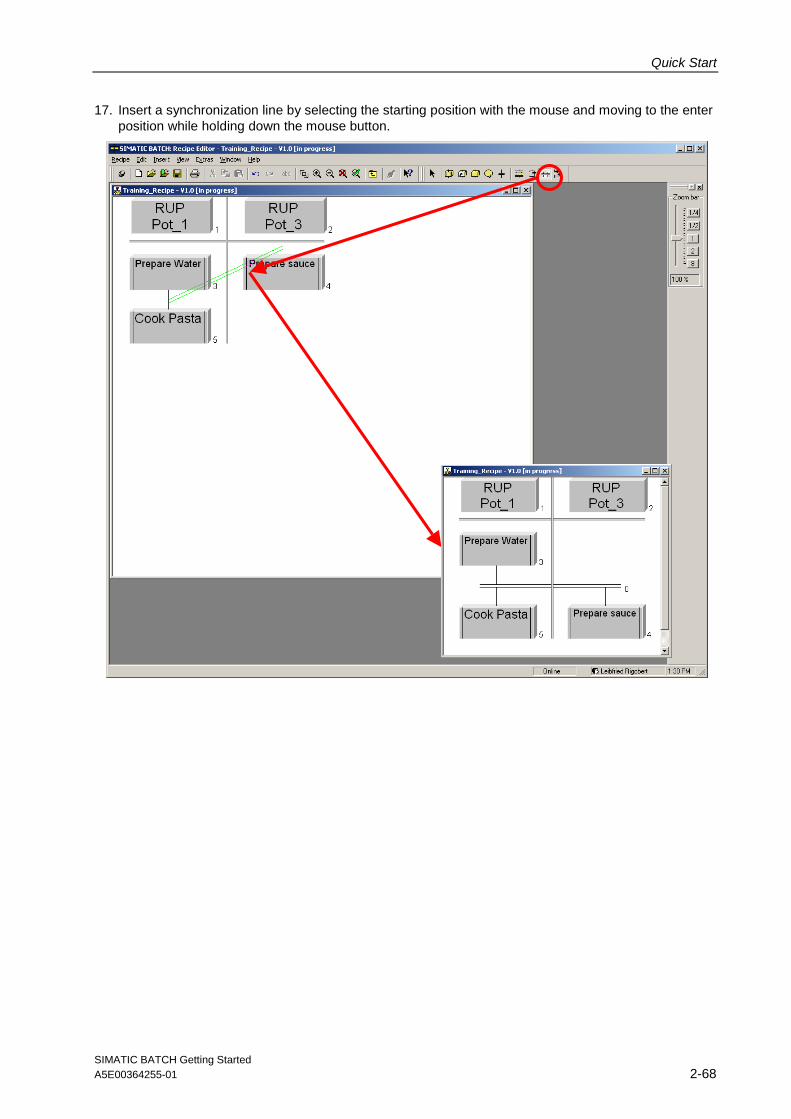
17. Insert a synchronization line by selecting the starting position with the mouse and moving to the enter position while holding down the mouse button.

Quick Start
SIMATIC BATCH Getting Started A5E00364255-01 2-69
18. Add the “Serve Pasta” and “Serve Sauce" ROPs (recipe operations) and complete them according to the recipe description for "Piccata Milanese“.

Quick Start
SIMATIC BATCH Getting Started A5E00364255-01 2-70
Quick Start
SIMATIC BATCH Getting Started A5E00364255-01 2-71
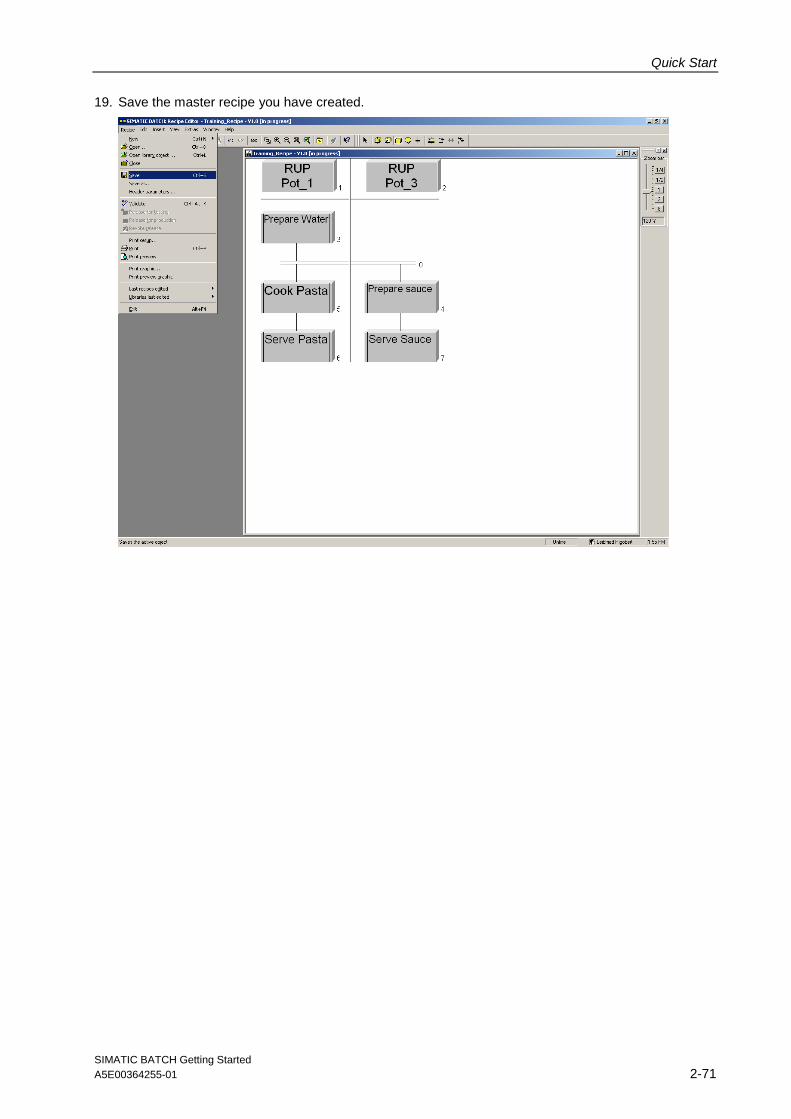
19. Save the master recipe you have created.
Quick Start
SIMATIC BATCH Getting Started A5E00364255-01 2-72
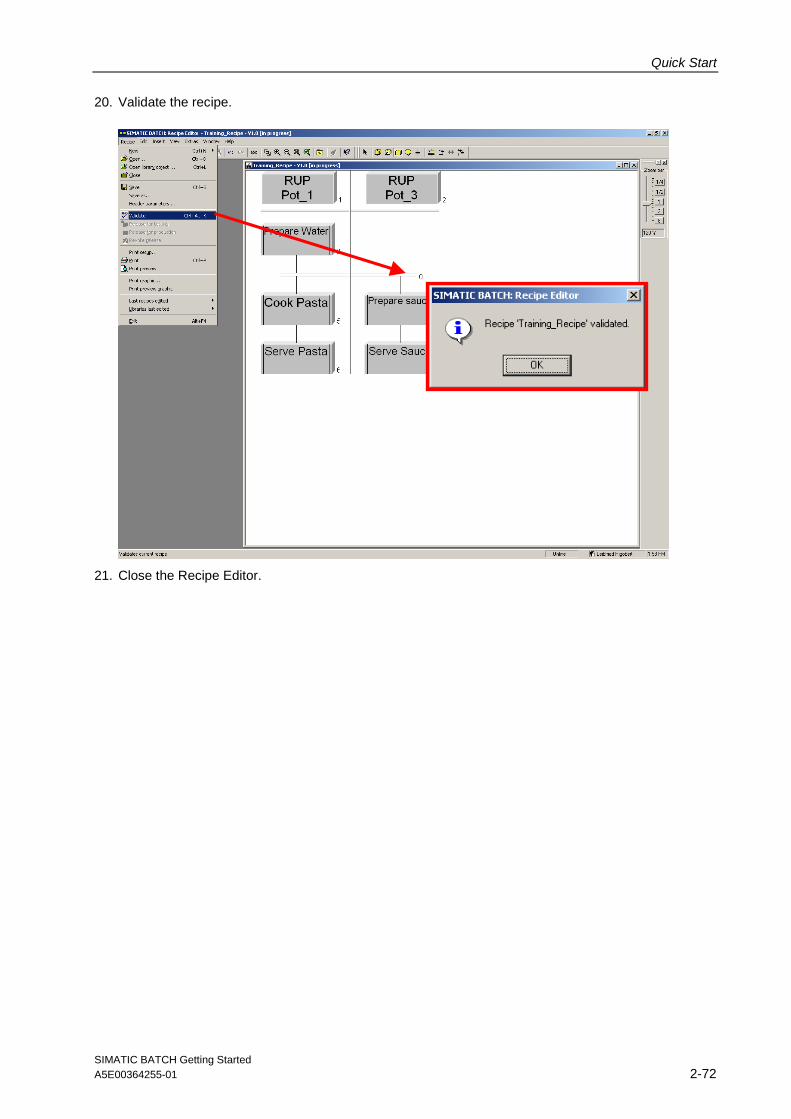
20. Validate the recipe.
21. Close the Recipe Editor.

Quick Start
SIMATIC BATCH Getting Started A5E00364255-01 2-73
Chapter 19 Releasing the Master Recipe for Production
Before you can use your master recipe “Training_Recipe V1.0” to create a batch, the recipe must be released for production or testing.
1. Release your recipe for production.

Quick Start
SIMATIC BATCH Getting Started A5E00364255-01 2-74
Note:
To be able to edit recipes that have already been released, the release has to be revoked. To do this, open the properties dialog in the BATCH Control Center with Options > Settings and select the “Allow editing of recipes in the "Release revoked" status“ check box.

Quick Start
SIMATIC BATCH Getting Started A5E00364255-01 2-75
Chapter 20 Creating an Order (Batch)
1. Create an order category with the name “order_category_GS”.

Quick Start
SIMATIC BATCH Getting Started A5E00364255-01 2-76
2. Create an order with the name "Order_GS" under “order_category_GS”.

Quick Start
SIMATIC BATCH Getting Started A5E00364255-01 2-77
3. Create a batch for "Order_GS” with the master recipe “Training_Recipe V1.0”.

Quick Start
SIMATIC BATCH Getting Started A5E00364255-01 2-78
Chapter 21 Releasing and Starting a Batch (Control Recipe)
1. Open the batch (control recipe) “Batch1”.

Quick Start
SIMATIC BATCH Getting Started A5E00364255-01 2-79
2. Release the “Batch1” control recipe. The icon of the control recipe becomes light blue.
Quick Start
SIMATIC BATCH Getting Started A5E00364255-01 2-80
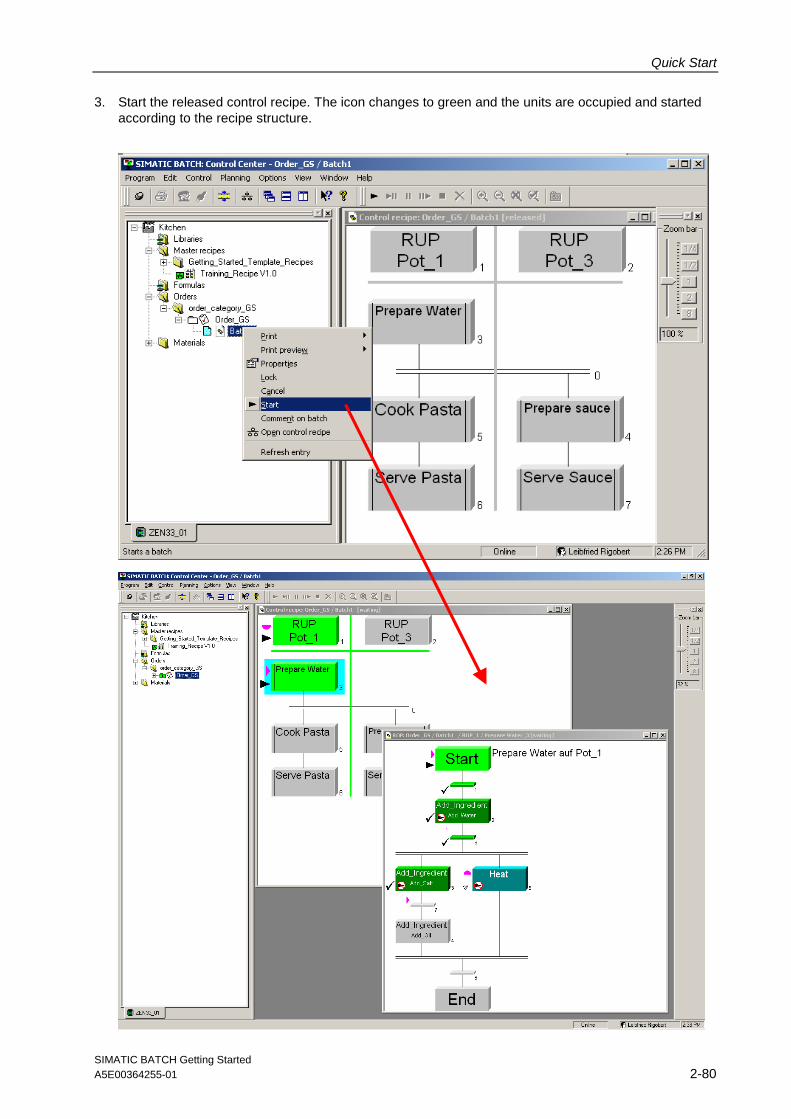
3. Start the released control recipe. The icon changes to green and the units are occupied and started according to the recipe structure.
Creating an Equipment Phase with SFC and BATCH Interface blocks
SIMATIC BATCH Getting Started A5E00364255-01 3-1
SIMATIC BATCH Getting Started
Part 3
Creating an Equipment Phase with SFC and BATCH Interface Blocks

Creating an Equipment Phase with SFC and BATCH Interface blocks
SIMATIC BATCH Getting Started A5E00364255-01 3-2

Creating an Equipment Phase with SFC and BATCH Interface blocks
SIMATIC BATCH Getting Started A5E00364255-01 3-3
Getting Started SIMATIC BATCHCreating an equipment phase
using SFC and BATCH interface blocks (IEPH, IEPAR_xxx)
Task/Implementation Concept
Expanding the Plant Hierarchy
Configuring the Control Module Level(Valve)
Configuring BATCH Interface Blocksfor the Control Commands and
Process Value Transfer
Creating an SFC
Connecting the Batch ControlCommands with the SFC
Compiling and Downloading the CPUand OS
Generating Batch Types
Compiling, Transferring the OS andDownloading Batch
Expanding the Unit Faceplate in theWinCC Explorer
Wo
rkin
g in
th
e S
IMA
TIC
Man
ager
Chap. 1
Chap. 4
Chap. 3
Chap. 2
Chap. 5
Chap. 9
Chap. 7
Chap. 6
Chap. 11
Chap. 10
Expanding a Recipe
Chap. 8

Creating an Equipment Phase with SFC and BATCH Interface blocks
SIMATIC BATCH Getting Started A5E00364255-01 3-4

Creating an Equipment Phase with SFC and BATCH Interface blocks
SIMATIC BATCH Getting Started A5E00364255-01 3-5
Chapter 1 Task/Implementation Concept
An additional equipment phase is required for the pan: It has to be extended by adding the “Quench” phase. A selectable quantity of a material (for example, red wine) will be added via a quench valve.
To simplify matters, the process of reaching the set quantity will be simulated by a selectable time. If the batch is held or aborted, the valve will close.
To implement the equipment phase, we will select blocks from the Batch library.
Unit
Process cell
Drain
Fill_Solid
Turn
Drain
Fill_Solid
Temp
Add_Ingredient
Stir
Turn
Drain
Fill_Solid
Temp
Add_Ingredient
Stir
Drain
Fill_Solid
Temp
Add_Ingredient
Stir
Drain
Fill_Solid
Temp
Add_Ingredient
Stir
Drain
Fill_Solid
Temp
Equipment Modules
Desk (Unit class Desk)
Pan
(Unit class Pan) Pot 1
(Unit class Pot) Pot 2
(Unit class Pot) Pot 3
(Unit class Pot) Oven (Unit
class Oven)
Quench
Creating an Equipment Phase with SFC and BATCH Interface blocks
SIMATIC BATCH Getting Started A5E00364255-01 3-6
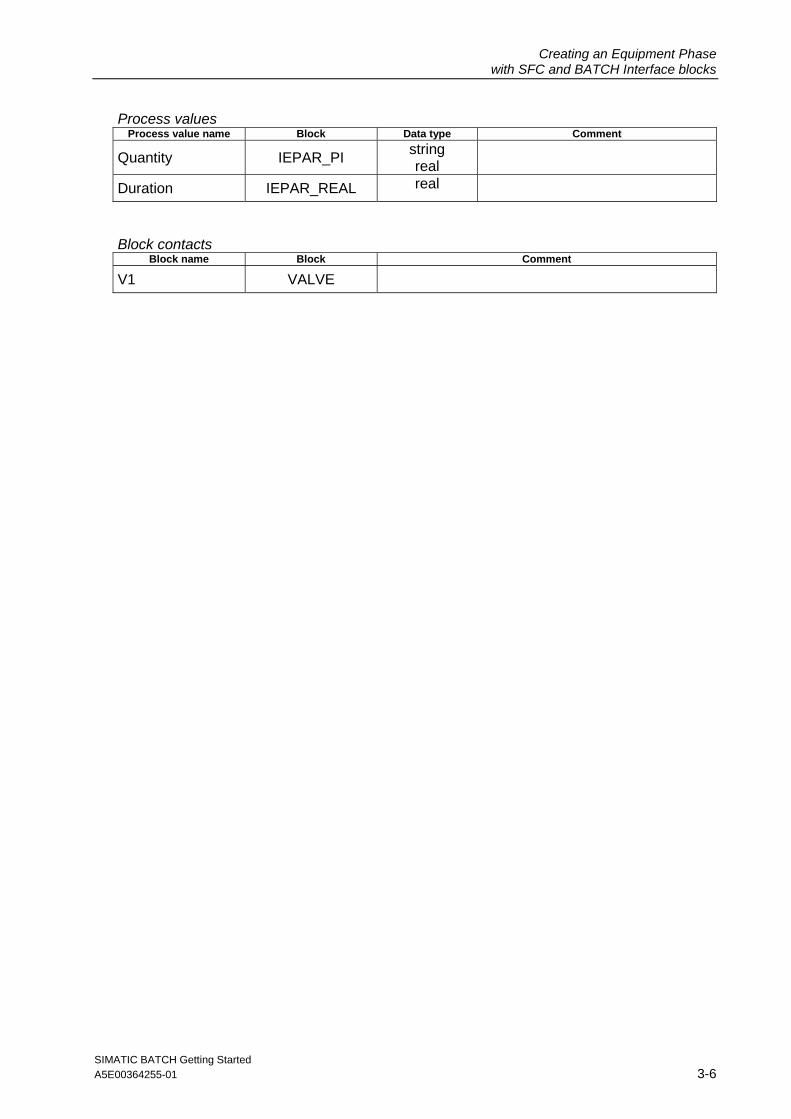
Process values
Process value name Block Data type Comment
Quantity IEPAR_PI string real
Duration IEPAR_REAL real
Block contacts
Block name Block Comment
V1 VALVE
Creating an Equipment Phase with SFC and BATCH Interface blocks
SIMATIC BATCH Getting Started A5E00364255-01 3-7
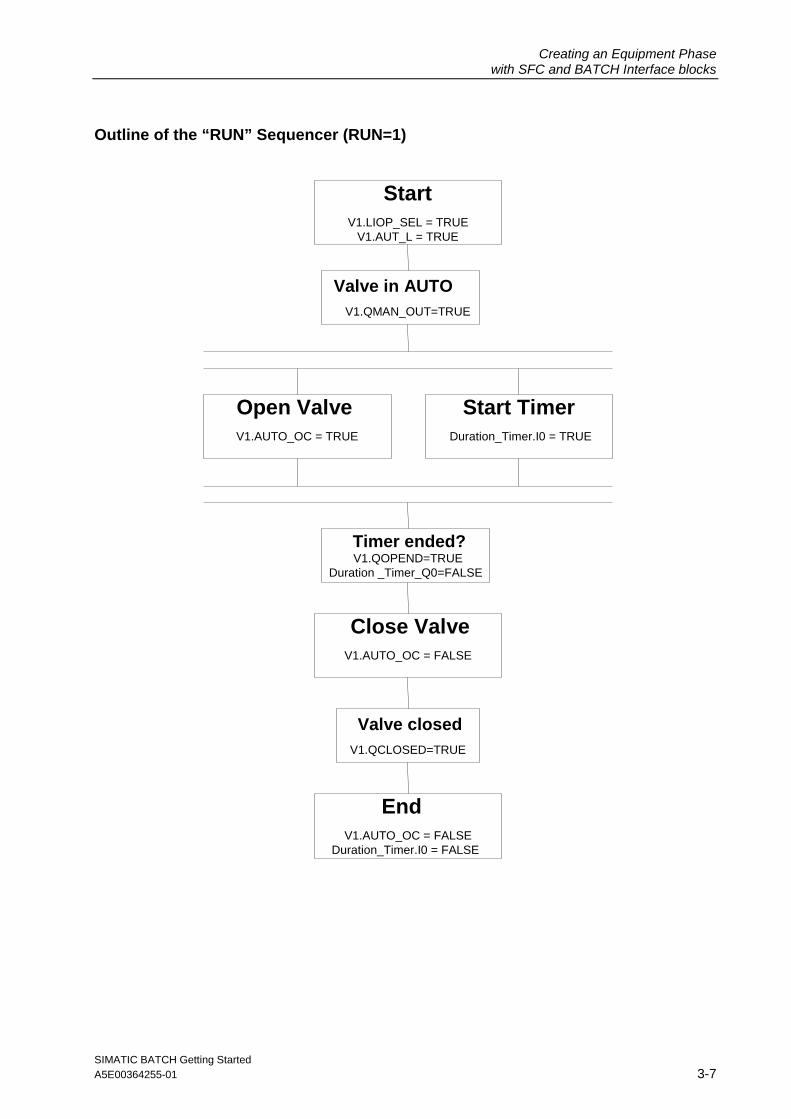
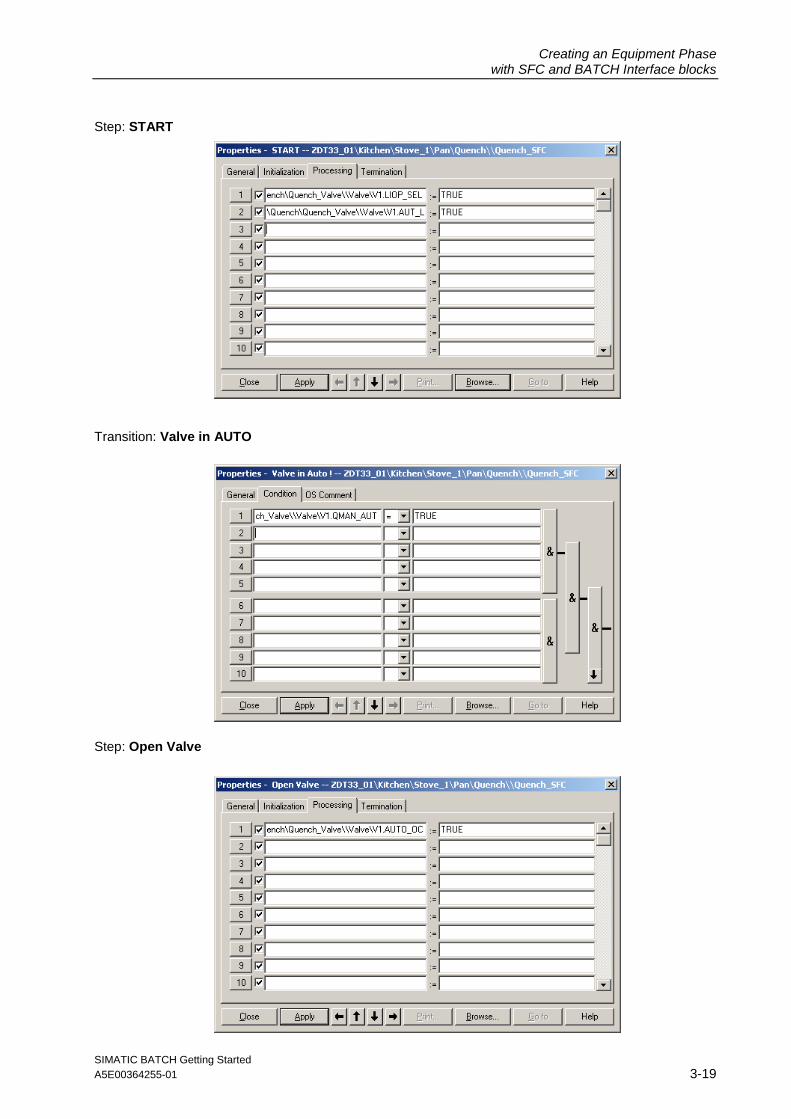
Outline of the “RUN” Sequencer (RUN=1)
Start
V1.LIOP_SEL = TRUE V1.AUT_L = TRUE
Valve in AUTO
V1.QMAN_OUT=TRUE
Start Timer
Duration_Timer.I0 = TRUE
Open Valve
V1.AUTO_OC = TRUE
Timer ended? V1.QOPEND=TRUE
Duration _Timer_Q0=FALSE
Close Valve
V1.AUTO_OC = FALSE
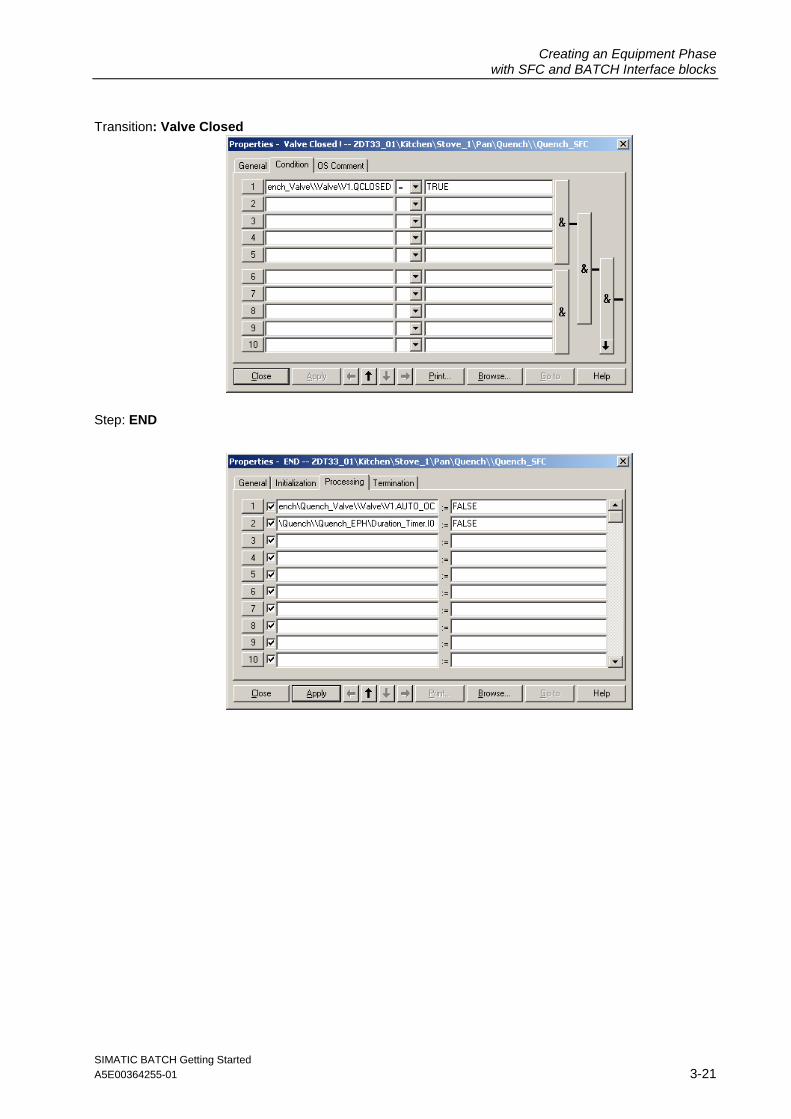
Valve closed
V1.QCLOSED=TRUE
End
V1.AUTO_OC = FALSE Duration_Timer.I0 = FALSE

Creating an Equipment Phase with SFC and BATCH Interface blocks
SIMATIC BATCH Getting Started A5E00364255-01 3-8
Outline of the “Hold/Abort/Complete” Sequencer (Holding=1 or Aborting=1 or Completing=1)
Valve closed
V1.QCLOSED=TRUE
End
Close Valve
V1.AUTO_OC = FALSE
Start

Creating an Equipment Phase with SFC and BATCH Interface blocks
SIMATIC BATCH Getting Started A5E00364255-01 3-9
Chapter 2 Expanding the Plant Hierarchy
1. Open your edited SIMATIC BATCH Getting Started “Quick Start”.
2. Expand the “Pan” unit by adding a hierarchy folder with the name “Quench”.
The newly added hierarchy folder is automatically declared as an equipment module and therefore also as Batch-relevant (folder is green).
At this level, you will find the Batch interface block (IEPH, IEPAR_xxx).

Creating an Equipment Phase with SFC and BATCH Interface blocks
SIMATIC BATCH Getting Started A5E00364255-01 3-10
3. Expand the “Quench” hierarchy folder by adding a hierarchy folder with the name “Quench_Valve”; this level also contains the control modules (here, the appropriate valve).

Creating an Equipment Phase with SFC and BATCH Interface blocks
SIMATIC BATCH Getting Started A5E00364255-01 3-11
Chapter 3 Configuring the Control Module Level (Valve V1)
1. Create a CFC chart with the name “Valve” in the "Quench_Valve" hierarchy folder.

Creating an Equipment Phase with SFC and BATCH Interface blocks
SIMATIC BATCH Getting Started A5E00364255-01 3-12
2. Open the “Valve” CFC chart and insert a valve block. Give the valve block the block name “V1”.
3. Make the inputs and outputs “QCONTROL”, “BA_EN”, “BA_ID”, “OCCUPIED”, “BA_NA”, and “STEP_NO” visible.
4. Interconnect the “QCONTROL” output with the “FB_OPEN” and “FB_CLOSE” inputs and invert “FB_CLOSE”.
Creating an Equipment Phase with SFC and BATCH Interface blocks
SIMATIC BATCH Getting Started A5E00364255-01 3-13
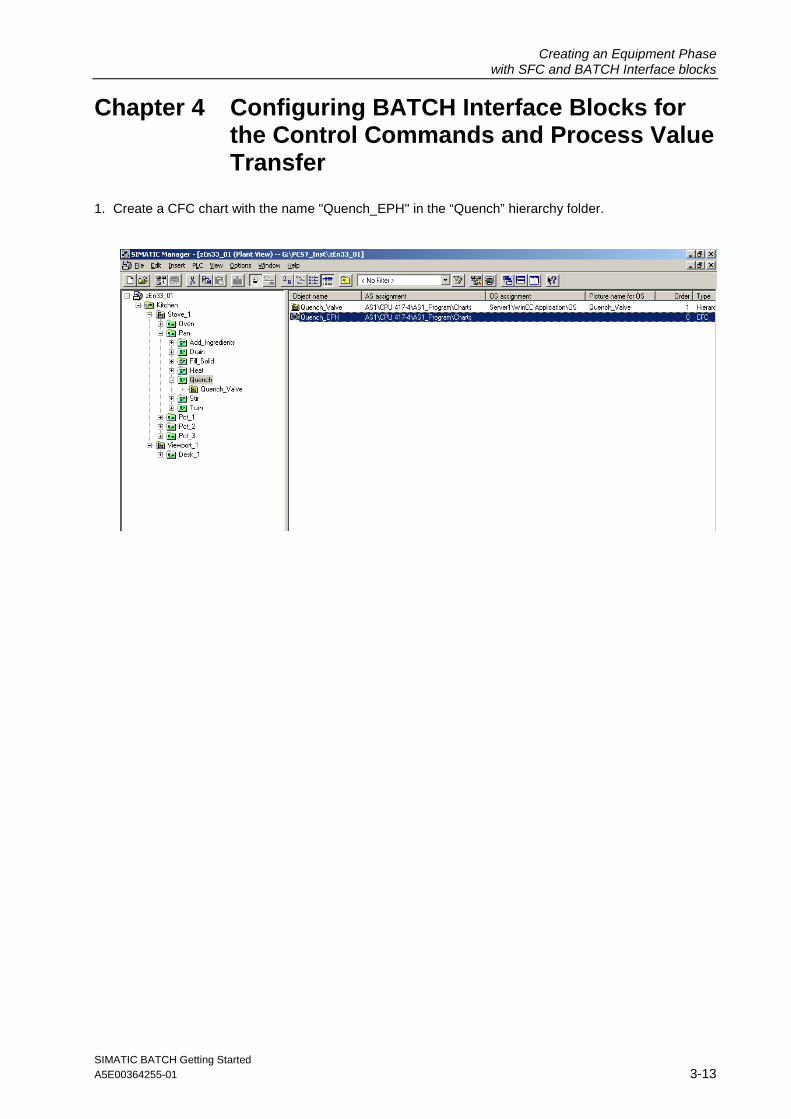
Chapter 4 Configuring BATCH Interface Blocks for the Control Commands and Process Value Transfer
1. Create a CFC chart with the name "Quench_EPH" in the “Quench” hierarchy folder.

Creating an Equipment Phase with SFC and BATCH Interface blocks
SIMATIC BATCH Getting Started A5E00364255-01 3-14
2. Open the “Quench_EPH” CFC chart and add the “IEPH”, “IEPAR_PI” and “IEPAR_REAL” blocks from the “SIMATIC BATCH Blocks” library. For the IEPH block, assign the name “Quench”, and assign the same name to the “F_TYPE” input. Assign the name "Quantity" to the IEPAR_PI block and the name "Duration" to the IEPAR_REAL block.
Creating an Equipment Phase with SFC and BATCH Interface blocks
SIMATIC BATCH Getting Started A5E00364255-01 3-15
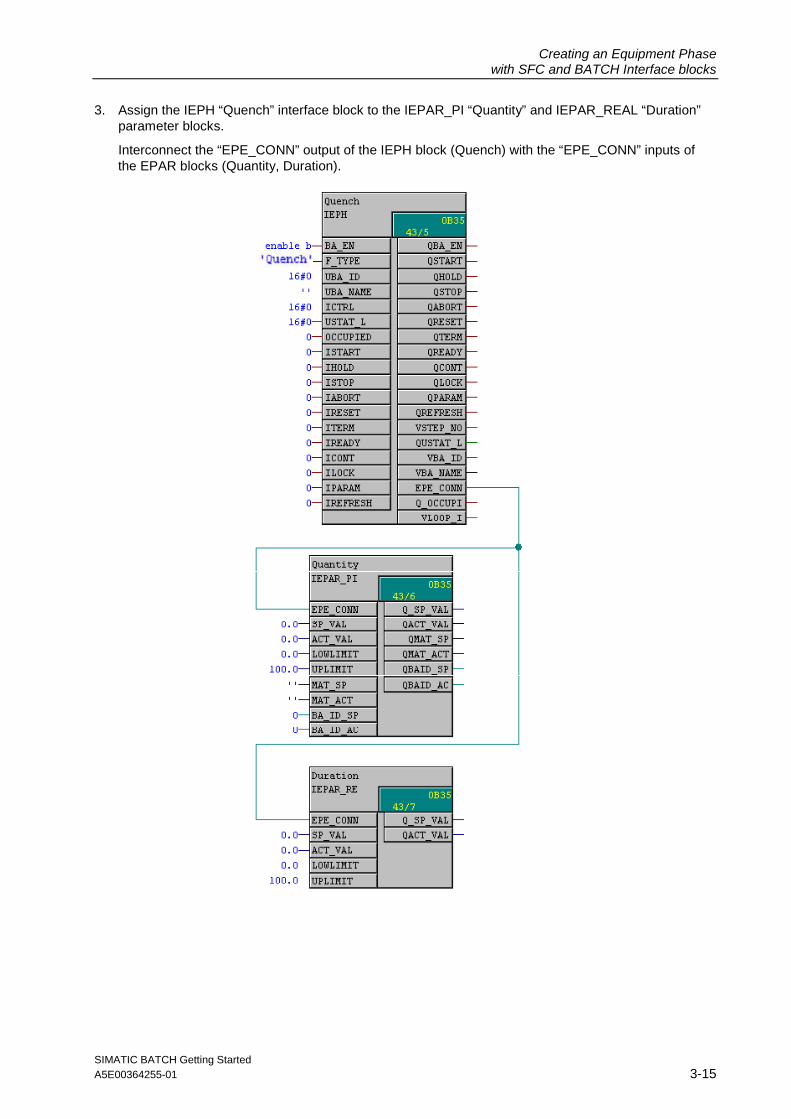
3. Assign the IEPH “Quench” interface block to the IEPAR_PI “Quantity” and IEPAR_REAL “Duration” parameter blocks.
Interconnect the “EPE_CONN” output of the IEPH block (Quench) with the “EPE_CONN” inputs of the EPAR blocks (Quantity, Duration).

Creating an Equipment Phase with SFC and BATCH Interface blocks
SIMATIC BATCH Getting Started A5E00364255-01 3-16
4. Add a TIMER_P block for the simulation of the “Duration” process value and assign the name "Duration_Timer" to the block and also assign MODE 1.
Interconnect the IEPAR_REAL block “Duration” with the TIMER_P block as follows.
Duration / Q_SP_VAL with Duration_Timer / TIMER0
Duration_Timer / PTIME with Duration / ACT_VAL
5. Interconnect the IEPAR_PI block “Quantity” to the simulation as follows.
Quantity / Q_SP_VAL with Quantity / ACT_VAL
Quantity / QMAT_SP with Quantity / MAT_SP
Quantity / QBAID_SP with Quantity / BA_ID_SP

Creating an Equipment Phase with SFC and BATCH Interface blocks
SIMATIC BATCH Getting Started A5E00364255-01 3-17
6. To have the BATCH name, Batch ID, Batch step number, Batch enable, occupied available at the valve block "V1", the valve block has to be interconnected with the Batch control block IEPH “Quench”.
Make interconnections as shown below.
Quench / QBA_EN with V1 / BA_EN
Quench / VSTEP_NO with V1 / STEP_NO
Quench / VBA_ID with V1 / BA_ID
Quench / VBA_NAME with V1 / BA_NA
Quench / Q_OCCUPI with V1 / OCCUPIED
As an alternative, BA_EN, BA_ID, BA_NA , OCCUPIED and STEP_NO can be supplied by the Unit block.
CFC chart "Quench_EPH" CFC chart "Valve"
Creating an Equipment Phase with SFC and BATCH Interface blocks
SIMATIC BATCH Getting Started A5E00364255-01 3-18
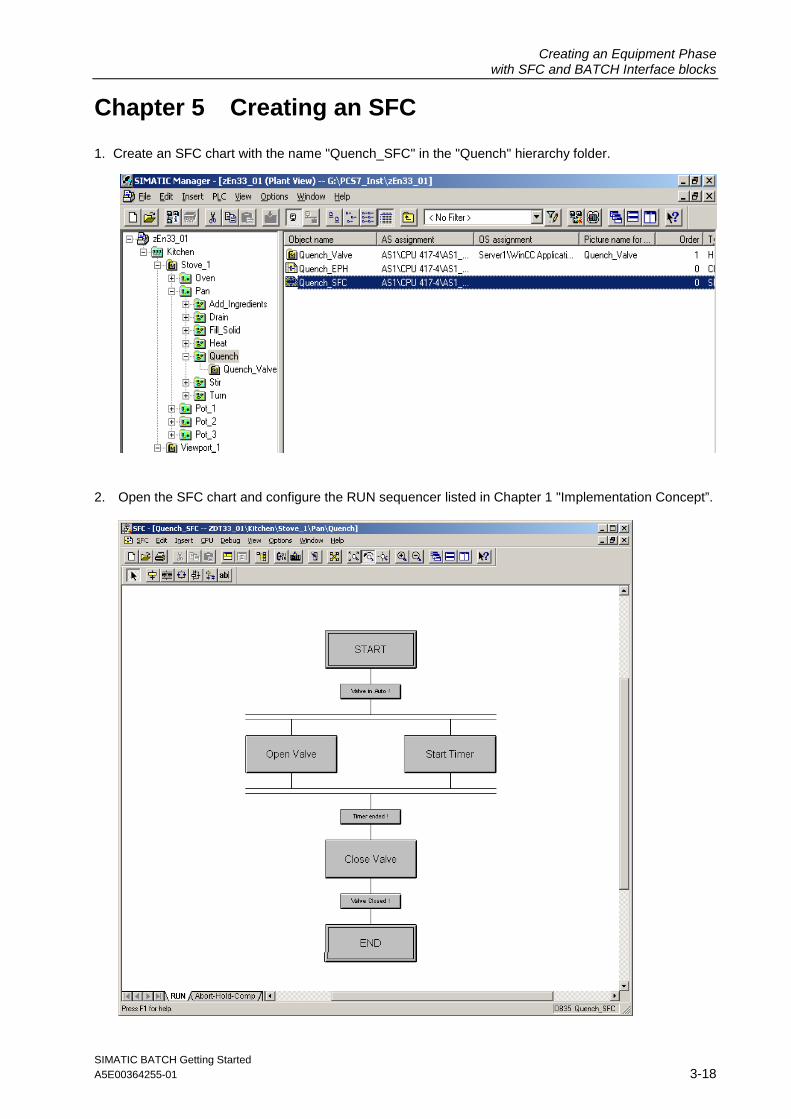
Chapter 5 Creating an SFC
1. Create an SFC chart with the name "Quench_SFC" in the "Quench" hierarchy folder.
2. Open the SFC chart and configure the RUN sequencer listed in Chapter 1 "Implementation Concept”.
Creating an Equipment Phase with SFC and BATCH Interface blocks
SIMATIC BATCH Getting Started A5E00364255-01 3-19
Step: START
Transition: Valve in AUTO
Step: Open Valve

Creating an Equipment Phase with SFC and BATCH Interface blocks
SIMATIC BATCH Getting Started A5E00364255-01 3-20
Step: Start Timer
Transition: Timer ended
Step: Close Valve
Creating an Equipment Phase with SFC and BATCH Interface blocks
SIMATIC BATCH Getting Started A5E00364255-01 3-21
Transition: Valve Closed
Step: END

Creating an Equipment Phase with SFC and BATCH Interface blocks
SIMATIC BATCH Getting Started A5E00364255-01 3-22
3. Insert a new sequencer in “Quench_SFC“.
- Open the properties window of SEQ1 (double-click on the SEQ1 tab).
- In the “General“ tab, enter the name “Abort-Hold-Comp”. Then apply the settings.
Creating an Equipment Phase with SFC and BATCH Interface blocks
SIMATIC BATCH Getting Started A5E00364255-01 3-23
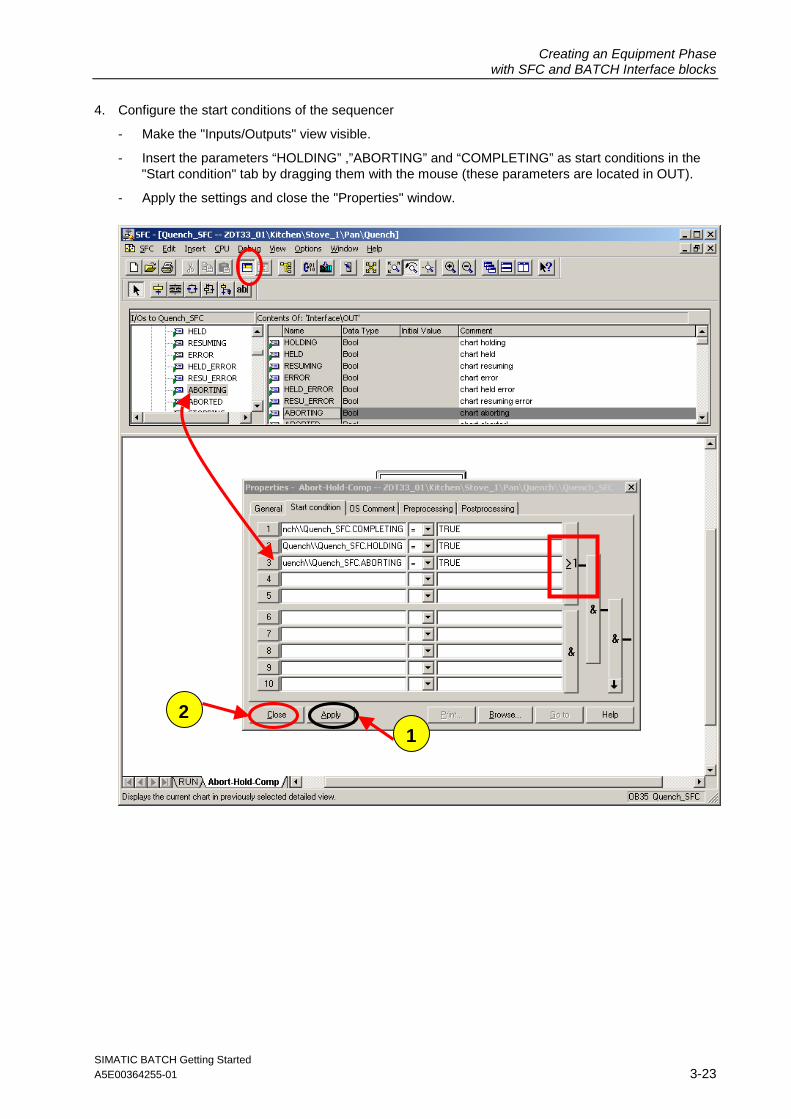
4. Configure the start conditions of the sequencer
- Make the "Inputs/Outputs" view visible.
- Insert the parameters “HOLDING” ,”ABORTING” and “COMPLETING” as start conditions in the "Start condition" tab by dragging them with the mouse (these parameters are located in OUT).
- Apply the settings and close the "Properties" window. 2
1
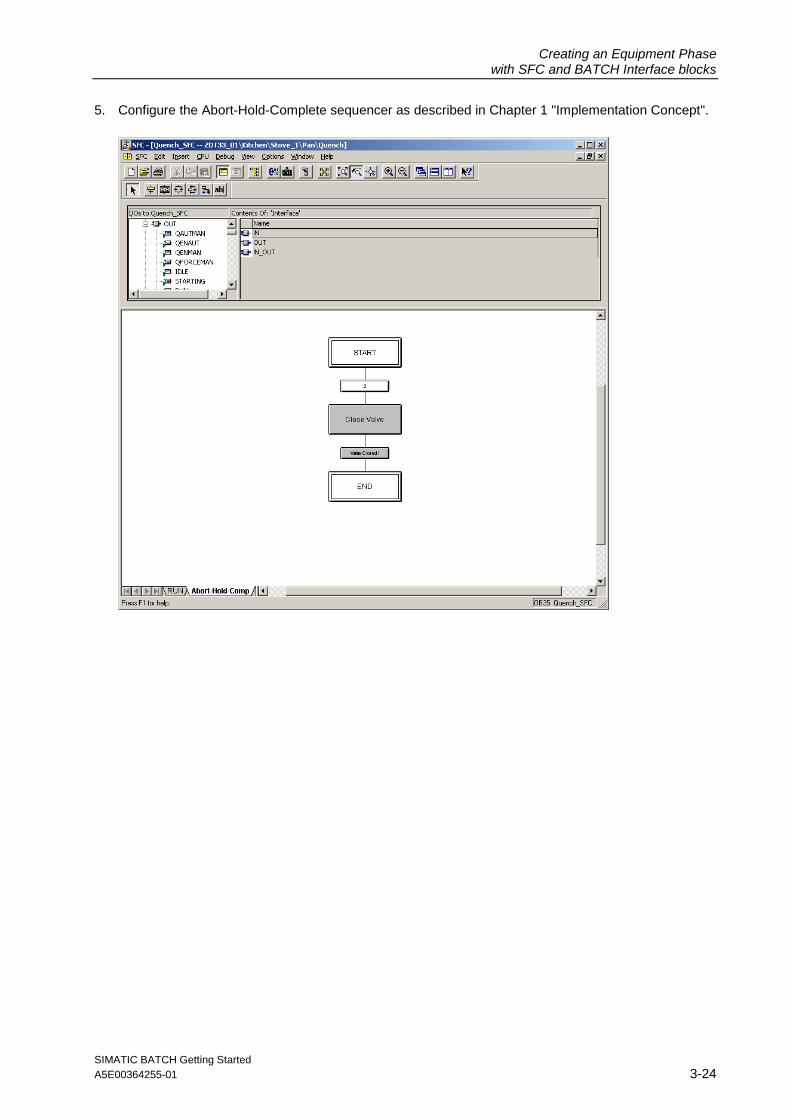
Creating an Equipment Phase with SFC and BATCH Interface blocks
SIMATIC BATCH Getting Started A5E00364255-01 3-24
5. Configure the Abort-Hold-Complete sequencer as described in Chapter 1 "Implementation Concept".
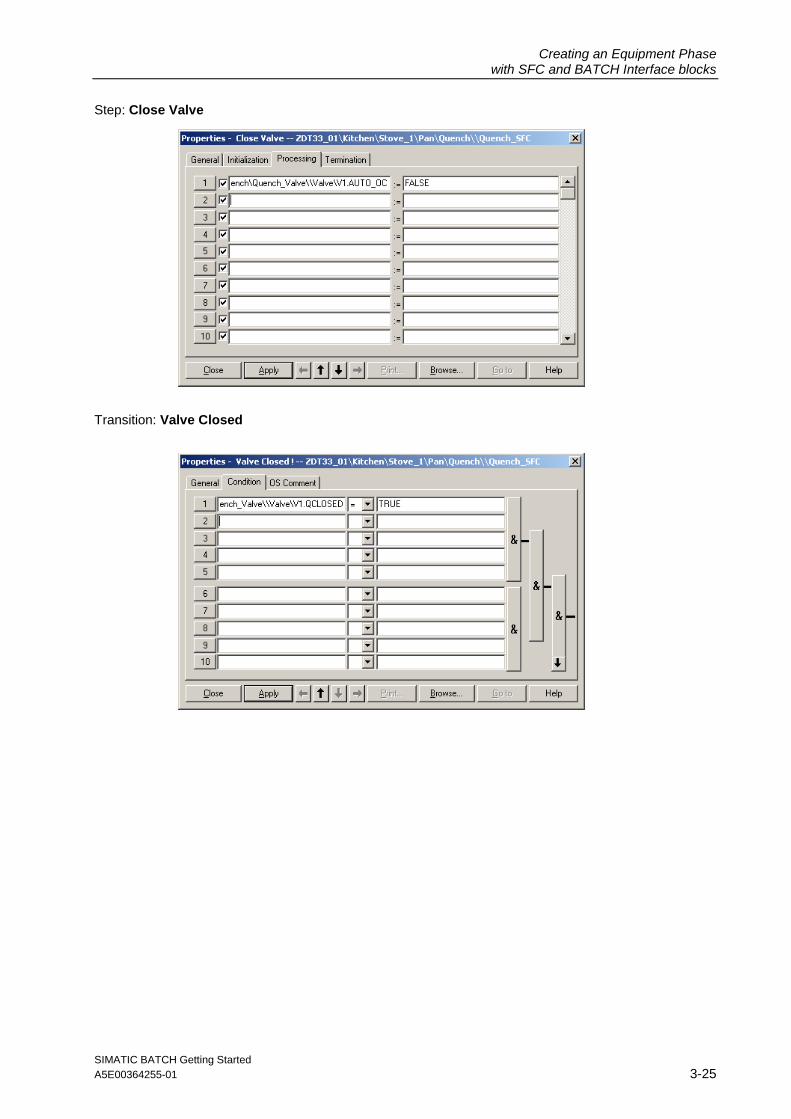
Creating an Equipment Phase with SFC and BATCH Interface blocks
SIMATIC BATCH Getting Started A5E00364255-01 3-25
Step: Close Valve
Transition: Valve Closed

Creating an Equipment Phase with SFC and BATCH Interface blocks
SIMATIC BATCH Getting Started A5E00364255-01 3-26
6. Select the "AUTO" mode in the “Quench_SFC” SFC chart.
7. Close the SFC Editor.
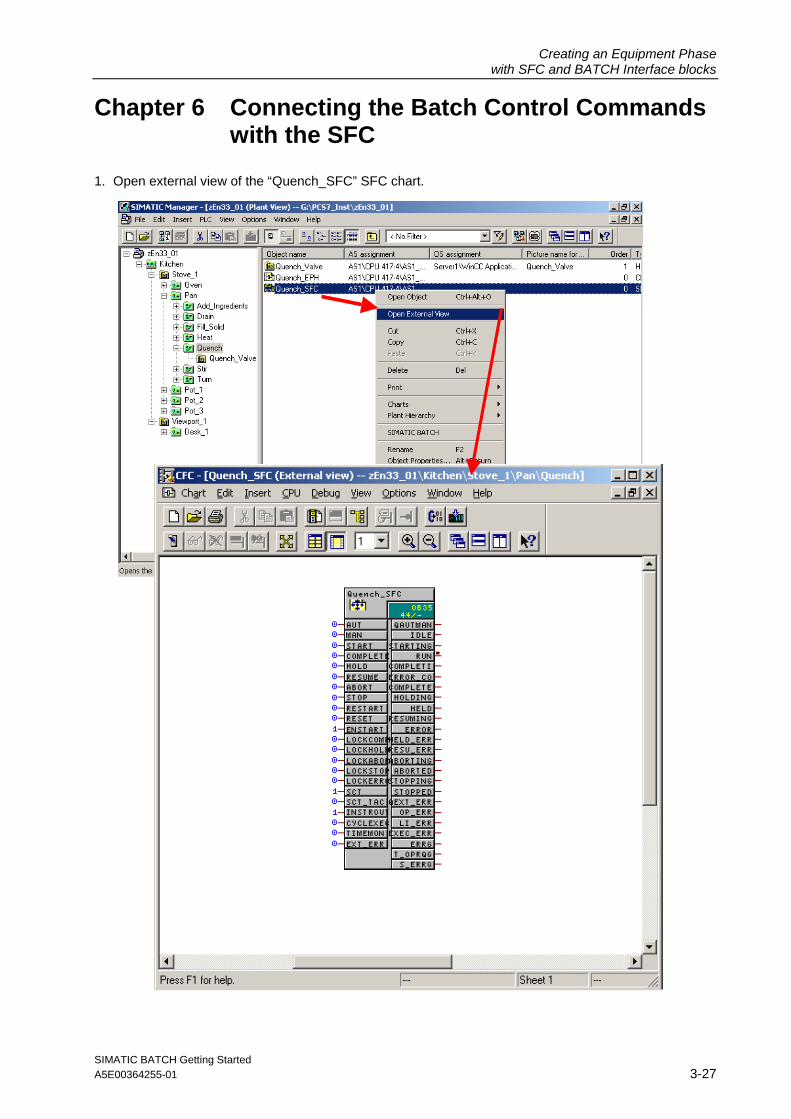
Creating an Equipment Phase with SFC and BATCH Interface blocks
SIMATIC BATCH Getting Started A5E00364255-01 3-27
Chapter 6 Connecting the Batch Control Commands with the SFC
1. Open external view of the “Quench_SFC” SFC chart.
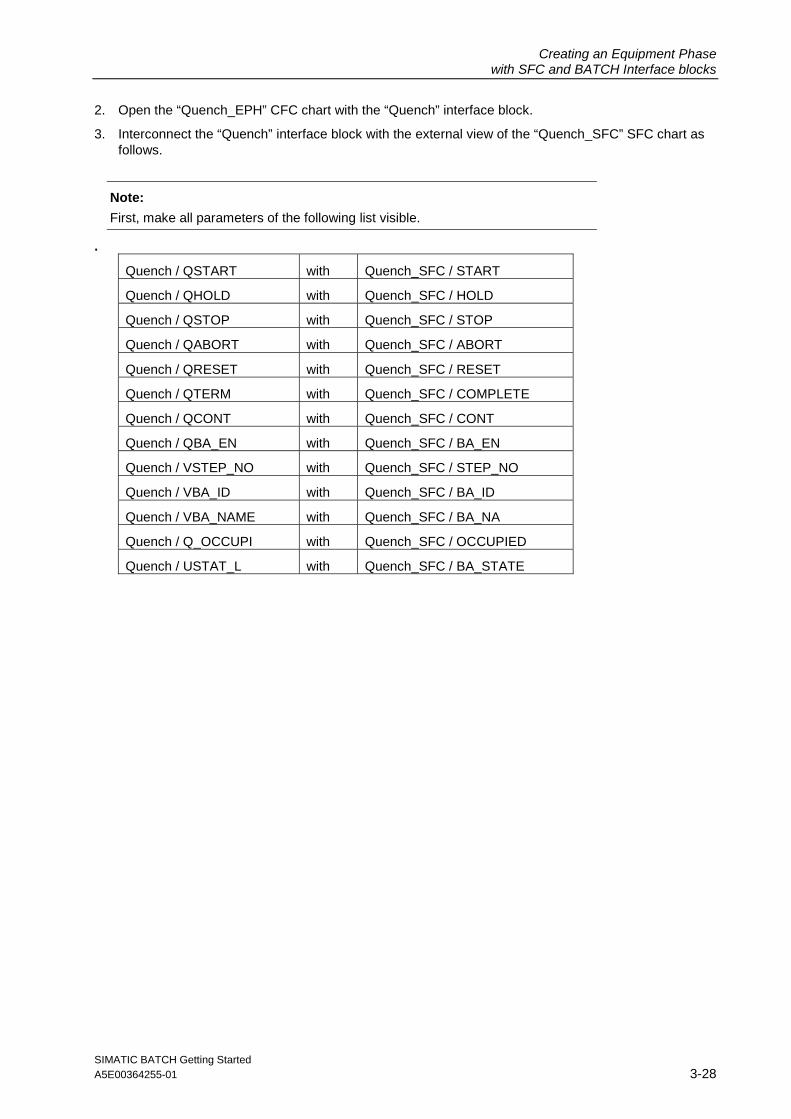
Creating an Equipment Phase with SFC and BATCH Interface blocks
SIMATIC BATCH Getting Started A5E00364255-01 3-28
2. Open the “Quench_EPH” CFC chart with the “Quench” interface block.
3. Interconnect the “Quench” interface block with the external view of the “Quench_SFC” SFC chart as follows.
Note:
First, make all parameters of the following list visible.
.
Quench / QSTART with Quench_SFC / START
Quench / QHOLD with Quench_SFC / HOLD
Quench / QSTOP with Quench_SFC / STOP
Quench / QABORT with Quench_SFC / ABORT
Quench / QRESET with Quench_SFC / RESET
Quench / QTERM with Quench_SFC / COMPLETE
Quench / QCONT with Quench_SFC / CONT
Quench / QBA_EN with Quench_SFC / BA_EN
Quench / VSTEP_NO with Quench_SFC / STEP_NO
Quench / VBA_ID with Quench_SFC / BA_ID
Quench / VBA_NAME with Quench_SFC / BA_NA
Quench / Q_OCCUPI with Quench_SFC / OCCUPIED
Quench / USTAT_L with Quench_SFC / BA_STATE
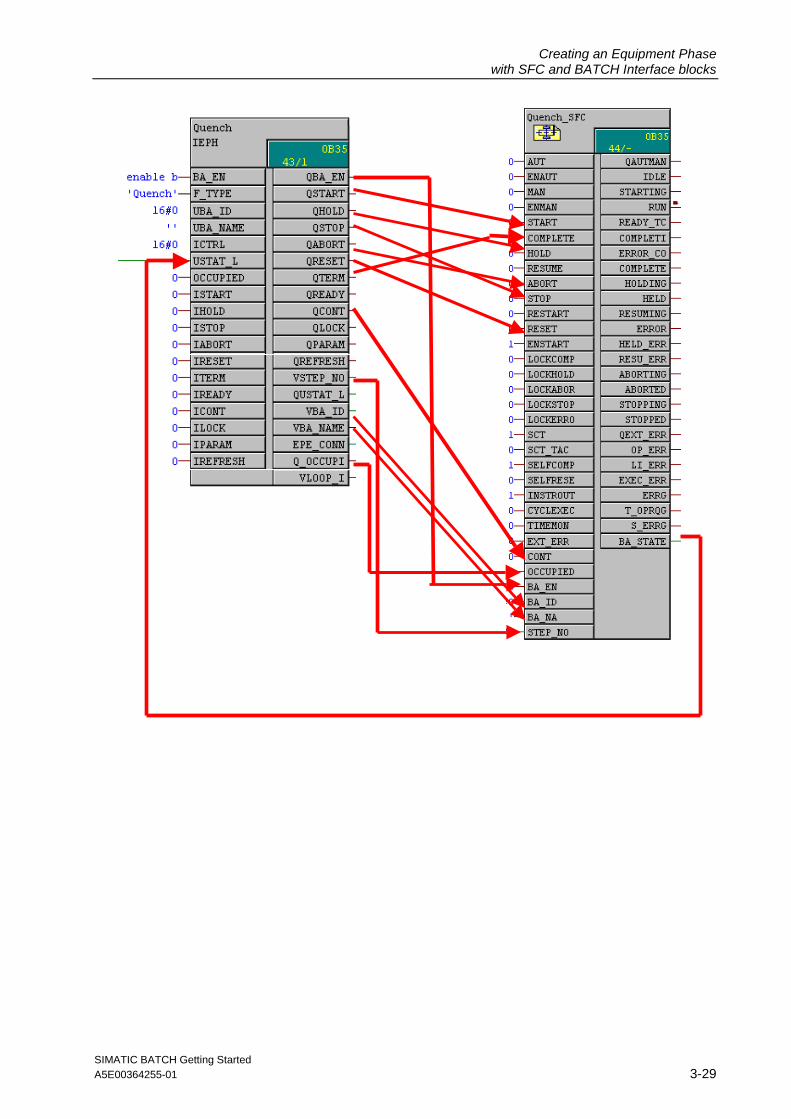
Creating an Equipment Phase with SFC and BATCH Interface blocks
SIMATIC BATCH Getting Started A5E00364255-01 3-29
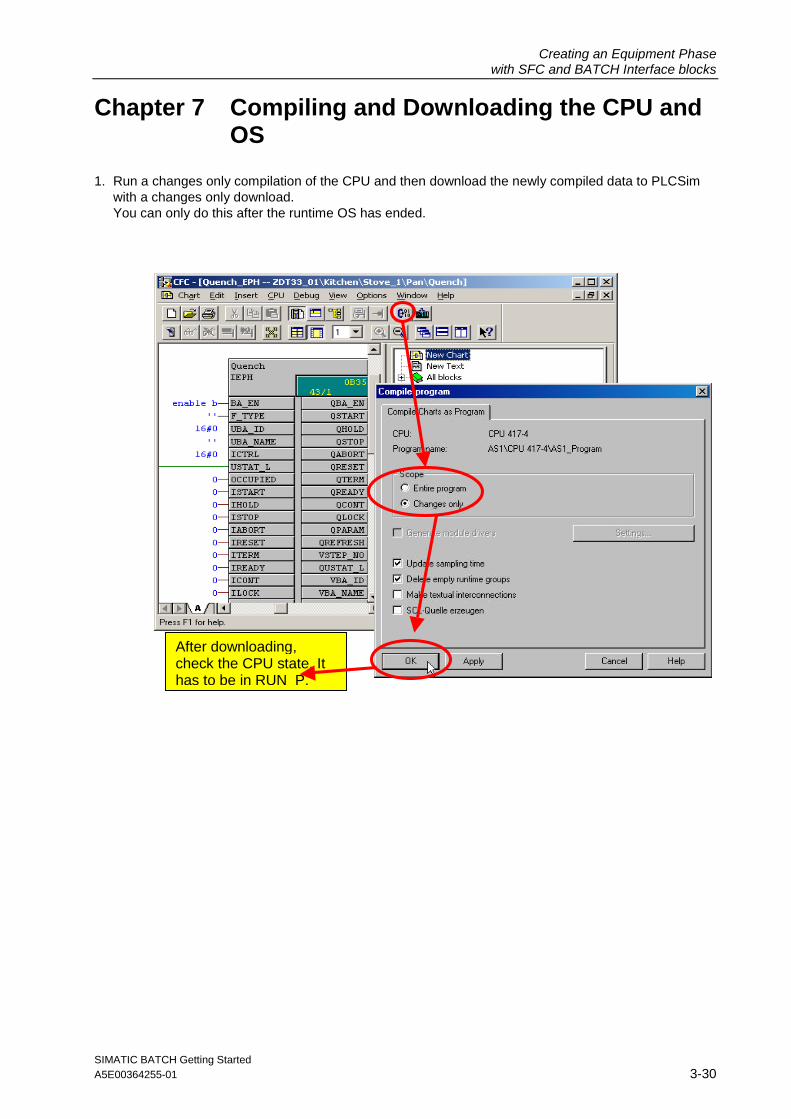
Creating an Equipment Phase with SFC and BATCH Interface blocks
SIMATIC BATCH Getting Started A5E00364255-01 3-30
Chapter 7 Compiling and Downloading the CPU and OS
1. Run a changes only compilation of the CPU and then download the newly compiled data to PLCSim with a changes only download. You can only do this after the runtime OS has ended.
After downloading, check the CPU state. It has to be in RUN_P.

Creating an Equipment Phase with SFC and BATCH Interface blocks
SIMATIC BATCH Getting Started A5E00364255-01 3-31
2. Run a changes only compilation of the OS.
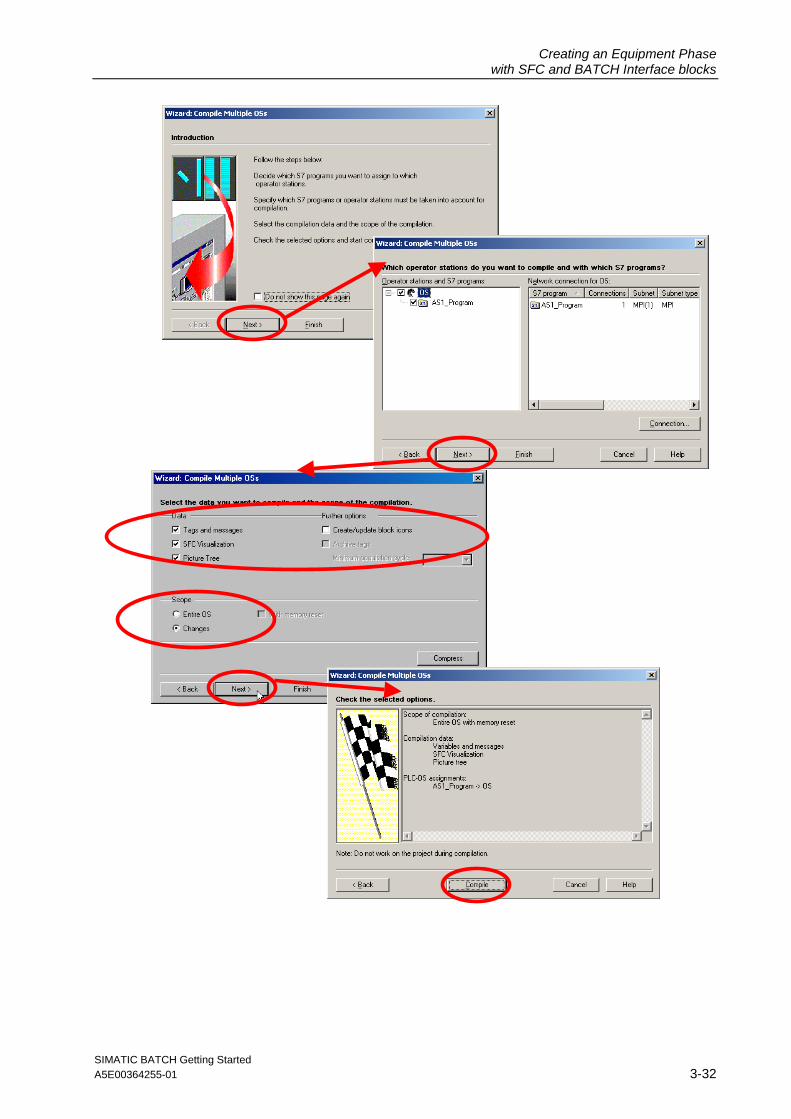
Creating an Equipment Phase with SFC and BATCH Interface blocks
SIMATIC BATCH Getting Started A5E00364255-01 3-32

Creating an Equipment Phase with SFC and BATCH Interface blocks
SIMATIC BATCH Getting Started A5E00364255-01 3-33
Chapter 8 Generating Batch Types
1. Open the “Configure Batch process cell“ dialog in the plant view in your project. Select “Batch types“.
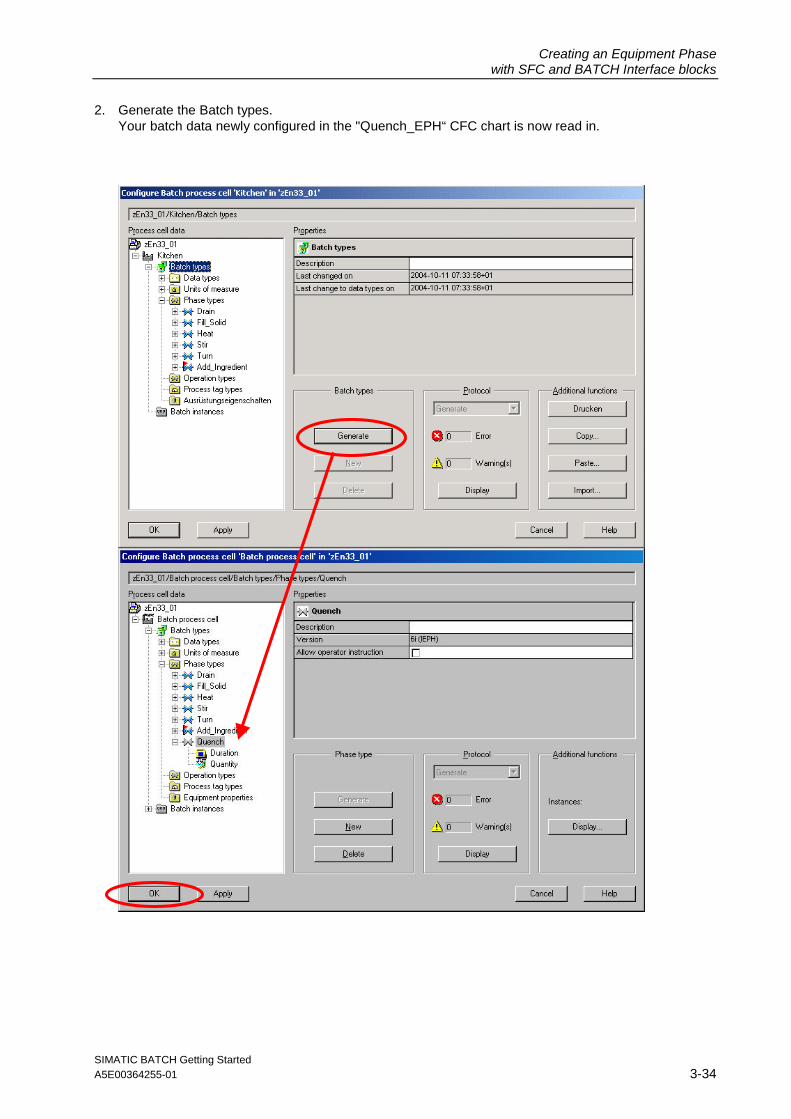
Creating an Equipment Phase with SFC and BATCH Interface blocks
SIMATIC BATCH Getting Started A5E00364255-01 3-34
2. Generate the Batch types. Your batch data newly configured in the "Quench_EPH“ CFC chart is now read in.
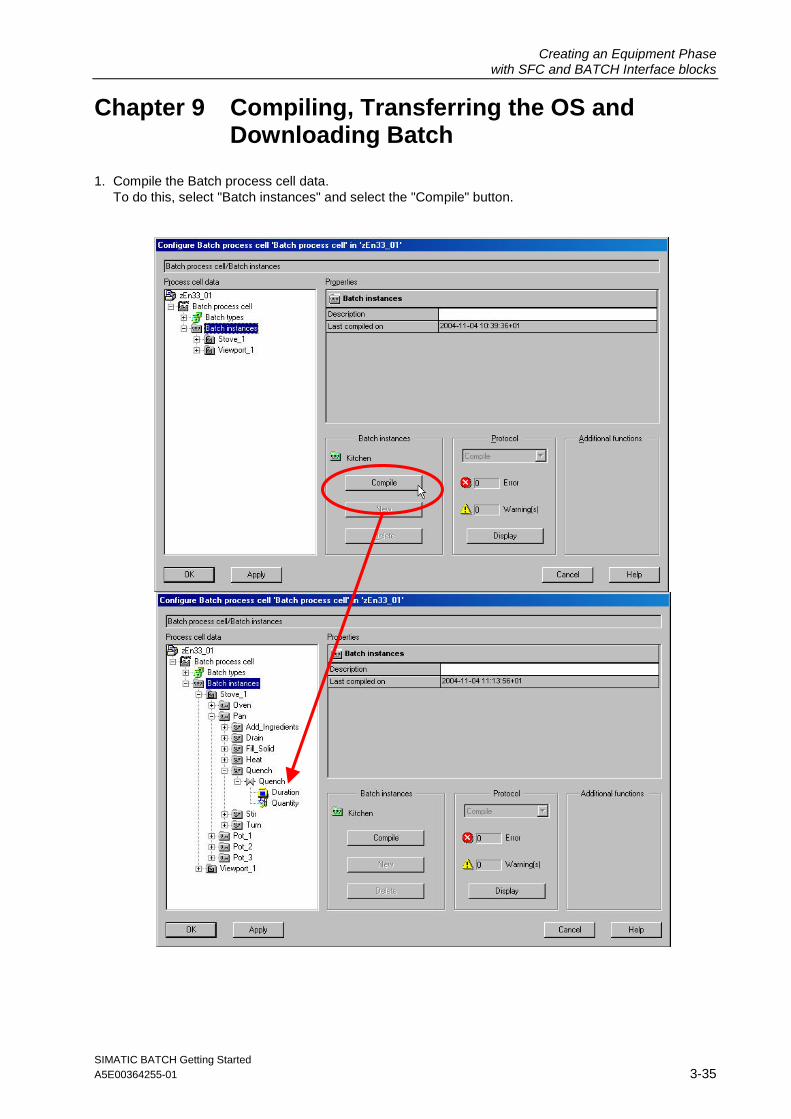
Creating an Equipment Phase with SFC and BATCH Interface blocks
SIMATIC BATCH Getting Started A5E00364255-01 3-35
Chapter 9 Compiling, Transferring the OS and Downloading Batch
1. Compile the Batch process cell data. To do this, select "Batch instances" and select the "Compile" button.

Creating an Equipment Phase with SFC and BATCH Interface blocks
SIMATIC BATCH Getting Started A5E00364255-01 3-36
2. Transfer the Batch process cell data to the OS. To do this, select the Batch process cell (in this case, Kitchen) and click "Transfer to OS”.
Start the transfer in the "Transfer BATCH-relevant data" dialog (WinCC has to first be closed).
3. Close the dialog.
Update the entries. Following this, your computer name is displayed in "Target system".
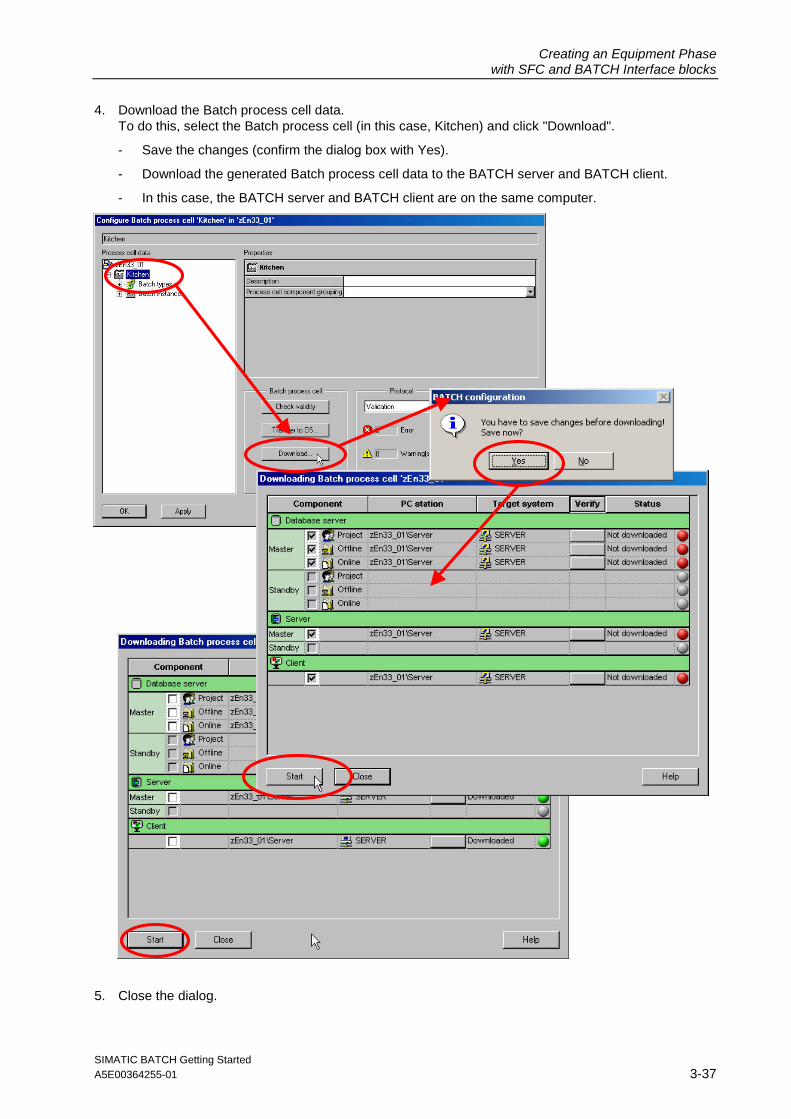
Creating an Equipment Phase with SFC and BATCH Interface blocks
SIMATIC BATCH Getting Started A5E00364255-01 3-37
4. Download the Batch process cell data. To do this, select the Batch process cell (in this case, Kitchen) and click "Download".
- Save the changes (confirm the dialog box with Yes).
- Download the generated Batch process cell data to the BATCH server and BATCH client.
- In this case, the BATCH server and BATCH client are on the same computer.
5. Close the dialog.
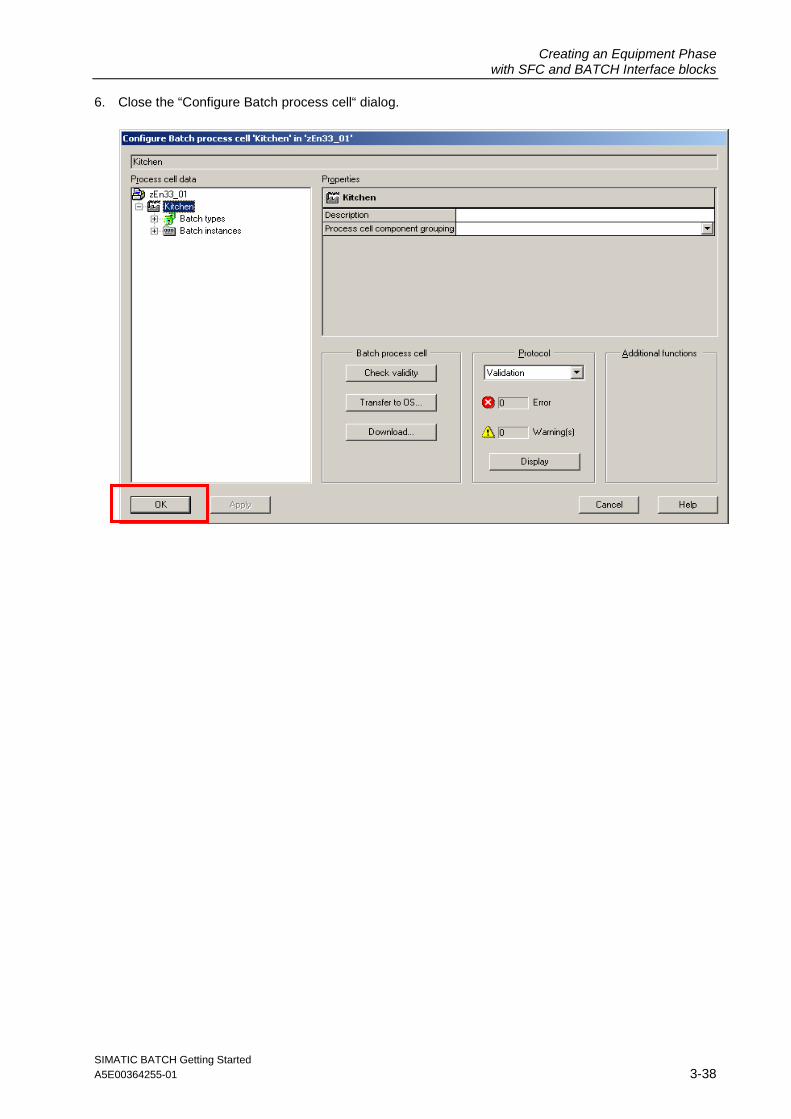
Creating an Equipment Phase with SFC and BATCH Interface blocks
SIMATIC BATCH Getting Started A5E00364255-01 3-38
6. Close the “Configure Batch process cell“ dialog.

Creating an Equipment Phase with SFC and BATCH Interface blocks
SIMATIC BATCH Getting Started A5E00364255-01 3-39
Chapter 10 Expanding the Unit Faceplate in the WinCC Explorer
1. Open the WinCC picture "Kitchen.PDL” from the WinCC Explorer.
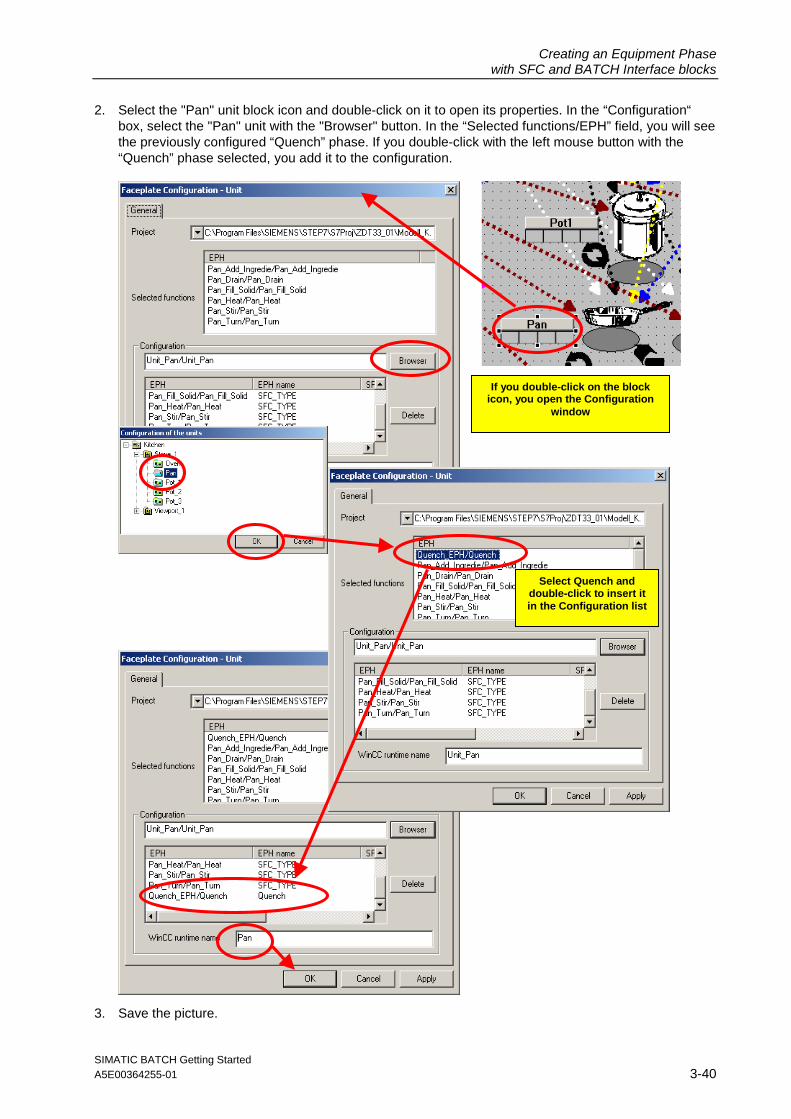
Creating an Equipment Phase with SFC and BATCH Interface blocks
SIMATIC BATCH Getting Started A5E00364255-01 3-40
2. Select the "Pan" unit block icon and double-click on it to open its properties. In the “Configuration“ box, select the "Pan" unit with the "Browser" button. In the “Selected functions/EPH” field, you will see the previously configured “Quench” phase. If you double-click with the left mouse button with the “Quench” phase selected, you add it to the configuration.
3. Save the picture.
If you double-click on the block icon, you open the Configuration
window
Select Quench and double-click to insert it in the Configuration list

Creating an Equipment Phase with SFC and BATCH Interface blocks
SIMATIC BATCH Getting Started A5E00364255-01 3-41
Chapter 11 Expanding a Recipe
1. Start the OS in runtime.
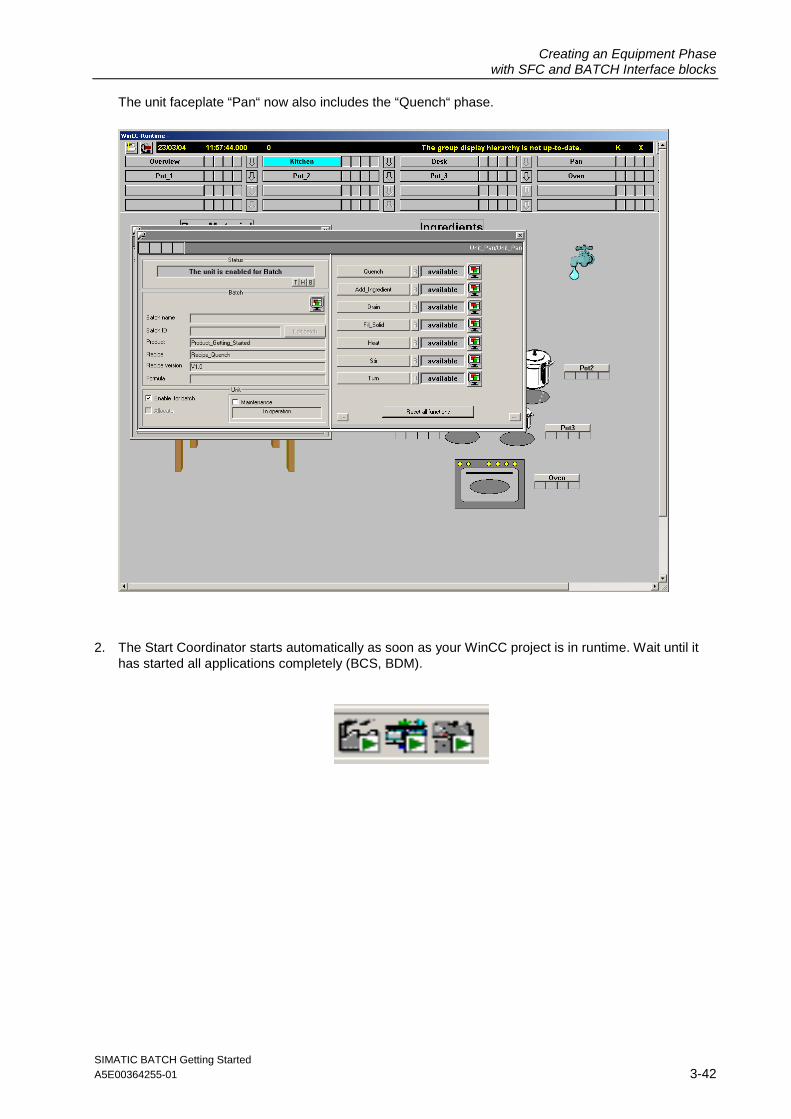
Creating an Equipment Phase with SFC and BATCH Interface blocks
SIMATIC BATCH Getting Started A5E00364255-01 3-42
The unit faceplate “Pan“ now also includes the “Quench“ phase.
2. The Start Coordinator starts automatically as soon as your WinCC project is in runtime. Wait until it has started all applications completely (BCS, BDM).

Creating an Equipment Phase with SFC and BATCH Interface blocks
SIMATIC BATCH Getting Started A5E00364255-01 3-43
3. Start the Batch Control Center and update the newly downloaded Batch process cell data.
After the update, your newly configured “Quench” phase is available for recipe creation.
Depending on the date on which the process cell was created, this window can appear differently.
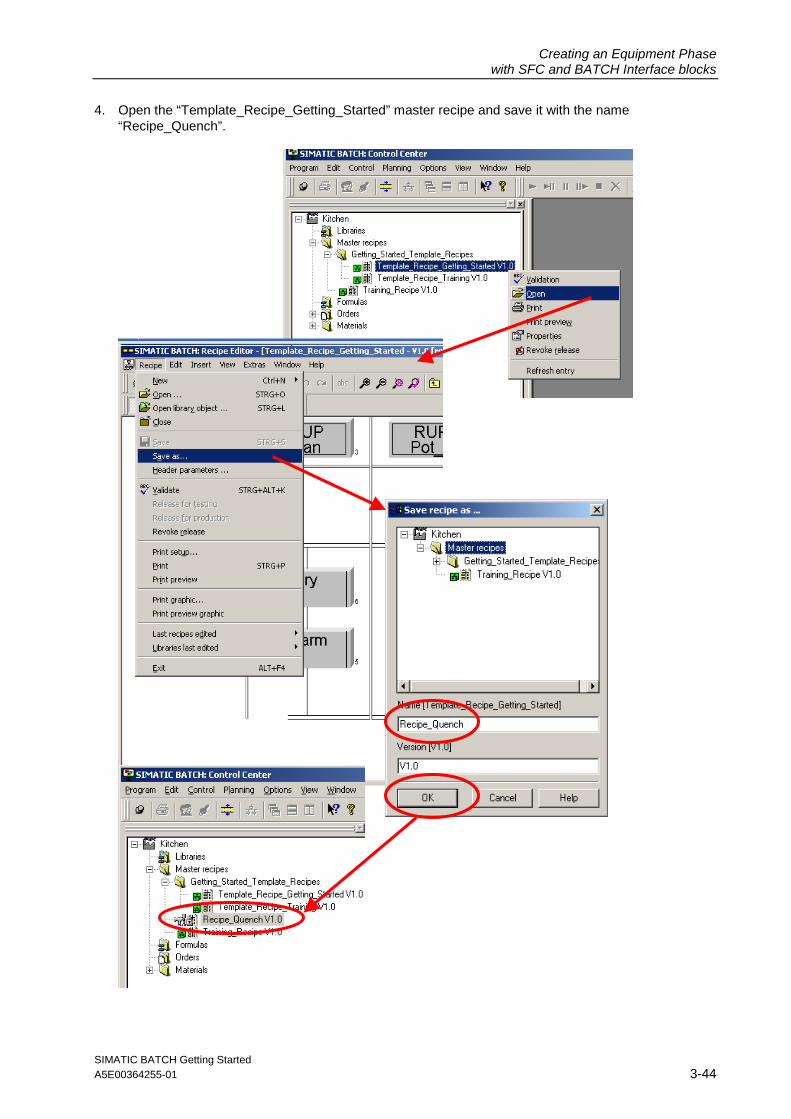
Creating an Equipment Phase with SFC and BATCH Interface blocks
SIMATIC BATCH Getting Started A5E00364255-01 3-44
4. Open the “Template_Recipe_Getting_Started” master recipe and save it with the name “Recipe_Quench”.

Creating an Equipment Phase with SFC and BATCH Interface blocks
SIMATIC BATCH Getting Started A5E00364255-01 3-45
5. In the “Recipe_Quench” recipe you have just created, insert the newly configured “Quench” phase.

Creating an Equipment Phase with SFC and BATCH Interface blocks
SIMATIC BATCH Getting Started A5E00364255-01 3-46
6. Save the recipe and validate it. Then close the Recipe Editor.

Creating an Equipment Phase with SFC and BATCH Interface blocks
SIMATIC BATCH Getting Started A5E00364255-01 3-47
7. Release the recipe for production in BatchCC. Then create a new batch with the “Recipe_Quench“ recipe, then release and start it.
Creating an Equipment Phase with SFC and BATCH Interface blocks
SIMATIC BATCH Getting Started A5E00364255-01 3-48
Creating an Equipment Phase with an SFC Type
SIMATIC BATCH Getting Started A5E00364255-01 4-1
SIMATIC BATCH Getting Started
Part 4
Creating an Equipment Phase with an SFC Type
Creating an Equipment Phase with an SFC Type
SIMATIC BATCH Getting Started A5E00364255-01 4-2
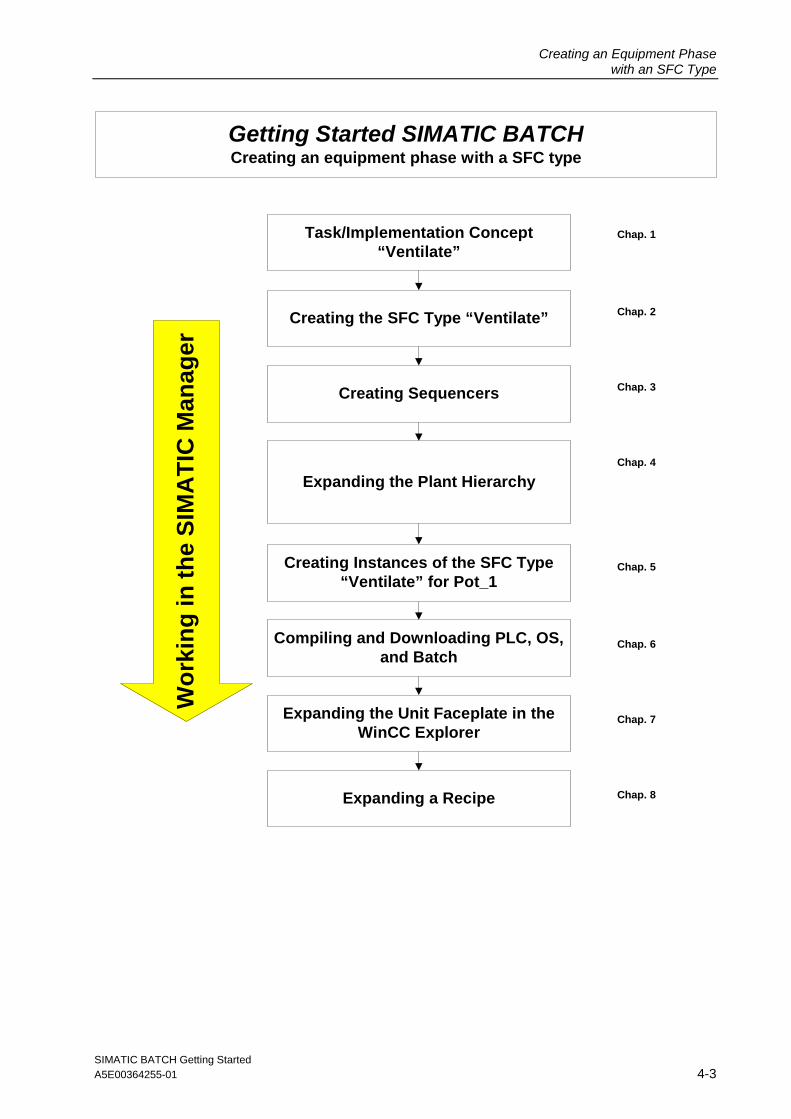
Creating an Equipment Phase with an SFC Type
SIMATIC BATCH Getting Started A5E00364255-01 4-3
Getting Started SIMATIC BATCHCreating an equipment phase with a SFC type
Task/Implementation Concept“Ventilate”
Creating the SFC Type “Ventilate”
Creating Sequencers
Expanding the Plant Hierarchy
Creating Instances of the SFC Type“Ventilate” for Pot_1
Compiling and Downloading PLC, OS,and Batch
Expanding the Unit Faceplate in theWinCC Explorer
Expanding a Recipe
Wo
rkin
g in
th
e S
IMA
TIC
Man
ager
Chap. 1
Chap. 4
Chap. 3
Chap. 2
Chap. 5
Chap. 8
Chap. 7
Chap. 6
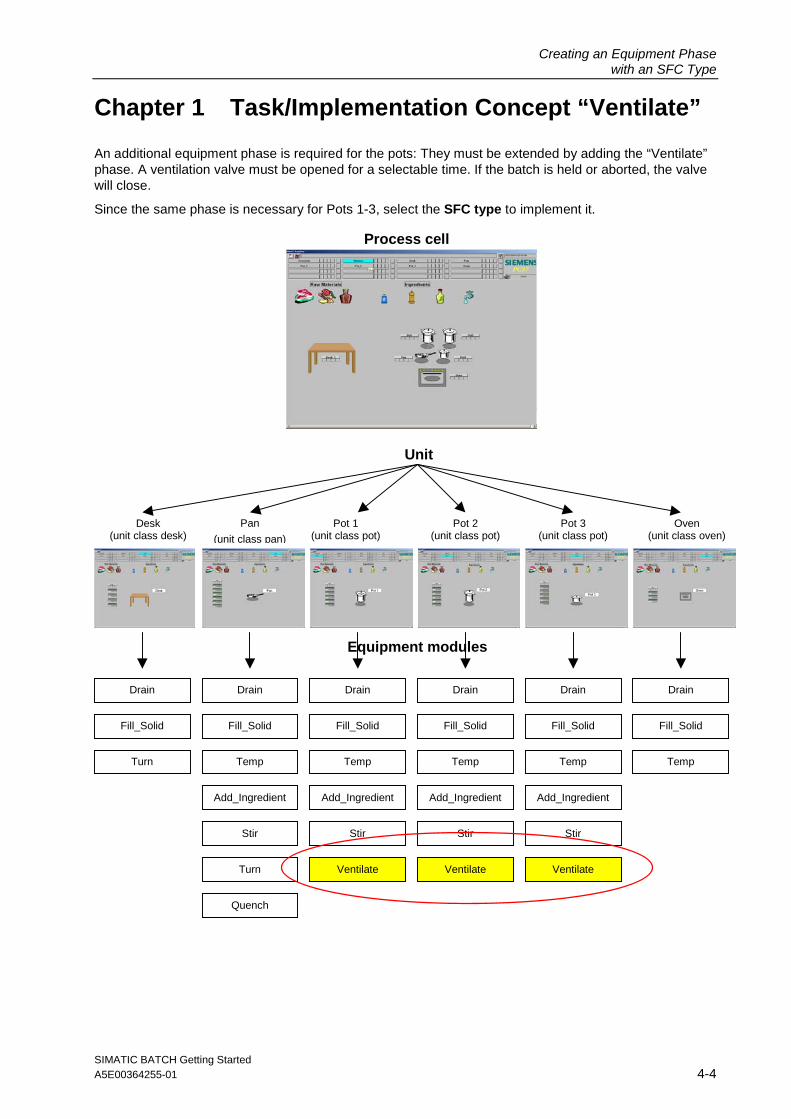
Creating an Equipment Phase with an SFC Type
SIMATIC BATCH Getting Started A5E00364255-01 4-4
Chapter 1 Task/Implementation Concept “Ventilate”
An additional equipment phase is required for the pots: They must be extended by adding the “Ventilate” phase. A ventilation valve must be opened for a selectable time. If the batch is held or aborted, the valve will close.
Since the same phase is necessary for Pots 1-3, select the SFC type to implement it.
Ventilate
Ventilate
Ventilate
Process cell
Drain
Fill_Solid
Turn
Drain
Fill_Solid
Temp
Add_Ingredient
Stir
Turn
Drain
Fill_Solid
Temp
Add_Ingredient
Stir
Drain
Fill_Solid
Temp
Add_Ingredient
Stir
Drain
Fill_Solid
Temp
Add_Ingredient
Stir
Drain
Fill_Solid
Temp
Unit
Equipment modules
Desk (unit class desk)
Pan
(unit class pan) Pot 1
(unit class pot) Pot 2
(unit class pot) Pot 3
(unit class pot) Oven
(unit class oven)
Quench

Creating an Equipment Phase with an SFC Type
SIMATIC BATCH Getting Started A5E00364255-01 4-5
Implementation Concept for SFC Type “Ventilate” Control strategies
Control strategy name Comment
Ventilate First control strategy, QCS=1
Setpoints
Setpoint name Data type Comment
Duration real Unit of measure seconds
Process values
Process value name Data type Comment
none
Times
Name Data type Comment
T_Leng Time Timer for setpoint “Duration”, Mode=1
Block contacts
Block name Block Comment
V1 VALVE Ventilation valve
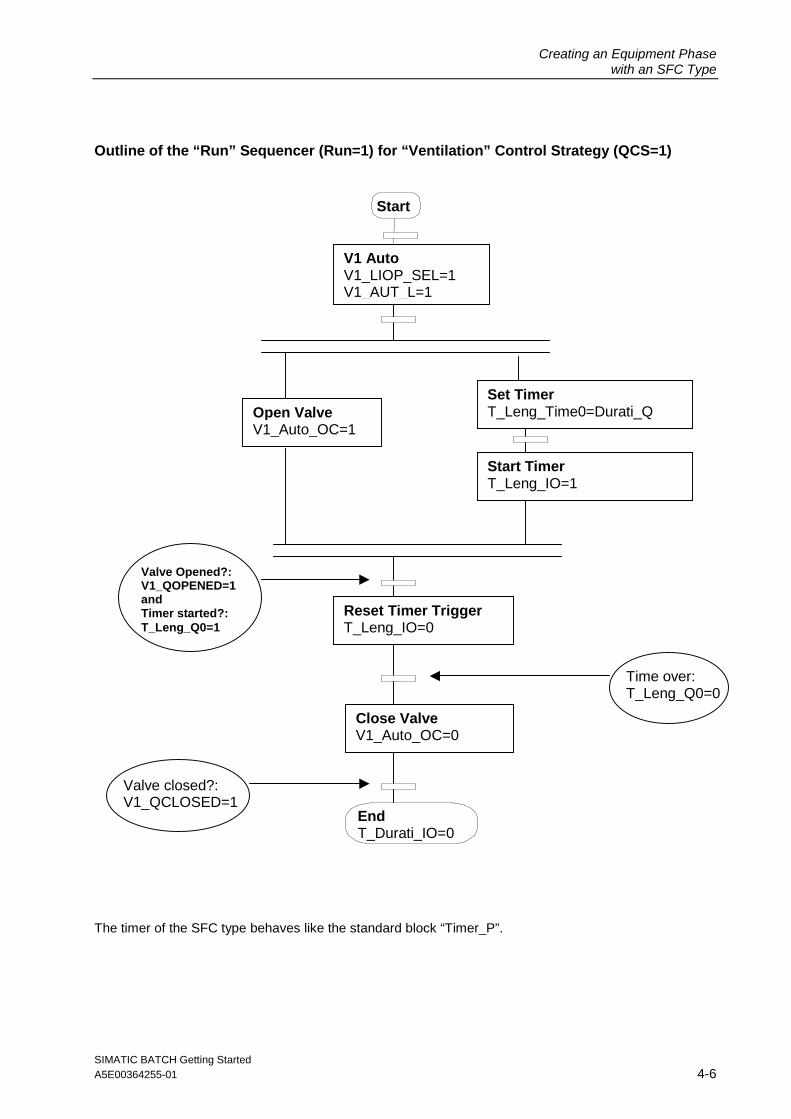
Creating an Equipment Phase with an SFC Type
SIMATIC BATCH Getting Started A5E00364255-01 4-6
Outline of the “Run” Sequencer (Run=1) for “Ventilation” Control Strategy (QCS=1) The timer of the SFC type behaves like the standard block “Timer_P”.
Start
End T_Durati_IO=0
V1 Auto V1_LIOP_SEL=1 V1_AUT_L=1
Set Timer T_Leng_Time0=Durati_Q
Start Timer T_Leng_IO=1
Open Valve V1_Auto_OC=1
Valve Opened?: V1_QOPENED=1 and Timer started?: T_Leng_Q0=1
Reset Timer Trigger T_Leng_IO=0
Valve closed?: V1_QCLOSED=1
Close Valve V1_Auto_OC=0
Time over: T_Leng_Q0=0

Creating an Equipment Phase with an SFC Type
SIMATIC BATCH Getting Started A5E00364255-01 4-7
Outline of the “Hold/Abort/Complete” Sequencer (Holding=1 or Aborting=1 or Completing=1)
Start
END
Close Valve V1_Auto_OC=0
Valve closed?: V1_QCLOSED=1

Creating an Equipment Phase with an SFC Type
SIMATIC BATCH Getting Started A5E00364255-01 4-8
Chapter 2 Creating the SFC Type “Ventilate”
1. Open the component view and insert the new SFC type “Ventilate”.
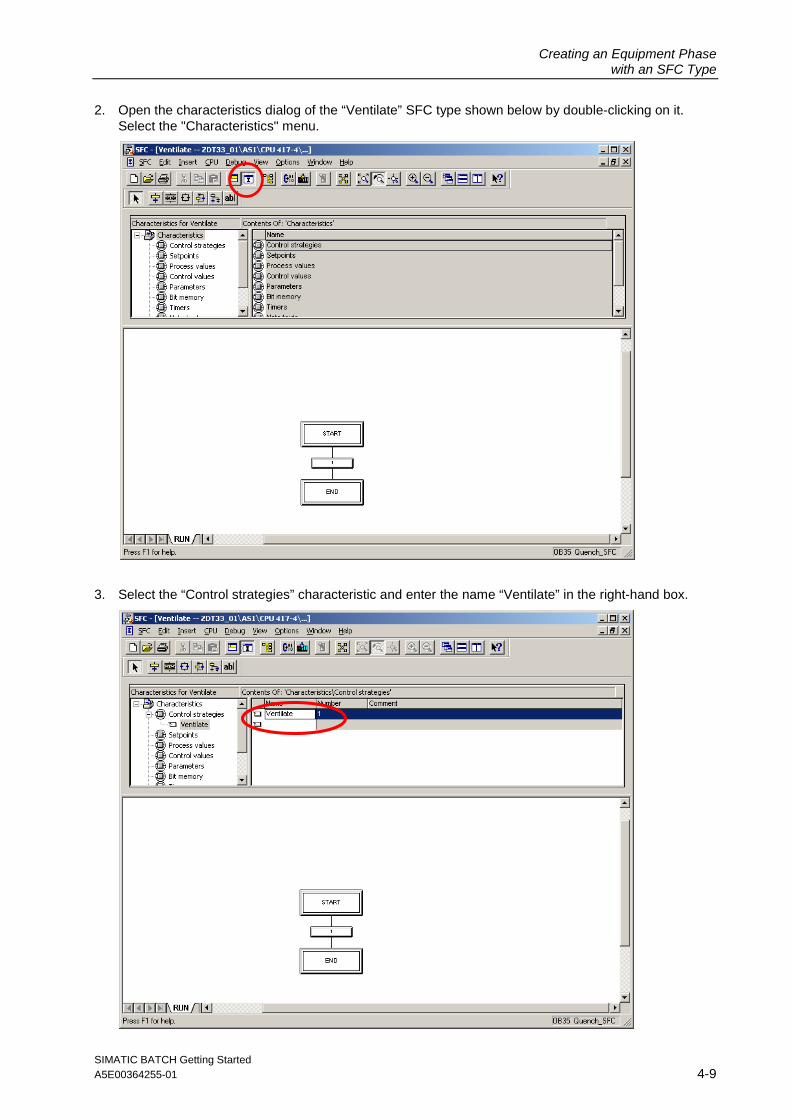
Creating an Equipment Phase with an SFC Type
SIMATIC BATCH Getting Started A5E00364255-01 4-9
2. Open the characteristics dialog of the “Ventilate” SFC type shown below by double-clicking on it. Select the "Characteristics" menu.
3. Select the “Control strategies” characteristic and enter the name “Ventilate” in the right-hand box.

Creating an Equipment Phase with an SFC Type
SIMATIC BATCH Getting Started A5E00364255-01 4-10
4. Now select the “Setpoints” characteristic and enter the setpoint name “Duration” in the right-hand field. Select “REAL” as the data type for duration. Enter "sec" as the unit of measure for duration.

Creating an Equipment Phase with an SFC Type
SIMATIC BATCH Getting Started A5E00364255-01 4-11
5. In the next step, we will define the timer. Select the “Timers” characteristic. In the right-hand field, enter the name “T_Length”. The timers that can be used in this way within SFC types, behave like the standard block “Timer_P” from the PCS 7 library.

Creating an Equipment Phase with an SFC Type
SIMATIC BATCH Getting Started A5E00364255-01 4-12
6. In the final step, we will create the valve. Select the “Block contacts” characteristic and enter the name “V1” in the right-hand field. Select the corresponding block types in the “Block” column. In our case, the block type is “VALVE”.
We have now specified all the characteristics required for the “Ventilate” example. The sequencers now have to be created and configured.
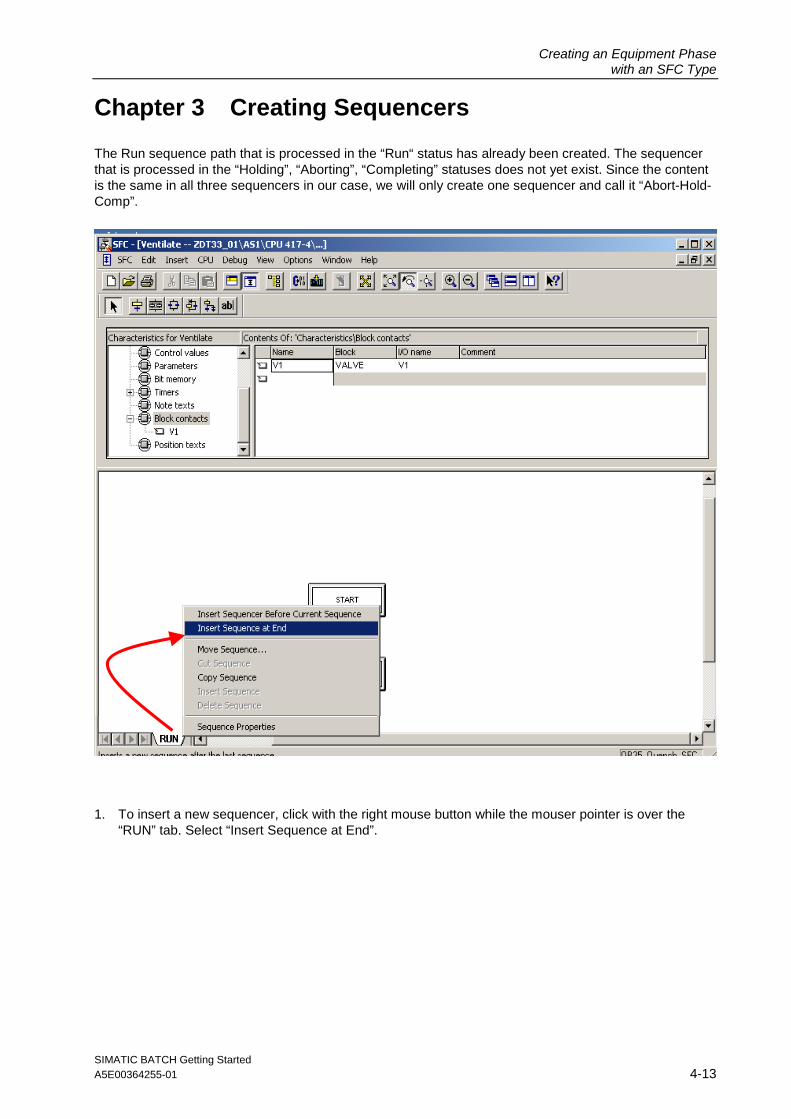
Creating an Equipment Phase with an SFC Type
SIMATIC BATCH Getting Started A5E00364255-01 4-13
Chapter 3 Creating Sequencers
The Run sequence path that is processed in the “Run“ status has already been created. The sequencer that is processed in the “Holding”, “Aborting”, “Completing” statuses does not yet exist. Since the content is the same in all three sequencers in our case, we will only create one sequencer and call it “Abort-Hold-Comp”.
1. To insert a new sequencer, click with the right mouse button while the mouser pointer is over the “RUN” tab. Select “Insert Sequence at End”.

Creating an Equipment Phase with an SFC Type
SIMATIC BATCH Getting Started A5E00364255-01 4-14
2. A new tab is created called “SEQ1”. Set the properties for SEQ1. In the general properties, enter the name Abort-Hold-Comp.
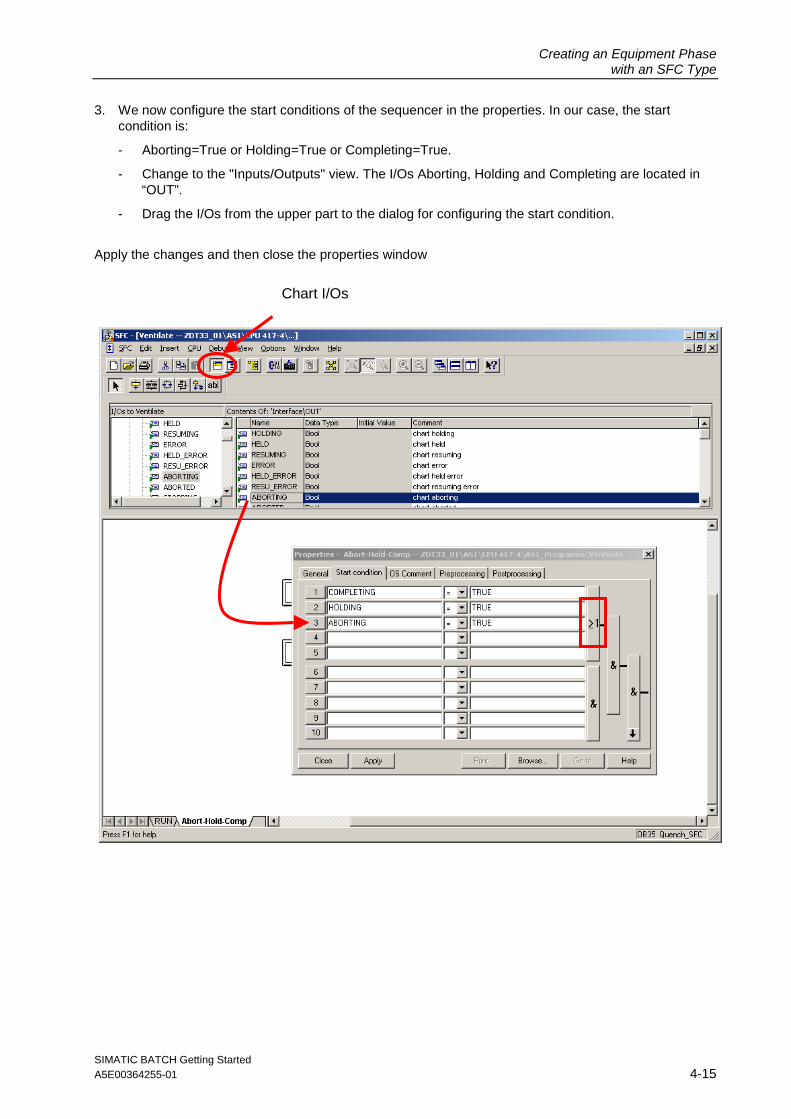
Creating an Equipment Phase with an SFC Type
SIMATIC BATCH Getting Started A5E00364255-01 4-15
3. We now configure the start conditions of the sequencer in the properties. In our case, the start condition is:
- Aborting=True or Holding=True or Completing=True.
- Change to the "Inputs/Outputs" view. The I/Os Aborting, Holding and Completing are located in “OUT”.
- Drag the I/Os from the upper part to the dialog for configuring the start condition.
Apply the changes and then close the properties window
Chart I/Os

Creating an Equipment Phase with an SFC Type
SIMATIC BATCH Getting Started A5E00364255-01 4-16
4. The next step is to configure the sequence of the “RUN“ sequencer.
Remain in the "Inputs/Outputs" view.
In the left-hand part of the window, you will see the I/Os of the SFC type “Ventilate” grouped according to inputs, outputs and in_outs. In the right-hand part, you see the list of corresponding I/Os.
The control outputs for the V1 valve or the T_Leng timer are located in “OUT”.
The feedback messages of the V1 valve are created in “IN”.

Creating an Equipment Phase with an SFC Type
SIMATIC BATCH Getting Started A5E00364255-01 4-17
5. Drag the I/Os from the upper part to the dialog for configuring the steps/transitions. The Run and the Abort-Hold-Complete sequencer are structured as shown in Chapter 1.
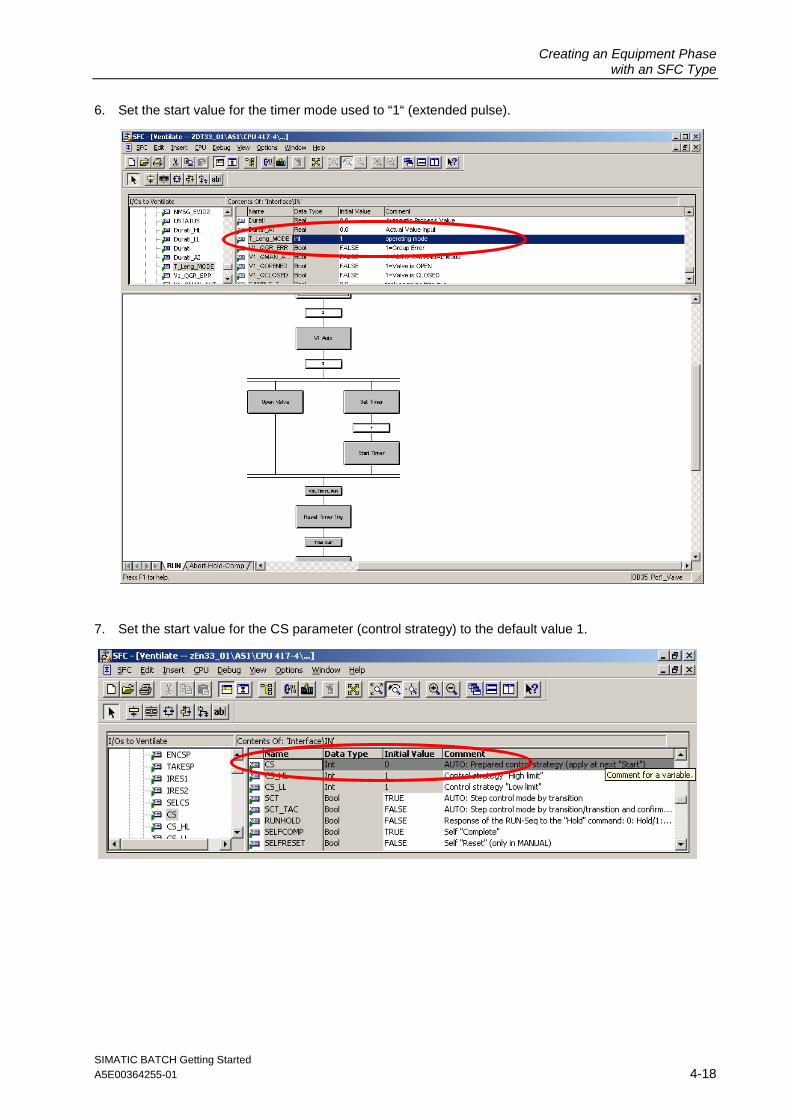
Creating an Equipment Phase with an SFC Type
SIMATIC BATCH Getting Started A5E00364255-01 4-18
6. Set the start value for the timer mode used to “1“ (extended pulse).
7. Set the start value for the CS parameter (control strategy) to the default value 1.
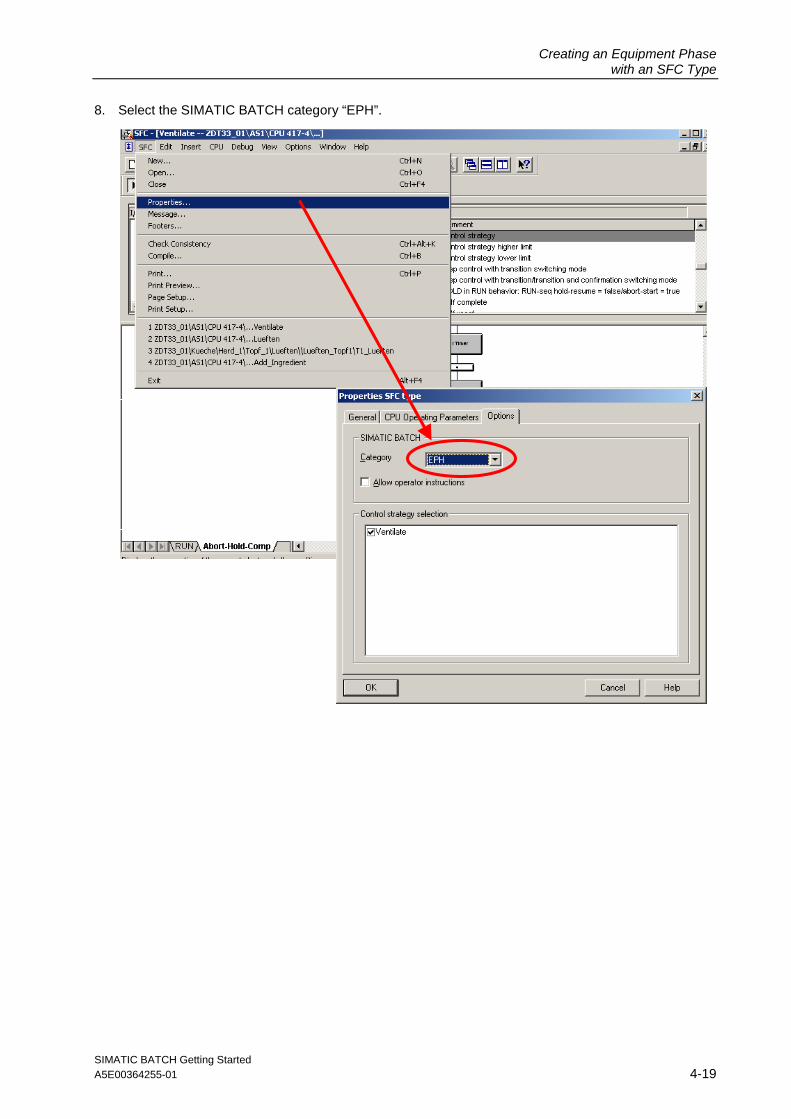
Creating an Equipment Phase with an SFC Type
SIMATIC BATCH Getting Started A5E00364255-01 4-19
8. Select the SIMATIC BATCH category “EPH”.

Creating an Equipment Phase with an SFC Type
SIMATIC BATCH Getting Started A5E00364255-01 4-20
9. Set the CPU operating parameter to “Auto“ as the default mode. This completes all the steps for configuring the “Ventilate” type.
10. Exit the SFC Editor.

Creating an Equipment Phase with an SFC Type
SIMATIC BATCH Getting Started A5E00364255-01 4-21
Chapter 4 Expanding the Plant Hierarchy
1. Open the plant view of the project in the SIMATIC Manager. We want to insert a new equipment phase "Ventilate" for Pot_1. Create a new hierarchy folder. Call the folder “Ventilate”.
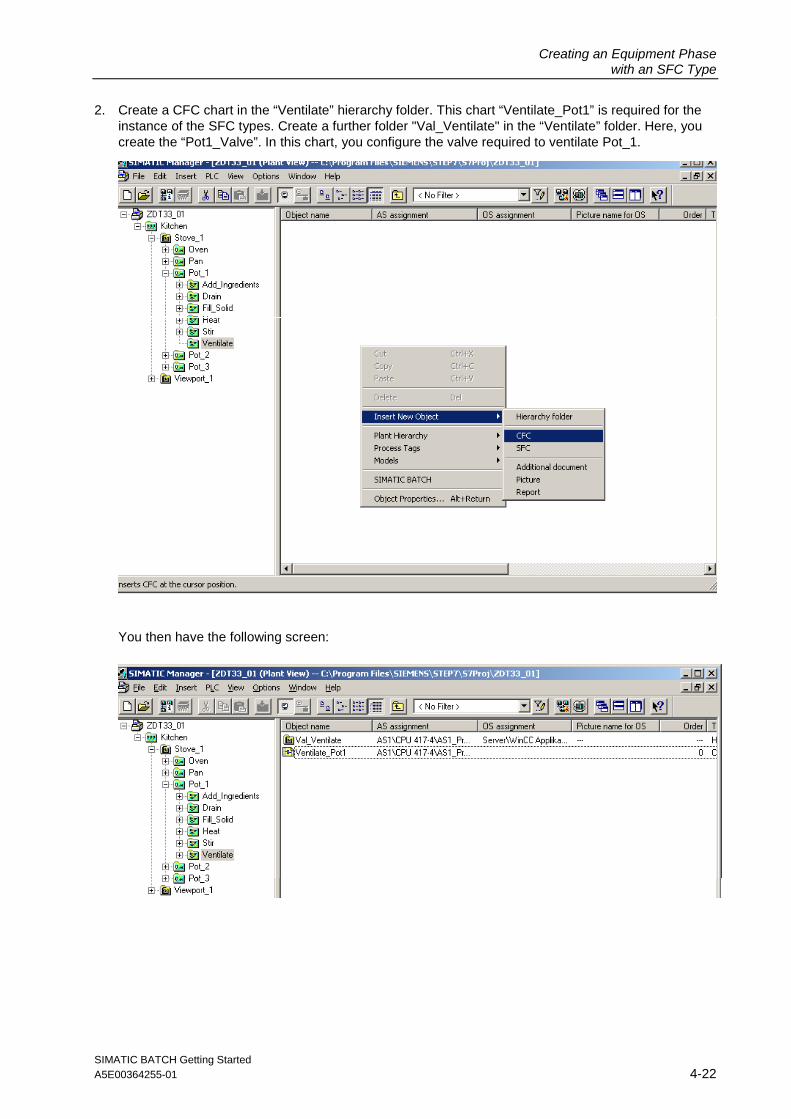
Creating an Equipment Phase with an SFC Type
SIMATIC BATCH Getting Started A5E00364255-01 4-22
2. Create a CFC chart in the “Ventilate” hierarchy folder. This chart “Ventilate_Pot1” is required for the instance of the SFC types. Create a further folder "Val_Ventilate" in the “Ventilate” folder. Here, you create the “Pot1_Valve”. In this chart, you configure the valve required to ventilate Pot_1.
You then have the following screen:

Creating an Equipment Phase with an SFC Type
SIMATIC BATCH Getting Started A5E00364255-01 4-23
3. Create the “Pot1_Valve” chart.
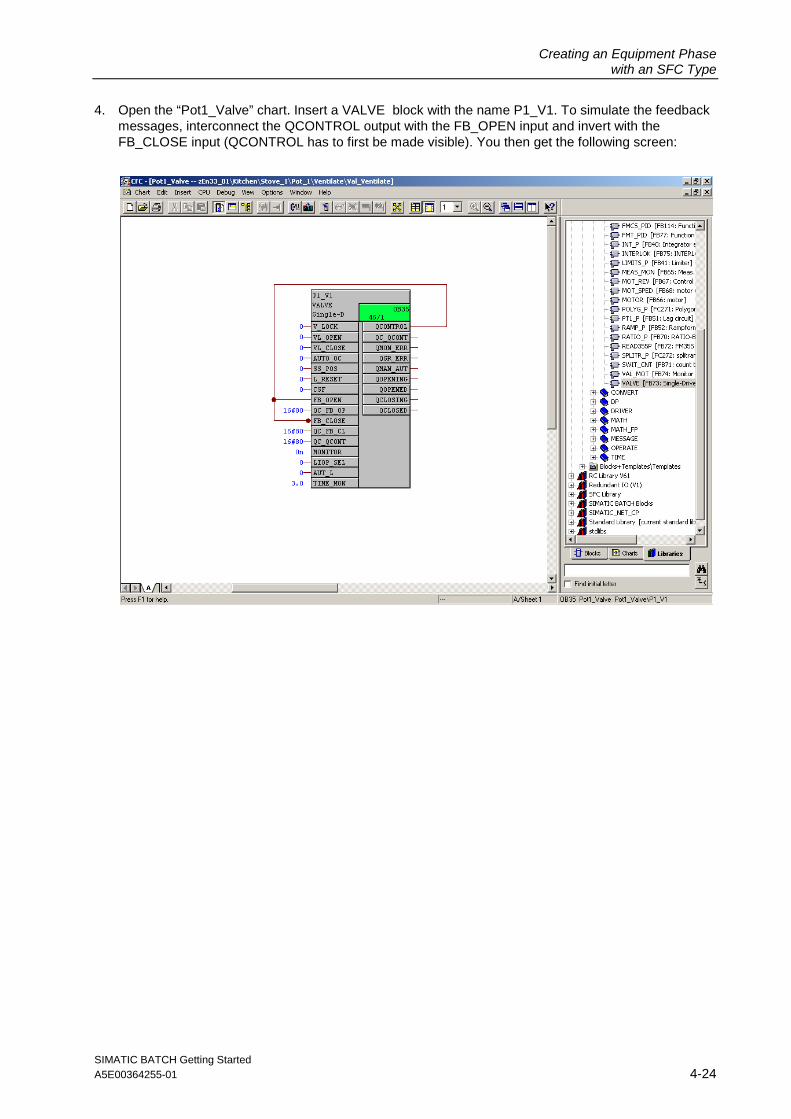
Creating an Equipment Phase with an SFC Type
SIMATIC BATCH Getting Started A5E00364255-01 4-24
4. Open the “Pot1_Valve” chart. Insert a VALVE block with the name P1_V1. To simulate the feedback messages, interconnect the QCONTROL output with the FB_OPEN input and invert with the FB_CLOSE input (QCONTROL has to first be made visible). You then get the following screen:

Creating an Equipment Phase with an SFC Type
SIMATIC BATCH Getting Started A5E00364255-01 4-25
Chapter 5 Creating Instances of the SFC Type “Ventilate” for Pot_1
1. Open the chart “Ventilate_Pot1“. You will find the previously created type in Catalog/Blocks/Other blocks. Insert a block with the name “T1_Ventilate“ of the type “Ventilate” in the chart.
You then get the following screen:

Creating an Equipment Phase with an SFC Type
SIMATIC BATCH Getting Started A5E00364255-01 4-26
2. Now open the chart “Pot1_Valve” as well and arrange the two windows side by side as shown below.
Creating an Equipment Phase with an SFC Type
SIMATIC BATCH Getting Started A5E00364255-01 4-27
3. The valve T1_V1 now has to be interconnected with T1_Ventilate.
- Select the V1_AUTO_OC output of T1_Ventilate. Select the corresponding valve input AUTO_OC of the valve P1_V1. All the relevant interconnections to the valve are now created automatically (eight in total).
- So that all the batch-relevant information that SIMATIC BATCH writes to the block instance of “Ventilate“ also arrives at the corresponding valve, the batch-relevant outputs (five) also have to be interconnected with the valve. First, the following parameters have to be made visible:
- On the valve P1_V1:
BA_EN, BA_ID, BA_NA, STEP_NO,OCCUPIED
- On the “Ventilate“ T1_Ventilate phase:
QBA_EN, QBA_ID, QBA_NA, QSTEP_NO, QOCCUPIED
- Interconnect the five outputs of T1_Ventilate (QBA_EN, QBA_ID, QBA_NA, QSTEP_NO, QOCCUPIED) with the corresponding inputs of the valve P1_V1 (BA_EN, BA_ID, BA_NA, STEP_NO,OCCUPIED).
- Interconnect the output “T_Leng_PTIME“ with the input “Duration_AI“. This is important for the displaying in the OS faceplate and for reading the process values with SIMATIC BATCH. The process value input on “T1_Ventilate“ is called “Duration_AI” (Actual Value Input).
- Check the interconnection based on the following screen.

Creating an Equipment Phase with an SFC Type
SIMATIC BATCH Getting Started A5E00364255-01 4-28

Creating an Equipment Phase with an SFC Type
SIMATIC BATCH Getting Started A5E00364255-01 4-29
Chapter 6 Compiling and Downloading PLC, OS, and Batch
Run a changes only compilation of the CPU and then download the newly compiled data to PLCSim with a "changes only" download.
Note:
You can only do this after the runtime OS has ended.
Then run a changes only compilation of the OS.
Open the “Configure Batch process cell“ dialog in the plant view in your project. Select “Batch types“. Generate the Batch types, compile and download the process cell.
Follow the steps as described in Chapters 7 through 9 in Part 3.

Creating an Equipment Phase with an SFC Type
SIMATIC BATCH Getting Started A5E00364255-01 4-30
Chapter 7 Expanding the Unit Faceplate in the WinCC Explorer
1. Open the WinCC picture "Kitchen.pdl" from the WinCC Explorer.
2. Select the unit block icon “Pot1“ and double-click on it to open its properties.
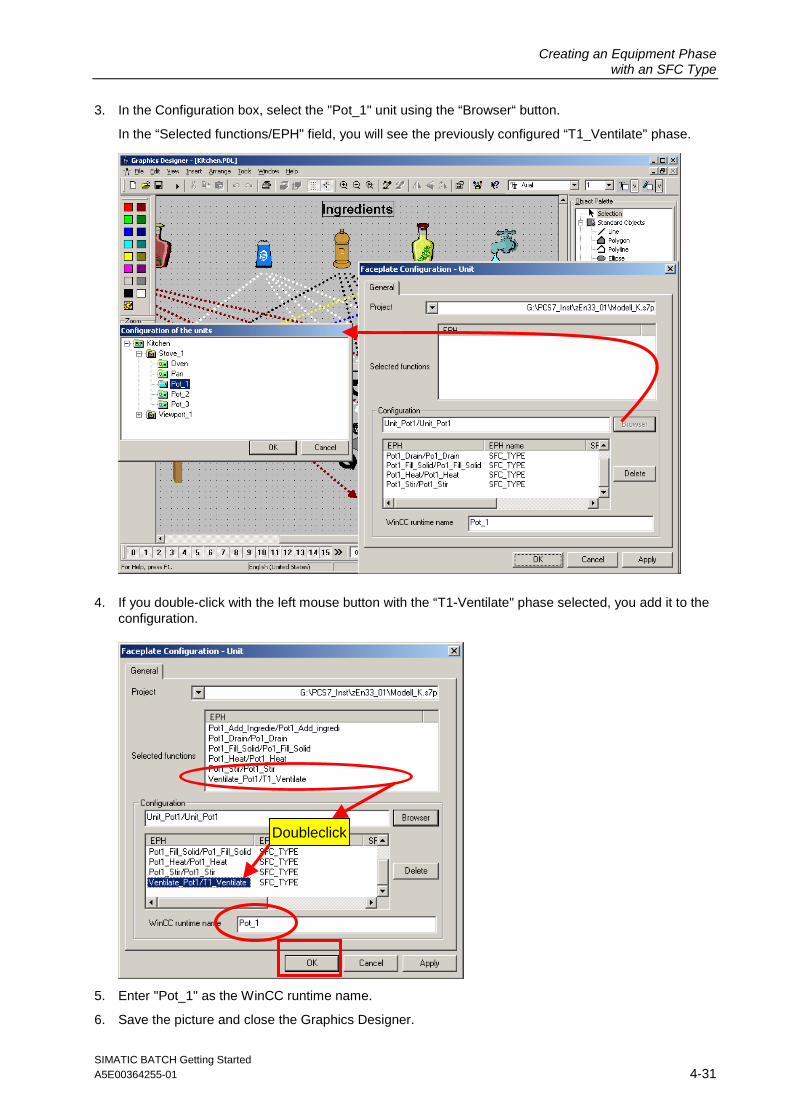
Creating an Equipment Phase with an SFC Type
SIMATIC BATCH Getting Started A5E00364255-01 4-31
3. In the Configuration box, select the "Pot_1" unit using the “Browser“ button.
In the “Selected functions/EPH" field, you will see the previously configured “T1_Ventilate" phase.
4. If you double-click with the left mouse button with the “T1-Ventilate" phase selected, you add it to the configuration.
5. Enter "Pot_1" as the WinCC runtime name.
6. Save the picture and close the Graphics Designer.
Doubleclick

Creating an Equipment Phase with an SFC Type
SIMATIC BATCH Getting Started A5E00364255-01 4-32
Chapter 8 Expanding a Recipe
1. Start the OS in runtime.
2. The Start Coordinator starts automatically as soon as your WinCC project is in runtime. Wait until it has started all applications completely (BCS, BDM).
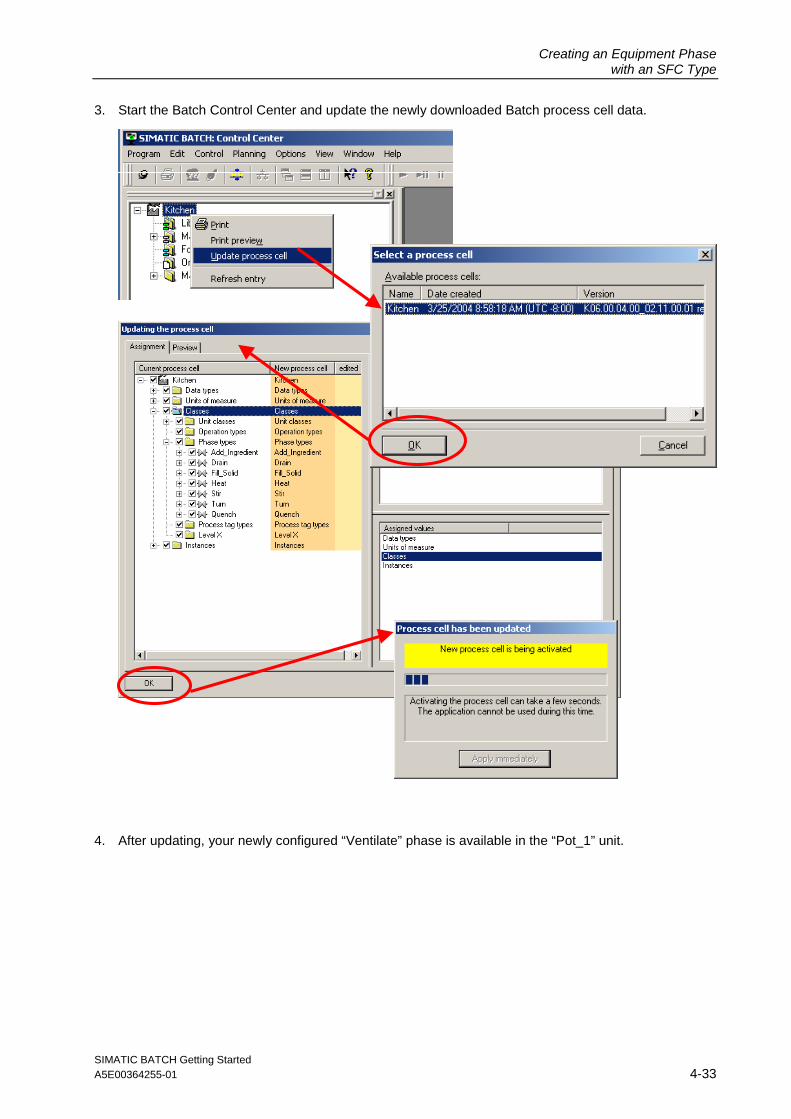
Creating an Equipment Phase with an SFC Type
SIMATIC BATCH Getting Started A5E00364255-01 4-33
3. Start the Batch Control Center and update the newly downloaded Batch process cell data.
4. After updating, your newly configured “Ventilate” phase is available in the “Pot_1” unit.

Creating an Equipment Phase with an SFC Type
SIMATIC BATCH Getting Started A5E00364255-01 4-34
5. Open the “Template_Recipe_Getting_Started” master recipe and save it with the name “Recipe_Ventilate”.
Note:
If you cannot modify the recipe, select the option "Allow editing of recipes in the "Release revoked" status in Options - Settings in the Batch Control Center.

Creating an Equipment Phase with an SFC Type
SIMATIC BATCH Getting Started A5E00364255-01 4-35
6. Open “the “Recipe_Ventilate” recipe you have just created and insert the newly configured “Ventilate” phase in the recipe.

Creating an Equipment Phase with an SFC Type
SIMATIC BATCH Getting Started A5E00364255-01 4-36
7. Save the recipe and validate it. Then close the Recipe Editor.

Creating an Equipment Phase with an SFC Type
SIMATIC BATCH Getting Started A5E00364255-01 4-37
8. Release the recipe for production in BatchCC. Then create a new batch with the “Recipe_Ventilate“ recipe, then release and start it.

Creating an Equipment Phase with an SFC Type
SIMATIC BATCH Getting Started A5E00364255-01 4-38