single station waterproof timer installation and ... · i single station waterproof timer...
TRANSCRIPT

i
Single Station Waterproof TimerInstallation and Programming GuideSingle Station Waterproof TimerInstallation and Programming Guide
Features• Up to four irrigation cycles per day
• Easy installation and programming
• Battery powered
• Waterproof and weather resistant
71 2 3 4 5 6SS M T W T F
1234AMPM24
Part No.: 53887

iiii
Table of ContentsParts Identification ................................................................................................................ 1Battery Installation ................................................................................................................ 2Attaching the SST to a Valve ................................................................................................. 3LCD Display Overview ......................................................................................................... 4Programming the SST ........................................................................................................... 5AM/PM or 24-Hour .............................................................................................................. 5Set Clock ............................................................................................................................... 6Set Current Day .................................................................................................................... 6Set Run Time ........................................................................................................................ 7Set Start Time ....................................................................................................................... 7Set Watering Days ................................................................................................................ 8Off Mode .............................................................................................................................. 9Sleep Mode ........................................................................................................................... 9Manual Operation ................................................................................................................ 10Stopping the Current Irrigation Cycle .................................................................................. 10Installing a Rain Sensor ........................................................................................................ 11The Reset Button .................................................................................................................. 12Troubleshooting Guide ......................................................................................................... 13
1
11
22
33
55
44
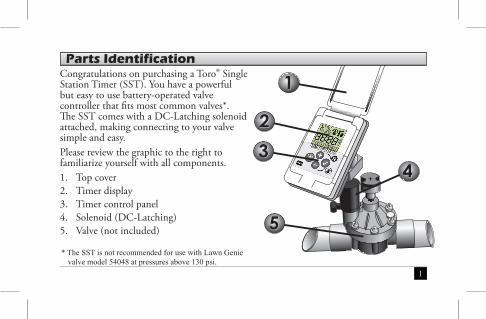
Parts IdentificationCongratulations on purchasing a Toro® Single Station Timer (SST). You have a powerful but easy to use battery-operated valve controller that fits most common valves*. The SST comes with a DC-Latching solenoid attached, making connecting to your valve simple and easy.Please review the graphic to the right to familiarize yourself with all components.1. Top cover2. Timer display3. Timer control panel4. Solenoid (DC-Latching)5. Valve (not included)
* The SST is not recommended for use with Lawn Genie valve model 54048 at pressures above 130 psi.
2
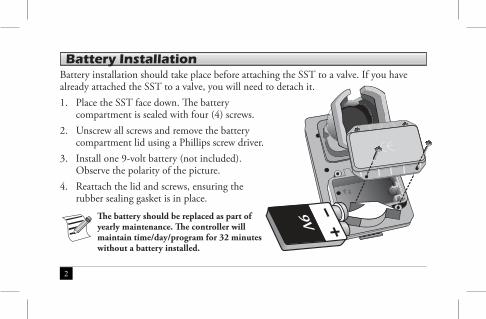
Battery InstallationBattery installation should take place before attaching the SST to a valve. If you have already attached the SST to a valve, you will need to detach it.1. Place the SST face down. The battery
compartment is sealed with four (4) screws.2. Unscrew all screws and remove the battery
compartment lid using a Phillips screw driver.3. Install one 9-volt battery (not included).
Observe the polarity of the picture.4. Reattach the lid and screws, ensuring the
rubber sealing gasket is in place.
The battery should be replaced as part of yearly maintenance. The controller will maintain time/day/program for 32 minutes without a battery installed.
9V

3
* The included DC-latching solenoid is not compatible with Hunter® brand valves. Use of the SST with Hunter valves requires a Hunter DC-latching solenoid (sold separately).Hunter is a trademark of Hunter Industries.
Attaching the SST to a ValveThe SST includes a pre-wired DC-latching solenoid*. The existing solenoid on your valve is not necessary. Follow the directions below to attach the SST to your valve:1. Turn water off to the valve.2. Unscrew the existing solenoid
and discard.3. Screw in the included adapter
(if necessary) (Figure 1).4. Screw the Toro solenoid onto
the adapter (Figure 1).5. Mount the SST onto the
solenoid (Figure 2).6. Turn water back on.
Figure 1 Figure 2

4
LCD Overview1. Low battery indicator. If the icon is flashing, the battery is low and should be
changed. If the icon is solid, the controller will not operate. Replace the battery.2. Set current time indicator3. Digital display. Shows the current time
or run-time during programming.4. Day of week indicator5. Start time of the program indicated6. Indicates if the controller is OFF (solid)
or rain sensor delay is active (flashing) 7. Active irrigation icon8. Manual program indicator9. Active start time (There are four available start times.) 10. Clock format (12 or 24 hour)
71 2 3 4 5 6
1234AMPM24
11
33
22
4410
665577
99
88
5
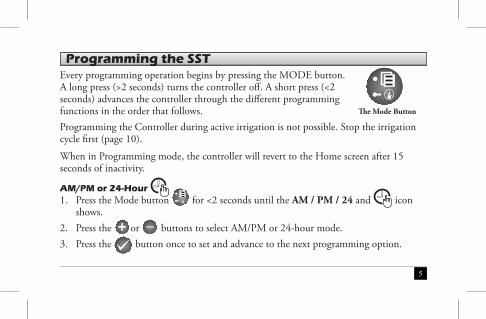
Programming the SSTEvery programming operation begins by pressing the MODE button. A long press (>2 seconds) turns the controller off. A short press (<2 seconds) advances the controller through the different programming functions in the order that follows.Programming the Controller during active irrigation is not possible. Stop the irrigation cycle first (page 10).
When in Programming mode, the controller will revert to the Home screen after 15 seconds of inactivity.
AM/PM or 24-Hour 1. Press the Mode button for <2 seconds until the AM / PM / 24 and icon
shows.2. Press the or buttons to select AM/PM or 24-hour mode.3. Press the button once to set and advance to the next programming option.
The Mode Button

6
Set Clock
1. The icon shows. The hour number (12:00 or 00:00 depending on mode chosen above) will flash. Press or to cycle to the correct hour.
If in AM/PM mode, AM or PM will be set in Step 5.2. Press to enter selection.3. The minute number (00:00) will flash. Press or to cycle to the correct
minute.4. 24-hour mode: Press once to set and advance to the next programming option.5. AM/PM mode: Press or to select AM or PM. Press once to set and
advance to the next programming option. Set Current Day 1. A day number will flash. Press or to cycle to the
correct day. Monday is day #1, Tuesday is day #2, etc.2. Press once to set and advance to the next programming option.
71 2 3 4 5 6

7
Set Run Time
1. The icon shows. The default run time per program is 10 minutes.
2. Press or to adjust the hours. Press .
3. Press or to adjust the minutes.
4. Press once to set and advance to the next programming option.
Set Start Time
This setting has 4 possible start times to allow watering up to four times a day.
1. The icon shows and “1” flashes. Press to select desired start time (1234).
2. If the Start Time is not set, --:-- will flash. Press or to activate start time. Press to set.
3. The hour number (12:00 or 00:00 depending on mode chosen above) will flash.
8
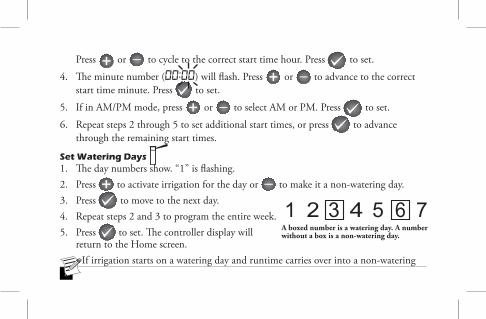
Press or to cycle to the correct start time hour. Press to set.
4. The minute number (00:00) will flash. Press or to advance to the correct start time minute. Press to set.
5. If in AM/PM mode, press or to select AM or PM. Press to set.
6. Repeat steps 2 through 5 to set additional start times, or press to advance through the remaining start times.
Set Watering Days 1. The day numbers show. “1” is flashing. 2. Press to activate irrigation for the day or to make it a non-watering day.3. Press to move to the next day.4. Repeat steps 2 and 3 to program the entire week.5. Press to set. The controller display will
return to the Home screen.If irrigation starts on a watering day and runtime carries over into a non-watering
71 2 3 4 5 6A boxed number is a watering day. A number without a box is a non-watering day.
9
day, irrigation will run past midnight.
Off ModeOFF mode turns off the watering program. Active Day boxes disappear. The time display and “OFF” toggle back and forth on the display. The current day flashes.1. Press for >2 seconds to activate OFF mode.
2. Press again to cancel the OFF mode and return to active watering.
Sleep ModeThe Display goes to sleep after 5 minutes of inactivity. This is to save battery life. Nothing is shown in the display, but the controller will still irrigate on schedule. If is pushed, the display will come on.

10
Manual Operation 1. To turn on the valve manually,
press and together.2. The valve will run for the programmed run-time
(page 8).3. To prematurely STOP a manual operation,
press and together.
Stopping the Current Irrigation CycleIt is possible to stop the current irrigation cycle. This might be done due to rainfall, a broken valve, or any number of reasons.1. Press for >2 seconds to stop the current irrigation cycle.
2. Press again for >2 seconds to return to normal operation.

11
Installing a Rain SensorIt is possible to connect a wired Toro® RainSensor™ to the SST. Other normally closed sensors can be installed as well. Wired polarity is not observed for the sensor. 1. Cut the wire loop (yellow) from the SST.
(See Figure 1.) 2. Strip 1/2˝ (1.25 cm) of insulation from the
wires. Connect the SST wires to the rain sensor wires using water-sealed / proof wire connectors (not included). (See Figure 2.)
22
11yellow wire

12
The Reset ButtonThe Reset button resets the controller to erase all watering programs.1. Remove the battery compartment lid and
battery.2. In the upper left corner, you will see a
black button with a refresh symbol. Using a screwdriver, press that button.
3. Reinstall the battery.4. Reattach the lid and screws, ensuring black
rubber sealing gasket is in place.
The Reset button

13
Troubleshooting GuideProblem Possible Cause SolutionController does not display anything.
1. The battery is dead.2. Controller is in Sleep mode.
1. Install a new 9V battery.2. Press MODE to activate screen.
Water does not turn ON. 1. Faulty control valve wire connections.2. Faulty solenoid.3. Program run time is set to 0.4. Low battery
1. Check all wire connections.2. Replace solenoid.3. Increase program run time. (p.8)4. Install a new 9V battery.
Water does not turn OFF. 1. Valve is blocked by dirt or debris. 1. Inspect, clean, and/or replace the valve.
Controller does not irrigate as scheduled.
1. Water at main water supply is shut off.2. Controller is set to OFF.3. Overlapping run times on the programs.
1. Check the main supply valve.2. Turn controller on. (Press Mode.)3. Check program and clock settings.
Controller displays “Err” 1. Shorted solenoid or valve wire. 1. Test solenoid and connections. Correct any shorted condition. Press MODE >2 seconds until error message clears.

14
The Toro Company and its affiliate, Toro Warranty Company, pursuant to an agreement between them, jointly warrants, to the owner, against defects in material and workmanship for a period of two years from the date of purchase. Neither The Toro Company nor Toro Warranty Company is liable for failure of products not manufactured by them even though such products may be sold or used in conjunction with Toro products. During such warranty period, we will repair or replace, at our option, any part found to be defective. Return the defective part to the place of purchase. Our liability is limited solely to the replacement or repair of defective parts. There are no other express warranties. This warranty does not apply where equipment is used, or installation is performed, in any manner contrary to Toro’s specifications and instructions, nor where equipment is altered or modified. Neither The Toro Company nor Toro Warranty Company is liable for indirect, incidental or consequential damages in connection with the use of equipment, including but not limited to: vegetation loss, the cost of substitute equipment or services required during periods of malfunction or resulting non-use, property damage or personal injury resulting from installer’s negligence. Some states do not allow the exclusion or limitation of incidental or consequential damages, so the above limitation or exclusion may not apply to you. All implied warranties, including those of merchantability and fitness for use, are limited to the duration of this express warranty. Some states do not allow limitations of how long an implied warranty lasts, so the above limitation may not apply to you.This warranty gives you specific legal rights and you may have other rights which vary from state to state. Toro is committed to developing and producing the highest quality, best performing, most dependable products on the market. Because your satisfaction is our first priority, we have provided the Toro Helpline. Please call toll-free 1-800-367-8676 or e-mail [email protected] if you have any questions or problems.
FEDERAL COMMUNICATIONS COMMISSION STATEMENTThis equipment has been tested and found to comply with the limits for a Class B digital device, pursuant to part 15 of the FCC Rules. These limits are designed to provide
reasonable protection against harmful interference in a residential installation. This equipment generates, uses and can radiate radio frequency energy and, if not installed
and used in accordance with the instructions, may cause harmful interference to radio communications. However, there is no guarantee that interference will not occur in a
particular installation. If this equipment does cause harmful interference to radio or television reception, which can be determined by turning the equipment off and on, the
user is encouraged to try to correct the interference by one or more of the following measures:
—Reorient or relocate the receiving antenna.
—Increase the separation between the equipment and receiver.
—Connect the equipment into an outlet on a circuit different from that to which the receiver is connected.
—Consult the dealer or an experienced radio/TV technician for help.
©2012 The Toro Company • www.toro.com • Part No. 373-0736 Rev. A
The Toro CompanyIrrigation Division5825 Jasmine StreetRiverside, CA 92504-1183
Warranty Statement