sirpnr2c pioneer installation guide - siriusxm canada · 2 sirpnr2c installation guide...
TRANSCRIPT

Installation Guide
SIRPNR2CPIONEER COMPATIBLE
SIRIUS SATELLITE RADIO TUNER
2 SIRPNR2C Installation Guide
Congratulations on your purchase of the SIRPNR2C– thePioneer Compatible SIRIUS Satellite Radio Tuner!
Your new SIRIUS Tuner is designed to work with all Pioneer headunits that aredesignated to be “SAT RADIO READY” for any Satellite Radio provider. ContactPioneer or SIRIUS for model compatibility.
What is SIRIUS Satellite Radio?
SIRIUS is 100 channels of the bestentertainment and completelycommercial-free music for your car,home or office.Only SIRIUS has 60 original musicchannels, from today’s hits to R&Boldies to classical masterpieces. Fromauthentic Country and real Bluegrass tocool Jazz, hot Latin, Reggae, Rock andmany more. Best of all, it’s allcompletely commercial-free.SIRIUS also has 40 channels ofworldclasssports, news and entertainment.Coupled with great sports news fromESPN, the SIRIUS sports offering isunrivaled. And don’t forget a host ofother great news and entertainment,like NPR, CNBC, CBC, Radio Disneyand E! Entertainment Radio.SIRIUS Canada’s lineup includes 10Canadian channels featuring some ofthe best Canadian programming andcutting edge Canadian indie music.
With SIRIUS, the emphasis is on themusic and entertainment you want.The music is hosted by SIRIUSJockeys, who are true experts. Theyback-up the music with compellinginformation about the song beingplayed, and they understand thatsometimes it’s best to just let themusic speak for itself.Rely on SIRIUS rocket science forsuperior coverage.Only SIRIUS has three powerfulsatellites that fly directly over NorthAmerica ensuring coast-to-coast-tocoastcoverage with high elevationangles. This gives the satellites a “clearline of sight” to your car or home, withmuch less concern for buildings, treesor other objects that might blockconventional satellite signals.Once you experience our 100 channelsof digital entertainment, you’ll neverwant to leave your car. For moreinformation, visit www.siriuscanada.ca.

3SIRPNR2C Operation and Installation Guide 3SIRPNR2C Installation Guide
Table of ContentsPackage Contents .............................................................................................. 3Warnings and Cautions ..................................................................................... 4Installation .......................................................................................................... 6Mounting the Tuner ............................................................................................ 6Installing the Antenna ........................................................................................ 6Optimum Antenna Mounting Locations ........................................................... 7Wiring and Cable Connections ......................................................................... 8System Connection Examples ........................................................................ 10Activating Your SIRIUS Subscription ............................................................... 12Specifications ................................................................................................... 13
Package ContentsA
B
C
G
SIRPNR2C Tuner
Mini Magnetic Antenna
Antenna Cable Cover/Tail
Alcohol Swab
Power Harness With In-Line Fuse
2.5-Meter IP-Bus Cable
6 Mounting Screws
D
E
A
B
C
D
E
F
G
F
FILTER &FUSE BOX
IN
OUT

4 SIRPNR2C Installation Guide
WARNINGThis symbol means importantinstructions. Failure to heed themcan result in serious injury or death.DO NOT OPERATE ANY FUNCTIONTHAT TAKES YOUR ATTENTIONAWAY FROM SAFELY DRIVING YOURVEHICLE.Any function that requires yourprolonged attention should only beperformed after coming to a completestop. Always stop the vehicle in a safelocation before performing thesefunctions.Failure to do so may result in anaccident.
DO NOT OPEN, DISASSEMBLE ORALTER THE UNIT IN ANY WAY. Doingso may result in fire, electric shock orproduct damage.
DO NOT INSERT ANY OBJECTS INTOTHE UNIT. Doing so may result in fire,electric shock or product damage.
USE THE CORRECT AMPERERATING WHEN REPLACING FUSE.Failure to do so may result in fire,electric shock or product damage.
MAKE THE CORRECT CONNECTIONS.Failure to make proper connections mayresult in fire or product damage.
DO NOT SPLICE INTO A ELECTRICALCABLES. Never cut away cableinsulation to supply power to otherequipment. Doing so will exceed thecurrent carrying capacity of the wire andresult in fire or electric shock.
DO NOT INSTALL IN LOCATIONSTHAT MIGHT HINDER VEHICLEOPERATION. Doing so may obstructvision or hamper movement which canresult in a serious accident.
DO NOT INSTALL THE UNIT TO HIGHLEVELS OF HUMIDITY, MOISTUREOR DUST. Doing so can result in electricshock or product failure.
FCC Warning: This equipment maygenerate or use radio frequency energy.Changes or modifications to thisequipment may cause harmfulinterference unless the modificationsare expressly approved in this UserGuide. The user could lose the authorityto operate this equipment if anunauthorized change or modification ismade.
Note: This equipment has been testedand found to comply with Part 15 of theFCC Rules. These rules are designed toprovide reasonable protection againstharmful interference. This equipment maycause harmful interference to radiocommunications if it is not installed andused in accordance with theseinstructions. However, there is noguarantee that interference will not occurin a particular installation. If this equipmentdoes cause harmful interference to radioor television reception, which can bedetermined by turning the equipment offand on, the user is encouraged to try tocorrect the interference by one of moreof the following measures:
• Relocate the receiving antenna.• Consult the dealer or an
experienced technician for help.
5SIRPNR2C Operation and Installation Guide 5SIRPNR2C Installation Guide
CAUTIONThis symbol means importantinstructions. Failure to heed themcan result in injury or materialproperty damage.
HALT USE IMMEDIATELY IF APROBLEM APPEARS. Failure to do somay cause personal injury or damageto the product. Return the unit to yourauthorized retailer or nearest servicecenter for repairing.
INSTALL THE WIRING SO THAT IT ISNOT CRIMPED OR PINCHED BYSCREWS OR SHARP METAL EDGES.Route the cables away from moving partsor sharp pointed edges. This will preventcrimping and damage to the wiring. If thewiring must pass through a metal hole,be sure to use a rubber grommet toprevent the wire’s insulation from beingcut by the metal edge of the hole.
USE THE SPECIFIED ACCESSORYPARTS AND INSTALL THE PRODUCTSECURELY. Be sure to use only thespecified accessory parts. Use of non-specified parts may damage this unitinternally or may not securely install theunit in place. This may cause parts tobecome loose, resulting in hazards orproduct failure.
USE CAUTION IF YOU NEED TODISCONNECT THE BATTERYTERMINAL. Please consult thevehicle’s owner’s manual or a servicetechnician prior to removing the batterypositive or ground connection, as it maycause damage to the vehicle’s electricalsystem or require reprogramming of thevehicle’s computer-controlled devices.

6 SIRPNR2C Installation Guide
Installing the AntennaThe antenna includes a “6-1/2” cablecover/tail which covers the exposedantenna cable and keeps it attachedsecurely to vehicle roof. The tail alsohelps position the antenna the properdistance from the window, sunroof orrear hatch.To attach the cover/tail:1) Once you have determined the
proper mounting location (see nextsection), clean the area with thesupplied alcohol swab.
InstallationIt is recommended that prior to startingthe installation, you thoroughly readthis manual and follow the guidelineslisted below:
Consider the mounting locationcarefully. You should make sure thatyou avoid the following:
• Any location where the tuner isexposed to moisture.
• Any location where the unit isexposed to extreme heat.
• Any location that would interferewith moving parts on the vehicle orhamper driving.
Mounting the SIRPNR2C TunerBe sure that you find a location that isflat and has clearance above the unitto prevent any damage as well asallow for ventilation.
Do not install the tuner under thecarpet or in a small enclosed areawithout proper ventilation. Doing socan result in damage to the tuner orthe vehicle.
Use the supplied screws to securelyfasten the unit.
2) Connect the cover/tail to the antennacable, making sure that the strain-relief on the antenna seats into thecover/tail groove. Route the cablethrough the wire channel in the cover/tail.
Caution:If you are attaching the unit directly tothe vehicle’s chassis, be sure that youcheck to make sure the area behind theunit is free from moving parts, fuel orbreak lines, wire harnesses or anyother items which may get damaged bydrilling a mounting hole or using thesupplied screws.
Antenna(Bottom)
Adhesive Strips
Cable Cover/Tail
Connect the cable cover/tail to the antenna cable,insert the cable throughthe groove. Peal off theadhesive tape

7SIRPNR2C Operation and Installation Guide 7SIRPNR2C Installation Guide
3) Remove the remaining protective tapefrom the adhesive, carefully positionthe antenna with cover/tail and applypressure to secure to the vehicle.
Sedan/Coupe
SUV/Mini-Van
Truck
Convertible (only)
• For SUVs, minivans and five-doorvehicles, bring the cable into thevehicle under the rubber molding forthe tailgate, and continue under theinterior trim.
• From the trunk, carefully route thecable to the location of theSIRPNR2C and plug the SMBconnector onto the unit.
Caution:• Do not pull the wire across sharp
edges that could damage it.• Keep the wire away from areas
where it could become tangled in thedriver’s and passenger’s feet.
• Keep the antenna wire away fromextreme heat – like exhaust systems.
• Avoid placing the cable near anymoving parts
Optimum Antenna Mounting LocationsThe optimum location to mount theincluded antenna is on the roof of thevehicle. It is important to avoid anyobstruction that will block satellitesignal – like a roof rack. For convertiblevehicles, install the antenna on the trunklid.
• Place the antenna on a metalsurface of your vehicle at least 12" x12", and at least 6" from a window.(Use the antenna cover/tail as aguide for the proper distance).
• The antenna’s powerful magnet willsecure it to the metal surface. Theadhesive that is attached to theantenna cover/tail will secure thecable to the vehicle. Before routingthe antenna cable, confirm that theantenna is mounted in a goodlocation.
• Route the cable from the antenna tothe vehicle’s interior by tucking itunderneath the rubber molding aroundthe rear window (if possible).
• Route the cable from the lowest pointof the rear window into the trunk. Takeadvantage of any existing cablechannels or wiring conduits.
Vehicle
Cable Cover/Tail

8 SIRPNR2C Installation Guide
Wiring and Cable Connections
Antenna InputConnect the right-angle SMBconnector from the antenna. Pushfirmly to attach.
IP-Bus Output ConnectorUse the supplied IP-BUS cable toconnect to the Pioneer Headunit orAudio Processor – See “SystemConnection Examples” for morespecific details.
IP-BUS Input ConnectorConnect to optional Pioneer audioequipment like CD Changers - See“System Connection Examples” formore specific details.
Antenna Input (SMB)
IP-Bus Output Connector (BLACK)
IP-Bus Input Connector (BLUE)
Power Connector
B
C
D
APower Harness ConnectorAfter the wiring connections arecomplete, plug the wiring harness intothe connector. Make sure to insertfirmly to lock the connector in place.
*NOTE* BE SURE TO CONNECT THEBATTERY (Yellow) AND GROUND (Black)WIRES CORRECTLY. IF THEY ARECROSSED, THE FUSE INSTALLED IN THEPOWER HARNESS FUSE BOX WILLBLOW. IF THE FUSE BLOWS, YOU WILLNEED TO REPLACE IT.
FILTER &FUSE BOX
IN
OUT
1 Open2 Yellow -- Battery (+12VDC)3 Black -- Ground (-)4 Open
Power harness withserviceable fuse box

9SIRPNR2C Operation and Installation Guide 9SIRPNR2C Installation Guide
FILTER &FUSE BOX
OU
T IN
Black – Connect to Chassis GroundPowerHarness
Antenna (21’ cable) - Mount onRoof of Vehicle
Right-angle IP-BusConnector
2.5-meter IP-Bus Cable(Connect to Pioneer SATRADIO READY Headunit orSignal Processor)
Right-angle SMBConnector
To access the fuse,remove the top cover ofthe in-line filter/fuse box
Yellow – Connect toBattery Positive (+)

10 SIRPNR2C Installation Guide
Optional Pioneer SAT RADIO READY Headunit (IP-Bus CD Player orMultimedia Headunit)
Optional Pioneer CD Changer
Optional Pioneer SAT RADIO READY Headunit (IP-Bus CD Player orMultimedia Headunit)
System Connection Examples
System 1: Pioneer Headunit and SIRPNR2C
System 2: Pioneer Headunit, DVD/CD Changer and SIRPNR2C
11SIRPNR2C Operation and Installation Guide 11SIRPNR2C Installation Guide
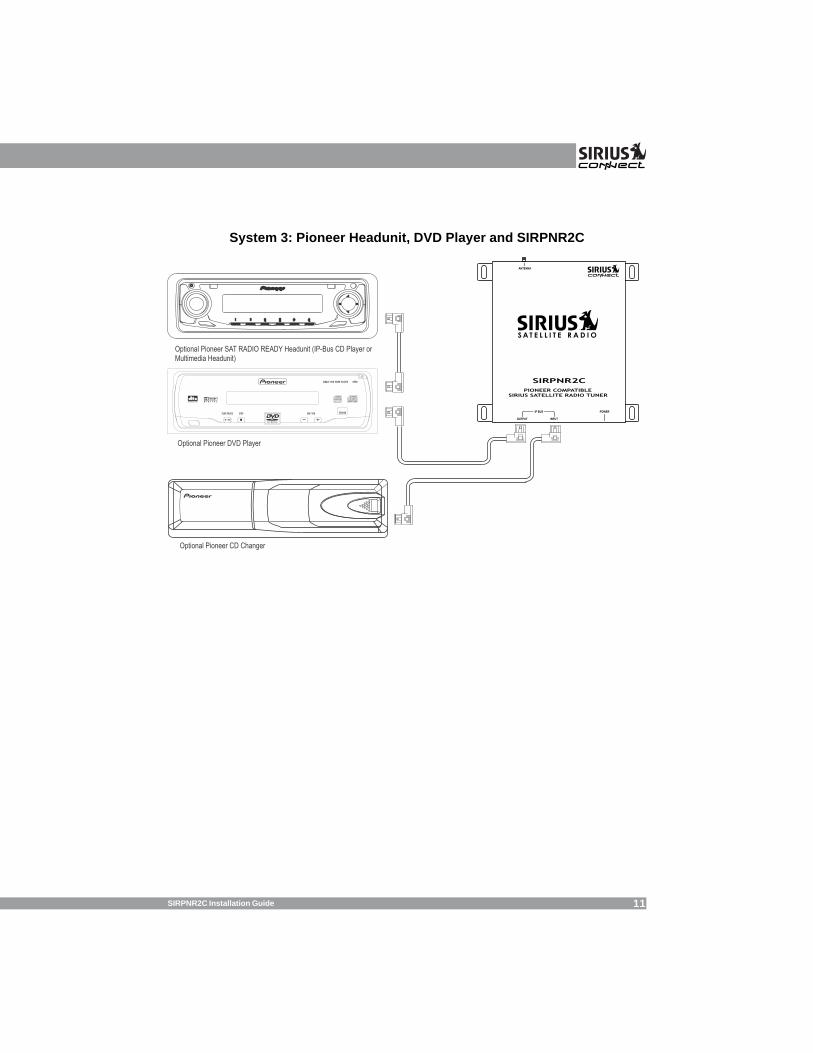
System 3: Pioneer Headunit, DVD Player and SIRPNR2C
Optional Pioneer CD Changer
Optional Pioneer SAT RADIO READY Headunit (IP-Bus CD Player orMultimedia Headunit)
Optional Pioneer DVD Player

12 SIRPNR2C Installation Guide
You must activate SIRPNR2C beforeyou can start to receive the SIRIUSSatellite Radio broadcast.1. Make sure that the SIRPNR2C is
properly connected and that itsantenna is oriented to receive theSIRIUS satellite signal.
2. Turn on the Pioneer headunit.3. Press and release the POWER/
SOURCE button on the head unit toselect EXTERNAL as the source.(Each press of the POWER/SOURCEbutton will change to a different audiosource.)
4. The display will read “UPDATING” untilthe SIRPNR2C channel update iscompleted. This is where the latestchannel line up is updated on theSIRIUS Receiver.
NOTE: Don’t push any buttons orperform any operations untilupdating has been completed.Once updated and the SIRIUSchannels are received, the displaywill change to “Call 1-888-539-SIRIUSto Subscribe” and will place you inSIRIUS Satellite Radio’s PreviewChannel (Channel 184). You Shouldbe able to hear the SIRIUS Previewchannel’s Audio.
5. Use the / buttons to select toChannel “000” on the display to bringup the SIRIUS ID (SID).
6. The unit will display “CH000”, followedby “ESN XXXXXXXXXXXX”. The SID willbe displayed in each of the Artist,Song Title, and Composer Fields ofthe Display – Example “ESN123456789123.” Write down the 12digit SID in the location provided onthe next page for future reference.
Note: You may have to press theFUNC button and select FUNC 1 tochange the current viewed field on thePioneer Headunit to show the SID.(See Pioneer Owners Manual for moreinformation.)
7. Contact SIRIUS on the Internet:https://activate.siriusradio.comFollow the prompts to activate yoursubscription.You can also call SIRIUS toll-free at1-888-539-SIRIUS (1-888-539-7474).
You will not be able to tune to anyother channels until you activateyour SIRIUS subscription. After yourPioneer SIRPNR2C is activated, thedisplay will read “SUB UPDT”. Pressany key to continue.”
Note: The SID can also be found on thesticker that is on the bottom of theSIRPNR2C and on the carton box thatthe unit was packed in.
Activating Your SIRIUS Subscription
Basic OperationThe SIRPNR2C SIRIUS Satellite RadioTuner is compatible with any Pioneerheadunit that is “SAT Radio Ready” –which includes 2004 models thatindicate they are satellite-ready for anysatellite radio provider. ConsultPoineer or SIRIUS Customer SupportDepartments for more information aboutcompatibility.
Please consult your Pioneer owner’smanual for proper operation instructionsfor using satellite radio products.

13SIRPNR2C Operation and Installation Guide 13SIRPNR2C Installation Guide
SIRIUS ID:
SIRIUS Customer Service: 1-888-539-7474
SpecificationsOperational FrequenciesSatellite ......................................................................... 2322.293/2330.207 MHzTerrestrial ....................................................................................... 2326.250MHz
Power Requirements .................................................................. 11-16 Volts DCFuse Type ....................................................................................... 1-AMP (Glass)
Chassis Size ............................. 126.75mm x 125.75mm x 34.75mm (WxHxD)
Antenna Type ................................................................................ Mini-MagneticAntenna Cable Length ................................................. 21’ (single micro-cable)Connector Type .....................................................................SMB (Right-angle)
Audio Interface ........................................... 2 IP-Bus Connectors (Input/Output)Audio Output ........................................................................................1V (Fixed)Included Cable .....................................................2.5 Meter IP-Bus (Male/Male)
Please write down your SIRIUS ID in the space provided below:

© 2006 SIRIUS Satellite Radio Inc.
SIRIUS Canada Inc.2 St. Clair Ave.
Suite 1100Toronto, Ontario M4V1L6
(888) 539-7474www.siriuscanada.ca
Pioneer-SIRPNR2C-English Install-Manual-(Mar. 2006)