site guide - home | building centre
TRANSCRIPT
Hanson - a global business
Hanson is one of the world's largest suppliers of heavy building materials to the constructionindustry. We produce aggregates (crushed rock, sand and gravel), ready-mixed and precastconcrete, asphalt and cement-related materials and a range of building products includingconcrete pipes, concrete pavers, tiles and clay bricks
We are part of the HeidelbergCement Group, which employs 70,000 people across fivecontinents and has leading positions in concrete and heavy building products, and is theglobal leader in aggregates.
Hanson Building Products is the UK’s largest brick and aircrete block producer. We alsoproduce aggregate blocks, bagged aggregate and cement products, renders, pavers, precastfloors and stairs, SUD systems and prefabricated building systems. The division incorporatesLondon Brick, Thermalite, Red Bank, Cradley, Formpave and Structherm.
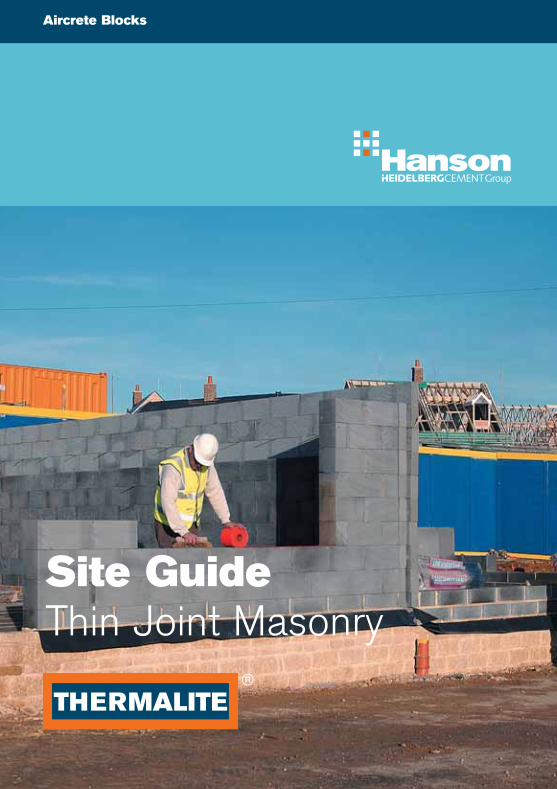
Aircrete Blocks
Site GuideThin Joint Masonry
Customer Services:
T 08705 626500 F 08705 626550E [email protected] www.hanson.com/uk
Hanson Building ProductsHead OfficeStewartbyBedfordMK43 9LZ
H00
®
®
464.20 TJ sitework 8:464.20 TJ sitework 27/11/07 14:20 Page 24

32
These benefits are achieved using a system with many of the characteristicsseen in traditional blockwork construction.
This means that familiarity with the build process and flexibility are alsoinherent within the system.
All of the blocks in the Thermalite range can be produced with the requiredtolerances for use in walls constructed using thin layer mortar. This allowsdesigners and builders to benefit from the full range of opportunities offeredby this method of construction.
Thin joint masonry is recognised as a Modern Method of Construction(MMC) in the Non-Offsite Manufacturing category.
Thermalite Thin Joint Masonry has been assessed and certified by theBritish Board of Agrément (BBA).
Independent speed trials, conducted by a leading Building Surveyor, haveindicated that a wall of Thermalite blocks and thin layer mortar can be laid twice as fast as that built with aggregate blocks and general purpose mortar.
This speed of construction can be further enhanced, by using ThermaliteLarge Format blocks, which have a face size equivalent to two traditionalconcrete blocks.
This Site Guide is a step-by-step manual on constructing with thin joint,covering all aspects of the build process including the tools and materialsrequired, how to mix and apply the mortar and detailing; lintels, wall ties, joisthangers etc. All of this information is designed to help you achieve the fullbenefits of using the Thermalite Thin Joint System.
IntroductionThe demands of the UK constructionindustry for higher build quality, greaterproductivity, improved thermal performance,airtightness and waste reduction, mean that the benefits offered by Thin JointMasonry are becoming more relevant.
00/372091/2723 0640
EMS 56644
464.20 TJ sitework 8:464.20 TJ sitework 27/11/07 14:18 Page 2

54
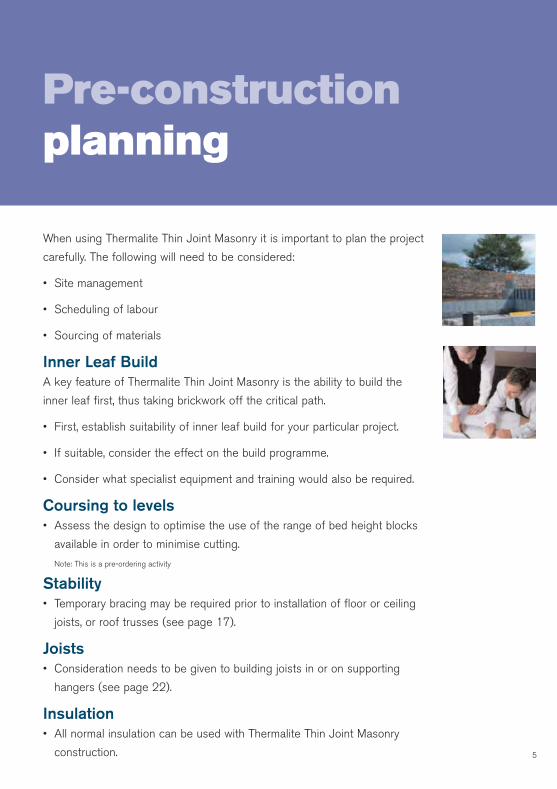
Pre-constructionplanning
Contents Page
Pre-construction planning 5-7
Tools & materialsWhat you need 8
General tools 9
Mixing tools 10
Cutting tools 10
Materials checklist 11
Setting outBase course 12
Mortar handling/mixing 13
Weather conditions 14
Mortar application 15
Block laying 16-17
Stability 17
DetailingGRP movement control mesh 18
Movement control 19
Windows & openings 20
Cavity trays 20
Lintel support and bedding 21
Intermediate floor support 22
Other ancillary components 22
When using Thermalite Thin Joint Masonry it is important to plan the project
carefully. The following will need to be considered:
• Site management
• Scheduling of labour
• Sourcing of materials
Inner Leaf BuildA key feature of Thermalite Thin Joint Masonry is the ability to build the
inner leaf first, thus taking brickwork off the critical path.
• First, establish suitability of inner leaf build for your particular project.
• If suitable, consider the effect on the build programme.
• Consider what specialist equipment and training would also be required.
Coursing to levels• Assess the design to optimise the use of the range of bed height blocks
available in order to minimise cutting.
Note: This is a pre-ordering activity
Stability• Temporary bracing may be required prior to installation of floor or ceiling
joists, or roof trusses (see page 17).
Joists• Consideration needs to be given to building joists in or on supporting
hangers (see page 22).
Insulation• All normal insulation can be used with Thermalite Thin Joint Masonry
construction.
464.20 TJ sitework 8:464.20 TJ sitework 27/11/07 14:18 Page 4
54
Pre-constructionplanning
Contents Page
Pre-construction planning 5-7
Tools & materialsWhat you need 8
General tools 9
Mixing tools 10
Cutting tools 10
Materials checklist 11
Setting outBase course 12
Mortar handling/mixing 13
Weather conditions 14
Mortar application 15
Block laying 16-17
Stability 17
DetailingGRP movement control mesh 18
Movement control 19
Windows & openings 20
Cavity trays 20
Lintel support and bedding 21
Intermediate floor support 22
Other ancillary components 22
When using Thermalite Thin Joint Masonry it is important to plan the project
carefully. The following will need to be considered:
• Site management
• Scheduling of labour
• Sourcing of materials
Inner Leaf BuildA key feature of Thermalite Thin Joint Masonry is the ability to build the
inner leaf first, thus taking brickwork off the critical path.
• First, establish suitability of inner leaf build for your particular project.
• If suitable, consider the effect on the build programme.
• Consider what specialist equipment and training would also be required.
Coursing to levels• Assess the design to optimise the use of the range of bed height blocks
available in order to minimise cutting.
Note: This is a pre-ordering activity
Stability• Temporary bracing may be required prior to installation of floor or ceiling
joists, or roof trusses (see page 17).
Joists• Consideration needs to be given to building joists in or on supporting
hangers (see page 22).
Insulation• All normal insulation can be used with Thermalite Thin Joint Masonry
construction.
464.20 TJ sitework 8:464.20 TJ sitework 27/11/07 14:18 Page 4

76
Wall ties• Consideration of wall tie types is needed to meet your project
requirements (see page 22).
Lintels• Consider which type of lintel is required for your application (see page 21)
Cavity trays• Either a dpc fixed to the block face or a ‘C’ type cavity tray may be used
(see page 20).
Flue blocks• Flue blocks can be sourced which are compatible with Thin Joint
Masonry coursing heights.
Windows & reveals• Consider frame type required, fixing method and support system (see
page 20).
• Consider material required for closing the cavity and the fixing method.
Accommodation of movement• The same rules apply to both thin layer and general purpose mortar
construction (see page 18 & 19).
Block tolerancesThermalite blocks for use in Thermalite Thin Joint Masonry are speciallymanufactured to tighter dimensional tolerances.
Using non-thin joint compliant blocks will result in difficulties maintaininglevel and line. Please state when ordering that blocks are required for ThinJoint Masonry.
Scaffolding• Initial construction is normally undertaken from inside the building, with
stagings used as required.
• The plan form of the building may decide selection of either a tube or ‘quick-stage’ system.
• A ‘system’ scaffold has been found to offer the most productive, versatile and adaptable solution.
This allows access to blockwork and can be rapidly altered to accommodatebrickwork.
For further information, please contact Customer Services on 08705 626500.
Pre-constructionplanning
464.20 TJ sitework 8:464.20 TJ sitework 27/11/07 14:19 Page 6
98
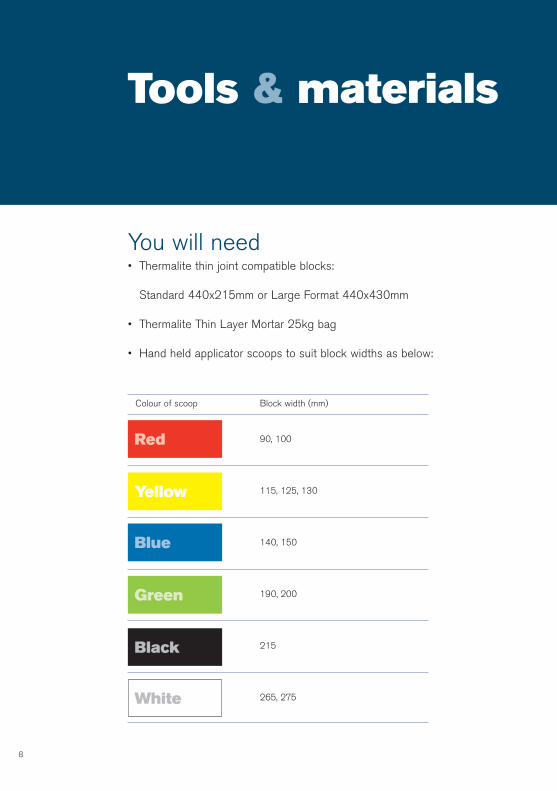
You will need• Thermalite thin joint compatible blocks:
Standard 440x215mm or Large Format 440x430mm
• Thermalite Thin Layer Mortar 25kg bag
• Hand held applicator scoops to suit block widths as below:
General tools1 Appropriate size application
scoop (see table opposite)
2 Block cutting square
3 Surform or block rasp
4 Hand brush
5 Separate tool cleaning bucket
6 Spirit level
7 Rubber mallet
1 2
3
5 6
7
4
Tools & materials
Colour of scoop Block width (mm)
90, 100
115, 125, 130
140, 150
190, 200
215
265, 275
Red
Yellow
Blue
Green
Black
White
464.20 TJ sitework 8:464.20 TJ sitework 27/11/07 14:19 Page 8

98
You will need• Thermalite thin joint compatible blocks:
Standard 440x215mm or Large Format 440x430mm
• Thermalite Thin Layer Mortar 25kg bag
• Hand held applicator scoops to suit block widths as below:
General tools1 Appropriate size application
scoop (see table opposite)
2 Block cutting square
3 Surform or block rasp
4 Hand brush
5 Separate tool cleaning bucket
6 Spirit level
7 Rubber mallet
1 2
3
5 6
7
4
Tools & materials
Colour of scoop Block width (mm)
90, 100
115, 125, 130
140, 150
190, 200
215
265, 275
Red
Yellow
Blue
Green
Black
White
464.20 TJ sitework 8:464.20 TJ sitework 27/11/07 14:19 Page 8
Materials checklistThe full productivity benefits of Thermalite Thin Joint Masonry can only be realised if all appropriate materials are on site before commencement of the project.
Below is a list of some of the additional materials needed ready for theconstruction start:
1 Lintels
2 Cavity trays
3 Wall ties and insulation clips
4 Insulation*
5 Movement control mesh
6 Thin joint wall ties
7 Joist hangers
8 Damp proof course* If using inner leaf build, insulation only required on site during construction of the outer leaf.
1110
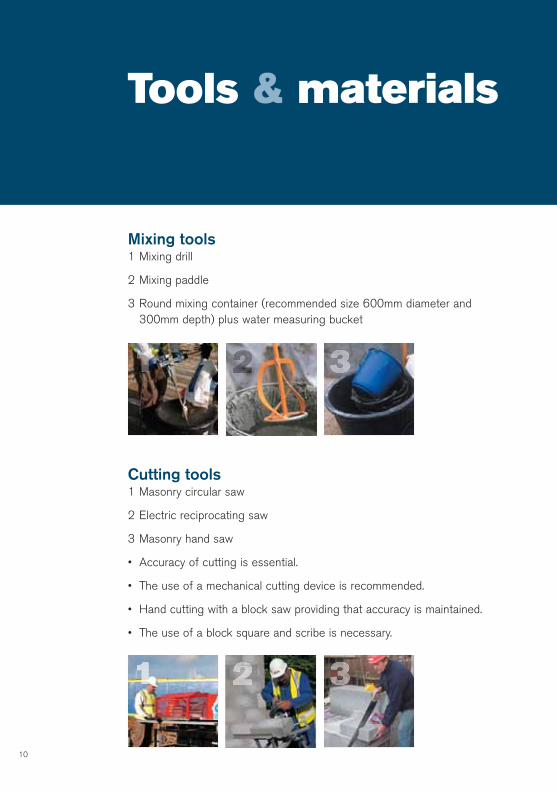
Mixing tools1 Mixing drill
2 Mixing paddle
3 Round mixing container (recommended size 600mm diameter and 300mm depth) plus water measuring bucket
Cutting tools1 Masonry circular saw
2 Electric reciprocating saw
3 Masonry hand saw
• Accuracy of cutting is essential.
• The use of a mechanical cutting device is recommended.
• Hand cutting with a block saw providing that accuracy is maintained.
• The use of a block square and scribe is necessary.
Tools & materials
464.20 TJ sitework 8:464.20 TJ sitework 27/11/07 14:20 Page 10

Materials checklistThe full productivity benefits of Thermalite Thin Joint Masonry can only be realised if all appropriate materials are on site before commencement of the project.
Below is a list of some of the additional materials needed ready for theconstruction start:
1 Lintels
2 Cavity trays
3 Wall ties and insulation clips
4 Insulation*
5 Movement control mesh
6 Thin joint wall ties
7 Joist hangers
8 Damp proof course* If using inner leaf build, insulation only required on site during construction of the outer leaf.
1110
Mixing tools1 Mixing drill
2 Mixing paddle
3 Round mixing container (recommended size 600mm diameter and 300mm depth) plus water measuring bucket
Cutting tools1 Masonry circular saw
2 Electric reciprocating saw
3 Masonry hand saw
• Accuracy of cutting is essential.
• The use of a mechanical cutting device is recommended.
• Hand cutting with a block saw providing that accuracy is maintained.
• The use of a block square and scribe is necessary.
Tools & materials
464.20 TJ sitework 8:464.20 TJ sitework 27/11/07 14:20 Page 10

1312
Base courseAccuracy of base course is essential, any inaccuracy could be difficult tocorrect in the subsequent thin layer mortar beds.
• Must use general purpose mortarIt is recommended that perp-ends of blocks be bonded with Thermalite Thin Layer Mortar. If general purpose mortar must be used, then care should be taken to maintain appropriate bond spacing on the following thin layer course.
• Include the dpc.
• Must be level and plumb.
• Minimum 12 hours curing to establish solid base for continuousthin joint build.
Setting out
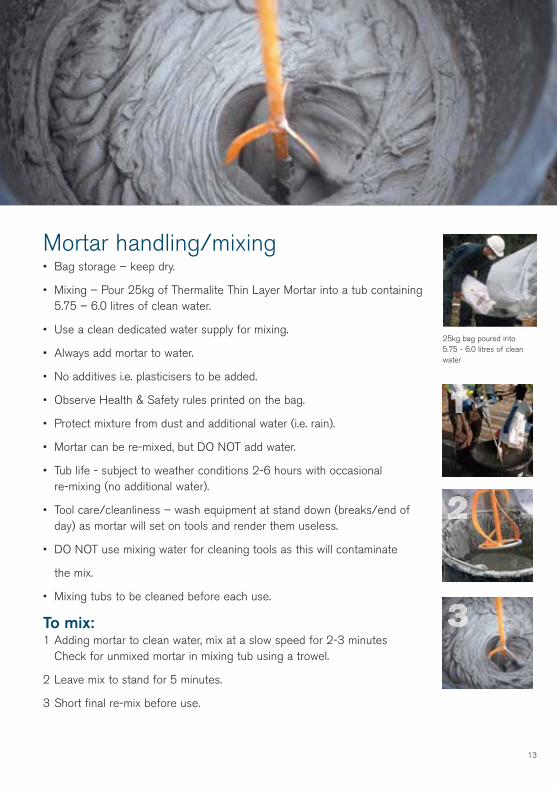
Mortar handling/mixing• Bag storage – keep dry.
• Mixing – Pour 25kg of Thermalite Thin Layer Mortar into a tub containing 5.75 – 6.0 litres of clean water.
• Use a clean dedicated water supply for mixing.
• Always add mortar to water.
• No additives i.e. plasticisers to be added.
• Observe Health & Safety rules printed on the bag.
• Protect mixture from dust and additional water (i.e. rain).
• Mortar can be re-mixed, but DO NOT add water.
• Tub life - subject to weather conditions 2-6 hours with occasional re-mixing (no additional water).
• Tool care/cleanliness – wash equipment at stand down (breaks/end of day) as mortar will set on tools and render them useless.
• DO NOT use mixing water for cleaning tools as this will contaminate
the mix.
• Mixing tubs to be cleaned before each use.
To mix:1 Adding mortar to clean water, mix at a slow speed for 2-3 minutes
Check for unmixed mortar in mixing tub using a trowel.
2 Leave mix to stand for 5 minutes.
3 Short final re-mix before use.
25kg bag poured into 5.75 - 6.0 litres of cleanwater
DPC
464.20 TJ sitework 8:464.20 TJ sitework 27/11/07 14:20 Page 12
1312
Base courseAccuracy of base course is essential, any inaccuracy could be difficult tocorrect in the subsequent thin layer mortar beds.
• Must use general purpose mortarIt is recommended that perp-ends of blocks be bonded with Thermalite Thin Layer Mortar. If general purpose mortar must be used, then care should be taken to maintain appropriate bond spacing on the following thin layer course.
• Include the dpc.
• Must be level and plumb.
• Minimum 12 hours curing to establish solid base for continuousthin joint build.
Setting out
Mortar handling/mixing• Bag storage – keep dry.
• Mixing – Pour 25kg of Thermalite Thin Layer Mortar into a tub containing 5.75 – 6.0 litres of clean water.
• Use a clean dedicated water supply for mixing.
• Always add mortar to water.
• No additives i.e. plasticisers to be added.
• Observe Health & Safety rules printed on the bag.
• Protect mixture from dust and additional water (i.e. rain).
• Mortar can be re-mixed, but DO NOT add water.
• Tub life - subject to weather conditions 2-6 hours with occasional re-mixing (no additional water).
• Tool care/cleanliness – wash equipment at stand down (breaks/end of day) as mortar will set on tools and render them useless.
• DO NOT use mixing water for cleaning tools as this will contaminate
the mix.
• Mixing tubs to be cleaned before each use.
To mix:1 Adding mortar to clean water, mix at a slow speed for 2-3 minutes
Check for unmixed mortar in mixing tub using a trowel.
2 Leave mix to stand for 5 minutes.
3 Short final re-mix before use.
25kg bag poured into 5.75 - 6.0 litres of cleanwater
DPC
464.20 TJ sitework 8:464.20 TJ sitework 27/11/07 14:20 Page 12
1514
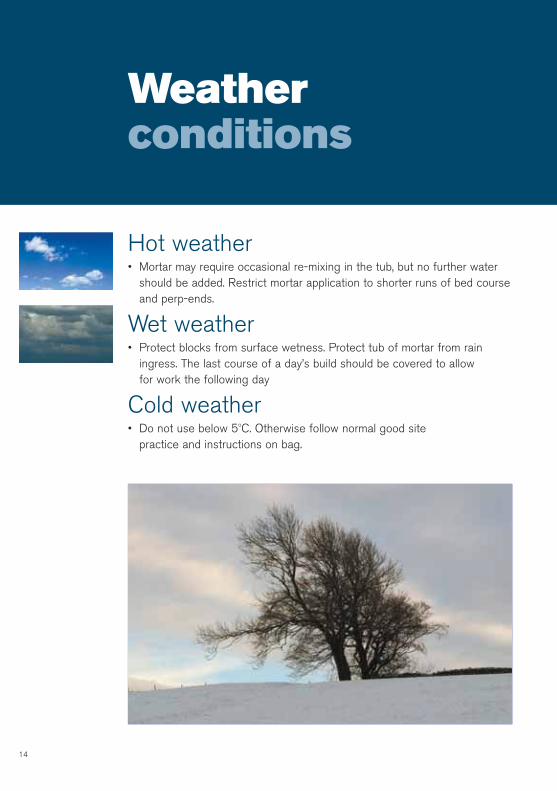
Weatherconditions
Mortar application
Hot weather• Mortar may require occasional re-mixing in the tub, but no further water
should be added. Restrict mortar application to shorter runs of bed courseand perp-ends.
Wet weather• Protect blocks from surface wetness. Protect tub of mortar from rain
ingress. The last course of a day’s build should be covered to allow for work the following day
Cold weather• Do not use below 5oC. Otherwise follow normal good site
practice and instructions on bag.
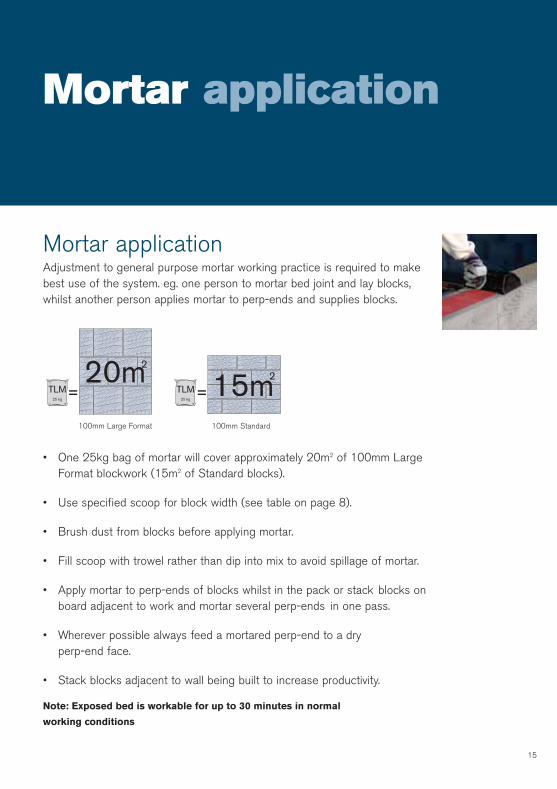
Mortar applicationAdjustment to general purpose mortar working practice is required to makebest use of the system. eg. one person to mortar bed joint and lay blocks,whilst another person applies mortar to perp-ends and supplies blocks.
100mm Standard100mm Large Format
TLM25 kg
20m2
15m2
= =TLM25 kg
• One 25kg bag of mortar will cover approximately 20m2 of 100mm Large Format blockwork (15m2 of Standard blocks).
• Use specified scoop for block width (see table on page 8).
• Brush dust from blocks before applying mortar.
• Fill scoop with trowel rather than dip into mix to avoid spillage of mortar.
• Apply mortar to perp-ends of blocks whilst in the pack or stack blocks onboard adjacent to work and mortar several perp-ends in one pass.
• Wherever possible always feed a mortared perp-end to a dry perp-end face.
• Stack blocks adjacent to wall being built to increase productivity.
Note: Exposed bed is workable for up to 30 minutes in normal
working conditions
464.20 TJ sitework 8:464.20 TJ sitework 27/11/07 14:20 Page 14
1514
Weatherconditions
Mortar application
Hot weather• Mortar may require occasional re-mixing in the tub, but no further water
should be added. Restrict mortar application to shorter runs of bed courseand perp-ends.
Wet weather• Protect blocks from surface wetness. Protect tub of mortar from rain
ingress. The last course of a day’s build should be covered to allow for work the following day
Cold weather• Do not use below 5oC. Otherwise follow normal good site
practice and instructions on bag.
Mortar applicationAdjustment to general purpose mortar working practice is required to makebest use of the system. eg. one person to mortar bed joint and lay blocks,whilst another person applies mortar to perp-ends and supplies blocks.
100mm Standard100mm Large Format
TLM25 kg
20m2
15m2
= =TLM25 kg
• One 25kg bag of mortar will cover approximately 20m2 of 100mm Large Format blockwork (15m2 of Standard blocks).
• Use specified scoop for block width (see table on page 8).
• Brush dust from blocks before applying mortar.
• Fill scoop with trowel rather than dip into mix to avoid spillage of mortar.
• Apply mortar to perp-ends of blocks whilst in the pack or stack blocks onboard adjacent to work and mortar several perp-ends in one pass.
• Wherever possible always feed a mortared perp-end to a dry perp-end face.
• Stack blocks adjacent to wall being built to increase productivity.
Note: Exposed bed is workable for up to 30 minutes in normal
working conditions
464.20 TJ sitework 8:464.20 TJ sitework 27/11/07 14:20 Page 14

1716
Block laying Stability
Block laying• Building to profiles is preferred to improve accuracy of level and line,
and speed.
• Any inaccuracy in levels may be corrected by use of a block rasp or ‘surform’ once the wall has set.
• Correction time of mortar is approx 10 minutes, and any adjustment should be made during this period using a rubber mallet.
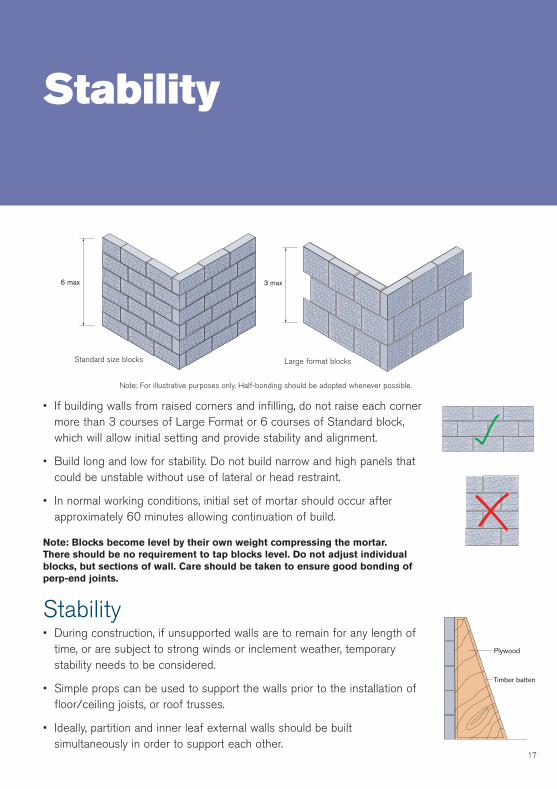
6 max 3 max
• If building walls from raised corners and infilling, do not raise each corner more than 3 courses of Large Format or 6 courses of Standard block, which will allow initial setting and provide stability and alignment.
• Build long and low for stability. Do not build narrow and high panels that could be unstable without use of lateral or head restraint.
• In normal working conditions, initial set of mortar should occur after approximately 60 minutes allowing continuation of build.
Note: Blocks become level by their own weight compressing the mortar. There should be no requirement to tap blocks level. Do not adjust individualblocks, but sections of wall. Care should be taken to ensure good bonding ofperp-end joints.
Stability• During construction, if unsupported walls are to remain for any length of
time, or are subject to strong winds or inclement weather, temporary stability needs to be considered.
• Simple props can be used to support the walls prior to the installation of floor/ceiling joists, or roof trusses.
• Ideally, partition and inner leaf external walls should be built simultaneously in order to support each other.
Timber batten
Plywood
Mortaredperp-end
Note: For illustrative purposes only. Half-bonding should be adopted whenever possible.
Note: For illustrative purposes only. Half-bonding should be adopted whenever possible.
Standard size blocks Large format blocks
464.20 TJ sitework 8:464.20 TJ sitework 27/11/07 14:20 Page 16
1716
Block laying Stability
Block laying• Building to profiles is preferred to improve accuracy of level and line,
and speed.
• Any inaccuracy in levels may be corrected by use of a block rasp or ‘surform’ once the wall has set.
• Correction time of mortar is approx 10 minutes, and any adjustment should be made during this period using a rubber mallet.
6 max 3 max
• If building walls from raised corners and infilling, do not raise each corner more than 3 courses of Large Format or 6 courses of Standard block, which will allow initial setting and provide stability and alignment.
• Build long and low for stability. Do not build narrow and high panels that could be unstable without use of lateral or head restraint.
• In normal working conditions, initial set of mortar should occur after approximately 60 minutes allowing continuation of build.
Note: Blocks become level by their own weight compressing the mortar. There should be no requirement to tap blocks level. Do not adjust individualblocks, but sections of wall. Care should be taken to ensure good bonding ofperp-end joints.
Stability• During construction, if unsupported walls are to remain for any length of
time, or are subject to strong winds or inclement weather, temporary stability needs to be considered.
• Simple props can be used to support the walls prior to the installation of floor/ceiling joists, or roof trusses.
• Ideally, partition and inner leaf external walls should be built simultaneously in order to support each other.
Timber batten
Plywood
Mortaredperp-end
Note: For illustrative purposes only. Half-bonding should be adopted whenever possible.
Note: For illustrative purposes only. Half-bonding should be adopted whenever possible.
Standard size blocks Large format blocks
464.20 TJ sitework 8:464.20 TJ sitework 27/11/07 14:20 Page 16
1918
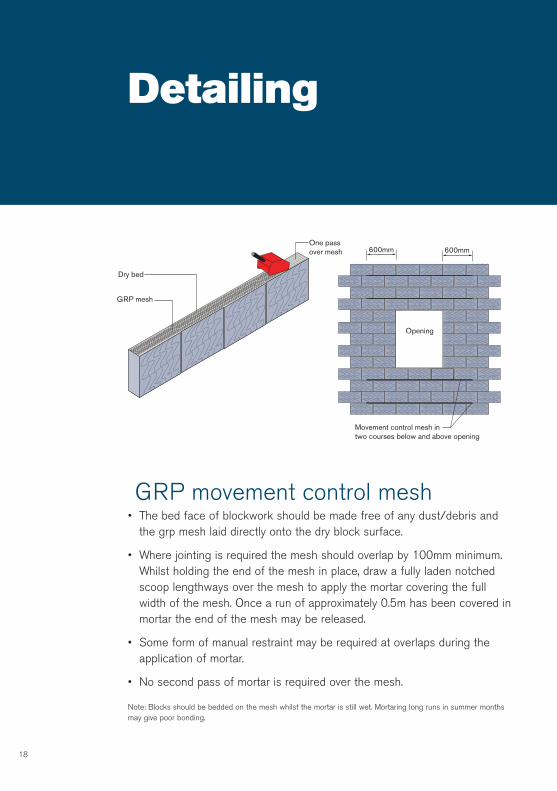
Detailing
GRP movement control mesh• The bed face of blockwork should be made free of any dust/debris and
the grp mesh laid directly onto the dry block surface.
• Where jointing is required the mesh should overlap by 100mm minimum. Whilst holding the end of the mesh in place, draw a fully laden notched scoop lengthways over the mesh to apply the mortar covering the full width of the mesh. Once a run of approximately 0.5m has been covered inmortar the end of the mesh may be released.
• Some form of manual restraint may be required at overlaps during the application of mortar.
• No second pass of mortar is required over the mesh.
Note: Blocks should be bedded on the mesh whilst the mortar is still wet. Mortaring long runs in summer monthsmay give poor bonding.
Dry bed
GRP mesh
One pass over mesh
Movement control mesh intwo courses below and above opening
Opening
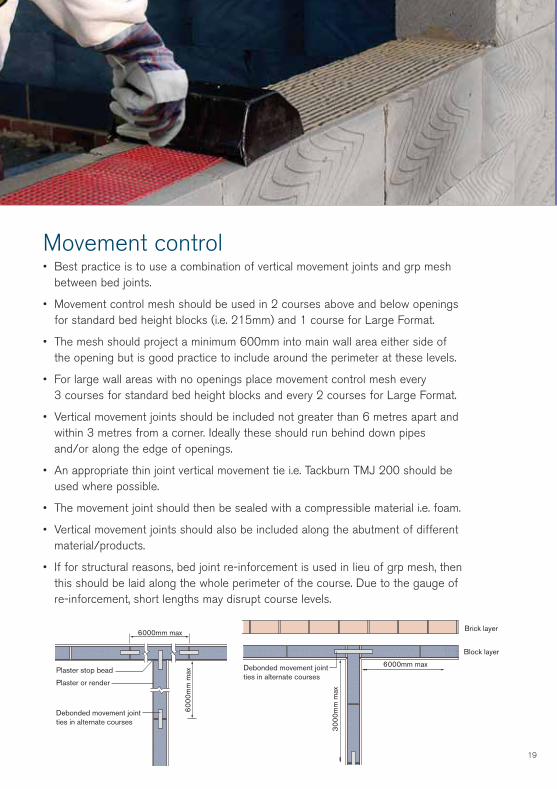
600mm600mm Movement control• Best practice is to use a combination of vertical movement joints and grp mesh
between bed joints.
• Movement control mesh should be used in 2 courses above and below openings for standard bed height blocks (i.e. 215mm) and 1 course for Large Format.
• The mesh should project a minimum 600mm into main wall area either side of the opening but is good practice to include around the perimeter at these levels.
• For large wall areas with no openings place movement control mesh every 3 courses for standard bed height blocks and every 2 courses for Large Format.
• Vertical movement joints should be included not greater than 6 metres apart and within 3 metres from a corner. Ideally these should run behind down pipes and/or along the edge of openings.
• An appropriate thin joint vertical movement tie i.e. Tackburn TMJ 200 should be used where possible.
• The movement joint should then be sealed with a compressible material i.e. foam.
• Vertical movement joints should also be included along the abutment of different material/products.
• If for structural reasons, bed joint re-inforcement is used in lieu of grp mesh, thenthis should be laid along the whole perimeter of the course. Due to the gauge of re-inforcement, short lengths may disrupt course levels.
Debonded movement jointties in alternate courses
300
0mm
max
Brick layer
Block layer
6000mm max
6000mm max
600
0mm
max
Plaster or render
Plaster stop bead
Debonded movement jointties in alternate courses
464.20 TJ sitework 8:464.20 TJ sitework 27/11/07 14:20 Page 18
1918
Detailing
GRP movement control mesh• The bed face of blockwork should be made free of any dust/debris and
the grp mesh laid directly onto the dry block surface.
• Where jointing is required the mesh should overlap by 100mm minimum. Whilst holding the end of the mesh in place, draw a fully laden notched scoop lengthways over the mesh to apply the mortar covering the full width of the mesh. Once a run of approximately 0.5m has been covered inmortar the end of the mesh may be released.
• Some form of manual restraint may be required at overlaps during the application of mortar.
• No second pass of mortar is required over the mesh.
Note: Blocks should be bedded on the mesh whilst the mortar is still wet. Mortaring long runs in summer monthsmay give poor bonding.
Dry bed
GRP mesh
One pass over mesh
Movement control mesh intwo courses below and above opening
Opening
600mm600mm Movement control• Best practice is to use a combination of vertical movement joints and grp mesh
between bed joints.
• Movement control mesh should be used in 2 courses above and below openings for standard bed height blocks (i.e. 215mm) and 1 course for Large Format.
• The mesh should project a minimum 600mm into main wall area either side of the opening but is good practice to include around the perimeter at these levels.
• For large wall areas with no openings place movement control mesh every 3 courses for standard bed height blocks and every 2 courses for Large Format.
• Vertical movement joints should be included not greater than 6 metres apart and within 3 metres from a corner. Ideally these should run behind down pipes and/or along the edge of openings.
• An appropriate thin joint vertical movement tie i.e. Tackburn TMJ 200 should be used where possible.
• The movement joint should then be sealed with a compressible material i.e. foam.
• Vertical movement joints should also be included along the abutment of different material/products.
• If for structural reasons, bed joint re-inforcement is used in lieu of grp mesh, thenthis should be laid along the whole perimeter of the course. Due to the gauge of re-inforcement, short lengths may disrupt course levels.
Debonded movement jointties in alternate courses
300
0mm
max
Brick layer
Block layer
6000mm max
6000mm max
600
0mm
max
Plaster or render
Plaster stop bead
Debonded movement jointties in alternate courses
464.20 TJ sitework 8:464.20 TJ sitework 27/11/07 14:20 Page 18
20 21
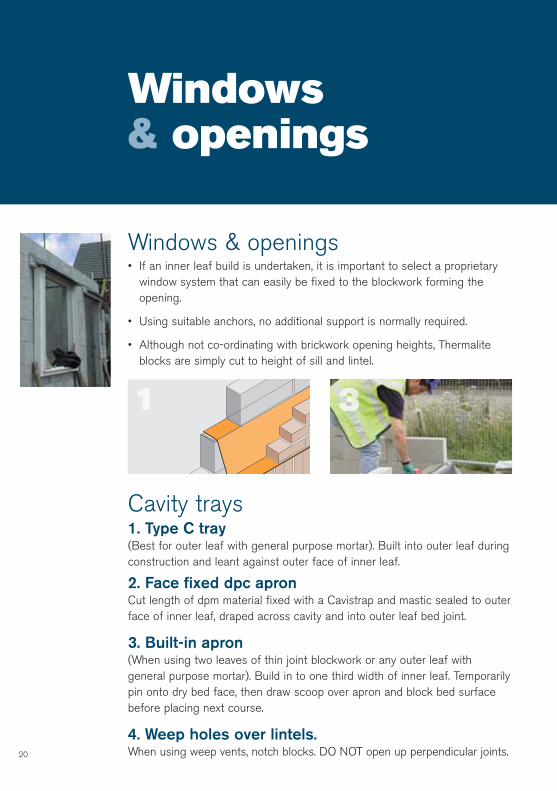
Windows & openings• If an inner leaf build is undertaken, it is important to select a proprietary
window system that can easily be fixed to the blockwork forming the opening.
• Using suitable anchors, no additional support is normally required.
• Although not co-ordinating with brickwork opening heights, Thermalite blocks are simply cut to height of sill and lintel.
Cavity trays1. Type C tray (Best for outer leaf with general purpose mortar). Built into outer leaf duringconstruction and leant against outer face of inner leaf.
2. Face fixed dpc apron Cut length of dpm material fixed with a Cavistrap and mastic sealed to outerface of inner leaf, draped across cavity and into outer leaf bed joint.
3. Built-in apron (When using two leaves of thin joint blockwork or any outer leaf withgeneral purpose mortar). Build in to one third width of inner leaf. Temporarilypin onto dry bed face, then draw scoop over apron and block bed surfacebefore placing next course.
4. Weep holes over lintels. When using weep vents, notch blocks. DO NOT open up perpendicular joints.
Windows & openings
Lintel support & bedding
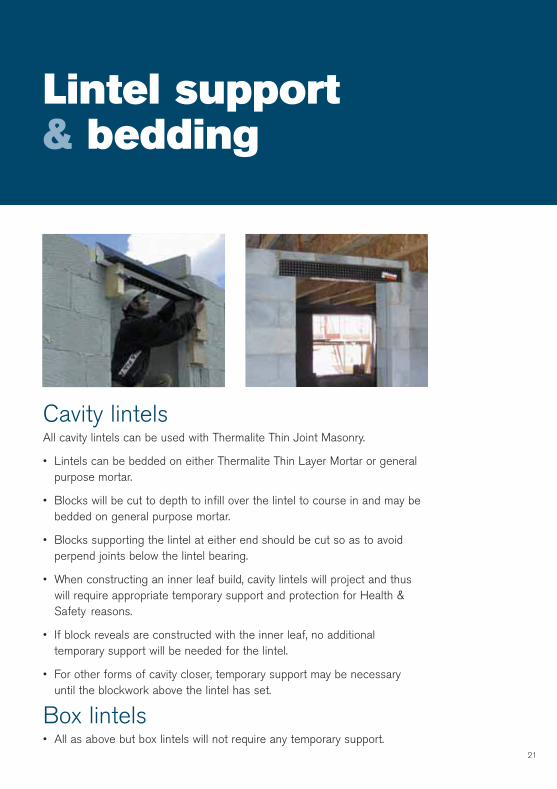
Cavity lintelsAll cavity lintels can be used with Thermalite Thin Joint Masonry.
• Lintels can be bedded on either Thermalite Thin Layer Mortar or general purpose mortar.
• Blocks will be cut to depth to infill over the lintel to course in and may be bedded on general purpose mortar.
• Blocks supporting the lintel at either end should be cut so as to avoid perpend joints below the lintel bearing.
• When constructing an inner leaf build, cavity lintels will project and thus will require appropriate temporary support and protection for Health & Safety reasons.
• If block reveals are constructed with the inner leaf, no additional temporary support will be needed for the lintel.
• For other forms of cavity closer, temporary support may be necessary until the blockwork above the lintel has set.
Box lintels• All as above but box lintels will not require any temporary support.
464.20 TJ sitework 8:464.20 TJ sitework 27/11/07 14:20 Page 20
20 21
Windows & openings• If an inner leaf build is undertaken, it is important to select a proprietary
window system that can easily be fixed to the blockwork forming the opening.
• Using suitable anchors, no additional support is normally required.
• Although not co-ordinating with brickwork opening heights, Thermalite blocks are simply cut to height of sill and lintel.
Cavity trays1. Type C tray (Best for outer leaf with general purpose mortar). Built into outer leaf duringconstruction and leant against outer face of inner leaf.
2. Face fixed dpc apron Cut length of dpm material fixed with a Cavistrap and mastic sealed to outerface of inner leaf, draped across cavity and into outer leaf bed joint.
3. Built-in apron (When using two leaves of thin joint blockwork or any outer leaf withgeneral purpose mortar). Build in to one third width of inner leaf. Temporarilypin onto dry bed face, then draw scoop over apron and block bed surfacebefore placing next course.
4. Weep holes over lintels. When using weep vents, notch blocks. DO NOT open up perpendicular joints.
Windows & openings
Lintel support & bedding
Cavity lintelsAll cavity lintels can be used with Thermalite Thin Joint Masonry.
• Lintels can be bedded on either Thermalite Thin Layer Mortar or general purpose mortar.
• Blocks will be cut to depth to infill over the lintel to course in and may be bedded on general purpose mortar.
• Blocks supporting the lintel at either end should be cut so as to avoid perpend joints below the lintel bearing.
• When constructing an inner leaf build, cavity lintels will project and thus will require appropriate temporary support and protection for Health & Safety reasons.
• If block reveals are constructed with the inner leaf, no additional temporary support will be needed for the lintel.
• For other forms of cavity closer, temporary support may be necessary until the blockwork above the lintel has set.
Box lintels• All as above but box lintels will not require any temporary support.
464.20 TJ sitework 8:464.20 TJ sitework 27/11/07 14:20 Page 20
2322
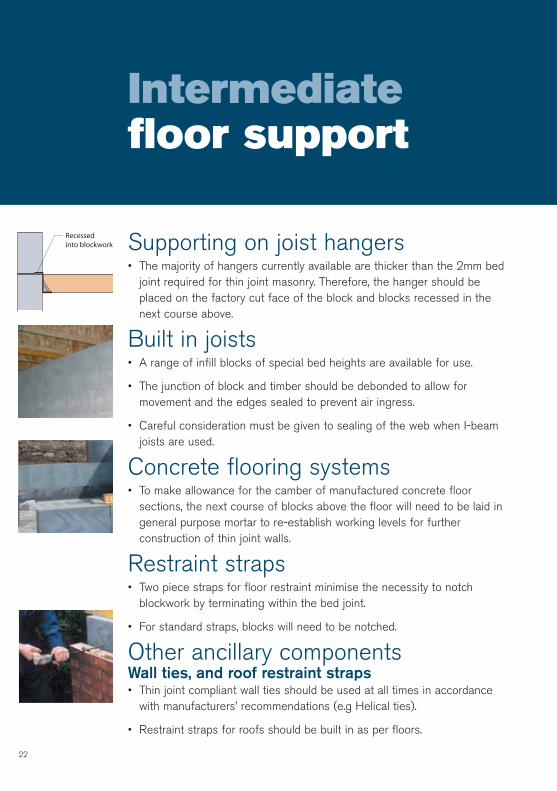
Supporting on joist hangers• The majority of hangers currently available are thicker than the 2mm bed
joint required for thin joint masonry. Therefore, the hanger should be placed on the factory cut face of the block and blocks recessed in the next course above.
Built in joists• A range of infill blocks of special bed heights are available for use.
• The junction of block and timber should be debonded to allow for movement and the edges sealed to prevent air ingress.
• Careful consideration must be given to sealing of the web when I-beam joists are used.
Concrete flooring systems• To make allowance for the camber of manufactured concrete floor
sections, the next course of blocks above the floor will need to be laid in general purpose mortar to re-establish working levels for further construction of thin joint walls.
Restraint straps• Two piece straps for floor restraint minimise the necessity to notch
blockwork by terminating within the bed joint.
• For standard straps, blocks will need to be notched.
Other ancillary componentsWall ties, and roof restraint straps• Thin joint compliant wall ties should be used at all times in accordance
with manufacturers’ recommendations (e.g Helical ties).
• Restraint straps for roofs should be built in as per floors.
Intermediatefloor support
Recessedinto blockwork Acknowledgements
We would like to thank all those who have supplied photographs and imagesfor this guide.
Sustainability and the EnvironmentThermalite is the most envrionmentally friendly aircrete product available inthe United Kingdom.
Hanson Building Products is committed to being a sustainable business andcontributing to sustainable development. We achieve this by continuousimprovement of our manufacturing and extraction processes and byproviding products which contribute to sustainable construction.
Made at factories certified to ISO 14001, our clay and concrete productshave many features which assist our customers in constructing attractive,sustainable buildings which enrich the built environment and are ideal forzero carbon developments. These include: thermal mass, insulation, longevity,durability, low maintenance, flexibility, flood resistance and the ability to berecycled. We can advise on how best to use our products in sustainablebuildings and how they contribute to high ratings under the Code forSustainable Homes and BREEAM.
Email: [email protected]
Web: www.hanson.com/uk/sustainability
464.20 TJ sitework 8:464.20 TJ sitework 27/11/07 14:20 Page 22
2322
Supporting on joist hangers• The majority of hangers currently available are thicker than the 2mm bed
joint required for thin joint masonry. Therefore, the hanger should be placed on the factory cut face of the block and blocks recessed in the next course above.
Built in joists• A range of infill blocks of special bed heights are available for use.
• The junction of block and timber should be debonded to allow for movement and the edges sealed to prevent air ingress.
• Careful consideration must be given to sealing of the web when I-beam joists are used.
Concrete flooring systems• To make allowance for the camber of manufactured concrete floor
sections, the next course of blocks above the floor will need to be laid in general purpose mortar to re-establish working levels for further construction of thin joint walls.
Restraint straps• Two piece straps for floor restraint minimise the necessity to notch
blockwork by terminating within the bed joint.
• For standard straps, blocks will need to be notched.
Other ancillary componentsWall ties, and roof restraint straps• Thin joint compliant wall ties should be used at all times in accordance
with manufacturers’ recommendations (e.g Helical ties).
• Restraint straps for roofs should be built in as per floors.
Intermediatefloor support
Recessedinto blockwork Acknowledgements
We would like to thank all those who have supplied photographs and imagesfor this guide.
Sustainability and the EnvironmentThermalite is the most envrionmentally friendly aircrete product available inthe United Kingdom.
Hanson Building Products is committed to being a sustainable business andcontributing to sustainable development. We achieve this by continuousimprovement of our manufacturing and extraction processes and byproviding products which contribute to sustainable construction.
Made at factories certified to ISO 14001, our clay and concrete productshave many features which assist our customers in constructing attractive,sustainable buildings which enrich the built environment and are ideal forzero carbon developments. These include: thermal mass, insulation, longevity,durability, low maintenance, flexibility, flood resistance and the ability to berecycled. We can advise on how best to use our products in sustainablebuildings and how they contribute to high ratings under the Code forSustainable Homes and BREEAM.
Email: [email protected]
Web: www.hanson.com/uk/sustainability
464.20 TJ sitework 8:464.20 TJ sitework 27/11/07 14:20 Page 22

Hanson - a global business
Hanson is one of the world's largest suppliers of heavy building materials to the constructionindustry. We produce aggregates (crushed rock, sand and gravel), ready-mixed and precastconcrete, asphalt and cement-related materials and a range of building products includingconcrete pipes, concrete pavers, tiles and clay bricks
We are part of the HeidelbergCement Group, which employs 70,000 people across fivecontinents and has leading positions in concrete and heavy building products, and is theglobal leader in aggregates.
Hanson Building Products is the UK’s largest brick and aircrete block producer. We alsoproduce aggregate blocks, bagged aggregate and cement products, renders, pavers, precastfloors and stairs, SUD systems and prefabricated building systems. The division incorporatesLondon Brick, Thermalite, Red Bank, Cradley, Formpave and Structherm.
Aircrete Blocks
Site GuideThin Joint Masonry
Customer Services:
T 08705 626500 F 08705 626550E [email protected] www.hanson.com/uk
Hanson Building ProductsHead OfficeStewartbyBedfordMK43 9LZ
H00
®
®
464.20 TJ sitework 8:464.20 TJ sitework 27/11/07 14:20 Page 24