sitedynamic 1.2 professional edition
TRANSCRIPT

SiteDynamic 1.2 - Quick Reference Guide
SiteDynamic 1.2 Professional Edition
Easy to use content management system
Quick Reference Guide For End-Users
SiteDynamic v1.2 Quick Reference Guide, October 14, 2005 Copyright 2005, CodeDynamic.com, all right reserved.
1

SiteDynamic 1.2 - Quick Reference Guide
Table of Contents
OVERVIEW 3
ICONS LEGEND 3 LOGIN 3 MY PROFILE 4 LOGOUT 5
CONTENT MANAGEMENT 5
ADD PAGE 5 EDIT PAGE CONTENT 6
TEXT/HTML 6 ITEM LIST 7 CONTACT FORMS 8
EDIT PAGE META-TAGS 8 MOVE PAGE POSITION 9 EDIT PAGE PROPERTIES 10
CONTROL PANEL 11
GENERAL CONFIGURATION 11 DEFAULT META-TAGS 13 DIRECT LINKS 14 MANAGE USERS 15
EDIT/ADD USER 15 MEDIA MANAGER 16 SKIN CONFIGURATION 17 LANGUAGE FILES 17 DATABASE MAINTENANCE 18 LOCK WEBSITE 19
SiteDynamic v1.2 Quick Reference Guide, October 14, 2005 Copyright 2005, CodeDynamic.com, all right reserved.
2

SiteDynamic 1.2 - Quick Reference Guide
Overview SiteDynamic enables you to create and manage your Website quickly. This document describes all the features of SiteDynamic in details.
Icons Legend After logging-in, icons will appear. Below you will find a list of icons with their feature.
Important! The position of the icons here is based on SiteDynamic default skin. It may differ depending on the skins. Note: Depending on your access right level you may not be able to view some of the above icons. If you think you should, please contact your administrator.
Login To access your Website control panel and start making changes to your Website you have to login first.
1. Type http://www.yourwebsitename.com/admin in your browser web address bar.
2. Enter your username and password given by your administrator.
SiteDynamic v1.2 Quick Reference Guide, October 14, 2005 Copyright 2005, CodeDynamic.com, all right reserved.
3

SiteDynamic 1.2 - Quick Reference Guide
3. Click the Login button. You may also select the Remember me select box if you wish to save your username on your computer. Important! For security reasons do not select the Remember me feature when logging in on public computers.
My Profile
You can view and change your profile details by clicking on the My Profile icon ( ).
• Your user title is assigned by your administrator and can only be changed by him.
• Enter a new username or leave your current username. • Enter your new or current password. • Confirm your password (the one you typed above). • Enter your email address. • Always click the Submit button to apply changes.
Tip: It is strongly recommended you change your username and password regularly. Important! The password and confirm password fields need to be filled when you want to apply changes. Note: Depending on your access right level you may not be able to access this feature. If you think you should, please contact your administrator.
SiteDynamic v1.2 Quick Reference Guide, October 14, 2005 Copyright 2005, CodeDynamic.com, all right reserved.
4

SiteDynamic 1.2 - Quick Reference Guide
Logout
To logout, click the logout icon ( ).
Important! The logging out action confirms your Website that you have finished and locks your session to other users using the same computer. When you have finished it is important to logout.
Content Management The content management system permits you to add, edit, and delete the page content of your pages.
Add Page
To add a new page, click the Add Page icon ( ). This icon is located top-left in SiteDynamic default skin.
Navigation Menu Title: Your page title is displayed both in the menu and at the top of the relevant page. A short title has a better impact. Filename: To help search engines and users find you quickly use a keyword describing your page content. Avoid at all cost using special characters (including accents). Page Position: Select a position in the menu for your page below an existing page.
SiteDynamic v1.2 Quick Reference Guide, October 14, 2005 Copyright 2005, CodeDynamic.com, all right reserved.
5

SiteDynamic 1.2 - Quick Reference Guide
Content Type: Select the type of content for the page.
• Text/Html is a classic text page. • Item List is to create a list of items (e.g. list of products, links, etc). • Contact Form is to create a page with a form to contact you.
Display in Menu: If you want your page not to be shown in the menu select “Hide” (Hiding a page can be handy while you are working on it). Note: Depending on your access right level you may not be able to access this feature. If you think you should, please contact your administrator.
Edit Page Content
To edit the content of a page, click the Edit Page Content icon ( ). There are 3 types of content. Text/Html
Type in your text in the textbox and format it using the editor toolbar above in the usual way. Note that you can save your content as you go by using the editor toolbar save button (icon). When you are done, click the “Submit” button located bottom-right hand side.
SiteDynamic v1.2 Quick Reference Guide, October 14, 2005 Copyright 2005, CodeDynamic.com, all right reserved.
6

SiteDynamic 1.2 - Quick Reference Guide
Item List
You can change the page header or footer in the same way as the Text/Html content page. You can also add a new item and edit/delete an existing one.
• Move to Top: Items are automatically placed one above the other. However you can tick the “Move to Top” checkbox when you want to move an existing item to the top of the list.
• Link Url: When you have the need for it, use this field either to link to a live Website or to another page of your own Website.
• ItemLink Text: For a better appearance give your link a title. • Link Target: If you want your link to open in a new window, select “New
Page” otherwise your link will open on the same window as your Website. Parent Page refers to frame users (It is actually something rarely used).
SiteDynamic v1.2 Quick Reference Guide, October 14, 2005 Copyright 2005, CodeDynamic.com, all right reserved.
7
SiteDynamic 1.2 - Quick Reference Guide
• Undefined Field: Can be used to indicate a category or a one word description (e.g. in a list of products such as books, the undefined field could refer to “Thriller”, “Novel”, “Poetry”, etc).
• Item Title/Description: This is the title and the full description of your item. These are both required fields.
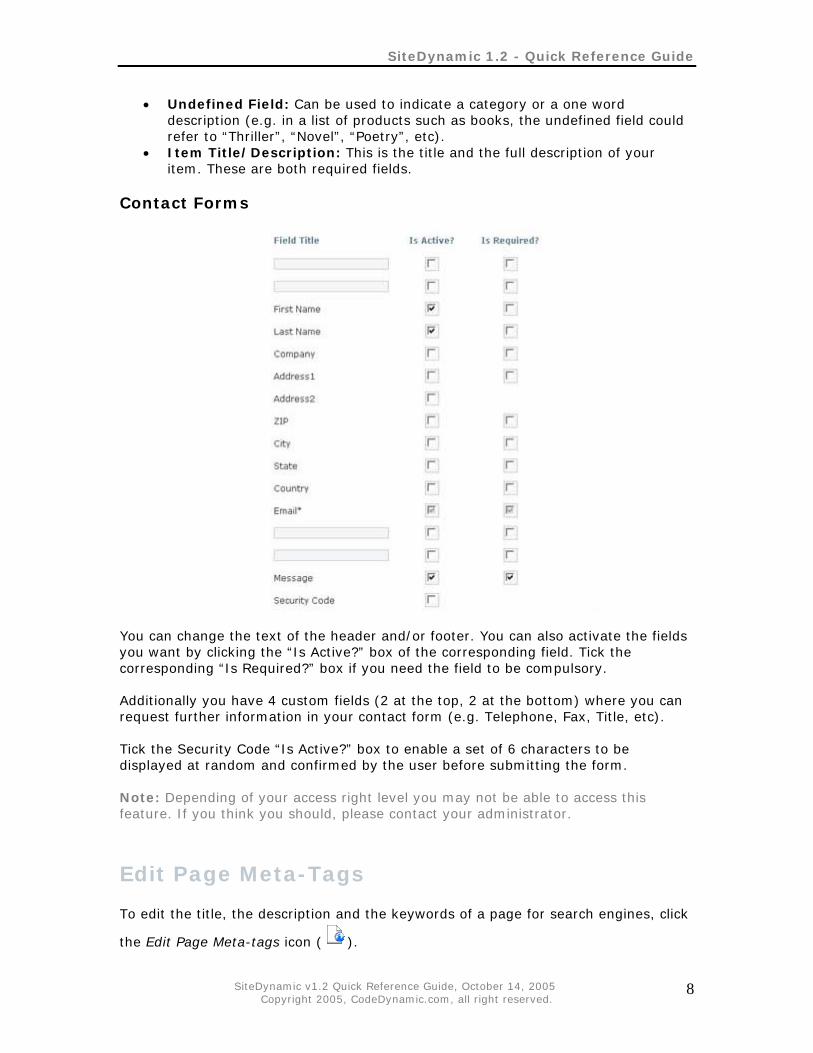
Contact Forms
You can change the text of the header and/or footer. You can also activate the fields you want by clicking the “Is Active?” box of the corresponding field. Tick the corresponding “Is Required?” box if you need the field to be compulsory. Additionally you have 4 custom fields (2 at the top, 2 at the bottom) where you can request further information in your contact form (e.g. Telephone, Fax, Title, etc). Tick the Security Code “Is Active?” box to enable a set of 6 characters to be displayed at random and confirmed by the user before submitting the form. Note: Depending of your access right level you may not be able to access this feature. If you think you should, please contact your administrator.
Edit Page Meta-Tags To edit the title, the description and the keywords of a page for search engines, click
the Edit Page Meta-tags icon ( ).
SiteDynamic v1.2 Quick Reference Guide, October 14, 2005 Copyright 2005, CodeDynamic.com, all right reserved.
8

SiteDynamic 1.2 - Quick Reference Guide
Title: The page title is used by search engines and is displayed in your browser title bar. Description: This description is inserted into the head area of your web page. It is used by search engines and is not seen by those viewing your page in a browser. Keywords: Keywords are also used by search engines and inserted in the hidden head area of your page. Tip: A maximum of 50 characters for your title, 250 for your description and 10 to 12 keywords separated by a comma has a better impact on search engines. Note: Depending on your access right level you may not be able to access this feature. If you think you should, please contact your administrator.
Move Page Position
To move the position of a page, click the Move Page Position icon ( ). A page is always placed below the selected page.
SiteDynamic v1.2 Quick Reference Guide, October 14, 2005 Copyright 2005, CodeDynamic.com, all right reserved.
9

SiteDynamic 1.2 - Quick Reference Guide
Note: Depending on your access right level you may not be able to access this feature. If you think you should, please contact your administrator.
Edit Page Properties
To edit the properties of a page, click the Edit Page Properties icon ( ).
Navigation Menu Title: You can change the title of the page displayed in the menu. RSS Output: Tick the “Enable RSS” box to create a RSS 2.0 (Really Simple Syndication) file for your page. A small icon linking to the RSS file will be displayed in your page content.
SiteDynamic v1.2 Quick Reference Guide, October 14, 2005 Copyright 2005, CodeDynamic.com, all right reserved.
10

SiteDynamic 1.2 - Quick Reference Guide
Display in Menu: If you want your page not to be shown in the menu, select “Hide”. This option is not available for the Homepage. Delete: Click the delete button to delete the page definitively. This option is not available for the Homepage. Note: Depending on your access right level you may not be able to access this feature. If you think you should, please contact your administrator.
Control Panel The control panel is the backbone of your Website. It permits you to have complete control over your Website.
General Configuration To edit the general settings of your Website, click the General Configuration icon
( ).
SiteDynamic v1.2 Quick Reference Guide, October 14, 2005 Copyright 2005, CodeDynamic.com, all right reserved.
11

SiteDynamic 1.2 - Quick Reference Guide
Website Url: Input the full web address of your Website (e.g. www.mywebsite.com). Mail Component: The mail component is installed on your web server and permits you to send emails. For compatibility reasons, several components are available in SiteDynamic. Simply choose one already installed. Website Email: Input an email address where you want to be contacted through the contact forms. SMTP Server: Input your mail server SMTP address as given by your Website administrator or Web host. SMTP Login/Password: Type in your SMTP username and password if your mail server requires authentication. This option is available using CDOsys and Persits AspEmail components only. Maximum File Size: Select the maximum size for your files to be uploaded.
SiteDynamic v1.2 Quick Reference Guide, October 14, 2005 Copyright 2005, CodeDynamic.com, all right reserved.
12

SiteDynamic 1.2 - Quick Reference Guide
Allowed File Types: Input the type of files you want to allow to be uploaded. Separate each of them by a semi-colon (e.g. jpg;png;gif;jpeg;pdf;txt). Cookie Name: You can change the default cookie name used for authentication. When submitting a new cookie name, please note that you will be automatically logged-out and will need to login again. Note: Depending on your access right level you may not be able to access this feature. If you think you should, please contact your administrator.
Default Meta-Tags To edit the meta-tags to be used by new pages, click the Default Meta-Tags icon
( ).
Website Name: This title is displayed in your browser title bar (located in the upper area of your browser window) after the page title. Owner: Input your full/company name. Title: Input a default page title. A maximum of 50 characters for your title (including spaces) has a better impact on search engines. Description/Keywords: Input a default description to be used by each newly created page. You can click the “Count” button to either count the number of
SiteDynamic v1.2 Quick Reference Guide, October 14, 2005 Copyright 2005, CodeDynamic.com, all right reserved.
13

SiteDynamic 1.2 - Quick Reference Guide
characters used in your description or in your list of keywords. A maximum of 250 characters for your description (including spaces) and a list of 10 to 12 keywords separated by a comma have a good impact on search engines. Note: Depending on your access right level you may not be able to access this feature. If you think you should, please contact your administrator.
Direct Links
To edit/add a direct link to the navigation menu, click the Direct Links icon ( ).
Navigation Menu Title: Input the title to be displayed in the navigation menu. URL: Input the Web address you want to link to. Position: Determine a position in the navigation menu. This link will be placed below the selected page. Display in Menu: If you don’t want this link to be displayed in the menu select “Hide”.
SiteDynamic v1.2 Quick Reference Guide, October 14, 2005 Copyright 2005, CodeDynamic.com, all right reserved.
14

SiteDynamic 1.2 - Quick Reference Guide
Manage Direct Links: Click the “Edit” button to edit a direct link. Click the “Delete” button to delete the link definitely. Note: Depending on your access right level you may not be able to access this feature. If you think you should, please contact your administrator.
Manage Users
To add, edit or delete a user, click the Manage Users icon ( ).
Add New User: Click this link to add a user. Edit/Del: Click the corresponding “Edit” link to change the details of an existing user or click the “Del” button to definitely delete a user. Edit/Add User
• Status: Tick off this checkbox if you want to deactivate the user.
SiteDynamic v1.2 Quick Reference Guide, October 14, 2005 Copyright 2005, CodeDynamic.com, all right reserved.
15

SiteDynamic 1.2 - Quick Reference Guide
• Title: The title is the function you have on the Website and is assigned by the administrator.
• Username/Password: Required to login into your Website. Note that both fields are case sensitive.
• Email: Input the email address where you want the Website administrator to contact you.
• Permissions: Tick to allow the use of the corresponding feature. Note: Depending on your access right level you may not be able to access this feature. If you think you should, please contact your administrator.
Media Manager To manage your Website images and documents, click the Media Manager icon
( ).
The Media Manager is used to view, upload, download and delete all files used within your content pages such as images and documents.
SiteDynamic v1.2 Quick Reference Guide, October 14, 2005 Copyright 2005, CodeDynamic.com, all right reserved.
16

SiteDynamic 1.2 - Quick Reference Guide
Note: Depending on your access right level you may not be able to access this feature. If you think you should, please contact your administrator.
Skin Configuration
To edit your Website skin configuration, click the Skin Configuration icon ( ).
Change Skin: Select a skin in the dropdown list and click the “Update” button to apply it to your Website. Upload Logo: Click the “Browse” button to select a logo saved on your computer then click the “Upload” button to upload it to your Website. Upload Banner: Click the “Browse” button to select a banner saved on your computer then click the “Upload” button to upload it to your Website. Note: Depending on your access right level you may not be able to access this feature. If you think you should, please contact your administrator.
Language Files To change your Website interface language, click the Language Files icon ( ).
SiteDynamic v1.2 Quick Reference Guide, October 14, 2005 Copyright 2005, CodeDynamic.com, all right reserved.
17

SiteDynamic 1.2 - Quick Reference Guide
Website Language: Select a language in the dropdown list and click the “Update” button. Editor Language: Select a language in the dropdown list and click the “Update” button. Upload Language File: Click the “Browse” button to select a language file saved on your computer then click the “Upload” button to upload it to your Website. Note: Depending on your access right level you may not be able to access this feature. If you think you should, please contact your administrator.
Database Maintenance To backup or compact your database, click the Database Maintenance icon ( ).
Database Information: Displays your database details (Microsoft Access and SQL Server).
SiteDynamic v1.2 Quick Reference Guide, October 14, 2005 Copyright 2005, CodeDynamic.com, all right reserved.
18

SiteDynamic 1.2 - Quick Reference Guide
Backup Database: Click this link to save your database onto your computer (Microsoft Access only). Compact Database: Compacting your database improves its performance (Microsoft Access only). You should compact your database at least once a week by clicking on this button. Note: Depending on your access right level you may not be able to access this feature. If you think you should, please contact your administrator.
Lock Website
To lock your Website, click the Lock Website icon ( ). This feature can be used when doing maintenance or to close your Website temporarily. When accessing your Website, a page is displayed with the title and the message you have chosen.
Title/Message: Input the title and message you want to be displayed. Lock/Unlock: Select lock or unlock accordingly. Important: The admin area will remain accessible to super admin and allowed users. Note: Depending on your access right level you may not be able to access this feature. If you think you should, please contact your administrator.
SiteDynamic v1.2 Quick Reference Guide, October 14, 2005 Copyright 2005, CodeDynamic.com, all right reserved.
19