sketchup pro 2015 layout exercise - meetupfiles.meetup.com/12554492/sketchup pro 2015 layout...
TRANSCRIPT

1 | P a g e L a r r y Z e n t 7 2 0 - 9 7 9 - 6 2 2 2 ( l d z e n t @ g m a i l . c o m )
SketchUp Pro 2015 LayOut Exercise: *** Please read and look over at all pages before starting***
The photos in this document may not look like yours on your computer as you are working.
1. This is an exercise that will give you an overall description of what SketchUp & LayOut looks like and the
basic use of the program. Any company logos and files for your company can be inserted in place of these test
files when you make your company templates.
2. Copy the file called “Test Logo.jpg”, and the SketchUp file called “Caretaker-House-2015.skp” to your
desktop.
3. Select “LayOut” from your desktop icon.
4. Several dialog boxes will open with LayOut, one showing a “Tip of the Day” that you can select and go
through the various items that LayOut can do. Click “Next” to see the various items and select “Close” at any
time to stop.
2 | P a g e L a r r y Z e n t 7 2 0 - 9 7 9 - 6 2 2 2 ( l d z e n t @ g m a i l . c o m )
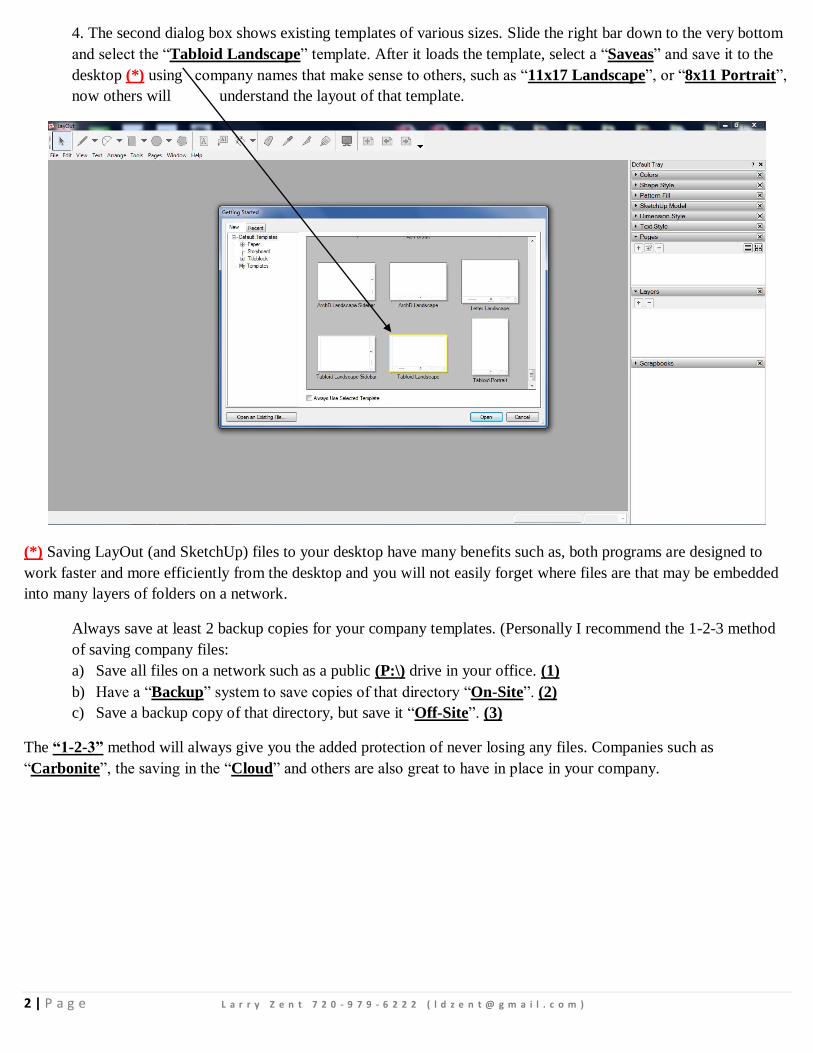
4. The second dialog box shows existing templates of various sizes. Slide the right bar down to the very bottom
and select the “Tabloid Landscape” template. After it loads the template, select a “Saveas” and save it to the
desktop (*) using company names that make sense to others, such as “11x17 Landscape”, or “8x11 Portrait”,
now others will understand the layout of that template.
(*) Saving LayOut (and SketchUp) files to your desktop have many benefits such as, both programs are designed to
work faster and more efficiently from the desktop and you will not easily forget where files are that may be embedded
into many layers of folders on a network.
Always save at least 2 backup copies for your company templates. (Personally I recommend the 1-2-3 method
of saving company files:
a) Save all files on a network such as a public (P:\) drive in your office. (1)
b) Have a “Backup” system to save copies of that directory “On-Site”. (2)
c) Save a backup copy of that directory, but save it “Off-Site”. (3)
The “1-2-3” method will always give you the added protection of never losing any files. Companies such as
“Carbonite”, the saving in the “Cloud” and others are also great to have in place in your company.
3 | P a g e L a r r y Z e n t 7 2 0 - 9 7 9 - 6 2 2 2 ( l d z e n t @ g m a i l . c o m )
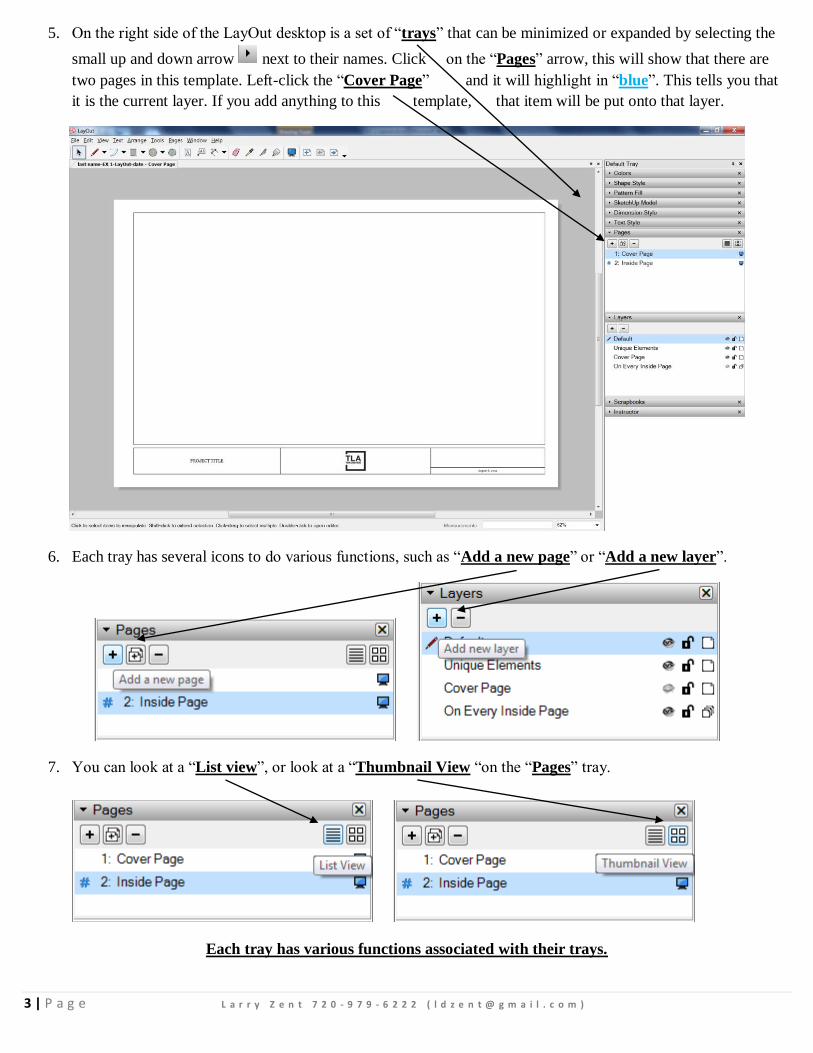
5. On the right side of the LayOut desktop is a set of “trays” that can be minimized or expanded by selecting the
small up and down arrow next to their names. Click on the “Pages” arrow, this will show that there are
two pages in this template. Left-click the “Cover Page” and it will highlight in “blue”. This tells you that
it is the current layer. If you add anything to this template, that item will be put onto that layer.
6. Each tray has several icons to do various functions, such as “Add a new page” or “Add a new layer”.
7. You can look at a “List view”, or look at a “Thumbnail View “on the “Pages” tray.
Each tray has various functions associated with their trays.

4 | P a g e L a r r y Z e n t 7 2 0 - 9 7 9 - 6 2 2 2 ( l d z e n t @ g m a i l . c o m )
From this point on, these steps will have you do several changes to the file, remember to try and be sure you do
each step, not missing any. The text can later be your company name and your company logo, and not what is
shown in the images.
8. Under the “Layers” dialog box, you can select to “lock” or “unlock” the layers. Select the + symbol and make
a new layer called “Titleblock Text”, and then select “enter” when you are done typing.
9. Left-click the text “PROJECT TITLE” area and then double-click the text.
10. Expand the “Text Style” tray and select a new Font and size you would like to use, then type in the title
“SketchUp Layout” and your name, select the enter key to add your name below it.
5 | P a g e L a r r y Z e n t 7 2 0 - 9 7 9 - 6 2 2 2 ( l d z e n t @ g m a i l . c o m )
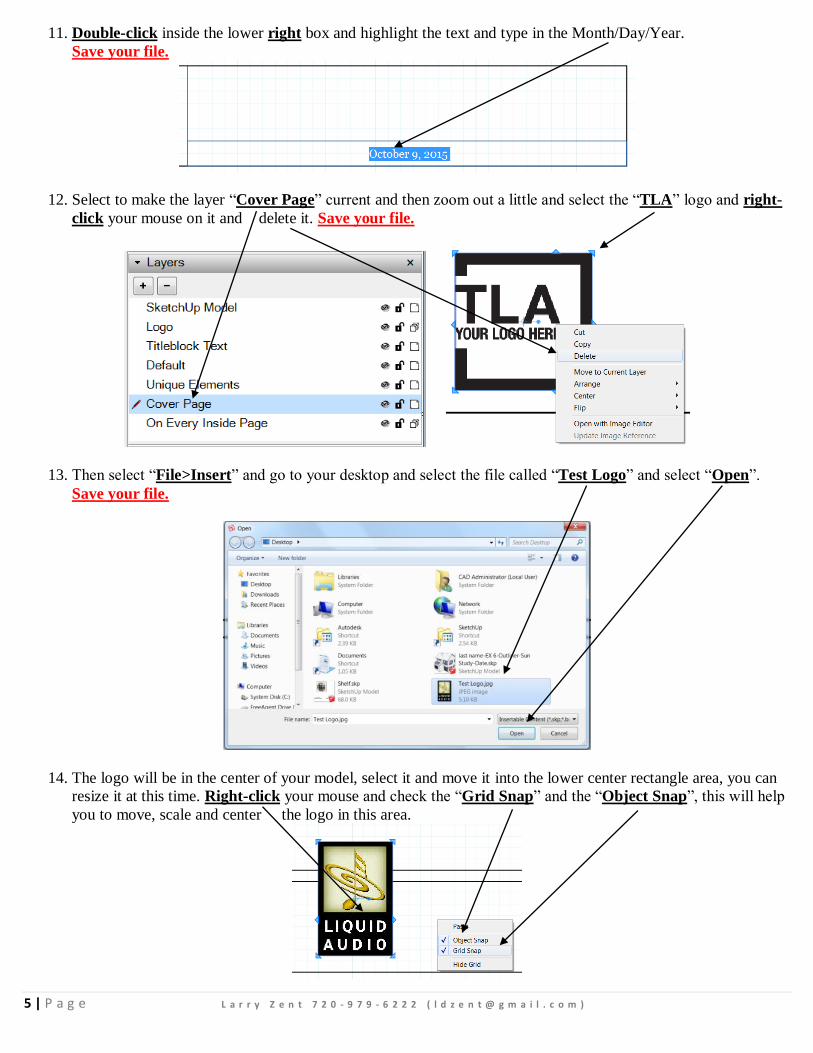
11. Double-click inside the lower right box and highlight the text and type in the Month/Day/Year.
Save your file.
12. Select to make the layer “Cover Page” current and then zoom out a little and select the “TLA” logo and right-
click your mouse on it and delete it. Save your file.
13. Then select “File>Insert” and go to your desktop and select the file called “Test Logo” and select “Open”.
Save your file.
14. The logo will be in the center of your model, select it and move it into the lower center rectangle area, you can
resize it at this time. Right-click your mouse and check the “Grid Snap” and the “Object Snap”, this will help
you to move, scale and center the logo in this area.

6 | P a g e L a r r y Z e n t 7 2 0 - 9 7 9 - 6 2 2 2 ( l d z e n t @ g m a i l . c o m )
15. Select “View<Zoom to Fit” under the “View” pull-down menu, this will show you the entire template on your
screen. Save your file.
16. Make a new layer called “SketchUp Model” and then select “File<Insert” and find the SketchUp file on your
desktop called “Caretaker-House 2015.skp” and select then “Open”.
Save your file.
17. The SketchUp model will insert in the center of your page. Move, center and enlarge the image, but leave
enough room at the bottom and top to add some text in the next step.

7 | P a g e L a r r y Z e n t 7 2 0 - 9 7 9 - 6 2 2 2 ( l d z e n t @ g m a i l . c o m )
18. Once a SketchUp model has been inserted in LayOut, and should you ever go back and change the file you can
“update” this file by, selecting “File>Document Setup” and then selecting the SketchUp file under the
“Preferences” side menu, and then selecting the “Update” button, and “Close”. This will update your
SketchUp model in LayOut.
19. Next select a text height of 28 pt. and make it a bold text. Then select the “Text” icon and place text above and
below the image. Calling out the name of the house file and also the name of your company.
8 | P a g e L a r r y Z e n t 7 2 0 - 9 7 9 - 6 2 2 2 ( l d z e n t @ g m a i l . c o m )
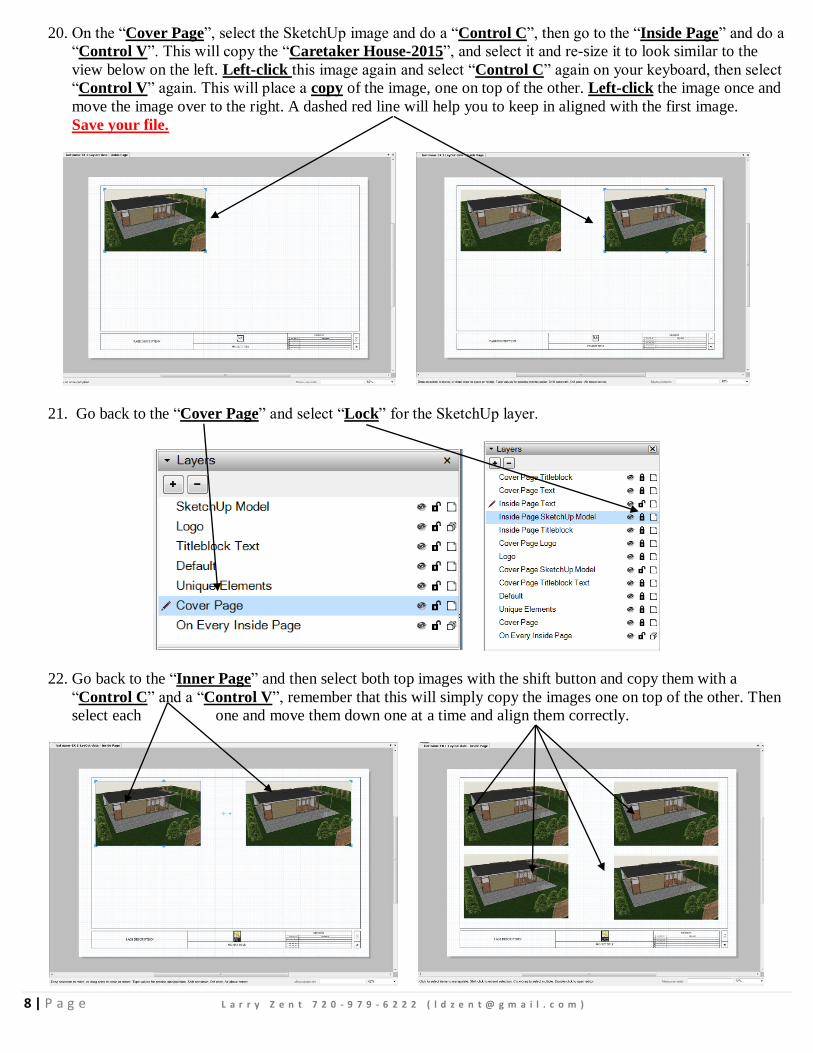
20. On the “Cover Page”, select the SketchUp image and do a “Control C”, then go to the “Inside Page” and do a
“Control V”. This will copy the “Caretaker House-2015”, and select it and re-size it to look similar to the
view below on the left. Left-click this image again and select “Control C” again on your keyboard, then select
“Control V” again. This will place a copy of the image, one on top of the other. Left-click the image once and
move the image over to the right. A dashed red line will help you to keep in aligned with the first image.
Save your file.
21. Go back to the “Cover Page” and select “Lock” for the SketchUp layer.
22. Go back to the “Inner Page” and then select both top images with the shift button and copy them with a
“Control C” and a “Control V”, remember that this will simply copy the images one on top of the other. Then
select each one and move them down one at a time and align them correctly.
9 | P a g e L a r r y Z e n t 7 2 0 - 9 7 9 - 6 2 2 2 ( l d z e n t @ g m a i l . c o m )
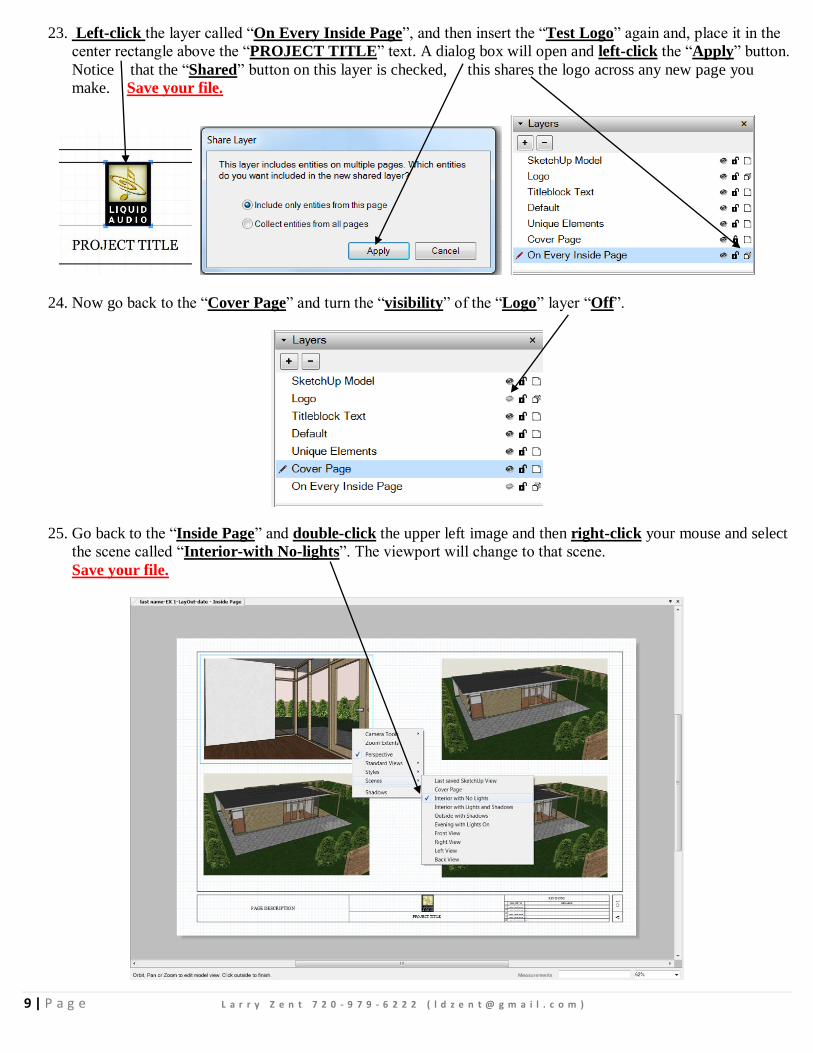
23. Left-click the layer called “On Every Inside Page”, and then insert the “Test Logo” again and, place it in the
center rectangle above the “PROJECT TITLE” text. A dialog box will open and left-click the “Apply” button.
Notice that the “Shared” button on this layer is checked, this shares the logo across any new page you
make. Save your file.
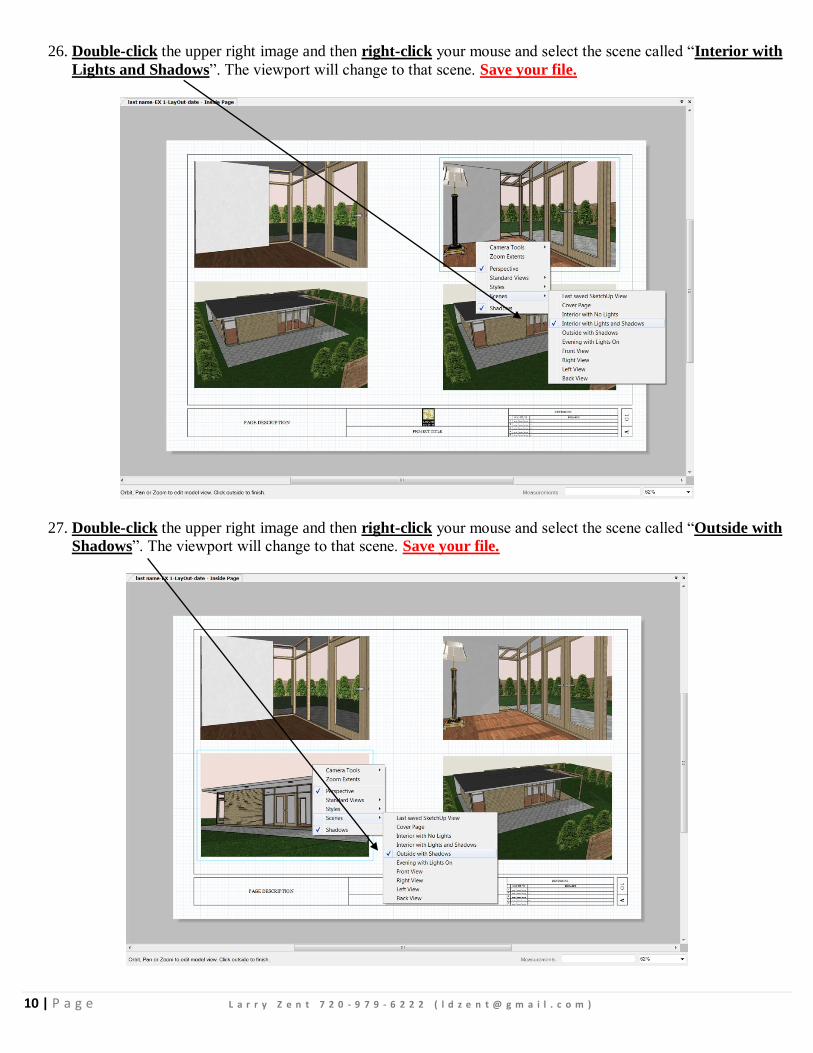
24. Now go back to the “Cover Page” and turn the “visibility” of the “Logo” layer “Off”.
25. Go back to the “Inside Page” and double-click the upper left image and then right-click your mouse and select
the scene called “Interior-with No-lights”. The viewport will change to that scene.
Save your file.
10 | P a g e L a r r y Z e n t 7 2 0 - 9 7 9 - 6 2 2 2 ( l d z e n t @ g m a i l . c o m )
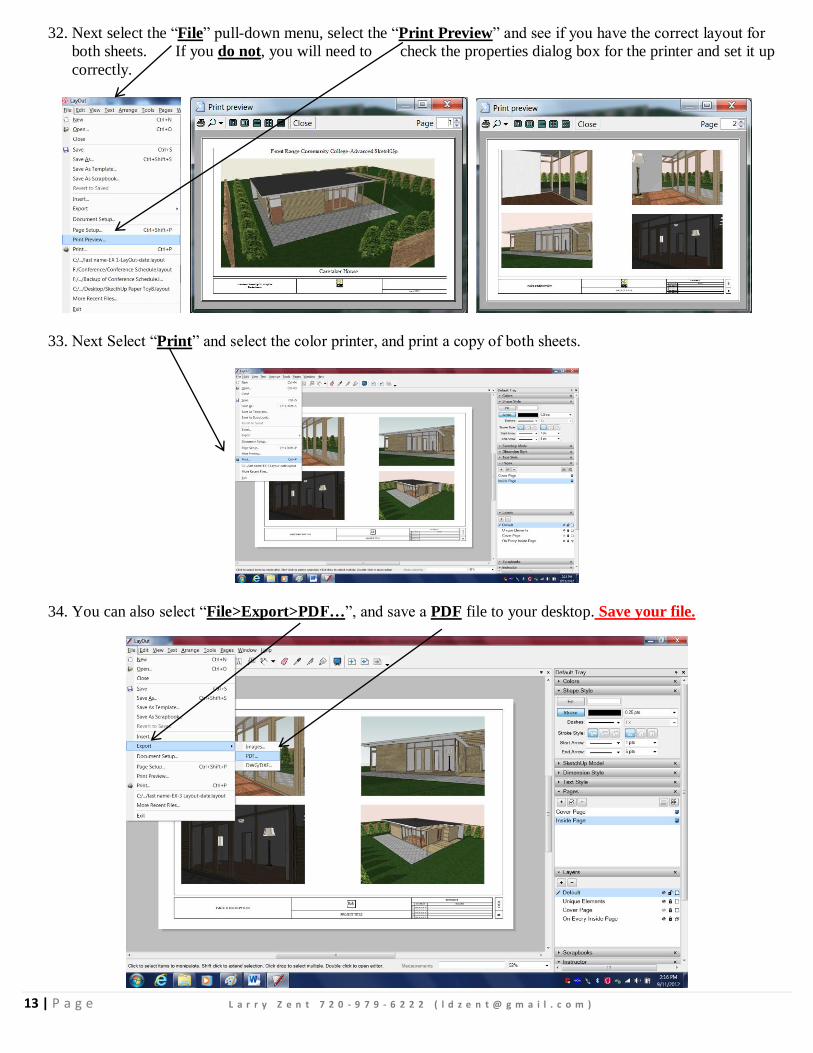
26. Double-click the upper right image and then right-click your mouse and select the scene called “Interior with
Lights and Shadows”. The viewport will change to that scene. Save your file.
27. Double-click the upper right image and then right-click your mouse and select the scene called “Outside with
Shadows”. The viewport will change to that scene. Save your file.

11 | P a g e L a r r y Z e n t 7 2 0 - 9 7 9 - 6 2 2 2 ( l d z e n t @ g m a i l . c o m )
28. Double-click the upper right image and then right-click your mouse and select the scene called “Evening with
Shadows”. The viewport will change to that scene. Save your file.
29. Next select the “File<Page Setup” select an “11” x 17” or “Tabloid” format and select “OK”.

12 | P a g e L a r r y Z e n t 7 2 0 - 9 7 9 - 6 2 2 2 ( l d z e n t @ g m a i l . c o m )
30. On the “Inside Page” make the “Titleblock Text” layer current and then expand the “Text Style” tray and
select the same “Font” you used in step 10, then add your name, date, and project name in the “PAGE
DESCRIPTION” area.
31. Add text under each view to call out the “Scene” names. (“Interior-with No-lights”, “Interior with Lights
and Shadows”, “Outside with Shadows”, and “Evening with Shadows”. Save your file.
13 | P a g e L a r r y Z e n t 7 2 0 - 9 7 9 - 6 2 2 2 ( l d z e n t @ g m a i l . c o m )
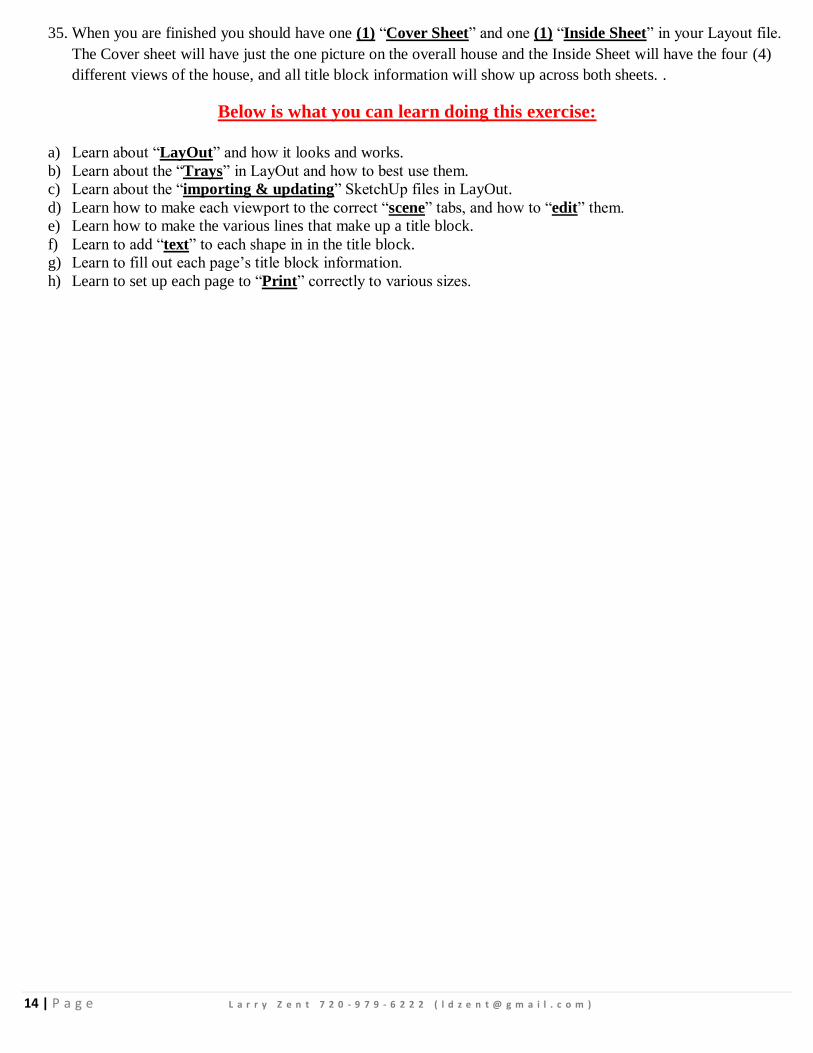
32. Next select the “File” pull-down menu, select the “Print Preview” and see if you have the correct layout for
both sheets. If you do not, you will need to check the properties dialog box for the printer and set it up
correctly.
33. Next Select “Print” and select the color printer, and print a copy of both sheets.
34. You can also select “File>Export>PDF…”, and save a PDF file to your desktop. Save your file.
14 | P a g e L a r r y Z e n t 7 2 0 - 9 7 9 - 6 2 2 2 ( l d z e n t @ g m a i l . c o m )
35. When you are finished you should have one (1) “Cover Sheet” and one (1) “Inside Sheet” in your Layout file.
The Cover sheet will have just the one picture on the overall house and the Inside Sheet will have the four (4)
different views of the house, and all title block information will show up across both sheets. .
Below is what you can learn doing this exercise:
a) Learn about “LayOut” and how it looks and works.
b) Learn about the “Trays” in LayOut and how to best use them.
c) Learn about the “importing & updating” SketchUp files in LayOut.
d) Learn how to make each viewport to the correct “scene” tabs, and how to “edit” them.
e) Learn how to make the various lines that make up a title block.
f) Learn to add “text” to each shape in in the title block.
g) Learn to fill out each page’s title block information.
h) Learn to set up each page to “Print” correctly to various sizes.