sketchup - · pdf filesketchup starting up the first thing you must do is select a template....
TRANSCRIPT

SketchUp Starting Up
The first thing you must do is select a
template.
While there are many different ones
to choose from the only real
difference in them is that some have
a coloured floor and a horizon and
the measurements used. The only
one with a noticeable difference is
the architectural ones that creates a
bold mark where lines intersect.
For most projects the simple
template of landscape one are great.
Setting Up the User Interface. The first time you launch the
program many of the essential
tool bars and icons you need
are not displayed.
To activate the other toolbars
click on View in the menu bar
and then Toolbars…
In the new box that appears untick Getting Started and
then tick:
Large Tool Set
Measurements
Shadows
Standard
Views
And then click close.
It should now look more like the picture below.

Important Features There are many little helpful features built into the program but here are the important ones.
Holding the middle mouse button (Pressing down on the scroll wheel)
while moving the mouse allows you to rotate the workspace. Holding
the shift key while doing the same thing scrolls the workspace.
On the workspace are red, blue and green axis guides to help you keep
orientation. These can be turned off in the view menu before you save
your picture.
The program has a “magnetic” click feature that helps you place the
cursor onto lines or corners and to find the middle of a line, or Midpoint.
The same “magnetic” feature allows to place the cursor on a point and
then move it away leaving a ghost guide line to show that you are
moving parallel along an axis.
The same guide lines also tell you if you reach a point parallel with
another point on your model. Helpful if you are trying to make parts of
equal height or length.
Use the mouse scroll wheel to zoom in and out.
The program uses single clicks, double clicks and is one of the only programs to use a triple
click.
Anatomy of A Shape Shapes consist of edges and faces. Imagine the edges act
like a frame for a shape and the faces are like sheets
stretched out across the frame.
It’s possible to have edges without a face, but edges
must be all connected to have a face. If you remove the
edge of a shape all faces connected to that shape will
disappear as well.
You can select a single face or edge with a single click. If
you double click on a face it will highlight that face and the edges surrounding it. If you triple click it
will select the whole shape (all edges and faces.)
Edges without face. Shape with face missing. Shape with edge missing.

Building A Simple House
1 – Open a new SketchUp page. If you want, you can delete the figure by clicking once and then
pressing the delete button.
2 – Change to top view by clicking on the icon that shows a house from above in the view
toolbar. Then using the rectangle draw tool drag out a box. Make sure you make it a decent
size, at least 10m x 10m. You can see the size of the shape you are drawing in the measurement
window.
3 – Switch back to isometric view by clicking in the 3D house in the view toolbar. Then select
the Push/Pull tool. The Push/Pull tools allows you to use the mouse to drag a face and extend
or shorten it.

4 – As you put the cursor on the face of your shape small dots should appear on it. Holding the
left mouse button drag the face upwards. You need to drag it up about 8 to 10m.
5 – You may need to move your shape down slightly so you can see the top better (Hold shift
key and middle mouse button and drag downwards or use the Pan tool.) Then keeping the
Push/Pull tool selected press the Ctrl key and a small plus sign will appear on the cursor. This
means that when we pull the top of box up again it starts a new section instead of just
extending the whole box. Click and drag the top of the box up again about 5m. You should see a
line around the box from where you started to drag.
6 – Again you will need to move the shape down so you can see the top clearly (shift + hold
middle mouse button) and you may like to rotate the angle (middle mouse button or Orbit
tool.) Click on the Select tool first and then click on the top of the box. You know it is selected
because small dots will appear on the face.

7 – Click on the Scale tool and green boxes appear on the edges around the face. You can click
and drag these boxes to change the scale of a face. Placing the mouse over a green box turns
that box and the box opposite red with a dotted line to show in the direction that it will scale as
you drag it. Place the mouse over one of the green boxes on the side of the box. Now press and
hold the Ctrl key on the keyboard. You will notice that the opposite red box has moved into the
middle of the face. If you now drag the red box towards the middle the opposite edge will
mirror the action to keep is symmetrical. You might find it easier as the two edges get closer to
zoom in with the mouse scroll wheel to get them closer.
8 – You should now have a basic house shape. Time to add windows and doors. First let’s look
at the front of our house by clicking on the Front view in the view tool bar.

9 – There are 2 ways to draw windows and doors. You can use the Rectangle tool to draw on
the house, or you can use the Line tool to draw rectangles or squares.
10 – If you want your windows to be the same height or match up
then you can use the ghost guide lines to help you. Select the tool
you want to use to draw with and then without clicking any mouse
buttons place the cursor on the corner of an existing window and
then slowly move your mouse horizontally or vertically and a guide
line should appear. If it does not appear straight away it will when
your cursor is level with another point on a window.
11 – Use the different views in the View tool bar to see all sides
of your house to add windows and doors to any other sides if
you want to.
12 – Click on the Paint Bucket tool to open the side menu. If you can’t see the materials
selection then click on the bar. In the drop down menu select Brick, Cladding and Siding. Using
the left mouse button click on the faces that you want bricks to appear.
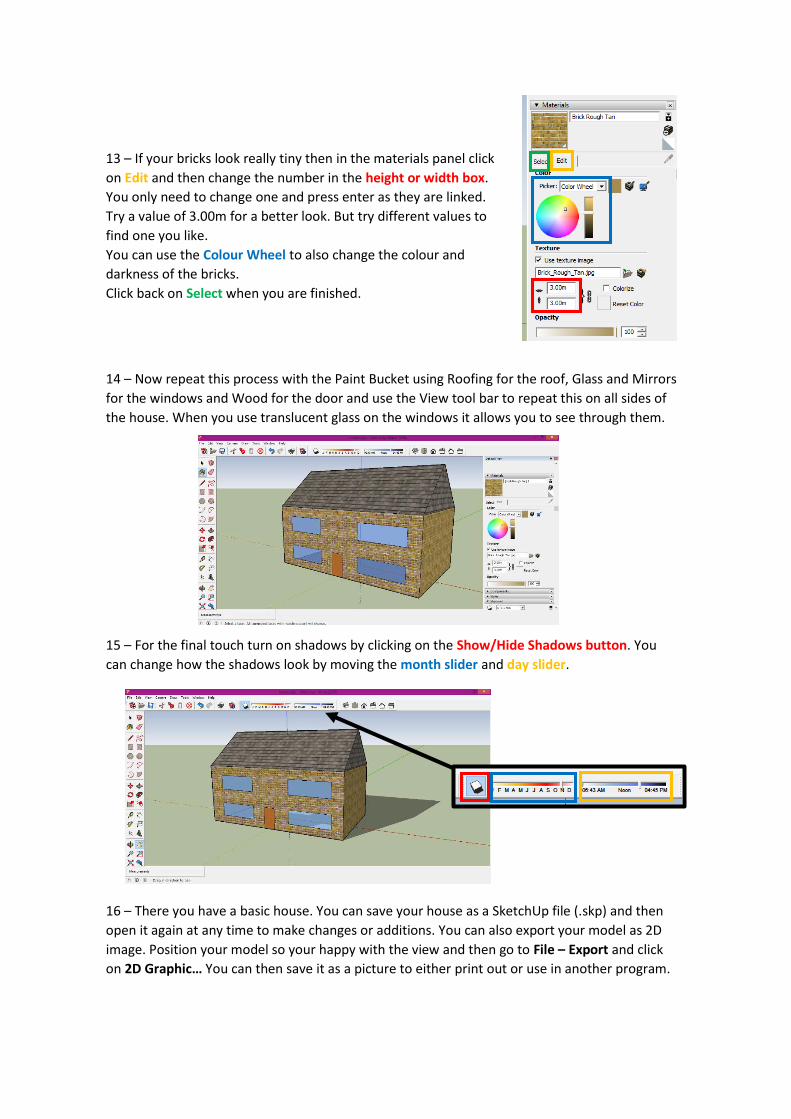
13 – If your bricks look really tiny then in the materials panel click
on Edit and then change the number in the height or width box.
You only need to change one and press enter as they are linked.
Try a value of 3.00m for a better look. But try different values to
find one you like.
You can use the Colour Wheel to also change the colour and
darkness of the bricks.
Click back on Select when you are finished.
14 – Now repeat this process with the Paint Bucket using Roofing for the roof, Glass and Mirrors
for the windows and Wood for the door and use the View tool bar to repeat this on all sides of
the house. When you use translucent glass on the windows it allows you to see through them.
15 – For the final touch turn on shadows by clicking on the Show/Hide Shadows button. You
can change how the shadows look by moving the month slider and day slider.
16 – There you have a basic house. You can save your house as a SketchUp file (.skp) and then
open it again at any time to make changes or additions. You can also export your model as 2D
image. Position your model so your happy with the view and then go to File – Export and click
on 2D Graphic… You can then save it as a picture to either print out or use in another program.

A Step Further If you feel your children have got the hang of the program then let them take it further and explore
what extra can they build.
See if they can add more details like:
Gardens Garages
Chimneys Paths
Swimming Pools Ponds
And try using more of the materials in the Paint Bucket, or maybe they would like to design a shop or
office.
You can also improve the look of your model before you print or save as
a 2D image by going to View in the menu bar and unticking Axes and
Guides. The go to View – Edge Style and unticking Edges and Profiles.
This removes the guides lines, axis and the black lines around the
model.