skill level 3 - advanced audi 3.0t magnetic supercharger...
TRANSCRIPT

Proper service and repair procedures are vital to the safe, reliable operation of all motor vehicles as well as the personal safety of those performing the repairs. Standard safety procedures and precautions (including use of safety goggles and proper tools and equipment) should be followed at all times to eliminate the possibility of personal injury or improper service which could damage the vehicle or compromise its safety.
Audi 3.0T Magnetic Supercharger Drain PlugInstallation w/Supercharger Service
Skill Level3 - Advanced
Advanced Skills &Experience Recommended
AUDI 3.0T MAGNETIC SUPERCHARGER DRAIN PLUG INSTALLATION W/SUPERCHARGER SERVICE ES#3234457
2WWW.ECSTUNING.COM© 2018 ECS TUNING 1000 SEVILLE RD. WADSWORTH, OH 44281 1.800.924.5172
Today, we will install our ECS Tuning magnetic supercharger drain plug into our Audi B8 S4 3.0T. Keep in mind that this installation process should apply to all 3.0T equipped vehicles. Our magnetic drain plug features a permanent magnet fastened to the plug body that attracts and holds small ferrous metal particles inside the supercharger oil. The magnet then holds on to these metal particles and prevents them from circulating through the supercharger, which can cause premature wear to bearings and other internal surfaces. The plug body is constructed of a 316 stainless steel for corrosion and deformity resistance, and it retains the factory sized 3/16” size Allen key for easy removal and installation.
It is worth noting that this drain plug can be installed without removing the supercharger and replacing the oil, but it will require some small fingers and a bit of patience. Be sure to check out our project overview section to see why it can be worth the extra effort of removing and servicing the supercharger. Read these instructions completely first and then we’ll guide you through the entire process step by step. Just to make sure you have everything you need, reference the required tool list on Page 4 before you begin. Thank you for looking to ECS Tuning for all your performance and repair needs, we appreciate your business!
INTRODUCTION
Kit Contents & Suggested Replacement Parts ........................................pg.3Required Tools and Equipment ....................................................................pg.4Shop Supplies and Materials .........................................................................pg.5Installation and Safety Information ............................................................pg.6Project Overview ...............................................................................................pg.7Supercharger Component Identification .................................................pg.8Removing the Supercharger .........................................................................pg.9Installing the ECS Magnetic Supercharger Drain Plug .........................pg.26Reassembly ..........................................................................................................pg.29Bleeding the Cooling System ........................................................................pg.31Belt Routing Diagram ......................................................................................pg.39Schwaben Tools .................................................................................................pg.40
TABLE OF CONTENTS
AUDI 3.0T MAGNETIC SUPERCHARGER DRAIN PLUG INSTALLATION W/SUPERCHARGER SERVICE ES#3234457
3Table of ContentsWWW.ECSTUNING.COM© 2018 ECS TUNING 1000 SEVILLE RD. WADSWORTH, OH 44281 1.800.924.5172
KIT CONTENTS
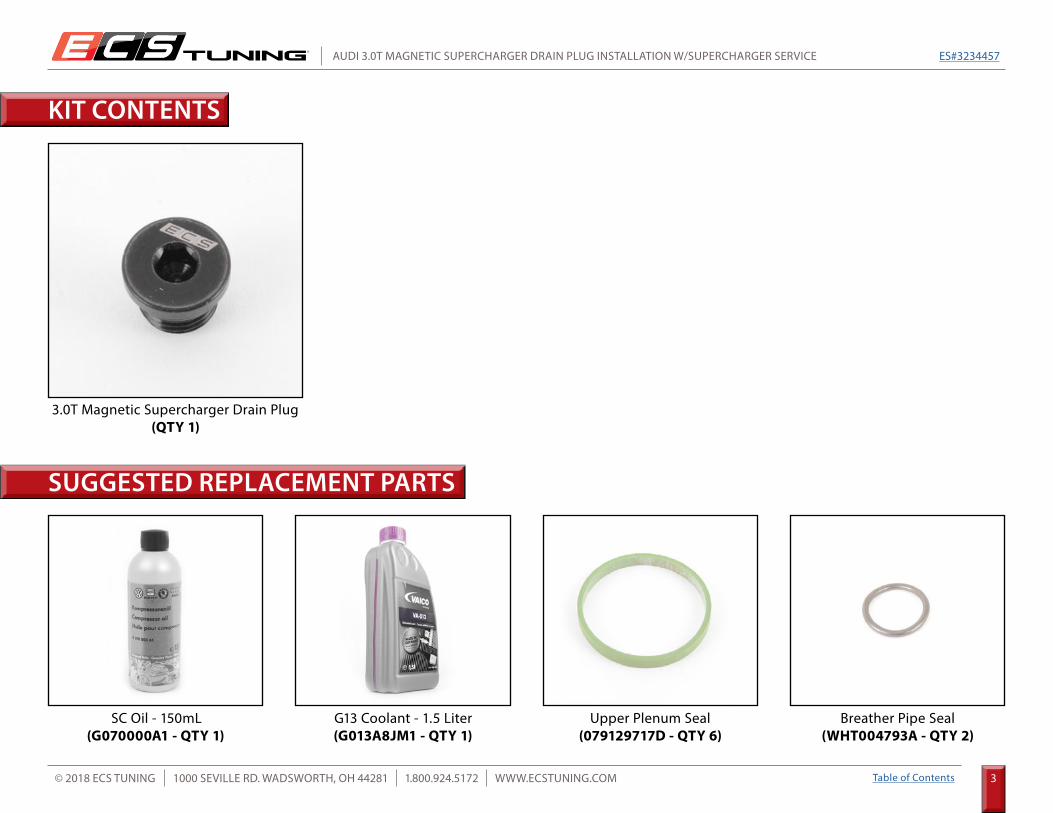
3.0T Magnetic Supercharger Drain Plug(QTY 1)
SUGGESTED REPLACEMENT PARTS
G13 Coolant - 1.5 Liter(G013A8JM1 - QTY 1)
SC Oil - 150mL(G070000A1 - QTY 1)
Upper Plenum Seal(079129717D - QTY 6)
Breather Pipe Seal(WHT004793A - QTY 2)
AUDI 3.0T MAGNETIC SUPERCHARGER DRAIN PLUG INSTALLATION W/SUPERCHARGER SERVICE ES#3234457
4Table of ContentsWWW.ECSTUNING.COM© 2018 ECS TUNING 1000 SEVILLE RD. WADSWORTH, OH 44281 1.800.924.5172
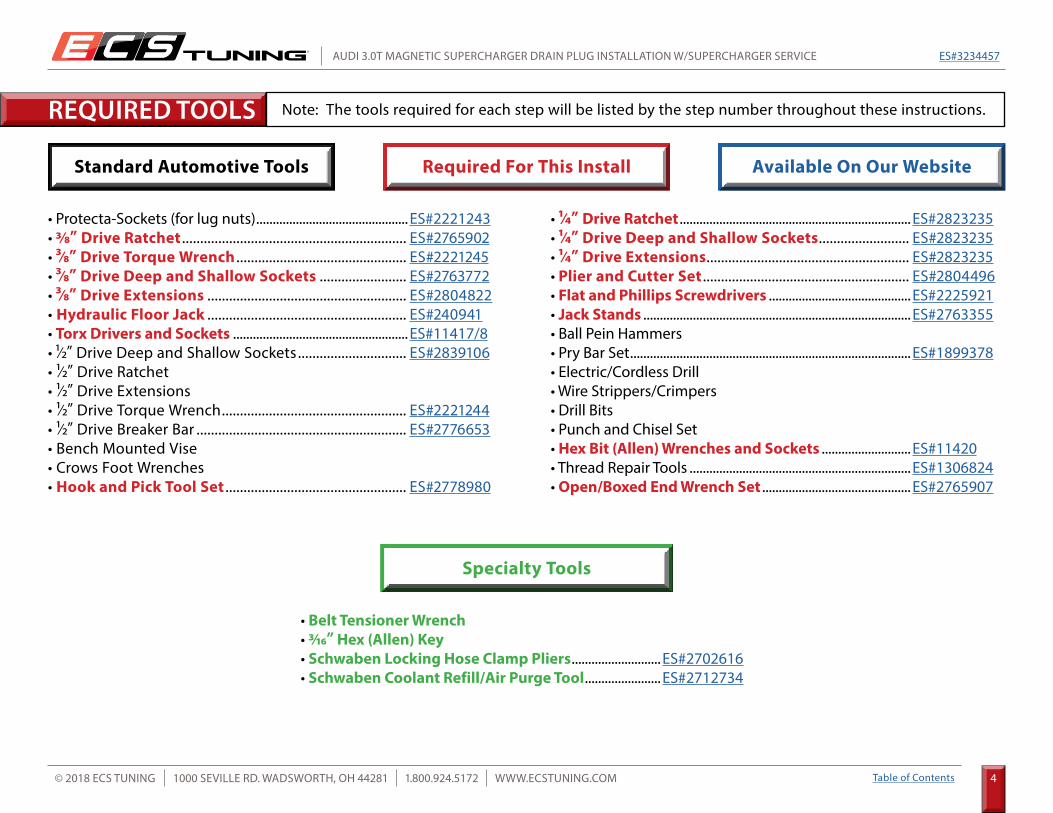
• Protecta-Sockets (for lug nuts) .............................................. ES#2221243• 3/8” Drive Ratchet .............................................................. ES#2765902• 3/8” Drive Torque Wrench ............................................... ES#2221245• 3/8” Drive Deep and Shallow Sockets ........................ ES#2763772• 3/8” Drive Extensions ....................................................... ES#2804822• Hydraulic Floor Jack ....................................................... ES#240941• Torx Drivers and Sockets ..................................................... ES#11417/8• 1/2” Drive Deep and Shallow Sockets .............................. ES#2839106• 1/2” Drive Ratchet• 1/2” Drive Extensions• 1/2” Drive Torque Wrench ................................................... ES#2221244• 1/2” Drive Breaker Bar .......................................................... ES#2776653• Bench Mounted Vise• Crows Foot Wrenches• Hook and Pick Tool Set .................................................. ES#2778980
• Belt Tensioner Wrench• 3/16” Hex (Allen) Key• Schwaben Locking Hose Clamp Pliers ........................... ES#2702616• Schwaben Coolant Refill/Air Purge Tool ....................... ES#2712734
• 1/4” Drive Ratchet ...................................................................... ES#2823235• 1/4” Drive Deep and Shallow Sockets ......................... ES#2823235• 1/4” Drive Extensions ........................................................ ES#2823235• Plier and Cutter Set ......................................................... ES#2804496• Flat and Phillips Screwdrivers ........................................... ES#2225921• Jack Stands .................................................................................ES#2763355• Ball Pein Hammers• Pry Bar Set .....................................................................................ES#1899378• Electric/Cordless Drill• Wire Strippers/Crimpers• Drill Bits• Punch and Chisel Set• Hex Bit (Allen) Wrenches and Sockets ........................... ES#11420• Thread Repair Tools ...................................................................ES#1306824• Open/Boxed End Wrench Set ............................................. ES#2765907
Standard Automotive Tools Available On Our WebsiteRequired For This Install
Specialty Tools
Note: The tools required for each step will be listed by the step number throughout these instructions.REQUIRED TOOLS

AUDI 3.0T MAGNETIC SUPERCHARGER DRAIN PLUG INSTALLATION W/SUPERCHARGER SERVICE ES#3234457
5Table of ContentsWWW.ECSTUNING.COM© 2018 ECS TUNING 1000 SEVILLE RD. WADSWORTH, OH 44281 1.800.924.5172
• Hand Cleaner/Degreaser - Click Here• Pig Mats - for protecting your garage floor and work area from spills and stains - Click Here• Spray detailer - for rapid cleaning of anything that comes into contact with your paint such as brake fluid - Click Here• Micro Fiber Towels - for cleaning the paint on your car - Click Here• Latex Gloves - for the extra oily and dirty jobs - Click Here• Medium and High Strength Loctite Thread lock compound - to prevent bolts from backing out - Click Here• Anti-Seize Compound - to prevent seizing, galling, and corrosion of fasteners - Click Here• Aerosol Brake/Parts Cleaner - for cleaning and degreasing parts• Shop Rags - used for wiping hands, tools, and parts• Penetrating oil - for helping to free rusted or stuck bolts and nuts• Mechanics wire - for securing components out of the way• Silicone spray lube - for rubber components such as exhaust hangers• Paint Marker - for marking installation positions or bolts during a torquing sequence• Plastic Wire Ties/Zip Ties - for routing and securing wiring harnesses or vacuum hoses• Electrical tape - for wrapping wiring harnesses or temporary securing of small components
Standard Shop Supply Recommendations: We recommend that you have a standard inventory of automotive shop supplies before beginning this or any automotive repair procedure. The following list outlines the basic shop supplies that we like to keep on hand. Shop supplies with a hyperlink are available on our website.
SHOP SUPPLIES AND MATERIALS
AUDI 3.0T MAGNETIC SUPERCHARGER DRAIN PLUG INSTALLATION W/SUPERCHARGER SERVICE ES#3234457
6Table of ContentsWWW.ECSTUNING.COM© 2018 ECS TUNING 1000 SEVILLE RD. WADSWORTH, OH 44281 1.800.924.5172
NEVER get underneath a vehicle that is supported only by a jack, andALWAYS make sure that the vehicle is securely supported on jack stands.
• RH refers to the passenger side of the vehicle.• LH refers to the driver side of the vehicle.• Always use the proper torque specifications.• If applicable to this installation, torque specifications will be listed throughout the document and at the end as well.• Please read all of these instructions and familiarize yourself with the complete process BEFORE you begin.
• Park your car in a safe, well lit, level area.• Shut the engine off and remove the key from the ignition switch.• Make sure any remote start devices are properly disabled.• ALWAYS wear safety glasses.• Make sure the parking brake is applied until the vehicle is safely lifted and supported.• Whether lifting a vehicle using an automotive lift or a hydraulic jack, be sure and utilize the factory specified lift points.• Lifting a vehicle in an incorrect location can cause damage to the suspension/running gear.• ALWAYS support the vehicle with jack stands.• ALWAYS read and follow all safety information and warnings for the equipment you are using.
ECS Tuning cares about your health and safety, please read the following safety information. This information pertains to automotive service in general, and while it may not pertain to every job you do, please remember and share these important safety tips.
INSTALLATION NOTES
GENERAL PREPARATION AND SAFETY INFORMATION
AUDI 3.0T MAGNETIC SUPERCHARGER DRAIN PLUG INSTALLATION W/SUPERCHARGER SERVICE ES#3234457
7Table of ContentsWWW.ECSTUNING.COM© 2018 ECS TUNING 1000 SEVILLE RD. WADSWORTH, OH 44281 1.800.924.5172
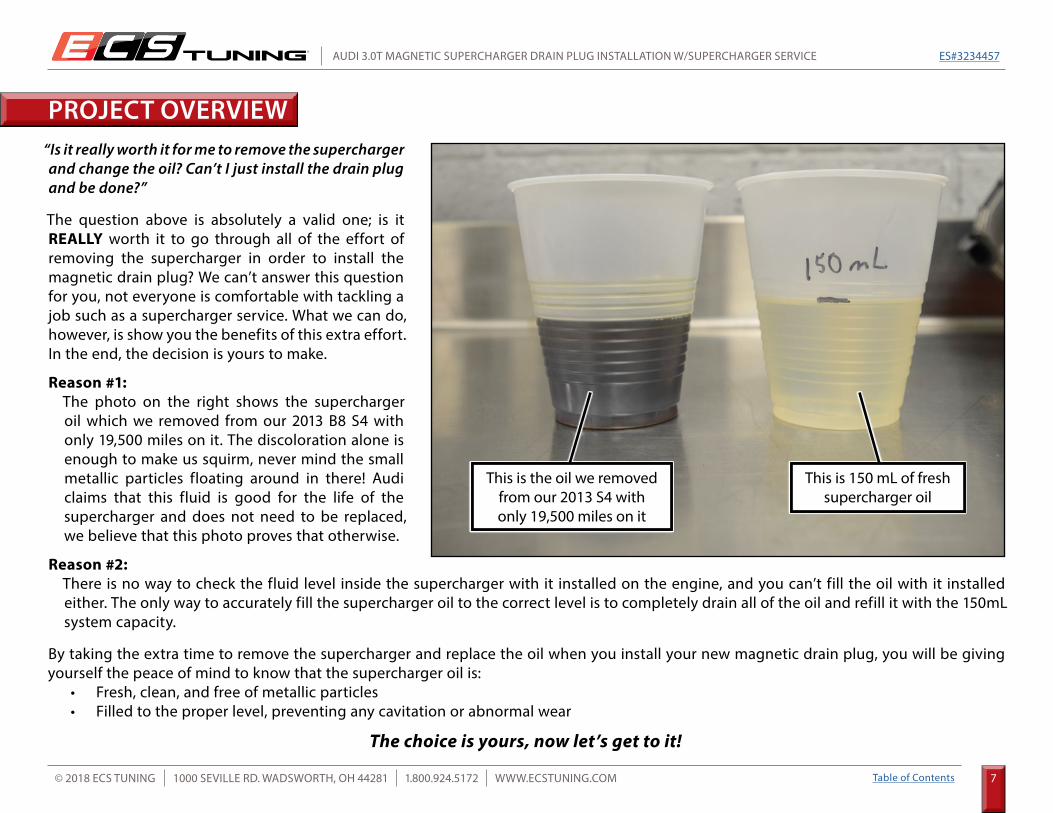
“Is it really worth it for me to remove the supercharger and change the oil? Can’t I just install the drain plug and be done?”
The question above is absolutely a valid one; is it REALLY worth it to go through all of the effort of removing the supercharger in order to install the magnetic drain plug? We can’t answer this question for you, not everyone is comfortable with tackling a job such as a supercharger service. What we can do, however, is show you the benefits of this extra effort. In the end, the decision is yours to make.
Reason #1: The photo on the right shows the supercharger oil which we removed from our 2013 B8 S4 with only 19,500 miles on it. The discoloration alone is enough to make us squirm, never mind the small metallic particles floating around in there! Audi claims that this fluid is good for the life of the supercharger and does not need to be replaced, we believe that this photo proves that otherwise.
The choice is yours, now let’s get to it!
PROJECT OVERVIEW
This is the oil we removed from our 2013 S4 with only 19,500 miles on it
This is 150 mL of fresh supercharger oil
Reason #2: There is no way to check the fluid level inside the supercharger with it installed on the engine, and you can’t fill the oil with it installed either. The only way to accurately fill the supercharger oil to the correct level is to completely drain all of the oil and refill it with the 150mL system capacity.
By taking the extra time to remove the supercharger and replace the oil when you install your new magnetic drain plug, you will be giving yourself the peace of mind to know that the supercharger oil is:
• Fresh, clean, and free of metallic particles• Filled to the proper level, preventing any cavitation or abnormal wear
AUDI 3.0T MAGNETIC SUPERCHARGER DRAIN PLUG INSTALLATION W/SUPERCHARGER SERVICE ES#3234457
8Table of ContentsWWW.ECSTUNING.COM© 2018 ECS TUNING 1000 SEVILLE RD. WADSWORTH, OH 44281 1.800.924.5172
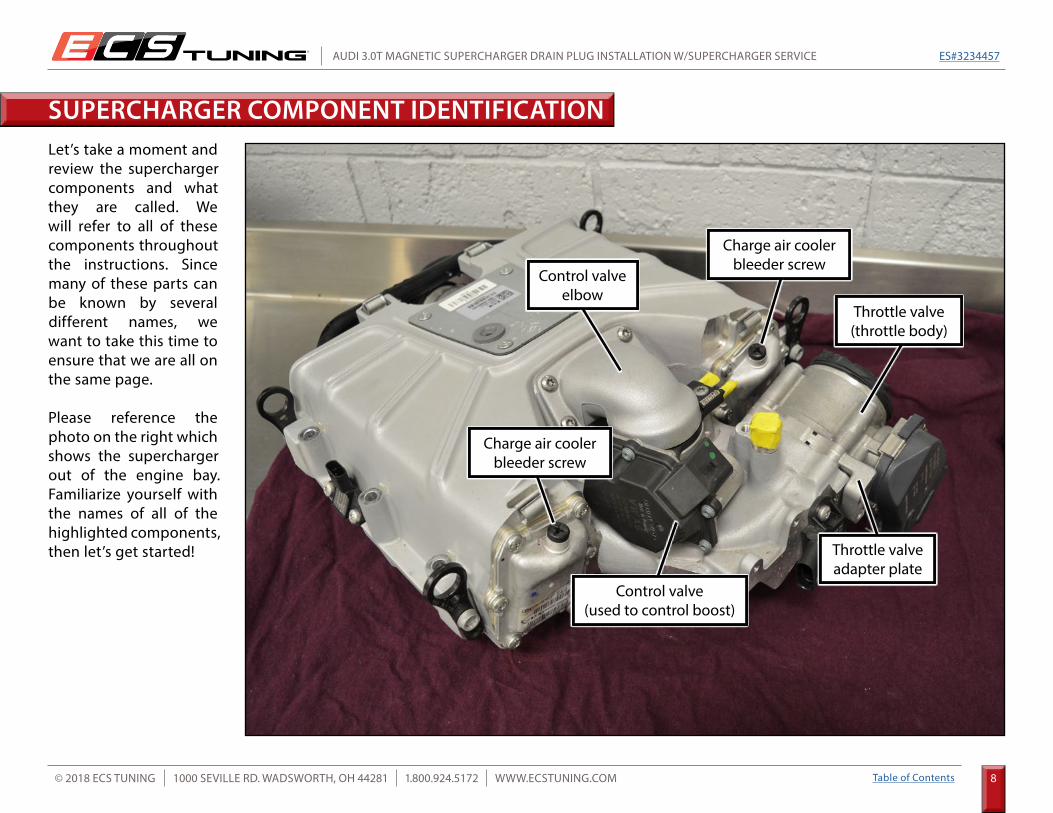
Let’s take a moment and review the supercharger components and what they are called. We will refer to all of these components throughout the instructions. Since many of these parts can be known by several different names, we want to take this time to ensure that we are all on the same page.
Please reference the photo on the right which shows the supercharger out of the engine bay. Familiarize yourself with the names of all of the highlighted components, then let’s get started!
SUPERCHARGER COMPONENT IDENTIFICATION
Control valve elbow
Control valve(used to control boost)
Charge air cooler bleeder screw
Throttle valve adapter plate
Charge air cooler bleeder screw
Throttle valve (throttle body)
AUDI 3.0T MAGNETIC SUPERCHARGER DRAIN PLUG INSTALLATION W/SUPERCHARGER SERVICE ES#3234457
9Table of ContentsWWW.ECSTUNING.COM© 2018 ECS TUNING 1000 SEVILLE RD. WADSWORTH, OH 44281 1.800.924.5172
Step 1:
Step 2:
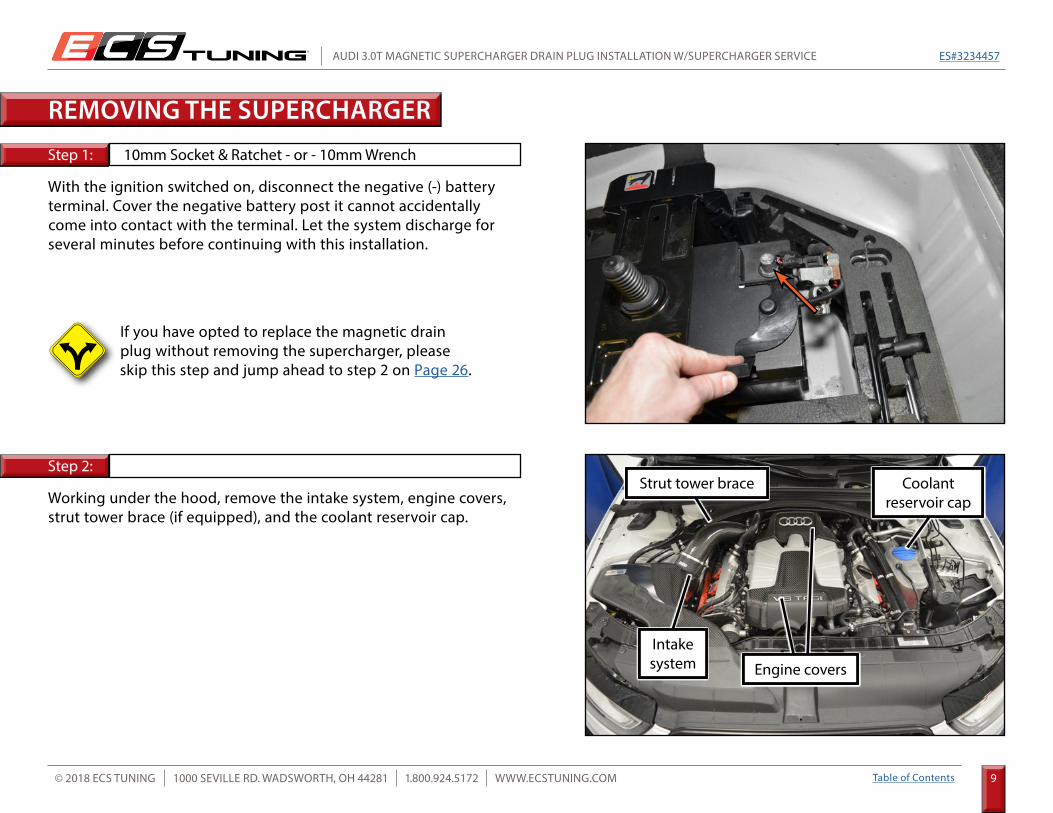
With the ignition switched on, disconnect the negative (-) battery terminal. Cover the negative battery post it cannot accidentally come into contact with the terminal. Let the system discharge for several minutes before continuing with this installation.
Working under the hood, remove the intake system, engine covers, strut tower brace (if equipped), and the coolant reservoir cap.
10mm Socket & Ratchet - or - 10mm Wrench
REMOVING THE SUPERCHARGER
Intake system Engine covers
Strut tower brace Coolantreservoir cap
If you have opted to replace the magnetic drain plug without removing the supercharger, please skip this step and jump ahead to step 2 on Page 26.

AUDI 3.0T MAGNETIC SUPERCHARGER DRAIN PLUG INSTALLATION W/SUPERCHARGER SERVICE ES#3234457
10Table of ContentsWWW.ECSTUNING.COM© 2018 ECS TUNING 1000 SEVILLE RD. WADSWORTH, OH 44281 1.800.924.5172
Step 3:
Step 4:
Safely lift and support the vehicle, then remove the OEM insulation panel (or belly pan).
The radiator drain valve is located on the lower radiator hose where it meets the lower RH corner of the radiator. Rotate this valve counter-clockwise to drain the coolant into a suitable drain pan or bucket.
REMOVING THE SUPERCHARGER
To reduce the mess, slide a 3/8” ID hose over the drain valve opening, then route the hose into your drain pan or bucket.
Coolant will drain from HERE
Drain valve
AUDI 3.0T MAGNETIC SUPERCHARGER DRAIN PLUG INSTALLATION W/SUPERCHARGER SERVICE ES#3234457
11Table of ContentsWWW.ECSTUNING.COM© 2018 ECS TUNING 1000 SEVILLE RD. WADSWORTH, OH 44281 1.800.924.5172
Step 5:
Step 6:
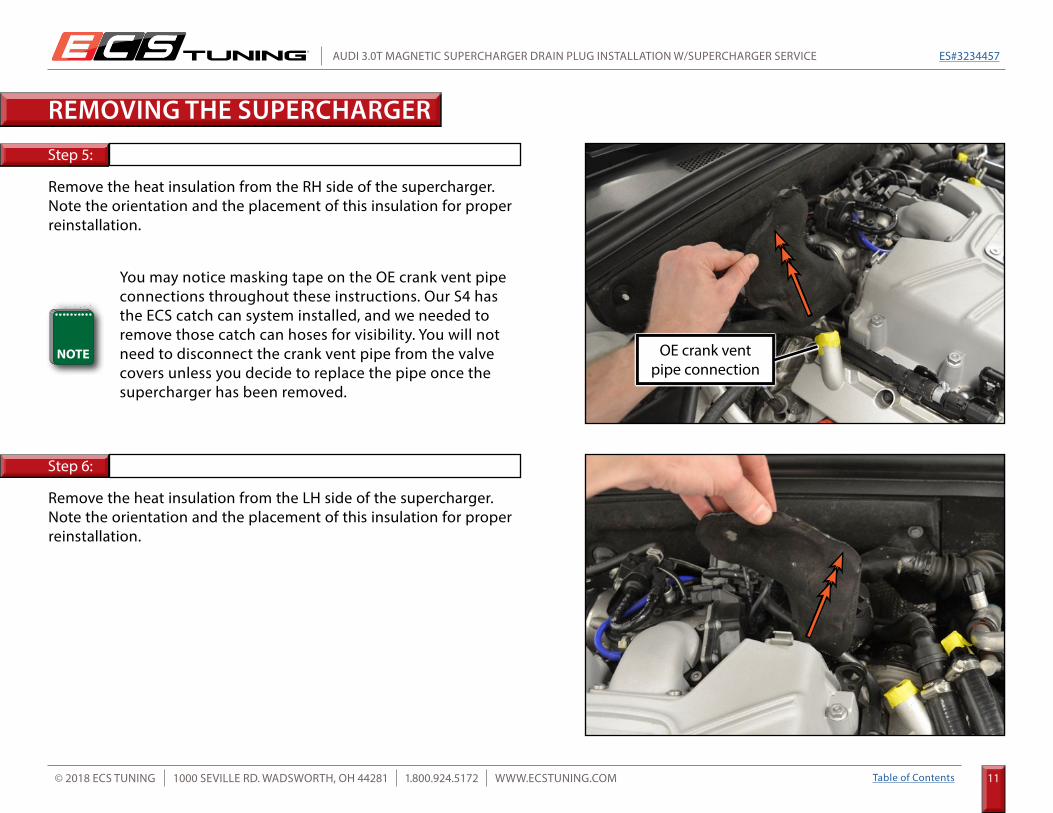
Remove the heat insulation from the RH side of the supercharger. Note the orientation and the placement of this insulation for proper reinstallation.
Remove the heat insulation from the LH side of the supercharger. Note the orientation and the placement of this insulation for proper reinstallation.
REMOVING THE SUPERCHARGER
OE crank vent pipe connection
You may notice masking tape on the OE crank vent pipe connections throughout these instructions. Our S4 has the ECS catch can system installed, and we needed to remove those catch can hoses for visibility. You will not need to disconnect the crank vent pipe from the valve covers unless you decide to replace the pipe once the supercharger has been removed.
AUDI 3.0T MAGNETIC SUPERCHARGER DRAIN PLUG INSTALLATION W/SUPERCHARGER SERVICE ES#3234457
12Table of ContentsWWW.ECSTUNING.COM© 2018 ECS TUNING 1000 SEVILLE RD. WADSWORTH, OH 44281 1.800.924.5172
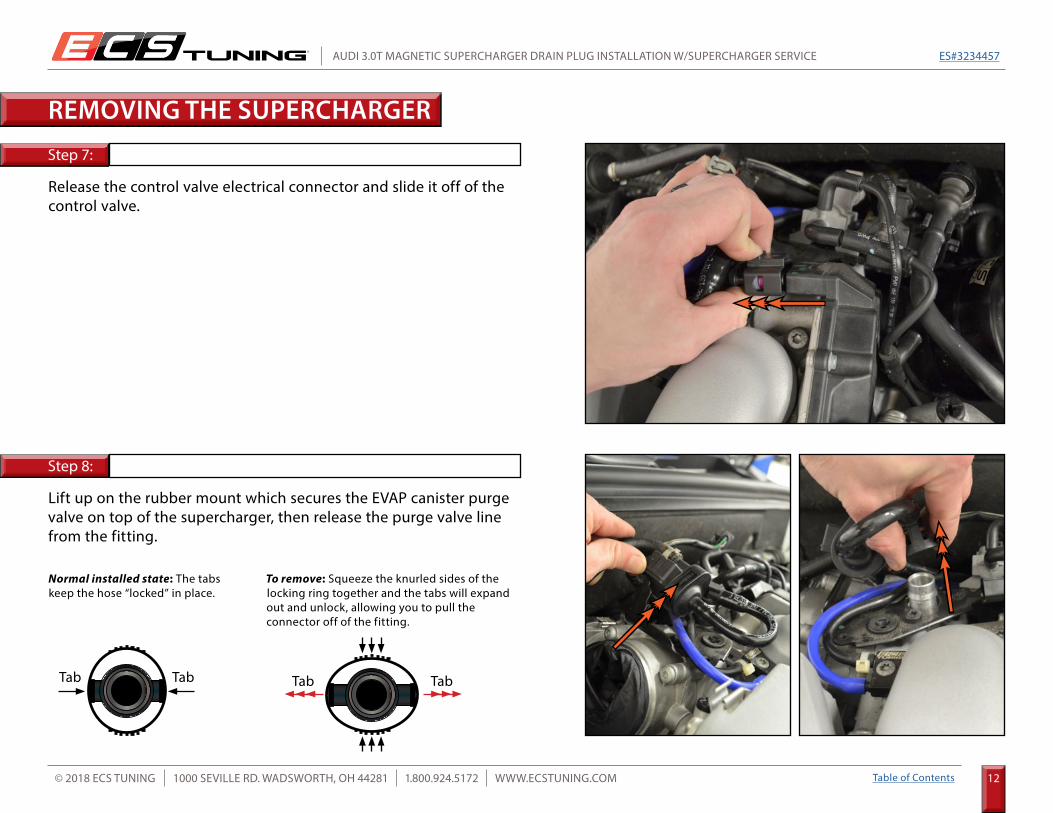
Step 7:
Step 8:
Release the control valve electrical connector and slide it off of the control valve.
Lift up on the rubber mount which secures the EVAP canister purge valve on top of the supercharger, then release the purge valve line from the fitting.
REMOVING THE SUPERCHARGER
Tab Tab TabTab
Normal installed state: The tabs keep the hose “locked” in place.
To remove: Squeeze the knurled sides of the locking ring together and the tabs will expand out and unlock, allowing you to pull the connector off of the fitting.
AUDI 3.0T MAGNETIC SUPERCHARGER DRAIN PLUG INSTALLATION W/SUPERCHARGER SERVICE ES#3234457
13Table of ContentsWWW.ECSTUNING.COM© 2018 ECS TUNING 1000 SEVILLE RD. WADSWORTH, OH 44281 1.800.924.5172
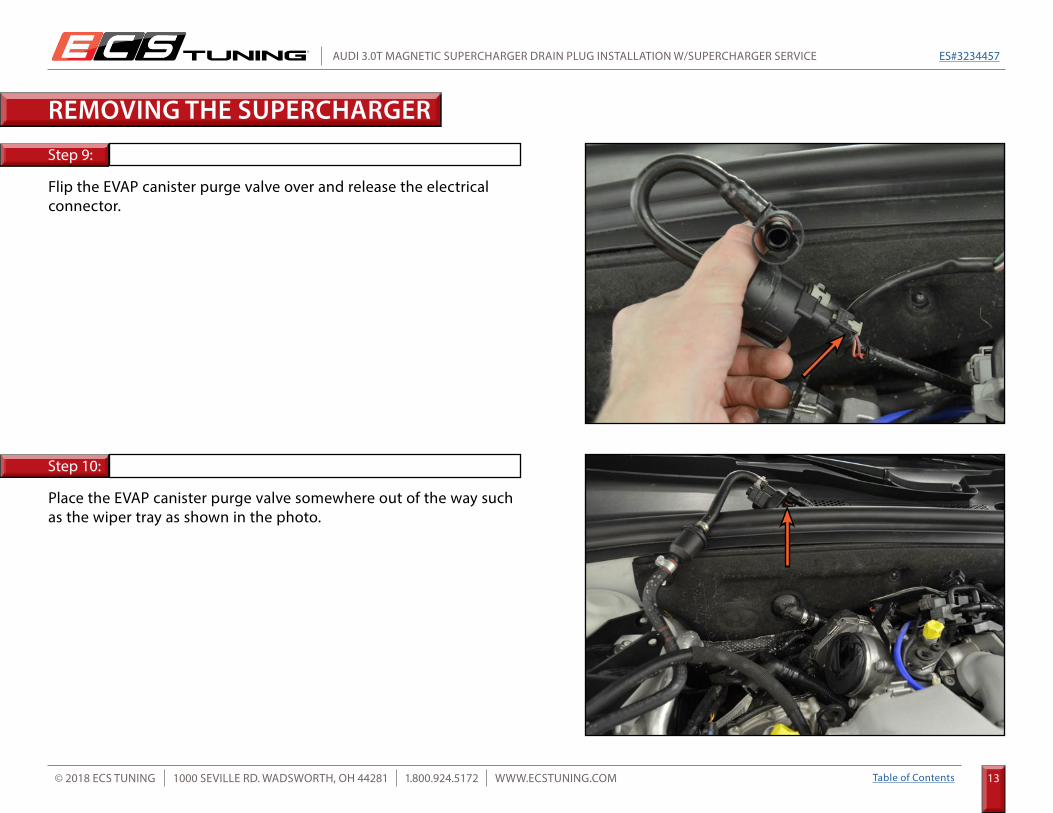
Step 9:
Step 10:
Flip the EVAP canister purge valve over and release the electrical connector.
Place the EVAP canister purge valve somewhere out of the way such as the wiper tray as shown in the photo.
REMOVING THE SUPERCHARGER
AUDI 3.0T MAGNETIC SUPERCHARGER DRAIN PLUG INSTALLATION W/SUPERCHARGER SERVICE ES#3234457
14Table of ContentsWWW.ECSTUNING.COM© 2018 ECS TUNING 1000 SEVILLE RD. WADSWORTH, OH 44281 1.800.924.5172
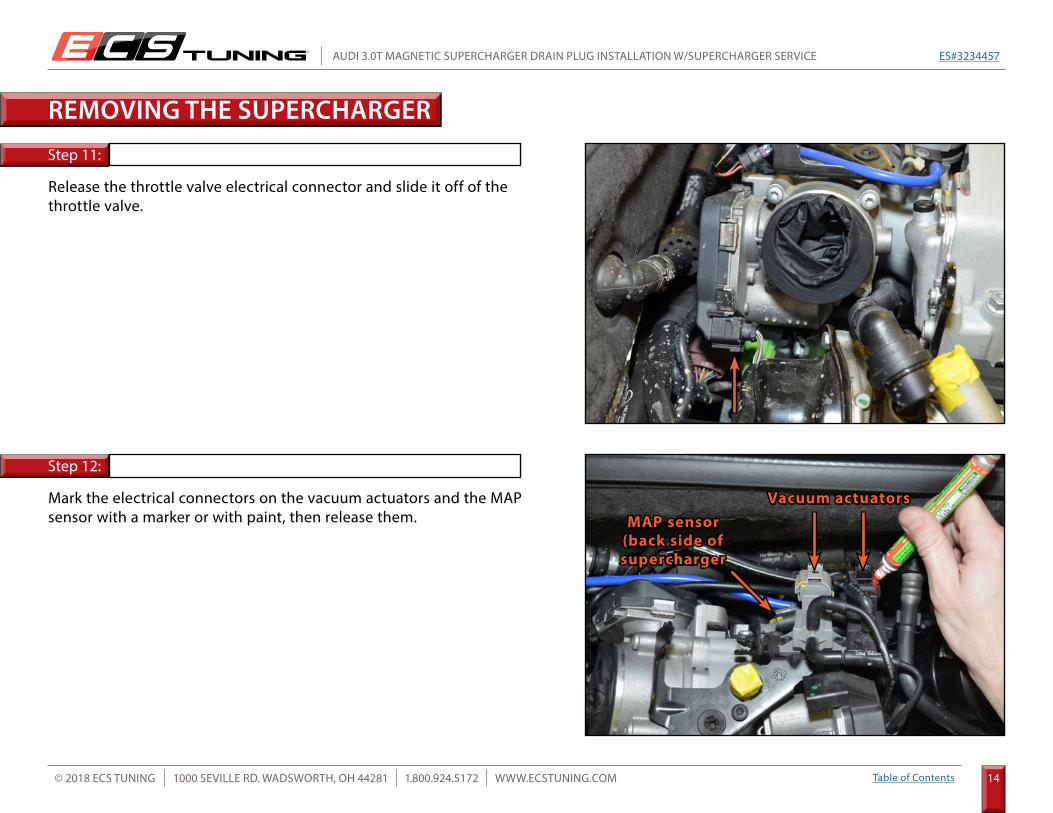
Step 11:
Step 12:
Release the throttle valve electrical connector and slide it off of the throttle valve.
Mark the electrical connectors on the vacuum actuators and the MAP sensor with a marker or with paint, then release them.
REMOVING THE SUPERCHARGER
Vacuum actuatorsMAP sensor
(back side of supercharger
AUDI 3.0T MAGNETIC SUPERCHARGER DRAIN PLUG INSTALLATION W/SUPERCHARGER SERVICE ES#3234457
15Table of ContentsWWW.ECSTUNING.COM© 2018 ECS TUNING 1000 SEVILLE RD. WADSWORTH, OH 44281 1.800.924.5172
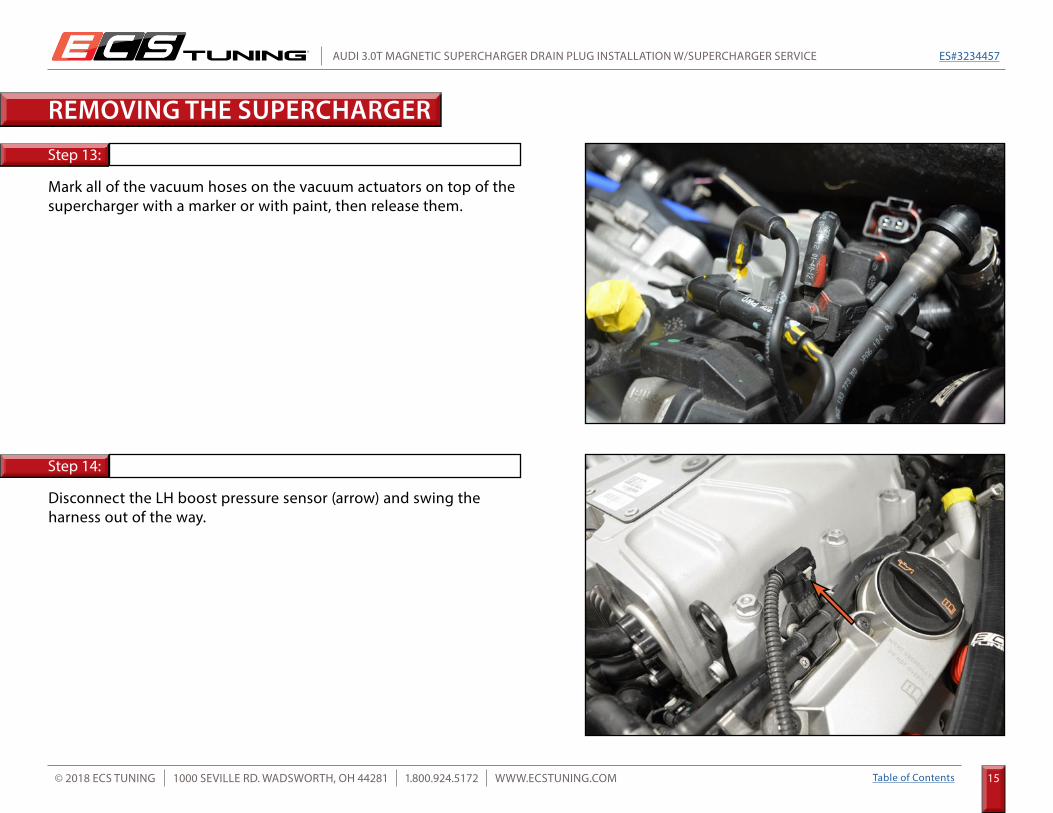
Step 13:
Step 14:
Mark all of the vacuum hoses on the vacuum actuators on top of the supercharger with a marker or with paint, then release them.
Disconnect the LH boost pressure sensor (arrow) and swing the harness out of the way.
REMOVING THE SUPERCHARGER
AUDI 3.0T MAGNETIC SUPERCHARGER DRAIN PLUG INSTALLATION W/SUPERCHARGER SERVICE ES#3234457
16Table of ContentsWWW.ECSTUNING.COM© 2018 ECS TUNING 1000 SEVILLE RD. WADSWORTH, OH 44281 1.800.924.5172
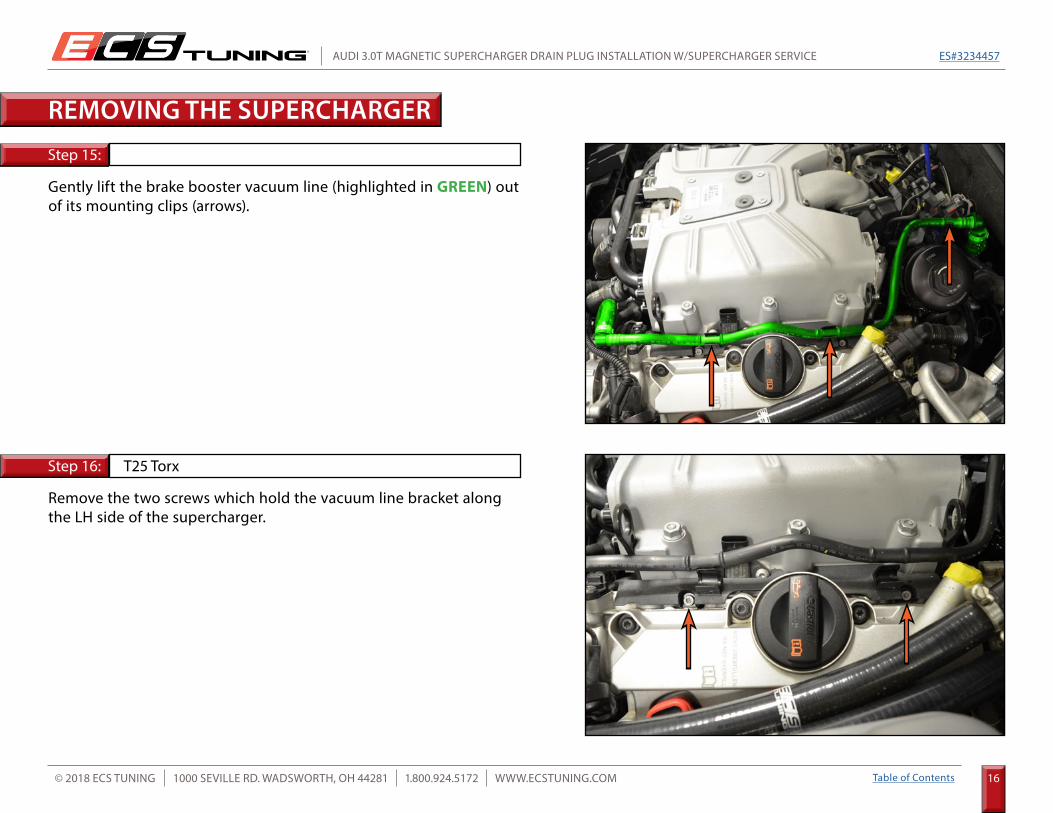
Step 15:
Step 16:
Gently lift the brake booster vacuum line (highlighted in GREEN) out of its mounting clips (arrows).
Remove the two screws which hold the vacuum line bracket along the LH side of the supercharger.
T25 Torx
REMOVING THE SUPERCHARGER
AUDI 3.0T MAGNETIC SUPERCHARGER DRAIN PLUG INSTALLATION W/SUPERCHARGER SERVICE ES#3234457
17Table of ContentsWWW.ECSTUNING.COM© 2018 ECS TUNING 1000 SEVILLE RD. WADSWORTH, OH 44281 1.800.924.5172
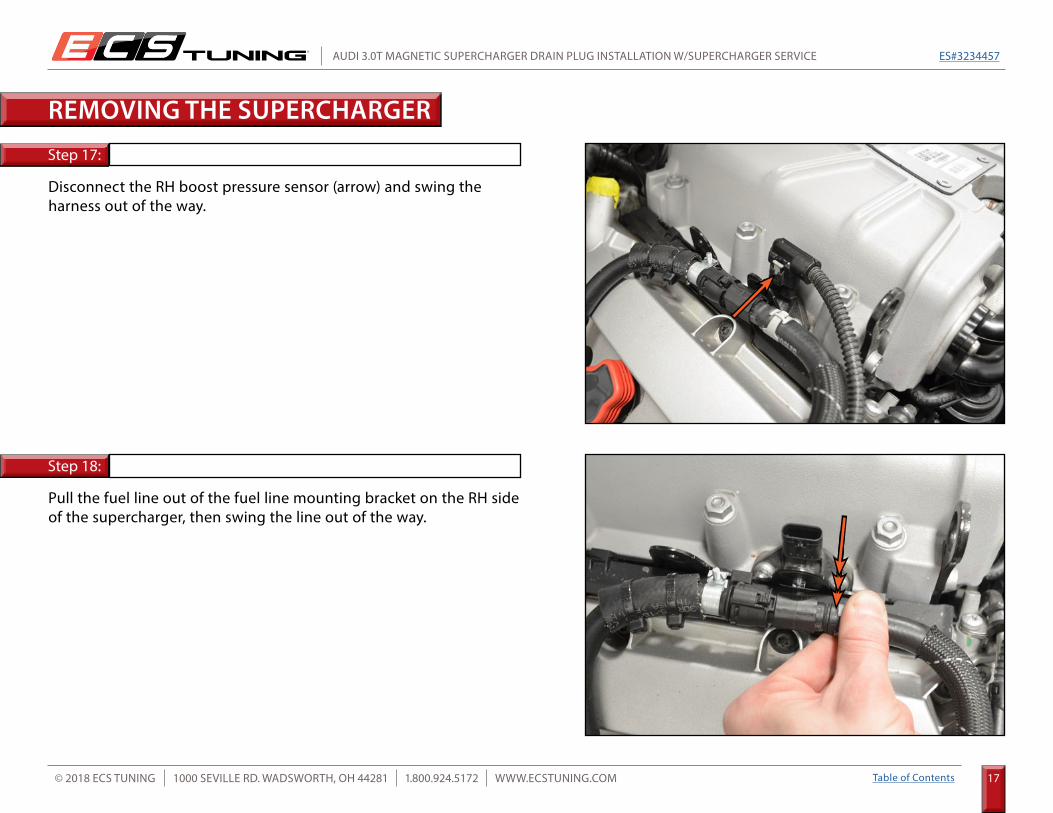
Step 17:
Step 18:
Disconnect the RH boost pressure sensor (arrow) and swing the harness out of the way.
Pull the fuel line out of the fuel line mounting bracket on the RH side of the supercharger, then swing the line out of the way.
REMOVING THE SUPERCHARGER
AUDI 3.0T MAGNETIC SUPERCHARGER DRAIN PLUG INSTALLATION W/SUPERCHARGER SERVICE ES#3234457
18Table of ContentsWWW.ECSTUNING.COM© 2018 ECS TUNING 1000 SEVILLE RD. WADSWORTH, OH 44281 1.800.924.5172
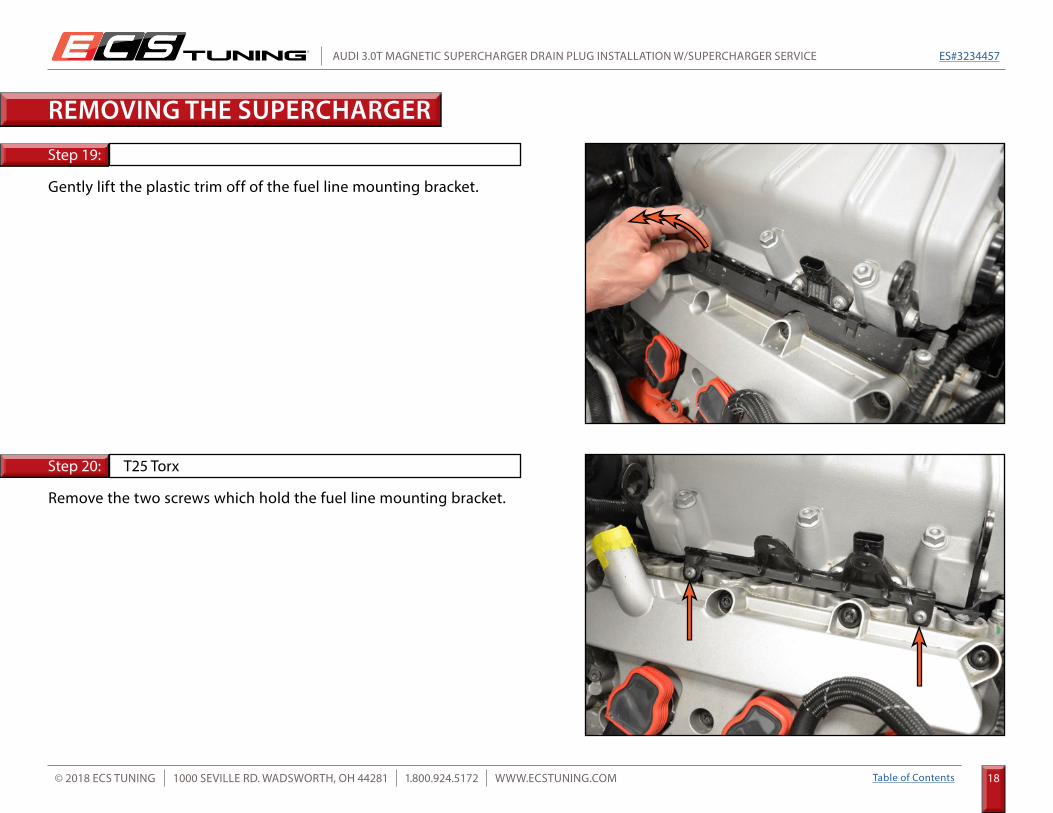
Step 19:
Step 20:
Gently lift the plastic trim off of the fuel line mounting bracket.
Remove the two screws which hold the fuel line mounting bracket.
T25 Torx
REMOVING THE SUPERCHARGER
AUDI 3.0T MAGNETIC SUPERCHARGER DRAIN PLUG INSTALLATION W/SUPERCHARGER SERVICE ES#3234457
19Table of ContentsWWW.ECSTUNING.COM© 2018 ECS TUNING 1000 SEVILLE RD. WADSWORTH, OH 44281 1.800.924.5172
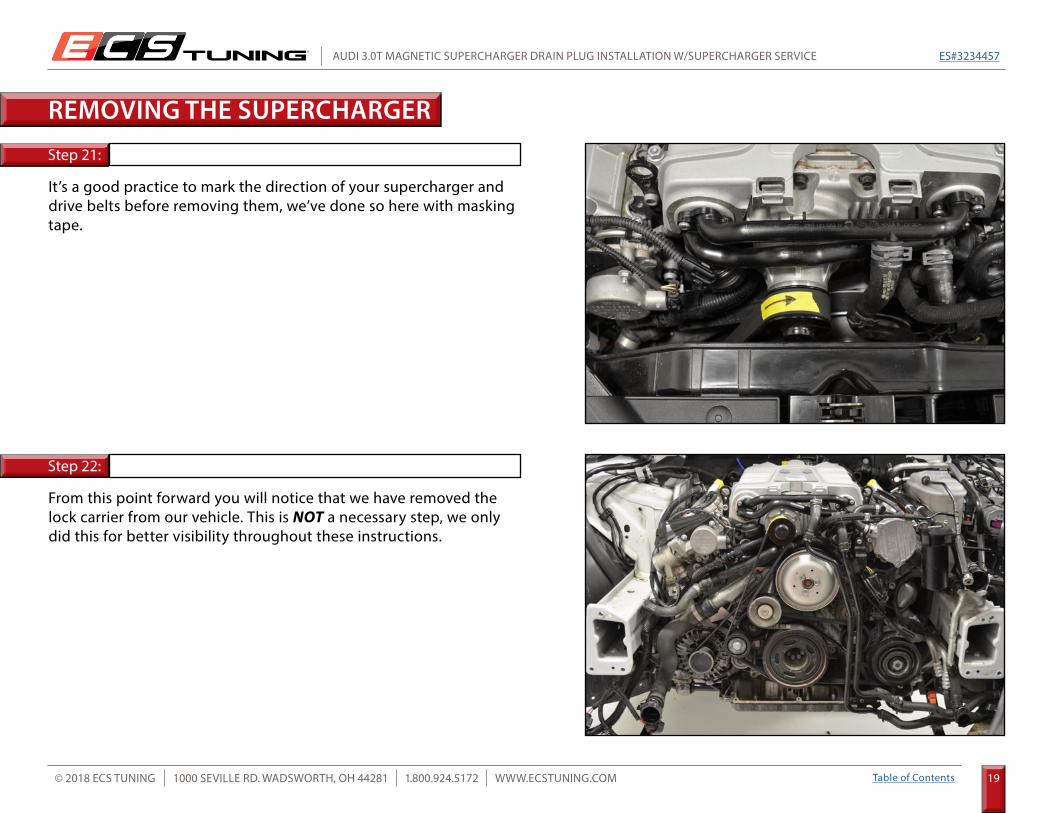
Step 21:
Step 22:
It’s a good practice to mark the direction of your supercharger and drive belts before removing them, we’ve done so here with masking tape.
From this point forward you will notice that we have removed the lock carrier from our vehicle. This is NOT a necessary step, we only did this for better visibility throughout these instructions.
REMOVING THE SUPERCHARGER
AUDI 3.0T MAGNETIC SUPERCHARGER DRAIN PLUG INSTALLATION W/SUPERCHARGER SERVICE ES#3234457
20Table of ContentsWWW.ECSTUNING.COM© 2018 ECS TUNING 1000 SEVILLE RD. WADSWORTH, OH 44281 1.800.924.5172
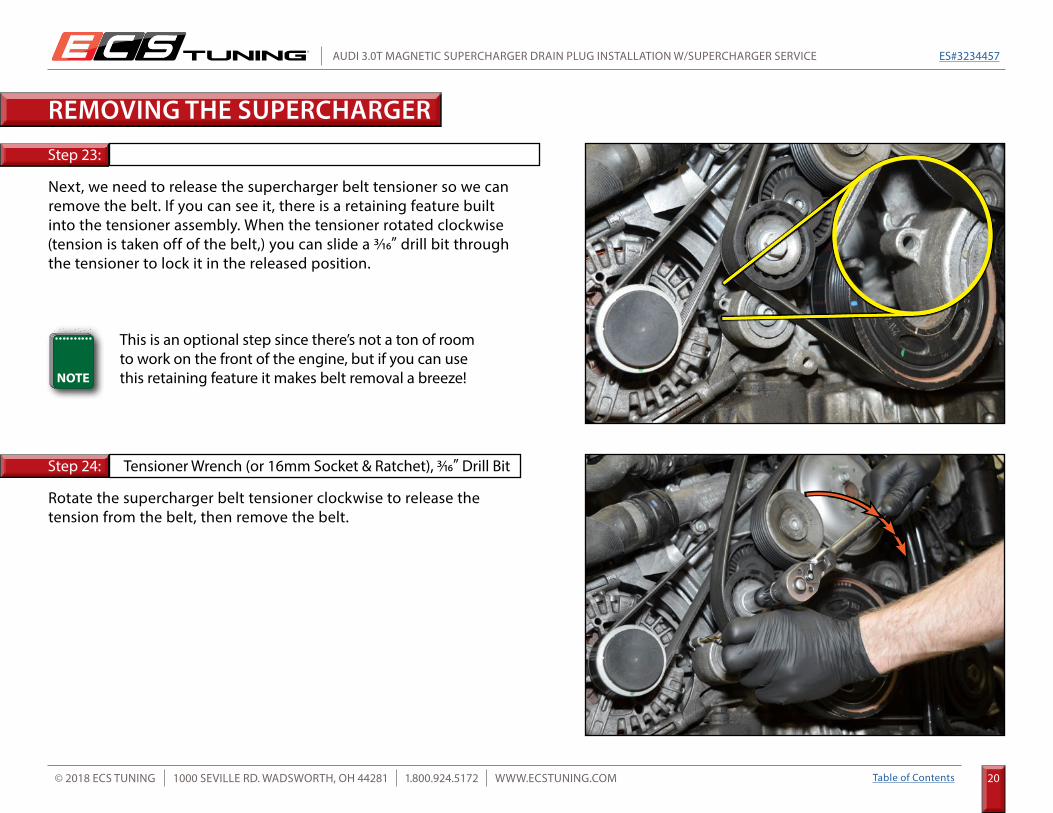
Step 23:
Step 24:
Next, we need to release the supercharger belt tensioner so we can remove the belt. If you can see it, there is a retaining feature built into the tensioner assembly. When the tensioner rotated clockwise (tension is taken off of the belt,) you can slide a 3/16” drill bit through the tensioner to lock it in the released position.
Rotate the supercharger belt tensioner clockwise to release the tension from the belt, then remove the belt.
Tensioner Wrench (or 16mm Socket & Ratchet), 3/16” Drill Bit
REMOVING THE SUPERCHARGER
This is an optional step since there’s not a ton of room to work on the front of the engine, but if you can use this retaining feature it makes belt removal a breeze!
AUDI 3.0T MAGNETIC SUPERCHARGER DRAIN PLUG INSTALLATION W/SUPERCHARGER SERVICE ES#3234457
21Table of ContentsWWW.ECSTUNING.COM© 2018 ECS TUNING 1000 SEVILLE RD. WADSWORTH, OH 44281 1.800.924.5172
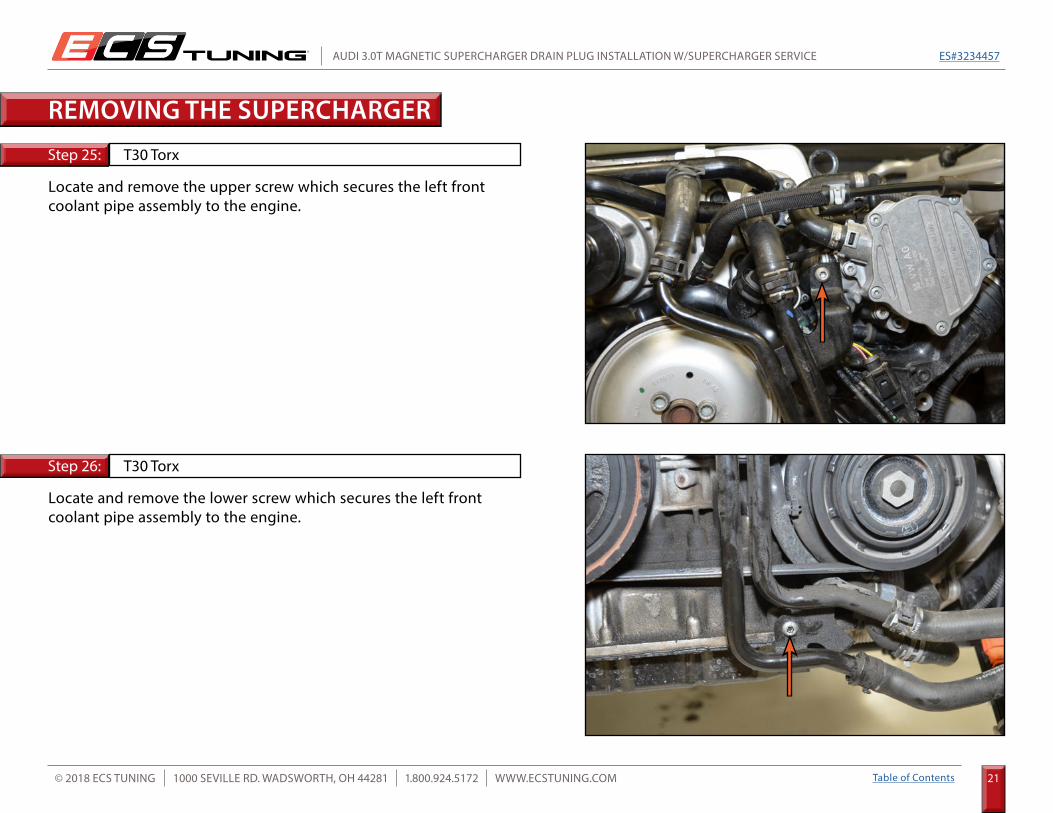
Step 25:
Step 26:
Locate and remove the upper screw which secures the left front coolant pipe assembly to the engine.
Locate and remove the lower screw which secures the left front coolant pipe assembly to the engine.
T30 Torx
T30 Torx
REMOVING THE SUPERCHARGER
AUDI 3.0T MAGNETIC SUPERCHARGER DRAIN PLUG INSTALLATION W/SUPERCHARGER SERVICE ES#3234457
22Table of ContentsWWW.ECSTUNING.COM© 2018 ECS TUNING 1000 SEVILLE RD. WADSWORTH, OH 44281 1.800.924.5172
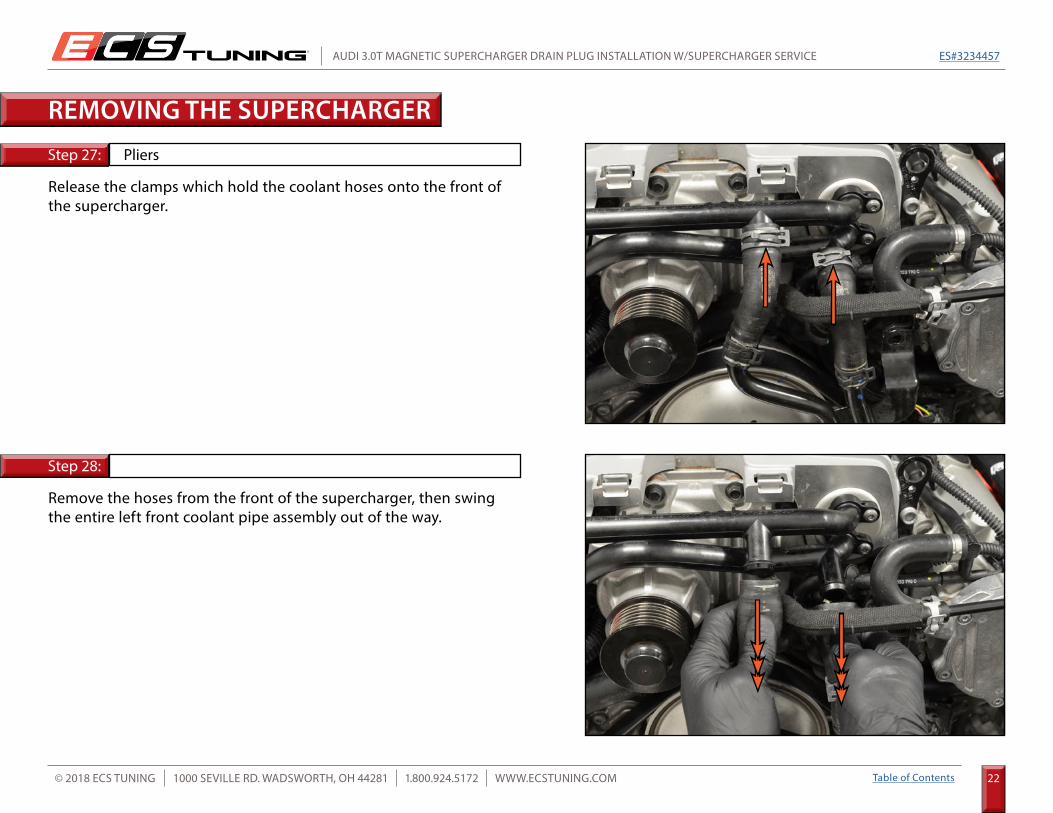
Step 27:
Step 28:
Release the clamps which hold the coolant hoses onto the front of the supercharger.
Remove the hoses from the front of the supercharger, then swing the entire left front coolant pipe assembly out of the way.
Pliers
REMOVING THE SUPERCHARGER
AUDI 3.0T MAGNETIC SUPERCHARGER DRAIN PLUG INSTALLATION W/SUPERCHARGER SERVICE ES#3234457
23Table of ContentsWWW.ECSTUNING.COM© 2018 ECS TUNING 1000 SEVILLE RD. WADSWORTH, OH 44281 1.800.924.5172
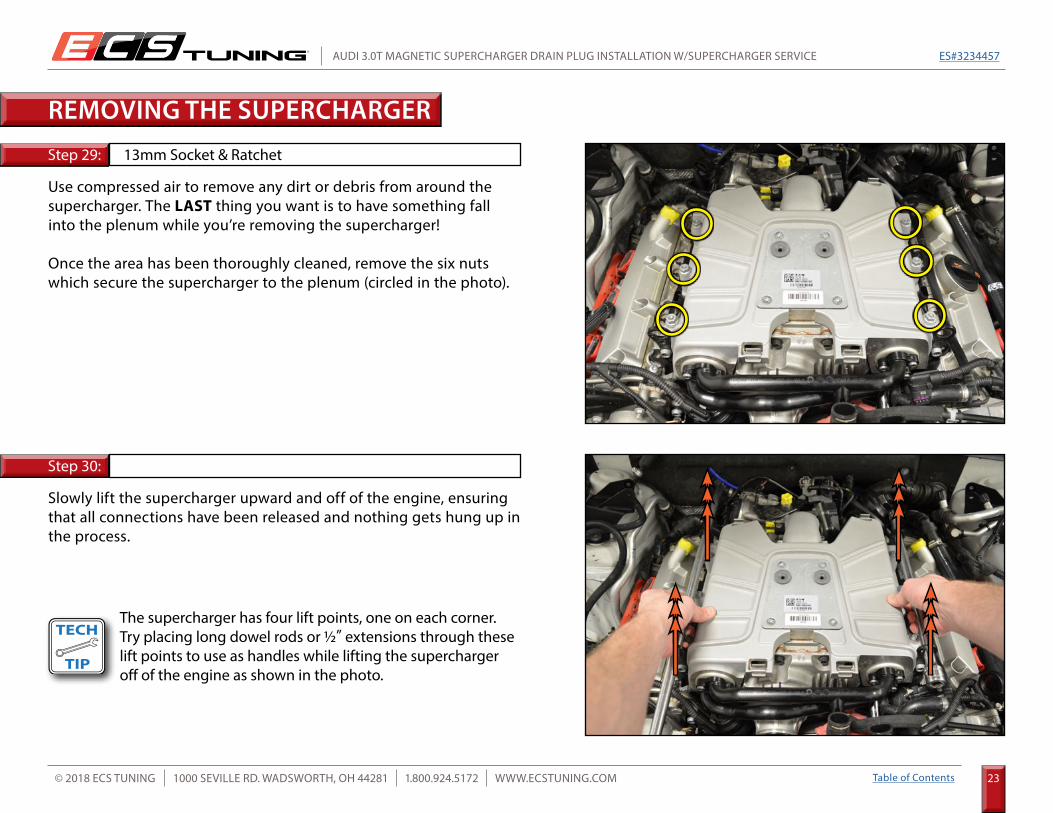
Step 29:
Step 30:
Use compressed air to remove any dirt or debris from around the supercharger. The LAST thing you want is to have something fall into the plenum while you’re removing the supercharger!
Once the area has been thoroughly cleaned, remove the six nuts which secure the supercharger to the plenum (circled in the photo).
Slowly lift the supercharger upward and off of the engine, ensuring that all connections have been released and nothing gets hung up in the process.
13mm Socket & Ratchet
REMOVING THE SUPERCHARGER
The supercharger has four lift points, one on each corner. Try placing long dowel rods or 1/2” extensions through these lift points to use as handles while lifting the supercharger off of the engine as shown in the photo.
AUDI 3.0T MAGNETIC SUPERCHARGER DRAIN PLUG INSTALLATION W/SUPERCHARGER SERVICE ES#3234457
24Table of ContentsWWW.ECSTUNING.COM© 2018 ECS TUNING 1000 SEVILLE RD. WADSWORTH, OH 44281 1.800.924.5172
Step 31:
Step 32:
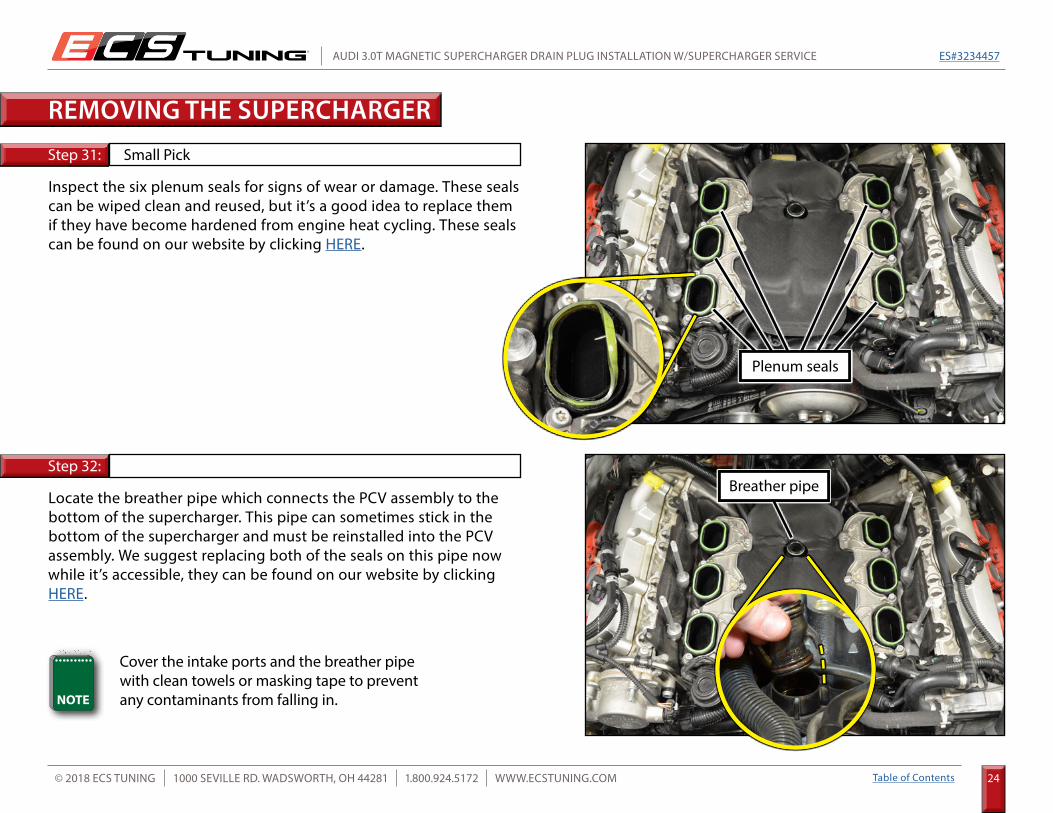
Inspect the six plenum seals for signs of wear or damage. These seals can be wiped clean and reused, but it’s a good idea to replace them if they have become hardened from engine heat cycling. These seals can be found on our website by clicking HERE.
Locate the breather pipe which connects the PCV assembly to the bottom of the supercharger. This pipe can sometimes stick in the bottom of the supercharger and must be reinstalled into the PCV assembly. We suggest replacing both of the seals on this pipe now while it’s accessible, they can be found on our website by clicking HERE.
Small Pick
REMOVING THE SUPERCHARGER
Plenum seals
Breather pipe
Cover the intake ports and the breather pipe with clean towels or masking tape to prevent any contaminants from falling in.
AUDI 3.0T MAGNETIC SUPERCHARGER DRAIN PLUG INSTALLATION W/SUPERCHARGER SERVICE ES#3234457
25Table of ContentsWWW.ECSTUNING.COM© 2018 ECS TUNING 1000 SEVILLE RD. WADSWORTH, OH 44281 1.800.924.5172
Step 33:
Step 34:
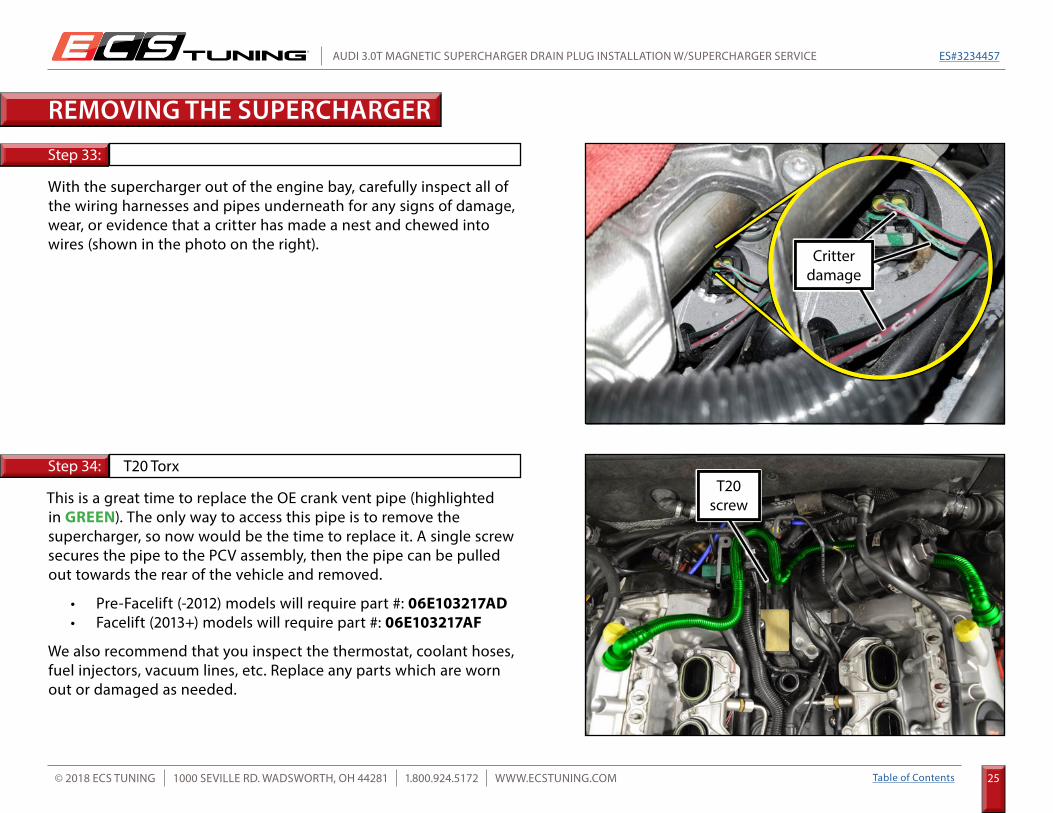
With the supercharger out of the engine bay, carefully inspect all of the wiring harnesses and pipes underneath for any signs of damage, wear, or evidence that a critter has made a nest and chewed into wires (shown in the photo on the right).
This is a great time to replace the OE crank vent pipe (highlighted in GREEN). The only way to access this pipe is to remove the supercharger, so now would be the time to replace it. A single screw secures the pipe to the PCV assembly, then the pipe can be pulled out towards the rear of the vehicle and removed.
• Pre-Facelift (-2012) models will require part #: 06E103217AD• Facelift (2013+) models will require part #: 06E103217AF
We also recommend that you inspect the thermostat, coolant hoses, fuel injectors, vacuum lines, etc. Replace any parts which are worn out or damaged as needed.
T20 Torx
REMOVING THE SUPERCHARGER
Critter damage
T20 screw
AUDI 3.0T MAGNETIC SUPERCHARGER DRAIN PLUG INSTALLATION W/SUPERCHARGER SERVICE ES#3234457
26Table of ContentsWWW.ECSTUNING.COM© 2018 ECS TUNING 1000 SEVILLE RD. WADSWORTH, OH 44281 1.800.924.5172
Step 1:
Step 2:
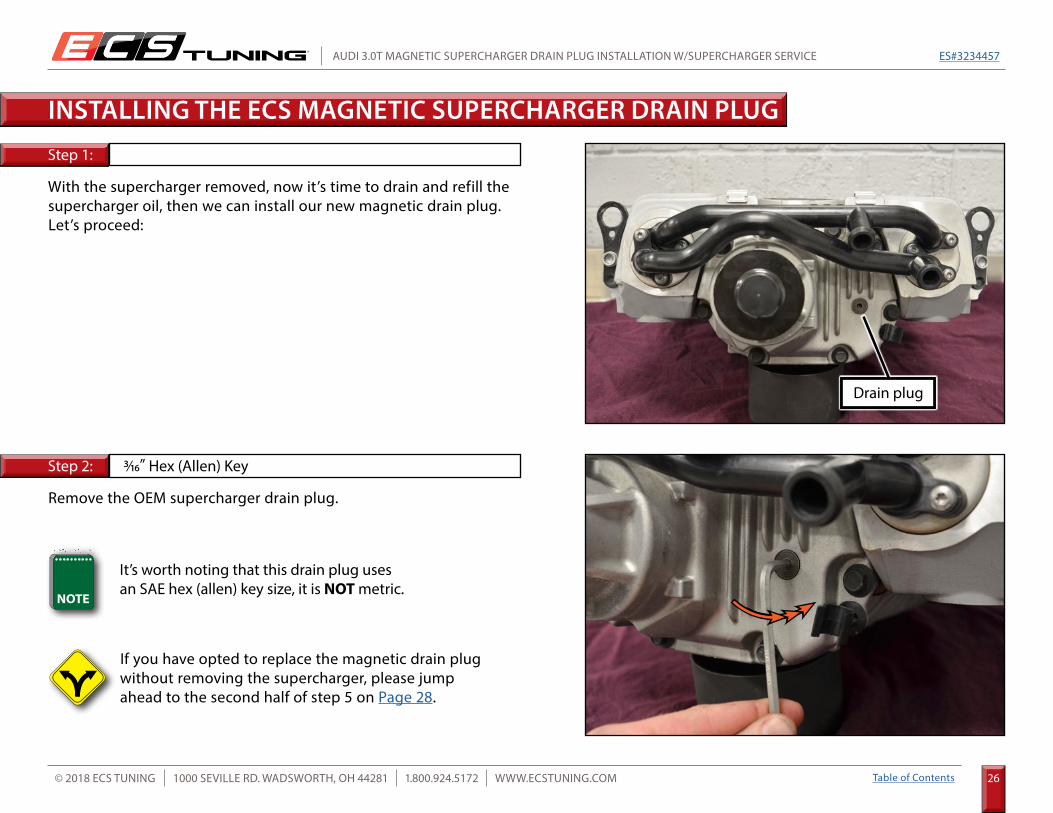
With the supercharger removed, now it’s time to drain and refill the supercharger oil, then we can install our new magnetic drain plug. Let’s proceed:
Remove the OEM supercharger drain plug.
3/16” Hex (Allen) Key
INSTALLING THE ECS MAGNETIC SUPERCHARGER DRAIN PLUG
Drain plug
It’s worth noting that this drain plug uses an SAE hex (allen) key size, it is NOT metric.
If you have opted to replace the magnetic drain plug without removing the supercharger, please jump ahead to the second half of step 5 on Page 28.
AUDI 3.0T MAGNETIC SUPERCHARGER DRAIN PLUG INSTALLATION W/SUPERCHARGER SERVICE ES#3234457
27Table of ContentsWWW.ECSTUNING.COM© 2018 ECS TUNING 1000 SEVILLE RD. WADSWORTH, OH 44281 1.800.924.5172
Step 3:
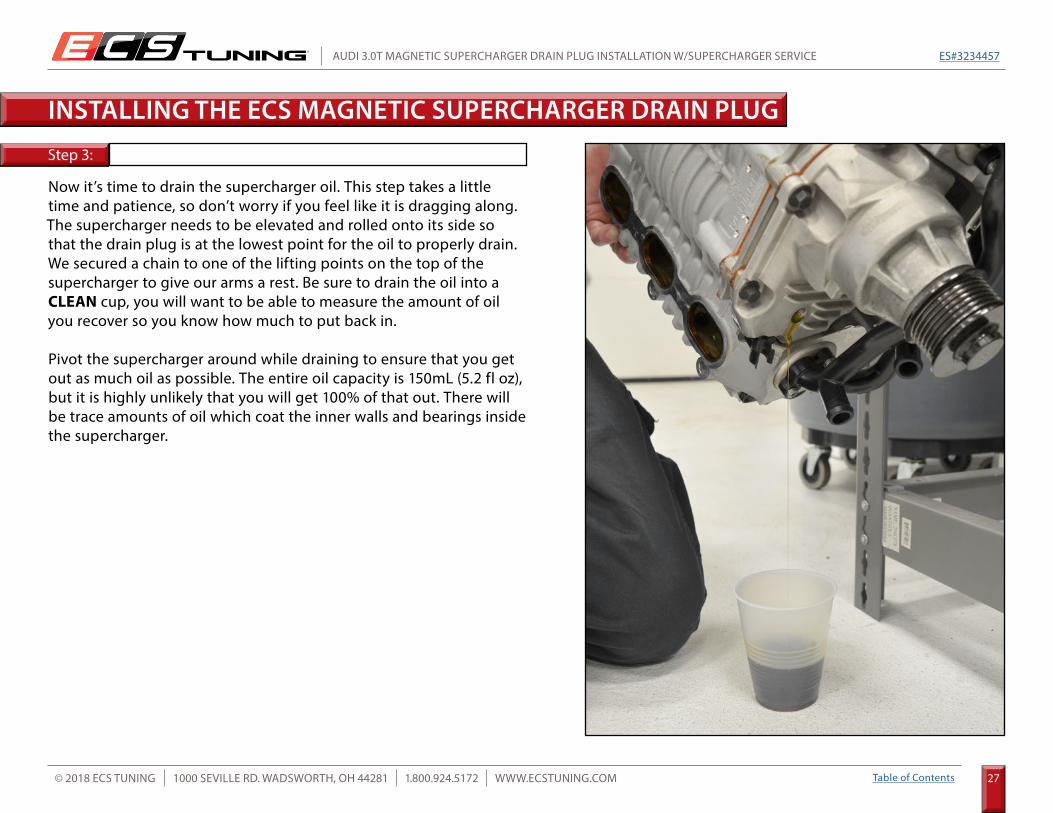
Now it’s time to drain the supercharger oil. This step takes a little time and patience, so don’t worry if you feel like it is dragging along. The supercharger needs to be elevated and rolled onto its side so that the drain plug is at the lowest point for the oil to properly drain. We secured a chain to one of the lifting points on the top of the supercharger to give our arms a rest. Be sure to drain the oil into a CLEAN cup, you will want to be able to measure the amount of oil you recover so you know how much to put back in.
Pivot the supercharger around while draining to ensure that you get out as much oil as possible. The entire oil capacity is 150mL (5.2 fl oz), but it is highly unlikely that you will get 100% of that out. There will be trace amounts of oil which coat the inner walls and bearings inside the supercharger.
INSTALLING THE ECS MAGNETIC SUPERCHARGER DRAIN PLUG
AUDI 3.0T MAGNETIC SUPERCHARGER DRAIN PLUG INSTALLATION W/SUPERCHARGER SERVICE ES#3234457
28Table of ContentsWWW.ECSTUNING.COM© 2018 ECS TUNING 1000 SEVILLE RD. WADSWORTH, OH 44281 1.800.924.5172
Step 4:
Step 5:
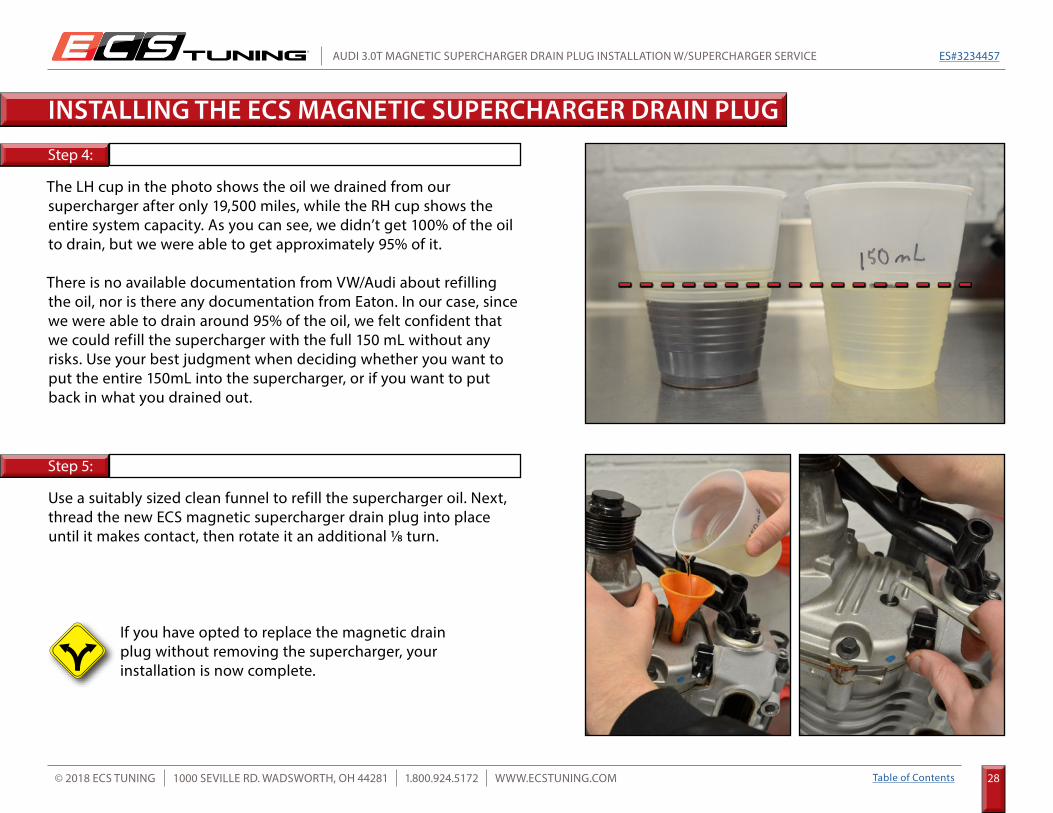
The LH cup in the photo shows the oil we drained from our supercharger after only 19,500 miles, while the RH cup shows the entire system capacity. As you can see, we didn’t get 100% of the oil to drain, but we were able to get approximately 95% of it.
There is no available documentation from VW/Audi about refilling the oil, nor is there any documentation from Eaton. In our case, since we were able to drain around 95% of the oil, we felt confident that we could refill the supercharger with the full 150 mL without any risks. Use your best judgment when deciding whether you want to put the entire 150mL into the supercharger, or if you want to put back in what you drained out.
Use a suitably sized clean funnel to refill the supercharger oil. Next, thread the new ECS magnetic supercharger drain plug into place until it makes contact, then rotate it an additional 1/8 turn.
INSTALLING THE ECS MAGNETIC SUPERCHARGER DRAIN PLUG
If you have opted to replace the magnetic drain plug without removing the supercharger, your installation is now complete.
AUDI 3.0T MAGNETIC SUPERCHARGER DRAIN PLUG INSTALLATION W/SUPERCHARGER SERVICE ES#3234457
29Table of ContentsWWW.ECSTUNING.COM© 2018 ECS TUNING 1000 SEVILLE RD. WADSWORTH, OH 44281 1.800.924.5172
Step 1:
Step 2:
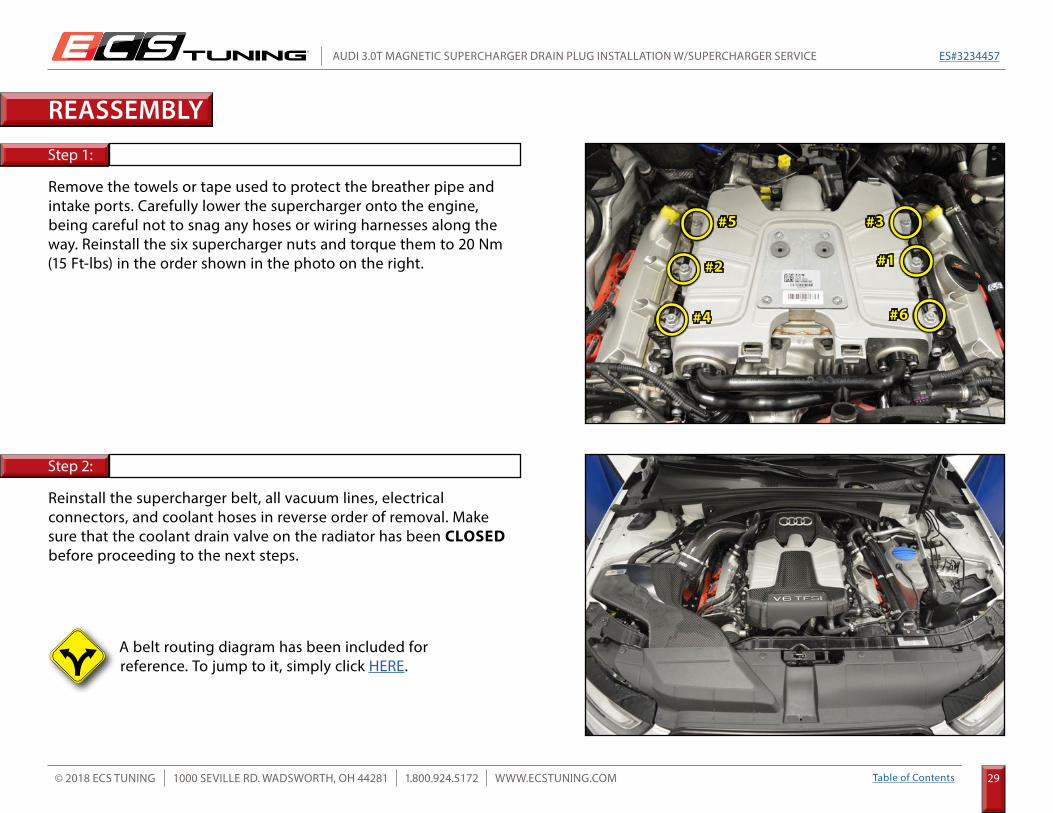
Remove the towels or tape used to protect the breather pipe and intake ports. Carefully lower the supercharger onto the engine, being careful not to snag any hoses or wiring harnesses along the way. Reinstall the six supercharger nuts and torque them to 20 Nm (15 Ft-lbs) in the order shown in the photo on the right.
Reinstall the supercharger belt, all vacuum lines, electrical connectors, and coolant hoses in reverse order of removal. Make sure that the coolant drain valve on the radiator has been CLOSED before proceeding to the next steps.
REASSEMBLY
#5
#2
#4
#3
#1
#6
A belt routing diagram has been included for reference. To jump to it, simply click HERE.
AUDI 3.0T MAGNETIC SUPERCHARGER DRAIN PLUG INSTALLATION W/SUPERCHARGER SERVICE ES#3234457
30Table of ContentsWWW.ECSTUNING.COM© 2018 ECS TUNING 1000 SEVILLE RD. WADSWORTH, OH 44281 1.800.924.5172
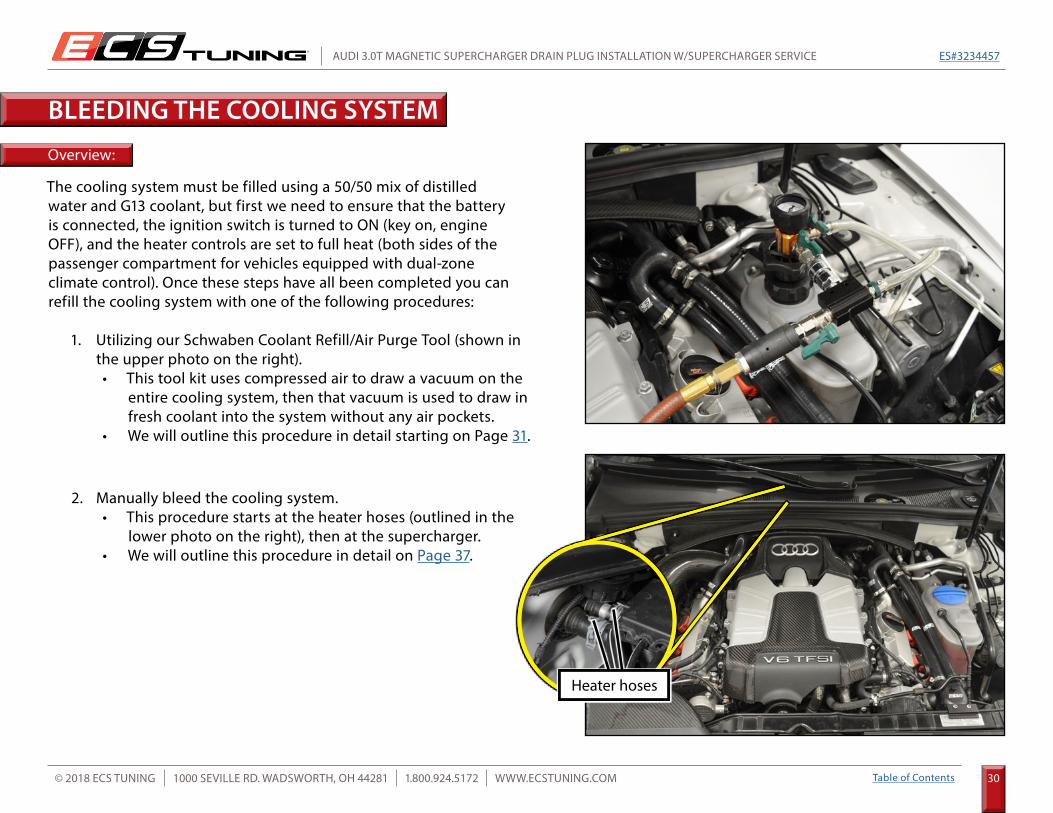
The cooling system must be filled using a 50/50 mix of distilled water and G13 coolant, but first we need to ensure that the battery is connected, the ignition switch is turned to ON (key on, engine OFF), and the heater controls are set to full heat (both sides of the passenger compartment for vehicles equipped with dual-zone climate control). Once these steps have all been completed you can refill the cooling system with one of the following procedures:
1. Utilizing our Schwaben Coolant Refill/Air Purge Tool (shown in the upper photo on the right).
BLEEDING THE COOLING SYSTEM
Heater hoses
• This tool kit uses compressed air to draw a vacuum on the entire cooling system, then that vacuum is used to draw in fresh coolant into the system without any air pockets.
• We will outline this procedure in detail starting on Page 31.
Overview:
2. Manually bleed the cooling system.• This procedure starts at the heater hoses (outlined in the
lower photo on the right), then at the supercharger.• We will outline this procedure in detail on Page 37.
AUDI 3.0T MAGNETIC SUPERCHARGER DRAIN PLUG INSTALLATION W/SUPERCHARGER SERVICE ES#3234457
31Table of ContentsWWW.ECSTUNING.COM© 2018 ECS TUNING 1000 SEVILLE RD. WADSWORTH, OH 44281 1.800.924.5172
Overview:
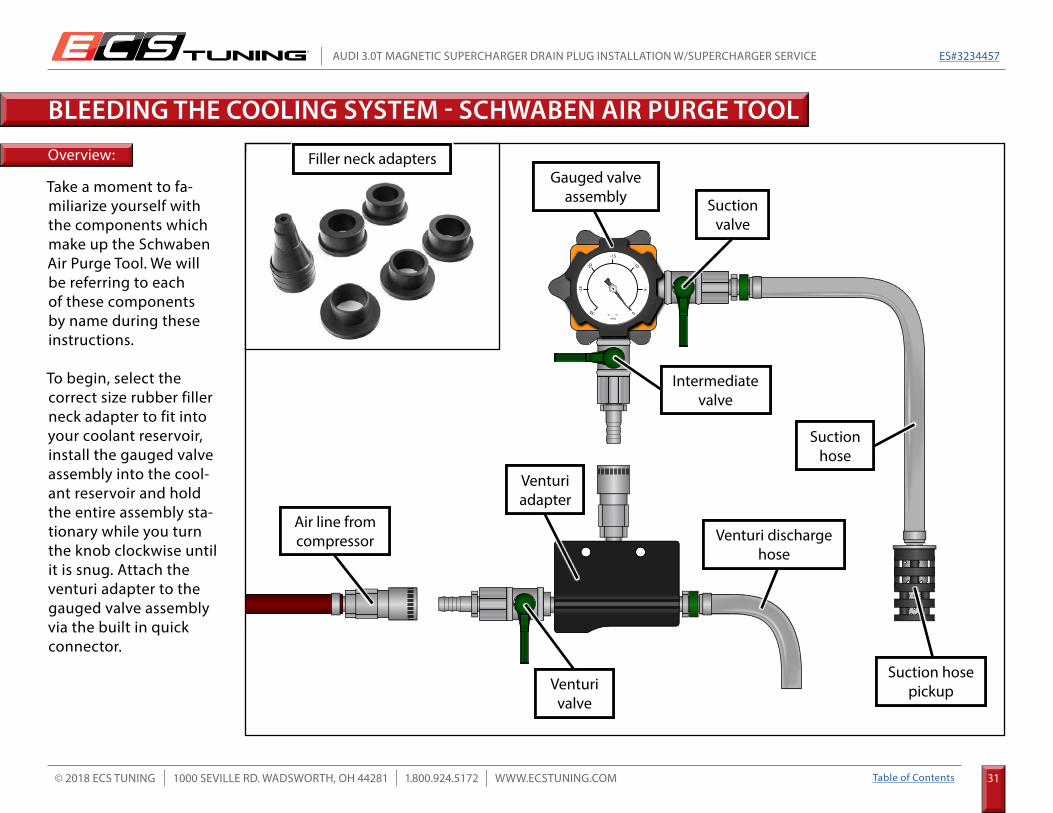
Take a moment to fa-miliarize yourself with the components which make up the Schwaben Air Purge Tool. We will be referring to each of these components by name during these instructions.
To begin, select the correct size rubber filler neck adapter to fit into your coolant reservoir, install the gauged valve assembly into the cool-ant reservoir and hold the entire assembly sta-tionary while you turn the knob clockwise until it is snug. Attach the venturi adapter to the gauged valve assembly via the built in quick connector.
BLEEDING THE COOLING SYSTEM - SCHWABEN AIR PURGE TOOL
inHg
-15-10
0-30
-25
-20
-5
Gauged valve assembly
Venturi valve
Venturi adapter
Intermediate valve
Suction valve
Suction hose
Suction hose pickup
Air line from compressor
Filler neck adapters
Venturi discharge hose
AUDI 3.0T MAGNETIC SUPERCHARGER DRAIN PLUG INSTALLATION W/SUPERCHARGER SERVICE ES#3234457
32Table of ContentsWWW.ECSTUNING.COM© 2018 ECS TUNING 1000 SEVILLE RD. WADSWORTH, OH 44281 1.800.924.5172
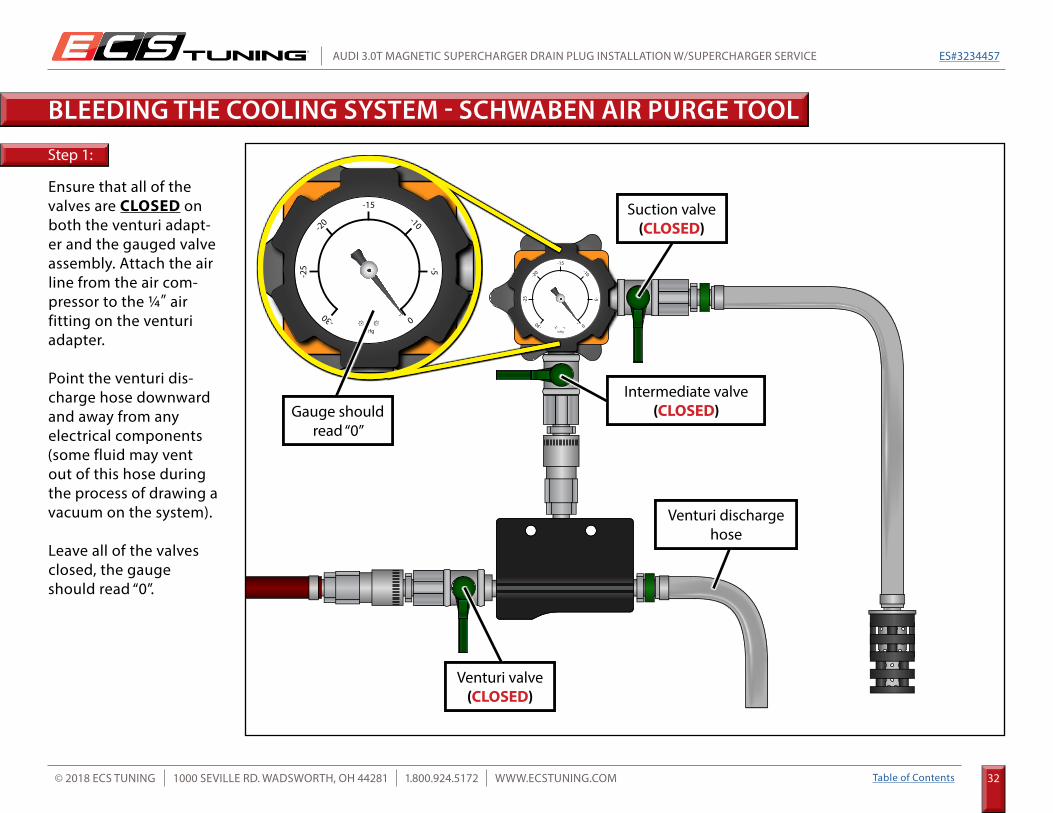
Step 1:
Ensure that all of the valves are CLOSED on both the venturi adapt-er and the gauged valve assembly. Attach the air line from the air com-pressor to the 1/4” air fitting on the venturi adapter.
Point the venturi dis-charge hose downward and away from any electrical components (some fluid may vent out of this hose during the process of drawing a vacuum on the system).
Leave all of the valves closed, the gauge should read “0”.
BLEEDING THE COOLING SYSTEM - SCHWABEN AIR PURGE TOOL
inHg
-15-10
0-30
-25
-20
-5
inHg
-15-10
0-30
-25
-20
-5
Venturi valve (CLOSED)
Suction valve (CLOSED)
Venturi discharge hose
Gauge should read “0”
Intermediate valve (CLOSED)
AUDI 3.0T MAGNETIC SUPERCHARGER DRAIN PLUG INSTALLATION W/SUPERCHARGER SERVICE ES#3234457
33Table of ContentsWWW.ECSTUNING.COM© 2018 ECS TUNING 1000 SEVILLE RD. WADSWORTH, OH 44281 1.800.924.5172
BLEEDING THE COOLING SYSTEM - SCHWABEN AIR PURGE TOOL
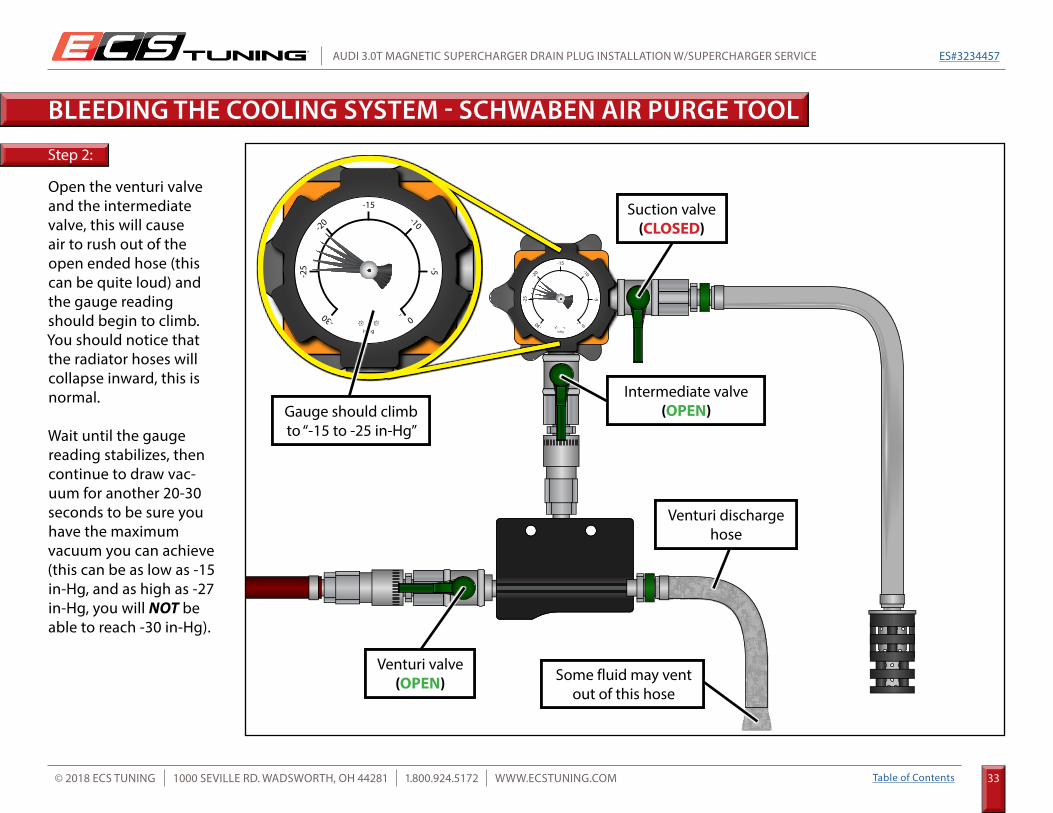
Step 2:
Open the venturi valve and the intermediate valve, this will cause air to rush out of the open ended hose (this can be quite loud) and the gauge reading should begin to climb. You should notice that the radiator hoses will collapse inward, this is normal.
Wait until the gauge reading stabilizes, then continue to draw vac-uum for another 20-30 seconds to be sure you have the maximum vacuum you can achieve (this can be as low as -15 in-Hg, and as high as -27 in-Hg, you will NOT be able to reach -30 in-Hg).
inHg
-15-10
0-30
-25
-20
-5
inHg
-15-10
0-30
-25
-20
-5
Venturi valve (OPEN)
Suction valve (CLOSED)
Venturi discharge hose
Gauge should climbto “-15 to -25 in-Hg”
Some fluid may vent out of this hose
Intermediate valve (OPEN)
AUDI 3.0T MAGNETIC SUPERCHARGER DRAIN PLUG INSTALLATION W/SUPERCHARGER SERVICE ES#3234457
34Table of ContentsWWW.ECSTUNING.COM© 2018 ECS TUNING 1000 SEVILLE RD. WADSWORTH, OH 44281 1.800.924.5172
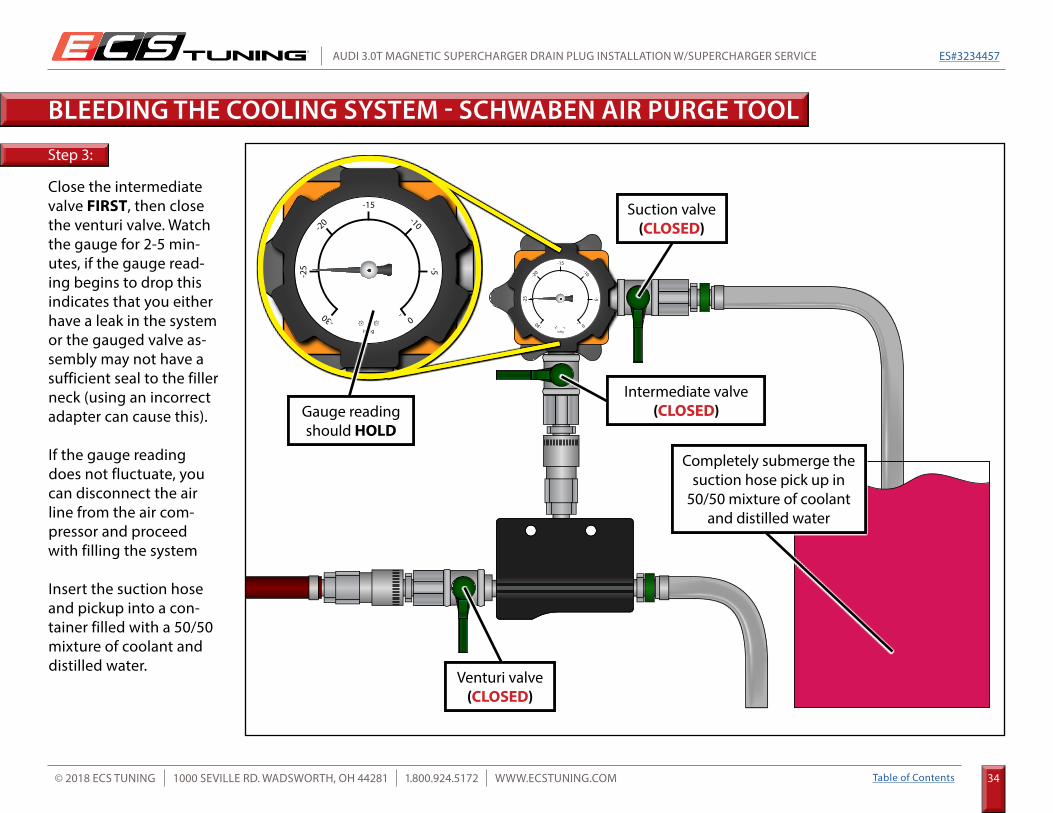
Step 3:
Close the intermediate valve FIRST, then close the venturi valve. Watch the gauge for 2-5 min-utes, if the gauge read-ing begins to drop this indicates that you either have a leak in the system or the gauged valve as-sembly may not have a sufficient seal to the filler neck (using an incorrect adapter can cause this).
If the gauge reading does not fluctuate, you can disconnect the air line from the air com-pressor and proceed with filling the system
Insert the suction hose and pickup into a con-tainer filled with a 50/50 mixture of coolant and distilled water.
BLEEDING THE COOLING SYSTEM - SCHWABEN AIR PURGE TOOL
inHg
-15-10
0-30
-25
-20
-5
inHg
-15-10
0-30
-25
-20
-5
Intermediate valve (CLOSED)
Suction valve (CLOSED)
Gauge reading should HOLD
Venturi valve (CLOSED)
Completely submerge the suction hose pick up in
50/50 mixture of coolant and distilled water
AUDI 3.0T MAGNETIC SUPERCHARGER DRAIN PLUG INSTALLATION W/SUPERCHARGER SERVICE ES#3234457
35Table of ContentsWWW.ECSTUNING.COM© 2018 ECS TUNING 1000 SEVILLE RD. WADSWORTH, OH 44281 1.800.924.5172
BLEEDING THE COOLING SYSTEM - SCHWABEN AIR PURGE TOOL
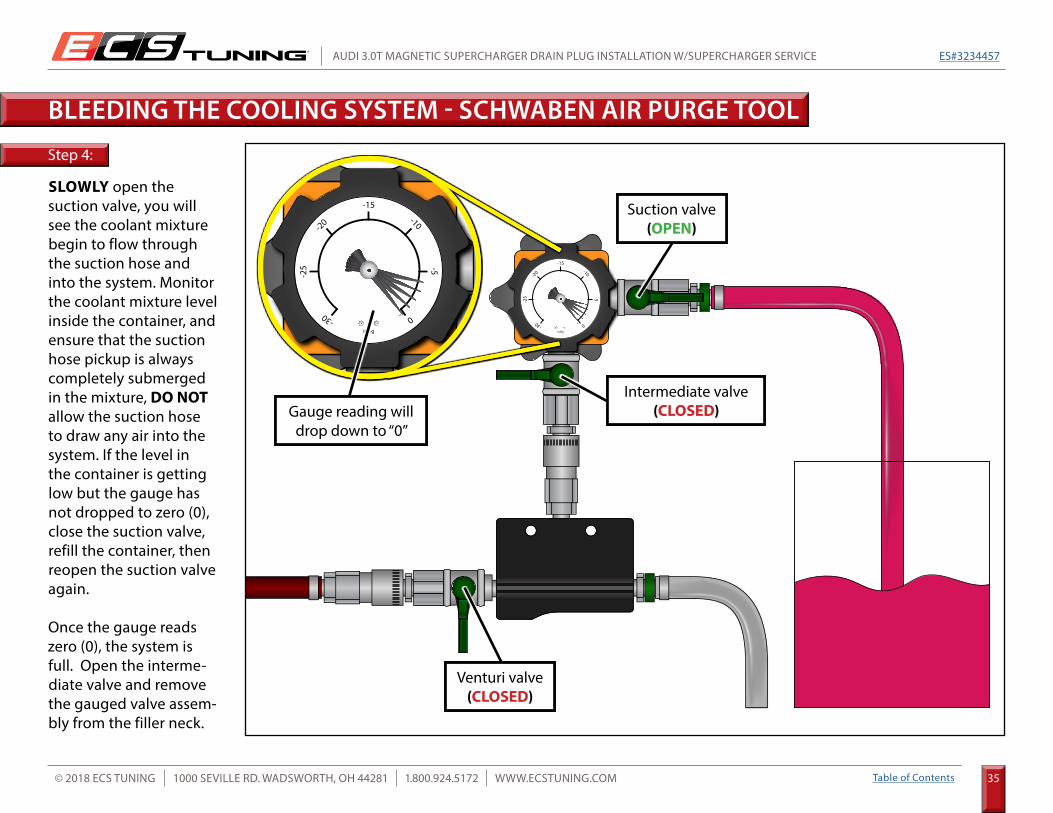
Step 4:
SLOWLY open the suction valve, you will see the coolant mixture begin to flow through the suction hose and into the system. Monitor the coolant mixture level inside the container, and ensure that the suction hose pickup is always completely submerged in the mixture, DO NOT allow the suction hose to draw any air into the system. If the level in the container is getting low but the gauge has not dropped to zero (0), close the suction valve, refill the container, then reopen the suction valve again.
Once the gauge reads zero (0), the system is full. Open the interme-diate valve and remove the gauged valve assem-bly from the filler neck.
inHg
-15-10
0-30
-25
-20
-5
inHg
-15-10
0-30
-25
-20
-5
Suction valve (OPEN)
Gauge reading will drop down to “0”
Venturi valve (CLOSED)
Intermediate valve (CLOSED)
AUDI 3.0T MAGNETIC SUPERCHARGER DRAIN PLUG INSTALLATION W/SUPERCHARGER SERVICE ES#3234457
36Table of ContentsWWW.ECSTUNING.COM© 2018 ECS TUNING 1000 SEVILLE RD. WADSWORTH, OH 44281 1.800.924.5172
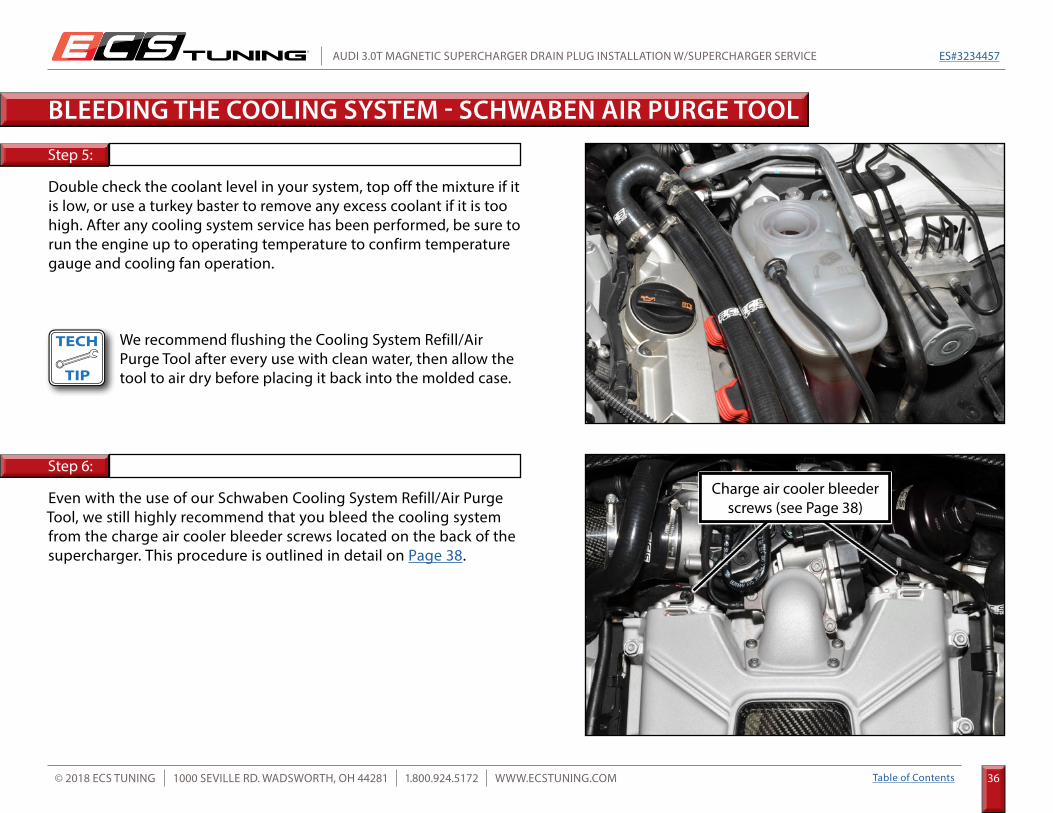
Step 5:
Step 6:
Double check the coolant level in your system, top off the mixture if it is low, or use a turkey baster to remove any excess coolant if it is too high. After any cooling system service has been performed, be sure to run the engine up to operating temperature to confirm temperature gauge and cooling fan operation.
Even with the use of our Schwaben Cooling System Refill/Air Purge Tool, we still highly recommend that you bleed the cooling system from the charge air cooler bleeder screws located on the back of the supercharger. This procedure is outlined in detail on Page 38.
BLEEDING THE COOLING SYSTEM - SCHWABEN AIR PURGE TOOL
Charge air cooler bleeder screws (see Page 38)
We recommend flushing the Cooling System Refill/Air Purge Tool after every use with clean water, then allow the tool to air dry before placing it back into the molded case.
AUDI 3.0T MAGNETIC SUPERCHARGER DRAIN PLUG INSTALLATION W/SUPERCHARGER SERVICE ES#3234457
37Table of ContentsWWW.ECSTUNING.COM© 2018 ECS TUNING 1000 SEVILLE RD. WADSWORTH, OH 44281 1.800.924.5172
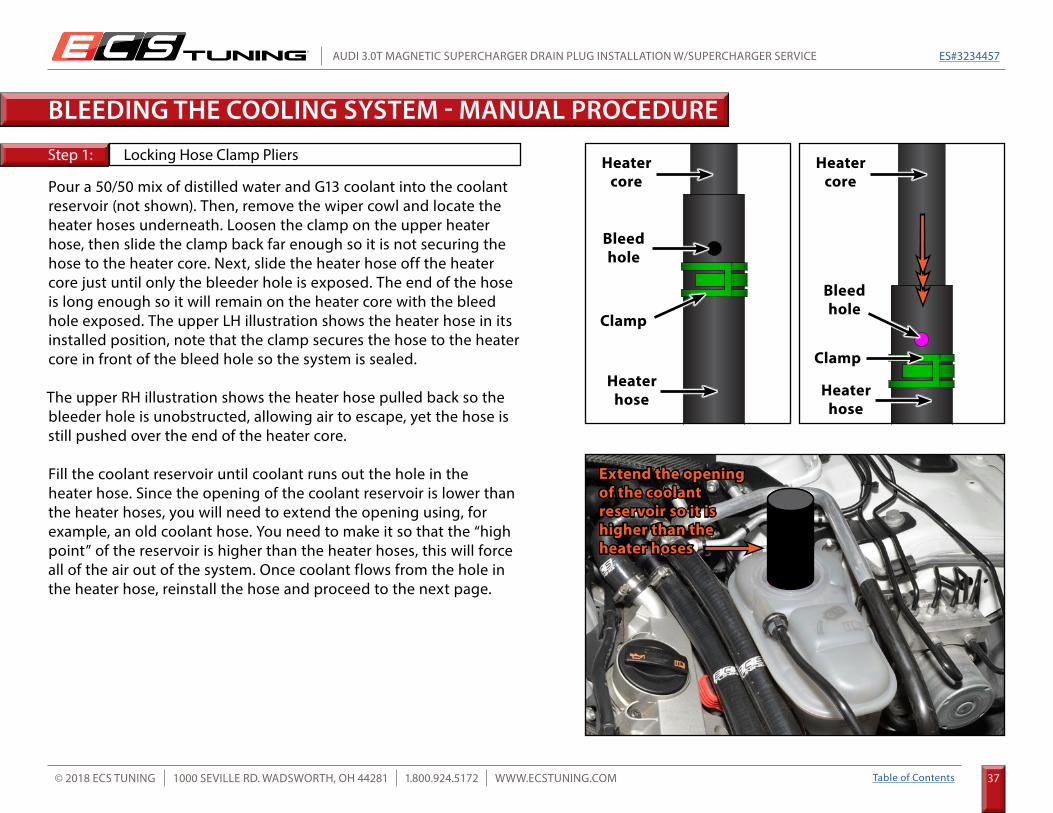
Step 1:
Pour a 50/50 mix of distilled water and G13 coolant into the coolant reservoir (not shown). Then, remove the wiper cowl and locate the heater hoses underneath. Loosen the clamp on the upper heater hose, then slide the clamp back far enough so it is not securing the hose to the heater core. Next, slide the heater hose off the heater core just until only the bleeder hole is exposed. The end of the hose is long enough so it will remain on the heater core with the bleed hole exposed. The upper LH illustration shows the heater hose in its installed position, note that the clamp secures the hose to the heater core in front of the bleed hole so the system is sealed.
The upper RH illustration shows the heater hose pulled back so the bleeder hole is unobstructed, allowing air to escape, yet the hose is still pushed over the end of the heater core.
Fill the coolant reservoir until coolant runs out the hole in the heater hose. Since the opening of the coolant reservoir is lower than the heater hoses, you will need to extend the opening using, for example, an old coolant hose. You need to make it so that the “high point” of the reservoir is higher than the heater hoses, this will force all of the air out of the system. Once coolant flows from the hole in the heater hose, reinstall the hose and proceed to the next page.
Locking Hose Clamp Pliers
Bleed hole
Heater core
Heater hose
Clamp
Heater core
Heater hose
Clamp
Bleed hole
Extend the opening of the coolant reservoir so it is higher than the heater hoses
BLEEDING THE COOLING SYSTEM - MANUAL PROCEDURE

AUDI 3.0T MAGNETIC SUPERCHARGER DRAIN PLUG INSTALLATION W/SUPERCHARGER SERVICE ES#3234457
38Table of ContentsWWW.ECSTUNING.COM© 2018 ECS TUNING 1000 SEVILLE RD. WADSWORTH, OH 44281 1.800.924.5172
Step 2:
Activate “Coolant circuit bleeding” through VAG-COM, or start the engine. We need the secondary coolant pump to be energized and pump coolant through the supercharger cooling circuit for this to work. You will want to place a cloth or rag around the charge air cooler bleeder screws to catch any coolant which spills during this procedure.
Open one of the bleeder screws at a time, one to two rotations should be all that is required in order to allow coolant to pass through the hole in the top of the screw. Once you see a steady stream of coolant flowing through the top of the screw you can close it. It is important to note that these bleeder screws are made of plastic and they can be extremely brittle. It is best to only turn them until the head of the screw bottoms out, any more than that and you risk breaking the head of the screw off inside the charge air cooler.
Repeat this procedure on the other charge air cooler bleeder screw, then check the coolant reservoir level and top off if needed. Reinstall the engine covers and any other components which have been removed.
Charge air cooler bleeder screws
BLEEDING THE COOLING SYSTEM - MANUAL PROCEDURE
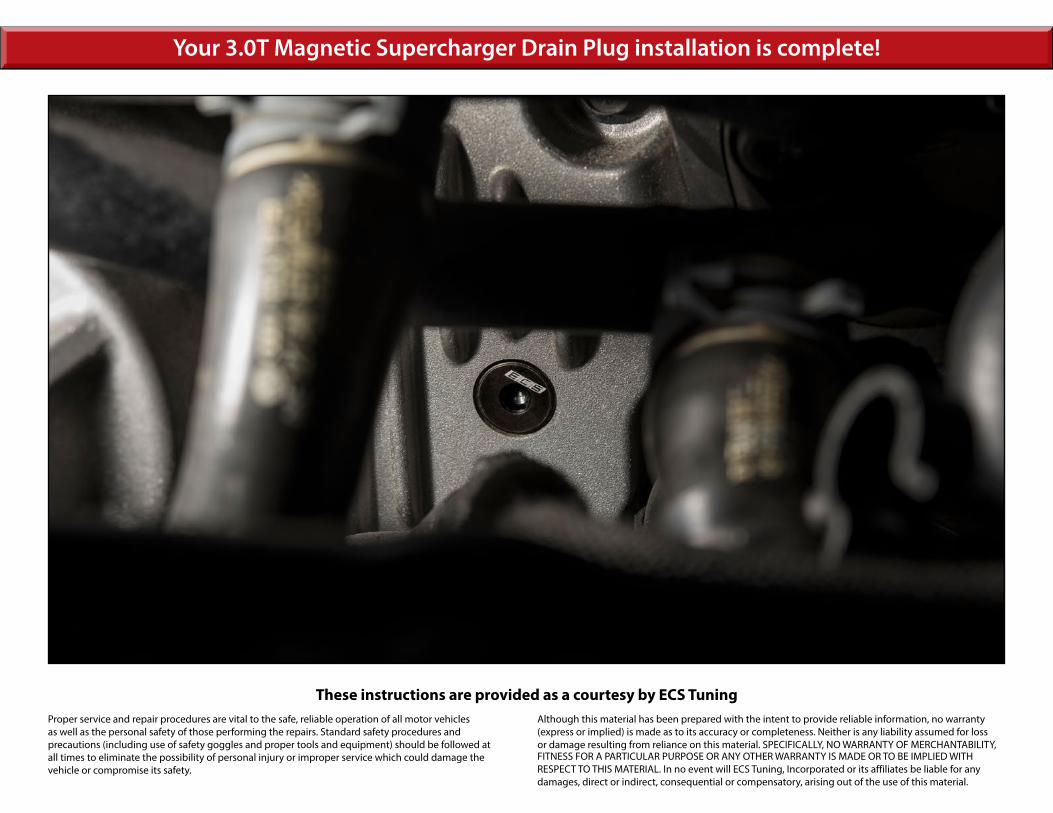
Your 3.0T Magnetic Supercharger Drain Plug installation is complete!
AUDI 3.0T MAGNETIC SUPERCHARGER DRAIN PLUG INSTALLATION W/SUPERCHARGER SERVICE ES#3234457
39Table of ContentsWWW.ECSTUNING.COM© 2018 ECS TUNING 1000 SEVILLE RD. WADSWORTH, OH 44281 1.800.924.5172
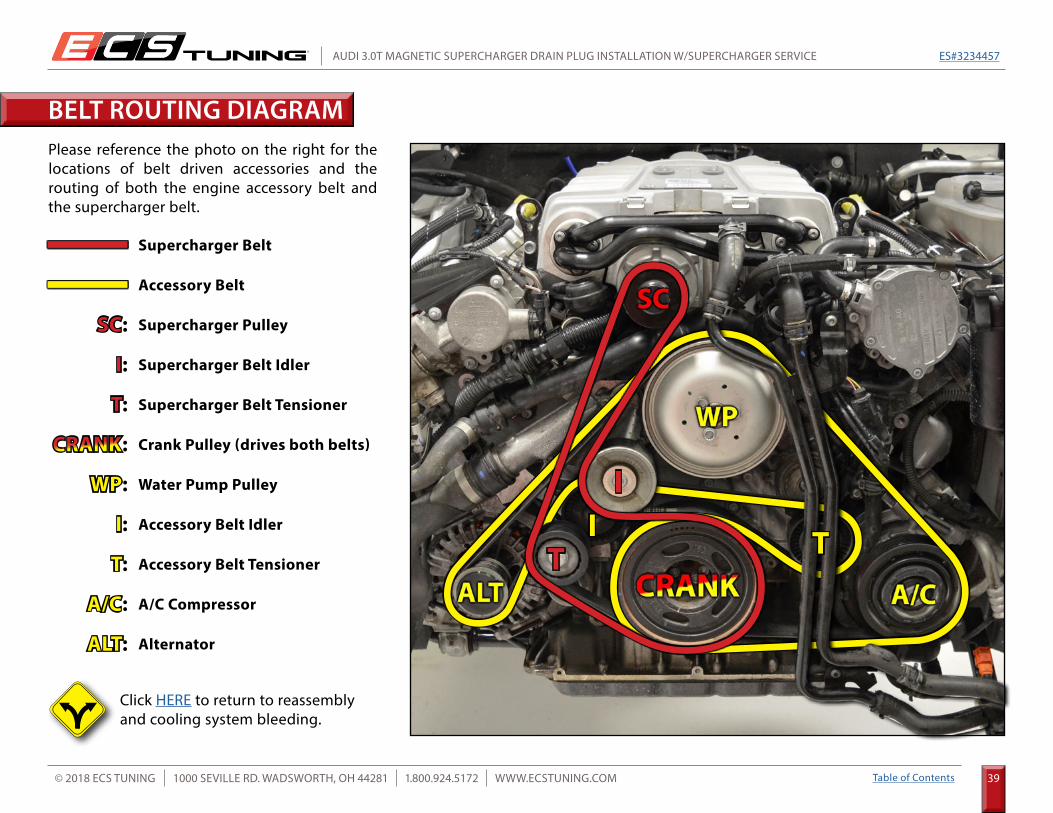
BELT ROUTING DIAGRAM
SC: Supercharger Pulley
Supercharger Belt
Crank Pulley (drives both belts)
Accessory Belt Tensioner
Supercharger Belt Idler
Accessory Belt
Water Pump Pulley
A/C Compressor
Supercharger Belt Tensioner
Accessory Belt Idler
Alternator
A/C:
ALT:
T:
TII
T:
I:
WP:
I:
CRANK:
Please reference the photo on the right for the locations of belt driven accessories and the routing of both the engine accessory belt and the supercharger belt.
T
Click HERE to return to reassembly and cooling system bleeding.

AUDI 3.0T MAGNETIC SUPERCHARGER DRAIN PLUG INSTALLATION W/SUPERCHARGER SERVICE ES#3234457
40Table of ContentsWWW.ECSTUNING.COM© 2018 ECS TUNING 1000 SEVILLE RD. WADSWORTH, OH 44281 1.800.924.5172
SCHWABEN - BUILD THE ULTIMATE TOOL COLLECTIONAt ECS Tuning, we carry a line of high quality Schwaben Tools and Equipment to help you build your ultimate tool collection. Never before has
affordability and quality been so closely related. Our entire Schwaben line is subjected to strict in house testing for strength and durability. See what we have to offer and equip your garage without breaking the bank.
These instructions are provided as a courtesy by ECS TuningProper service and repair procedures are vital to the safe, reliable operation of all motor vehicles as well as the personal safety of those performing the repairs. Standard safety procedures and precautions (including use of safety goggles and proper tools and equipment) should be followed at all times to eliminate the possibility of personal injury or improper service which could damage the vehicle or compromise its safety.
Although this material has been prepared with the intent to provide reliable information, no warranty (express or implied) is made as to its accuracy or completeness. Neither is any liability assumed for loss or damage resulting from reliance on this material. SPECIFICALLY, NO WARRANTY OF MERCHANTABILITY,
Your 3.0T Magnetic Supercharger Drain Plug installation is complete!
FITNESS FOR A PARTICULAR PURPOSE OR ANY OTHER WARRANTY IS MADE OR TO BE IMPLIED WITH RESPECT TO THIS MATERIAL. In no event will ECS Tuning, Incorporated or its affiliates be liable for any damages, direct or indirect, consequential or compensatory, arising out of the use of this material.