skype setup manual - microsoft · skype setup manual from account creation to taking ... if there...
TRANSCRIPT

Copyright © 2017ALC Press Inc. All Rights Reserved.
Skype Setup Manual From Account Creation to Taking
a Lesson
https://nihongo.alc.co.jp/home
Copyright © 2017ALC Press Inc. All Rights Reserved.
1. Installing Skype
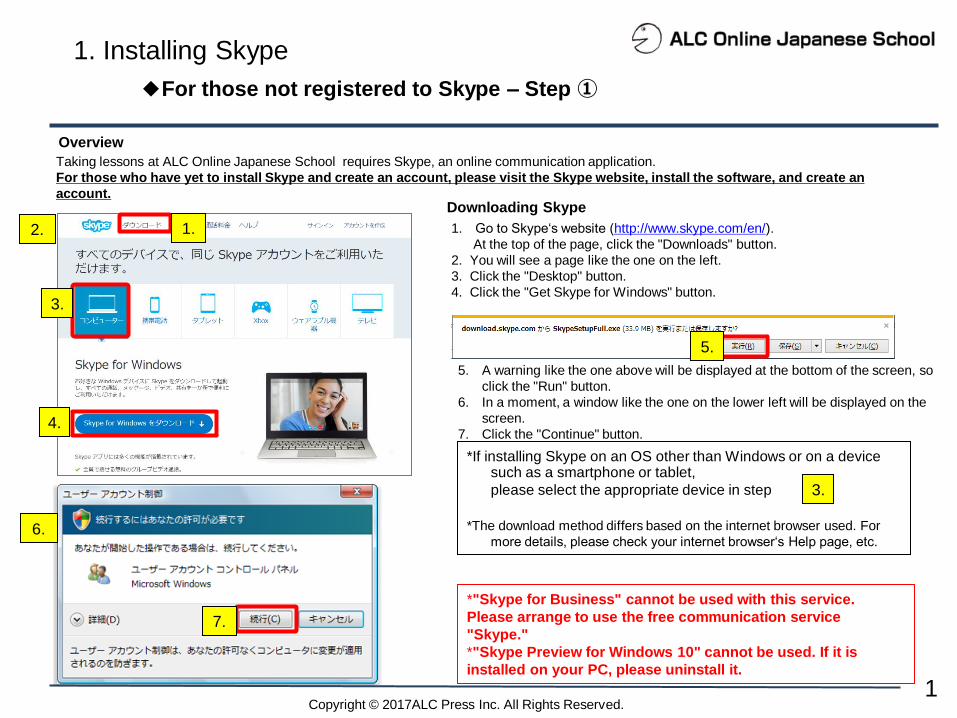
1. Go to Skype‘s website (http://www.skype.com/en/).
At the top of the page, click the "Downloads" button.
2. You will see a page like the one on the left.
3. Click the "Desktop" button.
4. Click the "Get Skype for Windows" button.
Downloading Skype
Overview
5. A warning like the one above will be displayed at the bottom of the screen, so
click the "Run" button.
6. In a moment, a window like the one on the lower left will be displayed on the
screen.
7. Click the "Continue" button.
3.
4.
5.
6.
1. 2.
7.
1
*If installing Skype on an OS other than Windows or on a device such as a smartphone or tablet,
please select the appropriate device in step
*The download method differs based on the internet browser used. For
more details, please check your internet browser‘s Help page, etc.
3.
◆For those not registered to Skype – Step ①
Taking lessons at ALC Online Japanese School requires Skype, an online communication application.
For those who have yet to install Skype and create an account, please visit the Skype website, install the software, and create an
account.
*"Skype for Business" cannot be used with this service.
Please arrange to use the free communication service
"Skype."
*"Skype Preview for Windows 10" cannot be used. If it is
installed on your PC, please uninstall it.

Copyright © 2017ALC Press Inc. All Rights Reserved.
1. Installing Skype
8. The Skype installation screen will be displayed.
9. Select a language.
10. Click the "I agree – Next" button.
11. A screen like the one of the left will be displayed.
12. Click the "Continue" button to begin the installation. The sign in screen will be displayed when the installation is
complete, so please wait until it finishes.
8.
9.
11.
10.
12.
2
◆For those not registered to Skype – Step ②

Copyright © 2017ALC Press Inc. All Rights Reserved.
2. Creating an Account ◆For those not registered to Skype – Step ③
Creating an account is required to use Skype. For those who do not have one, please create an account.
Creating a Skype Account
2.
1.
3
1. Starting Skype will open the sign in screen. After clicking the "Create
an Account" button, fill in the required fields following the guide.
2. Click "Use your email instead."
<The following will guide you through creating an account with an email
address as an example>

Copyright © 2017ALC Press Inc. All Rights Reserved.
2. Creating an Account ◆For those not registered to Skype – Step ④
5.
4
3. Enter the email address you use and your desired password.
4. After agreeing to the "Privacy Statement" and "Microsoft Services
Agreement," click the "Next" button.
5. Enter your name (first and last).
6. Click the "Next" button.
6.
3.
4.

Copyright © 2017ALC Press Inc. All Rights Reserved.
2. Creating an Account ◆For those not registered to Skype – Step ⑤
9
5
7. Enter the security code (4 digits) sent to the email address you entered.
8. Click the "Next" button.
7.
8.
9. A setup screen like the one on the left will be displayed.
10. Click "Continue."
10.

Copyright © 2017ALC Press Inc. All Rights Reserved.
2. Creating an Account ◆For those not registered to Skype – Step ⑥
12.
6
11. Select the headphones (or speaker) you will use and click "Test
Sound." Check whether you can hear the test sound. If you can, the test
has succeeded.
If you cannot hear the sound, try again after adjusting the speaker’s
volume and power supply or with another device.
12. Select the microphone you will use and, facing the microphone, make
some sound. If the green bar is displayed in response, the test has
succeeded.
If there is no response, check whether the microphone is functioning
properly or try again with another device.
13. If you will use a camera during lessons, select the camera you will
use. If your image is displayed on the screen, the test has succeeded.
If your image is not displayed on the screen, check whether the
camera is functioning properly, or try again with another device.
14. Click "Continue."
11.
13.
15.
15. If you will not setup your profile page, click "Add later."
16. If you will setup your profile page, click "Continue."
14.
16.

Copyright © 2017ALC Press Inc. All Rights Reserved.
2. Creating an Account ◆For those not registered to Skype – Step ⑦
7
17. If setting a picture saved on your computer as your profile picture,
click "Browse" and select the picture.
18. If taking a profile picture with your webcam, click "Take a Photo."
19. If you want to retake it, click "Try Again" and then click "Take a
Photo" once more.
20. Once you have taken a picture that is to your liking, click "Use This
Photo." 18.
21.
19. 20.
17.
21. The installation and initial setup are now complete.

Copyright © 2017ALC Press Inc. All Rights Reserved.
3. Signing in to Skype
◆For those not registered to Skype – Step ⑧
◆For those already registered to Skype – Step ①
For those who have finished creating an account, sign in to Skype in order to use it.
Overview
*
1. In order to sign in to Skype, enter your account information.
2. If you cannot sign in, click "Problems signing in?" and follow
the guide.
3. After completing the sign in, a screen like the one on the left
will be displayed.
1.
8
*For those who have made a Microsoft account with a cellphone
number, enter the number in the form of [+, country calling code,
space, phone number without first digit] when signing in.
(Ex) For a Japanese phone number
080-1234-5678 → +81 8012345678
●For those with a Skype account (username does not begin with
[live:] or [facebook:]), enter your Skype name. ●For those with a Microsoft account (such as one that begins with
[live:]), enter the phone number or email address used when you
acquired the Microsoft account.
*For those with a Facebook account, it can be used on Skype. If
using Skype with a Facebook account, click "Sign in with Facebook."
2.
3.
To check your Skype name, please refer to the "Checking Your
Skype Name" section of this manual.

Copyright © 2017ALC Press Inc. All Rights Reserved.
4. Configuring Skype
◆For those not registered to Skype – Step ⑨
◆For those already registered to Skype – Step ②
Overview
From the Skype privacy settings page, you can configure features such as permission for receiving voice and video calls
and how long chat histories will be saved. Configure these to your liking.
1. 1. From the "Tools" menu, select "Options."
2. Select "Privacy."
3. Allow calls from: ・Anyone → Everyone including users not added to your contacts
・Contacts → Users added to your contact list
4. Allow video and screen sharing from: ・Anyone → Everyone including users not added to your contacts
・Contacts → Users added to your contact list
・Nobody → All users
*If not allowing anybody, your teacher‘s face will not be
shown.
5. Allow chats from: ・Anyone → Everyone including users not added to your contacts
・Contacts → Users added to your contact list *If chats do not arrive even after selecting "Contacts," please confirm again that
you have approved your teacher‘s contact request.
6. Save chat history: Select the duration for which you want your chats to be saved. After this
period, all chats will be erased.
2.
3.
4.
5.
6.
9

Copyright © 2017ALC Press Inc. All Rights Reserved.
5. Sound Test
◆For those not registered to Skype – Step ⑩
◆For those already registered to Skype – Step ③
To prevent sound problems during lessons, please check the state of your settings prior to the lesson using Skype‘s automated
"Echo/Sound Test Service."
Overview
2. 1. You will connect with the "Echo/Sound Test Service" found in
your contacts list.
(If "Echo/Sound Test Service" is not displayed, search for
"echo123")
2. Click the call button and follow the audio guide to perform the
sound test. If your message is played back after a few
seconds, there are no problems.
3. If you cannot hear the automated voice or your message, click
on the call quality indicator (the indicator may be displayed in
red). After confirming the problem, follow the guide and check
your Skype settings again.
4. Repeat the sound test until you can hear the automated voice
and your message.
*If there are glitches during Skype calls, check the cause
using the sound test and resolve it.
Please check the following before carrying out the sound test.
3.
1.
10
・Is your headset or speaker properly connected?
・Is your computer or device‘s volume set to mute?

Copyright © 2017ALC Press Inc. All Rights Reserved.
6. Checking Your Skype Name
◆For those not registered to Skype – Step ⑪
◆For those already registered to Skype – Step ④
Your instructor will send a request to the Skype name you have registered to ALC Online Japanese School prior to the lesson and
will call you at the lesson time. There is only one of each Skype name and no two are the same, so please confirm that there are
no mistakes.
Overview
1. After signing in to Skype, click "Skype."
2. Click "My Account."
1.
11
2.
3.
3. When the My Account page opens, click "Caller ID" under
"Manage features."

Copyright © 2017ALC Press Inc. All Rights Reserved.
6. Checking Your Skype Name
◆For those not registered to Skype – Step ⑫
◆For those already registered to Skype – Step ⑤
4.
12
4. When the page changes, "You are currently identified by your Skype Name (●●●)" will be displayed at the bottom of the screen.
This ●●● portion is your Skype name.
If (live:●●●) is displayed, please include live: in your registration.
(For how to register your Skype name, please refer to the user manual.)

Copyright © 2017ALC Press Inc. All Rights Reserved.
7. Adding Instructors as Contacts
◆For those not registered to Skype – Step ⑬
◆For those already registered to Skype – Step ⑥
After booking a lesson, a contact request message will be sent from the instructor in charge to the Skype name you have registered
before the lesson begins. Please be sure to add the instructor to your contacts before the lesson begins.
(Please refer to the user manual for how to book a lesson and register your Skype name.)
Overview
1.
1. When the contact request from the instructor has arrived,
the "Recent" tab will be orange.
Click on the "Recent" tab.
2. Select your instructor‘s name from the "Pending contacts
request" section. ALC Online Japanese School instructor
display names (nicknames) will always have "ALC" as a suffix. Ex) ALC Mina
3. Where it says "Accept" and "Decline," click "Accept" to add your
instructor.
2.
3.
13
*If the request is not accepted, your instructor may be unable to
contact you due to your privacy settings. In order to allow the instructor to contact you, be sure to accept
the request before the lesson begins.
Copyright © 2017ALC Press Inc. All Rights Reserved.
8. Receiving Skype Calls from an Instructor
◆For those not registered to Skype – Step ⑭
◆For those already registered to Skype – Step ⑦
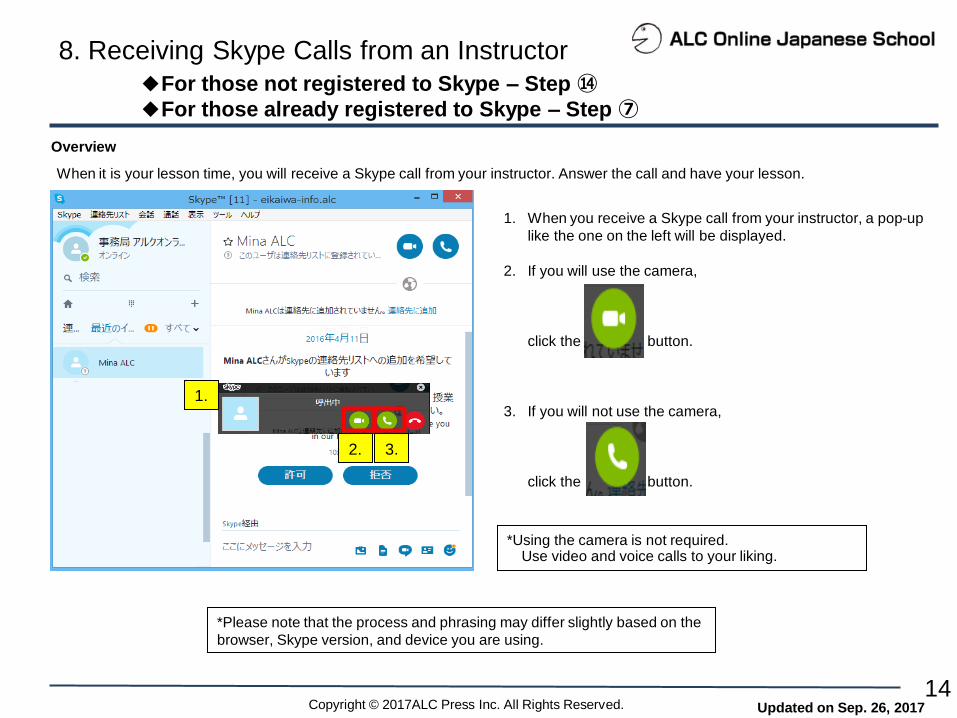
When it is your lesson time, you will receive a Skype call from your instructor. Answer the call and have your lesson.
Overview
1. When you receive a Skype call from your instructor, a pop-up
like the one on the left will be displayed.
2. If you will use the camera,
click the button.
3. If you will not use the camera,
click the button.
14
*Using the camera is not required. Use video and voice calls to your liking.
1.
2. 3.
*Please note that the process and phrasing may differ slightly based on the
browser, Skype version, and device you are using.
Updated on Sep. 26, 2017