slugbug neuroscience unit middle school level · slugbug neuroscience unit middle school level ......
TRANSCRIPT

SlugBug Neuroscience Unit Middle School Level
Includes: Lesson Plans, Labsheets, Lecture Information, Sample student work,
Learning Objectives and Learning Standards
Based on Work by: Liudmila Yafremava, M. Anthony Lewis, J. Jill Rogers Iguana Robotics, Inc.
Lessons prepared by: J. Jill Rogers and Geoff Freymuth, Edison Middle School

Iguana Robotics, Inc. 2004 - 1 -
Middle School SlugBug Neuroscience Unit The Middle School SlugBug neuroscience unit is a standards based, multidisciplinary unit in which students learn about neuroscience as well as mechanical engineering, neuromorphic engineering, robotics, biology and electronics as they design and construct a real walking robot. The seven to eight middle school lessons are presented at the introductory level and can be modified to fit the teaching style of the individual teacher or the curriculum of the school/State. Complete with lab sheets and supplementary teacher lecture information, this science unit is
flexible and easy to implement. Teachers can expand or combine lessons to meet their students’ needs and the time available. The Middle School, grades 6-8, unit consists of seven to eight basic lessons organized into the areas of Mechanics (M), Biology (B), and Electronics (E). The lessons offered are:
Table of Contents Specific learning Objectives page 2 Learning Standards addressed page 3 Lessons below include LabSheets, teacher lecture information and in some cases, samples of student work. Neuromorphic Engineering WebQuest page 4 Introduction to Neuromorphic/Biomorphic Engineering page 5 E-1 Basic components of Electronics page 9 B-1a Introduction to neurons and how they function page 12 B-1b Build a neuron with electronic components page 16 M-1 Build a Slug Bug page 18 M-2 Build a Slug Bug (continued) page 19 B-2 Tritonia Sea Slug Swim model page 23
Final lesson, “It walks” putting a brain on the Slug Bug

Iguana Robotics, Inc. 2004 - 2 -
Specific Learning Objectives
Middle School (6th –8th grades)
• Students will learn about the exciting field of biomorphic/neuromorphic engineering.
• Students will understand how a
neuron sends electrochemical impulses as they build and then witness the phenomena in a electronic model
• Students will identify the basic structures of a neuron, ( i.e. Pre synaptic terminal,
Dendrites, Nucleus, Axon, Cell Body (Soma), Axon Hillock, Myelin insulation) and describe their function.
• While studying the design and structure of the Tritonia sea slug and the SlugBug
robot, students will compare and contrast the physical and neurological structures of each.
• Students will attach a brain to a self-built robot and witness a neural network
generating locomotion in a walking robot.

Iguana Robotics, Inc. 2004 - 3 -
Illinois Science Learning Standards covered in SlugBug Science Unit Lesson Title: Introduction to Neuromorphic engineering Illinois Science Learning Standards: Science Standard 13.B: Know and apply concepts that describe the interaction between science, technology and society. 13.B.3c Describe how occupations use scientific and technological knowledge and skills. 13.B.2a Explain how technology is used in science for a variety of purposes (e.g., sample collection, storage and treatment; measurement; data collection, storage and retrieval; communication of information). Lesson Title: E-1: Basic components of electronics Illinois Science Learning Standards C and E: C. Know and apply concepts that describe properties of matter and energy and the interactions between them. 12.C.3a Explain interactions of energy with matter including changes of state and conservation of mass and energy. E. Know and apply concepts that describe the features and processes of the Earth and its resources. 12.E.2a Identify and explain natural cycles of the Earth’s land, water and atmospheric systems (e.g., rock cycle, water cycle, weather patterns). Lesson Title: B-1a: Introduction to Neurons and how they function Illinois Science Learning Standards 12.C: Know and apply concepts that describe properties of matter and energy and the interactions between them. 12.C.3b Model and describe the chemical and physical characteristics of mater Lesson Title B-1b: Build A Neuron With Electronic Components Illinois Science Learning Standard 12.C: Know and apply concepts that describe properties of matter and energy and the interactions between them. 12.C.3a Explain interactions of energy with matter including changes of state and conservation of mass and energy Lesson Title: M-1 & M-2: SlugBug Assembly Illinois Science Learning Standards: Standard B- Know and apply the principles of technological design. 11.B.2a Identify a design problem and propose possible solutions. 11.B.2b Develop a plan, design and procedure to address the problem identifying constraints (e.g., time, materials, technology). 11.B.2c Build a prototype of the design using available tools and materials. Lesson Title: B-3 Tritonia Swim Model Illinois Science Learning Standards: A. Know and apply concepts that explain how living things function, adapt and change. 12.A.3c Compare and contrast how different forms and structures reflect different functions.

Iguana Robotics, Inc. 2004 - 4 -
Lesson Title: Introduction to Neuromorphic/ Biomorphic engineering WebQuest Grade Level: 6-8 Target Audience and Time Frame: Whole class/ small group, One or two class periods Illinois Learning Standards: Science Standard 13.B: Know and apply concepts that describe the interaction between science, technology and society. 13.B.3c Describe how occupations use scientific and technological knowledge and skills. 13.B.2a Explain how technology is used in science for a variety of purposes (e.g., sample collection, storage and treatment; measurement; data collection, storage and retrieval; communication of information). Behavior Objective(s): Students will analyze the fields of Biomorphic/ Neuromorphic engineering while they perform various tasks on a WebQuest. Materials: Computer Lab, Webquest, “Biological Systems vs. Artificial Intelligence” can be found at http://zap.to/voyagerscience Description of Lesson: In this self guided lesson students will research robotics, neuroscience and the Tritonia Sea Slug. Pre-selected websites are explored as students find the answers to high level questions like “How will robots change your life as you know it today?” and informational questions like, “What is a neuron? The nervous system is divided into two divisions, what are they?” This web-based research will form a foundation of knowledge for students as they work their way through the SlugBug Neuroscience unit. Conclusion: To wrap up the lesson the teacher will discuss the students’ findings in their Web search, and, as a group the class will talk about the fields of Neuromorphic/Biomorphic engineering. At the end of the computer lab, the teacher will explain briefly how the brain of the Tritonia Sea Slug was used as a model for the brain of the SlugBug robot.

Iguana Robotics, Inc. 2004 - 5 -
Lesson Title: Introduction to Neuromorphic/ Biomorphic engineering Grade Level: 6-8 Target Audience and Time Frame: Whole class/ small group, One or two class periods Illinois Learning Standards: Science Standard 13.B: Know and apply concepts that describe the interaction between science, technology and society. 13.B.3c Describe how occupations use scientific and technological knowledge and skills. 13.B.2a Explain how technology is used in science for a variety of purposes (e.g., sample collection, storage and treatment; measurement; data collection, storage and retrieval; communication of information). Behavior Objective(s): Students will analyze and discuss the field of Neuromorphic engineering and how robot technology can be used in the modeling of biological systems. Materials: chalk board, paper and pencil, “Approaches to Robotics” flowchart, Intro. to Neuromorphic Engineering Lab sheet. Description of Lesson: Focusing Activity: It is suggested that students read the robot book provided with the SlugBug kit before beginning the unit. This book provides a basic background and history of robotics. Starting on page 10 of the robot book, the class will read aloud the section on A.I. vs. Biological systems and then discus the described scenario. After a group discussion, the teacher will write the terms A.I and Biological Systems on the board. Students will write their name under the approach which they feel is superior. This “vote” will be kept on the board for later discussion. Direct Instruction: The teacher will write the words Neuromorphic Engineering on the board. Students will be asked discuss what they think this type of engineer does. The teacher will then break the word into roots, ie: Neuro….. morphic…… to help students understand meaning or derivation of the discipline. Using Teacher Lecture Material: “Intro. To Neuromorphic Engineering” and the flow chart “Approaches to Robotics”, the teacher will introduce the field of Neuromorphic Engineering. The students will be told that during this unit they will become neuromorphic engineers and possibly discover something unknown about the nature of a biological nervous system. Small Group/Lab: In pairs, students will be asked to list all of the types of scientists who might be interested the biological systems approach to robotics. Students will then fill out the lab sheet provided. Conclusion: At the end of class discussion the teacher will refer to the vote results from earlier. Student will be allowed to change their vote if desired. A final vote can be taken at then end of the SlugBug unit. Evaluation: Labsheets can be graded; Webquest assignment can be checked for comprehension. Extension: The Webquest, “Biological Systems vs. Artificial Intelligence” can be found at http://zap.to/voyagerscience . Students can complete this quest as part of their final evaluation or in place of the Intro. lesson.

Iguana Robotics, Inc. 2004 - 6 -
LabSheet: Introduction to Neuromorphic Engineering
Part 1
Directions: With a partner, consider the biological systems approach to robotics. Think of all the different areas of science that might be involved in this type of robotic technology. Now, in the box below, list as many different types of scientists as you can think of that might work on a robotics project with a biological systems approach. Example: Zoologists
Part 2 These are a few types of scientists that might be involved in a neuromorphic engineering project: zoologists, brain scientists, electrical engineers, people who make prosthetics (artificial limbs), medical doctors. Directions: Select a scientist from the list provided and in your own words, describe how this type of scientist might be involved in the project. Write your ideas in the space below. Example: A zoologist could help design the nervous system and body of the neuromorphic project. Then she might want to study the neuromorphic model she helped create to better understand how the real animal swims or eats.
Iguana Robotics, Inc. 2004 - 7 -
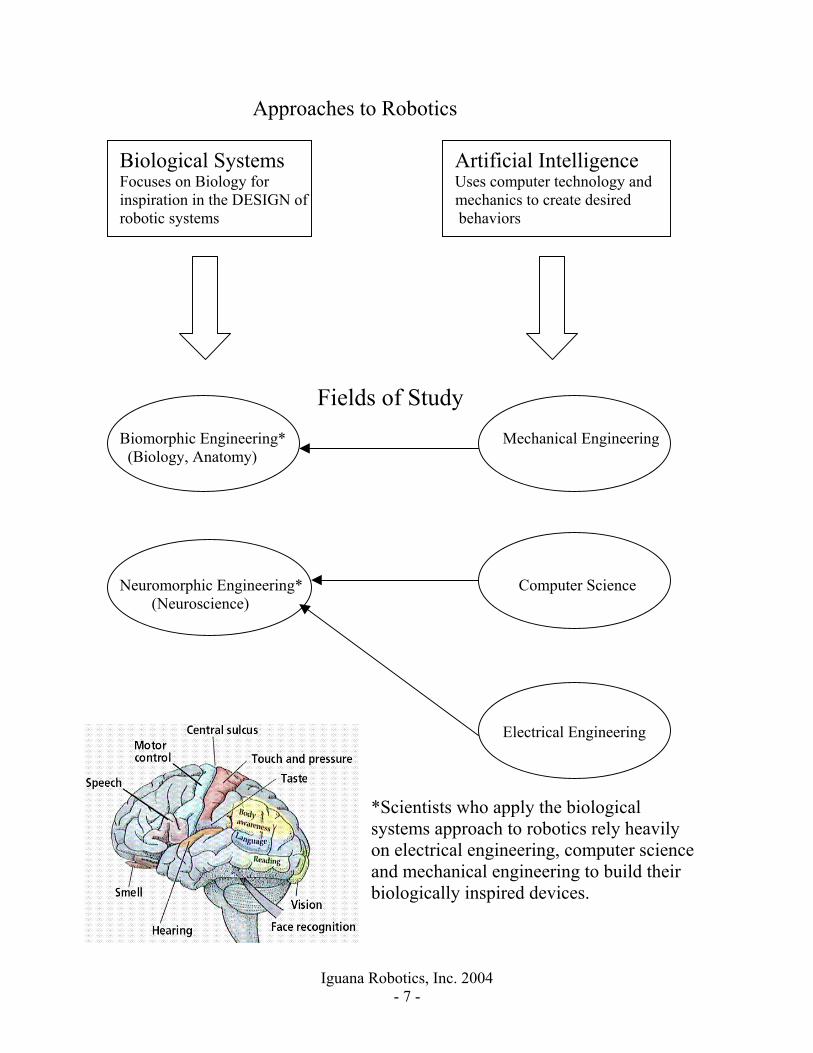
Approaches to Robotics Biological Systems Artificial Intelligence Focuses on Biology for Uses computer technology and inspiration in the DESIGN of mechanics to create desired robotic systems behaviors Fields of Study Biomorphic Engineering* Mechanical Engineering (Biology, Anatomy) Neuromorphic Engineering* Computer Science (Neuroscience)
Electrical Engineering *Scientists who apply the biological systems approach to robotics rely heavily on electrical engineering, computer science and mechanical engineering to build their biologically inspired devices.
Iguana Robotics, Inc. 2004 - 8 -
Teacher Lecture Material: Intro. To Neuromorphic Engineering
Neuromorphic engineers attempt to reverse engineer biological nervous systems, and then recreate the circuits they find in silicon. In other words they study biological brains and use the information they gather to design artificial control systems for robots and other electronic devices. This technique of building biologically similar electronic circuits was first pioneered by Professor Carver Mead of Caltech in the late 1980's. He named the technique "Neuromorphic Engineering."
With a close relationship to neuroscience, the neuromorphic engineer relies heavily on the more conventional fields of computer science, mechanical engineering, biology, kinesiology, zoology and electrical engineering to create tangible models of their designs. Often times, a computer simulation of a particular design is tried first, to investigate new neuromorphic designs. Next, robotic devices are frequently built to illustrate and test the simulated designs a neuromorphic engineer conceives. This technique called “modeling” allows the neuromorphic engineer to try out ideas on a robot to see if they really work. Sometimes, a flawless computer simulation behaves quite differently when run on a physical robot. Additionally, scientist in biological fields can better understand how a biological nervous system works through the close study of a robot with a neuromorphic design. Neuromorphic engineering is a truly multidisciplinary field of study.
Neuromorphic engineering has a wide range of applications from adaptive control of complex systems to the design of smart sensors, vision, speech understanding, medical prosthesis applications and robotics. Many of the fundamental principles in this field, such as the use of learning methods and the design of parallel hardware are inspired by biological systems. However, existing applications are modest and the challenge of scaling up from small artificial neural networks and designing completely autonomous systems at the levels achieved by actual biological systems lies ahead. From Science Magazine, 1997, volume 277 NEUROMORPHIC ENGINEERING: Why Can't a Computer Be More Like a Brain? : Watson, Andrew Computer scientists may tout their machines' abilities to perform millions or billions of operations a second, but in fact, biological systems are fantastically efficient at certain types of computation, such as interpreting sensory data. Some computer scientists are now trying to build a new kind of computer that captures in silicon the "essence" of biological subsystems. So-called "neuromorphic engineers" are adapting the tricks that the nervous system has come up with over the course of evolution.

Iguana Robotics, Inc. 2004 - 9 -
Lesson Title: E-1: Basic components of electronics Grade level: 6-8 Target Audience And Time Frame: Whole class/small group, One class period Illinois Science Learning Standards C and E: C. Know and apply concepts that describe properties of matter and energy and the interactions between them. 12.C.3a Explain interactions of energy with matter including changes of state and conservation of mass and energy. E. Know and apply concepts that describe the features and processes of the Earth and its resources. 12.E.2a Identify and explain natural cycles of the Earth’s land, water and atmospheric systems (e.g., rock cycle, water cycle, weather patterns). Learning outcomes:
1) Students will learn the basic function of a resistor and a capacitor 2) Students will understand the relationship between various parameters of a resistor and a capacitor and their ability to conduct/store charge
Behavior objectives: After comparing rivers and lakes to resisters and capacitors students will understand the parts and function of an RC circuit and then draw a model. Materials: chalkboard, pictures of rivers and dams, cups of various sizes, colored pencils, capacitors and resistors, LabSheet E-1 Description of a lesson:
Focusing activity: The teacher will show/hand out a number of pictures of rivers: wide, narrow, deep, shallow. While students are admiring the pictures, the teacher will ask which river they think carries more water, and which one less. The wider, deeper rivers usually carry more water. The narrow, shallow ones carry less. Direct instruction: 1) The teacher will introduce the concept of electricity as a flow of particles (electrons), or energy. Students will be asked to name places where they know there is electricity flow. The teacher will make a comparison between flow of electricity in the wires and flow of water in the river. Which river has more resistance to the flow of water? The narrow, shallow one. Which river has less resistance to the flow of water? The wide, deep one. The concept of resistor is introduced by analogy: resistor = wide and narrow rivers. The teacher will then show the class a resister and the symbol for resister. And draw this on board: resistance = more water/energy flow …and visa versa. 2) The teacher will hand out cups of various sizes and ask which one can hold more water. Once that cup is identified, it is put on the teacher’s desk. Then students are asked to compare their backpacks and decide which one can fit more books. The voted backpack will then be displayed on the teacher’s desk. The teacher will introduce the concept of capacitance as the ability to “store stuff.” The bigger the capacitor (cup, backpack), the more charge (water, books) it can contain. The concept of capacitor is introduced by analogy: capacitor = lakes and dams. The teacher will then show the class a capacitor and the symbol for capacitor. 3) The teacher will draw a picture of a water system: snowy mountain with a source river flowing down to a lake with a dam and an exit river. When the dam is closed, the lake fills up (capacitor charges) until it can contain no more water. When the dam is open, the water drains from the lake (capacitor discharges). This is a resistor and a capacitor

Iguana Robotics, Inc. 2004 - 10 -
connected in series. Next to the water system, the teacher will draw a RC circuit using electronic symbols. This is a model for a biological neuron as well (see lesson B-1a). Lab/small group activity: Together the class will complete the top part of LabSheet E-1. Have the students use a different colored pencil for each related vocabulary word. Next, the teacher will refer the class to the various drawings on the board and, in pairs, students will complete Labsheet E-1. Students should be instructed to use the same colored pencil for the correlations between vocabulary words and systems. (i.e. red pencil to draw the line between the vocabulary words: source and voltage and red pencil for the line between source and voltage in the system drawings)
Rivers …Resistance Lakes and Dams…Capacitance

Iguana Robotics, Inc. 2004 - 11 -
LabSheet E-1: Basic components of electronics
Name:________________________
Directions: Draw a colored line to match up the vocabulary words in the left column with the landforms in the middle column. Wait to connect the vocabulary words in the far right column until after lesson B-1a: Introduction to neurons. Resistor lake & dam Cell Body & Axon Hillock Capacitor source Axon & Pre-synaptic terminal Ground exit river Dendrite Voltage source river Stimulus Directions: With a partner decide who will draw each of the systems discussed in class. One will draw the “source*source river*lake & dam*exit river” system and one will draw a “5voltage*resister*capacitor*ground” system. Label the parts of each system. When you are finished, tape your pages side by side and draw colored lines illustrating the correlations between the two systems.


Iguana Robotics, Inc. 2004 - 12 -
Lesson Title: B-1a: Introduction to Neurons and how they function Grade Level: 6-8 Target Audience and Time Frame: Whole class, One class period Illinois Learning Standards Science Standard 12.C: Know and apply concepts that describe properties of matter and energy and the interactions between them. 12.C.3b Model and describe the chemical and physical characteristics of mater Learning Outcomes:
1. Students will explain how a neuron sends electrochemical impulses. 2. Students will know basic structure of a neuron
Behavior Objective(s): Students will label the parts of a neuron and describe how neurons function as they build a human model of neural network and create a model of a neuron out of pipe cleaners. Materials: Model of a brain, Labsheet B-1a, Teacher material B-1a, 4 paper cups, 2 pitchers of water, name tags, colored pipe cleaners Description of Lesson: Focusing Activity: The teacher will pass around a model of a brain, human or other. Directions for making your own brain model can be found at: http://faculty.washington.edu/chudler/chmodel.html While students are handling the model the teacher will ask if they know what types of cells brains are made out of. Once the word “neuron” is introduced the teacher will explain that neurons are much like other cells in the body; they have a nucleus, a cell membrane, cytoplasm and mitochondria. However, neurons differ in basic structure and the in way they communicate with each other. Direct Instruction: Using Teacher Material B-1a: Intro. to Neurons and neuroscience for kids website http://faculty.washington.edu/chudler/neurok.html the teacher will discuss how a neuron sends electrochemical impulses.
1. Stimulus arrives 2. Positively charged ions rush into cell body at resting potential (-70mV) 3. Neuron becomes more positively charged and achieves firing threshold (about -
55mV) 4. Neuron fires an action potential (spike) and sends electrochemical message down
the axon and out the pre synaptic terminals, on to the next neuron. On an overhead projection the teacher will label the parts of a neuron and explain how each part helps the neuron send signals to other neurons. Students can fill in Labsheet B-1a as the lecture proceeds.
Teacher Modeling: To illustrate neuronal function the teacher will create a human model of a neural network. First, six students will be selected and given name tags labeled: brain, neuron 1:-70mV (the resting potential of a neuron), neuron 2: -70mV, neuron 3:-70mV, neuron 4:-70mV, arm/hand muscles. Each neuron will receive a labeled cup to hold in their right hand. The brain student will hold a pitcher of water and the muscle student will hold an empty pitcher. The class will be instructed to imagine that the brain notices that the plant needs watering (stimulus), so it sends an electrochemical signal (water represents positively charged ions like Sodium) to neuron 1. Once neuron 1’s cell body fills (the cup), or when it reaches about –55mV (cup becomes full), the Axon Hillock will fire a “spike” or an “impulse.” This firing is called the action potential. Neuron 1 then sends the signal down its axon (neuron’s left arm) and out the

Iguana Robotics, Inc. 2004 - 13 -
pre synaptic terminal (fingers on left hand). This process repeats through the network until the muscle student receives the message and waters the plant. Small Group/Lab: Students will each receive pipe cleaners and build models of a neuron. Directions for this activity and similar activities can be found at: http://faculty.washington.edu/chudler/chmodel.html Conclusion: The class will reassemble and the teacher will review the terms and concepts covered in the lesson. Evaluation: Students will receive a grade for the accuracy of their pipe cleaner model and B-1a Labsheet. *Special thanks to Dr. Eric Chudler and the “Neuroscience for kids” website for much of the inspiration and information provided in this lesson.

Iguana Robotics, Inc. 2004 - 14 -
LabSheet B-1a: Parts of a Neuron Name:______________________
1. Label the parts of this neuron and label where the stimulus enters the
neuron. Draw an arrow indicating the direction of the electrochemical impulse.
Neuron vocabulary words: Synaptic terminal, Dendrites, Nucleus, Axon, Cell Body (Soma), Axon Hillock, Myelin insulation, Nodes of Ranvier
1. 2. 3. 4. 5.
6. 7. 8.
2. In your own words, describe how neurons receive and send electrochemical messages.


Iguana Robotics, Inc. 2004 - 15 -
Pipe Cleaner Neuron Get out those pipe cleaners and make a neuron! This neuron is made of pipe cleaners of 5 different colors: one color each for the dendrites, cell body, axon, myelin sheath and synaptic terminal. Any colors will do.
1. Take one pipe cleaner and roll it into a ball. This is will be the cell body.
2.Take another pipe cleaner and attach it to the new "cell body" by pushing it through the ball so there are two halves sticking out. Take the two halves and twist them together into a single extension. This will be the axon.
3.Take other pipe cleaners and push them through the "cell body" on the side opposite the axon. These are dendrites. These can be shorter than your axon and you can twist more pipe cleaners to make more dendrites.
4.Wrap small individual pipe cleaners along the length of the axon. These will represent the myelin sheath.
5. Wrap another pipe cleaner on the end of the axon. This will be the synaptic terminal.
Special thanks to the neuroscience for kids website for this activity http://faculty.washington.edu/chudler/chmodel.html

Iguana Robotics, Inc. 2004 - 16 -
Lesson Title (B1-b): Build A Neuron With Electronic Components Grade Level: 6-8 Target Audience And Time Frame: Whole class/small group, one class period Illinois Learning Standards Science Standard 12.C: Know and apply concepts that describe properties of matter and energy and the interactions between them. 12.C.3a Explain interactions of energy with matter including changes of state and conservation of mass and energy Learning outcomes:
1) Students will understand the concept of parallel connection and series connection.
2) Students will learn how to work with the bread-board. 3) Students will be able to assemble and test simple RC (model of neuron) circuits on a bread-board
Behavior objective: While using discrete electronic components, students will create “neurons” and observe their spiking behavior in a functioning RC circuit. Materials: 5 to 6 bread-boards, 5-6 jumper wire kits, one oscilloscope, an assortment of resistors of different values, an assortment of capacitors of different values, SlugBug board, masking tape Description of lesson: Review: The teacher will ask the students to recall the lesson on the basic electronic components and name components they already know. Students will be asked to compare resistors and capacitors to the rivers and the lakes, and explain how different magnitudes of resistance and capacitance is related to the ability of these components to conduct and store charge. Direct instruction: As the students recall the model of an RC circuit represented as the two rivers, a group of two is chosen from the class. One student is the river branch 1 (resistor), another student is the lake (capacitor). Students will be told that just like they have 2 legs, each resistor and capacitor has two legs as well. Take 2 sheets of paper. Ask the resistor student and capacitor student to step on one sheet of paper with their right foot. Ask them to step on the second sheet of paper with the left foot. Now they are connected in parallel. Then they are given a third sheet of paper. Resistor steps on it with his left foot and on the second sheet of paper with his right foot. Capacitor steps on the second piece of paper with her left foot and on the first sheet of paper with her right floor. Now they are connected in series. Focusing Activity: Students are asked to gather ion groups of two and repeat the procedure, alternating the parallel and series connectivity, alternating their legs etc... Lab/ Small group: The teacher will draw a diagram of a bread board and explain how wires run through it. The teacher will draw a diagram how to place resistor and capacitor on the breadboard in parallel and series. Students are then placed in small groups of two or three. Each group will receive a breadboard, jumper wire kit, and a bunch of capacitors and resistors of varying weights. Groups are instructed to connect their RC circuits in parallel. Groups will be encouraged to experiment with different types of connections. During this experimentation, the teacher will move around the room and check how things are connected. A testing station or two will be set up in the room with a SlugBug brain hooked up to a speaker. The SlugBug brain functions as the Axon

Iguana Robotics, Inc. 2004 - 17 -
Hillock or opening dam or the neuron model. The students will take their RC circuits to a testing station to hear their RC circuits fire. Students will hear the rate of fire increase as the capacitance lowers and visa versa. Then students will be invited to substitute Rs and Cs with different values and to hear the change in fire rate.
Conclusion: The whole class will be reassembled and will gather by the oscilloscope, which is connected to a circuit. Students will observe changes in the capacitor voltage as the neuron fires. The teacher will explain how this firing/spiking compares to a biological neuron

Iguana Robotics, Inc. 2004 - 18 -
Lesson Title: M-1 & M-2: SlugBug Assembly Grade Level: 6-8 Target Audience and Time Frame: Whole class/ small group; Two or three class periods Illinois Learning Standards: Standard B- Know and apply the principles of technological design. 11.B.2a Identify a design problem and propose possible solutions. 11.B.2b Develop a plan, design and procedure to address the problem identifying constraints (e.g., time, materials, technology). 11.B.2c Build a prototype of the design using available tools and materials. Behavior Objective(s): In small groups of three or four, students will design, then create a legged robot. While working in small groups, students will demonstrate cooperation and problem solving skills Learning outcomes:
1. Students will identify the basic parts of a robot. 2. Students will consider how leg shape effects speed.
Materials: SlugBug kit for each small group, One or two hot glue guns placed in work stations around the room, One or two pairs of wire cutters, pipe cleaners and/or other craft items for robot decoration, Labsheet M-1: SlugBug Design and M-1: Parts of a robot, Teacher material M-1. Day 1- Description of Lesson: Focusing Activity: As a group, the class will be asked to name a few legged creatures and then discuss how movement occurs in each. Next students will be asked to consider how the leg shape and muscle structures of these creatures facilitate different types of movement. Students should be invited to stand up to physically mimic the movement of the mentioned creatures in order to better understand the nature of the movement. (Real scientists who study movement often do this.) Direct Instruction: The teacher will first go over the material in Teacher material: M-1, which covers the parts of the robot and assembly instructions. Then the teacher will identify the design problem: What shape should the robot’s legs be in order to achieve optimum speed? Teacher Modeling: The teacher should model the steps in the robot assembly. See Teacher Material: M-1 Small Group/Lab
Students will: 1. Label the parts of the robot and draw possible leg and foot shapes for their robot
on Labsheet M-1 2. After considering the materials available, and using group consensus, a leg shape
and configuration will be determined. 3. Assemble their robot body and build their robot legs according to the agreed
design.

Iguana Robotics, Inc. 2004 - 19 -
Day 2- Description of Lesson: Focusing activity: The teacher will explain to the students that there is an additional design problem; this robot must be beautiful to other robots. How can the shape of the leg improve the beauty of the robot’s walk and the overall appearance of the creature? The teacher will explain to the students that the elegance of the walk will be tested at a later date, but visual beauty and graceful movement should be considered. Small Group/Lab:
Students will: 1. Write the second design problem on Labsheet M-1 2. Draw a total design for the robot on the back of Labsheet M-1 and decide, by
group consensus on a final design. 3. Attach the legs to their robot and finish decorating their robot prototype.
Evaluation: Labsheet M-1 can be graded and student knowledge of information covered can be assessed by the unit test. Extension: Have students make a list of things that are considered beautiful to their robot. Have student collect recycled items from home to decorate their robot.

Iguana Robotics, Inc. 2004 - 20 -
Labsheet M-1: Parts of a SlugBug
Please label these parts…Actuator(s), Brain, Servo points of rotation (2) Physical adornments, legs, feet
Write out design problem 1 below: _______________________________________________________________________ ------------------------------------------------------------------------------------------------------------ Draw possible leg and foot shapes for your robot below. Circle the shape that is selected by your group.

Iguana Robotics, Inc. 2004 - 21 -
Labsheet M-2: SlugBug Design
Write out Design Problem 2 below: ________________________________________________________________________ Explain the reason for the decorations you added to your SlugBug Draw your ideas for final robot design here
Iguana Robotics, Inc. 2004 - 22 -
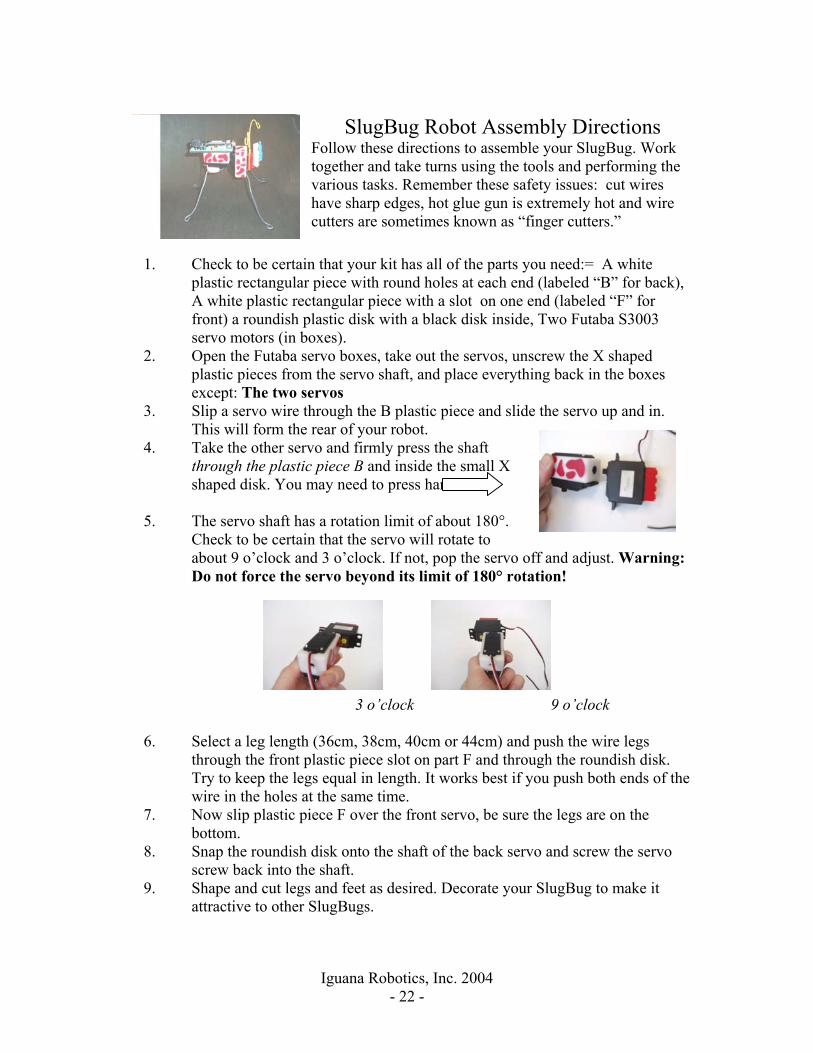
SlugBug Robot Assembly Directions
Follow these directions to assemble your SlugBug. Work together and take turns using the tools and performing the various tasks. Remember these safety issues: cut wires have sharp edges, hot glue gun is extremely hot and wire cutters are sometimes known as “finger cutters.”
1. Check to be certain that your kit has all of the parts you need:= A white plastic rectangular piece with round holes at each end (labeled “B” for back), A white plastic rectangular piece with a slot on one end (labeled “F” for front) a roundish plastic disk with a black disk inside, Two Futaba S3003 servo motors (in boxes).
2. Open the Futaba servo boxes, take out the servos, unscrew the X shaped plastic pieces from the servo shaft, and place everything back in the boxes except: The two servos
3. Slip a servo wire through the B plastic piece and slide the servo up and in. This will form the rear of your robot.
4. Take the other servo and firmly press the shaft through the plastic piece B and inside the small X shaped disk. You may need to press hard!
5. The servo shaft has a rotation limit of about 180°.
Check to be certain that the servo will rotate to about 9 o’clock and 3 o’clock. If not, pop the servo off and adjust. Warning: Do not force the servo beyond its limit of 180° rotation!
3 o’clock 9 o’clock
6. Select a leg length (36cm, 38cm, 40cm or 44cm) and push the wire legs through the front plastic piece slot on part F and through the roundish disk. Try to keep the legs equal in length. It works best if you push both ends of the wire in the holes at the same time.
7. Now slip plastic piece F over the front servo, be sure the legs are on the bottom.
8. Snap the roundish disk onto the shaft of the back servo and screw the servo screw back into the shaft.
9. Shape and cut legs and feet as desired. Decorate your SlugBug to make it attractive to other SlugBugs.

Iguana Robotics, Inc. 2004 - 23 -
Lesson Title: B-3 Tritonia Swim Model Grade Level: 6-8 Target Audience and Time Frame: Whole group/Small group, one class period Illinois Learning Standards: A. Know and apply concepts that explain how living things function, adapt and change. 12.A.3c Compare and contrast how different forms and structures reflect different functions. Behavior Objective(s): While studying the design and structure of the Tritonia sea slug and the SlugBug, students will compare and contrast the physical and neurological structures of each. Learning Outcome(s): 1. Students will be able to explain how a neuron generates motion in a muscle through the explanation of the Tritonia swim model. Materials: Assembled SlugBug (one for each group), Teacher lecture information B-2, Pictures of Tritonia Sea Slugs, Labsheet B-2a: Diagram of Tritonia Sea Slug and completed Labsheet M-1: Diagram of the SugBug (one for each student). Description of Lesson: Focusing Activity: After drawing a Venn diagram on a piece of butcher paper or over head projector , the teacher will display a SlugBug and a picture of a
Tritonia Sea Slug. The class will be asked to decide how these two things are alike and how they are different (visually). Responses will be filled into the proper sections of the Venn diagram. Direct Instruction: The teacher will cover the material about Tritonia sea slugs provided in the Teacher lecture information B-2. Special attention should be paid to the details of the Tritonia swim model. Then the class can again add to the Venn diagram, this time focusing on more detailed similarities and differences.
Teacher Modeling: Together, the class will label the parts of the Tritonia and students will be asked to fill out their own worksheet B-2. Small Group: Students will need their Tritonia diagram, SlugBug robot and worksheets M-1 and B-2a & b. Students will be asked to get into pairs and try to discover additional ways in which the SlugBug robot and the sea slug are alike. Worksheets M-1 and B-2a &b can be used to compare the physical structures of
the robot and slug. Conclusion: The class will reassemble and discuss the items on the Venn diagram. Each small group will be allowed to add their additional items for the diagram. The Venn diagram can be added to for the remainder of the science unit as additional similarities are revealed. Evaluation: Students can be evaluated by their group participation, their answers on the Labsheet and the Tritonia Swim model can be on the final, unit test. Extension: Visit this fun web site: http://www.seaslugforum.net How many different species of Tritonia sea slug can your students find?
Photo by Goddard, J., 2000 (October 2) Tritonia festiva (Stearns, 1873). [In] Sea Slug Forum. http://www.seaslugforum.net/tritfest.htm

Iguana Robotics, Inc. 2004 - 24 -
Labsheet B-2a: Tritonia Sea Slug
Name________________________
Label these parts: rhinopore, oral veil, cerata, tentacle (pepielae)
Illustration by Chris Hicks (Northolt, England)
Tritonia Swim Model Stimulus KEY DSI = (dorsal swim interneuron) VSI = (ventral swim interneuron) C2 = (connector neuron) = inhibit = excite
DSI
VSI
C2

Iguana Robotics, Inc. 2004 - 25 -
Tritonia Sea Slug Brains