small bead cap and bail - ann benson€¦ · 211 218 ann benson all rights resered. 211218 ann...
TRANSCRIPT
©2011, 2018 Ann Benson All Rights Reserved. ©2011,2018 Ann Benson All Rights Reserved.
MATERIALS
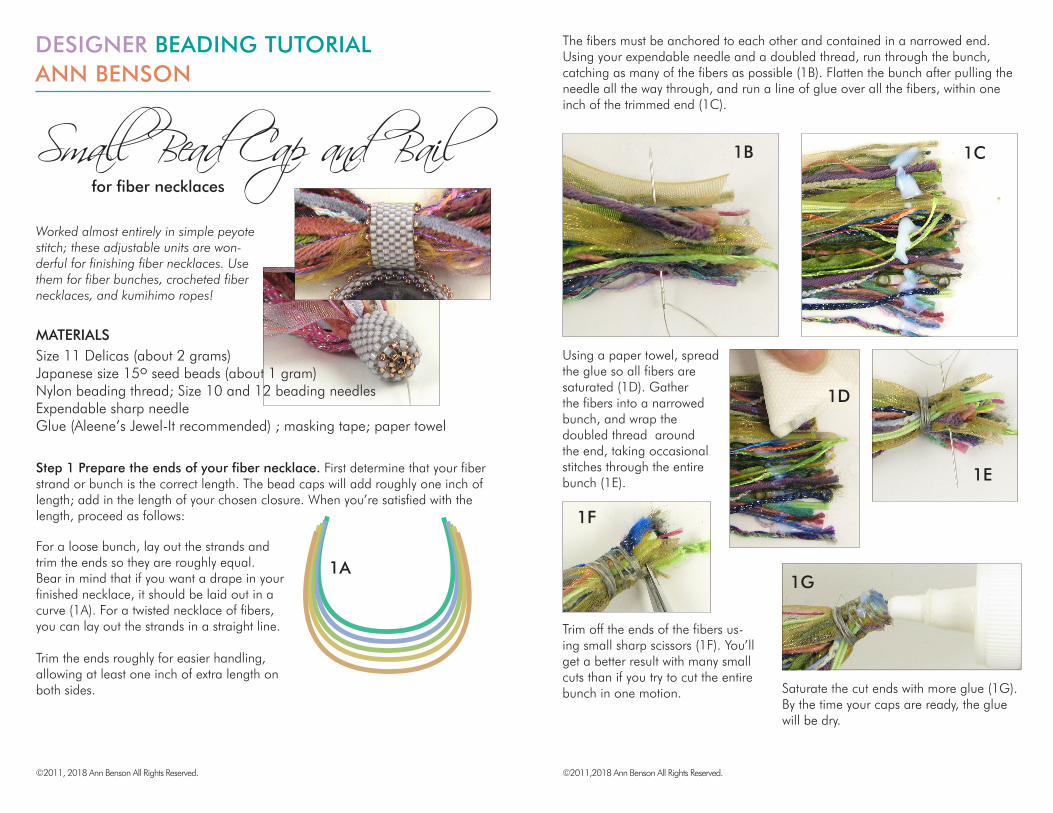
Small Bead Cap and Bail
Step 1 Prepare the ends of your fiber necklace. First determine that your fiber strand or bunch is the correct length. The bead caps will add roughly one inch of length; add in the length of your chosen closure. When you’re satisfied with the length, proceed as follows:
for fiber necklaces
Worked almost entirely in simple peyote stitch; these adjustable units are won-derful for finishing fiber necklaces. Use them for fiber bunches, crocheted fiber necklaces, and kumihimo ropes!
Size 11 Delicas (about 2 grams)Japanese size 15o seed beads (about 1 gram)Nylon beading thread; Size 10 and 12 beading needlesExpendable sharp needleGlue (Aleene’s Jewel-It recommended) ; masking tape; paper towel
For a loose bunch, lay out the strands and trim the ends so they are roughly equal. Bear in mind that if you want a drape in your finished necklace, it should be laid out in a curve (1A). For a twisted necklace of fibers, you can lay out the strands in a straight line.
Trim the ends roughly for easier handling, allowing at least one inch of extra length on both sides.
1A
The fibers must be anchored to each other and contained in a narrowed end. Using your expendable needle and a doubled thread, run through the bunch, catching as many of the fibers as possible (1B). Flatten the bunch after pulling the needle all the way through, and run a line of glue over all the fibers, within one inch of the trimmed end (1C).
1B 1C
1D
1E
Using a paper towel, spread the glue so all fibers are saturated (1D). Gather the fibers into a narrowed bunch, and wrap the doubled thread around the end, taking occasional stitches through the entire bunch (1E).
1F
1G
Trim off the ends of the fibers us-ing small sharp scissors (1F). You’ll get a better result with many small cuts than if you try to cut the entire bunch in one motion. Saturate the cut ends with more glue (1G).
By the time your caps are ready, the glue will be dry.
DESIGNER BEADING TUTORIAL ANN BENSON
©2011, 2018 Ann Benson All Rights Reserved. ©2011,2018 Ann Benson All Rights Reserved.
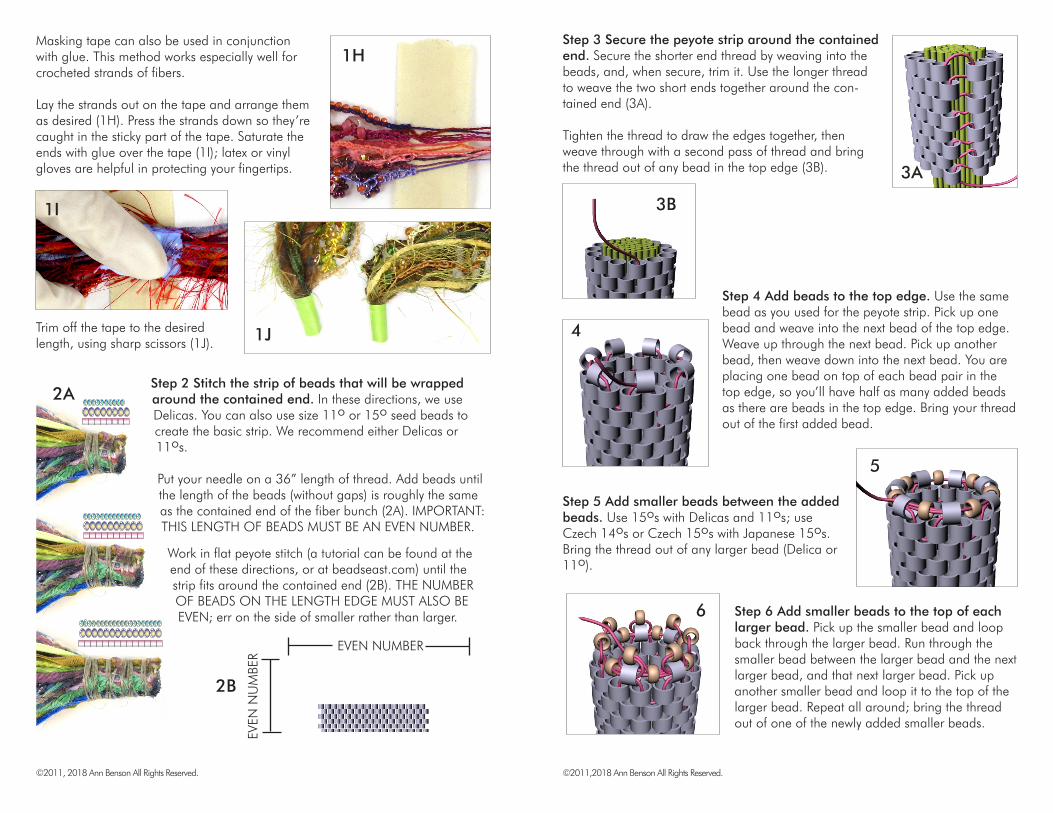
Masking tape can also be used in conjunction with glue. This method works especially well for crocheted strands of fibers.
Lay the strands out on the tape and arrange them as desired (1H). Press the strands down so they’re caught in the sticky part of the tape. Saturate the ends with glue over the tape (1I); latex or vinyl gloves are helpful in protecting your fingertips.
1H
1I
1JTrim off the tape to the desired length, using sharp scissors (1J).
Step 2 Stitch the strip of beads that will be wrapped around the contained end. In these directions, we use Delicas. You can also use size 11o or 15o seed beads to create the basic strip. We recommend either Delicas or 11os.
Put your needle on a 36” length of thread. Add beads until the length of the beads (without gaps) is roughly the same as the contained end of the fiber bunch (2A). IMPORTANT: THIS LENGTH OF BEADS MUST BE AN EVEN NUMBER.
Work in flat peyote stitch (a tutorial can be found at the end of these directions, or at beadseast.com) until the strip fits around the contained end (2B). THE NUMBER OF BEADS ON THE LENGTH EDGE MUST ALSO BE EVEN; err on the side of smaller rather than larger.
EVEN NUMBER
EVEN
NU
MBE
R
Step 3 Secure the peyote strip around the contained end. Secure the shorter end thread by weaving into the beads, and, when secure, trim it. Use the longer thread to weave the two short ends together around the con-tained end (3A).
Tighten the thread to draw the edges together, then weave through with a second pass of thread and bring the thread out of any bead in the top edge (3B).
2B
2A
3A
3B
Step 4 Add beads to the top edge. Use the same bead as you used for the peyote strip. Pick up one bead and weave into the next bead of the top edge. Weave up through the next bead. Pick up another bead, then weave down into the next bead. You are placing one bead on top of each bead pair in the top edge, so you’ll have half as many added beads as there are beads in the top edge. Bring your thread out of the first added bead.
Step 5 Add smaller beads between the added beads. Use 15os with Delicas and 11os; use Czech 14os or Czech 15os with Japanese 15os. Bring the thread out of any larger bead (Delica or 11o).
4
5
Step 6 Add smaller beads to the top of each larger bead. Pick up the smaller bead and loop back through the larger bead. Run through the smaller bead between the larger bead and the next larger bead, and that next larger bead. Pick up another smaller bead and loop it to the top of the larger bead. Repeat all around; bring the thread out of one of the newly added smaller beads.
6

©2011, 2018 Ann Benson All Rights Reserved. ©2011,2018 Ann Benson All Rights Reserved.
Step 7 Draw the last round of smaller beads together to roughly close the cap. Run one continu-ous thread through all the smaller beads added in step 6 (7A). Tighten the thread and draw those beads together. (7B)
7A
7B
Run the thread down through the center of the contained end; weave back and forth through the cap and the contained end to se-cure it. Bring the thread out of the center of the cap’s small opening.
The cap is now complete; you can add a beaded toggle, a mechanical clasp, or a but-ton and loop as a closure. When adding a mechanical clasp, cover the attachment thread with beads so the thread won’t be cut by the metal parts of the mechanical clasp. This will be illustrated in the example that follows, in which we show a button and loop. For a beaded toggle, attach the separate parts to the end of the cap with beads as needed.
Step 8 Add the closure; our example shows a button and loop. At this point you should try on your necklace and make sure it’s the desired length. Allow space for the added closure, based on its size. You can make adjustments in the length by adding larger beads outside the cap before adding the button and loop. We’ll show only one bead at the end of the cap.
Pick up enough beads to fit comfortably around your chosen button (8A). Use 11os or Japanese 15os; Delicas are not appro-priate for a loop because of their squared ends.
Weave down into the contained ends inside the cap; reverse direction and bring the thread out of the cap end again. Make a complete second pass of thread through the beads of the loop (8B).
8A
8B
Attach the button by threading a beaded strand through the shank on the back of the button. Make at least one additional pass of thread for strength, and be sure that beads cover the entire length to pre-vent fraying. Balance the loop and button attachment for a professional look. Photo 8C shows a holding loop that is too small. 8D shows a well-balanced assembly.
8C
8DOn all shank buttons and mechanical closures (such as metal toggles) the thread that goes through the shank must be covered with beads to prevent fraying Now that your caps and closure are
complete, you can add a bail to your already-surrounded cabochon. A bail is nothing more than a wide tube of peyote stitch, which is attached to the top of the cabochon surround. We suggest that you used the same size beads for the bail as for the center row of the cabochon surround.
If you have never surrounded a cabochon in a clutch of seed beads, we invite you to visit the free peyote stitch/cabochon surround video available at beadseast.com.
The example shown above is a simple, lightly decorated bail. Once you basic bail is stitched, you can decorate it with abandon!
The Bail
©2011, 2018 Ann Benson All Rights Reserved. ©2011,2018 Ann Benson All Rights Reserved.
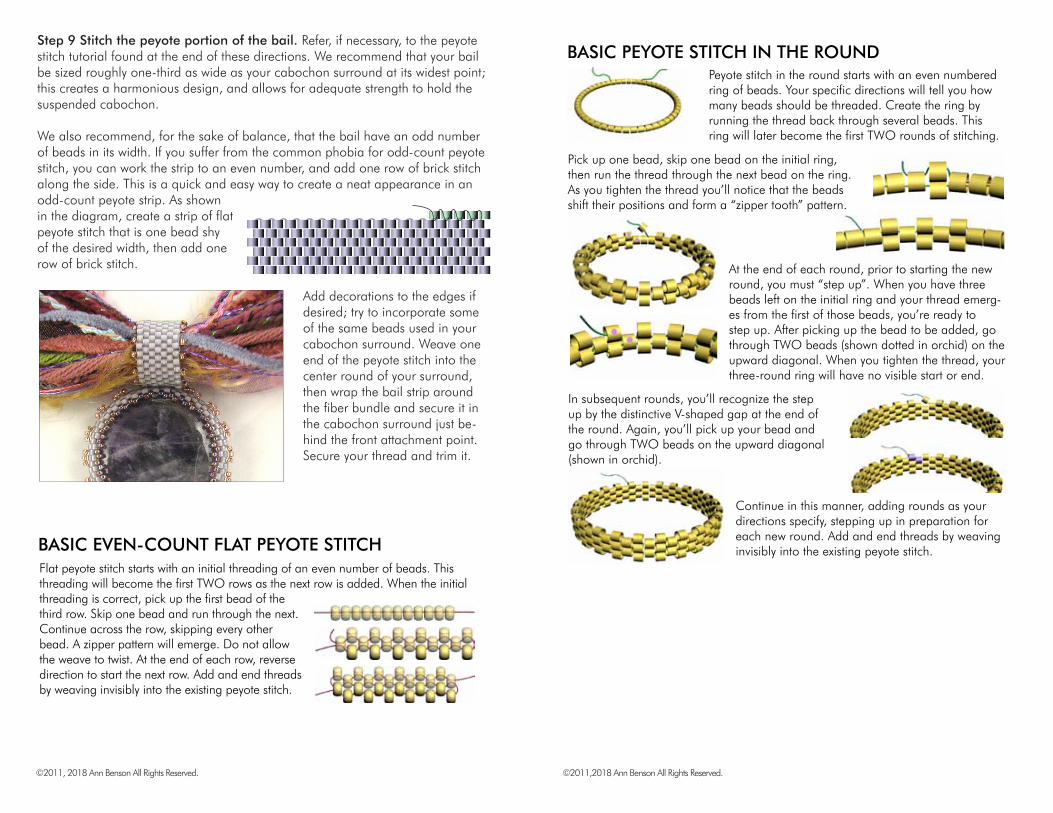
Step 9 Stitch the peyote portion of the bail. Refer, if necessary, to the peyote stitch tutorial found at the end of these directions. We recommend that your bail be sized roughly one-third as wide as your cabochon surround at its widest point; this creates a harmonious design, and allows for adequate strength to hold the suspended cabochon.
We also recommend, for the sake of balance, that the bail have an odd number of beads in its width. If you suffer from the common phobia for odd-count peyote stitch, you can work the strip to an even number, and add one row of brick stitch along the side. This is a quick and easy way to create a neat appearance in an odd-count peyote strip. As shown in the diagram, create a strip of flat peyote stitch that is one bead shy of the desired width, then add one row of brick stitch.
Add decorations to the edges if desired; try to incorporate some of the same beads used in your cabochon surround. Weave one end of the peyote stitch into the center round of your surround, then wrap the bail strip around the fiber bundle and secure it in the cabochon surround just be-hind the front attachment point. Secure your thread and trim it.
Peyote stitch in the round starts with an even numbered ring of beads. Your specific directions will tell you how many beads should be threaded. Create the ring by running the thread back through several beads. This ring will later become the first TWO rounds of stitching.
Pick up one bead, skip one bead on the initial ring, then run the thread through the next bead on the ring. As you tighten the thread you’ll notice that the beads shift their positions and form a “zipper tooth” pattern.
At the end of each round, prior to starting the new round, you must “step up”. When you have three beads left on the initial ring and your thread emerg-es from the first of those beads, you’re ready to step up. After picking up the bead to be added, go through TWO beads (shown dotted in orchid) on the upward diagonal. When you tighten the thread, your three-round ring will have no visible start or end.
In subsequent rounds, you’ll recognize the step up by the distinctive V-shaped gap at the end of the round. Again, you’ll pick up your bead and go through TWO beads on the upward diagonal (shown in orchid).
Continue in this manner, adding rounds as your directions specify, stepping up in preparation for each new round. Add and end threads by weaving invisibly into the existing peyote stitch.
BASIC PEYOTE STITCH IN THE ROUND
BASIC EVEN-COUNT FLAT PEYOTE STITCHFlat peyote stitch starts with an initial threading of an even number of beads. This threading will become the first TWO rows as the next row is added. When the initial threading is correct, pick up the first bead of the third row. Skip one bead and run through the next. Continue across the row, skipping every other bead. A zipper pattern will emerge. Do not allow the weave to twist. At the end of each row, reverse direction to start the next row. Add and end threads by weaving invisibly into the existing peyote stitch.
©2008 Beads East/Ann Benson, all rights reserved. This material in whole or part is intended for the private use of one individual only and may not be used for commercial, kitting, or instructional purposes without the prior express written permission of the copyright holder and compensation deemed appropriate by the copyright holder.