smartaccess deployment guide - jay 8.0 smartaccess deployment gui… · citrix access gateway...
TRANSCRIPT

Deployment Guide
SmartAccess Deployment Guide
For Access Gateway, Enterprise Edition

Document revision history
Version Date Author Comments
1.0 Apr 2007 Jay Tomlin Initial release based on Access Gateway 8.0 build 36.5
1.1 Dec 2007 Jay Tomlin Revision based on Access Gateway 8.0 build 50.3
© CITRIX SYSTEMS, INC., 2007. ALL RIGHTS RESERVED. NO PART OF THIS DOCUMENT MAY BE REPRODUCED OR TRANSMITTED IN ANY FORM OR BY ANY MEANS OR USED TO MAKE DERIVATIVE WORK (SUCH AS TRANSLATION, TRANSFORMATION, OR ADAPTATION) WITHOUT THE EXPRESS WRITTEN PERMISSION OF CITRIX SYSTEMS, INC. ALTHOUGH THE MATERIAL PRESENTED IN THIS DOCUMENT IS BELIEVED TO BE ACCURATE, IT IS PRESENTED WITHOUT WARRANTY OF ANY KIND, EXPRESS OR IMPLIED. USERS MUST TAKE ALL RESPONSIBILITY FOR THE USE OR APPLICATION OF THE PRODUCT(S) DESCRIBED IN THIS MANUAL. CITRIX SYSTEMS, INC. OR ITS SUPPLIERS DO NOT ASSUME ANY LIABILITY THAT MAY OCCUR DUE TO THE USE OR APPLICATION OF THE PRODUCT(S) DESCRIBED IN THIS DOCUMENT. INFORMATION IN THIS DOCUMENT IS SUBJECT TO CHANGE WITHOUT NOTICE. COMPANIES, NAMES, AND DATA USED IN EXAMPLES ARE FICTITIOUS UNLESS OTHERWISE NOTED.

Contents 1. Introduction
1.1 Access Gateway Enterprise Edition Deployment Overview 2
1.2 Example Customer Requirements and Solution Overview 3
1.3 Reference Deployment 4
1.4 Deployment Scenarios 4
1.5 Before you Begin 4
2. Basic Configuration Steps
2.1 Configure Access Gateway Networking 5
2.2 Install a License 8
2.3 Install an SSL Certificate 10
2.4 Create an Access Gateway Virtual Server 18
2.5 Configure Authentication and Secure Ticket Authority Details 20
2.6 Configure the Web Interface 24
2.7 Configure Clientless Access to Presentation Server 27
2.8 Test Application Enumeration and Launch 28
2.9 Define Client Security Requirements for SmartAccess 30
2.10 Configure Presentation Server Policies and Filters 32
2.11 Test from a Client Computer 36
3. Alternate Deployment Scenarios
3.1 Enable the Secure Access Client for all users 37
3.2 Enable Presentation Server as a Quarantine Access Method 39
3.3 Show the Client Choices Page at Logon 42
4. Advanced Topics
4.1 Firewall Considerations 44
4.2 Web Interface Failover 47
4.3 HTTP Port 80 Redirection 50
5. Frequently Asked Questions 51
5.1 Licensing questions 51
5.2. Web Interface integration questions 51
Citrix Access Gateway Enterprise Edition SmartAccess Deployment Guide
2
1. Introduction This document outlines how to enable secure application access using Citrix Access Gateway 8.0, Enterprise Edition, with details on deployment planning, configuration steps, and high-level considerations. In particular, this document was written based on the following products:
• Presentation Server 4.5
• Web Interface 4.6
• Access Gateway 8.0, Enterprise Edition build 50.3
1.1. Access Gateway Enterprise Edition Deployment Overview
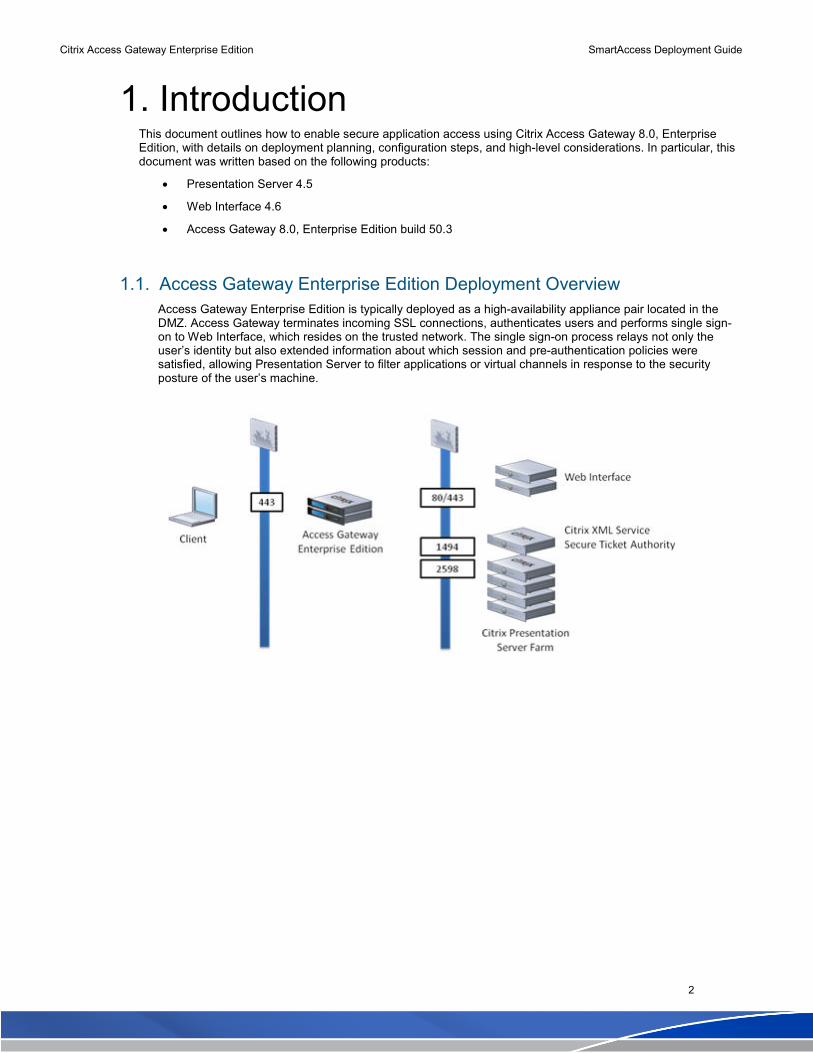
Access Gateway Enterprise Edition is typically deployed as a high-availability appliance pair located in the DMZ. Access Gateway terminates incoming SSL connections, authenticates users and performs single sign-on to Web Interface, which resides on the trusted network. The single sign-on process relays not only the user’s identity but also extended information about which session and pre-authentication policies were satisfied, allowing Presentation Server to filter applications or virtual channels in response to the security posture of the user’s machine.

Citrix Access Gateway Enterprise Edition SmartAccess Deployment Guide
3
1.2. Example Customer Requirements and Solution Overview
This document is structured as a detailed deployment example illustrating how Access Gateway 8.0, Enterprise Edition can meet requirements for secure application access. The following scenario is assumed:
1.2.1. Project Requirements
1. Connect client computers must be analyzed to determine whether they are company-issued. Any file,
process or registry key can be used to make this determination. For this example, we will check for the
presence of the file C:\valid.txt.
2. When users log in from a qualified endpoint (company-issued workstation):
a. All applications published to the user are included in the application list
b. Citrix Presentation Server Clients clipboard mapping is enabled
c. Presentation Server Clients drive mapping is enabled
d. Presentation Server Clients printer mapping is enabled
3. When users log in from an unqualified endpoint:
a. The “Sensitive Financial Application” icon should not be included in the user’s application list
b. Presentation Server Clients clipboard mapping is disabled
c. Presentation Server Clients drive mapping is disabled
d. Presentation Server Clients printer mapping is disabled
1.2.2. High-level Implementation Steps
Perform these tasks to demonstrate a solution that meets the requirements defined above.
1. Install Access Gateway 8.0, Enterprise Edition appliance
a. Configure networking
b. Install a license and a certificate
c. Create an Access Gateway virtual server named SmartAccess
d. Configure LDAP authentication
2. Publish applications on Presentation Server
a. Publish Notepad, Wordpad, etc.
b. Publish calc.exe as “Sensitive Financial Application”
3. Configure Web Interface
a. Create a Web Interface site
b. Configure the Web Interface site for Advanced Access Control
c. Configure Access Gateway, Secure Ticket Authority and DMZ settings
4. Configure Access Gateway
a. Configure Web Interface as the Access Gateway home page
b. Define endpoint analysis criteria
5. Modify published application and Presentation Server policy access control settings
a. Edit the properties of Sensitive Financial Application to require the Access Gateway endpoint
criteria
b. Create Presentation Server policies that enable client device mapping only when the Access
Gateway endpoint criteria are met
Citrix Access Gateway Enterprise Edition SmartAccess Deployment Guide
4
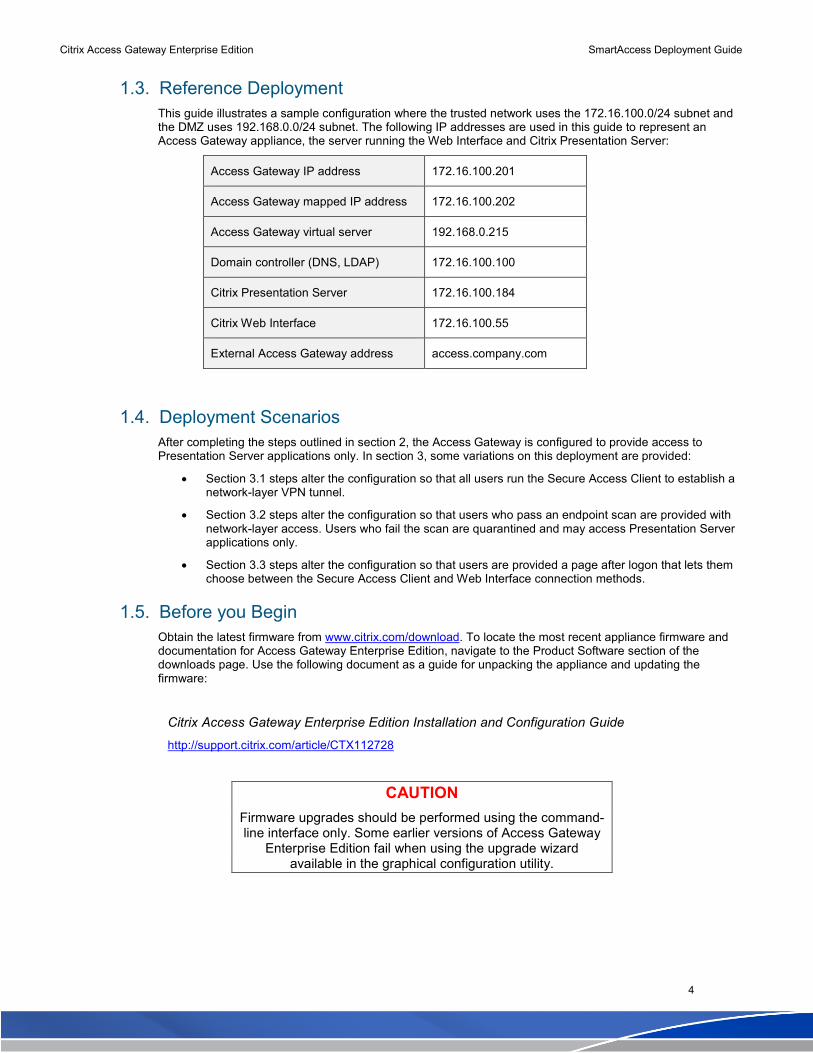
1.3. Reference Deployment
This guide illustrates a sample configuration where the trusted network uses the 172.16.100.0/24 subnet and the DMZ uses 192.168.0.0/24 subnet. The following IP addresses are used in this guide to represent an Access Gateway appliance, the server running the Web Interface and Citrix Presentation Server:
Access Gateway IP address 172.16.100.201
Access Gateway mapped IP address 172.16.100.202
Access Gateway virtual server 192.168.0.215
Domain controller (DNS, LDAP) 172.16.100.100
Citrix Presentation Server 172.16.100.184
Citrix Web Interface 172.16.100.55
External Access Gateway address access.company.com
1.4. Deployment Scenarios
After completing the steps outlined in section 2, the Access Gateway is configured to provide access to Presentation Server applications only. In section 3, some variations on this deployment are provided:
• Section 3.1 steps alter the configuration so that all users run the Secure Access Client to establish a network-layer VPN tunnel.
• Section 3.2 steps alter the configuration so that users who pass an endpoint scan are provided with network-layer access. Users who fail the scan are quarantined and may access Presentation Server applications only.
• Section 3.3 steps alter the configuration so that users are provided a page after logon that lets them choose between the Secure Access Client and Web Interface connection methods.
1.5. Before you Begin
Obtain the latest firmware from www.citrix.com/download. To locate the most recent appliance firmware and documentation for Access Gateway Enterprise Edition, navigate to the Product Software section of the downloads page. Use the following document as a guide for unpacking the appliance and updating the firmware:
Citrix Access Gateway Enterprise Edition Installation and Configuration Guide
http://support.citrix.com/article/CTX112728
CAUTION
Firmware upgrades should be performed using the command-line interface only. Some earlier versions of Access Gateway
Enterprise Edition fail when using the upgrade wizard available in the graphical configuration utility.

Citrix Access Gateway Enterprise Edition SmartAccess Deployment Guide
5
2. Basic Configuration Steps This section contains step-by-step instructions for configuring Access Gateway, Presentation Server and the Web Interface. It is assumed that the Access Gateway is at the factory default settings, Presentation Server, Web Interface and the domain controller are installed and working properly, and a few sample applications are published on Citrix Presentation Server.
2.1. Configure Access Gateway Networking
Step Action
1 Connect a serial cable from your computer to the Access Gateway and power on the device. Using HyperTerminal (or any other terminal emulation software) to connect to the serial port (8 bits, no parity, 1 stop bit). Logon as nsroot with the password nsroot (default administrative account).
At the > prompt, type config ns and then type 1 to set the appliance IP address and subnet mask.
After setting the desired IP address, type 6 to apply changes and exit. Answer yes to save the configuration and reboot.
login: nsroot
Password:
Last login: Tue Apr 3 16:12:51 on ttyd0
Done
> config ns
NSCONFIG NS8.0.
REVIEW CONFIGURATION PARAMETERS MENU
------------------------------------
This menu allows you to view and/or modify the
NetScaler's configuration. Each configuration
parameter displays its current value within brackets
if it has been set. To change a value, enter the
number that is displayed next to it.
------------------------------------
1. NetScaler's IP address: [192.168.0.100]
2. Netmask: [255.255.255.0]
3. Advanced Network Configuration.
4. Time zone.
5. Cancel all the changes and exit.
6. Apply changes and exit.
Select a menu item from 1 to 6 [6]:
Citrix Access Gateway Enterprise Edition SmartAccess Deployment Guide
6
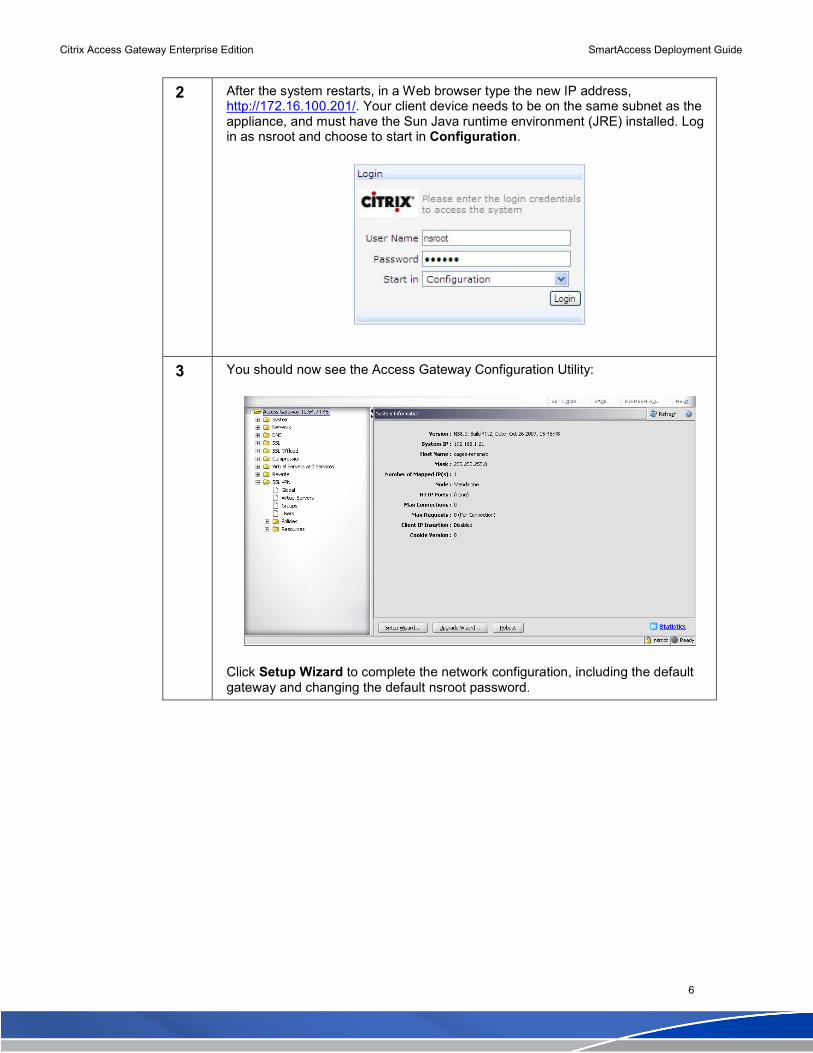
2 After the system restarts, in a Web browser type the new IP address, http://172.16.100.201/. Your client device needs to be on the same subnet as the appliance, and must have the Sun Java runtime environment (JRE) installed. Log in as nsroot and choose to start in Configuration.
3 You should now see the Access Gateway Configuration Utility:
Click Setup Wizard to complete the network configuration, including the default gateway and changing the default nsroot password.

Citrix Access Gateway Enterprise Edition SmartAccess Deployment Guide
7
4 The host name that you enter here needs to match the host name that appears in the license file(s) that you upload to the appliance.
Configure the system IP address and a mapped IP address. The system IP address is the address that the system uses by default when communicating with authentication servers such as LDAP or RADIUS.
A mapped IP address (MIP) must be defined. The mapped IP address is used by default as the source address for all Access Gateway user traffic and all communications with the Web Interface or Presentation Server. Complete the setup wizard by providing a default gateway and a new password for the nsroot administrative account.
Citrix Access Gateway Enterprise Edition SmartAccess Deployment Guide
8
2.2. Install a License
Before Access Gateway Enterprise Edition can support Access Gateway user sessions, the appliance must be properly licensed. Access Gateway Enterprise Edition requires two types of licenses, a platform license and a concurrent user license.
1. Access Gateway Enterprise Edition platform license – This free license is necessary to enable
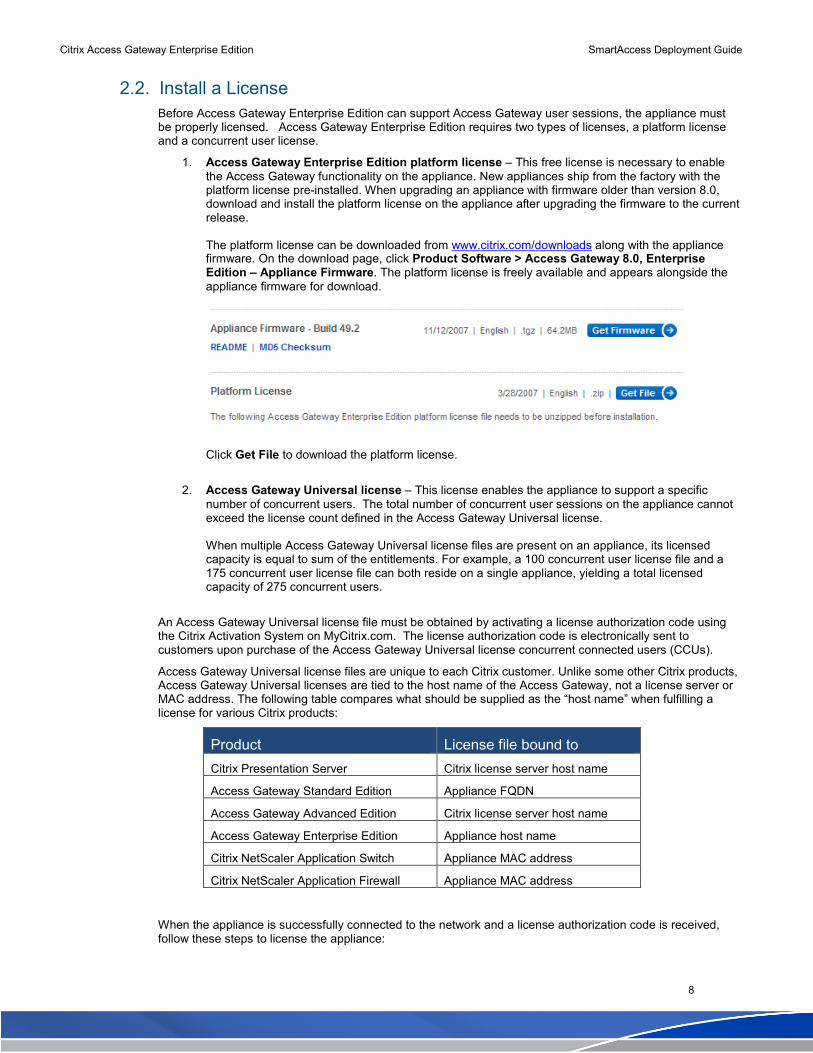
the Access Gateway functionality on the appliance. New appliances ship from the factory with the platform license pre-installed. When upgrading an appliance with firmware older than version 8.0, download and install the platform license on the appliance after upgrading the firmware to the current release. The platform license can be downloaded from www.citrix.com/downloads along with the appliance firmware. On the download page, click Product Software > Access Gateway 8.0, Enterprise Edition – Appliance Firmware. The platform license is freely available and appears alongside the
appliance firmware for download.
Click Get File to download the platform license.
2. Access Gateway Universal license – This license enables the appliance to support a specific
number of concurrent users. The total number of concurrent user sessions on the appliance cannot exceed the license count defined in the Access Gateway Universal license. When multiple Access Gateway Universal license files are present on an appliance, its licensed capacity is equal to sum of the entitlements. For example, a 100 concurrent user license file and a 175 concurrent user license file can both reside on a single appliance, yielding a total licensed capacity of 275 concurrent users.
An Access Gateway Universal license file must be obtained by activating a license authorization code using the Citrix Activation System on MyCitrix.com. The license authorization code is electronically sent to customers upon purchase of the Access Gateway Universal license concurrent connected users (CCUs).
Access Gateway Universal license files are unique to each Citrix customer. Unlike some other Citrix products, Access Gateway Universal licenses are tied to the host name of the Access Gateway, not a license server or MAC address. The following table compares what should be supplied as the “host name” when fulfilling a license for various Citrix products:
Product License file bound to
Citrix Presentation Server Citrix license server host name
Access Gateway Standard Edition Appliance FQDN
Access Gateway Advanced Edition Citrix license server host name
Access Gateway Enterprise Edition Appliance host name
Citrix NetScaler Application Switch Appliance MAC address
Citrix NetScaler Application Firewall Appliance MAC address
When the appliance is successfully connected to the network and a license authorization code is received, follow these steps to license the appliance:

Citrix Access Gateway Enterprise Edition SmartAccess Deployment Guide
9
Step Action
1 Use the provided serial cable or an SSH client (such as PuTTY) to connect to the command-line interface of the appliance. Log in as nsroot.
2 Set the host name of the appliance and restart by issuing the following commands (using the fully qualified domain name access.company.com as an example).
set ns hostName access.company.com
save config
shell
cd /nsconfig
echo hostname=\"access.company.com\" > rc.conf
mkdir license
rm hosts
reboot
3 From citrix.com, log into MyCitrix. From the My Tools section, open the Activation System/Manage Licenses toolbox. Choose Activate/Allocate from the drop-down menu and follow the online prompts. In order to allocate a license file, you must have a valid license code for “Citrix Access Gateway Universal License.” The license code is a string of characters similar to the following:
WXY33-12ABC-DF3G4-HRW5Q-9?6EQ
When allocating the Access Gateway Universal license, you are asked to supply the “Hostname of your Citrix license server.” Enter the case-sensitive host name of the appliance as it was set in step 2 above:
After completing this process, you should have an activated license file.
4 In the Access Gateway Configuration Utility, select System > Licenses and click the Manage Licenses button at the bottom of the screen. Click Add and browse to locate the license file you obtained from Citrix Activation System on MyCitrix.com. When prompted to restart, click Yes.
5 After restarting, return to the System > Licenses node in the Configuration Utility and confirm that SSL VPN appears with a green checkbox and that the Maximum SSL VPN Users Allowed field is equal to the number of Access Gateway Universal licenses allocated on MyCitrix:
Citrix Access Gateway Enterprise Edition SmartAccess Deployment Guide
10
2.3. Install an SSL Certificate
The Access Gateway can generate self-signed certificates for testing purposes, but these self-signed certificates are not compatible with the Citrix Presentation Server Clients. Therefore, it is strongly recommended that the built-in certificate wizard NOT be used when the deployment calls for access to Presentation Server farms without requiring the Secure Access Client or the ActiveX Plug-in.
Three methods for obtaining and installing a valid server certificate are outlined below. Choose the method that best suits your needs. The procedures to choose from are as follows:
1. Use the demo certificate provided in this document. No certificate server is required. This method is not appropriate for a production deployment of Access Gateway.
2. Export an existing Windows certificate to a PFX file and upload it to the Access Gateway appliance as a PKCS#12 file. This method is recommended when migrating from the Windows-based Secure Gateway to the Access Gateway appliance.
3. Create a certificate signing request (CSR) file on the Access Gateway appliance, send the CSR to a certificate authority, and then upload the response certificate.
2.3.1. Citrix Demo certificate – access.company.com
A sample server certificate and corresponding root certificate are provided in this document. The subject of the server certificate is access.company.com. When using this certificate, clients should have a HOSTS file
entry that resolves the fully qualified domain name access.company.com to the IP address of the Access Gateway virtual server.

Citrix Access Gateway Enterprise Edition SmartAccess Deployment Guide
11
Copy and paste the following text block into Notepad and save the file as access.company.com.pem.
-----BEGIN RSA PRIVATE KEY-----
Proc-Type: 4,ENCRYPTED
DEK-Info: DES-EDE3-CBC,604514D249082E85
tRXidXAbklUiSRNjvNU+laWz68OI2nS/dxJwmaUJpucCtbVFmMrilEICyRpBrZ4n
F/iMlO0WwjH88QGiUyAqETI8m4C3sut40Fm2mAjn2gNJZ7YHHEvv5L3XZJjLQH6X
KE4ImrVL0fR3cSW0cgK9cSAXTsjTRTyXS0F9x21jb4oeFC6/8segtTNDTiCFK4Zq
VjtIuFoje/JUP6uGfcLJvtZhumxGpHTQtBj6oNXMgyMX/ngpBLZkfxmCx39dkMjk
4EUecvnjbZro0TrTwSvuP8W2lHuDXuylIm/jyaNu2ffiiGPtyQyISQIgaS+jRsyD
fkm4S7mgJ/R3hBYiyyG5r4yJMVME/rsvvfXjjQVtGWpDQFOxpExSC9IUiRNEhBQs
Yx8vZKmbDnT3bqJvZLe29KwA2ZfClK5V5JETE/s4Wyr5tsYhaf6+duPr/+XA5Gve
YBlbcK9TDNY2UUHMm9WtrnNZjZD0AAol/vCMbMI6Nwz8EQa5hVskdYAtlayw/az5
5fIjUa2djB+CSiwGhnXOCdUt371JacimfmvFUtPPY+6WOX2thvRZNa2tH5RIR3xf
crtoawrXEk++OKP6Au3sq0NcOnl0isFP04Lhgn+YxLYxteepNNt8bJyI0ws5X+nx
1QLbKRL6qx71rMjndwDBM2Qh05X0l/fRHMtX6C3AEtW4+h6JVq/Me10ZfabLAVQp
vRJFqihR3Qwik8NnYPzlOS5g5mvvifBcg0jAP//hoBydfQwsxHtSJ9w1BY0+0CGn
MpiK1lG8WrWfDJi9r/GOQ2+3OeD8C6KFxYNKnLJOcbMTBEie4IZ4VQ==
-----END RSA PRIVATE KEY-----
-----BEGIN CERTIFICATE-----
MIIFCDCCA/CgAwIBAgIKObWE/gAAAAAAJTANBgkqhkiG9w0BAQUFADBBMRMwEQYK
CZImiZPyLGQBGRYDY3R4MRQwEgYKCZImiZPyLGQBGRYEZGVtbzEUMBIGA1UEAxML
Q2l0cml4IERlbW8wHhcNMDcwNTAxMjIwMDAwWhcNMDkwNDMwMjIwMDAwWjAdMRsw
GQYDVQQDExJhY2Nlc3MuY29tcGFueS5jb20wgZ8wDQYJKoZIhvcNAQEBBQADgY0A
MIGJAoGBAPaRjlOxBhimo/jmSoR4rIdQnF99yefWcgIpqffKL2Jek9U2rmJyuYJM
W/G1FNMWCiZbSUanygEj3LlPyTGQEXbDRdMCct+Zp267O27ZjbOmVdpOue8e4W3q
zht+LWHxmtyVZAuOhUoMaNCVIJRQuuiaBCiz4WxfBKzBi8feq/75AgMBAAGjggKo
MIICpDALBgNVHQ8EBAMCBaAwHQYDVR0OBBYEFLdrDrJdNUeWLTeNlccQNKg5z2jR
MCEGCSsGAQQBgjcUAgQUHhIAVwBlAGIAUwBlAHIAdgBlAHIwHwYDVR0jBBgwFoAU
XEavAKC+C7K+KiZ6BpQKD/Q52m4wggECBgNVHR8EgfowgfcwgfSggfGgge6GgbNs
ZGFwOi8vL0NOPUNpdHJpeCUyMERlbW8sQ049Q1RYREVNT0RDLENOPUNEUCxDTj1Q
dWJsaWMlMjBLZXklMjBTZXJ2aWNlcyxDTj1TZXJ2aWNlcyxDTj1Db25maWd1cmF0
aW9uLERDPWRlbW8sREM9Y3R4P2NlcnRpZmljYXRlUmV2b2NhdGlvbkxpc3Q/YmFz
ZT9vYmplY3RDbGFzcz1jUkxEaXN0cmlidXRpb25Qb2ludIY2aHR0cDovL2N0eGRl
bW9kYy5kZW1vLmN0eC9DZXJ0RW5yb2xsL0NpdHJpeCUyMERlbW8uY3JsMIIBFQYI
KwYBBQUHAQEEggEHMIIBAzCBqQYIKwYBBQUHMAKGgZxsZGFwOi8vL0NOPUNpdHJp
eCUyMERlbW8sQ049QUlBLENOPVB1YmxpYyUyMEtleSUyMFNlcnZpY2VzLENOPVNl
cnZpY2VzLENOPUNvbmZpZ3VyYXRpb24sREM9ZGVtbyxEQz1jdHg/Y0FDZXJ0aWZp
Y2F0ZT9iYXNlP29iamVjdENsYXNzPWNlcnRpZmljYXRpb25BdXRob3JpdHkwVQYI
KwYBBQUHMAKGSWh0dHA6Ly9jdHhkZW1vZGMuZGVtby5jdHgvQ2VydEVucm9sbC9D
VFhERU1PREMuZGVtby5jdHhfQ2l0cml4JTIwRGVtby5jcnQwEwYDVR0lBAwwCgYI
KwYBBQUHAwEwDQYJKoZIhvcNAQEFBQADggEBAGIxOVGDUWrIQ8n/bLoQeynHKDeS
fsmh7hkiUTRZw7r9lnAZsuL+cq6M1CMflJL+hvbIJRtFy1ufu/2Decqb1sBzrSrc
GwahYNAVayGd3BuBtNGO03TwIBXtQKF47kLSFBEgX2KGvjy1f1OejABhd5WrfRYn
SfzhebecL8o5peN7qZLim7hpWiVnG3ZrxlyrRhK3Q05FZGFRTV4PkuyuOiqyw7IJ
mAlf9vHbYKvIqeWPk0n8rGyg2GI+4R057epU8LQPpxYa2rtPwrMF4twSClog2uHg
G7gsmOYjaYWBkyZE8ADik2TYh+g+/ddO0zXc4F96EjV9RjBCYo0oRIixsfo=
-----END CERTIFICATE-----

Citrix Access Gateway Enterprise Edition SmartAccess Deployment Guide
12
Paste the following text block into a second file and save it as citrixdemo-root.cer.
-----BEGIN CERTIFICATE-----
MIIEZzCCA0+gAwIBAgIQLKYpLnkcqbZGQk/CIF8gbjANBgkqhkiG9w0BAQUFADBB
MRMwEQYKCZImiZPyLGQBGRYDY3R4MRQwEgYKCZImiZPyLGQBGRYEZGVtbzEUMBIG
A1UEAxMLQ2l0cml4IERlbW8wHhcNMDcwMjE0MTkyMDMzWhcNMjcwMjE0MTkyMjMw
WjBBMRMwEQYKCZImiZPyLGQBGRYDY3R4MRQwEgYKCZImiZPyLGQBGRYEZGVtbzEU
MBIGA1UEAxMLQ2l0cml4IERlbW8wggEiMA0GCSqGSIb3DQEBAQUAA4IBDwAwggEK
AoIBAQDaJ32DTFOfsKmr2Y26rxTntiv9LlGaO/xpU3bLoCfIqCWBaiTLpiDDAK7z
uz/OjUyd+SOWcBb7HWuvLy/oe252Q4Qt55f+dyQTAEruYKB+In2oeAVg6E6DQWxd
oVAXK1YcpooXe0pm4uZW+tWs6+3mXnzJ5bKcq5r7tFdcCn785SEqMphV5WNX/WhF
p+E/IQTrrXxvKMRWKjEhg1WfqpElUJVknUzXfQw+vQJTWvsjiMO5HDVCUgkFJpo1
EEwq33ph2m8OLs3SiKAVKjq59SjUZXTbWdZrf5AmHFS3dtIUydY74IgJuF5KC2/3
mbf9YSuziasIaw4HatOP4JfbJI9fAgMBAAGjggFZMIIBVTALBgNVHQ8EBAMCAYYw
DwYDVR0TAQH/BAUwAwEB/zAdBgNVHQ4EFgQUXEavAKC+C7K+KiZ6BpQKD/Q52m4w
ggECBgNVHR8EgfowgfcwgfSggfGgge6GgbNsZGFwOi8vL0NOPUNpdHJpeCUyMERl
bW8sQ049Q1RYREVNT0RDLENOPUNEUCxDTj1QdWJsaWMlMjBLZXklMjBTZXJ2aWNl
cyxDTj1TZXJ2aWNlcyxDTj1Db25maWd1cmF0aW9uLERDPWRlbW8sREM9Y3R4P2Nl
cnRpZmljYXRlUmV2b2NhdGlvbkxpc3Q/YmFzZT9vYmplY3RDbGFzcz1jUkxEaXN0
cmlidXRpb25Qb2ludIY2aHR0cDovL2N0eGRlbW9kYy5kZW1vLmN0eC9DZXJ0RW5y
b2xsL0NpdHJpeCUyMERlbW8uY3JsMBAGCSsGAQQBgjcVAQQDAgEAMA0GCSqGSIb3
DQEBBQUAA4IBAQDCYYCU0veqRJeRTdohrQcRJLMj5AGWjmc3HrPxkiWNRaZ20mqI
2VGvGShQJiBbzvy7ZTXDL1RaESk+SRcMhmXlihf51g5pc7zWUcgHNlMntRbVlUDs
/bYOhzKuX/VsKA5kb7bIZhdOF3GrAGCcH9u4vsW3d18nVJMFVE+lFPRB1dynn7f0
vq1CM26IOFjt5PxkzOLZwzN8UrZik+XyXZl2ex11zZPTRXuk25GZ9U0lnM1veOkv
X9LrsZA2spWGvtFPJJ+pTNbOog9aLhG/K7UPzOAipN0MgrhFZ5Qfote+V8shRLRe
9Qc1W+qmyzk6iDM9rYhgx3MVSzjIJH2X16+z
-----END CERTIFICATE-----
On any client device that logs onto the Access Gateway, install this root certificate by opening the file and following the Certificate Import wizard.
Use the following steps to upload the server certificate access.company.com.pem to the Access Gateway
appliance.
Step Action
1 In the Access Gateway Configuration Utility, select SSL > Certificates and click Add.
2 Type access-demo for the certificate-key pair name. Keep the file location set to Local System.
3 For the Certificate Filename field, click Browse and locate the access.company.com.pem file you created.
4 For the Key Filename field, click Browse and select the same access.company.com.pem file as above.
5 For the password field, type: citrix
6 Keep the PEM format selected and click Install. Then click Close.
7 The access-demo certificate should now be listed and is available for use with your deployment.

Citrix Access Gateway Enterprise Edition SmartAccess Deployment Guide
13
2.3.2. Import an Existing Windows Certificate
If a server running the Secure Gateway is currently deployed, you might be able to export its server certificate for use on the Access Gateway appliance. In some cases however, the private key may not be exportable in which case the certificate cannot be used. You can also use this technique to export a certificate that has been installed using the Internet Information Services (IIS) certificate wizard on any Windows-based Web server.
Perform the following steps to export a Windows certificate and private key to a PFX file and then upload the PFX file to the Access Gateway appliance.
Step Action
1 From the console of the Secure Gateway or an IIS server where an SSL certificate is installed, run mmc.exe. Add the Certificates snap-in for the Local Computer account.
2 Expand Certificates (Local Computer) > Personal > Certificates. Right-click the server certificate and select All tasks > Export…
3 During the certificate export wizard, choose Yes, export the private key. If the option to export the private key is disabled, you cannot use the certificate. Keep all other options at the default settings and use citrix for the export password. Save the file as C:\sgcert.pfx.
4 In the Access Gateway Configuration Utility, select the SSL > Certificates node and click Add… Enter sg for the certificate-key pair name. Enter C:\sgcert.pfx for the Certificate filename.
5 Click Install and an error appears: Invalid certificate. Click OK and Close.
This error occurs because the PFX file is not yet converted to PEM format. However, the PFX file has now been copied to the appliance and can be converted using the CA Tools section.
6 Select SSL > CA Tools and click Import PKCS#12. Enter the following:
Output File Name: sgcert.pem PKCS12 File Name: sgcert.pfx Import Password: citrix Encoding format: DES3 PEM Passphrase: citrix Verify PEM Passphrase: citrix
After clicking OK, you should see in the lower left status bar: PKCS12 file [sgcert.pfx] imported successfully.
7 The certificate from the Secure Gateway is now converted and ready to be added to the Access Gateway as a certificate entity. Select SSL > Certificates and click Add.
8 Enter the following information in the Install Certificate panel:
Certificate-Key Pair Name: vpn-cert File Location: Remote System Certificate Filename: sgcert.pem Key Filename: sgcert.pem Password: citrix Format: PEM
Citrix Access Gateway Enterprise Edition SmartAccess Deployment Guide
14
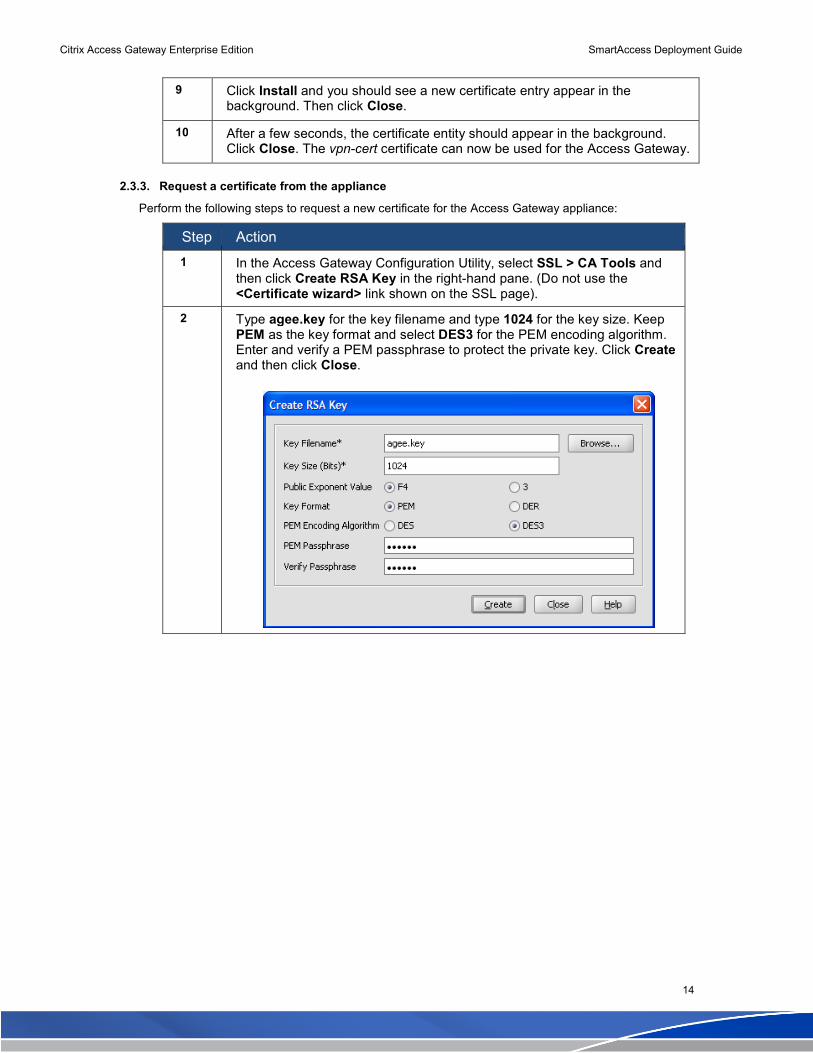
9 Click Install and you should see a new certificate entry appear in the background. Then click Close.
10 After a few seconds, the certificate entity should appear in the background. Click Close. The vpn-cert certificate can now be used for the Access Gateway.
2.3.3. Request a certificate from the appliance
Perform the following steps to request a new certificate for the Access Gateway appliance:
Step Action
1 In the Access Gateway Configuration Utility, select SSL > CA Tools and then click Create RSA Key in the right-hand pane. (Do not use the <Certificate wizard> link shown on the SSL page).
2 Type agee.key for the key filename and type 1024 for the key size. Keep PEM as the key format and select DES3 for the PEM encoding algorithm. Enter and verify a PEM passphrase to protect the private key. Click Create and then click Close.

Citrix Access Gateway Enterprise Edition SmartAccess Deployment Guide
15
3 Next, click Create Certificate Request on the CA Tools page. Type agee.csr for the request file name and agee.key for the key file name. Reenter the PEM passphrase you created in the previous step.
For the Common Name field, enter the fully-qualified host name that you intend to use for the Access Gateway on the Internet, such as access.company.com. Supply all other required fields with the appropriate location and company information.
Click Create and then Close.
4 The file agee.csr now resides on the appliance in the /nsconfig/ssl directory. The next step is to obtain the contents of that file and save it to a local file on your workstation.
Use WinSCP or any other secure FTP client to connect to the Access Gateway. Logon as nsroot.
5 Browse to the /nsconfig/ssl directory and locate the agee.csr file. Copy it to your computer.
6 If you would like to obtain a certificate from a commercial certificate vendor such as VeriSign, submit the contents of the agee.csr file as part of your certificate request.
Once you receive a response certificate from the vendor, save the response file as agee.cer and then skip to step 9 below to install the response certificate. Steps 7 and 8 below illustrate how to fulfill the certificate request using Microsoft Certificate Services.

Citrix Access Gateway Enterprise Edition SmartAccess Deployment Guide
16
7 Point to a Microsoft Certificate Services server, such as http://server01/certsrv/. Log in as an administrator of the certificate server.
Click Request a certificate and then click Advanced certificate request. Select the second of the three advanced options, which says Submit a certificate request by using a base-64-encoded CMC or PKCS #10 file, or submit a renewal request by using a base-64-encoded PKCS #7 file.
In the Saved Request field, paste the contents of your agee.csr file. Select Web Server as the Certificate Template and click Submit.
8 Once the certificate is issued to you, select to download the certificate in Base 64 encoded format. Base64 encoding is the same format as PEM.
Save the file to your local system as agee.cer.
9 Using WinSCP or any other secure FTP client, connect to the Access Gateway appliance and logon as nsroot. Upload the agee.cer file to the /nsconfig/ssl directory.

Citrix Access Gateway Enterprise Edition SmartAccess Deployment Guide
17
10 In the Access Gateway Configuration Utility, select SSL > Certificates and click Add.
11 For the certificate-key pair name, enter a descriptive name for this certificate entity, such as access.company.com.
12 For File Location select Remote System.
13 For Certificate Filename, click Browse and locate the agee.cer file you saved in step 6 or the response certificate you received from your certificate vendor. For the key filename type agee.key and supply the PEM passphrase you created in step 2. Keep PEM selected as the format.
14 Click Install and then Close. After a few seconds, the certificate entity should appear in the background. Click Close. The access.company.com certificate can now be used for the Access Gateway.
Citrix Access Gateway Enterprise Edition SmartAccess Deployment Guide
18
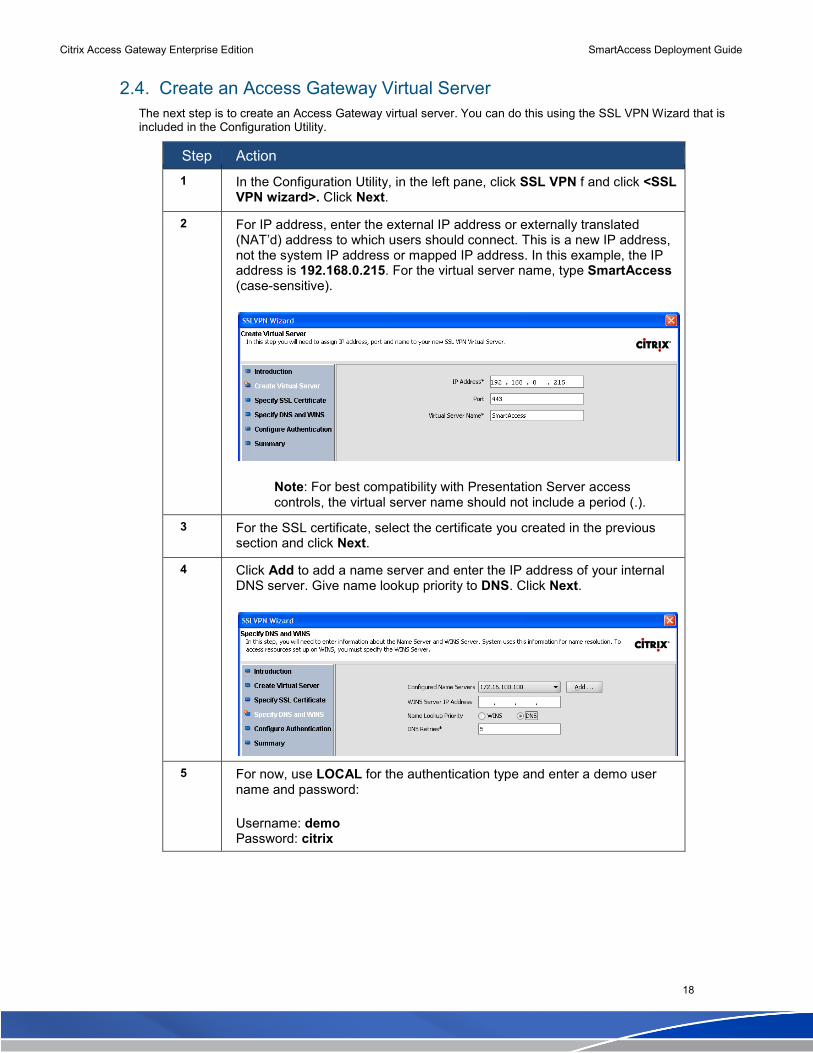
2.4. Create an Access Gateway Virtual Server
The next step is to create an Access Gateway virtual server. You can do this using the SSL VPN Wizard that is included in the Configuration Utility.
Step Action
1 In the Configuration Utility, in the left pane, click SSL VPN f and click <SSL VPN wizard>. Click Next.
2 For IP address, enter the external IP address or externally translated (NAT’d) address to which users should connect. This is a new IP address, not the system IP address or mapped IP address. In this example, the IP address is 192.168.0.215. For the virtual server name, type SmartAccess (case-sensitive).
Note: For best compatibility with Presentation Server access controls, the virtual server name should not include a period (.).
3 For the SSL certificate, select the certificate you created in the previous section and click Next.
4 Click Add to add a name server and enter the IP address of your internal DNS server. Give name lookup priority to DNS. Click Next.
5 For now, use LOCAL for the authentication type and enter a demo user name and password:
Username: demo Password: citrix
Citrix Access Gateway Enterprise Edition SmartAccess Deployment Guide
19
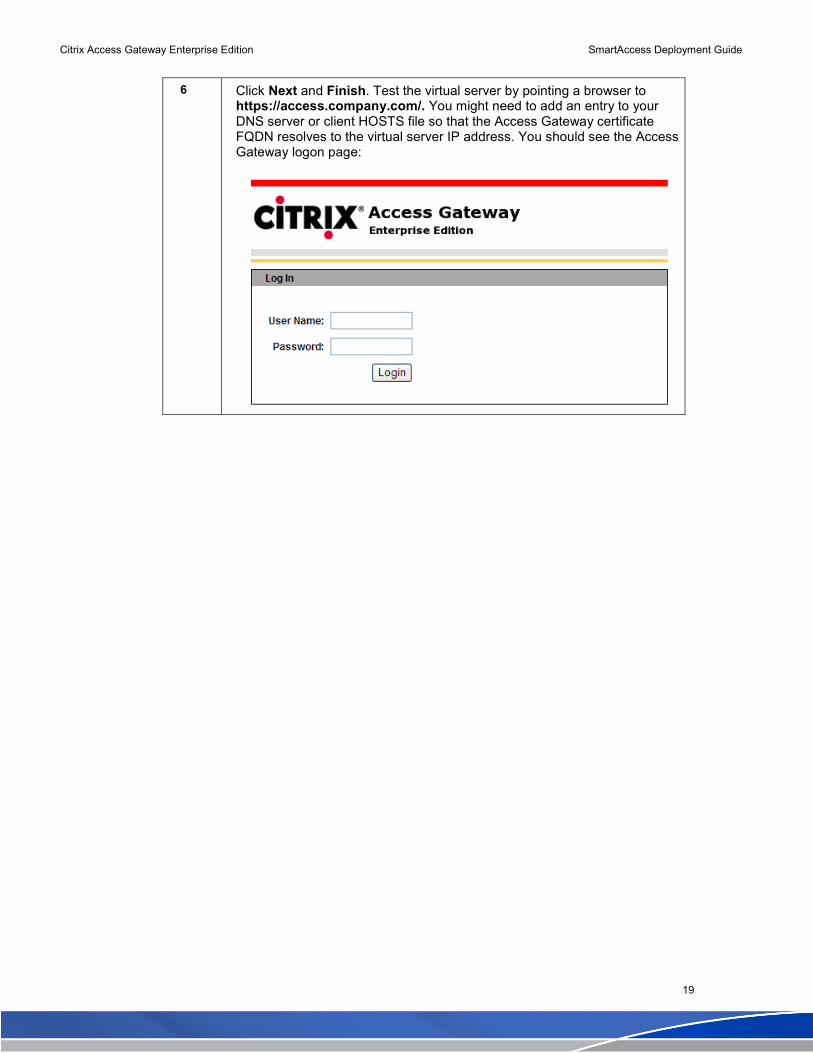
6 Click Next and Finish. Test the virtual server by pointing a browser to https://access.company.com/. You might need to add an entry to your DNS server or client HOSTS file so that the Access Gateway certificate FQDN resolves to the virtual server IP address. You should see the Access Gateway logon page:
Citrix Access Gateway Enterprise Edition SmartAccess Deployment Guide
20
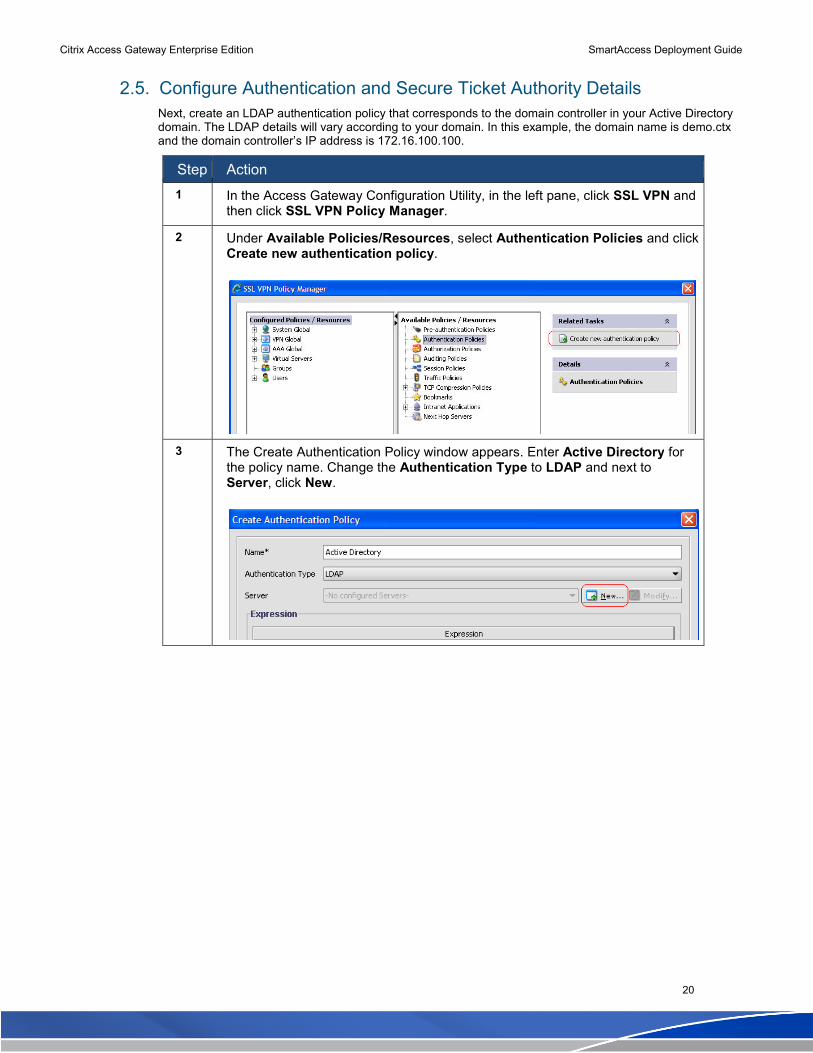
2.5. Configure Authentication and Secure Ticket Authority Details
Next, create an LDAP authentication policy that corresponds to the domain controller in your Active Directory domain. The LDAP details will vary according to your domain. In this example, the domain name is demo.ctx and the domain controller’s IP address is 172.16.100.100.
Step Action
1 In the Access Gateway Configuration Utility, in the left pane, click SSL VPN and then click SSL VPN Policy Manager.
2 Under Available Policies/Resources, select Authentication Policies and click Create new authentication policy.
3 The Create Authentication Policy window appears. Enter Active Directory for the policy name. Change the Authentication Type to LDAP and next to Server, click New.

Citrix Access Gateway Enterprise Edition SmartAccess Deployment Guide
21
4 Type AD-LDAP for the authentication server name. Then supply the appropriate details for connecting to your domain controller via LDAP. For example:
• Under Server, use 172.16.100.100 for the IP address and port 636 (default port for secure LDAP directory services).
• Under LDAP specific details, be sure to configure the details which are specific to your Active Direction environment. For example:
o The Base DN must be based on fully-qualified Active Directory domain. In the case of demo.ctx, the Base DN is dc=demo,dc=ctx
o The Bind DN is the user name of the account with permissions to log into the LDAP directory. In this example, we’ve used the credentials for the domain administrator ([email protected]), and this could also be a service account user name. After specifying the Bind DN, the Bind DN Password must be configured. This is the Active Directory password corresponding to Bind DN account.
o Configure the remaining attributes necessary for Active Directory authentication (using LDAP) including a Login Name of samAccountName (case-sensitive), a Group Attribute Name of memberOf (case-sensitive), and a Sub Attribute Name of CN. Enter the samAccountName again as the SSO Name Attribute
o Choose SSL for the security type.
Note: TLS or SSL is required to allow users to change their password during logon if their password expires. TLS uses port 389 and SSL uses port 636.

Citrix Access Gateway Enterprise Edition SmartAccess Deployment Guide
22
5 Click Create and you are returned to the Create Authentication Policy window. Next to Named Expressions, select ns_true from the list of expressions and click Add Expression. The expression ns_true should now appear in the expression editor:
6 Click Create and click Close. The Active Directory authentication policy appears as an icon in the SSL VPN Policy Manager.
7 Under Configured Policies / Resources, expand the Virtual Servers > SmartAccess node and then drag the Active Directory icon onto the SmartAccess > Authentication Policies icon.
8 Test the virtual server again opening a Web browser and typing https://access.company.com/. Log on using a domain user name and password.

Citrix Access Gateway Enterprise Edition SmartAccess Deployment Guide
23
9 In the SSL VPN Policy Manager, under Configured Policies / Resources, right-click the Virtual Servers > SmartAccess > STA Servers node and click Add. For the URL, type the HTTP URL that corresponds to the Presentation Server XML Service. The path to the STA (/Scripts/CtxSta.dll) can be omitted. Click Create.
Note: If the XML Service is running on a port other than 80, enter the port number after the server address, such as. http://172.16.100.184:8080/.
10 Click Close to close the SSL VPN Policy Manager.
Citrix Access Gateway Enterprise Edition SmartAccess Deployment Guide
24
2.6. Configure the Web Interface Next, create a Web Interface site and configure it to use the Advanced Access Control access method. A server
running Advanced Access Control is not configured in this deployment; the Access Gateway virtual server emulates
the services of Advanced Access Control for the Web Interface.
In order for the Web Interface to work properly with Access Gateway Enterprise Edition, the server running the Web
Interface must trust the Access Gateway certificate and be able to resolve the Access Gateway virtual server FQDN
to the appropriate IP address. If the virtual server to which users connect is not accessible from the Web Interface,
create an additional virtual server with an IP address that the Web Interface can reach. The virtual server contacted
by the Web Interface does not need to be enabled for user logons and does not need to have authentication
policies or session policies associated with it.
In the steps that follow, it is assumed that the certificate named access.company.com is being used.
Step Action
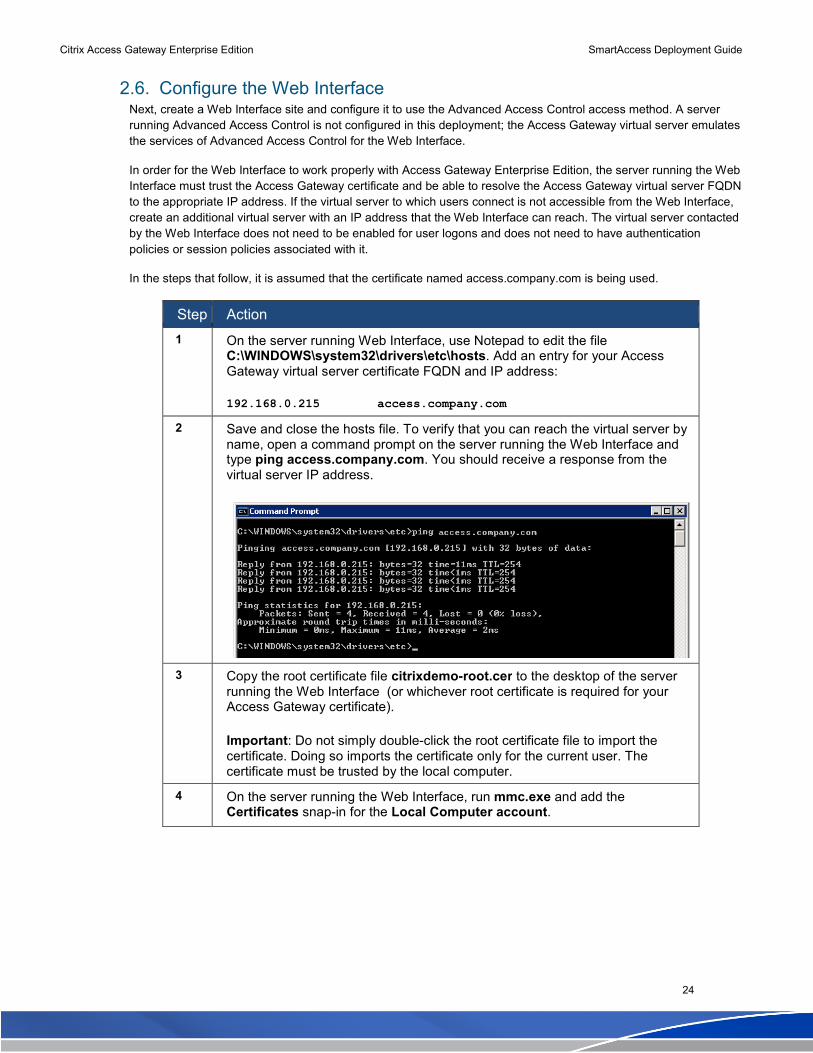
1 On the server running Web Interface, use Notepad to edit the file C:\WINDOWS\system32\drivers\etc\hosts. Add an entry for your Access Gateway virtual server certificate FQDN and IP address:
192.168.0.215 access.company.com
2 Save and close the hosts file. To verify that you can reach the virtual server by name, open a command prompt on the server running the Web Interface and type ping access.company.com. You should receive a response from the virtual server IP address.
3 Copy the root certificate file citrixdemo-root.cer to the desktop of the server running the Web Interface (or whichever root certificate is required for your Access Gateway certificate).
Important: Do not simply double-click the root certificate file to import the certificate. Doing so imports the certificate only for the current user. The certificate must be trusted by the local computer.
4 On the server running the Web Interface, run mmc.exe and add the Certificates snap-in for the Local Computer account.

Citrix Access Gateway Enterprise Edition SmartAccess Deployment Guide
25
5 Expand Certificates (Local Computer) > Trusted Root Certification Authorities > Certificates. Right-click the Certificates node and select certificate and select All tasks > Import…
6 Follow the instructions in the Certificate Import Wizard to locate the root certificate on your desktop. Once the import is complete, close the MMC snap-in.
7 Verify the certificate trust and name resolution requirements by pointing a Web browser to https://access.company.com/. The Access Gateway logon page should load without any certificate errors or warnings.
8 On the server running the Web Interface, open the Access Management Console. If prompted, configure and run discovery.
9 Select Citrix Resources > Configuration Tools > Web Interface and click Create site.
10 For the site type, select Access Platform site and click Next.
11 Keep the default IIS Site and Path selected (/Citrix/AccessPlatform/) and click Next.
12 Select Local file for the configuration source and click Next.
13 Select Use built-in authentication or Advanced Access Control for the authentication settings and click Next.
14 Click Next, then Finish. The Specify Initial Configuration wizard launches. Click Next.
15 Enter the XML Service information for your server farm and click Next.
16 Select an application type and click Next.

Citrix Access Gateway Enterprise Edition SmartAccess Deployment Guide
26
17 On the Specify Access Method page, select Using the Advanced Access Control and type the Access Gateway URL for the server portion of the Authentication Service address. For example, enter:
https://access.company.com/CitrixAuthService/AuthService.asmx
18 Click Next and click Finish. In the left pane of the Access Management Console, select the site.
19 Select Manage secure client access > Edit Gateway settings. Type access.company.com as the Access Gateway address, enable session reliability and add your Presentation Server XML Service address as a Secure Ticket Authority URL, such as http://172.16.100.184/Scripts/CtxSta.dll. Click OK.
20 Select Manage secure client access > Edit DMZ settings. Change the Default access method from Direct to Gateway Direct. Click OK.

Citrix Access Gateway Enterprise Edition SmartAccess Deployment Guide
27
2.7. Configure Clientless Access to Presentation Server
Step Action
1 Return to the Access Gateway Configuration Utility. In the left pane, click SSL VPN > Global and then in the right pane, click SSL VPN global settings.
2 Under Secure Gateway Setting, next to ICA Proxy, select ON. For WI Home Page type the URL of your Web Interface site. For example, use http://172.16.100.55/Citrix/AccessPlatform/ as the home page URL. Enter your Active Directory domain name as the SmartAccess NT Domain.
The SmartAccess NT Domain value should match the user account domain.
3 Click OK. The Access Gateway is now configured for use with Web Interface.

Citrix Access Gateway Enterprise Edition SmartAccess Deployment Guide
28
2.8. Test Application Enumeration and Launch At this point, domain users should be able to log on to the Access Gateway virtual server and receive a list of
published applications. Perform the following steps from a client device to make sure that the environment is
working as expected.
Step Action
1 Install the root certificate citrixdemo-root.cer (or your private root certificate) on the client device. If you are using a commercial certificate, this step is not necessary.
2 Using Notepad, edit the client hosts file C:\WINDOWS\system32\drivers\etc\hosts and add a line containing the Access Gateway virtual server IP address and certificate name:
192.168.0.215 access.company.com
3 Point your Web browser to https://access.company.com/. You should not receive any certificate warnings. (If you do, connections using Presentation Server Clients fail.)
4 Log on using domain credentials. At this point, any published applications assigned to the domain user should enumerate. After an initial delay, the application set appears while the Web Interface scripts are compiled.
If you receive an error, check the event viewer on the server running the Web Interface for information.
Citrix Access Gateway Enterprise Edition SmartAccess Deployment Guide
29
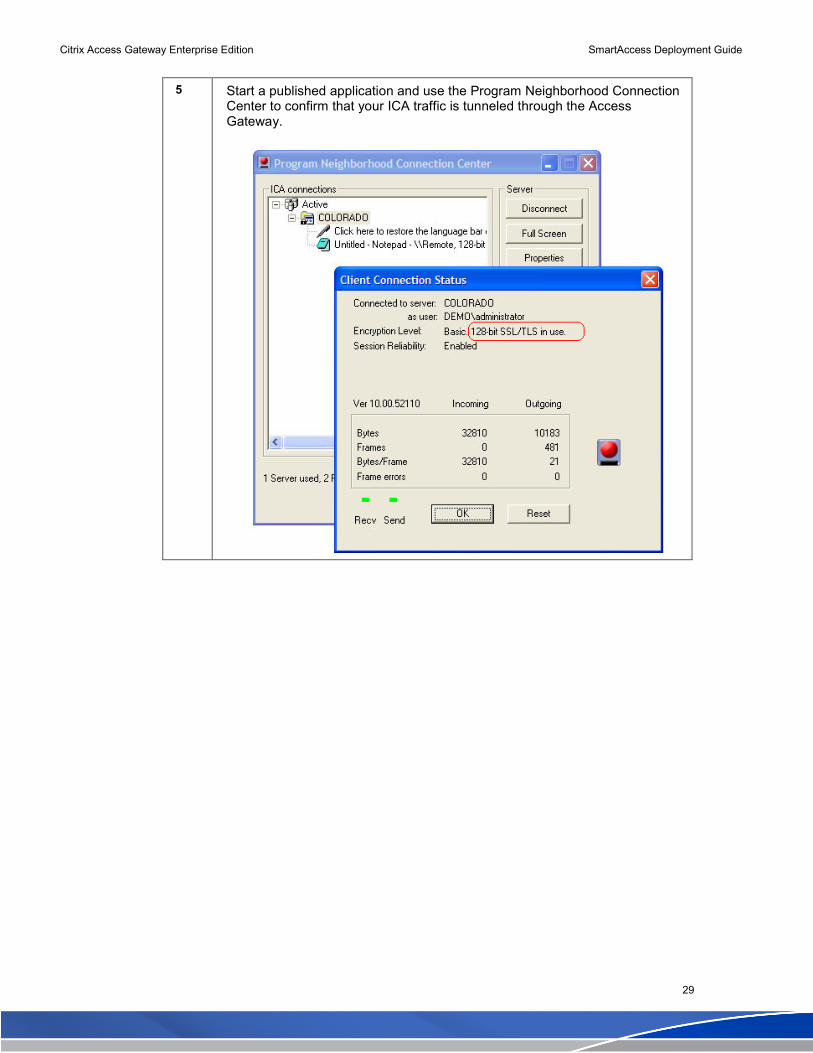
5 Start a published application and use the Program Neighborhood Connection Center to confirm that your ICA traffic is tunneled through the Access Gateway.

Citrix Access Gateway Enterprise Edition SmartAccess Deployment Guide
30
2.9. Define Client Security Requirements for SmartAccess In this section, client security requirements are added. For this demonstration, the client is considered valid if the file
C:\valid.txt exists on the client device.
When the file valid.txt exists, the user should receive a published application called Sensitive Financial Application
(calculator). When the file does not exist, the Sensitive Financial Application icon should not appear for the user.
Furthermore, when the file valid.txt is not present, the following Presentation Server policies are enforced:
• Disable client drive mapping
• Disable client printing
• Disable client clipboard
Follow the steps below to configure the endpoint security checks and map SmartAccess policies to Presentation
Server.
Step Action
1 In the Access Gateway Configuration Utility, open the SSL VPN Policy Manager.
2 Under Available Policies / Resources, click Session Policies. Under Related Tasks, click Create new session policy.
3 For the policy name, type ValidEndpoint.
4 Next to Request Profile, click New. Name the profile SmartAccess Filter and click Create. You are returned to the Create Session Policy window.
5 Beneath the Expression editor, click Add. The Add Expression window appears.
6 In Expression Type select Client Security. In Component, select File. In Name, type C:\\\\valid.txt.
Click OK and Close. You are returned to the Create Session Policy window.

Citrix Access Gateway Enterprise Edition SmartAccess Deployment Guide
31
7 Confirm that the Create Session Policy window appears as follows:
Click Create and click Close. ValidEndpoint now appears as a session policy.
8 In the SSL VPN Policy Manager, under Configured Policies / Resources, expand Virtual Servers > SmartAccess. Drag the ValidEndpoint policy onto the SmartAccess > Session Policies node.
9 Close the SSL VPN Policy Manager. Click Save to write the running Access Gateway configuration to disk. Return to the Presentation Server console.

Citrix Access Gateway Enterprise Edition SmartAccess Deployment Guide
32
2.10. Configure Presentation Server Policies and Filters
Follow these steps to create Presentation Server policies that apply to Access Gateway users according to their endpoint validation.
Step Action
1 Open the Presentation Server Access Management Console and publish calc.exe as Sensitive Financial Application.
2 Edit the access control properties of the Sensitive Financial Application. Change the connections allowed to Any connection that meets the following filters. Click Add.
3 In Access Gateway farm, type SmartAccess (the name of your Access Gateway virtual server).
In Access Gateway filter, type ValidEndpoint (the name of your conditional session policy).
4 Click OK. Click to clear Allow all other connections. The Access Control settings appear as follows:
Citrix Access Gateway Enterprise Edition SmartAccess Deployment Guide
33
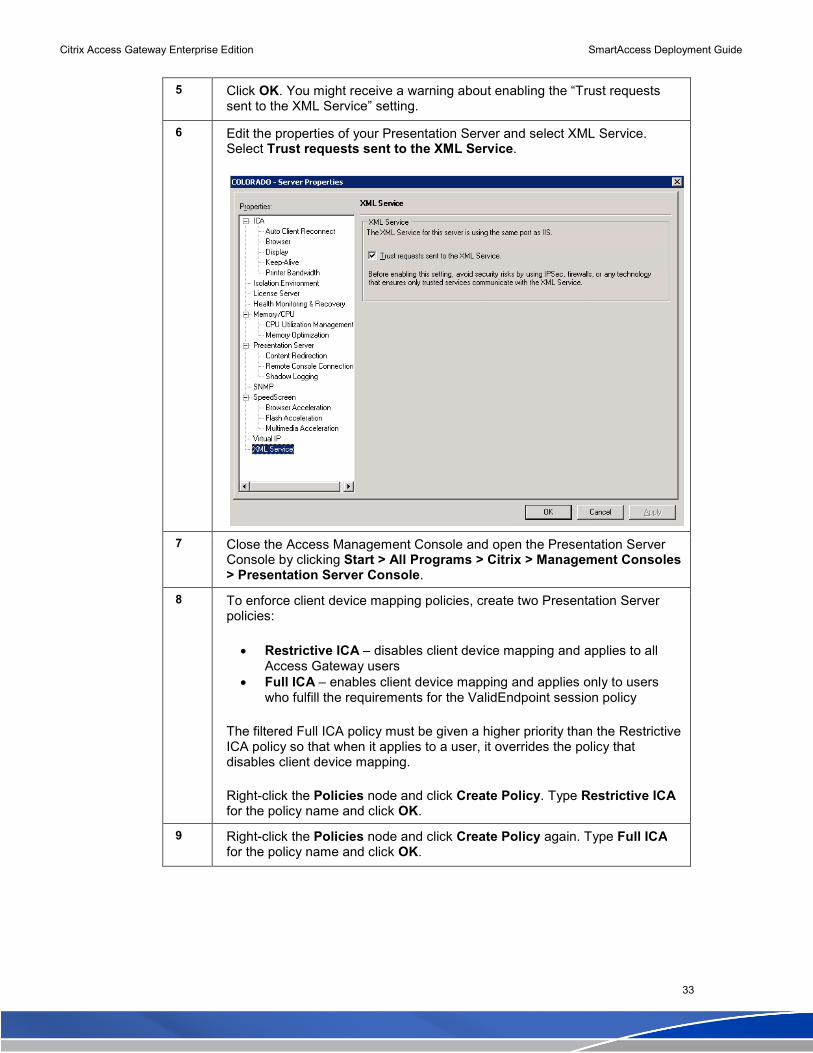
5 Click OK. You might receive a warning about enabling the “Trust requests sent to the XML Service” setting.
6 Edit the properties of your Presentation Server and select XML Service. Select Trust requests sent to the XML Service.
7 Close the Access Management Console and open the Presentation Server Console by clicking Start > All Programs > Citrix > Management Consoles > Presentation Server Console.
8 To enforce client device mapping policies, create two Presentation Server policies:
• Restrictive ICA – disables client device mapping and applies to all Access Gateway users
• Full ICA – enables client device mapping and applies only to users who fulfill the requirements for the ValidEndpoint session policy
The filtered Full ICA policy must be given a higher priority than the Restrictive ICA policy so that when it applies to a user, it overrides the policy that disables client device mapping.
Right-click the Policies node and click Create Policy. Type Restrictive ICA for the policy name and click OK.
9 Right-click the Policies node and click Create Policy again. Type Full ICA for the policy name and click OK.

Citrix Access Gateway Enterprise Edition SmartAccess Deployment Guide
34
10 Select the Full ICA policy and click the up arrow to make it the highest priority.
11 Edit the properties of the Restrictive ICA policy and configure it to disable client drive mapping, client clipboard mapping and client printer mapping.

Citrix Access Gateway Enterprise Edition SmartAccess Deployment Guide
35
12 Edit the properties of the Full ICA policy and click Enabled client drive mapping, client clipboard mapping and client printer mapping.
13 Right-click the Restrictive ICA policy and select Apply this policy to
14 Click Access Control. Select Filter based on Access Control. Select Apply to connections made through Access Gateway and keep the setting applied to Any connection. Click OK.
15 Right-click the Full ICA policy and select Apply this policy to
16 Select Access Control. Enable Filter based on Access Control. Select Apply to connections made through Access Gateway and change the setting to Any connection that meets any of the following filters.
Click Add. Type SmartAccess for the farm name and type ValidEndpoint for the Access Gateway filter name. Click OK.

Citrix Access Gateway Enterprise Edition SmartAccess Deployment Guide
36
2.11. Test from a Client Computer
From a client device, compare the behavior with and without the file C:\valid.txt present. The first time you access the site, you are prompted to install the Endpoint Analysis plug-in.
Step Action
1 Create the file C:\valid.txt on your client device. When this file is present during the Access Gateway logon:
• The Sensitive Financial Application icon appears in the user’s application set
• Client drives appear in the Save As dialog when running Notepad or Wordpad from the Presentation Server
• Client printers should appear when you select File > Print from an application running on Presentation Server
• It can copy text from a local application into an application running on Presentation Server
2 Log off of Presentation Server and the Web Interface completely. Close all browser windows. Delete the file C:\valid.txt.
3 Log back on to the Access Gateway with the file C:\valid.txt missing. When this file is not present during the Access Gateway logon:
• The Sensitive Financial Application icon is not be included in the user’s application set
• Client drives does not appear in the Save As dialog when running Notepad or Wordpad from Presentation Server
• Client printers do not appear when you select File > Print from an application running on Presentation Server
• It is not be possible to copy text from a local application into a Presentation Server application
Citrix Access Gateway Enterprise Edition SmartAccess Deployment Guide
37
3. Alternate Deployment Scenarios 3.1. Enable the Secure Access Client for all users
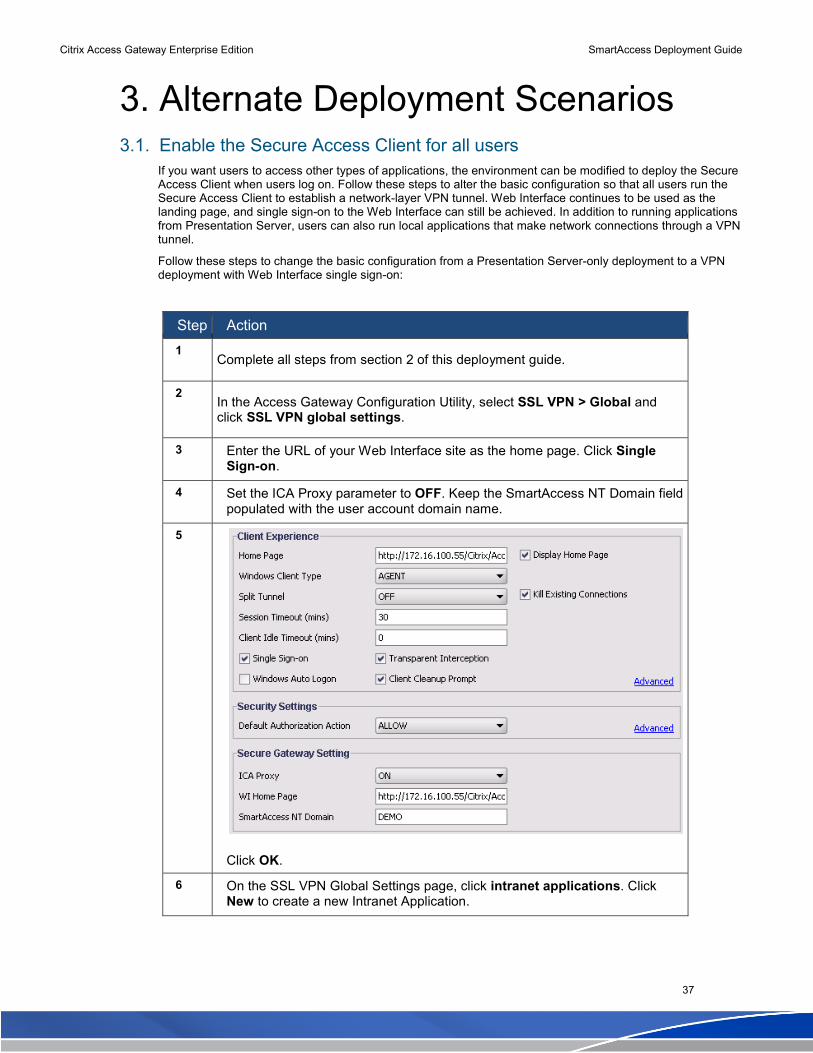
If you want users to access other types of applications, the environment can be modified to deploy the Secure Access Client when users log on. Follow these steps to alter the basic configuration so that all users run the Secure Access Client to establish a network-layer VPN tunnel. Web Interface continues to be used as the landing page, and single sign-on to the Web Interface can still be achieved. In addition to running applications from Presentation Server, users can also run local applications that make network connections through a VPN tunnel.
Follow these steps to change the basic configuration from a Presentation Server-only deployment to a VPN deployment with Web Interface single sign-on:
Step Action
1 Complete all steps from section 2 of this deployment guide.
2 In the Access Gateway Configuration Utility, select SSL VPN > Global and click SSL VPN global settings.
3 Enter the URL of your Web Interface site as the home page. Click Single Sign-on.
4 Set the ICA Proxy parameter to OFF. Keep the SmartAccess NT Domain field populated with the user account domain name.
5
Click OK.
6 On the SSL VPN Global Settings page, click intranet applications. Click New to create a new Intranet Application.

Citrix Access Gateway Enterprise Edition SmartAccess Deployment Guide
38
7 In Name, type LAN Subnet for the Intranet application name and choose TRANSPARENT as the interception mode. For the destination, enter the network ID and subnet mask that represents your internal network. For example, enter the IP address 172.16.100.0 and the subnet mask 255.255.255.0 to represent all servers on the 172.16.100.x subnet. The address of the Web Interface, Presentation Server and all other servers to which the user connects must fall within one of the subnets defined as an intranet application.
8 Click Create. Confirm that the LAN Subnet intranet application is now listed in the configured column and click OK.
Click Save to write the running Access Gateway configuration to disk.
Now when users log on, a full VPN tunnel is established and the Web Interface is used as the home page.

Citrix Access Gateway Enterprise Edition SmartAccess Deployment Guide
39
3.2. Enable Presentation Server as a Quarantine Access Method
Follow these steps to alter the configuration created in the previous scenario so that users who pass an endpoint scan are provided with network-layer access, while users who fail the scan are quarantined and can access applications running on Presentation Server only.
For this example, we use the presence of a client process, notepad.exe, to determine if the user qualifies for network layer access. If notepad.exe is running, the user is offered the Secure Access Client. When notepad.exe is not running, the user receives Presentation Server application access only. Presentation Server application filtering based on the presence of C:\valid.txt continues to work as before in both cases.
Step Action
1 Complete all steps from sections 2 and 3.1 of this deployment guide.
2 In the Access Gateway Configuration Utility, in the left pane, click SSL VPN. In the right pane, click SSL VPN Policy Manager.
3 Under Configured Policies / Resources, right-click Groups and select Add to create a new group. Type ICA Quarantine Group for the group name and click Create. Click Close.
4 Under Available Policies / Resources, click Session Policies. Under Related Tasks, click Create new session policy.
5 In Name, type Limited Access - CPS Only.
6 Next to Request Profile, click New. Type ICA Only for the profile name. Under Secure Gateway Setting, next to ICA Proxy, click Override Global and then select ON. Click Create.
7 In the Create Session Policy dialog box, select ns_true from the list of Named Expressions and click Add Expression.
Click Create. Click Close.

Citrix Access Gateway Enterprise Edition SmartAccess Deployment Guide
40
8 Drag the Limited Access - CPS Only session policy icon onto the ICA Quarantine Group icon.
9 Close the SSL VPN Policy Manager. In the Configuration Utility, in the left pane, click SSL VPN > Global and in the right pane, click SSL VPN global settings. Under Security Settings section, click Advanced.
10 Click New to create a new client security expression. Users have to pass this security check in order to receive network-layer access.
In the Create Expression dialog box, click Add, select Process for the component and type notepad.exe in the file name field. Click OK and Close.
Click Create and you are returned to the Advanced Security settings dialog box.
11 Next to Quarantine Group, select ICA Quarantine Group from the drop-down menu for quarantine group.
Click OK twice to commit the changes. Click Save to write the running Access Gateway configuration to disk.
12 From a client device, test the results after logging on with and without notepad.exe running. Only when notepad.exe is running should the user be able to log on using the Secure Access Client.
Citrix Access Gateway Enterprise Edition SmartAccess Deployment Guide
41
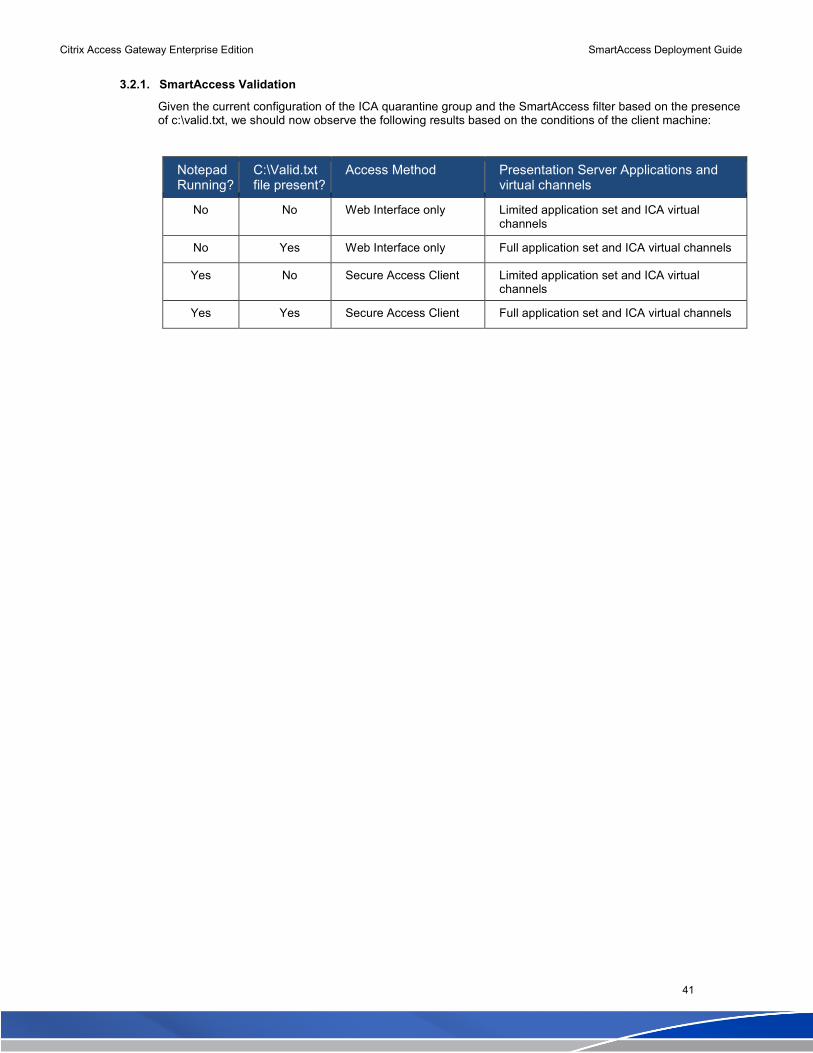
3.2.1. SmartAccess Validation
Given the current configuration of the ICA quarantine group and the SmartAccess filter based on the presence of c:\valid.txt, we should now observe the following results based on the conditions of the client machine:
Notepad Running?
C:\Valid.txt file present?
Access Method Presentation Server Applications and virtual channels
No No Web Interface only Limited application set and ICA virtual channels
No Yes Web Interface only Full application set and ICA virtual channels
Yes No Secure Access Client Limited application set and ICA virtual channels
Yes Yes Secure Access Client Full application set and ICA virtual channels

Citrix Access Gateway Enterprise Edition SmartAccess Deployment Guide
42
3.3. Show the Client Choices Page at Logon
Follow these steps to alter the configuration so that users are provided with a choice page after logon that lets them choose between the Secure Access Client and Web Interface.
If the user selects Secure Access Client, a network-layer connection is established. If they choose Citrix Web Interface, their experience matches the basic configuration outlined in section 2 where only Presentation Server applications are available.
Step Action
1 Complete all steps from sections 2 and 3.1 of this deployment guide.
2 In the Access Gateway Configuration Utility, in the left pane click SSL VPN > Global. In the right pane, click SSL VPN global settings.
3 Under Client Experience section, click Advanced.
4 On the General tab, click Client Choices and click OK twice.
Citrix Access Gateway Enterprise Edition SmartAccess Deployment Guide
43
When Client Choices is enabled:
• Users receive both options (Secure Access Client and Web Interface) if a client security expression is not defined in the SSL VPN global settings or in a session policy that applies to the user.
• If a client security expression is defined for the user and the user fails the scan, only the Web Interface option is presented to the user.
• Do not use quarantine groups. Users who fail an endpoint scan and are quarantined are treated the same as users who pass the endpoint scan.
Citrix Access Gateway Enterprise Edition SmartAccess Deployment Guide
44
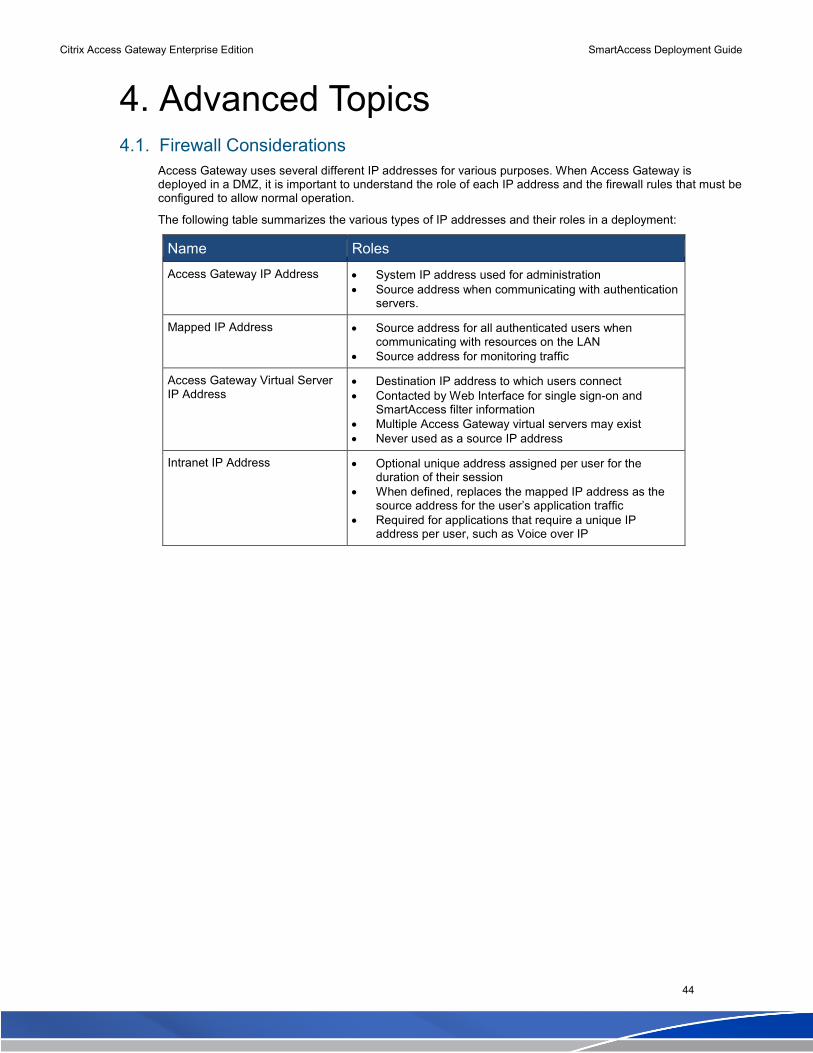
4. Advanced Topics 4.1. Firewall Considerations
Access Gateway uses several different IP addresses for various purposes. When Access Gateway is deployed in a DMZ, it is important to understand the role of each IP address and the firewall rules that must be configured to allow normal operation.
The following table summarizes the various types of IP addresses and their roles in a deployment:
Name Roles
Access Gateway IP Address • System IP address used for administration
• Source address when communicating with authentication servers.
Mapped IP Address • Source address for all authenticated users when communicating with resources on the LAN
• Source address for monitoring traffic
Access Gateway Virtual Server IP Address
• Destination IP address to which users connect
• Contacted by Web Interface for single sign-on and SmartAccess filter information
• Multiple Access Gateway virtual servers may exist
• Never used as a source IP address
Intranet IP Address • Optional unique address assigned per user for the duration of their session
• When defined, replaces the mapped IP address as the source address for the user’s application traffic
• Required for applications that require a unique IP address per user, such as Voice over IP

Citrix Access Gateway Enterprise Edition SmartAccess Deployment Guide
45
The following diagram illustrates the firewall port requirements for normal operation when the Access Gateway is deployed in a DMZ:
Source Destination Port Purpose
Internet Access Gateway virtual server
TCP 443 User logon
LAN Access Gateway IP address
TCP 80 Configuration Utility (HTML)
LAN Access Gateway IP address
TCP 3010 Configuration Utility (Java)
LAN Access Gateway IP address
TCP 22 Configuration Utility (File copies) Command-line access via SSH
NSIP LAN TCP 389 LDAP authentication using PLAINTEXT or TLS
NSIP LAN TCP 636 LDAP authentication using SSL
NSIP LAN UDP 1812 RADIUS authentication traffic
MIP STA TCP 80 Ticket validation for Presentation Server clients
MIP CPS TCP 1494 ICA traffic (without session reliability)
MIP CPS TCP 2598 ICA traffic (with session reliability)
Web Interface Access Gateway virtual server
TCP 443 Single sign-on with SmartAccess validation

Citrix Access Gateway Enterprise Edition SmartAccess Deployment Guide
46
If a route does not exist from the LAN to the DMZ subnet, it becomes necessary to create a second Access Gateway virtual server for the purpose of the Web Interface callback:

Citrix Access Gateway Enterprise Edition SmartAccess Deployment Guide
47
4.2. Web Interface Failover
Even when the load balancing feature is not licensed, it is possible to create a virtual server with one real server bound to it. Multiple real servers cannot be load balanced, but the virtual server can provide health monitoring and failover capabilities. Leverage this capability to implement a backup Web Interface server.
For example, suppose you have two servers running the Web Interface on the LAN and they are configured identically:
• WISRV01: 172.16.100.81
• WISRV02: 172.16.100.82
Step Action
1 Create service entities on the Access Gateway appliance that corresponds to the two servers running the Web Interface.
2 Create a load balancing virtual server with only WISRV01 bound to it as a service.

Citrix Access Gateway Enterprise Edition SmartAccess Deployment Guide
48
3 Create another load balancing virtual server with only WISRV02 bound to it. This virtual server does not need to be directly addressable.
4 Re-edit the properties of the primary Web Interface virtual server, click Advanced, and select the secondary virtual server as the Backup Virtual Server.
Citrix Access Gateway Enterprise Edition SmartAccess Deployment Guide
49
5 Now use the primary virtual server IP address instead of a real Web Interface server address when configuring the home page in the global settings or as part of a session policy, such as http://192.168.0.123/Citrix/AccessPlatform/.
All Web Interface traffic is routed through WISRV01 by default. If WISRV01 goes down and WISRV02 is active, then users automatically fail over to WISRV02.

Citrix Access Gateway Enterprise Edition SmartAccess Deployment Guide
50
4.3. HTTP Port 80 Redirection
Users often neglect to include the ‘s’ in ‘https://’ when pointing a browser to the Access Gateway URL. By following the steps below, a second virtual server can be added which listens on port 80 and redirects HTTP users to the HTTPS address. This technique relies on a virtual server that remains in a DOWN state with a redirect URL defined. The redirect URL is the HTTPS address of the Access Gateway where users log in.
Step Action
1 Select the Virtual Servers and Services > Virtual Servers node and click Add.
2 Enter a descriptive name such as http-redirect. In IP Address, type the same IP address as your Access Gateway virtual server. For the port, enter 80. Do not add or select any services for this virtual server.
On the Advanced tab, in the Redirect URL field, type the HTTPS URL of the Access Gateway, such as https://access.company.com/.
Click Create and click Close.
3 The virtual server is shown in a DOWN state. This is the expected behavior.
Click Save.
4 Point a browser to the Access Gateway virtual server address using HTTP instead of HTTPS and your browser should redirect the request to the HTTPS URL.
Citrix Access Gateway Enterprise Edition SmartAccess Deployment Guide
51
5. Frequently Asked Questions 5.1. Licensing questions I followed the instructions in the Administrator’s Guide for licensing the appliance. Why is my license still
not being recognized?
The Access Gateway 8.0, Enterprise Edition Administrator’s Guide includes instructions for creating the file
/nsconfig/hosts, which includes the IP address and host name of the gateway. The hosts file is not strictly
necessary, but if it exists it must also include the following line:
127.0.0.1 localhost
The hosts file does not need to be created and can be removed if it exists. When the hosts file exists without
the localhost line, licenses are not recognized. Use the steps in section 2.2 of this guide, which include the
removal of the hosts file if it exists.
Do I need to purchase additional user licenses for the secondary appliance in a high availability pair?
No, set the host name of both appliances to be the same and upload the same license file to both
appliances in the high availability pair.
Are Access Gateway licenses tied to the MAC address of the appliance?
No, only NetScaler Application Switch and Application Firewall licenses are tied to the appliance MAC
address. Access Gateway Universal license files should be assigned to the host name of the appliance.
5.2. Web Interface integration questions Why am I getting an Access Denied message from the Web Interface site after logging into Access
Gateway?
The Web Interface might be unable to make a trusted SSL connection to the Access Gateway virtual server.
Check the event viewer on the server running the Web Interface for more details. Possible reasons include:
• Web Interface cannot resolve the Access Gateway FQDN to the IP address of an Access Gateway
virtual server, or a firewall prevents access on port 443.
• Web Interface does not trust the certificate bound to the Access Gateway virtual server. To use a
private certificate authority, ensure that the CA root certificate is installed using the Certificates
MMC snap-in for the Local Computer certificate store on the server running Web Interface.
• The Access Gateway virtual server is configured to require client certificates – create a separate
Access Gateway virtual server to accept the Web Interface callback if this is the case.
• Single sign-on is not enabled in the Access Gateway global settings or session policy.
• The Web Interface URL uses an Internet IP address, in which case single sign-on is disabled as a
protection feature. Disable split tunneling or create a virtual server for Web Interface using an
internal IP address range (10.x.y.z, 192.168.y.z, 172.16.y.z).
• The client device is not sending traffic through the Access Gateway tunnel and is in fact contacting
the Web Interface server directly.

Citrix Access Gateway Enterprise Edition SmartAccess Deployment Guide
52
How can I configure the Web Interface so that ICA traffic for Secure Access Client users stays within the
existing SSL VPN tunnel, rather than initiating a new SSL connection and utilizing the Secure Ticket
Authority?
Edit the DMZ properties of the Web Interface site and set the access method to Direct instead of Gateway
Direct. To support users with and without the Secure Access Client in the same deployment, create two Web
Interface sites. Configure a site with the Direct access method as the “Home page” URL in the Access
Gateway global settings, and configure a site with the Gateway Direct method as the “WI Home Page”
address. The WI Home Page parameter can be configured globally or in a session policy.
On both Web Interface sites, enable “Advanced Access Control” as the authentication method and provide
an authentication service URL that points back to your Access Gateway virtual server.
Are script changes required to enable single sign-on to Web Interface, as explained in article CTX106202?
No, article CTX106202 applies to Access Gateway Standard Edition. In an Access Gateway Enterprise
Edition deployment, Web Interface should be configured for “Advanced Access Control” authentication as
outlined in section 2.6 of this guide. No Web Interface script changes are required.
Why doesn’t Web Interface perform client detection or offer a Presentation Server client to users that do not have one installed?
Client detection is disabled by default for Web Interface 4.6 when integrated with Access Gateway. To enable client detection:
1. Edit the WebInterface.conf file within your Web Interface site, for example, C:\Inetpub\wwwroot\Citrix\AccessPlatform\conf\WebInterface.conf.
2. Find the setting EnableClientDetectionForAG, delete the “#” symbol from the start of the line, and change the value of the setting from Off to On.
3. Save the file. Changes take effect immediately.