smartview (cep) - cook county,...
TRANSCRIPT
SMARTVIEW (CEP)
Created on 6/6/2017 9:25:00 AM

Training Guide
Page i
Table of Contents SMARTVIEW (CEP) ....................................................................................................... 1
Smart View ................................................................................................................ 1 Setting Smart View Options in Excel ........................................................................................ 1 Connecting to CAPEX and Accessing the Task List ................................................................ 6 Running Ongoing Project Summary Report by Department .................................................. 10 Adjusting Ongoing Projects .................................................................................................... 19 Adding New CEP Project ....................................................................................................... 24 Deleting New Project .............................................................................................................. 34 Running Project Request Summary Report ........................................................................... 36 Ranking Order Request ......................................................................................................... 45 Running New Project Request Rank by Department ............................................................. 47 Assigning Special Purpose Fund to Request ......................................................................... 56 Promoting Requests for Approval .......................................................................................... 61 Reviewing Department Request ............................................................................................ 68

Training Guide
Page 1
SMARTVIEW (CEP)
Smart View
Setting Smart View Options in Excel
Learning Objective: In this topic, you will learn how to set Smart View options in Excel.
Upon completion of this topic, you will be able to:
Set Smart View Options in Excel
This topic will cover: - Setting Smart View options in Excel Estimated time to complete this topic: 2 minutes
Step Action
1. To set options for Smart View in Excel, open Microsoft Excel and perform the necessary steps.
Training Guide
Page 2
Step Action
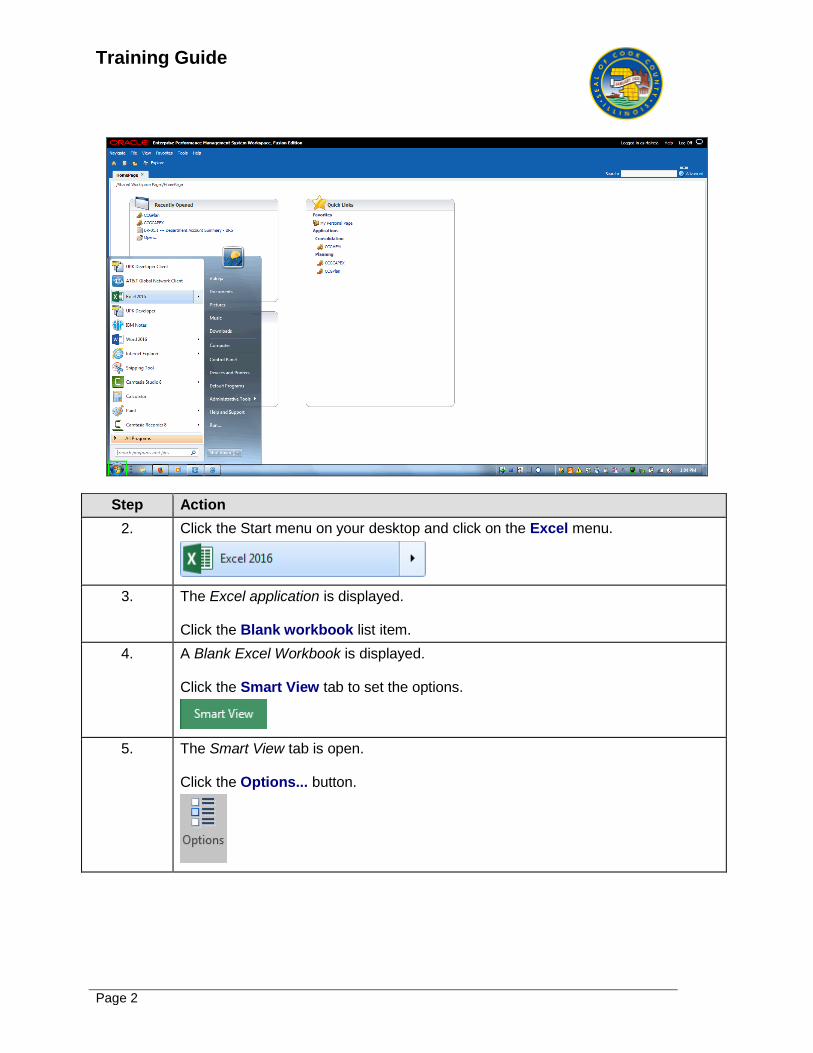
2. Click the Start menu on your desktop and click on the Excel menu.
3. The Excel application is displayed. Click the Blank workbook list item.
4. A Blank Excel Workbook is displayed. Click the Smart View tab to set the options.
5. The Smart View tab is open. Click the Options... button.
Training Guide
Page 3
Step Action
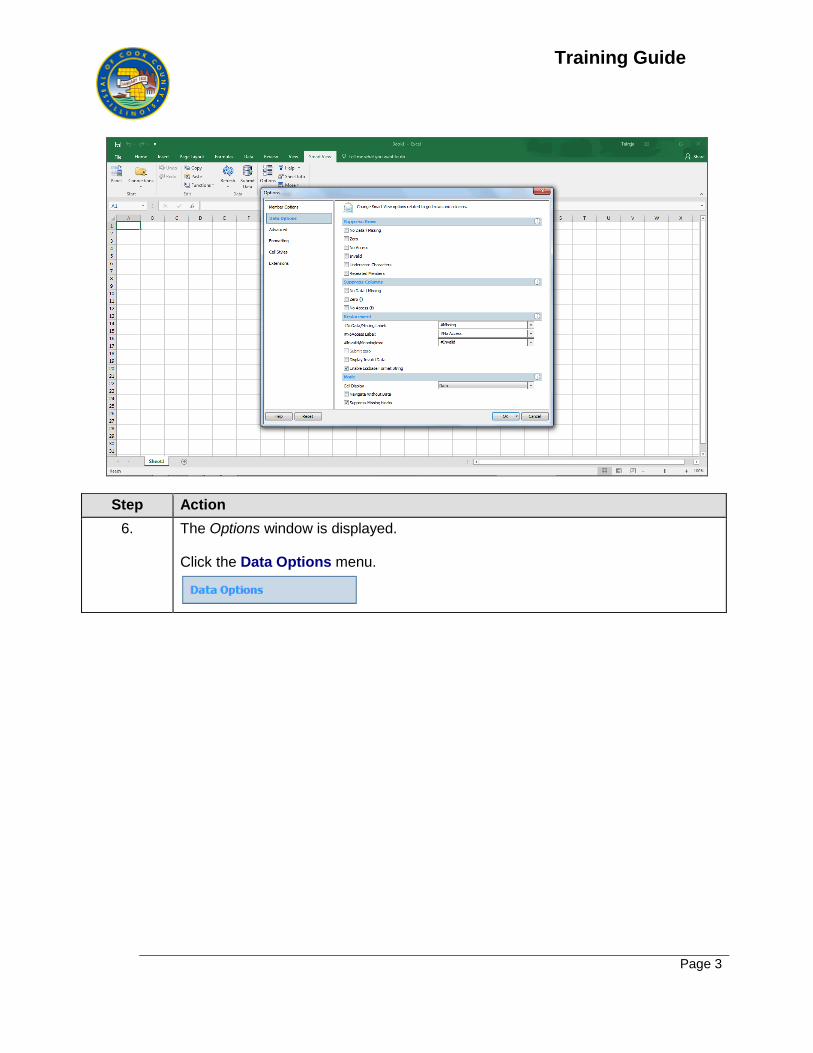
6. The Options window is displayed. Click the Data Options menu.
Training Guide
Page 4
Step Action
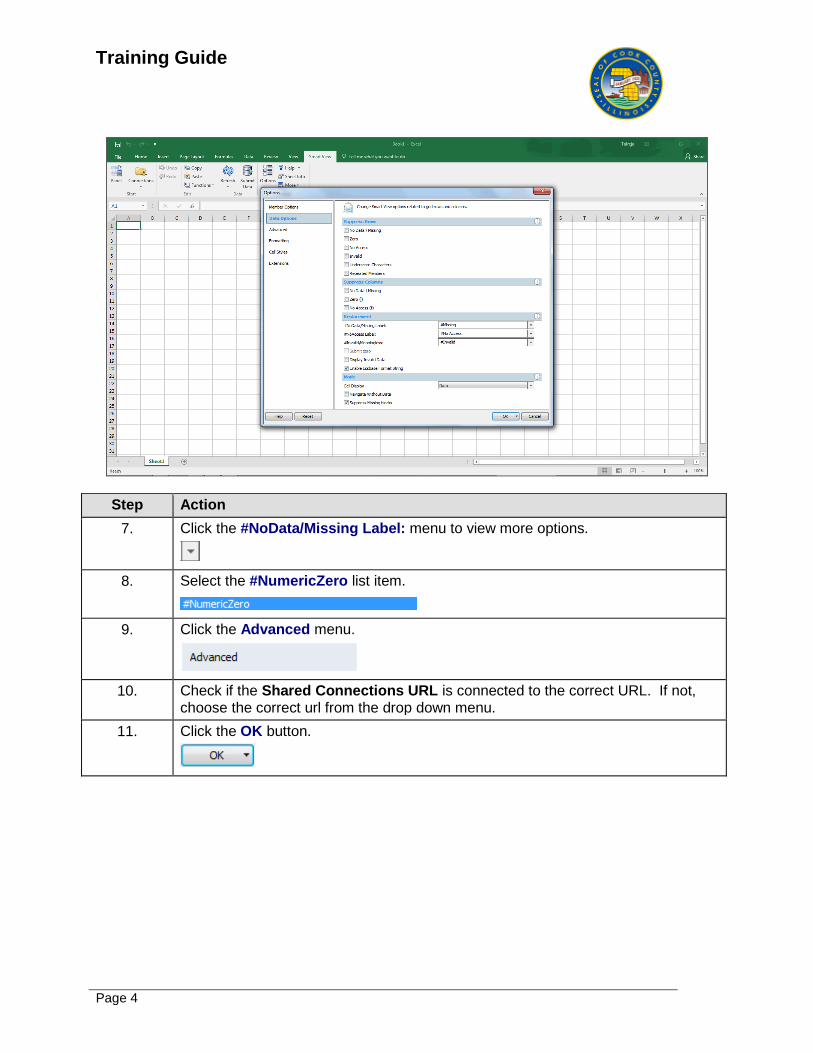
7. Click the #NoData/Missing Label: menu to view more options.
8. Select the #NumericZero list item.
9. Click the Advanced menu.
10. Check if the Shared Connections URL is connected to the correct URL. If not, choose the correct url from the drop down menu.
11. Click the OK button.
Training Guide
Page 5
Step Action
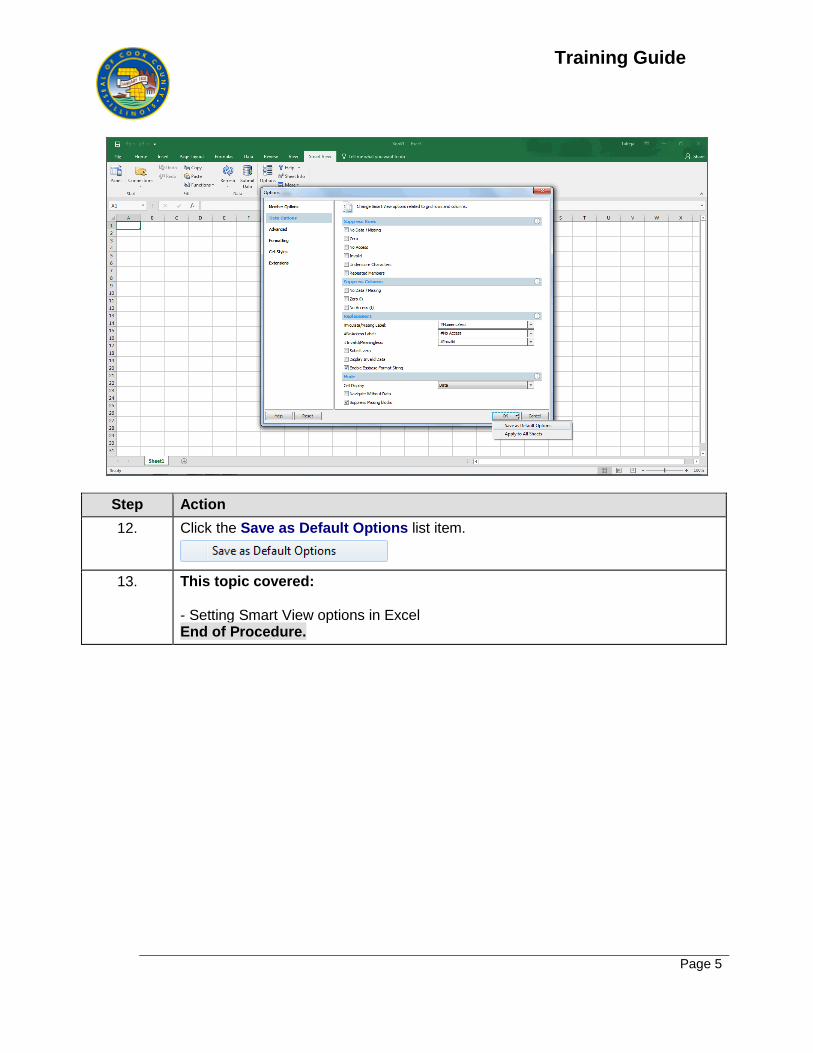
12. Click the Save as Default Options list item.
13. This topic covered: - Setting Smart View options in Excel End of Procedure.
Training Guide
Page 6
Connecting to CAPEX and Accessing the Task List
Learning Objective: In this topic, you will learn how to connect to CAPEX and access the Task list.
Upon completion of this topic, you will be able to:
Connect to CAPEX and Access the Task list.
This topic will cover: - Connecting to CAPEX and Accessing the Task List Estimated time to complete this topic: 3 minutes
Step Action
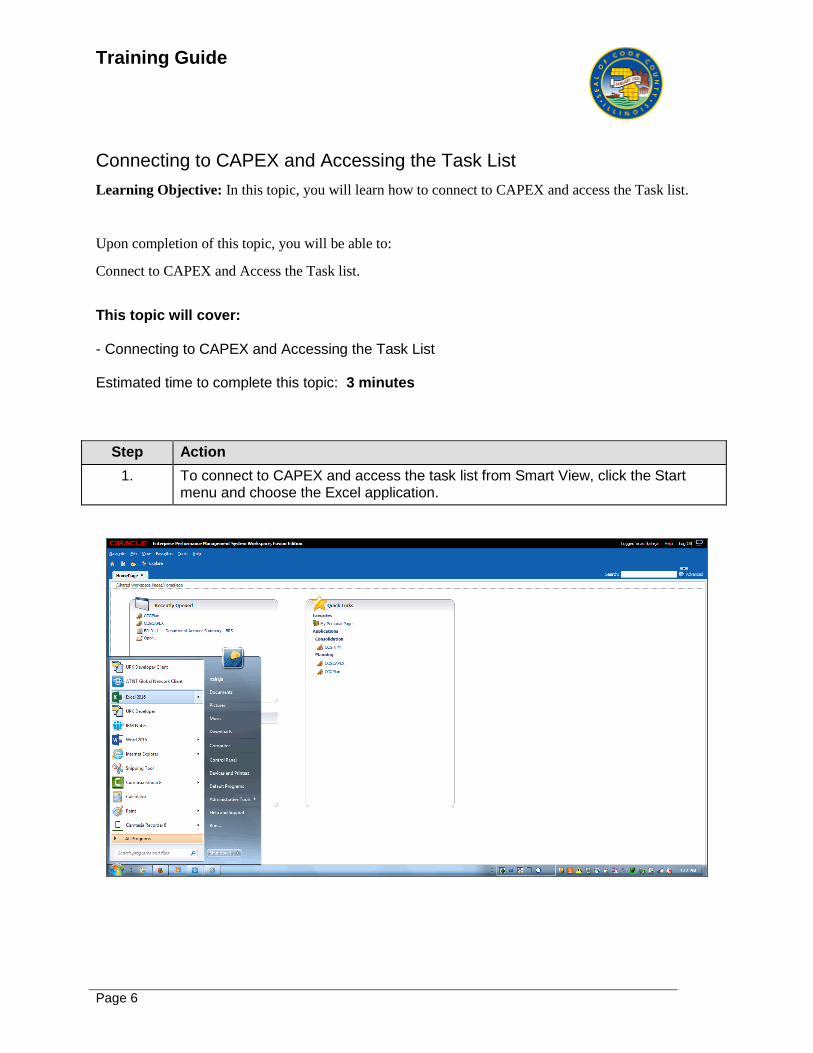
1. To connect to CAPEX and access the task list from Smart View, click the Start menu and choose the Excel application.
Training Guide
Page 7
Step Action
2. Click the Start menu on your desktop and click on the Excel menu.
3. The Excel application is displayed. Click the Blank workbook list item.
4. A Blank Excel workbook is open. Click the Smart View tab to set the options.
5. The Smart View tab is open. Click the Panel button.
6. The Smart View Home panel is displayed. Click the Shared Connections button.
7. The Connect to Data Source window is displayed. Make sure your user name is displayed and click in the Password: field.
8. Enter the appropriate password into the Password: field. In this example, enter "123".
9. Click the Connect button to connect to the database.
10. The Shared Connections panel is displayed. Click the dropdown button to view more options.
Training Guide
Page 8
Step Action
11. Select the appropriate connection from the list. In this example, click the Oracle® Hyperion Planning, Fusion Edition list item.
Step Action
12. The connection is now established. Click the "+" button to view more options under z9xhypap03.ccounty.com.
13. Click the "+" button to view more options under the CCGCAPEX application.
14. Click the "+" button to view more options under the Task Lists.
15. Double-click the Capital Equipment Projects Budget option to view task list details.
Training Guide
Page 9
Step Action
16. This topic covered: - Connecting to CAPEX and Accessing the Task List End of Procedure.
Training Guide
Page 10
Running Ongoing Project Summary Report by Department
Learning Objective: In this topic, you will learn how to run an ongoing project summary report
by department.
Upon completion of this topic, you will be able to:
Run an Ongoing Project Summary Report by Department
This topic will cover: - Running an Ongoing Project Summary Report by Department Estimated time to complete this topic: 4 minutes
Step Action
1. The task list under the Capital Equipment Projects Budget is displayed. You can view the detail in the Excel sheet when you click on any task.
Training Guide
Page 11
Step Action
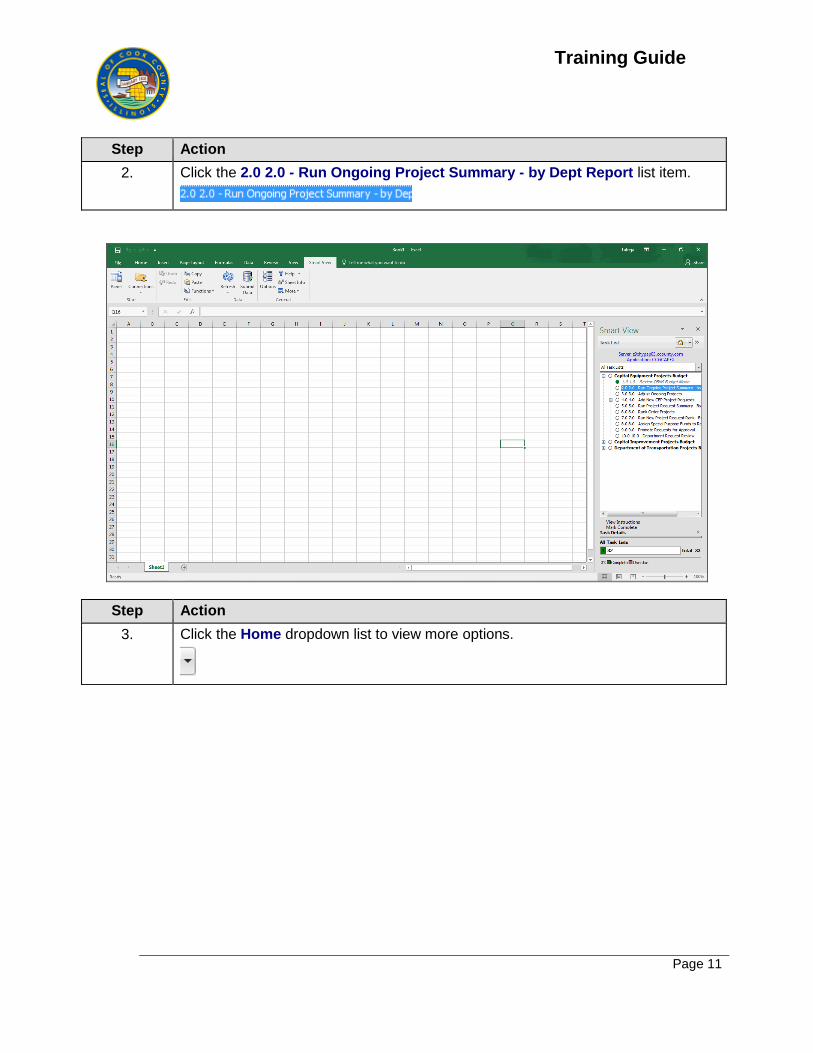
2. Click the 2.0 2.0 - Run Ongoing Project Summary - by Dept Report list item.
Step Action
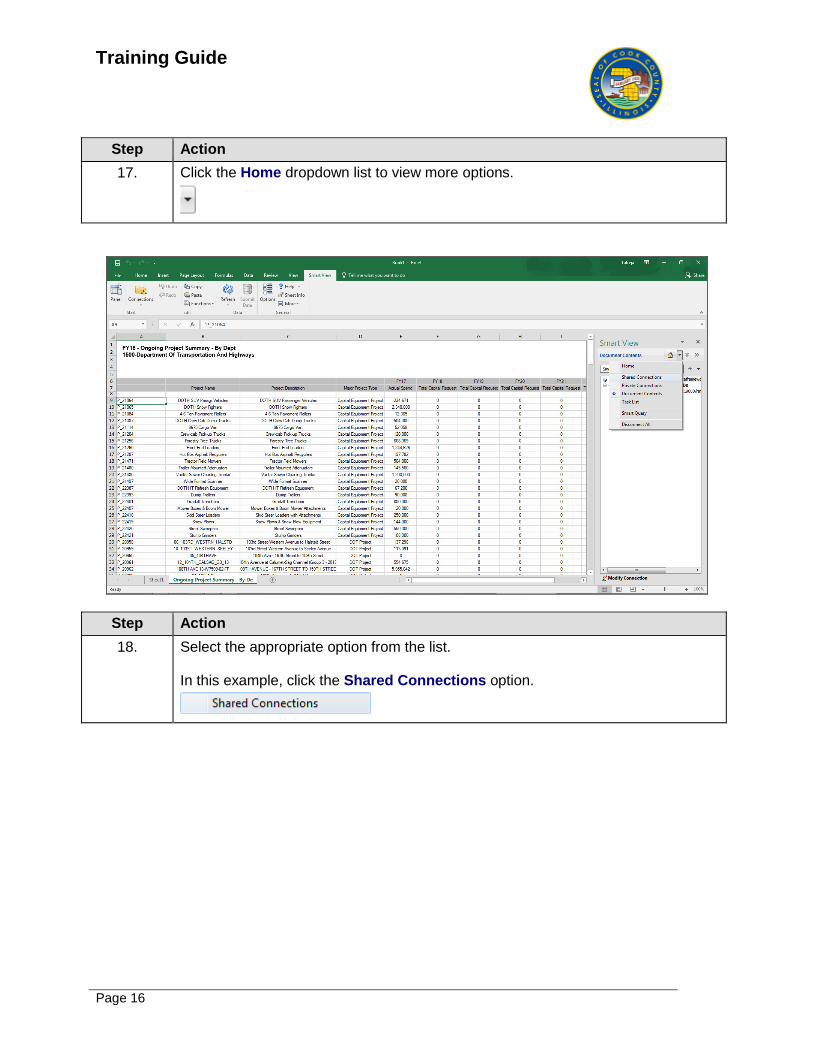
3. Click the Home dropdown list to view more options.
Training Guide
Page 12
Step Action
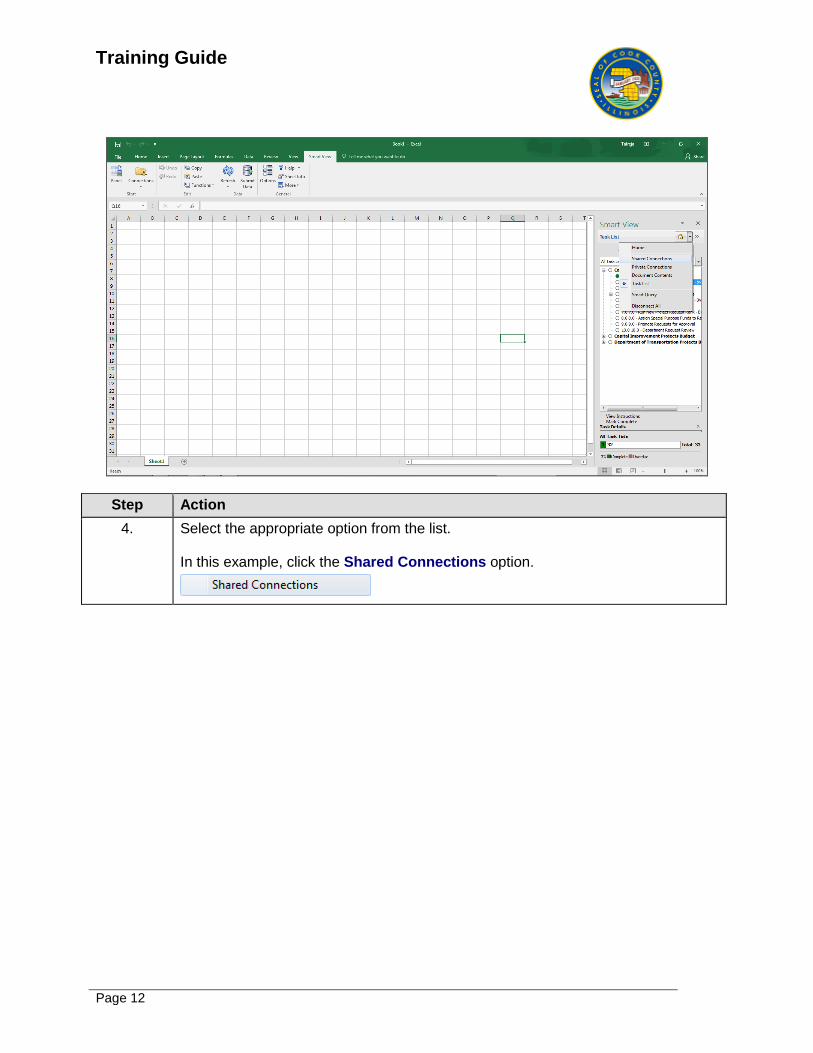
4. Select the appropriate option from the list. In this example, click the Shared Connections option.

Training Guide
Page 13
Step Action
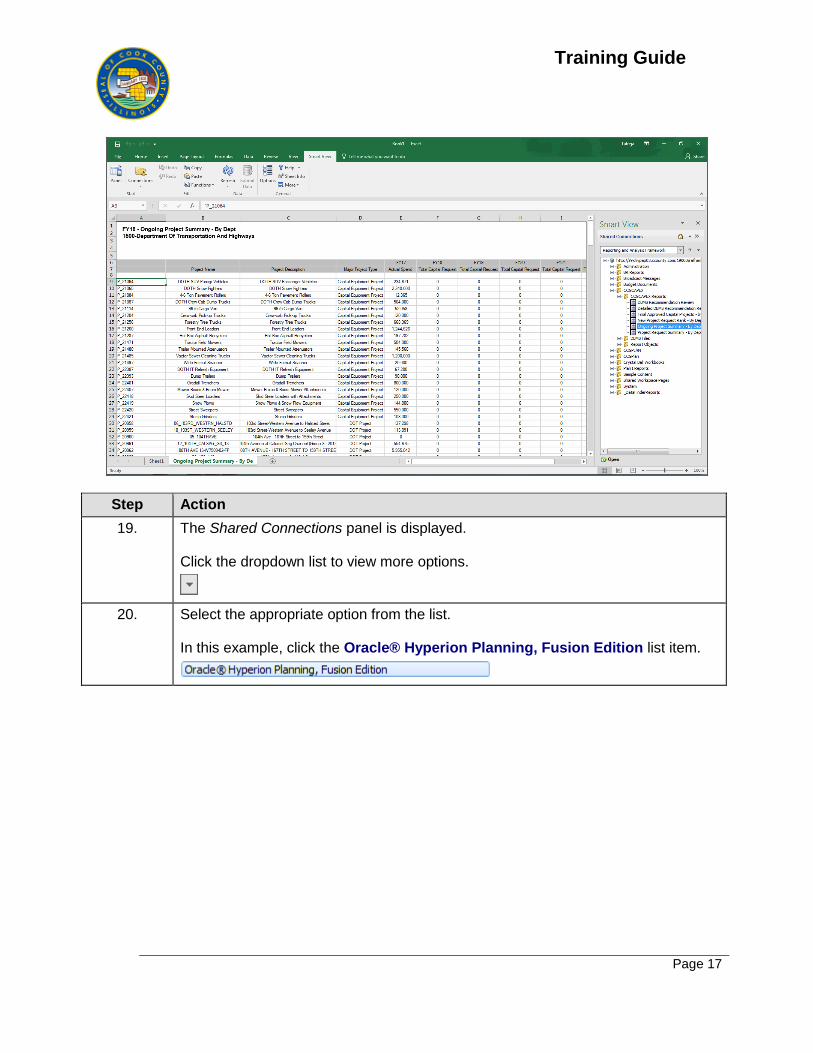
5. The Shared Connections panel is displayed. Click the dropdown list to view more options.
6. Select the appropriate option from the list. In this example, click the Reporting and Analysis Framework list item.
Training Guide
Page 14
Step Action
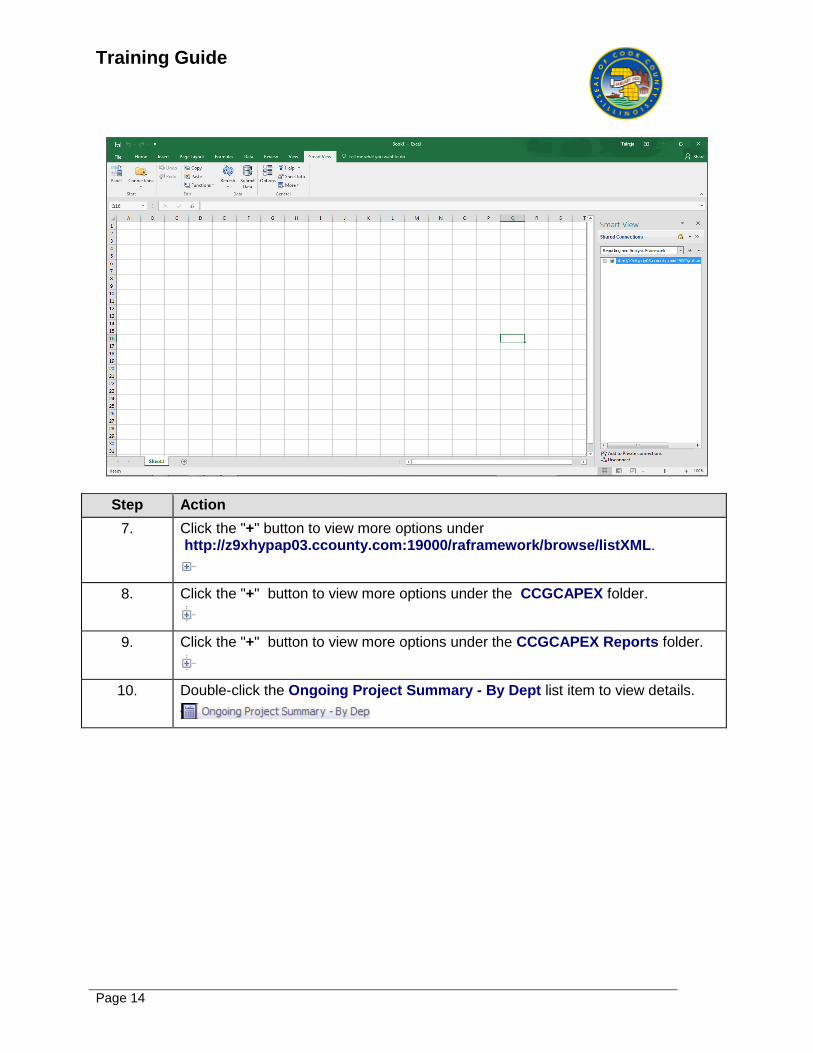
7. Click the "+" button to view more options under http://z9xhypap03.ccounty.com:19000/raframework/browse/listXML.
8. Click the "+" button to view more options under the CCGCAPEX folder.
9. Click the "+" button to view more options under the CCGCAPEX Reports folder.
10. Double-click the Ongoing Project Summary - By Dept list item to view details.
Training Guide
Page 15
Step Action
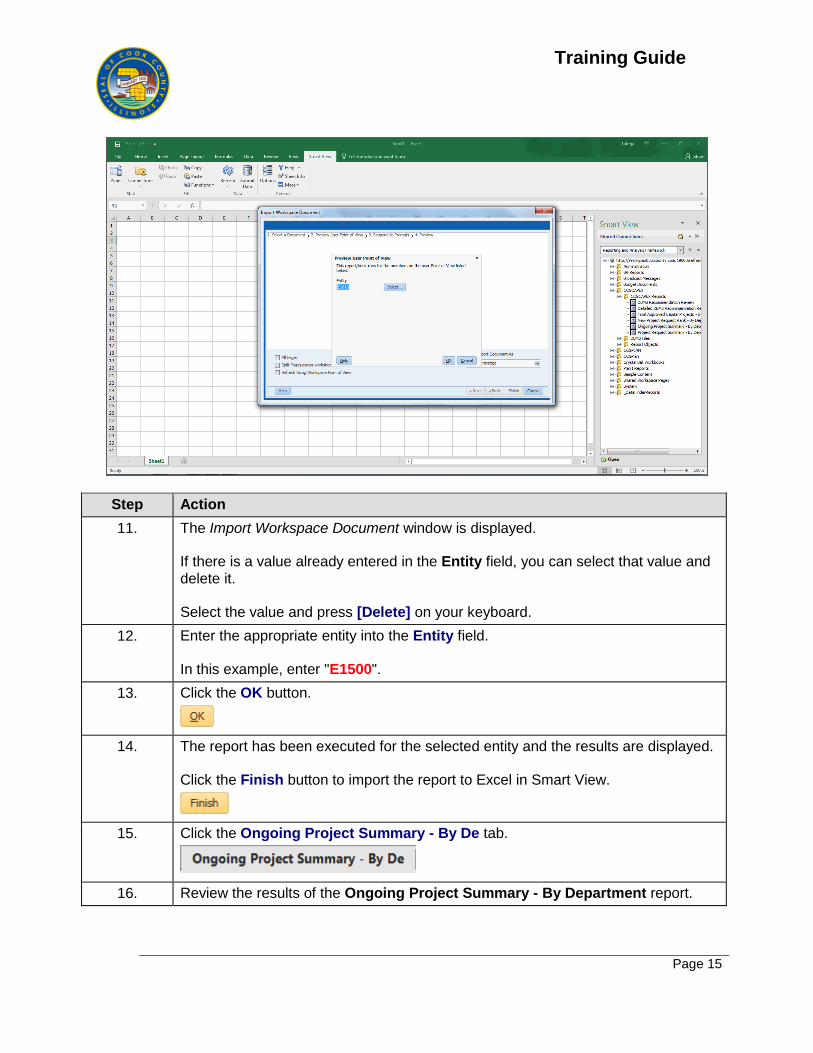
11. The Import Workspace Document window is displayed. If there is a value already entered in the Entity field, you can select that value and delete it. Select the value and press [Delete] on your keyboard.
12. Enter the appropriate entity into the Entity field. In this example, enter "E1500".
13. Click the OK button.
14. The report has been executed for the selected entity and the results are displayed. Click the Finish button to import the report to Excel in Smart View.
15. Click the Ongoing Project Summary - By De tab.
16. Review the results of the Ongoing Project Summary - By Department report.
Training Guide
Page 16
Step Action
17. Click the Home dropdown list to view more options.
Step Action
18. Select the appropriate option from the list. In this example, click the Shared Connections option.
Training Guide
Page 17
Step Action
19. The Shared Connections panel is displayed. Click the dropdown list to view more options.
20. Select the appropriate option from the list. In this example, click the Oracle® Hyperion Planning, Fusion Edition list item.
Training Guide
Page 18
Step Action
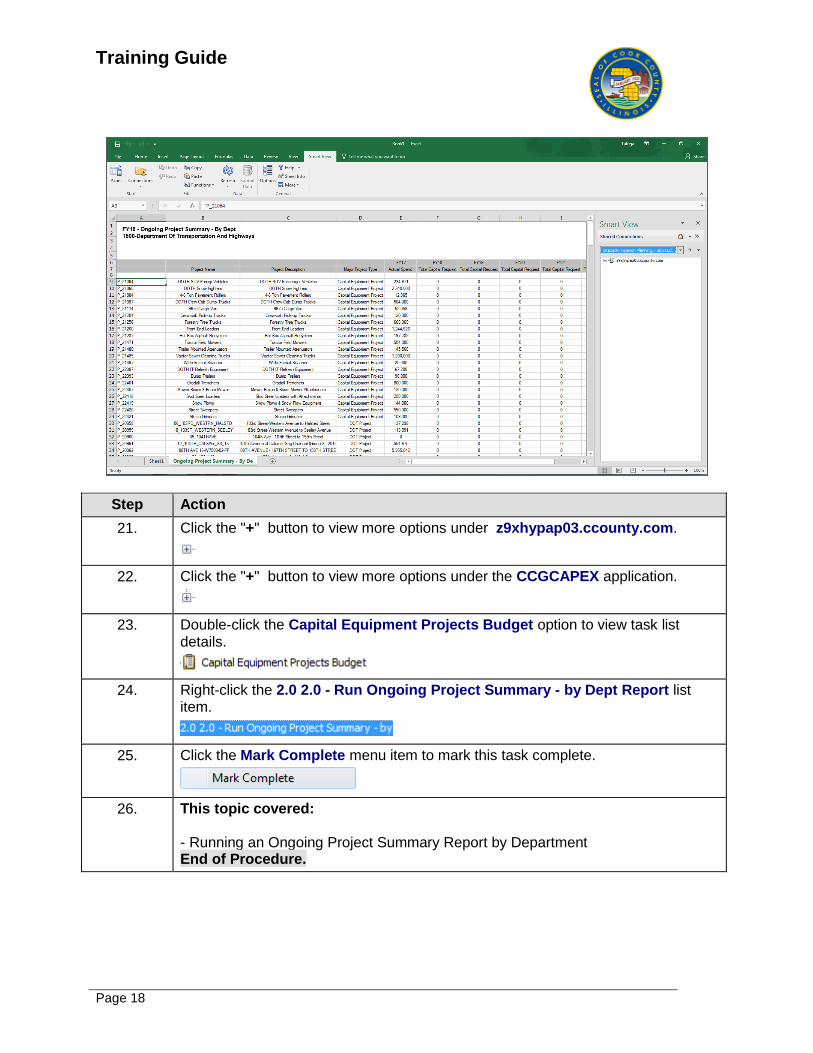
21. Click the "+" button to view more options under z9xhypap03.ccounty.com.
22. Click the "+" button to view more options under the CCGCAPEX application.
23. Double-click the Capital Equipment Projects Budget option to view task list details.
24. Right-click the 2.0 2.0 - Run Ongoing Project Summary - by Dept Report list item.
25. Click the Mark Complete menu item to mark this task complete.
26. This topic covered: - Running an Ongoing Project Summary Report by Department End of Procedure.
Training Guide
Page 19
Adjusting Ongoing Projects
Learning Objective: In this topic, you will learn how to adjust ongoing projects.
Upon completion of this topic, you will be able to:
Adjust Ongoing Projects.
This topic will cover: - Adjusting Ongoing Projects Estimated time to complete this topic: 5 minutes
Step Action
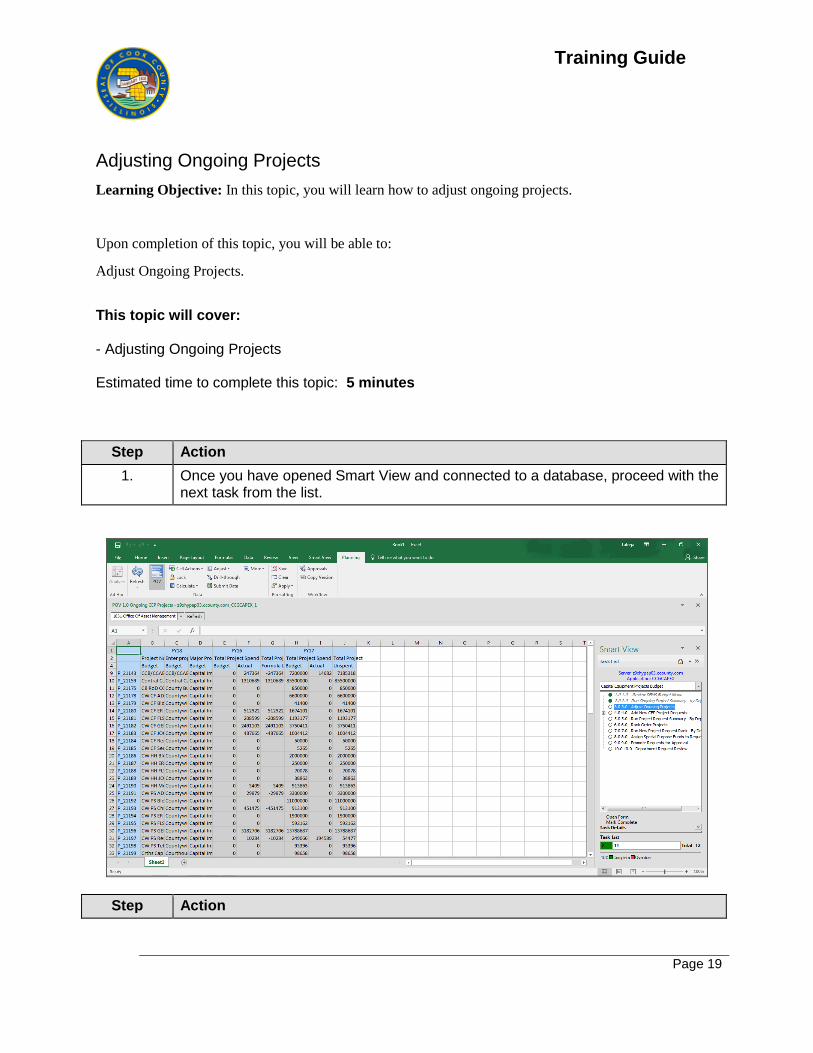
1. Once you have opened Smart View and connected to a database, proceed with the next task from the list.
Step Action
Training Guide
Page 20
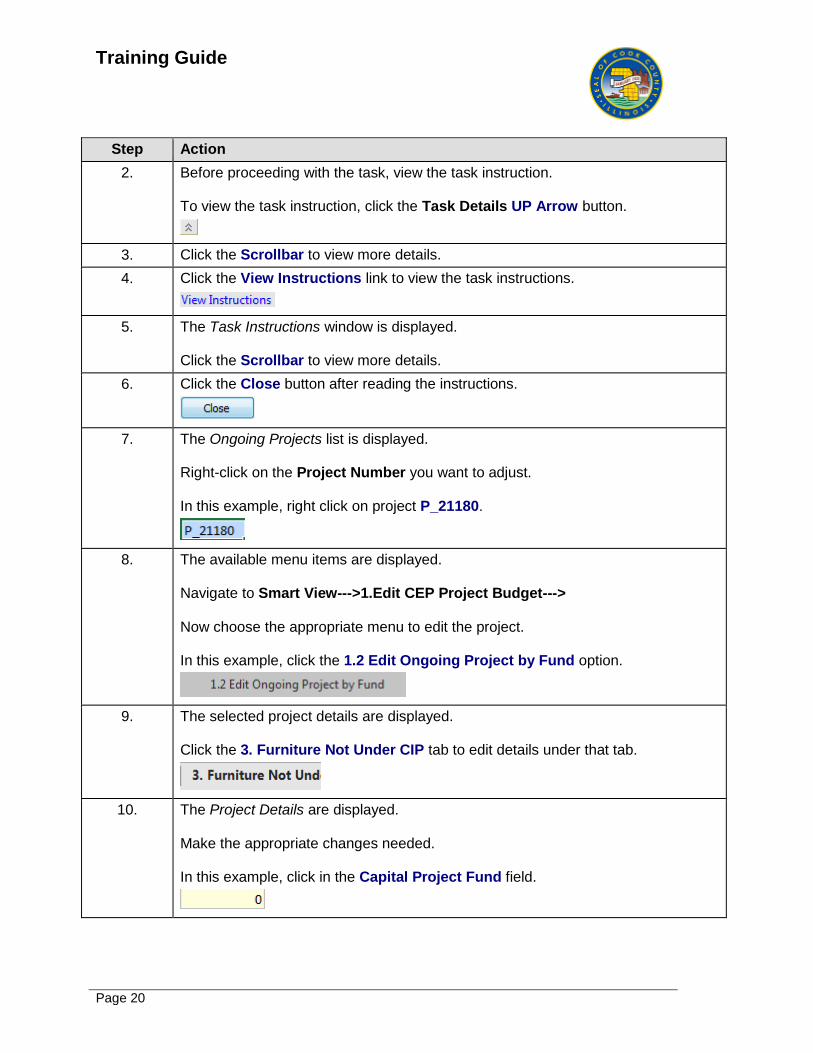
Step Action
2. Before proceeding with the task, view the task instruction. To view the task instruction, click the Task Details UP Arrow button.
3. Click the Scrollbar to view more details.
4. Click the View Instructions link to view the task instructions.
5. The Task Instructions window is displayed. Click the Scrollbar to view more details.
6. Click the Close button after reading the instructions.
7. The Ongoing Projects list is displayed. Right-click on the Project Number you want to adjust. In this example, right click on project P_21180.
8. The available menu items are displayed. Navigate to Smart View--->1.Edit CEP Project Budget---> Now choose the appropriate menu to edit the project. In this example, click the 1.2 Edit Ongoing Project by Fund option.
9. The selected project details are displayed. Click the 3. Furniture Not Under CIP tab to edit details under that tab.
10. The Project Details are displayed. Make the appropriate changes needed. In this example, click in the Capital Project Fund field.
Training Guide
Page 21
Step Action
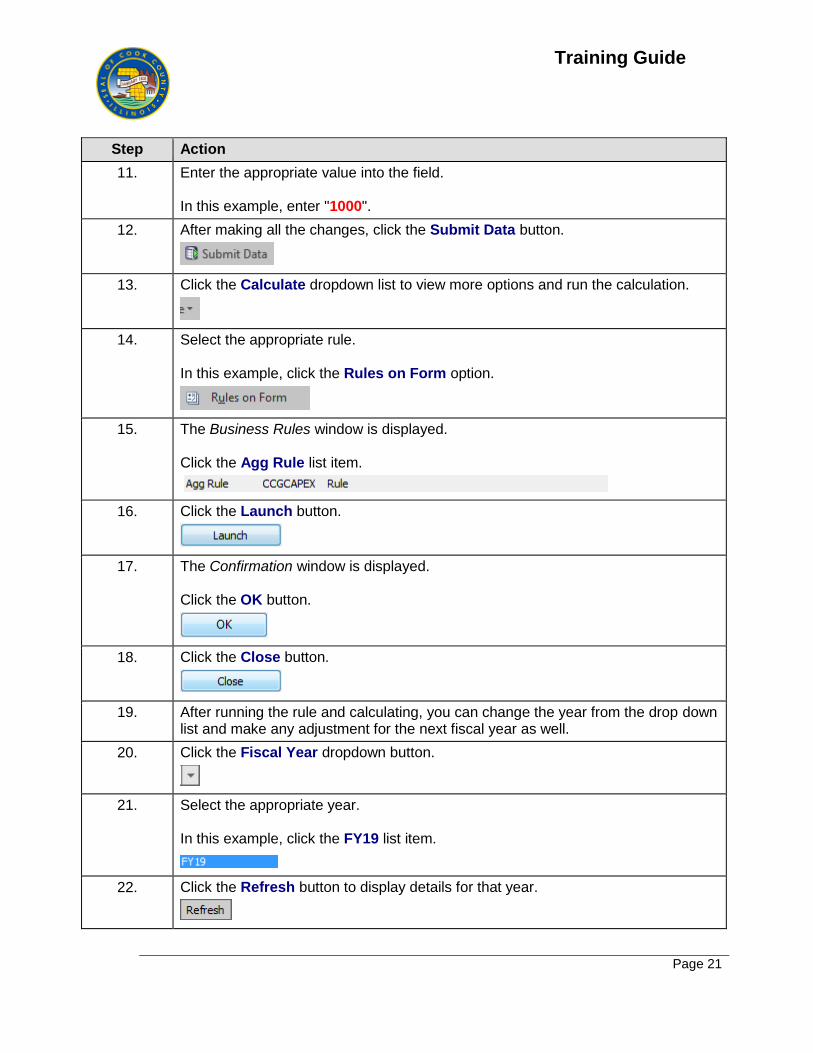
11. Enter the appropriate value into the field. In this example, enter "1000".
12. After making all the changes, click the Submit Data button.
13. Click the Calculate dropdown list to view more options and run the calculation.
14. Select the appropriate rule. In this example, click the Rules on Form option.
15. The Business Rules window is displayed. Click the Agg Rule list item.
16. Click the Launch button.
17. The Confirmation window is displayed. Click the OK button.
18. Click the Close button.
19. After running the rule and calculating, you can change the year from the drop down list and make any adjustment for the next fiscal year as well.
20. Click the Fiscal Year dropdown button.
21. Select the appropriate year. In this example, click the FY19 list item.
22. Click the Refresh button to display details for that year.
Training Guide
Page 22
Step Action
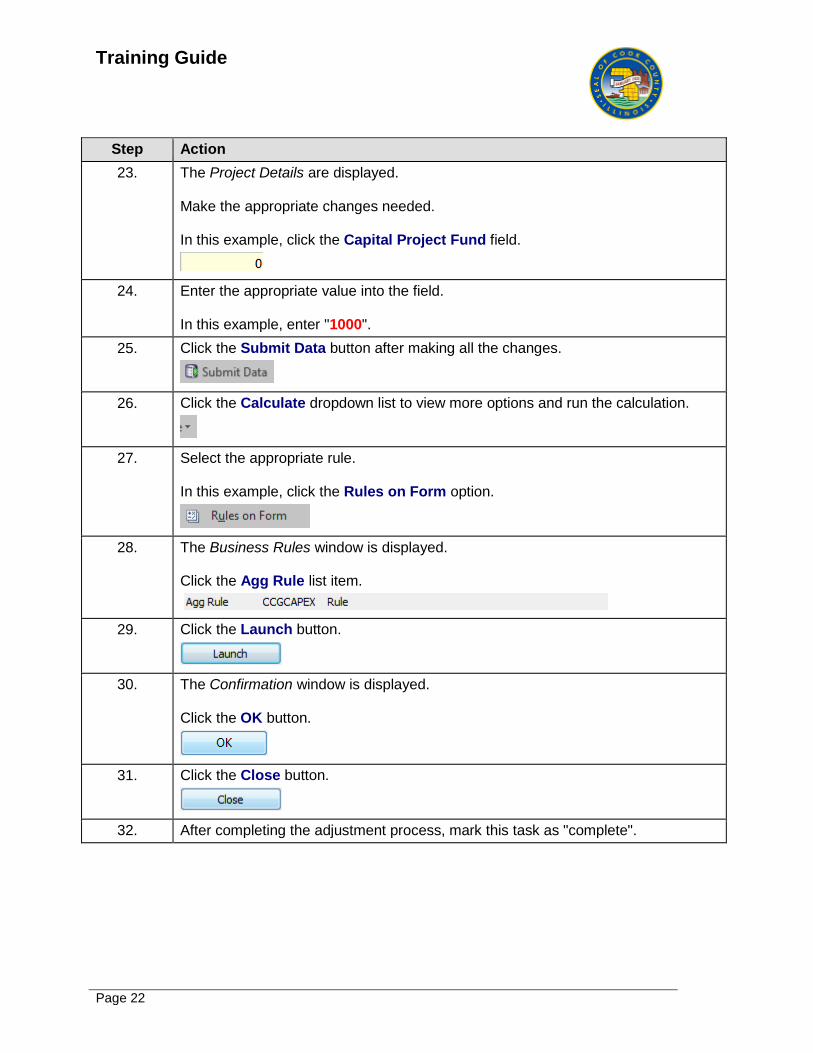
23. The Project Details are displayed. Make the appropriate changes needed. In this example, click the Capital Project Fund field.
24. Enter the appropriate value into the field. In this example, enter "1000".
25. Click the Submit Data button after making all the changes.
26. Click the Calculate dropdown list to view more options and run the calculation.
27. Select the appropriate rule. In this example, click the Rules on Form option.
28. The Business Rules window is displayed. Click the Agg Rule list item.
29. Click the Launch button.
30. The Confirmation window is displayed. Click the OK button.
31. Click the Close button.
32. After completing the adjustment process, mark this task as "complete".
Training Guide
Page 23
Step Action
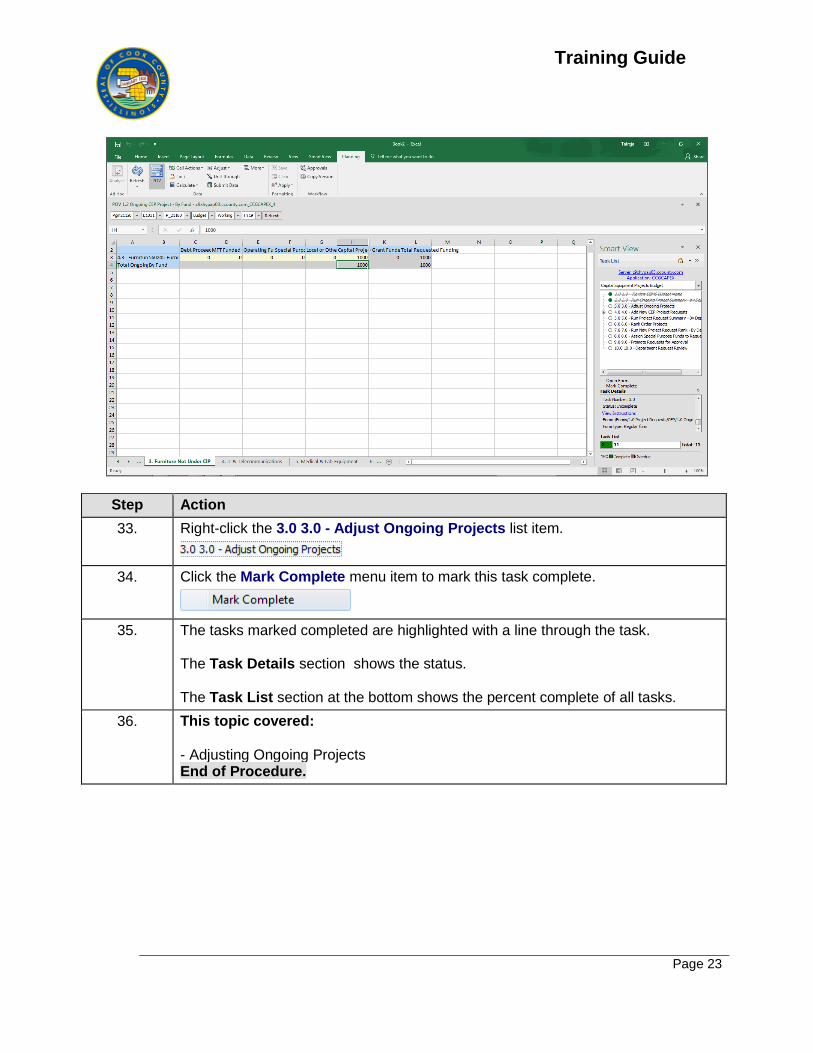
33. Right-click the 3.0 3.0 - Adjust Ongoing Projects list item.
34. Click the Mark Complete menu item to mark this task complete.
35. The tasks marked completed are highlighted with a line through the task. The Task Details section shows the status. The Task List section at the bottom shows the percent complete of all tasks.
36. This topic covered: - Adjusting Ongoing Projects End of Procedure.
Training Guide
Page 24
Adding New CEP Project
Learning Objective: In this topic, you will learn add a new CEP project.
Upon completion of this topic, you will be able to:
Add a New CEP Project
This topic will cover: - Adding a new CEP project Estimated time to complete this topic: 7 minutes
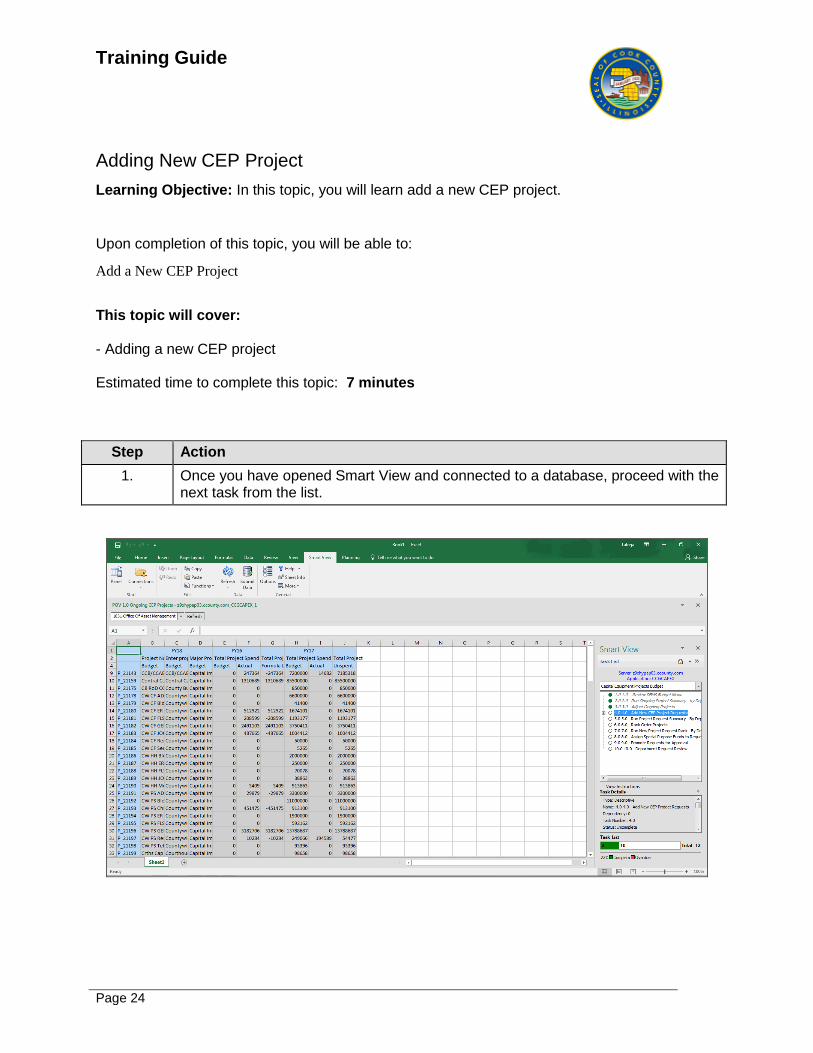
Step Action
1. Once you have opened Smart View and connected to a database, proceed with the next task from the list.
Training Guide
Page 25
Step Action
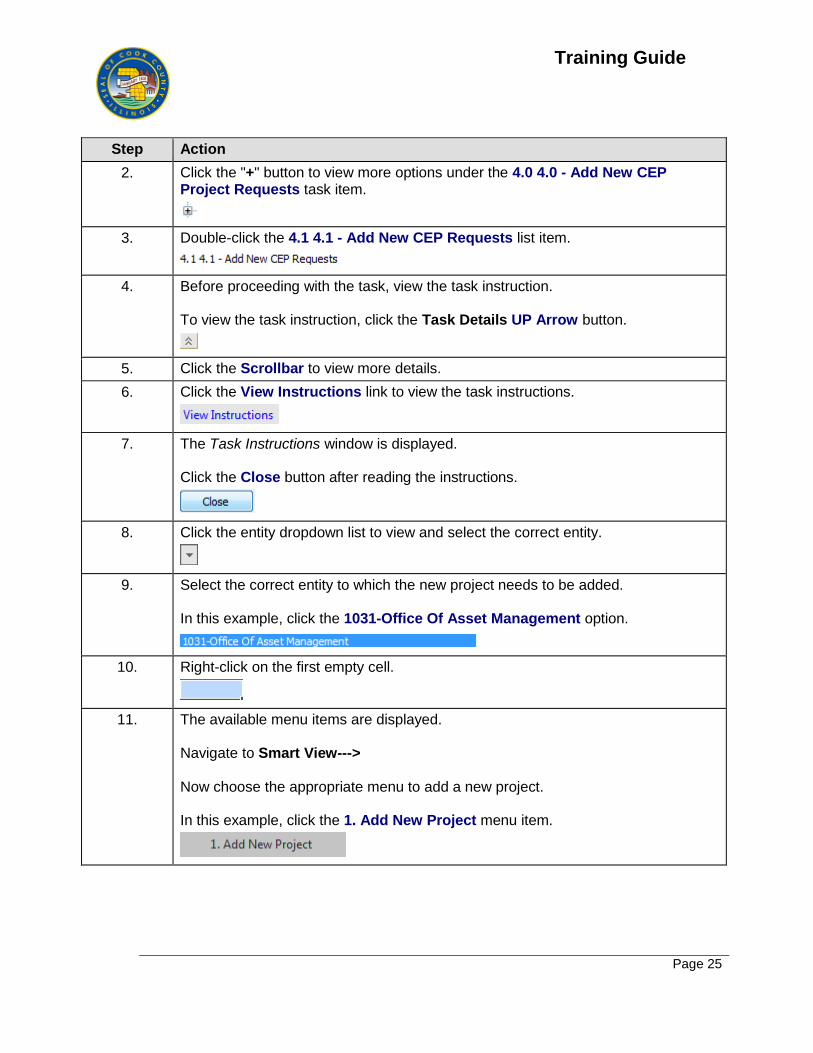
2. Click the "+" button to view more options under the 4.0 4.0 - Add New CEP Project Requests task item.
3. Double-click the 4.1 4.1 - Add New CEP Requests list item.
4. Before proceeding with the task, view the task instruction. To view the task instruction, click the Task Details UP Arrow button.
5. Click the Scrollbar to view more details.
6. Click the View Instructions link to view the task instructions.
7. The Task Instructions window is displayed. Click the Close button after reading the instructions.
8. Click the entity dropdown list to view and select the correct entity.
9. Select the correct entity to which the new project needs to be added. In this example, click the 1031-Office Of Asset Management option.
10. Right-click on the first empty cell.
11. The available menu items are displayed. Navigate to Smart View---> Now choose the appropriate menu to add a new project. In this example, click the 1. Add New Project menu item.
Training Guide
Page 26
Step Action
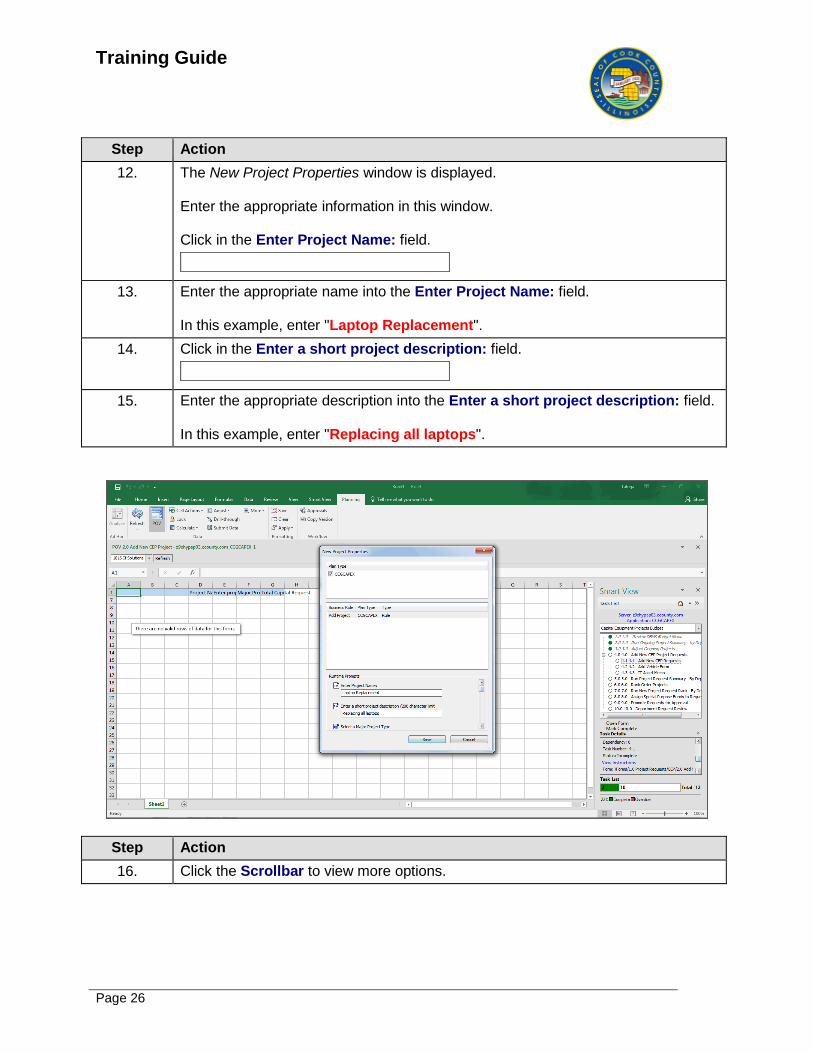
12. The New Project Properties window is displayed. Enter the appropriate information in this window. Click in the Enter Project Name: field.
13. Enter the appropriate name into the Enter Project Name: field. In this example, enter "Laptop Replacement".
14. Click in the Enter a short project description: field.
15. Enter the appropriate description into the Enter a short project description: field. In this example, enter "Replacing all laptops".
Step Action
16. Click the Scrollbar to view more options.
Training Guide
Page 27
Step Action
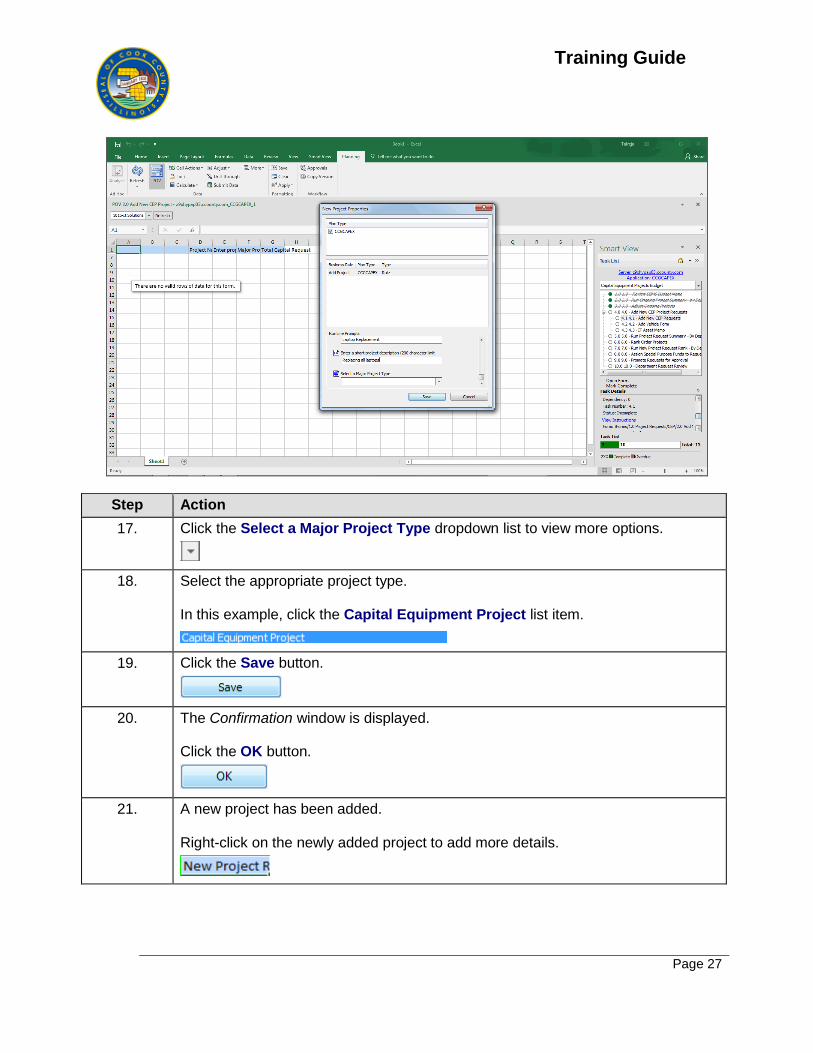
17. Click the Select a Major Project Type dropdown list to view more options.
18. Select the appropriate project type. In this example, click the Capital Equipment Project list item.
19. Click the Save button.
20. The Confirmation window is displayed. Click the OK button.
21. A new project has been added. Right-click on the newly added project to add more details.
Training Guide
Page 28
Step Action
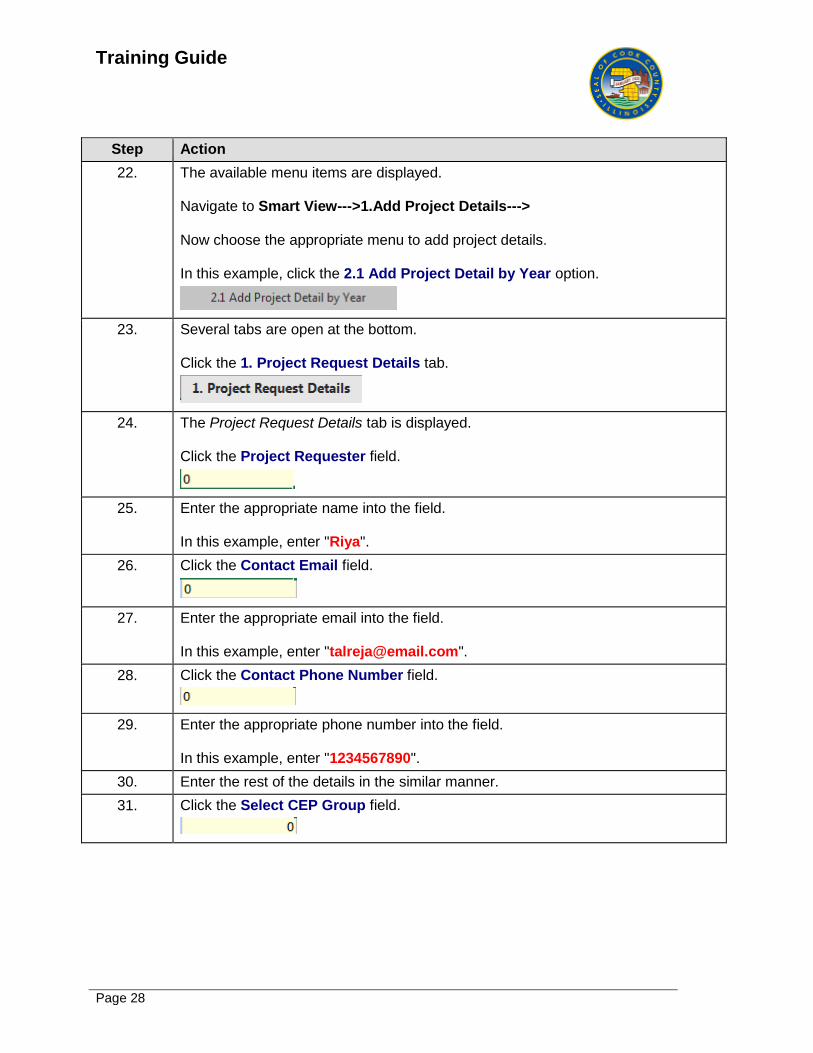
22. The available menu items are displayed. Navigate to Smart View--->1.Add Project Details---> Now choose the appropriate menu to add project details. In this example, click the 2.1 Add Project Detail by Year option.
23. Several tabs are open at the bottom. Click the 1. Project Request Details tab.
24. The Project Request Details tab is displayed. Click the Project Requester field.
25. Enter the appropriate name into the field. In this example, enter "Riya".
26. Click the Contact Email field.
27. Enter the appropriate email into the field. In this example, enter "[email protected]".
28. Click the Contact Phone Number field.
29. Enter the appropriate phone number into the field. In this example, enter "1234567890".
30. Enter the rest of the details in the similar manner.
31. Click the Select CEP Group field.
Training Guide
Page 29
Step Action
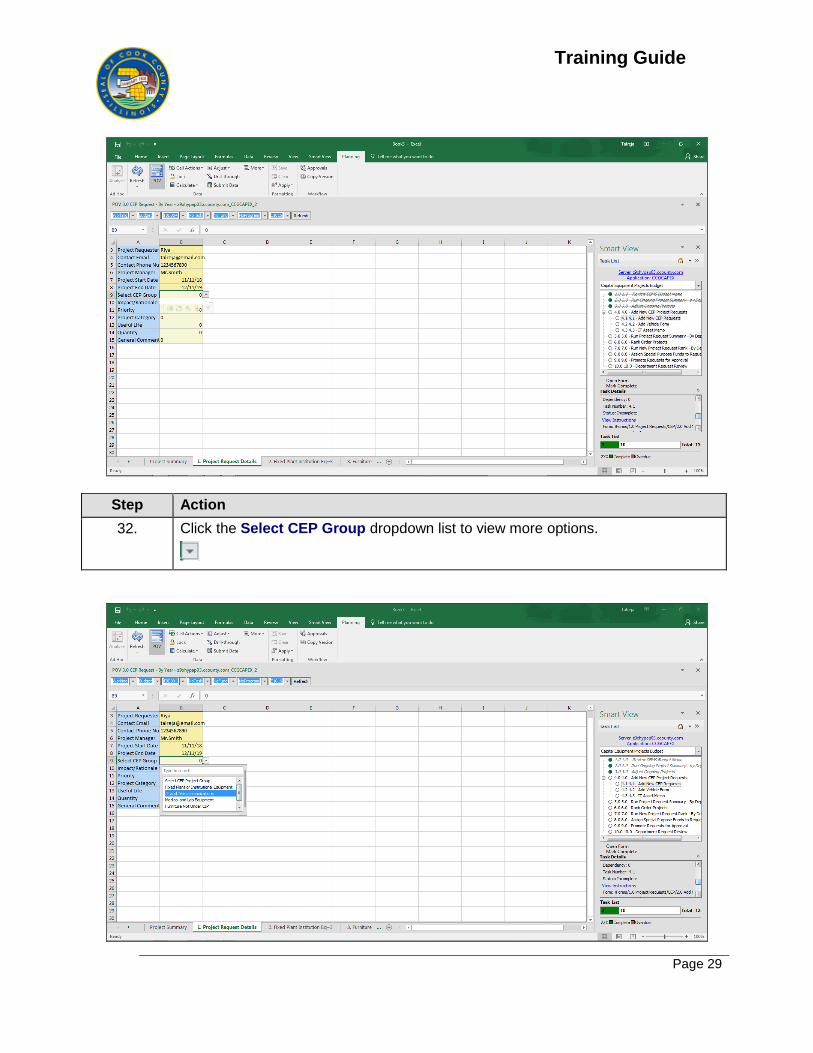
32. Click the Select CEP Group dropdown list to view more options.
Training Guide
Page 30
Step Action
33. Select the appropriate group from the list. In this example,click the "IT and Telecommunications" option.
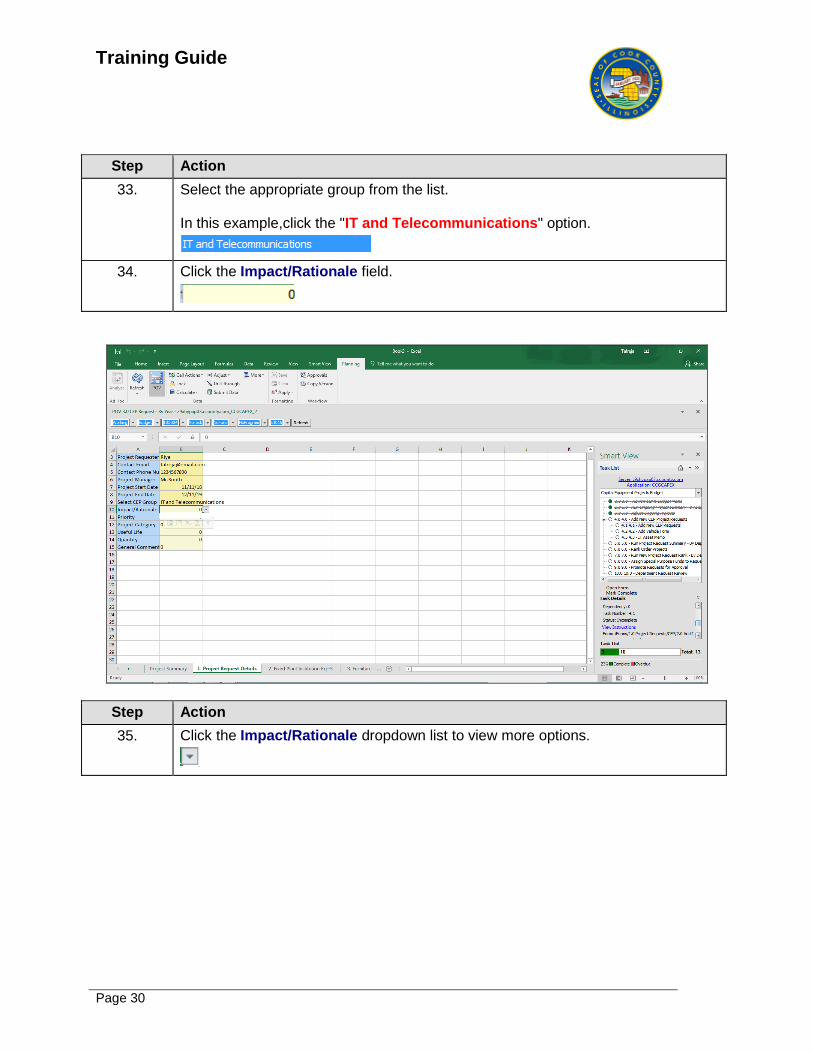
34. Click the Impact/Rationale field.
Step Action
35. Click the Impact/Rationale dropdown list to view more options.
Training Guide
Page 31
Step Action
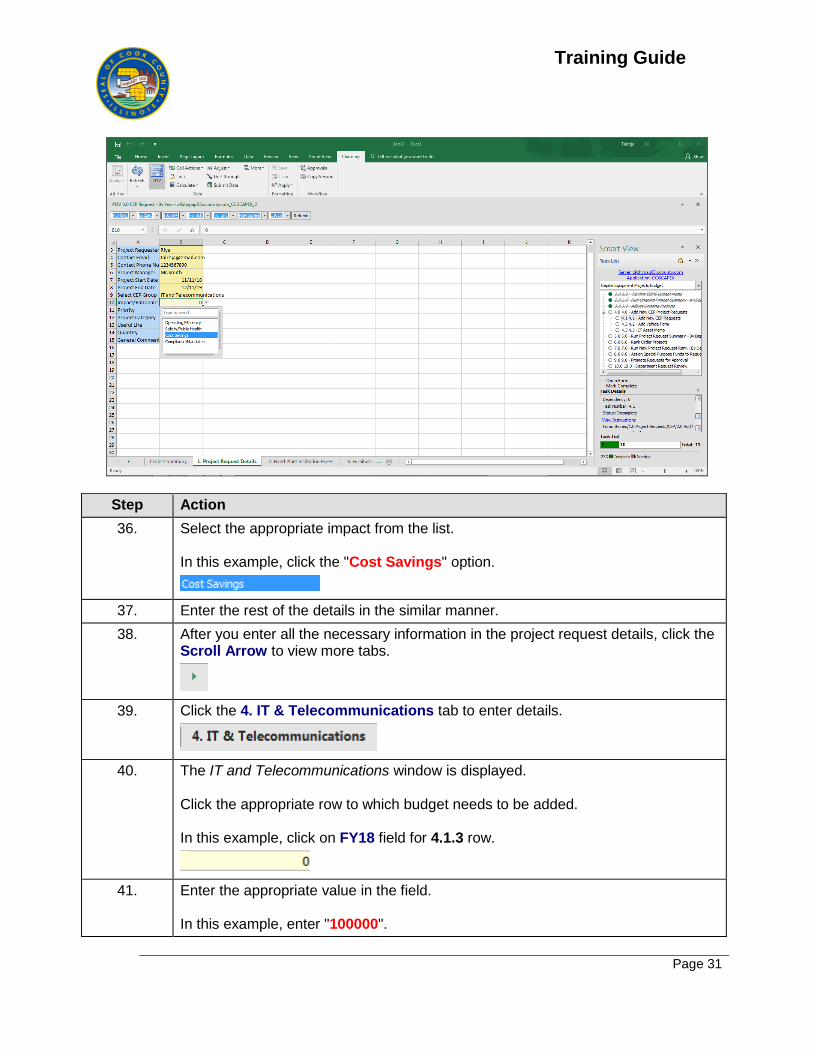
36. Select the appropriate impact from the list. In this example, click the "Cost Savings" option.
37. Enter the rest of the details in the similar manner.
38. After you enter all the necessary information in the project request details, click the Scroll Arrow to view more tabs.
39. Click the 4. IT & Telecommunications tab to enter details.
40. The IT and Telecommunications window is displayed. Click the appropriate row to which budget needs to be added. In this example, click on FY18 field for 4.1.3 row.
41. Enter the appropriate value in the field. In this example, enter "100000".

Training Guide
Page 32
Step Action
42. Enter the appropriate value in the field. In this example, enter "20000".
43. Enter the appropriate value in the field. In this example, enter "45000".
44. Click the Scroll button to navigate to Non- Capitalized Items tab.
45. Click the 7. Non-Capitalizable Items tab.
46. The Non-Capitalizable window is displayed. Click the appropriate row to which budget needs to be added. In this example, click on FY18 field.
47. Enter the appropriate value in the field. In this example, enter "25000".
48. Click the Submit Data button to save the changes.
49. After completing all the steps, mark this task as "complete".
Training Guide
Page 33
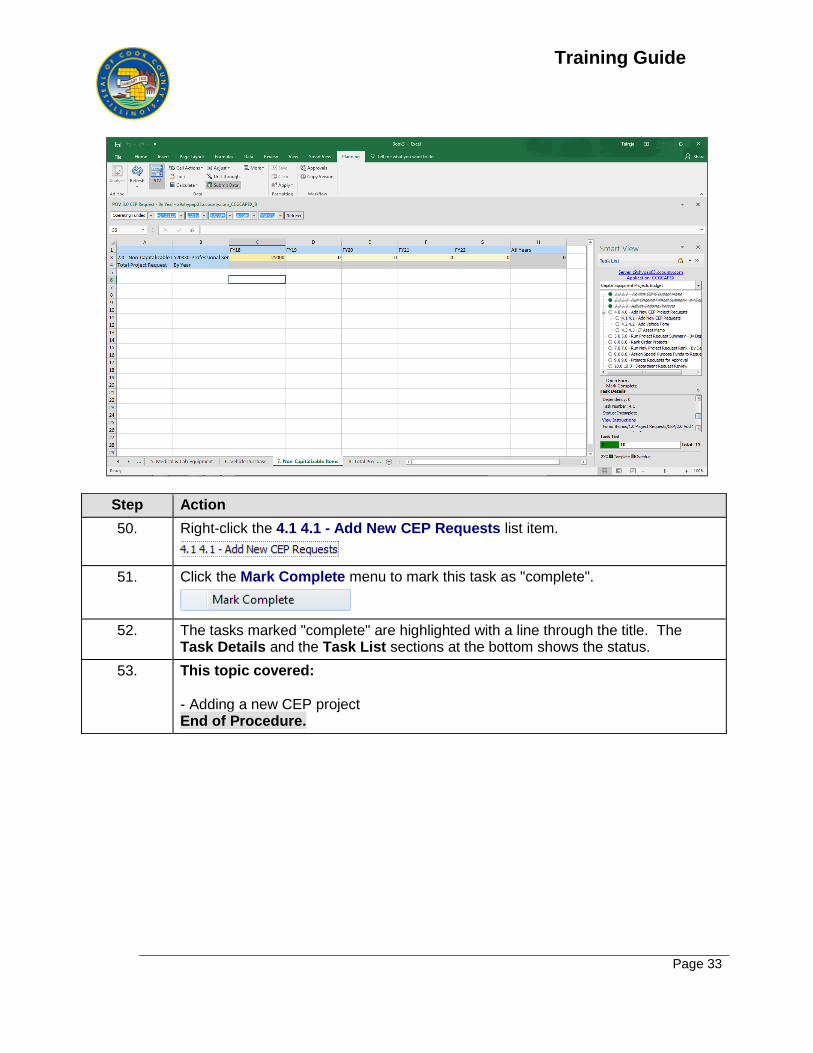
Step Action
50. Right-click the 4.1 4.1 - Add New CEP Requests list item.
51. Click the Mark Complete menu to mark this task as "complete".
52. The tasks marked "complete" are highlighted with a line through the title. The Task Details and the Task List sections at the bottom shows the status.
53. This topic covered: - Adding a new CEP project End of Procedure.
Training Guide
Page 34
Deleting New Project
Learning Objective: In this topic, you will learn how to delete a new project.
Upon completion of this topic, you will be able to:
Delete a new Project
This topic will cover: - Deleting a New Project Estimated time to complete this topic: 2 minutes
Step Action
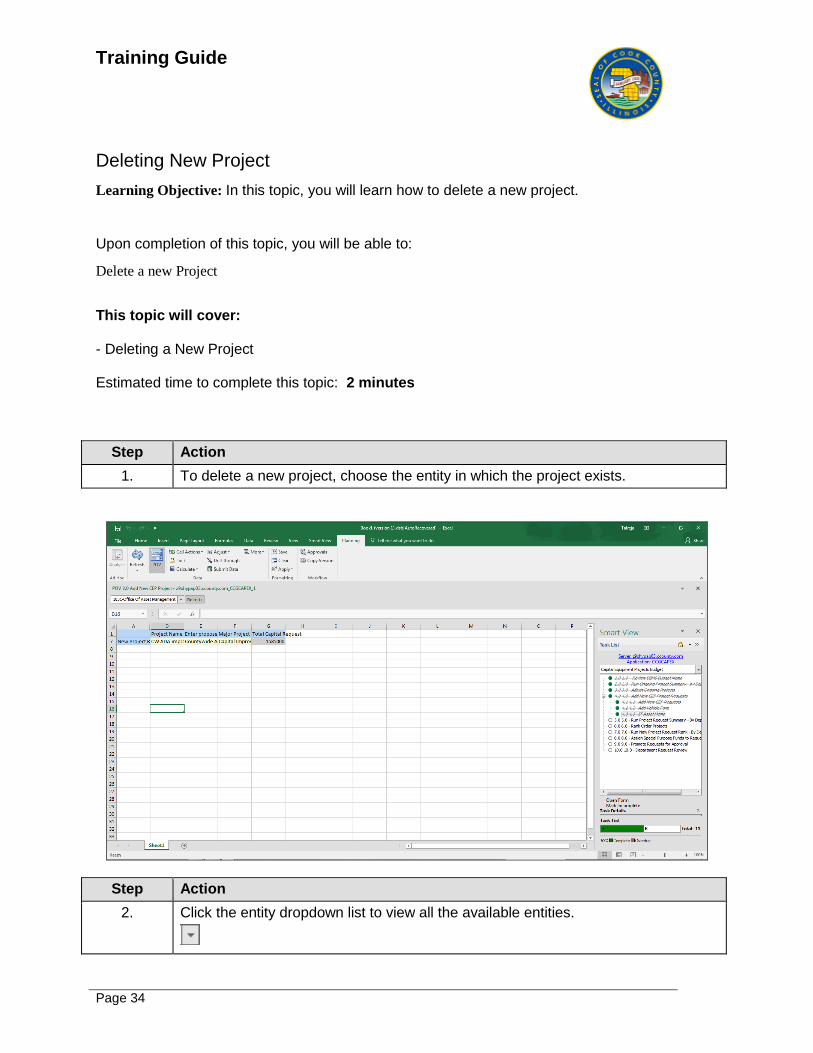
1. To delete a new project, choose the entity in which the project exists.
Step Action
2. Click the entity dropdown list to view all the available entities.
Training Guide
Page 35
Step Action
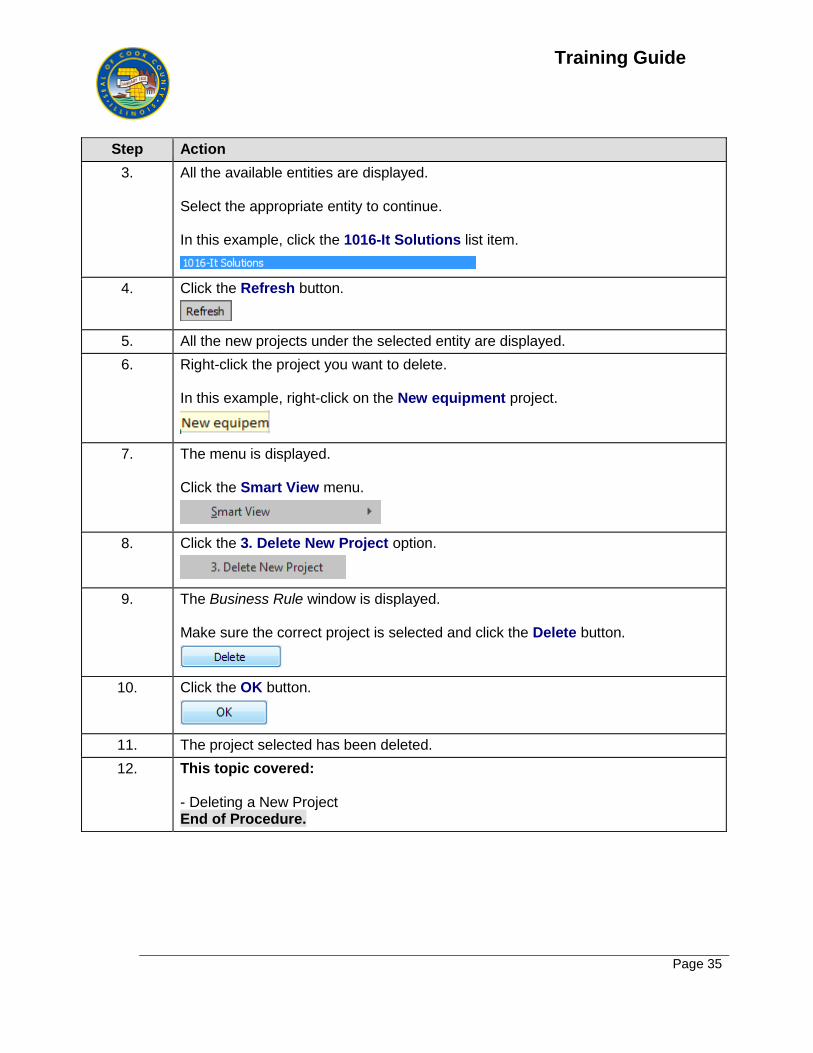
3. All the available entities are displayed. Select the appropriate entity to continue. In this example, click the 1016-It Solutions list item.
4. Click the Refresh button.
5. All the new projects under the selected entity are displayed.
6. Right-click the project you want to delete. In this example, right-click on the New equipment project.
7. The menu is displayed. Click the Smart View menu.
8. Click the 3. Delete New Project option.
9. The Business Rule window is displayed. Make sure the correct project is selected and click the Delete button.
10. Click the OK button.
11. The project selected has been deleted.
12. This topic covered: - Deleting a New Project End of Procedure.
Training Guide
Page 36
Running Project Request Summary Report
Learning Objective: In this topic, you will learn how to run a project request summary report.
Upon completion of this topic, you will be able to:
Run a Project Request Summary Report
This topic will cover: - Running a Project Request Summary Report Estimated time to complete this topic: 4 minutes
Step Action
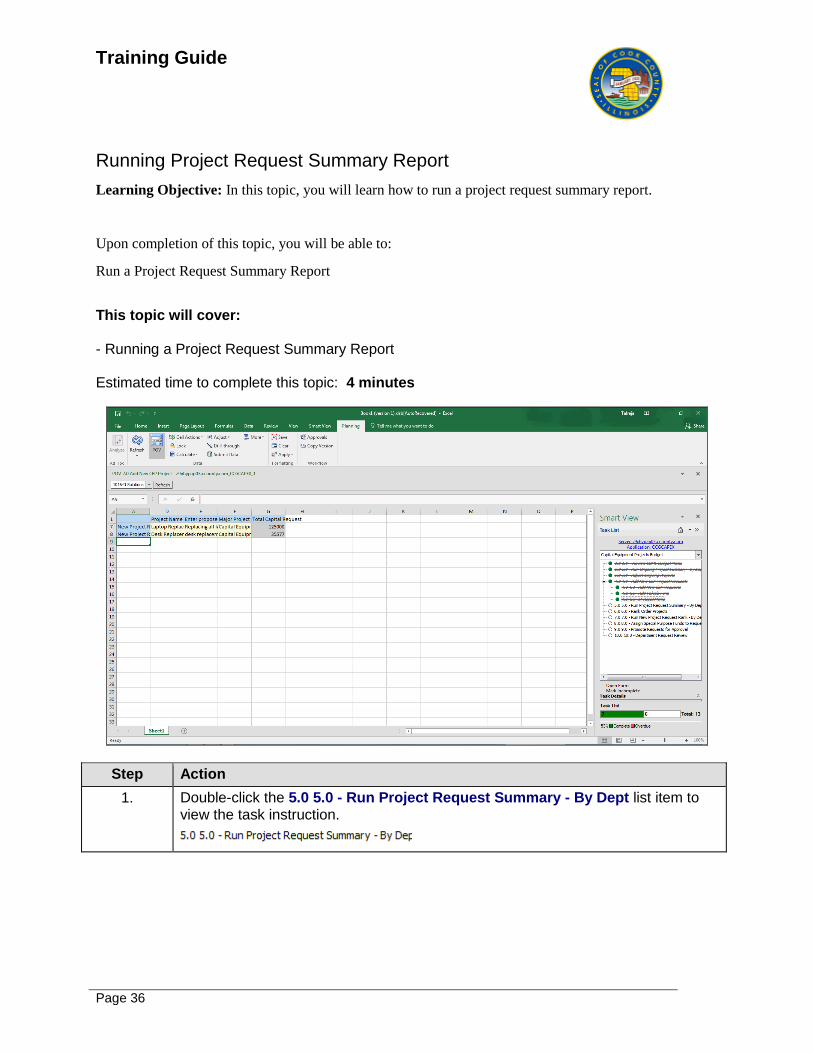
1. Double-click the 5.0 5.0 - Run Project Request Summary - By Dept list item to view the task instruction.
Training Guide
Page 37
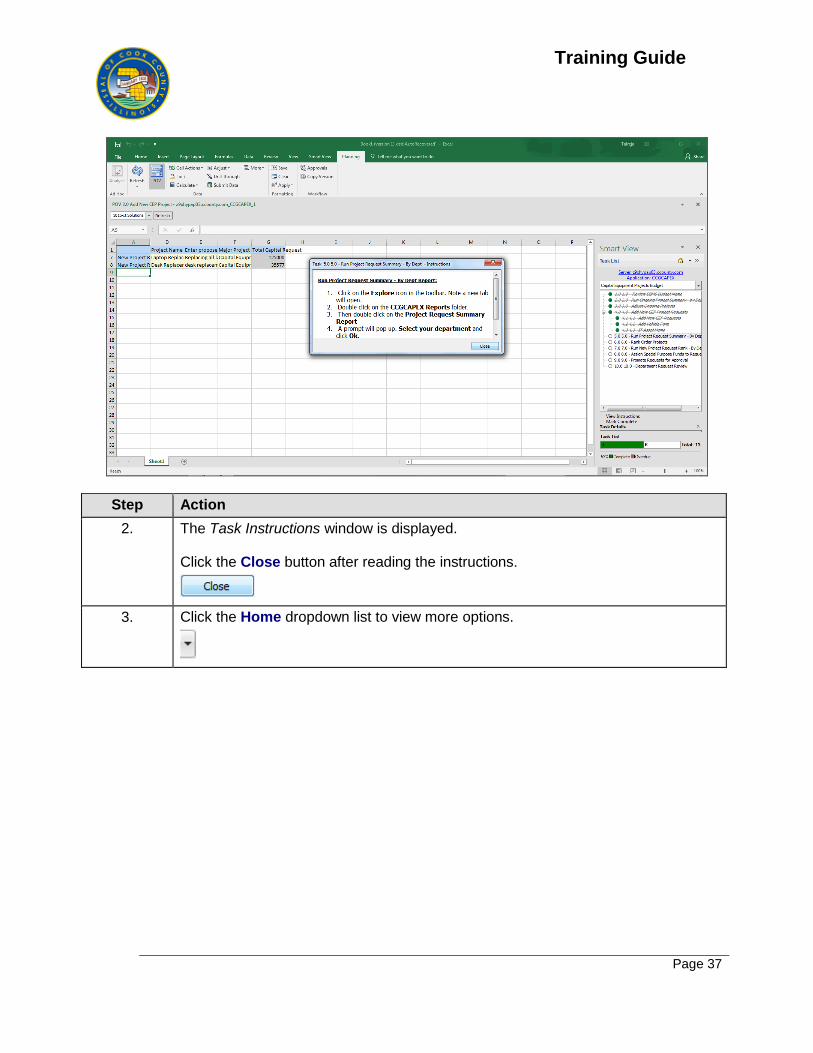
Step Action
2. The Task Instructions window is displayed. Click the Close button after reading the instructions.
3. Click the Home dropdown list to view more options.

Training Guide
Page 38
Step Action
4. Select the appropriate option from the list. In this example, click the Shared Connections option.

Training Guide
Page 39
Step Action
5. The Shared Connections panel is displayed. Click the dropdown list to view more options.
6. Select the appropriate option from the list. In this example, click the Reporting and Analysis Framework list item.
Training Guide
Page 40
Step Action
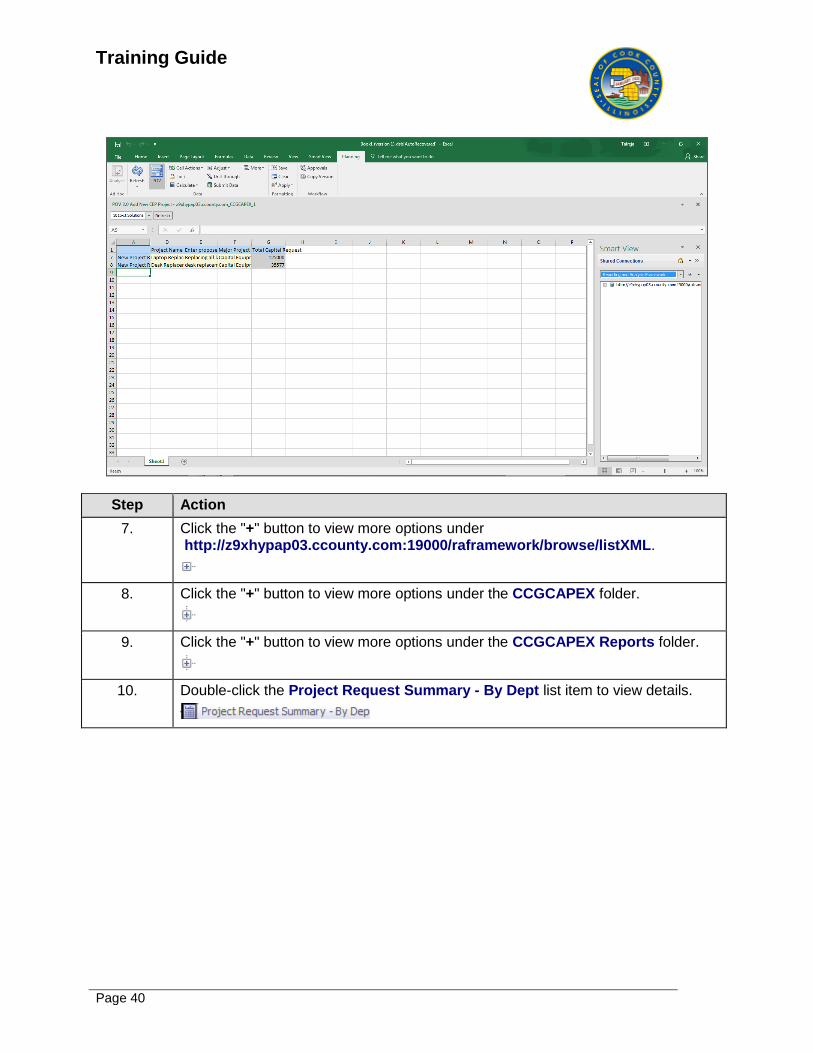
7. Click the "+" button to view more options under http://z9xhypap03.ccounty.com:19000/raframework/browse/listXML.
8. Click the "+" button to view more options under the CCGCAPEX folder.
9. Click the "+" button to view more options under the CCGCAPEX Reports folder.
10. Double-click the Project Request Summary - By Dept list item to view details.
Training Guide
Page 41
Step Action
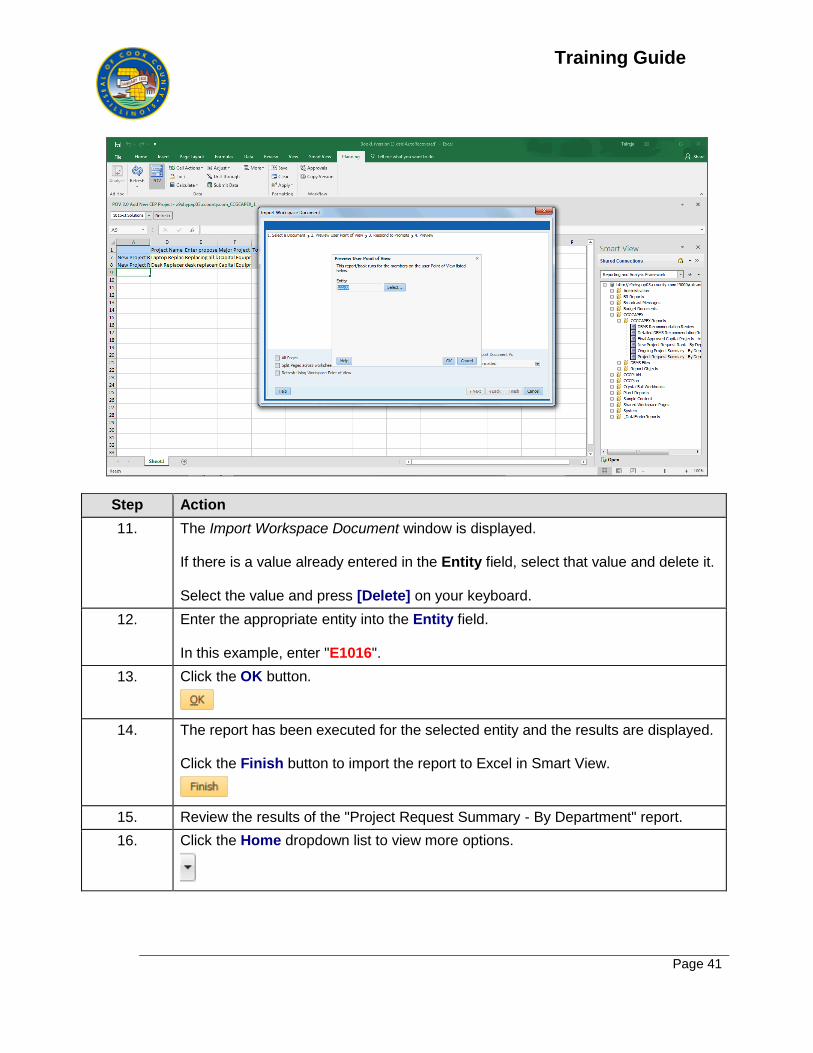
11. The Import Workspace Document window is displayed. If there is a value already entered in the Entity field, select that value and delete it. Select the value and press [Delete] on your keyboard.
12. Enter the appropriate entity into the Entity field. In this example, enter "E1016".
13. Click the OK button.
14. The report has been executed for the selected entity and the results are displayed. Click the Finish button to import the report to Excel in Smart View.
15. Review the results of the "Project Request Summary - By Department" report.
16. Click the Home dropdown list to view more options.
Training Guide
Page 42
Step Action
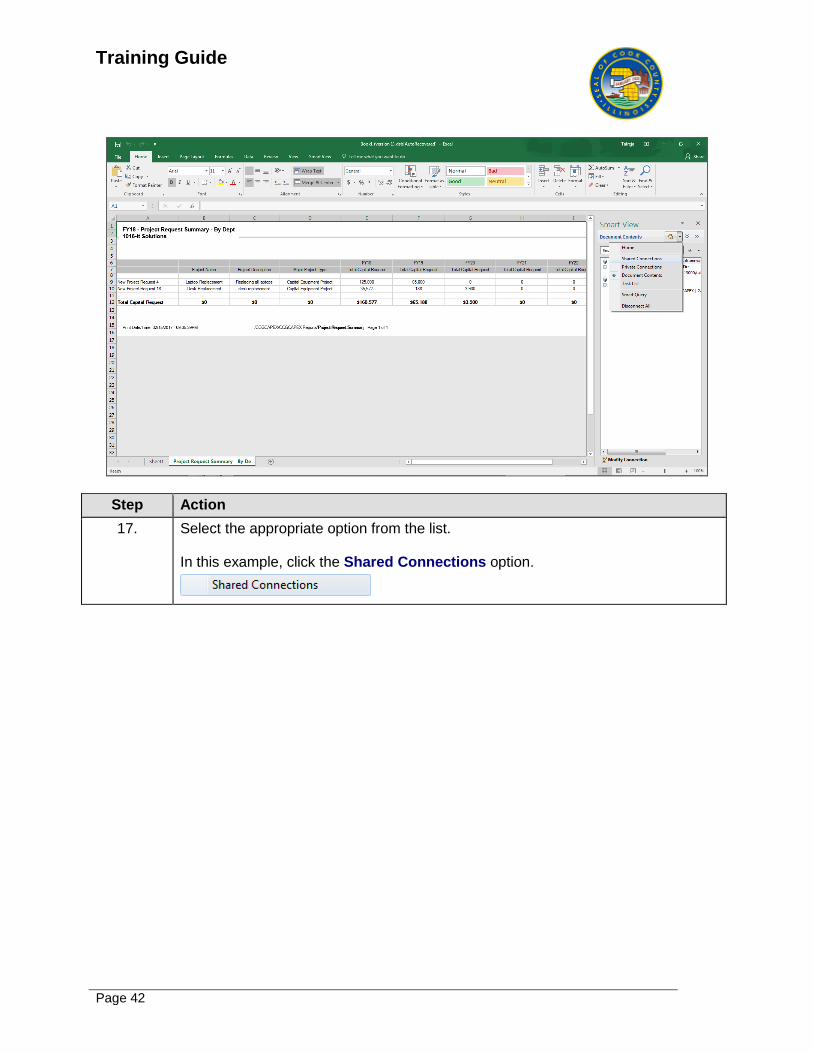
17. Select the appropriate option from the list. In this example, click the Shared Connections option.
Training Guide
Page 43
Step Action
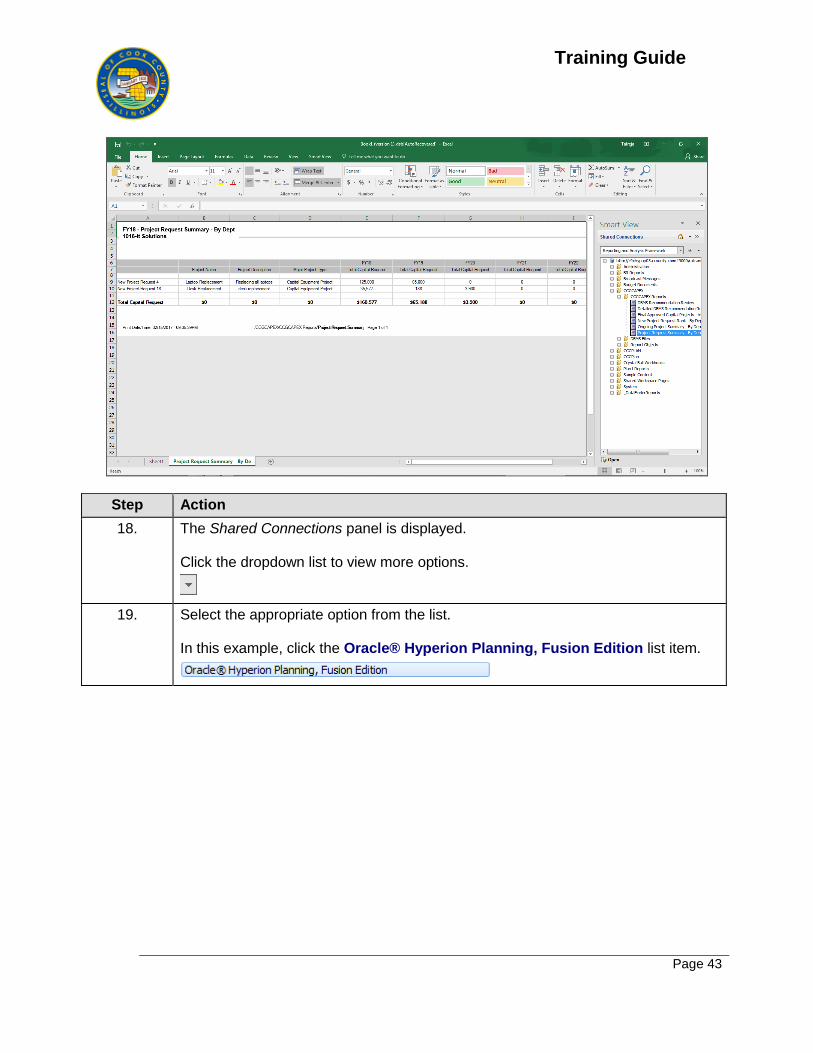
18. The Shared Connections panel is displayed. Click the dropdown list to view more options.
19. Select the appropriate option from the list. In this example, click the Oracle® Hyperion Planning, Fusion Edition list item.
Training Guide
Page 44
Step Action
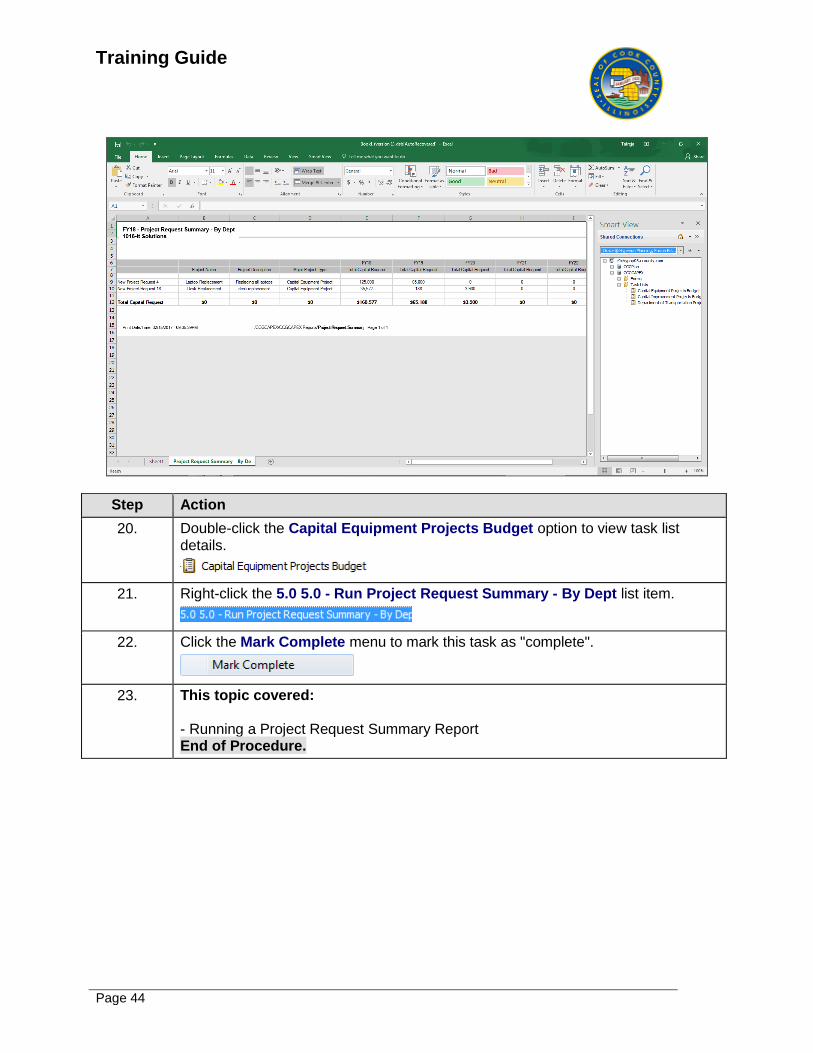
20. Double-click the Capital Equipment Projects Budget option to view task list details.
21. Right-click the 5.0 5.0 - Run Project Request Summary - By Dept list item.
22. Click the Mark Complete menu to mark this task as "complete".
23. This topic covered: - Running a Project Request Summary Report End of Procedure.
Training Guide
Page 45
Ranking Order Request
Learning Objective: In this topic, you will learn how to rank the order of your requests.
Upon completion of this topic, you will be able to:
Rank the Order of Your Requests.
This topic will cover: - Ranking Order Request Estimated time to complete this topic: 2 minutes
Step Action
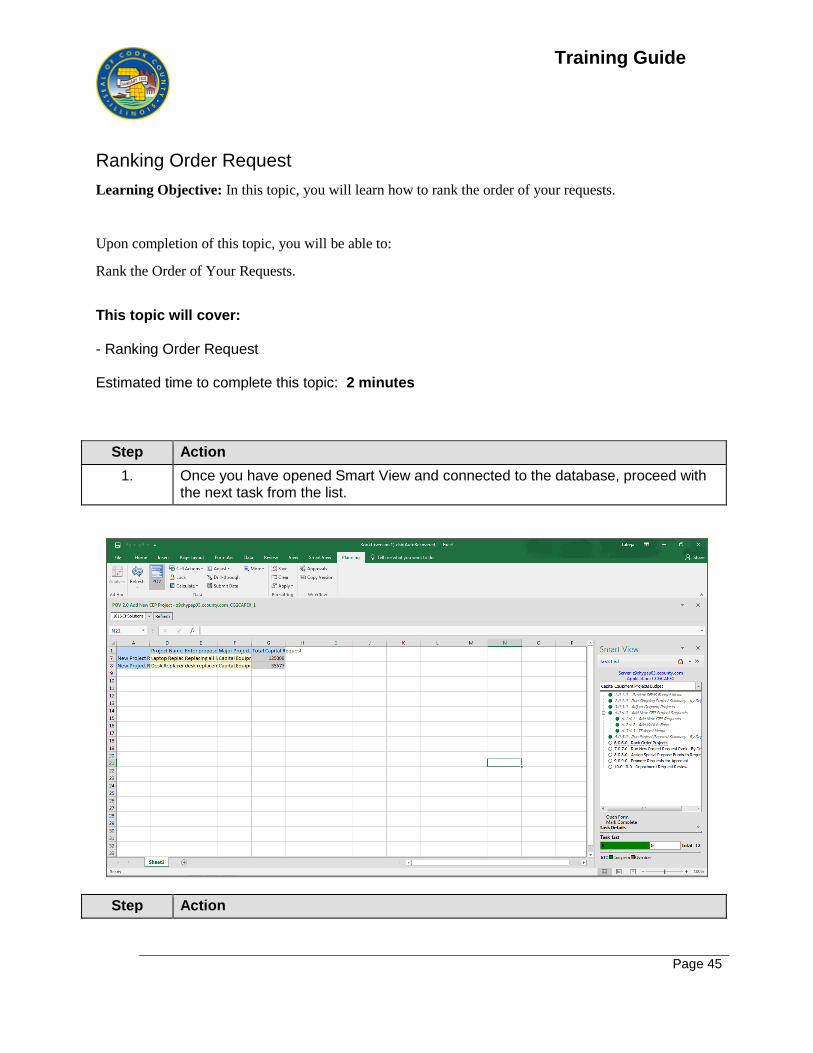
1. Once you have opened Smart View and connected to the database, proceed with the next task from the list.
Step Action
Training Guide
Page 46
Step Action
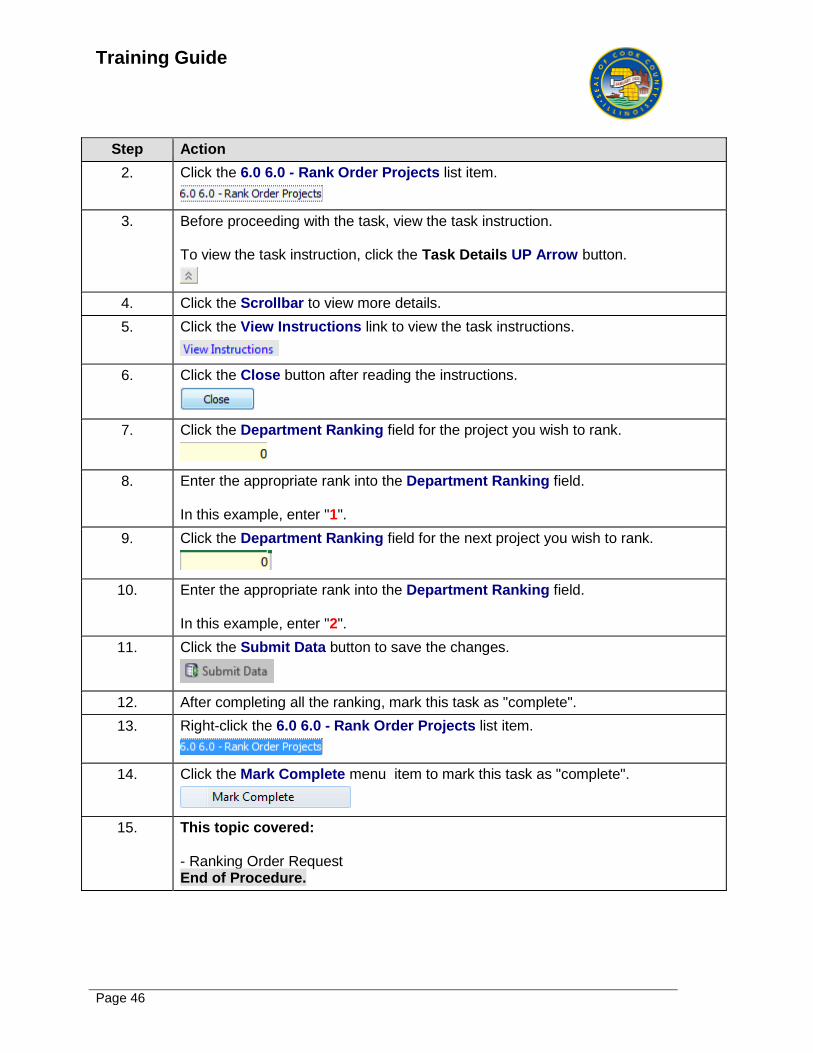
2. Click the 6.0 6.0 - Rank Order Projects list item.
3. Before proceeding with the task, view the task instruction. To view the task instruction, click the Task Details UP Arrow button.
4. Click the Scrollbar to view more details.
5. Click the View Instructions link to view the task instructions.
6. Click the Close button after reading the instructions.
7. Click the Department Ranking field for the project you wish to rank.
8. Enter the appropriate rank into the Department Ranking field. In this example, enter "1".
9. Click the Department Ranking field for the next project you wish to rank.
10. Enter the appropriate rank into the Department Ranking field. In this example, enter "2".
11. Click the Submit Data button to save the changes.
12. After completing all the ranking, mark this task as "complete".
13. Right-click the 6.0 6.0 - Rank Order Projects list item.
14. Click the Mark Complete menu item to mark this task as "complete".
15. This topic covered: - Ranking Order Request End of Procedure.
Training Guide
Page 47
Running New Project Request Rank by Department
Learning Objective: In this topic, you will learn how to run a new project request rank by department
report.
Upon completion of this topic, you will be able to:
Run a New Project Request Rank by Department Report
This topic will cover: - Running New Project Request Rank by Department Estimated time to complete this topic: 3 minutes
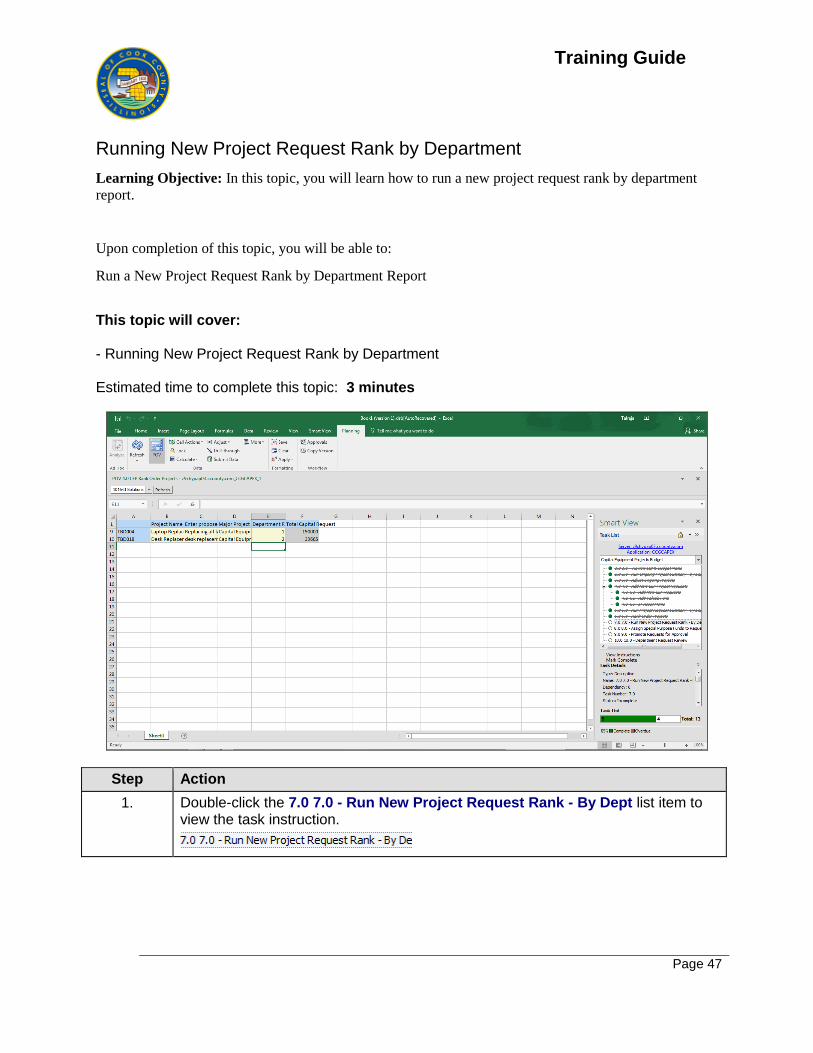
Step Action
1. Double-click the 7.0 7.0 - Run New Project Request Rank - By Dept list item to view the task instruction.
Training Guide
Page 48
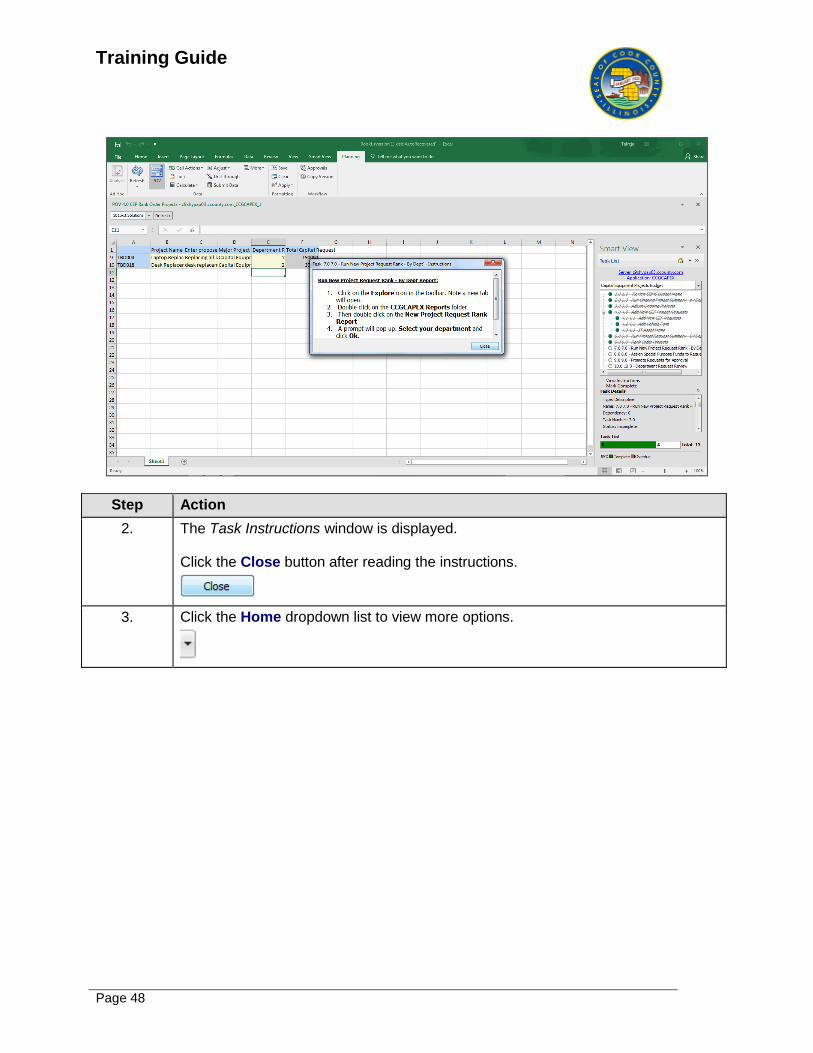
Step Action
2. The Task Instructions window is displayed. Click the Close button after reading the instructions.
3. Click the Home dropdown list to view more options.
Training Guide
Page 49
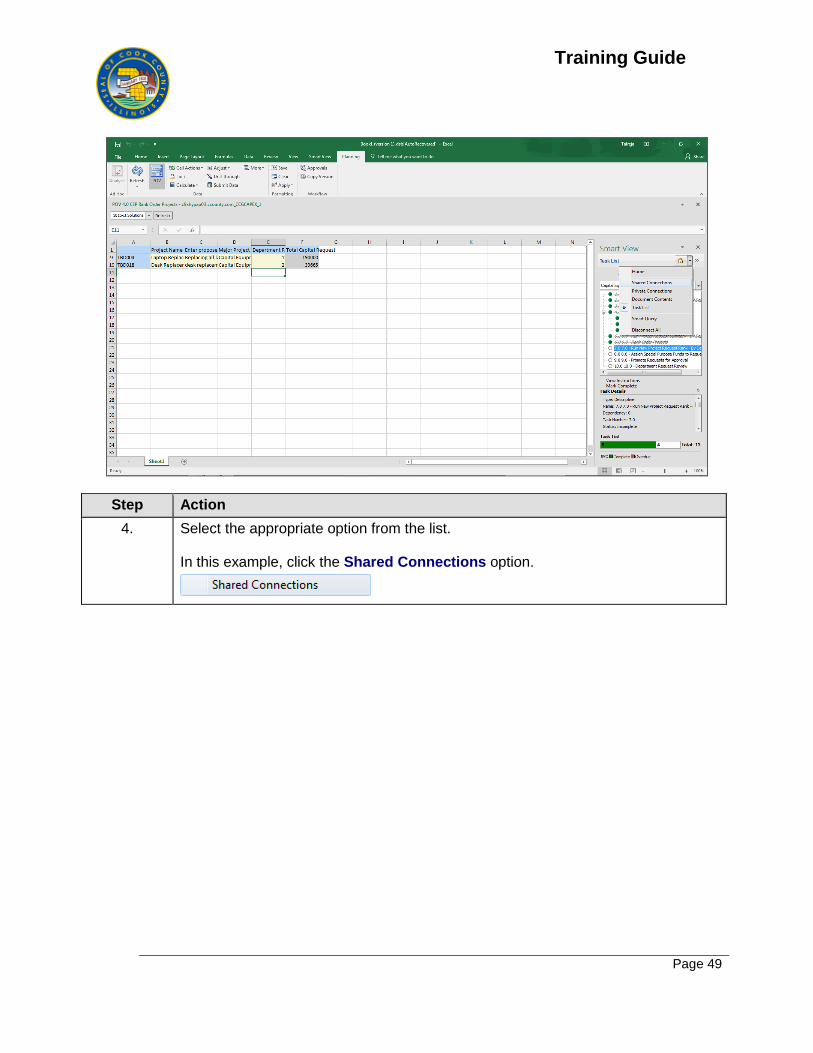
Step Action
4. Select the appropriate option from the list. In this example, click the Shared Connections option.
Training Guide
Page 50
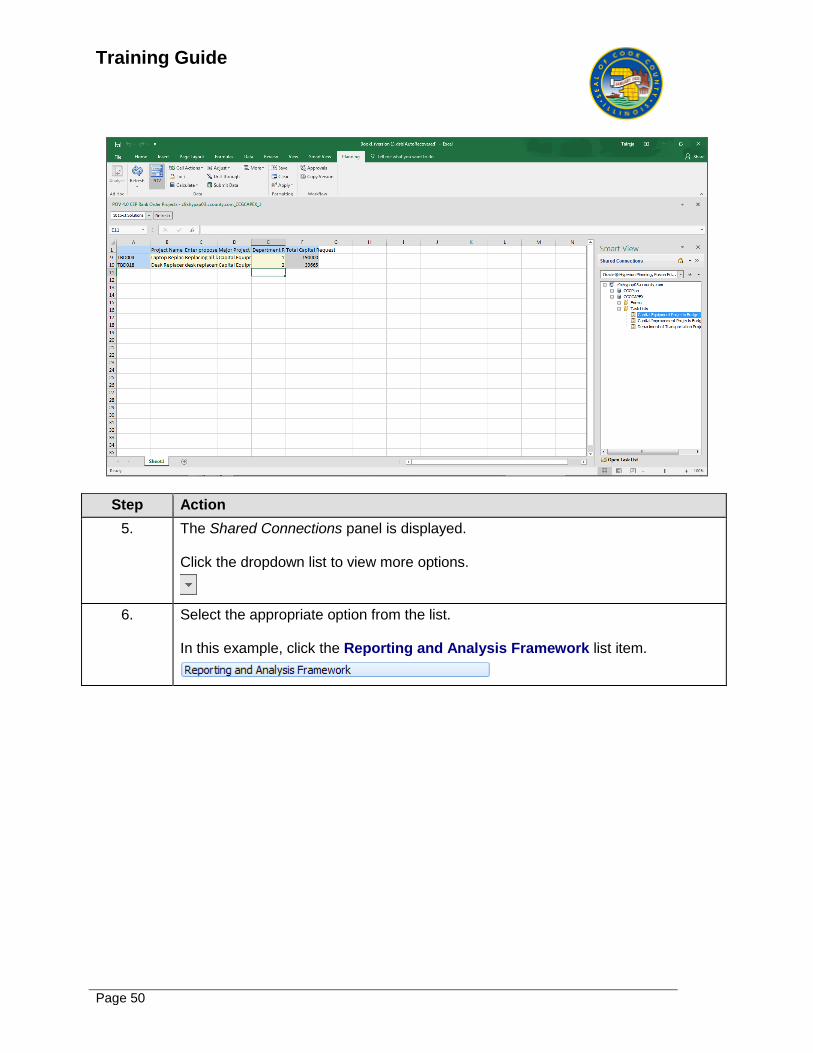
Step Action
5. The Shared Connections panel is displayed. Click the dropdown list to view more options.
6. Select the appropriate option from the list. In this example, click the Reporting and Analysis Framework list item.
Training Guide
Page 51
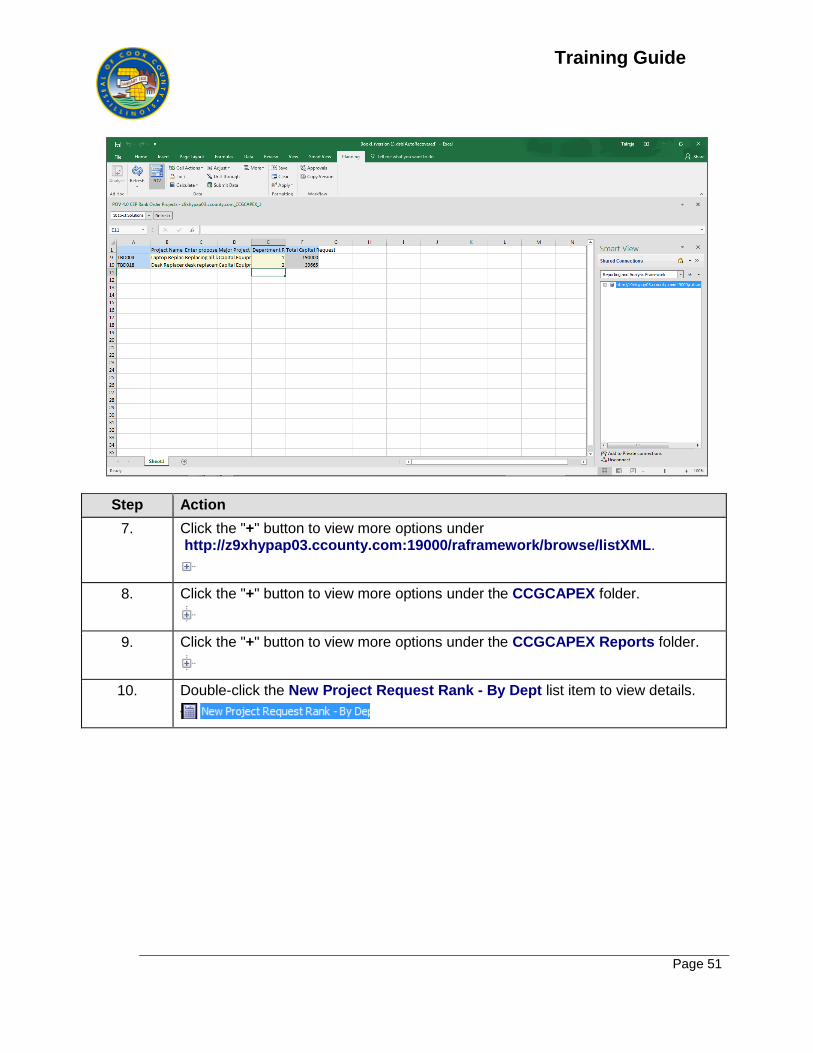
Step Action
7. Click the "+" button to view more options under http://z9xhypap03.ccounty.com:19000/raframework/browse/listXML.
8. Click the "+" button to view more options under the CCGCAPEX folder.
9. Click the "+" button to view more options under the CCGCAPEX Reports folder.
10. Double-click the New Project Request Rank - By Dept list item to view details.
Training Guide
Page 52
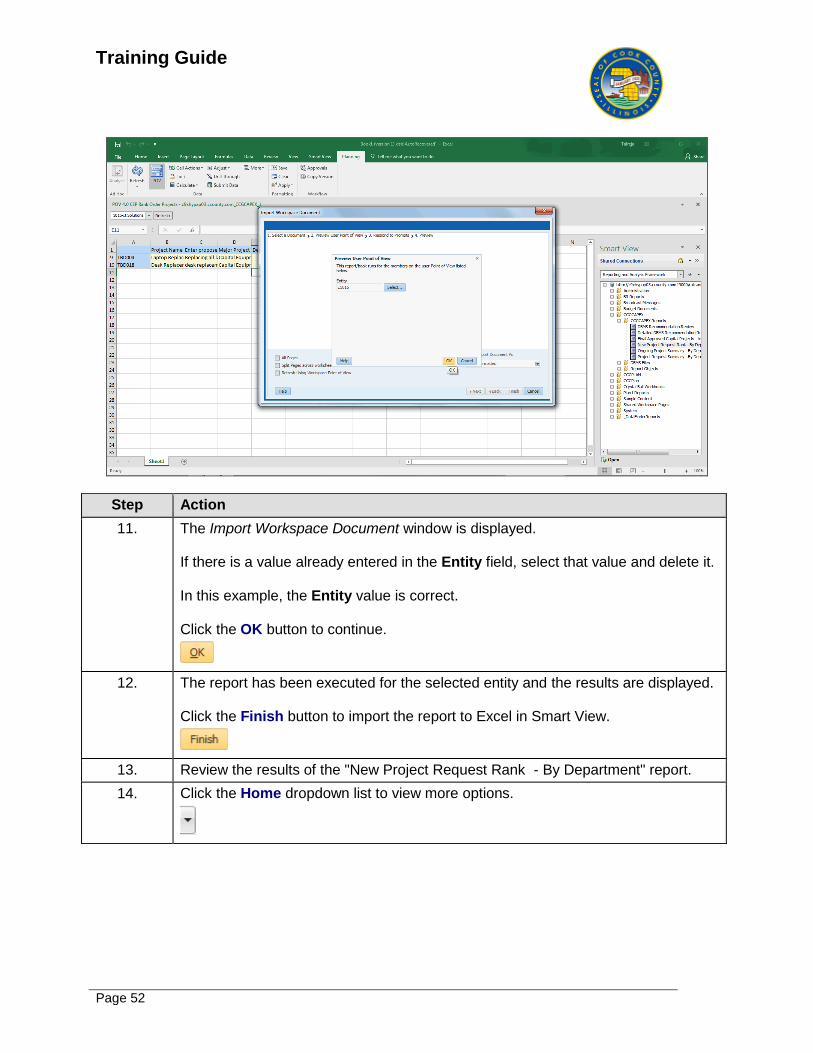
Step Action
11. The Import Workspace Document window is displayed. If there is a value already entered in the Entity field, select that value and delete it. In this example, the Entity value is correct. Click the OK button to continue.
12. The report has been executed for the selected entity and the results are displayed. Click the Finish button to import the report to Excel in Smart View.
13. Review the results of the "New Project Request Rank - By Department" report.
14. Click the Home dropdown list to view more options.
Training Guide
Page 53
Step Action
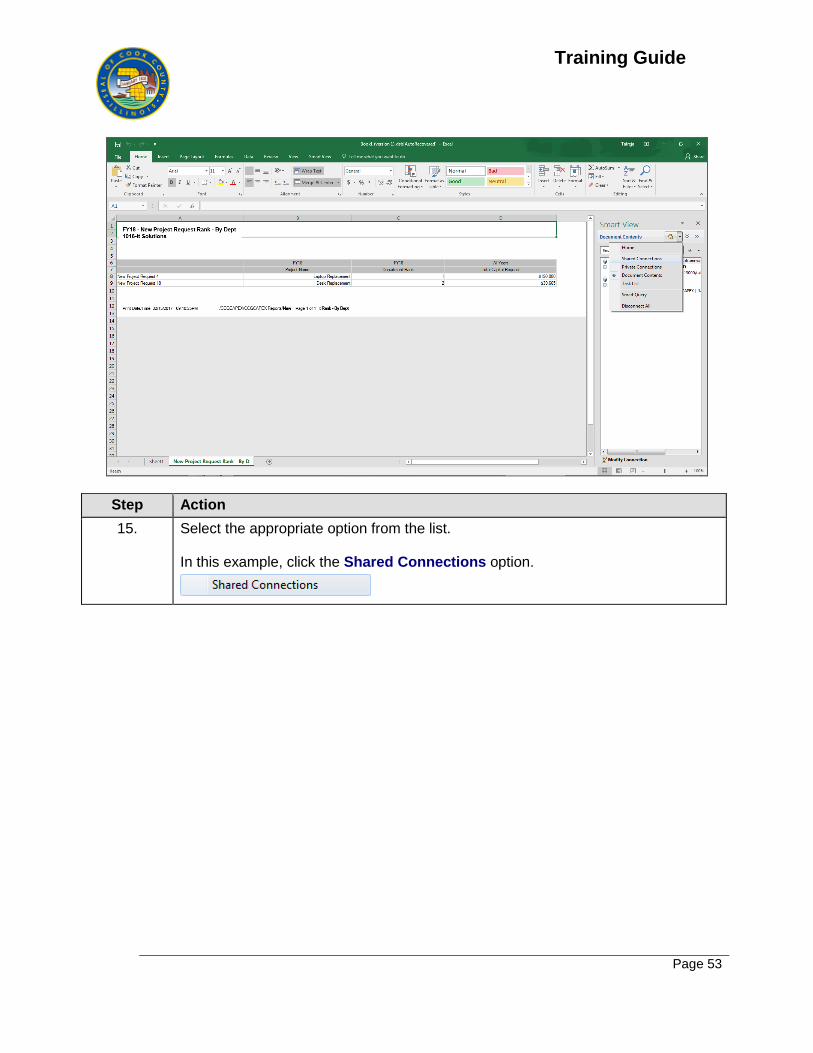
15. Select the appropriate option from the list. In this example, click the Shared Connections option.
Training Guide
Page 54
Step Action
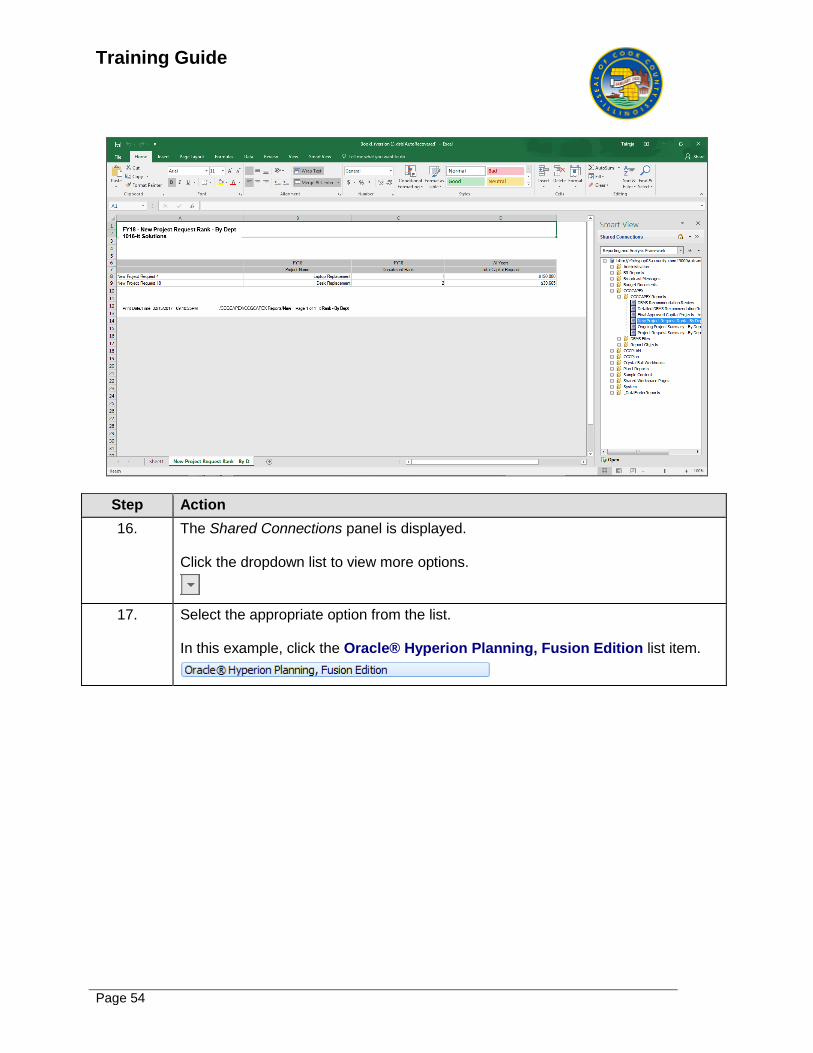
16. The Shared Connections panel is displayed. Click the dropdown list to view more options.
17. Select the appropriate option from the list. In this example, click the Oracle® Hyperion Planning, Fusion Edition list item.
Training Guide
Page 55
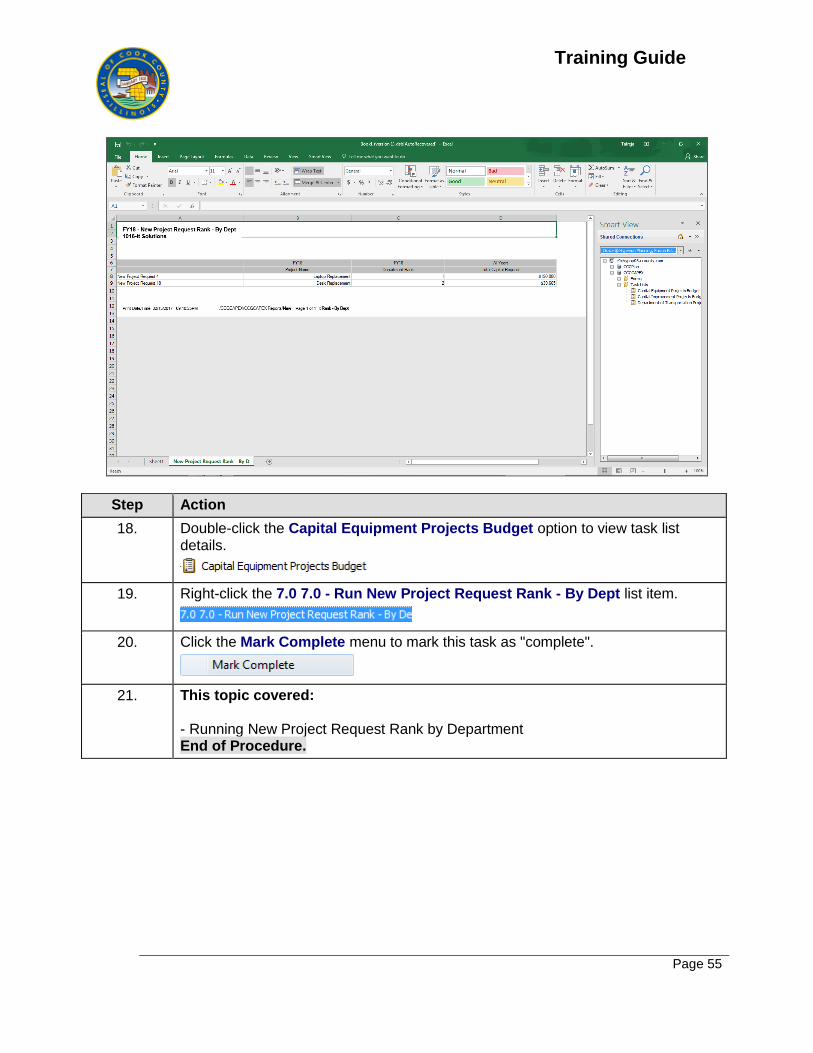
Step Action
18. Double-click the Capital Equipment Projects Budget option to view task list details.
19. Right-click the 7.0 7.0 - Run New Project Request Rank - By Dept list item.
20. Click the Mark Complete menu to mark this task as "complete".
21. This topic covered: - Running New Project Request Rank by Department End of Procedure.
Training Guide
Page 56
Assigning Special Purpose Fund to Request
Learning Objective: In this topic, you will learn how to assign a special purpose fund to requests.
Upon completion of this topic, you will be able to:
Assign a Special Purpose Fund to Requests
This topic will cover: - Assigning special purpose fund to request Estimated time to complete this topic: 2 minutes
Step Action
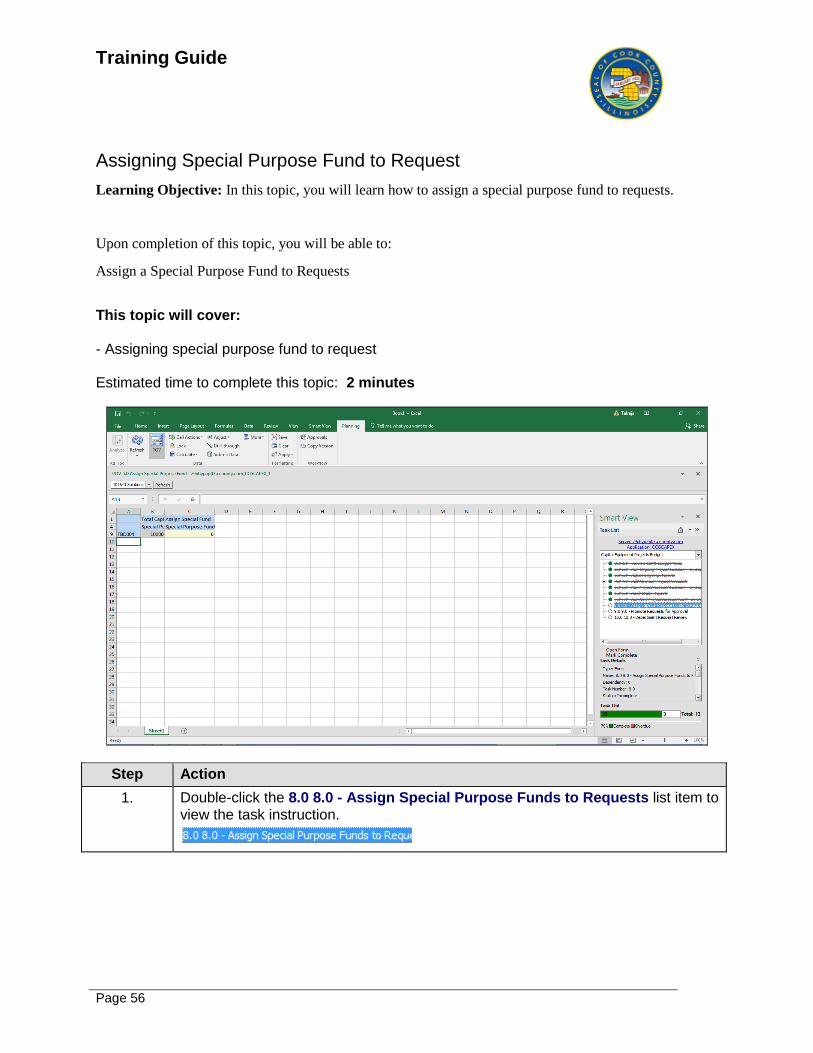
1. Double-click the 8.0 8.0 - Assign Special Purpose Funds to Requests list item to view the task instruction.
Training Guide
Page 57
Step Action
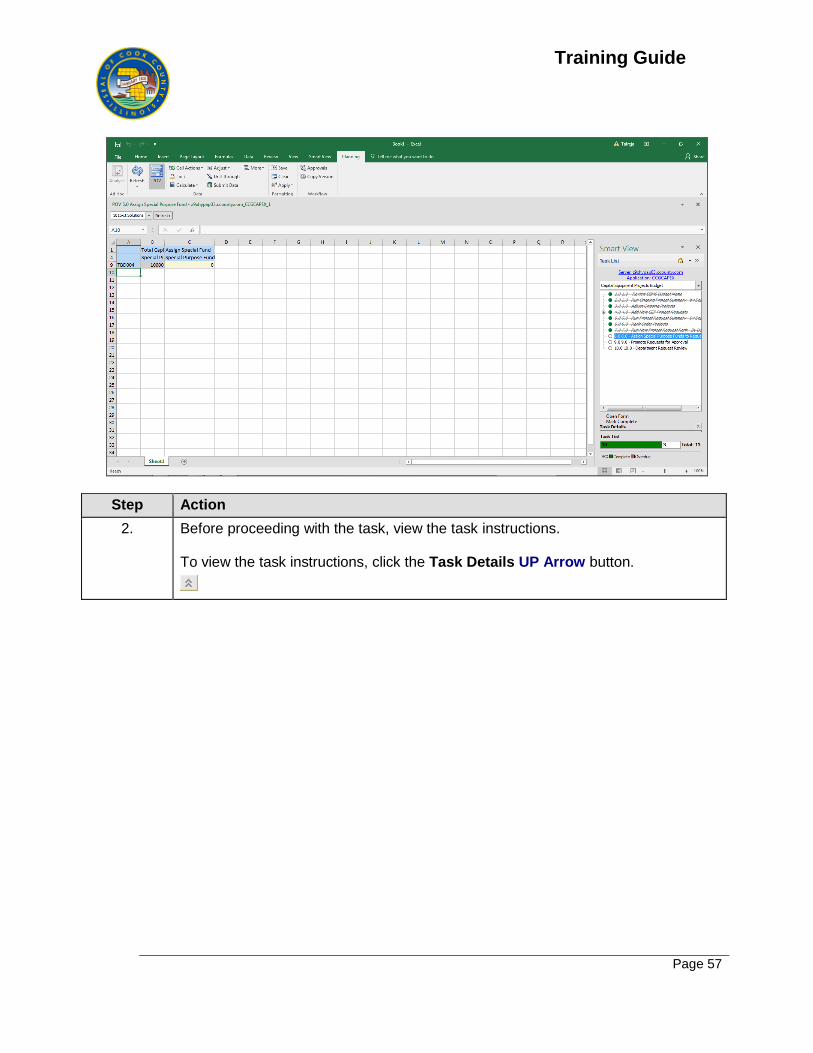
2. Before proceeding with the task, view the task instructions. To view the task instructions, click the Task Details UP Arrow button.
Training Guide
Page 58
Step Action
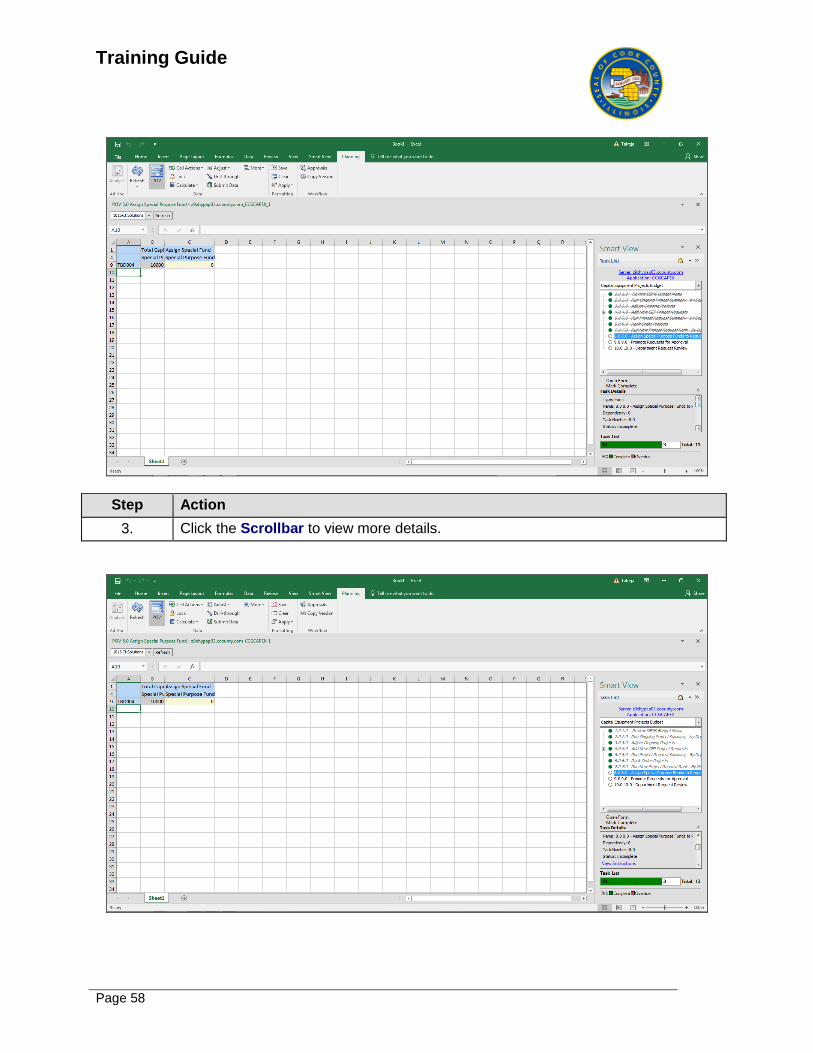
3. Click the Scrollbar to view more details.
Training Guide
Page 59
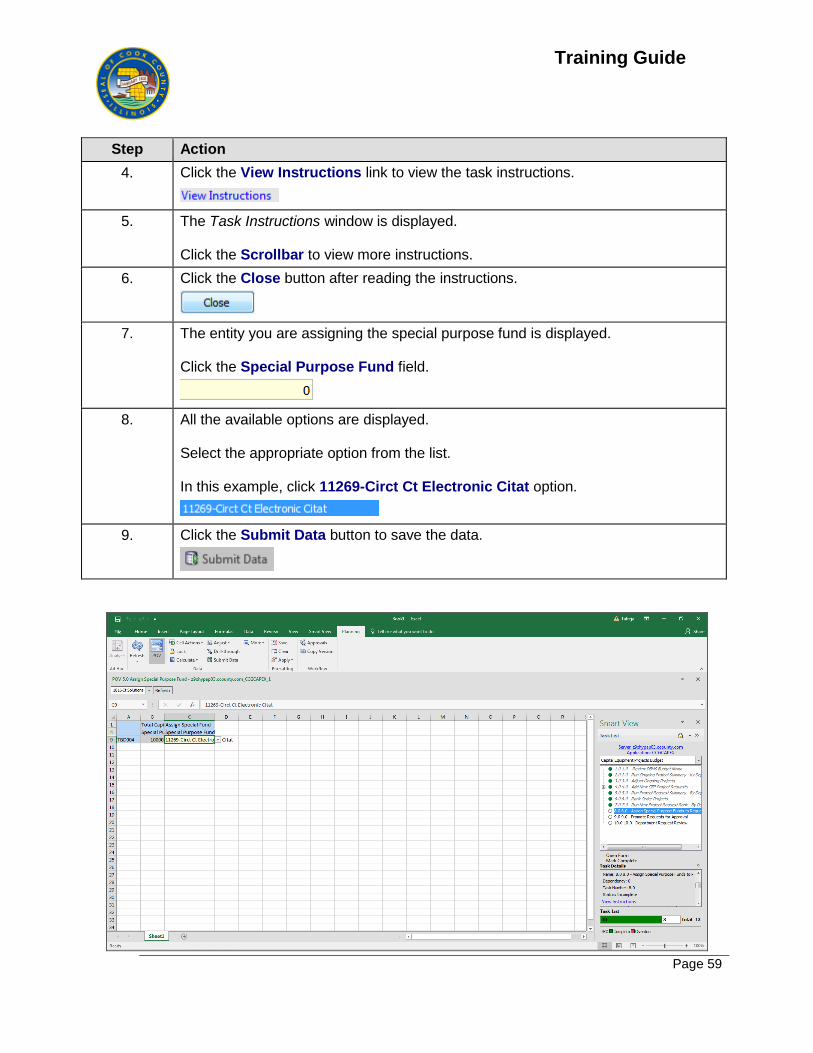
Step Action
4. Click the View Instructions link to view the task instructions.
5. The Task Instructions window is displayed. Click the Scrollbar to view more instructions.
6. Click the Close button after reading the instructions.
7. The entity you are assigning the special purpose fund is displayed. Click the Special Purpose Fund field.
8. All the available options are displayed. Select the appropriate option from the list. In this example, click 11269-Circt Ct Electronic Citat option.
9. Click the Submit Data button to save the data.
Training Guide
Page 60
Step Action
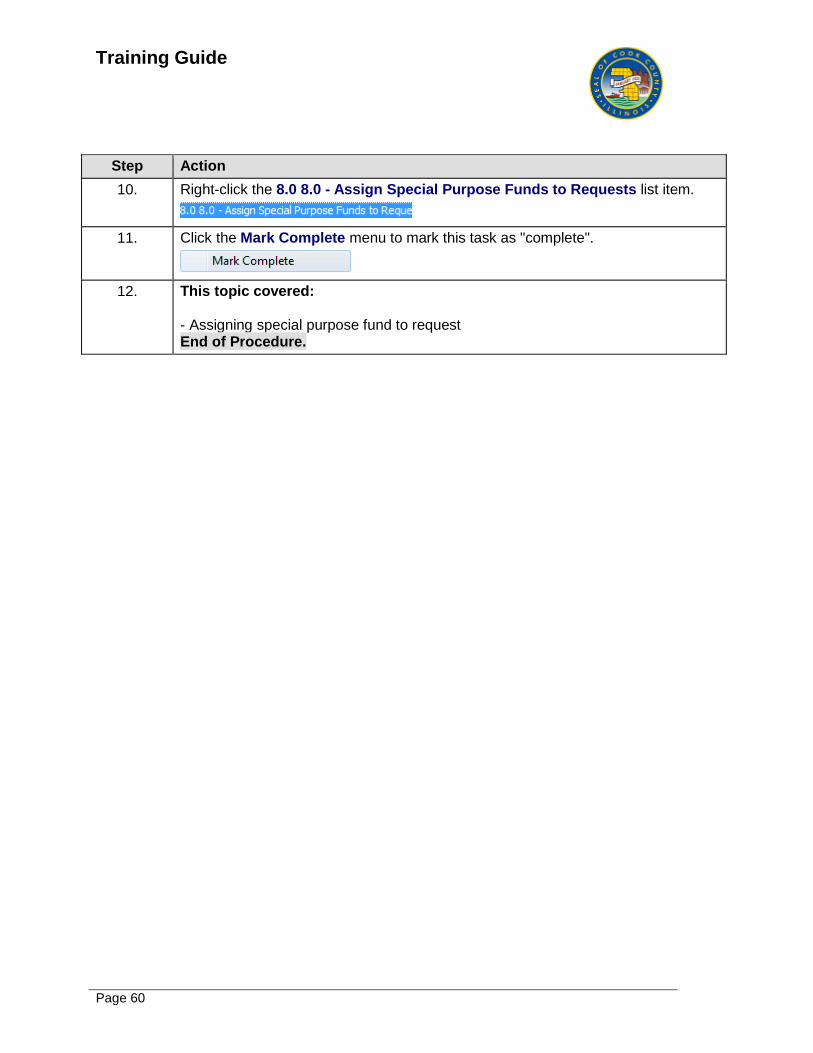
10. Right-click the 8.0 8.0 - Assign Special Purpose Funds to Requests list item.
11. Click the Mark Complete menu to mark this task as "complete".
12. This topic covered: - Assigning special purpose fund to request End of Procedure.
Training Guide
Page 61
Promoting Requests for Approval
Learning Objective: In this topic, you will learn how to promote requests for approval.
Upon completion of this topic, you will be able to:
Promote Requests for Approval
This topic will cover: - Promoting requests for approval Estimated time to complete this topic: 3 minutes
Step Action
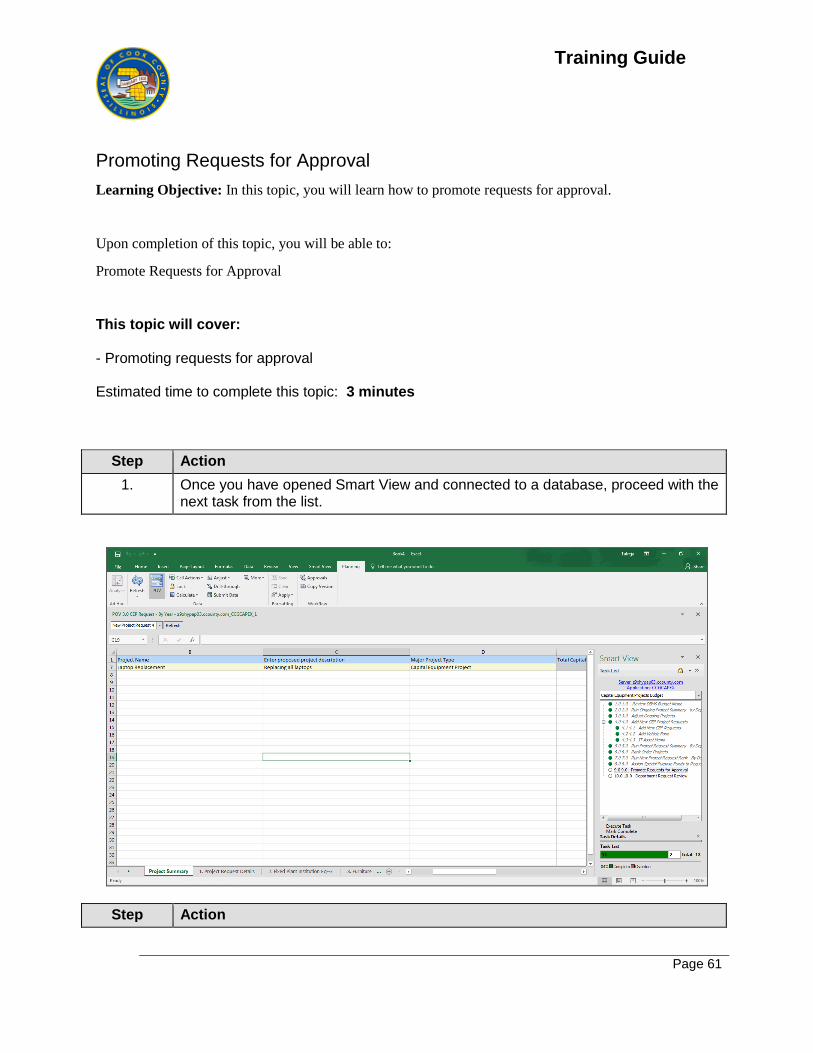
1. Once you have opened Smart View and connected to a database, proceed with the next task from the list.
Step Action
Training Guide
Page 62
Step Action
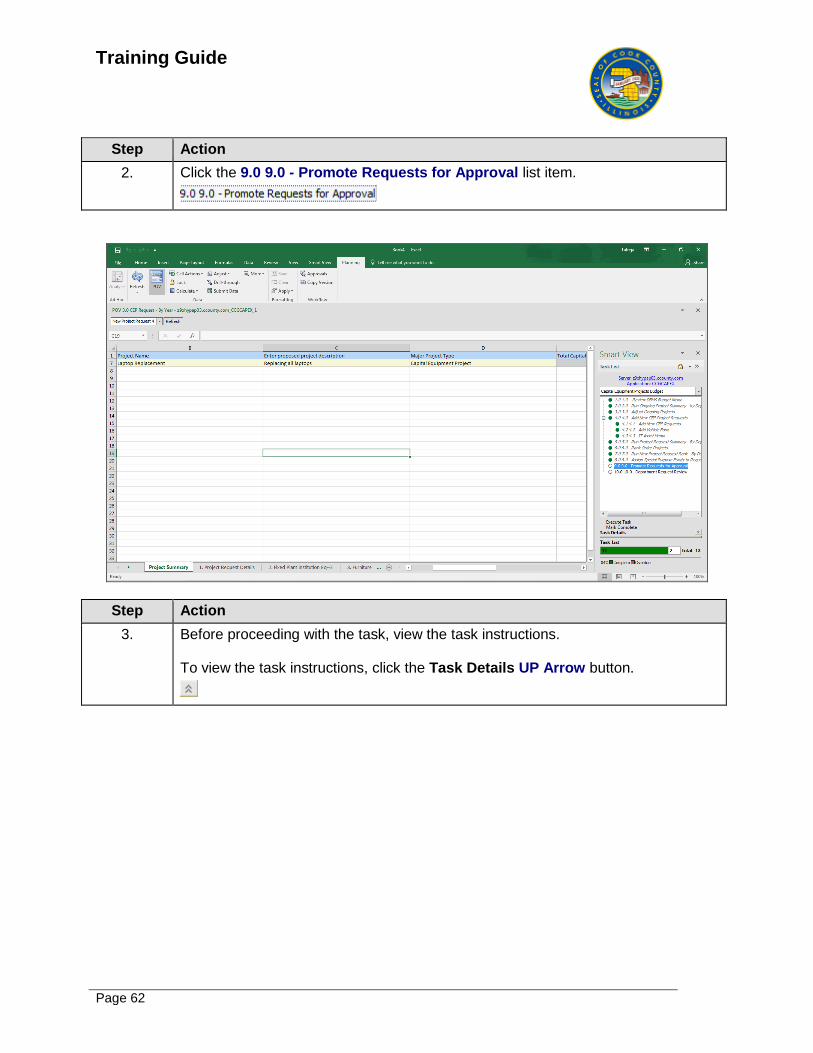
2. Click the 9.0 9.0 - Promote Requests for Approval list item.
Step Action
3. Before proceeding with the task, view the task instructions. To view the task instructions, click the Task Details UP Arrow button.
Training Guide
Page 63
Step Action
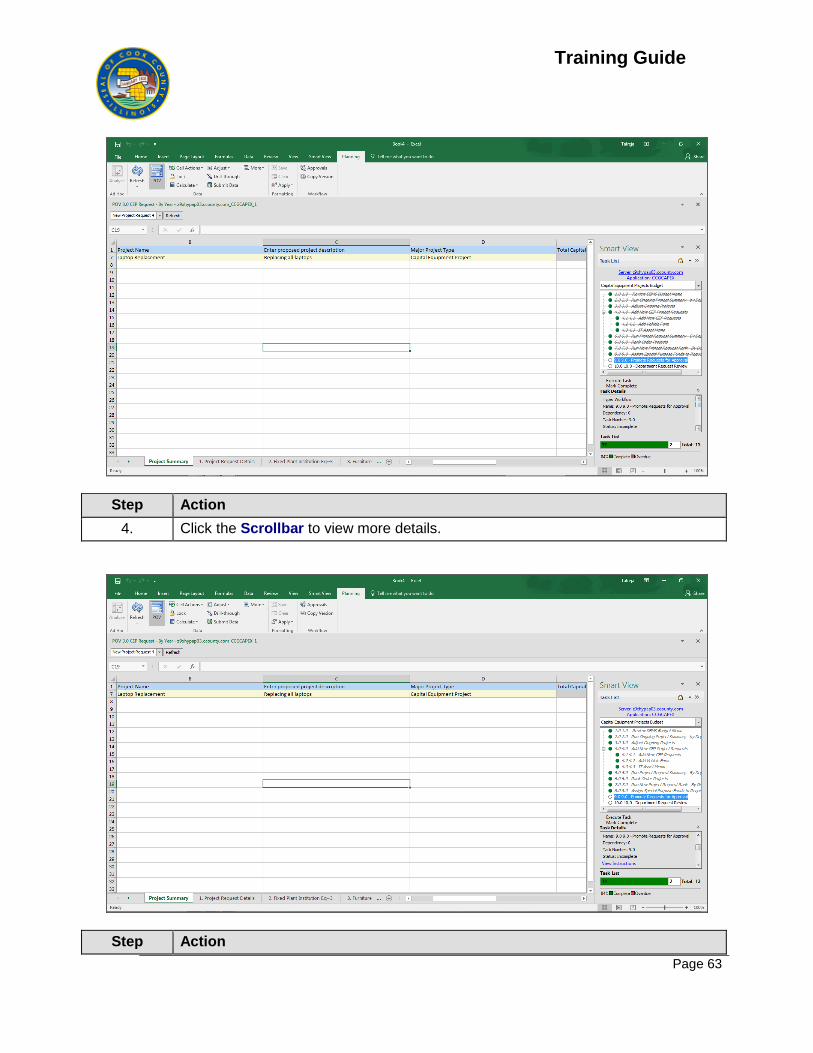
4. Click the Scrollbar to view more details.
Step Action
Training Guide
Page 64
Step Action
5. Click the View Instructions link to view the task instructions.
6. The Task Instructions window is displayed. Click the Scrollbar to view more details.
7. Click the Close button after reading the instructions.
Step Action
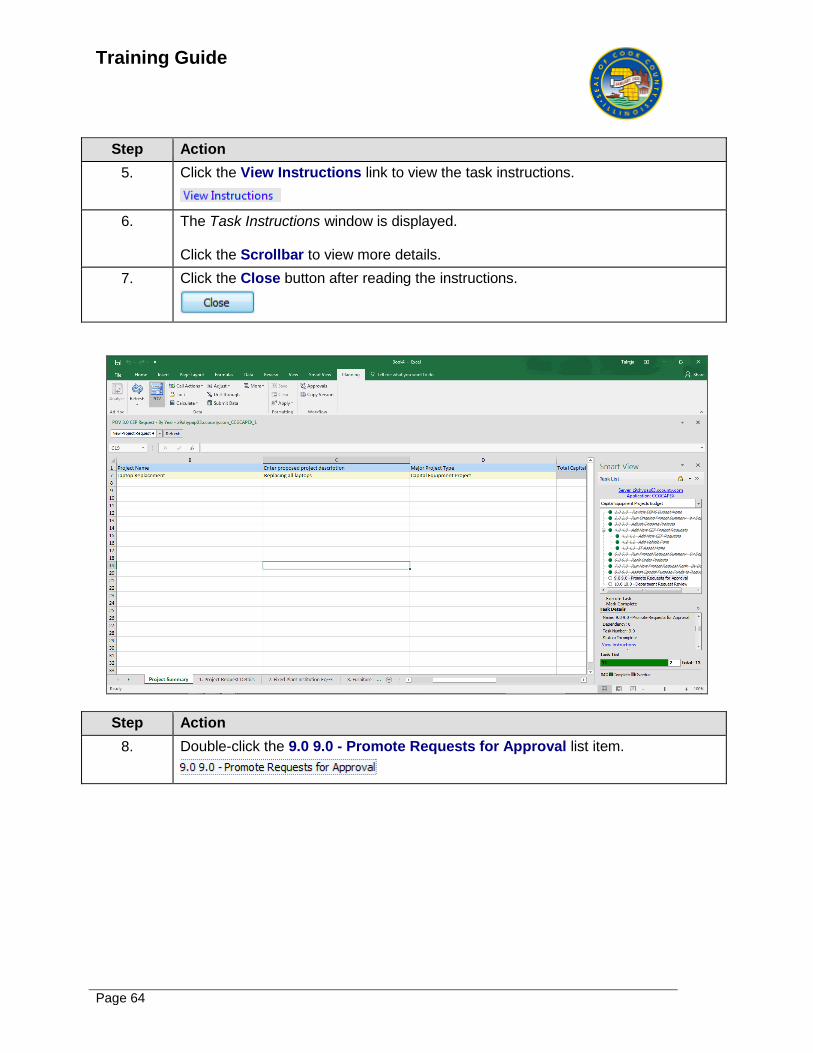
8. Double-click the 9.0 9.0 - Promote Requests for Approval list item.
Training Guide
Page 65
Step Action
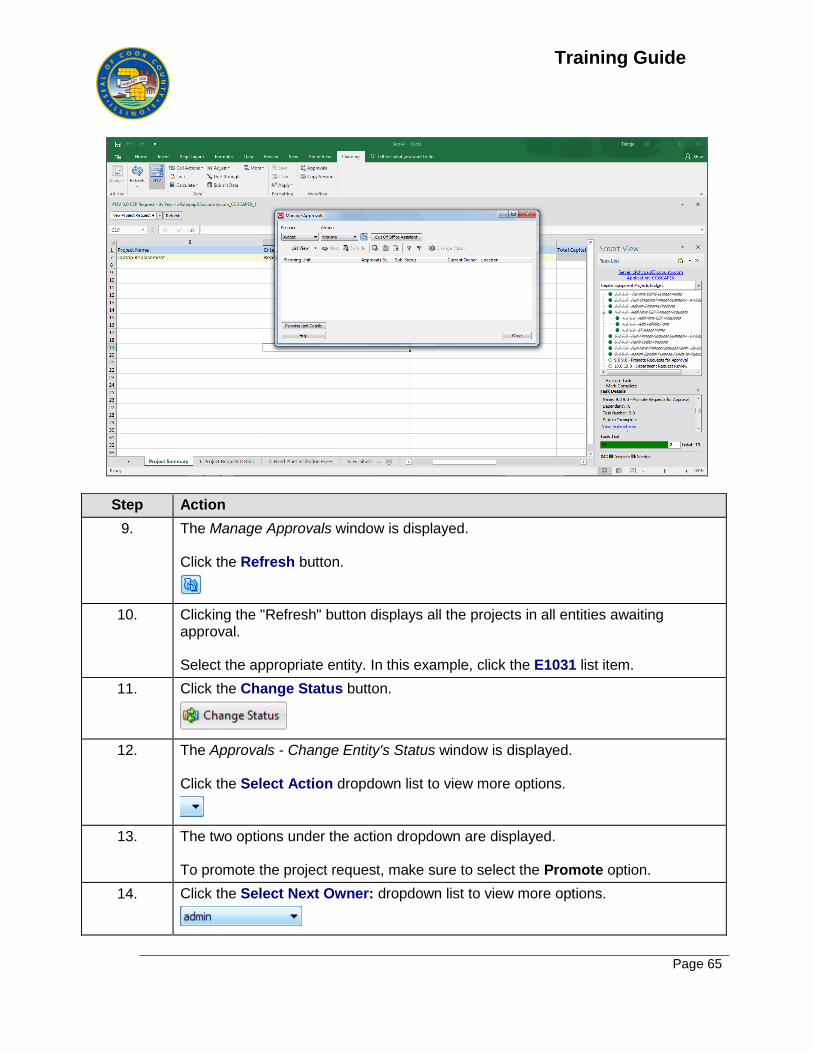
9. The Manage Approvals window is displayed. Click the Refresh button.
10. Clicking the "Refresh" button displays all the projects in all entities awaiting approval. Select the appropriate entity. In this example, click the E1031 list item.
11. Click the Change Status button.
12. The Approvals - Change Entity's Status window is displayed. Click the Select Action dropdown list to view more options.
13. The two options under the action dropdown are displayed. To promote the project request, make sure to select the Promote option.
14. Click the Select Next Owner: dropdown list to view more options.
Training Guide
Page 66
Step Action
15. Select the appropriate owner name from the list. In this example, click the rtalreja list item.
16. Click in the Enter Annotation: field.
17. Enter the appropriate information into the Enter Annotation: field. In this example, enter "please approve".
18. Click the Submit button.
19. Note the changes in the Approval Status and Current Owner fields.
20. Click the Close button.
21. After completing all the steps, mark this task as "complete".
Training Guide
Page 67
Step Action
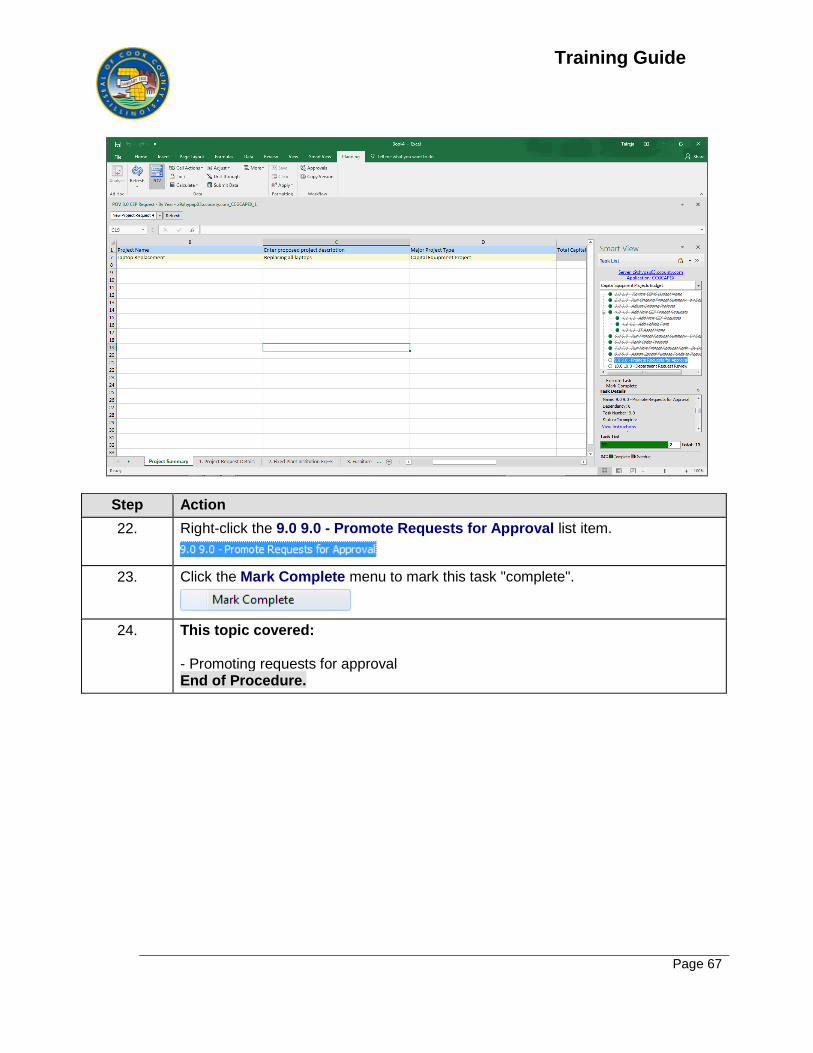
22. Right-click the 9.0 9.0 - Promote Requests for Approval list item.
23. Click the Mark Complete menu to mark this task "complete".
24. This topic covered: - Promoting requests for approval End of Procedure.
Training Guide
Page 68
Reviewing Department Request
Learning Objective: In this topic you will learn how to complete a department request review.
Upon completion of this topic you will be able to:
Complete a Department Request Review.
This topic will cover: - Reviewing the Department Request Estimated time to complete this topic: 2 minutes
Step Action
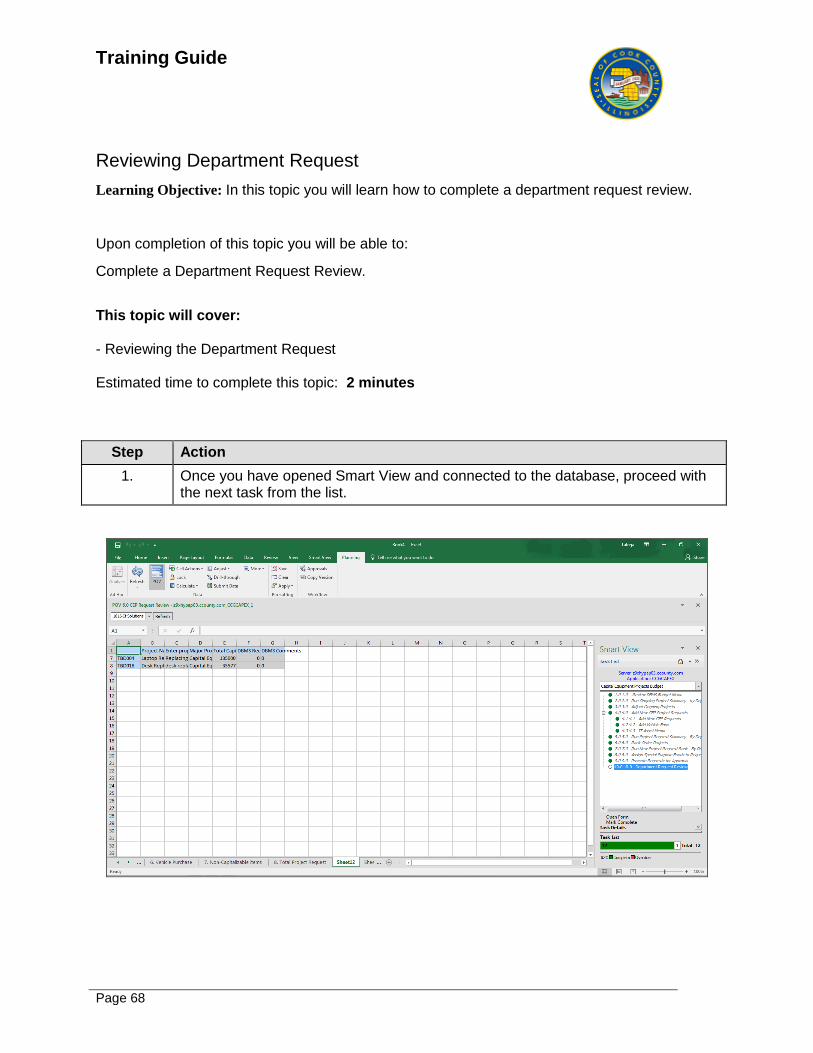
1. Once you have opened Smart View and connected to the database, proceed with the next task from the list.
Training Guide
Page 69
Step Action
2. Click the 10.0 10.0 - Department Request Review list item.
3. Before proceeding with the task, view the task instruction. To view the task instruction, click the Task Details UP Arrow button.
4. Click the Scrollbar to view more details.
5. Click the View Instructions link to view the task instructions.
6. The Task Instructions window is displayed. Click the Close button after reading the instructions.
7. To review the department request, make sure the entity you are viewing is correct. If not, change the entity to be reviewed and click the refresh button.
8. Review the department request for the projects under 1016-It Solutions.
9. After completing the review process, mark this task as "complete".
10. Right-click the 10.0 10.0 - Department Request Review list item.
11. Click the Mark Complete menu item to mark this task "complete".
12. The tasks marked completed are highlighted with a line through the name of the task. The Task Details section shows the status for the task as "Complete". The Task List section at the bottom shows the status of this task list as "Complete".
13. This topic covered: - Reviewing the Department Request End of Procedure.