smaw lesson #1: initiating and maintaining an arc using...
TRANSCRIPT

SMAW LESSON #1: Initiating and maintaining an arc using the scratch start method OBJECTIVE: Upon completion of this lesson the learner will be able to strike and maintain an arc
using SMAW on steel plate using E6010, E6011 and E6013 electrodes. TEXT REFERENCE:
PRACTICAL EXERCISES: Prepare the entire surface of a 3/8 x 4 x 8 in. steel plate for welding by using a wire brush or grinder.
Secure the work piece clamp
Set the welding current and polarity. Because they tend to start easier, begin with E6010, E6011 or E6013.
Place the bare end of an electrode in the jaw grooves of the holder at a 90 degree angle.
Scratch Start Method Position the electrode approximately 60 degrees from the plate and about 1 in. above the edge of the plate. Lower your helmet then swing the electrode down like striking a match. When the electrodes makes contact with the plate an arc will initiate, at that time raise the electrode about 1/4". Lower slightly, weld a short distance, break the arc, and repeat striking.
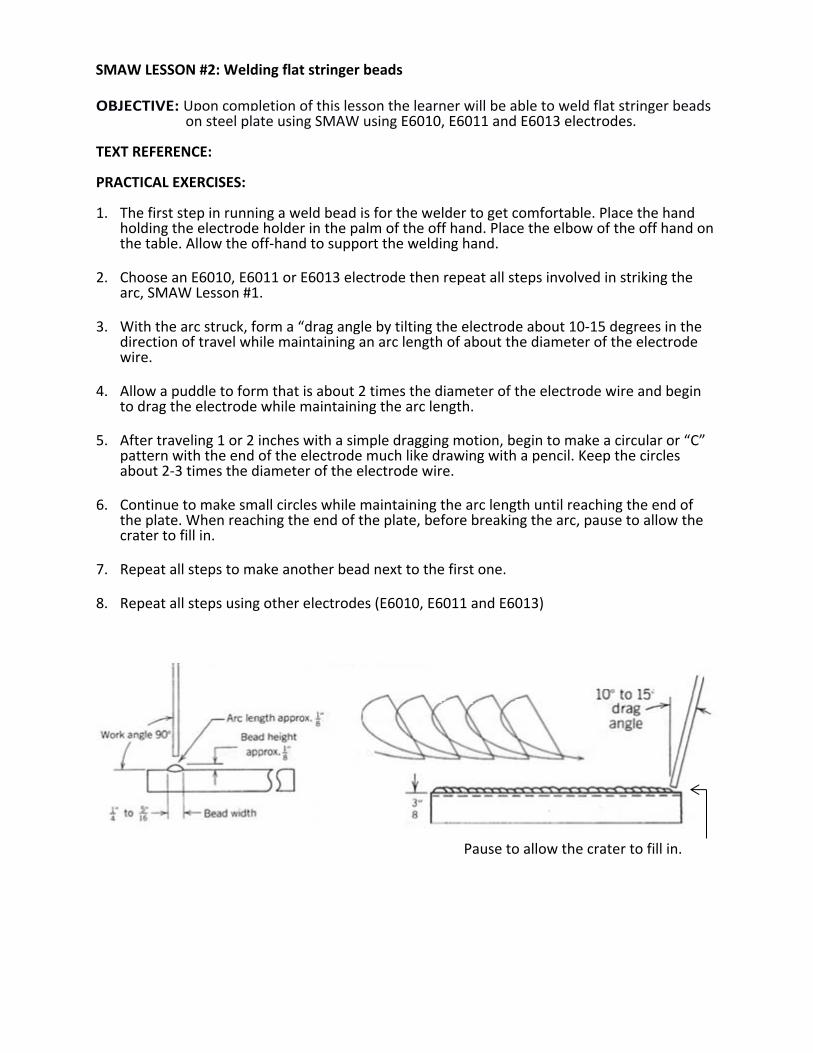
SMAW LESSON #2: Welding flat stringer beads OBJECTIVE: Upon completion of this lesson the learner will be able to weld flat stringer beads
on steel plate using SMAW using E6010, E6011 and E6013 electrodes. TEXT REFERENCE: PRACTICAL EXERCISES: 1. The first step in running a weld bead is for the welder to get comfortable. Place the hand
holding the electrode holder in the palm of the off hand. Place the elbow of the off hand on the table. Allow the off‐hand to support the welding hand.
2. Choose an E6010, E6011 or E6013 electrode then repeat all steps involved in striking the
arc, SMAW Lesson #1.
3. With the arc struck, form a “drag angle by tilting the electrode about 10‐15 degrees in the direction of travel while maintaining an arc length of about the diameter of the electrode wire.
4. Allow a puddle to form that is about 2 times the diameter of the electrode wire and begin
to drag the electrode while maintaining the arc length.
5. After traveling 1 or 2 inches with a simple dragging motion, begin to make a circular or “C” pattern with the end of the electrode much like drawing with a pencil. Keep the circles about 2‐3 times the diameter of the electrode wire.
6. Continue to make small circles while maintaining the arc length until reaching the end of
the plate. When reaching the end of the plate, before breaking the arc, pause to allow the crater to fill in.
7. Repeat all steps to make another bead next to the first one.
8. Repeat all steps using other electrodes (E6010, E6011 and E6013)
Pause to allow the crater to fill in.
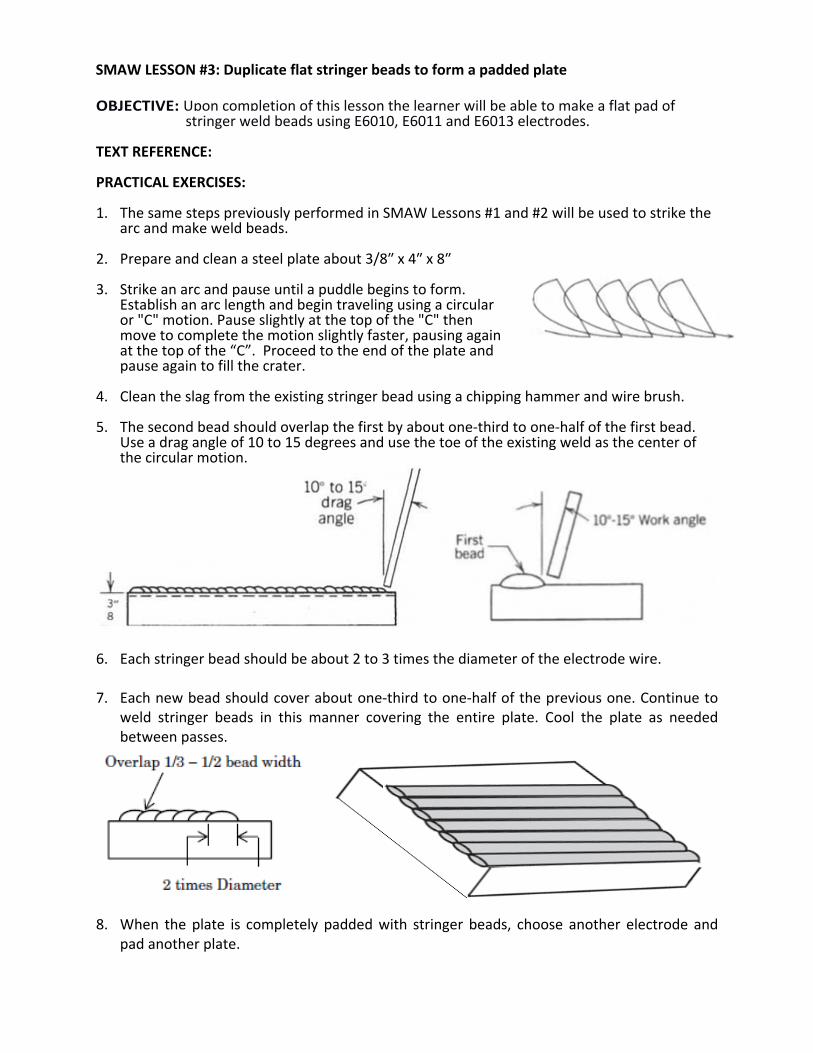
SMAW LESSON #3: Duplicate flat stringer beads to form a padded plate OBJECTIVE: Upon completion of this lesson the learner will be able to make a flat pad of
stringer weld beads using E6010, E6011 and E6013 electrodes. TEXT REFERENCE: PRACTICAL EXERCISES: 1. The same steps previously performed in SMAW Lessons #1 and #2 will be used to strike the
arc and make weld beads.
2. Prepare and clean a steel plate about 3/8″ x 4″ x 8″ 3. Strike an arc and pause until a puddle begins to form.
Establish an arc length and begin traveling using a circular or "C" motion. Pause slightly at the top of the "C" then move to complete the motion slightly faster, pausing again at the top of the “C”. Proceed to the end of the plate and pause again to fill the crater.
4. Clean the slag from the existing stringer bead using a chipping hammer and wire brush.
5. The second bead should overlap the first by about one‐third to one‐half of the first bead. Use a drag angle of 10 to 15 degrees and use the toe of the existing weld as the center of the circular motion.
6. Each stringer bead should be about 2 to 3 times the diameter of the electrode wire.
7. Each new bead should cover about one‐third to one‐half of the previous one. Continue to
weld stringer beads in this manner covering the entire plate. Cool the plate as needed between passes.
8. When the plate is completely padded with stringer beads, choose another electrode and
pad another plate.

SMAW LESSON #4: Weld stringer beads in a T Joint in the flat position OBJECTIVE: Upon completion of this lesson the learner will be able to weld stringer beads in a
flat position T joint using E6010, E6011 and E6013 electrodes. TEXT REFERENCE: PRACTICAL EXERCISES: 1. The same steps previously performed in SMAW Lessons #1, #2 and #3 will be used to strike
the arc and make weld beads in a T joint. 2. Prepare and clean one 3/8″ x 4″ x 8″ and two 3/8″ x 2″ x 8″ steel plates.
3. Tack weld the three plates tightly together
ensuring that no gaps exist and that the plates Tacks are evenly perpendicular to each other as shown. Using E6010, place the tack welds on each end.
4. Position the T joint in the flat position as shown.
5. With the electrode perpendicular to the joint run a
stringer from left to right. Maintain an electrode drag angle of 10 to 15 degrees. Use either the "C" motion, or a whipping motion.
6. Each stringer bead should be about 2 to 3 times the diameter of the electrode wire.
7. Each new bead should cover 1/3 ‐ 1/2 of the previous one. 8. Use a 10° to 15° travel angle and a 15° to 20°work angle.
The work angle will change as new beads are stacked on top of each other, bead 1 centered, bead 2 on left, bead 3 on right as shown.
9. Clean and cool the plate as needed between passes, then choose another electrode to place 3 beads in another joint.

SMAW LESSON #5: Weld weave beads in a T Joint in the flat position OBJECTIVE: Upon completion of this lesson the learner will be able to weld weave beads in a
flat position T joint using E6010, E6011 and E6013 electrodes. TEXT REFERENCE: PRACTICAL EXERCISES:
1. Continue filling the T joint using bead placement
as shown; with the first three stringers completed, cover cover them with a weave bead.
2. Increase the amperage slightly (5 amps or as
needed). Start by using the same electrode angles as used to weld bead #2. Strike an arc at the left toe of bead #2, then move to the right, finishing the weave at the right toe of bead #3.
3. Continue weaving the electrode from side to side
pausing slightly at the toes to fill the crater. 4. The weave bead (#4) should extend about 1/8 inch
beyond the toes of beads #2 and #3 beneath it.
5. Continue to run beads #5 and #6 similarly, each overlapping about 2/3 of bead #4.
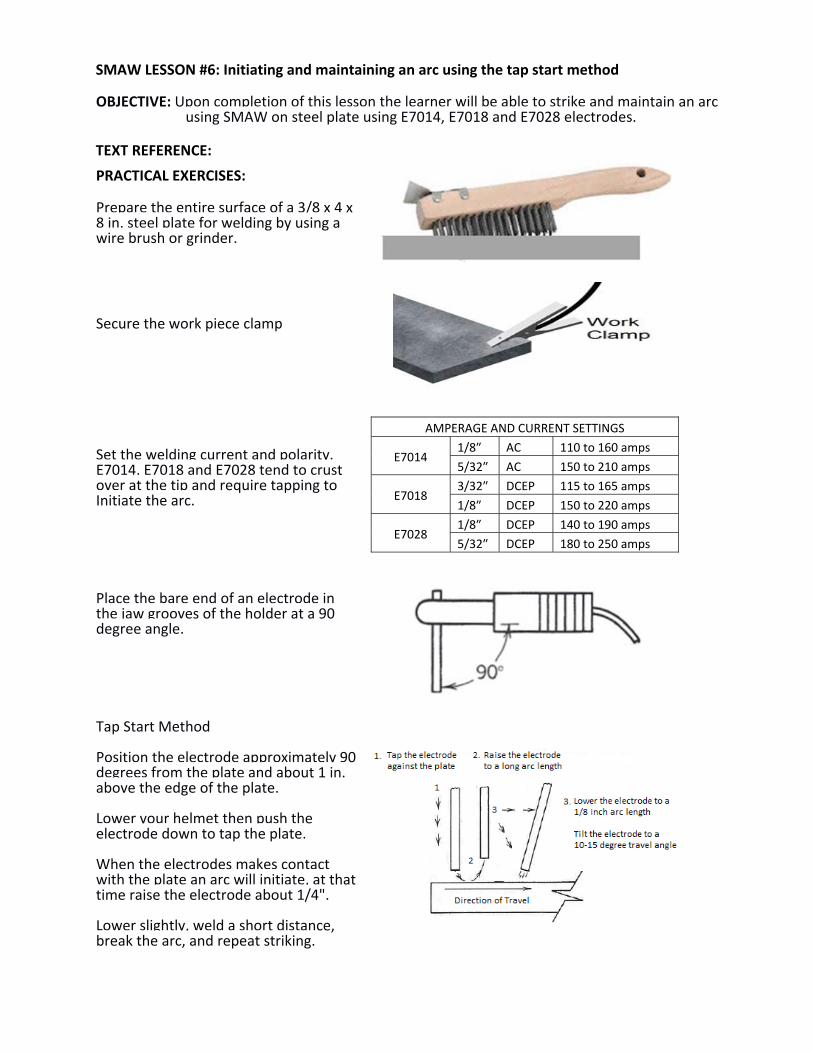
SMAW LESSON #6: Initiating and maintaining an arc using the tap start method OBJECTIVE: Upon completion of this lesson the learner will be able to strike and maintain an arc
using SMAW on steel plate using E7014, E7018 and E7028 electrodes. TEXT REFERENCE:
PRACTICAL EXERCISES: Prepare the entire surface of a 3/8 x 4 x 8 in. steel plate for welding by using a wire brush or grinder.
Secure the work piece clamp
Set the welding current and polarity. E7014, E7018 and E7028 tend to crust over at the tip and require tapping to Initiate the arc.
AMPERAGE AND CURRENT SETTINGS
E7014 1/8″ AC 110 to 160 amps
5/32″ AC 150 to 210 amps
E7018 3/32″ DCEP 115 to 165 amps
1/8″ DCEP 150 to 220 amps
E7028 1/8″ DCEP 140 to 190 amps
5/32″ DCEP 180 to 250 amps
Place the bare end of an electrode in the jaw grooves of the holder at a 90 degree angle.
Tap Start Method Position the electrode approximately 90 degrees from the plate and about 1 in. above the edge of the plate. Lower your helmet then push the electrode down to tap the plate. When the electrodes makes contact with the plate an arc will initiate, at that time raise the electrode about 1/4". Lower slightly, weld a short distance, break the arc, and repeat striking.
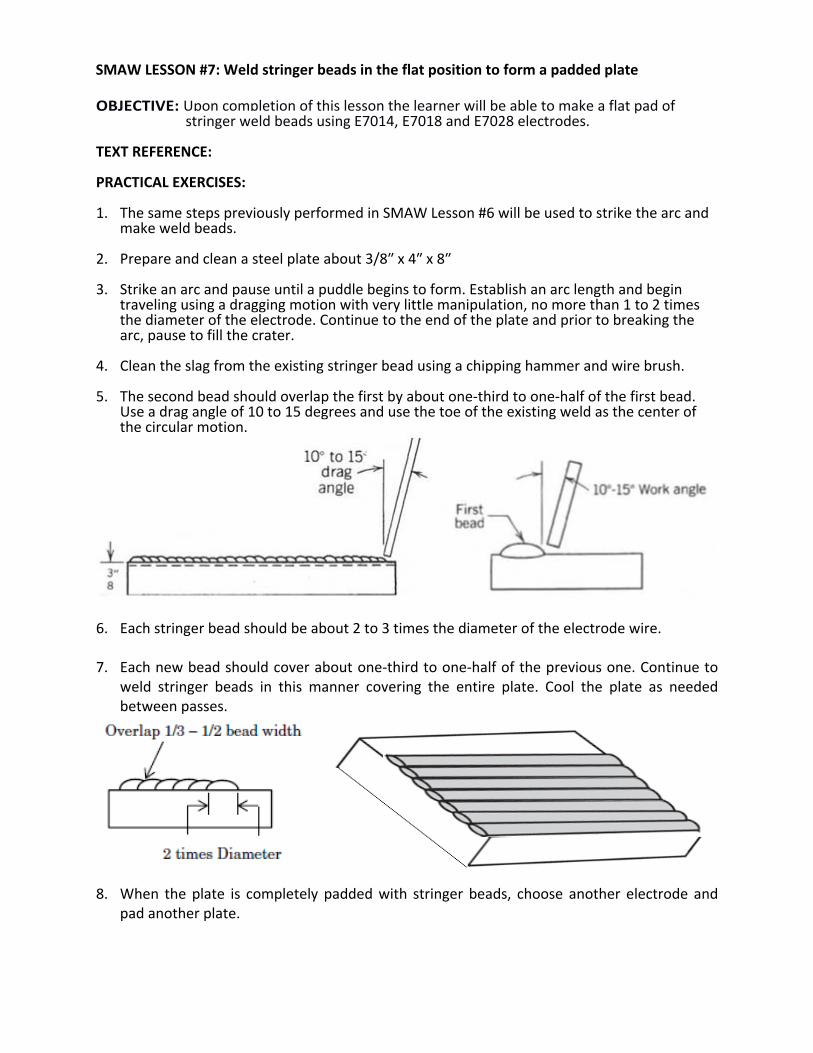
SMAW LESSON #7: Weld stringer beads in the flat position to form a padded plate OBJECTIVE: Upon completion of this lesson the learner will be able to make a flat pad of
stringer weld beads using E7014, E7018 and E7028 electrodes. TEXT REFERENCE: PRACTICAL EXERCISES: 1. The same steps previously performed in SMAW Lesson #6 will be used to strike the arc and
make weld beads.
2. Prepare and clean a steel plate about 3/8″ x 4″ x 8″ 3. Strike an arc and pause until a puddle begins to form. Establish an arc length and begin
traveling using a dragging motion with very little manipulation, no more than 1 to 2 times the diameter of the electrode. Continue to the end of the plate and prior to breaking the arc, pause to fill the crater.
4. Clean the slag from the existing stringer bead using a chipping hammer and wire brush.
5. The second bead should overlap the first by about one‐third to one‐half of the first bead. Use a drag angle of 10 to 15 degrees and use the toe of the existing weld as the center of the circular motion.
6. Each stringer bead should be about 2 to 3 times the diameter of the electrode wire.
7. Each new bead should cover about one‐third to one‐half of the previous one. Continue to
weld stringer beads in this manner covering the entire plate. Cool the plate as needed between passes.
8. When the plate is completely padded with stringer beads, choose another electrode and
pad another plate.
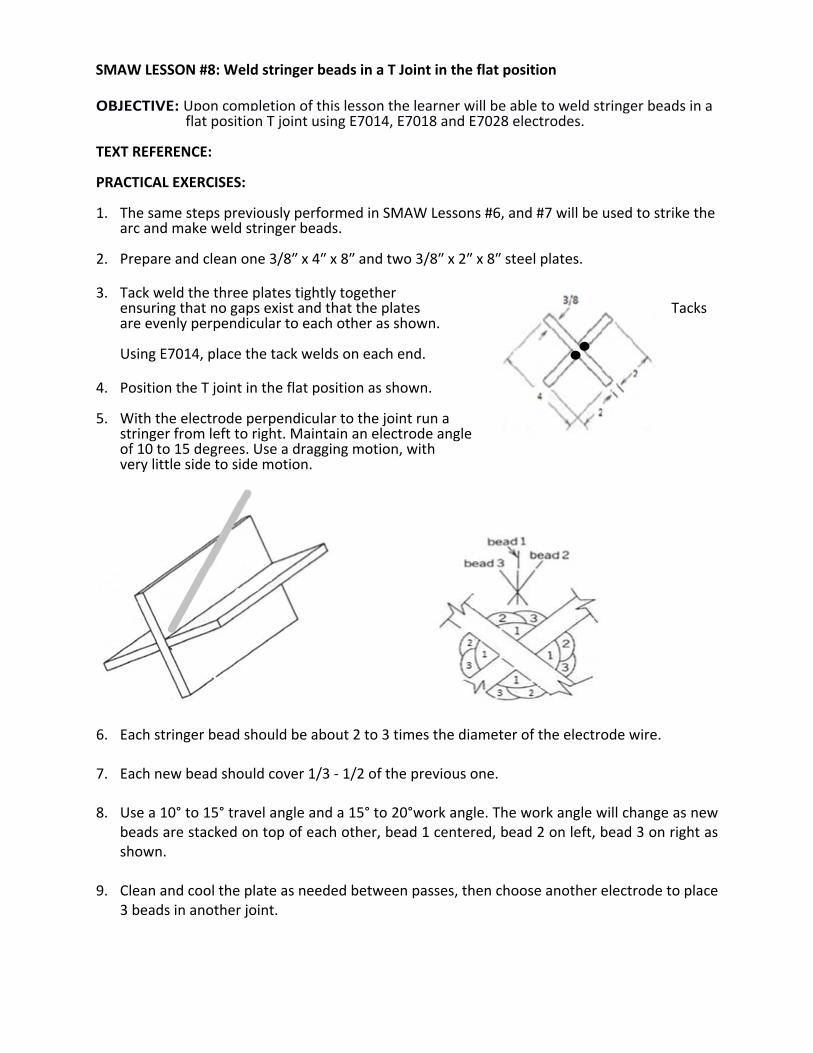
SMAW LESSON #8: Weld stringer beads in a T Joint in the flat position OBJECTIVE: Upon completion of this lesson the learner will be able to weld stringer beads in a
flat position T joint using E7014, E7018 and E7028 electrodes. TEXT REFERENCE: PRACTICAL EXERCISES: 1. The same steps previously performed in SMAW Lessons #6, and #7 will be used to strike the
arc and make weld stringer beads. 2. Prepare and clean one 3/8″ x 4″ x 8″ and two 3/8″ x 2″ x 8″ steel plates.
3. Tack weld the three plates tightly together
ensuring that no gaps exist and that the plates Tacks are evenly perpendicular to each other as shown. Using E7014, place the tack welds on each end.
4. Position the T joint in the flat position as shown.
5. With the electrode perpendicular to the joint run a
stringer from left to right. Maintain an electrode angle of 10 to 15 degrees. Use a dragging motion, with very little side to side motion.
6. Each stringer bead should be about 2 to 3 times the diameter of the electrode wire.
7. Each new bead should cover 1/3 ‐ 1/2 of the previous one. 8. Use a 10° to 15° travel angle and a 15° to 20°work angle. The work angle will change as new
beads are stacked on top of each other, bead 1 centered, bead 2 on left, bead 3 on right as shown.
9. Clean and cool the plate as needed between passes, then choose another electrode to place 3 beads in another joint.
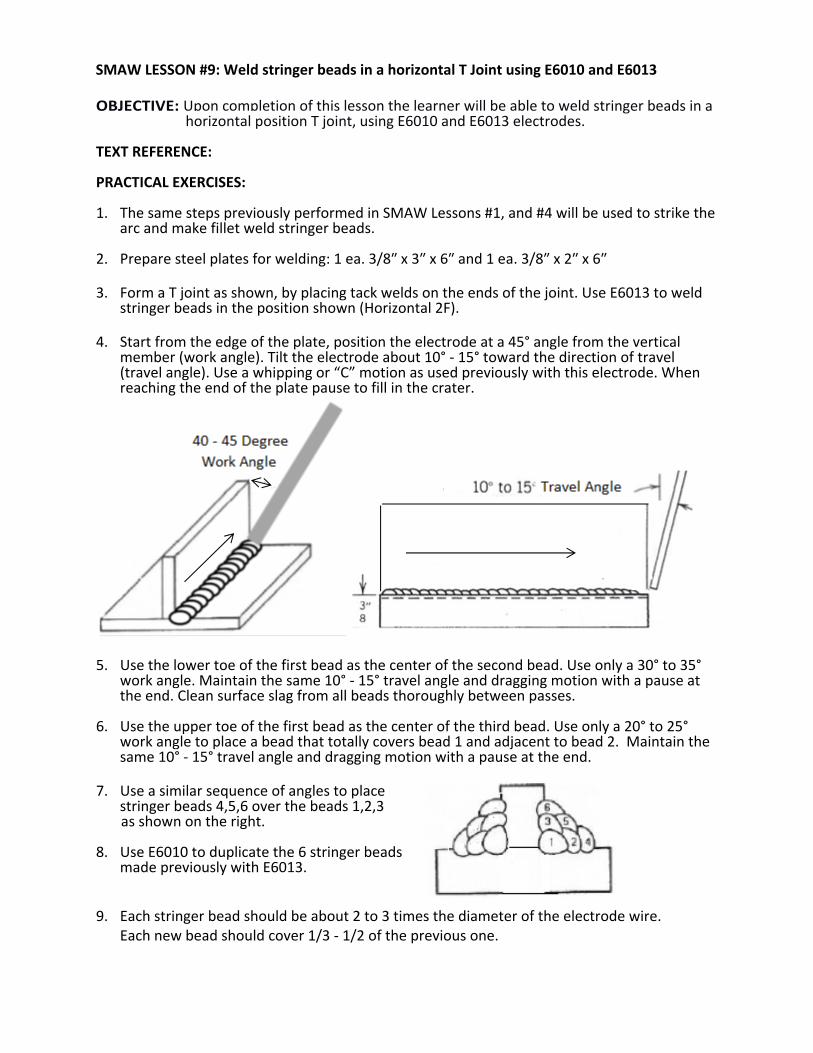
SMAW LESSON #9: Weld stringer beads in a horizontal T Joint using E6010 and E6013 OBJECTIVE: Upon completion of this lesson the learner will be able to weld stringer beads in a
horizontal position T joint, using E6010 and E6013 electrodes. TEXT REFERENCE: PRACTICAL EXERCISES: 1. The same steps previously performed in SMAW Lessons #1, and #4 will be used to strike the
arc and make fillet weld stringer beads. 2. Prepare steel plates for welding: 1 ea. 3/8″ x 3″ x 6″ and 1 ea. 3/8″ x 2″ x 6″
3. Form a T joint as shown, by placing tack welds on the ends of the joint. Use E6013 to weld
stringer beads in the position shown (Horizontal 2F).
4. Start from the edge of the plate, position the electrode at a 45° angle from the vertical member (work angle). Tilt the electrode about 10° ‐ 15° toward the direction of travel (travel angle). Use a whipping or “C” motion as used previously with this electrode. When reaching the end of the plate pause to fill in the crater.
5. Use the lower toe of the first bead as the center of the second bead. Use only a 30° to 35° work angle. Maintain the same 10° ‐ 15° travel angle and dragging motion with a pause at the end. Clean surface slag from all beads thoroughly between passes.
6. Use the upper toe of the first bead as the center of the third bead. Use only a 20° to 25°
work angle to place a bead that totally covers bead 1 and adjacent to bead 2. Maintain the same 10° ‐ 15° travel angle and dragging motion with a pause at the end.
7. Use a similar sequence of angles to place stringer beads 4,5,6 over the beads 1,2,3 as shown on the right. 8. Use E6010 to duplicate the 6 stringer beads
made previously with E6013. 9. Each stringer bead should be about 2 to 3 times the diameter of the electrode wire.
Each new bead should cover 1/3 ‐ 1/2 of the previous one.

SMAW LESSON #10: Weld an AWS D1.1 tack welder qualification test T joint OBJECTIVE: In this lesson the learner will weld a tack welder qualification T joint in accordance with the requirements of AWS D1.1. TEXT REFERENCE: PRACTICAL EXERCISES:
1. A tack welder shall be qualified by welding one T joint test plate in the horizontal 2F position using an E6010, E6011 or E6013 electrode.
2. The tack welder qualification test plate shall consist of a 1/4″ max. size fillet weld about
2″ long on one side of 3/8″ thick steel plate. The steel plates should be about 2″ x 3″ and shall form an offset T joint that is broken by applying force from the welded side by any convenient means. See the illustration below.
3. Prior to breaking, the instructor shall verify that the completed test weld presents a
reasonably uniform appearance that must be free from overlap, cracks, porosity and trapped slag. Undercut at any point throughout the weld shall not exceed 1/32″ deep.
4. The weld must fracture and must not reveal any lack of fusion to the base metal. Each
indication of slag inclusion or porosity shall not exceed 3/32″.
5. A welder who passes the break test may obtain a tack welder certification whereby he/she is qualified to make tack welds in the flat and horizontal positions in steel from 1/8″ to unlimited thickness in lap, corner and T joints. For certification, the appropriate application forms must be completed, submitted and accepted by the certifying authority.

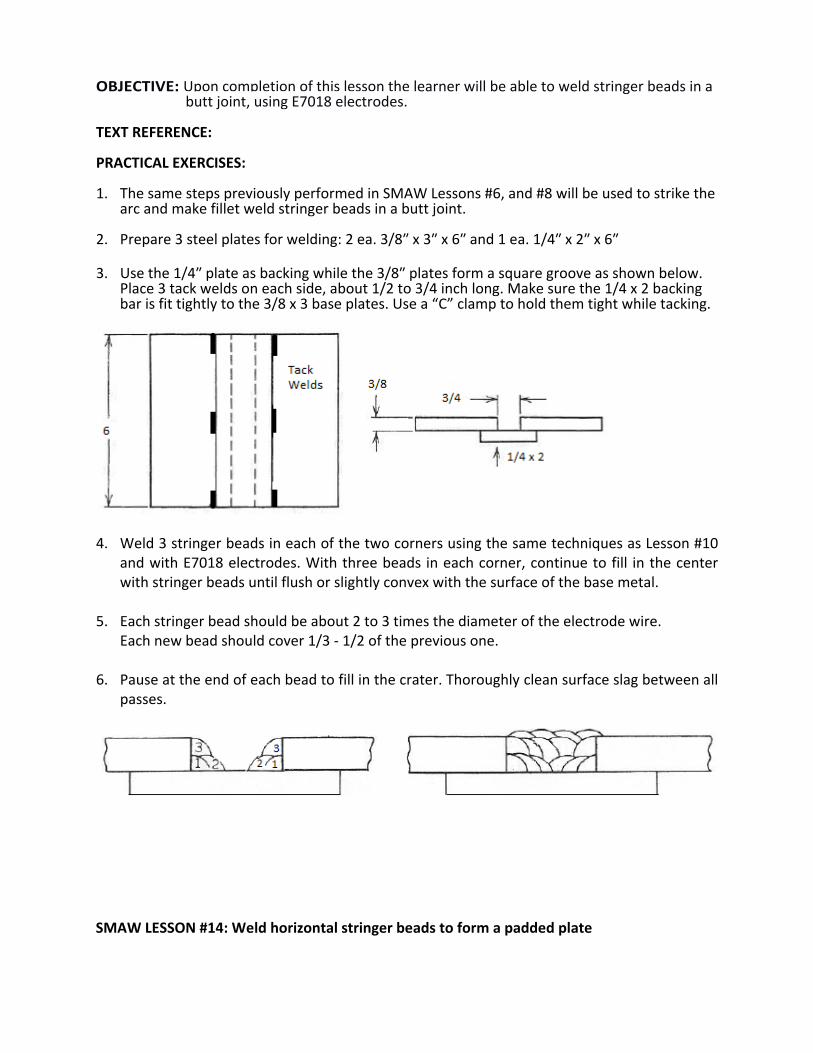
SMAW LESSON #11: Weld stringer beads in a flat butt Joint (1G) with backing using E6010 and E6013. OBJECTIVE: Upon completion of this lesson the learner will be able to weld stringer beads in a
butt joint, using E6010 and E6013 electrodes. TEXT REFERENCE: PRACTICAL EXERCISES: 1. The same steps previously performed in SMAW Lessons #6, and #7 will be used to strike the
arc and make weld stringer beads. 2. Prepare 3 steel plates for welding: 2 ea. 3/8″ x 3″ x 6″ and 1 ea. 1/4″ x 2″ x 6″
3. Use the 1/4″ plate as backing while the 3/8″ plates form a square groove as shown below.
Place 3 tack welds on each side, about 1/2 to 3/4 inch long. Make sure the 1/4 x 2 backing bar is fit tightly to the 3/8 x 3 base plates. Use a “C” clamp to hold them tight while tacking.
4. Weld 3 stringer beads in each of the two corners using the same techniques as Lesson #9
and with E6013 electrodes. With three beads in each corner, continue to fill in the center with stringer beads until flush or slightly convex with the surface of the base metal.
5. Each stringer bead should be about 2 to 3 times the diameter of the electrode wire.
Each new bead should cover 1/3 ‐ 1/2 of the previous one.
6. Pause at the end of each bead to fill in the crater. Thoroughly clean surface slag between all passes. When the joint is filled like the image on the right, repeat this lesson using E6010 electrodes.
SMAW LESSON #12: Weld fillet stringer beads in a horizontal T Joint using E7018 electrodes

OBJECTIVE: Upon completion of this lesson the learner will be able to weld fillet stringer
beads in a horizontal position T joint, using E7018 electrodes. TEXT REFERENCE: PRACTICAL EXERCISES: 10. The same steps previously performed in SMAW Lessons #7, and #8 will be used to strike the
arc and make fillet weld stringer beads. 11. Prepare steel plates for welding: 1 ea. 3/8″ x 3″ x 6″ and 1 ea. 3/8″ x 2″ x 6″
12. Form a T joint as shown, by placing tack welds on the ends of the joint. Use E7018 to weld
stringer beads in the position shown (Horizontal 2F).
13. Start from the edge of the plate, position the electrode at a 45° angle from the vertical member (work angle). Tilt the electrode about 10° ‐ 15° toward the direction of travel (travel angle). Use a dragging motion as used previously with this electrode. When reaching the end of the plate pause to fill in the crater.
14. Use the lower toe of the first bead as the center of the second bead. Use only a 30° to 35° work angle. Maintain the same 10° ‐ 15° travel angle and dragging motion with a pause at the end. Clean surface slag from all beads thoroughly between passes.
15. Use the upper toe of the first bead as the center of the third bead. Use only a 20° to 25°
work angle to place a bead that totally covers bead 1 and adjacent to bead 2. Maintain the same 10° ‐ 15° travel angle and dragging motion with a pause at the end.
16. Use a similar sequence of angles to place 3 stringer beads over the existing beads as shown on the right. 17. Continue using E7018 to fill in the other
Side of the joint. 18. Each stringer bead should be about 2 to 3 times the diameter of the electrode wire.
Each new bead should cover 1/3 ‐ 1/2 of the previous one. SMAW LESSON #13: Weld stringer beads in a flat butt Joint (1G) with backing using E7018.
OBJECTIVE: Upon completion of this lesson the learner will be able to weld stringer beads in a
butt joint, using E7018 electrodes. TEXT REFERENCE: PRACTICAL EXERCISES: 1. The same steps previously performed in SMAW Lessons #6, and #8 will be used to strike the
arc and make fillet weld stringer beads in a butt joint. 2. Prepare 3 steel plates for welding: 2 ea. 3/8″ x 3″ x 6″ and 1 ea. 1/4″ x 2″ x 6″
3. Use the 1/4″ plate as backing while the 3/8″ plates form a square groove as shown below.
Place 3 tack welds on each side, about 1/2 to 3/4 inch long. Make sure the 1/4 x 2 backing bar is fit tightly to the 3/8 x 3 base plates. Use a “C” clamp to hold them tight while tacking.
4. Weld 3 stringer beads in each of the two corners using the same techniques as Lesson #10
and with E7018 electrodes. With three beads in each corner, continue to fill in the center with stringer beads until flush or slightly convex with the surface of the base metal.
5. Each stringer bead should be about 2 to 3 times the diameter of the electrode wire.
Each new bead should cover 1/3 ‐ 1/2 of the previous one.
6. Pause at the end of each bead to fill in the crater. Thoroughly clean surface slag between all passes.
SMAW LESSON #14: Weld horizontal stringer beads to form a padded plate
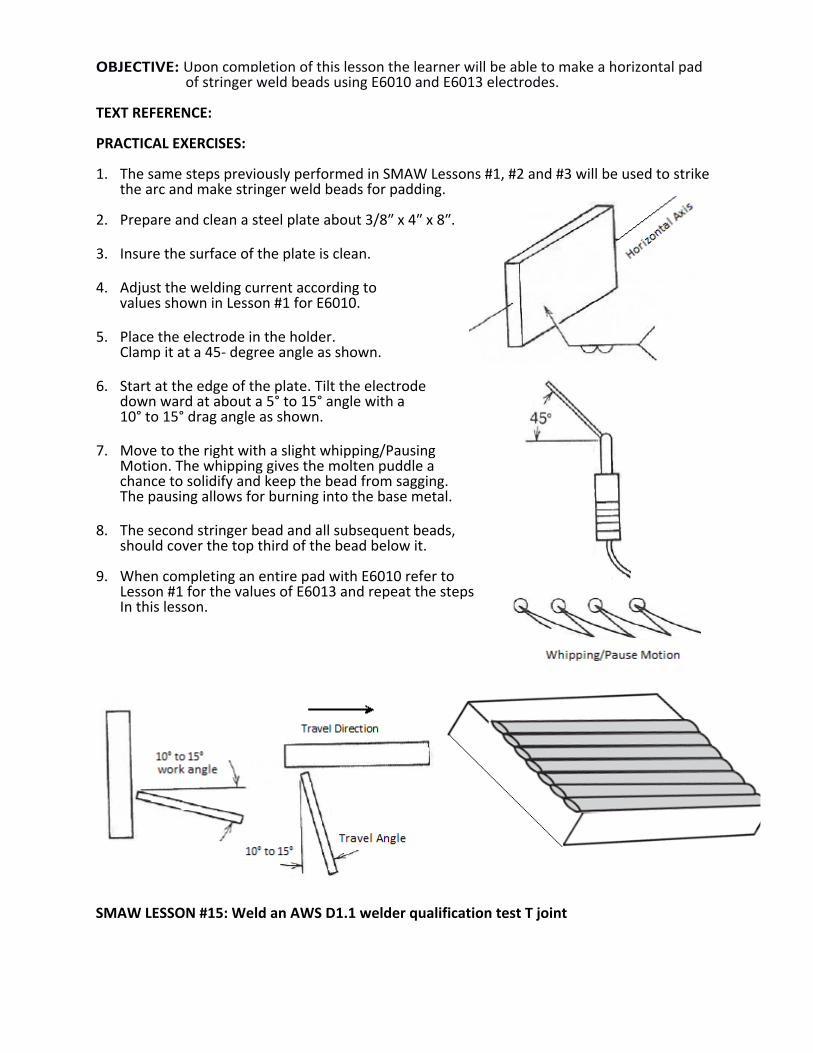
OBJECTIVE: Upon completion of this lesson the learner will be able to make a horizontal pad of stringer weld beads using E6010 and E6013 electrodes.
TEXT REFERENCE: PRACTICAL EXERCISES: 1. The same steps previously performed in SMAW Lessons #1, #2 and #3 will be used to strike
the arc and make stringer weld beads for padding.
2. Prepare and clean a steel plate about 3/8″ x 4″ x 8″.
3. Insure the surface of the plate is clean.
4. Adjust the welding current according to values shown in Lesson #1 for E6010.
5. Place the electrode in the holder.
Clamp it at a 45‐ degree angle as shown.
6. Start at the edge of the plate. Tilt the electrode down ward at about a 5° to 15° angle with a 10° to 15° drag angle as shown.
7. Move to the right with a slight whipping/Pausing
Motion. The whipping gives the molten puddle a chance to solidify and keep the bead from sagging. The pausing allows for burning into the base metal.
8. The second stringer bead and all subsequent beads,
should cover the top third of the bead below it. 9. When completing an entire pad with E6010 refer to
Lesson #1 for the values of E6013 and repeat the steps In this lesson.
SMAW LESSON #15: Weld an AWS D1.1 welder qualification test T joint
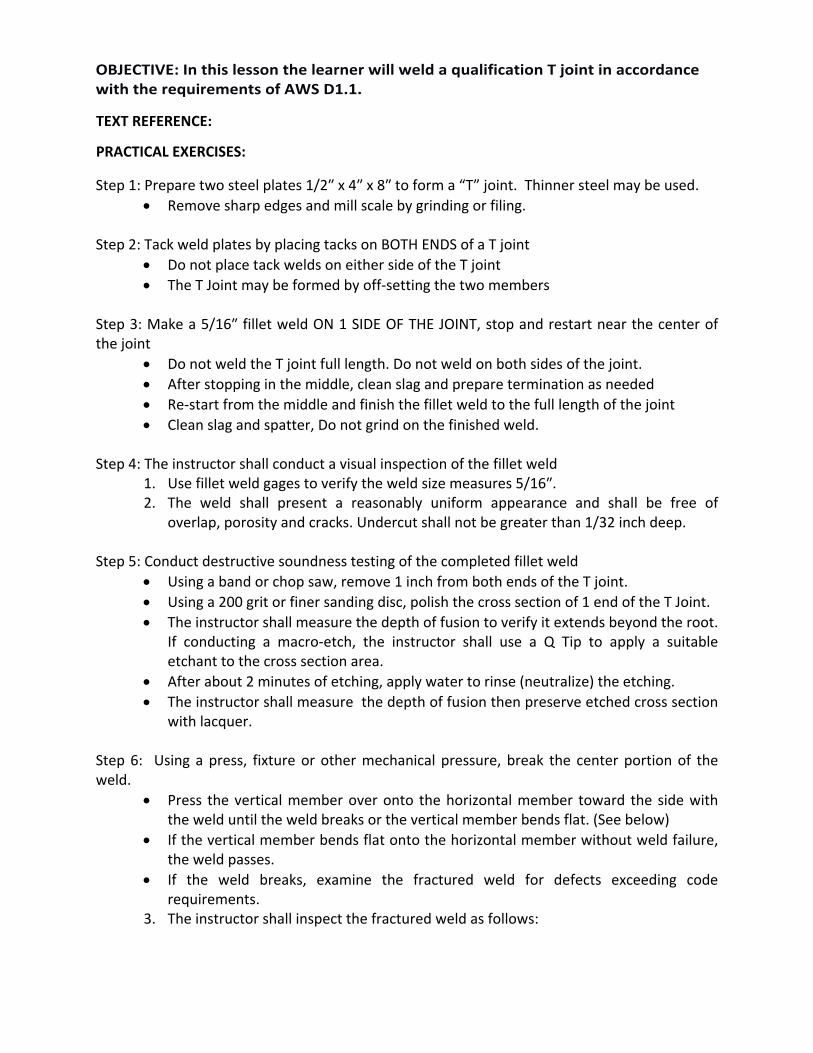
OBJECTIVE: In this lesson the learner will weld a qualification T joint in accordance with the requirements of AWS D1.1. TEXT REFERENCE: PRACTICAL EXERCISES: Step 1: Prepare two steel plates 1/2″ x 4″ x 8″ to form a “T” joint. Thinner steel may be used.
Remove sharp edges and mill scale by grinding or filing. Step 2: Tack weld plates by placing tacks on BOTH ENDS of a T joint
Do not place tack welds on either side of the T joint
The T Joint may be formed by off‐setting the two members Step 3: Make a 5/16″ fillet weld ON 1 SIDE OF THE JOINT, stop and restart near the center of the joint
Do not weld the T joint full length. Do not weld on both sides of the joint.
After stopping in the middle, clean slag and prepare termination as needed
Re‐start from the middle and finish the fillet weld to the full length of the joint
Clean slag and spatter, Do not grind on the finished weld. Step 4: The instructor shall conduct a visual inspection of the fillet weld
1. Use fillet weld gages to verify the weld size measures 5/16″. 2. The weld shall present a reasonably uniform appearance and shall be free of
overlap, porosity and cracks. Undercut shall not be greater than 1/32 inch deep. Step 5: Conduct destructive soundness testing of the completed fillet weld
Using a band or chop saw, remove 1 inch from both ends of the T joint.
Using a 200 grit or finer sanding disc, polish the cross section of 1 end of the T Joint.
The instructor shall measure the depth of fusion to verify it extends beyond the root. If conducting a macro‐etch, the instructor shall use a Q Tip to apply a suitable etchant to the cross section area.
After about 2 minutes of etching, apply water to rinse (neutralize) the etching.
The instructor shall measure the depth of fusion then preserve etched cross section with lacquer.
Step 6: Using a press, fixture or other mechanical pressure, break the center portion of the weld.
Press the vertical member over onto the horizontal member toward the side with the weld until the weld breaks or the vertical member bends flat. (See below)
If the vertical member bends flat onto the horizontal member without weld failure, the weld passes.
If the weld breaks, examine the fractured weld for defects exceeding code requirements.
3. The instructor shall inspect the fractured weld as follows:
o (1) The fillet weld has a fracture surface showing complete fusion to the root of the joint with no slag inclusion or porosity larger than 3/32″, and
o (2) All inclusions and porosity < 3/32″ cannot add up to more than 3/8˝ for the entire length of the 6″ long specimen.
Step 8: A welder who passes the fillet weld break test may obtain welder certification whereby
he/she is qualified to make full length fillet welds in the flat and horizontal positions in steel from 1/8″ to unlimited thickness in lap, corner and T joints. For certification, the appropriate application forms must be completed, submitted and accepted by the certifying authority.
SMAW LESSON #16: Weld flat single V groove joint (1G) with E6010 electrodes.
OBJECTIVE: Upon completion of this lesson the learner will be able to weld an open root flat
single V groove joint (1G) with E6010 electrodes using stringer and weave techniques.
PRACTICAL EXERCISES:
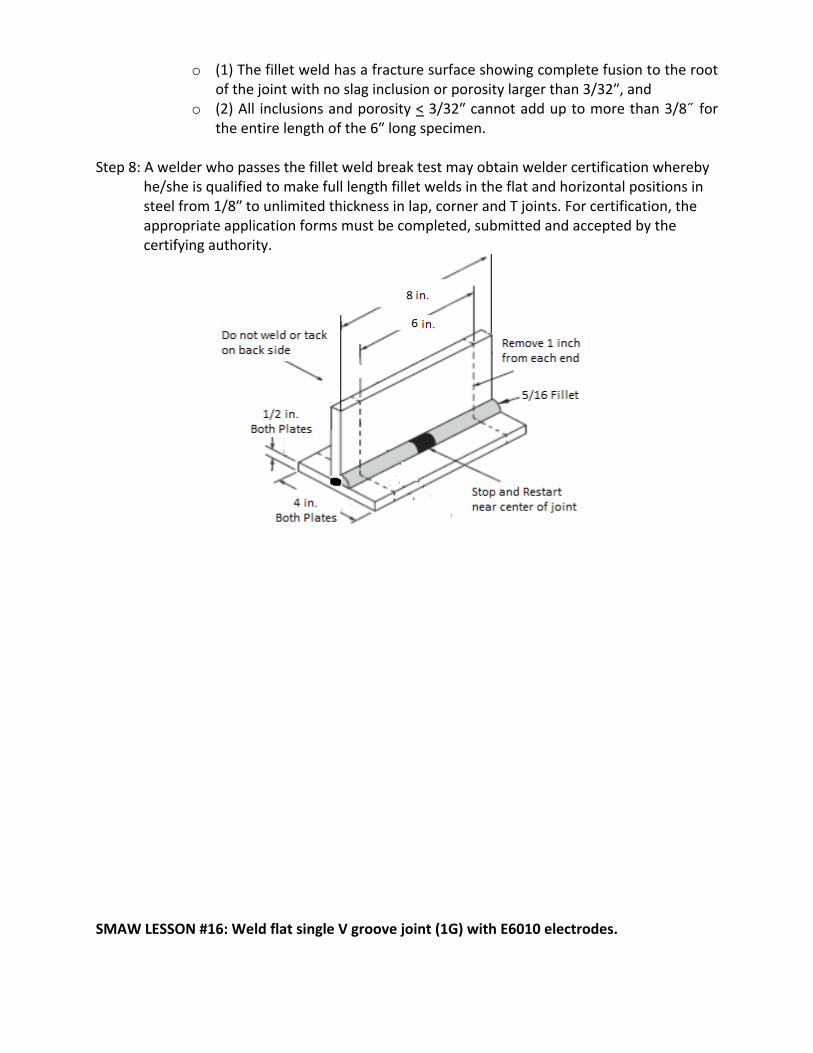
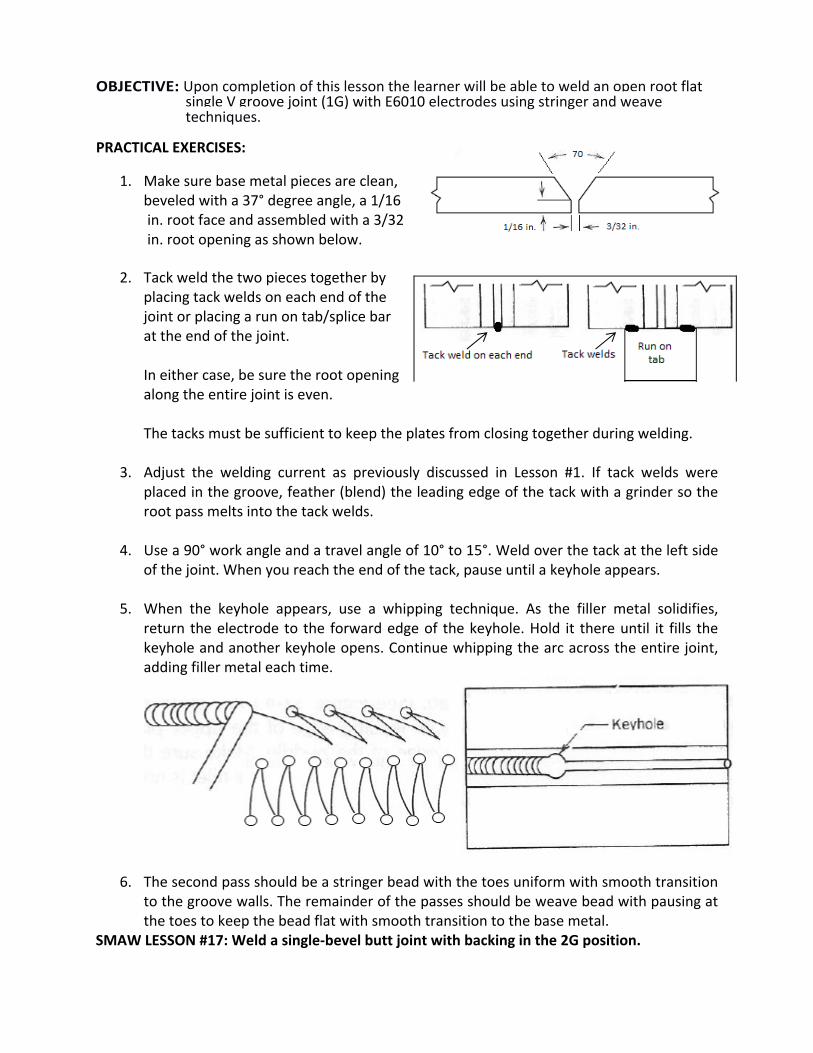
1. Make sure base metal pieces are clean, beveled with a 37° degree angle, a 1/16 in. root face and assembled with a 3/32 in. root opening as shown below.
2. Tack weld the two pieces together by placing tack welds on each end of the joint or placing a run on tab/splice bar at the end of the joint. In either case, be sure the root opening along the entire joint is even. The tacks must be sufficient to keep the plates from closing together during welding.
3. Adjust the welding current as previously discussed in Lesson #1. If tack welds were
placed in the groove, feather (blend) the leading edge of the tack with a grinder so the root pass melts into the tack welds.
4. Use a 90° work angle and a travel angle of 10° to 15°. Weld over the tack at the left side of the joint. When you reach the end of the tack, pause until a keyhole appears.
5. When the keyhole appears, use a whipping technique. As the filler metal solidifies,
return the electrode to the forward edge of the keyhole. Hold it there until it fills the keyhole and another keyhole opens. Continue whipping the arc across the entire joint, adding filler metal each time.
6. The second pass should be a stringer bead with the toes uniform with smooth transition to the groove walls. The remainder of the passes should be weave bead with pausing at the toes to keep the bead flat with smooth transition to the base metal.
SMAW LESSON #17: Weld a single‐bevel butt joint with backing in the 2G position.
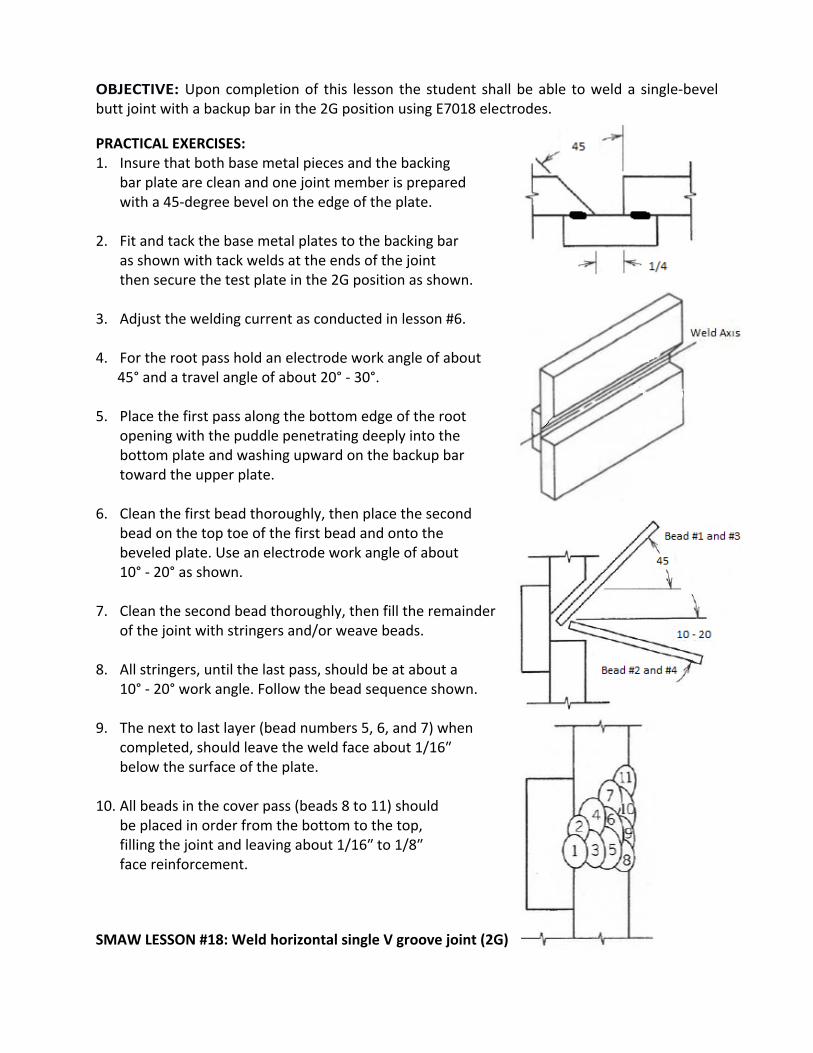
OBJECTIVE: Upon completion of this lesson the student shall be able to weld a single‐bevel butt joint with a backup bar in the 2G position using E7018 electrodes. PRACTICAL EXERCISES: 1. Insure that both base metal pieces and the backing
bar plate are clean and one joint member is prepared with a 45‐degree bevel on the edge of the plate.
2. Fit and tack the base metal plates to the backing bar as shown with tack welds at the ends of the joint then secure the test plate in the 2G position as shown.
3. Adjust the welding current as conducted in lesson #6.
4. For the root pass hold an electrode work angle of about 45° and a travel angle of about 20° ‐ 30°. 5. Place the first pass along the bottom edge of the root
opening with the puddle penetrating deeply into the bottom plate and washing upward on the backup bar toward the upper plate.
6. Clean the first bead thoroughly, then place the second bead on the top toe of the first bead and onto the beveled plate. Use an electrode work angle of about 10° ‐ 20° as shown.
7. Clean the second bead thoroughly, then fill the remainder of the joint with stringers and/or weave beads.
8. All stringers, until the last pass, should be at about a 10° ‐ 20° work angle. Follow the bead sequence shown.
9. The next to last layer (bead numbers 5, 6, and 7) when completed, should leave the weld face about 1/16″ below the surface of the plate.
10. All beads in the cover pass (beads 8 to 11) should be placed in order from the bottom to the top, filling the joint and leaving about 1/16″ to 1/8″ face reinforcement.
SMAW LESSON #18: Weld horizontal single V groove joint (2G) with E6010 electrodes.
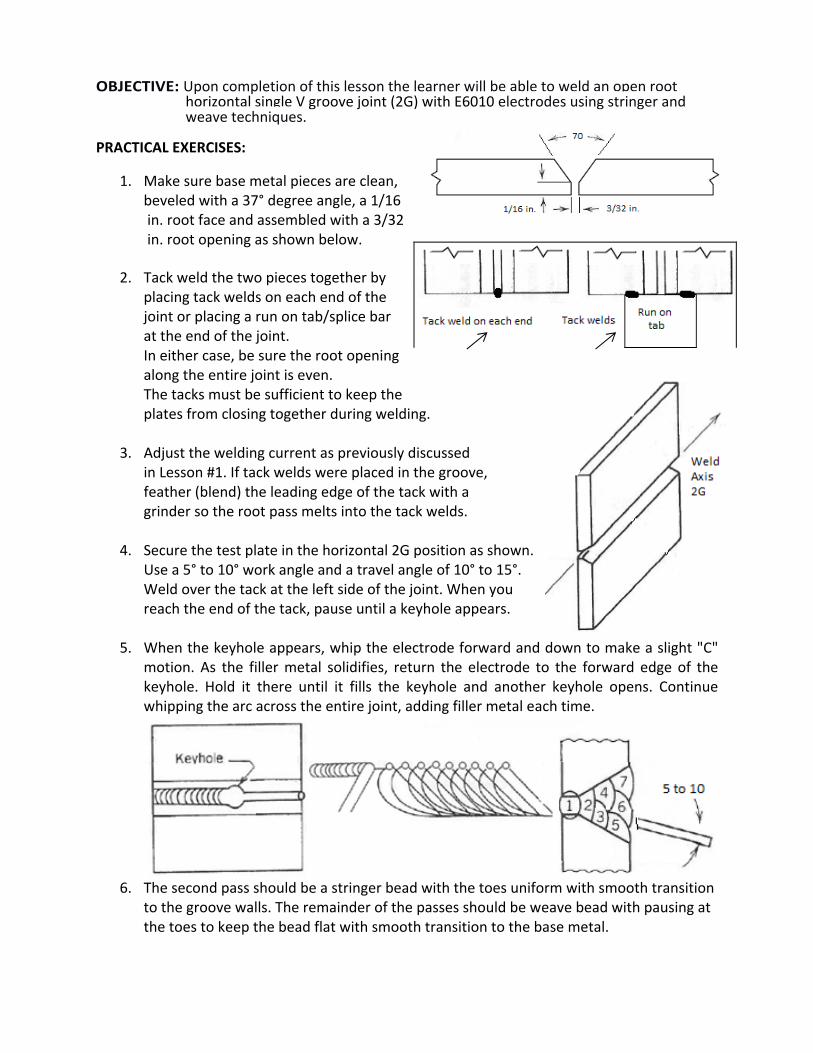
OBJECTIVE: Upon completion of this lesson the learner will be able to weld an open root
horizontal single V groove joint (2G) with E6010 electrodes using stringer and weave techniques.
PRACTICAL EXERCISES:
1. Make sure base metal pieces are clean, beveled with a 37° degree angle, a 1/16 in. root face and assembled with a 3/32 in. root opening as shown below.
2. Tack weld the two pieces together by placing tack welds on each end of the joint or placing a run on tab/splice bar at the end of the joint. In either case, be sure the root opening along the entire joint is even. The tacks must be sufficient to keep the plates from closing together during welding.
3. Adjust the welding current as previously discussed
in Lesson #1. If tack welds were placed in the groove, feather (blend) the leading edge of the tack with a grinder so the root pass melts into the tack welds.
4. Secure the test plate in the horizontal 2G position as shown. Use a 5° to 10° work angle and a travel angle of 10° to 15°. Weld over the tack at the left side of the joint. When you reach the end of the tack, pause until a keyhole appears.
5. When the keyhole appears, whip the electrode forward and down to make a slight "C"
motion. As the filler metal solidifies, return the electrode to the forward edge of the keyhole. Hold it there until it fills the keyhole and another keyhole opens. Continue whipping the arc across the entire joint, adding filler metal each time.
6. The second pass should be a stringer bead with the toes uniform with smooth transition
to the groove walls. The remainder of the passes should be weave bead with pausing at the toes to keep the bead flat with smooth transition to the base metal.
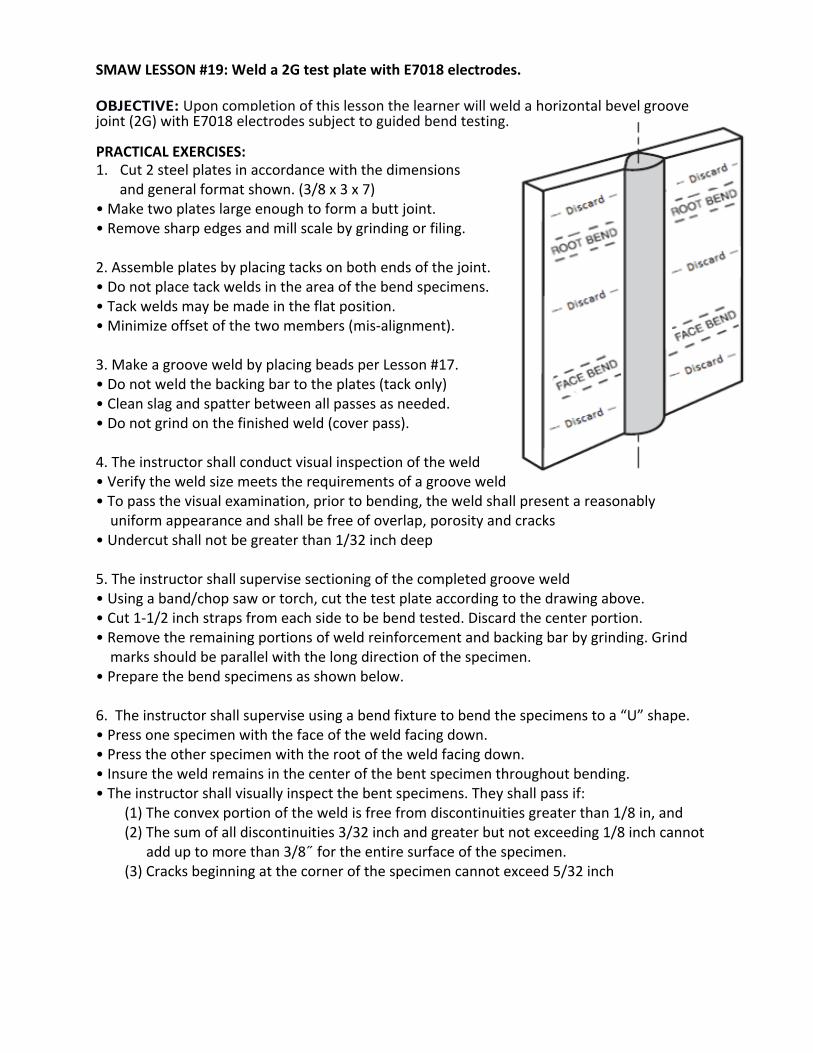
SMAW LESSON #19: Weld a 2G test plate with E7018 electrodes. OBJECTIVE: Upon completion of this lesson the learner will weld a horizontal bevel groove joint (2G) with E7018 electrodes subject to guided bend testing. PRACTICAL EXERCISES: 1. Cut 2 steel plates in accordance with the dimensions
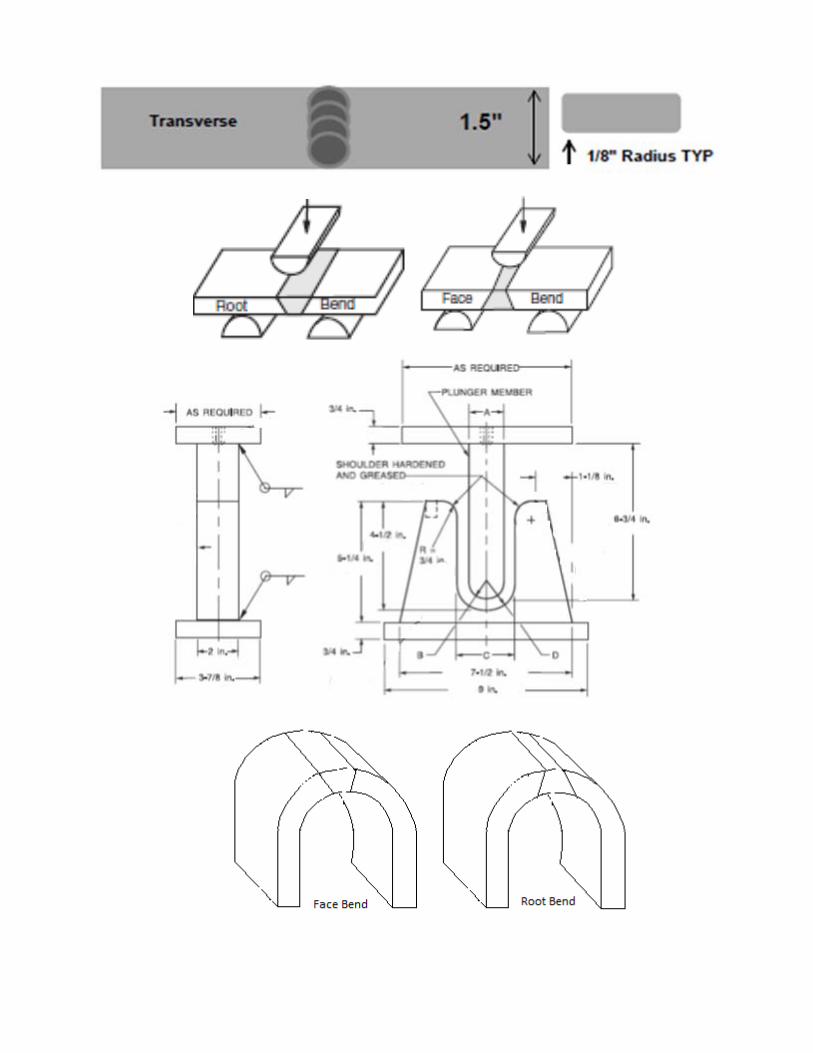
and general format shown. (3/8 x 3 x 7) • Make two plates large enough to form a butt joint. • Remove sharp edges and mill scale by grinding or filing. 2. Assemble plates by placing tacks on both ends of the joint. • Do not place tack welds in the area of the bend specimens. • Tack welds may be made in the flat position. • Minimize offset of the two members (mis‐alignment). 3. Make a groove weld by placing beads per Lesson #17. • Do not weld the backing bar to the plates (tack only) • Clean slag and spatter between all passes as needed. • Do not grind on the finished weld (cover pass). 4. The instructor shall conduct visual inspection of the weld • Verify the weld size meets the requirements of a groove weld • To pass the visual examination, prior to bending, the weld shall present a reasonably uniform appearance and shall be free of overlap, porosity and cracks • Undercut shall not be greater than 1/32 inch deep 5. The instructor shall supervise sectioning of the completed groove weld • Using a band/chop saw or torch, cut the test plate according to the drawing above. • Cut 1‐1/2 inch straps from each side to be bend tested. Discard the center portion. • Remove the remaining portions of weld reinforcement and backing bar by grinding. Grind marks should be parallel with the long direction of the specimen. • Prepare the bend specimens as shown below. 6. The instructor shall supervise using a bend fixture to bend the specimens to a “U” shape. • Press one specimen with the face of the weld facing down. • Press the other specimen with the root of the weld facing down. • Insure the weld remains in the center of the bent specimen throughout bending. • The instructor shall visually inspect the bent specimens. They shall pass if: (1) The convex portion of the weld is free from discontinuities greater than 1/8 in, and (2) The sum of all discontinuities 3/32 inch and greater but not exceeding 1/8 inch cannot add up to more than 3/8˝ for the entire surface of the specimen. (3) Cracks beginning at the corner of the specimen cannot exceed 5/32 inch
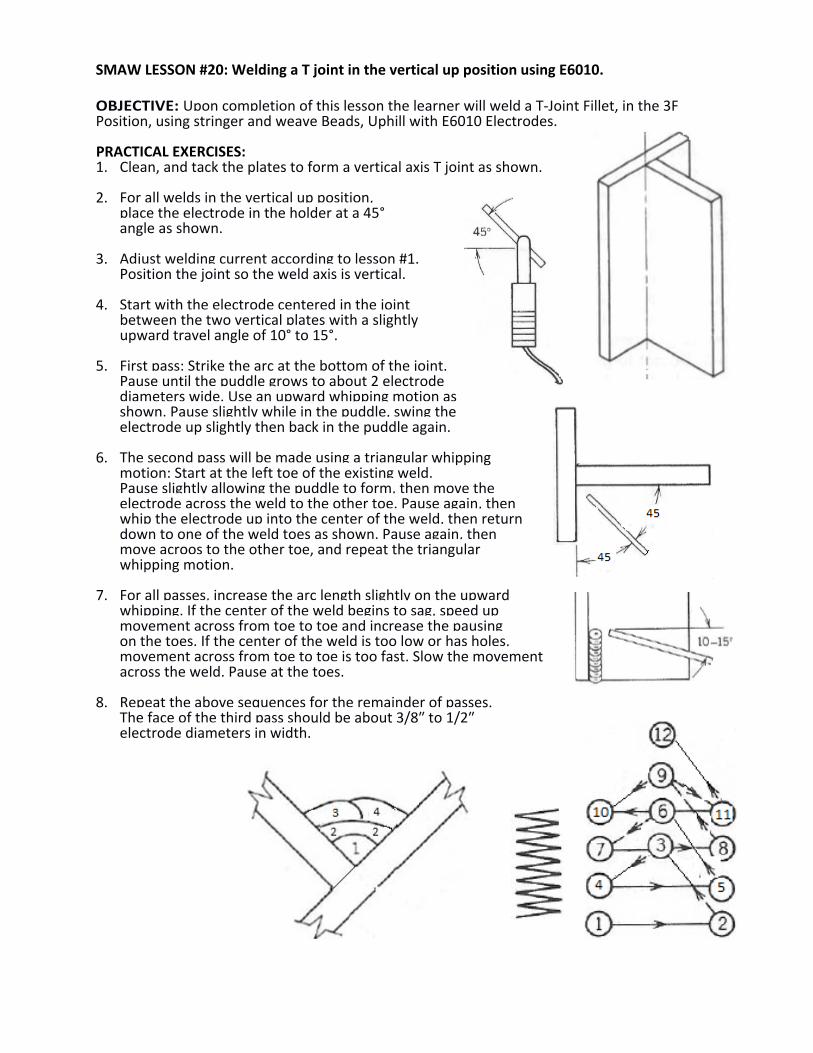
SMAW LESSON #20: Welding a T joint in the vertical up position using E6010. OBJECTIVE: Upon completion of this lesson the learner will weld a T‐Joint Fillet, in the 3F Position, using stringer and weave Beads, Uphill with E6010 Electrodes. PRACTICAL EXERCISES: 1. Clean, and tack the plates to form a vertical axis T joint as shown.
2. For all welds in the vertical up position,
place the electrode in the holder at a 45° angle as shown.
3. Adjust welding current according to lesson #1. Position the joint so the weld axis is vertical.
4. Start with the electrode centered in the joint between the two vertical plates with a slightly upward travel angle of 10° to 15°.
5. First pass: Strike the arc at the bottom of the joint. Pause until the puddle grows to about 2 electrode diameters wide. Use an upward whipping motion as shown. Pause slightly while in the puddle, swing the electrode up slightly then back in the puddle again.
6. The second pass will be made using a triangular whipping motion: Start at the left toe of the existing weld. Pause slightly allowing the puddle to form, then move the electrode across the weld to the other toe. Pause again, then whip the electrode up into the center of the weld, then return down to one of the weld toes as shown. Pause again, then move acroos to the other toe, and repeat the triangular whipping motion.
7. For all passes, increase the arc length slightly on the upward whipping. If the center of the weld begins to sag, speed up movement across from toe to toe and increase the pausing on the toes. If the center of the weld is too low or has holes, movement across from toe to toe is too fast. Slow the movement across the weld. Pause at the toes.
8. Repeat the above sequences for the remainder of passes. The face of the third pass should be about 3/8″ to 1/2″ electrode diameters in width.

SMAW LESSON #21: Welding a T joint in the vertical up position using E7018. OBJECTIVE: Upon completion of this lesson the learner will weld a T‐Joint Fillet, in the 3F Position, using stringer and weave Beads, Uphill with E7018 Electrodes. PRACTICAL EXERCISES: 1. Clean, and tack the plates to form a vertical axis T joint as shown.
2. For all welds in the vertical up position,
place the electrode in the holder at a 45° angle as shown.
3. Adjust welding current according to lesson #6. Position the joint so the weld axis is vertical.
4. Start with the electrode centered in the joint between the two vertical plates with a slightly upward travel angle of 10° to 15°.
5. First pass: Strike the arc at the bottom of the joint. Pause until the puddle grows to about 2 electrode diameters wide. Use an upward dragging motion or a slight weaving motion, pausing at the toes.
6. The second pass will be made using a larger weaving motion. Start at the left toe of the existing weld. Pause slightly allowing the puddle to form, then move the electrode across the weld to the other toe. Pause again, then return across to the other toe, and repeat.
7. For all passes, significant pausing must occur at each toe. If the center of the weld begins to sag, speed up movement across from toe to toe and increase the pausing on the toes. If the center of the weld is too low or has holes, movement across from toe to toe is too fast. Slow the movement across the weld. Pause at the toes. No weave bead should be wider than three times the diameter of the electrode.
8. Repeat the above sequences for the remainder of passes. The face of the third pass should be about 3/8″ to 1/2″ electrode diameters in width.

SMAW LESSON #22: Welding a T joint in the vertical down position using E6010. OBJECTIVE: Upon completion of this lesson the learner will weld a T‐Joint Fillet, in the 3F Position, using stringer and weave Beads, downhill with E6010 Electrodes. PRACTICAL EXERCISES: 1. Clean, and tack the plates to form a vertical axis T joint as shown.
2. For all welds in the vertical down position,
place the electrode in the holder at a 45° angle as shown.
3. Adjust welding current according to lesson #1. Position the joint so the weld axis is vertical.
4. Start with the electrode centered in the joint between the two vertical plates with the electrode pointed upward at an angle of 20° to 30°.
5. First pass: Strike the arc at the bottom of the joint. Pause until the puddle grows to about 2 electrode diameters wide. Use a downward weaving motion with as short of an arc length as practical. Increase the angle of the electrode as needed to keep below the molten puddle.
6. All subsequent passes will be made using the same technique. Maintain a minimum of a 20° to 30° electrode angle. Clean thoroughly between passes.
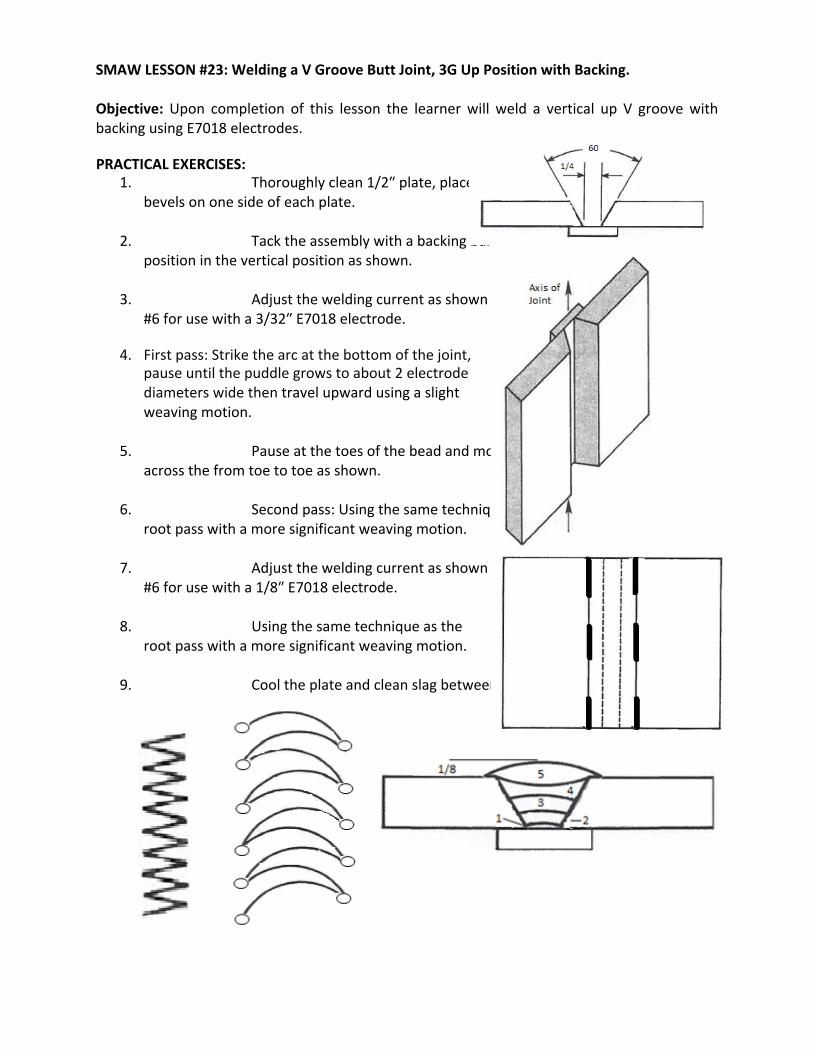
SMAW LESSON #23: Welding a V Groove Butt Joint, 3G Up Position with Backing. Objective: Upon completion of this lesson the learner will weld a vertical up V groove with backing using E7018 electrodes. PRACTICAL EXERCISES:
1. Thoroughly clean 1/2″ plate, place 30° bevels on one side of each plate.
2. Tack the assembly with a backing bar and
position in the vertical position as shown.
3. Adjust the welding current as shown in Lesson #6 for use with a 3/32″ E7018 electrode.
4. First pass: Strike the arc at the bottom of the joint,
pause until the puddle grows to about 2 electrode diameters wide then travel upward using a slight weaving motion.
5. Pause at the toes of the bead and move quickly
across the from toe to toe as shown.
6. Second pass: Using the same technique as the root pass with a more significant weaving motion.
7. Adjust the welding current as shown in Lesson #6 for use with a 1/8″ E7018 electrode.
8. Using the same technique as the root pass with a more significant weaving motion.
9. Cool the plate and clean slag between all passes.

SMAW LESSON #24: Welding an open V Groove Butt Joint, 3G Up Position with E6010. Objective: Upon completion of this lesson the learner will weld an open root vertical up V groove using E6010 electrodes PRACTICAL EXERCISES: 1. Clean and bevel the plates with a 30° angle.
2. Assemble the joint with a 1/16″ root face and
1/16″ root opening as shown.
3. Position the joint in the 3G position as shown.
4. Adjust the welding current as shown in Lesson #1. 5. Start the arc on the bottom tack. Hold the arc at the
beginning of the root opening until a keyhole appears. Use an electrode angle 10° to 15° as shown.
6. Root pass: Travel upward using a slight whipping motion then
return to the keyhole. Pause each time you return to the keyhole, until it fills and another hole opens above it. Continue uphill whipping.
If the keyhole does not appear: travel speed is too fast; amperage is too low; root opening is too tight; arc length is too short; or, an incorrect electrode is being used.
If the keyhole opens up: travel speed is too slow; amperage is too high;
root opening tis too large; arc length is too long; or, an incorrect electrode is being used.
7. Start at the bottom of the joint. Hold a normal arc length and travel uphill using the triangular weave as used previously in Lesson #20. Pause at the sides and continue to fill the joint using stringers and weaves. Chip slag and clean between all passes.
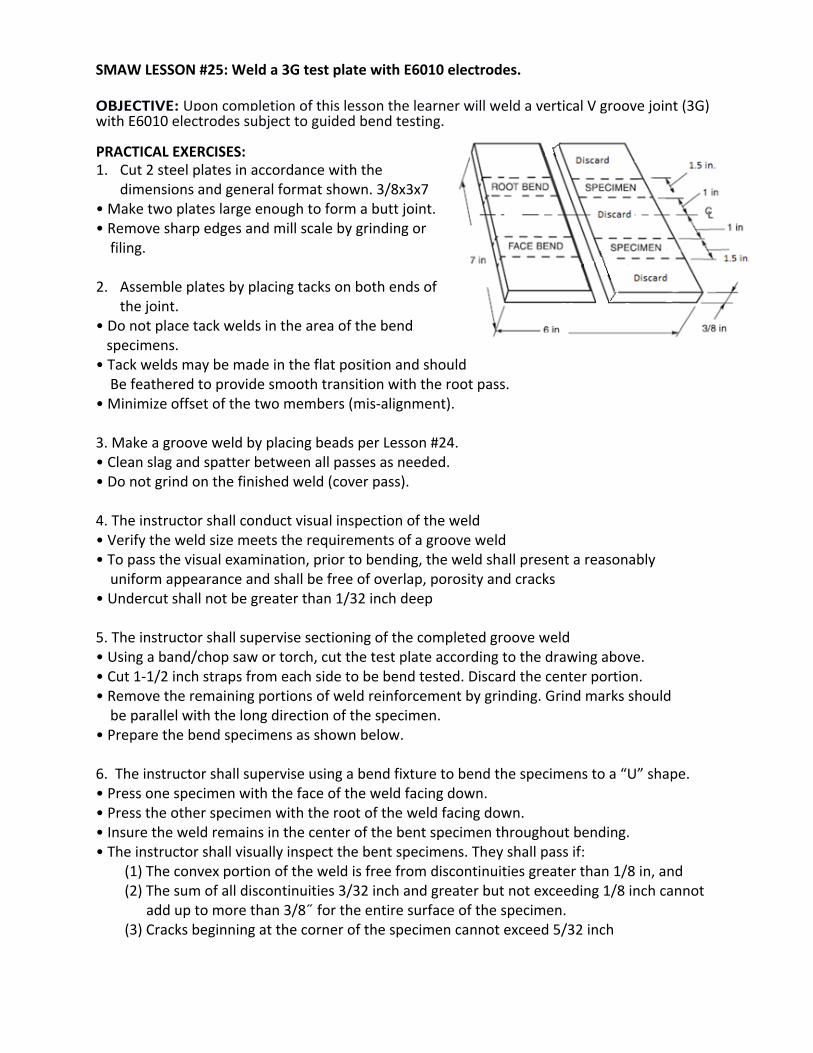
SMAW LESSON #25: Weld a 3G test plate with E6010 electrodes. OBJECTIVE: Upon completion of this lesson the learner will weld a vertical V groove joint (3G) with E6010 electrodes subject to guided bend testing. PRACTICAL EXERCISES: 1. Cut 2 steel plates in accordance with the
dimensions and general format shown. 3/8x3x7 • Make two plates large enough to form a butt joint. • Remove sharp edges and mill scale by grinding or filing. 2. Assemble plates by placing tacks on both ends of
the joint. • Do not place tack welds in the area of the bend specimens. • Tack welds may be made in the flat position and should Be feathered to provide smooth transition with the root pass. • Minimize offset of the two members (mis‐alignment). 3. Make a groove weld by placing beads per Lesson #24. • Clean slag and spatter between all passes as needed. • Do not grind on the finished weld (cover pass). 4. The instructor shall conduct visual inspection of the weld • Verify the weld size meets the requirements of a groove weld • To pass the visual examination, prior to bending, the weld shall present a reasonably uniform appearance and shall be free of overlap, porosity and cracks • Undercut shall not be greater than 1/32 inch deep 5. The instructor shall supervise sectioning of the completed groove weld • Using a band/chop saw or torch, cut the test plate according to the drawing above. • Cut 1‐1/2 inch straps from each side to be bend tested. Discard the center portion. • Remove the remaining portions of weld reinforcement by grinding. Grind marks should be parallel with the long direction of the specimen. • Prepare the bend specimens as shown below. 6. The instructor shall supervise using a bend fixture to bend the specimens to a “U” shape. • Press one specimen with the face of the weld facing down. • Press the other specimen with the root of the weld facing down. • Insure the weld remains in the center of the bent specimen throughout bending. • The instructor shall visually inspect the bent specimens. They shall pass if: (1) The convex portion of the weld is free from discontinuities greater than 1/8 in, and (2) The sum of all discontinuities 3/32 inch and greater but not exceeding 1/8 inch cannot add up to more than 3/8˝ for the entire surface of the specimen. (3) Cracks beginning at the corner of the specimen cannot exceed 5/32 inch

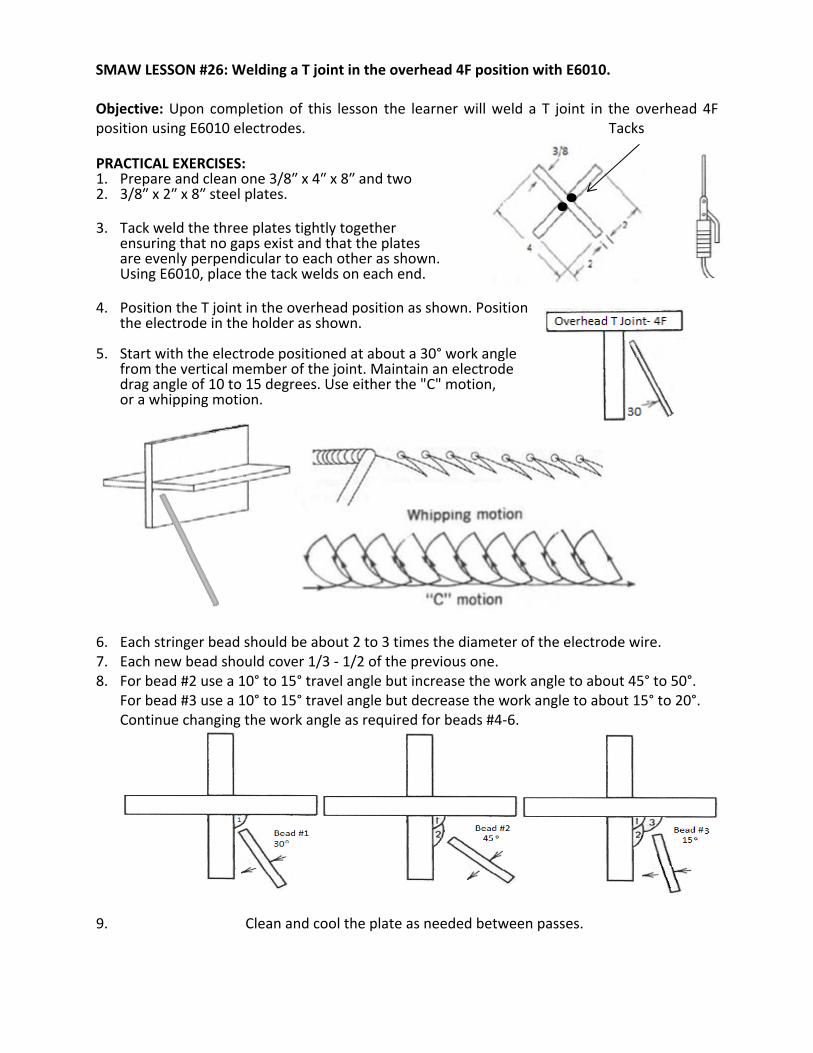
SMAW LESSON #26: Welding a T joint in the overhead 4F position with E6010. Objective: Upon completion of this lesson the learner will weld a T joint in the overhead 4F position using E6010 electrodes. Tacks PRACTICAL EXERCISES: 1. Prepare and clean one 3/8″ x 4″ x 8″ and two 2. 3/8″ x 2″ x 8″ steel plates.
3. Tack weld the three plates tightly together
ensuring that no gaps exist and that the plates are evenly perpendicular to each other as shown. Using E6010, place the tack welds on each end.
4. Position the T joint in the overhead position as shown. Position
the electrode in the holder as shown.
5. Start with the electrode positioned at about a 30° work angle from the vertical member of the joint. Maintain an electrode drag angle of 10 to 15 degrees. Use either the "C" motion, or a whipping motion.
6. Each stringer bead should be about 2 to 3 times the diameter of the electrode wire. 7. Each new bead should cover 1/3 ‐ 1/2 of the previous one. 8. For bead #2 use a 10° to 15° travel angle but increase the work angle to about 45° to 50°.
For bead #3 use a 10° to 15° travel angle but decrease the work angle to about 15° to 20°. Continue changing the work angle as required for beads #4‐6.
9. Clean and cool the plate as needed between passes.

SMAW LESSON #27: Welding a T joint in the overhead 4F position with E7018. Objective: Upon completion of this lesson the learner will weld a T joint in the overhead 4F position using E7018 electrodes. Tacks PRACTICAL EXERCISES: 1. Prepare and clean one 3/8″ x 4″ x 8″ and two 2. 3/8″ x 2″ x 8″ steel plates.
3. Tack weld the three plates tightly together
ensuring that no gaps exist and that the plates are evenly perpendicular to each other as shown. Using E7018, place the tack welds on each end.
4. Position the T joint in the overhead position as shown. Position
the electrode in the holder as shown.
5. Start with the electrode positioned at about a 30° work angle from the vertical member of the joint. Maintain an electrode drag angle of 10 to 15 degrees. Use either the "C" motion, or a dragging motion. Be sure to pause at the top of the “C”.
6. Each stringer bead should be about 2 to 3 times the diameter of the electrode wire. 7. Each new bead should cover 1/3 ‐ 1/2 of the previous one. 8. For bead #2 use a 10° to 15° travel angle but increase the work angle to about 45° to 50°.
For bead #3 use a 10° to 15° travel angle but decrease the work angle to about 15° to 20°. Continue changing the work angle as required for beads #4‐6.
9. Clean and cool the plate as needed between passes.

SMAW LESSON #28: Welding a V Groove Butt Joint, in the overhead 4G Position with Backing. Objective: Upon completion of this lesson the learner will weld an overhead V groove with backing using E7018 electrodes. PRACTICAL EXERCISES: 1. Thoroughly clean 1/2″ plate, place 30° bevels on one side of each plate. 2. Tack the assembly with a backing bar and position in the overhead position as shown. 3. Adjust the welding current as shown in Lesson #6 for use with a 3/32″ E7018 electrode. 4. First pass: Strike the arc at the edge of the joint, pause until the puddle grows to about 2 electrode diameters wide then travel using a dragging motion. 5. Start the first pass with a 30° travel angle and a work
angle of about 80° from the right as shown.
6. Weld the second pass with a 30° travel angle and a work angle of about 50° from the left as shown.
7. Weld the third pass with a 30° travel angle and a work angle of about 50° from the right as shown.
8. Continue using a similar changing of angles for
remainder of the passes.
9. Cool the plate and clean slag between all passes.

SMAW LESSON #29: Welding an open root V Groove Butt Joint, in the overhead 4G position with E6010. Objective: Upon completion of this lesson the learner will weld an open root overhead V groove using E6010 electrodes PRACTICAL EXERCISES: 1. Clean and bevel the plates with a 30° angle.
2. Assemble the joint with a 1/16″ root face and
1/16″ root opening as shown.
3. Position the joint in the 4G position as shown.
4. Adjust the welding current as shown in Lesson #1. 5. Start the arc on the edge of the joint. Hold the arc at
the beginning of the root opening until a keyhole appears. Use an electrode angle 10° to 15° as shown.
6. Root pass: Travel using a slight whipping motion
then return to the keyhole. Pause each time you return to the keyhole, until it fills and another hole opens above it. Continue uphill whipping.
If the keyhole does not appear: travel speed is too fast; amperage is too low; root opening is too tight; arc length is too short; or, an incorrect electrode is being used.
If the keyhole opens up: travel speed is too slow; amperage is too high;
root opening tis too large; arc length is too long; or, an incorrect electrode is being used.
7. Fill passes. Hold a short arc length and travel using a whipping Technique as used previously. Change the work angles as done Previously in Lesson #28. Continue to fill the joint using stringers. Chip slag and clean between all passes.

SMAW LESSON #30: Weld a 4G test plate with E6010 electrodes. OBJECTIVE: Upon completion of this lesson the learner will weld an overhead bevel groove joint (4G) with E6010 electrodes subject to guided bend testing. PRACTICAL EXERCISES: 1. Cut 2 steel plates in accordance with the
dimensions and general format shown. 3/8x3x7 • Make two plates large enough to form a butt joint. • Remove sharp edges and mill scale by grinding or filing. 2. Assemble plates by placing tacks on both ends of
the joint. • Do not place tack welds in the area of the bend specimens. • Tack welds may be made in the flat position and should Be feathered to provide smooth transition with the root pass. • Minimize offset of the two members (mis‐alignment). 3. Make a groove weld by placing beads per Lesson #24. • Clean slag and spatter between all passes as needed. • Do not grind on the finished weld (cover pass). 4. The instructor shall conduct visual inspection of the weld • Verify the weld size meets the requirements of a groove weld • To pass the visual examination, prior to bending, the weld shall present a reasonably uniform appearance and shall be free of overlap, porosity and cracks • Undercut shall not be greater than 1/32 inch deep 5. The instructor shall supervise sectioning of the completed groove weld • Using a band/chop saw or torch, cut the test plate according to the drawing above. • Cut 1‐1/2 inch straps from each side to be bend tested. Discard the center portion. • Remove the remaining portions of weld reinforcement by grinding. Grind marks should be parallel with the long direction of the specimen. • Prepare the bend specimens as shown below. 6. The instructor shall supervise using a bend fixture to bend the specimens to a “U” shape. • Press one specimen with the face of the weld facing down. • Press the other specimen with the root of the weld facing down. • Insure the weld remains in the center of the bent specimen throughout bending. • The instructor shall visually inspect the bent specimens. They shall pass if: (1) The convex portion of the weld is free from discontinuities greater than 1/8 in, and (2) The sum of all discontinuities 3/32 inch and greater but not exceeding 1/8 inch cannot add up to more than 3/8˝ for the entire surface of the specimen. (3) Cracks beginning at the corner of the specimen cannot exceed 5/32 inch
