s/mime on good for enterprise ms online certificate...
TRANSCRIPT

1
© Good Technology 2014. All rights reserved.
S/MIME on Good for Enterprise MS Online Certificate Status Protocol Installation and Configuration Notes Updated: October 08, 2014
Installing the Online Responder service ....................................................................................................................... 1 Preparing the environment ........................................................................................................................................ 3
Configuring the CAs ............................................................................................................................................... 3 Enrolling for an OCSP Response Signing Certificate ............................................................................................ 5
Creating a self-signing OCSP Certificate from Active Directory Certificate Services ................................................... 5 Configuring the Online Responder ................................................................................................................................ 7
Creating a revocation configuration ........................................................................................................................... 7 Modifying the Online Responder Identifier: ............................................................................................................... 9
Configuring GMM Server (supported version 6.3.1.24) ................................................................................................ 9 Configuring GMC settings for OCSP URL............................................................................................................... 10
Exporting the OCSP certificate created from the certificate services ......................................................................... 10 This note documents the specific MS OCSP option settings used for Good Mobile Messaging to function correctly. The instructions are based on Microsoft procedures and are provided to guide you through the installation and configuration process. For expanded, detailed information on CA deployment, refer to Windows Server 2008 CA Enhancements (http://go.microsoft.com/fwlink/?LinkID=83212). To install MS OCSP, use Windows Server 2008 R2 Enterprise Edition.
Installing the Online Responder service
Deploying Online Responders should occur after deploying CAs and before deploying the end-entity certificates. 1. In Server Manager, click Start, point to Administrative Tools, and then click Server Manager.
2
© Good Technology 2014. All rights reserved.
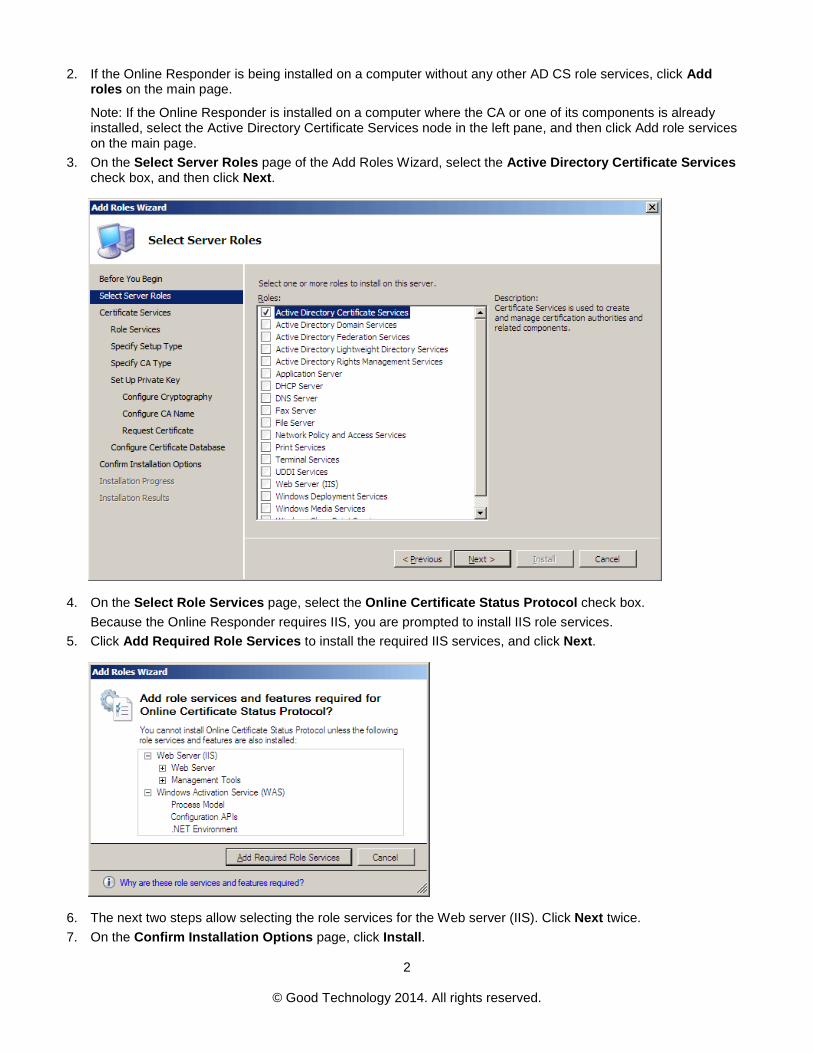
2. If the Online Responder is being installed on a computer without any other AD CS role services, click Add roles on the main page.
Note: If the Online Responder is installed on a computer where the CA or one of its components is already installed, select the Active Directory Certificate Services node in the left pane, and then click Add role services on the main page.
3. On the Select Server Roles page of the Add Roles Wizard, select the Active Directory Certificate Services check box, and then click Next.
4. On the Select Role Services page, select the Online Certificate Status Protocol check box. Because the Online Responder requires IIS, you are prompted to install IIS role services.
5. Click Add Required Role Services to install the required IIS services, and click Next.
6. The next two steps allow selecting the role services for the Web server (IIS). Click Next twice. 7. On the Confirm Installation Options page, click Install.

3
© Good Technology 2014. All rights reserved.
Note: The IIS installation process might take a long time to complete. 8. When the installation is complete, the status of the installation process is displayed on the Installation Results
page. 9. Click Close.
Preparing the environment
The environment preparation consists of the following steps: • Configure the CA. • Enroll for an OCSP Response Signing certificate against a stand-alone CA. • Ports 80 and 389 should be open on the Good Mobile Messaging Server for OCSP and LDAP lookup when
using S/MIME.
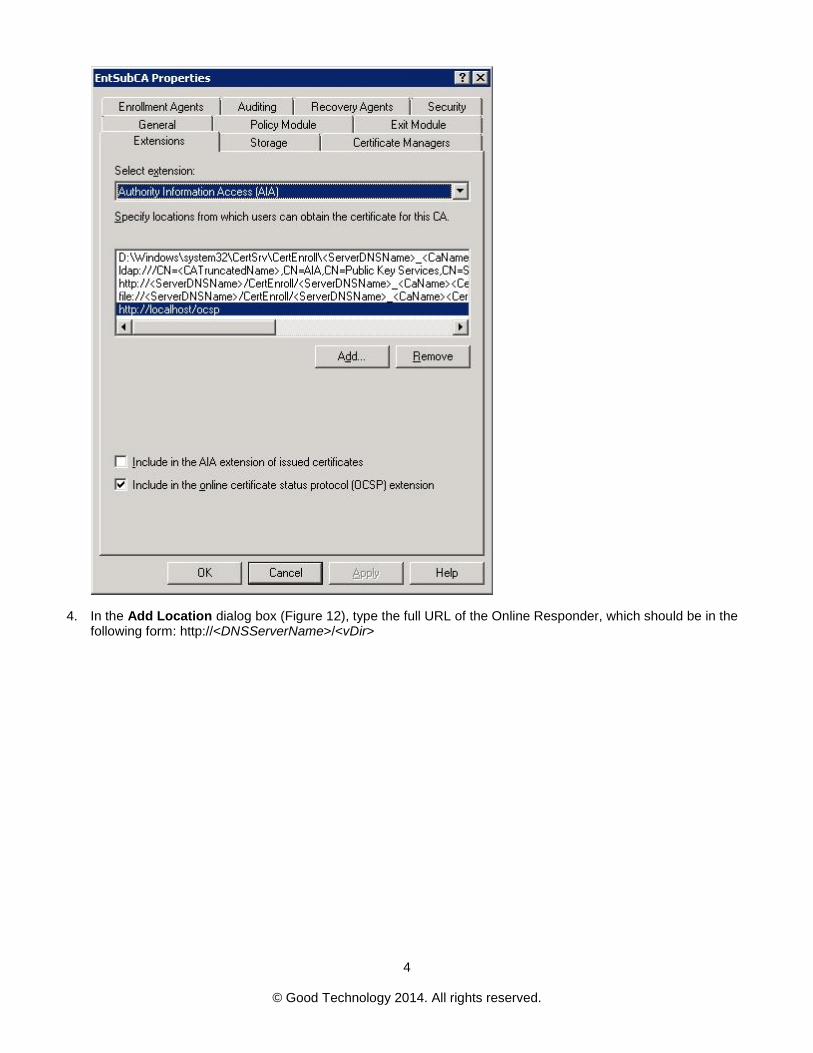
Configuring the CAs You must configure the CAs to include the Online Responder's URL as part of the authority information access extension of issued certificates. This URL is used by the OCSP client to validate the certificate status. To configure the authority information access extension: 1. Open the Certification Authority snap-in, right-click the name of the issuing CA, and then click Properties. 2. Click the Extensions tab. 3. In the Select extension list, click Authority Information Access (AIA), and then click Add.
4
© Good Technology 2014. All rights reserved.
4. In the Add Location dialog box (Figure 12), type the full URL of the Online Responder, which should be in the following form: http://<DNSServerName>/<vDir>

5
© Good Technology 2014. All rights reserved.
Note: When installing the Online Responder, the default virtual directory used in IIS is OCSP.
5. Click OK. 6. Select the location from the Location list. 7. Select the Include in the online certificate status protocol (OCSP) extension check box, and then click OK.
Enrolling for an OCSP Response Signing Certificate We noticed in our testing that OCSP signing private key permissions must be configured manually on the Online Responder computer to allow the Online Responder service access to the private key” on Windows server 2008.
To configure the private key permissions for an OCSP signing certificate: 1. On the Online Responder computer, open the Certificates snap-in for the local computer. 2. In the available certificates list, select the OCSP Response Signing certificate.
Note: The signing certificate should first be manually enrolled. 3. On the Actions menu, point to All Tasks, click Manage Private Keys, and then click Add. 4. Type network service, and then click OK. 5. Verify that only the Read permission is allowed for the NETWORK SERVICE, and then click OK. 6. Restart the Online Responder service by typing the following commands at a command prompt:
net stop ocspsvc
net start ocspsvc
Note: The steps above apply only if the Online Responder revocation configuration is set for manual enrollment of the OCSP signing certificate. If the revocation configuration is configured for OCSP automatic enrollment, the private keys should have the correct permissions by default and the steps above should not be required.
Creating a self-signing OCSP Certificate from Active Directory Certificate Services
This procedure guides you though requesting a new certificate for 1.3.6.1.5.5.7.3.9 (OCSP):
6
© Good Technology 2014. All rights reserved.
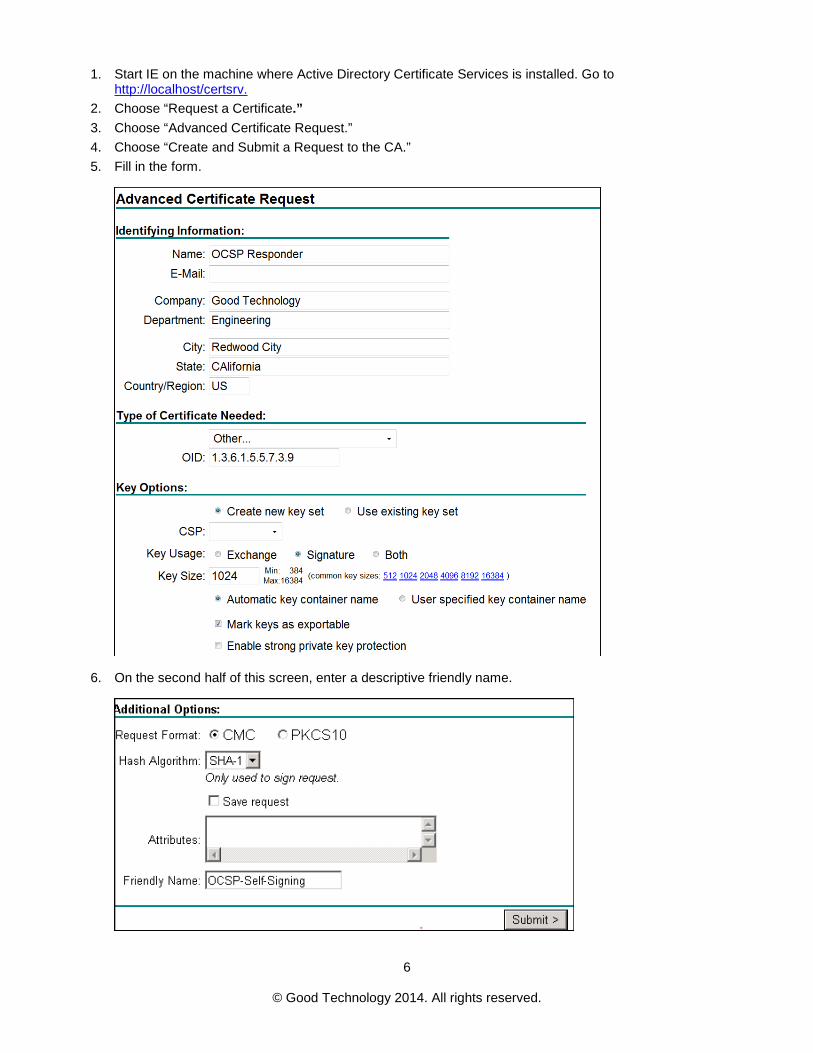
1. Start IE on the machine where Active Directory Certificate Services is installed. Go to http://localhost/certsrv.
2. Choose “Request a Certificate.” 3. Choose “Advanced Certificate Request.” 4. Choose “Create and Submit a Request to the CA.” 5. Fill in the form.
6. On the second half of this screen, enter a descriptive friendly name.
7
© Good Technology 2014. All rights reserved.
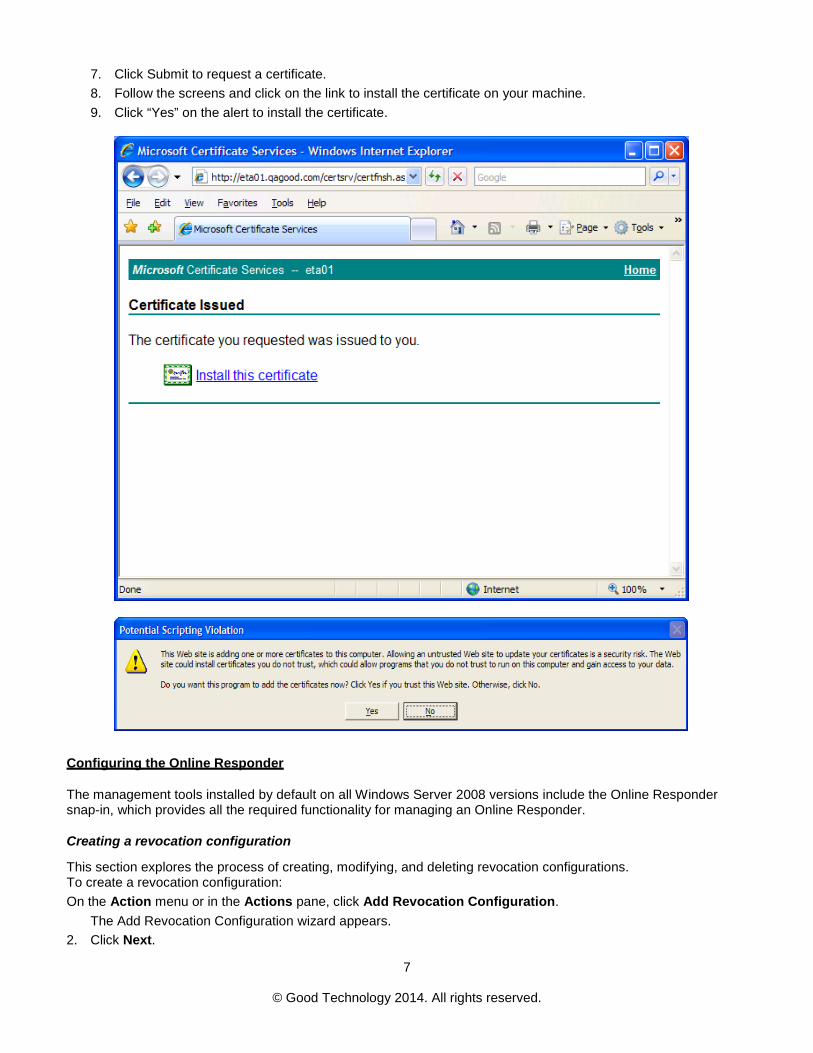
7. Click Submit to request a certificate. 8. Follow the screens and click on the link to install the certificate on your machine. 9. Click “Yes” on the alert to install the certificate.
Configuring the Online Responder
The management tools installed by default on all Windows Server 2008 versions include the Online Responder snap-in, which provides all the required functionality for managing an Online Responder.
Creating a revocation configuration
This section explores the process of creating, modifying, and deleting revocation configurations. To create a revocation configuration: On the Action menu or in the Actions pane, click Add Revocation Configuration.
The Add Revocation Configuration wizard appears. 2. Click Next.
8
© Good Technology 2014. All rights reserved.
3. In the Name box of the Name the Revocation Configuration page, enter a friendly name for the revocation configuration (which will help identify the revocation configuration from the available revocation configurations), and then click Next.
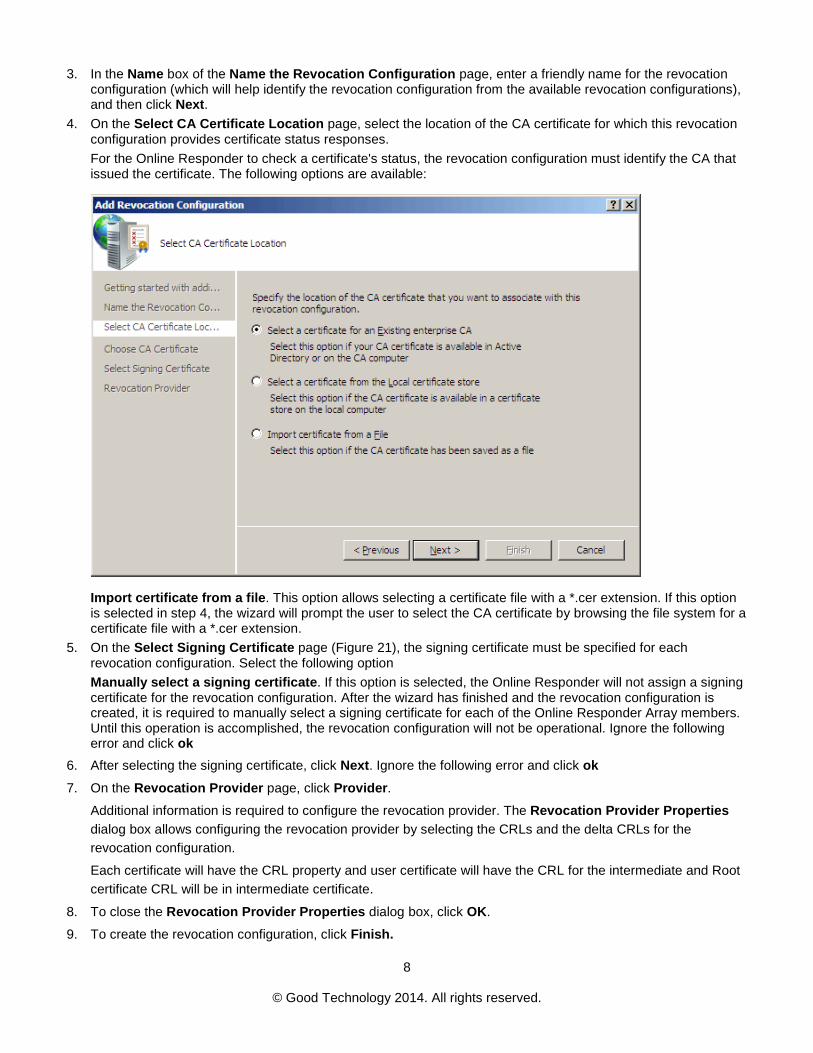
4. On the Select CA Certificate Location page, select the location of the CA certificate for which this revocation configuration provides certificate status responses. For the Online Responder to check a certificate's status, the revocation configuration must identify the CA that issued the certificate. The following options are available:
Import certificate from a file. This option allows selecting a certificate file with a *.cer extension. If this option is selected in step 4, the wizard will prompt the user to select the CA certificate by browsing the file system for a certificate file with a *.cer extension.
5. On the Select Signing Certificate page (Figure 21), the signing certificate must be specified for each revocation configuration. Select the following option Manually select a signing certificate. If this option is selected, the Online Responder will not assign a signing certificate for the revocation configuration. After the wizard has finished and the revocation configuration is created, it is required to manually select a signing certificate for each of the Online Responder Array members. Until this operation is accomplished, the revocation configuration will not be operational. Ignore the following error and click ok
6. After selecting the signing certificate, click Next. Ignore the following error and click ok 7. On the Revocation Provider page, click Provider.
Additional information is required to configure the revocation provider. The Revocation Provider Properties dialog box allows configuring the revocation provider by selecting the CRLs and the delta CRLs for the revocation configuration.
Each certificate will have the CRL property and user certificate will have the CRL for the intermediate and Root certificate CRL will be in intermediate certificate.
8. To close the Revocation Provider Properties dialog box, click OK.
9. To create the revocation configuration, click Finish.
9
© Good Technology 2014. All rights reserved.
Modifying the Online Responder Identifier:
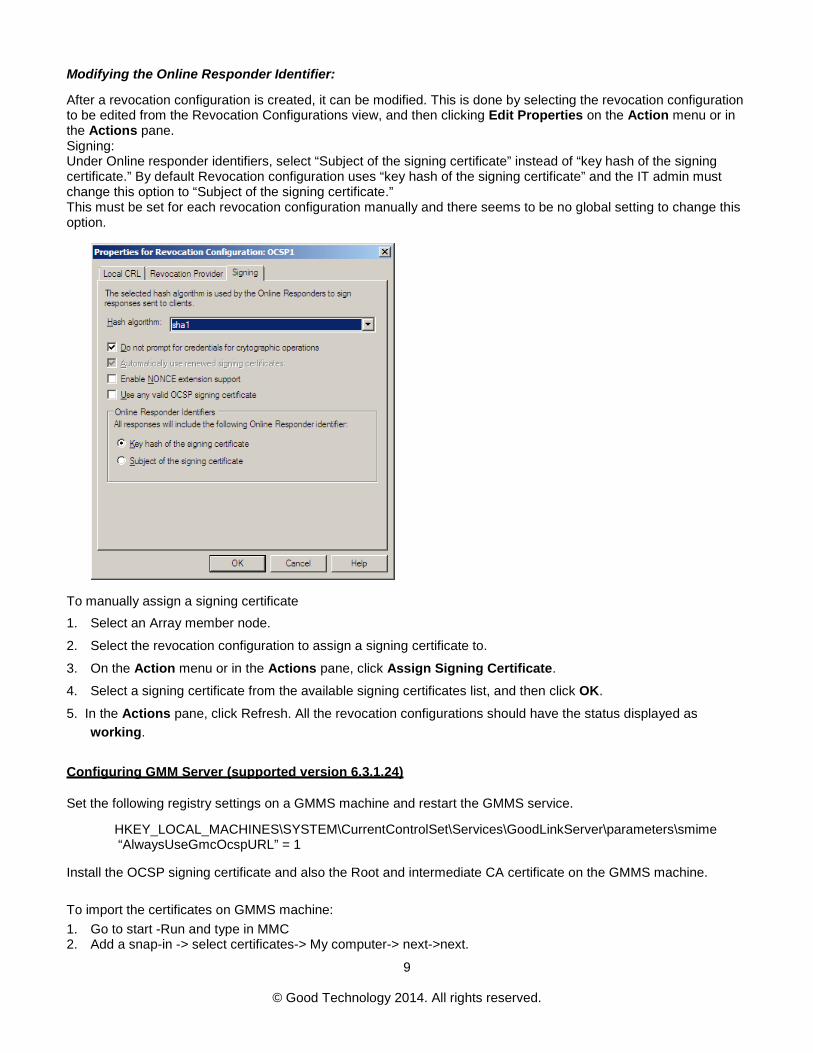
After a revocation configuration is created, it can be modified. This is done by selecting the revocation configuration to be edited from the Revocation Configurations view, and then clicking Edit Properties on the Action menu or in the Actions pane. Signing: Under Online responder identifiers, select “Subject of the signing certificate” instead of “key hash of the signing certificate.” By default Revocation configuration uses “key hash of the signing certificate” and the IT admin must change this option to “Subject of the signing certificate.” This must be set for each revocation configuration manually and there seems to be no global setting to change this option.
To manually assign a signing certificate 1. Select an Array member node.
2. Select the revocation configuration to assign a signing certificate to.
3. On the Action menu or in the Actions pane, click Assign Signing Certificate.
4. Select a signing certificate from the available signing certificates list, and then click OK.
5. In the Actions pane, click Refresh. All the revocation configurations should have the status displayed as working.
Configuring GMM Server (supported version 6.3.1.24)
Set the following registry settings on a GMMS machine and restart the GMMS service.
HKEY_LOCAL_MACHINES\SYSTEM\CurrentControlSet\Services\GoodLinkServer\parameters\smime “AlwaysUseGmcOcspURL” = 1
Install the OCSP signing certificate and also the Root and intermediate CA certificate on the GMMS machine.
To import the certificates on GMMS machine: 1. Go to start -Run and type in MMC 2. Add a snap-in -> select certificates-> My computer-> next->next.
10
© Good Technology 2014. All rights reserved.
3. Expand the certificates and import all the Root/OCSP certificates in to Root certificates and intermediate CA in to intermediate store.
Configuring GMC settings for OCSP URL
Use the IP address of the system OCSP server
EX: http://10.102.164.167/ocsp
Exporting the OCSP certificate created from the certificate services
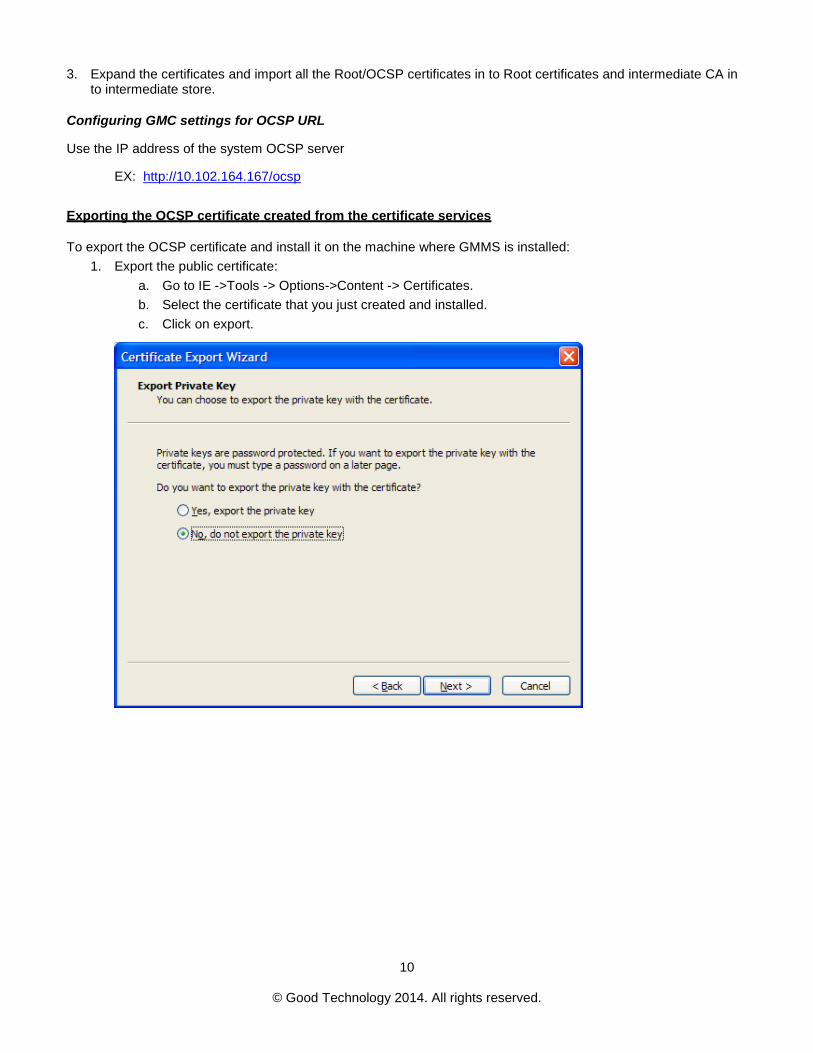
To export the OCSP certificate and install it on the machine where GMMS is installed: 1. Export the public certificate:
a. Go to IE ->Tools -> Options->Content -> Certificates. b. Select the certificate that you just created and installed. c. Click on export.

11
© Good Technology 2014. All rights reserved.
2. Click “Next” and select the location to save the certificate. 3. Click “Next” and click “Finish” to complete the export. 4. Export the PFX file from IE:
12
© Good Technology 2014. All rights reserved.
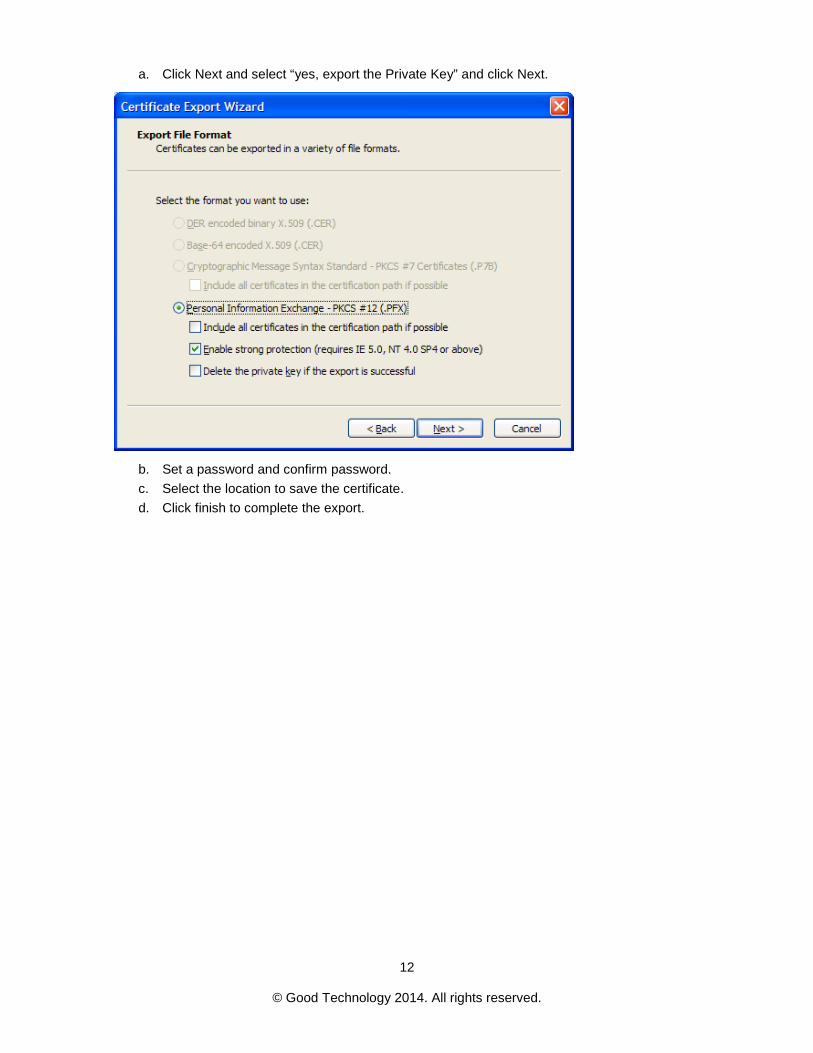
a. Click Next and select “yes, export the Private Key” and click Next.
b. Set a password and confirm password. c. Select the location to save the certificate. d. Click finish to complete the export.