smokehouse owner’s manual section i installation · pdf filesmokehouse owner’s...
TRANSCRIPT

(718) 388-5650 (800) 221-5032 except NY fax: (718) 388-5860 townfood.com
Food Service Equipment Co., Inc.72 Beadel Street BKLYN, NY 11222(718)388-5650 fax (718)388-5860 townfood.com
SMOKEHOUSE OWNER’S MANUALSECTION I INSTALLATION INSTRUCTIONS
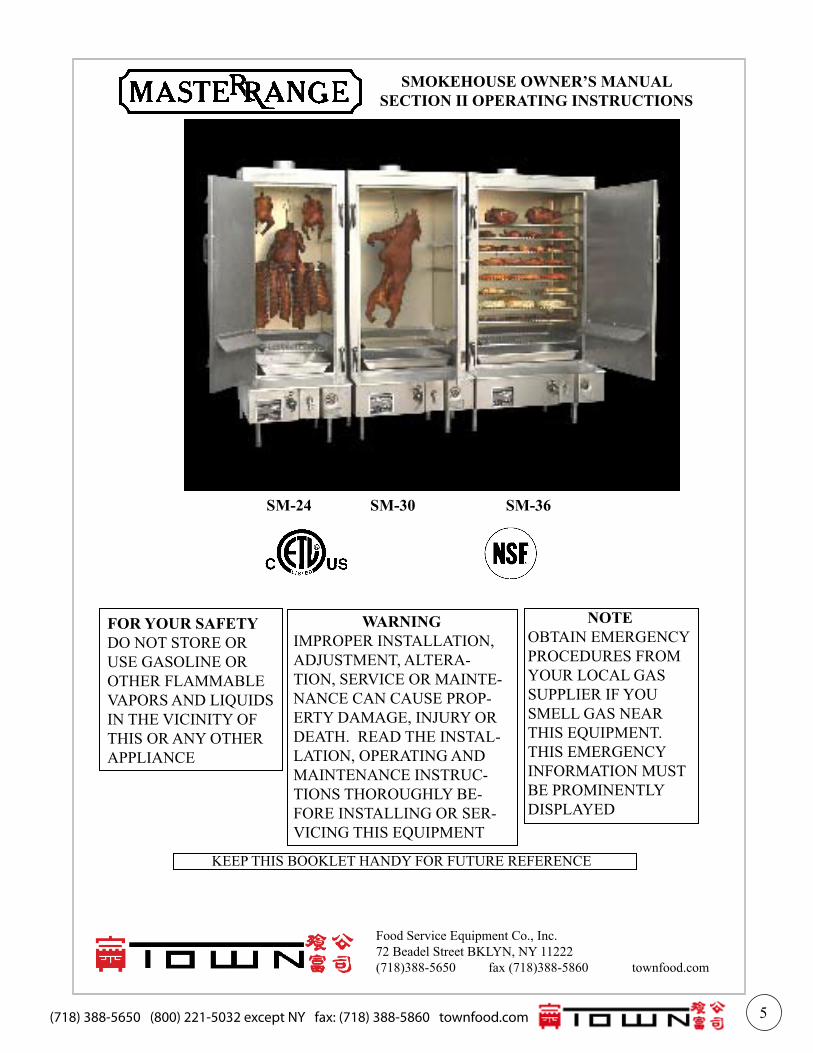
SM-24 SM-30 SM-36
FOR YOUR SAFETYDO NOT STORE OR USE GASOLINE OR OTHER FLAMMABLE VAPORS AND LIQUIDS IN THE VICINITY OF THIS OR ANY OTHER APPLIANCE
WARNINGIMPROPER INSTALLATION, ADJUSTMENT, ALTERA-TION, SERVICE OR MAINTE-NANCE CAN CAUSE PROP-ERTY DAMAGE, INJURY OR DEATH. READ THE INSTAL-LATION, OPERATING AND MAINTENANCE INSTRUC-TIONS THOROUGHLY BE-FORE INSTALLING OR SER-VICING THIS EQUIPMENT
NOTEOBTAIN EMERGENCY PROCEDURES FROM YOUR LOCAL GAS SUPPLIER IF YOU SMELL GAS NEAR THIS EQUIPMENT. THIS EMERGENCY INFORMATION MUST BE PROMINENTLY DISPLAYED
KEEP THIS BOOKLET HANDY FOR FUTURE REFERENCEWHEN SOLD IN THE COMMONWEALTH OF MASSACHUSETTS THIS UNIT MUST BE
EQUIPPED WITH AN INTERLOCK TO PREVENT OPERATION ONLY IF THE HOOD SYSTEM IS OPERATIONAL. INSTALLATION OF THE INTERLOCK IS THE RESPONSIBILITY OF THE
INSTALLER; IT IS NOT SUPPLIED BY THE FACTORY.
1
FOOD SERVICE EQUIPMENT CO., INC. • 72 BEADEL ST • BKLYN • NY 112222
CONGRATULATIONS on your purchase of a MasteRRange Smokehouse. It will give you many years of trouble free use if it is properly used and maintained. You can now produce delicious, juicy barbecue quickly
and easily. Feel free to call our Customer Service Department at (718)388-5650 if you have questions regarding operation or care.
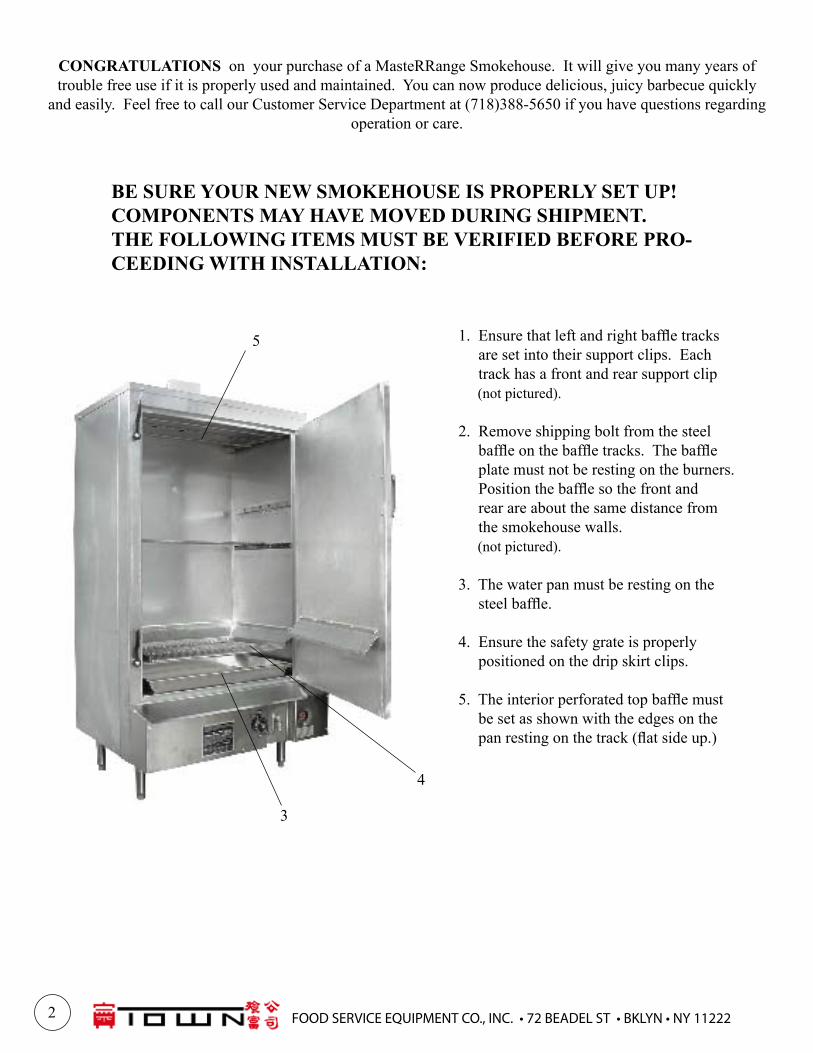
BE SURE YOUR NEW SMOKEHOUSE IS PROPERLY SET UP! COMPONENTS MAY HAVE MOVED DURING SHIPMENT. THE FOLLOWING ITEMS MUST BE VERIFIED BEFORE PRO-CEEDING WITH INSTALLATION:
1. Ensure that left and right baffle tracks are set into their support clips. Each track has a front and rear support clip (not pictured).
2. Remove shipping bolt from the steel baffle on the baffle tracks. The baffle plate must not be resting on the burners. Position the baffle so the front and rear are about the same distance from the smokehouse walls. (not pictured).
3. The water pan must be resting on the steel baffle.
4. Ensure the safety grate is properly positioned on the drip skirt clips.
5. The interior perforated top baffle must be set as shown with the edges on the pan resting on the track (flat side up.)
3
4
5
(718) 388-5650 (800) 221-5032 except NY fax: (718) 388-5860 townfood.com 3
INSTALLATION INSTRUCTIONS
Proper installation is vital for proper performance. Consult your equipment dealer, utility company or local “yellow pages” if assistance is needed in locating a qualified installer. When uncrating, locate all components. Each unit is provided with a baffle, two baffle tracks, water pan, safety grate, lighter rod, and six skewers. Re-fer to the sketch on the opposite page and verify proper component positioning.
INSTALLATION AREA MUST BE FREE & CLEAR FROM COMBUSTIBLES
1. Set the smokehouse in the position it is to occupy in the cooking area. Check that the unit is level. The adjustable feet on the legs may be used to level the unit.2. The gas supply line must be of adequate size to ensure maximum efficiency of the unit and conform with the National Fuel Gas Code, ANSI-Z223.13. The installation must conform with local codes, or in the absence of local codes with the National Fuel Gas Code ANSI-Z223.1: a) The appliance and its individual shutoff valve must be disconnected from the gas supply piping system during any pressure testing of that system at test pressures in excess of 1/2 psig. b) The appliance must be isolated from the gas supply piping system by closing its individual manual valve during any pressure testing of the gas supply piping system at test pressures equal or less than 1/2 psig.4. This appliance is designed for use with Natural or Propane (bottled) gas only and may be connected only to the type of gas for which it is equipped as specified on the rating plate secured to the front of the unit.5. Smokehouse should be used under a hood with adequate ventilation.6. Smokehouse installation must have rear clearance of 4” and side clearance of 4” from any combustible construction. Clearances for non-combustible construction are same as combustible clearances. Suitable for installation or non-combustible floors.7. Materials such as wood, compressed paper and plant fibers that will ignite and burn, MUST NOT BE LEFT NEAR THIS UNIT. Local safety codes should be complied with in respect to fire hazard avoidance.8. The front of the unit must be kept clear to avoid restriction of air supply for combustion.9. The unit must be installed in an area or room with sufficient fresh air supply to ensure proper combustion.10. There must be adequate clearance for air openings into the combustion chamber, servicing and proper operation.11. If your unit is supplied with casters, the installation shall be made with a connector that complies with the Standard for Connectors for Movable Gas Appliances, ANZI-Z21.69, and a Quick Dis connect device that complies with the Standard for Quick Disconnect Devices for Use with Gas Fuel ANSIZ21.41, and adequate means must be provided to limit the movement of the appliance without depending on connector and the quick disconnect device or its associated piping to limit the appliance movement.12. If your unit is provided with casters on legs, the legs with locking casters must be installed in the front leg gussets. Restraining devices are required for caster mounted equipment. Such restraining devices are to be well secured to sides or rear of the unit.
FOOD SERVICE EQUIPMENT CO., INC. • 72 BEADEL ST • BKLYN • NY 112224
13. Do not locate unit by door or window as air currents adversely affect operation14. DO NOT THROW AWAY THESE INSTRUCTIONS. THIS MANUAL MUST REMAIN WITH THE UNIT FOR FUTURE REFERENCE.
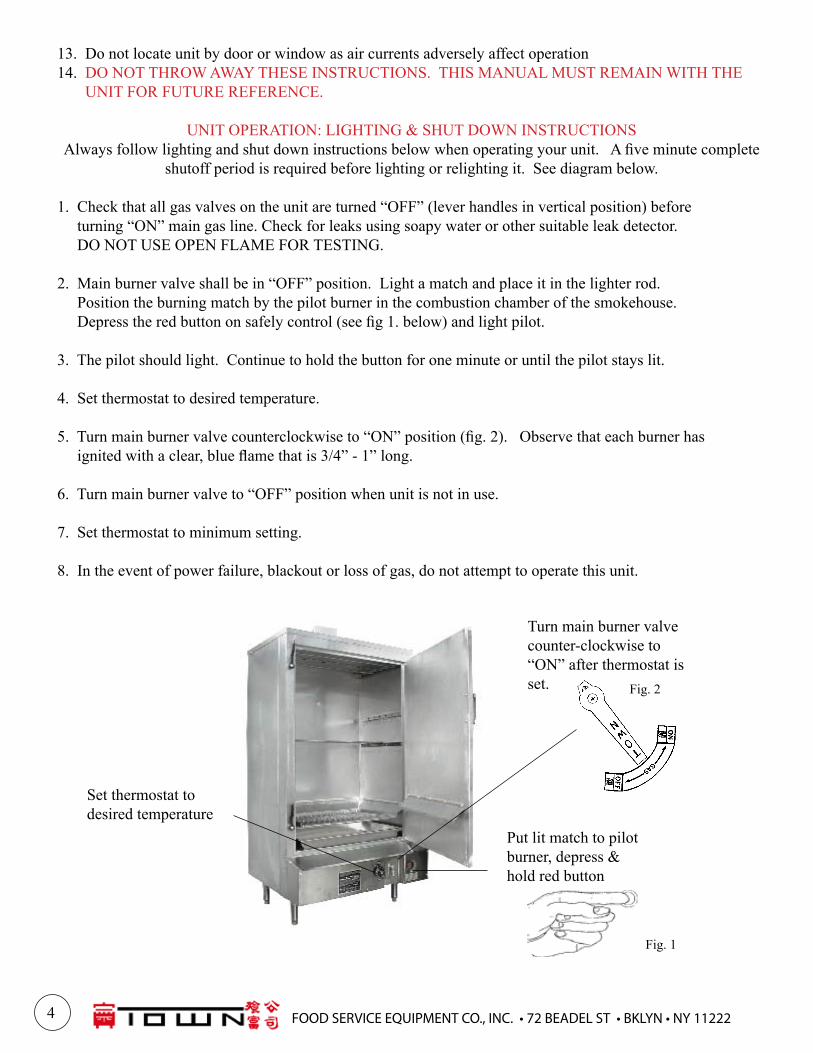
UNIT OPERATION: LIGHTING & SHUT DOWN INSTRUCTIONSAlways follow lighting and shut down instructions below when operating your unit. A five minute complete
shutoff period is required before lighting or relighting it. See diagram below.
1. Check that all gas valves on the unit are turned “OFF” (lever handles in vertical position) before turning “ON” main gas line. Check for leaks using soapy water or other suitable leak detector. DO NOT USE OPEN FLAME FOR TESTING.
2. Main burner valve shall be in “OFF” position. Light a match and place it in the lighter rod. Position the burning match by the pilot burner in the combustion chamber of the smokehouse. Depress the red button on safely control (see fig 1. below) and light pilot.
3. The pilot should light. Continue to hold the button for one minute or until the pilot stays lit.
4. Set thermostat to desired temperature.
5. Turn main burner valve counterclockwise to “ON” position (fig. 2). Observe that each burner has ignited with a clear, blue flame that is 3/4” - 1” long.
6. Turn main burner valve to “OFF” position when unit is not in use.
7. Set thermostat to minimum setting.
8. In the event of power failure, blackout or loss of gas, do not attempt to operate this unit.
Set thermostat to desired temperature
Turn main burner valve counter-clockwise to “ON” after thermostat is set.
Put lit match to pilot burner, depress & hold red button
Fig. 1
Fig. 2
(718) 388-5650 (800) 221-5032 except NY fax: (718) 388-5860 townfood.com 5
Food Service Equipment Co., Inc.72 Beadel Street BKLYN, NY 11222(718)388-5650 fax (718)388-5860 townfood.com
SMOKEHOUSE OWNER’S MANUALSECTION II OPERATING INSTRUCTIONS
SM-24 SM-30 SM-36
FOR YOUR SAFETYDO NOT STORE OR USE GASOLINE OR OTHER FLAMMABLE VAPORS AND LIQUIDS IN THE VICINITY OF THIS OR ANY OTHER APPLIANCE
WARNINGIMPROPER INSTALLATION, ADJUSTMENT, ALTERA-TION, SERVICE OR MAINTE-NANCE CAN CAUSE PROP-ERTY DAMAGE, INJURY OR DEATH. READ THE INSTAL-LATION, OPERATING AND MAINTENANCE INSTRUC-TIONS THOROUGHLY BE-FORE INSTALLING OR SER-VICING THIS EQUIPMENT
NOTEOBTAIN EMERGENCY PROCEDURES FROM YOUR LOCAL GAS SUPPLIER IF YOU SMELL GAS NEAR THIS EQUIPMENT. THIS EMERGENCY INFORMATION MUST BE PROMINENTLY DISPLAYED
KEEP THIS BOOKLET HANDY FOR FUTURE REFERENCE
FOOD SERVICE EQUIPMENT CO., INC. • 72 BEADEL ST • BKLYN • NY 112226
OPERATION INSTRUCTIONS
1. Materials such as wood, compressed paper and plant fibers that will ignite and burn, MUST NOT BE LEFT NEAR THIS UNIT. Local safety codes should be complied with in respect to fire hazard avoidance.
2. The front of the unit must be kept clear to avoid restriction of air supply for combustion or ventilation for exhaust.
3. There must be adequate clearance for air openings into the combustion chamber, servicing and proper operation.
4. This unit should be operated only with water pan in place and filled with water. Drippings, especially fat, will ignite if the unit is used without water in the water pan. Be sure to drain fat and refill the water pan if the cooking process allows most of the water to evaporate, such as a slow cooking brisket.
5. If your unit is supplied with casters, there should be a restraint on the appliance to limit its movement. If disconnection of the restraint becomes necessary, you must be sure to reconnect the restraint after the appliance is returned to its originally installed position.
6. This appliance is designed for use with Natural or Propane (bottled) gas only and may be connected only to the type of gas for which it is equipped as specified on the rating plate secured to the front of the unit.
7. The installation must conform with local codes, or in the absence of local codes with the National Fuel Gas Code ANSI-Z223.1: a) The appliance and its individual shutoff valve must be disconnected from the gas supply piping system during any pressure testing of that system at test pressures in excess of 1/2 psig. b) The appliance must be isolated from the gas supply piping system by closing its individual manual valve during any pressure testing of the gas supply piping system at test pressures equal or less than 1/2 psig.
8. The gas supply line must be of adequate size to ensure maximum efficiency of the unit and conform with the National Fuel Gas Code, ANSI-Z223.1
9. The unit must be installed in an area or room with sufficient fresh air supply to ensure proper combustion. This unit cannot operate safely without sufficient air supply.
10. Smokehouse installation must have rear clearance of 4” and side clearance of 4” from any combustible construction. Clearances for non-combustible construction are same as combustible clearances. Suitable for installation or non-combustible floors.
11. Smokehouse should be used under a hood with adequate ventilation.
12. DO NOT THROW AWAY THESE INSTRUCTIONS. THIS MANUAL MUST REMAIN WITH THE UNIT FOR FUTURE REFERENCE.
(718) 388-5650 (800) 221-5032 except NY fax: (718) 388-5860 townfood.com 7
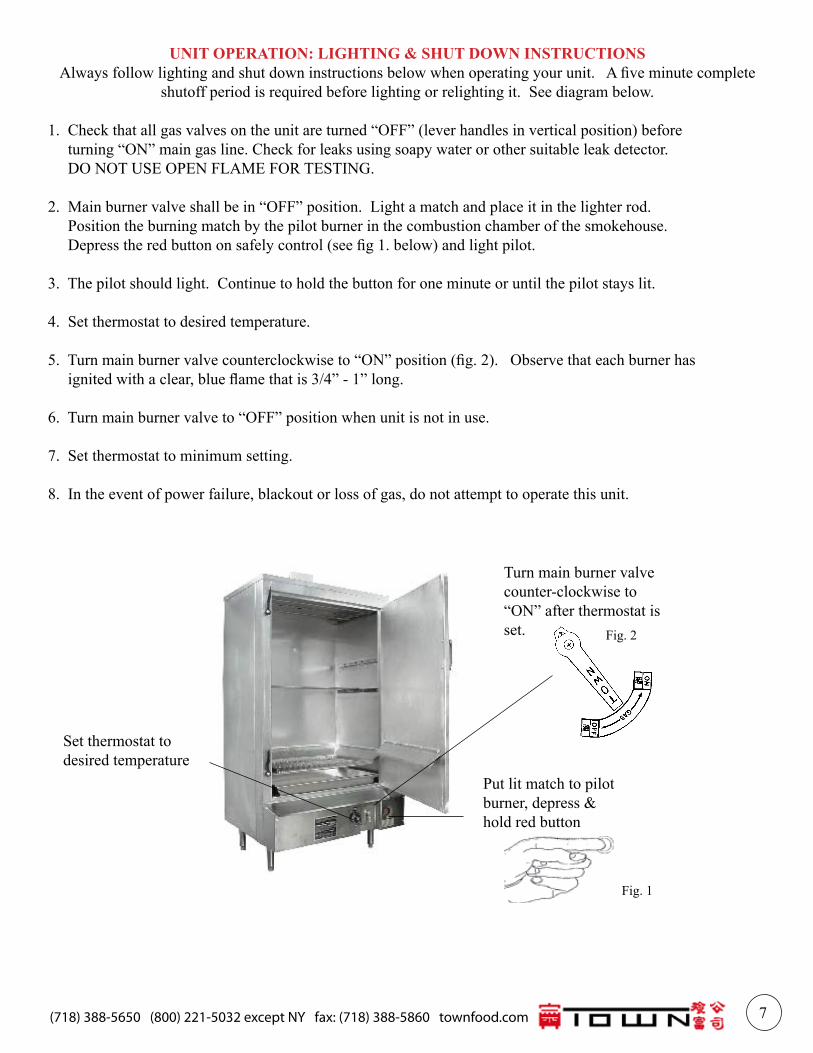
UNIT OPERATION: LIGHTING & SHUT DOWN INSTRUCTIONSAlways follow lighting and shut down instructions below when operating your unit. A five minute complete
shutoff period is required before lighting or relighting it. See diagram below.
1. Check that all gas valves on the unit are turned “OFF” (lever handles in vertical position) before turning “ON” main gas line. Check for leaks using soapy water or other suitable leak detector. DO NOT USE OPEN FLAME FOR TESTING.
2. Main burner valve shall be in “OFF” position. Light a match and place it in the lighter rod. Position the burning match by the pilot burner in the combustion chamber of the smokehouse. Depress the red button on safely control (see fig 1. below) and light pilot.
3. The pilot should light. Continue to hold the button for one minute or until the pilot stays lit.
4. Set thermostat to desired temperature.
5. Turn main burner valve counterclockwise to “ON” position (fig. 2). Observe that each burner has ignited with a clear, blue flame that is 3/4” - 1” long.
6. Turn main burner valve to “OFF” position when unit is not in use.
7. Set thermostat to minimum setting.
8. In the event of power failure, blackout or loss of gas, do not attempt to operate this unit.
Set thermostat to desired temperature
Turn main burner valve counter-clockwise to “ON” after thermostat is set.
Put lit match to pilot burner, depress & hold red button
Fig. 1
Fig. 2
FOOD SERVICE EQUIPMENT CO., INC. • 72 BEADEL ST • BKLYN • NY 112228
RECOMMENDED SEASONING INSTRUCTIONS BEFORE FIRST USE
1. Clean smokehouse interior & exterior with a damp towel.2. Turn valves clockwise to “OFF”. NOTE: Before operation of this unit, all pipes and connections must be tested using soapy water or an alternate safe method. Never use an open flame for testing.3. Using the lighter rod, light the smokehouse using the procedure outlined earlier in this booklet. Close the door. Set thermostat temperature to 400˚ and let the unit operate for 15 minutes.4. Turn off the main gas valve. Wearing gloves, safety goggles, head and arm coverings, wipe the interior or with any good quality cooking oil. Be sure none of your bare skin is exposed. Be careful when doing this procedure: hot ovens can burn you!5. Interior should be wiped with oil but not dripping. Close the door. Reset the thermostat to 400˚ and allow the smokehouse to operate for another 15-20 minutes. At the end of this process the interior will be hot but seasoned and ready for cooking.
OVERVIEWFIRST TIME USERS CAN REQUEST OUR USER’S GUIDE FOR OPERATING TIPS
SM smokehouses are designed for skewer roasting and smoking of ribs, tenderloin, duck, chicken, and other cuts of meat. Other foods such as roasts and chicken wings can be roasted using an optional rack system. The unique flavor found in smokehouse cooked food is a result of the marination process, moisture retention by use of the water pan and the smoke created by drippings of the meat during the cooking process.
The water pan must be nearly full of water and seasonings at the start of the cooking process. Brought to a boil by heat from the combustion chamber below, the water mixes with drippings from the product above. Rising steam continuously bastes and flavors the product being cooked. While the steaming/basting process prevents shrinkage, dry heat radiates upward from the combustion chamber rendering excess fat. This fat will fall on the hot drip shields and smoke creating a delicious barbecue taste that permeates the meat or into the water pan to continue the basting process.
Temperature control and length of cooking time are determined by the product being cooked, desired texture and the experience of the chef.
GENERAL GUIDELINES
The following capacities are approximate and intended to give the operator some guidelines. There are two cooking levels in all sizes. Every unit is supplied with six skewers. Each level will accommodate three skewers with: SM-24: 10 slabs of ribs per skewer, total of 60 slabs SM-30 13 slabs of ribs per skewer, total of 78 slabs SM-36 16 slabs of ribs per skewer, total of 96 slabs
Pork Tenderloin: Trim to a weight of approximately 1/2 lb. per section before marinating. Use the same skewer capacity as for ribs.
Peking Duck: Leave neck, head and body intact. Clean and eviscerate duck through vent, then seal vent by tying or sewing skin. Insert needle valve of air pump into neck between skin and neck bones.
(718) 388-5650 (800) 221-5032 except NY fax: (718) 388-5860 townfood.com 9
to separate skin from the body with a cushion of air. Quickly and carefully remove air needle and tie off the neck below the opening so the skin and body remain separated by the trapped air. Hang the duck using a #248008 duck hook. Hang the duck and let it drip according to tradition. Cook by suspending the hooks from the upper rest only as the lower rest will not provide enough height.
There are nearly limitless applications for this unit. In our test kitchen we have prepared chicken wings, rack of lamb and smoked fish. If you have questions, give us a call at (718)388-5650.
CAUTION: NEVER OPERATE UNIT WITHOUT SAFETY GRATE IN PLACE AND SUFFICIENT WATER IN THE WATER PAN.
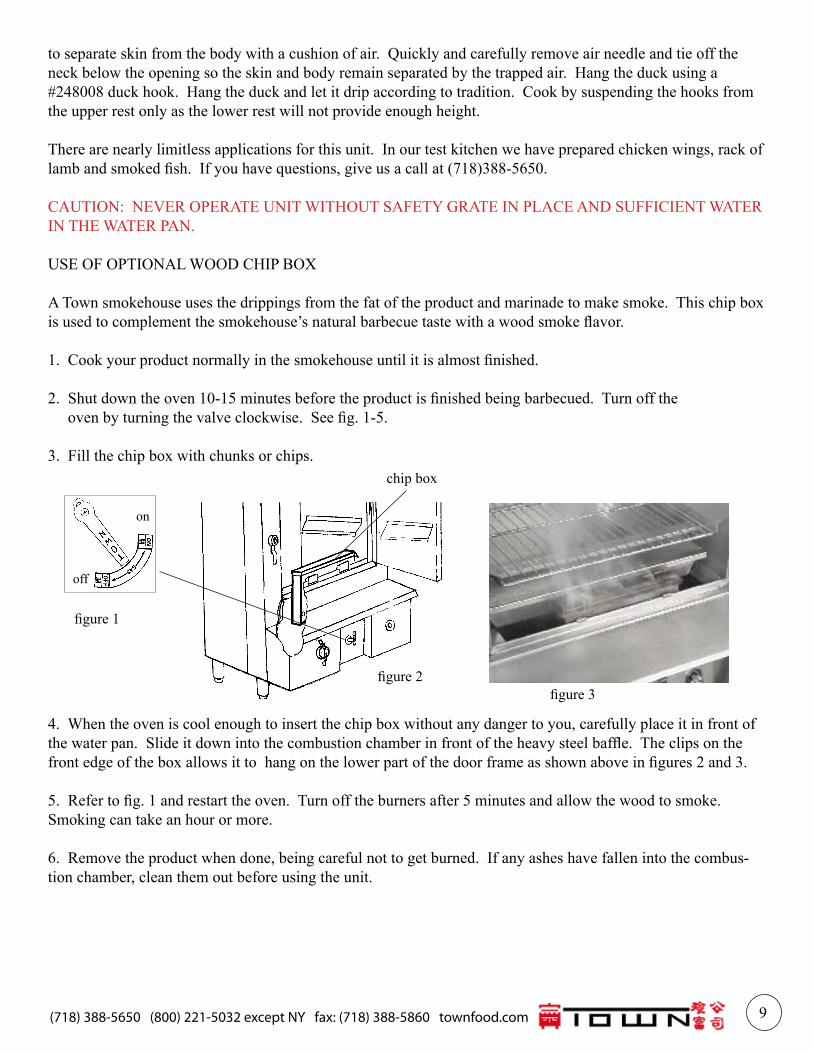
USE OF OPTIONAL WOOD CHIP BOX
A Town smokehouse uses the drippings from the fat of the product and marinade to make smoke. This chip box is used to complement the smokehouse’s natural barbecue taste with a wood smoke flavor.
1. Cook your product normally in the smokehouse until it is almost finished.
2. Shut down the oven 10-15 minutes before the product is finished being barbecued. Turn off the oven by turning the valve clockwise. See fig. 1-5.
3. Fill the chip box with chunks or chips.
4. When the oven is cool enough to insert the chip box without any danger to you, carefully place it in front of the water pan. Slide it down into the combustion chamber in front of the heavy steel baffle. The clips on the front edge of the box allows it to hang on the lower part of the door frame as shown above in figures 2 and 3.
5. Refer to fig. 1 and restart the oven. Turn off the burners after 5 minutes and allow the wood to smoke. Smoking can take an hour or more.
6. Remove the product when done, being careful not to get burned. If any ashes have fallen into the combus-tion chamber, clean them out before using the unit.
chip box
figure 2
figure 1
figure 3
on
off
FOOD SERVICE EQUIPMENT CO., INC. • 72 BEADEL ST • BKLYN • NY 1122210
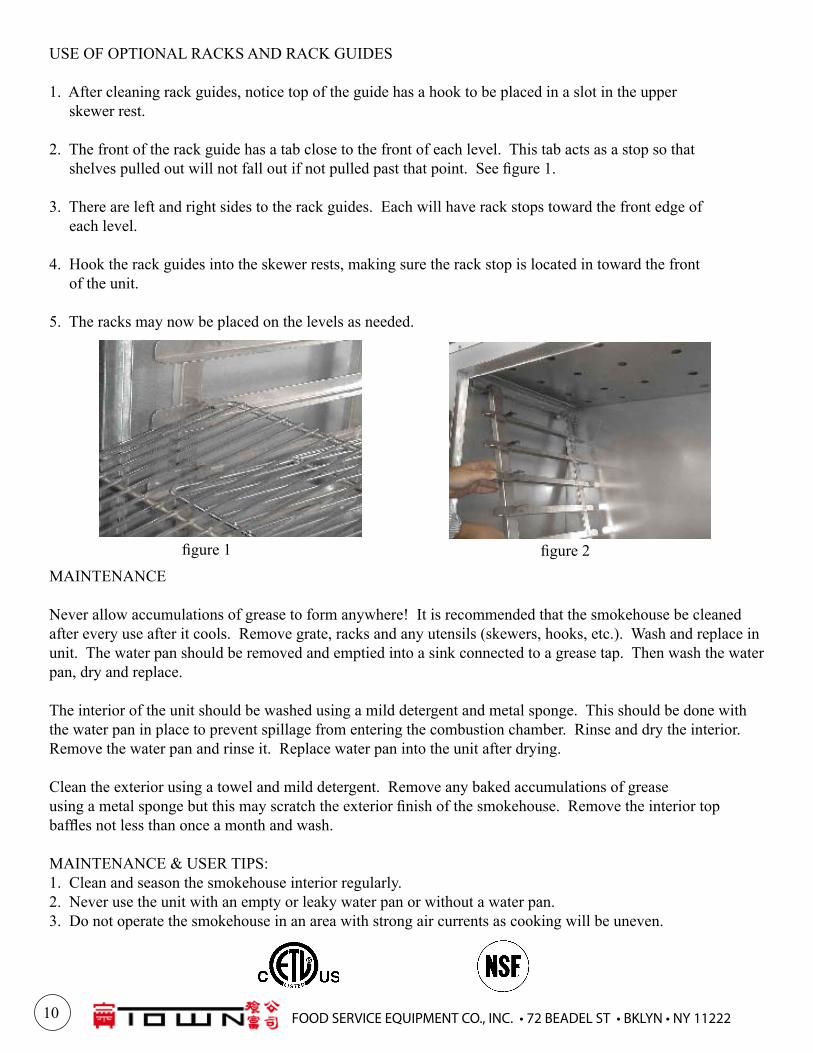
USE OF OPTIONAL RACKS AND RACK GUIDES
1. After cleaning rack guides, notice top of the guide has a hook to be placed in a slot in the upper skewer rest.
2. The front of the rack guide has a tab close to the front of each level. This tab acts as a stop so that shelves pulled out will not fall out if not pulled past that point. See figure 1.
3. There are left and right sides to the rack guides. Each will have rack stops toward the front edge of each level.
4. Hook the rack guides into the skewer rests, making sure the rack stop is located in toward the front of the unit.
5. The racks may now be placed on the levels as needed.
MAINTENANCE
Never allow accumulations of grease to form anywhere! It is recommended that the smokehouse be cleaned after every use after it cools. Remove grate, racks and any utensils (skewers, hooks, etc.). Wash and replace in unit. The water pan should be removed and emptied into a sink connected to a grease tap. Then wash the water pan, dry and replace.
The interior of the unit should be washed using a mild detergent and metal sponge. This should be done with the water pan in place to prevent spillage from entering the combustion chamber. Rinse and dry the interior. Remove the water pan and rinse it. Replace water pan into the unit after drying.
Clean the exterior using a towel and mild detergent. Remove any baked accumulations of grease using a metal sponge but this may scratch the exterior finish of the smokehouse. Remove the interior top baffles not less than once a month and wash.
MAINTENANCE & USER TIPS:1. Clean and season the smokehouse interior regularly.2. Never use the unit with an empty or leaky water pan or without a water pan.3. Do not operate the smokehouse in an area with strong air currents as cooking will be uneven.
figure 1 figure 2
(718) 388-5650 (800) 221-5032 except NY fax: (718) 388-5860 townfood.com 11
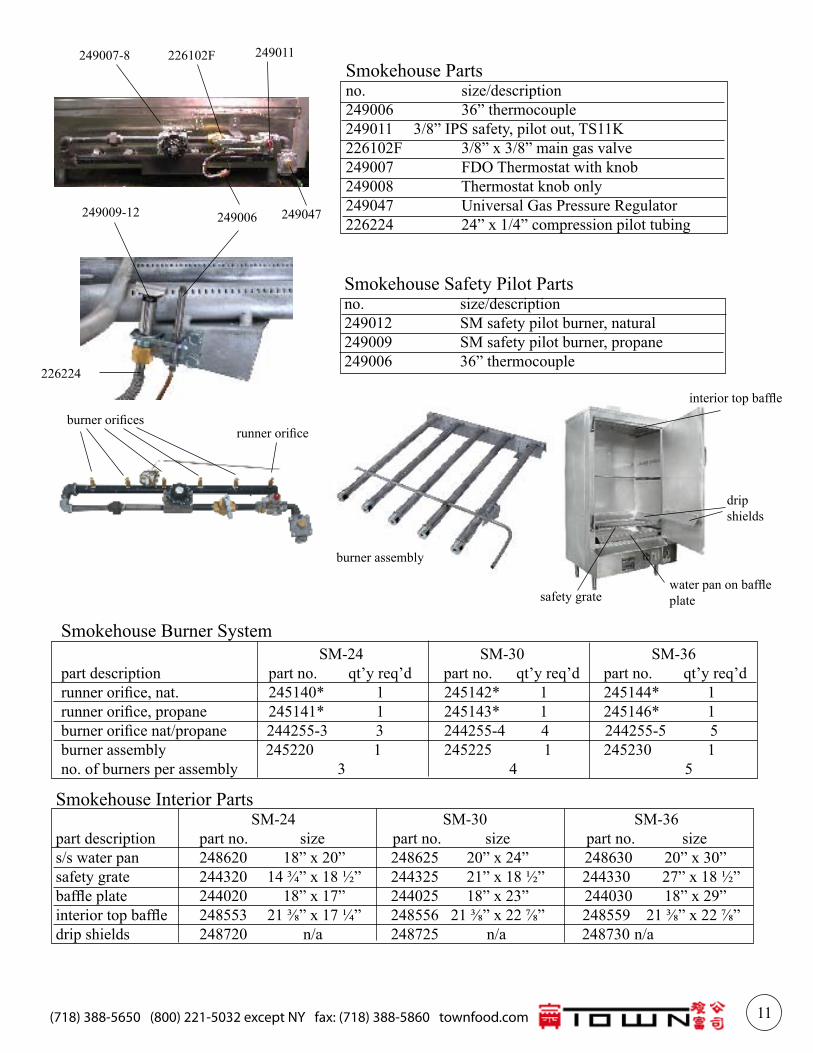
Smokehouse Partsno. size/description249006 36” thermocouple249011 3/8” IPS safety, pilot out, TS11K226102F 3/8” x 3/8” main gas valve249007 FDO Thermostat with knob249008 Thermostat knob only249047 Universal Gas Pressure Regulator226224 24” x 1/4” compression pilot tubing
Smokehouse Safety Pilot Partsno. size/description249012 SM safety pilot burner, natural249009 SM safety pilot burner, propane249006 36” thermocouple
Smokehouse Burner System SM-24 SM-30 SM-36 part description part no. qt’y req’d part no. qt’y req’d part no. qt’y req’drunner orifice, nat. 245140* 1 245142* 1 245144* 1 runner orifice, propane 245141* 1 245143* 1 245146* 1burner orifice nat/propane 244255-3 3 244255-4 4 244255-5 5burner assembly 245220 1 245225 1 245230 1no. of burners per assembly 3 4 5
Smokehouse Interior Parts SM-24 SM-30 SM-36 part description part no. size part no. size part no. sizes/s water pan 248620 18” x 20” 248625 20” x 24” 248630 20” x 30”safety grate 244320 14 ¾” x 18 ½” 244325 21” x 18 ½” 244330 27” x 18 ½”baffle plate 244020 18” x 17” 244025 18” x 23” 244030 18” x 29”interior top baffle 248553 21 ⅜” x 17 ¼” 248556 21 ⅜” x 22 ⅞” 248559 21 ⅜” x 22 ⅞”drip shields 248720 n/a 248725 n/a 248730 n/a
249007-8 226102F 249011
249047249006249009-12
226224
runner orificeburner orifices
burner assembly
interior top baffle
drip shields
water pan on baffle platesafety grate

FOOD SERVICE EQUIPMENT CO., INC. • 72 BEADEL ST • BKLYN • NY 1122212
SM ACCESSORIESRoasting AccessoriesWe offer these stainless steel hooks and holders to facilitate cooking chicken, duck, and meats.
RACK GUIDES AND CHIP BOXUnits with serial number starting 55 will accept racks and rack guides without modification. Earlier serial num-bers will require replacement skewer rests that will accept rack guides. Racks and wood chip boxes are popular additions.
Copyright: No part of this booklet or its illustrations may be copied or reproduced without writ-ten authorization from Town Food Service Equipment Co., Inc. Rev. 11/06
RACK GUIDES fit all units and are required if you wish to use racks.244009 9 level rack guideSTAINLESS STEEL RACKSNo. fits model size244332 SM-24 17” x 20”244335 SM-30 23” x 20”244336 SM-36 28.75” x 20”WOOD CHIP BOX244000 standard wood chip box fits all models244002 large capacity wood chip box
248000S Hook
248007Pei-pa
duck fork
248010duck tail needle
248014barbecue pork hook
248012barbecue
meat hook
248006three star
hook
2480088” duck
hook
248009roast meat
holder248011barbecue needle