smsi ezdvr installers manual model 2013 - storage … · smsi ezdvr installers manual model 2013 on...
TRANSCRIPT
SMSI EZdvr Installers Manual Model 2013
SMSI EZdvr Installers Manual Model 2013
TABLE OF CONTENTS Section 1 Program Execution ---------------------------------------------------------------------------------------------- 1
Section 2 Main Application -------------------------------------------------------------------------------------------------- 2 Section 3 Setup ------------------------------------------------------------------------------------------------------------------ 5
Section 4 View Log System Status ---------------------------------------------------------------------------------------22
Section 5 Playback recorded video-------------------------------------------------------------------------------------- 23
Manager and or Installer it is required that the provided sign off sheet be signed and faxed to 317-890-1540 for warranty to be in affect for your new EZdvr equipment please be sure to include the EZDVR Serial number.
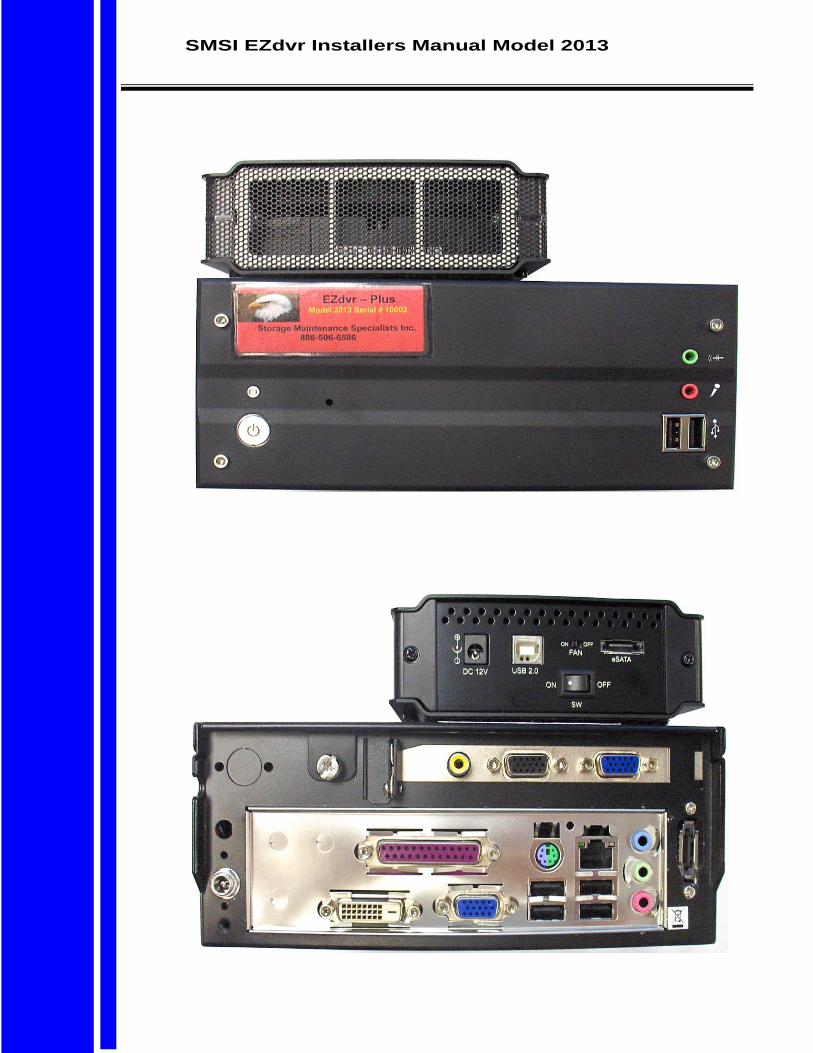
Be sure there is proper ventilation for DVR overheating from lack of ventilation will void warranty! (If temp. stays over 52 degrees C or 125 degrees F it needs more ventilation!)
SMSI EZdvr Installers Manual Model 2013
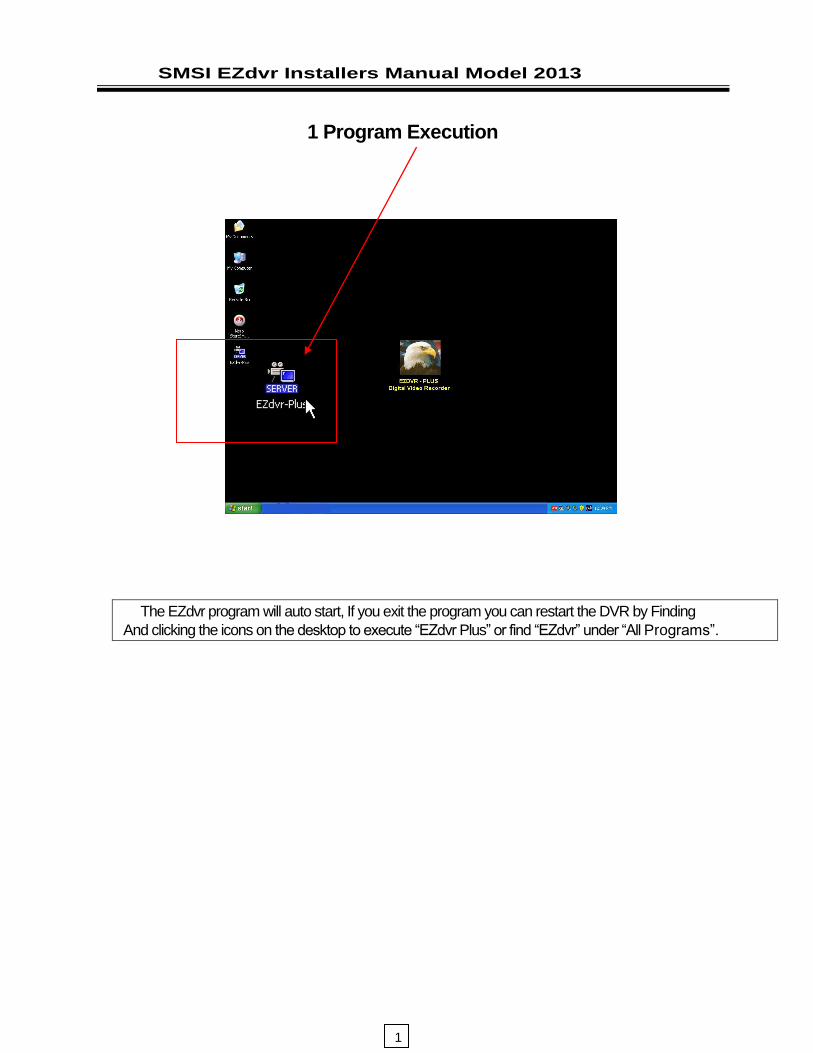
1 Program Execution
The EZdvr program will auto start, If you exit the program you can restart the DVR by Finding
And clicking the icons on the desktop to execute “EZdvr Plus” or find “EZdvr” under “All Programs”.
1

SMSI EZdvr Installers Manual Model 2013
Section 2 Main System Application (Control)
2.1 Startup Screen
The above screen will appear as EZdvr system starts.
2.2 Login
The default values for User and Password are “admin” Installer must call FSM or SMSI for password”. Click “OK” to
execute EZdvr system. To create new users, certain Configurations are required
(Setup/User). Only “admin” and users with appropriate Authorizations have access to the Setup menu.
Note: Virtual keypad is available on the right top of GUI if needed
2
SMSI EZdvr Installers Manual Model 2013
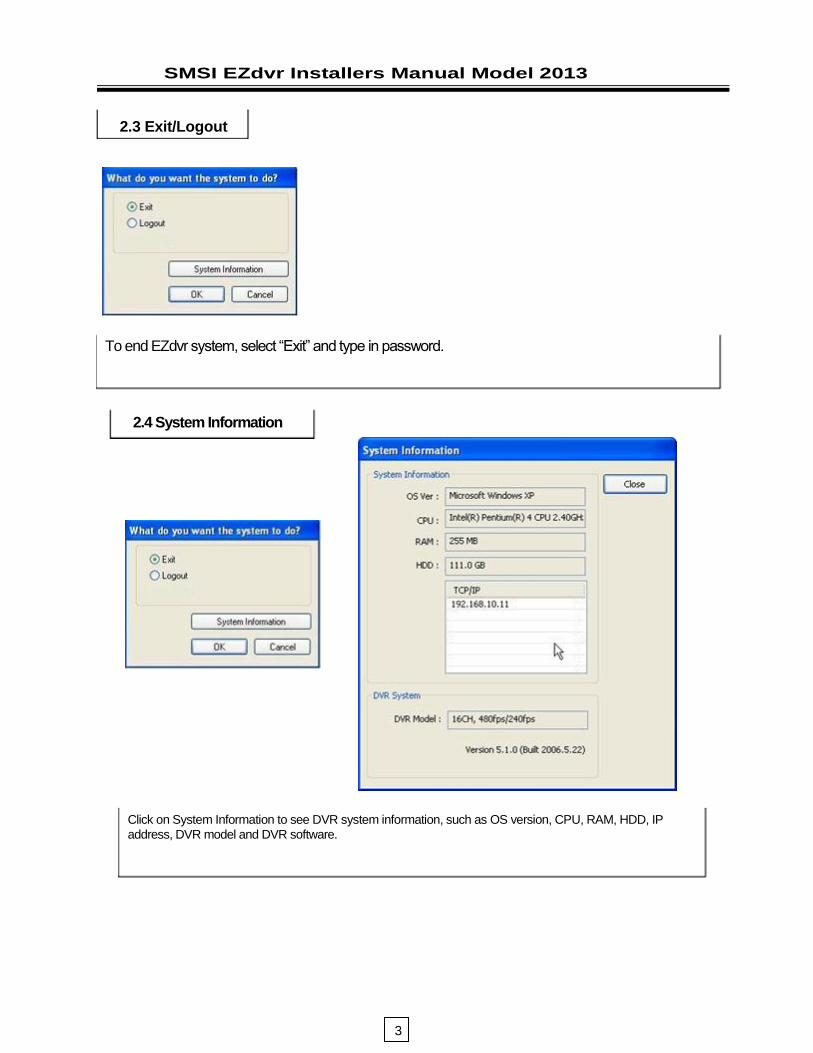
2.3 Exit/Logout
To end EZdvr system, select “Exit” and type in password.
2.4 System Information
Click on System Information to see DVR system information, such as OS version, CPU, RAM, HDD, IP
address, DVR model and DVR software.
3
SMSI EZdvr Installers Manual Model 2013
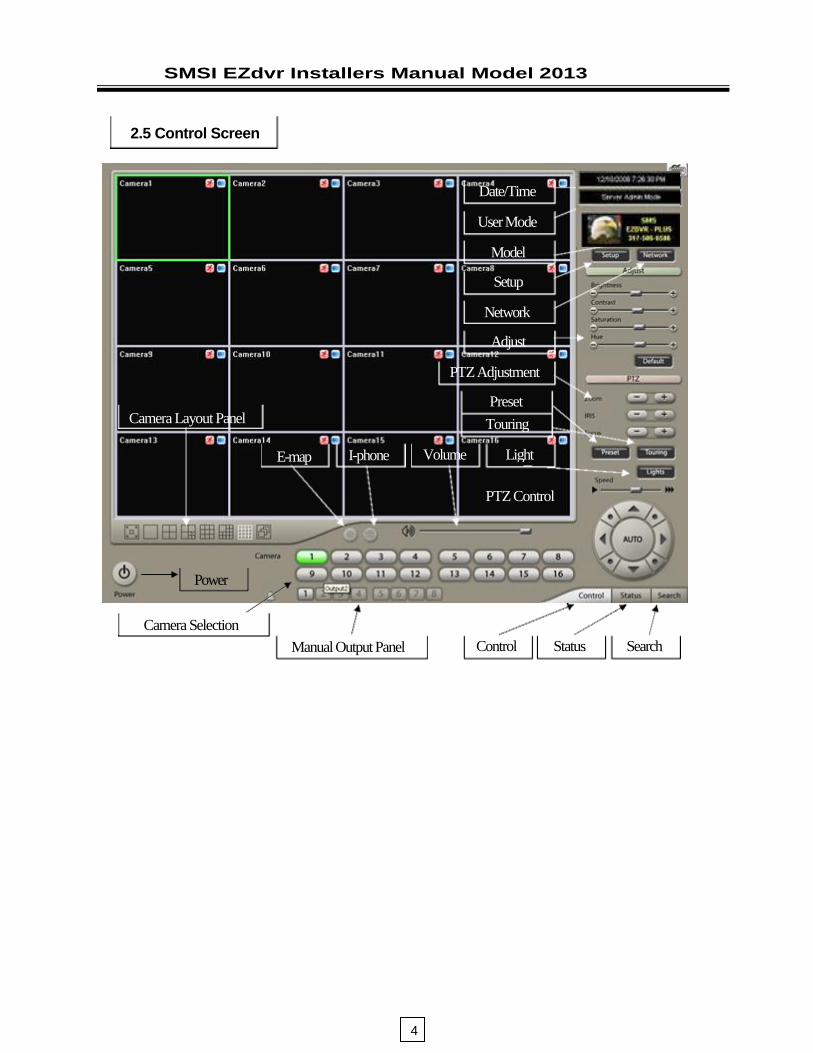
2.5 Control Screen
Date/Time
User Mode
Model
Setup
Network
Adjust
PTZ Adjustment
Preset
Camera Layout Panel
E-map
PTZ Control
Power
Camera Selection
Manual Output Panel
I-phone Volume
Touring
Light
Control Status Search
4
SMSI EZdvr Installers Manual Model 2013
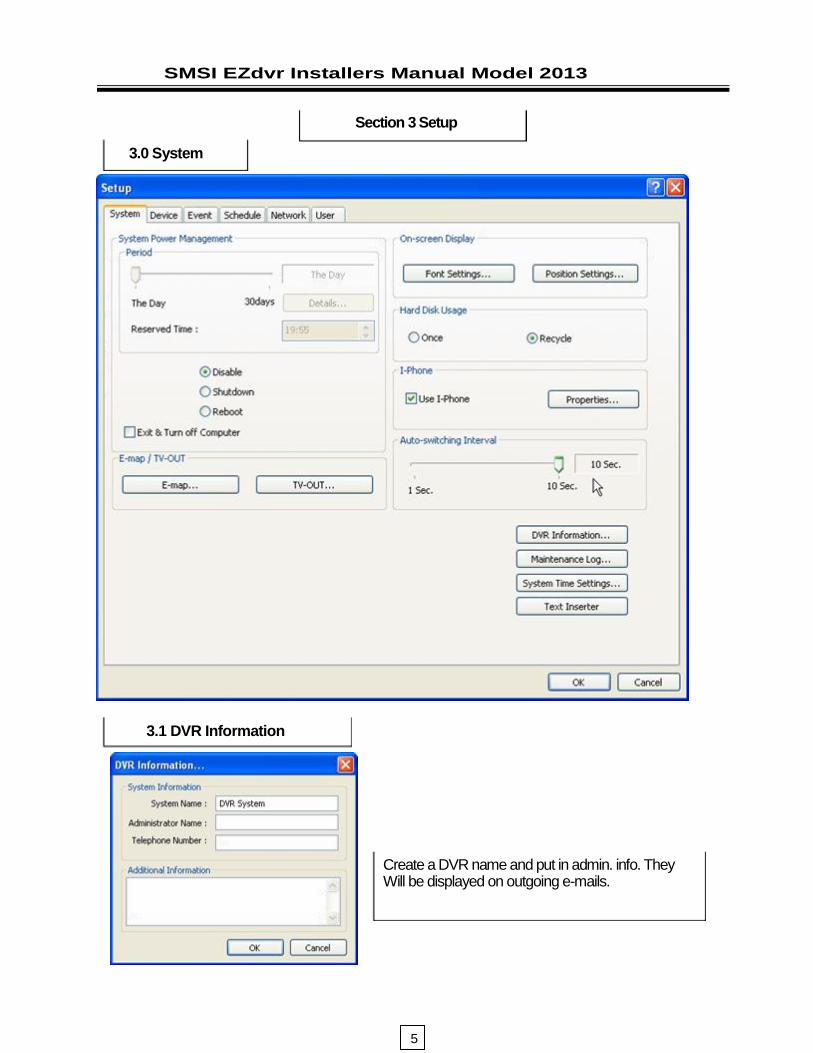
Section 3 Setup
3.0 System
3.1 DVR Information
Create a DVR name and put in admin. info. They Will be displayed on outgoing e-mails.
5
SMSI EZdvr Installers Manual Model 2013
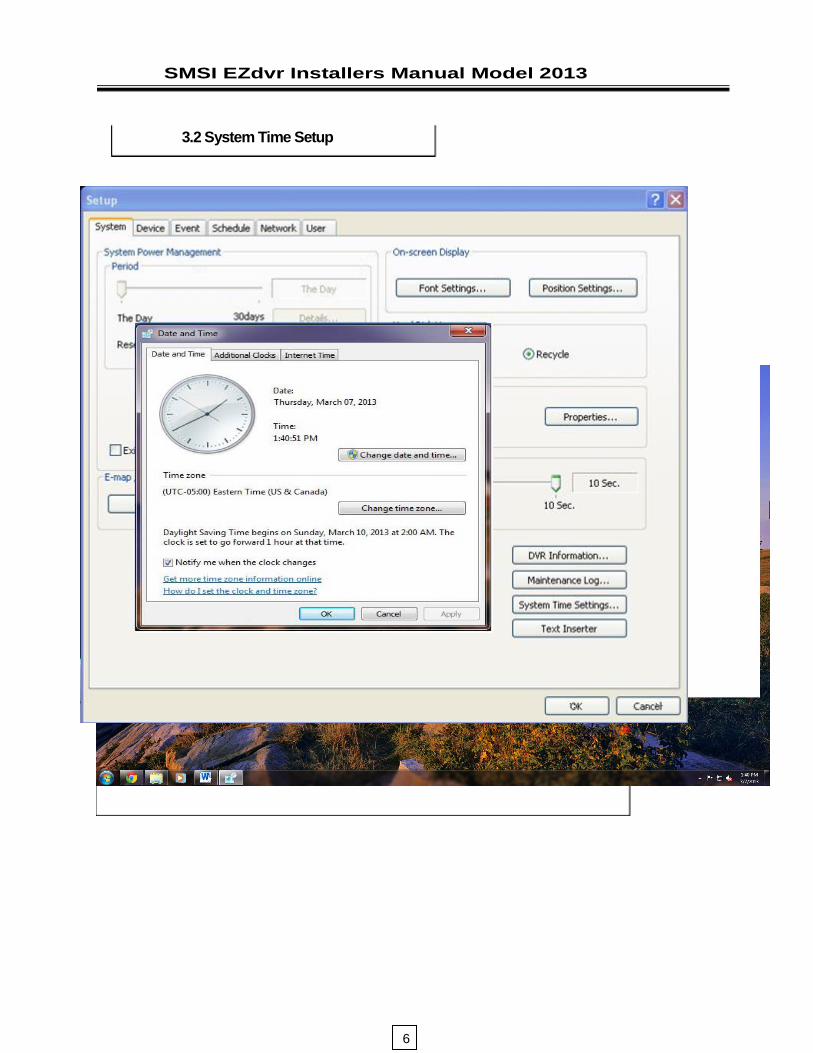
3.2 System Time Setup
By clicking System Time Setup, users are able to set Date and Time in DVR software.
6
SMSI EZdvr Installers Manual Model 2013
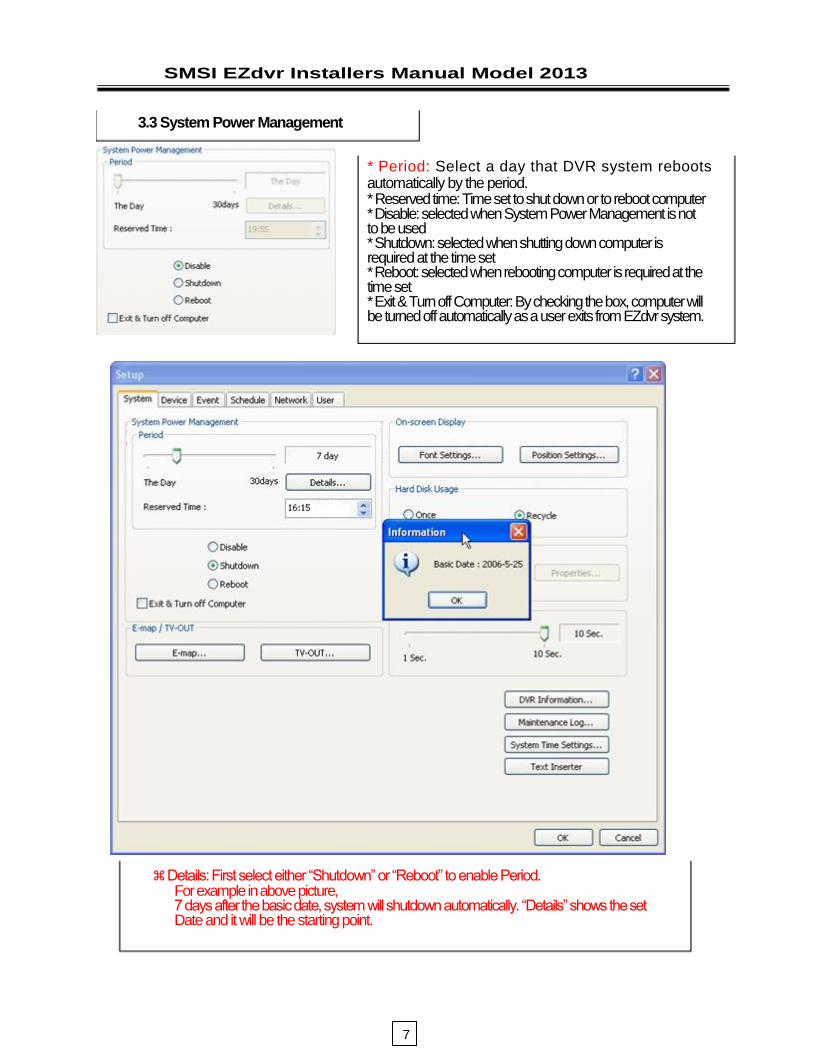
3.3 System Power Management
* Period: Select a day that DVR system reboots automatically by the period. * Reserved time: Time set to shut down or to reboot computer * Disable: selected when System Power Management is not to be used * Shutdown: selected when shutting down computer is required at the time set * Reboot: selected when rebooting computer is required at the time set * Exit & Turn off Computer: By checking the box, computer will be turned off automatically as a user exits from EZdvr system.
Details: First select either “Shutdown” or “Reboot” to enable Period. For example in above picture, 7 days after the basic date, system will shutdown automatically. “Details” shows the set Date and it will be the starting point.
7
SMSI EZdvr Installers Manual Model 2013
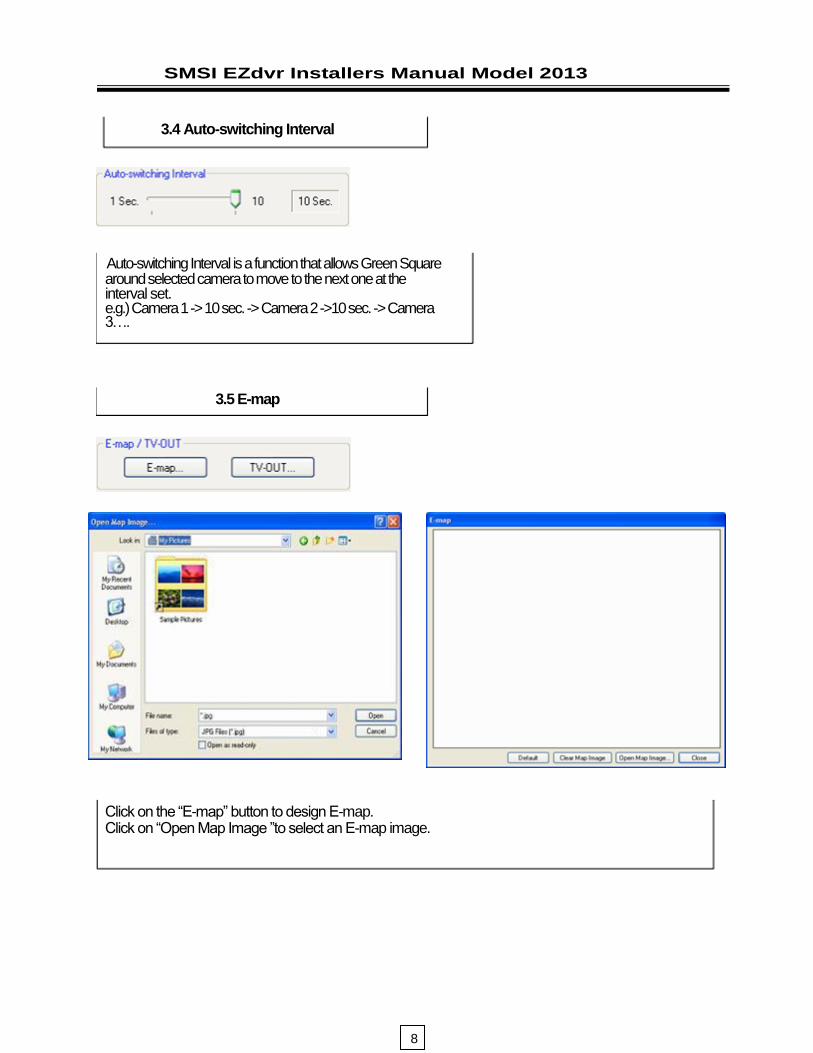
3.4 Auto-switching Interval
Auto-switching Interval is a function that allows Green Square around selected camera to move to the next one at the interval set. e.g.) Camera 1 -> 10 sec. -> Camera 2 ->10 sec. -> Camera 3….
3.5 E-map
Click on the “E-map” button to design E-map. Click on “Open Map Image ”to select an E-map image.
8

SMSI EZdvr Installers Manual Model 2013
Click on the E-map button positioned next to the I-phone button to open E-map. White Camera: Not on Recording, Yellow Camera: On Recording,
White Input/White Output: Not Activated, Yellow Input/Yellow Output: Activated
3.6 TV-OUT
TV-OUT is a function that sends selected cameras to a call monitor
(external analog monitor). Click on the “TV-OUT” button for set up.
9

SMSI EZdvr Installers Manual Model 2013
* Setup Options:
1. (32 Camera model Only) Same as Server Screen Mode - TV-OUT Monitor displays what’s on DVR server. Manual Channel Selection - Channels are selected manually. Once “Manual Channel Selection” is selected, channels can also be selected manually on Control screen by placing mouse on camera picture and clicking the right mouse. 2. Auto Channel Switching - Selected channels
rotate to display at the switching interval set. * Switching Interval: The length of time to stay at one camera
3.6.1 On-screen Display
Font Settings: Font change on screen Display.
Position Setting: Position change on screen
Display.
OK

SMSI EZdvr Installers Manual Model 2013
On a camera screen, you may click one right mouse to control OSD as bellows.
* Show Camera Names and Status: By checking it, camera names and status will be displayed on camera pictures.
* Show Motion Detection Blocks: By checking it, green motion detection blocks will be displayed on camera pictures when recording schedule is set as “M” (Setup/Schedule).
* Show Object Detection Blocks: By checking it, blue object detection blocks will be displayed on camera pictures.
Note : One right mouse click can be a very useful tool. Manual TV-out and OSD setup can be done. Additionally,
instant recording can start by one click. 3.6.2 Hard Disk Usage
Hard Disk Usage is to select data storage method. If “Once” is selected, data will be stored up to the point where HDD reaches its maximum capacity. If “Recycle” is selected, data will be overwritten from the point HDD reaches its maximum capacity based on “First In First Out”.
11

SMSI EZdvr Installers Manual Model 2013
3.6.3 Maintenance Log
It is used to record and view maintenance history.
3.6.4 Device
Device sub-screen is divided into 5 different setup categories; Camera, Output, Input, Audio and Alert. All devices in each category can be set up on one same page.
Modify Frame rate itself: By
Selecting it, DVR software will Automatically allocate maximum Frames to channels.
12
SMSI EZdvr Installers Manual Model 2013
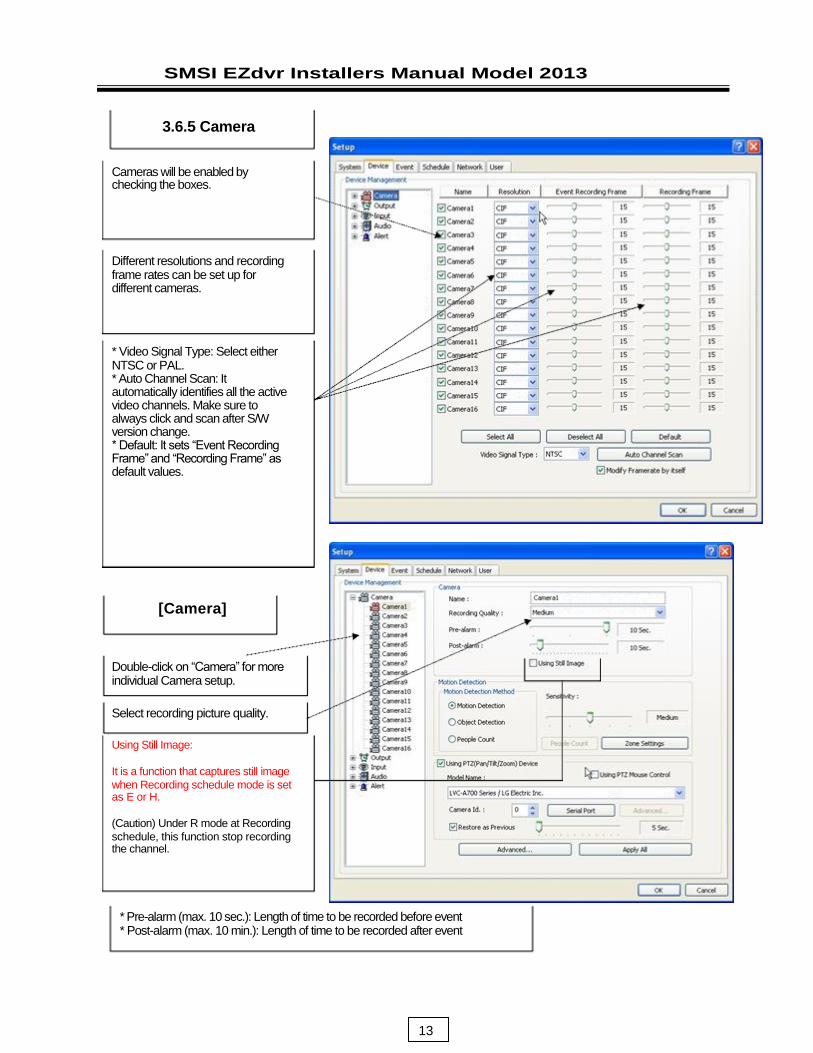
3.6.5 Camera
Cameras will be enabled by checking the boxes.
Different resolutions and recording frame rates can be set up for different cameras.
* Video Signal Type: Select either NTSC or PAL. * Auto Channel Scan: It automatically identifies all the active video channels. Make sure to always click and scan after S/W version change. * Default: It sets “Event Recording Frame” and “Recording Frame” as default values.
[Camera]
Double-click on “Camera” for more individual Camera setup.
Select recording picture quality.
Using Still Image:
It is a function that captures still image
when Recording schedule mode is set as E or H.
(Caution) Under R mode at Recording
schedule, this function stop recording the channel.
* Pre-alarm (max. 10 sec.): Length of time to be recorded before event * Post-alarm (max. 10 min.): Length of time to be recorded after event
13
SMSI EZdvr Installers Manual Model 2013
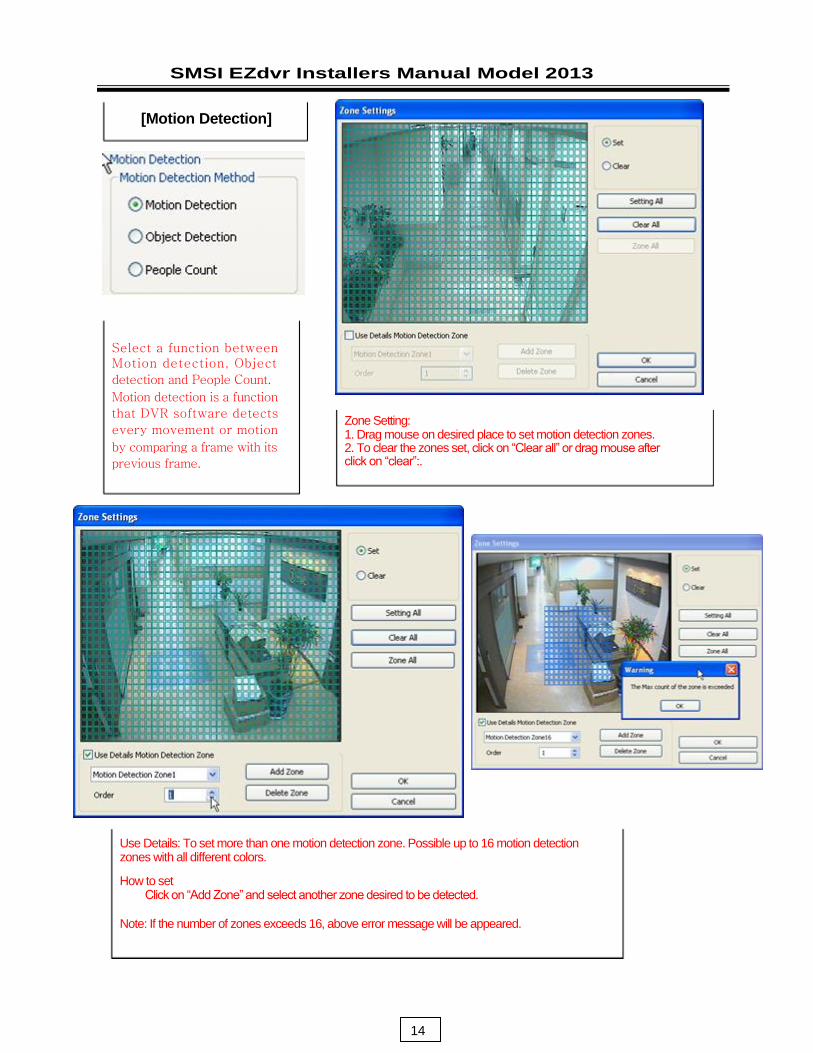
[Motion Detection]
Select a function between Motion detection, Object
detection and People Count.
Motion detection is a function
that DVR software detects
every movement or motion
by comparing a frame with its
previous frame.
Use Details: To set more than one motion detection zone. Possible up to 16 motion detection zones with all different colors.
Note: If the number of zones exceeds 16, above error message will be appeared.
Zone Setting: 1. Drag mouse on desired place to set motion detection zones. 2. To clear the zones set, click on “Clear all” or drag mouse after click on “clear”:.
How to set Click on “Add Zone” and select another zone desired to be detected.
14

SMSI EZdvr Installers Manual Model 2013
Zone All: Displays all areas together that have been set for the zones.
Setting All: Select whole area DeleteZone:Deleteszones
one by one.
15

SMSI EZdvr Installers Manual Model 2013
3.6.6 Event
“Event” consists of 3 different groups; “Input”, “Motion Detection” and “No Video Signal”. On this menu, devices can be set to respond to different events.
3.6.7 Input
* Length of Full Screen Display: The time length for full screen display in the case of input device activation.
* Full Screen Display Channels: Full Screen Display : Selected camera channel will pop up if the linked input device is triggered.
The equipment of application: Events triggered by Input or Motion
detection can pop on a desired screen among DVR system
* Link to Recording: One Input device can have as many as 16 recording cameras on activation. The below example shows that Camera1 will record in the case of Input1 activation.
* Link to Output: One Input device can have as many as 8 activating output devices on activation. The above example shows that Output1 will be activated in the case of Input1 activation. * Link to Alert: Input device can also be linked to alert.
16
SMSI EZdvr Installers Manual Model 2013
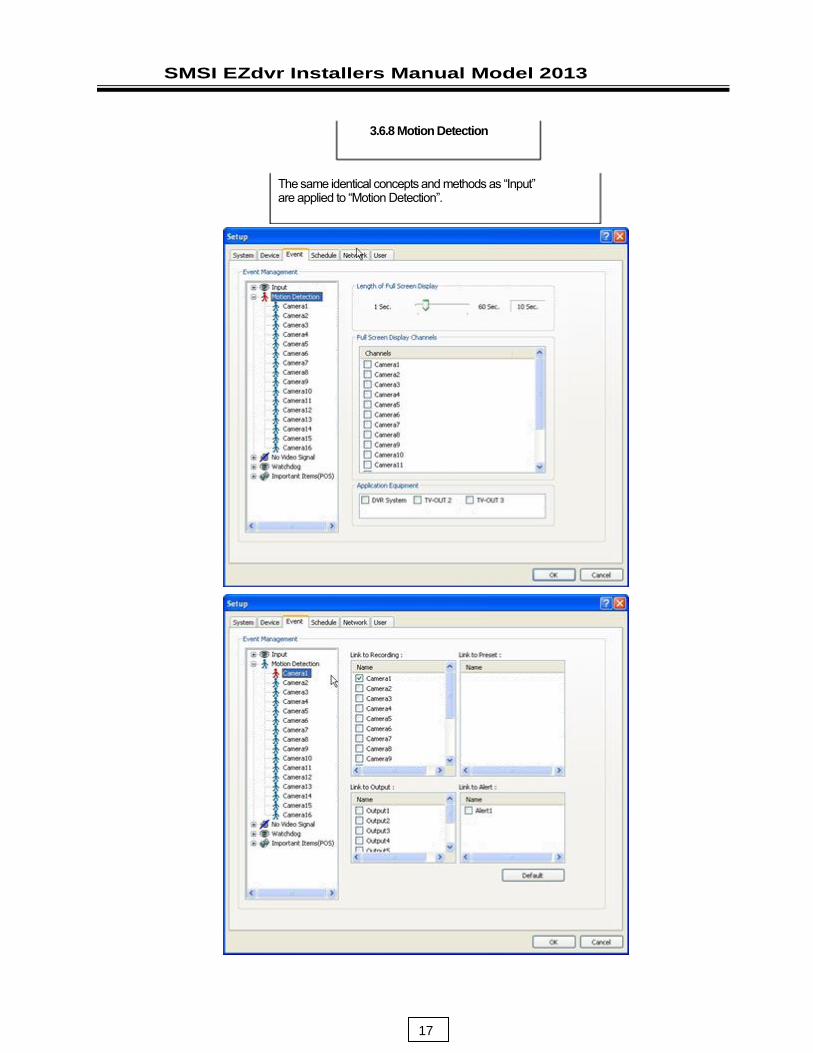
3.6.8 Motion Detection
The same identical concepts and methods as “Input” are applied to “Motion Detection”.
17
SMSI EZdvr Installers Manual Model 2013
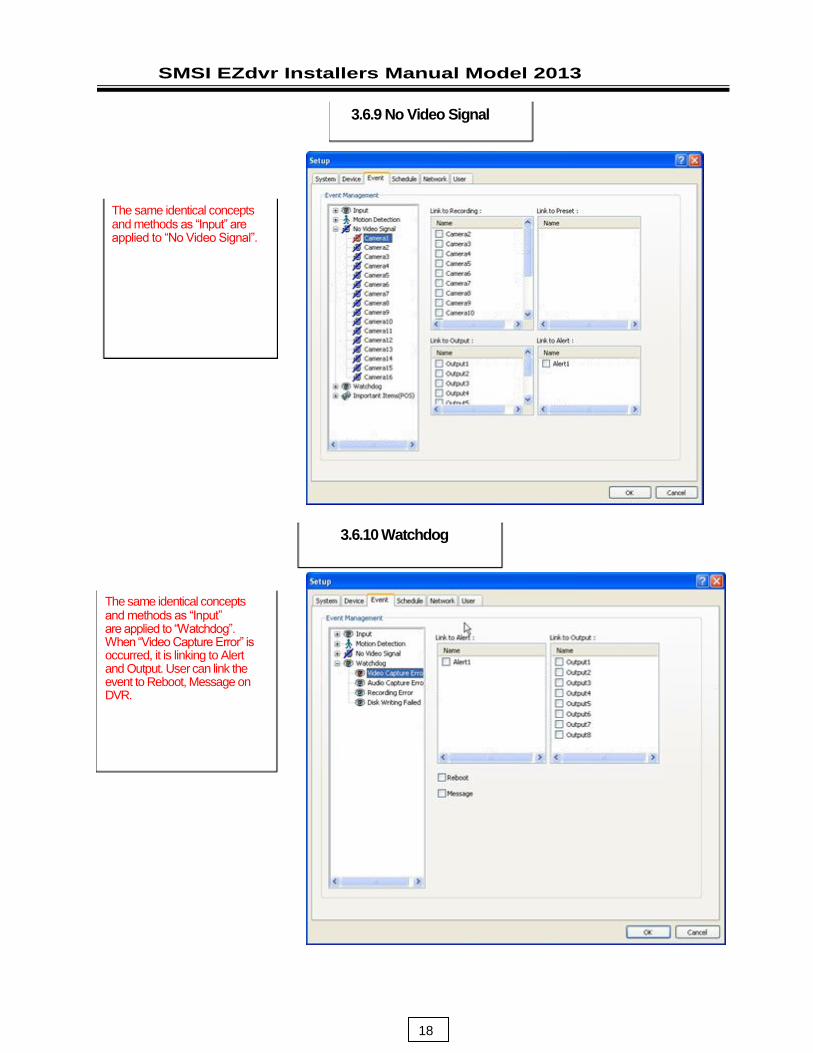
3.6.9 No Video Signal
The same identical concepts and methods as “Input” are applied to “No Video Signal”.
3.6.10 Watchdog
The same identical concepts and methods as “Input” are applied to “Watchdog”. When “Video Capture Error” is occurred, it is linking to Alert and Output. User can link the event to Reboot, Message on DVR.
18
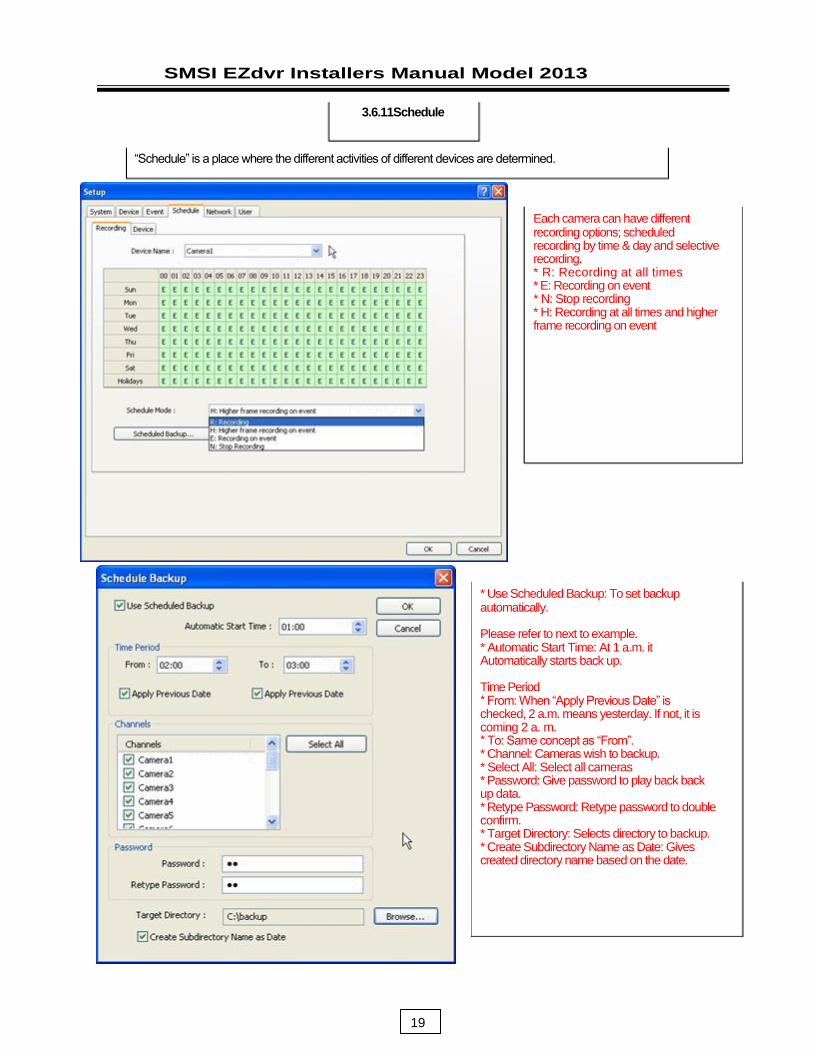
3.6.11Schedule
Each camera can have different recording options; scheduled recording by time & day and selective recording. * R: Recording at all times * E: Recording on event * N: Stop recording * H: Recording at all times and higher frame recording on event
* Use Scheduled Backup: To set backup automatically.
Please refer to next to example. * Automatic Start Time: At 1 a.m. it Automatically starts back up.
Time Period * From: When “Apply Previous Date” is checked, 2 a.m. means yesterday. If not, it is coming 2 a. m. * To: Same concept as “From”. * Channel: Cameras wish to backup. * Select All: Select all cameras * Password: Give password to play back back up data. * Retype Password: Retype password to double confirm. * Target Directory: Selects directory to backup. * Create Subdirectory Name as Date: Gives created directory name based on the date.
SMSI EZdvr Installers Manual Model 2013
“Schedule” is a place where the different activities of different devices are determined.
19
SMSI EZdvr Installers Manual Model 2013
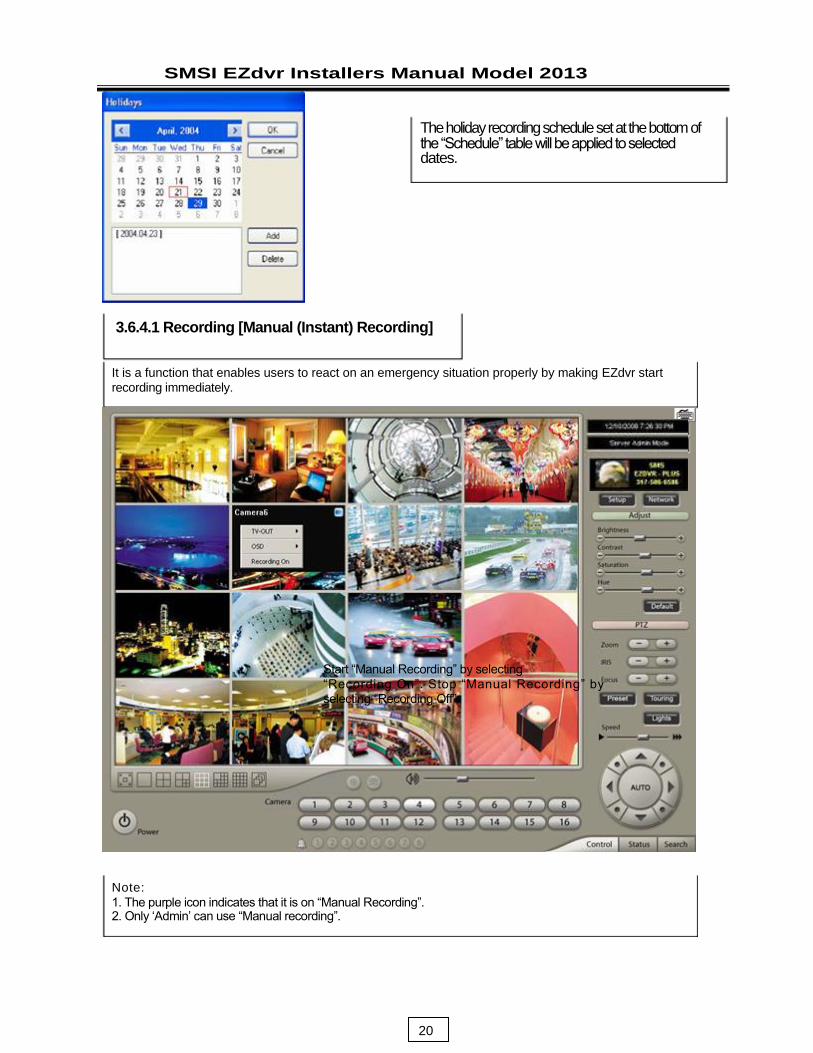
The holiday recording schedule set at the bottom of the “Schedule” table will be applied to selected dates.
3.6.4.1 Recording [Manual (Instant) Recording]
It is a function that enables users to react on an emergency situation properly by making EZdvr start
recording immediately.
Start “Manual Recording” by selecting
“Recording On”. Stop “Manual Recording” by selecting “Recording Off”.
Note:
1. The purple icon indicates that it is on “Manual Recording”. 2. Only ‘Admin’ can use “Manual recording”.
20
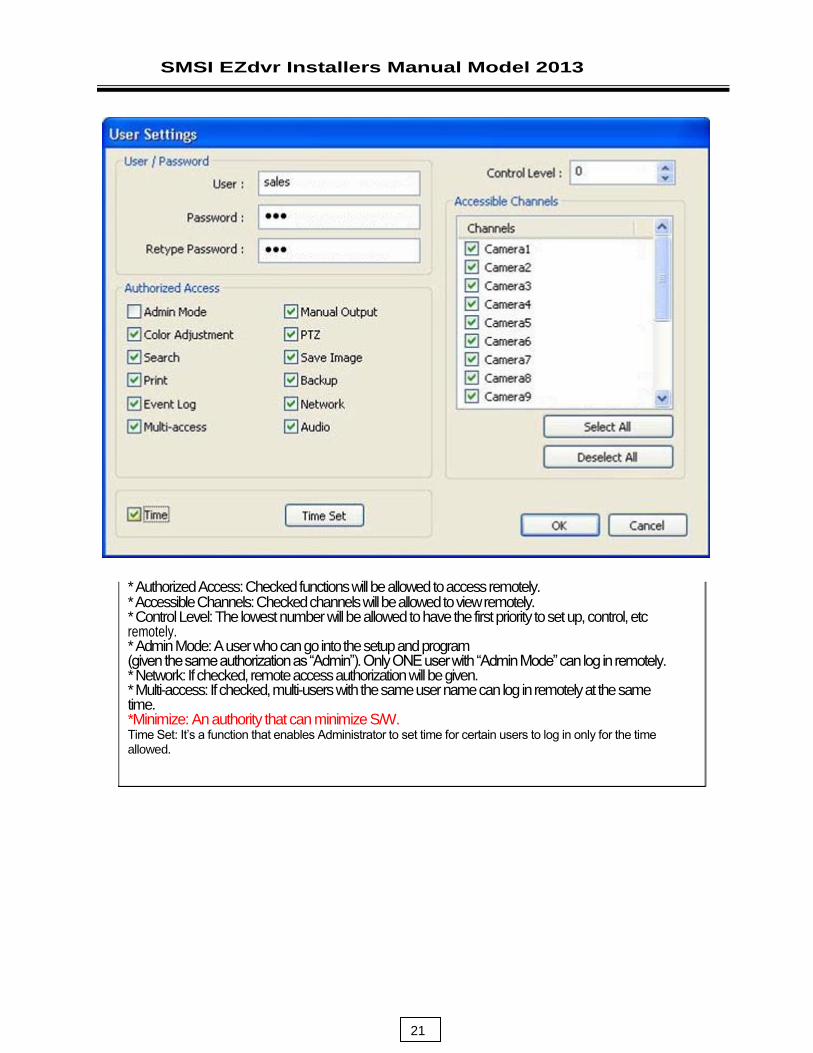
* Authorized Access: Checked functions will be allowed to access remotely. * Accessible Channels: Checked channels will be allowed to view remotely. * Control Level: The lowest number will be allowed to have the first priority to set up, control, etc remotely. * Admin Mode: A user who can go into the setup and program (given the same authorization as “Admin”). Only ONE user with “Admin Mode” can log in remotely. * Network: If checked, remote access authorization will be given. * Multi-access: If checked, multi-users with the same user name can log in remotely at the same time. *Minimize: An authority that can minimize S/W. Time Set: It’s a function that enables Administrator to set time for certain users to log in only for the time allowed.
SMSI EZdvr Installers Manual Model 2013
21

SMSI EZdvr Installers Manual Model 2013
Section 4 View Log Application (Status)
4.1 Screen Features
Recording Camera: It shows recording status. Sensor Detection: It shows sensor detection status. Motion Detection: It shows motion detection status. Alarm: It shows alarm activation status. HDD Capacity: It shows HDD capacity used for recording. Event: It shows events occurred. Event Log: It shows all the previous events occurred by date.
22
SMSI EZdvr Installers Manual Model 2013
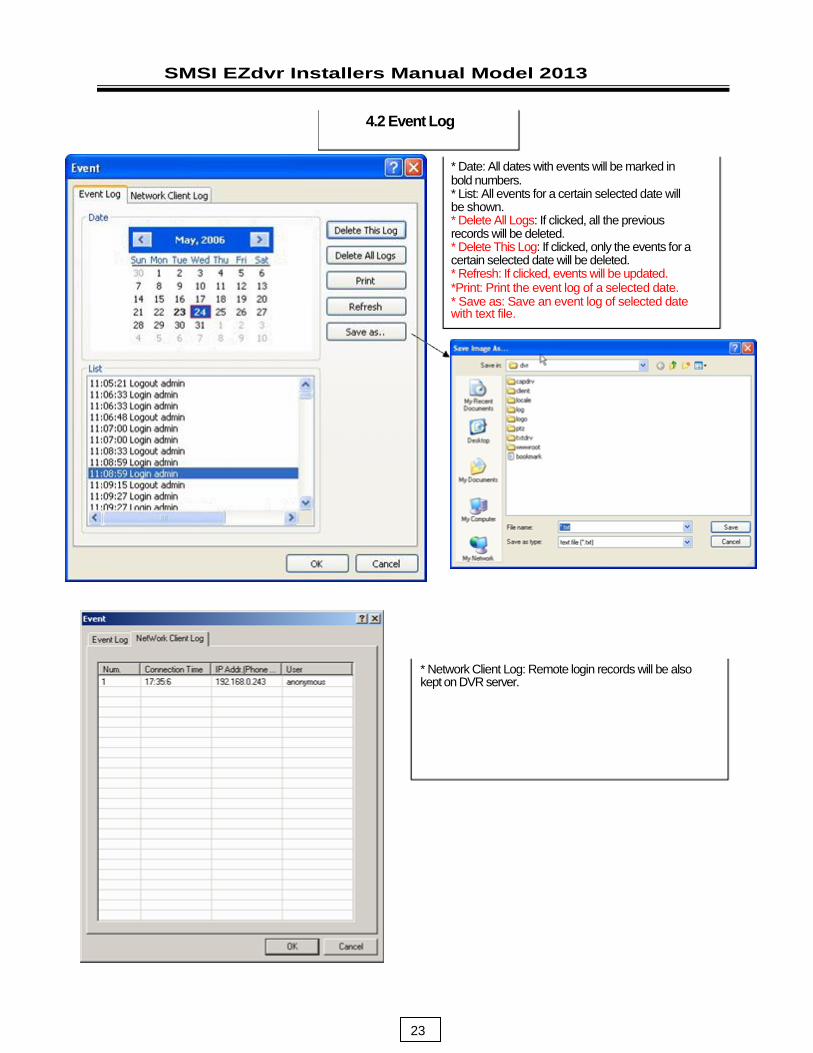
4.2 Event Log
* Date: All dates with events will be marked in bold numbers. * List: All events for a certain selected date will be shown. * Delete All Logs: If clicked, all the previous records will be deleted. * Delete This Log: If clicked, only the events for a certain selected date will be deleted. * Refresh: If clicked, events will be updated. *Print: Print the event log of a selected date. * Save as: Save an event log of selected date with text file.
* Network Client Log: Remote login records will be also kept on DVR server.
23

SMSI EZdvr Installers Manual Model 2013
Section 5 Playback Application (Search)
5.1 Search Features 1
Calendar: All dates with recorded data will be marked in bold numbers. Blur/Sharp/Normal: Buttons to adjust sharpness of image Zoom: Buttons to zoom in/out Brightness: buttons to adjust brightness Contrast: buttons to adjust contrast Default: Default for Zoom/Brightness/Contrast
5.2 Search Features 2
Clicking right mouse on Time bar for Browse… and select a folder containing backup data
5.2.1 Playback
24

SMSI EZdvr Installers Manual Model 2013
For playback, simply select date, screen mode (1, 4, 9, 16, etc.), time by one click on the time bar and click the play button. What different colors mean on the time bar:
1. Blue: Recorded data by sensor & motion detection 2. Purple: Recorded data by 24-hour-recording 3. White: No recorded data in all cameras 4. Gray: No recorded data for some cameras 5. Green: Blue + audio 6. Light Green: Purple + audio 7. Dark Red : Purple + recorded text data (POS) 8. Orange: Even- recorded data with recorded text data. 9. Dark Yellow : Event-recorded data + recorded text data + audio 10. Yellow : Purple + recorded text data + audio
Stop
Play Backward * 2
Event/Object/text/People count / Access control search
Move to the First Data
Move1 Frame Backward
5.2.2 Event / Object / Text /People Count/Access Control Search
[Event Search]
Click the Event/Object Search button and select “Event”.
Play
Play Backward
Move 1 Frame Forward
Play * 2
Move to the Last Data
25

SMSI EZdvr Installers Manual Model 2013
[Save in AVI Format]
"Start" to start saving
"Stop” to stop saving.
Mute: Saving video only (no audio)
High Speed: Saving in high speed
Time period setting: for length of time to record.
Click time period settings and put the time
period that you want to save.

This Manual is designed for the Installer to cover Retrieval of the SMS EZdvr – the proper setup and programming of the DVR unit.
A separate Quick Setup and User guide are provided, and should be used to instruct the end user on how to use the DVR.
It is imperative that the proper setup and programming be done by qualified personnel
as this can affect the quality and quantity of the DVR data.
These units have been designed to give reliability and long history as well as ease of
use. For other functionality and more detailed operation please email