snowflake ornament cover
TRANSCRIPT

Snowflake Ornament Cover
By Michelle Skobel
Materials:
11/0 Miyuki Seed Beads (A) (Caravanbeads.com) Super Duo Turquoise (B)
Super Duo Purple (C) 2 5/8 Inch Glass Ball (bronners.com)
C-Lon or Nymo #12 Beading Needle
© October 2013 Michelle Skobel www.michelleskobel.com

This pattern uses Deborah Roberti’s Snowflake tutorial with her permission. You can find it here: http://www.aroundthebeadingtable.com/Tutorials/Snowflake.html
Start by stretching and waxing your thread. Leave at least a 8-10 inch tail to be weaved in later.
Belly Band: Using Deborah’s Snowflake tutorial make (8) Snowflakes. Do NOT cut your thread you will be using that to connect your snowflakes together. I chose to alternate between my (B) and (C) beads on every other snowflake.
Connecting the Snowflakes:
Step 1: Make sure your thread is coming out of the left hole on the (B) bead figure 1.
Step 2: Pick up (3)A. Needle up through the right hole on your (B) bead figure 2.
Fig 1
Fig 2
Step 3: Pick up (5)A. Using another snowflake needle down through the left hole on your (C) bead figure 3.
Fig 3
1

Step 4: Pick up (3)A. Needle up through the right hole on your (C) bead, left hole on your (B) bead, (3)A, left hole on your (B) bead and the right hole on your (C) bead figure 4.
Fig 4
Step 5: Pick up (3)A. Needle down the left hole of your (C) bead figure 5.
Fig 5
Step 6: Pick up (5)A. Needle up through the right hole on your (B) bead on the left flower figure 6.
Fig 6
Step 7: Pick up (3)A. Needle down the left hole on your (B) bead, the right hole on your (C) bead and (3)A figure 7.
Fig 7
Step 8: Needle through all (4) of your center (A) beads (2 times) figure 8.
Fig 8 2
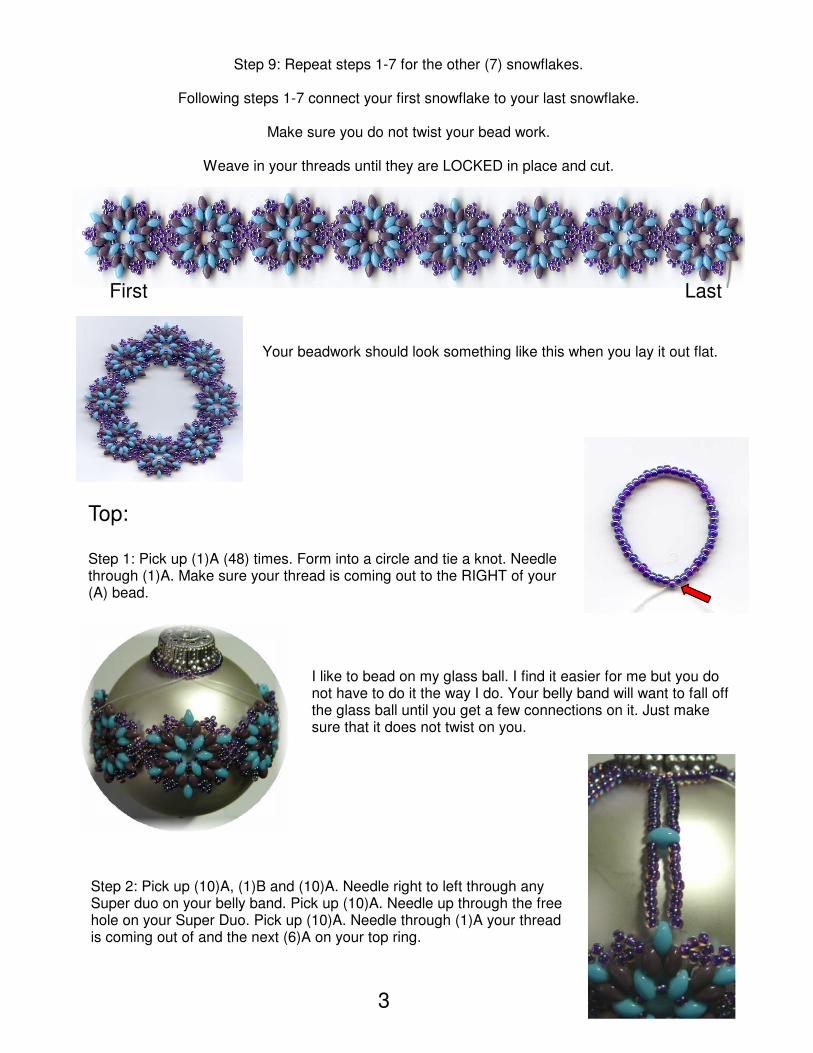
Step 9: Repeat steps 1-7 for the other (7) snowflakes.
Following steps 1-7 connect your first snowflake to your last snowflake.
Make sure you do not twist your bead work.
Weave in your threads until they are LOCKED in place and cut.
First Last
Your beadwork should look something like this when you lay it out flat.
Top: Step 1: Pick up (1)A (48) times. Form into a circle and tie a knot. Needle through (1)A. Make sure your thread is coming out to the RIGHT of your (A) bead.
I like to bead on my glass ball. I find it easier for me but you do not have to do it the way I do. Your belly band will want to fall off the glass ball until you get a few connections on it. Just make sure that it does not twist on you.
Step 2: Pick up (10)A, (1)B and (10)A. Needle right to left through any Super duo on your belly band. Pick up (10)A. Needle up through the free hole on your Super Duo. Pick up (10)A. Needle through (1)A your thread is coming out of and the next (6)A on your top ring.
3

Step 4: Take your beadwork off your glass ball and place your ball inside. Repeat steps 1-3 for the other half of your ornament.
Step 3: Repeat step 2 so all (8) of your snowflakes are connected to your top ring.
4
Weave in your threads until they are LOCKED in place and cut.