soapui tutorial jra1 meeting cambridge 8 june 2007 michalis michael cynet
TRANSCRIPT
soapUI Tutorial
JRA1 MeetingCambridge 8 June 2007Michalis MichaelCynet
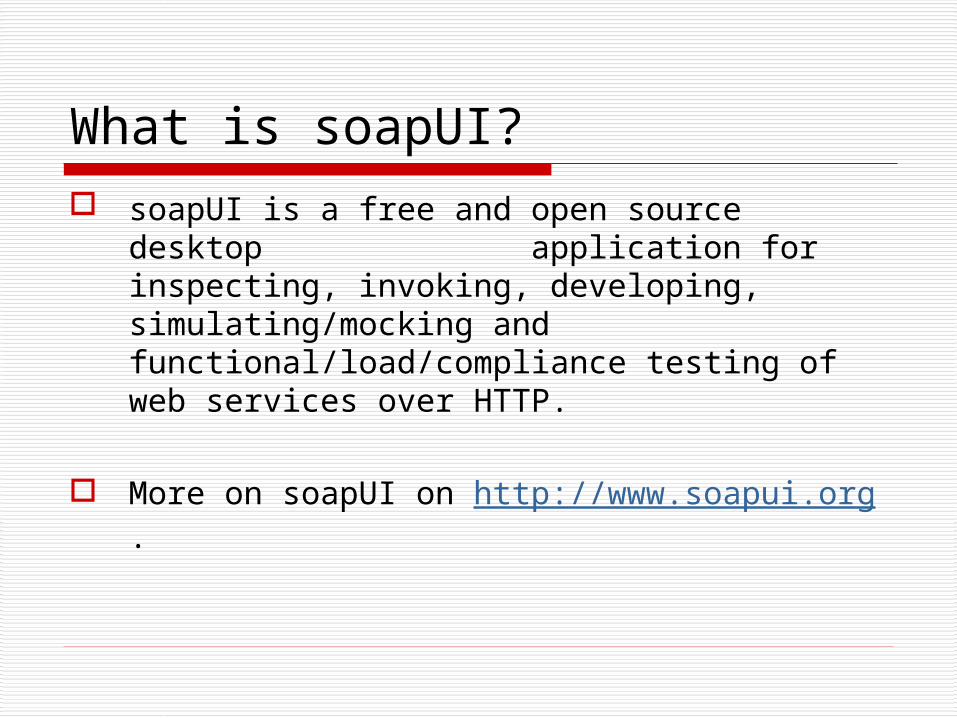
What is soapUI? soapUI is a free and open source desktop
application for inspecting, invoking, developing, simulating/mocking and functional/load/compliance testing of web services over HTTP.
More on soapUI on http://www.soapui.org .
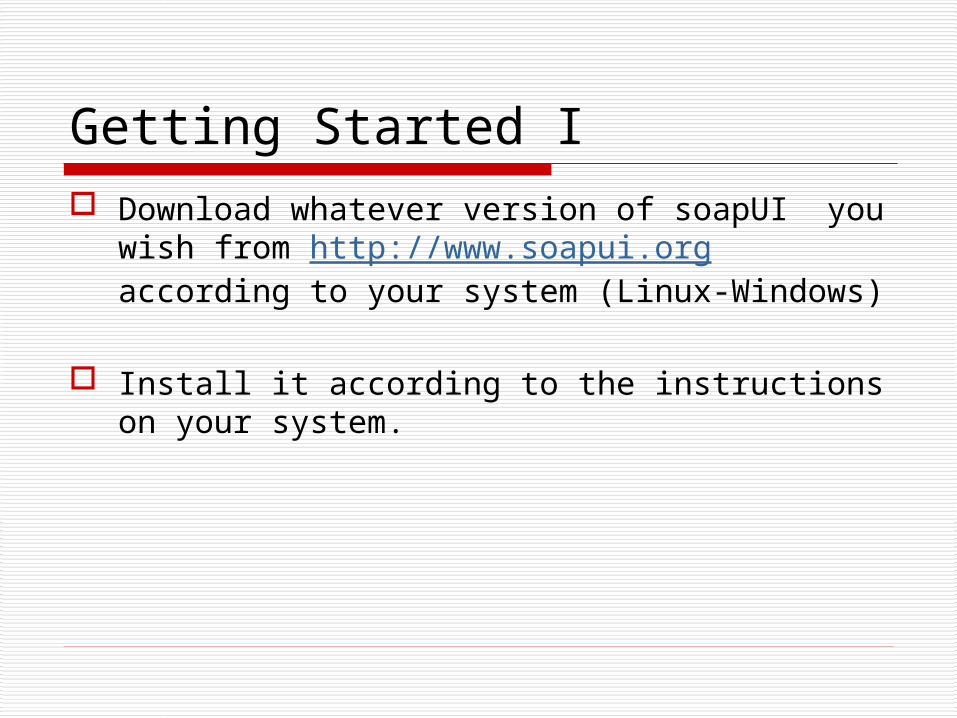
Getting Started I Download whatever version of soapUI you wish
from http://www.soapui.org according to your system (Linux-Windows)
Install it according to the instructions on your system.
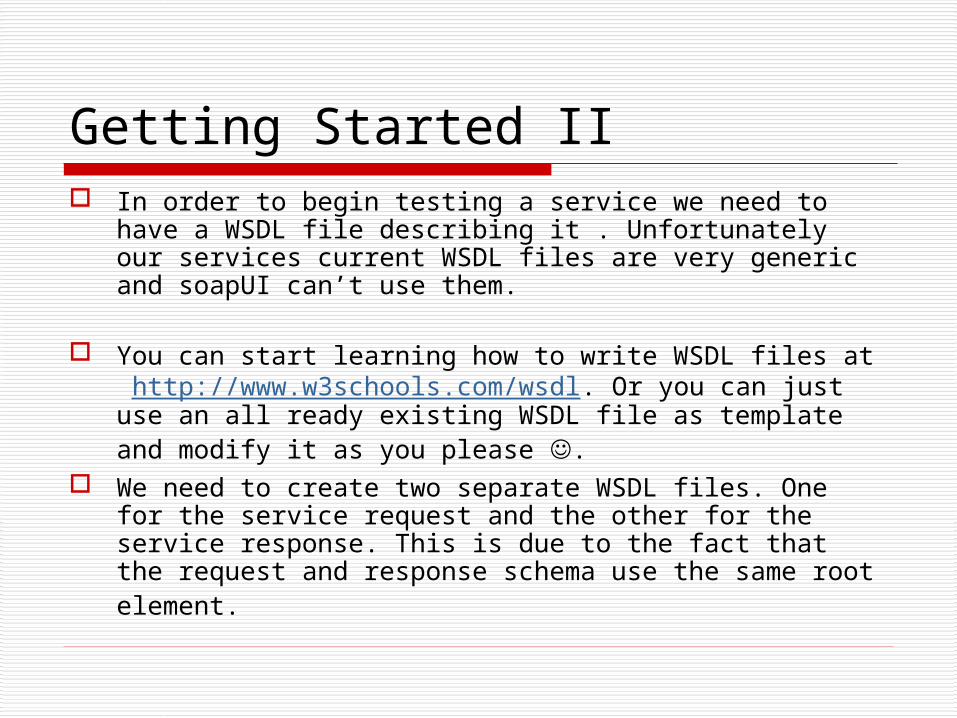
Getting Started II In order to begin testing a service we need to have a
WSDL file describing it . Unfortunately our services current WSDL files are very generic and soapUI can’t use them.
You can start learning how to write WSDL files at http://www.w3schools.com/wsdl. Or you can just use an all ready existing WSDL file as template and modify it as you please .
We need to create two separate WSDL files. One for the service request and the other for the service response. This is due to the fact that the request and response schema use the same root element.
Getting Started III Next you will need to create the .xsd files needed in the WSDL
description so that soapUI can validate the schema our services responses.
Our services schema is described in a Relax NG syntax. Relax NG syntax can be turned into xsd with he help of trang
$mkdir service-req service-res $trang service-req.rnc service-req/service-req.xsd $trang service-res.rnc service-res/service-res.xsd
Note that the xsd files are created in a directory because more than one xsd files may be created each time.
You can find trang here: http://www.thaiopensource.com/relaxng/trang.html
Getting Started IV Unfortunately its very common for the xsd files
created by trang not to be accepted as a valid schema by soapUI.
This is because our rnc files may contain multiple definitions for the same elements as nmwg:data or nmwg:metadata. To bypass this the services rnc files have to be modified accordingly.
However this may loosen the schema or if the modification is not the appropriate one, change it.
Creating Tests I Click to start soapUI Now lets create a WSDL project. Go to the
menu bar and click File -> New WSDL project From there you can give the project a name.
Because of path problems its not recommended to add a WSDL file yet. Click ok and the project will be created
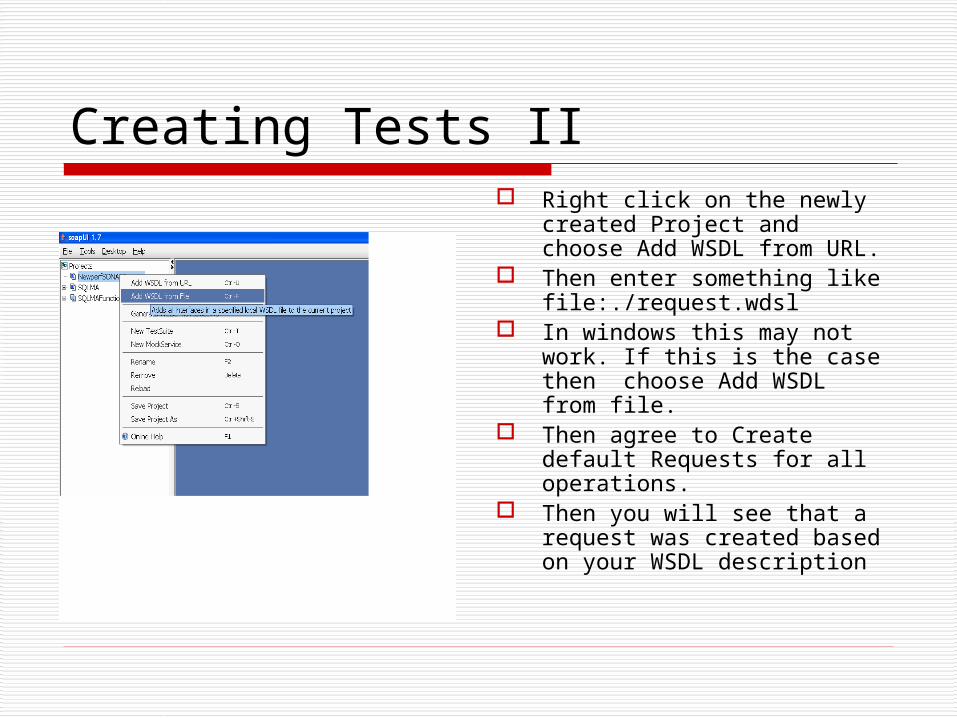
Creating Tests II Right click on the newly
created Project and choose Add WSDL from URL.
Then enter something like file:./request.wdsl
In windows this may not work. If this is the case then choose Add WSDL from file.
Then agree to Create default Requests for all operations.
Then you will see that a request was created based on your WSDL description
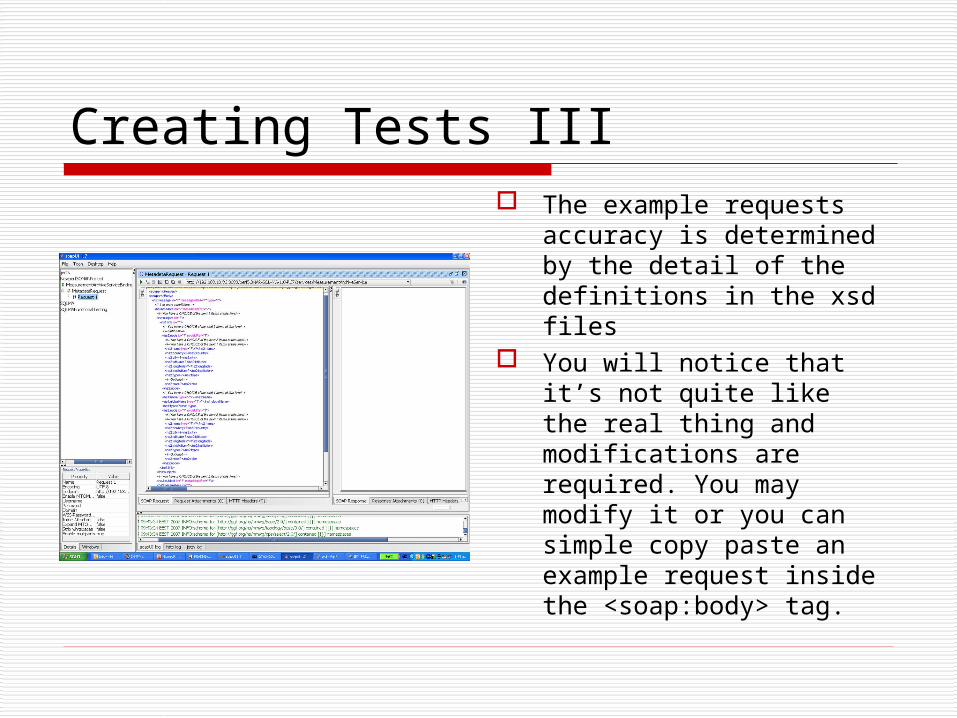
Creating Tests III The example requests
accuracy is determined by the detail of the definitions in the xsd files
You will notice that it’s not quite like the real thing and modifications are required. You may modify it or you can simple copy paste an example request inside the <soap:body> tag.
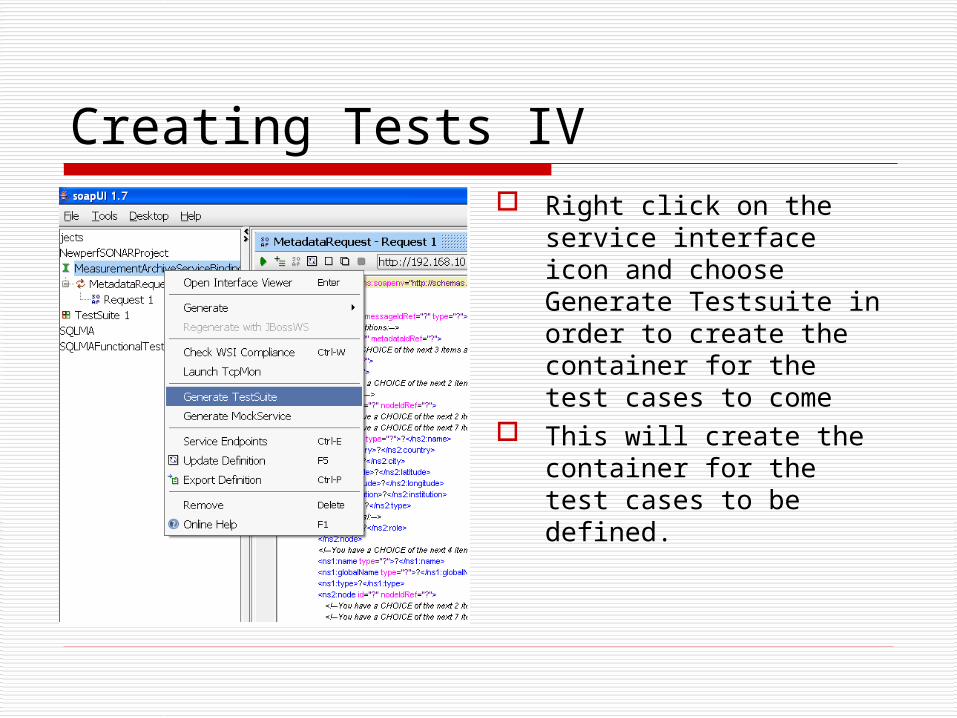
Creating Tests IV Right click on the service
interface icon and choose Generate Testsuite in order to create the container for the test cases to come
This will create the container for the test cases to be defined.
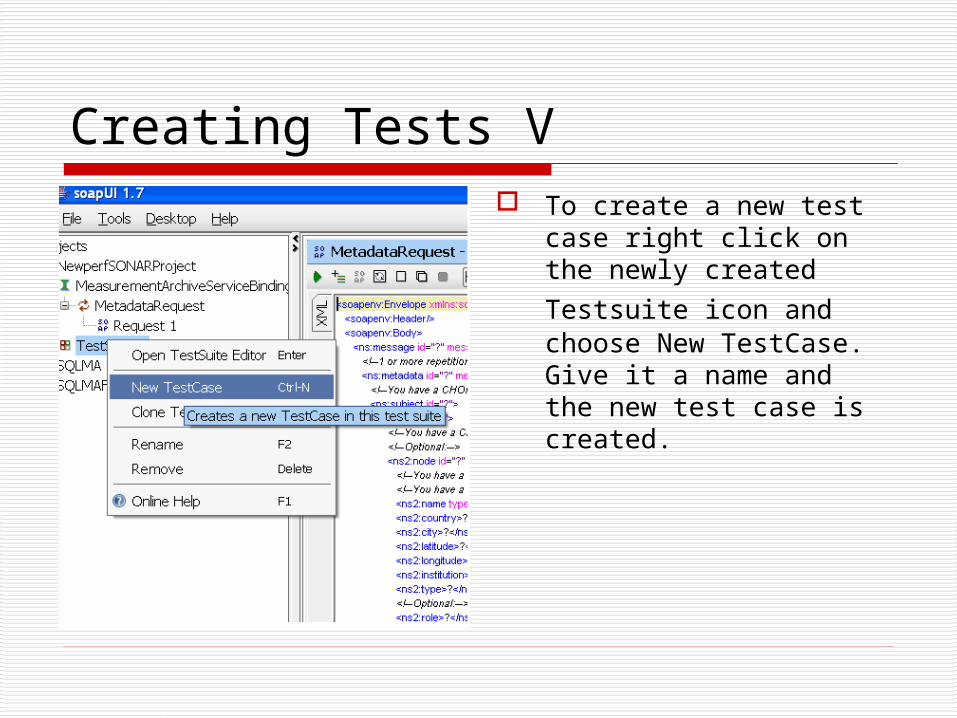
Creating Tests V To create a new test
case right click on the newly created Testsuite
icon and choose New TestCase. Give it a name and the new test case is created.
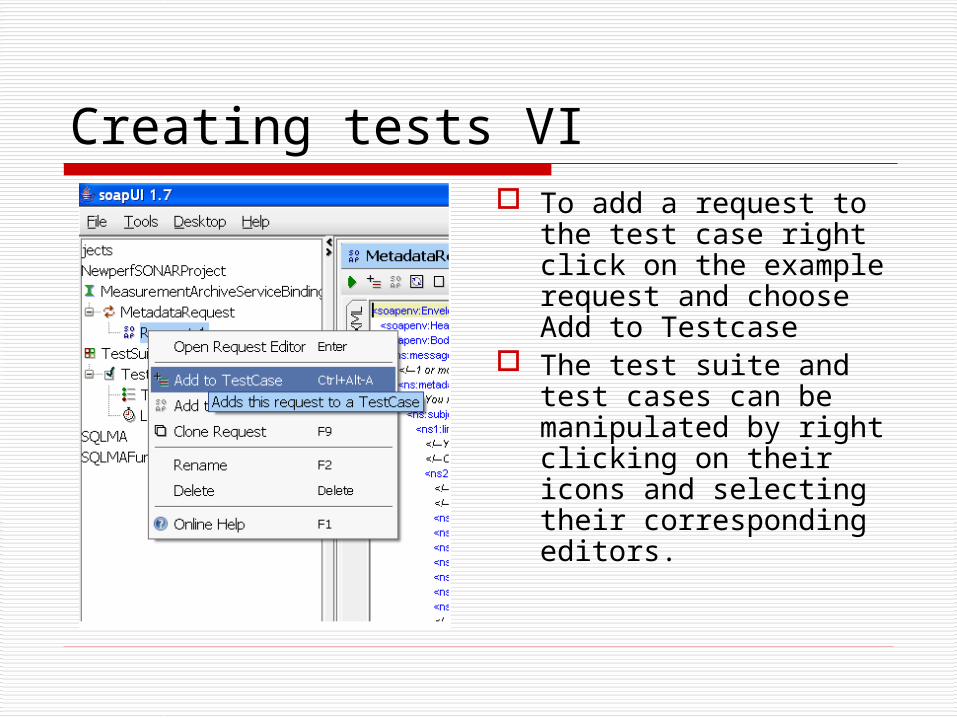
Creating tests VI To add a request to
the test case right click on the example request and choose Add to Testcase
The test suite and test cases can be manipulated by right clicking on their icons and selecting their corresponding editors.
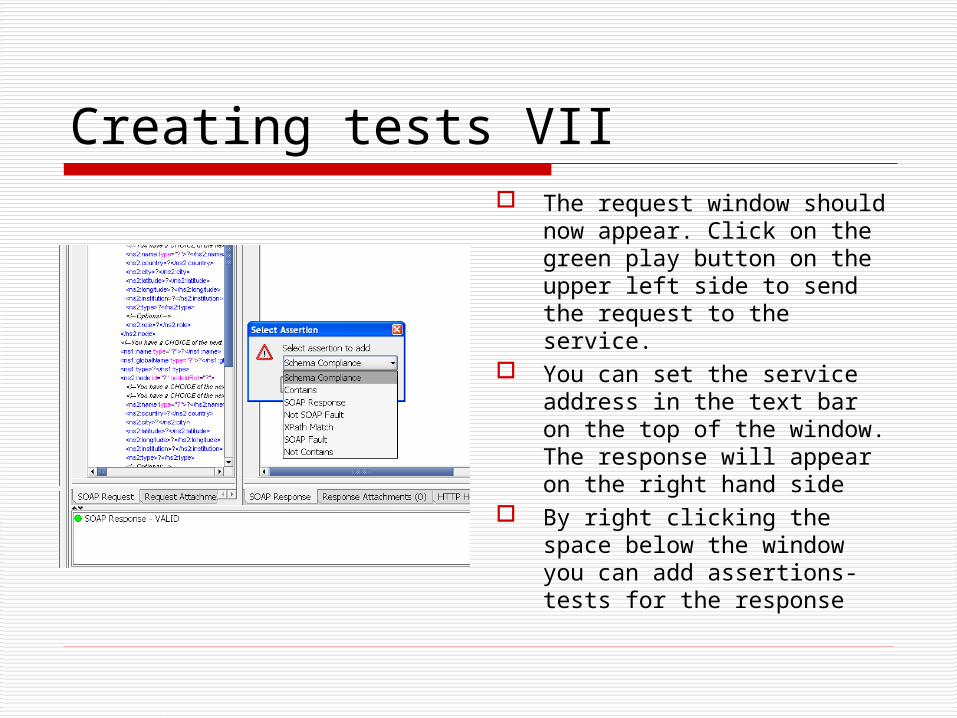
Creating tests VII The request window should
now appear. Click on the green play button on the upper left side to send the request to the service.
You can set the service address in the text bar on the top of the window. The response will appear on the right hand side
By right clicking the space below the window you can add assertions-tests for the response
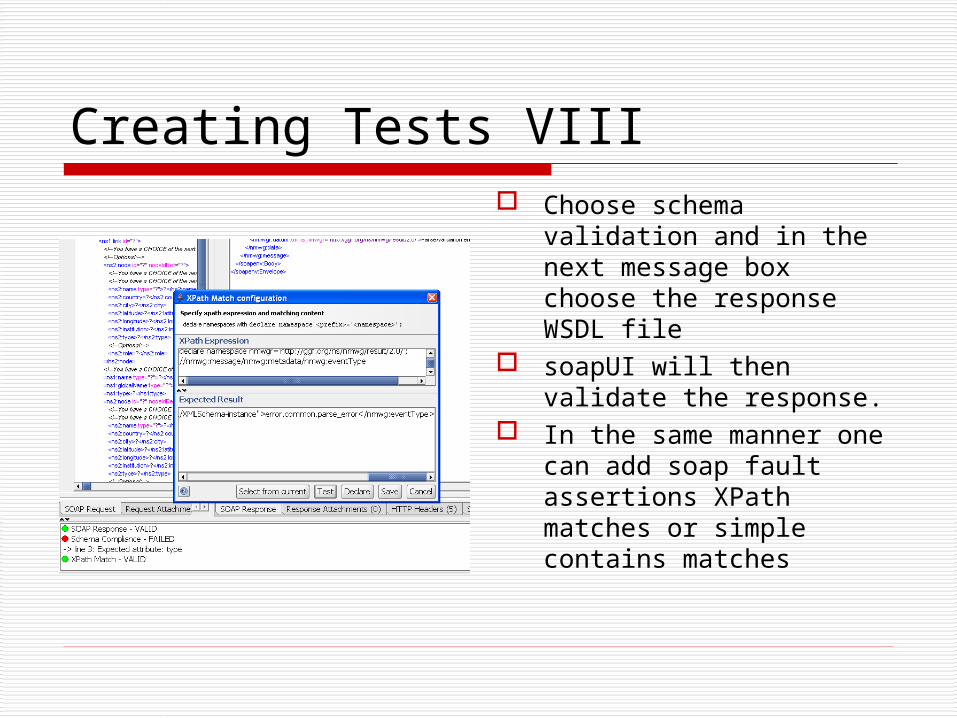
Creating Tests VIII Choose schema
validation and in the next message box choose the response WSDL file
soapUI will then validate the response.
In the same manner one can add soap fault assertions XPath matches or simple contains matches
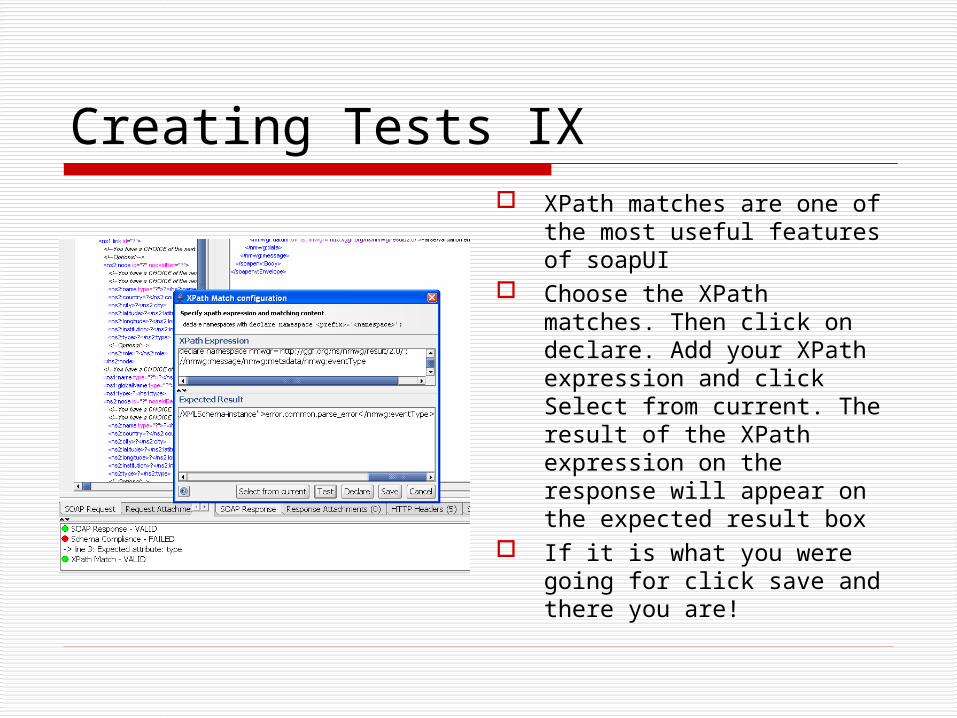
Creating Tests IX XPath matches are one of
the most useful features of soapUI
Choose the XPath matches. Then click on declare. Add your XPath expression and click Select from current. The result of the XPath expression on the response will appear on the expected result box
If it is what you were going for click save and there you are!
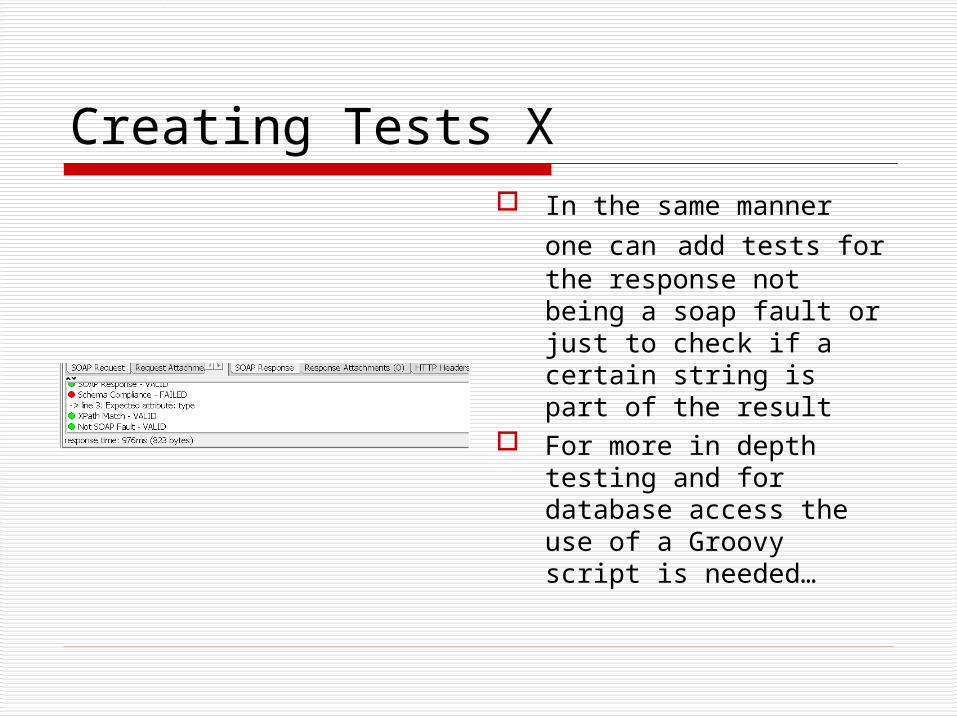
Creating Tests X In the same manner one
can add tests for the response not being a soap fault or just to check if a certain string is part of the result
For more in depth testing and for database access the use of a Groovy script is needed…
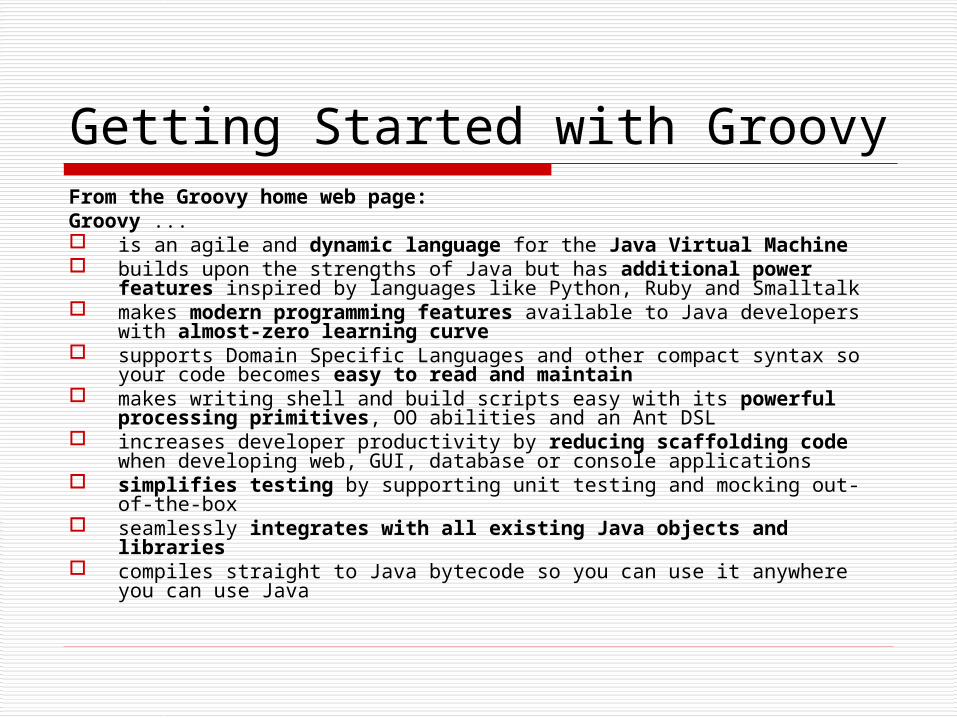
Getting Started with GroovyFrom the Groovy home web page: Groovy ... is an agile and dynamic language for the Java Virtual Machine builds upon the strengths of Java but has additional power features
inspired by languages like Python, Ruby and Smalltalk makes modern programming features available to Java developers with
almost-zero learning curve supports Domain Specific Languages and other compact syntax so your
code becomes easy to read and maintain makes writing shell and build scripts easy with its powerful processing
primitives, OO abilities and an Ant DSL increases developer productivity by reducing scaffolding code when
developing web, GUI, database or console applications simplifies testing by supporting unit testing and mocking out-of-the-box seamlessly integrates with all existing Java objects and libraries compiles straight to Java bytecode so you can use it anywhere you can use
Java
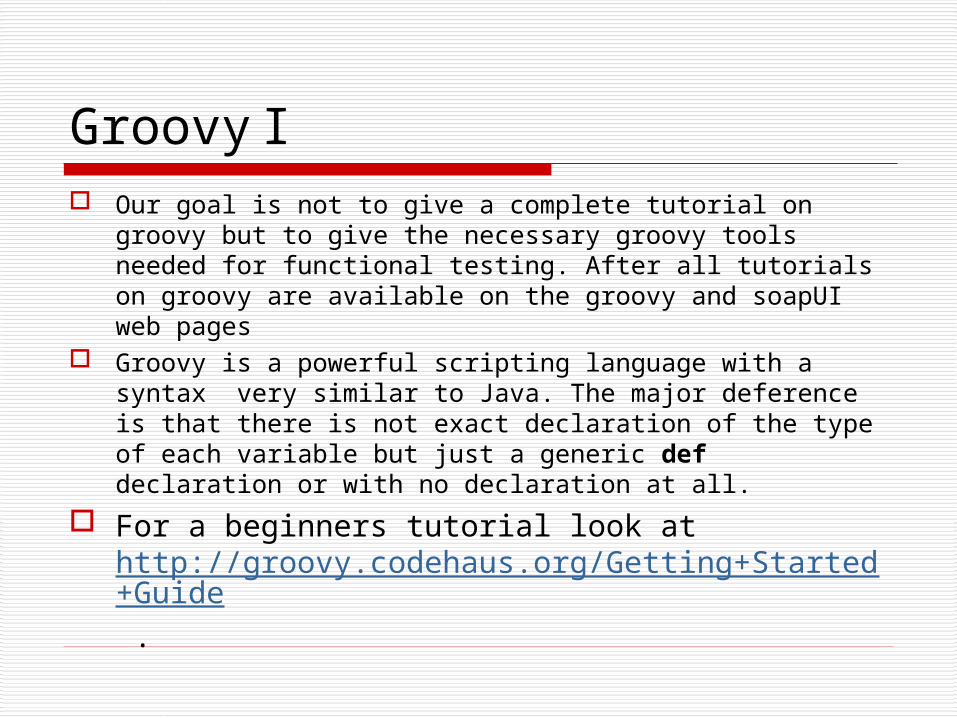
Groovy I Our goal is not to give a complete tutorial on groovy but
to give the necessary groovy tools needed for functional testing. After all tutorials on groovy are available on the groovy and soapUI web pages
Groovy is a powerful scripting language with a syntax very similar to Java. The major deference is that there is not exact declaration of the type of each variable but just a generic def declaration or with no declaration at all.
For a beginners tutorial look at http://groovy.codehaus.org/Getting+Started+Guide .

Groovy II def knownResultsMap=[id:"DFN-Surfnet-Link-5678",status:"down",admin:"UNKNOWN"] def sql = Sql.newInstance("jdbc:mysql://192.168.10.86:3306/perfsonar_ma", "perfsonar_ma", "testpass", "com.mysql.jdbc.Driver")
def resultList=[] sql.eachRow("select id,status_oper,status_admin from domain_link"){ def result=[:] result=[id:it.id,status:it.status_oper,admin:it.status_admin] resultList.add(result) }
Above you can see an example of accessing a mySQL database and retrieving data from it.
First we define a map
def knownResultsMap=[id:"DFN-Surfnet-Link-5678",status:"down",admin:"UNKNOWN"]
This map contains what we expect from the database
Note: All examples to work need the proper imports!

Groovy IIIdef sql = Sql.newInstance("jdbc:mysql://192.168.10.86:3306/perfsonar_ma",
"perfsonar_ma", "testpass", "com.mysql.jdbc.Driver")
Then a connection to the mySQL database is established, providing the address the username the password and the driver.
def resultList=[]
sql.eachRow("select id,status_oper,status_admin fromdomain_link"){
def result=[:]
result=[id:it.id,status:it.status_oper,admin:it.status_admin] resultList.add(result)}
With sql.eachRow the select statement is executed and the results are stored inside the result map with the help of an iterator “it” . The result map holds the results for one row and all rows are stored in the result list.
There is not need to declare the iterator, its “built-in” with the .eachRow method
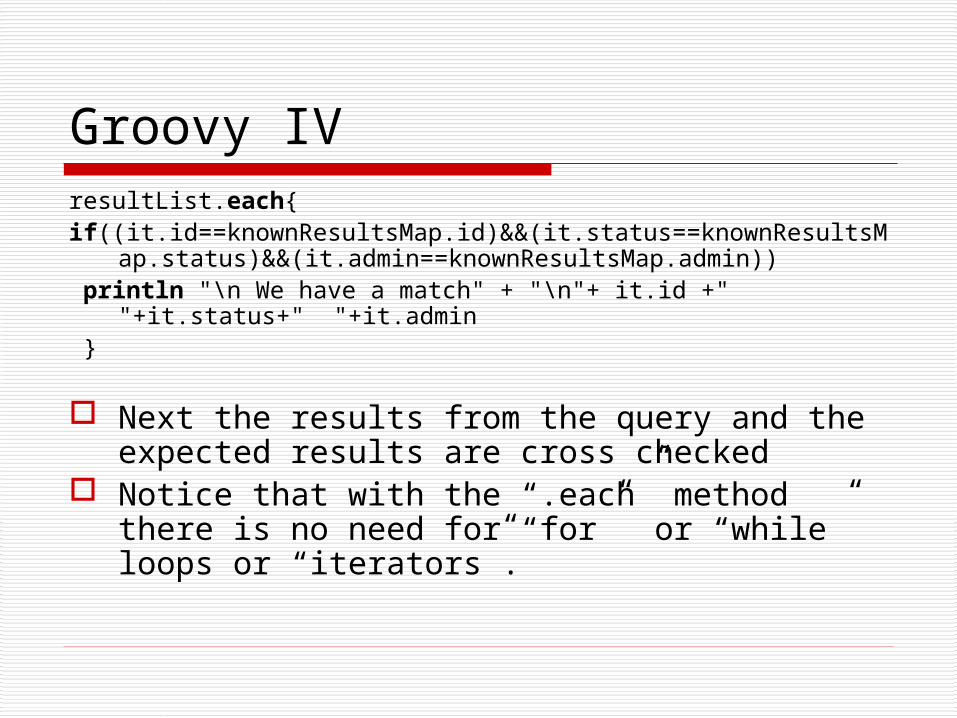
Groovy IVresultList.each{if((it.id==knownResultsMap.id)&&(it.status==knownResultsMap.status)&&(it.
admin==knownResultsMap.admin)) println "\n We have a match" + "\n"+ it.id +" "+it.status+" "+it.admin }
Next the results from the query and the expected results are cross checked
Notice that with the “.each” method there is no need for “for” or “while” loops or “iterators”.

Groovy V There is no native Groovy support for the eXist
database though… But no problem there, groovy can still use java
libraries instead here is an example:Class cl = Class.forName("org.exist.xmldb.DatabaseImpl");Database database = (Database) cl.newInstance();DatabaseManager.registerDatabase(database);Collection collection = DatabaseManager.getCollection("xmldb:exist://192.168.10.86:8080/exist/
xmlrpc/db/sqlmaconfig", "sqlmaservice", "testpass");
The traditional java method and classes can be used for accessing eXist, lucking of course groovy’s capabilities.
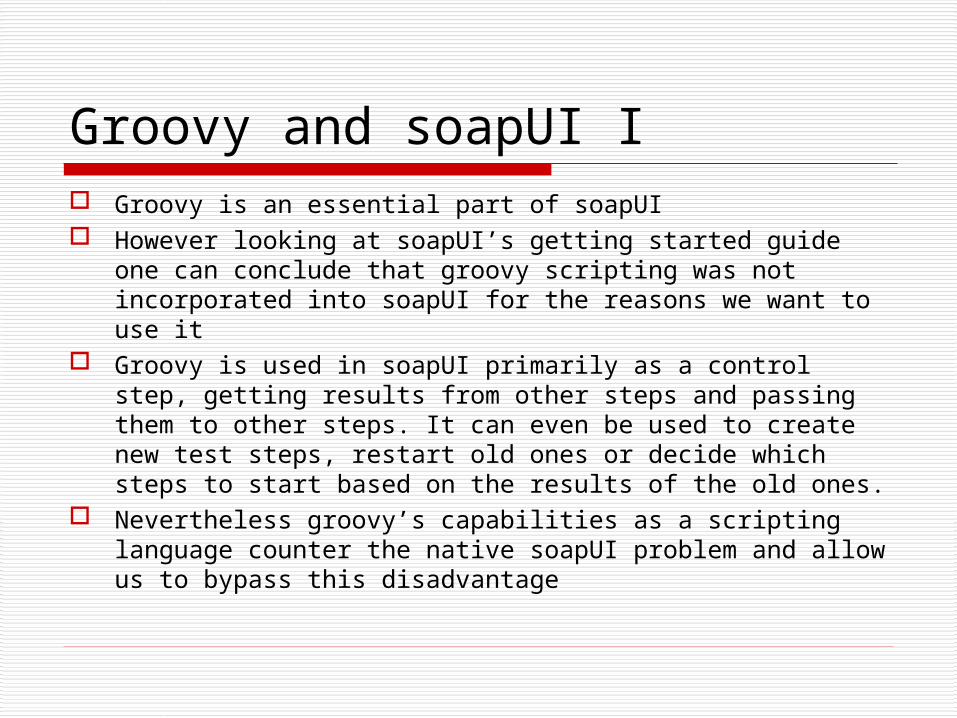
Groovy and soapUI I Groovy is an essential part of soapUI However looking at soapUI’s getting started guide one
can conclude that groovy scripting was not incorporated into soapUI for the reasons we want to use it
Groovy is used in soapUI primarily as a control step, getting results from other steps and passing them to other steps. It can even be used to create new test steps, restart old ones or decide which steps to start based on the results of the old ones.
Nevertheless groovy’s capabilities as a scripting language counter the native soapUI problem and allow us to bypass this disadvantage

Groovy and soapUI II Groovy can access test steps through the testRunner
instance.def request = testRunner.testCase.getTestStepByName( "MetadataKeyRequest1" );
def property = request.getProperty( "Response" );
println property.value
In the previous example we’ve accessed the MetadatakeyRequest1 object through the testRunner instance, then through testCase and finally got what we wanted from the getTestStepByName method
Next we obtained the response through the request object using its getProperty method.
The Groovy-soapUI combination has some powerful xml handling capabilities which we intend to use…

Groovy and soapUI IIIdef response = new groovy.util.XmlParser(false,false).parseText(property.value);def parameters=response["soapenv:Body"] ["nmwg:message"] ["nmwg:data"]
["nmwg:key"]["nmwg:parameters"]["nmwg:parameter"]parameters.each{println it['@name']println it.text()}
From the above example we can see the power of groovy on xml
We got the response document through the groovy.util.XmlParser and then accessed the parameters element through a very simple XPath API
Then with the help of the .each method and the XPath API we’ve accessed all the parameter element

Groovy and soapUI IV As said before the groovy scripting step was not intended to be
a testing mechanism but rather a control unit. So there is no way I could find that could allow a groovy script
step to fail as a test request step. But there are ways to get around that log.info "script failed“
log. error "script failed“
Through the log instance you can report any failures to the logging space at the bottom of the groovy script window
The logs output is the soapUI log Or you can just throw an exceptionthrow new Exception( “script failed" )

Groovy and soapUI V But the best way in my opinion is to write the result of the
groovy script to an external file along with the results of all tests
def fields = ["a":"1", "b":"2", "c":"3"]
new File("foo.ini").withWriter { out -> fields.each() { key, value -> out.writeLine("${key}=${value}") }
}
The former piece of code uses the withWriter method and the help of a “closure” to write the map to the file.
Writing our results with the help of groovy to an external file, can give us the reporting capability that we have using traditional languages for functional testing as Java and Perl

Groovy and soapUI VI-Tips The groovy script editor is pretty raw and I
wouldn’t suggest it for any serious developing I’d suggest to install groovy on a machine and
try most of the code apart from soapUI There is also an eclipse plug-in. Instructions on
how to install it are found at http://groovy.codehaus.org/Eclipse+Plugin
When you finish testing the code pieces that are independent from soapUI you can copy the code to the soapUI script editor and add the remaining code.

Groovy and soapUI VII-Tips Be careful! The embedded groovy language in soapUI
can only accept new packages only if it is installed on your machine. JNLP versions can not accept new packages.
Adding new packages to the embedded groovy-such as xmldb- can be tricky.
Modification of soapUI.bat or .sh is needed. Copy the packages you want to add in the lib directory of
the soapUI installation folder. Then modify the soapUI.bat or .sh file adding set
CLASSPATH=%CLASSPATH%;..\lib\mypackage.jar Restart soapUI so that the changes may take place This is necessary for the mysql-connector and xmldb
packages.

Groovy and soapUI VIII

Questions?

Thanks!
A special thanks to Jochen Reinward for his precious assistance on soapUI and on the rnc to
xsd transformation. This tutorial was heavily based on Jochen’s instructions found on svn.
Thank you all for watching!