soffit, fascia & rainware systems - kaycan.com · aluminum soffit & fascia installations...
TRANSCRIPT

SOFFIT, FASCIA & RAINWARE SYSTEMS
• EASY TO INSTALL• ECONOMICAL TO MAINTAIN
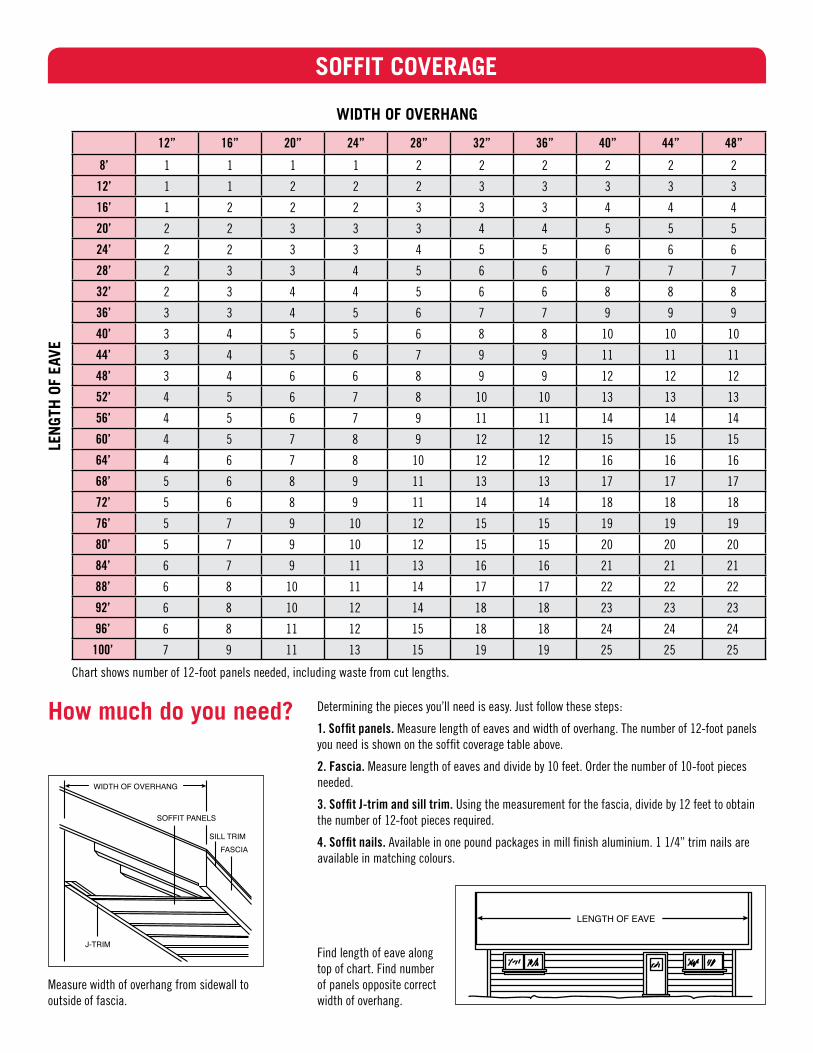
SOFFIT COVERAGE
12” 16” 20” 24” 28” 32” 36” 40” 44” 48”
8’ 1 1 1 1 2 2 2 2 2 2
12’ 1 1 2 2 2 3 3 3 3 3
16’ 1 2 2 2 3 3 3 4 4 4
20’ 2 2 3 3 3 4 4 5 5 5
24’ 2 2 3 3 4 5 5 6 6 6
28’ 2 3 3 4 5 6 6 7 7 7
32’ 2 3 4 4 5 6 6 8 8 8
36’ 3 3 4 5 6 7 7 9 9 9
40’ 3 4 5 5 6 8 8 10 10 10
44’ 3 4 5 6 7 9 9 11 11 11
48’ 3 4 6 6 8 9 9 12 12 12
52’ 4 5 6 7 8 10 10 13 13 13
56’ 4 5 6 7 9 11 11 14 14 14
60’ 4 5 7 8 9 12 12 15 15 15
64’ 4 6 7 8 10 12 12 16 16 16
68’ 5 6 8 9 11 13 13 17 17 17
72’ 5 6 8 9 11 14 14 18 18 18
76’ 5 7 9 10 12 15 15 19 19 19
80’ 5 7 9 10 12 15 15 20 20 20
84’ 6 7 9 11 13 16 16 21 21 21
88’ 6 8 10 11 14 17 17 22 22 22
92’ 6 8 10 12 14 18 18 23 23 23
96’ 6 8 11 12 15 18 18 24 24 24
100’ 7 9 11 13 15 19 19 25 25 25
WIDTH OF OVERHANG
LEN
GTH
OF
EAVE
Chart shows number of 12-foot panels needed, including waste from cut lengths.
How much do you need? Determining the pieces you’ll need is easy. Just follow these steps:
1. Soffit panels. Measure length of eaves and width of overhang. The number of 12-foot panels you need is shown on the soffit coverage table above.
2. Fascia. Measure length of eaves and divide by 10 feet. Order the number of 10-foot pieces needed.
3. Soffit J-trim and sill trim. Using the measurement for the fascia, divide by 12 feet to obtain the number of 12-foot pieces required.
4. Soffit nails. Available in one pound packages in mill finish aluminium. 1 1/4” trim nails are available in matching colours.
Find length of eave along top of chart. Find number of panels opposite correct width of overhang.
LENGTH OF EAVE
Measure width of overhang from sidewall to outside of fascia.
WIDTH OF OVERHANG
J-TRIM
SOFFIT PANELS
SILL TRIMFASCIA
ALUMINUM SOFFIT & FASCIA
Kaycan Aluminum Soffit & Fascia Installation InstructionsOnly a few simple tools are needed... measuring tape, metal-cutting shears, hammer, nail-set, scoring knife and chalkline. Desirable, but not essential, are a carpenter’s level and/or a square and a power saw with a metal cutting edge.
INSTALLATION TIPS
1. Whenever possible, nail soffit panels in grooves.
2. Where eavestroughs cover part of the fascia, either (a) remove trough before installing fascia and replace it upon completion of installation; (b) run fascia part way under existing trough. (Note: painted finish normally insulated aluminum from contact with other metals. However, bare steel, lead or old copper work should be removed.)
3. An easy way to cut aluminum lengthwise is to score the panel with a scoring knife, then bend panel back and forth until the metal breaks. (Wear goggles when cross-cutting with power saw.)
4. Keep hands clean or wear gloves to make it unnecessary to wash the completed installation.
5. The paint finish is tough, but care should be taken in handling to protect appearance.
6. On applications where panel lengths from 4 to 12 feet are required, it is recommended that the panels be attached on 24” centers with coloured trim nails set in grooves or #6 aluminium sheet metal screws. (Use touchup paint on screw heads.)
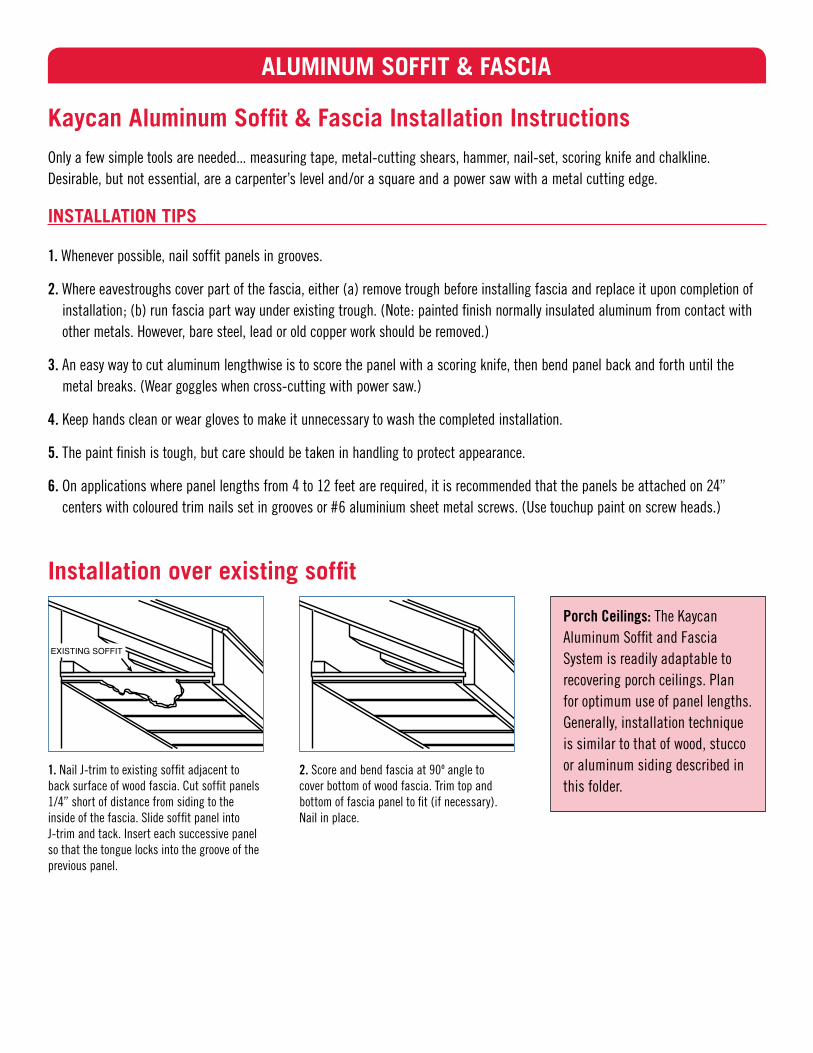
Installation over existing soffit
1. Nail J-trim to existing soffit adjacent to back surface of wood fascia. Cut soffit panels 1/4” short of distance from siding to the inside of the fascia. Slide soffit panel into J-trim and tack. Insert each successive panel so that the tongue locks into the groove of the previous panel.
EXISTING SOFFIT
2. Score and bend fascia at 90º angle to cover bottom of wood fascia. Trim top and bottom of fascia panel to fit (if necessary). Nail in place.
Porch Ceilings: The Kaycan Aluminum Soffit and Fascia System is readily adaptable to recovering porch ceilings. Plan for optimum use of panel lengths. Generally, installation technique is similar to that of wood, stucco or aluminum siding described in this folder.
ALUMINUM SOFFIT & FASCIA
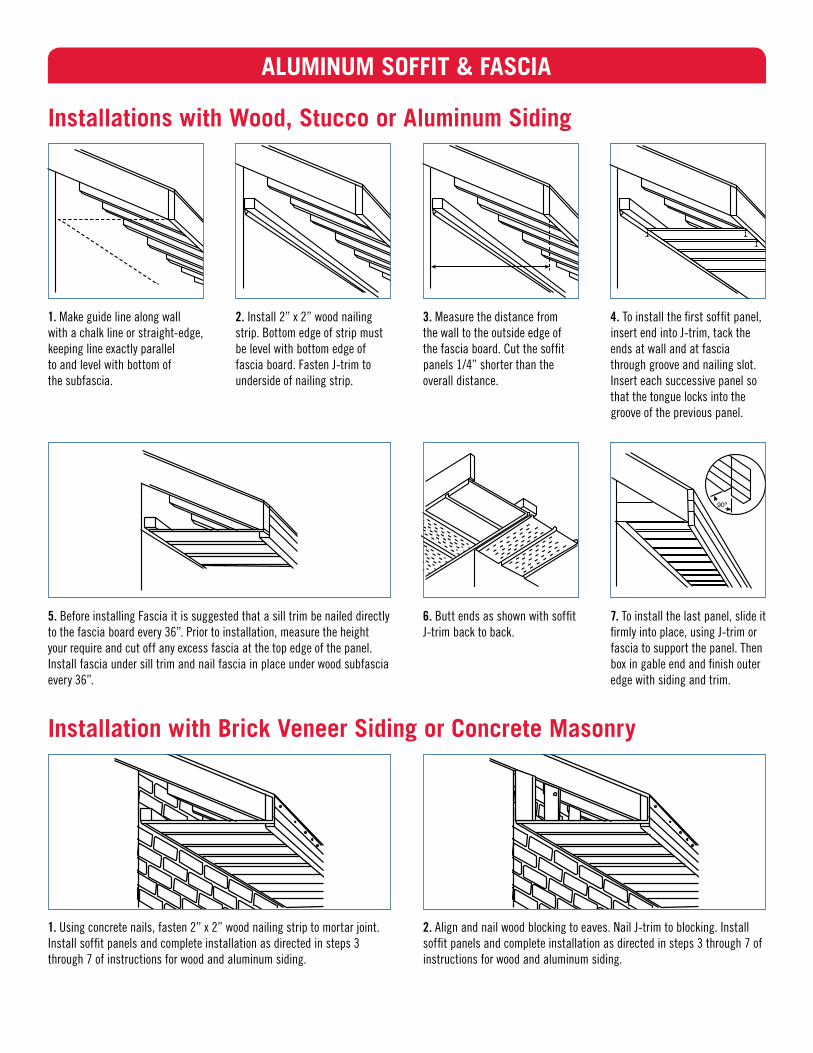
Installations with Wood, Stucco or Aluminum Siding
5. Before installing Fascia it is suggested that a sill trim be nailed directly to the fascia board every 36”. Prior to installation, measure the height your require and cut off any excess fascia at the top edge of the panel. Install fascia under sill trim and nail fascia in place under wood subfascia every 36”.
Installation with Brick Veneer Siding or Concrete Masonry
1. Using concrete nails, fasten 2” x 2” wood nailing strip to mortar joint. Install soffit panels and complete installation as directed in steps 3 through 7 of instructions for wood and aluminum siding.
2. Align and nail wood blocking to eaves. Nail J-trim to blocking. Install soffit panels and complete installation as directed in steps 3 through 7 of instructions for wood and aluminum siding.
6. Butt ends as shown with soffit J-trim back to back.
7. To install the last panel, slide it firmly into place, using J-trim or fascia to support the panel. Then box in gable end and finish outer edge with siding and trim.
90º
1. Make guide line along wall with a chalk line or straight-edge, keeping line exactly parallel to and level with bottom of the subfascia.
2. Install 2” x 2” wood nailing strip. Bottom edge of strip must be level with bottom edge of fascia board. Fasten J-trim to underside of nailing strip.
3. Measure the distance from the wall to the outside edge of the fascia board. Cut the soffit panels 1/4” shorter than the overall distance.
4. To install the first soffit panel, insert end into J-trim, tack the ends at wall and at fascia through groove and nailing slot. Insert each successive panel so that the tongue locks into the groove of the previous panel.
RAINWARE
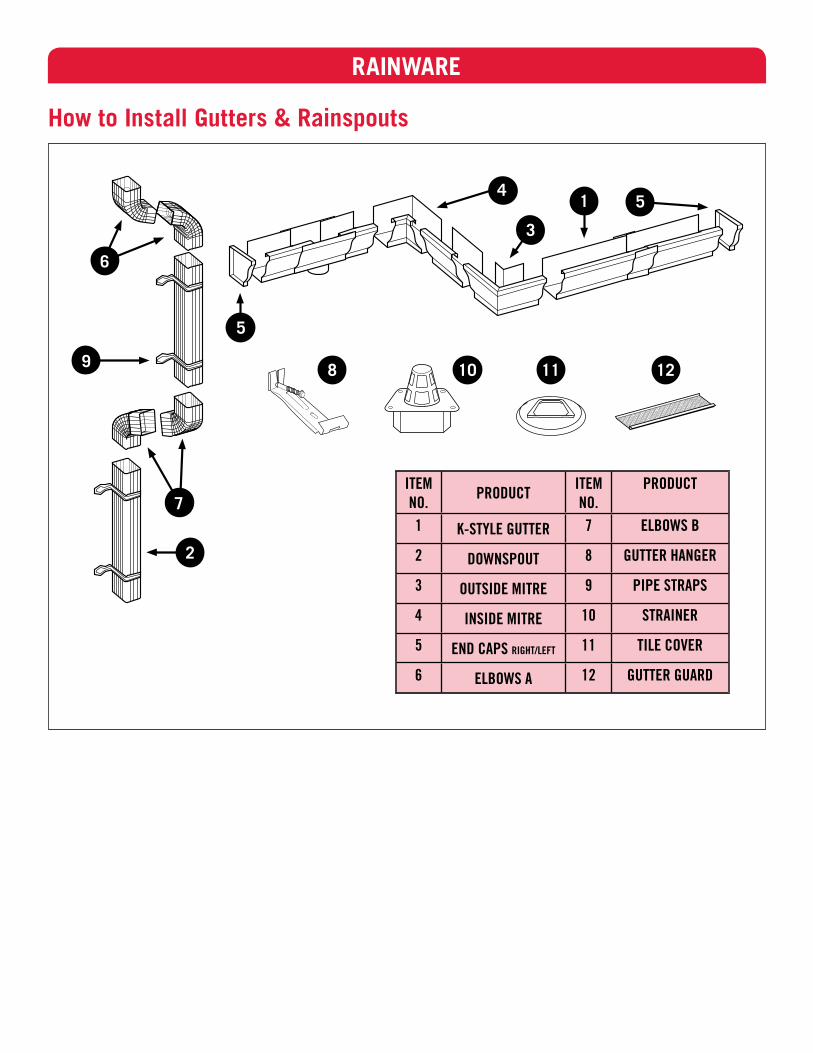
How to Install Gutters & Rainspouts
2
1
3
45
5
6
9
7
8 121110
ITEM NO. PRODUCT ITEM
NO.PRODUCT
1 K-STYLE GUTTER 7 ELBOWS B
2 DOWNSPOUT 8 GUTTER HANGER
3 OUTSIDE MITRE 9 PIPE STRAPS
4 INSIDE MITRE 10 STRAINER
5 END CAPS RIGHT/LEFT 11 TILE COVER
6 ELBOWS A 12 GUTTER GUARD
RAINWARE
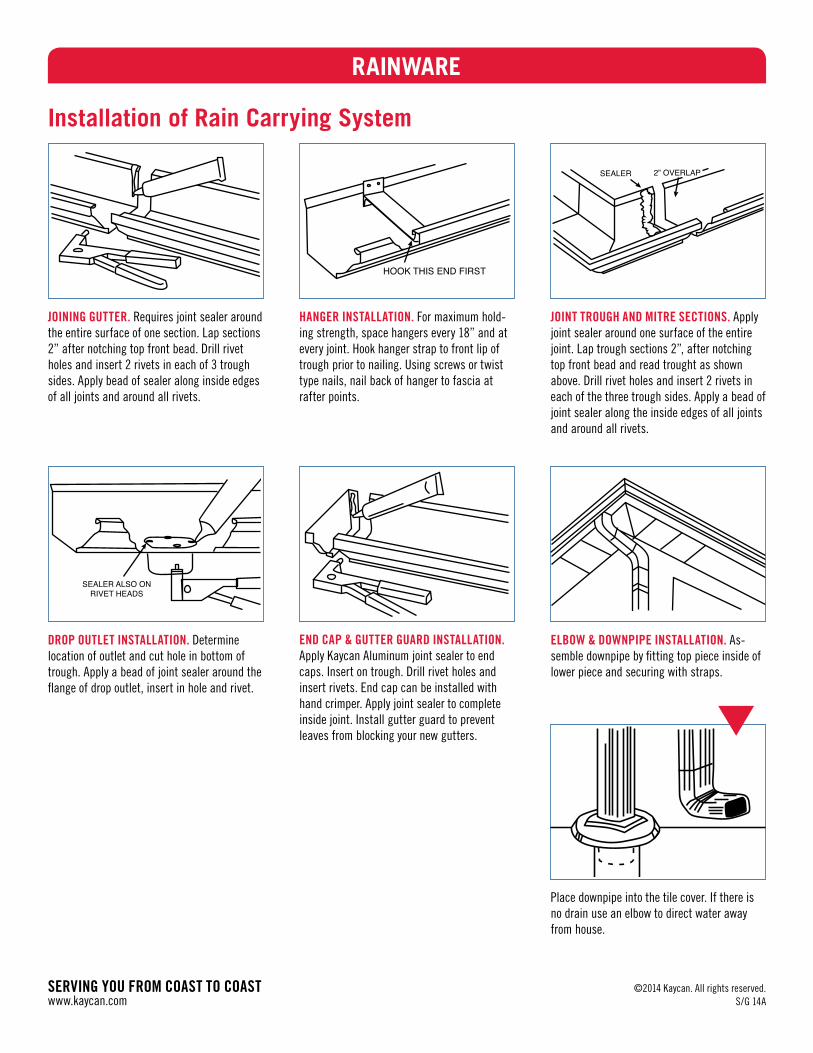
Installation of Rain Carrying System
JOINING GUTTER. Requires joint sealer around the entire surface of one section. Lap sections 2” after notching top front bead. Drill rivet holes and insert 2 rivets in each of 3 trough sides. Apply bead of sealer along inside edges of all joints and around all rivets.
HOOK THIS END FIRST
SEALER 2” OVERLAP
HANGER INSTALLATION. For maximum hold-ing strength, space hangers every 18” and at every joint. Hook hanger strap to front lip of trough prior to nailing. Using screws or twist type nails, nail back of hanger to fascia at rafter points.
JOINT TROUGH AND MITRE SECTIONS. Apply joint sealer around one surface of the entire joint. Lap trough sections 2”, after notching top front bead and read trought as shown above. Drill rivet holes and insert 2 rivets in each of the three trough sides. Apply a bead of joint sealer along the inside edges of all joints and around all rivets.
DROP OUTLET INSTALLATION. Determine location of outlet and cut hole in bottom of trough. Apply a bead of joint sealer around the flange of drop outlet, insert in hole and rivet.
SEALER ALSO ONRIVET HEADS
END CAP & GUTTER GUARD INSTALLATION. Apply Kaycan Aluminum joint sealer to end caps. Insert on trough. Drill rivet holes and insert rivets. End cap can be installed with hand crimper. Apply joint sealer to complete inside joint. Install gutter guard to prevent leaves from blocking your new gutters.
ELBOW & DOWNPIPE INSTALLATION. As-semble downpipe by fitting top piece inside of lower piece and securing with straps.
Place downpipe into the tile cover. If there is no drain use an elbow to direct water away from house.
©2014 Kaycan. All rights reserved.S/G 14A
SERVING YOU FROM COAST TO COAST www.kaycan.com