software 3.0 - bio-rad laboratories
TRANSCRIPT

ProteinChip® Data ManagerSoftware 3.0.7Installation and Setup

Page i
Bio-Rad Laboratories, Inc.Notice to Purchaser: Limited License
Surface Enhanced Laser Desorption/Ionization (“SELDI”) is a patented process. To use the SELDIprocess an end user must obtain a two-part license, including an up-front fee component and arunning-royalty component, under U.S. Patent 5,719,060 or its foreign counterparts, from Bio-RadLaboratories, Inc. (“Bio-Rad”). The purchase price of your ProteinChip® SELDI system (the “Reader”)includes limited, nontransferable rights under the up-front fee component to use this Reader topractice SELDI and related processes described in said patents for the research and developmentactivities of the purchaser when this product is used in conjunction with Bio-Rad ProteinChip productswhose use is covered by the running-royalty component. The rights under the running-royaltycomponent may be purchased only from Bio-Rad or one of its authorized distributors as part of thepurchase of SELDI ProteinChip products. No rights of use are granted herein in the field of clinicaldiagnostics. Further information on licenses to practice the SELDI process and on assigning yourexclusive clinical diagnostic rights to any intellectual property developed by you using our SELDIproducts, if any, may be obtained by contacting the Legal Department at Bio-Rad Laboratories, Inc.,1000 Alfred Nobel Drive, Hercules, California 94547.
Microsoft, Windows, and Windows XP are trademarks of Microsoft Corporation. ONEAC is atrademark of ONEAC Corporation.

Page ii
ProteinChip Data Manager 3.0.7 Installation and Setup

Page iii
Table of Contents
Chapter 1: Getting Started 1
Welcome 3
Software Overview 3
ProteinChip Data Manager Software Components 3
Database Software: MySQL or Oracle 3
System Requirements 4
Client-Server Configurations 5
ProteinChip SELDI System 5
ProteinChip Biology (PBS) System II (or IIc) 6
Installation Overview 7
Installation Steps 7
What You Will Need for Installation 8
Installation Choices 9
MySQL Users 9
Oracle Users 9
Chapter 2: New ProteinChipData Manager Installation Using MySQL 11
Introduction 13
Before You Begin 13
Obtain a License 13
Install the Database and Server Software 13
Chapter 3: New ProteinChipData Manager Installation Using Oracle 17
Introduction 19
Before You Begin 19
Obtain a License 19
Oracle Database Installation 19
Install the Database and Server Software 19
Create the Database Using Oracle 9i 19
Initialize the Database 20
Install the Server Software 20
Create the Database Tables 23
Chapter 4: Installation Addendum for ProteinChip Data Manager Software 3.0.7 27
Upgrading the Server SoftwareFrom 3.0 to 3.0.7 for MySQL Users 29
Back Up the MySQL Database 29

Page iv
ProteinChip Data Manager 3.0.7 Installation and Setup
Uninstall the Previous Version of CiphergenExpress Software 29
Install the Database and Server Software 30
Upgrading the Server SoftwareFrom 3.0 to 3.0.7 for Oracle Users 32
Back Up the Oracle Database 32
Uninstall the Previous Version of CiphergenExpress Software 32
Install the Server Software 32
Chapter 5: Upgrading From Version 2.x Using MySQL 37
Introduction 39
Before you begin 39
Back Up the MySQL Database 39
Uninstall the Previous Version of CiphergenExpress Software 40
Upgrade the Server and Database 40
Install the Server Software 40
Install the Database 43
Chapter 6: Upgrading From Version 2.x Using Oracle 45
Introduction 47
Before You Begin 47
Back Up the Oracle Database 47
Uninstall the Previous Version of CiphergenExpress Software 48
Upgrade the Server and Database 48
Install the Server Software 48
Update the Database Tables 51
Chapter 7: Installing the Client Software 53
Before You Begin 55
Installing and Configuring the Client Software 55
Installing the Client Software 55
Configure the Client Software’s Server Connection 56
Register the Server 58
Chapter 8: Troubleshooting 59
Troubleshooting Installations and Upgrades 61
Contacts 61
Index 63

Page 1
Chapter 1: Getting Started
Welcome 3
Software Overview 3
ProteinChip Data Manager Software Components 3
Database Software: MySQL or Oracle 3
System Requirements 3
Client-Server Configurations 5
ProteinChip SELDI System 5
ProteinChip Biology (PBS) System II (or IIc) 6
Installation Overview 7
Installation Steps 7
What You Will Need for Installation 8
Installation Choices 8

Page 2
Getting Started
ProteinChip Data Manager 3.0.7 Installation and Setup

Welcome
Page 3
Welcome
Welcome to the installation guide for ProteinChip data manager software. This booklet provides complete installation and upgrade instructions for ProteinChip data manager software, together with additional setup and administrative tasks.
Software Overview
ProteinChip Data Manager Software Components
ProteinChip data manager software is a client-server application, and is comprised of three components: client software, server software, and a MySQL or Oracle relational database. The database is where the trace data, sample properties, peak lists,
etc
. are stored. The server software performs most of the data processing. Commands issued through the client software are received by the server software for execution. The client software provides the user graphical access to the server software, and to ProteinChip SELDI system instruments.
Database Software: MySQL or Oracle
The server software is designed to use MySQL or Oracle 9i as the database software.
• MySQL database software is included on the ProteinChip data manager software CD, and a MySQL license is provided for the initial installation
• Oracle users are responsible for obtaining Oracle 9i software and a license
Refer to Chapter 2 for instructions on installing the server in conjunction with a MySQL server. If you wish to use an Oracle database instead of the MySQL database, please refer to Chapter 3, New ProteinChip Data Manager Installation Using Oracle, for installation information.
System Requirements
The database and server software should be installed on a Windows computer that can function as a server. The resource recommendations for the server and client computers are outlined in Table 1.1 and Table 1.2; however, processing and data storage requirements depend greatly on the number of samples and spectra stored and processed as well as the number of concurrent users to support.
ProteinChip data manager server software must be installed on a computer that is a dedicated server for ProteinChip Data manager software, with no other server or database applications running on that machine. This requirement is necessitated by the large amount of system resources involved in processing and analyzing SELDI data.

Page 4
Getting Started
ProteinChip Data Manager 3.0.7 Installation and Setup
The recommended computer settings are specified for users who wish to cluster and visualize more than one million peaks in one analysis.
Table 1.1: System requirements for the server software and the database.
Table 1.2: Client workstation system requirements for ProteinChip datamanager client software.
Component Required Recommended
Operatingsystem
Microsoft Windows 2000 Server or Microsoft Windows 2000 or Windows XP
Microsoft Windows 2000 Server or Microsoft Windows 2000 or Windows XP
Processor 1 GHz 2 GHz or greater
Memory 1 GB RAM 2 GB RAM or greater
Free disk space
50 GB 100 GB or greater
Database MySQL 4.0 (included) or Oracle 9i release 1 or later (to be obtained by customer)
MySQL 4.0 (included) or Oracle 9i release 1 or later (to be obtained by customer)
Misc. CD-ROM for program installation, network connectivity
CD-ROM for program installation, network connectivity
Component Required Recommended
Operatingsystem
Microsoft Windows 2000 or Windows XP
Microsoft Windows 2000 or Windows XP
Processor 500 MHz 1 GHz or greater
Memory 256 MB RAM 1 GB RAM or greater
Free disk space
100 MB 1 GB or greater
Misc. Network connection to the ProteinChip data manager server computer; minimum 1024 x 768 screen resolution
Network connection to ProteinChip data manager server computer; minimum 1024 x 768 screen resolution

Client-Server Configurations
Page 5
NOTE
During the first use of ProteinChip data manager software, the server software must be registered. A license file is required to register the server software, and can be obtained by sending an email containing the server computer name and IP address to [email protected]. The license is installed by
selecting
Help | Register
from the client software menu.
Client-Server Configurations
There are two different client-server configurations possible, depending on the type of instrument you have. Please identify the appropriate configuration for your instrument and refer to the appropriate section of the instrument manual for setup information.
ProteinChip SELDI System
The ProteinChip SELDI system is configured with a computer that contains both the ProteinChip data manager server and database, and also serves as the primary workstation. Additional client workstation computers can be networked to the instrument (Fig. 1.1).

Page 6
Getting Started
ProteinChip Data Manager 3.0.7 Installation and Setup
Fig. 1.1:
Client-server configuration for the ProteinChip SELDI System.
ProteinChip Biology (PBS) System II (or IIc)
If you purchased ProteinChip Data manager software for use with a PBS-II or PBS-IIc ProteinChip reader, you will need to install and set up the software. Before installing the client software, the server and database software must be installed on a networked dedicated server computer by a network administrator. You must also install ProteinChip software 3.2.1 or later to communicate properly with ProteinChip data manager software (Fig. 1.2).
Instrument workstationProteinChip data manager server,
database software, and client software
Desktop workstationclient software
Desktop workstationclient software
Desktop workstationclient software
Desktop workstationclient software
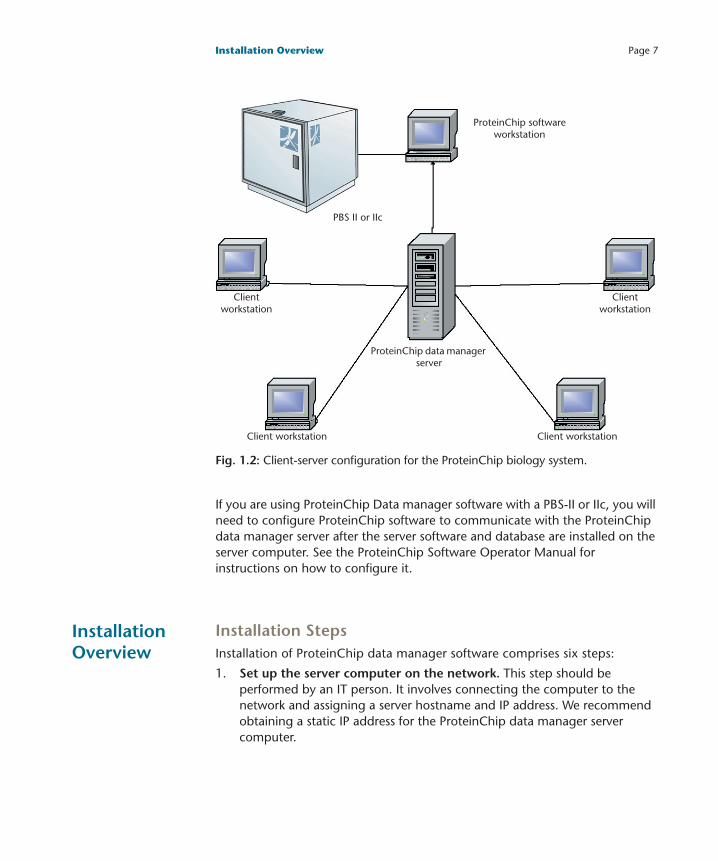
Installation Overview
Page 7
Fig. 1.2:
Client-server configuration for the ProteinChip biology system.
If you are using ProteinChip Data manager software with a PBS-II or IIc, you will need to configure ProteinChip software to communicate with the ProteinChip data manager server after the server software and database are installed on the server computer. See the ProteinChip Software Operator Manual for instructions on how to configure it.
Installation Overview
Installation Steps
Installation of ProteinChip data manager software comprises six steps:
1.
Set up the server computer on the network.
This step should be performed by an IT person. It involves connecting the computer to the network and assigning a server hostname and IP address. We recommend obtaining a static IP address for the ProteinChip data manager server computer.
ProteinChip data manager server
PBS II or IIc
Client workstationClient workstation
Clientworkstation
ProteinChip software workstation
Clientworkstation

Page 8
Getting Started
ProteinChip Data Manager 3.0.7 Installation and Setup
2.
Obtain a license file.
In order to use ProteinChip data manager software, a valid license file must be obtained from Bio-Rad Laboratories, Inc. The license file required for registration can be obtained by sending an email containing your name, company, server hostname, and server IP address to:
. If you are purchasing a server in conjunction with ProteinChip Data manager software, your server will be preinstalled with ProteinChip Data manager software and will be prelicensed.
3.
Install the database and server software.
This step should be performed by an IT person on the computer to be used as the server. The installation must be performed using an account that has administrative privileges on the computer.
4.
Install the client software.
The client setup program is downloaded from the ProteinChip data manager server using an Internet browser.
5.
Register the ProteinChip data manager server software.
Using the license file obtained in the second step, the server is registered and readied for use. Note that if you have purchased a server from Bio-Rad, it will be preinstalled and prelicensed in the factory.
6.
Set up instrument communication.
If you are using a ProteinChip SELDI System you must configure the instrument directly via the client software, which also serves as the controlling software.
What You Will Need for Installation
1. A ProteinChip data manager software CD.
2. A networked computer to be used as the ProteinChip data manager server with at least 50 GB of free disk space. The software must be installed using an account with administrative access to the computer.
3. At least one workstation computer to run the client software, with at least 100 MB of free disk space. This workstation must reside on the network and have an Internet browser such as Microsoft Internet Explorer installed on it.
4. Your ProteinChip data manager license file, obtained by sending an email to
.
Installation Choices
Installation procedures are broken down into chapters by system configuration. The number 2.x refers to both version 2.0 and 2.1 of ProteinChip data manager software. You cannot upgrade directly from ProteinChip data manager software version 1.0 to version 3.0.7.

Installation Choices
Page 9
Use the list below to choose the appropriate chapters to use for installing ProteinChip data manager on your network and workstation(s). No matter which chapter is used as a guide for installing the database and server software, you will need to follow Chapter 7, Installing the Client Software, to install ProteinChip data manager client software on the workstation(s).
MySQL Users
•
New version 3.0.7 installation
— Chapter 2, New ProteinChip Data Manager Installation Using MySQL, and Chapter 7, Installing the Client Software.
•
Upgrading from version 2.x
— Chapter 5, Upgrading From Version 2.x Using MySQL, and Chapter 7, Installing the Client Software.
Oracle Users
•
New version 3.0.7 installation
— Chapter 3, New ProteinChip Data Manager Installation Using Oracle, and Chapter 7, Installing the Client Software.
•
Upgrading from version 2.x
— Chapter 6, Upgrading From Version 2.x Using Oracle, and Chapter 7, Installing the Client Software.

Page 10
Getting Started
ProteinChip Data Manager 3.0.7 Installation and Setup

Page 11
Chapter 2: New ProteinChipData Manager Installation Using MySQL
Introduction 13
Before You Begin 13
Obtain a License 13
Install the Database and Server Software 13

Page 12
New ProteinChip Data Manager Installation Using MySQL
ProteinChip Data Manager 3.0.7 Installation and Setup

Introduction
Page 13
Introduction
This section provides instructions for creating a
new
installation of ProteinChip data manager software using a MySQL database. It does not include instructions for updating from version 2.x. If you are updating from an earlier version, or using an Oracle database, please see Installation Choices on page 9.
Please email any installation questions to
.
Before You Begin
Obtain a License
ProteinChip data manager software must be registered to function. A license file is required to register the software, and can be obtained by sending an email containing the server computer name, IP address, and company name to
.
Install the Database and Server Software
The MySQL database software is included on the ProteinChip data manager software CD and will be installed and configured during the installation.
1. Insert the ProteinChip data manager software CD into the CD-ROM drive of the computer to be used as the ProteinChip data manager server. If the program does not start automatically after a few moments, browse to the CD using Windows Explorer and double-click
setup.exe
.
2. At the
Welcome
page, click the
Next
button.
3. At the
License Agreement
page, please read the license agreement. You must click the
Yes
button to accept the agreement in order to proceed.
4. Please read the preinstall instructions on the
Install checklist
page, then click the
Next
button.
5. At the
Choose Destination Location
page, specify where on the hard drive you would like to install the server software. The default path is C:\PCDM. If you must change the path (to change the drive letter, for example) make sure there are no spaces in the path, or the software will not function correctly. Click the
Next
button to continue.
IMPORTANT
If you modify any part of the default path, you
must
ensure that there are
no
spaces
in the path name or the software will not run correctly.
6. At the
Setup Type
page, select
1. New installation using a MySQL database
and then click the
Next
button (Fig. 2.1).

Page 14
New ProteinChip Data Manager Installation Using MySQL
ProteinChip Data Manager 3.0.7 Installation and Setup
Fig. 2.1:
The
Setup Type
page.
7. At the
Select Program Folder
page, choose the location where the program shortcuts will be placed in the computer’s
Start
menu. The default location is ProteinChip Data Manager Software version 3.0.7. Click the Next button to continue.
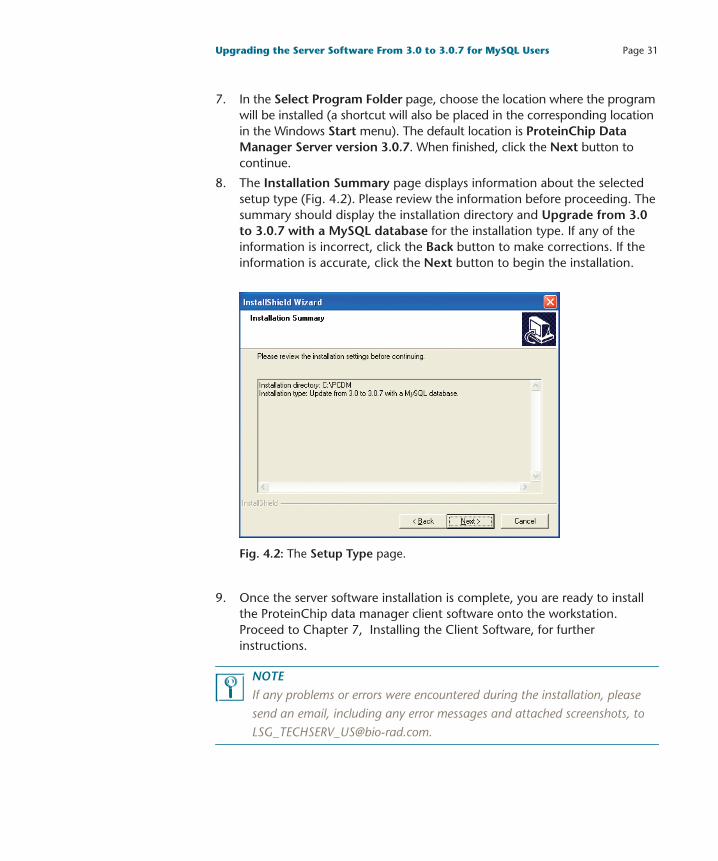
8. The Installation Summary page (Fig. 2.2) displays summary information about the setup type that was chosen. Please review the contents before proceeding. For new installations using MySQL, the summary should show your specified installation directory, and New installation with a MySQL database for the installation type. If any of the information is incorrect, click the Back button to make corrections. If the information is accurate, click the Next button to begin the installation.

Install the Database and Server Software Page 15
Fig. 2.2: The Installation Summary page.
9. Once the server installation is complete, you are ready to install the client software onto the workstation. Proceed to Chapter 7, Installing the Client Software for further instructions.
NOTEIf any problems or errors were encountered during the installation, please send an email, including any error messages and attached screenshots, to [email protected].

Page 16 New ProteinChip Data Manager Installation Using MySQL
ProteinChip Data Manager 3.0.7 Installation and Setup

Page 17
Chapter 3: New ProteinChipData Manager Installation Using Oracle
Introduction 19
Before You Begin 19Obtain a License 19
Oracle Database Installation 19
Install the Database and Server Software 19Create the Database Using Oracle 9i 19
Initialize the Database 20
Install the Server Software 20
Create the Database Tables 23

Page 18 New ProteinChip Data Manager Installation Using Oracle
ProteinChip Data Manager 3.0.7 Installation and Setup

Introduction Page 19
Introduction This section provides instructions for creating a new installation of ProteinChip data manager software using an Oracle database. It does not include instructions for updating from version 2.x. If you are updating from version 2.x, or using a MySQL database, please see Installation Choices on page 8.
Please email any installation questions to [email protected].
Before You Begin
Obtain a LicenseProteinChip data manager software must be registered to function. A license file is required to register the software, and can be obtained by sending an email containing the server computer name, IP address, and company name to [email protected].
Oracle Database InstallationIf you will be using an Oracle database with ProteinChip data manager software, a database administrator must install the Oracle database before configuring the database schema and installing the server software. The Oracle database installation and initialization procedures should be reviewed and performed by an Oracle database administrator or personnel with equivalent experience. These procedures should only be performed for a new ProteinChip data manager installation using an Oracle database.
NOTEYour organization is responsible for obtaining the Oracle database software and an Oracle license.
Install the Database and Server Software
These procedures should only be performed for a new ProteinChip data manager software installation using an Oracle database. The Oracle database install and initialize procedures should be reviewed and performed by an Oracle database administrator or personnel with equivalent experience.
Create the Database Using Oracle 9iThese procedures should only be performed for a new ProteinChip data manager software installation using an Oracle database.
1. Launch the Oracle Database Configuration Assistant.
2. On the Operations page, select Create a Database and click Next.

Page 20 New ProteinChip Data Manager Installation Using Oracle
ProteinChip Data Manager 3.0.7 Installation and Setup
3. On the Templates page, select Data Warehouse and click Next.
4. On the Database Identification page, enter cipherdb followed by the domain name (e.g., cipherdb.bio-rad.com) for the global database name. The SID should be cipherdb and should be entered automatically by the installation software.
5. Click Finish. The default values will be used for all subsequent settings.
6. Click OK in the Summary dialog box. The database setup should begin.
7. Once the setup completes, click Exit in the database configuration assistant window.
Initialize the DatabaseThese procedures should only be performed for a new ProteinChip data manager software installation using an Oracle database.
1. Copy the setupdb.sql and execsql.cmd files from the ProteinChip data manager software installation CD to the Oracle root folder. These files are located in the Oracle_setup folder on the CD.
2. Edit the setupdb.sql file using a text editor such as Notepad. Replace the C:\oracle portion of the path on the first line with the actual Oracle root directory and save the file.
3. Edit the execsql.cmd file using a text editor such as Notepad. Replace the system password with your password (by default, “manager”) and save the file.
4. Run execsql.cmd.
Install the Server Software1. Insert the ProteinChip data manager software CD into the CD-ROM drive
of the computer to be used as the server. If the program does not start automatically after a few moments, browse to the CD using Windows Explorer and double-click setup.exe.
2. At the Welcome page, click the Next button.
3. At the License Agreement page, please read the license agreement. You must click the Yes button to accept the agreement in order to proceed.
4. Please read the preinstall instructions on the Install checklist page, then click the Next button.
5. At the Choose Destination Location page, specify where on the hard drive you would like to install the server software. The default path is C:\PCDM. If you must change the path (to change the drive letter, for example), make sure there are no spaces in the path, or the software will not function correctly. Click the Next button to continue.

Install the Database and Server Software Page 21
IMPORTANTIf you modify any part of the default path, you must ensure that there are no spaces in the path name or the software will not run correctly.
6. At the Setup Type page, select 2. New installation using an Oracle database and then click the Next button (Fig. 3.1).
Fig. 3.1: The Setup Type page.
7. At the Enter Text page (Fig. 3.2), enter in the network name of the computer that is running the Oracle database. If server software and the Oracle database are running on the same machine, this name can be left as “localhost”. Click the Next button to continue.

Page 22 New ProteinChip Data Manager Installation Using Oracle
ProteinChip Data Manager 3.0.7 Installation and Setup
Fig. 3.2: The Enter Text page.
8. At the Select Program Folder page, choose the location where the program shortcuts will be placed on the computer’s Start menu. The default location is ProteinChip Data Manager Software version 3.0.7. Click the Next button to continue.
9. The Installation Summary page (Fig. 3.3) displays summary information about the setup type that was chosen. Please review the contents before proceeding. For new installations using Oracle, the summary should show the specified installation directory, and New installation using an Oracle database for the installation type. Additionally, the Host for the Oracle computer should be displayed. If any of the information is incorrect, click the Back button to make corrections. If the information is accurate, click the Next button to begin the installation. Once the files are copied, another installation program will be launched to create the database tables.

Install the Database and Server Software Page 23
Fig. 3.3: The Installation Summary page.
Create the Database TablesA separate, embedded installation program is used to create the Oracle database tables.
1. Once the program files have been transferred, the database installer program will launch automatically. On the first page of the ProteinChip Data Manager Database Installer, under Choose install type, select Initialize ProteinChip Data Manager Oracle version 3.0, then click the Next button (Fig. 3.4).

Page 24 New ProteinChip Data Manager Installation Using Oracle
ProteinChip Data Manager 3.0.7 Installation and Setup
Fig. 3.4: The first page of the ProteinChip Data Manager Database Installer.
2. On the next page of the ProteinChip Data Manager Database Installer (Fig. 3.5), under Enter Oracle connection information, enter the following information:
a. Enter the hostname or IP address of the computer that contains the Oracle database (“localhost” can be used if the database is on the same machine upon which you are installing the server) into the Host/IP field.
b. The SID/Database should be cipherdb as outlined in Create the Database Using Oracle 9i on page 19.
c. The User should be ciphergen.
d. Enter the Password for the database. The default password is express.
Once all the information is entered, click the Next button to continue.

Install the Database and Server Software Page 25
Fig. 3.5: The second page of the ProteinChip Data Manager Database Installer.
3. The ProteinChip Data Manager Install Action window displays the status of the database table creation. Once the process is complete, click Finish.
4. Once the database installation is complete, you will be returned to the main installer program. Click the Finish button to complete the installation.
5. After the server installation is complete, you are ready to install the client software onto the workstation. Proceed to Chapter 7, Installing the Client Software, for further instructions.
NOTEIf any problems or errors were encountered during the installation, please send an email, including any error messages and attached screenshots, to [email protected].

Page 26 New ProteinChip Data Manager Installation Using Oracle
ProteinChip Data Manager 3.0.7 Installation and Setup

Page 27
Chapter 4: Installation Addendum for ProteinChip Data Manager Software 3.0.7
Upgrading the Server Software From 3.0 to 3.0.7 for MySQL Users 29Back Up the MySQL Database 29
Uninstall the Previous Version of CiphergenExpress Software 29
Install the Database and Server Software 30
Upgrading the Server Software From 3.0 to 3.0.7 for Oracle Users 32Back Up the Oracle Database 32
Uninstall the Previous Version of CiphergenExpress Software 32
Install the Server Software 32

Page 28 Installation Addendum for ProteinChip Data Manager Software 3.0.7
ProteinChip Data Manager 3.0.7 Installation and Setup

Upgrading the Server Software From 3.0 to 3.0.7 for MySQL Users Page 29
Upgrading the Server SoftwareFrom 3.0 to 3.0.7 for MySQL Users
This section provides instructions for upgrading ProteinChip data manager software using a MySQL database from version 3.0 to version 3.0.7. The upgrade process installs the new server software. You must also install a new version of the ProteinChip data manager client software.
NOTEThe upgrade procedure must be performed on the server computer itself, and cannot be performed from a client workstation.
Back Up the MySQL DatabaseCiphergen strongly recommends that you back up the database before performing the upgrade procedure.
1. Stop the MySQL service by selecting Control Panel | Administrative Tools | Services. Right-click on MySQL and select Stop in the pop-up menu.
2. Stop the CiphergenExpress Server service by selecting Control Panel | Administrative Tools |Services. Right-click on CiphergenExpress Server and select Stop from the pop-up menu.
3. Once the services are stopped, locate the folder containing the ProteinChip data manager database. The default folder location is C:\CEDM\mysql. Within this folder, locate the subfolder named data.
4. Make a backup copy of the data folder in another location, preferably on another computer. This may take some time, depending on the size the folder.
NOTELeave the original data folder in its original location. It is required for the remaining steps of the update procedure.
Uninstall the Previous Version of CiphergenExpress SoftwareBefore ProteinChip data manager software 3.0.7 can be installed, you must first uninstall the previous version.
1. Uninstall the CiphergenExpress server software. Select Control Panel | Add/Remove Programs. Locate the program called CiphergenExpress Server version 3.0 and uninstall it.

Page 30 Installation Addendum for ProteinChip Data Manager Software 3.0.7
ProteinChip Data Manager 3.0.7 Installation and Setup
IMPORTANTDo not delete the CEDM folder! This folder contains all the data to be transferred to the new version.
Install the Database and Server SoftwareThe MySQL database software is included on the ProteinChip data manager software CD and will be installed and configured during the installation.
1. Insert the ProteinChip data manager software 3.0.7 CD into the CD-ROM drive of the computer to be used as the ProteinChip data manager server. If the program does not start automatically after a few moments, browse to the CD using Windows Explorer and double-click setup.exe.
2. In the Welcome page, click the Next button.
3. At the License Agreement page, please read the license agreement. You must click the Yes button to accept the agreement in order to proceed.
4. Please read the preinstall instructions on the Install checklist page, then click the Next button.
5. In the Choose Destination Location page, specify the original location of the previous server installation. The default path is C:\CEDM. Click the Next button to continue.
6. In the Setup Type page, select 5: Upgrade version 3.0 to 3.0.7 with a MySQL database and then click the Next button (Fig. 4.1).
Fig. 4.1: The Setup Type page.
Upgrading the Server Software From 3.0 to 3.0.7 for MySQL Users Page 31
7. In the Select Program Folder page, choose the location where the program will be installed (a shortcut will also be placed in the corresponding location in the Windows Start menu). The default location is ProteinChip Data Manager Server version 3.0.7. When finished, click the Next button to continue.
8. The Installation Summary page displays information about the selected setup type (Fig. 4.2). Please review the information before proceeding. The summary should display the installation directory and Upgrade from 3.0 to 3.0.7 with a MySQL database for the installation type. If any of the information is incorrect, click the Back button to make corrections. If the information is accurate, click the Next button to begin the installation.
Fig. 4.2: The Setup Type page.
9. Once the server software installation is complete, you are ready to install the ProteinChip data manager client software onto the workstation. Proceed to Chapter 7, Installing the Client Software, for further instructions.
NOTEIf any problems or errors were encountered during the installation, please send an email, including any error messages and attached screenshots, to [email protected].

Page 32 Installation Addendum for ProteinChip Data Manager Software 3.0.7
ProteinChip Data Manager 3.0.7 Installation and Setup
Upgrading the Server SoftwareFrom 3.0 to 3.0.7 for Oracle Users
This section provides instructions for upgrading ProteinChip data manager software using an Oracle database from version 3.0 to version 3.0.7. The upgrade process installs the new server software. You must also install a new version of the client software.
NOTEThe upgrade procedure must be performed on the server computer itself, and cannot be performed from a client workstation.
Back Up the Oracle DatabaseBio-Rad strongly recommends that you back up the database before performing the upgrade procedure. Consult Oracle technical documentation for backup procedures if your database is implemented with Oracle.
NOTEYou may need to stop the CiphergenExpress Server service before performing a backup. To stop the service, select Control Panel | Administrative Tools | Services. Right-click CiphergenExpress Server and select Stop from the pop-up menu.
Uninstall the Previous Version of CiphergenExpress SoftwareBefore ProteinChip data manager software 3.0.7 can be installed, you must first uninstall the previous version.
1. Select Control Panel | Add/Remove Programs. Locate the program called CiphergenExpress Data Manager Server and uninstall it.
Install the Server Software1. Insert the ProteinChip data manager software version 3.0.7 CD into the
CD-ROM drive of the computer to be used as the ProteinChip data manager server. If the program does not start automatically after a few moments, browse to the CD using Windows Explorer and double-click setup.exe.
2. At the Welcome page, click the Next button.
3. At the License Agreement page, please read the license agreement. You must click the Yes button to accept the agreement in order to proceed.
4. Please read the preinstall instructions on the Install checklist page, then click the Next button.

Upgrading the Server Software From 3.0 to 3.0.7 for Oracle Users Page 33
5. In the Choose Destination Location page, specify the original location of the previous server installation. The default path is C:\PCDM. Click the Next button to continue.
6. At the Setup Type page, select 6: Upgrade version 3.0 to 3.0.7 with an Oracle database and then click the Next button (Fig. 4.3).
Fig. 4.3: The Setup Type page.
7. At the Enter Text page, enter in the network name of the computer that is running the Oracle database. If the server software and the Oracle database are running on the same machine, this field can be left as “localhost”. Click the Next button to continue (Fig. 4.4).

Page 34 Installation Addendum for ProteinChip Data Manager Software 3.0.7
ProteinChip Data Manager 3.0.7 Installation and Setup
Fig. 4.4: The Enter Text page.
8. In the Select Program Folder page, choose the location where the program will be installed (a shortcut will also be placed in the corresponding location in the Windows Start menu). The default location is ProteinChip Data Manager Software version 3.0.7. When finished, click the Next button to continue.
9. The Installation Summary page displays information about the selected setup type. Please review the information before proceeding. The summary should display the installation directory and Upgrade from 3.0 to 3.0.7 with an Oracle database for the installation type. If any of the information is incorrect, click the Back button to make corrections. If the information is accurate, click the Next button to begin the installation (Fig. 4.5).

Upgrading the Server Software From 3.0 to 3.0.7 for Oracle Users Page 35
Fig. 4.5: The Installation Summary page.
10. Once the server software installation is complete, you are ready to install the ProteinChip data manager client software onto the workstation. Proceed to Chapter 7, Installing the Client Software, for further instructions.
NOTEIf any problems or errors were encountered during the installation, please send an email, including any error messages and attached screenshots, to [email protected].

Page 36 Installation Addendum for ProteinChip Data Manager Software 3.0.7
ProteinChip Data Manager 3.0.7 Installation and Setup
Page 37
Chapter 5: Upgrading From Version 2.x Using MySQL
Introduction 39
Before you begin 39Back Up the MySQL Database 39
Uninstall the Previous Version of CiphergenExpress Software 40
Upgrade the Server and Database 40Install the Server Software 40
Install the Database 43

Page 38 Upgrading From Version 2.x Using MySQL
ProteinChip Data Manager 3.0.7 Installation and Setup

Introduction Page 39
Introduction This chapter provides instructions for upgrading CiphergenExpress Server software version 2.x implemented with a MySQL database to ProteinChip Data Manager Server version 3.0.7. You cannot upgrade directly from CiphergenExpress Server version 1.0 to version 3.0.7. The upgrade process installs the new server software and updates the database tables to be compatible with new features included in the version 3.0.7 software. If you are not updating from version 2.x using a MySQL database, please see Installation Choices on page 8.
Please email any installation questions to [email protected].
NOTEThis upgrade can take several hours if the database is very large.
IMPORTANTThe upgrade process requires free disk space equal to a quarter the size of the database. The current size of the database is found in the Properties dialog box for the MySQL data folder. By default, this folder is in the C:\CiphergenExpress_Database folder.
WARNINGFollow the instructions below exactly. Failure to do so may result in a failure to migrate the existing data. Email [email protected] if you have any questions.
Before you begin
Back Up the MySQL DatabaseBio-Rad strongly recommends that you back up the version 2.x database before performing the upgrade procedure.
1. Stop the MySQL service by selecting Control Panel | Administrative Tools | Services. Right-click on MySQL and select Stop in the pop-up menu.
2. Stop the CiphergenExpress Server service by going to Control Panel | Administrative Tools |Services. Right-click on CiphergenExpress Server and select Stop from the pop-up menu.
3. Once the services are stopped, locate the folder containing the MySQL database. The default folder location is: C:\CiphergenExpress _Database. Within this folder, locate the subfolder named data.

Page 40 Upgrading From Version 2.x Using MySQL
ProteinChip Data Manager 3.0.7 Installation and Setup
4. Make a copy of the data folder in another location, preferably on another computer. This may take some time, depending on the size the folder.
5. After the folder has finished copying, be sure to close the Services dialog box — leaving it open can interfere with the installation process.
NOTELeave the original data folder in its original location. It is required for the remaining steps of the update procedure.
Uninstall the Previous Version of CiphergenExpress SoftwareBefore ProteinChip data manager software 3.0.7 can be installed, you must first uninstall the previous version.
1. Uninstall the CiphergenExpress server software. Select Control Panel | Add/Remove Programs. Locate the program called CiphergenExpress Server and uninstall it. Delete the CiphergenExpress_Server folder.
2. Uninstall the CiphergenExpress database program. Select Control Panel | Add/Remove Programs. Locate the program called CiphergenExpress Database and uninstall it. (You may receive an error saying that the uninstaller could not delete the “data” directory. This is expected).
IMPORTANTDo not delete the CiphergenExpress Database folder! This folder contains the data to be transferred to the new version.
3. Select Control Panel | Add/Remove Programs. Uninstall Java 2 Runtime Environment, SE v1.4.2. Then, uninstall Java 2 SDK, SE v1.4.2.
Upgrade the Server and Database
Install the Server SoftwareThe MySQL database software is included on the ProteinChip data manager software CD and will be installed and configured during the installation.
1. Insert the ProteinChip data manager software CD into the CD-ROM drive of the computer to be used as the ProteinChip data manager server. If the program does not start automatically after a few moments, browse to the CD using Windows Explorer and double-click setup.exe.
2. At the Welcome page, click the Next button.

Upgrade the Server and Database Page 41
3. At the License Agreement page, please read the license agreement. You must click the Yes button to accept the agreement in order to proceed.
4. Please read the preinstall instructions on the Install checklist page, then click the Next button.
5. At the Choose Destination Location page, specify where on the hard drive you would like to install the ProteinChip data manager server software. The default path is C:\PCDM. If you must change the path (to change the drive letter, for example), make sure there are no spaces in the path or the software will not function correctly. Click the Next button to continue.
IMPORTANTIf you modify any part of the default path, you must ensure that there are no spaces in the path name or the software will not run correctly.
6. At the Setup Type page, select 3: Upgrade from v.2x to v3.0.7 with a MySQL database and then click the Next button (Fig. 5.1).
Fig. 5.1: The Setup Type page.
7. The installer will prompt you to confirm the upgrade (Fig. 5.2). Click the Yes button to continue.

Page 42 Upgrading From Version 2.x Using MySQL
ProteinChip Data Manager 3.0.7 Installation and Setup
Fig. 5.2: The confirmation dialog box.
8. After confirming the upgrade path, you will be prompted to browse to the location of the original 2.x database (Fig. 5.3). The default location for the database in version 2.x was C:\CiphergenExpress_Database.
Fig. 5.3: The browse prompt dialog box.
9. If the installer successfully determines that the folder contains a valid database, the database location will be displayed as shown in Fig. 5.4. Click OK to proceed.
Fig. 5.4: The upgrade location dialog box.
10. At the Select Program Folder page, choose the location where the program shortcuts will be placed on the computer’s Start menu. The default location is ProteinChip Data Manager Server version 3.0.7. Click the Next button to continue.
11. The Installation Summary page (Fig. 5.5) displays summary information about the setup type that was chosen. Please review the contents before proceeding. For upgrades using MySQL, the summary should show the specified installation directory and Upgrade from 2.x to 3.0.7 with a
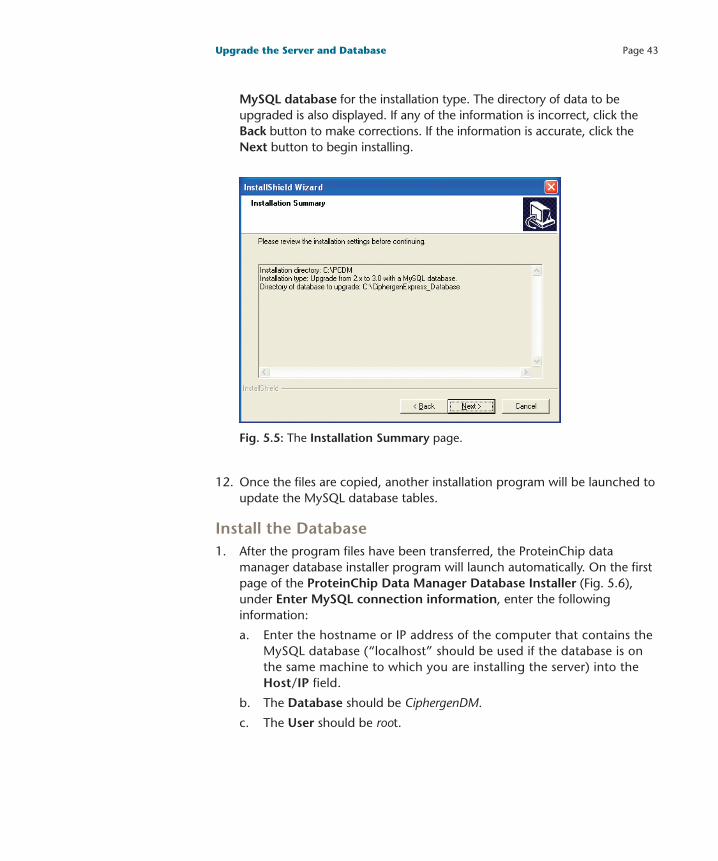
Upgrade the Server and Database Page 43
MySQL database for the installation type. The directory of data to be upgraded is also displayed. If any of the information is incorrect, click the Back button to make corrections. If the information is accurate, click the Next button to begin installing.
Fig. 5.5: The Installation Summary page.
12. Once the files are copied, another installation program will be launched to update the MySQL database tables.
Install the Database1. After the program files have been transferred, the ProteinChip data
manager database installer program will launch automatically. On the first page of the ProteinChip Data Manager Database Installer (Fig. 5.6), under Enter MySQL connection information, enter the following information:
a. Enter the hostname or IP address of the computer that contains the MySQL database (“localhost” should be used if the database is on the same machine to which you are installing the server) into the Host/IP field.
b. The Database should be CiphergenDM.
c. The User should be root.

Page 44 Upgrading From Version 2.x Using MySQL
ProteinChip Data Manager 3.0.7 Installation and Setup
d. Enter the password for the database. The password is blank by default. However the password will be cipheradmin if you are upgrading from a backup copy of your MySQL data folder.
After all the information is entered, click the Next button to continue.
Fig. 5.6: The first page of the ProteinChip Data Manager Database Installer.
2. The ProteinChip Data Manager Install Action window will display the status of the database table update. After the process is complete, click the Finish button.
3. Once the ProteinChip Data Manager Database Installer is finished, you will be returned to the main installer program. Click the Finish button to complete the installation.
4. Once the server installation is complete, you are ready to install the ProteinChip data manager client software onto the workstation. Proceed to Chapter 7, Installing the Client Software, for further instructions.
NOTEIf any problems or errors were encountered during the installation, please send an email, including any error messages and attached screenshots, to [email protected].
Page 45
Chapter 6: Upgrading From Version 2.x Using Oracle
Introduction 47
Before You Begin 47Back Up the Oracle Database 47
Uninstall the Previous Version of CiphergenExpress Software 48
Upgrade the Server and Database 48Install the Server Software 48
Update the Database Tables 51

Page 46 Upgrading From Version 2.x Using Oracle
ProteinChip Data Manager 3.0.7 Installation and Setup

Introduction Page 47
Introduction This section provides instructions for upgrading CiphergenExpress software version 2.x to ProteinChip Data Manager software version 3.0.7 using an Oracle database. The instructions are the same for upgrading from version 2.0 or 2.1. You cannot upgrade directly from ProteinChip data manager software version 1.0 to version 3.0.7. The upgrade process installs the new server software and updates the database tables to be compatible with new features included in the version 3.0.7 software. If you are not updating from version 2.x using the Oracle database, please see Installation Choices on page 8.
Please email any installation questions to [email protected].
NOTEThe upgrade can take several hours if the database is very large.
IMPORTANTThe upgrade process requires free disk space equal to a quarter the size of the database. See your Oracle database administrator to ascertain the size of the existing CiphergenExpress database.
WARNING Follow the instructions below exactly. Failure to do so may result in a failure to migrate the existing data.
Before You Begin
Back Up the Oracle DatabaseBio-Rad strongly recommends that you back up the CiphergenExpress database before performing the upgrade procedure. Consult Oracle technical documentation for backup procedures if your ProteinChip data manager database is implemented with Oracle.
NOTEYou may need to stop the CiphergenExpress Server service before performing a backup. To stop the service, select Control Panel | Administrative Tools | Services. Right-click CiphergenExpress Server and select Stop from the pop-up menu.

Page 48 Upgrading From Version 2.x Using Oracle
ProteinChip Data Manager 3.0.7 Installation and Setup
Uninstall the Previous Version of CiphergenExpress SoftwareBefore ProteinChip data manager software 3.0.7 can be installed, you must first uninstall the previous version.
1. Uninstall the CiphergenExpress server software. Select Control Panel | Add/Remove Programs. Locate the program called CiphergenExpress Server and uninstall it. Delete the CiphergenExpress_Server folder.
2. Select Control Panel | Add/Remove Programs. Uninstall Java 2 Runtime Environment, SE v1.4.2. Then, uninstall Java 2 SDK, SE v1.4.2.
Upgrade the Server and Database
Install the Server Software1. Insert the ProteinChip data manager software CD into the CD-ROM drive
of the computer to be used as the ProteinChip data manager server. If the program does not start automatically after a few moments, browse to the CD using Windows Explorer and double-click setup.exe.
2. At the Welcome page, click the Next button.
3. At the License Agreement page, please read the license agreement. You must click the Yes button to accept the agreement in order to proceed.
4. Please read the preinstall instructions on the Install checklist page, then click the Next button.
5. At the Choose Destination Location page, specify where on the hard drive you would like to install the ProteinChip data manager server software. The default path is C:\PCDM. If you must change the path (to change the drive letter, for example), make sure there are no spaces in the path or the software will not function correctly. Click the Next button to continue.
IMPORTANTIf you modify any part of the default path, you must ensure that there are no spaces in the path name or the software will not run correctly.
6. At the Setup Type page, select 4: Upgrade from v.2x to v3.0.7 with an Oracle database and then click the Next button (Fig. 6.1).

Upgrade the Server and Database Page 49
Fig. 6.1: The Setup Type page.
7. At the Enter Text page, enter the network name of the computer that is running the Oracle database. If ProteinChip data manager server software and the Oracle database are running on the same machine, this field can be left as “localhost”. Click the Next button to continue (Fig. 6.2).
Fig. 6.2: The Enter Text page.

Page 50 Upgrading From Version 2.x Using Oracle
ProteinChip Data Manager 3.0.7 Installation and Setup
8. At the Select Program Folder page, choose the location where the program shortcuts will be placed in the computer’s Start menu. The default location is ProteinChip Data Manager Server version 3.0.7. Click Next to continue.
9. The Installation Summary page displays summary information about the setup type that was chosen (Fig. 6.3). Please review the contents before proceeding. For new installations using Oracle, the summary should show your specified installation directory, and Upgrade from 2.x to 3.0.7 with an Oracle database for the installation type. The name of the Oracle computer should also be displayed. If any of the information is incorrect, click the Back button to make corrections. If the information is accurate, click the Next button to begin installing. Once the files are copied, another installation program will be launched to create the database tables.
Fig. 6.3: The Installation Summary page.
Upgrade the Server and Database Page 51
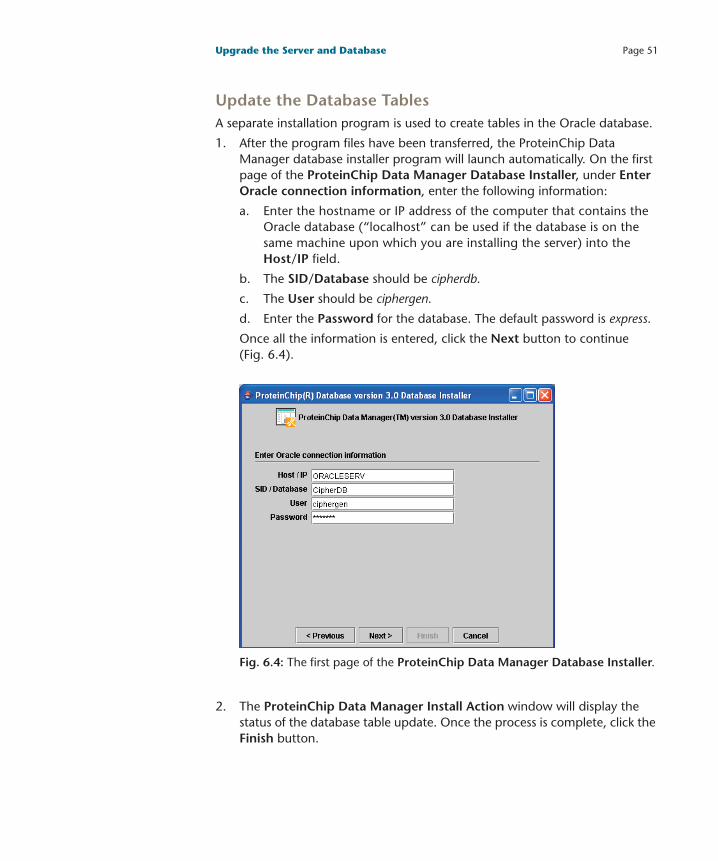
Update the Database TablesA separate installation program is used to create tables in the Oracle database.
1. After the program files have been transferred, the ProteinChip Data Manager database installer program will launch automatically. On the first page of the ProteinChip Data Manager Database Installer, under Enter Oracle connection information, enter the following information:
a. Enter the hostname or IP address of the computer that contains the Oracle database (“localhost” can be used if the database is on the same machine upon which you are installing the server) into the Host/IP field.
b. The SID/Database should be cipherdb.
c. The User should be ciphergen.
d. Enter the Password for the database. The default password is express.
Once all the information is entered, click the Next button to continue (Fig. 6.4).
Fig. 6.4: The first page of the ProteinChip Data Manager Database Installer.
2. The ProteinChip Data Manager Install Action window will display the status of the database table update. Once the process is complete, click the Finish button.

Page 52 Upgrading From Version 2.x Using Oracle
ProteinChip Data Manager 3.0.7 Installation and Setup
3. Once the installation is complete, you are ready to install the ProteinChip data manager client software onto the workstation. Proceed to Chapter 7, Installing the Client Software, for further instructions.
NOTEIf any problems or errors were encountered during the installation, please send an email, including any error messages and attached screenshots, to [email protected].

Page 53
Chapter 7: Installing the Client Software
Before You Begin 55
Installing and Configuring the Client Software 55Installing the Client Software 55
Configure the Client Software’s Server Connection 56
Register the Server 58

Page 54 Installing the Client Software
ProteinChip Data Manager 3.0.7 Installation and Setup

Before You Begin Page 55
Before You Begin
You must have local administrative privileges on the workstation in order to install the client software. Contact a network administrator for assistance if required.
Please email any installation questions to [email protected].
Installing and Configuring the Client Software
Installing the Client SoftwareOnce the database and server installation is complete, the client software can be downloaded and installed using a browser. You must have local administrative privileges on the workstation in order to install the client software. Contact a network administrator for assistance if required.
To install ProteinChip data manager client software:
1. Close all other programs.
2. Launch an Internet browser and open the URL http://<hostname>:6611/CiphergenExpressDM/install.htm where <hostname> is the name of the ProteinChip data manager server computer.
NOTEEnter the URL exactly as shown above — it is case sensitive.
3. The Warning - Security dialog box may appear (Fig. 7.1). Click Yes to continue the installation. Click Always to proceed and hide the dialog box in future.
Fig. 7.1: The Warning - Security dialog box.

Page 56 Installing the Client Software
ProteinChip Data Manager 3.0.7 Installation and Setup
4. The ProteinChip data manager client software installation web page appears (Fig. 7.2). Click Start Installer for Windows... and follow the installation instructions.
Fig. 7.2: The ProteinChip data manager client software installation web page.
Configure the Client Software’s Server ConnectionThe first time you launch the client software, you must configure its connection to the ProteinChip data manager server software.
1. Start the client software by selecting Start | Programs | ProteinChip Data Manager | ProteinChip Data Manager Client or by double-clicking the ProteinChip data manager client icon on the desktop.
2. When the log-in dialog box appears, click the ellipse button (...) next to the Server list (Fig. 7.3).

Installing and Configuring the Client Software Page 57
Fig. 7.3: The ProteinChip Data Manager Log-in dialog box.
3. When the Servers dialog box appears, click New (Fig. 7.4).
Fig. 7.4: The Servers dialog box.
4. The New server dialog box appears (Fig. 7.5).
Fig. 7.5: The New server dialog box.
5. Enter a nickname for the server in the Alias field. Enter the name of the server computer in the Host field and make sure the Port value is 6611. Click Add.
6. The Servers dialog box will reappear, listing both your new server and the default “localhost” server. You may wish to delete the “localhost” server if it is not in use. Click Close.

Page 58 Installing the Client Software
ProteinChip Data Manager 3.0.7 Installation and Setup
Register the Server
1. After you have installed the client software and configured its connection to the server, log in as the administrator. The user name is admin and the password is admin.
2. If this is the first time you have logged in, the Register now dialog box appears, asking if you want to register. If the software was upgraded from 2.x to 3.0.7, the license file should be transferred from the 2.1 version to 3.0.7 automatically during the upgrade process (Fig. 7.6).
Fig. 7.6: The Register now dialog box.
3. Click Yes, then enter the location of the license file obtained from Bio-Rad in the dialog box that appears (or use the Browse button to browse to it). Once this step is completed you will be able to start the client software (Fig. 7.7).
Fig. 7.7: The Register Server dialog box.
4. We recommend that you change the admin password at this time.

Page 59
Chapter 8: TroubleshootingTroubleshooting Installations and Upgrades 61
Contacts 61

page 60 Troubleshooting
ProteinChip Data Manager 3.0.7 Installation and Setup

Troubleshooting Installations and Upgrades Page 61
Troubleshooting Installations and Upgrades
If the command window flashes by, but the ProteinChip data manager database installer application never opens, continue with the rest of the installation or upgrade, but do not attempt to use the client software. After the installation or upgrade is complete, manually run the ProteinChip data manager database installer application.
1. Stop the server service. To shut down the server, go to Control Panel | Administrative Tools | Services. Right-click on ProteinChip Data Manager Server and select Stop in the pop-up menu.
2. In Windows Explorer, navigate to the DBUpgrade folder on the ProteinChip data manager software CD.
3. Run the dbinstall.bat file by double-clicking on it.
4. A command window should appear, followed by the ProteinChip data manager database installer application. Note that there may be a time lag before the application opens.
5. Select the operation you are attempting. Refer to the previous instructions for the type of database and installation or upgrade you are performing.
6. If errors occur, contact Bio-Rad immediately at [email protected].
7. Restart the server service. To start the server, go to Control Panel | Administrative Tools | Services. Right-click on ProteinChip Data Manager Server and select Start in the pop-up menu.
Once ProteinChip data manager software is installed, if you receive error messages such as “Unable to connect to server at port 6611” check the following:
1. Go to Control Panel | Administrative Tools | Services and check that ProteinChip Data Manager Server and MySQL show Started as their status. If they are not started, you can start them by right-clicking and selecting Start.
2. If starting the services from the Control Panel fails, then reboot the server.
3. If ProteinChip Data Manager Server and MySQL do not appear in the Services panel, check the paths to the locations where the ProteinChip data manager database and the ProteinChip data manager server software are installed. If there are any spaces in the path names, you must uninstall both the database and server software and reinstall ensuring that there are no spaces in any path names.
Contacts For all technical, licensing, and software questions, please contact [email protected].

page 62 Troubleshooting
ProteinChip Data Manager 3.0.7 Installation and Setup

Page 63
IndexC
client software
configuring server connection 56–57
installation 55–56
URL for downloading 55
client-server configurations
PBS-II instruments 7
ProteinChip SELDI systems 6
compatibility requirements for ProteinChip software 6
D
database installation choices 9
I
installation choices 9
installing
new MySQL database and server 13–15
new Oracle database and server 19–25
troubleshooting installation 61
L
license (ProteinChip data manager server software), obtaining 5, 8
logging in 61
M
MySQL
installing new database and server 13–15
upgrading version 2.x database and server 39–44
upgrading version 3.0 database and server 29–31
N
New server dialog box 57
O
Oracle
installing new database and server 19–25
upgrading version 2.x database and server 47–52
upgrading version 3.0 database and server 32–35

Page 64 Index
ProteinChip Data Manager 3.0.7 Installation and Setup
P
PBS-II instruments, client-server configuration 7
ProteinChip data manager software
components 3
obtaining server license 5, 8, 13, 19
registering server 58
ProteinChip SELDI system, client-server configuration 6
ProteinChip software, compatibility requirements for ProteinChip data manager software 6
R
Register now dialog box 58
Register Server dialog box 58
registering ProteinChip data manager server software 58
S
software installation, see installing
software upgrades, see upgrading
system requirements
client workstation 5
server 4
U
upgrading
using version 2.x and MySQL database 39–44
using version 2.x and Oracle database 47–52
using version 3.0 and MySQL database 29–31
using version 3.0 and Oracle database 32–35
URL for downloading client software 55

Life ScienceGroup
06-0054 0207 Sig 1106Bulletin 10008270 US/EG Rev C
Bio-Rad Laboratories, Inc.
Web site www.bio-rad.com USA 800 4BIORAD Australia 61 02 9914 2800 Austria 01 877 89 01 Belgium 09 385 55 11 Brazil 55 21 3237 9400 Canada 905 712 2771 China 86 21 6426 0808 Czech Republic 420 241 430 532 Denmark 44 52 10 00 Finland 09 804 22 00 France 01 47 95 69 65 Germany 089 318 84 0 Greece 30 210 777 4396 Hong Kong 852 2789 3300 Hungary 36 1 455 8800 India 91 124 4029300 Israel 03 963 6050 Italy 39 02 216091 Japan 03 5811 6270 Korea 82 2 3473 4460 Mexico 52 555 488 7670 The Netherlands 0318 540666 New Zealand 0508 805 500 Norway 23 38 41 30 Poland 48 22 331 99 99 Portugal 351 21 472 7700 Russia 7 495 721 14 04 Singapore 65 6415 3188 South Africa 27 861 246 723 Spain 34 91 590 5200 Sweden 08 555 12700 Switzerland 061 717 95 55 Taiwan 886 2 2578 7189 United Kingdom 020 8328 2000