solar eclipse business connect xml - lowe electric … · eclipse business connect xml overview ......
TRANSCRIPT

Solar Eclipse Business Connect XML Release 8.6.9

Legal Notices
© 2011 Epicor Software Corporation. All rights reserved. Unauthorized reproduction is a violation of applicable laws. Epicor and the Epicor logo are registered trademarks and/or registered service marks of Epicor Software Corporation in the United States and other countries. Epicor Eclipse is a trademark and/or service mark of Epicor Software Corporation. All other trademarks or service marks are the property of their respective owners and should be treated as such.
Epicor ® Eclipse™ 8.6.9 Online Help System
This online help system, as well as the software described in it, is provided under license and may be used only in accordance with the terms of the license. The content provided is for informational use only and is subject to change without notice. Epicor Software Corporation assumes no responsibility or liability for any errors or inaccuracies that may be included in this documentation.
Publication Date: August 31, 2011

iii
Table of Contents Eclipse Business Connect XML Overview ................................................................................................... 1
What's New in Business Connect XML 2.0 .................................................................................................. 2
Getting Started with Business Connect XML ............................................................................................... 3
What Do I Need From My Trading Partners? .......................................................................................... 3
How Do I Get Started? ............................................................................................................................. 3
How XML Documents Flow Through the System ....................................................................................... 5
Example XML Data Flow ............................................................................................................................. 7
Example XML Data Flow with Marketplace ................................................................................................ 9
Business Connect XML Setup Overview ................................................................................................... 11
Setup Requirements for Business Connect XML ....................................................................................... 12
Control Maintenance Records ................................................................................................................ 12
Authorization Keys ................................................................................................................................. 12
Defining the ***Product Not Found*** Product for XML Transactions ................................................... 13
Setting Customer Activity Triggers for XML Documents ......................................................................... 15
Setting System Notifications for XML Customer Transactions ................................................................. 18
Setting Post Locations for XML Customer Transaction Documents .......................................................... 19
Defining Pricing Variance for XML Customer Transactions ..................................................................... 20
Defining Customer E-Commerce IDs for XML Transactions .................................................................... 21
Setting Vendor Access Information for XML Documents ......................................................................... 22
Setting Vendor Activity Triggers for XML Documents ............................................................................. 24
Setting Post Locations for XML Vendor Transaction Documents ............................................................. 25
Remote Document Details Overview ......................................................................................................... 26
Setting Remote Order Document Details .................................................................................................... 27
Setting Remote Advanced Ship Notice Document Details ......................................................................... 29
Setting Remote Change Order Document Details ...................................................................................... 30
Setting Remote Quote Request Document Details ..................................................................................... 32
Setting Remote Order Acknowledgement Document Details .................................................................... 33
Setting Remote Invoice Document Details ................................................................................................. 35
XML Schema Maintenance Overview ........................................................................................................ 37
Eclipse Data and XML Database Schemas ................................................................................................. 38
Eclipse Database ..................................................................................................................................... 38
XML Database Schemas' Relationship to Eclipse .................................................................................. 39
How XML Database Schemas Form Transactions ..................................................................................... 42

Solar Eclipse Business Connect XML
iv
Transaction Schemas and the XML Mapping Utility ............................................................................. 42
Creating XML Database Schemas .............................................................................................................. 46
Importing Eclipse dictionaries to Create an XML Database Schema..................................................... 46
Creating XML Database Schemas without Importing Dictionaries ....................................................... 47
Modifying and Deleting XML Database Schemas ................................................................................. 48
Defining XML Database Schema Translation Properties ........................................................................... 50
Business Connect XML Mapping Utility Overview ................................................................................... 53
Accessing the Business Connect XML Mapping Utility ............................................................................ 54
Setting Business Connect XML Mapping Utility Preferences ................................................................... 55
Adding and Editing XML Trading Partners ............................................................................................... 56
XML Transaction Maps Overview ............................................................................................................. 57
What is an XML Transaction? ................................................................................................................ 57
What is a Transaction Map? ................................................................................................................... 57
What if the Data Sent and Received is in Different Formats? ................................................................ 58
How Does the System Know to Use the Map I Defined? ...................................................................... 58
Mapping XML and Eclipse Data Elements ................................................................................................ 60
Valid XML Mappings and Precautions ...................................................................................................... 62
Mapping Fields with Modified Data....................................................................................................... 62
Mapping Repeating Groups .................................................................................................................... 62
Required XML Transaction Data ................................................................................................................ 63
Required Data for Customer Transactions ............................................................................................. 63
Required Data for Vendor Transactions ................................................................................................. 64
Creating XML Transaction Maps ............................................................................................................... 65
Defining Transaction Types and Selecting DTD Files ........................................................................... 65
Mapping the Received XML .................................................................................................................. 71
Mapping the Reply/Sent XML ............................................................................................................... 72
Adding and Editing Source Distinctions in XML Transaction Maps ......................................................... 73
Defining XML Mapping Selection Criteria ................................................................................................ 74
Duplicating XML Elements for Repeating Groups .................................................................................... 76
Searching for XML Elements in Transaction Maps ................................................................................... 78
Adding HTTP Headers to XML Transaction Maps .................................................................................... 79
Indicating the Document Type in XML Transaction Maps ........................................................................ 80
Previewing XML Transaction Maps ........................................................................................................... 82
Renaming XML Transaction Maps ............................................................................................................. 83
Copying XML Transaction Maps ............................................................................................................... 84

Table Of Contents
v
Deleting XML Transaction Maps ............................................................................................................... 85
Modifying Incoming and Outgoing XML Data Overview ......................................................................... 86
Building Modification Expressions for XML Data .................................................................................... 88
The XML Mapping Conversion Editor Dialog Box ............................................................................... 88
Accessing the XML Mapping Conversion Edit Dialog Box .................................................................. 89
Building Expressions .............................................................................................................................. 89
Removing Sources and Operations from Expressions ............................................................................ 90
Adding Literal Statements to XML Data .................................................................................................... 91
Inserting Lines into XML Data ................................................................................................................... 92
Concatenating XML Data ........................................................................................................................... 94
Copying Substrings of XML Data .............................................................................................................. 95
Extracting Fields from Delimited XML Strings ......................................................................................... 96
Performing Table-Based Conversions on XML Data ................................................................................. 97
Converting Decimal Formats in XML Data ............................................................................................... 99
Converting Date Formats in XML Data ................................................................................................... 100
Performing Mathematical Operations on XML Data ................................................................................ 102
Encoding and Decoding XML Data to and from Base64 ......................................................................... 103
Extracting the Current Date and Time from XML Data ........................................................................... 105
Inverting Numbers in XML Data .............................................................................................................. 107
Uppercasing and Lowercasing Letters in XML Data ............................................................................... 108
Defining Logical Expressions for XML Data ........................................................................................... 109
Selecting an Element From a Repeating Group.................................................................................... 109
XPath Selection .................................................................................................................................... 110
Basic If-Then-Else Operation ............................................................................................................... 110
Previewing the XML Translation for Transaction Maps .......................................................................... 112
Running Test Compilations of XML Transaction Maps........................................................................... 113
Posting Test XML Transactions to Eclipse ............................................................................................... 114
Viewing the Business Connect XML Mapping Utility Change Log ........................................................ 115
Viewing the Business Connect XML Mapping Utility Error Log ............................................................ 116
Business Connect XML Mapping Utility Main Window Aspects ............................................................ 117
Trading Partners Tree ........................................................................................................................... 117
Tabs for Customer Transactions ........................................................................................................... 118
Tabs for Vendor Transactions .............................................................................................................. 122
Mapping Selection Criteria Tab ........................................................................................................... 126
Viewing and Saving Open XML Transaction Maps ................................................................................. 128
Solar Eclipse Business Connect XML
vi
Business Connect XML Mapping Utility Symbols .................................................................................. 129
Sending and Receiving Customer Transactions Using XML ................................................................... 130
Reviewing XML Orders From Your Customers ....................................................................................... 131
Processing XML Product Inquiries ........................................................................................................... 134
Reviewing XML Change Order Requests From Your Customers ............................................................ 135
Reviewing XML Quote Requests From Your Customers ........................................................................ 136
Processing XML Punch-Out Requests ...................................................................................................... 138
Sending XML Order Acknowledgements to Your Customers ................................................................. 139
Sending XML Advance Ship Notices to Your Customers ........................................................................ 140
Sending XML Invoices to Your Customers .............................................................................................. 141
Processing B2B Connection Test Transactions From Your Customers ................................................... 142
Sending and Receiving Vendor Transactions Using XML ....................................................................... 143
Reviewing XML Order Acknowledgements From Your Vendors ........................................................... 144
Reviewing XML Advanced Ship Notices From Your Vendors ............................................................... 147
Reprocessing XML Invoices From Your Vendors ................................................................................... 150
Processing XML Product Inquiries ........................................................................................................... 151
Sending XML Purchase Orders to Your Vendors .................................................................................... 152
Sending XML Change Order Requests to Your Vendors ......................................................................... 153
Sending XML Direct Orders to Your Vendors ......................................................................................... 154
Testing Vendor B2B Connections with XML .......................................................................................... 155
Reviewing Remote Transactions with Errors ........................................................................................... 157
Remote Archive Maintenance Overview .................................................................................................. 160
Viewing Archived Documents for Remote Transactions ......................................................................... 161
Reprocessing Remote Archived Documents ............................................................................................. 164
Business Connect XML Application Server Logging and Error Notification Overview ......................... 165
Logging Levels ..................................................................................................................................... 165
Configuring the Business Connect XML Application Server Logging Parameters ................................. 167
Configuring Basic Logging Information .............................................................................................. 167
Configuring E-Mail Notifications......................................................................................................... 168
Changing the Logging Level ................................................................................................................ 169
Troubleshooting XML Transaction Processing ........................................................................................ 171
Troubleshooting XML Transaction Map Creation ................................................................................... 174
Index ......................................................................................................................................................... 175
© 2011 Epicor Software Corporation. All rights reserved. 1
Eclipse Business Connect XML Overview
Using Eclipse Business Connect XML (referred to in this documentation as Business Connect XML) you can take advantage of real-time collaboration between systems, no matter how similar or dissimilar they may be. Use the integrated mapping utility to establish electronic trading relationships with your customers and vendors, as well as other distributors using XML. You can receive transactions, such as orders, from your customers in any XML format and translate outgoing XML transactions, such as order confirmations, into a format your customers' systems can understand. Using the HTTPs transport protocol, you can ensure your transactions and data are traded securely.
Use Business Connect XML to:
• Eliminate EDI VAN and portal charges by linking directly with customers, vendors, and other distributors.
• Improve your customer service by making it easier for your customers to get what they want, when they want it.
• Reduce costs associated with manual transactions and their potential errors.
• Increase inventory visibility of slow-moving items and dead stock.
• Sell excess inventory to other distributors, optimizing the use of your warehouse space.
• Fill orders from other wholesalers' inventory.
• Save time by taking advantage of existing resources.
• Save on mapping costs by setting up your own trading partner relationships.
• Receive orders and inquiries from your customers through supply-chain marketplaces such as Ariba, DataStream, MRO, MROSoup, Commerce One®, and Pantellos®.
You might have electronic trading relationships established with customers and vendors that also use Eclipse through the Eclipse B2B Commerce companion product. If you conduct electronic business with other Eclipse users, you can still use B2B Commerce to complete those transactions. Use Business Connect XML to complete XML transactions with customers and vendors who are not using Eclipse.
Important: The Business Connect XML functionality that runs outside the XML Mapping Utility has not been incorporated into Solar Eclipse as of this release. Use the character-based system when sending and receiving XML transactions.
Use this document to guide you through creating trading partner profiles, mapping XML transactions, and sending and receiving XML transactions through the Eclipse system.
Note: The content of the Business Connect XML online Help assumes you have a working knowledge of XML, Windows applications, and the Eclipse system.

Solar Eclipse Business Connect XML Rel. 8.7.2
2 © 2011 Epicor Software Corporation. All rights reserved.
What's New in Business Connect XML 2.0
The following functionality is new in the Business Connect XML 2.0 release.
Send direct shipments using XML from within sales order entry. For more information, see Sending XML Direct Orders to Your Vendors.
Access any user-defined files that you create beyond the standard files in Eclipse. For example, you may want to store or send additional information about a transaction that you have defined in a user-defined file. Modifying the existing XML schemas to include your user-defined files makes those files available in the XML mapping utility. For more information, see Creating XML Database Schemas.
Rel. 8.7.2 Business Connect XML
© 2011 Epicor Software Corporation. All rights reserved. 3
Getting Started with Business Connect XML
Consider the following when setting up an XML document trading relationship with your trading partners:
• What are my trading partner's e-commerce capabilities?
• What documents and transactions do I want to exchange with my trading partners?
• Do my trading partners conduct business through an online portal, such as the Ariba Supplier Network?
• What manual processes will this new relationship automate?
• Who will manage the trading partner relationships going forward?
Your answers to these questions dictate how and when you implement each trading relationship.
What Do I Need From My Trading Partners? Before exchanging XML documents with your trading partners, obtain the following items for each transaction you plan to trade:
• Document type definition (DTD) files - For each transaction type, the DTD is required to complete the transaction map using the Business Connect XML mapping utility.
• Document specifications - Defines required elements, what data is contained in each element, and element descriptions.
• Sample XML documents - Use sample XML documents to determine which fields from the DTD the trading partner uses and to test transactions after creating the transaction map.
Meet with your trading partners to discuss the best way to map their transaction data in and out of Eclipse and work with them to determine the following:
• Transactions to trade.
• Definitions of all data fields in the XML documents.
• The intended purpose or use of each field in the XML document.
• Post URL for each document.
• Workflow procedures that both parties use when processing transactions.
How Do I Get Started? After you determine which transactions you are going to trade using XML and have obtained the necessary documents from your trading partner, complete the following tasks to get started using the Business Connect XML application.
1. Learn how XML documents flow from your trading partner through the Eclipse system.
• How XML documents flow through the system.
• Example XML data flow .
• Example XML data flow with marketplace diagram.
Solar Eclipse Business Connect XML Rel. 8.7.2
4 © 2011 Epicor Software Corporation. All rights reserved.
2. Set system, customer, and vendor parameters in Eclipse.
3. Learn about XML database schemas and how they form transactions.
4. Use the Business Connect XML mapping utility to create transaction maps for each transaction you complete with your trading partners.
• Learn about the Business Connect XML mapping utility and its symbols.
• Add trading partners to the mapping utility.
• Learn about transaction maps.
• Create an XML transaction map for each transaction.
• Define XML mapping selection criteria.
• Modify incoming and outgoing data, if necessary.
5. Send and receive transactions from your customers and vendors.

Rel. 8.7.2 Business Connect XML
© 2011 Epicor Software Corporation. All rights reserved. 5
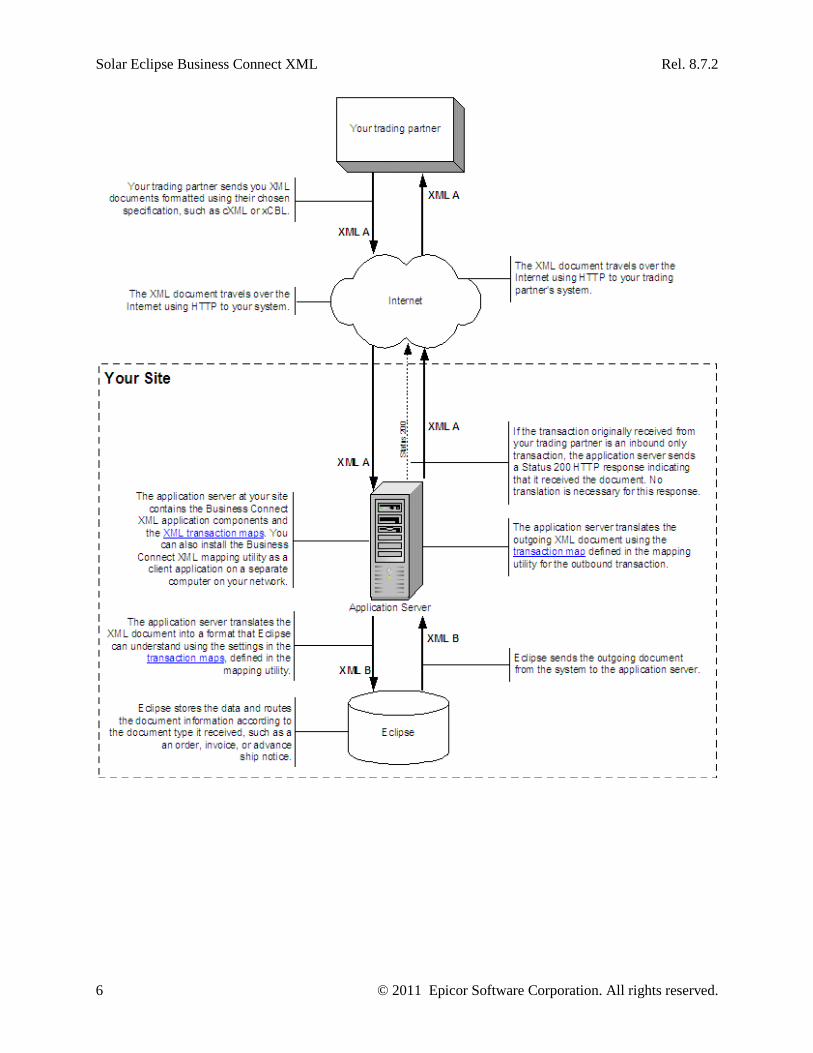
How XML Documents Flow Through the System
The following diagram illustrates how XML documents flow from your trading partner through your application server and on to Eclipse.
If you are sending an outbound only transaction, such as an invoice to your customer, the XML document originates in Eclipse with no inbound component. In the diagram below, start with the Eclipse symbol at the bottom and follow the flow up the right side to the trading partner.
Solar Eclipse Business Connect XML Rel. 8.7.2
6 © 2011 Epicor Software Corporation. All rights reserved.
Rel. 8.7.2 Business Connect XML
© 2011 Epicor Software Corporation. All rights reserved. 7
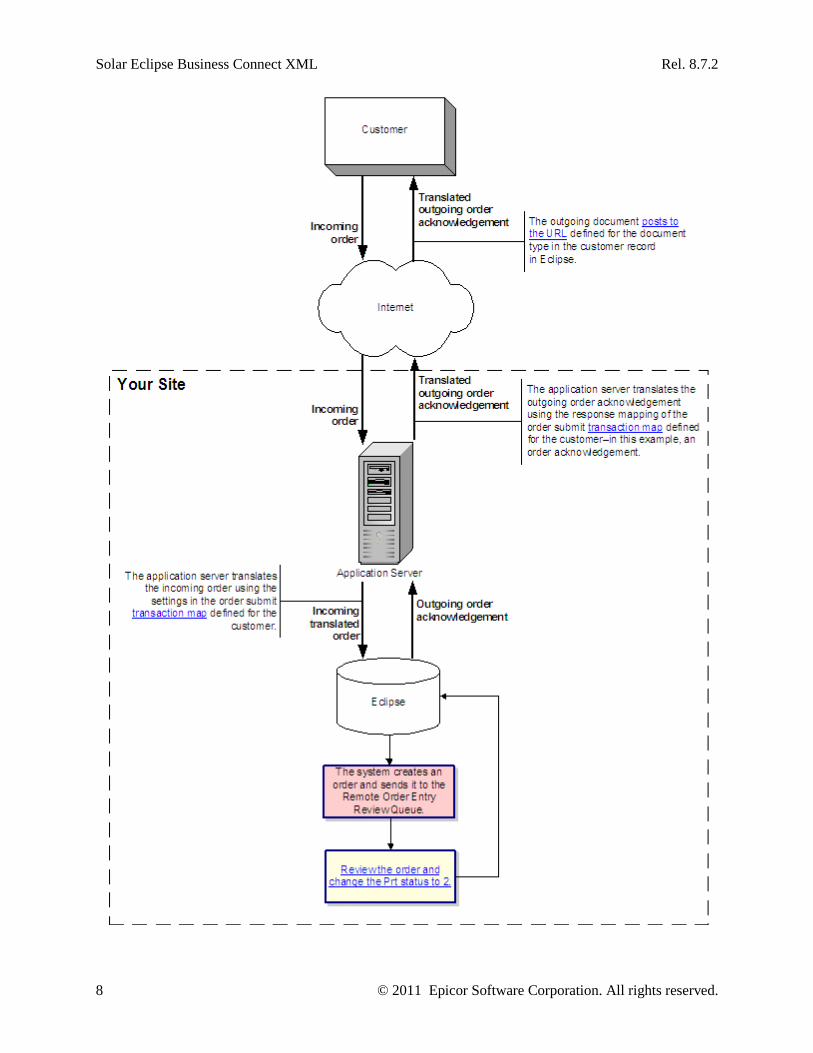
Example XML Data Flow
The following diagram illustrates how XML documents for an order submit transaction flow from a customer flow through the system to the application server and on to Eclipse.
In the example below, you have a transaction map defined for an order submit transaction that contains a received document map for an order submit transaction type, and sent document map for an order acknowledgement transaction type.
Solar Eclipse Business Connect XML Rel. 8.7.2
8 © 2011 Epicor Software Corporation. All rights reserved.
Rel. 8.7.2 Business Connect XML
© 2011 Epicor Software Corporation. All rights reserved. 9
Example XML Data Flow with Marketplace
The following diagram illustrates how XML documents for an order submit transaction flow from a supply chain marketplace site, or portal, through the system to the application server and on to Eclipse.
In the example below, you have a transaction map defined for the following:
• A websession transaction for the marketplace site that contains a received document map for an websession request and a sent document map for a websession response.
• An order submit transaction that contains a received document map for an order submit transaction type, and sent document map for an order acknowledgement transaction type.

Solar Eclipse Business Connect XML Rel. 8.7.2
10 © 2011 Epicor Software Corporation. All rights reserved.

Rel. 8.7.2 Business Connect XML
© 2011 Epicor Software Corporation. All rights reserved. 11
Business Connect XML Setup Overview
Set the following parameters before sending or receiving XML documents:
• XML-related control maintenance records
• XML Product Not Found product
• Remote document details
Set the following parameters before sending or receiving XML documents to or from customers:
• Activity triggers for XML documents
• System notifications
• Document post locations
• Pricing variance parameters
• E-commerce IDs
Set the following parameters before sending or receiving XML documents to or from vendors:
• Vendor access information
• Activity triggers for XML documents
• Document post locations
Solar Eclipse Business Connect XML Rel. 8.7.2
12 © 2011 Epicor Software Corporation. All rights reserved.
Setup Requirements for Business Connect XML
Following are control maintenance records and authorization keys used for Business Connect XML.
Control Maintenance Records Set the following control maintenance records:
• BCXML Application Server Settings
The combination of the server name and port define the address that the Eclipse system must use to communicate with the BCXML server.
• IDMS-XML Admin Message User/Group
• IDMS-XML Default Part # Used For Creating A Nonstock Item
• IDMS-XML Default Sales Order Writer Default Sales Order Writer
• IDMS-XML Inbound Sales Orders Always Use Partner Pricing Inbound Sales Orders Always Use Partner Pricing
• Order Statuses Displayed In IDMS-XML
• Default IDMS-XML Sales Source
• J2EE Application Server Settings
Authorization Keys Assign the following authorization keys:
• WOE.MAINT

Rel. 8.7.2 Business Connect XML
© 2011 Epicor Software Corporation. All rights reserved. 13
Defining the ***Product Not Found*** Product for XML Transactions
When the system processes an XML order, it uses the following hierarchy to match products.
• Eclipse product ID
• Product description
• UPC
• Customer part number
• User-defined fields
• Catalog number
• Keywords
• Description
Each of the items must have data from the XML document mapped for the system to search on it. If the data is not mapped, the system searches on the next available piece of data. For example, if you map both the product ID and product description, the system first tries to match against the product ID. If it finds a match, it stops and does not search using the rest of the hierarchy. If the system does not find a match on the product ID or you have not mapped the product ID data, it tries the product description, and so on down the hierarchy.
When the system processes an XML order for a product it cannot identify or find, the system substitutes a default product for the line item so it can continue processing the order. At a later time, you can review the order and replace the default product entries with actual products. For the system to use this feature, you need to create a product for this purpose in Product Maintenance and then assign the product part number to the IDMS-XML Default Part # Used For Creating A Nonstock Item control maintenance record.
To create the ***Product Not Found*** product:
1. From the Files menu, select Product to display the Product Maintenance screen.
2. In the Product ID field, type new and press Enter.
3. In the Description field, type ***B2B PRODUCT NOT FOUND***. This is the description that displays on an order when the system cannot identify or find a requested product.
4. In the Prc Line field, enter Nonstock.
5. In the Buy Line field, enter Nonstock.
6. In the Status field, select the Nonstock status.
7. In the Quant field for unit of measure, enter 1.
8. In the GL Acct/Product Type field, select a miscellaneous code.
9. Note the part number assigned to the product displayed in the upper right part of the screen.
10. Press Esc to save the record and exit the screen.

Solar Eclipse Business Connect XML Rel. 8.7.2
14 © 2011 Epicor Software Corporation. All rights reserved.
To assign the product to the IDMS-XML Default Part # Used For Creating A Nonstock Item control maintenance record:
1. From the System > System Files menu, select Control Maintenance to display the Control Maintenance screen.
2. In the Keyword field, enter IDMS-XML and press Enter.
3. Select IDSM-XML Default Part # Used For Creating A Nonstock Item from the control maintenance record list and press Enter.
4. Enter the part number from the product you just created and press Esc.
See Also:
Business Connect XML Setup Overview

Rel. 8.7.2 Business Connect XML
© 2011 Epicor Software Corporation. All rights reserved. 15
Setting Customer Activity Triggers for XML Documents
You can set up XML activities that events in the system automatically trigger. For example, you can set up the system to send an Advanced Shipment Notification (ASN) to a trading partner using XML when the shipping ticket for the order prints. For more information about activity triggers, see Assigning Activity Triggers.
You must set the activity triggers and post locations for XML documents to send documents to your customers.
Use the following activity triggers and trigger actions:
• B2B Advanced Ship Notification used with Shipment Notification and Ship Ticket Print triggers.
• B2B Sales Doc used with Batch Invs in Lieu of Print, Email Stmts - Invs in lieu of Print, Invoice Order, and Invoice Print triggers.
• E-mail and Fax Notifications used with the BC-XML Submit Order trigger.
To send triggered B2B ASNs:
1. From the Maintenance menu, select Customer and display the customer to which you want to assign triggers.
2. From the Additional menu, select Activity Trigger to display the Activity Trigger Maintenance window.
3. In the Trigger Description and Activity Description fields, do one of the following:
To... Do this... send an ASN at shipment notification enter Shipment Notification and select B2B Adv
Ship Notice in the Activity Description field.
send an ASN when the shipping ticket prints for an order
enter Ship Ticket Print and select B2B Adv Ship Notice in the Activity Description field.
send an ASN from the Shipping Manifest Queue after the manifest is created and locked
enter Manifest Lock and select B2B Adv Ship Notice in the Activity Description field.
send an ASN when the pick ticket prints for an order
enter Pick Ticket Print and select B2B Adv Ship Notice in the Activity Description field.
send an ASN when invoicing an order enter Invoice Order and select B2B Adv Ship Notice in the Activity Description field.
send an ASN when printing an invoice for an order
enter Invoice Print and select B2B Adv Ship Notice in the Activity Description field.
send an ASN when an RF order closes enter RF Order Close and B2B Adv Ship Notice in the Activity Description field.
4. In the Foreground and Background fields, accept the default setting.
5. Select the trigger you just added and select Activity Properties from the File menu.
6. Enter the URL to which to post the ASN for this customer and press Enter.
7. Return to the Customer record.
8. Save your changes and exit the window.

Solar Eclipse Business Connect XML Rel. 8.7.2
16 © 2011 Epicor Software Corporation. All rights reserved.
To send triggered B2B sales documents:
1. From the Maintenance menu, select Customer and display the customer to which you want to assign triggers.
2. From the Additional menu, select Activity Trigger to display the Activity Trigger Maintenance window.
3. In the Trigger Description field, do one of the following:
To... Do this... send a sales document when processing batch invoices
enter Batch Invs in Lieu of Print and select B2B Sales Doc in the Activity Description field.
send a sales document when invoicing an order enter Invoice Order and select B2B Sales Doc in the Activity Description field.
send a sales document when printing an invoice for an order
enter Invoice Print and select B2B Sales Doc in the Activity Description field.
send a sales document when processing overdue invoices
enter Overdue Invoices and select B2B Sales Doc in the Activity Description field.
send a sales document when printing a pick ticket for an order
enter Pick Ticket Print and select B2B Sales Doc in the Activity Description field.
send a sales document when an RF order closes enter RF Order Close and select B2B Sales Doc in the Activity Description field.
send a sales document when receiving a purchase order acknowledgement for a direct order
enter PO Ack Received on Direct and select B2B Sales Doc in the Activity Description field.
send a sales document when printing a shipping ticket for an order
enter Ship Ticket Print and select B2B Sales Doc in the Activity Description field.
send the sales document in XML format by way of B2B Commerce.
enter BC-XML Submit Order and Select B2B Sales Doc in the Activity Description field.
4. In the Foreground and Backround fields, accept the default setting.
5. Select the trigger you just added and select use the Activity Properties from the File menu.
6. Enter the URL to which to post the ASN for this customer and press Enter.
7. Return to the Customer record.
8. Save your changes and exit the window.
To send triggered e-mails and faxes when an order is submitted:
1. From the Maintenance menu, select Customer and display the customer to which you want to assign triggers.
2. From the Additional menu, select Activity Trigger to display the Activity Trigger Maintenance window.
Rel. 8.7.2 Business Connect XML
© 2011 Epicor Software Corporation. All rights reserved. 17
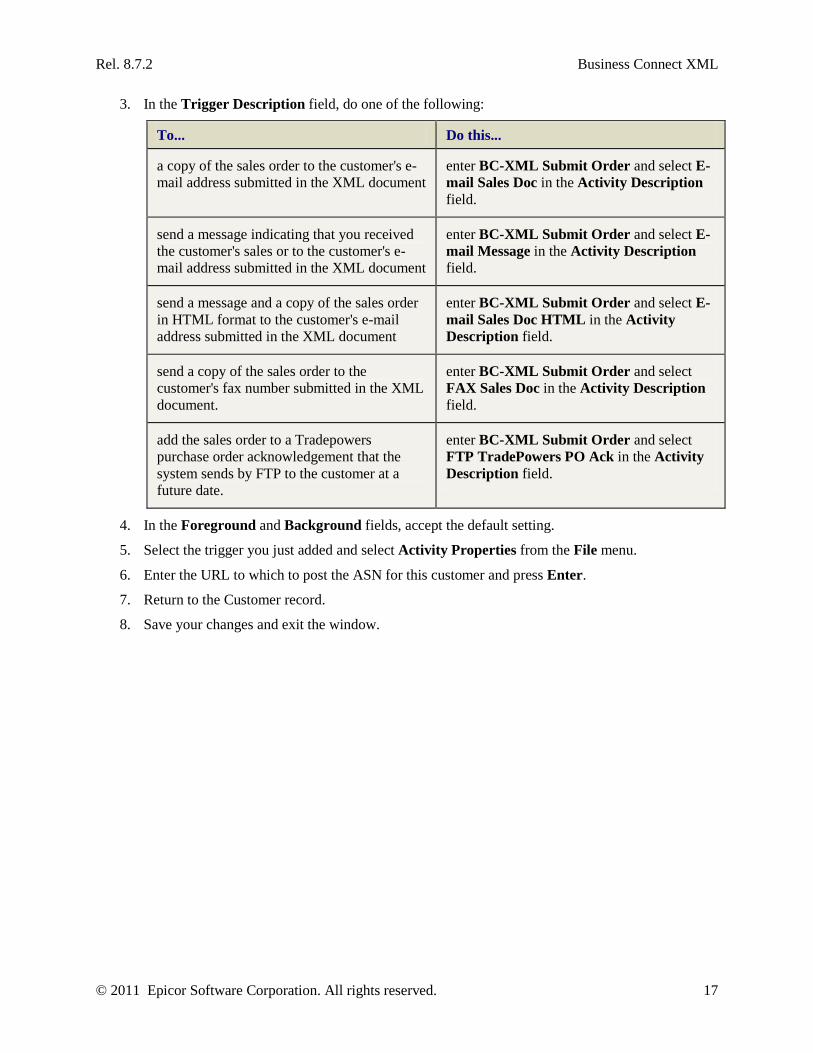
3. In the Trigger Description field, do one of the following:
To... Do this...
a copy of the sales order to the customer's e-mail address submitted in the XML document
enter BC-XML Submit Order and select E-mail Sales Doc in the Activity Description field.
send a message indicating that you received the customer's sales or to the customer's e-mail address submitted in the XML document
enter BC-XML Submit Order and select E-mail Message in the Activity Description field.
send a message and a copy of the sales order in HTML format to the customer's e-mail address submitted in the XML document
enter BC-XML Submit Order and select E-mail Sales Doc HTML in the Activity Description field.
send a copy of the sales order to the customer's fax number submitted in the XML document.
enter BC-XML Submit Order and select FAX Sales Doc in the Activity Description field.
add the sales order to a Tradepowers purchase order acknowledgement that the system sends by FTP to the customer at a future date.
enter BC-XML Submit Order and select FTP TradePowers PO Ack in the Activity Description field.
4. In the Foreground and Background fields, accept the default setting.
5. Select the trigger you just added and select Activity Properties from the File menu.
6. Enter the URL to which to post the ASN for this customer and press Enter.
7. Return to the Customer record.
8. Save your changes and exit the window.

Solar Eclipse Business Connect XML Rel. 8.7.2
18 © 2011 Epicor Software Corporation. All rights reserved.
Setting System Notifications for XML Customer Transactions
While processing XML transactions, the system can notify users or message groups using the Eclipse message system about events, such as when it receives a new order from a customer, or when a transaction encounters problems processing through the system.
Define notification settings for each customer with which you conduct business using XML. If the system receives an order and cannot identify the customer who sent it, the system sends notifications to the user or users defined in the IDMS-XML Admin Message User/Group control maintenance record.
To set system notifications for XML customer transactions:
1. Display the character-based system.
Note: The error message user functionality has not been incorporated into Solar Eclipse as of this release.
2. From the Files menu, select Customer to display the Customer Maintenance screen and open a customer record.
3. Use the Remote hot key to display the Remote Order Entry Parameters screen.
4. Do one of the following:
• To define a user or set of users to receive notification for all types of remote transactions, enter the ID to receive messages in the following fields:
• Default User Messaged With New Order #
• Default User Messaged With Order Changes
• Default User Messaged With Errors
• To define a different user or set of users for XML transactions, use the Remote Messaging hot key, select Business Connect, and enter user IDs to receive messaged in the following fields:
• User to be Messaged With New Order #
• User to be Messaged With Order Changes
• User to be Messaged with Errors
5. Press Esc to return to the Customer Maintenance screen.
6. Press Esc to save your changes and exit the record.
Rel. 8.7.2 Business Connect XML
© 2011 Epicor Software Corporation. All rights reserved. 19
Setting Post Locations for XML Customer Transaction Documents
For each customer you do business with using XML, define the URL location to which to save outgoing documents, such as order acknowledgements, invoices, and advance ship notices. This URL can be specific for each type of transaction, or a default for all transactions for the customer, regardless of the type.
If the transactions with a customer are inbound only, a post location is not required for sending the standard Status 200 HTTP response that indicates to the customer's system that you received their XML document transmission.
To set post locations for XML customer transaction documents:
1. From the Maintenance menu, select Customer to display the Customer Maintenance window and open a customer record.
2. From the Orders menu, select Remote Order Entry Parameters to display the Remote Order Entry Parameters window.
3. From the Edit menu, select WOE Information to display the B2B/WOE Remote Order Entry Parameters window.
4. In the B2B Post URLs field in the URLs section at the bottom of the window, enter the post location for each XML document for the customer.
The system uses the location in the Default transaction type if all transactions' posts go to the same location for the customer. If the customer requires posts for different transaction types to go to different locations, set the URL for the individual transaction type.
To trade secure information, such as credit card information, use the HTTPs transport protocol instead of plain HTTP. Specify the post URL as https:// instead of http://.
5. Save the customer record to save your changes.

Solar Eclipse Business Connect XML Rel. 8.7.2
20 © 2011 Epicor Software Corporation. All rights reserved.
Defining Pricing Variance for XML Customer Transactions
For each customer you do business with using XML, you can select whether to use the pricing information defined in Eclipse, or the pricing information the customer sends to you in an XML document for a transaction. In addition, you can set an acceptable dollar amount or a percentage range in which the price can differ and still use the customer's pricing information. Set the following to set the pricing variance for XML customer transactions:
• Partner pricing parameter.
• Allowed variance in pricing.
If the Use Partner Pricing parameter is set in the order document details for this customer, the system uses the setting as defined in the order document details rather than the setting in Customer Maintenance for XML transactions. However, other remote transactions still use the Customer Maintenance parameter setting.
To set the partner pricing parameter for a customer:
1. From the Maintenance menu, select Customer to display the Customer Maintenance window and open a customer record.
2. From the Orders menu, select Remote Order Entry Parameters to display the Remote Order Entry Parameters window.
3. From the Edit menu, select WOE Information to display the B2B/WOE Remote Order Entry Parameters window.
4. From the Edit menu, select IDMS-XML Parameters to display the IDMS-XML Parameters window.
5. Select the Use Partner Pricing check box to indicate that you want to use the pricing information the customer sends to you with an order.
6. Save your changes and return to the Remote Order Entry Parameters window.
7. Continue with the next procedure.
To set the allowed variance in pricing:
1. Complete the previous procedure.
2. In the Allowed Pricing Variance Percentage field, select Dollar Amt or Percentage to indicate the measurement type for the pricing variance.
3. Enter the dollar amount or percentage in which a customer's pricing information is allowed to differ from the pricing defined in Eclipse.
If the difference between the customer's pricing information and that defined in Eclipse is outside the range that you enter here, the system uses the pricing information defined in Eclipse.
Note: The variance you enter in this field is the variance the system uses for all remote order entry transactions, not just XML transactions. However, if the pricing parameter is not set, the variance does not apply to XML transactions.
4. Save your changes and exit the customer record.

Rel. 8.7.2 Business Connect XML
© 2011 Epicor Software Corporation. All rights reserved. 21
Defining Customer E-Commerce IDs for XML Transactions
The system uses customer e-commerce IDs to identify shipping locations that you service. The system uses the IDs to determine the customer's ship-to account to use when creating an order. When entering customer e-commerce IDs, remember that they can be in any format; however, each ID must be unique. When you create your transaction maps for a customer, you can map the customer's incoming customer number to the ship-to element in Eclipse. For the system to identify and match the data to a customer record, concatenate a literal string to the beginning or the end of the incoming data to make it unique.
For example, if your trading partner sends you a customer number of 1234, that number might not be unique to a customer record in Eclipse. To convert the number to a unique e-commerce ID, such as ABC1234, you can concatenate an alpha string to the beginning of the data using a literal string and the concatenate operation in the mapping utility. Now the system has a unique identifier to which it can match the ship-to and bill-to information for an order for the customer.
E-commerce IDs are also used with Ariba transactions.
To define customer e-commerce IDs for XML transactions:
1. From the Maintenance menu, select Customer to display the Customer Maintenance window and open a customer record.
2. From the Orders menu, select Remote Order Entry Parameters to display the Remote Order Entry Parameters window.
3. From the Edit menu, select ECommerce IDs to display the Customer Unique E-Commerce IDs window.
4. Enter each ID on a new line in the window.
5. Save your changes and return to the main Customer Maintenance window.
6. Save the customer record.

Solar Eclipse Business Connect XML Rel. 8.7.2
22 © 2011 Epicor Software Corporation. All rights reserved.
Setting Vendor Access Information for XML Documents
Before sending XML documents to a trading partner, define the web site and access information such as login name and password, where the vendor retrieves documents that you send.
To set vendor access information for XML documents:
1. Display the character-based system.
Note: The vendor access for XML document settings have not been incorporated into Solar Eclipse as of this release.
2. From the File menu, select Vendor and display the vendor to which you want to set access information.
3. Use the WWW hot key then the B2B Commerce hot key to display the Eclipse B2B Commerce Vendor Maintenance screen.
4. In the WWW Address field, enter the full Uniform Resource Locator (URL) path used to access the vendor’s web site where documents from your system post. Include the “http://” in the URL. For example, http://www.thewidgetspro.com.
Use the Expand WWW Address hot key to enter or view a web site address that is longer than the display area on the screen.
5. Enter the login information you use to access the vendor’s site. If you are using Business Connect XML to talk to another Eclipse system using Eclipse B2B Commerce, this login information is required to complete transactions.
Field Description Customer ID Your company-assigned login identification.
Login The login ID you use to access the vendor's web site to post requests.
Password The password you use to access the vendor's web site to post requests.
6. In the Preferred Remote Site New Order Status field, press F10 and select the default status for orders placed remotely to this vendor.
7. Use the Test Connection hot key to test your connection to the vendor. The system attempts to connect to the vendor's web address, using your login information.
If the connection test is... Then... successful the following message displays:
"Good Customer Number and Password. Connection was successful."
not successful a message displays with troubleshooting information. For example, the message might indicate that the password you specified is invalid, or the web server would not allow a certain method. The message often displays detailed HTML information that you can use to determine the connection problem. Consult with the web experts at your company or Eclipse for assistance.

Rel. 8.7.2 Business Connect XML
© 2011 Epicor Software Corporation. All rights reserved. 23
8. Press Esc until you return to the Vendor Maintenance screen.
9. Press Esc to save the vendor record and exit the screen.
Note: The All,Description,/Price Line,! Group field is used with the Eclipse B2B Commerce companion product and is not required for trading XML documents with a vendor.

Solar Eclipse Business Connect XML Rel. 8.7.2
24 © 2011 Epicor Software Corporation. All rights reserved.
Setting Vendor Activity Triggers for XML Documents
You can set up XML activities that events in the system automatically trigger. For more information about activity triggers, see Assigning Activity Triggers.
Note: You must set post locations and activity triggers for XML documents to send documents to your customers.
You can set up the system to send a B2B Purchasing document when any of the following activities occur:
• You create and exit a new purchase order.
• You create and exit a new purchase order bid.
• You create and exit new direct order.
• Receive a purchase order.
To send triggered B2B purchasing documents:
1. From the Maintenance menu, select Vendor and display the vendor to which you want to assign triggers.
2. From the Additional menu, select Activity Trigger to display the Activity Trigger Maintenance window.
3. In the Trigger Description field, select the event for which you want to send a B2B purchasing document.
For example, to send B2B documents for purchase orders, select New Purchase Order or New Purchase Order Bid. To send a B2B document for a direct order, select New Direct Order.
4. In the Activity Description field, select B2B Purchasing Document.
Note: In the Foreground and Background fields, accept the default setting.
5. Select the trigger you added and select Activity Properties from the File menu a enter the URL where the XML document posts for the vendor.
6. Return to the Vendor record.
7. Save your changes and exit the window.
8. Set the post location for the documents you send to the vendor using XML.

Rel. 8.7.2 Business Connect XML
© 2011 Epicor Software Corporation. All rights reserved. 25
Setting Post Locations for XML Vendor Transaction Documents
For each vendor you do business with using XML, define the URL location to which to save outgoing documents, such as orders, quote requests, and product inquiries. This URL can be specific for each transaction type, or a default for all transactions for the vendor, regardless of type.
Note: You must set post locations and activity triggers for XML documents to send documents to your vendors.
To set post locations for XML vendor transaction documents:
1. Display the character-based system.
Note: The post locations for vendor transaction documents has not been incorporated into Solar Eclipse as of this release.
2. From the Files menu, select Vendor to display the Vendor Maintenance screen and open a vendor record.
3. Use the WWW hot key and then the B2B Commerce hot key to display the Eclipse B2B Commerce Vendor Maintenance screen.
4. Use the B2B Post URL hot key and select the type of transaction for which you are setting the post location.
The system uses the location in the Default transaction type if all transactions' posts go to the same location for the vendor. If the vendor requires posts for different transaction types to go to different locations, set the URL for the individual transaction type.
4. In the B2B Post URL field, enter the post location for XML documents for the vendor.
5. Press Esc until you return to the Vendor Maintenance screen.
6. Press Esc to save the vendor record and exit the screen.

Solar Eclipse Business Connect XML Rel. 8.7.2
26 © 2011 Epicor Software Corporation. All rights reserved.
Remote Document Details Overview
For each customer or vendor with whom you have a remote trading relationship, define additional document settings for each transaction you trade with them. Additional settings include but are not limited to indicating who the system notifies when it receives a transaction of a given type and setting the initial order status.
Use Remote Trading Partner Maintenance to define details for each document type that you receive or send to each customer and vendor.
Note: In the current release, you can only define details for XML documents in Remote Trading Partner Maintenance. Define EDI document details through EDI Group Profile Maintenance.
For customers, some of the document details that you can set in Remote Trading Partner Maintenance, such as who to notify about a certain document transmissions and pricing variances can also be set in the customer record. Setting document details in Remote Trading Partner Maintenance overrides the settings defined at the customer level.
Define details for the following remote document types:
• Orders
• Advanced ship notices
• Change order requests
• Quote requests
• Order acknowledgements
• Invoices

Rel. 8.7.2 Business Connect XML
© 2011 Epicor Software Corporation. All rights reserved. 27
Setting Remote Order Document Details
Use Remote Trading Partner Maintenance to set additional details about remote order documents that you trade with your customer and vendors.
Note: In the current release, you can only define details for XML documents in Remote Trading Partner Maintenance. Define document details for EDI 850 purchase orders through EDI Group Profile Maintenance.
To set remote order document details:
1. Display the character-based system.
Note: The Remote Trading Partner Maintenance functionality has not been incorporated into Solar Eclipse as of this release.
2. From the System > Custom menu, select Remote Trading Partner Maintenance to display the Remote Trading Partner Maintenance screen.
3. In the Trading Partner field, enter the trading partner for which you want to set remote order document details. Press F10 for a list of trading partners that have transaction maps defined in the Business Connect XML mapping utility.
4. In the Remote Type field, select the type of remote transaction for which you want to set details.
Note: In the current release, Remote Trading Partner Maintenance supports only XML transactions.
5. Press Enter to display the list of transactions that have transaction maps defined for the trading partner.
6. Select the order submit transaction and use the Add'l Doc Info hot key to display the additional detail fields for the transaction type.
7. Enter the detail information as necessary for the transaction type:
Field Applies To Description User To Notify Orders received from
customers The user or message group that receives notification when the system receives an order from this customer. Setting this parameter overrides notification settings for this transaction type that are set at the customer level.
User To Review Orders received from customers
The user or message group that reviews orders from this customer. Setting this parameter overrides notification settings for this transaction type that are set at the customer level.
Initial Order Status Orders received from customers
The status default for all remote orders you receive from the customer. We recommend setting the initial order status to Bid.

Solar Eclipse Business Connect XML Rel. 8.7.2
28 © 2011 Epicor Software Corporation. All rights reserved.
Field Applies To Description Use Partner Pricing Orders received from
customers Indicates whether to use the pricing information defined in Eclipse, or the pricing information the customer sends to you in the order request. Setting this parameter overrides partner pricing parameters that are set at the customer level.
Remote Order Entry %
Orders received from customers
The dollar amount or percentage in which a customer's pricing information is allowed to differ from the pricing defined in Eclipse. If the difference between the customer's pricing information and that defined in Eclipse is outside the range that you enter here, the system uses the pricing information defined in Eclipse. Setting this parameter overrides pricing variance parameters that are set at the customer level.
Round Up to Min Sales Qty
Orders received from customers
Indicates whether the system rounds order quantities to the minimum sales quantity for each item on an order. Set this field to No to allow the user to order any quantity.
Notify of Receipt Orders sent to vendors The user or message group that receives notification when your vendor's system receives an order from this customer.
Send Pricing Data In Qty UOM
Orders sent to vendors Converts the pricing information to the same unit of measure as the quantity information.
8. Press Esc to return to the Remote Trading Partner Maintenance screen.
9. Press Esc to close the screen and save your changes.

Rel. 8.7.2 Business Connect XML
© 2011 Epicor Software Corporation. All rights reserved. 29
Setting Remote Advanced Ship Notice Document Details
Use Remote Trading Partner Maintenance to set additional details about remote advanced ship notice (ASN) documents that you trade with your customers and vendors.
Note: In the current release, you can only define details for XML documents in Remote Trading Partner Maintenance. Define document details for EDI 856 ASNs through EDI Group Profile Maintenance.
To set remote ASN document details:
1. Display the character-based system.
Note: The Remote Trading Partner Maintenance functionality has not been incorporated into Solar Eclipse as of this release.
2. From the System > Custom menu, select Remote Trading Partner Maintenance to display the Remote Trading Partner Maintenance screen.
3. In the Trading Partner field, enter the trading partner for which you want to set remote ASN document details. Press F10 for a list of trading partners that have transaction maps defined in the Business Connect XML mapping utility.
4. In the Remote Type field, select the type of remote transaction for which you want to set details.
Note: In the current release, Remote Trading Partner Maintenance supports only XML transactions.
5. Press Enter to display the list of transactions that have transaction maps defined for the trading partner.
6. Select the advance ship notice transaction and use the Add'l Doc Info hot key to display the detail fields for the transaction type.
7. Enter the following information, as necessary for the document type:
Field Applies To Description User to Review ASNs received from
vendors The user or message group that reviews ASNs from the trading partner.
User to Notify ASNs received from vendors
The user or message group that receives notification when the system receives an ASN from there trading partner.
8. Press Esc to return to the Remote Trading Partner Maintenance screen.
9. Press Esc to close the screen and save your changes.

Solar Eclipse Business Connect XML Rel. 8.7.2
30 © 2011 Epicor Software Corporation. All rights reserved.
Setting Remote Change Order Document Details
Use Remote Trading Partner Maintenance to set additional details about remote change order documents that you trade with your customers and vendors.
Note: In the current release, you can only define details for XML documents in Remote Trading Partner Maintenance. Define document details for EDI 860 purchase order change requests through EDI Group Profile Maintenance.
To set remote change order document details:
1. Display the character-based system.
Note: The Remote Trading Partner Maintenance functionality has not been incorporated into Solar Eclipse as of this release.
2. From the System > Custom menu, select Remote Trading Partner Maintenance to display the Remote Trading Partner Maintenance screen.
3. In the Trading Partner field, enter the trading partner for which you want to set remote change order document details. Press F10 for a list of trading partners that have transaction maps defined in the Business Connect XML mapping utility.
4. In the Remote Type field, select the type of remote transaction for which you want to set details.
Note: In the current release, Remote Trading Partner Maintenance supports only XML transactions.
5. Press Enter to display the list of transactions that have transaction maps defined for the trading partner.
6. Select the change order transaction and use the Add'l Doc Info hot key to display the detail fields for the transaction type.
7. Enter the detail information, as necessary for the transaction type:
Field Applies To Description User to Review Change orders received from
customers The user or message group that reviews change orders from this customer. Setting this parameter overrides notification settings for this transaction type that are set at the customer level.
User to Notify Change orders received from customers
The user or message group that receives notification when the system receives an order from this customer. Setting this parameter overrides notification settings for this transaction type that are set at the customer level.

Rel. 8.7.2 Business Connect XML
© 2011 Epicor Software Corporation. All rights reserved. 31
8. Press Esc to return to the Remote Trading Partner Maintenance screen.
9. Press Esc to close the screen and save your changes.

Solar Eclipse Business Connect XML Rel. 8.7.2
32 © 2011 Epicor Software Corporation. All rights reserved.
Setting Remote Quote Request Document Details
Use Remote Trading Partner Maintenance to set additional details about remote quote request documents that you trade with your customers and vendors.
Note: In the current release, you can only define details for XML documents in Remote Trading Partner Maintenance. Define document details for EDI 840 quote requests through EDI Group Profile Maintenance.
To set remote quote request document details:
1. Display the character-based system.
Note: The Remote Trading Partner Maintenance functionality has not been incorporated into Solar Eclipse as of this release.
2. From the System > Custom menu, select Remote Trading Partner Maintenance to display the Remote Trading Partner Maintenance screen.
3. In the Trading Partner field, enter the trading partner for which you want to set remote quote request document details. Press F10 for a list of trading partners that have transaction maps defined in the Business Connect XML mapping utility.
4. In the Remote Type field, select the type of remote transaction for which you want to set details.
Note: In the current release, Remote Trading Partner Maintenance supports only XML transactions.
5. Press Enter to display the list of transactions that have transaction maps defined for the trading partner.
6. Select the quote request transaction and use the Add'l Doc Info hot key to display the detail fields for the transaction type.
7. Enter the detail information, as necessary for the transaction type:
Field Applies To Description User To Notify Quote requests received
from customers The user or message group that receives notification when the system receives a quote request form the trading partner. Setting this parameter overrides notification settings for this transaction type that are set at the customer level.
User To Review Quote requests received from customers
The user or message group that reviews quote requests from the trading partner. Setting this parameter overrides notification settings for this transaction type that are set at the customer level.
8. Press Esc to return to the Remote Trading Partner Maintenance screen.
9. Press Esc to close the screen and save your changes.

Rel. 8.7.2 Business Connect XML
© 2011 Epicor Software Corporation. All rights reserved. 33
Setting Remote Order Acknowledgement Document Details
Use Remote Trading Partner Maintenance to set additional details about remote order acknowledgment documents that you trade with your customers and vendors.
Note: In the current release, you can only define details for XML documents in Remote Trading Partner Maintenance. Define document details for EDI 855 purchase order acknowledgements through EDI Group Profile Maintenance.
To set remote order acknowledgement document details:
1. Display the character-based system.
Note: The Remote Trading Partner Maintenance functionality has not been incorporated into Solar Eclipse as of this release.
2. From the System > Custom menu, select Remote Trading Partner Maintenance to display the Remote Trading Partner Maintenance screen.
3. In the Trading Partner field, enter the trading partner for which you want to set remote order acknowledgment document details. Press F10 for a list of trading partners that have transaction maps defined in the Business Connect XML mapping utility.
4. In the Remote Type field, select the type of remote transaction for which you want to set details.
Note: In the current release, Remote Trading Partner Maintenance supports only XML transactions.
5. Press Enter to display the list of transactions that have transaction maps defined for the trading partner.
6. Select the order acknowledgement transaction and use the Add'l Doc Info hot key to display the detail fields for the transaction type.
7. Enter the detail information, as necessary for the transaction type:
Field Applies To Description User to Notify • Order acknowledgements sent to
customers • Order acknowledgements
received from vendors
The user or message group that receives notification when the system receives an order acknowledgment from the trading partner. Setting this parameter overrides notification settings for this transaction type that are set at the customer level.
User to Review • Order acknowledgements sent to customers
• Order acknowledgements received from vendors
The user or message group that reviews order acknowledgments from this trading partner. Setting this parameter overrides notification settings for this transaction type that are set at the customer level.

Solar Eclipse Business Connect XML Rel. 8.7.2
34 © 2011 Epicor Software Corporation. All rights reserved.
Field Applies To Description Initial Order Status Order acknowledgements received
from vendors The status default for all remote order acknowledgments you receive from the trading partner.
Dflt Lead Time if NO Shp Dt Provided
Order acknowledgements received from vendors
The number of days it takes the vendor to ship the material out of their warehouse. The system adds this number to the date of the order acknowledgement and uses this calculated date as the expected receive date for the order.
Update Req'd Date with the Ship Date
Order acknowledgements received from vendors
Updates the required date of the order with the calculated ship date from the vendor.
8. Press Esc to return to the Remote Trading Partner Maintenance screen.
9. Press Esc to close the screen and save your changes.

Rel. 8.7.2 Business Connect XML
© 2011 Epicor Software Corporation. All rights reserved. 35
Setting Remote Invoice Document Details
Use Remote Trading Partner Maintenance to set additional details about remote order invoice documents that you trade with your customers and vendors.
Note: In the current release, you can only define details for XML documents in Remote Trading Partner Maintenance. Define document details for EDI 810 invoices through EDI Group Profile Maintenance.
To set remote invoice document details:
1. Display the character-based system.
Note: The Remote Trading Partner Maintenance functionality has not been incorporated into Solar Eclipse as of this release.
2. From the System > Custom menu, select Remote Trading Partner Maintenance to display the Remote Trading Partner Maintenance screen.
3. In the Trading Partner field, enter the trading partner for which you want to set remote invoice document details. Press F10 for a list of trading partners that have transaction maps defined in the Business Connect XML mapping utility.
4. In the Remote Type field, select the type of remote transaction for which you want to set details.
Note: In the current release, Remote Trading Partner Maintenance supports only XML transactions.
5. Press Enter to display the list of transactions that have transaction maps defined for the trading partner.
6. Select the invoice transaction and use the Add'l Doc Info hot key to display the detail fields for the transaction type.
7. Enter the detail information, as necessary for the transaction type:
Field Applies To Description User to Notify • Invoices received from
vendors • Invoices sent to customers
The user or message group that receives notification when the system sends or receives an invoice from the trading partner. Setting this parameter overrides notification settings for this transaction type that are set at the customer level.
User to Review • Invoices received from vendors
• Invoices sent to customers
The user or message group that reviews invoices from the trading partner. Setting this parameter overrides notification settings for this transaction type that are set at the customer level.
Enable Auto Approve on Invoicing
Invoices received from vendors
Indicates if the system reconciles and approves a remote invoice automatically when the line items match and the dollar amount is within the over/short range.
Solar Eclipse Business Connect XML Rel. 8.7.2
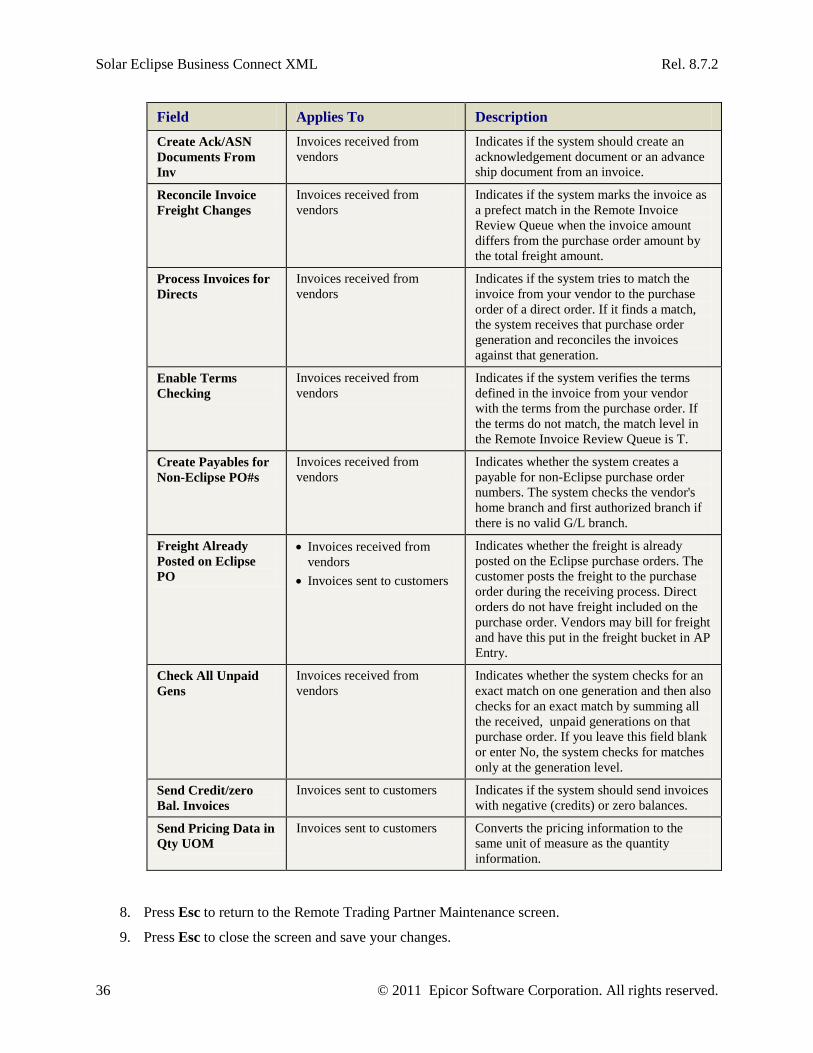
36 © 2011 Epicor Software Corporation. All rights reserved.
Field Applies To Description Create Ack/ASN Documents From Inv
Invoices received from vendors
Indicates if the system should create an acknowledgement document or an advance ship document from an invoice.
Reconcile Invoice Freight Changes
Invoices received from vendors
Indicates if the system marks the invoice as a prefect match in the Remote Invoice Review Queue when the invoice amount differs from the purchase order amount by the total freight amount.
Process Invoices for Directs
Invoices received from vendors
Indicates if the system tries to match the invoice from your vendor to the purchase order of a direct order. If it finds a match, the system receives that purchase order generation and reconciles the invoices against that generation.
Enable Terms Checking
Invoices received from vendors
Indicates if the system verifies the terms defined in the invoice from your vendor with the terms from the purchase order. If the terms do not match, the match level in the Remote Invoice Review Queue is T.
Create Payables for Non-Eclipse PO#s
Invoices received from vendors
Indicates whether the system creates a payable for non-Eclipse purchase order numbers. The system checks the vendor's home branch and first authorized branch if there is no valid G/L branch.
Freight Already Posted on Eclipse PO
• Invoices received from vendors
• Invoices sent to customers
Indicates whether the freight is already posted on the Eclipse purchase orders. The customer posts the freight to the purchase order during the receiving process. Direct orders do not have freight included on the purchase order. Vendors may bill for freight and have this put in the freight bucket in AP Entry.
Check All Unpaid Gens
Invoices received from vendors
Indicates whether the system checks for an exact match on one generation and then also checks for an exact match by summing all the received, unpaid generations on that purchase order. If you leave this field blank or enter No, the system checks for matches only at the generation level.
Send Credit/zero Bal. Invoices
Invoices sent to customers Indicates if the system should send invoices with negative (credits) or zero balances.
Send Pricing Data in Qty UOM
Invoices sent to customers Converts the pricing information to the same unit of measure as the quantity information.
8. Press Esc to return to the Remote Trading Partner Maintenance screen.
9. Press Esc to close the screen and save your changes.

Rel. 8.7.2 Business Connect XML
© 2011 Epicor Software Corporation. All rights reserved. 37
XML Schema Maintenance Overview
Use XML Schema Maintenance to define and access data stored in any file in Eclipse when using Business Connect XML to receive and send transactions. XML database schemas are similar to Eclipse dictionaries, in that they display data file information so you can easily view and understand it. XML database schemas provide additional information specific to the XML interface and translation of data to and from the database. Each data file in Eclipse can have a corresponding XML database schema.
The system uses XML database schemas to store data when receiving transactions via XML, such as order submits or stock inquiries, and to retrieve data to send out using XML. Each XML transaction type calls one or more XML database schemas, grouped into transaction schemas. For example, an OrderSubmit transaction schema uses the Order and OrderDetail database schemas to store and retrieve the data required to submit an order in the system using XML. For more information, see How XML Database Schemas Form Transactions.
Note: Business Connect XML includes a set of predefined XML transaction types such as order submits and remittance advice. For a complete list of the supported customer and vendor transactions, see Sending and Receiving Customer Transactions Using XML and Sending and Receiving Vendor Transactions Using XML.
Your system administrator has the ability to add or modify data definitions to a schema or add additional schemas required for your business relationships. Eclipse personnel set up the following default XML database schemas.
• Contact
• Entity
• Order
• OrderAdditional
• OrderChange
• OrderDetail
• OrderDetailChange
• Product
• Territory
Use the following instructions to create or modify XML database schemas:
• Creating XML Database Schemas
• Defining XML Database Schema Translation Properties

Solar Eclipse Business Connect XML Rel. 8.7.2
38 © 2011 Epicor Software Corporation. All rights reserved.
Eclipse Data and XML Database Schemas
If you are defining your own XML database schemas or are adding additional information to the default XML schemas provided to you, it is important to understand how Eclipse stores and retrieves data. Understanding the database structure helps to ensure that you enter the correct attribute, value, and sub-value marks in XML Schema Maintenance.
This topic discusses the following information:
• The Eclipse Database
• XML Database Schemas' Relationships to Eclipse
Eclipse Database The Eclipse system stores its information in a nested relational database.
• Data is separated and stored in files. For example, the Product file contains details about the products you sell, and the Contact file contains information about contacts at customers you do business with.
• Each file contains records. For example, the Contact file contains a record for each contact in your system.
• Each record contains fields of information called attributes. Within each record the same type of information is stored in the same attribute. For example, attribute 1 in a contact record is the contact's first name.
Attribute 0
Attribute 1
Attribute 2 Attribute 11
Item ID
First Name
Last Name Email
Record 1 001 John Doe [email protected]
Record 2 002 Jane Doe [email protected]
A unique key identifies every record in the system. The key is a number, which the system assigns when you create the record. The system stores the key in attribute number 0 (zero).
Note: You cannot change the unique key in attribute 0.
• Attributes can contain multiple pieces of data, called values. For example, for each contact, you can have multiple phone numbers.
Attribute 0
Attribute 1
Attribute 2 Attribute 11 Attribute 14
Item ID
First Name
Last Name Email Phone Number
Record 1
001 John Doe [email protected] Value:: 303-555-1234 Value: 303-555-4321

Rel. 8.7.2 Business Connect XML
© 2011 Epicor Software Corporation. All rights reserved. 39
Attribute 0
Attribute 1
Attribute 2 Attribute 11 Attribute 14
Item ID
First Name
Last Name Email Phone Number
Record 2
002 Jane Doe [email protected] Value: 303-555-5678 Value: 303-555-8765
• A value can contain one or more pieces of data, called sub-values. For example, for each contact, you can have multiple credit cards on file.
Attribute 0
Attribute 1
Attribute 2 Attribute 11 Attribute 26
Item ID
First Name
Last Name Email Credit Card
Record 1
001 John Doe [email protected] Value: Credit Card Type Sub-value: Visa Sub-value: MC
Value: Credit Card # Sub-value: 1111111111111111 Sub-value: 2222222222222222
Record 2
002 Jane Doe [email protected] Value: Credit Card Type Sub-value: Visa Sub-value: MC
Value: Credit Card # Sub-value: 3333333333333333 Sub-value: 4444444444444444
XML Database Schemas' Relationship to Eclipse When defining XML database schemas, it is important to enter the correct attribute, value, and sub-value positions for each data definition within the schema. If the attribute or value marks are incorrect, it can cause data to be stored in the wrong position within a record in the Eclipse database. When creating your own schemas, or entering additional data definitions for existing schemas, study the record layout that you are defining data for in XML Schema Maintenance using Dictionary Maintenance.
For example, in the Contact record, attribute 7 is the contact's address information. When entering a contact in Eclipse you enter the information in the Address field, and the address can be up to two lines long. In the following example, John Doe's contact information is contained in record number 7772, and his address is 123 Anywhere Lane, #12A.

Solar Eclipse Business Connect XML Rel. 8.7.2
40 © 2011 Epicor Software Corporation. All rights reserved.
When you save the contact record in above example, the system stores the address information in attribute 7 within the contact record numbered 7772.
Attribute 7 consists of the following values, separated by a superscript 2:
• Address Line 1 which is 123 Anywhere Lane
• Address Line 2 which is #12A
The Contact XML database schema contains attribute 7 and indicates that Address Line 1 is part of attribute 7 in Eclipse, and any information entered there is saved in value 1. Address Line 2 is also part of attribute 7, that information is saved in value 2 of attribute 7.

Rel. 8.7.2 Business Connect XML
© 2011 Epicor Software Corporation. All rights reserved. 41

Solar Eclipse Business Connect XML Rel. 8.7.2
42 © 2011 Epicor Software Corporation. All rights reserved.
How XML Database Schemas Form Transactions
A transaction schema is one or more XML database schemas that define an XML transaction type. For example, Business Connect XML includes the following XML database schemas:
• Order - Includes items such as the bill-to address and the payment terms.
• OrderDetail - Contains the items being ordered, including product ID and total order quantities.
An order in the system includes the information required to ship the order and the information about what is being purchased or sold. The OrderSubmit transaction schema contains both the Order and OrderDetail database schemas to create a complete order submit transaction. An XML database schema can be included in more than one transaction schema. For example, the Order and OrderDetail schemas are also used to create an invoice transaction.
Note: Business Connect XML includes a set of predefined XML transaction types such as order submits and invoices. For a complete list of the supported customer and vendor transactions, see Sending and Receiving Customer Transactions Using XML and Sending and Receiving Vendor Transactions Using XML. You cannot create your own transaction schemas.
A transaction can be one of the following types:
• Inbound inquiry, such as a price and availability check.
• Inbound update, such as an order submit or change order from a customer or an invoice from a vendor.
• Outbound, such as a purchase order you are sending to a vendor.
Transaction Schemas and the XML Mapping Utility Transaction schemas defined in Eclipse are available for selection as transaction types in the Business Connect XML mapping utility. When you create a new transaction map in the mapping utility, select the transaction type, or schema, in the Transaction Type fields for both the received and sent documents:

Rel. 8.7.2 Business Connect XML
© 2011 Epicor Software Corporation. All rights reserved. 43
The contents of the transaction schema display as the target or source XML in the mapping utility, depending on the type of transaction you are creating and whether you are viewing the received or sent to map. In the following example, the OrderSubmit transaction schema contains the Order and OrderDetail XML database schemas.

Solar Eclipse Business Connect XML Rel. 8.7.2
44 © 2011 Epicor Software Corporation. All rights reserved.
The order detail data is stored in the table called LineItemInfo defined for the OrderDetail XML database schema's properties, and displays nested in the XML mapping utility.

Rel. 8.7.2 Business Connect XML
© 2011 Epicor Software Corporation. All rights reserved. 45

Solar Eclipse Business Connect XML Rel. 8.7.2
46 © 2011 Epicor Software Corporation. All rights reserved.
Creating XML Database Schemas
Use XML Schema Maintenance to define new XML database schemas. One way to create XML database schemas is to dictionaries directly from Eclipse files. Importing dictionaries saves you time if a similar dictionary is already defined for the XML database schema you want to create. You can also create XML database schemas from scratch without importing Eclipse dictionaries.
Note: You can also modify schemas or delete schemas using XML Schema Maintenance.
Use XML Schema Maintenance to complete the following tasks:
• Import Eclipse dictionaries to create an XML database schema.
• Create XML database schemas without importing dictionaries.
• Modify and delete XML database schemas.
Importing Eclipse dictionaries to Create an XML Database Schema Importing existing dictionaries saves you time if a similar dictionary is already defined for the XML database schema you want to create.
To import Eclipse dictionaries to create an XML database schema:
1. From the System > Custom > Add On Products > Eclipse B2B Products menu, select XML Schema Maintenance to display the XML Schema Maintenance screen.
Note: If prompted, log on to the charcter-based system.
2. In the XML Database Schema field, do one of the following:
• Type the new name of the schema that you want to create and select New.
• Press F10 to select an existing XML database schema to which you want to add information from an Eclipse dictionary.
4. In the Eclipse File field, enter or select the Eclipse file that contains the data you want to include in your schema. You can enter standard Eclipse files or user-defined files. Press F10 to select a valid file.
Press F10 for a list of files with dictionaries defined in your system.
5. Use the Import hot key to import the dictionary information for the file.
Note: If you are an internal Eclipse user, answer Yes at the Use New dictionaries Only prompt to import only the dictionaries that meet the new Eclipse dictionary naming conventions. If you are not an internal Eclipse user, you do not receive this prompt.

Rel. 8.7.2 Business Connect XML
© 2011 Epicor Software Corporation. All rights reserved. 47
6. The system displays details for each dictionary defined in the file you imported. Update the information for each line, as necessary.
Field Description XML Name The system's translation of the dictionary name into XML format and
what displays in the Business Connect XML mapping utility when mapping data to and from Eclipse data. The XML name contains no spaces, and is formatted with initial caps, for example, EmailAddress and PhoneNumber.
XML Description The description for the dictionary as defined in Dictionary Maintenance. Update the description for each line item as necessary to further clarify each piece when mapping XML data.
AM The attribute marker for the data. See Understanding Eclipse Data and XML Database Schemas for more information about attributes.
VM The value marker for the data within an attribute. See Understanding Eclipse Data and XML Database Schemas for more information about values.
SVM The sub-value marker for the data within a value. See Understanding Eclipse Data and XML Database Schemas for more information about sub-values.
7. Do the following to complete the XML database schema:
To... Do this... define XML database schema translation properties for each line
select the line for which you want to define translation properties and use the Properties hot key to display the XML Schema Properties screen. See Defining XML Database Schema Translation Properties for additional information about defining schema properties.
Note: Setting translation properties for each line is required before you can close the XML Schema Maintenance screen and compile the XML for the schema.
delete the data definitions that you do not want to map to using the Business Connect XML mapping utility
select the line to delete and press Alt + Delete. You can only delete lines that you have added. You cannot delete standard Eclipse files that provide data essential for the supported transaction sets.
modify the imported information for a data definition, such as the description listed in the XML Description field
access the field and type the new information. Any updates that you make to the XML name and XML description are made only to the schema and do not apply to the dictionary that you imported. Note: Although you can change the values for attribute marks, value marks, and any sub-value marks, we recommend that you do not do so. Changing these markers affects how data is stored.
8. Press Esc to save the schema and compile the associated XML.
Creating XML Database Schemas without Importing Dictionaries You can create XML database schemas without importing Eclipse dictionaries, however, importing dictionaries does save time when creating schemas.
Solar Eclipse Business Connect XML Rel. 8.7.2
48 © 2011 Epicor Software Corporation. All rights reserved.
To create XML database schemas without importing dictionaries:
1. From the System > Custom > Add On Products > Eclipse B2B Products menu, select XML Schema Maintenance to display the XML Schema Maintenance screen.
Note: If prompted, log on to the charcter-based system.
2. In the XML Database Schema field, type the name of the XML database schema you want to create and select New.
3. In the Eclipse File field, enter or select the Eclipse file that contains the data you want to include in your schema. You can enter standard Eclipse files or user-defined files. Press F10 to select a valid file.
4. In the XML Name field, enter the name of the data definition, such as Address1. The XML name format cannot contain spaces. Use uppercase letters to distinguish between words, such as FirstName in a contact record.
5. In the XML Description field, enter a detailed description of the data. For example, for an XML name of CreditCard, you might enter Default Credit Card Info in the XML Description field.
6. In the AM field, enter the attribute mark for the data in the Eclipse file.
7. In the VM field, enter the value mark, if any, for the data within the attribute in the Eclipse file.
8. In the SVM field, enter the sub-value mark, if any, for the data within the attribute in the Eclipse file.
9. With the line selected, use the Properties hot key and define the XML database schema translation properties.
10. Press Esc to save the schema and compile the associated XML.
Modifying and Deleting XML Database Schemas You can add data definitions for your user-defined files to the default schemas set up with your system or delete an XML database schema that is no longer valid. Ensure that any schemas you want to delete are not currently used in an XML transaction map for a trading partner.
Note: You can only delete XML database schemas that you created, not those provided by Eclipse.
To modify XML database schemas:
1. Display the character-based system.
Note: The XML database schedule functionality has not been incorporated into Solar Eclipse as of this release.
2. From the System > Custom menu, select XML Schema Maintenance to display the XML Schema Maintenance screen.
3. In the XML Database Schema field, enter or select the XML database schema you want to modify and press Enter.

Rel. 8.7.2 Business Connect XML
© 2011 Epicor Software Corporation. All rights reserved. 49
4. Do any the following to modify the XML database schema:
To... Do this... update XML database schema translation properties
select the line for which you want to define translation properties and use the Properties hot key to display the XML Schema Properties screen.
delete data definitions that you do not want to include in the schema
select the line you want to delete and press Alt + Delete. You can only delete lines that you have added. You cannot delete standard Eclipse files that provide data essential for the supported transaction sets.
modify the information for a data definition, such as, the description listed in the XML Description field
for each line you want to change, access the field and type the new information.
Note: Although you can change the values for attribute marks, value marks, and any sub-value marks, we recommend that you do not do so. Changing these markers affects how data is stored.
4. Press Esc to save your changes to the schema and to compile the new XML.
To delete XML database schemas:
1. Display the character-based system.
Note: The XML database schedule functionality has not been incorporated into Solar Eclipse as of this release.
2. From the System > Custom menu, select XML Schema Maintenance to display the XML Schema Maintenance screen.
3. In the XML Database Schema field, enter or select the XML database schema to delete and press Enter.
4. Use the Delete hot key and type Delete at the prompt to confirm the removal of the schema.

Solar Eclipse Business Connect XML Rel. 8.7.2
50 © 2011 Epicor Software Corporation. All rights reserved.
Defining XML Database Schema Translation Properties
You need to define translation properties for each attribute in an XML database schema. The translation properties indicate to the system how data is converted from XML for storage in Eclipse, and how data is converted from Eclipse for transmission using XML.
Each data definition in the database schema requires that you define the following:
• The type of data that is stored in Eclipse, such as Text or Numeric.
• The type of information that is received or sent in XML, such as String or Integer.
To define XML schema translation properties:
1. From the System > Custom menu, select XML Schema Maintenance to display the XML Schema Maintenance screen.
Note: If prompted, log on to the charcter-based system.
2. In the XML Database Schema field, enter or select the XML database schema for which you want to define properties.
The Eclipse data files and their associated XML information display for each line in the schema. See Creating XML Database Schemas for additional information.
3. Select the line for which you want to define properties and use the Properties hot key to display the XML Schema Properties screen.
4. In the attribute and sub-value fields, for example AM and SSVM, the system displays the information as it was defined in the XML Schema Maintenance screen. Update the values as necessary.
As you define the properties for the attribute, update the attribute mark, value mark, and sub-value marks as necessary for the data.
Note: Although you can change the values for attribute marks, value marks, and any sub-value marks, we recommend that you do not do so. These markers change how data is stored.
For additional information about attributes, values, and sub-values, see Eclipse Data and XML Database Schemas.
5. In the Eclipse Database Data Type field, select one of the following to identify the type of data stored:
Data Type Description Text The Eclipse data stored is a text string, such as the name or address in a
customer or contact record. If you are unsure what type of data you are defining, use Text as the default setting. In the Wrap Width field, enter the number of characters that display before wrapping occurs if the data for this field can wrap from one line to the next. In the Delimiter field, enter the character or marker in the data that indicates a new item. Typically, the delimiter for text is a value marker.

Rel. 8.7.2 Business Connect XML
© 2011 Epicor Software Corporation. All rights reserved. 51
Data Type Description Date The Eclipse data stored is a calendar date. The Domain Object Data Type
field defaults to Integer to reflect that the data for a date is a number, such as 06/04/2004.
Numeric The Eclipse data stored is a number, such as the credit limit or past due days defined for a customer in a customer record, or the unit weight for a product. If you select Numeric as the data type, indicate the number of places after the decimal the system allows in the Decim field. For example, if you are defining properties for unit weight for a product, you might determine that a product can be measured to two decimal places, such as 10.25 lbs.
Y/N Only The Eclipse data stored is yes or no, such as the flag that indicates whether the entity address should be used for a contact.
* Only The Eclipse data stored is an asterisk (*), such as, an attribute where more than one value can be set. For example, lists where you can indicate more than one option, such as indicating a bill-to/ship-to customer.
Time The Eclipse data is a time of day, such as a normal delivery time of 8:00 am for a customer or the last updated date for a contact.
Order Qty The Eclipse data stored is a product quantity on an order, such as total quantity of an item order, or a total ship quantity.
6. In the Domain Object Data Type field, the system displays the XML data type that is associated with the domain object data type you entered in the Eclipse Data Type field. You can change the value, if necessary.
Select one of the following data types:
Date type Description String The data is text, such as a contact's first name or last name. String is the
default setting for the Text Eclipse data type.
Boolean The data is a yes or no value, such as a flag that indicates whether the entity address should be used for a contact. Boolean is the default setting for the Y/N Eclipse data type.
Integer The data is a number, such as a date or a quantity. Integer is the default setting for the Date, Numeric, and Time Eclipse data types.
Real The data is a number value that is counted, such as an order quantity or a dollar amount. Real is the default setting for the Order Qty Eclipse data type.
7. To nest an XML database schema within an element in the Business Connect XML mapping utility's tree structure, enter the schema in the Pointer to Database Schema field. Use the Multi hot key to insert multiple schemas.
For example, if the bill-to address contains all the same information for an entity address, you might point the BillTo data definition to the Entity schema. When a transaction is defined that uses the schema in the Business Connect XML mapping utility, the nested element in the Pointer to Database Schema field displays as a child element.

Solar Eclipse Business Connect XML Rel. 8.7.2
52 © 2011 Epicor Software Corporation. All rights reserved.
8. If the data definition can have multiple values, continue with the procedure below. If it does not
allow multiple values, press Esc to save the property settings and return to the XML Schema Maintenance screen.
To define multiple value settings for an XML schema translation:
1. Complete the procedure above.
2. In the Can this position have Multiple Values field, enter Yes.
3. In the XML Table Name field, enter the Eclipse database table where they system stores the XML data.
For example, if you are defining properties for a contact's credit cards, your Contact XML database schema might contain two pieces of data: Credit Card Types and Credit Card Numbers. A contact can use more than one credit card to pay for orders, so the attributes contain more than one credit card type and credit card number. These values can be stored in a table called Credit Card Information with values and sub-values.
4. In the Will this Table Always contain a value field, enter Yes to indicate that the XML table you indicated in the previous field requires a value. If the table does not always need to contain a value, enter No.
5. Press Esc to save your changes and return to the XML Schema Maintenance screen.

Rel. 8.7.2 Business Connect XML
© 2011 Epicor Software Corporation. All rights reserved. 53
Business Connect XML Mapping Utility Overview
Use the Business Connect XML mapping utility to define how the system translates data transmitted using XML from your trading partners' format to a format that Eclipse can understand. Also use the mapping utility to define how the system translates data stored in Eclipse to a format that your trading partners' systems can understand.
For example, you receive orders from a trading partner in XML. You can map data in a customer order submit request from a trading partner to corresponding data elements in Eclipse that make up an Eclipse sales order. The trading partner sends data in an XML element called PurchaseOrder/CustomerIdentifiers/CustomerNum. To process the information, map that element to the OrderSubmit/Order/ShipTo data element in Eclipse.
To create an order acknowledgement response to the order request, map the Eclipse data you send to an XML element the trading partner can understand.
See the following topics to add trading partners and transactions:
• Adding and Editing XML Trading Partners
• XML Transaction Maps Overview
• Mapping XML and Eclipse Data Elements
• Valid XML Mappings and Precautions
• Creating XML Transaction Maps
• Defining XML Mapping Selection Criteria
See the following topics for additional information about the mapping utility:
• Business Connect XML Mapping Utility Main Window Aspects
• Business Connect XML Mapping Utility Symbols

Solar Eclipse Business Connect XML Rel. 8.7.2
54 © 2011 Epicor Software Corporation. All rights reserved.
Accessing the Business Connect XML Mapping Utility
The Business Connect XML mapping utility is a client application that opens outside the Eclipse Eterm and Solar Eclipse environment.
To access the Business Connect XML mapping utility:
1. From the Windows Start menu, select Programs > Eclipse > Business Connect XML Mapper.
The Eclipse Login dialog box displays.
2. In the User Name field, enter the user name you use to log in to Eclipse.
3. In the Password field, enter the password you use to log in to Eclipse.
4. Click OK to open the Business Connect XML mapping utility.
Rel. 8.7.2 Business Connect XML
© 2011 Epicor Software Corporation. All rights reserved. 55
Setting Business Connect XML Mapping Utility Preferences
Set the following preferences in the Business Connect XML mapping utility:
• Change the application server to which the mapping utility points.
• Change the default HTTP port to display the online Help system.
To change the application server settings:
1. Access the Business Connect XML mapping utility,
2. From the File menu, select Preferences to display the Preferences dialog box.
3. In the Application Server Address field, enter the IP address or domain name and the port number to the application server that is running the Business Connect XML application.
Note: The port number to the application server is 1099.
4. Click OK to save the setting and return to the main window.
To set the HTTP port for access to the online Help: Note: When you install the Business Connect XML mapping utility, it sets a default
HTTP port. Change this value if you are experiencing port conflicts.
1. Access the Business Connect XML mapping utility.
2. From the File menu, select Preferences to display the Preferences dialog box.
3. In the HTTP Port field, enter the port number to access the online Help.
4. Click OK to save the setting and return to the main window.

Solar Eclipse Business Connect XML Rel. 8.7.2
56 © 2011 Epicor Software Corporation. All rights reserved.
Adding and Editing XML Trading Partners
Before you can create transaction maps, add the XML trading partners with whom you are doing business to the Trading Partners Tree in the mapping utility. The Trading Partners Tree is a way to organize your trading partners and their associated transaction maps.
The trading partners display in the tree in the order that you add them. The system validates any trading partners you enter against the entity records in Eclipse. You can only enter customers or vendors that have a record defined within Eclipse.
To make any changes to an XML trading partner's profile, access the customer or vendor record within Eclipse. To edit the name of the trading partner in the Trading Partner Tree within the mapping utility, use the instructions below.
If a trading partner in the tree does not have any transactions defined, the system deletes the trading partner from the tree when you exit the mapping utility.
Note: Editing a trading partner name is transaction map specific. That is, you can use the editing function to move a transaction map to a different trading partner in the tree. For additional information, see the procedure below.
To add an XML trading partner in the mapping utility:
1. Access the Business Connect XML mapping utility.
2. From the File menu, select New Trading Partner to display the Trading Partner dialog box.
3. Enter the name of the customer or vendor defined in Eclipse that you want to add as an XML trading partner.
You can also enter the entity ID or the first few letters of the name and click the arrow to search for the customer or vendor.
4. Click OK to add the trading partner to the Trading Partners Tree on the left side of the main window.
The system validates the trading partner you entered against the existing customer and vendor records. If a match is not found, No Entity Found displays.
To edit the name of an XML trading partner in the mapping utility:
1. Access the Business Connect XML mapping utility.
2. Right-click a transaction in the Trading Partner Tree and select Edit Transaction Map to display the transaction map.
3. From the Edit menu, select Edit Trading Partner to display the Edit Trading Partner dialog box.
4. Enter a new trading partner name and click OK.
The system renames the trading partner, and places the selected transaction under the new name in the Trading Partner Tree, and removes it from the original trading partner name.
Note: The system validates the trading partner you entered against the Eclipse customer and vendor records. If a match is not found, No Entity Found displays.

Rel. 8.7.2 Business Connect XML
© 2011 Epicor Software Corporation. All rights reserved. 57
XML Transaction Maps Overview
Before you can begin using Business Connect XML to do business with your trading partners using XML, you need to determine what XML standard each trading partner is going to use. All XML standards have associated document type definition (DTD) files that explain the data elements in the XML documents they send you. DTD files determine what data elements your trading partners can receive from you.
What is an XML Transaction? An XML transaction can consist of the following components:
• An inbound request (received document), such as an order from a customer that contains the customer data required to enter and ship the order plus the line items for products on the order.
• An outbound request (reply document), such as an order acknowledgement that lets a customer know that you successfully received their order request.
A transaction can be an inbound-only transaction (such as an invoice you receive from a vendor) with no outbound reply document, or an outbound-only transaction (such as an invoice you send to your customer) with no inbound received document.
What is a Transaction Map? A transaction map creates an XQuery, which the system uses to translate data from an XML document to a format Eclipse can understand, or to translate Eclipse data to XML. A valid transaction map includes a received document, sent document, or both, and mapping selection criteria.
The elements defined in the DTD files from your trading partners might contain elements that are not named the same as Eclipse elements. Therefore, when you receive XML data from a trading partner or send data from Eclipse to a trading partner the system needs to know which elements to associate with elements in Eclipse. A transaction map associates the elements from a trading partner's XML document to the elements in Eclipse.
For example, your trading partner sends the purchase order number information in an order request in an element called PONum. Eclipse stores PO number or order number address information in the CustomerPONumber element in the database. Therefore, you need to associate the element from the DTD file to the corresponding element in Eclipse. Using the Business Connect XML mapping utility, you can make that association by drawing a line between the two elements, as shown in the following illustration:

Solar Eclipse Business Connect XML Rel. 8.7.2
58 © 2011 Epicor Software Corporation. All rights reserved.
Define a transaction map for each transaction type for each trading partner with which you do business using XML. For instructions to create a complete transaction map, see Creating XML Transaction Maps.
What if the Data Sent and Received is in Different Formats? At times, your trading partners might define data in a different format than how Eclipse can store it. For example, you have a trading partner that defines dates in the mm/dd/yy format, where Eclipse stores dates in the mm/dd/yyyy format. Or, you have a trading partner that defines the unit of measure of each as "each" where Eclipse stores the same unit of measure as "ea."
To process XML transactions successfully, you might need to manipulate incoming or outgoing data to match the intended format. The system translates the data to the new format before saving it or sending it. You can modify each element in the Target XML column of a transaction for both the received document map and the sent document map using operations such as concatenation, adding, subtracting, and defining table-based conversions. For additional information about how to manipulate the XML data for translation, see Modifying Incoming and Outgoing XML Data.
How Does the System Know to Use the Map I Defined? You might have trading relationships with many customers and vendors, therefore receiving and sending multiple XML documents to and from different trading partners in one day. As the system receives and sends XML transactions, it scans the XML documents for an element or a value that you define per transaction for each trading partner. This element or value tells the system which trading partner is sending or receiving the XML document and which transaction map to use to translate the XML.
For example, trading partner ABC Company sends you order requests with the following data elements within the XML:
HeaderBlock
From
To
CustomerIdentifiers
CompanyName
Rel. 8.7.2 Business Connect XML
© 2011 Epicor Software Corporation. All rights reserved. 59
CustomerNum
ItemList
.
.
If ABC Company is the only trading partner you have that sends you an XML document with the CustomerNum element, you can tag that element in the transaction map as the indicator. When the system receives the XML, it scans the content of the request and knows it is from ABC Company when it reaches the CustomerNum element and also knows to use the map you have defined for an order request transaction from ABC Company. However, if ABC Company sends you multiple XML documents that contain the CustomerNum element, defining the element itself does not provide the system enough information to distinguish the map. In this case, or if you have another trading partner that uses the same element, define a value sent in the element as the map indicator.
For each transaction map that you create, define an element tag as the indicator or a value as the indicator.

Solar Eclipse Business Connect XML Rel. 8.7.2
60 © 2011 Epicor Software Corporation. All rights reserved.
Mapping XML and Eclipse Data Elements
The Business Connect XML mapping utility provides a way to connect source and target elements using drag and drop functionality. The mapping utility represents each connection using a line that you draw from the Source XML column to the Target XML column. Each connection is also represented in the preview pane of the mapping utility main window. For more information about the mapping utility, see Business Connect XML Mapping Utility Overview. For more information about transaction maps, see XML Transaction Maps Overview.
Bold elements in a trading partner's DTD indicate elements that are required for the transaction.
See the following instructions to map elements:
• Map source and target elements (one-to-one, one-to-many, and many-to-one relationships).
• Map repeating groups to non-repeating groups (many-to-one relationships).
• Delete element mappings.
To map source and target elements (one-to-one, one-to-many, and many-to-one relationships):
1. Access the Business Connect XML mapping utility.
2. Right-click a transaction in the Trading Partner Tree and select Edit Transaction Map to display the transaction map.
Note: Expand the elements as necessary to access nested elements.
3. In the Source XML column, select the element you want to connect to a target element.
4. Click and drag the selected source element to the element in the Target XML column to which you want to connect the source element.
The system draws a line from the source element through the Mapping column to the target element and highlights the elements mapped together.
Note: You can also view the map in column format using the Mapping Preview pane.
To map repeating groups (many-to-one relationships):
1. Access the Business Connect XML mapping utility.
2. Right-click a transaction in the Trading Partner Tree and select Edit Transaction Map to display the transaction map.
Note: Expand the elements as necessary to access nested elements.
3. In the Source XML column, select the repeating element you want to connect to a target element.
Note: Repeating groups are identified in a DTD file with a plus (+) after the element.
4. Click and drag the selected source element to the element in the Target XML column to which you want to connect the source element.
The Repeating Group Selection dialog box displays with the source element listed in the Group Name field.

Rel. 8.7.2 Business Connect XML
© 2011 Epicor Software Corporation. All rights reserved. 61
5. In the Occurrence field, indicate the occurrence number that you want to map to the target element.
For example, a trading partner sends you contact telephone numbers in an element called ContactNumber nested in an element called Contact. The ContactNumber is a repeating group that can occur one or multiple times:
• The first time it occurs, the telephone number it contains is the contact's business phone number.
• The second time it occurs, the telephone number it contains is the contact's mobile phone number.
• The third time it occurs, the telephone number it contains is the contact's home phone number.
You want to map the contact's business phone number to a target data element. In this example, enter 1 in the Occurrence field to indicate that you want to map the first occurrence of the repeating group to capture the business telephone number.
6. Click OK to save the information and return to the mapping utility main window.
To delete element mappings:
1. Access the Business Connect XML mapping utility.
2. Right-click a transaction in the Trading Partner Tree and select Edit Transaction Map to display the transaction map.
Note: Expand the elements as necessary to access nested elements.
3. In the Target XML column, right-click the element whose connection you want to remove and select Remove Mapping.
The system removes the connection between the source element and the target element.

Solar Eclipse Business Connect XML Rel. 8.7.2
62 © 2011 Epicor Software Corporation. All rights reserved.
Valid XML Mappings and Precautions
When creating maps between XML elements and Eclipse database elements, every line you draw represents a movement of data from an XML document to Eclipse, or from Eclipse to an XML document being sent to your customers' or vendors' systems.
You can create maps from almost any source element to almost any target element. Be sure to make the connections in a logical manner. For example, do not map elements to the BillTo element in Eclipse. Any data you map to the BillTo element overwrites the BillTo information you have stored in the customer record for the trading partner. Instead, map a customer number or ID to the ShipTo element. The system verifies that the incoming number or ID is valid and matches a customer ID or e-commerce ID in the system and then populates the BillTo information from the customer record.
Note: If an XML element in the document type definition (DTD) file for a received or sent document has nested elements, the mapping utility might not allow you to draw a connection from or to the parent element. Expand the element to map the nested children, if necessary.
The symbols that display for a DTD file in the mapping utility indicate what types of data can be transmitted in the corresponding XML document. For example, items on an order request might be indicated with a plus sign (+) in the mapping utility, indicating that they are a repeating group. The repeating group symbol means that the element can occur multiple times within the XML document.
Mapping Fields with Modified Data As you create your transaction maps, note that any field that you map and add data modifications to must be contained in the XML document you send or receive. The field in the XML document can be blank; however, if the tag does not exist in the XML document for a mapped field, the system gives you an error.
Mapping Repeating Groups In creating your transaction maps, take into consideration how repeating groups are stored in Eclipse. For example, the data element called Item in a customer's DTD file likely contains additional nested elements such as ItemNum and Description. You can logically map these elements to the ProductID and ProductKeywords database elements in Eclipse, thus, creating a logical map where the system can store the information from the repeating group.
You can map the following:
• A single element from the source to a single element in the target (one-to-one mapping).
• A single element from the source to multiple elements in the target (one-to-many mapping).
• Multiple elements from the source to a single field in the target (many-to-one mapping). The system concatenates each element from the source into the target element.
Note: A valid transaction map includes an inbound request, an outbound request, or both, and mapping selection criteria. Inbound and outbound documents can be one directional, that is, inbound only or outbound only.

Rel. 8.7.2 Business Connect XML
© 2011 Epicor Software Corporation. All rights reserved. 63
Required XML Transaction Data
When creating maps between XML elements and Eclipse database elements, some transaction types have data that is required to send the transaction through the system.
• Required data for customer transactions.
• Required data for vendor transactions.
Required Data for Customer Transactions The following data is required for transactions you send to or receive from your customers:
Transaction Type Required Data Mapped to Eclipse Order Submit Request for Quote
• ShipTo - Can be either the Eclipse ID or the customer e-commerce ID.
• ProductIdentifier - Can be the UPC, product keywords, product ID, or the customer part number.
• TotalQty - Defaults to one each for each product if you do not map data to this element, or if this element is mapped but the XML document contains no data.
Product Inquiry • ProductIdentifier - Can be the UPC, product keywords, product ID, or customer part number.
Order Inquiry • OrderID.
Change Order Request • ChangeType - Free form text is allowed. • OrderID or CustomerPONumber. • Any elements that identify the changes to the order.

Solar Eclipse Business Connect XML Rel. 8.7.2
64 © 2011 Epicor Software Corporation. All rights reserved.
Required Data for Vendor Transactions The following data is required for transactions you send to or receive from your vendors:
Transaction Type Required Data Mapped to Eclipse Order Acknowledgement Advance Ship Notice Invoice
• OrderID. • PayTo or ShipFrom. • ProductIdentifier - Can be the UPC code, product ID, customer
part number, or vendor catalog number. • TotalQty - The total quantity on the order.
When creating a transaction map for an order acknowledgement that you receive from your vendor, map the full ordered quantity from the vendor's DTD to TotalQty in Eclipse. If the full order quantity is not filled in and not correct, the system cannot match the acknowledgement to an order in your system. When creating a transaction map for an invoice that you receive from your vendor, map the number being shipped from the vendor's DTD to TotalQty in Eclipse.
Note: TotalQty and InStockShipQty are located under OrderDetail in the Vendor Order Acknowledgement transaction type.
• InStockShipQty - Quantity available for shipment. When creating a transaction map for ab order acknowledgements that you receive from your vendor, map the total number of items being acknowledged from the vendor's DTD to the InStockShipQty in Eclipse. If the full order quantity is not filled in and not correct, the system cannot match the acknowledgement to an order in your system.
Note: TotalQty and InStockShipQty are located under OrderDetail in the Vendor Order Acknowledgement transaction type.
Direct Order Submit • ShipTo - Located under the CustomerSalesOrderID element in a vendor direct order submit transaction. The CustomerSalesOrderID element references the header information specific to the customer receiving the items on the direct order.
• BillTo - Located under the CustomerSalesOrderID element in a vendor direct order submit transaction. The CustomerSalesOrderID element references the header information specific to the customer receiving the items on the direct order.

Rel. 8.7.2 Business Connect XML
© 2011 Epicor Software Corporation. All rights reserved. 65
Creating XML Transaction Maps
Use the Business Connect XML mapping utility to create a relationship between the document type definition (DTD) files you receive from your trading partners and Eclipse data. Define the relationship by creating a transaction map.
Creating an XML transaction map requires completing the following tasks:
• Defining transaction types and selecting DTD files
• Mapping the received XML
• Mapping the sent or reply XML
• Defining mapping selection criteria
To better understand the layout of the mapping utility, see Business Connect XML Mapping Utility Main Window Aspects.
Note: If you need to modify the XML data, modify the mapping characteristics after creating the XML transaction map.
Defining Transaction Types and Selecting DTD Files Create transaction maps for each transaction you want to trade with each trading partner. Before you can create a transaction map, you must work with your trading partner to obtain DTD files and document specifications. DTD files define the data that is contained within each document you trade using XML. For more information, see Getting Started with Business Connect XML.
A transaction can be a received-only transaction with no reply document, or a sent-to only transaction with no received document.
To define the transaction type and select the DTD files:
1. Access the Business Connect XML mapping utility and select the trading partner for which you want to define a transaction.
2. Right-click the trading partner and select New Transaction Map to display the New Transaction Map dialog box.
3. In the Transaction Name field, enter the name of the transaction, such as Purchase Order. The name you enter here displays in the Trading Partners Tree under the trading partner.
4. In the Transaction Source field, enter the portal or marketplace the trading partner uses for the transaction. Entering a transaction source allows you to sort by the source in the remote review queues within Eclipse.

Solar Eclipse Business Connect XML Rel. 8.7.2
66 © 2011 Epicor Software Corporation. All rights reserved.
5. Based on the trading partner for which you are creating the transaction map, the New Transaction Map dialog box displays fields specific to customers or vendors. Enter the transaction type and DTD information in the fields for a customer or vendor transaction.
Vendor Transaction Type
Description
Document sent to the vendor and a reply document received from the vendor
(outbound with an inbound response)
1. In the Transaction Type field in the Document Sent to Vendor area of the New Transaction Map dialog box, select the transaction type of the document you receive from your vendor. For example, if you are creating a map for a purchase order transaction, select Order Submit as the type in the Transaction Type field. Your selection populates the Source XML column in the mapping utility's main window for the sent document map and determines which elements in Eclipse are available. For additional information about how your selections display in the main window, see Understanding the Business Connect XML Mapping Utility. The options available in the Transaction Type field are defined in XML database schemas.
2. In the Vendor's DTD field in the Document Sent to Vendor area, enter the path to the DTD file your trading partner provided you for this transaction type. The DTD you enter here populates the Target XML column in the mapping utility's main window for the sent document map. Click Browse to select the field.
3. In the Transaction Type field in the Reply Document Received from Vendor area, select the transaction type of the reply document your vendor sends to you. For example, if you are creating a map for a purchase order transaction, select Order SubmitResponse as the type in the Transaction Type field. Your selection populates the Target XML column in the mapping utility's main window for the received document map and determines which elements in Eclipse are available. For additional information about how your selections display in the main window, see Understanding the Business Connect XML Mapping Utility. The options available in the Transaction Type field are defined in XML database schemas.
4. In the Vendor's DTD field in the ReplyDocument Received from Vendor area, enter the path to the DTD file your trading partner provided you for this transaction type. The DTD you enter here populates the Source XML column in the mapping utility's main window for the received document map. Click Browse to select the file.

Rel. 8.7.2 Business Connect XML
© 2011 Epicor Software Corporation. All rights reserved. 67
Vendor Transaction Type
Description
Document sent to the vendor, but no reply document received from the vendor (outbound only)
5. In the Transaction Type field in the Document Sent to Vendor area of the New Transaction Map dialog box, select the transaction type of the document you receive from your vendor. For example, if you are creating a map for a purchase order transaction, select Order Submit as the type in the Transaction Type field. Your selection populates the Source XML column in the mapping utility's main window for the sent document map and determines which elements in Eclipse are available. For additional information about how your selections display in the main window, see Understanding the Business Connect XML Mapping Utility. The options available in the Transaction Type field are defined in XML database schemas.
6. In the Vendor's DTD field in the Document Sent to Vendor area, enter the path to the DTD file your trading partner provided you for this transaction type. The DTD you enter here populates the Target XML column in the mapping utility's main window for the sent document map. Click Browse to select the file.
7. In the Reply Document Received from Vendor area, select the No Reply Will Be Received check box to indicate that the vendor does not send a reply to your request. When your vendor's system receives your XML document, it sends an immediate HTTP Status 200 message back to your system. The Status 200 message indicates that the system received your request. The Document Received From Vendor tab is disabled for the transaction map.
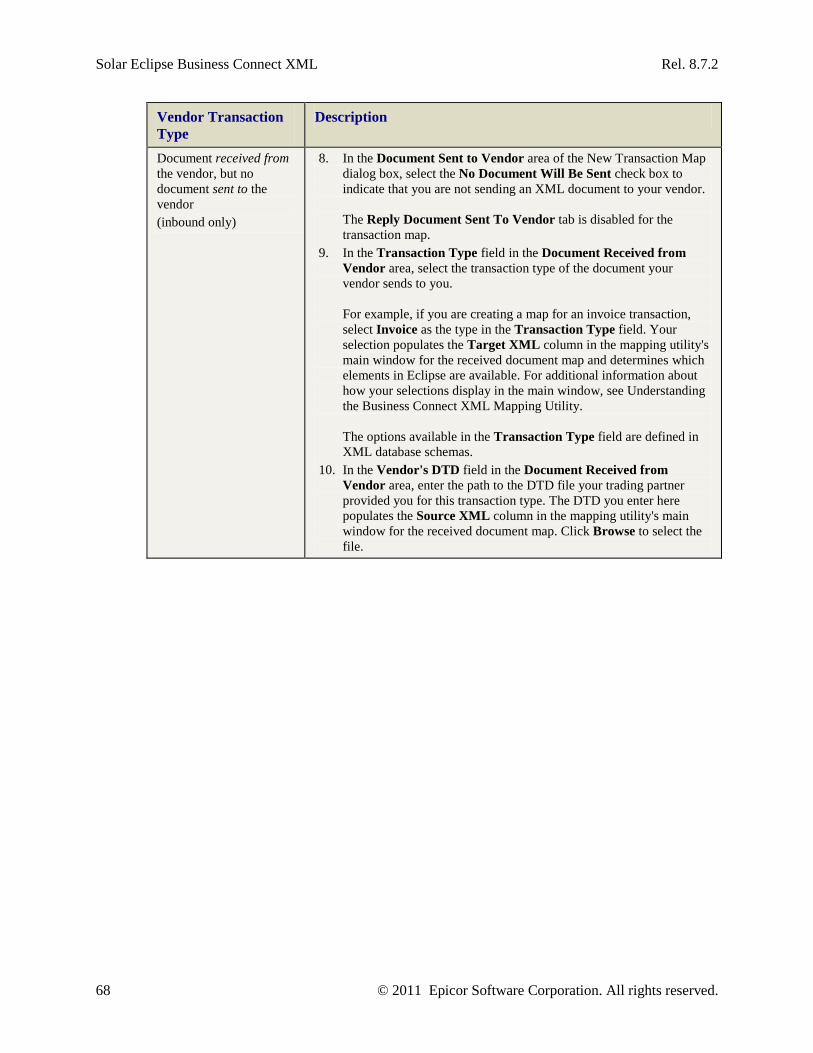
Solar Eclipse Business Connect XML Rel. 8.7.2
68 © 2011 Epicor Software Corporation. All rights reserved.
Vendor Transaction Type
Description
Document received from the vendor, but no document sent to the vendor (inbound only)
8. In the Document Sent to Vendor area of the New Transaction Map dialog box, select the No Document Will Be Sent check box to indicate that you are not sending an XML document to your vendor. The Reply Document Sent To Vendor tab is disabled for the transaction map.
9. In the Transaction Type field in the Document Received from Vendor area, select the transaction type of the document your vendor sends to you. For example, if you are creating a map for an invoice transaction, select Invoice as the type in the Transaction Type field. Your selection populates the Target XML column in the mapping utility's main window for the received document map and determines which elements in Eclipse are available. For additional information about how your selections display in the main window, see Understanding the Business Connect XML Mapping Utility. The options available in the Transaction Type field are defined in XML database schemas.
10. In the Vendor's DTD field in the Document Received from Vendor area, enter the path to the DTD file your trading partner provided you for this transaction type. The DTD you enter here populates the Source XML column in the mapping utility's main window for the received document map. Click Browse to select the file.
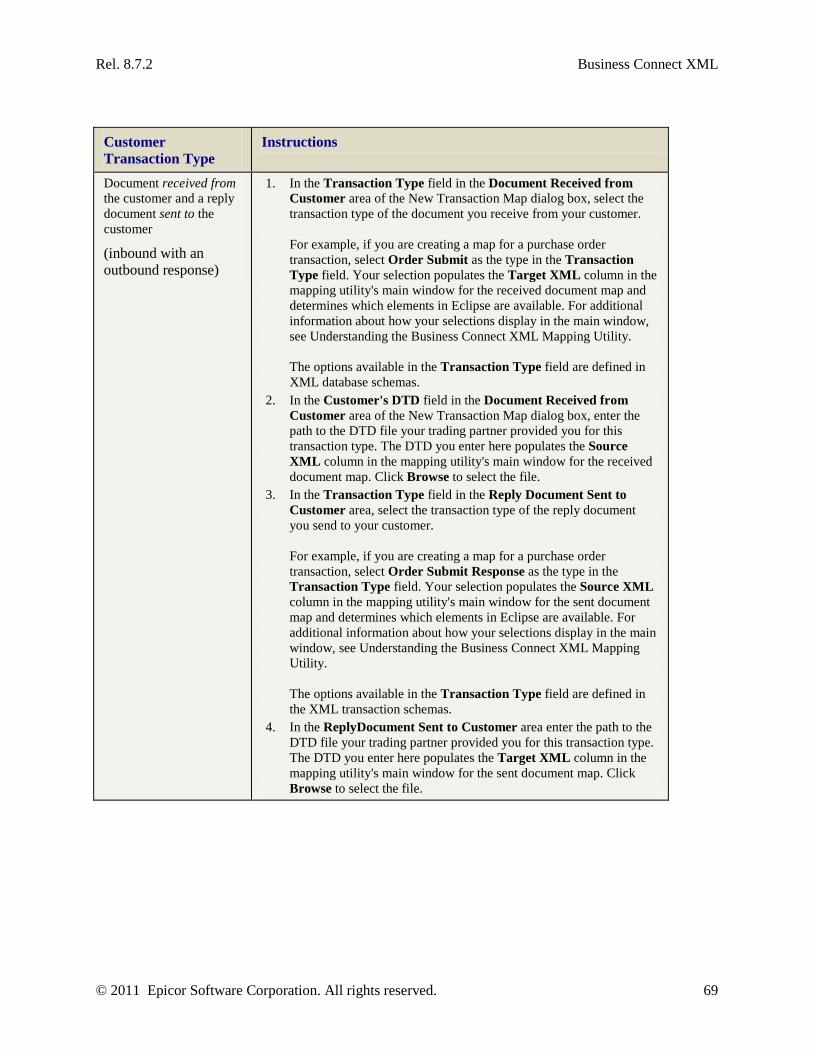
Rel. 8.7.2 Business Connect XML
© 2011 Epicor Software Corporation. All rights reserved. 69
Customer Transaction Type
Instructions
Document received from the customer and a reply document sent to the customer
(inbound with an outbound response)
1. In the Transaction Type field in the Document Received from Customer area of the New Transaction Map dialog box, select the transaction type of the document you receive from your customer. For example, if you are creating a map for a purchase order transaction, select Order Submit as the type in the Transaction Type field. Your selection populates the Target XML column in the mapping utility's main window for the received document map and determines which elements in Eclipse are available. For additional information about how your selections display in the main window, see Understanding the Business Connect XML Mapping Utility. The options available in the Transaction Type field are defined in XML database schemas.
2. In the Customer's DTD field in the Document Received from Customer area of the New Transaction Map dialog box, enter the path to the DTD file your trading partner provided you for this transaction type. The DTD you enter here populates the Source XML column in the mapping utility's main window for the received document map. Click Browse to select the file.
3. In the Transaction Type field in the Reply Document Sent to Customer area, select the transaction type of the reply document you send to your customer. For example, if you are creating a map for a purchase order transaction, select Order Submit Response as the type in the Transaction Type field. Your selection populates the Source XML column in the mapping utility's main window for the sent document map and determines which elements in Eclipse are available. For additional information about how your selections display in the main window, see Understanding the Business Connect XML Mapping Utility. The options available in the Transaction Type field are defined in the XML transaction schemas.
4. In the ReplyDocument Sent to Customer area enter the path to the DTD file your trading partner provided you for this transaction type. The DTD you enter here populates the Target XML column in the mapping utility's main window for the sent document map. Click Browse to select the file.
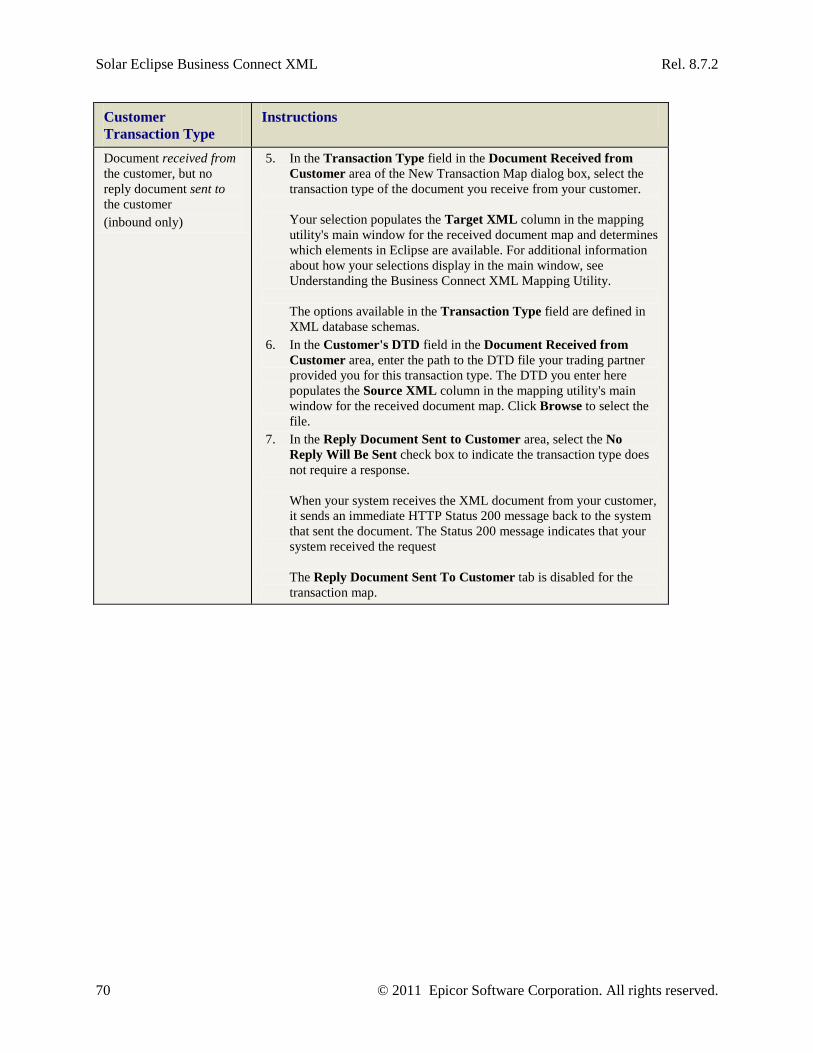
Solar Eclipse Business Connect XML Rel. 8.7.2
70 © 2011 Epicor Software Corporation. All rights reserved.
Customer Transaction Type
Instructions
Document received from the customer, but no reply document sent to the customer (inbound only)
5. In the Transaction Type field in the Document Received from Customer area of the New Transaction Map dialog box, select the transaction type of the document you receive from your customer. Your selection populates the Target XML column in the mapping utility's main window for the received document map and determines which elements in Eclipse are available. For additional information about how your selections display in the main window, see Understanding the Business Connect XML Mapping Utility. The options available in the Transaction Type field are defined in XML database schemas.
6. In the Customer's DTD field in the Document Received from Customer area, enter the path to the DTD file your trading partner provided you for this transaction type. The DTD you enter here populates the Source XML column in the mapping utility's main window for the received document map. Click Browse to select the file.
7. In the Reply Document Sent to Customer area, select the No Reply Will Be Sent check box to indicate the transaction type does not require a response. When your system receives the XML document from your customer, it sends an immediate HTTP Status 200 message back to the system that sent the document. The Status 200 message indicates that your system received the request The Reply Document Sent To Customer tab is disabled for the transaction map.

Rel. 8.7.2 Business Connect XML
© 2011 Epicor Software Corporation. All rights reserved. 71
Customer Transaction Type
Instructions
No document received from the customer, but a document is sent to the customer (outbound only)
8. In the Document Received from Customer area of the New Transaction Map dialog box, select the No Document Will Be Received check box to indicate the transaction does not have an inbound transaction type, such as sending an invoice to your customer. The Document Received From Customer tab is disabled for the transaction map.
9. In the Transaction Type field in the Document Sent to Customer area, select the transaction type for the document you send to your customer. For example, if you are creating a map to send an invoice to your customer, select Invoice as the type in the Transaction Type field. Your selection populates the Source XML column in the mapping utility's main window for the sent document map and determines which elements in Eclipse are available. For additional information about how your selections display in the main window, see Understanding the Business Connect XML Mapping Utility. The options available in the Transaction Type field are defined in XML database schemas.
10. In the Customer's DTD field in the Document Sent to Customer area, enter the path to the DTD file your trading partner provided you for this transaction type. The DTD you enter here populates the Target XML column in the mapping utility's main window for the sent document map. Click Browse to select the file.
7. Click OK to add the transaction under the trading partner in the Trading Partner Tree.
8. If the transaction has a received document, continue with Mapping the Received XML. If the transaction does not have a received document, continue with Mapping the Reply/Sent XML.
Mapping the Received XML If the transaction you are mapping contains a received document, map the received DTD elements from your trading partner to the Eclipse database elements available for the transaction type. If the transaction you are mapping does not contain a received transaction type, the Document Received From Customer/Vendor tab of the mapping utility is disabled.
Note: The tab name changes based on whether you are creating a customer or vendor transaction map.
To map the request XML:
1. If the transaction you want to map is not open, right-click the transaction in the Trading Partners Tree and select Edit Transaction Map.
2. Select the Document Received From Customer/Vendor tab to display the DTD for the source XML and the elements in Eclipse to which you can map the data.
Solar Eclipse Business Connect XML Rel. 8.7.2
72 © 2011 Epicor Software Corporation. All rights reserved.
3. Map elements from the Source XML column to elements in the Target XML column. For additional information about how to map and guidelines for creating valid mapping connections, see Mapping XML and Eclipse Data Elements.
4. Modify the mapping characteristics, as necessary.
5. If the transaction has an outgoing transaction type, continue with Mapping the Reply/Sent XML. If the transaction is a received-only transaction type, continue with Defining XML Mapping Selection Criteria.
Mapping the Reply/Sent XML If the transaction you are mapping contains a document you are sending to a customer or vendor, map Eclipse elements available for the transaction type to the elements in the response DTD from your trading partner. If the transaction you are mapping does not contain a reply/sent transaction type, the Document Sent to Customer/Vendor tab of the mapping utility is disabled.
Note: The tab name changes based on whether you are creating a customer or vendor transaction map.
To map the reply/sent XML:
1. If the transaction you want to map is not open, right-click the transaction in the Trading Partners Tree and select Edit Transaction Map.
2. Select the Document Sent To Customer/Vendor tab to display the DTD for the reply/sent XML and the data elements in Eclipse from which you map the outgoing data.
3. Map Eclipse database elements in the Source XML column to the data elements in the response DTD in the Target XML column. For additional information about how to map and guidelines for creating valid mapping connections, see Mapping XML and Eclipse Data Elements.
4. Modify the mapping characteristics, as necessary.
5. Define the XML mapping selection criteria.
6. From the File menu, select Save Transaction Map to save the map.

Rel. 8.7.2 Business Connect XML
© 2011 Epicor Software Corporation. All rights reserved. 73
Adding and Editing Source Distinctions in XML Transaction Maps
When you create your transaction maps, you can associate each map to a source, such as a portal or marketplace, or to a general specification, such as xCBL or cXML. You might have more than one trading partner that trades through a portal or marketplace or more than one trading partner that uses the same XML specifications. Assign a transaction source and use that source to filter what displays in Remote Archive Maintenance. For example, if you have three trading partners that are using a source, such as iProcure, you can filter the remote archive to display only transactions that are sent through that source, and the system displays transactions from all three trading partners that were sent through the same source.
To add a source distinction to an XML transaction map:
1. Access the Business Connect XML mapping utility and select the trading partner for which you want to define a transaction.
2. Create a new transaction map.
3. In the Transaction Source field, click the down arrow to select the portal or marketplace used for the transaction.
The Selection dialog box displays.
4. Do one of the following:
• Select an existing source name – Select a name in the list to add it to the Transaction Source field in the New Transaction Map dialog box.
• Create a new source name – Click Create New and enter the new source name. Click OK to add it to the Transaction Source field in the New Transaction Map dialog box. The name is also added to the selection list for future transactions.
5. Continue creating the transaction map.
To edit a transaction source:
1. Access the Business Connect XML mapping utility.
2. Right-click the transaction in the Trading Partner Tree that you want to rename and select Edit Transaction Map to display the transaction map.
3. From the Edit menu, select Edit Transaction Source to display the Mapping Source dialog box.
4. Enter or select a new source and click OK.
5. The system updates the transaction source for the transaction map.
Solar Eclipse Business Connect XML Rel. 8.7.2
74 © 2011 Epicor Software Corporation. All rights reserved.
Defining XML Mapping Selection Criteria
You might have trading relationships with many customers and vendors, therefore receiving and sending multiple XML documents to and from different trading partners in one day. As the system receives and sends XML transaction requests, it scans the XML for an element or a value that you define per transaction for each trading partner. This element or value tells the system which trading partner is sending or receiving the XML document and which transaction map to use to translate the XML.
Note: You must define the mapping selection criteria before you can save a transaction map.
For each transaction map for each trading partner, define one of the following:
• Element tag as the selection indicator.
• Value as the selection indicator.
Note: For a purchase order that you send to your vendor, use only the PayTo and ShipFrom elements as selection criteria.
To define an element tag as the selection indicator:
1. Access the Business Connect XML mapping utility.
2. Right-click a transaction in the Trading Partner Tree and select Edit Transaction Map to display the transaction map.
3. Select the Mapping Selection Criteria tab to display the available elements to define as map indicators.
If the transaction map is a received transaction type, the content of the DTD for the received document displays in this tab. If the transaction map is a sent-only transaction type, the content of the DTD for the sent document displays.
4. Right-click the element to use as the indicator and select Set Selection Criteria to display the Selection Criteria dialog box.
5. Select the This Tag Exists option to indicate that the system should look only for this tag, not a value associated with this tag.
6. Click OK to save the setting and return to the Mapping Selection Criteria tab.
The option you selected displays with a red highlight.
7. From the File menu, select Save Transaction Map to save the map settings.
Note: To change the indicator, repeat steps 3 through 6.
To define a value as the selection indicator:
1. Access the Business Connect XML mapping utility.
2. Right-click a transaction in the Trading Partner Tree and select Edit Transaction Map to display the transaction map.
3. Select the Mapping Selection Criteria tab to display the available elements to define as map indicators.

Rel. 8.7.2 Business Connect XML
© 2011 Epicor Software Corporation. All rights reserved. 75
If the transaction map is a received transaction type, the content of the DTD for the received document displays in this tab. If the transaction map is a sent-only transaction type, the content of the DTD for the sent document displays.
4. Right-click the element to use as the indicator and select Set Selection Criteria to display the Selection Criteria dialog box.
5. Select the This Tag Exists With Values option to indicate that the system should look for values defined within the element.
6. In the Value field, enter the value the system uses to identify this trading partner and press Enter to add the value to the list.
7. Repeat steps 5 and 6 to add additional values, as necessary.
Note: To delete a value from the list, select the value and click the X button.
8. Click OK to save the setting and return to the Mapping Selection Criteria tab.
The option you selected displays with a red highlight.
9. From the File menu, select Save Transaction Map to save the map settings.
Note: To change the indicator, repeat steps 3 through 8.
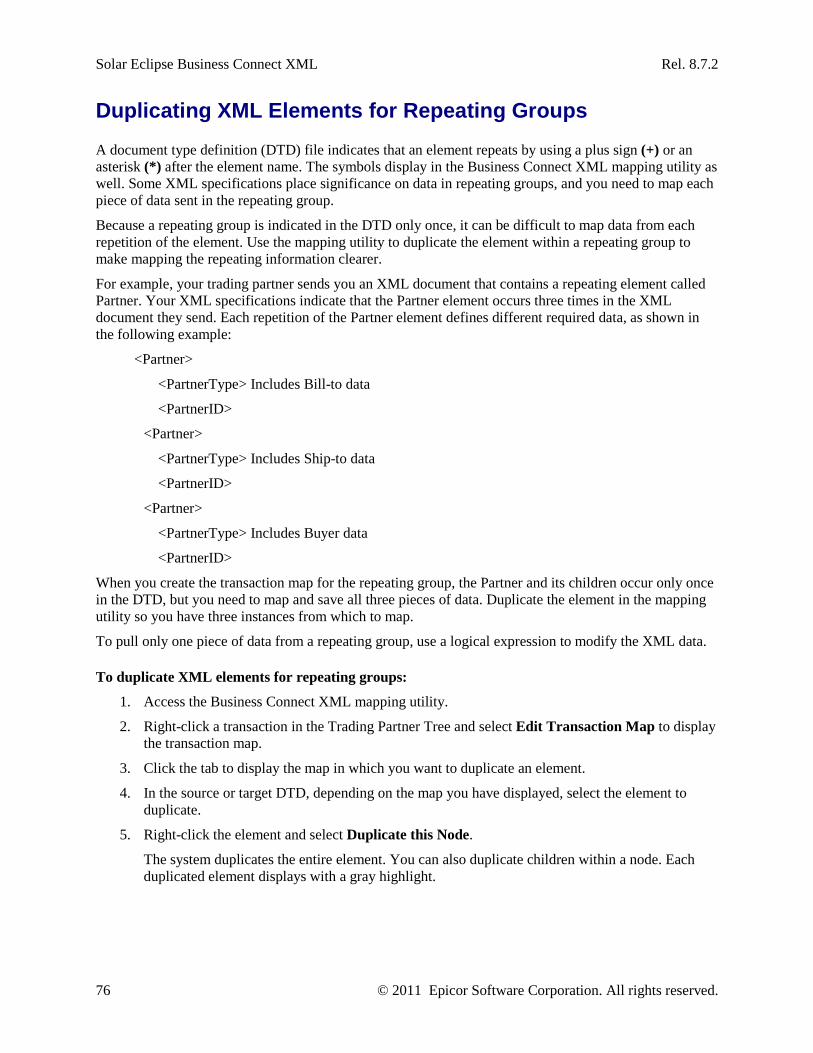
Solar Eclipse Business Connect XML Rel. 8.7.2
76 © 2011 Epicor Software Corporation. All rights reserved.
Duplicating XML Elements for Repeating Groups
A document type definition (DTD) file indicates that an element repeats by using a plus sign (+) or an asterisk (*) after the element name. The symbols display in the Business Connect XML mapping utility as well. Some XML specifications place significance on data in repeating groups, and you need to map each piece of data sent in the repeating group.
Because a repeating group is indicated in the DTD only once, it can be difficult to map data from each repetition of the element. Use the mapping utility to duplicate the element within a repeating group to make mapping the repeating information clearer.
For example, your trading partner sends you an XML document that contains a repeating element called Partner. Your XML specifications indicate that the Partner element occurs three times in the XML document they send. Each repetition of the Partner element defines different required data, as shown in the following example:
<Partner>
<PartnerType> Includes Bill-to data
<PartnerID>
<Partner>
<PartnerType> Includes Ship-to data
<PartnerID>
<Partner>
<PartnerType> Includes Buyer data
<PartnerID>
When you create the transaction map for the repeating group, the Partner and its children occur only once in the DTD, but you need to map and save all three pieces of data. Duplicate the element in the mapping utility so you have three instances from which to map.
To pull only one piece of data from a repeating group, use a logical expression to modify the XML data.
To duplicate XML elements for repeating groups:
1. Access the Business Connect XML mapping utility.
2. Right-click a transaction in the Trading Partner Tree and select Edit Transaction Map to display the transaction map.
3. Click the tab to display the map in which you want to duplicate an element.
4. In the source or target DTD, depending on the map you have displayed, select the element to duplicate.
5. Right-click the element and select Duplicate this Node.
The system duplicates the entire element. You can also duplicate children within a node. Each duplicated element displays with a gray highlight.
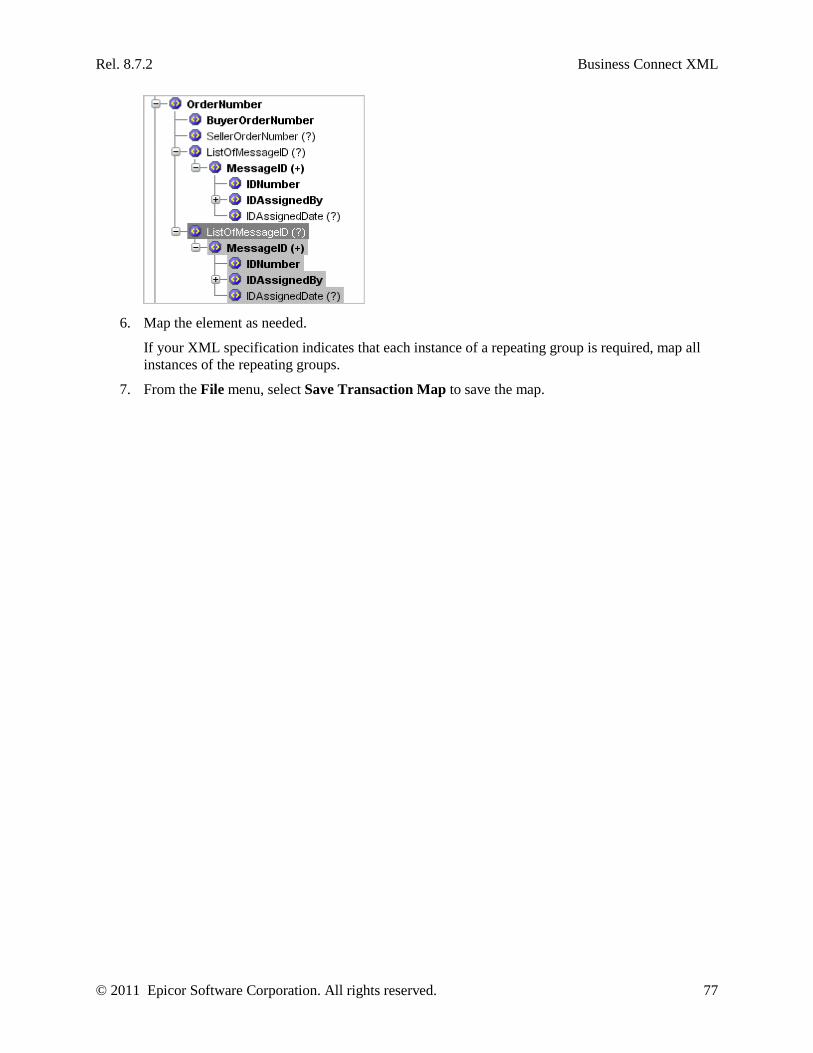
Rel. 8.7.2 Business Connect XML
© 2011 Epicor Software Corporation. All rights reserved. 77
6. Map the element as needed.
If your XML specification indicates that each instance of a repeating group is required, map all instances of the repeating groups.
7. From the File menu, select Save Transaction Map to save the map.

Solar Eclipse Business Connect XML Rel. 8.7.2
78 © 2011 Epicor Software Corporation. All rights reserved.
Searching for XML Elements in Transaction Maps
You can have lengthy document definition files (DTD) files or the list of elements in Eclipse can be lengthy. You can search for text in either the Source XML column or the Target XML column in a transaction map. You can also search for elements in the Mapping Selection Criteria tab.
To search for XML elements in transaction maps:
1. Access the Business Connect XML mapping utility.
2. Right-click a transaction in the Trading Partner Tree and select Edit Transaction Map to display the transaction map.
3. From the Options menu, select Find.
Note: If you want to search the contents of Mapping Selection Criteria tab, select that tab and then select Find from the Options menu. Continue with step 5.
4. Click the button corresponding to the column you want to search, Source or Target, to display the Tree Node Search dialog box.
5. In the Search Text field, enter the text you want to find.
6. In the Deepest Tree Level field, enter the number of levels deep you want to search.
For example, you might have a DTD file from a trading partner that has a data element structured as follows:
ItemList
Item
ItemNum
Attachments
Attachment
URL
The <URL> element is six levels deep. If you enter 3 in the Deepest Tree Level field and search for URL, the search will not locate the element, because it is six levels deep.
7. Click Search to find the first occurrence of the text in the column you selected. The system highlights the first occurrence.
8. Click Search Next to find the next occurrence.
9. Click Cancel in the Tree Node Search dialog box to return to the main window.

Rel. 8.7.2 Business Connect XML
© 2011 Epicor Software Corporation. All rights reserved. 79
Adding HTTP Headers to XML Transaction Maps
Your trading partners might require that you add security or other information to an XML document in the form of an HTTP header. Including an HTTP header section in an XML document allows your trading partner's system to examine the information in the header prior to opening the XML document. An XML document can include more than one HTTP header section.
When you preview the XML translation for the transaction map containing an HTTP header, the HTTP header displays as part of the XML in the response document. When the XML is transformed and sent to your trading partner, the system extracts the information and adds it to the HTTP headers in the HTTP transaction.
Note: You can add HTTP header information only to transaction maps for outgoing XML documents.
To add an HTTP header to an XML transaction map:
1. Access the Business Connect XML mapping utility.
2. Right-click a transaction in the Trading Partner Tree and select Edit Transaction Map to display the transaction map.
3. Click the Document Sent to Customer/Vendor tab to display the DTD for the reply/sent XML.
4. In the Target XML column, right-click any element and select Add HTTP Header Info to display the Add HTTP Header Info dialog box.
The default element name displays.
5. Update the element name, as needed. We recommend you use the default element name.
6. Click OK to add the HTTP header element to the Target XML column.
7. Map the element, as needed.
8. Modify the mapping characteristics, as needed.
9. From the File menu, select Save Transaction Map to save the map.
To delete an HTTP header from an XML transaction map:
1. Access the Business Connect XML mapping utility.
2. Right-click a transaction in the Trading Partner Tree and select Edit Transaction Map to display the transaction map.
3. Click the Document Sent to Customer/Vendor tab to display the DTD for the reply/sent XML.
4. In the Target XML column, right-click the HTTP header element you want to delete and select Remove HTTP Header Info.
5. From the File menu, select Save Transaction Map to save the map.

Solar Eclipse Business Connect XML Rel. 8.7.2
80 © 2011 Epicor Software Corporation. All rights reserved.
Indicating the Document Type in XML Transaction Maps
Your trading partners might require that you declare the document type in a DOCTYPE element in XML documents you send. The DOCTYPE declaration contains a URL to the document type definition (DTD) or schema that defines the XML document, and tells your trading partner's system which DTD or schema to use to validate the XML.
Note: You can add a DOCTYPE declaration only to transaction maps for XML documents you are sending to a trading partner. XML documents that you receive from your trading partners do not require a DOCTYPE declaration.
To indicate the document type in an XML transaction map:
1. Access the Business Connect XML mapping utility.
2. Right-click a transaction in the Trading Partner Tree and select Edit Transaction Map to display the transaction map.
3. Click the Document Sent to Customer/Vendor tab to display the reply/sent transaction map.
4. In the Target XML column, right-click any element and select Add DOCTYPE Reference to display the Add DOCTYPE Reference dialog box.
5. In the System ID Reference field, complete the URL to the DTD or schema the XML document uses.
• http://y.com - The URL path to the location that contains the DTD or schema.
• /*.dtd - The DTD file name or schema name. An XML schema's file extension is .xsd.
For example, if the XML document uses the basic commerce XML (cXML) DTD, complete the URL to read http://xml.cxml.org/schemas/cXML/<version>/cXML.dtd, where <version> is the full cXML versions number, such as 1.2.014.
The declaration must be in the correct upper and lower case for the reference to work.
6. Click OK to add the DOCTYPE reference to the transaction map.
The first element in the Target XML column displays with a yellow icon, indicating that the XML document now contains the DOCTYPE element.
7. From the File menu, select Save Transaction Map to save the map.
To verify the DOCTYPE in the outgoing XML, preview the XML translation for transaction map's response XML document. To test the document post the XML to Eclipse. You must save the transaction prior to posting.
To remove the document type declaration from an XML transaction map:
1. Access the Business Connect XML mapping utility.
2. Right-click a transaction in the Trading Partner Tree and select Edit Transaction Map to display the transaction map.
3. Click the Document Sent to Customer/Vendor tab to display the reply/sent transaction map.
4. In the Target XML column, right-click any element and select Remove DOCTYPE Reference.

Rel. 8.7.2 Business Connect XML
© 2011 Epicor Software Corporation. All rights reserved. 81
The system removes the DOCTYPE element and the yellow icon no longer displays in the first element in the Target XML column.
5. From the File menu, select Save Transaction Map to save the map.

Solar Eclipse Business Connect XML Rel. 8.7.2
82 © 2011 Epicor Software Corporation. All rights reserved.
Previewing XML Transaction Maps
Use the preview pane to preview an XML transaction map in a format different from the main window view. The preview pane displays the transaction map in column format, lists the source items mapped to the target items, and indicates if modifications have been assigned to XML data.
To preview an XML transaction map:
1. Access the Business Connect XML mapping utility.
2. Right-click a transaction in the Trading Partner Tree and select Edit Transaction Map to display the transaction map.
3. Click the tab for the map you want to view.
4. From the Options menu, select Show Preview Pane to display the Mapping Preview pane.
Note: The Preview Pane displays by default when you open the mapping utility.
The preview displays the following information for mapped elements in the received document or sent document map:
Column Description Target The elements that display in the Target XML column of the tab you are
currently viewing: • For received document maps, displays elements in Eclipse for the
transaction type. • For sent document maps, displays elements in the DTD file for the
reply/sent document from your trading partner.
Source The elements that display in the Source XML column of the tab you are currently viewing: • For received document maps, displays elements in the DTD file for the
received document from your trading partner. • For reply/sent maps, displays elements in Eclipse for the transaction type.
Note: If a source element has several target elements mapped to it, the listing in the Source column of the Mapping Preview pane displays with a Multiple symbol. Double-click the symbol to view the target elements mapped to the source.
Conversion Data Indicates if modifications have been specified for the element. For additional information, see Modifying Incoming and Outgoing XML Data Overview. Click the symbol in the Conversion Data column to display the XML Mapping Conversion Editor dialog box. If there is a single operation applied to the element, the type of operation displays, for example, ConvertDate. If multiple operations are assigned to the element, Multiple Operations displays.
Note: Right-click a line item in the Mapping Preview pane and select Remove this Mapping to remove an element mapping from the transaction map. Right-click a line item and select Modify this Mapping to modify XML data.

Rel. 8.7.2 Business Connect XML
© 2011 Epicor Software Corporation. All rights reserved. 83
Renaming XML Transaction Maps
Use the rename transaction map function to rename any transaction map.
To rename XML transaction maps:
1. Access the Business Connect XML mapping utility.
2. Right-click the transaction in the Trading Partner Tree that you want to rename and select Edit Transaction Map to display the transaction map.
3. From the Edit menu, select Edit Transaction Name.
4. In the Enter New Transaction Name field, enter the new name and click OK.
5. The system updates the transaction name in the Trading Partner Tree and in the tab above the map.

Solar Eclipse Business Connect XML Rel. 8.7.2
84 © 2011 Epicor Software Corporation. All rights reserved.
Copying XML Transaction Maps
Use the transaction copy function to copy and reuse maps. For example, you might have multiple transaction types for a trading partner that can share the same transaction map. Or, you might have transactions that are similar in nature, and require only small changes to the map. You can also copy transactions that exist for one trading partner and paste them to a different trading partner.
To copy XML transaction maps:
1. Access the Business Connect XML mapping utility.
2. Right-click the transaction in the Trading Partner Tree that you want to copy and select Copy Transaction Map.
3. Click OK in the dialog box to continue.
4. In the Trading Partner Tree, right-click the trading partner to which to copy the transaction and select Paste Transaction Map.
5. Enter the name for the new transaction.
6. Click OK to copy the transaction and add it to the transaction list under the trading partner in the Trading Partner Tree.
If you need to make changes to the copied map, right-click the new transaction and select Edit Transaction Map.

Rel. 8.7.2 Business Connect XML
© 2011 Epicor Software Corporation. All rights reserved. 85
Deleting XML Transaction Maps
You might have transaction maps that you no longer use. Delete any unused transaction maps, as necessary. Deleting the last transaction map from a trading partner also removes the trading partner from the Trading Partner Tree.
Note: If you delete a transaction map for a trading partner with which you are still doing business, be sure a map exists for any transactions you still receive or send to that trading partner using XML.
To delete an XML transaction map:
1. Access the Business Connect XML mapping utility.
2. Right-click the transaction map in the Trading Partner Tree that you want to delete and select Delete Transaction Map.
3. Click Yes to confirm the deletion.
Solar Eclipse Business Connect XML Rel. 8.7.2
86 © 2011 Epicor Software Corporation. All rights reserved.
Modifying Incoming and Outgoing XML Data Overview
Lines drawn from source to target elements in a transaction map represent a movement of data. At times, your trading partners might define data in a format different than how Eclipse can store it or the data in Eclipse might not be in a format your trading partner can understand. For example, you might have a trading partner that defines dates using the mm/dd/yy format, where Eclipse stores dates using the mm/dd/yyyy format; or you might have a trading partner that defines the unit of measure of each as "each," but Eclipse stores the same unit of measure as "ea".
To process XML transactions successfully, modify this type of data to match the required format. The system translates the data to the new format before saving it or sending it. You can manipulate each target element of a transaction for both the received document map and the sent document map using operations such as concatenation, adding, subtracting, and table-based conversions.
You can also add sources, such as literal statements to help identify data. For example, you might store e-mail addresses and other information in the Internal Notes field of an order. To better identify data stored and displayed in the field, you can concatenate a literal statement, such as Email: to the incoming data address.
Using a combination of sources and operations, you can create a stacked operation to modify any XML data, even if the element does not have source data mapped to it.
You can add the following sources to an expression:
Source Description Literal Adds a text string to the XML data. For example, you can store e-mail
addresses and other information in the Internal Notes field of an order. To better identify data stored and printed in the field, add literal statements to identify the data.
New Line Inserts a line break in the XML data, for better readability.
You can add the following operations to an expression:
Operation Description Concatenate Links or joins data together. For example, if you are mapping several
pieces of data to the Internal Notes field of an order, link the data together to form a valid expression.
Substring Copies one part of a string, and assigns it to a variable or element. For example, you can extract the first four digits of a credit card number to identify the bank. If the string of data contains delimiters, you can also use the extract field operation.
Extract fields Extracts data from a substring of data separated by delimiters into numbered field names. For example, if you have a string of three values separated by a comma (the delimiter), and you need to save the middle value, use the extract field operation to indicate which field within the delimited string you want to save.
Table-based conversions Converts data from one format to another. For example, your trading partner might use the unit of measure of "each." Eclipse stores units of measure as two characters. Using a table-based conversion, you can tell the system to change the unit of measure "each" to "ea" for incoming data, and to change "ea" to "each" for outgoing data.

Rel. 8.7.2 Business Connect XML
© 2011 Epicor Software Corporation. All rights reserved. 87
Operation Description Decimal conversions Tells the system how many decimal places to use in numeric values. Use
decimal conversions if your trading partner sends dollar amounts or other numbers in a format that does not contain decimals in the actual data.
Date conversions Converts dates into different formats. For example, your trading partner sends date information using the mm/dd/yy format, but Eclipse stores dates using the mm/dd/yyyy format. Define a date conversion operation to convert the format of the date element.
Mathematical operations Adds, subtracts, multiplies, divides, or sums amounts within XML data.
Encode or decode Base64 Encodes or decodes Base64 data. Use this type of encoding to preserve special characters that you might receive or send using XML. Note: Base64 encoding does not encrypt data.
Extract current date and time
Extracts the date and time the transaction was received or sent. Use this operation to extract all or a portion of a date or time stamp.
Inversion Divides a number into 1, making a reciprocal. For example, if you received the number 42, assigning this operation changes the number to 1/42.
Uppercasing and lowercasing letters
Uppercases or lowercases letters in a string of XML data.
XPath selection
Defines an if-then-else operation for XML data that identifies the element to use instead of another element if the correct conditions exist.
Repeating group selection
Defines an if-then-else operation for XML data that identifies one specific piece of data within an XML repeating element.
Logical If-Then-Else Defines a basic if-then-else operation for XML data. For example, use this logical expression type to define a condition in which you would need to change data.

Solar Eclipse Business Connect XML Rel. 8.7.2
88 © 2011 Epicor Software Corporation. All rights reserved.
Building Modification Expressions for XML Data
Use the XML Mapping Conversion Editor dialog box to build expressions that alter XML data that you receive or send.
The XML Mapping Conversion Editor Dialog Box The XML Mapping Conversion Editor dialog box, shown in the diagram below, consists of the following areas:
• Sources and Operations - Tags used to build an expression.
• Operation Stack - Sources and operations in the order they occur that comprise the expression.
• Operation Stack Expression Validation - Illustrates the expression built in the operation stack. If the expression is invalid, a message displays in this area.
• Up and Down Arrow buttons - Moves the selected source or operation in the operation stack.
• Remove button - Removes the selected source or operation from the operation stack.
• Properties button - Displays the properties dialog box for the selected operation in the operation stack, if properties are associated with the operation type.

Rel. 8.7.2 Business Connect XML
© 2011 Epicor Software Corporation. All rights reserved. 89
Accessing the XML Mapping Conversion Edit Dialog Box 1. Access the Business Connect XML mapping utility.
2. Right-click a transaction in the Trading Partner Tree and select Edit Transaction Map to display the transaction map.
3. In the Target XML column of either the received map or the reply/sent map, right-click the element to modify and select Modify Mapping to display the XML Mapping Conversion Editor dialog box.
If the element you select has a source element mapped to it, the source element displays in the Operation Stack field. If the element is not mapped, the Operation Stack field is blank.
Building Expressions All the available sources and operations to build an expression are listed the Sources field and the Operations field.
To add sources and operations to build expressions:
1. Do one of the following to add a source or operation to the operation stack:

Solar Eclipse Business Connect XML Rel. 8.7.2
90 © 2011 Epicor Software Corporation. All rights reserved.
• In the Sources or Operations field, select the item to add. Click and drag it to the operation stack. You can drag the selected source or operation to anywhere in the stack.
• In the Sources or Operations field, double-click the item to add. The system places it at the bottom of the operation stack.
2. If the source or operation you added requires additional properties, the associated properties dialog box displays when you add the source or operation to the operation stack. Enter those properties and click OK.
For additional information about entering additional properties, see the instructions for each source and operation type.
Note: If you need to change the properties of a source or operation, right-click the item in the operation stack and select Edit Additional Data.
3. Do one of the following to move the source or operation in the operation stack:
• Select the item to move and use the Up and Down Arrow buttons.
• Select the item to move and drag it to the correct location.
• Right-click the item you want to move and select Move Up or Move Down to move the item one place up or down.
4. After completing the modification expression, click OK to return to the mapping utility main window.
5. From the File menu, select Save Transaction Map to save the map and your modification expressions.
Removing Sources and Operations from Expressions If you add a source or operation to an expression in error, you can remove the item from the operation stack.
To remove a source or operation from an expression:
1. In the Operation Stack field, select the source or operation to delete.
2. Right-click the item and select Remove.
The system removes the item from the operation stack. View the expression validation message at the bottom of the dialog box to verify the expression is still valid.

Rel. 8.7.2 Business Connect XML
© 2011 Epicor Software Corporation. All rights reserved. 91
Adding Literal Statements to XML Data
Use literal statements to add additional text to XML data. For example, you might use the Internal Notes field or the Shipping Instructions field of an order to store and print data about a customer or the order itself. If you store more than one piece of data in this field, the data can become hard to read. Use literal statements to tag each piece of data for easier identification later.
To add literal statements to XML data:
1. Access the Business Connect XML mapping utility.
2. Right-click a transaction in the Trading Partner Tree and select Edit Transaction Map to display the transaction map.
3. In the Target XML column of either the received map or the reply/sent map, right-click the element to modify and select Modify Mapping to display the XML Mapping Conversion Editor dialog box.
If the element you select has a source element mapped to it, the source element displays in the Operation Stack field. If the element is not mapped, the Operation Stack field is blank.
4. From the Sources field, double-click Literal to add it to the Operation Stack field.
The Literal Value dialog box displays.
5. In the Literal Value field, type the text to insert as the literal statement.
6. Click OK to return to the XML Mapping Conversion Editor dialog box. The literal tag now displays in the Operation Stack field.
7. If necessary, move the tag to the correct place in the operation stack.
If you are adding a literal string to identify data, place that string before the element name in the operation stack. The placement in the stack determines how the operation functions.
Using the example above, if you are mapping the Email element to the Internal Notes field for an order, the literal statement "Email address:" displays before the data in the Email element.
8. When adding literal statements to data, the system does not consider the operation valid until you concatenate the data being received or sent. Use the concatenate operation to form a valid expression.
The above operation displays the e-mail address as Email: [email protected].
9. Add additional sources and other operations, as necessary.
10. Click OK to save the expression and return to the mapping utility main window.
11. From the File menu, select Save Transaction Map to save the map.
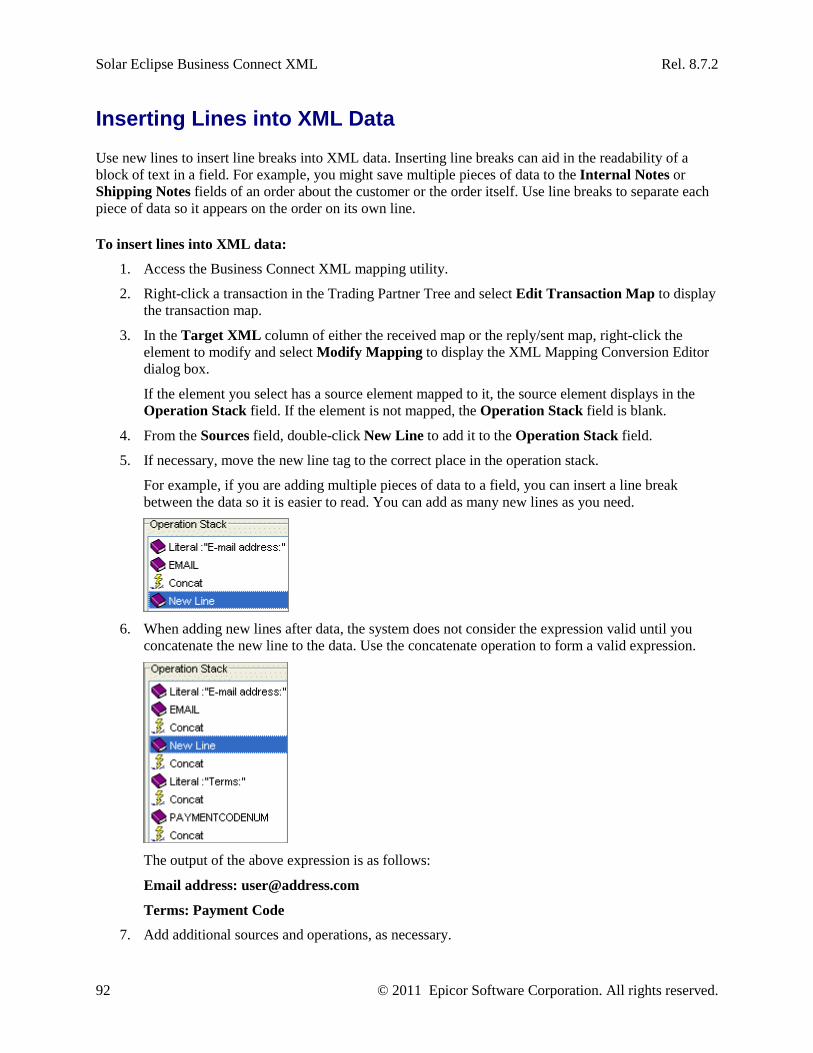
Solar Eclipse Business Connect XML Rel. 8.7.2
92 © 2011 Epicor Software Corporation. All rights reserved.
Inserting Lines into XML Data
Use new lines to insert line breaks into XML data. Inserting line breaks can aid in the readability of a block of text in a field. For example, you might save multiple pieces of data to the Internal Notes or Shipping Notes fields of an order about the customer or the order itself. Use line breaks to separate each piece of data so it appears on the order on its own line.
To insert lines into XML data:
1. Access the Business Connect XML mapping utility.
2. Right-click a transaction in the Trading Partner Tree and select Edit Transaction Map to display the transaction map.
3. In the Target XML column of either the received map or the reply/sent map, right-click the element to modify and select Modify Mapping to display the XML Mapping Conversion Editor dialog box.
If the element you select has a source element mapped to it, the source element displays in the Operation Stack field. If the element is not mapped, the Operation Stack field is blank.
4. From the Sources field, double-click New Line to add it to the Operation Stack field.
5. If necessary, move the new line tag to the correct place in the operation stack.
For example, if you are adding multiple pieces of data to a field, you can insert a line break between the data so it is easier to read. You can add as many new lines as you need.
6. When adding new lines after data, the system does not consider the expression valid until you
concatenate the new line to the data. Use the concatenate operation to form a valid expression.
The output of the above expression is as follows:
Email address: [email protected]
Terms: Payment Code
7. Add additional sources and operations, as necessary.
Rel. 8.7.2 Business Connect XML
© 2011 Epicor Software Corporation. All rights reserved. 93
8. Click OK to return to the mapping utility main window.
9. From the File menu, select Save Transaction Map to save the map.
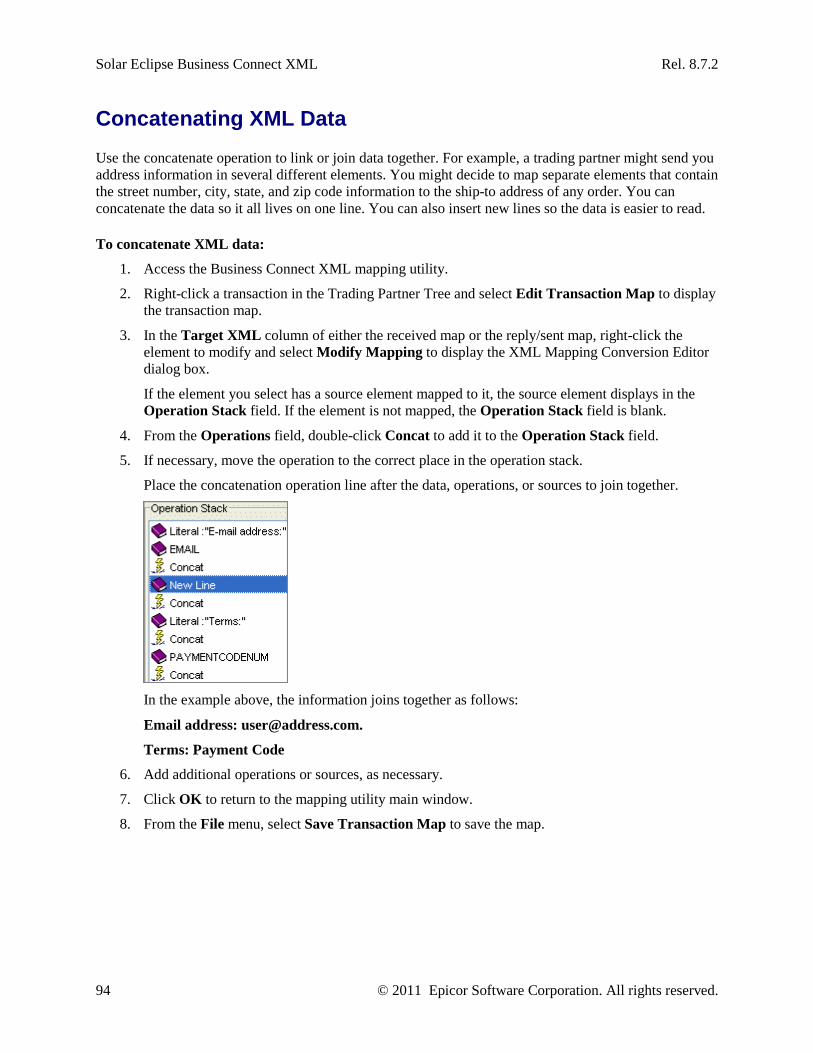
Solar Eclipse Business Connect XML Rel. 8.7.2
94 © 2011 Epicor Software Corporation. All rights reserved.
Concatenating XML Data
Use the concatenate operation to link or join data together. For example, a trading partner might send you address information in several different elements. You might decide to map separate elements that contain the street number, city, state, and zip code information to the ship-to address of any order. You can concatenate the data so it all lives on one line. You can also insert new lines so the data is easier to read.
To concatenate XML data:
1. Access the Business Connect XML mapping utility.
2. Right-click a transaction in the Trading Partner Tree and select Edit Transaction Map to display the transaction map.
3. In the Target XML column of either the received map or the reply/sent map, right-click the element to modify and select Modify Mapping to display the XML Mapping Conversion Editor dialog box.
If the element you select has a source element mapped to it, the source element displays in the Operation Stack field. If the element is not mapped, the Operation Stack field is blank.
4. From the Operations field, double-click Concat to add it to the Operation Stack field.
5. If necessary, move the operation to the correct place in the operation stack.
Place the concatenation operation line after the data, operations, or sources to join together.
In the example above, the information joins together as follows:
Email address: [email protected].
Terms: Payment Code
6. Add additional operations or sources, as necessary.
7. Click OK to return to the mapping utility main window.
8. From the File menu, select Save Transaction Map to save the map.

Rel. 8.7.2 Business Connect XML
© 2011 Epicor Software Corporation. All rights reserved. 95
Copying Substrings of XML Data
Use the substring operation to copy part of a string from a received XML document and assign it to a variable or an element in Eclipse, or to an XML element for a sent document. For example, you can copy the first four digits of a credit card number to identify the bank associated with the card. Using the substring operation, you can specify how many characters and the starting character position to copy. For example, if you know that a string always contains 16 characters, and to extract the fourth, fifth, and sixth characters, use the substring operation to indicate the fourth character as the starting character and that you want to copy three characters.
If you receive data in a string that is not always a consistent length, use the extract field operation to indicate the delimiter and the field within the string to copy.
To copy a substring of XML data:
1. Access the Business Connect XML mapping utility.
2. Right-click a transaction in the Trading Partner Tree and select Edit Transaction Map to display the transaction map.
3. In the Target XML column of either the received map or the reply/sent map, right-click the element to modify and select Modify Mapping to display the XML Mapping Conversion Editor dialog box.
If the element you select has a source element mapped to it, the source element displays in the Operation Stack field. If the element is not mapped, the Operation Stack field is blank.
4. From the Operations field, double-click Substring to add it to the Operation Stack field.
The Sub-String Parameters dialog box displays.
5. In the Start Index field, enter the first character position of the string you want to copy.
6. In the Number of Characters field, enter the number of characters to copy.
For example, if you want to copy data from characters in the fourth, fifth, and sixth positions, enter 4 in the Star Index field and 3 in the Number Of Bytes field.
7. Click OK to return to the XML Mapping Conversion Editor dialog box.
8. If necessary, move the operation to the correct location in the operation stack.
The substring operation line falls after the data that contains the substring from which you want to copy data:
9. Add additional sources and operations, as necessary.
10. Click OK to return to the mapping utility main window.
11. From the File menu, select Save Transaction Map to save the map.

Solar Eclipse Business Connect XML Rel. 8.7.2
96 © 2011 Epicor Software Corporation. All rights reserved.
Extracting Fields from Delimited XML Strings
Use the extract field operation to extract and copy part of a delimited string and assign it to an element in the database, or to an XML element for a document you are sending. For example, your trading partner sends you a string of data in an XML element that contains three fields separated by delimiters. The second field within that string might be a necessary piece of data to complete a transaction, such as a ship-to ID for an order. Using the extract field operation, you can map the element and tell the system to save only the second field in that string.
Use the extract field operation to save pieces of data from a string that might not always be the same number of characters long. Use the substring operation to extract data from a string that is consistently the same length by indicating which character positions to extract.
To extract fields from delimited XML strings:
1. Access the Business Connect XML mapping utility.
2. Right-click a transaction in the Trading Partner Tree and select Edit Transaction Map to display the transaction map.
3. In the Target XML column of either the received map or the reply/sent map, right-click the element to modify and select Modify Mapping to display the XML Mapping Conversion Editor dialog box.
If the element you select has a source element mapped to it, the source element displays in the Operation Stack field. If the element is not mapped, the Operation Stack field is blank.
4. From the Operations field, double-click ExtractField to add it to the Operation Stack field.
The Field Extraction dialog box displays.
5. In the Field Delimiter field, enter the character that is the delimiter in the string, for example, a comma or a pipe (, or |).
6. In the Occurrence field, enter the field to extract.
For example, you receive a delimited string that reads 123|4567|89 the string contains three fields, each separated by the | symbol. To copy the values in the second field, enter 2 in the Occurrence field.
7. Click OK to return to the XML Mapping Conversion Editor dialog box.
8. If necessary, move the operation to the correct place in the operation stack.
Typically, the extract field operation falls after the data you want to extract:
9. Add additional sources and operations, as necessary.
10. Click OK to return to the mapping utility main window.
11. From the File menu, select Save Transaction Map to save the map.

Rel. 8.7.2 Business Connect XML
© 2011 Epicor Software Corporation. All rights reserved. 97
Performing Table-Based Conversions on XML Data
Use the table conversion operation to change the format of XML data into a format that the receiving system can understand. Use table-based conversions for data such as the following:
• Ship vias
• Units of measure
For example, your trading partner uses the unit of measure "each." Eclipse stores units of measure as two characters. Using a table-based conversion, you can tell the system to change the unit of measure "each" to "ea" for incoming data, and to change "ea" to "each" for outgoing data. For a designated element, you can define multiple unit of measure conversions in the conversion table.
To perform table-based conversion on XML data:
1. Access the Business Connect XML mapping utility.
2. Right-click a transaction in the Trading Partner Tree and select Edit Transaction Map to display the transaction map.
3. In the Target XML column of either the received map or the reply/sent map, right-click the element you want to modify and select Modify Mapping to display the XML Mapping Conversion Editor dialog box.
If the element you select has a source element mapped to it, the source element displays in the Operation Stack field. If the element is not mapped, the Operation Stack field is blank.
4. From the Operations field, double-click TableConversion to add it to the Operation Stack field.
The Table Conversion dialog box displays.
5. In the Convert From field, type the source data that you want to convert.
6. In the Convert To field, type the format to which you want to convert the source.
For example, if you are converting units of measure from your trading partner, enter a unit of measure in the format they use, such as "each" or "box," in the Convert From field. In the Convert To field, enter the two-character format of the corresponding unit of measure stored in Eclipse, such as "ea" and "bx."
Note: The information you enter for table-based conversions is case sensitive. The system looks for exactly what you type in the Convert From field. For example, if you enter "EACH" in the Convert From field, and the data in the XML document is "each" the system does not convert the data.
7. Repeat steps 5 and 6 to enter additional format conversions for the element.
Note: Ensure that there are no blank lines in the table as you are adding conversions.
8. Click OK to return to the XML Mapping Conversion Editor dialog box.
9. If necessary, move the operation to the correct place in the operation stack.
Typically, the table conversion operation line falls after the element that contains the data you want to convert:

Solar Eclipse Business Connect XML Rel. 8.7.2
98 © 2011 Epicor Software Corporation. All rights reserved.
10. Add additional sources or operations, as necessary.
11. Click OK to return to the mapping utility main window.
12. From the File menu, select Save Transaction Map to save the map.
Rel. 8.7.2 Business Connect XML
© 2011 Epicor Software Corporation. All rights reserved. 99
Converting Decimal Formats in XML Data
Some document type definition (DTD) files indicate that quantities or other numbers are sent without decimal places, and that a decimal place indicator is sent in a different element. For example, a trading partner's XML document contains a Quantity element that contains a dollar quantity, such as 50000. A nested element, NumOfDecimals within the Quantity element indicates that there are two decimal places in any number sent in the Quantity element. Therefore, the quantity 50000 is actually 500.00.
Use the decimal conversion operation to convert the decimal places in this circumstance.
Note: Map both the value and the decimal indicator to the same target to convert the decimal places using the decimal conversion operation.
To convert decimal formats in XML data:
1. Access the Business Connect XML mapping utility.
2. Right-click a transaction in the Trading Partner Tree and select Edit Transaction Map to display the transaction map.
3. In the Target XML column of either the received map or the reply/sent map, right-click the element to modify and select Modify Mapping to display the XML Mapping Conversion Editor dialog box.
If the element you selected has a source element mapped to it, the source element displays in the Operation Stack field. If the element is not mapped, the Operation Stack field is blank.
4. From the Operations field, double-click DecimalConversion to add it to the Operation Stack field.
5. If necessary, move the operation to the correct place in the operation stack. Decimal conversions fall after the element that indicates the decimal conversion value.
6. Add additional sources and operations, as necessary.
7. Click OK to return to the, mapping utility main window.
8. From the File menu, select Save Transaction Map to save the map.

Solar Eclipse Business Connect XML Rel. 8.7.2
100 © 2011 Epicor Software Corporation. All rights reserved.
Converting Date Formats in XML Data
Use the date conversion operation to convert calendar dates into different formats. For example, your trading partners might send date information using the mm/dd/yy format, but Eclipse stores dates using the mm/dd/yyyy format. Define a date conversion operation to convert the format the format of an element that contains date information.
To convert date formats in XML data:
1. Access the Business Connect XML mapping utility.
2. Right-click a transaction in the Trading Partner Tree and select Edit Transaction Map to display the transaction map.
3. In the Target XML column of either the received map or the reply/sent map, right-click the element to modify and select Modify Mapping to display the XML Mapping Conversion Editor dialog box.
If the element you select has a source element mapped to it, the source element displays in the Operation Stack field. If the element is not mapped, the Operation Stack field is blank.
4. From the Operations field, double-click DateConversion to add it to the Operation Stack field.
The Define Format Conversions dialog box displays.
5. In the Incoming Date Format field, enter the source date format. For an outgoing transaction, this is the format from Eclipse. For received transaction, this is the format from your trading partner.
Use the following notations when entering date formats:
Date Element Full Form Short Form Year yyyy yy
Month MMM MM or M
Day of week EEEE EE
Day of month dd d
Hour (1-12) hh h
Hour (0-23) HH H
Hour (0-11) KK K
Hour (1-24) kk k
Minute mm
Second ss
Millisecond SSS
AM/PM a
Time zone zzzz zz
Day of week in month (for example, the third Thursday)
F
Day in year DDD D

Rel. 8.7.2 Business Connect XML
© 2011 Epicor Software Corporation. All rights reserved. 101
Date Element Full Form Short Form Week in year ww
Era (for example, BC or AD) G
Note: Date format notations are case sensitive. For example, to convert an incoming date from mm/dd/yy to contain a four digit year, enter MM/dd/yyyy for the outgoing date format.
6. In the Outgoing Date Format field, enter the format to which to save the date in all lowercase letters.
For a sent transaction, this is the format that your trading partner requires. For a received transaction, this is the format Eclipse requires.
7. Click OK to return to the XML Mapping Conversion Editor dialog box.
8. If necessary, move the operation to the correct place in the operation stack.
Typically, the date conversion operations fall after the data you need to convert:
9. Add additional sources and operations, as necessary.
10. Click OK to return the mapping utility main window.
11. From the File menu, select Save Transaction Map to save the map.

Solar Eclipse Business Connect XML Rel. 8.7.2
102 © 2011 Epicor Software Corporation. All rights reserved.
Performing Mathematical Operations on XML Data
Use the mathematical operations—add, subtract, multiply, divide, and sum— to apply common math functions to XML data. For example, if an incoming XML document contains an extended price of $42 for 10 of an item, you can use the divide operation to divide the extended price by the order quantity to determine the unit price.
Use the Summation function to total quantities in a repeating group. For example, if you have the following XML, you can use the Summation function to total the amounts in each repeating Price element.
<Item>
<Price>10.55</Price> <Price>10.49</Price> <Price>11.50</Price>
</Item>
To perform mathematical operations on XML data:
1. Access the Business Connect XML mapping utility.
2. Right-click a transaction in the Trading Partner Tree and select Edit Transaction Map to display the transaction map.
3. In the Target XML column of either the received map or the reply/sent map, right-click the element you want to modify and select Modify Mapping to display the XML Mapping Conversion Editor dialog box.
If the element you selected has a source element mapped to it, the source element displays in the Operation Stack field. If the element is not mapped, the Operation Stack field is blank.
4. From the Operations field, double-click Add, Subtract, Multiply, Divide, or Summation to add it to the Operation Stack field.
5. If necessary, move the operation to the correct place in the operation stack.
6. Click OK to return to the mapping utility main window.
7. From the File menu, select Save Transaction Map to save the map.

Rel. 8.7.2 Business Connect XML
© 2011 Epicor Software Corporation. All rights reserved. 103
Encoding and Decoding XML Data to and from Base64
Use the Base64 operation to encode or decode XML data. For example, your trading partner uses Base64 to encode special characters that you need to preserve. To successfully save that information to Eclipse, use the Base64 decode operation to translate the data.
Note: Encoding data using Base64 does not encrypt the data. Use secure HTTP (HTTPS) for transmitting sensitive information.
To encode data to Base64:
1. Access the Business Connect XML mapping utility.
2. Right-click a transaction in the Trading Partner Tree and select Edit Transaction Map to display the transaction map.
3. In the Target XML column of either the received map or the reply/sent map, right-click the element to modify and select Modify Mapping to display the XML Mapping Conversion Editor dialog box.
If the element you selected has a source element mapped to it, the source element displays in the Operation Stack field. If the element is not mapped, the Operation Stack field is blank.
4. From the Operations field, double-click Base64Encode add it to the Operation Stack field.
5. If necessary, move the operation to the correct place in the operation stack.
Typically, the Base64 encode operation falls after the data you want to encode:
6. Add additional sources and operations, as necessary.
7. Click OK to return to the mapping utility main window.
8. From the File menu, select Save Transaction Map to save the map.
To decode data from Base 64:
1. Access the Business Connect XML mapping utility.
2. Right-click a transaction in the Trading Partner Tree and select Edit Transaction Map to display the transaction map.
3. In the Target XML column of either the received map or the reply/sent map, right-click the element to modify and select Modify Mapping to display the XML Mapping Conversion Editor dialog box.
If the element you selected has a source element mapped to it, the source element displays in the Operation Stack field. If the element is not mapped, the Operation Stack field is blank.
4. From the Operations field, double-click B64Decode to add it to the Operation Stack field.
5. If necessary, move the operation to the correct place in the operation stack.
Typically, the Base64 decode operation falls after the data you want to decode:

Solar Eclipse Business Connect XML Rel. 8.7.2
104 © 2011 Epicor Software Corporation. All rights reserved.
6. Add additional sources and operations, as necessary.
7. Click OK to return to the mapping utility main window.
8. From the File menu, select Save Transaction Map to save the map.

Rel. 8.7.2 Business Connect XML
© 2011 Epicor Software Corporation. All rights reserved. 105
Extracting the Current Date and Time from XML Data
Use the extract current date and time operation to extract and copy the date and time an XML document was sent or received. Use this operation to extract any of the following for an element that contains information about the date and time an order was sent or received:
• Day, month, or year
• Whole date
• Hour, minute, or second
• Time (including hours, minutes, and seconds)
• Time zone
• Whole date and time
To extract the current date and time from XML data:
1. Access the Business Connect XML mapping utility.
2. Right-click a transaction in the Trading Partner Tree and select Edit Transaction Map to display the transaction map.
3. In the Target XML column of either the received map or the reply/sent map, right-click the element to modify and select Modify Mapping to display the XML Mapping Conversion Editor dialog box.
If the element you select has a source element mapped to it, the source element displays in the Operation Stack field. If the element is not mapped, the Operation Stack field is blank.
4. From the Operations field, double-click ExtractCurrentDateTime to add it to the Operation Stack field.
The Current Date Time Extraction dialog box displays.
5. In the Extract Current field, select the portion of the date/time stamp to extract, such as month, or hour.
6. Click OK to return to the XML Mapping Conversion Editor dialog box.
7. If necessary, move the operation to the correct place in the operation stack.
Typically, the extract date and time operation falls after the data you want to extract:
8. When extracting a date or time, the system does not consider the expression valid until you
concatenate the data. Use the concatenate operation to form a valid expression.
Solar Eclipse Business Connect XML Rel. 8.7.2
106 © 2011 Epicor Software Corporation. All rights reserved.
9. Add additional sources and operations, as necessary.
10. Click OK to return to the mapping utility main window.
11. From the File menu, select Save Transaction Map to save the map.
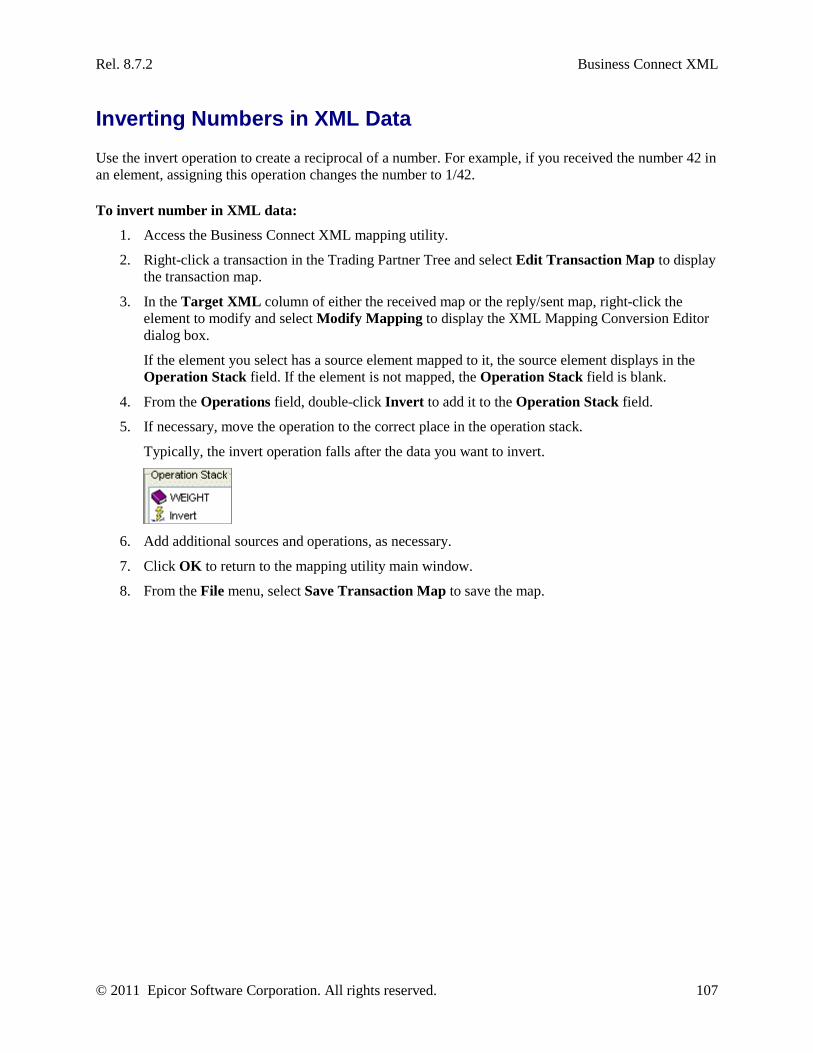
Rel. 8.7.2 Business Connect XML
© 2011 Epicor Software Corporation. All rights reserved. 107
Inverting Numbers in XML Data
Use the invert operation to create a reciprocal of a number. For example, if you received the number 42 in an element, assigning this operation changes the number to 1/42.
To invert number in XML data:
1. Access the Business Connect XML mapping utility.
2. Right-click a transaction in the Trading Partner Tree and select Edit Transaction Map to display the transaction map.
3. In the Target XML column of either the received map or the reply/sent map, right-click the element to modify and select Modify Mapping to display the XML Mapping Conversion Editor dialog box.
If the element you select has a source element mapped to it, the source element displays in the Operation Stack field. If the element is not mapped, the Operation Stack field is blank.
4. From the Operations field, double-click Invert to add it to the Operation Stack field.
5. If necessary, move the operation to the correct place in the operation stack.
Typically, the invert operation falls after the data you want to invert.
6. Add additional sources and operations, as necessary.
7. Click OK to return to the mapping utility main window.
8. From the File menu, select Save Transaction Map to save the map.
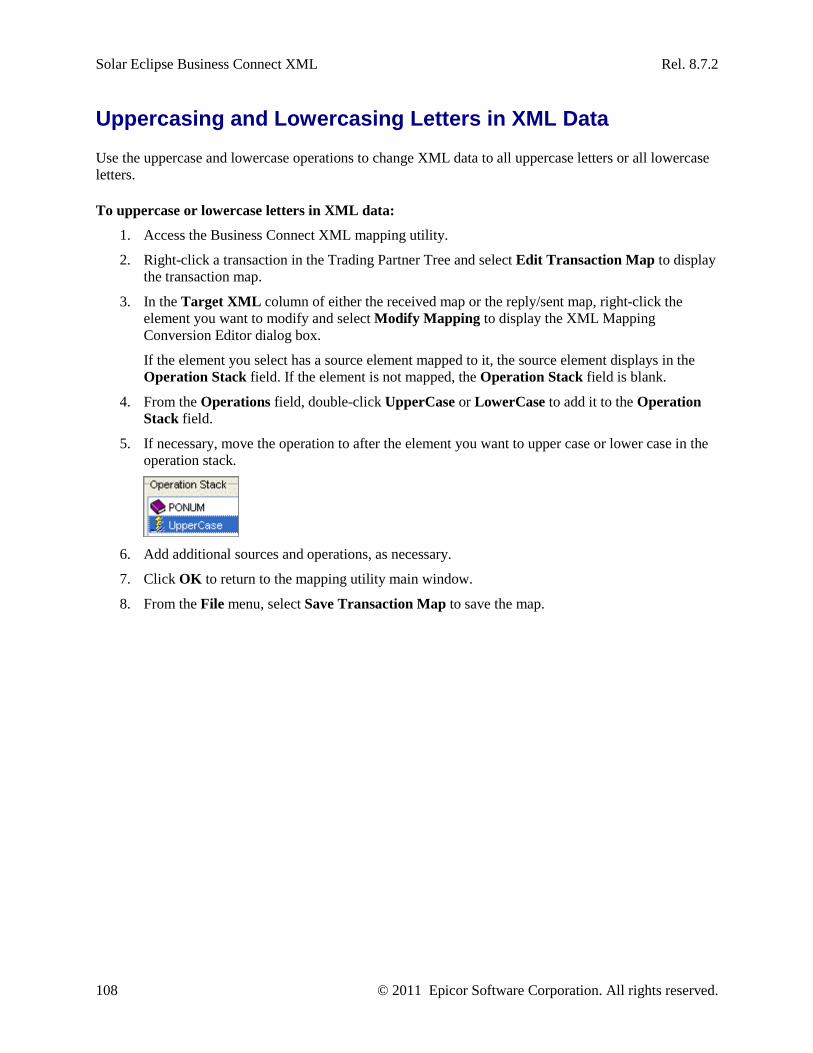
Solar Eclipse Business Connect XML Rel. 8.7.2
108 © 2011 Epicor Software Corporation. All rights reserved.
Uppercasing and Lowercasing Letters in XML Data
Use the uppercase and lowercase operations to change XML data to all uppercase letters or all lowercase letters.
To uppercase or lowercase letters in XML data:
1. Access the Business Connect XML mapping utility.
2. Right-click a transaction in the Trading Partner Tree and select Edit Transaction Map to display the transaction map.
3. In the Target XML column of either the received map or the reply/sent map, right-click the element you want to modify and select Modify Mapping to display the XML Mapping Conversion Editor dialog box.
If the element you select has a source element mapped to it, the source element displays in the Operation Stack field. If the element is not mapped, the Operation Stack field is blank.
4. From the Operations field, double-click UpperCase or LowerCase to add it to the Operation Stack field.
5. If necessary, move the operation to after the element you want to upper case or lower case in the operation stack.
6. Add additional sources and operations, as necessary.
7. Click OK to return to the mapping utility main window.
8. From the File menu, select Save Transaction Map to save the map.

Rel. 8.7.2 Business Connect XML
© 2011 Epicor Software Corporation. All rights reserved. 109
Defining Logical Expressions for XML Data
Use logical expressions to create if-then-else statements to modify XML data. A logical expression is useful if you need to set conditions to determine which mapped element to use, save a portion of data in a repeating group, or define a basic expression to save data for an element such as a flag.
Use any of the following logical expressions to modify XML data:
• Repeating group selection
• XPath selection
• Basic if-then-else expression
Selecting an Element From a Repeating Group Use this logical expression type to create an if-then-else statement to identify one specific piece of data in a repeating group. For example, your trading partner sends you an XML document that contains a repeating element called Partner. Each repetition of the Partner element defines a different type of data, as shown in the following example:
<Partner>
<PartnerType> Includes bill-to data.
<PartnerID>
<Partner>
<PartnerType> Includes ship-to data.
<PartnerID>
<Partner>
<PartnerType> Includes buyer data.
<PartnerID>
When you create the transaction map for this repeating group, the Partner element and its children occur only once in the document type definition (DTD) file from your trading partner. If you need only the ship-to data from the second occurrence of the repeating group, you can use an if-then-else operation to identify the data you need to map.
To create an if-then-else statement for a repeating group:
1. Access the Business Connect XML mapping utility.
2. Right-click a transaction in the Trading Partner Tree and select Edit Transaction Map to display the transaction map.
3. In the Target XML column of either the received map or the reply/sent map, right-click the element you want to modify and select Modify Mapping to display the XML Mapping Conversion Editor dialog box.
Note: To define a logical expression, the element you select must be a repeating group and must have a mapping defined.
Solar Eclipse Business Connect XML Rel. 8.7.2
110 © 2011 Epicor Software Corporation. All rights reserved.
4. From the Operations field, double-click RepeatingGroupSelection to add it to the operation stack.
The Repeating Group Selection dialog box displays.
5. Define the logical expression by selecting the operator, such as EQUAL, and defining the value.
To create a logical expression for the example above, select Equal as the operator and enter Ship To as the value.
6. Click OK to return to the XML Mapping Conversion Editor dialog box.
7. If necessary, move the operation to the correct place in the operation stack.
To create a valid logical expression, the logical operation falls below the item you want to modify in the operation stack.
8. Add additional sources and operations, as necessary.
9. Click OK to return to the mapping utility main window.
10. From the File menu, select Save Transaction Map to save the map.
XPath Selection Use this logical expression type to create an if-then-else statement to use a mapping from another element if the conditions you state are met.
1. Access the Business Connect XML mapping utility.
2. Right-click a transaction in the Trading Partner Tree and select Edit Transaction Map to display the transaction map.
3. In the Target XML column of either the received map or the reply/sent map, right-click the element you want to modify and select Modify Mapping to display the XML Mapping Conversion Editor dialog box.
4. From the Operations field, double-click XPathSelection to add it to the operation stack.
The XPath Selection dialog box displays.
5. Build the expression by selecting the data element you want to use and the operator and value.
6. Click OK to return to the XML Mapping Conversion Editor dialog box.
7. If necessary, move the operation to the correct place in the operation stack.
To create a valid logical expression, the logical operation falls below the item you want to modify in the operation stack.
8. Add additional sources and operations, as necessary.
9. Click OK to return to the mapping utility main window.
10. From the File menu, select Save Transaction Map to save the map.
Basic If-Then-Else Operation Use this logical expression type to create a basic if-then-else statement to modify XML data. For example, your trading partner might send XML data in an element that is used as a flag, such as Success or Fail. The flags might not correspond exactly to the data format you use in Eclipse to indicate the same

Rel. 8.7.2 Business Connect XML
© 2011 Epicor Software Corporation. All rights reserved. 111
flag. You might need to store the Success flag as a 1 value in your system. Use a basic logical expression to tell the system that if it reads Success in the data element, to store a 1 in the mapped Eclipse element.
To create a simple if-then-else operation:
1. Access the Business Connect XML mapping utility.
2. Right-click a transaction in the Trading Partner Tree and select Edit Transaction Map to display the transaction map.
3. In the Target XML column of either the received map or the reply/sent map`, right-click the element you want to modify and select Modify Mapping to display the XML Mapping Conversion Editor dialog box.
Note: To define a logical expression, the element must have a mapping defined.
4. From the Operations field, double-click Logical If-Then-Else to add it to the operation stack.
The If-Then-Else Logical dialog box displays.
5. Build the expression by entering the following information:
Expression Section Description If operand value Select the operator and the value for the expression.
Then use this value Enter the value to use if the data meets the criteria stated in the If statement.
Otherwise use this value Enter the value to use if the data does not meet the criteria stated in the If statement.
To create a logical expression for the example above, select Equal as the operator and enter Success as the value. In the Then value, enter 1. This is the value the system stores in the mapped element if it reads "Success" in the source data element. In the Otherwise value, enter 2. This is the value the system stores in the mapped element if it does not read "Success" in the source data element.
The XQuery Preview area displays the expression as it appears in the XQuery code for the transaction map.
6. Click OK to return to the XML Mapping Conversion Editor dialog box.
7. If necessary, move the operation to the correct place in the operation stack.
To create a valid logical expression, the logical operation falls below the item you want to modify in the operation stack.
8. Add additional sources and operations, as necessary.
9. Click OK to return to the mapping utility main window.
10. From the File menu, select Save Transaction Map to save the map.
Solar Eclipse Business Connect XML Rel. 8.7.2
112 © 2011 Epicor Software Corporation. All rights reserved.
Previewing the XML Translation for Transaction Maps
As you create your transaction maps, the system creates the XQuery code that it uses to translate XML data. You can view the translation code using the Show XQuery functionality. Viewing the code is useful for troubleshooting your transaction maps. If necessary, you can copy and paste the compiled code to send it to Eclipse Technical Support.
To preview the XML translation for a transaction map:
1. Access the Business Connect XML mapping utility.
2. Right-click a transaction in the Trading Partner Tree and select Edit Transaction Map to display the transaction map.
3. From the Options menu, select Show XQuery to display the XQuery Viewer dialog box.
4. Click the tab for the preview information you want to view:
Tab Description Request XQuery The XQuery code for the received document map.
Response XQuery The XQuery code for the sent document map.
Requested Data TxXML
The translation XML.
Request XML Document
The XML generated for the received document map.
Response XML Document
The XML generated for the sent document map.
If you had data element selected in the transaction, the system tries to find the XQuery line that corresponds to the selected element. If it finds one, the system highlights the text in the XQuery translation. If it does not find a corresponding line, the system displays the first line in the translation for the transaction.
Note: The XQuery Viewer dialog box defaults to the XQuery tab related to the tab selected on the main Business Connect XML window. If the Mapping Selection Criteria tab is selected on the main window, the Request XQuery tab displays in the XQuery Viewer dialog box.
5. Click Close to return to the main window.
To search the XQuery Code, TxXML translation, or the XML documents:
1. Open the XQuery Viewer dialog box.
2. Select the tab for the information you want to view.
3. Click Search and enter the text for which you want to search.
4. Click OK to search for the first occurrence of the text.
5. Click Search Next to find the next occurrence of the text.

Rel. 8.7.2 Business Connect XML
© 2011 Epicor Software Corporation. All rights reserved. 113
Running Test Compilations of XML Transaction Maps
As you create your transaction maps, the system creates the XQuery code that it uses to translate XML. The system needs to compile the code before being able to receive or send XML documents. You can set the system to compile the code as you map elements, but you can also run a test compilation at any time.
To run a test complication of an XML transaction map:
1. Access the Business Connect XML mapping utility.
2. Right-click a transaction in the Trading Partner Tree and select Edit Transaction Map to display the transaction map.
3. Select the tab to display the side of the transaction for which you want to compile code.
4. From the Options menu, select Test XQuery Compilation to compile the code.
A message displays indicating whether the code compiled successfully.
5. Click OK to return to the main window.

Solar Eclipse Business Connect XML Rel. 8.7.2
114 © 2011 Epicor Software Corporation. All rights reserved.
Posting Test XML Transactions to Eclipse
Use the XML Poster to post a test XML document to Eclipse, before receiving live transactions from a customer or a vendor. Posting test XML sends a sample XML document to the application server and on to Eclipse to verify that it processes correctly. Posting test XML documents allows you to verify that the document flows through the system without encountering any errors, and also allows you to verify that the information you mapped in the transaction is correctly formatted within fields in Eclipse, such as price data or dates on an order.
Within the XML Poster, you can search the test request data and replace portions with real data. For example, your test XML document from a trading partner might contain artificial part numbers that will not correctly process through the system. Use the Find function to search for that element in the test XML document within the poster and replace the test data with real part numbers.
To post test XML transactions to Eclipse:
1. Copy data from a test XML document to the Windows clipboard.
2. Access the Business Connect XML mapping utility.
3. Right-click a transaction in the Trading Partner Tree and select Edit Transaction Map to display the transaction map.
4. From the Options menu, select Post XML to display the XML Poster dialog box.
The Post To field, displays the path to your application server in the following format:
http://<Your Application Server Name>/ecom/EcommerceXML
5. In the XML Request field, paste the contents of the test XML document.
6. From the File menu, select Post XML to send the XML document through the system.
The results of the transaction processing display in the XML Response field. The results display a status that indicates the system received the document, if there is no sent document map defined for the transaction you are testing. If there is a sent document map defined, the XML Response field displays the response document it would send based on the map defined.
7. From the File menu, select Close to return to the mapping utility main window.
To search the XML request data:
1. In the XML Poster dialog box, select Options > Find to display the Input dialog box.
2. In the Search For field, enter the text you want to find.
3. Click OK to start the search.
4. To search for the next occurrence of the text, press F3 or select Find Next from the Options menu.

Rel. 8.7.2 Business Connect XML
© 2011 Epicor Software Corporation. All rights reserved. 115
Viewing the Business Connect XML Mapping Utility Change Log
As you make edits to transaction maps, the system records your actions in the mapping utility's change log. Use the change log to help troubleshoot problems with transaction maps, or to view the activity for a given map.
To view the change log for transactions:
1. Access the Business Connect XML mapping utility.
2. Right-click a transaction in the Trading Partner Tree and select Edit Transaction Map to display the transaction map.
3. From the File menu, select View Change Log to display the Maintenance Log Viewer dialog box for the transaction.
The dialog box displays the following information for the transaction that you selected:
Field Description User The user who made the change.
Date The date the transaction was changed.
Time The time the transaction was changed.
Description The details about the action taken on the transaction.
4. Click Close to return to the mapping utility main window.
To view the change log for deleted transactions:
1. Access the Business Connect XML mapping utility.
2. Right-click a transaction in the Trading Partner Tree and select Edit Transaction Map to display the transaction map.
3. From the File menu, select View Change Log to display the Maintenance Log Viewer dialog box.
4. Click the Show Deleted Transactions Maps Only check box. The system lists all the deleted transaction maps, including the following information:
Field Description User The user who deleted the transaction.
Date The date the transaction was deleted.
Time The time the transaction was deleted.
Description The details about the deleted transaction, such as the transaction name and the trading partner to whom the transaction belonged.
5. Click Close to return to the mapping utility main window.
Solar Eclipse Business Connect XML Rel. 8.7.2
116 © 2011 Epicor Software Corporation. All rights reserved.
Viewing the Business Connect XML Mapping Utility Error Log
As you create, change, and test transaction maps, the system records any errors it encounters when compiling a map and creating the XQuery code. If you encounter problems with a map or the mapping utility, you can copy the data recorded in the error log and send it to Eclipse to help identify the cause of the error.
Note: The error log available in the mapping utility contains only errors generated by activity within the utility itself. Additional logging information is stored on the application server about server activity and possible server errors.
To view the XML mapping utility error log:
1. Access the Business Connect XML mapping utility.
2. From the File menu, select Show Error Log to display the Error Log dialog box.
Note: If the File menu does not contain the Show Error Log option, contain Eclipse Technical support.
3. Click Close to close the error log and return the mapping utility main window.
To clear the XML mapping utility error log window:
1. Access the Business Connect XML mapping utility.
2. From the File menu, select Show Error Log to display the Error Log dialog box.
Note: If the File menu does not contain the Show Error Log option, contain Eclipse Technical support.
3. Click Clear Log to clear all the contents from the log dialog box.
The system clears the contents from the on-screen display; however, the log file remains intact for later access if necessary. See the entire log file in the eclipseinc.log file in the Business Connect XML mapping utility installation directory.

Rel. 8.7.2 Business Connect XML
© 2011 Epicor Software Corporation. All rights reserved. 117
Business Connect XML Mapping Utility Main Window Aspects
As you select document type definition (DTD) files and identify what transaction types comprise a trading partner transaction, the system populates the Business Connect XML mapping utility with data from your selections. This topic illustrates how each field in the New Mapping Transaction dialog box relates to the data you use to create transaction maps within the mapping utility.
See the following sections for information about what data displays in each:
• Trading Partners Tree
• Tabs for Customer Transactions
• Tabs for Vendor Transactions
• Mapping Selection Criteria Tab for Customer and Vendor Transactions
For information about symbols and useful tips for using the mapping utility most efficiently, see the following topics:
• Viewing and Saving Open XML Transaction Maps
• Business Connect XML Mapping Utility Symbols
Trading Partners Tree When you add a new trading partner, the system adds the trading partner name to the Trading Partners Tree:
As you define transaction maps for each trading partner, the transactions display nested under the partner to which they belong:

Solar Eclipse Business Connect XML Rel. 8.7.2
118 © 2011 Epicor Software Corporation. All rights reserved.
Tabs for Customer Transactions The Document Received from Customer tab displays the elements in Eclipse for inbound documents that you receive from your customer. When defining a customer transaction map, the transaction type you select in the Document Received from Customer area of the New Mapping Transaction dialog box populates the Target XML column in the Document Received from Customer tab. The target XML for this transaction type contains the data elements in Eclipse that are available for the transaction. The elements available are defined in XML database schemas.
Note: If the customer transaction does not contain a received document, such as an invoice, and you select the No Document Will Be Received check box in the Document Received from Customer area of the New Transaction Map dialog box, the Document Received From Customer tab is disabled.
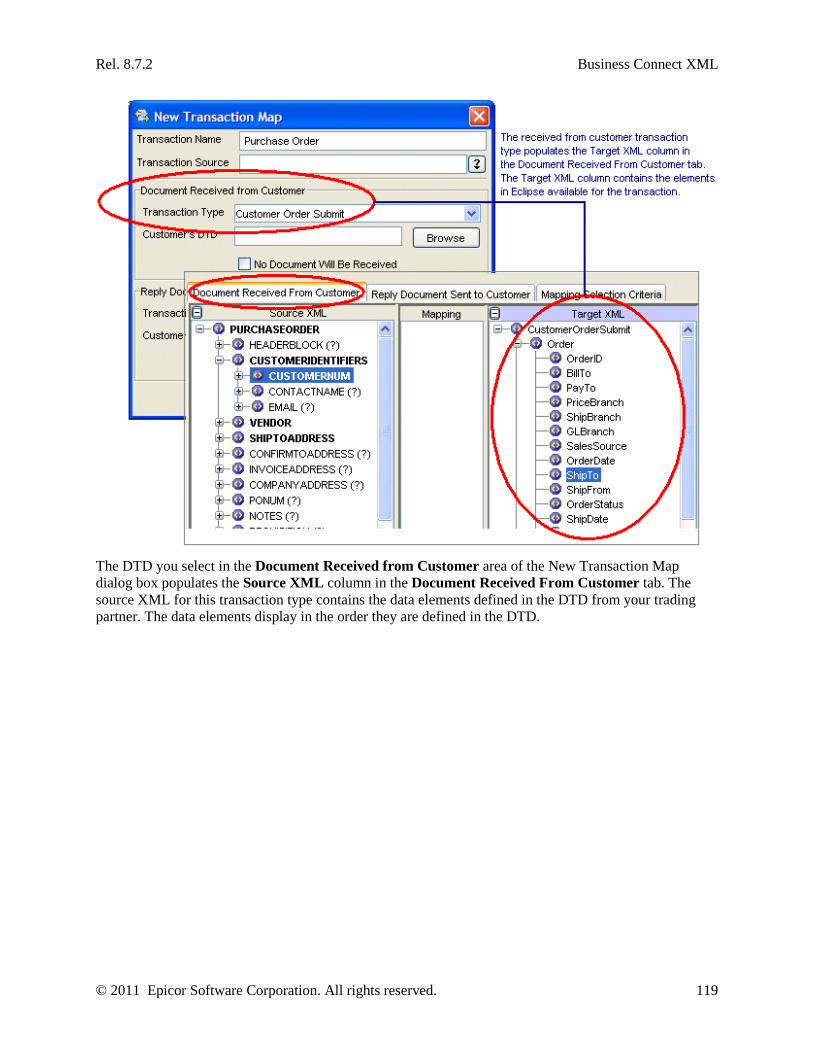
Rel. 8.7.2 Business Connect XML
© 2011 Epicor Software Corporation. All rights reserved. 119
The DTD you select in the Document Received from Customer area of the New Transaction Map dialog box populates the Source XML column in the Document Received From Customer tab. The source XML for this transaction type contains the data elements defined in the DTD from your trading partner. The data elements display in the order they are defined in the DTD.

Solar Eclipse Business Connect XML Rel. 8.7.2
120 © 2011 Epicor Software Corporation. All rights reserved.
The Reply Document Sent to Customer tab displays the data elements in Eclipse for documents you send to your customer. When defining a transaction map, the transaction type you select in the Reply Document Sent to Customer area of the New Transaction Map dialog box populates the Source XML column in the Reply Document Sent to Customer tab. The source XML for a sent document contains the data elements in Eclipse available for the transaction. The elements available are defined in XML database schemas.
Note: If the customer transaction does not contain a sent document and you select the No Document Will Be Received check box in the Reply Document Sent to Customer area of the New Transaction Map dialog box, the Reply Document Sent to Customer tab is disabled.

Rel. 8.7.2 Business Connect XML
© 2011 Epicor Software Corporation. All rights reserved. 121
The DTD you select in the Reply Document Sent to Customer area of the New Transaction Map dialog box populates the Target XML column in the Reply Document Sent to Customer tab. The target XML for this transaction type contains the data elements defined in the DTD file from your trading partner. The data elements display in the order they are defined in the DTD.

Solar Eclipse Business Connect XML Rel. 8.7.2
122 © 2011 Epicor Software Corporation. All rights reserved.
Tabs for Vendor Transactions The Document Sent to Vendor tab displays the elements in Eclipse for documents you send to your vendor. When defining a transaction map, the transaction type you select in the Document Sent to Vendor area of the New Transaction Map dialog box populates the Source XML column in the Document Sent to Vendor tab. The source XML for a sent document contains the elements in Eclipse available for the transaction. The elements available are defined in XML database schemas.
Note: If the vendor transaction does not contain a sent document and you select the No Document Will be Received check box in the Document Sent to Vendor area of the New Transaction Map dialog box, the Document Sent to Vendor tab is disabled.

Rel. 8.7.2 Business Connect XML
© 2011 Epicor Software Corporation. All rights reserved. 123
The DTD you select in the Document Sent to Vendor area of the New Transaction Map dialog box populates the Target XML column in the Document Sent to Vendor tab. The target XML for this transaction type contains the data elements defined in the DTD file from your trading partner. The data elements display in the order they are defined in the DTD.

Solar Eclipse Business Connect XML Rel. 8.7.2
124 © 2011 Epicor Software Corporation. All rights reserved.
The Reply Document Received from Vendor tab displays the elements in Eclipse for documents that you receive from your vendor. When defining a vendor transaction map, the transaction type you select in the Reply Document Received from Vendor area of the New Transaction Map dialog box populates the Target XML column in the Reply Document Received from Vendor tab. The target XML for this transaction type contains the data elements in Eclipse that are available for the transaction. The elements available are defined in XML database schemas.
Note: If the vendor transaction does not contain a received document, and you select the No Document Will Be Received check box in the Reply Document Received from Vendor area of the New Transaction Map dialog box, the Reply Document Received From Vendor tab is disabled.

Rel. 8.7.2 Business Connect XML
© 2011 Epicor Software Corporation. All rights reserved. 125
The DTD you select in the Reply Document Received from Vendor area of the New Transaction Map dialog box populates the Source XML column in the Reply Document Received from Vendor tab. The source XML for this transaction type contains the data elements defined in the DTD from your trading partner. The data elements display in the order they are defined in the DTD.

Solar Eclipse Business Connect XML Rel. 8.7.2
126 © 2011 Epicor Software Corporation. All rights reserved.
Mapping Selection Criteria Tab Use the Mapping Select Criteria tab to indicate to the system which map to use when it receives or sends an XML document. If the transaction map contains an inbound, received transaction type, the DTD file you select for the received XML document in the New Transaction dialog box populates the Mapping Selection Criteria tab. If the transaction map does not contain an inbound transaction type and is outbound-only, the DTD you select for the outgoing, sent to document populates the Mapping Selection Criteria tab. For additional information, see Defining Mapping Selection Criteria.

Rel. 8.7.2 Business Connect XML
© 2011 Epicor Software Corporation. All rights reserved. 127

Solar Eclipse Business Connect XML Rel. 8.7.2
128 © 2011 Epicor Software Corporation. All rights reserved.
Viewing and Saving Open XML Transaction Maps
As you create and edit transaction maps, the system keeps each map open until you close the transaction using the File menu. Each open transaction map displays as a tab along the top of the main mapping utility window. To view a map that is already open for editing, click the tab for the transaction at the top of the main window.
To close transaction maps:
1. Select the tab of the transaction you want to close.
2. From the File menu, select Close Transaction Map.
To save all open transaction maps:
1. From the File menu, select Save All Transaction Maps.
The system saves all changes to all open transaction maps.
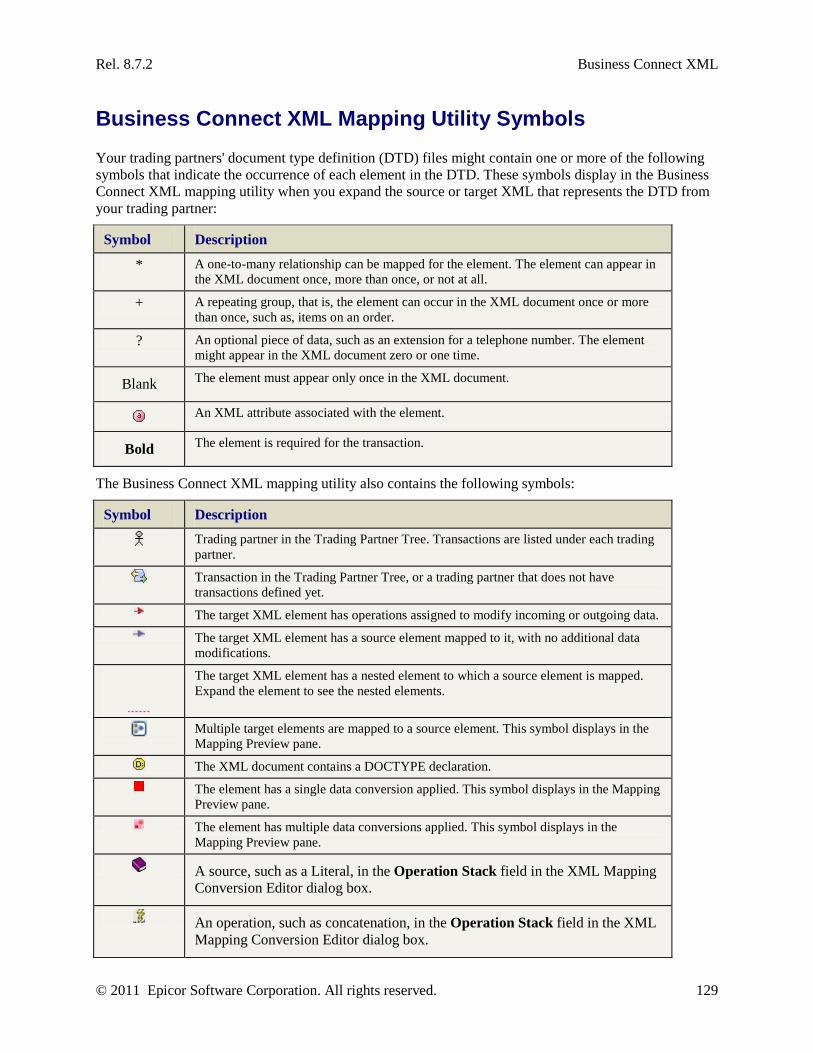
Rel. 8.7.2 Business Connect XML
© 2011 Epicor Software Corporation. All rights reserved. 129
Business Connect XML Mapping Utility Symbols
Your trading partners' document type definition (DTD) files might contain one or more of the following symbols that indicate the occurrence of each element in the DTD. These symbols display in the Business Connect XML mapping utility when you expand the source or target XML that represents the DTD from your trading partner:
Symbol Description
* A one-to-many relationship can be mapped for the element. The element can appear in the XML document once, more than once, or not at all.
+ A repeating group, that is, the element can occur in the XML document once or more than once, such as, items on an order.
? An optional piece of data, such as an extension for a telephone number. The element might appear in the XML document zero or one time.
Blank The element must appear only once in the XML document.
An XML attribute associated with the element.
Bold The element is required for the transaction.
The Business Connect XML mapping utility also contains the following symbols:
Symbol Description
Trading partner in the Trading Partner Tree. Transactions are listed under each trading partner.
Transaction in the Trading Partner Tree, or a trading partner that does not have transactions defined yet.
The target XML element has operations assigned to modify incoming or outgoing data. The target XML element has a source element mapped to it, with no additional data
modifications.
The target XML element has a nested element to which a source element is mapped. Expand the element to see the nested elements.
Multiple target elements are mapped to a source element. This symbol displays in the Mapping Preview pane.
The XML document contains a DOCTYPE declaration. The element has a single data conversion applied. This symbol displays in the Mapping
Preview pane. The element has multiple data conversions applied. This symbol displays in the
Mapping Preview pane.
A source, such as a Literal, in the Operation Stack field in the XML Mapping Conversion Editor dialog box.
An operation, such as concatenation, in the Operation Stack field in the XML Mapping Conversion Editor dialog box.

Solar Eclipse Business Connect XML Rel. 8.7.2
130 © 2011 Epicor Software Corporation. All rights reserved.
Sending and Receiving Customer Transactions Using XML
Using the settings you define in Eclipse and the transaction maps you set up for trading partners in the mapping utility, the system processes transactions and routes them to review queues where appropriate.
Before sending or receiving XML from customers, ensure you have completed the following setup for the customer records in Eclipse. For additional system setup requirements, see Business Connect XML Setup Overview.
• Set system notifications for XML customer transactions.
• Set post locations for XML customer transaction documents.
• Set XML activity triggers.
• Define pricing variance for XML customer transactions.
Use Business Connect XML to receive the following transaction types from customers with whom you do business using XML documents:
• Order submits
• Product inquiries
• Change order requests
• Requests for quotes
• Punch-out setup requests
• B2B connection test
Use Business Connect XML to send the following transaction types to customers with whom you do business using XML documents:
• Order acknowledgements
• Advance ship notices
• Invoices

Rel. 8.7.2 Business Connect XML
© 2011 Epicor Software Corporation. All rights reserved. 131
Reviewing XML Orders From Your Customers
You can receive and process orders from your customers using XML. When a trading partner submits an order to your company using XML, the system does the following:
• Translates the XML document according to the settings in the inbound order submit transaction map for the trading partner.
• Creates a sales order with the initial order status set.
If the order status is mapped and sent in the XML document, the system uses this value. If the XML document either does not have an order status mapped or the data is not included in the XML, the system uses the default new order status set in the Customer record. If the customer record does not have a default new order status set, the system defaults to Bid.
• Places the order in the Remote Order Entry Review Queue if the Log Bids For Review field in the customer record is set to New Order. If the initial status for inbound orders for the customer is set to Order, the system places the order in the Remote Order Entry Review Queue if the Log Orders for Review field in the customer record is set to New Order.
If an item on the order is backordered, the system assigns the BkOrd status to the queue entry.
• Sends a message to the user responsible for reviewing the Remote Order Entry Review Queue for the customer. This person reviews the order, makes any needed edits, and then changes the order status to an open status.
• Archives the incoming XML document in Remote Archive Maintenance.
To display the Remote Order Entry Review Queue:
1. Display the character-based system.
Note: The Remote Order Entry Queue has not been incorporated into Solar Eclipse as of this release.
2. From the System > Custom menu, select Remote Review Queues and select Order Entry Queue to display the Selection Criteria screen.
3. In the Start Date field and End Date field, enter the first and last dates in the range for which to display documents in the queue.
For example, to see all the orders that you received from April 1, 2004 to April 15, 2004, enter 04/01/04 in the Start Date field and 04/15/04 in the End Date field.
The fields default to the date one week before the current date and to the current date.

Solar Eclipse Business Connect XML Rel. 8.7.2
132 © 2011 Epicor Software Corporation. All rights reserved.
4. Enter additional selection criteria and press Esc to populate the BCXML Remote Order Entry Review Queue.
Field Description Remote Type The type of remote transaction you want to view, for example, XML or EDI.
Note: The current release supports only XML order acknowledgments in the Remote P/O Acknowledgment Review Queue.
User ID The user ID to display only XML order acknowledgments that a user is assigned to review.
Branch The branch from which the items ordered will be shipped. To review orders for all branches, leave this field blank.
Note: This field respects the setting in the Remote Order Review Queue Branch control maintenance record.
The summary information for each acknowledgement that meets the criteria displays.
Field Description SO# The sales order number the order references.
Customer The bill-to customer for the order.
Status The current shipment status of the order, such as B for bid or A for ship when available.
Order Amount The total dollar amount of the order.
Type The type of transmission, such as XML or EDI. Note: The current release supports only XML orders in the Remote Order Entry Review Queue.
Error Identifies any errors that occurred in the transaction.
Note: To refine or change your search, use the Select hot key and enter new search criteria.
To research orders with errors:
1. Display the Remote Order Entry Review Queue.
2. Use any of the following hot keys to research orders with errors:
To... Use this hot key... view the associated sales order in view-only mode View

Rel. 8.7.2 Business Connect XML
© 2011 Epicor Software Corporation. All rights reserved. 133
To... Use this hot key... make changes to the associated sales order, such as overwriting any ***B2B Product Not Found*** items with the correct product, or updating the ship via for an order
Edit
Note: Do not delete a product-not-found item or add any new items to the original generation order generation. The information provided in the purchase order is repeated back in the order acknowledgement and the invoice documents. Add any new items to new order generations.
view the error message for an order Errors
display the archived XML document as the system received it
Detail The Remote Archive Detail screen displays. Use the Edit hot key to edit the contents of the document and the Requeue hot key to reprocess the document.
More Options When Reviewing XML Orders From Customers
The following are additional options you can use when reviewing remote orders in the Remote Order Entry Review Queue:
To... Use this hot key... delete an order that no longer requires your attention
Clear
to delete all orders older than a designated date from the queue
Clear By Date
to delete orders that successfully processed with no errors
Clear Orders W/O Errs

Solar Eclipse Business Connect XML Rel. 8.7.2
134 © 2011 Epicor Software Corporation. All rights reserved.
Processing XML Product Inquiries
When a trading partner submits a request for prices and product availability to your company using XML, the system does the following:
• Translates the XML document according to the settings in the inbound price and availability transaction map for the trading partner.
• Searches the price and available inventory information in the system.
• Sends a response using the product inquiry response transaction map for the trading partner.
• Archives the incoming XML document in Remote Archive Maintenance.
The system retrieves the price and available inventory information and generates the response automatically.

Rel. 8.7.2 Business Connect XML
© 2011 Epicor Software Corporation. All rights reserved. 135
Reviewing XML Change Order Requests From Your Customers
Your customers might send you changes to existing orders using an inbound XML change order request. When the system receives an XML change order request, it does the following:
• Looks for a sales order number that matches one that exists in your system.
• Processes the change order request using the change order transaction map you defined for the trading partner requesting the change.
• Creates a report that contains the requested changes.
• Saves the report to the Hold file of the user entered in the Default User Messaged With Order Changes field in the Remote Order Entry Parameters screen for the customer, and sends a system notification message to that user.
• Places the order in the Remote Order Entry Review Queue if the Log Bids For Review field in the customer record is set to Changes. If the initial status for inbound orders for the customer is set to Order, the system places the order in the Remote Order Entry Review Queue if the Log Orders for Review field in the customer record is set to Changes.
Note: If a default user is not defined for change order notifications in the customer record, the system notifies the user identified for order changes in the Default Remote Order Entry (ROE) Messaging control maintenance record.
The identified user reviews the requested changes to the order and updates the order in the system manually. The system does not update existing orders automatically with requested changes because an order could be picked and on a truck at the time the customer makes the change request.
After making the requested changes, you can send an XML order acknowledgement. The system transmits the acknowledgment to customers when you set the print status of the order to 2 for B2B.

Solar Eclipse Business Connect XML Rel. 8.7.2
136 © 2011 Epicor Software Corporation. All rights reserved.
Reviewing XML Quote Requests From Your Customers
You can receive quote requests from your customers using XML. When a trading partner submits a quote request to your company using XML, the system does the following:
• Translates the XML document according to the settings in the inbound quote request transaction map for the trading partner.
• Creates a sales order with an order status of Bid.
• Places the order in the Remote Order Entry Review Queue if the Log Bids For Review field in the customer record is set to New Order. If the initial status for inbound orders for the customer is set to Order, the system places the order in the Remote Order Entry Review Queue if the Log Orders for Review field in the customer record is set to New Order.
• Sends a message to the user responsible for reviewing the Remote Order Entry Review Queue. This person reviews the order, makes any needed edits, and then changes the order status to an open status.
• Archives the incoming XML document in Remote Archive Maintenance.
To review an XML quote request:
1. Display the character-based system.
Note: The Remote Order Entry Queue has not been incorporated into Solar Eclipse as of this release.
2. From the System > Custom menu, select Remote Review Queues and select Order Entry Queue to display the Selection Criteria screen.
3. In the Start Date field and End Date field, enter the first and last dates in the range for which to display documents in the queue.
For example, to see all the orders that you received from April 1, 2004 to April 15, 2004, enter 04/01/04 in the Start Date field and 04/15/04 in the End Date field.
The fields default to the date one week before the current date and to the current date.
4. Enter additional selection criteria and press Esc to populate the Remote Order Acknowledgement Review Queue.
Field Description Remote Type The type of remote transaction you want to view, for example, XML or EDI.
Note: The current release supports only XML order acknowledgments in the Remote P/O Acknowledgment Review Queue.
User ID The user ID to display only XML order acknowledgments that a user is assigned to review.
Branch The branch from which the items ordered will be shipped. To review orders for all branches, leave this field blank.
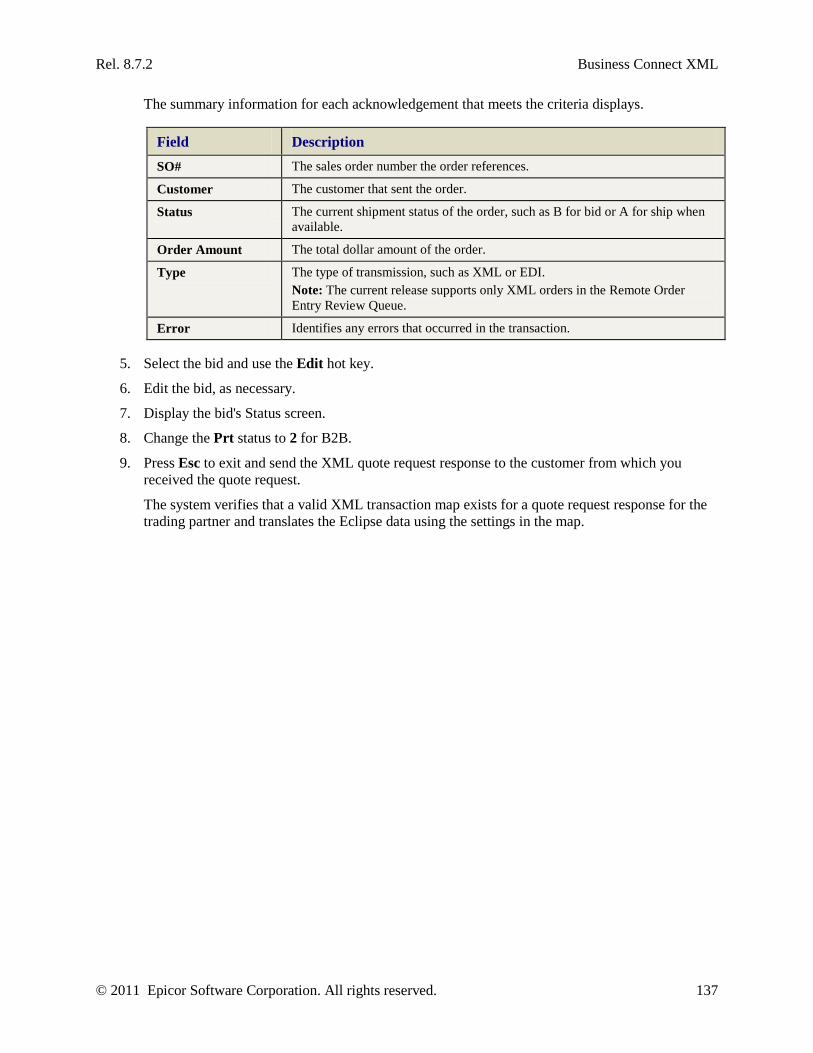
Rel. 8.7.2 Business Connect XML
© 2011 Epicor Software Corporation. All rights reserved. 137
The summary information for each acknowledgement that meets the criteria displays.
Field Description SO# The sales order number the order references.
Customer The customer that sent the order.
Status The current shipment status of the order, such as B for bid or A for ship when available.
Order Amount The total dollar amount of the order.
Type The type of transmission, such as XML or EDI. Note: The current release supports only XML orders in the Remote Order Entry Review Queue.
Error Identifies any errors that occurred in the transaction.
5. Select the bid and use the Edit hot key.
6. Edit the bid, as necessary.
7. Display the bid's Status screen.
8. Change the Prt status to 2 for B2B.
9. Press Esc to exit and send the XML quote request response to the customer from which you received the quote request.
The system verifies that a valid XML transaction map exists for a quote request response for the trading partner and translates the Eclipse data using the settings in the map.

Solar Eclipse Business Connect XML Rel. 8.7.2
138 © 2011 Epicor Software Corporation. All rights reserved.
Processing XML Punch-Out Requests
Use Business Connect XML to process inbound punch-out requests from procurement marketplace software, such as the Ariba Supplier Network. When a user requests a product on the source's web site, the site requests to access, or "punch-in," to your web site to view your catalog. Using a punch-out system allows your buyers to access your most current catalog and pricing information at any time of day.
When the Eclipse system receives a punch-out setup request, it does the following:
• Translates the XML document according to the settings in the websession transaction map for the trading partner.
• Sends a URL and websession login ID using the websession response transaction map for the trading partner.
• Archives the XML document in Remote Archive Maintenance.
As a customer shops and places orders for items from your catalog, the source site routes XML order requests through to the Eclipse system for order fulfillment. For information about how to process inbound order requests, see Reviewing XML Orders From Your Customers.

Rel. 8.7.2 Business Connect XML
© 2011 Epicor Software Corporation. All rights reserved. 139
Sending XML Order Acknowledgements to Your Customers
When a customer sends an inbound XML order request, the system does the following to generate the order and automatically send an order acknowledgement. You can also send an other acknowledgement manually.
Note: Before the system can send a purchase order acknowledgement to a customer, create an XML transaction map for an order acknowledgement transaction type, set activity triggers, and define document post locations for the customer.
• Translates the XML document according to the settings in the inbound order submit transaction map for the trading partner.
• Creates a sales order with the initial order status set.
If the order status is mapped and sent in the XML document, the system uses this value. If the incoming XML document either does not have an order status mapped or the data is not included in the XML, the system uses the default new order status set in the Customer record. If the customer record does not have a default new order status set, the system defaults to Bid.
• Places the order in the Remote Order Entry Review Queue if the Log Bids For Review field in the customer record is set to New Order. If the initial status for inbound orders for the customer is set to Order, the system places the order in the Remote Order Entry Review Queue if the Log Orders for Review field in the customer record is set to New Order.
• Sends a message to the user responsible for reviewing the Remote Order Entry Review Queue for the customer. This person reviews the order, makes any needed edits, and then changes the order status to an open status.
• Archives the incoming XML document in Remote Archive Maintenance.
• When the order has been processed, the system sends the XML order acknowledgement to the customer.
To manually send an XML purchase order acknowledgement:
1. From the Orders > Queues menu, select Remote Order Entry Review to display the Remote Order Review Queue window.
2. Select the XML bid and double-click it to display the bid in sales order entry.
3. Edit the order, as necessary.
4. Display the order's Status tab.
5. Change the order status to an open status, such as Call When Complete.
Note: The order status cannot be Bid, Invoiced, or Canceled for the system to send an order acknowledgement using XML.
6. In the Print field, change the print status to 2.
7. Exit the window and process the order.
8. If prompted, select the type of acknowledgement to send.
The system verifies that a valid XML transaction map is created for an order acknowledgement for the trading partner and translates the Eclipse data using the settings in the map.
Solar Eclipse Business Connect XML Rel. 8.7.2
140 © 2011 Epicor Software Corporation. All rights reserved.
Sending XML Advance Ship Notices to Your Customers
Using XML, you can set the system to create and send an Advance Ship Notice (ASN) to your trading partner, advising them of inventory you are going to ship in their next order.
Note: Before the system can send an advanced ship notice to a customer, create an XML transaction map for an advanced ship notice transaction type, set activity triggers, and define document post locations for the customer.
You can set the system to create and send an ASN from the following locations:
• From the Shipping Manifest Queue after the manifest is created and locked. Use the Manifest Lock activity trigger with the B2B ASNs activity description to set up this process.
• From an order generation when the Prt field on the Status screen is set to 2.
When you send an ASN using XML, the system verifies that the customer has a transaction map defined for the outbound Advanced Ship Notice transaction type and archives the XML sent in Remote Archive Maintenance.
To send an XML ASN from a shipping manifest:
1. Set the Manifest Lock activity trigger for the customer to B2B ASNs.
When an order for the customer is placed on a manifest in the Shipping Manifest Queue and the manifest is locked, the system generates the ASN and sends it using the transaction map defined for an outbound ASN transaction for the trading partner.
To send an XML ASN from a sales order:
1. Open the order for which you want to send the advance ship notice document.
2. Display the order's Status tab and change the order status to Invoice.
3. In the Print field, enter 2 for B2B.
4. Exit the window and process the order.
5. If prompted, select the type of ASN to send.
The system verifies that a valid XML transaction map exists for an ASN for the trading partner and translates the Eclipse data using the settings in the map.
Rel. 8.7.2 Business Connect XML
© 2011 Epicor Software Corporation. All rights reserved. 141
Sending XML Invoices to Your Customers
The system transmits outbound invoices using XML when the Prt field on the Status screen of an invoiced order generation is set to 2. Before the system can send an XML invoice to a customer, create an XML transaction map for an outbound invoice transaction type for the trading partner.
Note: Before the system can send an invoice to a customer, create an XML transaction map for an invoice transaction type, set activity triggers, and define document post locations for the customer.
When you send an invoice using XML, the system verifies that the customer has a transaction map defined for the outbound invoice transaction type and archives the XML sent in Remote Archive Maintenance.
Single Invoice Processing
To send or re-send a single invoice using XML, change the print status of the order.
To send an individual XML invoice from a sales order:
1. Display an invoiced order in Sales Order Entry.
2. Display the order's Status tab.
3. In the Printt field of the generation for which you want to send an invoice, select 2 for B2B.
4. Exit and process the order.
5. If prompted, select the type of invoice to send.
The system verifies that a valid XML transaction map is created for an invoice for the trading partner and translates the Eclipse data using the settings in the map.
Batch Invoice Processing
If you flag your trading partner's customer record for XML and set the Batch Invoice in Lieu of Print activity trigger in the record to B2B Sales Doc, the system sets the print status during batch invoice processing and then sends the invoice.
To flag a customer for XML batch processing:
1. From the Maintenance menu, select Customer to display the Customer Maintenance window.
2. In the Customer field, enter the customer's name and press Enter to display the record.
3. From the Pricing menu, select Price Information to display the Customer Pricing Information window.
4. In the Invoice Print Copies field, enter the number of invoices you want to print during the batch processing cycle.
5. Return to the customer record.
6. Save your changes and close the customer record.
When you run the batch printing program, the system checks the setting in the Invoice Print Copies field and sends the B2B Sales Doc, as specified in the Batch Invoice in Lieu of Print activity trigger. The system sends the invoice using the outbound invoice transaction map defined for the customer.

Solar Eclipse Business Connect XML Rel. 8.7.2
142 © 2011 Epicor Software Corporation. All rights reserved.
Processing B2B Connection Test Transactions From Your Customers
If you are using the Eclipse B2B Commerce companion product for electronic trading with customers who also run Eclipse, your system processes test transactions to verify the communication connection between your Eclipse system and your customer's Eclipse system. When a trading partner submits a B2B connection test to your company using XML, your system does the following:
• Translates the XML request according to the settings in the inbound customer B2B connection test transaction map for the trading partner.
• Verifies the basic credential information passed in the transaction.
• Sends a successful HTTP 200 response back to your customer.
• Archives the incoming XML document in Remote Archive Maintenance.

Rel. 8.7.2 Business Connect XML
© 2011 Epicor Software Corporation. All rights reserved. 143
Sending and Receiving Vendor Transactions Using XML
Using the settings you define in Eclipse and the transaction maps you set up for trading partners in the mapping utility, the system processes transactions and routes them to review queues where appropriate.
Before sending or receiving XML from vendors, ensure you have completed the following setup for vendor records in Eclipse. For additional system setup requirements, see Business Connect XML Setup Overview.
• Set vendor access information for XML documents.
• Set vendor activity triggers for XML documents.
• Set post locations for XML vendor transaction documents.
Use Business Connect XML to receive the following transaction types from vendors with whom you do business using XML documents:
• Purchase order acknowledgements
• Advance ship notices
• Invoices
• Product inquiries
Use Business Connect XML to send the following transaction to vendors with whom you do business using XML documents:
• Purchase orders
• Change order requests
• Direct orders
• B2B connection tests

Solar Eclipse Business Connect XML Rel. 8.7.2
144 © 2011 Epicor Software Corporation. All rights reserved.
Reviewing XML Order Acknowledgements From Your Vendors
An XML trading partner might send an XML acknowledgement document after they receive a purchase order from you.
Note: The current release supports only XML order acknowledgements in the Remote Order Acknowledgment Review Queue.
When the system receives the order acknowledgement, it does the following:
• Translates the XML document according to the settings in the inbound order acknowledgement transaction map for the trading partner.
• Adds the order acknowledgement to the Remote Order Acknowledgement Review Queue.
• Locates the order number referenced in the acknowledgement and matches the items to an open purchase order generation in the system.
• Sets the match level depending on the matching results:
Match Level Description N No match was found. This level can occur for any of the following
reasons: • The acknowledgement contains an invalid order number. • The referenced order does not contain an open generation. • The order has an open generation, but is locked by another user or
process. • The system cannot match any items on the acknowledgement with
items and quantities on any open generation of an open purchase order.
S Some items and quantities match.
G The items and quantities have an exact match, but the dollar amount is not within the acceptable over or short range.
P All items and quantities are perfect matches.
• Archives the order acknowledgement document in Remote Archive Maintenance.
Review the orders in the queue to verify which acknowledgements matched successfully to existing purchase order generations in your system.
To display the Remote Order Acknowledgment Review Queue:
1. Display the character-based system.
Note: The Remote P/O Acknowledgement Queue has not been incorporated into Solar Eclipse as of this release.
2. From the System > Custom menu, select Remote Review Queues and select P/O Acknowledgment Queue to display the Selection Criteria screen.
3. In the Start Date field and End Date field, enter the first and last dates in the range for which to display documents in the queue.

Rel. 8.7.2 Business Connect XML
© 2011 Epicor Software Corporation. All rights reserved. 145
For example, to see all the order acknowledgements that you received from April 1, 2004 to April 15, 2004, enter 04/01/04 in the Start Date field and 04/15/04 in the End Date field.
The fields default to the date one week before the current date and to the current date.
4. Enter additional selection criteria and press Esc to populate the Remote Order Acknowledgement Review Queue:
Field Description Remote Type The type of remote transaction you want to view, for example, XML or EDI.
Note: The current release supports only XML order acknowledgments in the Remote P/O Acknowledgment Review Queue.
User ID The user ID to display only XML order acknowledgments that a user is assigned to review.
Ship Branch The branch to which the items ordered will be shipped. To review acknowledgments for all branches, leave this field blank.
Vendor The vendor to whom you sent the original purchase order. To review acknowledgments from all vendors, leave this field blank.
PO# The order number to search for a specific order.
The summary information for each acknowledgement that meets the criteria displays:
Field Description PO# The purchase order number the acknowledgement references.
Vendor The vendor who received your purchase order and sent you the acknowledgement.
M (Match Level) The system-assigned match level. A dollar sign ($) in this field indicates there is a message attached. Use the Message hot key to view the message.
Post Date The date the system received the acknowledgement document.
RcvBr The receiving branch of the purchase order, if noted in the acknowledgment.
Ship Via The carrier handling the shipment, such as UPS, if noted in the acknowledgement.
Type The transmission type, such as XML or EDI. Note: The current release supports only XML documents in the Remote P/O Acknowledgment Review Queue.
Note: To refine or change your search, use the Select hot key and enter new search criteria.
To research unsuccessful acknowledgment matches:
1. Display the Remote Order Acknowledgement Review Queue.

Solar Eclipse Business Connect XML Rel. 8.7.2
146 © 2011 Epicor Software Corporation. All rights reserved.
2. Use any of the following hot keys to research unsuccessful matches:
To... Use this hot key... display messages attached to the acknowledgement Message
view the associated order in view-only mode View
display the archived XML document as the system received it
Detail The Remote Archive Detail screen displays. Use the Edit hot key to edit the contents of the document and the Requeue hot key to reprocess the document.
display the detailed order acknowledgement to research discrepancies, such as price mismatches
Detail then Vendor Item Detail The system displays the order acknowledgement in the Hold Entry Pre-View screen.
More Options When Reviewing XML Order Acknowledgements From Vendors
The following are additional options you can use when reviewing XML order acknowledgements in the Remote Order Acknowledgment Review Queue:
To... Use this hot key... delete an acknowledgment that no longer requires your attention Clear
delete all acknowledgments older than a designated date from the queue
Clear By Date
edit the associated order within Eclipse Edit
clear order acknowledgements with a perfect match level from the queue
Clear Matches

Rel. 8.7.2 Business Connect XML
© 2011 Epicor Software Corporation. All rights reserved. 147
Reviewing XML Advanced Ship Notices From Your Vendors
When an XML trading partner ships an order to you, they might send an advance ship notice (ASN) using XML. This document lists the items from your original submitted purchase order that the vendor is shipping to you.
Note: The current release supports only XML advance ship notices in the Remote Advanced Ship Notice Review Queue.
When the system receives an ASN from a vendor using XML, it does the following:
• Translates the XML document according to the settings in the inbound order submit transaction map for the trading partner.
• Adds the ASN to the Remote Advanced Ship Notice Review Queue.
• Locates the purchase order number referenced in the ASN, and matches the items to an open generation on the purchase order. The system looks at the total number or line items and quantities to match line items.
• Sets the match level depending on the matching results:
Match Level Description N No match was found. This level can occur for any of the following reasons:
• The ASN contains an invalid purchase order number. • The referenced purchase order does not have an open generation. • They purchase order has an open generation, but is locked by another user or
process. • The system cannot match any items on the ASN with items and quantities on any
open generation of the referenced purchase order.
S Some items and quantities match.
G The items and quantities have an exact match, but the dollar amount is not within the acceptable over or short range.
P All items and quantities are perfect matches.
• If the system finds an exact match, it changes the generation Prt status from Open to Vendor Shipment Notification.
If there is an entry in the Freight Days field on the Miscellaneous Vendor Information screen for the vendor who sent the ASN, the system adds that number of days to the ship date indicated on the ASN to determine the expected arrival date of the order.
• If the system does not find an exact match, it transfers the matched items from the open generation to a new Vendor Shipment Notification generation.
• Posts the "B2B Creating Vendor Ship Notification" message to the purchase order change log for ASNs that matched all or some items.
Use the ASN listed in the Remote Advanced Ship Notice Review Queue to review the items on the shipment before the shipment arrives.
Solar Eclipse Business Connect XML Rel. 8.7.2
148 © 2011 Epicor Software Corporation. All rights reserved.
To display the Remote Advanced Ship Notice Review Queue:
1. Display the character-based system.
Note: The Remote Advanced Ship Notice Review Queue has not been incorporated into Solar Eclipse as of this release.
1. From the System > Custom menu, select Remote Review Queues and select Advanced Ship Notice Queue to display the Selection Criteria screen.
2. In the Start Date field and End Date field, enter the first and last dates in the range for which to display ASNs.
For example, to see all the ASNs that you received from April 1, 2004 to April 15, 2004, enter 04/01/04 in the Start Date field and 04/15/04 in the End Date field.
The fields default to the date one week before the current date and to the current date.
3. Enter additional selection criteria and press Esc to populate the Remote Advanced Ship Notice Review Queue:
Criteria Description Remote Type The type of remote transaction you want to view, for example XML or
EDI.
Note: The current release supports only XML ASNs in the Remote Advanced Ship Notice Review Queue.
User ID The user ID to display only ASN documents assigned to the user to review. To review ASNs assigned to all users, leave this field blank.
Ship Branch The branch to which items on the ASN are being shipped. To review ASNs for all branches, leave this field blank.
Vendor The vendor who shipped the items. To review ASNs from all your vendors, leave this field blank.
PO # The order number associated with the ASN to search for a specific order.
The summary information for each remote ASN displays:
Field Description PO# The purchase order number that the ASN references.
Vendor The vendor who sent the ASN.
M (Match Level) The system-assigned match level. A dollar sign ($) in this field indicates there is a message attached. Use the Message hot key to view the message.
Ship Date The date the vendor shipped or plans to ship the items.
RcvBr The branch that is scheduled to receive the shipment.
Ship Via The carrier handling the shipment, if noted in the ASN.
Rel. 8.7.2 Business Connect XML
© 2011 Epicor Software Corporation. All rights reserved. 149
Field Description Type The transmission type, such as XML or EDI.
Note: The current release supports only XML ASNs in the Remote P/O Advanced Ship Notice Review Queue.
Note: To refine or change your search, use the Select hot key and enter new search criteria.
To research unsuccessful XML advance ship notice matches:
1. Display the Remote Advanced Ship Notice Review Queue.
2. Use any of the following hot keys to research unsuccessful matches:
To... Use this hot key... display messages associated with an ASN Message
view the associated purchase order View
display the archived ASN document as the system received it
Detail The Remote Archive Detail screen displays. Use the Edit hot key to edit the contents of the document and the Requeue hot key to reprocess the document.
display the detailed ASN to research discrepancies, such as total number of items ordered versus that shipped
Detail then Vendor Item Detail The system displays the ASN in the Hold Entry Pre-View screen.
More Options When Reviewing XML Advanced Ship Notices From Vendors
The following are additional options you might use when reviewing ASNs in the Remote Advanced Ship Notice Review Queue:
To... Use this hot key... delete an ASN that no longer requires your attention
Clear
delete all ASNs older than a designated date from the queue
Clear By Date Clearing ASNs removes them from the queue. You can still view the documents in Remote Archive Maintenance.
edit the associated order within Eclipse Edit
clear ASNs that match perfectly from the queue Clear Matches

Solar Eclipse Business Connect XML Rel. 8.7.2
150 © 2011 Epicor Software Corporation. All rights reserved.
Reprocessing XML Invoices From Your Vendors
If the system receives an invoice through XML before you receive the items from the vendor in the system, the entry in the Remote Invoice Review Queue shows that the system did not find a matching received purchase order. After you receive the order into the system, you can reprocess the invoice. You can also reprocess invoices after making changes to matching purchase orders.
We recommend that you reprocess invoices in the queue daily. You can also schedule the process to run automatically.
Note: The system archives the XML invoices it receives in Remote Document Maintenance.
To reprocess an XML invoice:
1. Display XML invoices in the Remote Invoice Review Queue and select the invoice you would like to reprocess.
2. Use the Detail hot key to display the Remote Archive Detail screen, which displays the XML received for the invoice.
3. Use the Requeue hot key to resubmit the XML document.

Rel. 8.7.2 Business Connect XML
© 2011 Epicor Software Corporation. All rights reserved. 151
Processing XML Product Inquiries
When a trading partner submits a request for prices and product availability to your company using XML, the system does the following:
• Translates the XML document according to the settings in the inbound price and availability transaction map for the trading partner.
• Searches the price and available inventory information in the system.
• Sends a response using the product inquiry response transaction map for the trading partner.
• Archives the incoming XML document in Remote Archive Maintenance.
The system retrieves the price and available inventory information and generates the response automatically.

Solar Eclipse Business Connect XML Rel. 8.7.2
152 © 2011 Epicor Software Corporation. All rights reserved.
Sending XML Purchase Orders to Your Vendors
The system transmits purchase orders to vendors using XML when you set the print status on the purchase order to 2. You can also send a purchase order to your vendor using the Eclipse B2B Commerce screen in sales order entry if you are procuring items for an order.
Note: Before the system can send a purchase order to a vendor, create an XML transaction map for a purchase order transaction type, set activity triggers, and define document post locations for the vendor.
When you send a purchase order using XML, the system verifies that the vendor has a transaction map defined for an outbound purchase order transaction type and archives the XML sent in Remote Archive Maintenance.
To send an XML purchase order to your vendor:
1. Display an open order in Purchase Order Entry.
2. Display the order's Status tab.
3. In the Print field, enter 2 for B2B Transmit.
Note: You can also send a purchase order to your vendor using the Eclipse B2B Commerce screen in sales order entry if you are procuring items for an order.
4. Exit the window, process the purchase order, and send it to the vendor.
5. If prompted, select the type of purchase order document to send.
The system verifies that a valid XML transaction map exists for a purchase order for the trading partner and translates the Eclipse data using the settings in the map.

Rel. 8.7.2 Business Connect XML
© 2011 Epicor Software Corporation. All rights reserved. 153
Sending XML Change Order Requests to Your Vendors
The system transmits changes to purchase orders to vendors using XML when you set the print status on the purchase order to 2.
Note: Before the system can send a change order request to a vendor, create an XML transaction map for a change order transaction type, set activity triggers, and define document post locations for the vendor.
Before you can send a change order request to an XML trading partner, complete the following tasks:
• Set vendor access information for posting documents to the trading partner's web site.
• Create an XML transaction map for an outbound XML order submit transaction type for the trading partner.
When you send a change order request using XML, the system verifies that the vendor has a transaction map defined for an outbound purchase order transaction type and archives the XML sent in Remote Archive Maintenance.
To send an XML change order request to your vendor:
1. Display an open order in Purchase Order Entry.
2. Make order changes, as necessary.
3. Display the order's Status tab.
4. In the Print field, enter 2 for B2B Transmit.
5. Exit the window, process the purchase order, and send it to the vendor.
6. If prompted, select the type of purchase order document to send.
The system verifies that a valid XML transaction map exists for a purchase order for the trading partner and translates the Eclipse data using the settings in the map.

Solar Eclipse Business Connect XML Rel. 8.7.2
154 © 2011 Epicor Software Corporation. All rights reserved.
Sending XML Direct Orders to Your Vendors
A direct order is similar to a purchase order that you send to your vendor to request items for your warehouse to fill outstanding orders. However, using a direct order, you instruct the vendor to ship the ordered items directly to your customer, not to you.
The system transmits direct orders to vendors using XML when you set the print status on a direct sales order generation to 2 and select the Direct Order Submit transaction document. The direct sales order generation contains the items that you are acquiring from your vendor to fill the order. You can also send a direct order to your vendor using the Eclipse B2B Commerce screen in sales order entry if you are procuring items for an order and want to ship them directly to your customer.
Note: Before the system can send a direct order to a vendor, create an XML transaction map for a direct order transaction type that contains the ship-to and bill-to information for the order, set activity triggers, and define document post locations for the vendor.
When you send a direct order using XML, the system verifies that the vendor has a transaction map defined for an outbound direct order transaction type and archives the XML sent in Remote Archive Maintenance.
To send an XML direct order to your vendor:
1. Display an open order in Sales Order entry.
2. Display the order's Status tab and select the direct order generation you want to send.
3. In the Print field for that generation, enter 2 for B2B Transmit.
Note: You can also send a direct order to your vendor using the Eclipse B2B Commerce screen in sales order entry if you are procuring items for an order and want to ship them directly to your customer.
4. Exit the window, process the order, and send it to the vendor.
5. If prompted, select the Direct Order Submit document.
The system verifies that a valid XML transaction map exists for a purchase order for the trading partner and translates the Eclipse data using the settings in the map.

Rel. 8.7.2 Business Connect XML
© 2011 Epicor Software Corporation. All rights reserved. 155
Testing Vendor B2B Connections with XML
If you are using the Eclipse B2B Commerce companion product for electronic trading with your vendors who also run Eclipse, test the B2B communication connection between your Eclipse application and your vendors from the Vendor B2B Setup screen in Eclipse. When you test the vendor B2B communication, your system and your vendor's system do the following:
• Your system translates the XML request according to the settings in the outbound vendor B2B connection test transaction map.
• Your vendor's system verifies the basic credential information passed in the transaction and sends a message back to your system. If the connection test was successful, your vendor's system sends HTTP 200 response back to your system and Eclipse displays the following message in the Vendor B2B Setup screen: Good Customer Number and Password. Connection was successful.
If the connection test was not successful, Eclipse displays troubleshooting information in the Vendor B2B Setup scree. For example, the message might indicate that the password you specified is invalid, or the web server would not allow a certain method. The message often displays detailed HTML information that you can use to determine the connection problem.
• Your system archives the outgoing XML document in Remote Archive Maintenance.
To send a vendor B2B connection test transaction:
1. Display the character-based system.
Note: The B2B connection test functionality has not been incorporated into Solar Eclipse as of this release.
2. From the Files menu, select Vendor to display the Vendor Maintenance screen.
3. Open or create a vendor maintenance record.
4. Use the WWW hot key to display the Internet Information Maintenance screen.
5. Use the B2B Commerce hot key to open the vendor's Eclipse B2B Commerce Vendor Maintenance screen.
6. Enter the login information you use to access the vendor’s web site:
Field Description Customer ID Your company-assigned login identification.
Login The login ID for the customer.
Password Your company-assigned login password.
7. Use the B2B Post URL hot key and select Connection Test.
The system uses the location in the Default transaction type if all transactions' posts go to the same location for the vendor. If the vendor requires the connection test posts to go to different locations, set the URL for the connection test URL. If not, use the default post URL.
8. In the B2B Post URL field, enter the post location for XML documents for the customer.
9. Press Esc until you return to the Vendor Maintenance screen.
10. Press Esc to save the vendor record and exit the screen.
Solar Eclipse Business Connect XML Rel. 8.7.2
156 © 2011 Epicor Software Corporation. All rights reserved.
11. Use the Test Connection hot key to test your connection access to the vendor. The system attempts to connect to the vendor's URL, using your login information.

Rel. 8.7.2 Business Connect XML
© 2011 Epicor Software Corporation. All rights reserved. 157
Reviewing Remote Transactions with Errors
The Remote Error Review Queue displays inbound and outbound documents for remote transactions, such as XML and EDI, that contain errors that cause them to not process correctly. From the Remote Error Review Queue, you can drill down into the details of a document to identify errors, edit the document, and reprocess it through the system.
Note: The current release supports only XML documents in the Remote Error Review Queue.
If you receive or send a document with errors, the system does the following:
• Creates an entry in the Remote Error Review Queue.
• Sends a system message to the user responsible for reviewing the Remote Error Review Queue.
• Archives the document in Remote Archive Maintenance.
You can complete the following tasks in the Remote Error Review Queue:
• Review XML remote transactions with errors.
• View or edit a remote document.
• View or edit transaction in Eclipse that are associated with the remote document.
• Delete documents from the queue.
To review remote transactions with errors:
1. Display the character-based system.
The Error Queue functionality has not been incorporated into Solar Eclipse as of this release.
2. From the System > Custom menu, select Remote Review Queues and select Error Queue to display the Selection Criteria screen.
3. In the Start Date field and End Date field, enter the first and last dates in the range for which to display documents in the queue.
For example, to see all the documents that were received or transmitted with errors from April 1, 2004 to April 15, 2004, enter 04/01/04 in the Start Date field and 04/15/04 in the End Date field.
The fields default to the date one week before the current date and to the current date.
4. Enter additional selection criteria in the remaining fields to filter the documents displayed in the queue.
Field Description Remote Type The type of remote documents you want to view, such as XML or EDI.
Note: The current release supports only XML documents in the Remote Error Review Queue.

Solar Eclipse Business Connect XML Rel. 8.7.2
158 © 2011 Epicor Software Corporation. All rights reserved.
Field Description In/Out The document type to display. Press F10 and select Inbound to view only
documents you received that contained errors or Outbound to view only documents you sent that contained errors. Leave this field blank to view both inbound and outbound documents.
Search String Any word, phrase, or numerical value within a document. For example, if you want to see only documents that contain a specific product or trading partner, enter that product or trading partner name here. The system searches the document transactions for that string.
5. Press Esc to display the Remote Error Review Queue screen with the documents in error that match your search criteria.
The screen displays details about each document the system sent or received.
Field Description Error The type of error the system encountered when processing the document.
For example, an error message may indicate that the system could not find an entity for the transaction or that it could not compile the XQuery code for an XML transaction. Select an error message and use the Message hot key to display the entire message.
* (Archive Type) The document type, inbound or outbound. I(Inbound) – A document the system received. If the Eclipse system initiated the transaction, an incoming document is typically a response from the receiving source. O(Outbound) – A document the system sent. If your trading partner initiated the transaction, the outgoing document is typically an Eclipse system response to the sending source. Each transmission typically contains both an incoming and an outgoing document.
Type The remote type, such as XML or EDI.
Note: The current release supports only XML documents in the Remote Error Review Queue.
Date The date the document was received or sent.
Time The time the document was received or sent.
Note: To refine or change your search, use the Select hot key and enter new search criteria.
To view or edit a remote document's transmission:
1. View documents in the Remote Error Review Queue.
2. Select the document to view.
3. Use the Detail hot key to display the Remote Archive Detail screen, which displays the document as it was received from or sent to the Eclipse system.
Note: Use this function to identify potential problems that are causing a document to not process correctly.

Rel. 8.7.2 Business Connect XML
© 2011 Epicor Software Corporation. All rights reserved. 159
4. Use the following hot keys, if necessary:
To... Use this hot key...
edit the contents of the document Edit The screen changes to an edit mode. Make any changes necessary to correct the document and press Esc.
reprocess a document Requeue Requeue the document after you have identified errors and made any necessary changes.
5. Press Esc to return to the Remote Archive Maintenance screen.
To view or edit transactions in Eclipse that are associated with a remote document:
1. View documents in the Remote Error Review Queue.
2. Select the document to view or edit.
3. Do one of the following:
• Use the View hot key to open the transaction in view-only mode. For some transactions, such as a stock inquiry, select the inquiry type, such as Future Ledger, History Ledger, or Product Maintenance.
• Use the Edit hot key to open the transaction in edit mode. Select the item to edit from the list.
Note: The View and Edit hot keys look for order numbers, customer numbers, or part numbers in a document, and provide links to Eclipse data.
To delete documents from the Remote Error Review Queue:
1. View documents in the Remote Error Review Queue.
2. Select the document to delete.
3. Do one of the following:
• Use the Delete hot key to delete the selected document from the queue.
• Use the Delete By Date hot key to delete all documents from the queue that are older than the specified date. Enter the date and press Esc.
Note: The system removes the documents from the Remote Error Review Queue. However, the documents are still available in Remote Archive Maintenance.
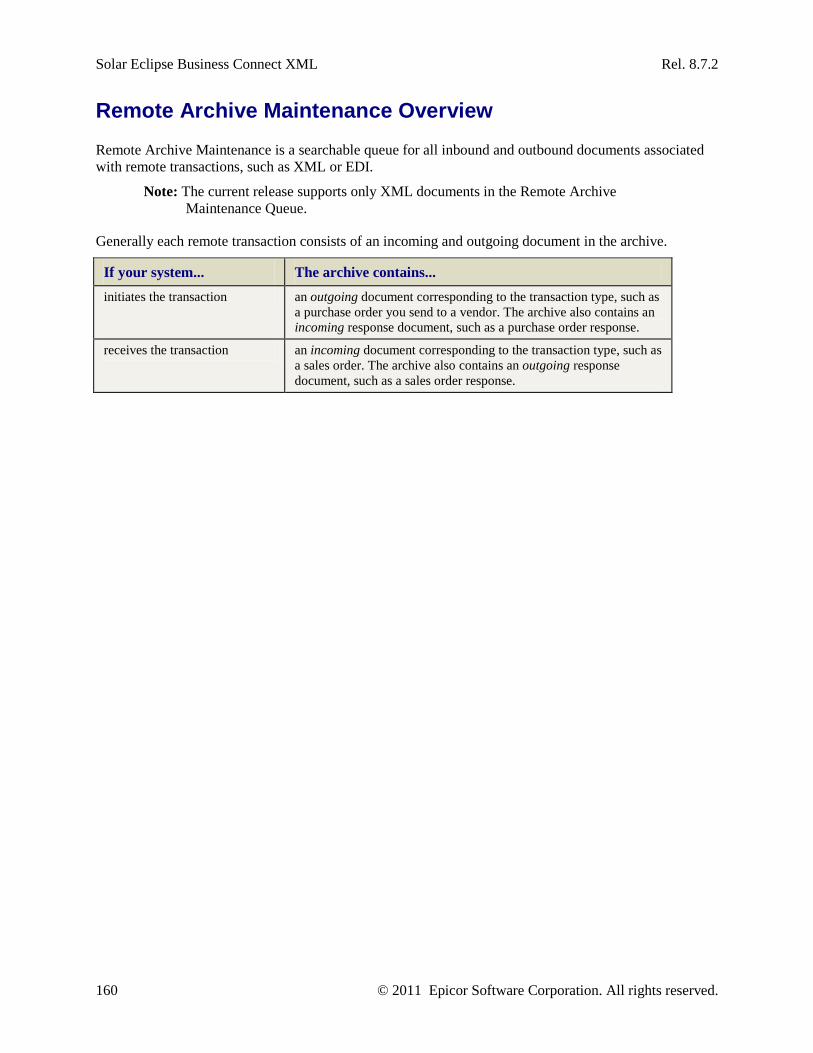
Solar Eclipse Business Connect XML Rel. 8.7.2
160 © 2011 Epicor Software Corporation. All rights reserved.
Remote Archive Maintenance Overview
Remote Archive Maintenance is a searchable queue for all inbound and outbound documents associated with remote transactions, such as XML or EDI.
Note: The current release supports only XML documents in the Remote Archive Maintenance Queue.
Generally each remote transaction consists of an incoming and outgoing document in the archive.
If your system... The archive contains... initiates the transaction an outgoing document corresponding to the transaction type, such as
a purchase order you send to a vendor. The archive also contains an incoming response document, such as a purchase order response.
receives the transaction an incoming document corresponding to the transaction type, such as a sales order. The archive also contains an outgoing response document, such as a sales order response.

Rel. 8.7.2 Business Connect XML
© 2011 Epicor Software Corporation. All rights reserved. 161
Viewing Archived Documents for Remote Transactions
As your company receives and sends remote transactions, the system archives each transaction document. Using Remote Archive Maintenance, you can search and view the documents and drill down to the Eclipse-related transaction, such as a purchase order.
Use Remote Archive Maintenance to complete the following tasks:
• View archived documents.
• View or edit a remote document's transmission.
• View or edit transactions in Eclipse that are associated with the remote document.
To reprocess documents from Remote Archive Maintenance, see Reprocessing Remote Documents. To remove XML documents from the archive, use the purge routine located on Files > Merge/Purge menu in Eclipse.
Note: The current release supports only XML documents in Remote Archive Maintenance.
To view documents in Remote Archive Maintenance:
1. Display the character-based system.
Note: The Remote Archive Maintenance functionality has not been incorporated in Solar Eclipse as of this release.
2. From the System > Custom menu, select Remote Archive Maintenance to display the Selection Criteria screen.
3. In the Start Date field and End Date field, enter the first and last dates in the range for which to display documents in the archive.
For example, to see all the documents that were received or transmitted from April 1, 2004 to April 15, 2004, enter 04/01/04 in the Start Date field and 04/15/04 in the End Date field.
The fields default to the date one week before the current date and to the current date.
4. Enter any additional, optional selection criteria in the remaining fields to filter the documents displayed in the archive.
Field Description Remote Type The type of remote documents you want to view, such as XML or
EDI.
Note: The current release supports only XML documents in Remote Archive Maintenance.
In/Out The document type to display. Press F10 and select Incoming or Outgoing. Leave this field blank to include both incoming and outgoing documents.

Solar Eclipse Business Connect XML Rel. 8.7.2
162 © 2011 Epicor Software Corporation. All rights reserved.
Field Description Search String Any word, phrase, or numerical value within a document. For
example, if you want to see only documents that contain a specific product, enter that product here. The system searches the document transactions for that string.
Trading Partner The customer or vendor for which to display documents in the archive. For example, if you want to see only documents for Joe's Electrical Supply, enter the name in this field to limit the archive display to documents sent to or received from Joe's Electrical Supply. Leave this field blank to include documents from all your vendors and customers.
Source A portal, marketplace, or specification for which to display documents in the archive. For example, if you want to see only documents from a single source, enter the source name to limit the archive display to include only those documents. Leave this field blank to include documents from all sources.
Transaction The transaction type for which to display documents in the archive. For example, if you want to see only documents that are purchase order responses, enter the type to limit the archive display to include only those documents. Leave this field blank to include all document types.
5. Press Esc to display the Remote Archive Maintenance screen with the documents that match your search criteria.
The screen displays details about each document the system sent or received.
Field Description Trading Partner The customer or vendor to which or from which the document was sent
or received.
Transaction The transaction type, such as a vendor order acknowledgement, vendor order submit, or customer invoice.
Source The document sender, if the document is not sent to or received from a customer or vendor. For additional information, see Adding Source Distinctions to XML Transaction Maps.
* (Archive Type) The document type, inbound or outbound: • I(Inbound) – A document the system received. If the Eclipse system
initiated the transaction, an incoming document is typically a response from the receiving source.
• O(Outbound) – A document the system sent. If your trading partner initiated the transaction, the outgoing document is typically an Eclipse system response to the sending source.
Each transmission typically contains both an incoming and an outgoing document.
Type The remote type, such as XML or EDI.
Note: The current release supports only XML documents in Remote Archive Maintenance.

Rel. 8.7.2 Business Connect XML
© 2011 Epicor Software Corporation. All rights reserved. 163
Field Description Date The date the document was received or sent.
Time The time the document was received or sent.
Note: To refine or change your search, use the Select hot key and enter new search criteria.
To view or edit a remote document's transmission:
1. View documents in Remote Archive Maintenance.
2. Move your cursor to the document you want to view.
3. Use the Detail hot key to display the Remote Archive Detail screen with the document as it was received or sent to or from the Eclipse system.
Note: Use this function to identify potential problems that are causing a document to not process correctly. Reprocess the document, if necessary.
4. Press Esc to return to the Remote Archive Maintenance screen.
To view or edit transactions in Eclipse associated with the remote document:
1. View documents in Remote Archive Maintenance.
2. Move your cursor to the transaction you want to view or edit.
3. Do one of the following:
• Use the View hot key to open the transaction in view-only mode. For some transactions, such as a stock inquiry, select the inquiry type, such as Future Ledger, History Ledger, or Product Maintenance.
• Use the Edit hot key to open the transaction in edit mode. Select the item you want to edit from the list.
Note: The View and Edit hot keys look for any order number, customer number, or part numbers in a document and provide links to the Eclipse data from the remote archive.

Solar Eclipse Business Connect XML Rel. 8.7.2
164 © 2011 Epicor Software Corporation. All rights reserved.
Reprocessing Remote Archived Documents
Remote transactions are typically two-way transactions. For each received transaction, the system generates a response and sends it back to your trading partner to acknowledge the receipt. You might find that some documents transmit unsuccessfully, for example, because a password failed. In which case, you can reprocess the document data as it was originally received after making changes in the Eclipse system.
Note: You can only reprocess documents that you received from a customer or vendor. You cannot reprocess documents from Remote Archive Maintenance that you sent to a customer or vendor.
To reprocess remote archived documents:
1. View documents in Remote Archive Maintenance or the Remote Error Review Queue.
Note: You can also reprocess remote documents from the Remote Order Acknowledgment Review Queue, Remote Advanced Ship Notice Review Queue, and the Remote Invoice Review Queue.
2. Select the document to reprocess.
3. Use the Detail hot key to display the Remote Archive Detail screen.
4. Use the Requeue hot key to reprocess the document.
See Also:
Remote Archive Maintenance Overview
Viewing Archived Documents for Remote Transactions

Rel. 8.7.2 Business Connect XML
© 2011 Epicor Software Corporation. All rights reserved. 165
Business Connect XML Application Server Logging and Error Notification Overview
The application server records all Business Connect XML messages about activity and communications to a log file called eclipseinc.log located in the $<APPLICATION SERVER HOME>/server/default/log directory.
The default configuration of each message in the log provides the following information:
• Date and time the log message was generated, in the following format: YYYY-MM-DD HH:MM:SS,MS. For example, 2004-04-01 14:03:50,771
• The logging level, such as Debug, Info, Warn, Error, or Fatal.
• The name of the Java class that logged the message. For example, com.eclipseinc.jca.uv.impl.UVManagedConnectionFactory.UVConnection
• The actual error message. For example, Binding object 'com.eclipseinc.jca.uv.impl.UVConnectionFactoryImpl@8ca8ac' into JNDI at 'java:/UVConnection'
A single message in the log looks similar to the following, and can be contained all on one line: 2004-04-01 14:03:50,771 DEBUG [com.eclipseinc.jca.uv.impl.UVManagedConnectionFactory.UVConnection] Binding object 'com.eclipseinc.jca.uv.impl.UVConnectionFactoryImpl@8ca8ac' into JNDI at 'java:/UVConnection'
Note: You can configure the rolling schedule and the log statement layout to meet your business needs. See Configuring the Application Server Logging Parameters for additional information.
When the log file reaches its maximum size limit of 2 MB, the system changes the eclipseinc.log file to eclipseinc.X.log where X is the rollover level. Each time you restart the server, the system starts a new log file; however, it does not clear or delete any eclipse.X.log files.
Logging Levels You can set the application server to log only certain types of messages. The following logging levels are available:
• Debug
• Info
• Warn
• Error
• Fatal
The Debug level logs the most messages, and is the default logging level for Business Connect XML. The logging hierarchy is inclusive from top to bottom as it is listed above. That is, the Debug level includes information that would be logged at the Info, Warn, Error, and Fatal levels. If you change the logging
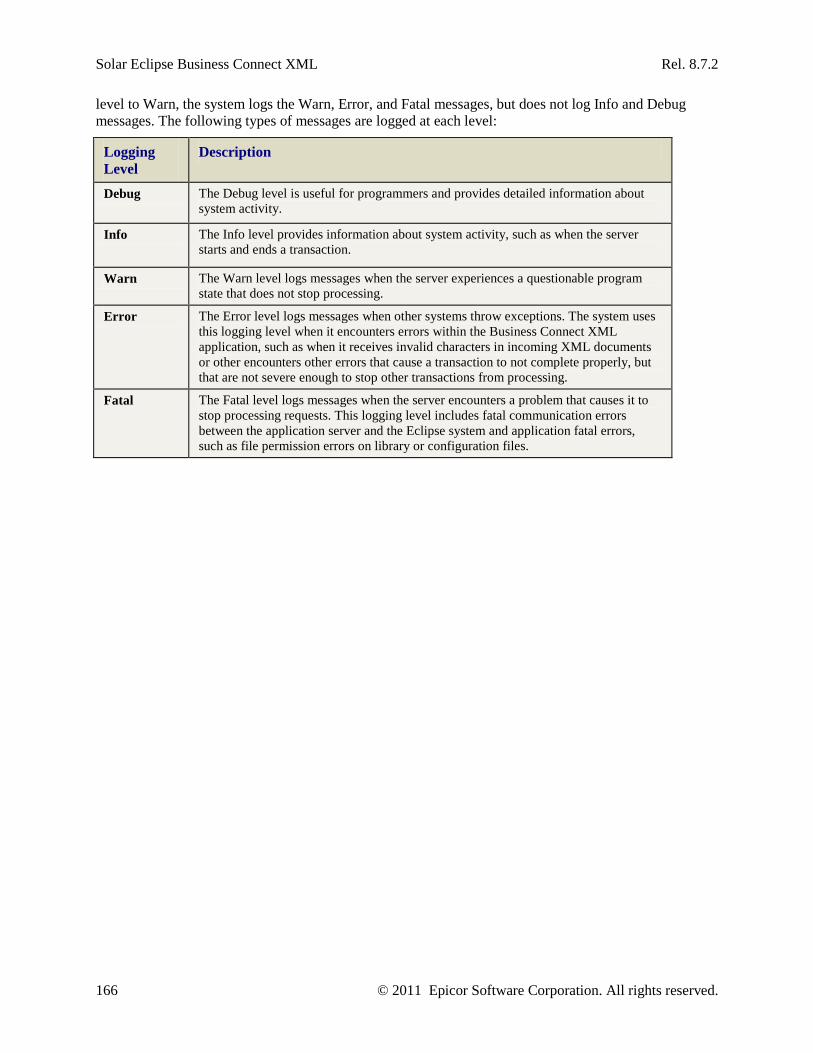
Solar Eclipse Business Connect XML Rel. 8.7.2
166 © 2011 Epicor Software Corporation. All rights reserved.
level to Warn, the system logs the Warn, Error, and Fatal messages, but does not log Info and Debug messages. The following types of messages are logged at each level:
Logging Level
Description
Debug The Debug level is useful for programmers and provides detailed information about system activity.
Info The Info level provides information about system activity, such as when the server starts and ends a transaction.
Warn The Warn level logs messages when the server experiences a questionable program state that does not stop processing.
Error The Error level logs messages when other systems throw exceptions. The system uses this logging level when it encounters errors within the Business Connect XML application, such as when it receives invalid characters in incoming XML documents or other encounters other errors that cause a transaction to not complete properly, but that are not severe enough to stop other transactions from processing.
Fatal The Fatal level logs messages when the server encounters a problem that causes it to stop processing requests. This logging level includes fatal communication errors between the application server and the Eclipse system and application fatal errors, such as file permission errors on library or configuration files.
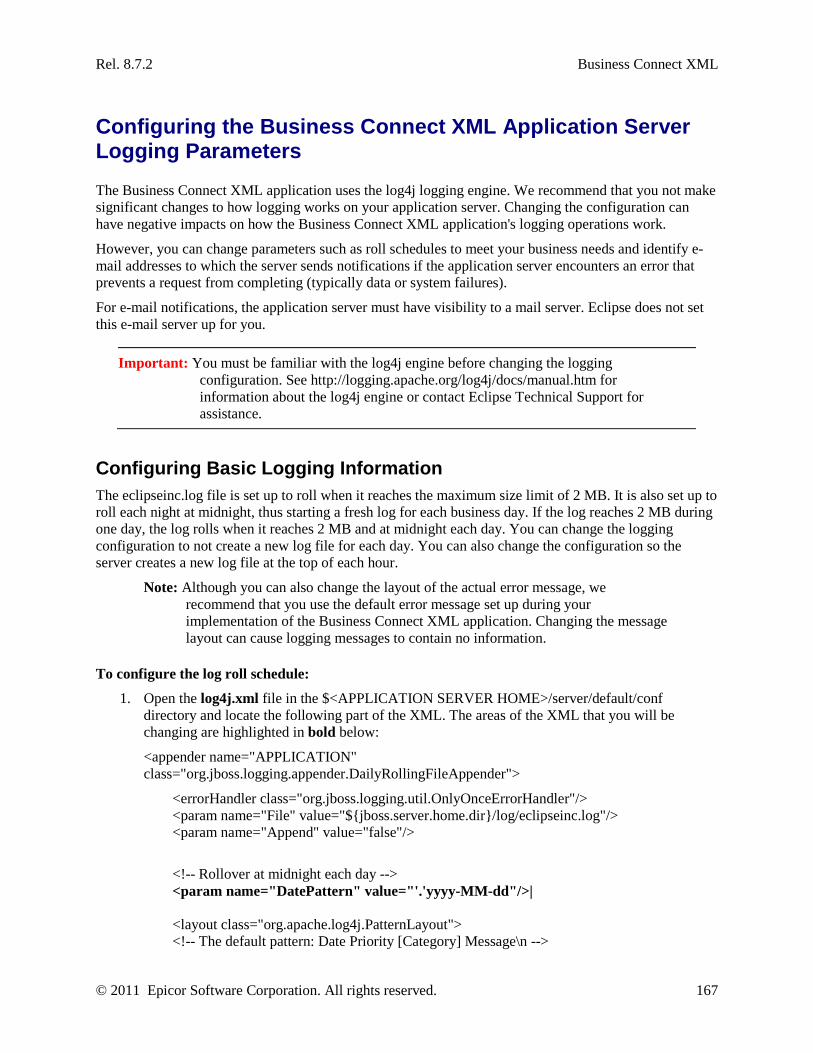
Rel. 8.7.2 Business Connect XML
© 2011 Epicor Software Corporation. All rights reserved. 167
Configuring the Business Connect XML Application Server Logging Parameters
The Business Connect XML application uses the log4j logging engine. We recommend that you not make significant changes to how logging works on your application server. Changing the configuration can have negative impacts on how the Business Connect XML application's logging operations work.
However, you can change parameters such as roll schedules to meet your business needs and identify e-mail addresses to which the server sends notifications if the application server encounters an error that prevents a request from completing (typically data or system failures).
For e-mail notifications, the application server must have visibility to a mail server. Eclipse does not set this e-mail server up for you.
Important: You must be familiar with the log4j engine before changing the logging configuration. See http://logging.apache.org/log4j/docs/manual.htm for information about the log4j engine or contact Eclipse Technical Support for assistance.
Configuring Basic Logging Information The eclipseinc.log file is set up to roll when it reaches the maximum size limit of 2 MB. It is also set up to roll each night at midnight, thus starting a fresh log for each business day. If the log reaches 2 MB during one day, the log rolls when it reaches 2 MB and at midnight each day. You can change the logging configuration to not create a new log file for each day. You can also change the configuration so the server creates a new log file at the top of each hour.
Note: Although you can also change the layout of the actual error message, we recommend that you use the default error message set up during your implementation of the Business Connect XML application. Changing the message layout can cause logging messages to contain no information.
To configure the log roll schedule:
1. Open the log4j.xml file in the $<APPLICATION SERVER HOME>/server/default/conf directory and locate the following part of the XML. The areas of the XML that you will be changing are highlighted in bold below:
<appender name="APPLICATION" class="org.jboss.logging.appender.DailyRollingFileAppender">
<errorHandler class="org.jboss.logging.util.OnlyOnceErrorHandler"/> <param name="File" value="${jboss.server.home.dir}/log/eclipseinc.log"/> <param name="Append" value="false"/>
<!-- Rollover at midnight each day --> <param name="DatePattern" value="'.'yyyy-MM-dd"/>| <layout class="org.apache.log4j.PatternLayout"> <!-- The default pattern: Date Priority [Category] Message\n -->

Solar Eclipse Business Connect XML Rel. 8.7.2
168 © 2011 Epicor Software Corporation. All rights reserved.
<param name="ConversionPattern" value="%d %-5p [%c] %m%n"/>
<!-- The full pattern: Date MS Priority [Category] (Thread:NDC) Message\n <param name="ConversionPattern" value="%d %-5r %-5p [%c] (%t:%x) %m%n"/>
--> </layout>
</appender>
2. Do one of the following to change the log roll schedule:
To... Do This... create a new log file only when it reaches the maximum size limit
delete the line in red above: <param name="DatePattern" value="'.'yyyy-MM-dd"/>| Add this line back to this location if you want to roll the log at midnight every night.
to create a new log at the top of every hour
add the following text under the section that controls the daily rollover: <!-- Rollover at the top of each hour <param name="DatePattern" value="'.'yyyy-MM-dd-HH"/> -->
3. Save your changes and exit the file.
Configuring E-Mail Notifications You can change the following e-mail notification parameters to indicate who in your company receives notifications by e-mail if the application server encounters an error within the Business Connect XML application or the application server itself.
• The e-mail address to which the server sends notifications of messages logged at the Error and Fatal logging levels, and the sent from e-mail address. These logging levels include fatal communication errors between the application server and the Eclipse system and application fatal errors, such as file permission errors on library or configuration files.
• The subject line of the error notification e-mails.
• The e-mail server through which messages are routed.
To change these settings, open the log4j.xml file in the $<APPLICATION SERVER HOME>server/default/conf directory, locate the following part of the XML, and follow the instructions below. The areas of the XML that you will be changing are highlighted in bold below:
<!-- EMail events to an administrator -->
<appender name="SMTP" class="org.apache.log4j.net.SMTPAppender">
<errorHandler class="org.jboss.logging.util.OnlyOnceErrorHandler"/>
<param name="Threshold" value="ERROR"/>
<param name="To" value="[email protected]"/>
<param name="From" value="[email protected]"/>

Rel. 8.7.2 Business Connect XML
© 2011 Epicor Software Corporation. All rights reserved. 169
<param name="Subject" value="Eclipse Inc. ECommerce Application Errors"/>
<param name="SMTPHost" value="SDEX06.eclipseinc.com"/>
<param name="BufferSize" value="10000"/>
<layout class="org.apache.log4j.PatternLayout">
<param name="ConversionPattern" value="[%d{ABSOLUTE},%c{1}] %m%n"/>
</layout>
</appender>
Note: Although you can also change the layout of the actual error message, we recommend that you use the default error message set up during your implementation of the Business Connect XML application. Changing the message layout can cause logging messages to contain no information.
To change the e-mail addresses:
1. In the log4j.xml file detailed above, locate the following lines:
<param name="To" value="[email protected]"/>
<param name="From" value="[email protected]"/>
2. Update the e-mail address in the To parameter to the address to which you want error notifications sent.
3. Update the e-mail address in the From parameter to the address from which you want error notification sent.
Note: You can enter multiple e-mail addresses in the To and From parameters. Use a semi-colon (;) to separate the addresses.
4. Save your changes and exit the file.
To change the e-mail subject line:
1. In the log4j.xml file detailed above, locate the following line:
<param name="Subject" value="Eclipse Inc. ECommerce Application Errors"/>
2. Change the text in quotation marks to the text that you want to display in the subject line of error notification e-mails.
3. Save your changes and exit the file.
Changing the Logging Level You can set the application server to log only certain types of messages. For more information about the available logging levels, see Application Server Logging and Error Notification Overview.

Solar Eclipse Business Connect XML Rel. 8.7.2
170 © 2011 Epicor Software Corporation. All rights reserved.
You can change the logging level if necessary to capture more or less information.
Important! We recommend that only Eclipse personnel change the logging level.
To change the logging level:
1. Open the log4j.xml file in the $<APPLICATION SERVER HOME>/server/default/conf directory and locate the following part of the XML. The areas of the XML that you will be changing are highlighted in bold below:
<category name="com.intuit">
<priority value="WARN"/>
<appender-ref ref="APPLICATION"/>
</category>
2. Change the Priority Value parameter to a different logging level, as described in Application Server Logging and Error Notification Overview.
3. Save your changes and exit the file.
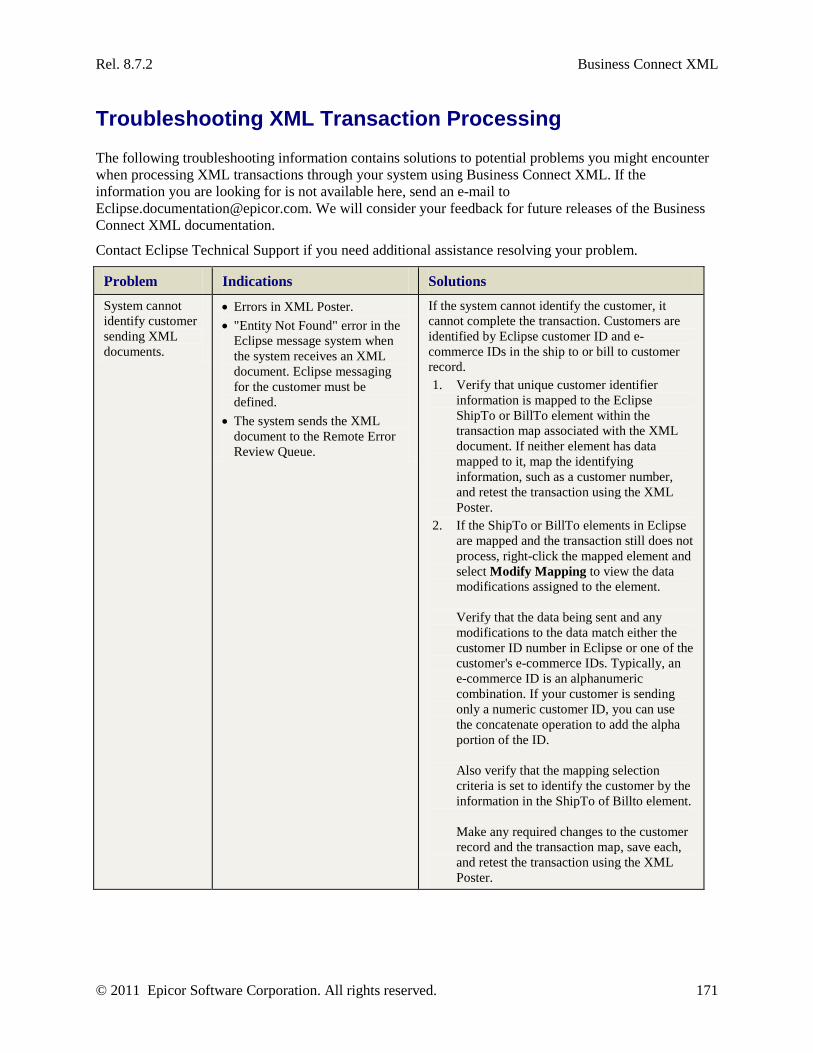
Rel. 8.7.2 Business Connect XML
© 2011 Epicor Software Corporation. All rights reserved. 171
Troubleshooting XML Transaction Processing
The following troubleshooting information contains solutions to potential problems you might encounter when processing XML transactions through your system using Business Connect XML. If the information you are looking for is not available here, send an e-mail to [email protected]. We will consider your feedback for future releases of the Business Connect XML documentation.
Contact Eclipse Technical Support if you need additional assistance resolving your problem.
Problem Indications Solutions System cannot identify customer sending XML documents.
• Errors in XML Poster. • "Entity Not Found" error in the
Eclipse message system when the system receives an XML document. Eclipse messaging for the customer must be defined.
• The system sends the XML document to the Remote Error Review Queue.
If the system cannot identify the customer, it cannot complete the transaction. Customers are identified by Eclipse customer ID and e-commerce IDs in the ship to or bill to customer record. 1. Verify that unique customer identifier
information is mapped to the Eclipse ShipTo or BillTo element within the transaction map associated with the XML document. If neither element has data mapped to it, map the identifying information, such as a customer number, and retest the transaction using the XML Poster.
2. If the ShipTo or BillTo elements in Eclipse are mapped and the transaction still does not process, right-click the mapped element and select Modify Mapping to view the data modifications assigned to the element. Verify that the data being sent and any modifications to the data match either the customer ID number in Eclipse or one of the customer's e-commerce IDs. Typically, an e-commerce ID is an alphanumeric combination. If your customer is sending only a numeric customer ID, you can use the concatenate operation to add the alpha portion of the ID. Also verify that the mapping selection criteria is set to identify the customer by the information in the ShipTo of Billto element. Make any required changes to the customer record and the transaction map, save each, and retest the transaction using the XML Poster.

Solar Eclipse Business Connect XML Rel. 8.7.2
172 © 2011 Epicor Software Corporation. All rights reserved.
Problem Indications Solutions System not matching products correctly on XML orders.
Remote XML orders contain the wrong products.
The system matches products based on what is mapped in the transaction map, and follows the product matching hierarchy. 1. Check the order change log to verify that
the order was created automatically. 2. View the content of the XML document in
Remote Archive Maintenance to identify the requested part number. The product part number is located in the Item Detail section of the XML document.
3. Open the transaction map and determine if the item description is mapped to an element in Eclipse. If it is mapped, then the system is searching for the product by description, not by part number.
4. Open the product record in Eclipse and determine if the description matches the product description sent in. If so, the system is correctly matching this product to the request from your trading partner.
5. Change the transaction map to map the incoming product description to the ItemComments element. Now, the system will not search on the product, but saves the information.
6. Save the transaction map and retest the transaction using the XML Poster.
System not adding products to XML orders.
Products sent in an XML order document are not included on the system-generated order.
If products sent in an XML document are not included in the system-generated order, the system cannot find a match in your system for the requested product. Ensure that you have a B2B Product Not Found product defined and that the product is identified in the IDMS-XML Default Part # Used For Creating A Nonstock Item control maintenance record. When these two items are set up, retest the transaction using the XML Poster. Any items the system cannot match are added to the order with the product description you define in the product not found product record.
System reporting errors in the message system for the remote order review user when the XML contained no errors
Receive a message similar to the following in the Eclipse message system: 08/16/04|04:24pm|BCS|xCustomer has created order number S1111111 through Eclipse Business Connect Suite with 2 Error(s).
If the system successfully creates an order, it sends a system message to the remote order review user for the customer. However, the system can successfully create an order and still identify errors, such as not finding matching products. The system message indicates notifies the reviewer that the order cannot ship correctly and requires review.

Rel. 8.7.2 Business Connect XML
© 2011 Epicor Software Corporation. All rights reserved. 173
Problem Indications Solutions XML orders contain the wrong pricing information.
• Pricing information on the order is from Eclipse, not from the trading partner.
• Pricing information on the order is from the trading partner's system, not from Eclipse.
If the order uses pricing information from Eclipse, the customer record's Use Partner Pricing field is set to No, and the system uses the pricing information available in Eclipse. If you want to use the trading partner's pricing information, set the pricing variance for the customer. If the customer record's Use Partner Pricing field is set to Yes, the system uses the pricing information within the variance that you define on system-generated orders. If the pricing information on the order is from the trading partner, disable the flag and retest the transaction: 1. Check the order change log to verify that
the order was created automatically. 2. View the content of the XML document in
Remote Archive Maintenance. Identify the pricing information sent in the order.
3. Open the customer record and select Remote Order Entry Parameters from the Orders menu. From that window, select WOE Information from the Edit menu to display the B2B/WOE Remote Order Entry Parameters window.
4. Select IDMS-XML from the Edit menu to display the IDMS-XML Parameters window.
5. Deselect the Use Partner Pricing check box, and save the customer record.
6. Retest the transaction using the XML Poster.

Solar Eclipse Business Connect XML Rel. 8.7.2
174 © 2011 Epicor Software Corporation. All rights reserved.
Troubleshooting XML Transaction Map Creation
The following troubleshooting information contains solutions to potential problems you might encounter when creating XML transaction maps using the Business Connect XML mapping utility. If the information you are looking for is not available here, send an e-mail to [email protected]. We will consider your feedback for future releases of the Business Connect XML documentation.
Contact Eclipse Technical Support if you need additional assistance resolving your problem.
Problem Indications Solutions Cannot add a trading partner in the mapping utility.
"No entity found" error displays.
The trading partners that you add to the Trading Partner Tree must have a customer or vendor record defined in Eclipse. Type part of the customer or vendor name and click the Down Arrow to search.
Cannot draw a connection between Source XML and Target XML.
No line is drawn from the source element to the target element.
Select the element in the Source XML column you want to map. Click the element again and drag the mouse to the element in the Target XML column.
Cannot drag an operation to operation stack.
The operation is not added to the Operation Stack field in the XML Mapping Conversion Editor dialog box.
Select the operation you want to add from the operation list. Click the operation again and drag the mouse to the operation stack.
Files and fields added to XML database schemas are not available in the mapping utility.
The Source XML or the Target XML that contains the data elements for Eclipse does not contain the files and fields added in XML Schema Maintenance.
Stop and restart the JBoss server.

© 2011 Epicor Software Corporation. All rights reserved. 175
Index
A
application server, logging ..................... 165, 167
archived remote transaction documents
about .......................................................... 160
reprocessing ............................................... 164
viewing ...................................................... 161
B
Business Connect XML
about .......................................................... 1, 3
application server logging ......................... 165
archived documents
about ...................................................... 160
reprocessing ........................................... 164
viewing .................................................. 161
data flow
example ..................................................... 7
example with marketplace ......................... 9
main flow .................................................. 5
database schemas
about .................................................. 37, 38
creating .................................................... 46
Eclipse data ............................................. 38
transactions, forming ............................... 42
translation properties ............................... 50
documents in error ..................................... 157
mapping utility
about ................................................ 53, 117
accessing ................................................. 54
Base64 encoding and decoding ............. 103
change log ............................................. 115
compiling maps ..................................... 113
concatenating data ................................... 94
data elements, mapping ........................... 60
date formats, converting ........................ 100
date stamps, extracting .......................... 105
decimal formats ....................................... 99
document types ....................................... 80
error log ................................................. 116
extracting date and time stamps ............ 105
extracting fields from delimited strings .. 96
HTTP headers ......................................... 79
if-then-else expressions ......................... 109
inserting line breaks ................................ 92
inverting numbers ................................. 107
literal statements ..................................... 91
logical expressions ................................ 109
lowercasing data.................................... 108
map selection criteria .............................. 74
mathematical operations ....................... 102
modification expressions, building ......... 88
modifying data ........................................ 86
opening .................................................... 54
precautions .............................................. 62
preferences .............................................. 55
previewing transaction maps ................... 82
repeating groups ................................ 60, 76
saving open maps .................................. 128
searching for elements ............................ 78
sources in maps ....................................... 73
substrings, copying ................................. 95
symbols ................................................. 129
table-based conversions .......................... 97
trading partners, adding .......................... 56
transaction maps...................................... 57

Solar Eclipse Business Connect XML Rel. 8.7.2
176 © 2011 Epicor Software Corporation. All rights reserved.
uppercasing data .................................... 108
valid mappings ........................................ 62
view open maps ..................................... 128
post test XML transactions ........................ 114
product matching hierarchy ......................... 13
setup requirements
about ........................................................ 11
access information, vendor ...................... 22
activity triggers .................................. 15, 24
advanced ship notice details .................... 29
change order details ................................. 30
control maintenance records .................... 12
document details ...................................... 26
e-commerce IDs, customer ...................... 21
invoice details .......................................... 35
order acknowledgement details ............... 33
order details ............................................. 27
post locations, customer .......................... 19
post locations, vendor .............................. 25
pricing variance, customer ...................... 20
Product Not Found product ..................... 13
quote request details ................................ 32
system notifications ................................. 18
troubleshooting
creating maps ........................................ 174
processing transactions .......................... 171
XML transactions, testing .......................... 114
D
data interchange ................................................. 1
database schemas
about ...................................................... 37, 38
creating ........................................................ 46
Eclipse data .................................................. 38
transactions, forming ................................... 42
translation properties ................................... 50
E
electronic trading ............................................... 1
M
mapping utility, XML
about .................................................... 53, 117
accessing...................................................... 54
change log ................................................. 115
data elements, mapping ............................... 60
error log ..................................................... 116
map selection criteria .................................. 74
opening ........................................................ 54
post test XML transactions ........................ 114
precautions .................................................. 62
preferences .................................................. 55
previewing XML transactions ................... 112
repeating groups .................................... 60, 76
saving maps ............................................... 128
searching for elements ................................. 78
symbols ..................................................... 129
trading partners, adding ............................... 56
transaction maps
about ........................................................ 57
adding sources to..................................... 73
Base64 encoding and decoding ............. 103
compiling .............................................. 113
concatenating data ................................... 94
copying .................................................... 84
creating .................................................... 65
date format conversions ........................ 100
decimal formats ....................................... 99
deleting .................................................... 85
document typtes ...................................... 80
extracting date and time stamps ............ 105
extracting fields from delimited strings .. 96
HTTP headers ......................................... 79
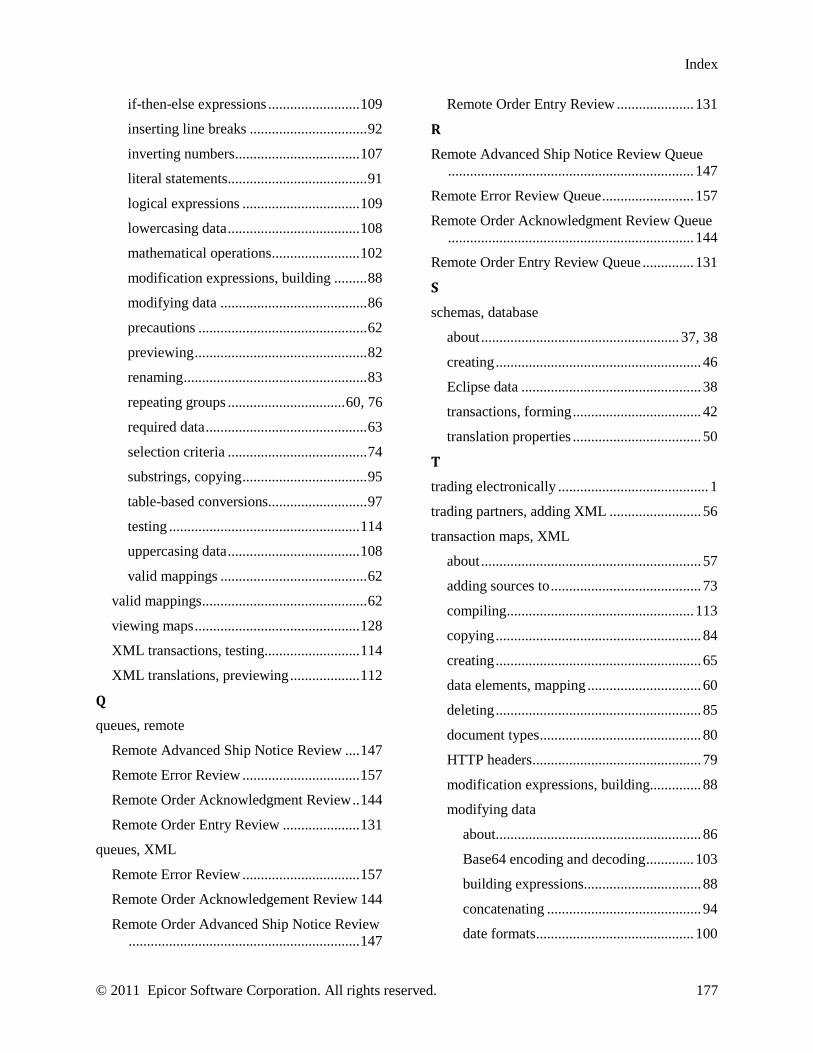
Index
© 2011 Epicor Software Corporation. All rights reserved. 177
if-then-else expressions ......................... 109
inserting line breaks ................................ 92
inverting numbers .................................. 107
literal statements ...................................... 91
logical expressions ................................ 109
lowercasing data .................................... 108
mathematical operations ........................ 102
modification expressions, building ......... 88
modifying data ........................................ 86
precautions .............................................. 62
previewing ............................................... 82
renaming .................................................. 83
repeating groups ................................ 60, 76
required data ............................................ 63
selection criteria ...................................... 74
substrings, copying .................................. 95
table-based conversions ........................... 97
testing .................................................... 114
uppercasing data .................................... 108
valid mappings ........................................ 62
valid mappings ............................................. 62
viewing maps ............................................. 128
XML transactions, testing .......................... 114
XML translations, previewing ................... 112
Q
queues, remote
Remote Advanced Ship Notice Review .... 147
Remote Error Review ................................ 157
Remote Order Acknowledgment Review .. 144
Remote Order Entry Review ..................... 131
queues, XML
Remote Error Review ................................ 157
Remote Order Acknowledgement Review 144
Remote Order Advanced Ship Notice Review ............................................................... 147
Remote Order Entry Review ..................... 131
R
Remote Advanced Ship Notice Review Queue ................................................................... 147
Remote Error Review Queue ......................... 157
Remote Order Acknowledgment Review Queue ................................................................... 144
Remote Order Entry Review Queue .............. 131
S
schemas, database
about ...................................................... 37, 38
creating ........................................................ 46
Eclipse data ................................................. 38
transactions, forming ................................... 42
translation properties ................................... 50
T
trading electronically ......................................... 1
trading partners, adding XML ......................... 56
transaction maps, XML
about ............................................................ 57
adding sources to ......................................... 73
compiling ................................................... 113
copying ........................................................ 84
creating ........................................................ 65
data elements, mapping ............................... 60
deleting ........................................................ 85
document types ............................................ 80
HTTP headers .............................................. 79
modification expressions, building.............. 88
modifying data
about ........................................................ 86
Base64 encoding and decoding ............. 103
building expressions ................................ 88
concatenating .......................................... 94
date formats ........................................... 100
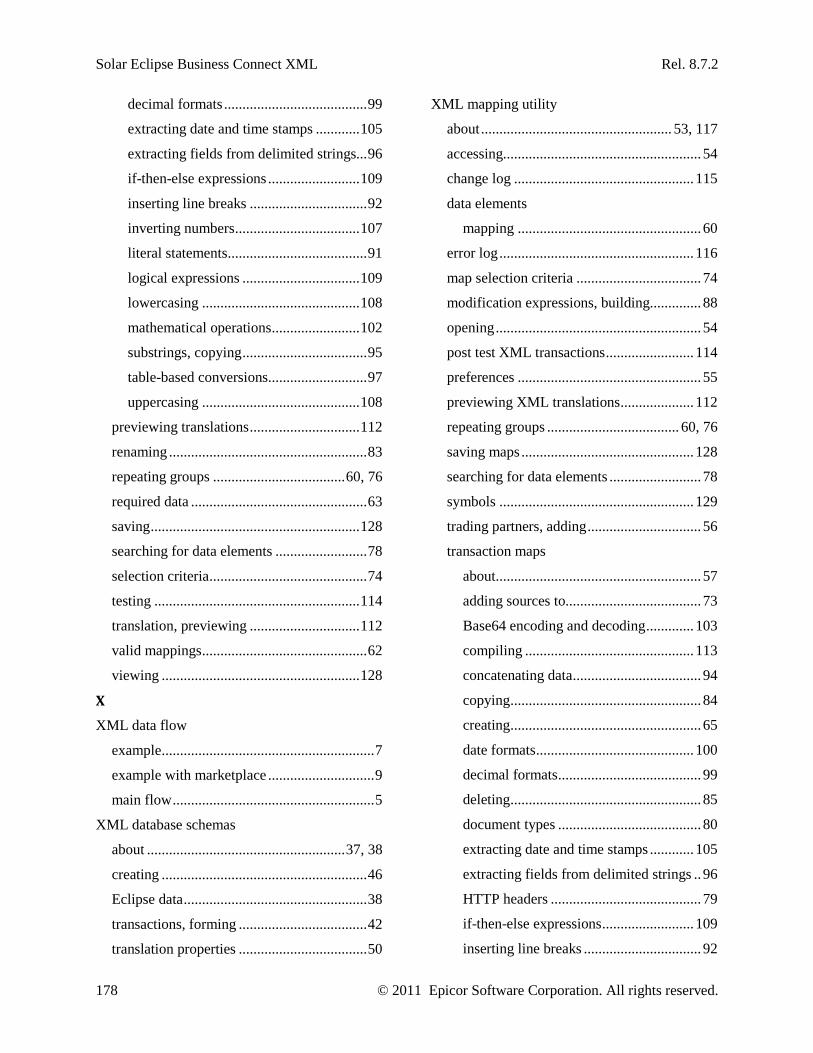
Solar Eclipse Business Connect XML Rel. 8.7.2
178 © 2011 Epicor Software Corporation. All rights reserved.
decimal formats ....................................... 99
extracting date and time stamps ............ 105
extracting fields from delimited strings... 96
if-then-else expressions ......................... 109
inserting line breaks ................................ 92
inverting numbers .................................. 107
literal statements ...................................... 91
logical expressions ................................ 109
lowercasing ........................................... 108
mathematical operations ........................ 102
substrings, copying .................................. 95
table-based conversions ........................... 97
uppercasing ........................................... 108
previewing translations .............................. 112
renaming ...................................................... 83
repeating groups .................................... 60, 76
required data ................................................ 63
saving ......................................................... 128
searching for data elements ......................... 78
selection criteria ........................................... 74
testing ........................................................ 114
translation, previewing .............................. 112
valid mappings ............................................. 62
viewing ...................................................... 128
X
XML data flow
example .......................................................... 7
example with marketplace ............................. 9
main flow ....................................................... 5
XML database schemas
about ...................................................... 37, 38
creating ........................................................ 46
Eclipse data .................................................. 38
transactions, forming ................................... 42
translation properties ................................... 50
XML mapping utility
about .................................................... 53, 117
accessing...................................................... 54
change log ................................................. 115
data elements
mapping .................................................. 60
error log ..................................................... 116
map selection criteria .................................. 74
modification expressions, building.............. 88
opening ........................................................ 54
post test XML transactions ........................ 114
preferences .................................................. 55
previewing XML translations .................... 112
repeating groups .................................... 60, 76
saving maps ............................................... 128
searching for data elements ......................... 78
symbols ..................................................... 129
trading partners, adding ............................... 56
transaction maps
about ........................................................ 57
adding sources to..................................... 73
Base64 encoding and decoding ............. 103
compiling .............................................. 113
concatenating data ................................... 94
copying .................................................... 84
creating .................................................... 65
date formats ........................................... 100
decimal formats ....................................... 99
deleting .................................................... 85
document types ....................................... 80
extracting date and time stamps ............ 105
extracting fields from delimited strings .. 96
HTTP headers ......................................... 79
if-then-else expressions ......................... 109
inserting line breaks ................................ 92

Index
© 2011 Epicor Software Corporation. All rights reserved. 179
inverting numbers .................................. 107
literal statements ...................................... 91
logical expressions ................................ 109
lowercasing data .................................... 108
mathematical operations ........................ 102
modification expressions, building ......... 88
modifying data ........................................ 86
precautions .............................................. 62
renaming .................................................. 83
required data ............................................ 63
selection criteria ...................................... 74
substrings, copying .................................. 95
table-based conversions ........................... 97
uppercasing data .................................... 108
valid mappings ........................................ 62
translation, previewing .............................. 112
viewing maps ............................................. 128
XML transactions, testing .......................... 114
XML transaction maps
about ............................................................ 57
adding sources ............................................. 73
compiling ................................................... 113
copying ........................................................ 84
creating ........................................................ 65
data elements, mapping ............................... 60
deleting ........................................................ 85
document types ............................................ 80
HTTP headers .............................................. 79
modifying data
about ........................................................ 86
Base64 encoding and decoding ............. 103
concatenating data ................................... 94
date formats ........................................... 100
decimal formats ....................................... 99
expressions, building ............................... 88
extracting date and time stamps ............ 105
extracting fields from delimited strings .. 96
if-then-else expressions ......................... 109
inserting line breaks ................................ 92
inverting numbers ................................. 107
literal statements ..................................... 91
logical expressions ................................ 109
lowercasing ........................................... 108
mathematical operations ....................... 102
substrings, copying ................................. 95
table-based conversions .......................... 97
uppercasing ........................................... 108
precautions .................................................. 62
previewing translation ............................... 112
renaming ...................................................... 83
repeating groups .................................... 60, 76
required data ................................................ 63
saving ........................................................ 128
searching for data elements ......................... 78
selection criteria .......................................... 74
testing ........................................................ 114
translation, previewing .............................. 112
valid mappings ............................................ 62
viewing ...................................................... 128
XML transactions, customers
errors ......................................................... 157
product matching hierarchy ......................... 13
receiving
about ...................................................... 130
B2B test connections ............................. 142
change order requests ............................ 135
orders .................................................... 131
product inquiries ........................... 134, 151
punch-out requests ................................ 138
quote requests........................................ 136
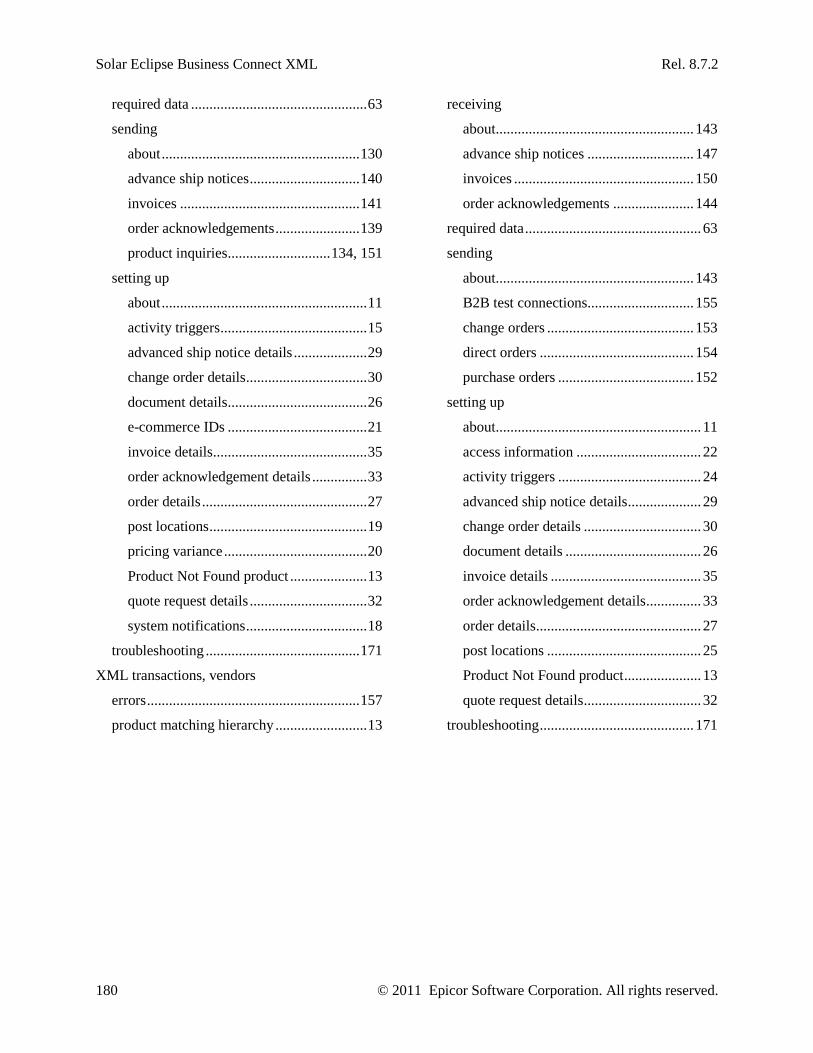
Solar Eclipse Business Connect XML Rel. 8.7.2
180 © 2011 Epicor Software Corporation. All rights reserved.
required data ................................................ 63
sending
about ...................................................... 130
advance ship notices .............................. 140
invoices ................................................. 141
order acknowledgements ....................... 139
product inquiries ............................ 134, 151
setting up
about ........................................................ 11
activity triggers ........................................ 15
advanced ship notice details .................... 29
change order details ................................. 30
document details ...................................... 26
e-commerce IDs ...................................... 21
invoice details .......................................... 35
order acknowledgement details ............... 33
order details ............................................. 27
post locations ........................................... 19
pricing variance ....................................... 20
Product Not Found product ..................... 13
quote request details ................................ 32
system notifications ................................. 18
troubleshooting .......................................... 171
XML transactions, vendors
errors .......................................................... 157
product matching hierarchy ......................... 13
receiving
about ...................................................... 143
advance ship notices ............................. 147
invoices ................................................. 150
order acknowledgements ...................... 144
required data ................................................ 63
sending
about ...................................................... 143
B2B test connections ............................. 155
change orders ........................................ 153
direct orders .......................................... 154
purchase orders ..................................... 152
setting up
about ........................................................ 11
access information .................................. 22
activity triggers ....................................... 24
advanced ship notice details .................... 29
change order details ................................ 30
document details ..................................... 26
invoice details ......................................... 35
order acknowledgement details ............... 33
order details ............................................. 27
post locations .......................................... 25
Product Not Found product ..................... 13
quote request details ................................ 32
troubleshooting .......................................... 171