solar inverter hardware and installation manual freesun/03 manuales … · power electronics...
TRANSCRIPT
Solar Inverter
Hardware and Installation Manual


Solar Inverter
Hardware and Installation Manual
Edition: March 2011
FSMTHW01HI Rev. H

FREESUN POWER ELECTRONICS
2
POWER ELECTRONICS FREESUN
SAFETY SYMBOLS 3
E NGLIS
H
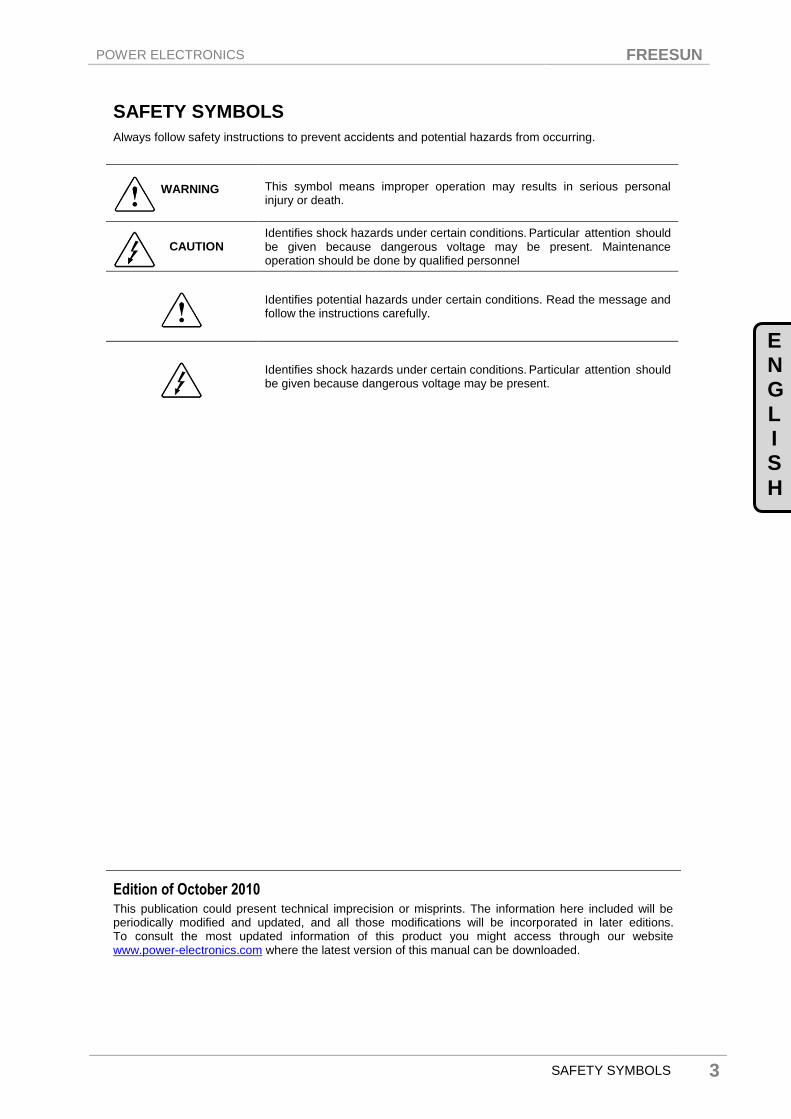
SAFETY SYMBOLS
Always follow safety instructions to prevent accidents and potential hazards from occurring.
Edition of October 2010 This publication could present technical imprecision or misprints. The information here included will be periodically modified and updated, and all those modifications will be incorporated in later editions. To consult the most updated information of this product you might access through our website www.power-electronics.com where the latest version of this manual can be downloaded.
WARNING This symbol means improper operation may results in serious personal
injury or death.
CAUTION
Identifies shock hazards under certain conditions. Particular attention should be given because dangerous voltage may be present. Maintenance operation should be done by qualified personnel
Identifies potential hazards under certain conditions. Read the message and follow the instructions carefully.
Identifies shock hazards under certain conditions. Particular attention should be given because dangerous voltage may be present.
FREESUN POWER ELECTRONICS
4
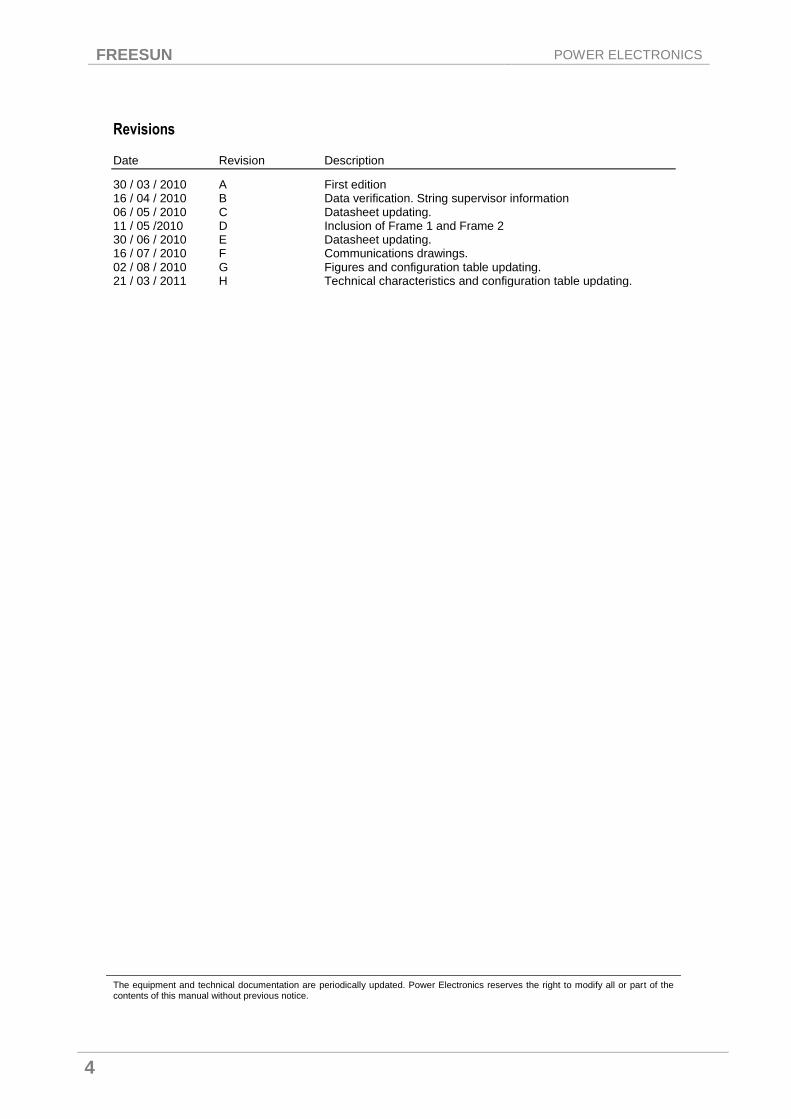
Revisions
Date Revision Description
30 / 03 / 2010 A First edition 16 / 04 / 2010 B Data verification. String supervisor information 06 / 05 / 2010 C Datasheet updating. 11 / 05 /2010 D Inclusion of Frame 1 and Frame 2 30 / 06 / 2010 E Datasheet updating. 16 / 07 / 2010 F Communications drawings. 02 / 08 / 2010 G Figures and configuration table updating. 21 / 03 / 2011 H Technical characteristics and configuration table updating.
The equipment and technical documentation are periodically updated. Power Electronics reserves the right to modify all or part of the contents of this manual without previous notice.

POWER ELECTRONICS FREESUN
INDEX 5
E NGLIS
H
INDEX
SAFETY INSTRUCTIONS ........................................................................................................... 6
1. INTRODUCTION .................................................................................................................. 10
1.1. Configuration Table ...................................................................................................... 12 1.2. Standard Ratings ......................................................................................................... 12
2. TECHNICAL CHARACTERISTICS ...................................................................................... 13
3. INSTALLATION REQUIREMENTS ...................................................................................... 14
3.1. Requisites for the Installation ....................................................................................... 14
4. GENERAL INFORMATION .................................................................................................. 21
4.1. Correct Use .................................................................................................................. 21 4.2. Electrical Connections .................................................................................................. 21 4.3. Power Supplies ............................................................................................................ 21 4.4. Emergency Stop ........................................................................................................... 22 4.5. Operation ..................................................................................................................... 22 4.6. Commissioning, Maintenance and Repair .................................................................... 22 4.7. Cooling system maintenance ....................................................................................... 23 4.8. Hearing protection ........................................................................................................ 23 4.9. Burns ............................................................................................................................ 23
5. ELECTRICAL CONNECTION .............................................................................................. 24
5.1. External Connection ..................................................................................................... 24 5.2. Disconnect ................................................................................................................... 26 5.3. Sensors and Control Signals for the User .................................................................... 28 5.4. Inverter Communication Connection ............................................................................ 28 5.5. String Supervisor Description ....................................................................................... 32 5.6. Overvoltage Protection ................................................................................................. 35
6. COMMISSIONING ................................................................................................................ 36
6.1. Initial Conditions ........................................................................................................... 36 6.2. Verify the Wiring ........................................................................................................... 36 6.3. Switch On ..................................................................................................................... 37
7. TRANSPORT AND HANDLING ........................................................................................... 38
7.1. Freesun Weights and dimensions ................................................................................ 38 7.2. Transport Procedure .................................................................................................... 40 7.3. Prior to connection ....................................................................................................... 41
8. DECLARATION OF CONFORMITY CE ............................................................................... 43

FREESUN POWER ELECTRONICS
6 SAFETY INSTRUCTIONS
SAFETY INSTRUCTIONS
IMPORTANT!
Read this manual carefully to maximise the performance of this product and to ensure its safe use.
In order to use appropriately the FREESUN, please, follow all instructions described in the installation manual referred to transport, installation, electrical connection, and commissioning of the equipment.
Power Electronics accepts no responsibility or liability for any and all damage resulting from inappropriate use of the equipment.
The information contained in the installation guide must be observed when installing the inverter.
PRIOR TO CONNECTION
In the rear side of the solar inverter are located the SECURITY FIXATIONS FOR TRANSPORT in both the transformer and the inductance of the inverter. Before making any connections to the inverter is necessary to consider: If the inverters are going to be installed side by side, it is NECESSARY to REMOVE these SECURITY FIXATIONS BEFORE placing them in their final location. It is ESSENTIAL to REMOVE them BEFORE CONNECTING. Make sure that all fixations are properly removed and put back the rear covers of the inverter. The inverter can now be placed in its final location and the connection procedure can be done as described in the installation manual attached to the inverter.
WARNINGS AND RECOMMENDATIONS
If your device has the positive or negative pole of the photovoltaic system earth connected, the following instructions must be considered: The only point in the installation where the positive or the negative pole should be grounded is in the proper inverter (through the 4-pole circuit breaker that is added to that effect). It is important to note that if there was another grounded connection elsewhere in the installation (in the panels themselves, in the String Supervisor, etc..) the protection provided by the additional circuit breaker would have NO effect.
Therefore, it is recommended to revise periodically the insulation between the pole that is going to be grounded and the earth. Like this, it will be possible to detect a ground fault unwanted in other points of the installation. This will prevent the circuit breaker from providing inappropriate protection due to eventual uncontrolled ground leakages.

POWER ELECTRONICS FREESUN
SAFETY INSTRUCTIONS 7
E NGLIS
H
In this manual, safety messages are classified as follows:
WARNING
If possible do not remove the solar inverter cover while the power is applied or the unit is in operation. Otherwise electric shock could occur.
If possible do not run the solar inverter with any of the covers removed. Otherwise you may get an
electric shock due to the high voltage terminals inside the inverter.
Do not open the inverter doors except when necessary for installation or maintenance, even in such cases, remove the input power if possible. Otherwise you may access the charged circuits and
get an electric shock.
Operate the switches with dry hands.
Otherwise you may get an electric shock.
Do not use cables with damaged insulation.
Otherwise you may get an electric shock.
Do not subject the cables to abrasions, excessive stress, heavy loads or pinching.
Otherwise, you may get an electric shock.
CAUTION
Install the inverter on a non-flammable surface. Do not place flammable material nearby.
Otherwise fire could occur.
Disconnect the input power if the solar inverter gets damaged.
Otherwise it could result in a secondary accident or fire.
After the input power is applied or removed, the inverter will remain hot for a couple of minutes.
Touching hot parts may result in skin burns.
Do not apply power to a damaged inverter or to an inverter with parts missing even if the installation is complete.
Otherwise you may get an electric shock.
Do not allow lint, paper, wood chips, dust, metallic chips or other foreign matter into the inverter.
Otherwise fire or accident could occur.
FREESUN POWER ELECTRONICS
8 SAFETY INSTRUCTIONS
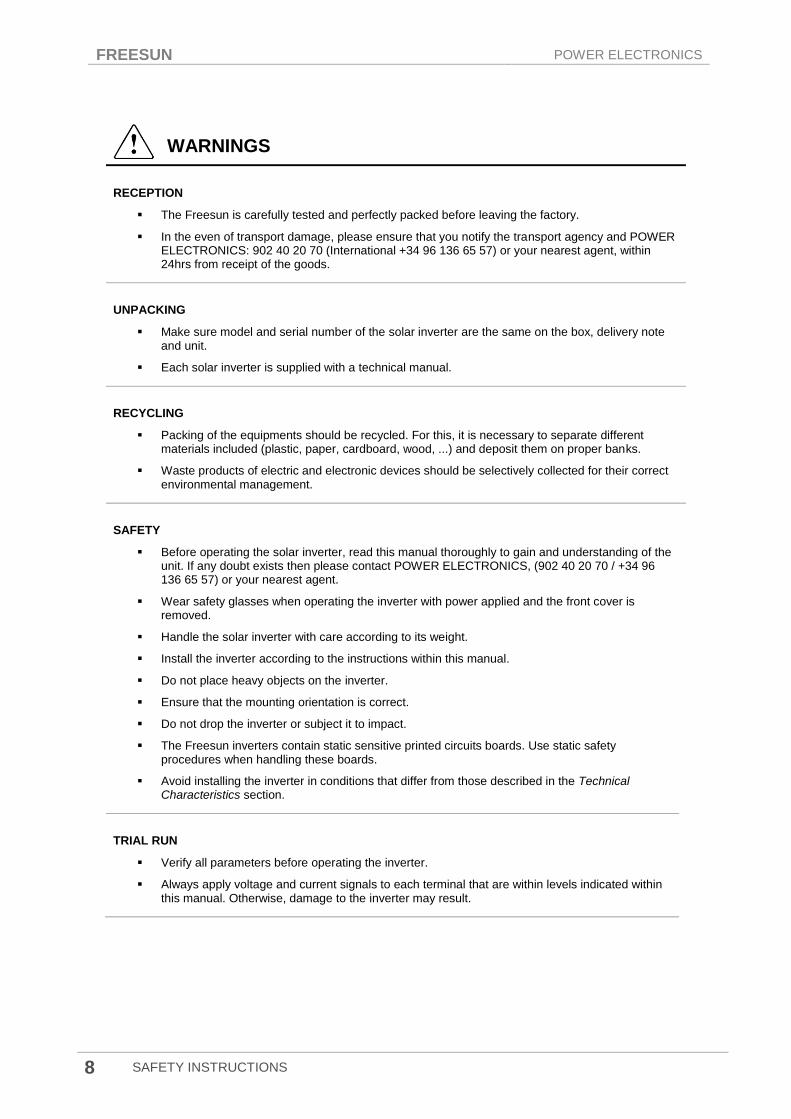
WARNINGS
RECEPTION
The Freesun is carefully tested and perfectly packed before leaving the factory.
In the even of transport damage, please ensure that you notify the transport agency and POWER ELECTRONICS: 902 40 20 70 (International +34 96 136 65 57) or your nearest agent, within 24hrs from receipt of the goods.
UNPACKING
Make sure model and serial number of the solar inverter are the same on the box, delivery note and unit.
Each solar inverter is supplied with a technical manual.
RECYCLING
Packing of the equipments should be recycled. For this, it is necessary to separate different materials included (plastic, paper, cardboard, wood, ...) and deposit them on proper banks.
Waste products of electric and electronic devices should be selectively collected for their correct environmental management.
SAFETY
Before operating the solar inverter, read this manual thoroughly to gain and understanding of the unit. If any doubt exists then please contact POWER ELECTRONICS, (902 40 20 70 / +34 96 136 65 57) or your nearest agent.
Wear safety glasses when operating the inverter with power applied and the front cover is removed.
Handle the solar inverter with care according to its weight.
Install the inverter according to the instructions within this manual.
Do not place heavy objects on the inverter.
Ensure that the mounting orientation is correct.
Do not drop the inverter or subject it to impact.
The Freesun inverters contain static sensitive printed circuits boards. Use static safety procedures when handling these boards.
Avoid installing the inverter in conditions that differ from those described in the Technical Characteristics section.
TRIAL RUN
Verify all parameters before operating the inverter.
Always apply voltage and current signals to each terminal that are within levels indicated within this manual. Otherwise, damage to the inverter may result.

POWER ELECTRONICS FREESUN
SAFETY INSTRUCTIONS 9
E NGLIS
H
OPERATION PRECAUTIONS
Do not modify or alter anything within the inverter.
Before programming or operating the Freesun Series, initialise all parameters back to factory default values.
WHO'S ABLE TO APPLY THE FOLLOWING INSTRUCTIONS?
Only trained electricians approved by the responsible energy supply company may install and commission the inverters. The instructions assume that you, the installer, are familiar with electrical installations and know the corresponding rules and regulations.
SPECIAL HAZARDS OF PHOTOVOLTAIC SYSTEMS
Photovoltaic systems have special characteristics that can represent special hazards:
An active power source is connected. This means that, regardless to the operating mode of the inverter, there may be voltage present, either from the photovoltaic generator and/or the FREESUN. This is especially important to consider when disconnecting particular parts of the system.
Very high DC voltages are present (no zero-crossing) which, in case of a fault or inappropriate use of fuses or plugs, may lead to arcing.
The short-circuit current of the photovoltaic generator is only slightly more than the maximum operating current and is also dependent on the level of a solar irradiation. This means that, if a short circuit occurs in the system, the existing circuit breakers are not guaranteed to switch off.
A highly branched generator array may be difficult to disconnect if a fault develops (e. g. short circuit). We recommend the extra use of external DC circuit breakers for disconnecting the inverter and/or the DC main cables / String supervisors (DC circuit breakers are built-in). One circuit breaker should be allocated to each input, and these should be located near to de FREESUN as described in the standard VDE0100 part 7-712 and the VDI 6012 regulations.
Power Electronics must be informed of the required AC grid connection type
The device contains capacitors on the AC and DC sides. The discharge time of the capacitors is longer than 10 minutes. For this reason, it is required to wait longer than this time before making any operation or maintenance actions in the unit.

FREESUN POWER ELECTRONICS
10 SAFETY INSTRUCTIONS
1. INTRODUCTION
In order to guarantee correct connection and reliable operation of the device, it is recommended to read carefully the safety and installation instructions in the following sections.
Figure 1.1: FREESUN Frame 1 Outdoor Front View
For a safe transport of the unit, the internal transformer will be fixed. It is important to remove the corresponding fixations once the unit has been correctly placed on site and before starting with electrical connections.
Figure 1.2: FREESUN Frame 3 Indoor Front View
POWER ELECTRONICS FREESUN
INTRODUCTION 11
E NGLIS
H
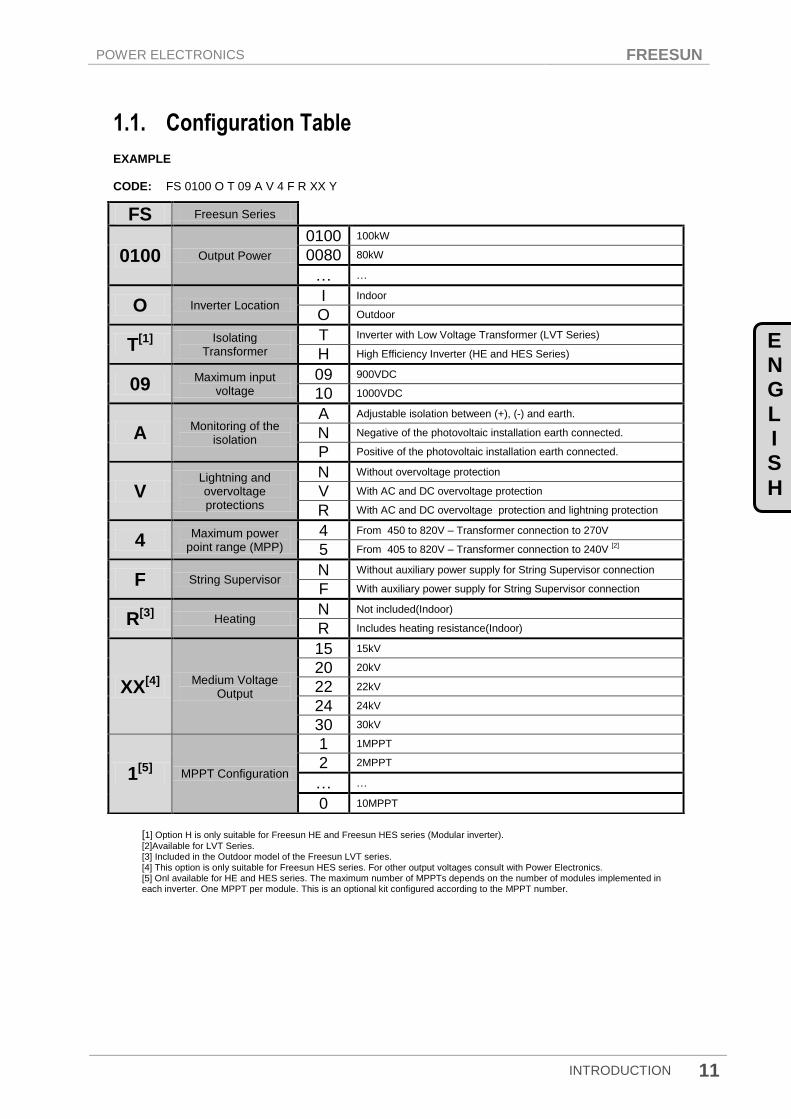
1.1. Configuration Table
EXAMPLE
CODE: FS 0100 O T 09 A V 4 F R XX Y
[1] Option H is only suitable for Freesun HE and Freesun HES series (Modular inverter).
[2]Available for LVT Series. [3] Included in the Outdoor model of the Freesun LVT series. [4] This option is only suitable for Freesun HES series. For other output voltages consult with Power Electronics. [5] Onl available for HE and HES series. The maximum number of MPPTs depends on the number of modules implemented in each inverter. One MPPT per module. This is an optional kit configured according to the MPPT number.
FS Freesun Series
0100 Output Power
0100 100kW
0080 80kW
… …
O Inverter Location I Indoor
O Outdoor
T[1] Isolating
Transformer
T Inverter with Low Voltage Transformer (LVT Series)
H High Efficiency Inverter (HE and HES Series)
09 Maximum input
voltage
09 900VDC
10 1000VDC
A Monitoring of the
isolation
A Adjustable isolation between (+), (-) and earth.
N Negative of the photovoltaic installation earth connected.
P Positive of the photovoltaic installation earth connected.
V Lightning and overvoltage protections
N Without overvoltage protection
V With AC and DC overvoltage protection
R With AC and DC overvoltage protection and lightning protection
4 Maximum power
point range (MPP)
4 From 450 to 820V – Transformer connection to 270V
5 From 405 to 820V – Transformer connection to 240V [2]
F String Supervisor N Without auxiliary power supply for String Supervisor connection
F With auxiliary power supply for String Supervisor connection
R[3] Heating N Not included(Indoor)
R Includes heating resistance(Indoor)
XX[4] Medium Voltage
Output
15 15kV
20 20kV
22 22kV
24 24kV
30 30kV
1[5] MPPT Configuration
1 1MPPT
2 2MPPT
… …
0 10MPPT
FREESUN POWER ELECTRONICS
12 SAFETY INSTRUCTIONS
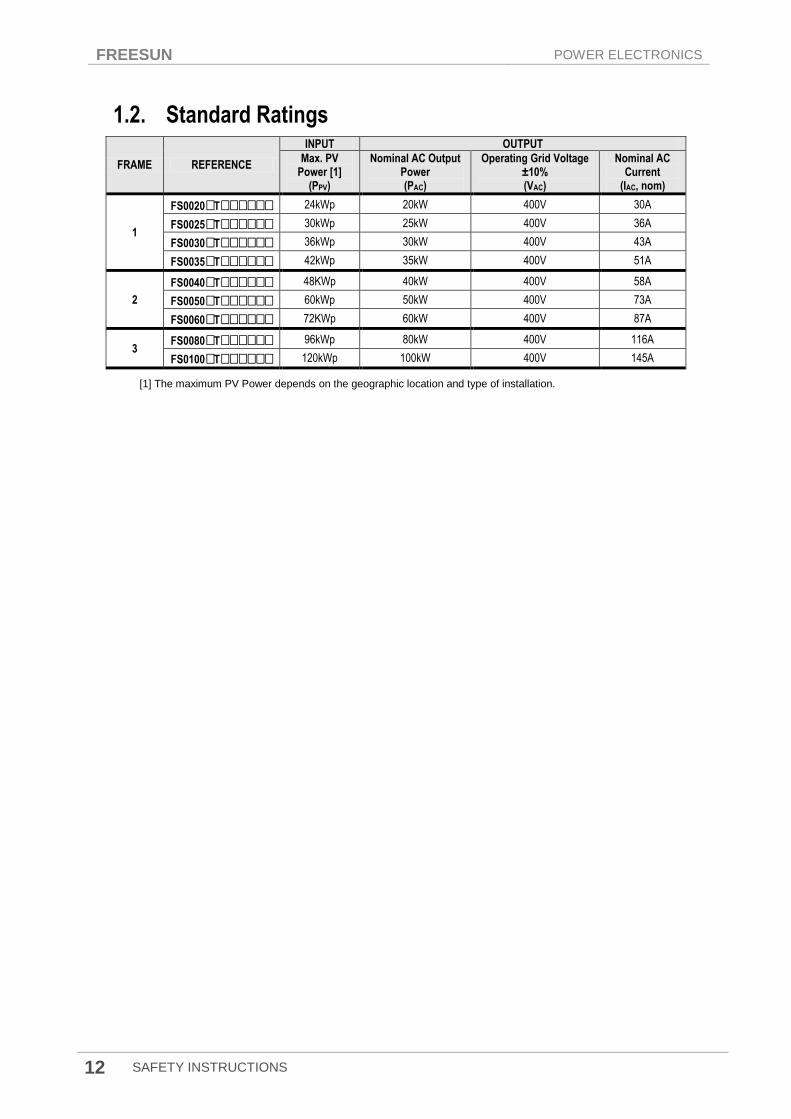
1.2. Standard Ratings
FRAME REFERENCE
INPUT OUTPUT
Max. PV Power [1]
(PPV)
Nominal AC Output Power (PAC)
Operating Grid Voltage ±10% (VAC)
Nominal AC Current
(IAC, nom)
1
FS0020T 24kWp 20kW 400V 30A
FS0025T 30kWp 25kW 400V 36A
FS0030T 36kWp 30kW 400V 43A
FS0035T 42kWp 35kW 400V 51A
2
FS0040T 48KWp 40kW 400V 58A
FS0050T 60kWp 50kW 400V 73A
FS0060T 72KWp 60kW 400V 87A
3 FS0080T 96kWp 80kW 400V 116A
FS0100T 120kWp 100kW 400V 145A
[1] The maximum PV Power depends on the geographic location and type of installation.
POWER ELECTRONICS FREESUN
INTRODUCTION 13
E NGLIS
H
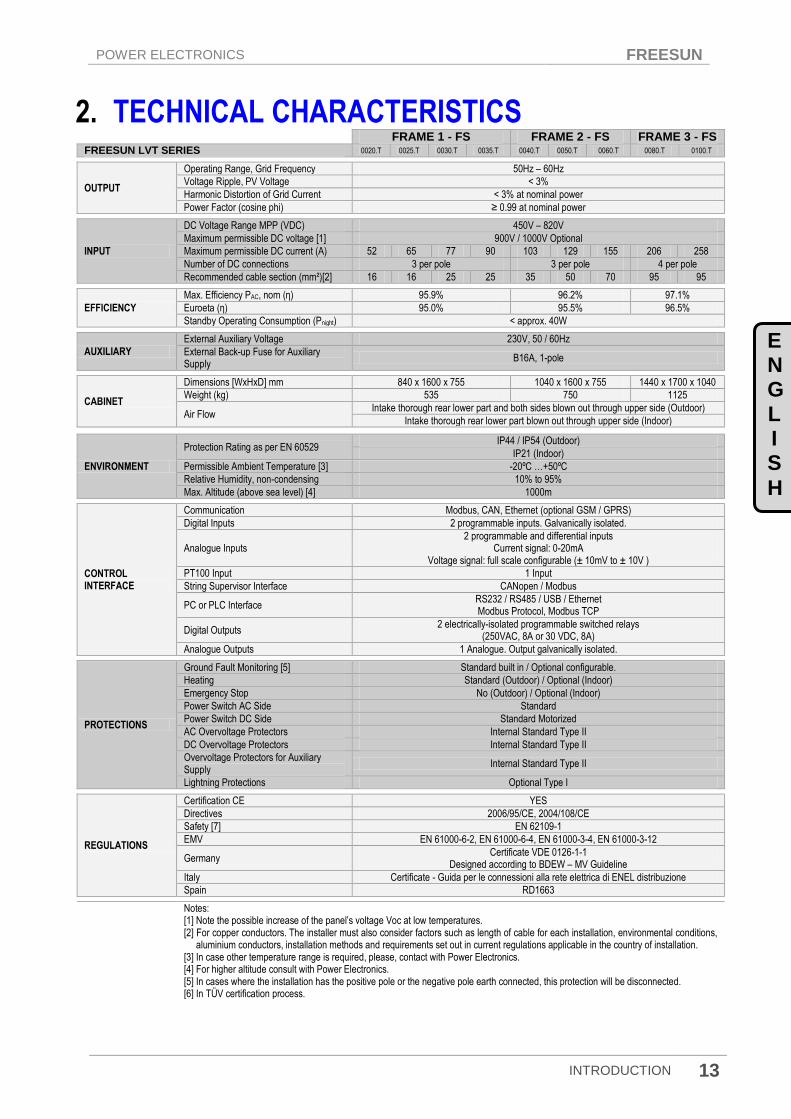
2. TECHNICAL CHARACTERISTICS FRAME 1 - FS FRAME 2 - FS FRAME 3 - FS
FREESUN LVT SERIES 0020.T 0025.T 0030.T 0035.T 0040.T 0050.T 0060.T 0080.T 0100.T
OUTPUT
Operating Range, Grid Frequency 50Hz – 60Hz
Voltage Ripple, PV Voltage < 3%
Harmonic Distortion of Grid Current < 3% at nominal power
Power Factor (cosine phi) ≥ 0.99 at nominal power
INPUT
DC Voltage Range MPP (VDC) 450V – 820V
Maximum permissible DC voltage [1] 900V / 1000V Optional
Maximum permissible DC current (A) 52 65 77 90 103 129 155 206 258
Number of DC connections 3 per pole 3 per pole 4 per pole
Recommended cable section (mm²)[2] 16 16 25 25 35 50 70 95 95
EFFICIENCY
Max. Efficiency PAC, nom (η) 95.9% 96.2% 97.1%
Euroeta (η) 95.0% 95.5% 96.5%
Standby Operating Consumption (Pnight) < approx. 40W
AUXILIARY
External Auxiliary Voltage 230V, 50 / 60Hz
External Back-up Fuse for Auxiliary Supply
B16A, 1-pole
CABINET
Dimensions [WxHxD] mm 840 x 1600 x 755 1040 x 1600 x 755 1440 x 1700 x 1040
Weight (kg) 535 750 1125
Air Flow Intake thorough rear lower part and both sides blown out through upper side (Outdoor)
Intake thorough rear lower part blown out through upper side (Indoor)
ENVIRONMENT
Protection Rating as per EN 60529 IP44 / IP54 (Outdoor)
IP21 (Indoor)
Permissible Ambient Temperature [3] -20ºC …+50ºC
Relative Humidity, non-condensing 10% to 95%
Max. Altitude (above sea level) [4] 1000m
CONTROL INTERFACE
Communication Modbus, CAN, Ethernet (optional GSM / GPRS)
Digital Inputs 2 programmable inputs. Galvanically isolated.
Analogue Inputs 2 programmable and differential inputs
Current signal: 0-20mA Voltage signal: full scale configurable (± 10mV to ± 10V )
PT100 Input 1 Input
String Supervisor Interface CANopen / Modbus
PC or PLC Interface RS232 / RS485 / USB / Ethernet Modbus Protocol, Modbus TCP
Digital Outputs 2 electrically-isolated programmable switched relays
(250VAC, 8A or 30 VDC, 8A)
Analogue Outputs 1 Analogue. Output galvanically isolated.
PROTECTIONS
Ground Fault Monitoring [5] Standard built in / Optional configurable.
Heating Standard (Outdoor) / Optional (Indoor)
Emergency Stop No (Outdoor) / Optional (Indoor)
Power Switch AC Side Standard
Power Switch DC Side Standard Motorized
AC Overvoltage Protectors Internal Standard Type II
DC Overvoltage Protectors Internal Standard Type II
Overvoltage Protectors for Auxiliary Supply
Internal Standard Type II
Lightning Protections Optional Type I
REGULATIONS
Certification CE YES
Directives 2006/95/CE, 2004/108/CE
Safety [7] EN 62109-1
EMV EN 61000-6-2, EN 61000-6-4, EN 61000-3-4, EN 61000-3-12
Germany Certificate VDE 0126-1-1
Designed according to BDEW – MV Guideline
Italy Certificate - Guida per le connessioni alla rete elettrica di ENEL distribuzione
Spain RD1663
Notes: [1] Note the possible increase of the panel’s voltage Voc at low temperatures. [2] For copper conductors. The installer must also consider factors such as length of cable for each installation, environmental conditions, aluminium conductors, installation methods and requirements set out in current regulations applicable in the country of installation. [3] In case other temperature range is required, please, contact with Power Electronics. [4] For higher altitude consult with Power Electronics. [5] In cases where the installation has the positive pole or the negative pole earth connected, this protection will be disconnected. [6] In TÜV certification process.
FREESUN POWER ELECTRONICS
14 INSTALLATION REQUIREMENTS
3. INSTALLATION REQUIREMENTS
3.1. Requisites for the Installation
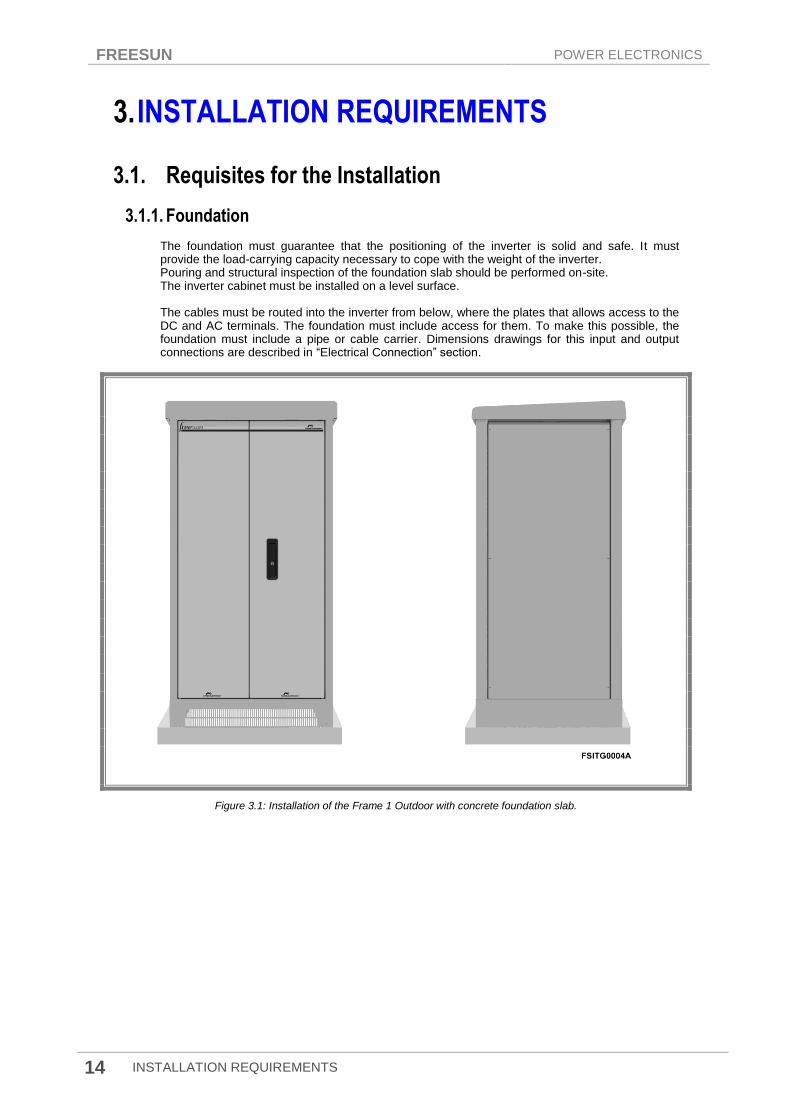
3.1.1. Foundation
The foundation must guarantee that the positioning of the inverter is solid and safe. It must provide the load-carrying capacity necessary to cope with the weight of the inverter. Pouring and structural inspection of the foundation slab should be performed on-site. The inverter cabinet must be installed on a level surface. The cables must be routed into the inverter from below, where the plates that allows access to the DC and AC terminals. The foundation must include access for them. To make this possible, the foundation must include a pipe or cable carrier. Dimensions drawings for this input and output connections are described in “Electrical Connection” section.
Figure 3.1: Installation of the Frame 1 Outdoor with concrete foundation slab.

POWER ELECTRONICS FREESUN
INSTALLATION REQUIREMENTS 15
E NGLIS
H
Figure 3.2: Installation of the Frame 2 Outdoor with concrete foundation slab.
Figure 3.3: Installation of the Frame 3 Outdoor with concrete foundation slab.
FREESUN POWER ELECTRONICS
16 INSTALLATION REQUIREMENTS
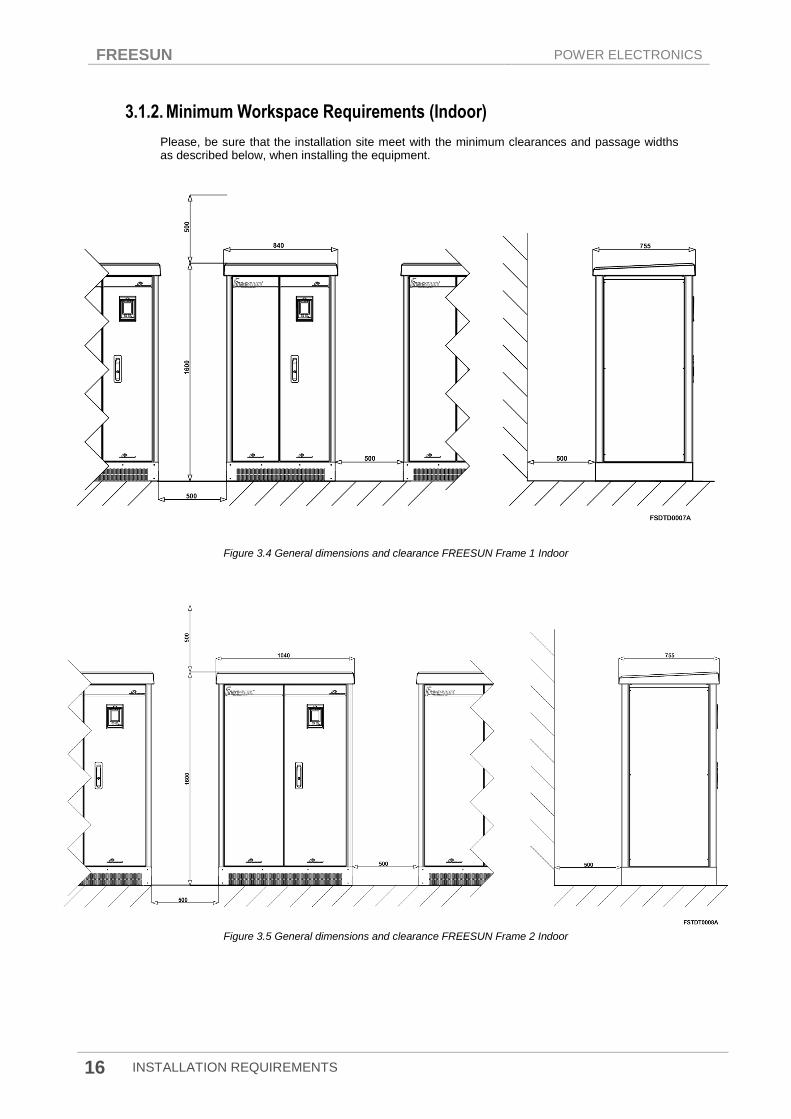
3.1.2. Minimum Workspace Requirements (Indoor)
Please, be sure that the installation site meet with the minimum clearances and passage widths as described below, when installing the equipment.
Figure 3.4 General dimensions and clearance FREESUN Frame 1 Indoor
Figure 3.5 General dimensions and clearance FREESUN Frame 2 Indoor
POWER ELECTRONICS FREESUN
INSTALLATION REQUIREMENTS 17
E NGLIS
H
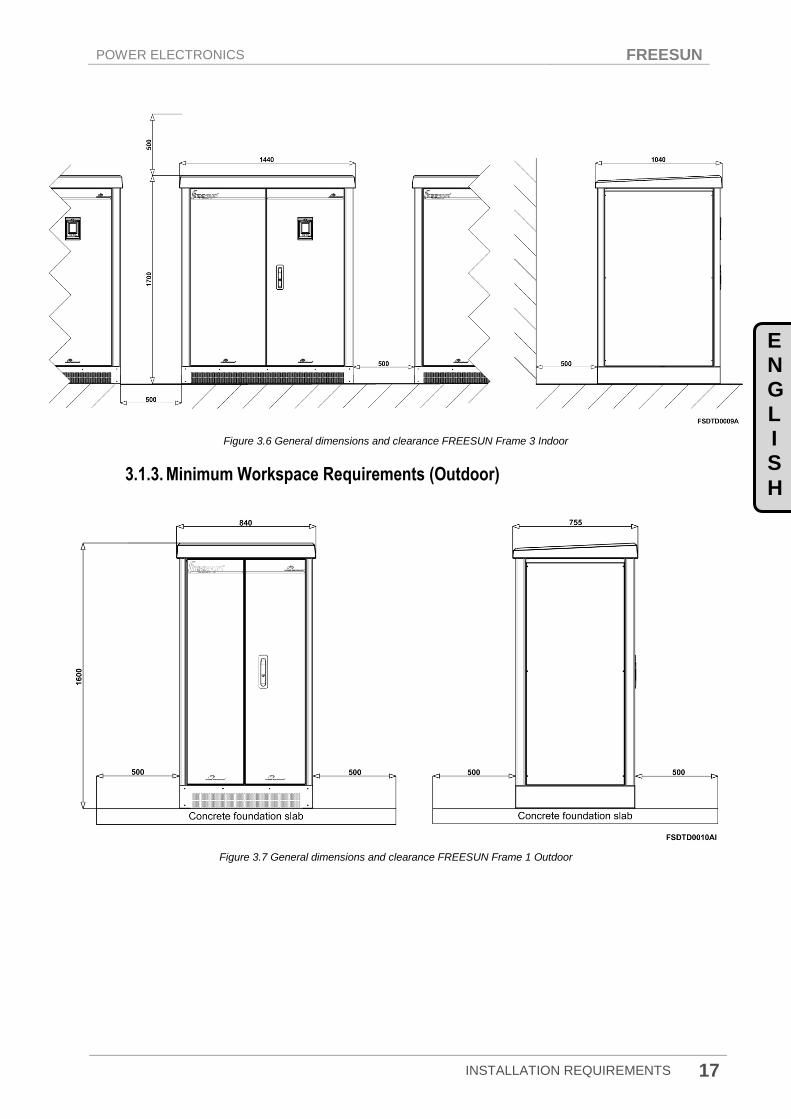
Figure 3.6 General dimensions and clearance FREESUN Frame 3 Indoor
3.1.3. Minimum Workspace Requirements (Outdoor)
Figure 3.7 General dimensions and clearance FREESUN Frame 1 Outdoor
FREESUN POWER ELECTRONICS
18 INSTALLATION REQUIREMENTS
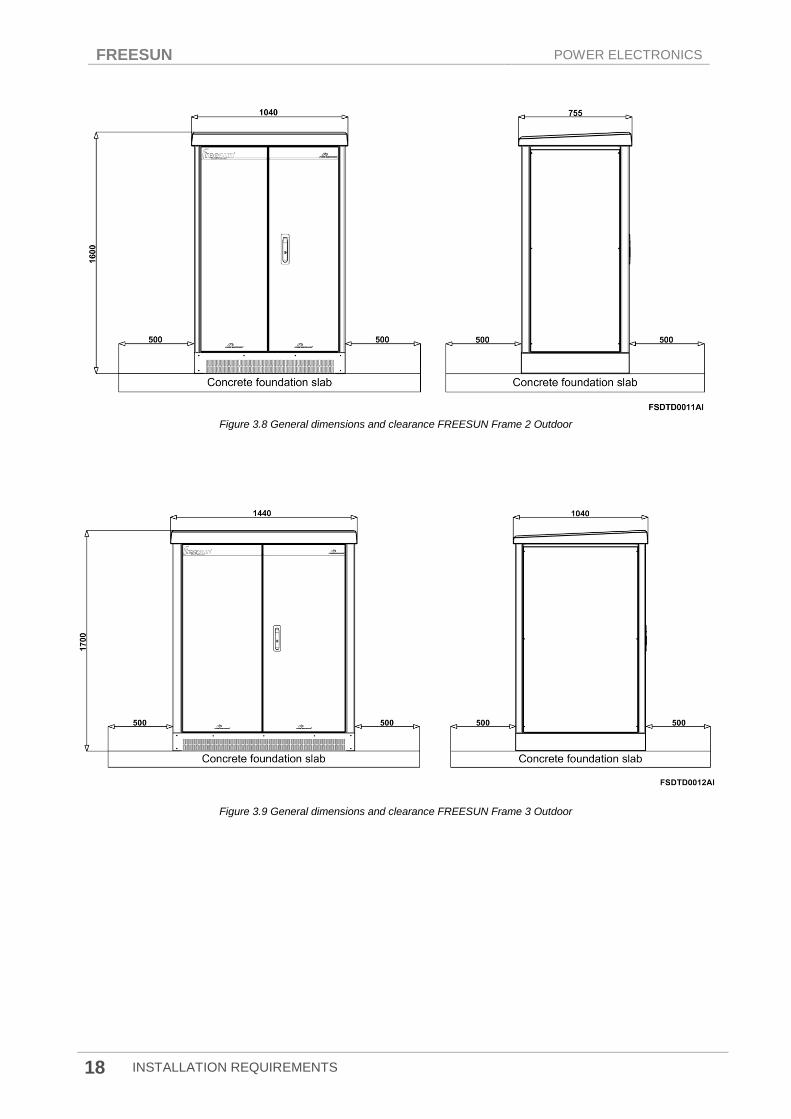
Figure 3.8 General dimensions and clearance FREESUN Frame 2 Outdoor
Figure 3.9 General dimensions and clearance FREESUN Frame 3 Outdoor
POWER ELECTRONICS FREESUN
INSTALLATION REQUIREMENTS 19
E NGLIS
H
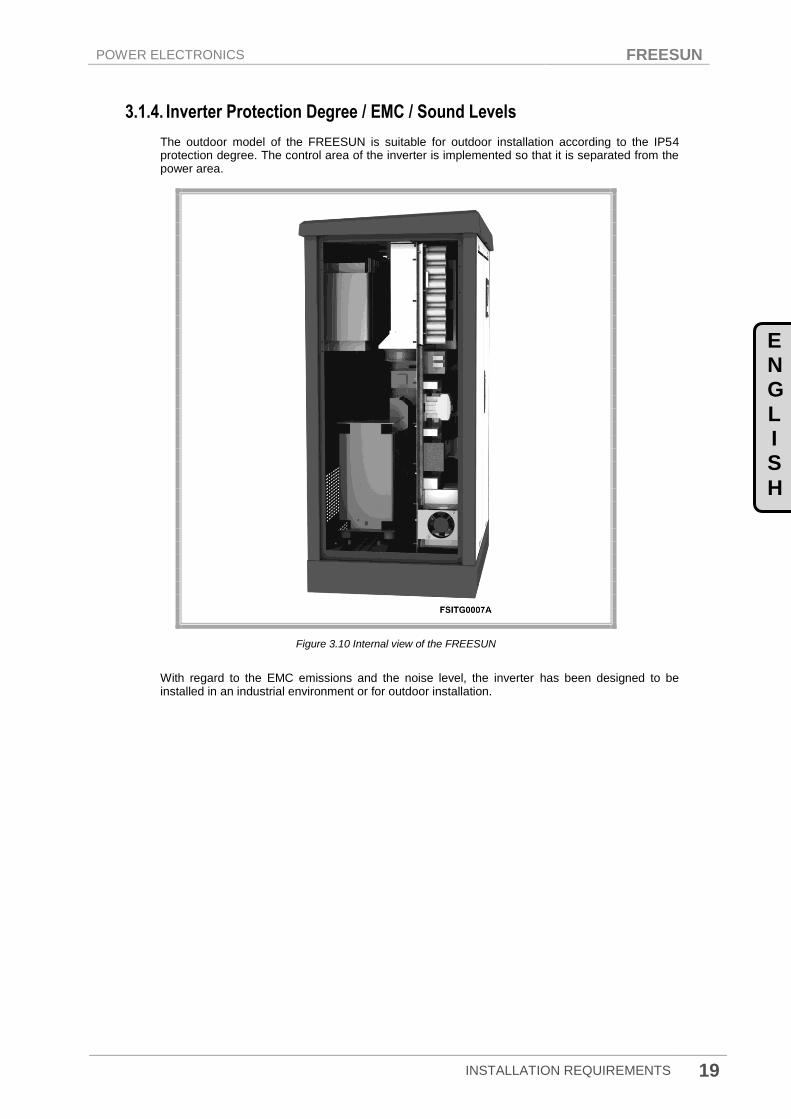
3.1.4. Inverter Protection Degree / EMC / Sound Levels
The outdoor model of the FREESUN is suitable for outdoor installation according to the IP54 protection degree. The control area of the inverter is implemented so that it is separated from the power area.
Figure 3.10 Internal view of the FREESUN
With regard to the EMC emissions and the noise level, the inverter has been designed to be installed in an industrial environment or for outdoor installation.
FREESUN POWER ELECTRONICS
20 INSTALLATION REQUIREMENTS
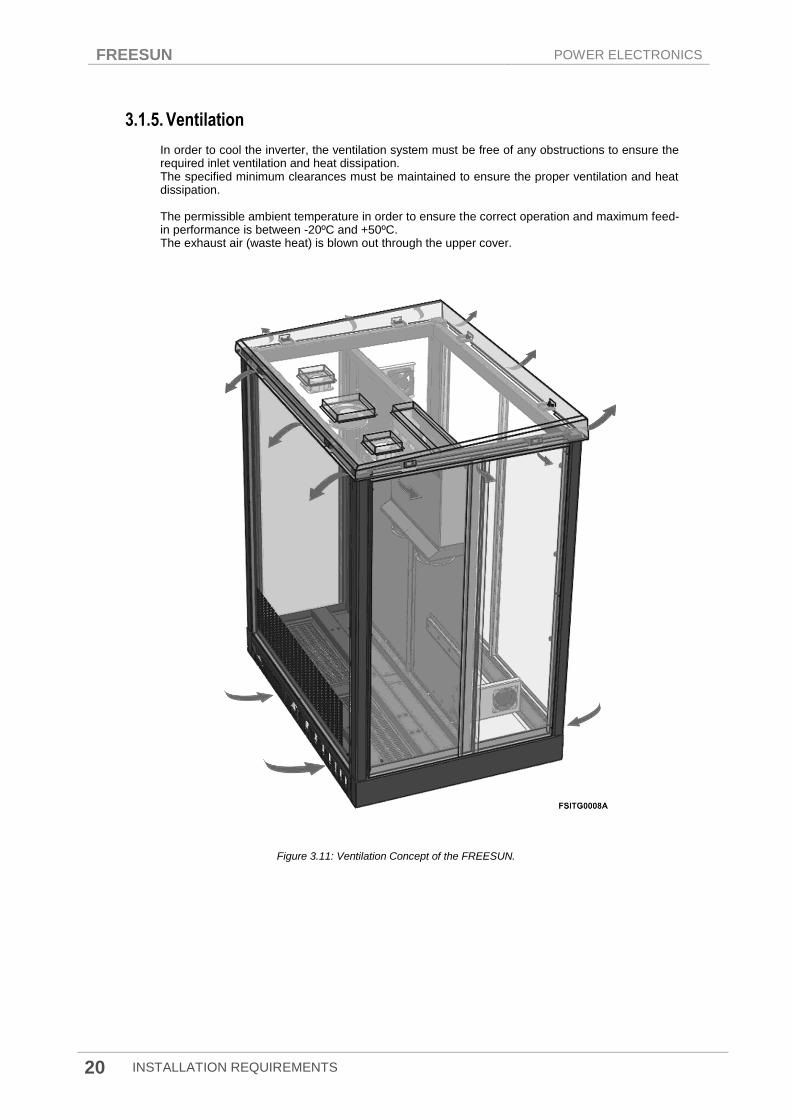
3.1.5. Ventilation
In order to cool the inverter, the ventilation system must be free of any obstructions to ensure the required inlet ventilation and heat dissipation. The specified minimum clearances must be maintained to ensure the proper ventilation and heat dissipation. The permissible ambient temperature in order to ensure the correct operation and maximum feed-in performance is between -20ºC and +50ºC. The exhaust air (waste heat) is blown out through the upper cover.
Figure 3.11: Ventilation Concept of the FREESUN.

POWER ELECTRONICS FREESUN
GENERAL INFORMATION 21
E NGLIS
H
4. GENERAL INFORMATION
4.1. Correct Use
Appropriate use of the equipment includes:
o Observation of the safety instructions described in the whole manual.
o Observation of the instructions in the FREESUN user manual.
o Observation of additional documentation for variants and options, such as grounded operation (GFDI) and the extended voltage range (EVR).
o Observation of the technical data for the device.
4.2. AC grid connection
The customer must determine the required grid connection type for the AC grid connection (TN-C, TN-S, TT grid) and coordinate it with Power Electronics. Ensure the grid connection cable for grid feeding is fused at the nominal current indicated on the name plate. If the specified nominal current differs front the nominal current of the fuse plug, the fuse plug having the next highest nominal current may be used. A power switch is used for the optional load-disconnecting switch.
4.3. Power Supplies
Switching on the different power supplies:
o Connection of main AC grid voltage for the grid feed-in.
o Connection of auxiliary control voltage 230Vac (internal power supply). There is the option of feeding it externally, as long as permitted by the current legislation of the country where the installation takes place.
o DC voltage connection from the photovoltaic generator must occur in the sequence described and may only be performed when the following conditions are satisfied:
Verify that all connections have been made according to the “Electrical Connections” section.
The protective ground connection for grid feed in and for internal power supply is correctly connected.
It must be checked that the inverter is connected to the correct grid connection type (TN-C, TN-S or TT). In addition, it is also necessary to verify that existing rotary field on R, S and T is the same than inverter phase sequence; on the contrary a trip will be generated. To this end, consider labelling (L1, L2 and L3).
Check the polarity of DC voltages (PV+ and PV-) in the connection plates of the inverter.
The photovoltaic generator has been checked with an insulation test to ensure that there is no ground fault.

FREESUN POWER ELECTRONICS
22 GENERAL INFORMATION
4.4. Emergency Stop
The Freesun inverter outdoor model is not provided with external emergency stop, but it can be ordered as an option. The emergency stop button will provide the corresponding normally closed contacts free potential to be correspondly wired to the Freesun. Each emergency stop must be powered only from the corresponding inverter.
4.5. Operation
Apart from the FREESUN Control, there are no control elements on the device. The cabinet doors must only be opened for commissioning, maintenance and troubleshooting, as well as for data query and parameter setting. Please also note the following safety instructions for working on the device.
4.6. Commissioning, Maintenance and Repair
All work on the FREESUN may only be performed when the device is safely disconnected from de PV voltage (DC), the grid voltage (AC), and the auxiliary power supply (internal or external), when these power sources are secured against being switched on again, and when it has been checked that the device is voltage-free. Only qualified technical personnel may undertake any such task.
Figure 4.1: FREESUN Frame 1 internal view
POWER ELECTRONICS FREESUN
GENERAL INFORMATION 23
E NGLIS
H
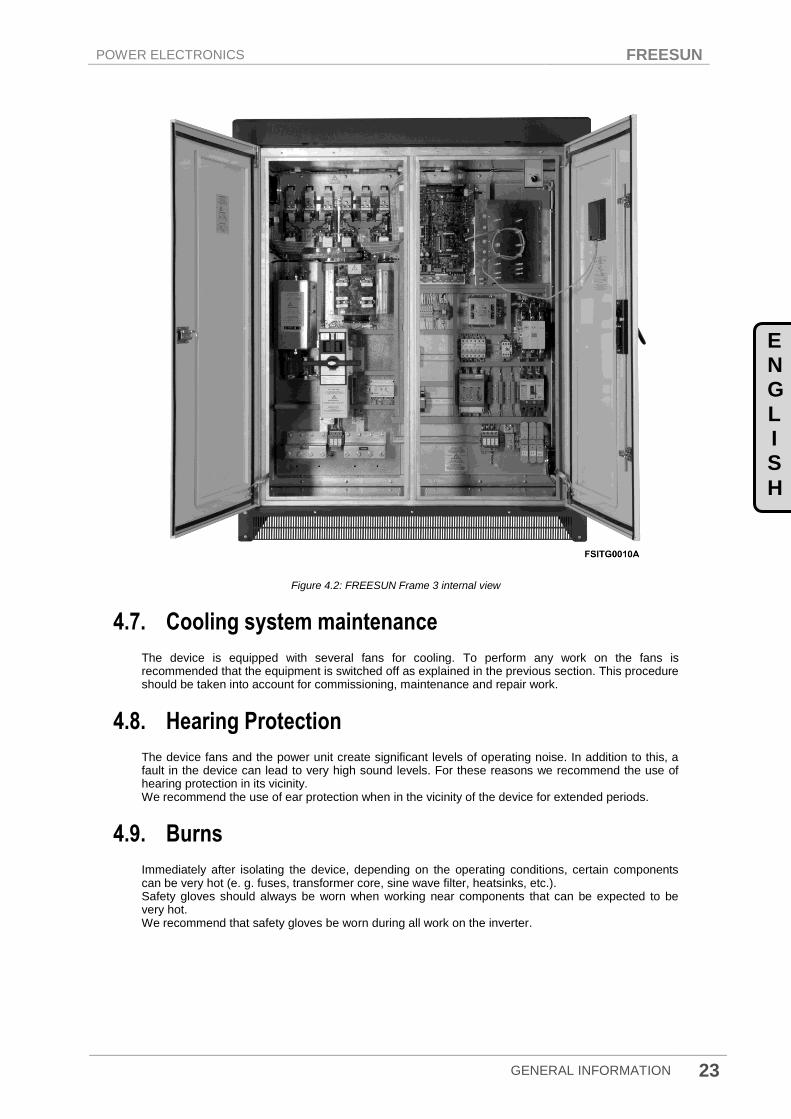
Figure 4.2: FREESUN Frame 3 internal view
4.7. Cooling system maintenance
The device is equipped with several fans for cooling. To perform any work on the fans is recommended that the equipment is switched off as explained in the previous section. This procedure should be taken into account for commissioning, maintenance and repair work.
4.8. Hearing Protection
The device fans and the power unit create significant levels of operating noise. In addition to this, a fault in the device can lead to very high sound levels. For these reasons we recommend the use of hearing protection in its vicinity. We recommend the use of ear protection when in the vicinity of the device for extended periods.
4.9. Burns
Immediately after isolating the device, depending on the operating conditions, certain components can be very hot (e. g. fuses, transformer core, sine wave filter, heatsinks, etc.). Safety gloves should always be worn when working near components that can be expected to be very hot. We recommend that safety gloves be worn during all work on the inverter.

FREESUN POWER ELECTRONICS
24 ELECTRICAL CONNECTION
5. ELECTRICAL CONNECTION The electrical connection can be set up after the inverter has been correctly placed on site. The cables are inserted from below through the pedestal and the base of the cabinet, opening the base grilles in the front of the cabinet or in the rear part of the cabinet, according to installation requirements. In this way, it is possible the access to the bottom plates. Required glands must be installed in these bottom plates to let the correct installation of input and output cables.
5.1. External Connections
5.1.1. Electrical Connections to the AC Grid Power
The AC grid connection is made at the TN-C, TN-S, TT grid connection type, which must be provided by the customer, using a 3-phase system equipped for 400V. In addition, it is also necessary to verify that existing rotary field on L1, L2 and L3 is the same than inverter phase sequence; on the contrary a trip will be generated. The grid connection must be installed in a way such that a right-hand rotary field lies at the input of the cabinet. In case of a left-hand rotary field is present, the inverter will generate a trip. Ensure the grid connection cable is fused at the nominal current indicated on the name plate. If the specified nominal current differs from the nominal current of the fuse plug, the fuse plug having the next highest nominal current may be used. The cables for AC connection will be fixed using M8 cable lugs.
Figure 5.1: View of the base plates for cable routing and the FREESUN electrical connections
Figure 5.2: AC connection terminals
POWER ELECTRONICS FREESUN
ELECTRICAL CONNECTION 25
E NGLIS
H
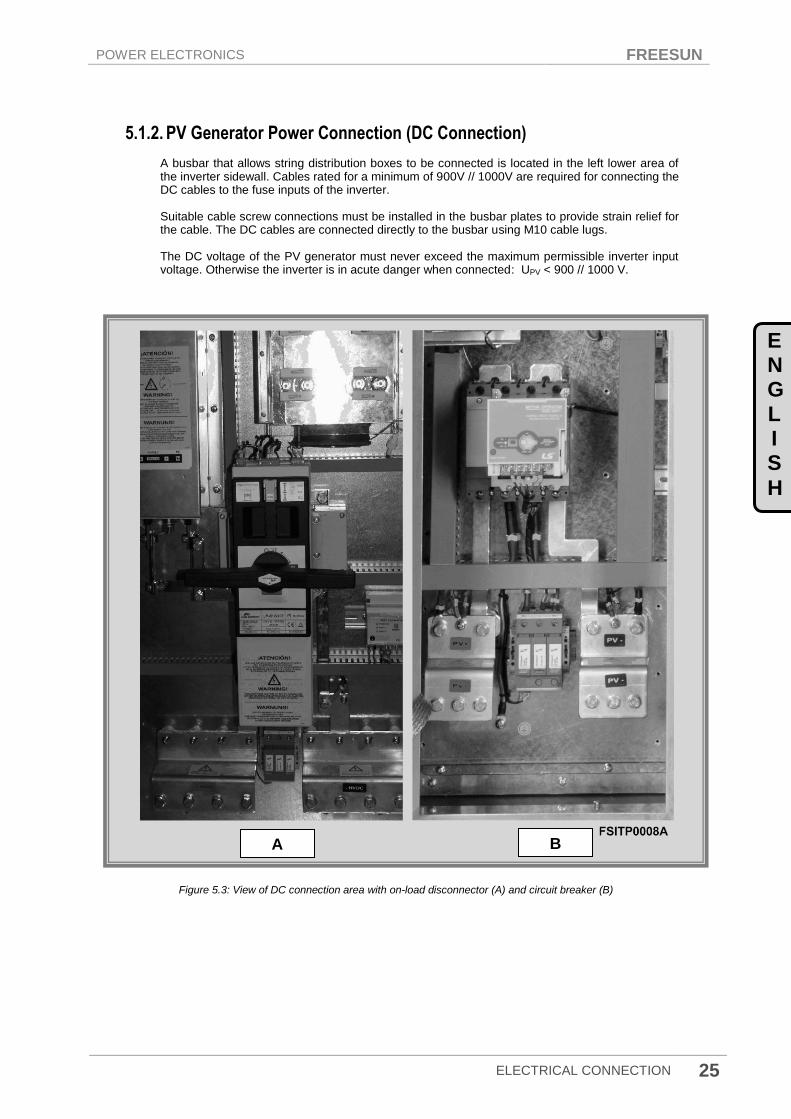
5.1.2. PV Generator Power Connection (DC Connection)
A busbar that allows string distribution boxes to be connected is located in the left lower area of the inverter sidewall. Cables rated for a minimum of 900V // 1000V are required for connecting the DC cables to the fuse inputs of the inverter. Suitable cable screw connections must be installed in the busbar plates to provide strain relief for the cable. The DC cables are connected directly to the busbar using M10 cable lugs. The DC voltage of the PV generator must never exceed the maximum permissible inverter input voltage. Otherwise the inverter is in acute danger when connected: UPV < 900 // 1000 V.
Figure 5.3: View of DC connection area with on-load disconnector (A) and circuit breaker (B)
A B

FREESUN POWER ELECTRONICS
26 ELECTRICAL CONNECTION
5.1.3. General dimensions for AC and DC connection
Figure 5.4: AC and DC Input / Output cable plates Frame 1
Figure 5.5: AC and DC Input / Output cable plates Frame 2
POWER ELECTRONICS FREESUN
ELECTRICAL CONNECTION 27
E NGLIS
H
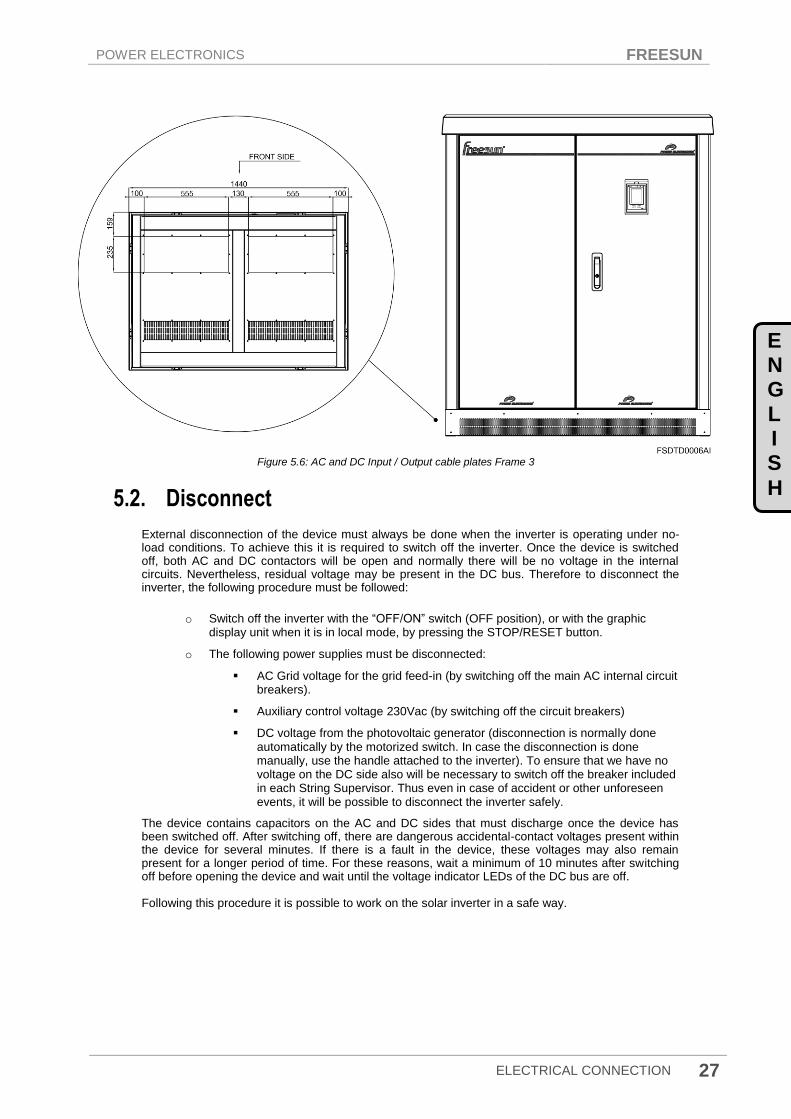
Figure 5.6: AC and DC Input / Output cable plates Frame 3
5.2. Disconnect
External disconnection of the device must always be done when the inverter is operating under no-load conditions. To achieve this it is required to switch off the inverter. Once the device is switched off, both AC and DC contactors will be open and normally there will be no voltage in the internal circuits. Nevertheless, residual voltage may be present in the DC bus. Therefore to disconnect the inverter, the following procedure must be followed:
o Switch off the inverter with the “OFF/ON” switch (OFF position), or with the graphic display unit when it is in local mode, by pressing the STOP/RESET button.
o The following power supplies must be disconnected:
AC Grid voltage for the grid feed-in (by switching off the main AC internal circuit breakers).
Auxiliary control voltage 230Vac (by switching off the circuit breakers)
DC voltage from the photovoltaic generator (disconnection is normally done automatically by the motorized switch. In case the disconnection is done manually, use the handle attached to the inverter). To ensure that we have no voltage on the DC side also will be necessary to switch off the breaker included in each String Supervisor. Thus even in case of accident or other unforeseen events, it will be possible to disconnect the inverter safely.
The device contains capacitors on the AC and DC sides that must discharge once the device has been switched off. After switching off, there are dangerous accidental-contact voltages present within the device for several minutes. If there is a fault in the device, these voltages may also remain present for a longer period of time. For these reasons, wait a minimum of 10 minutes after switching off before opening the device and wait until the voltage indicator LEDs of the DC bus are off. Following this procedure it is possible to work on the solar inverter in a safe way.

FREESUN POWER ELECTRONICS
28 ELECTRICAL CONNECTION
5.3. Sensors and Control Signals for the User
All required information about digital I/O and analogue I/O are described below. Two analogue sensors and one PT100 temperature sensor can be connected to the Freesun. Their connection is made in the connection area of the inverter.
Figure 5.7: Control terminals for the user
Further information about setting of each input and output; please refer to the Freesun Programming and Software Manual.
5.4. Inverter Communication Connection
The device can be equipped with various interface cards for the communication between the inverter and a PC or modem. The data can be transferred using the following:
o Ethernet
o RS232 / RS485 / USB
o CAN (For the String Supervisor)
o GSM.
The following control scheme provides information of the different elements that can make up the installation and its interconnection, as well as the different lines that may be necessary for both power and communications. In case the 230Vac power supply for control is externally provided, it will be connected to the elements showed in the scheme. The provision of this power supply to the inverters is legislated by the relevant regulatory agency of the country where the installation is located and must therefore be respected.

POWER ELECTRONICS FREESUN
ELECTRICAL CONNECTION 29
E NGLIS
H
To connect and power those elements that are not part of the scope of Power Electronics, consider the installation instructions of the respective manufacturers (switch, router, …) Please, consider the following general cable layout:
Figure 5.8: General communications layout

FREESUN POWER ELECTRONICS
30 ELECTRICAL CONNECTION
5.4.1. Details for connection between Freesun and String Supervisor
The Freesun and the String Supervisor are connected by a CAN interface. The CAN interface connector is J900 and it is located in the control board of the Freesun. Connections of String Supervisor with the Freesun inverter are described in the following drawings:
Case A) J900 connector is a DB9 connector:
Figure 5.9: Connection with string supervisor using a DB9 connector.
CONSIDERATIONS
The cable for CAN connection between the solar inverter and the String Supervisor must meet the following specifications to ensure proper operation:
o Family: CAN-BUS 2x2x0.75mm² VIOLET o Section: 0.75mm² o Colour code: DIN 47100 o Ext. cover: PVC o Characteristic impedance: 120Ω
The recommended maximum cable length is between 75m and 100m for a data transmission speed of 500Kbps. For longer distances please contact Power Electronics. Excessive bending of CAN cables can reduce their ability to meet the CAN specification. Standard „Thick‟ cables shall have a bending radius of greater than 75mm (3”). Standard „Thin‟ cables shall have a bending radius of greater than 50mm (2”). These generic cable types are available in a variety of different offerings such as FLEX, HAZ-DUTY, CLASS I (600V), UV RESISTANT, etc.

POWER ELECTRONICS FREESUN
ELECTRICAL CONNECTION 31
E NGLIS
H
Case B) J900 connector is a screw terminal connector:
Figure 5.10: Connection with String Supervisor using a screw terminal connector
CONSIDERATIONS
The cable for CAN connection between the solar inverter and the String Supervisor must meet the following specifications to ensure proper operation:
o Family: CAN-BUS 2x2x0.75mm² VIOLET o Section: 0.75mm² o Colour code: DIN 47100 o Ext. cover: PVC o Characteristic impedance: 120Ω
The recommended maximum cable length is between 75m and 100m for a data transmission speed of 500Kbps. For longer distances please contact Power Electronics. Excessive bending of CAN cables can reduce their ability to meet the CAN specification. Standard „Thick‟ cables shall have a bending radius of greater than 75mm (3”). Standard „Thin‟ cables shall have a bending radius of greater than 50mm (2”). These generic cable types are available in a variety of different offerings such as FLEX, HAZ-DUTY, CLASS I (600V), UV RESISTANT, etc.

FREESUN POWER ELECTRONICS
32 ELECTRICAL CONNECTION
5.4.2. Details for connection between Power Control Interface (PCI) and the Ripple Control Receiver
In the following drawing is described the connection of the Power Control Interface to a radio ripple control receiver. Please, check the manufacture‟s user manual for more information about the configuration of the radio ripple control device.
Figure 5.11: Connection between the Power Control Interface and the radio ripple control receiver
5.5. String Supervisor Description
The main function of the string supervisor is monitoring the strings status to detect quickly their malfunction. To do this, using a current transducer "hall effect", the current provided by each string is measured and in this way it is possible to analyse easily the performance of each single one. In case of one of the string produces less energy than the others will be detected thanks to the string supervisor. The string supervisor is a “slave” of the solar inverter. Its function is to inform the solar inverter and to connect in parallel the panel strings. To achieve this, the string supervisor is provided with two communication buses already implemented: CAN bus to communicate with the inverter and RS485, just in case the user requires to access to the STRING SUPERVISOR, via MODBUS. Each string supervisor is provided with an overvoltage protector that protects the installation. Power Electronics string supervisor detects the status of this overvoltage protector and in case it is out of service, as the result of action against a very high energetic value overvoltage, it will inform to the solar inverter. With this information the maintenance people will have able of managing the situation properly. The string supervisor has two fuses for each string that disconnects the panels forming this string in case of overload. If the fuse is blown, it would be detected by the supervisor string, because the current of this string would be zero. The string supervisor provides a digital input to detect the theft of panels. The string supervisor has one on load disconnector already built in that allows a complete isolation of the string from the installation by switching off both, the positive and the negative poles. This is very useful when maintenance operations are required but without stopping energy production.

POWER ELECTRONICS FREESUN
ELECTRICAL CONNECTION 33
E NGLIS
H
Figure 5.12: String Supervisor External View
External dimensions for string supervisor are described in the following drawing:
Figure 5.13: String Supervisor dimensions
FREESUN POWER ELECTRONICS
34 ELECTRICAL CONNECTION
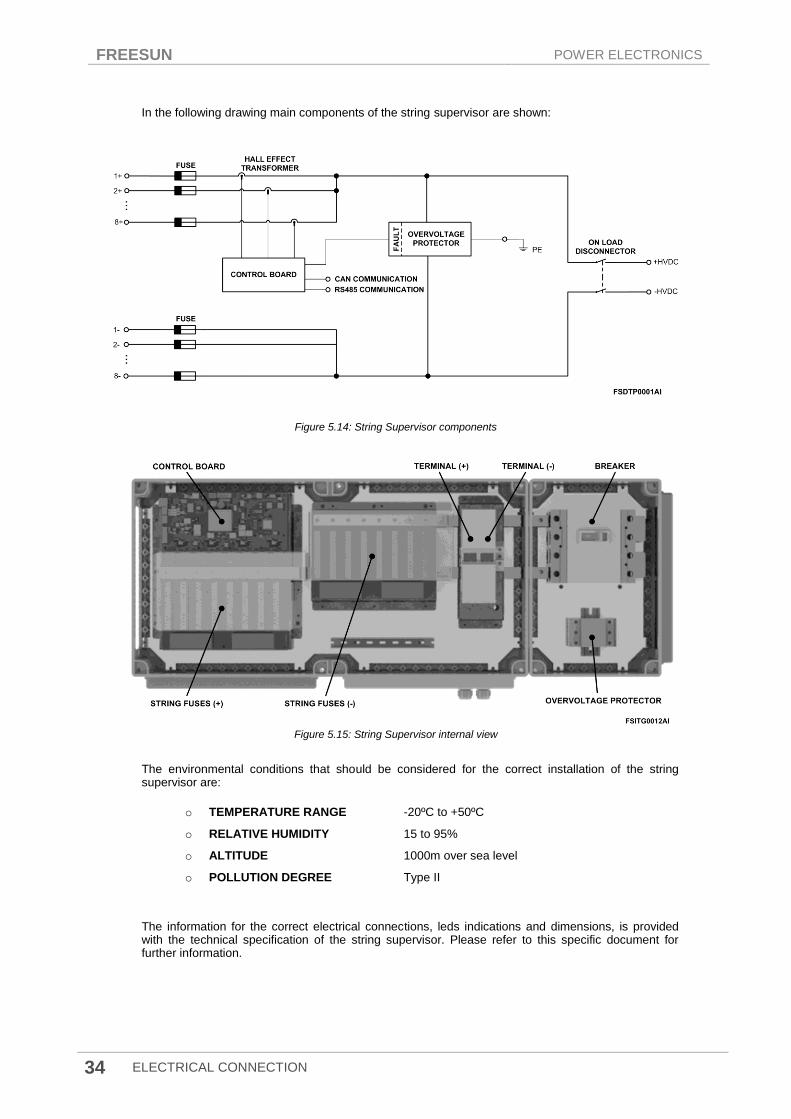
In the following drawing main components of the string supervisor are shown:
Figure 5.14: String Supervisor components
Figure 5.15: String Supervisor internal view
The environmental conditions that should be considered for the correct installation of the string supervisor are:
o TEMPERATURE RANGE -20ºC to +50ºC
o RELATIVE HUMIDITY 15 to 95%
o ALTITUDE 1000m over sea level
o POLLUTION DEGREE Type II
The information for the correct electrical connections, leds indications and dimensions, is provided with the technical specification of the string supervisor. Please refer to this specific document for further information.

POWER ELECTRONICS FREESUN
ELECTRICAL CONNECTION 35
E NGLIS
H
5.6. Overvoltage Protection
The Freesun Outdoor model is equipped with internal overvoltage protection as standard (Optional in Frame 1). Optionally, the inverter can also be equipped with lightning protection. This built in overvoltage protectors will provide the corresponding protection for AC connection, DC connection and also CAN interface for connecting the String Supervisors. The Freesun inverter requires auxiliary internal control voltage of 230VAC. In case the user provides this power supply externally, as long as permitted by the current legislation of the country where the installation takes place, the Freesun will provide the corresponding overvoltage protection for this line. The user must consider that before measuring the insulation, it is required to remove or disconnect the overvoltage protectors or the existing fuses must be removed.
FREESUN POWER ELECTRONICS
36 COMMISSIONING
6. COMMISSIONING Before the first commissioning, all work performed on the device should be thoroughly checked. Special care with the voltages on the DC and AC sides is required to ensure conformance with the limits allowed on the inverter. Nameplate data must be observed.
6.1. Initial Conditions
Following conditions must be observed to allow a correct commissioning of the solar inverter. Before the inverter is put into operation, will be required:
o Ensure an appropriate grounding resistance. This is decisive for the safety of the complete system and must therefore be determined before the system is started for the first time.
o Every circuit breaker and overload switch in the Freesun must be switched off when it is delivered.
6.2. Verify the Wiring
When performing the cabling checks, the connections are first checked for correctness and proper installation.
6.2.1. AC Grid Connection
The connection made to the feed-in cables is 3-phase. It must be checked that the inverter is connected to the correct grid connection type (TN-C, TN-S or TT). In addition, it is also necessary to verify that existing rotary field on R, S and T is the same than inverter phase sequence; on the contrary a trip will be generated. The level of the AC voltage should be measured and logged. The Freesun feeds into the grid using 3 x 400V ±10%.
6.2.2. Auxiliary Control Voltage Supply (external / internal)
The solar inverter must receive an internal 230VAC 50/60Hz single phase supply. In case of the power supply for control voltage is externally provided, as long as permitted by the current legislation of the country where the installation takes place, it must be protected with a back-up external auxiliary supply fuse B16A, 1-pole.
6.2.3. DC Power Connections
The DC power connections are made over the main DC plates of the inverter. Consider that DC connections should be checked to ensure they are mechanically tightened. The voltage on each of the main DC cables should be identical and should never exceed the maximum DC voltage level of the inverter. It is also important to check not only DC voltage levels but also the polarity of each of the DC main cables because the wrong polarity in one of the DC main cables can damage the PV generator.
POWER ELECTRONICS FREESUN
COMMISSIONING 37
E NGLIS
H
6.2.4. Serial Interfaces
For external communication and string current supervision, the data cables have to be connected. Detailed information has been above described and specific connection is described in String Supervisor documentation.
6.3. Switch On
Once all tests and measurements have been performed, and all measured values lie within the acceptable range, the inverter can be switched on for the first time. For this, all circuit breakers and overload switches in the Freesun must be switched on. At this time, the graphic display unit is connected, the LED "FAULT" is flashing while the inverter is synchronizing. Once the inverter is synchronized, the LED will turn off. In this way, the inverter is completely connected in both AC and DC sides. After that, you can proceed to start the unit by pressing the START button of the graphic display unit if it is in local mode, or with the key switch (select “ON” position) inside the cabinet. The Freesun will now start automatically after checking the grid voltage and frequency parameters. Finally, the motorized DC breaker is activated automatically and connects the PV generator.

FREESUN POWER ELECTRONICS
38 TRANSPORT AND HANDLING
7. TRANSPORT AND HANDLING Only the transport methods described in the installation guide are permissible, please follow the transport requirements here described. Any other transport method or system could damage the unit.
7.1. Weights and dimensions Freesun
Please note the heavy weight of the inverter. To assist with transporting, the data sheet of the dimensions and weight must be considered.
CAUTION
Heavy weight of the cabinet unit. Danger of tipping during transport. The cabinet must always be transported upright.
FRAME REFERENCE DIMENSIONS (mm)
WEIGHT (kg) HEIGHT (H) WIDTH (W) DEPTH (D)
1
FS0020
1600 840 755 535 FS0025
FS0030
FS0035
Figure 7.1 Freesun Frame 1 dimensions

POWER ELECTRONICS FREESUN
TRANSPORT AND HANDLING 39
E NGLIS
H
FRAME REFERENCE DIMENSIONS (mm)
WEIGHT (kg) HEIGHT (H) WIDTH (W) DEPTH (D)
2
FS0040
1600 1040 755 750 FS0050
FS0060
Figure 7.2 Freesun Frame 2 dimensions
FRAME REFERENCE DIMENSIONS (mm)
WEIGHT (kg) HEIGHT (H) WIDTH (W) DEPTH (D)
3 FS0080
1700 1440 1040 1125 FS0100
Figure 7.3: Freesun Frame 3 dimensions

FREESUN POWER ELECTRONICS
40 TRANSPORT AND HANDLING
7.2. Transport Procedure
Transport Using a Pallet Truck / Crane. The inverter is properly labelled with instructions for handling with the packaging and must be respected at all times. This also applies to the proper signalling of gravity symbol (Figure 7.4). The plinth panels must be unscrewed to transport the cabinet without a palette. This allows the fork of a pallet truck/forklift or crane to be inserted under the cabinet. To avoid damage or accidents during transport and on the installation site, the following measures have been introduced:
The transport markings stipulate that forklift or pallet trucks must always load the switch cabinets by their long sides (front and rear sides of the FREESUN). It is forbidden to lift them by their sort sides. (Figure 7.5)
Transport by crane is allowed if a suitable crane fork is used which is pushed through the openings in the base of the cabinet (Figure 7.6).
The cabinets must not be tilted.
To perform this manipulation is recommended that the inverter is left as close as possible to their final location.
Figure 7.4: Gravity centre marking
Figure 7.5: With "forklift / pallet truck"
POWER ELECTRONICS FREESUN
TRANSPORT AND HANDLING 41
E NGLIS
H
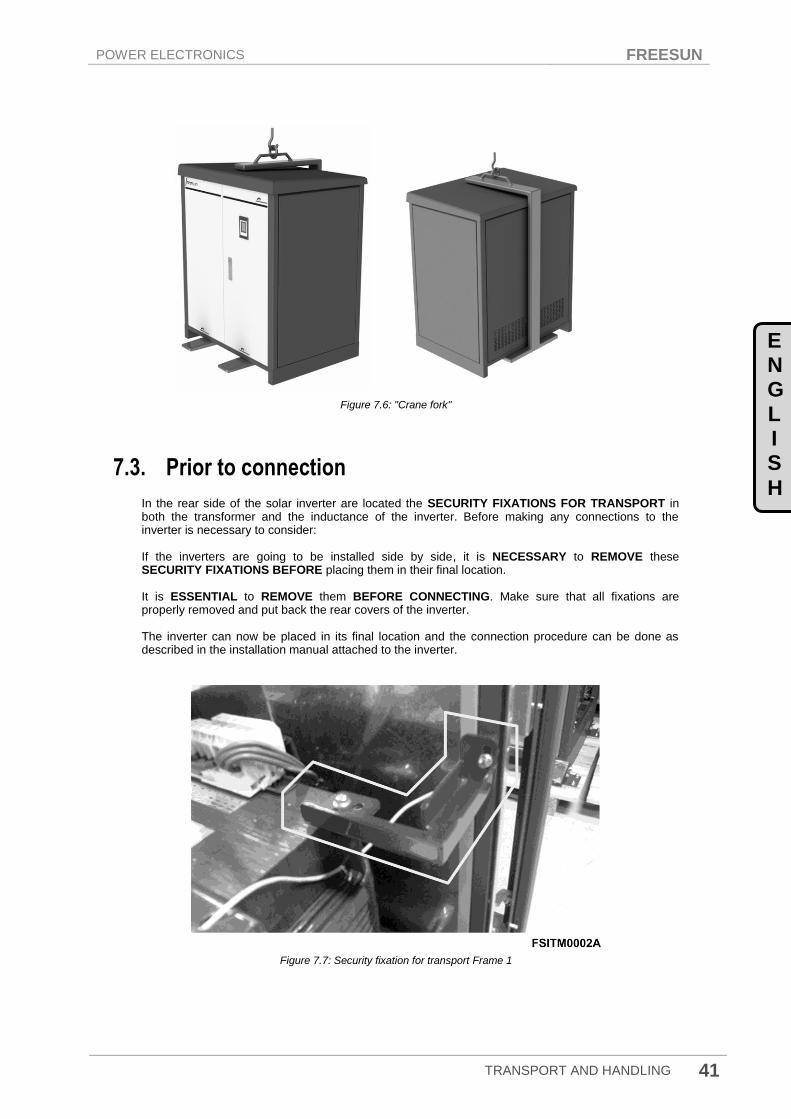
Figure 7.6: "Crane fork"
7.3. Prior to connection
In the rear side of the solar inverter are located the SECURITY FIXATIONS FOR TRANSPORT in both the transformer and the inductance of the inverter. Before making any connections to the inverter is necessary to consider: If the inverters are going to be installed side by side, it is NECESSARY to REMOVE these SECURITY FIXATIONS BEFORE placing them in their final location. It is ESSENTIAL to REMOVE them BEFORE CONNECTING. Make sure that all fixations are properly removed and put back the rear covers of the inverter. The inverter can now be placed in its final location and the connection procedure can be done as described in the installation manual attached to the inverter.
Figure 7.7: Security fixation for transport Frame 1

FREESUN POWER ELECTRONICS
42 TRANSPORT AND HANDLING
Figure 7.8: Security fixations for transport Frame 2
Figure 7.9: Security fixations for transport Frame 3

DECLARATION OF CONFORMITY CE
The Company: Name: POWER ELECTRONICS ESPAÑA, S.L. Address: C/ Leonardo Da Vinci, 24-26, 46980 Paterna (Valencia) Telephone: +34 96 136 65 57 Fax: +34 96 131 82 01 Declares under its own responsibility, that the product:
Solar Inverter
Brand: Power Electronics Model name: Freesun Series
Is in conformity with the following European Directives:
References Title
2006/95/CE Electrical Material intended to be used with certain limits of voltage
2004/108/CE Electromagnetic Compatibility
References of the harmonized technical norms applied under the Low Voltage Directive:
References Title
EN 50178: 1997 (*) Electric devices to be used in power installations
References of the harmonized technical norms applied under the Electromagnetic Compatibility Directive:
References Title
EN 61000-6-2:2005 Electromagnetic compatibility (EMC) -- Part 6-2: Generic standards - Immunity for industrial environments
EN 61000-6-4:2007
Electromagnetic compatibility (EMC) -- Part 6-4: Generic standards - Emission standard for industrial environments
EN 61000-3-12:2005
Electromagnetic compatibility (EMC) -- Part 3-12: Limits - Limits for harmonic currents produced by equipment connected to public low-voltage systems with input current > 16 A and <= 75 A per phase
IEC 61000-3-4:1998
Electromagnetic compatibility (EMC) - Part 3-4: Limits - Limitation of emission of harmonic currents in low-voltage power supply systems for equipment with rated current greater than 16 A
EN 61000-3-11:2000
Electromagnetic Compatibility (EMC) - Part 3-11: Limits – Limitation of voltage changes, voltage fluctuations and flicker in public low-voltage supply systems – Equipment with rated current 75 A and subjected to conditional connection
Note (*): the requirements of the new norm IEC 61209-1:2010 have been considered in the design and test of our range FREESUN
Paterna, 28th
of April 2010
David Salvo Executive Director

www.powerelectronics.es | www.power-electronics.com
24 Hours Technical Assistance 365 days a year +34 96 136 65 57
HEADQUARTER • VALENCIA • SPAIN
C/ Leonardo da Vinci, 24 – 26 • Parque Tecnológico • 46980 – PATERNA • VALENCIA • ESPAÑA Tel. 902 40 20 70 • Tel. (+34) 96 136 65 57 • Fax (+34) 96 131 82 01
BRANCHES
CATALUÑA
BARCELONA • Avda. de la Ferrería, 86-88 • 08110 • MONTCADA I REIXAC
Tel. (+34) 96 136 65 57 • Fax (+34) 93 564 47 52
LLEIDA • C/ Terrasa, 13 · Bajo • 25005 • LLEIDA
Tel. (+34) 97 372 59 52 • Fax (+34) 97 372 59 52
CANARIAS LAS PALMAS • C/ Juan de la Cierva, 4 • 35200 • TELDE
Tel. (+34) 928 68 26 47 • Fax (+34) 928 68 26 47
LEVANTE
VALENCIA • Leonardo da Vinci, 24-26 • 46980 PATERNA
Tel. (+34) 96 136 65 57 • Fax (+34) 96 131 82 01
CASTELLÓN • C/ Juan Bautista Poeta • 2º Piso · Puerta 4 • 12006 • CASTELLÓN
Tel. (+34) 96 434 03 78 • Tel. (+34) 96 136 65 57 • Fax (+34) 96 434 14 95
MURCIA • Pol. Residencial Santa Ana • Avda. Venecia, 17 • 30319 • CARTAGENA
Tel. (+34) 96 853 51 94 • Fax (+34) 96 812 66 23
NORTE VIZCAYA • Parque de Actividades • Empresariales Asuarán • Edificio Asúa, 1º B • Ctra. Bilbao · Plencia • 48950 • ERANDIO • Tel. (+34) 96 136 65 57 • Fax (+34) 94 431 79 08
CENTRO MADRID • Avda. Rey Juan Carlos I, 98, 4º C • 28916 • LEGANÉS
Tel. (+34) 96 136 65 57 • Fax (+34) 91 687 53 84
SUR SEVILLA • C/ Averroes, 6 • Edificio Eurosevilla • 41020 • SEVILLA
Tel. (+34) 96 136 65 57 • Fax (+34) 95 451 57 73
GALICIA LA CORUÑA • Plaza Agramar, 5 · Bajo • Perillo · Oleiros • 15172 • LA CORUÑA
Tel. (+34) 96 136 65 57 • Fax (+34) 98 163 45 83
INTERNATIONAL SUBSIDIARIES
GERMANY Power Electronics Deutschland GmbH • Dieselstrasse, 77 • D·90441 • NÜRNBERG GERMANY
Tel. (+49) 911 99 43 99 0 • Fax (+49) 911 99 43 99 8
AUSTRALIA Power Electronics Australia Pty Ltd • U6, 30-34 Octal St, Yatala, • BRISBANE, QUEENSLAND 4207 • P.O. Box
3166, Browns Plains, Queensland 4118 • AUSTRALIA
Tel. (+61) 7 3386 1993 • Fax (+61) 7 3386 1997
BRAZIL Power Electronics Brazil Ltda • Av. Guido Caloi, 1985-Galpão 09 • CEP 05802-140 • SÃO PAULO • BRASIL
Tel. (+55) 11 5891 9612 • Tel. (+55) 11 5891 9762
CHILE
Power Electronics Chile Ltda • Los Productores # 4439 – Huechuraba • SANTIAGO • CHILE
Tel. (+56) (2) 244 0308 · 0327 · 0335 • Fax (+56) (2) 244 0395
Oficina Petronila # 246, Casa 19 • ANTOFAGASTA • CHILE Tel. (+56) (55) 793 965
CHINA
Power Electronics Beijing • Room 509, Yiheng Building • No 28 East Road, Beisanhuan • 100013, Chaoyang
District • BEIJING • R.P. CHINA
Tel. (+86 10) 6437 9197 • Fax (+86 10) 6437 9181
Power Electronics Asia Ltd • 20/F Winbase Centre • 208 Queen‟s Road Central • HONG KONG • R.P. CHINA
KOREA Power Electronics Asia HQ Co • Room #305, SK Hub Primo Building • 953-1, Dokok-dong, Gangnam-gu • 135-270
• SEOUL • KOREA
Tel. (+82) 2 3462 4656 • Fax (+82) 2 3462 4657
INDIA Power Electronics India • No 26 3rd Cross, • Vishwanathapuram • 625014 • MADURAI
Tel. (+91) 452 434 7348 • Fax (+91) 452 434 7348
MEXICO P.E. Internacional Mexico S de RL • Calle Cerrada José Vasconcelos, 9 • Colonia Tlalnepantla Centro • Tlanlnepantla de Baz • CP 54000 • MEXICO DF
Tel. (+52) 55 5390 8818 • Tel. (+52) 55 5390 8363 • Tel. (+52) 55 5390 8195
NEW ZEALAND
Power Electronics Nueva Zelanda Ltd • 12A Opawa Road, Waltham • CHRISTCHURCH 8023 • P.O. Box 1269
CHRISTCHURCH 8140
Tel. (+64 3) 379 98 26 • Fax.(+64 3) 379 98 27

www.power-electronics.com