solaris guide for windows nt administrators - desy - it alto, ca 94303-4900 usa ... figure 3-1...
TRANSCRIPT

901 San Antonio RoadPalo Alto, CA 94303-4900 USA650 960-1300 Fax 650 969-9131
Solaris™ Guide for
Windows NT Administrators
Tom Bialaski
Part No. 805-7622-10June 1999, Revision A
Sun Microsystems, Inc.
Send comments about this document to: [email protected]

PleaseRecycle
Copyright 1999 Sun Microsystems, Inc., 901 San Antonio Road • Palo Alto, CA 94303 USA. All rights reserved.
This product or document is protected by copyright and distributed under licenses restricting its use, copying, distribution, and
decompilation. No part of this product or document may be reproduced in any form by any means without prior written authorization
of Sun and its licensors, if any. Third-party software, including font technology, is copyrighted and licensed from Sun suppliers.
Parts of the product may be derived from Berkeley BSD systems, licensed from the University of California. UNIX is a registered trademark in
the U.S. and other countries, exclusively licensed through X/Open Company, Ltd.
Sun, Sun Microsystems, the Sun logo, AnswerBook, Java, the Java Coffee Cup, and Solaris are trademarks, registered trademarks, or service
marks of Sun Microsystems, Inc. in the U.S. and other countries. All SPARC trademarks are used under license and are trademarks or registered
trademarks of SPARC International, Inc. in the U.S. and other countries. Products bearing SPARC trademarks are based upon an architecture
developed by Sun Microsystems, Inc.
The OPEN LOOK and Sun™ Graphical User Interface was developed by Sun Microsystems, Inc. for its users and licensees. Sun acknowledges
the pioneering efforts of Xerox in researching and developing the concept of visual or graphical user interfaces for the computer industry. Sun
holds a non-exclusive license from Xerox to the Xerox Graphical User Interface, which license also covers Sun’s licensees who implement OPEN
LOOK GUIs and otherwise comply with Sun’s written license agreements.
RESTRICTED RIGHTS: Use, duplication, or disclosure by the U.S. Government is subject to restrictions of FAR 52.227-14(g)(2)(6/87) and
FAR 52.227-19(6/87), or DFAR 252.227-7015(b)(6/95) and DFAR 227.7202-3(a).
DOCUMENTATION IS PROVIDED “AS IS” AND ALL EXPRESS OR IMPLIED CONDITIONS, REPRESENTATIONS AND WARRANTIES,
INCLUDING ANY IMPLIED WARRANTY OF MERCHANTABILITY, FITNESS FOR A PARTICULAR PURPOSE OR NON-
INFRINGEMENT, ARE DISCLAIMED, EXCEPT TO THE EXTENT THAT SUCH DISCLAIMERS ARE HELD TO BE LEGALLY INVALID.
Copyright 1998 Sun Microsystems, Inc., 901 San Antonio Road • Palo Alto, CA 94303 Etats-Unis. Tous droits réservés.
Ce produit ou document est protégé par un copyright et distribué avec des licences qui en restreignent l’utilisation, la copie, la distribution, et la
décompilation. Aucune partie de ce produit ou document ne peut être reproduite sous aucune forme, par quelque moyen que ce soit, sans
l’autorisation préalable et écrite de Sun et de ses bailleurs de licence, s’il y en a. Le logiciel détenu par des tiers, et qui comprend la technologie
relative aux polices de caractères, est protégé par un copyright et licencié par des fournisseurs de Sun.
Des parties de ce produit pourront être dérivées des systèmes Berkeley BSD licenciés par l’Université de Californie. UNIX est une marque
déposée aux Etats-Unis et dans d’autres pays et licenciée exclusivement par X/Open Company, Ltd.
Sun, Sun Microsystems, le logo Sun, AnswerBook, Java, le logo Jave Coffee Cup, et Solaris sont des marques de fabrique ou des marques
déposées, ou marques de service, de Sun Microsystems, Inc. aux Etats-Unis et dans d’autres pays. Toutes les marques SPARC sont utilisées sous
licence et sont des marques de fabrique ou des marques déposées de SPARC International, Inc. aux Etats-Unis et dans d’autres pays. Les
produits portant les marques SPARC sont basés sur une architecture développée par Sun Microsystems, Inc.
L’interface d’utilisation graphique OPEN LOOK et Sun™ a été développée par Sun Microsystems, Inc. pour ses utilisateurs et licenciés. Sun
reconnaît les efforts de pionniers de Xerox pour la recherche et le développement du concept des interfaces d’utilisation visuelle ou graphique
pour l’industrie de l’informatique. Sun détient une licence non exclusive de Xerox sur l’interface d’utilisation graphique Xerox, cette licence
couvrant également les licenciés de Sun qui mettent en place l’interface d’utilisation graphique OPEN LOOK et qui en outre se conforment aux
licences écrites de Sun.
CETTE PUBLICATION EST FOURNIE "EN L’ETAT" ET AUCUNE GARANTIE, EXPRESSE OU IMPLICITE, N’EST ACCORDEE, Y
COMPRIS DES GARANTIES CONCERNANT LA VALEUR MARCHANDE, L’APTITUDE DE LA PUBLICATION A REPONDRE A UNE
UTILISATION PARTICULIERE, OU LE FAIT QU’ELLE NE SOIT PAS CONTREFAISANTE DE PRODUIT DE TIERS. CE DENI DE
GARANTIE NE S’APPLIQUERAIT PAS, DANS LA MESURE OU IL SERAIT TENU JURIDIQUEMENT NUL ET NON AVENU.

Contents
1. Introduction 15
Target Audience 15
Scope 16
Typographic Conventions 16
Shell Prompts 17
Operating System Versions 17
2. Understanding Solaris User Account Management 19
Evolution of Network Operating Systems 19
Early UNIX Computers 20
Early Personal Computers 20
Solaris NFS vs. Windows for Workgroups 21
File System Access Rights 21
Groups and Access Control Lists 21
User Account Identification 23
Windows NT and Solaris NIS Domains 24
Similarities 24
Differences 24
Special User Accounts 25
Similarities 25
iii

Differences 25
Granting Remote File Access Rights to root 26
The Solaris suid Bit 26
User Account Information 27
Username 27
Password 27
UID and GID 28
Account Description 28
Home Directory 28
Login Shell 29
User Profiles 29
Login Process 31
Solaris Login Process 31
Windows NT Login Process 32
User Account Management 33
Solaris User Account Management 33
Windows NT User Account Management 35
3. Service and Task Management 37
Services 37
The Windows NT Way 37
The Solaris Way 38
Tasks 39
The Windows NT Way 39
The Solaris Way 40
System Error Messages 41
The Windows NT Way 41
The Solaris Way 42
iv Solaris Guide for Windows NT Administrators

Service Troubleshooting Tips 44
Problem: Process Keeps Dying After Restart 44
Problem: Service Process is Hung 45
4. TCP/IP Administration 47
Ethernet—LAN Hardware 47
Types of Ethernet 48
Network Interface Card 48
NIC Drivers 49
Installing and Configuring NIC Drivers 50
The Windows NT Way 50
The Solaris Way 50
Configuring the TCP/IP Stack 51
The Windows NT Way 52
The Solaris Way 52
Solaris Hostnames vs. Windows NT Computer Names 58
DNS Servers 63
Configuring a Solaris DNS Server 63
DNS and NIS 63
Multihomed Systems 64
Configuring Multiple NICs 64
Turning Off IP Forwarding 66
Issue With Multiple MAC Addresses in Solaris 68
TCP/IP Services 69
Telnet 69
FTP 70
Telnet and FTP Proxies 72
Network Monitoring Tools 72
Contents v

Windows NT’s Network Monitor 73
Solaris snoop 74
TCP/IP Tuning Tips 75
TCP/IP Troubleshooting Tips 75
Viewing System Errors 75
Problem: Solaris Systems Can’t Communicate with Other Systems on the
Local Subnet 78
Problem: Solaris System Doesn’t Communicate Past the Local Subnet 80
Problem: Connection to Solaris System Appears Slow 81
Problem: ping Works With IP Addresses, but Not Hostnames 82
Problem: Telnet or FTP Server Not Working 83
5. File Sharing Administration 85
SMB File Sharing on Windows NT Systems 85
SMB File Sharing on Solaris Systems 86
Installing SMB 87
Configuring File Shares 89
Setting User Permissions 92
Solaris TAS Troubleshooting Tips 96
Problem: Windows NT Clients Cannot Access Solaris TAS Server 96
Problem: Only Clients on the Local Subnet Can See the Solaris TAS
Server 97
Problem: The message specified network password is not correctis displayed 98
NFS File Sharing on Solaris Systems 98
NFS File Sharing on Windows NT Systems 99
Configuring Windows NT as an NFS Client 105
NFS Troubleshooting Tips 109
Problem: Solaris Cannot Access Shared NFS Files on Windows NT 109
vi Solaris Guide for Windows NT Administrators

Problem: Accessing Files with /net Doesn’t Work 110
Problem: Windows NT NFS Clients Cannot Access NFS Files on a Solaris
Server 111
6. Printer Administration 113
TCP/IP Printing 113
Solaris TCP/IP Printing 114
Windows NT TCP/IP Printing 117
SMB Printing 119
Administering Printing on Solaris Servers 120
Printer Troubleshooting Tips 122
Problem: lp:permission denied 122
7. Email Administration 123
Email Protocols 123
SMTP on Solaris Systems 124
Typical Solaris sendmail Configurations 124
▼ Configure a Solaris sendmail Mail Server 124
▼ To Configure a Solaris sendmail Client 125
Relay Mail Hosts 126
Mail Domains in Solaris 129
SMTP on Windows NT 129
▼ To Configure Internet Mail Service for Exchange 129
POP3/IMAP4 Servers on Solaris 131
Benefits of POP3 and IMAP4 132
POP3 and IMAP4 for Windows NT Servers 133
Authenticating Solaris Users 133
POP3 or IMAP4 Solaris Clients 134
Configuring DTMAIL on Solaris Systems 134
Contents vii

POP3 or IMAP4 for Windows NT Clients 139
Configuring Outlook Express 139
Email Client Considerations 139
Providing Email Access from a Web Browser 140
▼ To Enable Outlook Web Access 140
Email Troubleshooting Tips 141
Problem: Email Messages Bounce 141
Problem: Mail Server Not Reachable 141
Problem: Users Cannot Connect to POP3/IMAP4 Server 142
Problem: POP3/IMAP4 Users Cannot Be Authenticated 143
8. Web Services Administration 145
Solaris Web Servers 145
Differences between IIS and Solaris Web Servers 146
Downloading and Installing Sun WebServer (SWS) 1.0 147
▼ To Obtain a Copy of Sun WebServer 1.0 147
Configuring Sun WebServer 149
Apache Web Server for Solaris Software 153
▼ To Download and Install Apache Web Server 153
▼ To Configure and Run the Apache Web Server 154
Starting and Stopping the Apache Web Server 154
Web Content Development and Management Tools 155
▼ To Install the FrontPage Extensions on the Apache Web Server 155
Web Browsers 157
▼ To Install Internet Explorer and Outlook Express on Solaris Systems 158
Web Server Troubleshooting Tips 159
Problem: Connecting to Sun Web Server Fails 159
A. Function Cross Reference 161
viii Solaris Guide for Windows NT Administrators

B. Recommended Patches 163
▼ To Install a Patch 163
Contents ix

x Solaris Guide for Windows NT Administrators

Figures
FIGURE 2-1 Solaris File Manager Property Sheet 22
FIGURE 2-2 Special File Access Window 23
FIGURE 2-3 Windows NT Desktop Environment 30
FIGURE 2-4 Solaris Desktop Environment 30
FIGURE 2-5 Solaris User Login Process 31
FIGURE 2-6 Windows NT Login Process 32
FIGURE 2-7 Solaris Add User Property Sheet 34
FIGURE 2-8 Solaris Add Group Property Sheet 35
FIGURE 2-9 Windows NT User Property Sheet 35
FIGURE 2-10 Windows NT New Global Group Property Sheet 36
FIGURE 3-1 Windows NT Services Window 38
FIGURE 3-2 Windows NT Task Manager Window 39
FIGURE 3-3 Windows NT Event Viewer 42
FIGURE 4-1 Windows NT Driver Parameters Window 50
FIGURE 4-2 Windows NT TCP/IP Property Sheet 52
FIGURE 4-3 Windows NT Add Static Mappings Property Sheet 60
FIGURE 4-4 Windows NT Network Adapters Property Sheet 65
FIGURE 4-5 TCP/IP Property Sheet 67
FIGURE 4-6 Windows NT FTP Service Property Sheet 71
xi

FIGURE 4-7 Windows NT Network Monitor 73
FIGURE 4-8 Windows NT Event Viewer 76
FIGURE 5-1 Solaris TAS Administration Tool 89
FIGURE 5-2 Windows NT Sharing Property Sheet 90
FIGURE 5-3 Windows NT Shared Directories Window 90
FIGURE 5-4 Solaris TAS New Volume Definition Screen 92
FIGURE 5-5 Solaris TAS Create/Modify Directory Property Sheet 92
FIGURE 5-6 Solaris TAS Update Authentication Proxy Screen 93
FIGURE 5-7 UNIX User Name Mapping Property Sheet 94
FIGURE 5-8 Solaris TAS Configuration Property Sheet 95
FIGURE 5-9 Windows NT Server Manager Property Sheet 95
FIGURE 5-10 Windows NT DiskShare Folder Property Sheet 100
FIGURE 5-11 Windows NT NFS Share Permissions Property Sheet 101
FIGURE 5-12 Windows NT DiskShare User/Group Mapping Configuration 102
FIGURE 5-13 Windows NT Map Network Drive Property Sheet 104
FIGURE 5-14 Windows NT DiskAccess Administration Property Sheet 106
FIGURE 5-15 Windows NT Add LAN Tool 107
FIGURE 5-16 Windows NT NFS Attribute Property Sheet 108
FIGURE 5-17 Windows NT DiskAccess NT Authority Property Sheet 108
FIGURE 6-1 Solaris Admintool: Add Local Printer Property Sheet 114
FIGURE 6-2 Solaris Admintool: Modify Printer Property Sheet 116
FIGURE 6-3 Solaris Admintool: Add Access to Printer Property Sheet 117
FIGURE 6-4 Windows NT Printer Ports Window 118
FIGURE 6-5 Windows NT Add LPR Compatible Printer Property Sheet 118
FIGURE 6-6 TAS Administration Tool 120
FIGURE 6-7 Solaris Print Manager Window 121
FIGURE 7-1 Microsoft Exchange Administrator Window 130
FIGURE 7-2 Windows NT Internet Mail Services Property Sheet 130
xii Solaris Guide for Windows NT Administrators
FIGURE 7-3 IMAP4 (Mail) Settings Property Sheet 134
FIGURE 7-4 DTMAIL Mail Options Property Sheet 135
FIGURE 7-5 DTMAIL Login Dialogue Box 135
FIGURE 7-6 Netscape Preferences Window 137
FIGURE 7-7 Solaris Netscape LDAP Server Preferences 138
FIGURE 7-8 Windows NT Communicator Address Book 138
FIGURE 7-9 Accounts Property Sheet 139
FIGURE 8-1 Solaris Sun WebServer Authentication Tool 151
FIGURE 8-2 Solaris Sun WebServer Configuration Tool 151
FIGURE 8-3 Windows NT Internet Service Manager Tool 152
FIGURE 8-4 Open FrontPage Web Tool 157
Figures xiii

xiv Solaris Guide for Windows NT Administrators

CHAPTER 1
Introduction
Just a few years ago, personal computers (PCs) were networked together in their
own little islands using network services such as NetWare and LAN Manager to
share printers and files. As these islands grew in size, administrators were appointed
to take care of them. At the time, these administrators only needed to be concerned
with the PC network protocols being used within their departments.
With the introduction of Windows NT, a new class of PC servers began to emerge.
Instead of just providing file and print services, other services such as email and
database applications were provided on PC servers running the Windows NT
operating system. PC servers were no longer separate islands and began making
their way into the data center.
UNIX servers, on the other hand, grew up in the data center as many mainframe
functions were offloaded to UNIX servers. These UNIX servers were administered
by trained UNIX administrators, who had little contact with PC server
administrators.
The arrival of PC servers in the data center heralded the arrival of the PC server
administrators. Since maintaining two different system adminstration organizations
is expensive, the trend in IT departments is to cross-train the staff. This may seem
like a formidable task. However, with a little guidance, experienced PC server
administrators can leverage what they know about Windows NT.
Sun BluePrints Program
The mission of the Sun BluePrints™ Program is to empower Sun customers with the
technical knowledge required to implement reliable, available, extensible, and secure
information systems within the data center using Sun products. The Sun BluePrints
Program is managed by the Enterprise Engineering Group. This group provides a
13

framework to identify, develop, and distribute best practices information that
applies across the Sun product line. Technical subject matter experts in various areas
contribute to the program and focus on the scope and usefulness of the information.
The Enterprise Engineering Group is the primary provider of the technical content of
the Sun BluePrints Program that includes books, guides, and online articles.
Through these vehicles, Sun can provide guidance, installation and implementation
experiences, real-life scenarios, and late-breaking technical information.
The bimonthly electronic magazine, Sun BluePrints OnLine, is located on the Web at
http://www.sun.com/blueprints . To be notified about updates to the Sun
BluePrints Program, please register yourself on this site.
Target Audience
This book is aimed at the experienced Windows NT LAN administrator who must
support the interoperability between servers running the Solaris™ operating
environment and those running Windows NT. The assumption is that you have a
working knowledge of LAN concepts.
Scope
This document covers the following topics:
■ User account management
■ Solaris service and task management
■ TCP/IP networking
■ File services
■ Print services
■ Email services
■ Web services
These topics are not covered in great detail, but instead, tips for installation and
configuration are presented along with some helpful troubelshooting tips.
14 Solaris Guide for Windows NT Administrators

Typographic Conventions
TABLE P-1 Typographic Conventions
Typeface Meaning Examples
AaBbCc123 The names of commands, files,
and directories; on-screen
computer output
Edit your .login file.
Use ls -a to list all files.
% You have mail .
AaBbCc123 What you type, when
contrasted with on-screen
computer output
% suPassword:
AaBbCc123 Book titles, new words or terms,
words to be emphasized
Command-line variable; replace
with a real name or value
Read Chapter 6 in the User’s Guide.
These are called class options.
You must be superuser to do this.
To delete a file, type rm filename.
Chapter 1 Introduction 15

Shell Prompts
Operating System Versions
Except where noted, Windows NT Server 4.0, Service Pack 3, and the Solaris 2.6 are
the referenced operating systems.
TABLE P-2 Shell Prompts
Shell Prompt
C shell machine_name%
C shell superuser machine_name#
Bourne shell and Korn shell $
Bourne shell and Korn shell superuser #
Windows NT commands in a DOS window C:\>
16 Solaris Guide for Windows NT Administrators

CHAPTER 2
Understanding Solaris UserAccount Management
The corporate data center landscape is changing. While a few years ago mainframe
computers and UNIX servers dominated the data center, Windows NT servers are
now becoming major players. It is now common to see Windows NT servers and
UNIX servers side by side, providing services to the same population of users.
One of your most common tasks as a system administrator is managing user
accounts. While the concept of user accounts is shared between Windows NT and
UNIX operating systems such as the Solaris operating environment, the
implementation differs. Even though you may be comfortable managing user
accounts in one environment, you may not be so comfortable in a different
environment.
The purpose of this chapter is to provide insight into how user accounts are
managed in Solaris software so that you can effectively manage user accounts in
both environments. The intent is not to provide a comprehensive text on Solaris
system administration techniques, but rather to draw comparisons between Solaris
software and Windows NT, highlighting the differences.
Evolution of Network OperatingSystems
The concept of a user account has changed over time. With the advent of networked
computing, users now access services provided by several computers during the
course of a day and not just the computer they initially log on to. The way Solaris
software and Windows NT handle network logons differ in some aspects. Since
some of these differences are the result of how the two operating environments
evolved, it’s worthwhile to look back at the evolution of network computing.
19

Early UNIX Computers
UNIX has its roots as a multiuser operating system with users connecting to a UNIX
server via ascii terminals. In this environment, users have accounts established on
the server they are attached to. The purpose of the account is to grant the user
permissions for reading and writing files and executing programs. Since local area
networking had not come onto the scene yet, users only required access to the
computer they were directly attached to. Therefore, all the user account information
was kept on the local server.
With the introduction of TCP/IP networking, accessing data and executing
programs on remote computers became possible. However, to access remote systems
using the TCP/IP telnet (remote login) and ftp ( remote file copying) services, users
were required to have an account on that system. Because having to input an
account name and password each time a remote access is made is very inconvenient,
Solaris software provided a feature allowing users from trusted systems to log into,
run programs on, and copy files to and from a remote system without having to
supply a user account name and password each time. However, a user account still
needed to be maintained on that remote system, which created administration
headaches.
With the introduction of UNIX workstations, which replaced the character-based
mulituser systems, remote access to other computers became the norm and not the
exception. To facilitate file sharing, which was cumbersome using ftp , Sun invented
Network File System (NFS) and Network Information Service (NIS). NFS provided
transparent file access, while NIS provided a central place to store user account
information. Instead of maintaining an account on the local system, the account
information was stored on a central server.
Early Personal Computers
Unlike UNIX, which was a multiuser operating system, personal computers (PCs),
as the name suggests, were standalone systems. Since there was only one user at a
time and networked computers had not evolved, there was no need to maintain user
accounts. This situation changed when PCs began to be networked together.
Microsoft’s first entre into the network operating system world was Windows for
Workgroups (WFWG). Unlike UNIX, which supported telnet and ftp , WFWG
employed LAN Manager file sharing as its main protocol. WFWG supported two
modes of file sharing: share mode and user mode. In share mode, files could be
shared so anyone could read or write to them. In user mode, a username and
password were required to access shared files. Each computer kept its own list of
users and passwords, much like Solaris software did before NIS was created.
20 Solaris Guide for Windows NT Administrators • June 1999

Solaris NFS vs. Windows for Workgroups
The difference between how NFS access is controlled in the Solaris operating
environment and how file share access is controlled with WFWG has more to do
with the file system structure than with the network protocol. WFWG uses the DOS
FAT file system which does not have the notion of file ownership or access rights. In
contrast, each file or folder accessed via NFS has an owner and access rights that can
be set.
Because no access rights are maintained in the file system itself, the only control
WFWG has is at the share level. WFWG controlls access rights by maintaining a list
of users who can have access to a file share. NFS generally does not maintain a list of
who has access rights, passing that responsibility to the underlying file system.
Therefore, there is no notion of share level and user level access. In a sense, NFS uses
share level, where the file permissions really dictate what can be accessed and by
whom.
WFWG networking has the concept of browsing, while NFS does not. In WFWG
networking, workgroups are created for browsing purposes. Only file shares in a
computer’s workgroup will show up, for example, net view . In Solaris software,
there is no notion of a workgroup and no browsing, both of which are perceived as
an unnecessary use of network bandwidth.
File System Access Rights
Both Windows NT and Solaris software support groups and access control lists
(ACLs). User accounts are made members of particular groups when the account is
created. A user must be a member of at least one group and can be a member of
several. ACLs are a more convenient method than using group permissions for
denying access to a particular user or group.
Groups and Access Control Lists
One difference between Solaris software and Windows NT is the use of worldpermissions. Windows NT has the notion of a group called Everyone. By default all
users belong to this group. Solaris software does not employ such a group. Instead,
Solaris software has the concept of other access rights. A directory whose access
rights are set to read/write for other in Solaris software has the same effect as setting
read/write to the group Everyone in Windows NT.
Chapter 2 Understanding Solaris User Account Management 21

FIGURE 2-1 Solaris File Manager Property Sheet
FIGURE 2-1 shows the Solaris File Manager property sheet for a folder named Project.
Solaris software has the notion of setting a mask, which dictates what the maximum
allowable permissions will be for a given folder and its subfolders. The mask can be
changed by the owner of the folder. Using a mask is a convenient method for
quickly restricting permission and prevents accidently assigning too high privileges
to users or groups.
FIGURE 2-2 shows the Special File Access property sheet found under My Computer.
Windows NT provides file permissions similar to those provided by Solaris
software. The Delete option in Windows NT is equivalent to setting write
permissions on a Solaris directory. A user who does not have directory write
privileges in the Solaris operating environment, cannot delete a file in that directory,
but can modify one that already exists.
The default behavior in the Solaris operating environment is to allow the owner of a
file or folder to change the ownership. This behavior can be changed in Solaris
software by setting the RSTCHOWN variable. Solaris software does not have an
equivalent to the Take Ownership attribute that is found in Windows NT.
Note – Only file systems formatted as NTFS contain Special File Access properties.
22 Solaris Guide for Windows NT Administrators • June 1999

FIGURE 2-2 Special File Access Window
User Account Identification
Both Windows NT and Solaris software associate a number or ID with a user’s
name. In Solaris software, this numeric identifier is assigned by the system
administrator and is called the user ID (UID). The UID is a 16 bit integer assigned to
user accounts in the range of 100 - 60000.
Note – Solaris software does not prevent the use of duplicate UIDs, but will issue a
warning if an administrator attempts to assign an ID that already exists if the
account is created using Admintool. User accounts with the same UID will have the
same access rights.
Windows NT creates a security ID (SID) when a new account is created. The SID
differs from the Solaris UID in that it is assigned by the system and is not visible to
users. A unique SID is created within a Windows NT domain for each user account.
If an account with the same name is created in a different NT domain, it will be
issued a different SID.
Windows NT also creates a group SID for POSIX compliance. The Group SID
specifies a primary group, which POSIX requires. The notion of primary group is not
widely used in Windows NT.
Chapter 2 Understanding Solaris User Account Management 23

Note – Since a unique SID is created for each account, once an account is deleted,
the SID is lost forever. Even if a new account is created with the same user name as
the previously deleted one, a new SID is generated. Therefore, the recreated user
account will not have the same access rights as the previous user.
Windows NT and Solaris NIS Domains
As company networks grew and more dependence was placed on shared resources,
maintaining user accounts on each computer became increasingly more
cumbersome. To ease this management problem, the concept of a directory service
was created. Instead of maintaining user accounts in a file on a local computer, this
information was moved to directory servers that were contacted by the other
computers in the network when user account information was required.
Instead of keeping user account information for all the users within a company in
one place, separate name spaces are created. These name spaces are called Windows
NT domains and NIS domains in Solaris software. The servers that maintain these
name spaces are called domain controllers in Windows NT and NIS servers in
Solaris software.
Similarities
Both directory services maintain user account information on primary and backup
servers. In Windows NT terminology, these are called primary domain controllers
(PDCs) and backup domain controllers (BDCs). Solaris software refers to them as
NIS master servers and NIS slave servers. In both cases, these servers perform the
same function. Changes are always made to the PDC or NIS master, then propagated
to the BDC or NIS slave. Only one PDC and one NIS master can exist in a domain,
while there can be multiple BDCs and slaves. Requests from clients are serviced by
either PDC/NIS masters or BDC/NIS slaves.
Differences
In Windows NT, to become a member of an existing domain, the computer name of
the client must first be registered on the PDC. Solaris NIS clients do not require that
their name be registered with the NIS server before becoming part of a NIS domain.
24 Solaris Guide for Windows NT Administrators • June 1999

Windows NT has a notion of trusted domains, where a user in one domain can obtain
some level of access rights in another domain if it is a trusted domain. Solaris NIS
domains are separate entities and do not share any trust relationship. Users who
need access rights in another NIS domain must have an account set up there.
Special User Accounts
Both Windows NT and Solaris have a special privileged account that has permission
to do anything on the local system. In the Windows NT world this user is called
Administrator, while in the Solaris world, this user is called root. While there are
many similarities between these two accounts there are also some differences.
Similarities■ Both are created when the operating system is installed.
■ Both are treated as local accounts.
■ User rights on the local computer are not automatically transferable to other
computers in the network.
Differences■ Login information for root can be kept in NIS, while Administrator is always
local.
■ Any account with the UID of 0 and GID of 1 has the same access rights as root on
a Solaris system. Windows NT allows similar, but not identical access rights to be
established for other accounts by allowing membership to Administrator groups.
■ The Administrator account cannot be removed, while root can.
■ Administrator is included in the group Everyone, while root is treated differently
than other. See “Granting Remote File Access Rights to root” on page 26.
■ There are certain privileged commands only root can perform unless the suid bit
is set on the command. See “The Solaris suid Bit” on page 26.
Chapter 2 Understanding Solaris User Account Management 25

Granting Remote File Access Rights to root
Normally, you would expect that if a folder is shared with access rights to Everyone
in Windows NT or other in Solaris software that Administrator and root would have
those rights. In Solaris software this is not always the case. The default behavior of
shared folders in Solaris software is to deny all access rights to root. To override this
behavior, the folder must be shared with the anon=0 or root= option.
Note – Solaris software does not have an equivalent of the Domain Administrator
group. Placing Administrator users from different Windows NT servers in the
Domain Administrator group has the same effect of granting root permissions on
remote systems using the anon=0 and root= options.
The Solaris suid Bit
Certain functions in Solaris software require that the process performing those
functions be run as root. If the process is started via a Solaris command, then that
command needs to be invoked by the root user. Sometimes, it’s desirable for
someone other than root to run the command. In this case, the Set User ID (suid ) bit
is set on the command which gives the command being run the same access rights as
its owner, which in this case is root.
An example of a Solaris command which uses the suid bit is ps , which is used to
look at the processes currently running on the local computer.
Guest and nobody Accounts
Windows NT has a built-in account for temporary users called Guest. Solaris
software has a somewhat similar user account called nobody. Users who do not have
an account in NIS or in the remote system’s /etc/passwd file, are given the UID of
nobody.
26 Solaris Guide for Windows NT Administrators • June 1999

User Account Information
Solaris software maintains user account information in a NIS map that gets created
from two ascii files: /etc/passwd and /etc/shadow . The following user account
information is stored in this NIS map:
■ Username
■ Password
■ UID
■ GID
■ Account description
■ Home directory
■ Login shell
Note – The above information can be either input manually by editing files, or
produced automatically by using Solaris tools. If files are edited manually, they can
be checked for accuracy by running the pwck command.
Username
The rules for creating usernames are somewhat different between Solaris software
and Windows NT. The primary things to watch out for are:
■ Solaris usernames should be 8 characters or fewer.
■ Solaris usernames are case sensitive, hence, “Tom” does not equal “tom.”
Note – Totalnet Advanced Server for Solaris software provides a facility for
mapping greater than 8 character Windows NT usernames to 8 character Solaris
usernames.
Password
In Solaris software, like Windows NT, passwords can either be assigned by the
administrator at the time the account is created, or assigned by the user after the first
logon. If the Solaris user changes the password, then it must be at least 6 characters
long and have a mixture or alpha and numeric characters.
Chapter 2 Understanding Solaris User Account Management 27

Password aging can be set using Admintool for /etc/passwd accounts and
AdminSuite for NIS accounts. Automatic lock out of a user account after a specified
number of bad login attempts is not a feature of Solaris software.
Note – Defaults for /etc/passwd accounts can be changed by modifying
/etc/default/passwd .
UID and GID
As discussed earlier, the UID and GID are assigned by the Solaris system
administrator. The UID of 0 and GID of 1 are reserved for the Solaris root user
account. These fields do not show up in Windows NT because they are generated by
the system and kept hidden from users.
Account Description
Account description is a text field for entering the full name and a description of the
user. Unlike Windows NT, which has one field called Full Name and another called
Description, Solaris software has only a single field.
Home Directory
Solaris software has the concept of a current working directory. When a user logs in,
the current working directory is set to the user’s home. This allows the user to view
files and folders that are at or below home. Windows NT has a similar concept
where the user’s home directory is the default starting point for many file
operations.
To allow access to a user’s home directory anywhere on the network, home
directories are placed on network drives. In Windows NT, this directory is
referenced using the Universal Naming Convention (UNC), for example,
\\server_name\folder_name . Solaris software has a similar method for
referencing directories on remote drives called automounting. Using the convention
/home/user_name , the home directory of a particular user can be located by
referencing information kept in NIS maps.
Solaris software also makes use of home directories to store login scripts and user
profiles. More information on user profiles is provided in the next section.
28 Solaris Guide for Windows NT Administrators • June 1999
Note – If a non-existent home directory is specified, or if the user does not have
appropriate access rights to it, the users’s home is set to “/”, which is the top level
directory on a Solaris system.
Login Shell
As mentioned earlier, UNIX originated as a character based multiuser operating
system. A command line interface, or shell, is immediately presented when a user
logs in. This is similar to early versions of Windows where a DOS shell would first be
presented to the user before the Windows GUI was invoked.
As UNIX grew in popularity, many enhancements were made to the original shell.
These enhancements came from different sources and resulted in a choice of shells.
Solaris software includes the three most popular shells:
■ sh—the original Bourne shell
■ csh—C-shell, developed as part of BSD UNIX
■ ksh—Korn shell, developed at ATT
There is much reference material available on these shells, so their differences and
benefits will not be discussed here. One important feature, however, is the ability to
specify a start up script when the shell is first started. These start up scripts appear
similar to the autoexec.bat file in DOS, but are actually more akin to user profiles
in Windows NT.
Note – Although this field is typically used for a login shell, a program or script can
be specified instead. For example, a user account called halt can be created which
simply executes the Solaris halt command, then exits.
User Profiles
Solaris software supports start up scripts to establish a user’s environment as does
Windows NT. Solaris software does this by placing a startup file, .login ,
.profiles , .cshrc in the user’s home directory. These files contain scripts and
environment variable settings.
Both Solaris software and Windows NT provide default user profiles. FIGURE 2-3
shows a default user desktop environment in Windows NT. FIGURE 2-4 shows a
default user desktop environment in Solaris software.
Chapter 2 Understanding Solaris User Account Management 29

FIGURE 2-3 Windows NT Desktop Environment
FIGURE 2-4 Solaris Desktop Environment
One major difference between creating user profiles in Solaris software and
Windows NT is that Windows NT supports system wide (or NT Domain wide) user
profiles. Solaris software always looks in the user’s home directory for login scripts.
However, system wide login scripts can be created in Solaris software by invoking a
common script from the login script in a user’s home directory.
30 Solaris Guide for Windows NT Administrators • June 1999

Sample Solaris login scripts can be found in /etc/skel . These scripts can be
modified and copied to the user’s home directory as .profile , .login , and
.cshrc . Accounts created with Admintool or AdminSuite will have these scripts
automatically copied if desired.
Login Process
The process of logging into a Windows NT computer is similar to logging into a
Solaris computer. Similar steps are performed, although the underlying system
functions are different. The following steps describe the login process at a high level.
1. User types username and password
2. The computer checks to see if the user name exists in the directory service and, if
so, verifies the password.
3. A local shell is started that reads and executes specified start up scripts.
4. The desktop environment is started.
Solaris Login Process
FIGURE 2-5 shows the Solaris user login process.
FIGURE 2-5 Solaris User Login Process
Login:Password:
root:x:0:1:tom:x:101.10:mary:x:102:10:+
passwd: files nisgroup: files nis
/etc/nsswitch.conf
bob:x:1001:20:sue:x:1002:20:bill:x1003:20:etc.etc.etc.
Login script/etc/passwd NIS
Solaris CDEDesktop
login shell
Chapter 2 Understanding Solaris User Account Management 31

Solaris Name Service Switch
One of the unique features of Solaris software is the ability to specify where to look
for a user’s account information. This allows local accounts in /etc/passwd to be
created, but at the same time use NIS to find non-local account information. The file
/etc/nsswitch.conf specifies a search path for locating the user’s account
information. The default behavior is to first check to see if the user name matches
one in /etc/passwd and, if so, use that information. If the user name is not in
/etc/passwd , then NIS is checked to see if it contains that name.
Windows NT Login Process
FIGURE 2-6 shows the Windows NT login process.
FIGURE 2-6 Windows NT Login Process
Two differences between the Solaris and Windows NT login process should be
noted:
■ If trusted domains are implemented, then the user will have a choice of Windows
NT domains to verify the login
■ If a Windows computer belongs to a Windows NT domain, then no accounts on
the local computer exists. The PDC/BDC is always consulted in this case. The
exception is when Windows NT is deployed as a member server, which can
contain local accounts.
Note – If a Solaris user account in /etc/passwd has the same UID as an account in
NIS, the user logging in using the /etc/passwd account will have the same
permissions as the NIS account. Therefore, it is advisable to restrict the use of local
root accounts so /etc/passwd accounts can only be created by system
administrators.
User
Login:Password:Domain:
PDC/BDC
Profiles
WindowsDesktopUser
SAM
32 Solaris Guide for Windows NT Administrators • June 1999

User Account Management
Historically, Solaris system administrators have preferred to use command line tools
for user account management. However, GUI based tools similar to tools in
Windows NT, like Admintool, are available for Solaris software.
Solaris User Account Management
This section only describes the Solaris GUI based tools for adding users and groups
and contrasts them with Windows NT tools.
Note – Admintool must be run as root or someone in the sys group to add or delete
users or modify user account information. Like User Manager for Domains in
Windows NT, other users can view the information, but cannot modify anything.
Adding Users
FIGURE 2-7 shows the Add User property sheet, invoked by using the
Edit➤Add User property sheet found in Admintool.
Chapter 2 Understanding Solaris User Account Management 33

FIGURE 2-7 Solaris Add User Property Sheet
Following are a few of Admintool’s characteristics that you should be aware of:
■ User ID—Admintool will automatically assign the next highest unused ID.
■ Groups can be entered as a name or as a GID.
■ Every user must belong to a primary group.
■ Secondary groups are optional.
■ The /home/username nomenclature refers to an NFS file system. The directory
that /home is mapped to could reside on a system other than the one Admintool
is being run from. If it is, the root user running Admintool must have write access
rights on that directory.
FIGURE 2-8 shows the Edit➤Add Group screen in Admintool.
34 Solaris Guide for Windows NT Administrators • June 1999

FIGURE 2-8 Solaris Add Group Property Sheet
Unlike Windows NT, Solaris software requires that a unique GID be assigned to each
group. The Members List is primarily used to create secondary group membership
for users. Members that have the group listed as its primary group will not
automatically appear in the Member List.
Windows NT User Account Management
The tools used to add or delete users and modify user account information in
Windows NT is User Manager for Domains. Like Admintool in Solaris software, this
tool does not need to be run on the same computer that contains the actual account
information, that is, the PDC.
FIGURE 2-9 shows the User Properties screen of User Manager for Domains.
FIGURE 2-9 Windows NT User Property Sheet
Chapter 2 Understanding Solaris User Account Management 35

The user account information on the main screen is similar to the user account
information found in Solaris software. Tools for specifying the hours that a
particular user can log in, the systems the user can access, and whether a dial-in
login is permitted, are not part of Admintool.
FIGURE 2-10 shows the New Global Group screen which is invoked from the Groups
button.
FIGURE 2-10 Windows NT New Global Group Property Sheet
Groups in Windows NT can be either Global or Local. Solaris software does not have
the notion of Local groups, which are primarily used with Domain Trusts in
Windows NT.
36 Solaris Guide for Windows NT Administrators • June 1999

CHAPTER 3
Service and Task Management
You frequently need to stop and restart services and sometime need to terminate run
away or non-responding tasks. This chapter takes a look at how services and tasks
are managed in Solaris software and Windows NT.
Services
This section compares how Solaris software and Windows NT manage services.
The Windows NT Way
Window NT services that are part of the operating system and application services
that are loaded after Windows NT is installed are controlled through the Services
window in the Control Panel. Services can be stopped, restarted, or disabled using
the Services window. When a new application is added to a Windows NT server, the
services it uses will appear.
FIGURE 3-1 shows the Services window.
35

FIGURE 3-1 Windows NT Services Window
The Solaris Way
Solaris software uses scripts to stop and restart services. These scripts reside in the
folder /etc/init.d . The name of the script reflects the service that is performed.
Each script contains a start and stop function that can be invoked from the Solaris
command line.
In the above example, the httpd service, which is used by the Sun WebServer, is
stopped. It can be restarted using the following command.
Services are started automatically when the system boots and are shut down in an
orderly fashion when the system is halted by scripts contained in the folder
/etc/rc2.d . These scripts begin with either “S” for start “K” for kill, followed by a
number. When Solaris software boots the scripts beginning with “S” are run in
numerical order. Likewise, when the system is halted, the scripts beginning with “K”
are run. To prevent a script, which essentially disables the service, from being run
rename the script so that it doesn’t start with “S”, for example:
solaris# /etc/init.d/httpd stop
solaris# /etc/init.d/httpd start
solaris# cd /etc/rc2.dsolaris# mv S95http xS95http
36 Solaris Guide for Windows NT Administrators

In this example, the Sun WebServer will not be automatically started the next time
the Solaris software boots.
Tasks
A task, or process in Solaris terminology, sometimes hangs or gets stuck in a program
loop that uses up an abnormal amount of CPU time. In either case, the task needs to
be terminated. Halting the system is one way to terminate all running tasks, but
using tools like Windows NT Task Manager and the Solaris kill command is a
more graceful method.
The Windows NT Way
A list of running tasks can be displayed by invoking Task Manager. Tasks that are
hung show a status of “not responding.” Runaway processes show a rapidly
growing amount of CPU time. These tasks can then be highlighted and terminated
using the End Task button.
FIGURE 3-2 shows the output of Task Manager.
FIGURE 3-2 Windows NT Task Manager Window
Chapter 3 Service and Task Management 37

The Solaris Way
Solaris processes or tasks that are currently running are displayed with the pscommand. The -ea flag displays every process along with the CPU time used by
each, for example:
Note – The “?” in the TTY column denotes processes started by Solaris
● To terminate a process, run the Solaris kill command, for example:
The kill command actually sends a signal to the process that is referenced by its
Process Identifier (PID), 299 in this example. The -9 flag sends a signal to the
process that it can’t ignore.
Creating a kill Script
Instead of running ps to determine which PID to terminate, you can create a simple
shell script that terminates the process by name instead of PID. The following
example shows how to create a shell script called killproc .
solaris# ps -eaPID TTY TIME CMD
0 ? 0:00 sched1 ? 0:02 init
139 ? 0:00 in.rdisc263 ? 0:00 lmgrd.st149 ? 0:03 rpcbind179 ? 0:00 inetd266 ? 0:00 sendmail276 ? 0:00 utmpd299 ? 0:00 httpd345 ? 0:00 nfsd
solaris# kill -9 299
38 Solaris Guide for Windows NT Administrators
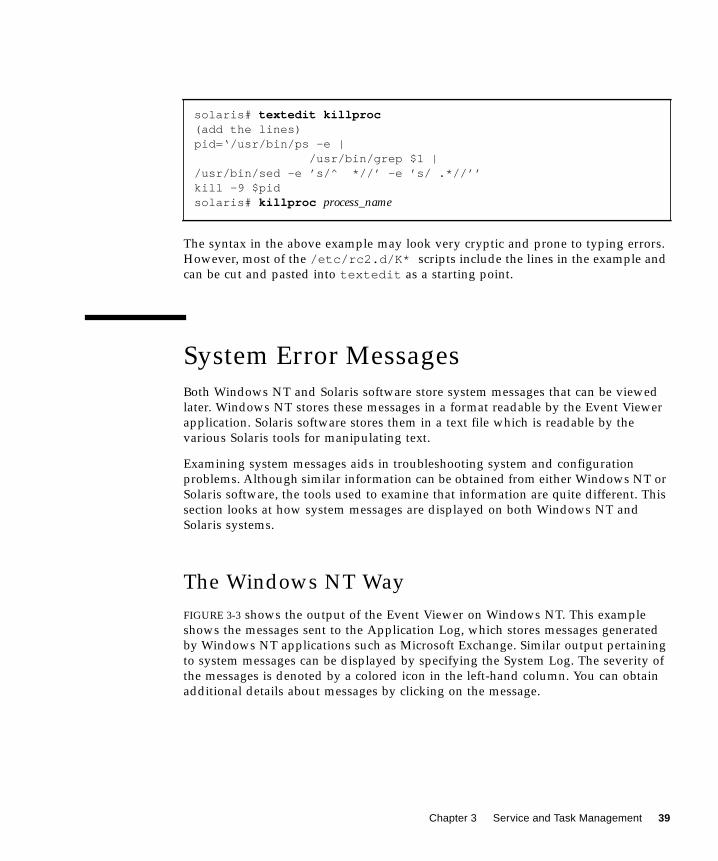
The syntax in the above example may look very cryptic and prone to typing errors.
However, most of the /etc/rc2.d/K* scripts include the lines in the example and
can be cut and pasted into textedit as a starting point.
System Error Messages
Both Windows NT and Solaris software store system messages that can be viewed
later. Windows NT stores these messages in a format readable by the Event Viewer
application. Solaris software stores them in a text file which is readable by the
various Solaris tools for manipulating text.
Examining system messages aids in troubleshooting system and configuration
problems. Although similar information can be obtained from either Windows NT or
Solaris software, the tools used to examine that information are quite different. This
section looks at how system messages are displayed on both Windows NT and
Solaris systems.
The Windows NT Way
FIGURE 3-3 shows the output of the Event Viewer on Windows NT. This example
shows the messages sent to the Application Log, which stores messages generated
by Windows NT applications such as Microsoft Exchange. Similar output pertaining
to system messages can be displayed by specifying the System Log. The severity of
the messages is denoted by a colored icon in the left-hand column. You can obtain
additional details about messages by clicking on the message.
solaris# textedit killproc(add the lines)pid=‘/usr/bin/ps -e | /usr/bin/grep $1 |/usr/bin/sed -e ’s/^ *//’ -e ’s/ .*//’’kill -9 $pidsolaris# killproc process_name
Chapter 3 Service and Task Management 39

FIGURE 3-3 Windows NT Event Viewer
The Solaris Way
Unlike Windows NT, Solaris software does not attempt to hide system messages
from the user when the system boots. Messages are sent both to the screen and to a
log file. To obtain more message details, boot Solaris software with the verbose flag
(-v ) set, for example:
These messages often fly by on the screen too quickly to read, so Solaris software
provides two mechanisms to examine them after the system boots. The first method
is to execute the dmesg command, which displays the most recently generated
messages that are stored in a system buffer, for example:
solaris# /usr/sbin/haltok boot -v
40 Solaris Guide for Windows NT Administrators

The second method is to look at the history of all system messages contained in the
/var/adm/messages file, for example:
Note – The /var/adm/messages file is periodically copied to a new file and then
emptied. Since these files continually grow like the log files in Windows NT, they
should be periodically purged.
solaris# /usr/bin/dmesgSunOS Release 5.6 Version Generic [UNIX(R) System V Release 4.0]Copyright (c) 1983-1997, Sun Microsystems, Inc.mem = 131072K (0x8000000)avail mem = 125927424Ethernet address = 8:0:20:8a:e5:71root nexus = Sun Ultra 30 UPA/PCI (UltraSPARC-II 296MHz)pci108e,80000 at root: UPA 0x1f 0x4000PCI-device: scsi@3, glm #0sd0 is /pci@1f,4000/scsi@3/sd@0,0 <SUN4.2G cyl 3880 alt 2 hd 16 sec 135>sd6 at glm0: target 6 lun 0root on /pci@1f,4000/scsi@3/disk@0,0:a fstype ufs
solaris# more /var/adm/messagesMay 5 10:14:55 gserver4 reboot: rebooted by tomMay 5 10:18:55 gserver4 unix: /sd@3,0May 5 10:18:55 gserver4 unix: <SUN4.2G cyl 3880 alt 2 hd 16 sec135>May 5 10:18:55 gserver4 unix: sd75 at pci1000,f5: target 0 lun 0May 5 10:18:55 gserver4 unix: sd75 is /pci@6,4000/scsi@4,1/sd@0,0May 5 10:18:55 gserver4 unix: <SUN4.2G cyl 3880 alt 2 hd 16 sec135>May 5 10:18:55 gserver4 unix: sd76 at pci1000,f5: target 1 lun 0May 5 10:18:55 gserver4 unix: sd76 is /pci@6,4000/scsi@4,1/sd@1,0
Chapter 3 Service and Task Management 41

Service Troubleshooting Tips
This section lists service problems and describes the probable causes and solutions.
Problem: Process Keeps Dying After Restart
Probable Cause
If a Solaris service fails to start, it writes an error message to the console and
/var/adm/messages file. Most failures are caused by a lack of required system
resources. These resources can be missing files or tunable system parameters.
Solution
First identify the missing system resource. If the error message is not helpful, you
can obtain additional information by looking at a process trace, using the trusscommand, for example:
Note – The output of truss can be voluminous and cryptic. However, you can still
obtain useful information about what files the service is trying to access.
solaris# truss /usr/lib/httpd
42 Solaris Guide for Windows NT Administrators

Problem: Service Process is Hung
Probable Cause
A service process can hang if an external event it is waiting for never happens.
Solution
To determine the event the hung service is waiting for, use the truss command
with the -p flag to trace the running process.
Chapter 3 Service and Task Management 43

44 Solaris Guide for Windows NT Administrators

CHAPTER 4
TCP/IP Administration
Windows NT and Solaris systems share a common network medium, Ethernet, and
a common protocol, TCP/IP. While these are both industry standards, some
implementation details, namely installation and configuration, vary between the two
operating systems. This chapter examines those differences and shows how to
perform the equivalent network configuration functions in Solaris software that you
routinely perform.
The following topics are covered in this chapter:
■ Ethernet—the physical medium connecting Windows NT systems with Solaris
systems
■ Network interface card (NIC) drivers
■ Configuring TCP/IP properties
■ Multihomed systems—installation and configuration
■ TCP/IP services—telnet and ftp
Ethernet—LAN Hardware
The physical medium that most commonly connects Windows NT and Solaris
systems together in a Local Area Network (LAN) is Ethernet. Ethernet can run at
different speeds and operate in different modes. Most modern Ethernet controllers
can operate in multiple modes and at multiple speeds. The software component that
sets the behavior of the Ethernet controller is the network interface card (NIC)
driver. Solaris and Windows NT NIC drivers provide similar functionality, but the
configuration and terminology used are quite different.
45

Types of Ethernet
The two most popular types of Ethernet deployed in corporate LANs are 10BaseT
and 100BaseT. 1000BaseT, or gigabit Ethernet, is available on Solaris and Windows
NT servers, but is still relatively new. The standard speed for controllers on most
new systems today is 100 Mbit/sec, which can also operate at the lower 10 Mbit/sec
rate.
Ethernet can operate in two modes: Full Duplex and Half Duplex. In the Full Duplex
mode, the system has exclusive use of all the available bandwidth (10 Mbit or 100
Mbit). In Half Duplex mode, the bandwidth is shared with other systems on the
network segment. Ethernet controllers that support Full Duplex mode can also
operate in Half Duplex mode, if an Ethernet hub is used instead of switched
Ethernet.
Typically, all systems on a LAN segment are configured with the same speed and
mode. The usual practice is to set up Ethernet controllers in auto-negotiation mode
so that they will determine the proper settings when the network interface comes on
line. Sometimes, however, it is desirable to force the controller to operate at a
particular speed, or in a particular mode. Instructions on how to do this with Solaris
systems appear in “Installing and Configuring NIC Drivers” on page 48.
Network Interface Card
In Windows NT terminology, the piece of hardware that provides the physical
Ethernet connection is the network interface card (NIC). In Solaris terminology, this
hardware is often referred to as the Ethernet controller. Unlike some PC servers,
which require add-on NICs, all Solaris servers are manufactured with onboard
Ethernet controllers. Additional controllers can be added to Solaris servers by
installing SBus cards or PCI cards depending on the server model. To optimize real
estate on these cards, Solaris add-on Ethernet controllers typically are packaged
along with a SCSI disk controller or multiple (4) Ethernet controllers or NICs as they
are also increasingly referred to even in Solaris terminology.
Instead of using the manufacturer’s model number to reference a NIC, Solaris uses
an abbreviation. This abbreviation refers to the NIC driver and not the actual
physical hardware. In some cases, the same NIC driver is used for multiple
hardware implementations, so the same abbreviation can refer to different NICs. The
following tables show the common NICs used on Solaris workgroup servers.
46 Solaris Guide for Windows NT Administrators

.
Instructions on configuring software for add-on boards appear in “Multihomed
Systems” on page 62.
NIC Drivers
Windows NT ships with a set of drivers for popular NICs, which are supplied by the
NIC vendors. However, these drivers are usually out of date because of new PC
hardware that was introduced after the Windows NT CD-ROM was created. When a
new PC server is purchased, updated drivers are shipped on separate floppies or
CD-ROM. The latest copy of a driver can also be downloaded from the vendor’s
website.
With Solaris software, the latest NIC drivers are included in the Solaris CD-ROM
and, in most cases, can be used as is. There are a couple of exceptions. One is when
a new add-on board is introduced after a major Solaris release, and the other is when
patches are created to fix bugs. A list of known patches for NIC drivers and add-on
drivers can be found on the website http://sunsolve.sun.com
TABLE 4-1 Onboard Ethernet Controllers
Server Model Description Abbreviation
Ultra Enterprise 1 10 Mbit half/full
duplex
hme
Ultra Enterprise 2 10/100 Mbit half/
full duplex
hme
E450 10/100 Mbit half/
full duplex
hme
SS20 10 Mbit le
TABLE 4-2 Add-on Ethernet Controllers
Server Model Description Abbreviation
E450 PCI Quad Ethernet qfe
Ultra Enterprise 1 SunSwift 100BaseT hme
SBus Ethernet
Controller
10BaseT le
Chapter 4 TCP/IP Administration 47

Installing and Configuring NIC Drivers
Th section shows how NIC drivers are installed and configured on both Windows
NT and Solaris systems.
The Windows NT Way
NIC drivers are installed and configured on Windows NT by invoking Control
Panel➤Network➤Adapters. This procedure is usually performed as part of the
initial installation, but can be used later to modify parameters. Under the Adapter
tag is a list of parameters that can be changed. FIGURE 4-1 shows an example.
FIGURE 4-1 Windows NT Driver Parameters Window
The Solaris Way
No additional steps are required to install and configure NICs in Solaris software.
Solaris NIC drivers by default will auto-negotiate to set the proper NIC properties. If
auto-negotiation is not desirable, properties can be overwritten by using the Solaris
ndd command. The ndd command can be run from the command line or placed in
one of the system start up files such as /etc/inet.d/inetinit .
● To set the NIC hme0 to 100Mbit Full Duplex, type:
● To set the NIC hme0 to 100Mbit Half Duplex, type:
solaris# ndd -set /dev/hme instance 0 adv_100fdx_cap 1
solaris# ndd -set /dev/hme instance 0 adv_100hdx_cap 1
48 Solaris Guide for Windows NT Administrators

● To set the NIC hme0 to 10Mbit Full Duplex, type:
● To set the NIC hme0 to 10Mbit Half Duplex, type:
Note – Changes made to NIC settings using the ndd command will be lost when the
system is rebooted. To preserve the changes, the ndd command must be placed in
one of the system start up files.
On some older Solaris SPARC systems, the le NIC driver is used instead of the hmedriver. The le driver assumes a link pulse by default and flags an error if one is not
detected. If older hubs that do not send link pulses are used, or the link pulse is
disabled, this presents a problem.
● To disable the link test, you can modify the eeprom :
Note – This is not an issue with the newer hme driver.
Configuring the TCP/IP Stack
By default all Solaris servers have a TCP/IP stack installed. Installation is not an
issue because the stack is always there. Windows NT ships with multiple network
stacks, one of which is the TCP/IP stack. The installer has a choice to load it as the
only network stack, or load it along side another stack such as NetBEUI. However,
most Windows NT administrators avoid NetBEUI because of the additional network
traffic created.
To configure TCP/IP on a system, a number of property values need to be set. These
values include: IP address, gateway address, netmask, DNS server address, and so
on. This section shows how these parameters are set in Windows NT and Solaris.
solaris# ndd -set /dev/hme instance 0 adv_10fdx_cap 1
solaris# ndd -set /dev/hme instance 0 adv_10hdx_cap 1
solaris# /usr/sbin/haltok setenv tpe-link-test? falsetpe-link-test? = false
Chapter 4 TCP/IP Administration 49

The Windows NT Way
In Windows NT, the TCP/IP properties can be assigned manually at installation
time, via DHCP, or by using the TCP/IP property sheet, accessed through
Control Panel ➤Network➤Protocols.
FIGURE 4-2 shows the TCP/IP property sheet for Windows NT.
FIGURE 4-2 Windows NT TCP/IP Property Sheet
Most Windows NT administrators set up a DHCP server to dole out TCP/IP
parameters to Windows NT clients. If DHCP is not used, and TCP/IP parameters are
manually changed, Windows NT requires a reboot in most cases. In contrast, Solaris
software does not require a reboot.
The Solaris Way
TCP/IP parameters in Solaris software can also be assigned via DHCP or manually.
There is also a third way these parameters can be configured in Solaris software,
which is to install the system using JumpStart. In practice, very few Solaris
administrators use DHCP to set TCP/IP parameters, instead opting to either
manually set them or use JumpStart.
50 Solaris Guide for Windows NT Administrators

As with Windows NT, TCP/IP parameters are first set at installation time. Unlike
Windows NT, many of the initial parameters can be obtained automatically, even if
DHCP isn’t being used. Solaris software also provides a command called
sys-unconfig , which can be used to reset all the initial TCP/IP parameters
without re-installing the Solaris operating system.
Where Solaris TCP/IP Parameters are Set
Unlike Windows NT, Solaris software does not have a single TCP/IP property sheet
which is used to set all the various TCP/IP parameters. While this may seem
cumbersome at first, most Solaris administrators automate the process of assigning
TCP/IP parameters by using JumpStart, which will be discussed later.
The following is a list of TCP/IP parameters along with where they are set:
■ hostname—manually or from RARP server
■ IP address—manually or from RARP server
■ Subnet mask—manually or from /etc/netmasks
■ Default router—manually or from automatic router discovery
■ DNS server—manually or via NIS server DNS forwarding
Setting the Solaris Hostname and IP Address
The hostname and associated IP address for Solaris systems is set by entering an
entry in the /etc/hosts file. One exception to this is when a Solaris system is
configured to use DHCP, which is not widely deployed by Solaris administrators. In
most cases, the entry in the /etc/hosts file is created automatically. The entry gets
created at the following times:
■ during installation by filling in the hostname and IP address fields
■ automatically during installation via RARP
■ upon reboot after the sys-unconfig command is issued
Note – Most Solaris administrators configure systems to use NIS for hostname/ IP
address resolution instead of /etc/hosts . However, the entry in /etc/hosts is
still accessed when the Solaris system boots.
Chapter 4 TCP/IP Administration 51

Changing the Solaris Hostname and IP Address
In most Solaris environments, a system’s hostname and IP address are maintained in
two places: NIS and the local /etc/hosts file. To avoid inconsistencies, it is a good
idea to first modify the NIS entry, then modify the local /etc/hosts file. When the
hostname of a Solaris system is changed, the file /etc/nodename must also be
changed.
● To change a system’s hostname and IP address, run the sys-unconfig command,for example:
However, running sys-unconfig will cause the system to reboot.
● To dynamically change the IP address of a system issue ifconfig command, forexample:
● To dynamically change the system’s hostname, issue the hostname command, forexample:
Configuring a RARP Server
The Reverse Address Resolution Protocol (RARP) pre-dates DHCP and has been
used by Solaris administrators for years to automatically assign a hostname and
associated IP address to a system. Unlike DHCP, RARP only assigns a hostname and
IP address. All Solaris SPARC systems automatically perform RARP requests when
they are first installed and when the sys-unconfig command is run.
The RARP request is a broadcast used to find a RARP server on the local subnet. The
RARP server maintains a list of Ethernet addresses along with hostnames associated
with them. A RARP request, which is sent by a client, contains its Ethernet address.
If a RARP server is located which contains that Ethernet address, a hostname and IP
address are returned.
Note – When a JumpStart server is configured, a RARP server is automatically
started.
solaris# /usr/sbin/sys-unconfig
solaris# /usr/sbin/ifconfig hme0 IPaddress
solaris# /usr/bin/hostname newhostname
52 Solaris Guide for Windows NT Administrators

▼ To Configure a Solaris System to be a RARP Server
1. Add IP/hostname pairs to /etc/hosts or NIS
2. Create the file /etc/ethers that contains the Ethernet address / hostname pairs.
3. Start the RARP daemon.
Note – Setting up a RARP server is not required, but makes life easier when
installing or reconfiguring Solaris clients. NIS should be used instead of
/etc/ethers and /etc/hosts to allow multiple RARP servers access to the same
data.
Setting Subnet Masks
Most corporate LANS are segmented into subnets to limit the range of broadcast
traffic. Each system on a particular subnet needs to use the same subnet mask for
TCP/IP to function correctly. Subnet masks in Windows NT are set through either
DHCP or the Control Panel➤Network➤Protocols property sheet. In Solaris software,
the subnet mask can be set manually during installation or changed later by running
the sys-unconfig command. An alternative to the manual method in Solaris
software is to define a table that maps a subnet mask to a network number. This
table is contained in a file called /etc/netmasks . The following example assigns a
subnet mask of 255.255.255.0 to the 129.148.0.0 network, for example:
Rather than maintaining a separate /etc/netmasks file on each Solaris system, it is
easier to create a NIS map that contains the same information as
/etc/netmasks . If the information is changed in /etc/netmasks , the Solaris
solaris# cp /etc/hosts /etc/hosts.baksolaris# echo “129.148.55.99 newsys” >> /etc/hosts
solaris# echo “8:0:20:1:2:3 newsys” >> /etc/ethers
solaris# /usr/sbin/in.rarpd -a
solaris# echo “129.148.0.0 255.255.255.0” >> /etc/netmasks
Chapter 4 TCP/IP Administration 53

system must be rebooted for the change to take effect. If a reboot is not desirable,
then the ifconfig command can be run to change the current subnet mask, for
example:
Setting a Default Router or Gateway
In most corporate LANS subnets are connected to each other through routers or
gateways. A common practice to attach a router port to each subnet. This router port
is often referred to as the default gateway for the subnet since it provides the
connection to other subnets. The default gateway in Windows NT is specified
through the Control Panel➤Network➤Protocols property sheet or via DHCP. In
either case, the address of the gateway must be known in advance.
By default Solaris software runs the router discovery protocol to specify the default
gateway. If the routers on the LAN are not running the router discovery protocol, or
a specific gateway is desired, the router discovery mechanism can be disabled by the
following commands:
If the Solaris system has multiple NICs, a different gateway address can be specified
for each interface.
Note – If the sys-unconfig command is run, the /etc/defaultrouter file is
removed and must be recreated after the system reboots.
Configuring a DNS Client
DNS is the Internet standard for resolving hostnames and IP addresses. An
alternative method for resolving IP addresses that Windows NT uses is WINS.
Likewise, Solaris software has an alternative method called NIS. Both WINS and NIS
have a mechanism for forwarding name resolution requests to DNS, so in some cases
all the client needs is access to WINS or NIS. However, some applications, most
notably web browsers, require direct access to a DNS server.
The DNS server(s) for a client in Windows NT is specified through the
Control Panel➤Network➤Protocols property sheet or via DHCP.
solaris# /usr/sbin/ifconfig hme0 hostname netmask 255.255.255.0
solaris# echo “gateway-addr” > /etc/defaultroutersolaris# reboot
54 Solaris Guide for Windows NT Administrators

The IP address of the DNS server(s) used by Solaris clients is placed in a file called
/etc/resolv.conf, which contains the following format: nameserver IPaddr
A DNS server on a Solaris client is specified in the following example:
This command can be used multiple times to define additional DNS servers.
Setting TCP/IP Parameters with DHCP
Even though Solaris administrators typically do not employ DHCP to set TCP/IP
parameters, Solaris software provides both DHCP server and DHCP client
capability. Since DHCP is a standard protocol, a Solaris DHCP server can service
Windows NT clients and a Windows NT DHCP server can service Solaris clients.
Configuring a DHCP Server
DHCP servers in Windows NT are configured through
Control Panel➤Network➤Services property sheet. Once the DHCP server is
installed, DHCP parameters are administered through the DHCP Manager program.
The dhcpconfig command is run in Solaris software to set up a DHCP server. A
text based menu walks you through the steps. One difference between the Solaris
and the Windows NT implementation is that Solaris software attempts to ascertain
DHCP parameters by looking at various system tables, as shown in the following
example:
Configuring a DHCP Client
In Windows NT, DHCP is used as the default to configure the TCP/IP stack on the
client. This behavior can be changed via Control Panel➤Network➤Protocols.
solaris# echo “nameserver 129.148.52.77” >> /etc/resolv.conf
solaris# dhcpconfigConfigure BOOTP/DHCP on local LAN network: 129.148.72.0? ([Y]/N):Do you want hostnames generated and inserted in the files hoststable? (Y/[N]):Enter starting IP address [129.148.72.0]:Enter the number of clients you want to add (x < 255): 10. . . . . . . . .. . . . . . . . . . . .
Chapter 4 TCP/IP Administration 55

● On Solaris systems, use the following command to activate DHCP on a client:
Note – This command is placed in one of the Solaris system startup files so it will be
executed each time the system boots.
● On Windows NT clients, use the following command to release DHCP addresses:
● On Solaris clients, use the following command to release DHCP address:
Solaris Hostnames vs. Windows NT Computer
Names
While the notion of a hostname in Solaris software appears to be the same as the
computer name assigned to a Windows NT system, there are some important
differences. The main differences between the two are:
■ Windows NT assigns a computer name independent of TCP/IP configuration.
■ Solaris software always associates a hostname with a singular IP address.
■ Solaris software assigns a different hostname to each network interface.
■ Solaris hostnames are case sensitive.
Computer names assigned to Windows NT systems date back from its LAN
Manager and NetBEUI roots. Prior to TCP/IP, protocols such as NetBEUI would
broadcast their names as strings on the wire to identify themselves. In this
environment, a numeric identifier such as the IP address was not required. TCP/IP,
on the other hand, always used a numeric identifier. The hostname used in TCP/IP
serves only as an index into a table containing IP addresses.
While only one computer name is assigned to a Windows NT system, multiple
hostnames can be assigned to the same Solaris system. In Solaris, a hostname is
assigned to each IP address the system has. Hence, in a multihomed system, there
will be a different hostname associated with each NIC.
solaris# /usr/sbin/ifconfig hme0 dhcp
C:\> ipconfig /release
solaris# /usr/sbin/ifconfig hme0 dhcp release
56 Solaris Guide for Windows NT Administrators

Computer names in Windows NT do more than name-to-IP-address translation, as is
the case with hostnames in Solaris software. The computer name string is used in
NetBEUI broadcasts and for WINS registration. To be compatible with DOS based
clients, the Windows NT computer name is not case-sensitive. Solaris hostnames are
case-sensitive.
Although these differences may seem slight, they can cause confusion especially
when dealing with multihomed systems.
Addressing Solaris Hostnames from Windows NT
While IP addresses can be used directly when accessing services on a Solaris server,
it is usually more convenient to use names. Perhaps the most popular way of
providing this translation of names to IP addresses is the deployment of DNS.
However, you may not always have ready access to the DNS server tables, so a
couple of alternatives may come in handy.
The first method is to place the Solaris hostname in the system’s LMHOSTS file.
Chapter 4 TCP/IP Administration 57

▼ To Place Solaris Hostnames in the LMHOSTS File
1. Using Notepad, Open File ➤ C:\Winnt\System32\Drivers\Etc\LMHOSTS.
2. Add the line:
The use of the #PRE directive improves system performance by caching the Solaris
system’s name and IP address. Also, make sure LMHOSTS Lookup is enabled in the
TCP/IP property sheet so the LMHOST file will be referenced.
Note – If the Solaris system contains multiple NICs, the IP address specified in the
LMHOST file should be on the same subnet as the client, or unnecessary routing can
occur.
The second method, which is easier to administer since it doesn’t require an
LMHOSTS file on each system, is to specify the Solaris system’s address in WINS.
Since Solaris systems do not perform dynamic WINS registration as Windows NT
systems do, you need to set up a static mapping of the Solaris system name to its IP
address. FIGURE 4-3 shows the Static Mapping property sheet in WINS:
FIGURE 4-3 Windows NT Add Static Mappings Property Sheet
129.148.72.24 solaris-server #PRE
58 Solaris Guide for Windows NT Administrators
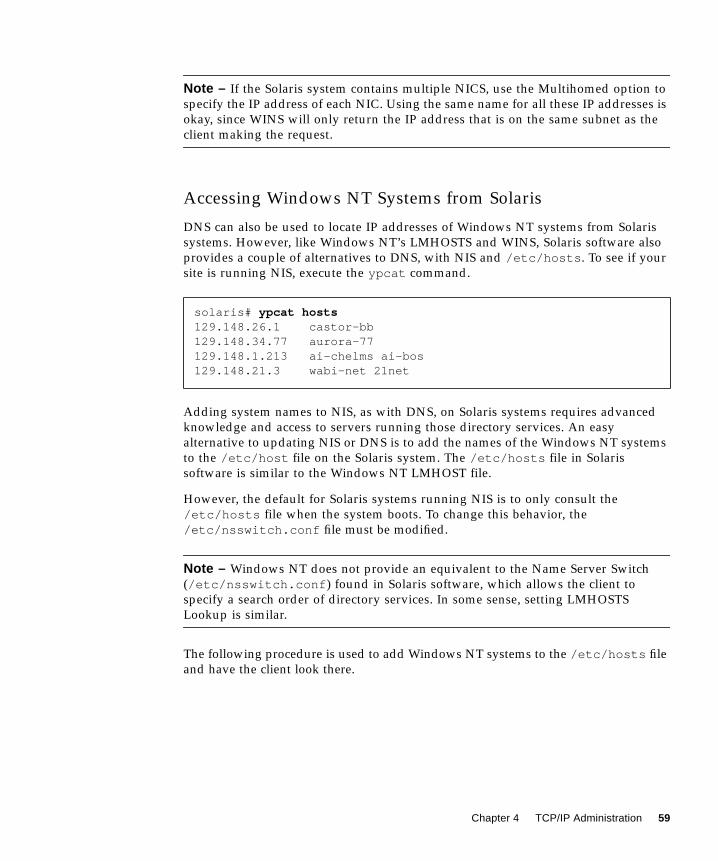
Note – If the Solaris system contains multiple NICS, use the Multihomed option to
specify the IP address of each NIC. Using the same name for all these IP addresses is
okay, since WINS will only return the IP address that is on the same subnet as the
client making the request.
Accessing Windows NT Systems from Solaris
DNS can also be used to locate IP addresses of Windows NT systems from Solaris
systems. However, like Windows NT’s LMHOSTS and WINS, Solaris software also
provides a couple of alternatives to DNS, with NIS and /etc/hosts . To see if your
site is running NIS, execute the ypcat command.
Adding system names to NIS, as with DNS, on Solaris systems requires advanced
knowledge and access to servers running those directory services. An easy
alternative to updating NIS or DNS is to add the names of the Windows NT systems
to the /etc/host file on the Solaris system. The /etc/hosts file in Solaris
software is similar to the Windows NT LMHOST file.
However, the default for Solaris systems running NIS is to only consult the
/etc/hosts file when the system boots. To change this behavior, the
/etc/nsswitch.conf file must be modified.
Note – Windows NT does not provide an equivalent to the Name Server Switch
(/etc/nsswitch.conf ) found in Solaris software, which allows the client to
specify a search order of directory services. In some sense, setting LMHOSTS
Lookup is similar.
The following procedure is used to add Windows NT systems to the /etc/hosts file
and have the client look there.
solaris# ypcat hosts129.148.26.1 castor-bb129.148.34.77 aurora-77129.148.1.213 ai-chelms ai-bos129.148.21.3 wabi-net 21net
Chapter 4 TCP/IP Administration 59

▼ To Add Windows NT Systems to the /etc/hosts File
1. Edit the /etc/nsswitch.conf file.
2. Change the following line:
To read:
3. Add the Windows NT server name to /etc/hosts .
4. Use the ping command to verify that you can now use the Solaris system name toaccess Windows NT:
solaris# cp /etc/nsswitch.conf /etc/nsswitch.conf.baksolaris# textedit /etc/nsswitch.conf
hosts: xfn nis [NOTFOUND=return] files
hosts: files xfn nis dns
solaris# textedit /etc/hosts## Internet host table#127.0.0.1 localhost129.148.220.102 veda loghost129.148.220.210 redmond129.148.220.220 ntserver
solaris# ping ntserverntserver is alive
60 Solaris Guide for Windows NT Administrators

DNS Servers
Both Windows NT and Solaris software provide a DNS server. While the two servers
can interoperate, Windows NT provides the added functionality to interoperate with
WINS. Solaris systems do not use WINS, hence this functionality is not part of the
Solaris DNS server.
The software required to make Solaris a DNS server is part of the Solaris operating
system, so no additional software is required. The software consists of a process
called in.named and associated configuration files.
Configuring a Solaris DNS Server
The procedure for setting up and configuring a Solaris DNS server is well
documented in the Solaris System Administrator AnswerBook. The following is a
general overview of the steps.
1. Create the boot and data files that in.named requires.
2. Edit the Solaris server’s startup script /etc/rc.inet by removing the commentcharacter (#) from the in.named line.
DNS and NIS
Most Solaris sites run a mixture of NIS and DNS. NIS is typically used to locate
systems within the corporate intranet, while DNS is used to locate systems outside
the intranet. Although not required, it is good practice to name the NIS domain the
same as the DNS domain. This is important since some electronic mail transports on
Solaris use DNS instead of NIS, so keeping a consistent domain name prevents
bounced email.
The NIS server process (ypserv ) will forward requests to a DNS server if the -dflag is specified when it starts. In this case the name of the DNS server must be
specified in the /etc/resolv.conf file on the Solaris NIS server.
Chapter 4 TCP/IP Administration 61

Multihomed Systems
For years, Solaris servers have shipped with multiple NICs installed. Originally,
Solaris servers with two or more NICs functioned as routers. Solaris software
provides the services required, such as the Routing Information Protocol (RIP), to
route packets between subnets. However, most corporate LANs today are
constructed with commercially available routers and do not rely on the routing
capabilities of Solaris.
Solaris servers with multiple NICs have since taken on a new role. With the
increased speed of servers and their clients, the network can become a bottleneck
long before the other server resources are exhausted. One way to eliminate this
bottleneck is to put multiple NICs on a server, each attached to a separate subnet. By
spreading out clients among several subnets, the network no longer becomes the
bottleneck.
Configuring Multiple NICs
This section describes the differences between Windows NT and Solaris software in
configuring multiple NICs.
The Windows NT Way
Additional NICs for Windows NT systems are configured through the
Control Panel➤Network➤Adapters property sheet. TCP/IP properties are assigned
to the new adapter in the same manner as the one already installed. These properties
can either be assigned manually or acquired from a DHCP server.
One major difference between adding an additional NIC to a Windows NT server
and a Solaris server is that Windows NT does not require that an additional
computer name be assigned to the new NIC. Solaris software does require that an
additional hostname be assigned to the new NIC.
62 Solaris Guide for Windows NT Administrators

FIGURE 4-4 Windows NT Network Adapters Property Sheet
The Solaris Way
In most cases, installing an additional NIC on a Solaris system does not require
loading or installing NIC drivers. One exception is the installation of a new type of
NIC that was shipped after the Solaris CD-ROM was created. In this case, the new
NIC driver will be included on the CD-ROM that ships with the NIC hardware.
For the most part, additional NICs are configured automatically by the Solaris
operating system when it reboots. A file called /etc/ hostname.xxx that contains a
hostname assigned to the new NIC is created. The .xxx extension refers to the NIC’s
driver abbreviation and the number of the NIC. All similar NICs in a Solaris system
are labeled 0-n. The presence of a /etc/ hostname.xxx file triggers the configuration
of the new NIC.
Note – To determine the proper .xxxn extension to use, run the dmesg command
after the Solaris system is rebooted with the new NIC installed.
Chapter 4 TCP/IP Administration 63

▼ To Add NICs to a Solaris Server
1. Create a new entry in /etc/hosts file for each new NIC.
2. Create a new file called /etc/ hostname.xxxn for each new NIC.
3. Reboot Solaris.
Accessing the New Solaris NIC
The additional NICs installed on a Solaris server are referenced by their IP address
or hostname. To use Solaris hostnames, a static mapping of the new IP addresses
should be made in WINS or an entry created in each client’s LMHOSTS file.
Turning Off IP Forwarding
Unlike Windows NT, which by default turns off IP forwarding between NICs, Solaris
software assumes that any system with two NICs is a router and enables IP
forwarding. In addition, Solaris sotware starts the RIP and rdisc protocols to
advertise that the system is a router. This is usually not a desirable situation, since
other Solaris systems on the same subnet will discover this server and bind to it as
its default gateway.
The Windows NT Way
By default IP forwarding is turned off on a Windows NT server. To ensure that it is,
look at the Control Panel➤Network➤Protocols➤TCP/IP property sheet.
solaris# textedit /etc/hosts
solaris# echo newhostname > /etc/hostname.hme1
solaris# /usr/sbin/reboot
64 Solaris Guide for Windows NT Administrators

FIGURE 4-5 TCP/IP Property Sheet
The Solaris Way
IP forwarding can be turned off on Solaris systems by invoking the ndd command,
for example:
Alternatively, if a /etc/notrouter file or /etc/defaultrouter file exists, IP
forwarding will be disabled.
or
solaris# ndd -set /dev/ip ip_forwarding 0
solaris# touch /etc/notrouter
solaris# echo “gateway-addr” > /etc/defaultrouter
Chapter 4 TCP/IP Administration 65
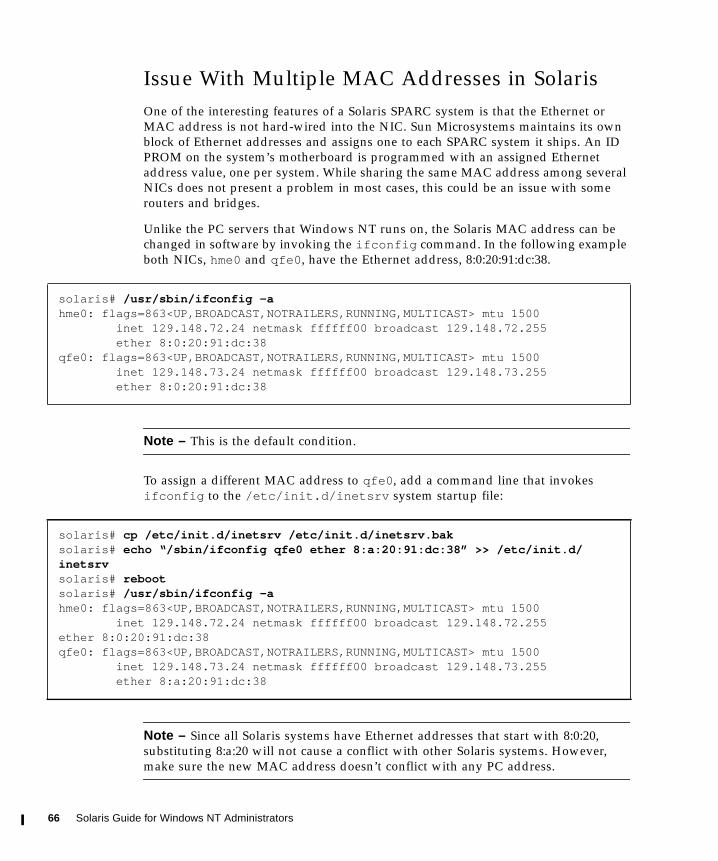
Issue With Multiple MAC Addresses in Solaris
One of the interesting features of a Solaris SPARC system is that the Ethernet or
MAC address is not hard-wired into the NIC. Sun Microsystems maintains its own
block of Ethernet addresses and assigns one to each SPARC system it ships. An ID
PROM on the system’s motherboard is programmed with an assigned Ethernet
address value, one per system. While sharing the same MAC address among several
NICs does not present a problem in most cases, this could be an issue with some
routers and bridges.
Unlike the PC servers that Windows NT runs on, the Solaris MAC address can be
changed in software by invoking the ifconfig command. In the following example
both NICs, hme0 and qfe0 , have the Ethernet address, 8:0:20:91:dc:38.
Note – This is the default condition.
To assign a different MAC address to qfe0 , add a command line that invokes
ifconfig to the /etc/init.d/inetsrv system startup file:
Note – Since all Solaris systems have Ethernet addresses that start with 8:0:20,
substituting 8:a:20 will not cause a conflict with other Solaris systems. However,
make sure the new MAC address doesn’t conflict with any PC address.
solaris# /usr/sbin/ifconfig -ahme0: flags=863<UP,BROADCAST,NOTRAILERS,RUNNING,MULTICAST> mtu 1500 inet 129.148.72.24 netmask ffffff00 broadcast 129.148.72.255 ether 8:0:20:91:dc:38qfe0: flags=863<UP,BROADCAST,NOTRAILERS,RUNNING,MULTICAST> mtu 1500 inet 129.148.73.24 netmask ffffff00 broadcast 129.148.73.255 ether 8:0:20:91:dc:38
solaris# cp /etc/init.d/inetsrv /etc/init.d/inetsrv.baksolaris# echo “/sbin/ifconfig qfe0 ether 8:a:20:91:dc:38” >> /etc/init.d/inetsrvsolaris# rebootsolaris# /usr/sbin/ifconfig -ahme0: flags=863<UP,BROADCAST,NOTRAILERS,RUNNING,MULTICAST> mtu 1500 inet 129.148.72.24 netmask ffffff00 broadcast 129.148.72.255ether 8:0:20:91:dc:38qfe0: flags=863<UP,BROADCAST,NOTRAILERS,RUNNING,MULTICAST> mtu 1500 inet 129.148.73.24 netmask ffffff00 broadcast 129.148.73.255 ether 8:a:20:91:dc:38
66 Solaris Guide for Windows NT Administrators

TCP/IP Services
Solaris provides ftp service for file transfers between systems and telnet for
remote login capability. Similar services, which Solaris inherited from the BSD
version of UNIX, are also included as part of the Solaris operating system. These
services are: rcp , rlogin , and rsh . Since those services are not shipped with
Windows NT, they are not discussed here. Details on using rcp , rlogin , and rshcan be found in the Solaris man pages.
Telnet
Unlike Windows NT, Solaris software provides both a telnet client and a telnetserver. The telnet client is text based and run from the command line in a terminal
window. The telnet server is started automatically when the Solaris system boots.
To access the telnet server on a Solaris system, the user must have an account on
that system. While running the telnet server on every Solaris system provides the
Solaris administrator a tool to remotely log into a system to perform maintenance,
there may be times, such as during backups, that remote access is undesirable. The
following procedure can be used to temporarily or permanently disable the telnetserver on a Solaris system.
● To temporarily disable telnet :
● To re-enable telnet :
● To permanently disable telnet :
Note – To avoid a system reboot, a hangup signal can be sent to the inetd process,
which causes the inetd.con f file to be reread. .
solaris# echo “Telnet is Disabled, Try Later...” > /etc/nologin
solaris# rm /etc/nologin
solaris# cp /etc/inetd.conf /etc/inetd.conf.baksolaris# sed “s/telnet/#telnet/” /etc/inetd.conf.bak > /etc/inetd.confsolaris# /usr/sbin/reboot
Chapter 4 TCP/IP Administration 67

FTP
Solaris software provides both a ftp client and a ftp server. The ftp client that
ships with Solaris software is text-based. However, a graphical version of ftp , called
ftptool , is available in the public domain. Like the telnet server, the Solaris ftpserver is automatically started at system boot time. The following procedure can be
used to disable this behavior.
Note – To avoid a system reboot, a hangup signal can be sent to the inetd process,
which causes the inetd.conf file to be reread.
Anonymous FTP
Both Solaris software and Windows NT provide anonymous ftp capability. This
section shows how to configure and manage the anonymous ftp server in each
operating environment.
The Windows NT Way
Windows NT provides anonymous ftp capability as part of the Internet Information
Server (IIS). The configuration and management of this ftp server is performed
through the Internet Service Manager. The FTP Service property sheet is shown in
FIGURE 4-6.
solaris# cp /etc/inetd.conf /etc/inetd.conf.baksolaris# sed “s/ftp/#ftp/ /etc/inetd.conf.bak > /etc/inetd.confsolaris# /usr/sbin/reboot
68 Solaris Guide for Windows NT Administrators

FIGURE 4-6 Windows NT FTP Service Property Sheet
The Solaris Way
Solaris software ships with anonymous ftp capability that can be run and managed
independently of a web server. Graphical tools for configuring and managing an
anonymous ftp server are available as part of Sun WebServer, but are not required.
See Chapter 8, “Administering Web Services,” for detailed information on
installation and configuration. To get a full description of manually setting up a
Solaris system to be an anonymous ftp server, refer to the Solaris man pages.
solaris# man ftpd
Chapter 4 TCP/IP Administration 69

A synopsis of the steps required to manually set up a Solaris anonymous ftp server
appear below. In this example, a folder called /export/ftp is created as the
anonymous ftp home directory. Anonymous ftp users are granted full read and
write access.
Telnet and FTP Proxies
For security reasons, most corporations do not want employees making direct
telnet or ftp connections to systems outside the corporate LAN. Instead, proxy
servers are used to provide access to the outside world. Public domain and
commercial versions of ftp and telnet proxy servers are available for Solaris
software, as well as telnet and ftp clients that access proxy servers.
Note – Most access to anonymous ftp servers is performed through web browsers
which can interact with proxy servers so special ftp clients are not required.
Network Monitoring Tools
Both Windows NT and Solaris software provide a tool for examining packets on the
network. These tools are useful for diagnosing network problems. Windows NT
includes the Network Monitor, which is a graphical tool, while Solaris software
provides a text based tool called snoop . Besides the user interface, the most
significant difference between the two tools is that snoop has the ability to examine
all the packets on the local network while the version of Network Monitor that is
included with Windows NT can only examine packets sent to and from the server it
is running on. An enhanced version of Network Monitor, which is packaged with
System Management Server (SMS), can examine all the packets on the local network
like snoop can.
solaris# mkdir /export/ftpsolaris# chmod 777 /export/ftpsolaris# echo “ftp:x:30000:30000:Anonymous FTP:/export/ftp:/none” >> /etc/passwdsolaris# echo “ftp:NP:6445::::::” >> /etc/shadow
70 Solaris Guide for Windows NT Administrators

Windows NT’s Network Monitor
Network Monitor is not installed by default, so it must be installed via the
Control Panel➤Network ➤Services property sheet. Once installed, Network Monitor
can display network traffic in real time, filter specified packet types, and store the
output in a file for later analysis. FIGURE 4-7 shows the output of Network Monitor
running on a Windows NT system.
FIGURE 4-7 Windows NT Network Monitor
Chapter 4 TCP/IP Administration 71

Solaris snoop
Solaris software provides a similar tool to Network Monitor called snoop . Unlike its
counterpart in Windows NT, snoop runs in a text window and by default examines
all packets on the network. Also, by default, the output of snoop only appears on
the screen and is not captured. The following is a sample output of snoop :
Running snoop on Solaris
A complete listing of the features of snoop is contained in the Solaris man pages.
● To access the snoop man pages:,
● To look at all the packets on the network:
● To look at the traffic between two systems:
● To look at traffic on a secondary network interface:
● To capture the output of snoop to a file:
bull-run -> veda TCP D=1023 S=2049 Ack=428077779 Seq=3509010798veda -> bull-run TCP D=2049 S=1023 Ack=3509010798 Seq=428077779veda -> bull-run TCP D=2049 S=1023 Ack=3509010798 Seq=428079239veda -> bull-run TCP D=2049 S=1023 Ack=3509010798 Seq=428080699
bull-run -> veda TCP D=1023 S=2049 Ack=428080699 Seq=3509010798veda -> bull-run TCP D=2049 S=1023 Ack=3509010798 Seq=428082159
veda -> bull-run NFS C WRITE3 FH=2F7D at 0 for 8192 (ASYNC)
solaris# man snoop
solaris# /usr/sbin/snoop
solaris# /usr/sbin/snoop system1 system2
solaris# /usr/sbin/snoop -d hme1
solaris# /usr/sbin/snoop -o /tmp/output
72 Solaris Guide for Windows NT Administrators

● To display captured data:
TCP/IP Troubleshooting Tips
This section describes how to view system errors and lists possible TCP/IP problems
and solutions.
Viewing System Errors
Both Windows NT and Solaris software store system messages that can be viewed
later. Windows NT stores these messages in a format readable by the Event Viewer
application. Solaris software stores them in a text file that is readable by the various
Solaris tools for manipulating text.
Examining system messages aids in troubleshooting system and configuration
problems. Although similar information can be obtained from either Windows NT or
Solaris software, the tools used to examine that information are quite different. This
section looks at how system messages are displayed on both Windows NT and
Solaris systems.
Windows NT’s Event Viewer
Figure 3-7 shows the output of the Event Viewer on Windows NT. This example
shows messages sent to the Application Log, which stores messages generated by
Windows NT applications such as Microsoft Exchange. Similar output pertaining to
system messages can be displayed by specifying the System Log. The severity of the
messages is denoted by a colored icon in the left hand column. Additional details
about messages can be obtained by clicking on the message.
solaris# /usr/sbin/snoop -i /tmp/output
Chapter 4 TCP/IP Administration 73

FIGURE 4-8 Windows NT Event Viewer
Solaris System Messages
Unlike Windows NT, Solaris software does not attempt to hide system messages
from the user when the system boots. Messages are sent both to the screen and to a
log file. You can obtain more detailed messages by booting the Solaris system with
the verbose flag (-v ) set.
These messages often fly by on the screen too quickly to read, so Solaris software
provides two mechanisms to examine them after the system boots. The first method
is to execute the dmesg command which displays the most recently generated
messages, which are stored in a system buffer, for example:
solaris# /usr/sbin/haltok boot -v
solaris# /usr/bin/dmesgSunOS Release 5.6 Version Generic [UNIX(R) System V Release 4.0]Copyright (c) 1983-1997, Sun Microsystems, Inc.mem = 131072K (0x8000000)avail mem = 125927424Ethernet address = 8:0:20:8a:e5:71root nexus = Sun Ultra 30 UPA/PCI (UltraSPARC-II 296MHz)pci108e,80000 at root: UPA 0x1f 0x4000PCI-device: scsi@3, glm #0sd0 is /pci@1f,4000/scsi@3/sd@0,0 <SUN4.2G cyl 3880 alt 2 hd 16 sec 135>sd6 at glm0: target 6 lun 0root on /pci@1f,4000/scsi@3/disk@0,0:a fstype ufs
74 Solaris Guide for Windows NT Administrators

The second method is to look at the history of all system messages, which are
contained in the /var/adm/messages file.
Note – The /var/adm/messages file is periodically copied to a new file and then
emptied. Since these files continually grow like the log files in Windows NT, they
should be periodically purged.
Problem: Solaris Systems Can’t Communicate
with Other Systems on the Local Subnet
A number of problems can prevent Solaris systems from communicating with other
systems in the network. These problems are usually caused by either NIC or TCP/IP
configuration errors. If a problem is suspected, the first thing to do is to check the
configuration parameters by issuing the ifconfig command.
The -a flag displays all the configured NICs. The line beginning with lo0 refers to
the internal loopback interface instead of an actual physical device and should
always appear as the first line of output. If a NIC that is installed in the system does
not appear in the output, then check the NIC configuration.
solaris# more /var/adm/messagesMay 5 10:14:55 gserver4 reboot: rebooted by tomMay 5 10:18:55 gserver4 unix: /sd@3,0May 5 10:18:55 gserver4 unix: <SUN4.2G cyl 3880 alt 2 hd 16 sec135>May 5 10:18:55 gserver4 unix: sd75 at pci1000,f5: target 0 lun 0May 5 10:18:55 gserver4 unix: sd75 is /pci@6,4000/scsi@4,1/sd@0,0May 5 10:18:55 gserver4 unix: <SUN4.2G cyl 3880 alt 2 hd 16 sec135>May 5 10:18:55 gserver4 unix: sd76 at pci1000,f5: target 1 lun 0May 5 10:18:55 gserver4 unix: sd76 is /pci@6,4000/scsi@4,1/sd@1,0
solaris# /usr/sbin/ifconfig -a
lo0: flags=849<UP,LOOPBACK,RUNNING,MULTICAST> mtu 8232 inet127.0.0.1 netmask ff000000
hme0: flags=863<UP,BROADCAST,NOTRAILERS,RUNNING,MULTICAST> mtu1500 inet 129.148.220.102 netmask ffffff00 broadcast129.148.220.255 ether 8:0:20:8a:e5:71
Chapter 4 TCP/IP Administration 75

Checking the Solaris NIC Configuration
If an installed NIC does not appear in the output of the ifconfig command, the
first thing to do is check to see if the Solaris system recognized the device when the
system booted. You can determine this either by watching the messages as the
system boots, or by issuing the dmesg command after the system boots.
A handy way to filter the output of the dmesg command is to send the output to the
grep command. The following example illustrates a situation where the hme1interface was not configured:
The output no such device or address is a bit misleading. The presence of
the messages means that the Solaris software did find the hardware but was unable
to configure a driver for it.
Note – Always make sure the Solaris system is connected to a live network before
booting. Unlike Windows NT, Solaris will disable a network interface if it isn’t
connected to a live network when the system boots.
Probable Cause
For the device hme1 to be configured the file /etc/hostname.hme1 must exist and
contain a valid hostname. If this file is missing or contains an invalid hostname the
NIC driver will not be installed.
Solution
Issue the following command, then reboot the system:
Note – If the problem persists, the fault may be due to a hardware failure or an out-
of-date NIC driver. In this case, run the hardware diagnostic test from the PROM
monitor, for example, ok test net , and check for updated NIC driver patches.
solaris# /usr/bin/dmesg | grep hme1hme1:no such device or address
solaris# echo “hostname” > /etc/hostname.hme1solaris# reboot
76 Solaris Guide for Windows NT Administrators

Checking the NIC TCP/IP Properties
The ifconfig command will return the IP address assigned to the NIC and the
subnet mask being used. If either of these is incorrect, the Solaris system will not be
able to communicate with other systems on the network.
Probable Cause
An error in the /etc/hosts , /etc/netmasks , or NIS maps could cause this
problem.
Solution
To temporarily assign a new IP address and subnet mask to a NIC on a running
system, issue the following command:
If setting the above parameters fixes the problem, then run the sys-unconfigcommand to make the changes permanent.
Problem: Solaris System Doesn’t Communicate
Past the Local SubnetIf the Solaris system can communicate with other systems on its own subnet, but
can’t communicate with systems on other subnets, the problem is usually due to a
default router or gateway configuration error.
solaris# /usr/sbin/ifconfig hme1 129.148.200.22 netmask 255.255.255.0
solaris# /usr/sbin/sys-unconfig
Chapter 4 TCP/IP Administration 77

Probable Cause
The router discovery program has found the wrong router, or the address in
/etc/defaultrouter is wrong. To verify the default router the Solaris system is
using, run the netstat command.
In this example, the output from the netstat command shows that net220-5om is
the default router.
Solution
If the wrong default router is determined automatically by the router discovery
program, turn off router discovery by creating an /etc/defaultrouter file then
reboot Solaris.
Problem: Connection to Solaris System Appears
Slow
If pinging a Solaris system takes an unusually long time, or occasionally returns a
timeout error, there could be a problem with the Solaris configuration or network
hardware.
solaris# netstat -rRouting Table:
Destination Gateway Flags Ref Use Interface-------------------- -------------------- ----- ----- ------ -----129.148.220.0 veda U 3 9847 hme0224.0.0.0 veda U 3 0 hme0default net220-5om UG 0 1387localhost localhost UH 03454343 lo0
solaris# echo “router IPaddr” > /etc/defaultroutersolaris# reboot
78 Solaris Guide for Windows NT Administrators

Probable Cause
Long response times can be caused by an excessive Ethernet collision or error rate.
To check the collision and error rate run the netstat command.
The above output shows a high input error rate of about 10 percent. This is a
symptom of a network hardware problem.
If the error rate and collision rate are low (less than 1 percent), the problem could be
caused by unnecessary routing occurring. Run the netstat -r command to check
this.
solution
Replacing defective hardware may be the answer, but another check should be made
first. If the LAN is configured for switched Ethernet, then the Solaris system should
be set to full-duplex mode. You can check this by examining the
/var/adm/messages file.
The output of this command tells you that the hme driver was initialized and is set
to 100 Mbit/sec, operating in full duplex mode. If the appropriate mode and speed
are not being set correctly, these can be changed by running the ndd command.
solaris# netstat -iName Mtu Net/Dest Address Ipkts Ierrs Opkts Oerrs Collis Queuelo0 8232 loopback localhost 15399654 0 15399654 0 0 0hme0 1500 veda veda 19505923 2441680 3928826 0 175601 0
solaris# grep hme /var/adm/messagesSUNW,hme0: Using Internal TransceiverSUNW,hme0: 100 Mbps full-duplex Link Up
solaris# ndd -set /dev/hme instance 0 adv_100fdx_cap 1
Chapter 4 TCP/IP Administration 79

Problem: ping Works With IP Addresses, but Not
Hostnames
The command ping can be issued with either an IP address or a Solaris hostname. If
a Solaris system is reachable by specifying its IP address, but not its hostname, then
a problem exists with the hostname to IP address translation.
Probable Cause
Hostnames, along with their associated IP addresses, can appear in NIS, DNS, or
/etc/hosts . Solaris software does not provide synchronization between these three
data stores, so the values stored in /etc/hosts that Solaris software refers to when
booting can be different than the values stored in NIS or DNS.
Solution
First, check the search order for hosts in the /etc/nsswitch.conf file of the
Solaris system issuing the ping command. Locate the line beginning with hosts .
The entry above causes Solaris to search for the hostname in the following order.
1./etc/hosts
2. NIS
3. DNS
Use the following commands to verify the IP address.
hosts: files nis dns
solaris# more /etc/hostssolaris# ypmatch hostname hostssolaris# nslookup hostname
80 Solaris Guide for Windows NT Administrators

Problem: Telnet or FTP Server Not Working
Solaris software provides both a telnet and a ftp server that are started
automatically when the system boots. Two types of errors can occur with these
services. One is the failure of the Solaris system to respond to a telnet or ftprequest and the other is a user authentication error.
Probable Cause
If the Solaris system is not responding to telnet or ftp requests, the problem could
be caused by the failure of these services to start. These services are started on
demand by the inetd process, so they won’t show up on an idle system. The failure
to start can be caused either by the service being disabled or by an IP port conflict.
If a particular user is unable to be authenticated by telnet or ftp , the user does
not have an account on that system. Unless NIS is deployed, a user’s account on one
Solaris server does not automatically give the user access to another Solaris server.
Solution
The startup of the telnet and ftp services is governed by entries in the
/etc/inetd.conf file. If these entries are missing or commented out, the services
will not start. The following lines should be present in /etc/inetd.conf :
The IP port numbers that these services start on is determined by an entry in the
/etc/services file , or by a NIS map. The following lines should appear in
/etc/services :
If any of these entries are missing or incorrect, they should be modified and the
inetd process reinitialized by the following command:
ftp stream tcp nowait root /usr/sbin/in.ftpd in.ftpdtelnet stream tcp nowait root /usr/sbin/in.telnetd in.telnetd
ftp 21/tcptelnet 23/tcp
solaris# ps -e | grep inetd345 ? 0:00 inetdsolaris# kill -1 345
Chapter 4 TCP/IP Administration 81

82 Solaris Guide for Windows NT Administrators

CHAPTER 5
File Sharing Administration
The native file sharing protocols built into Windows NT and Solaris software are not
compatible, which makes file sharing between the two operating systems
problematic. Windows NT bases its file sharing on the Server Message Block (SMB)
protocol, while Solaris software builds its file sharing on top of Network File System
(NFS).
There are two approaches which solve the file sharing problem between Windows
NT and Solaris software. One approach is to install SMB based file sharing on the
Solaris system, and the other is to install NFS on the Windows NT system. To
implement either of these approaches, additional software packages must be
installed and configured on either the server or client.
This chapter takes a look at SMB solutions available for Solaris systems and NFS
solutions available for Windows NT. Although there are several products on the
market that provide these interoperability solutions, the focus is on TotalNet
Advanced Server (TAS) 5.2 for Solaris software and the NFS products from
Intergraph, which are part of Microsoft’s UNIX Option Pack for Windows NT.
SMB File Sharing on Windows NTSystems
Since the introduction of Windows for Workgroups, Microsoft has been shipping
SMB based file sharing as an integral part of the operating system. In the WFWG
implementation, SMB was layered on top of the NetBEUI transport protocol. In the
Windows NT and Windows 95 implementations, SMB can run on top of either
NetBEUI or TCP/IP.
85

An important aspect of file sharing is maintaining file access control. Windows NT
implements LAN Manager domains for authenticating network users and granting
them access rights. User accounts are created on Domain Controllers, which
authenticate users and establish individual and group permissions.
SMB file sharing on Windows NT and Windows 95 is bidirectional. This means a
system can be both a client and a server at the same time. Some earlier
implementations of the SMB protocol, such as LAN Manager, relied on dedicated
servers to provide file sharing to client systems.
Windows NT supports the notion of browsing the network for file servers. In the
WFWG implementation, clients locate file servers on the network by sending out
broadcasts and then create and maintain their own list of servers. To eliminate the
excessive broadcast network traffic this activity causes, Windows NT designates one
system on a subnet as the browse master. Windows clients can then locate the browse
master and obtain a list of file servers from it instead of performing their own
searches.
SMB File Sharing on Solaris Systems
Solaris software does not provide native SMB file sharing as part of the operating
system. However, you can add software packages that enable Solaris to provide SMB
file service to Solaris systems. Two of the most popular software packages available
are TotalNet Advanced Server (TAS) and Samba. Both of these are server side
implementations of SMB, so they do not provide Solaris with SMB client access. SMB
client access products for Solaris systems are available from Syntax, but are not
widely used because they require installing software on each Solaris system.
Samba is public domain software which runs on multiple UNIX implementations.
The Samba web site http://samba.anu.edu.au/samba/ contains the latest
Samba software and information on installing and configuring it for Solaris systems.
Sun does not provide customer support for Samba.
TAS is part of the Solaris Intranet Extension CD-ROM and is fully supported by Sun.
By installing TAS on a Solaris server, Windows clients can access shared files like
they would from a Windows NT server.
TAS supports user and share mode file access, browse master, Windows NT Domain
Controller authentication, and WINS registration. The SMB protocol can run on top
of either NetBEUI or TCP/IP.
Although TAS can authenticate users from a Windows PDC or BDC, it cannot act as
a PDC or BDC. File shares can be managed with the tools provided by TAS software,
but not with the Windows NT tools.
86 Solaris Guide for Windows NT Administrators

Installing SMB
This section describes how to install SMB on either Windows NT or Solaris systems.
The Windows NT Way
With Windows NT, SMB file sharing is installed as part of two services: NetBIOS
Interface and Server. These services are installed automatically when networking is
set up during the Windows NT installation. Most of the tools to administer file
sharing on Windows NT are integrated into the desktop tools used to manipulate
folders and files. An additional administration tool, called Server Manager, is also
used. All these tools are installed automatically.
The Solaris Way
Solaris software does not implement SMB as a core part of the operating system, so
installation from a separate CD is required. Unlike Windows NT, TAS enforces
licensing, so a license key is required. If a license key is not entered, TAS will still
support a single connection for testing and demonstration purposes.
▼ To Install TAS 5.2 on a Solaris System
1. Put the TAS CD-ROM in the CD-ROM drive.
2. Access the TAS product on the CD-ROM.
3. Install TAS 5.2.
4. When the CD finishes loading, run the TAS setup program.
solaris# cd /cdrom/TotalNet5.2
solaris# pkgadd -d .
solaris# /opt/totalnet/sbin/tnsetup
Chapter 5 File Sharing Administration 87

5. Respond to the prompts, as follows:
The software installation is now complete, and you can begin to configure file shares
and user permissions.
Configuring TAS
Once TAS is installed most of the administration is performed via a web browser
based tool. This tool can be invoked from Windows NT using Internet Explorer. Type
the following URL: http:// hostname:7777
TotalNet Administrator: rootTotalNet Administration Group: sysEnable LM-NT-OS/2: yesLMserver server name: hostnameNetBEUI? noNetWare? noAppletalk? no
88 Solaris Guide for Windows NT Administrators

FIGURE 5-1 Solaris TAS Administration Tool
Note – The TAS Administration Tool will not run in a Solaris Hot Java browser.
Configuring File Shares
After the SMB server is installed on either Windows NT or Solaris, the administrator
must choose which folders should be made accessible and what access rights clients
should be granted. This section shows how file shares are created on a Windows NT
server and the corresponding Solaris/TAS method.
Chapter 5 File Sharing Administration 89

The Windows NT Way
Folders are shared by highlighting a folder displayed in My Computer then
invoking the Sharing property sheet.
FIGURE 5-2 Windows NT Sharing Property Sheet
The shared directories on a system are viewed and managed by specifying the
Shared Directories option in the Server Manager tool.
FIGURE 5-3 Windows NT Shared Directories Window
90 Solaris Guide for Windows NT Administrators

The Solaris Way
Before getting into the details of how file shares work in Solaris software, it’s
important to understand a few terms that are used in TAS for Solaris software,
which may be unfamiliar to you.
■ REALM—TAS supports multiple file sharing protocols: SMB, NetWare, and
AppleTalk. These different protocols are managed as realms. The realm that
Windows NT LAN administrators are interested in is called LM-NT-OS/2, whose
name dates back to pre-Windows NT days and LAN Manager.
■ File Service—With TAS on Solaris systems, multiple virtual file servers can be
created. These file services are seen to clients as separate servers with different
NetBIOS names. Since there are no technical benefits derived from using multiple
file services on Solaris systems, specifying just one file service that has a NetBIOS
name that is the same as the Solaris hostname is sufficient. The examples
presented in this chapter assume this configuration.
■ Volume—Volumes are equivalent to the folder name being shared. The sharepermissions are set on volumes in Solaris software in a similar way that sharepermissions are set on folders in Windows NT.
■ Attach Point—These are equivalent to share names in Windows NT which
represents the name the client will reference when connecting to it. Attach points
are optional in Solaris software, so using the volume name instead of creating
attach points works fine.
The first step in setting up file shares is to identify the disk drive or disk partition
where you want the shared folder to reside. Unlike Windows NT, which uses drive
letters to identify disks, Solaris software uses a pathname, which begins at “/ ”. A
handy way to identify a suitable area, is to use the Solaris df command, as shown in
the following example:
The output of this command identifies where the free disk space exists. The
directory /export in the above example is a good place to create a shared folder.
Note – Never use the pathname /tmp as a mount point, since it is really a RAM
disk and will be purged upon the next Solaris reboot.
Once the top level path, where you want to put the shared folder is determined, use
the New Volume Definition screen in the TAS administration tool to create it.
● Choose System➤Volumes➤Create
hostname% df -kFilesystem kbytes used avail capacity Mounted on/dev/dsk/c0t0d0s0 3608078 1558309 2013689 44% /exportswap 503624 320 503304 1% /tmp
Chapter 5 File Sharing Administration 91

FIGURE 5-4 Solaris TAS New Volume Definition Screen
To create a new Solaris directory for this shared folder, use the Create/modify
directory property sheet:
FIGURE 5-5 Solaris TAS Create/Modify Directory Property Sheet
Setting User Permissions
When files are shared it’s important to set user permissions correctly. This section
describes how to set permissions for both Windows NT files and Solaris files.
The Windows NT Way
File share permissions can be established either through share mode or user mode.
In share mode a single password is used by anyone who wants to access the shared
folder. In most cases, this is not desirable. More common, is to set up shared folders
that are accessed based on the user’s login name and password. Windows NT PDCs
and BDCs are used to authenticate users.
92 Solaris Guide for Windows NT Administrators

The Solaris Way
To have Windows NT users seamlessly access shared folders on a Solaris server
based on a user’s access rights, that user must have an account on the Solaris server.
Since most users will be accessing the Solaris server from their PC and don’t need to
log directly into the Solaris server, you can use a short cut to create these accounts.
Use the Solaris adduser command to quickly create user accounts, as shown in the
following example:
The passwords that the adduser command assigns will not be used, so this is not an
issue. Instead, authentication is performed using the password on the Windows NT
PDC, which contains the user’s account. The following section describes how to set
up Solaris TAS so that authentication from a Windows NT PDC is performed.
Specifying a Windows NT PDC as an Authentication Proxy Server
Using the TAS administration tool, bring up the Update Authentication Proxy
screen.
● Choose LM-NT-OS/2 Realm ➤ Manage File Services➤(pick one) ➤Administer➤
Authentication Mode ➤Authentication Proxy.
FIGURE 5-6 Solaris TAS Update Authentication Proxy Screen
Note – The authentication server must be specified as the Windows NT NetBIOS
name and not as an IP address. Add the Windows NT PDC to the Solaris
/etc/hosts file. See Chapter 4 for more details.
solaris# adduser tomsolaris# adduser marysolaris# adduser sue
Chapter 5 File Sharing Administration 93

Setting Up a Single Solaris Account for Use by Multiple Windows NTUsers
An alternative to creating a Solaris account for each Windows NT user, is to map a
grouping of Windows NT users to a single Solaris user. In this case, you still
authenticate through the Windows NT PDC for each user. But once authenticated,
the file permissions used are those of the Solaris user account. This is a convenient
way to set up a file share that only a certain group of users can access, without
having to deal with Solaris group permissions. If you wanted to set up a folder that
only people in the sales group could access, you would first set up a Solaris user
called sales, for example:
The next thing to do is associate the Windows NT users you want in the sales group
with the Solaris sales account. Do this by using the UNIX Name Mapping property
sheet in the TAS administration tool, for example:
● Choose System➤Username Maps.
FIGURE 5-7 UNIX User Name Mapping Property Sheet
Registering a Solaris Server in WINS
To enable Windows clients to have access to a Solaris server beyond the local subnet,
the NetBIOS name of the Solaris file server must be translated to an IP address. The
easiest way to do this is to have the Solaris server register itself with WINS. You can
perform this operation via the TAS administration tool, using the Configuration
property sheet.
● Choose LM-NT-OS/2 REALM ➤Configuration and Control➤Configuration.
solaris# adduser sales
94 Solaris Guide for Windows NT Administrators

FIGURE 5-8 Solaris TAS Configuration Property Sheet
File Service Administration
In Windows NT, the Server Manager is the tool you use to look at the Shared
Resources on the system and the connected users.
FIGURE 5-9 Windows NT Server Manager Property Sheet
In Solaris software, you can get the same information about shares and connected
users via the TAS administration tool.
1. Choose System ➤Volumes.
2. Choose System➤TAS Connected Users.
Chapter 5 File Sharing Administration 95

Solaris TAS Troubleshooting Tips
This section lists problems you may encounter using Solaris TAS and describes
probable causes and solutions.
Problem: Windows NT Clients Cannot Access
Solaris TAS Server
To verify if TAS is accessible use the Find option in the start menu or the netcommand from a DOS prompt, for example:
● Choose Start➤Find➤Computer
Probable Cause
If the Find option or net view command cannot locate the Solaris server, the
problem could be either a failure of TAS to start or the NetBIOS name of the Solaris
server could not be resolved to an IP address. To see if TAS is running, bring up the
TAS Administration tool in a web browser, for example:
● Choose Internet Explorer ➤http://solaris:7777➤Status at a Glance
To see if the Solaris NetBIOS name can be resolved to an IP address use the
nbtstat command. Example:
Solution
If the Status shows that the TAS service is not running, try restarting it, for example:
C:\> net view // solaris
C:\> nbtstat -c
96 Solaris Guide for Windows NT Administrators

● Choose Internet Explorer➤http://solaris:7777➤System-SystemAdministration➤Start Services
If the Solaris server name doesn’t appear in the output of nbtstat then the name
should be added to a WINS server as a static entry, or to the client’s LMHOSTS file,
for example:
Add an entry in the form: IPaddress systemname
Problem: Only Clients on the Local Subnet Can
See the Solaris TAS Server
Probable Cause
If a client is on the same subnet as the Solaris TAS server, its NetBIOS name can be
resolved through broadcasts. This can be verified using the nbtstat command, for
example:
Solution
To reach the Solaris TAS server beyond the local subnet, its name must exist in the
WINS database or the client’s LMHOST file. See the example in the previous
Solution for instructions on adding entries to LMHOSTS.
C:\> cd winnt\system32\drivers\etcC:\> notepad lmhosts
C:\> nbtstat -r
Chapter 5 File Sharing Administration 97

Problem: The message specified networkpassword is not correct is displayed
Probable Cause
If a specified network password is not correct message is displayed,
then there is probably an authentication problem. Either a Solaris account for the
user accessing the Solaris TAS server doesn’t exist, or the authentication mode is not
set correctly.
Solution
Make sure a Solaris account exists for the Windows NT user logged in.
Make sure the authentication mode is set correctly and the proxy name is correct.
● Choose LM-NT-OS/2➤Manage File Services➤(pick one)➤Administer➤
Authentication Mode➤Authentication Proxy Server.
If authentication is still not working correctly, change to share mode to see if the
problem goes away.
● Choose M-NT-OS/2➤Manage File Services➤(pick one)➤Administer➤
Authentication Mode➤Share Mode.
NFS File Sharing on Solaris Systems
Like SMB on Windows NT, Solaris software provides both a client and server
implementation of NFS by default. The NFS client is active by default and does not
require any configuration. By default, NFS sharing is turned off in Solaris software.
To enable NFS sharing, the nfs.server command is run and the folder that is to be
shared is specified using the share command, for example;
solaris# grep <username> /etc/passwdsolaris# ypmatch <username> passwd
solaris# /etc/init.d/nfs.server startsolaris# /usr/sbin/share -F nfs / folder_path_name
98 Solaris Guide for Windows NT Administrators

To have NFS sharing automatically start when the Solaris system boots, an entry
specifying which folders are shared is placed in the /etc/dfs/dfstab file. Solaris
software will examine this file upon reboot and automatically run nfs.server , for
example:
The access rights granted to NFS clients is controlled by the share command. This
command can be used to grant read and write access to everyone, grant read only
access, or grant access only to specific clients. The command can be run manually or
placed in the /etc/dfs/dfstab file for automatic execution when the Solaris
system boots, for example:
More information on using the share command can be found in the Solaris man
pages.
Note – The default of share is read/write access to all clients. However, the Solaris
user file permissions still apply, so this is a reasonable default.
NFS File Sharing on Windows NTSystems
The decision to run NFS on a system Windows NT rather than SMB on a Solaris
isystem s usually based on the existing computing environment. If there are many
NFS servers and few Windows clients, installing a NFS client on each PC running
Windows makes sense. If there are a large number of PC clients and few Solaris
servers, installing a SMB server on the Solaris servers makes sense. NFS client access
from Windows NT to Solaris NFS servers can also be achieved through NFS gateway
products which translates SMB requests to NFS requests. However, these products
provide lower performance and poorer file access control.
solaris# cp /etc/dfs/dfstab /etc/dfs/dfstab.baksolaris# echo “share -F / folder_path_name” >> /etc/dfs/dfstab
solaris# share -F nfs -o ro / folder_path_name [shares as read only]solaris# share -F nfs -o rw= client / folder_path_name [shares as readand write to client ]
hostname% man share
Chapter 5 File Sharing Administration 99

Several products that provide NFS client and server capability for Windows NT exist
in the market. One of these products, DiskAccess from Intergraph, is included in
Microsoft’s Windows NT Option Pack for UNIX. A companion product from
Intergraph called DiskShare, which provides a NFS server, can be purchased
separately. The installation and configuration of these two products are discussed in
the following sections.
Configuring Windows NT as an NFS Server
A convenient way to provide Solaris clients with access to files that reside on a
Windows NT server is to make it an NFS server. The DiskShare product from
Intergraph provides this capability. A trial version can be downloaded from
http://www.intergraph.com .
DiskShare is installed by running the setup.exe command then following the
instructions in the Install Wizard. The installation consists of loading the DiskShare
NFS services and extending the Windows NT tools used to manage file sharing.
Once installed, the NFS service is controlled through the Services icon in Control
Panel and sharing is administered through a folder’s property sheet.
As shown in FIGURE 5-10, the property sheet is extended to include NFS Sharing.
FIGURE 5-10 Windows NT DiskShare Folder Property Sheet
100 Solaris Guide for Windows NT Administrators

Note – The NFS sharing is separate from the native Windows NT file sharing. A
folder can be shared in NFS without being shared in Windows NT native file sharing
and vice versa.
When choosing a folder name to be shared, keep in mind that UNIX filenames are
case sensitive and all UNIX systems support long filenames.
To set access rights to the shared NFS folder, use the Modify/View Permissions
button.
FIGURE 5-11 Windows NT NFS Share Permissions Property Sheet
By default, everyone is able to read and write to a NFS shared folder. This is
accomplished by allowing the Solaris Anonymous UID. Solaris software uses a User
Identification (UID) tag to determine access rights to files or folders.
If the Anonymous UID is not permitted, then the user’s name must be mapped to a
Windows NT user name. “Mapping Solaris User Names to Windows NT User
Names” on page 101 explains how to accomplish this mapping.
Mapping Solaris User Names to Windows NT User Names
The tool used to map Solaris user names to Windows NT user names is the
DiskShare User Manager.
Chapter 5 File Sharing Administration 101

FIGURE 5-12 Windows NT DiskShare User/Group Mapping Configuration
Since most Solaris networks will be running Network Information Service (NIS), you
can obtain a list of Solaris users by querying NIS.
Note – NIS performs a similar function as the Windows NT PDC does. Like a PDC,
NIS is referenced by a domain name. One key difference is that the NIS domain
name is case sensitive, so be aware when typing in the name.
FIGURE 5-12 shows a list of Solaris users with their UIDs under the heading NFS
Users. Windows NT users are listed under Windows Users. The mapping is
performed by choosing a name from NFS Users and a name from Windows Users,
then clicking the Add button.
After the mapping is performed, the Solaris user will have the same access rights on
shared files and folders as the corresponding Windows NT user has. Solaris groups
can also be mapped to Windows NT groups.
102 Solaris Guide for Windows NT Administrators

Accessing Windows NT NFS File Shares from Solaris Systems
There are two ways to access NFS file shares from a Solaris system:
1. Via the automounter
2. Mapping the NFS file share to a folder
This section describes each method.
Using the Solaris Automounter
Using the automounter in Solaris software is similar to using UNC in Windows NT
to specify a file or folder name. Instead of using the \\ servername\ foldername as is
the case with UNC, the /net/ servername syntax is used.
To see what folders are exported from a Windows NT server called bgates, for
example, you would use the following Solaris commands.
Note – Unlike SMB file sharing, NFS does not support master browsers. You can
obtain a list of all servers that have NFS shares by using the ls /net command, but
it may take some time to complete.
Mapping NFS File Shares to Local Solaris Folders
In Windows NT software, the File Explorer is used to map file shares to a drive letter.
solaris# cd /net/bgatessolaris# ls *C:InetPub/ tom/ tomdir/D:tomdir/
Chapter 5 File Sharing Administration 103

FIGURE 5-13 Windows NT Map Network Drive Property Sheet
The mount command in Solaris software provides functionality similar to File
Explorer in Windows NT.
Note – Solaris software does not use drive letters to denote file mappings. Instead,
the Solaris filesystem looks like a single inverted tree. Network drives are mounted as
a folder that appears in the tree structure. The user cannot tell the difference
between a local folder and a folder mounted from an NFS file server.
Before an NFS file share can be mounted, a Solaris folder (or directory in Solaris
terminology) must be created. The Solaris folder, which will be used as a mount
point, may be anywhere in the filesystem tree, except under another NFS mount
point.
The NFS share path on the Windows NT server can be referenced with or without
the colon after the drive letter.
Note – Solaris software uses the forward slash (/ ) as a pathname delimiter instead
of the backslash used in the Windows NT environment. Do not mix the two types of
slashes. It will confuse the operating system.
104 Solaris Guide for Windows NT Administrators

An example of using the Solaris mount command follows:
To make the equivalent of Reconnect at Logon, which appears in File Explorer, a line
for each mounted NFS share must be added to the /etc/vfstab file. The easiest
way to do this is to first manually mount the new NFS share, then use the -p option
of mount to add the line to /etc/vfstab .
Configuring Windows NT as an NFS Client
Using DiskAccess from Intergraph, Windows NT can act as an NFS client with a
Solaris NFS server. DiskAccess is integrated with Windows NT tools such as File
Explorer and Network Neighborhood, so file access to Solaris NFS servers is similar
to accessing files on a Windows NT server using the native SMB protocol.
Authenticating Windows NT Users on Solaris Systems
To obtain access rights to files on a Solaris NFS server, the user must have a Solaris
account on that server. At logon, the user is first authenticated by Windows NT, then
by a Solaris server. Solaris authentication can be performed either through NIS or by
a process running on the Solaris server called pcnfsd . In most cases, NIS is
preferable, but if NIS is not deployed, pcnfsd will work with the Solaris
/etc/passwd authentication.
hostname% mkdir / new_foldersolaris# mount ntserver:/C/folder / new_folder
solaris# mkdir / new_foldersolaris# mount ntserver:/C/folder / new_foldersolaris# cp /etc/vfstab /etc/vfstab.baksolaris# mount -p > /etc/vfstab
Chapter 5 File Sharing Administration 105

FIGURE 5-14 Windows NT DiskAccess Administration Property Sheet
The screen shown in FIGURE 5-14 will appear the first time a Windows NT user logs
in. Once the authentication mode is set, this screen will not appear at subsequent
logins. To change the authentication mode in the future, the DiskAccess
Administration Tool can be invoked from the Windows NT Control Panel.
The user only needs to enter the Solaris user name and password once, and will not
be prompted at future logins if the Authenticate at System Logon box is checked.
However, if the user password on Solaris is changed, then the Windows NT user will
be prompted for the new password at the next login. Changing the user’s Windows
NT password will not have any effect.
Note – If no Solaris user name or password is supplied, the Windows NT user will
be logged in as the anonymous user in Solaris software.
106 Solaris Guide for Windows NT Administrators

Browsing NFS Servers
Solaris NFS servers do not support the concept of Browse Masters found in
Windows NT. Therefore, a browse list must be created on the NFS client. The default
is to look for NFS servers on the local subnet and add those to the browse list. NFS
servers beyond the local subnet are added manually, using the DiskAccess
Administrator Utility.
FIGURE 5-15 shows the Add LAN tool that is used to specify non-local LANs and NFS
servers on those LANS.
FIGURE 5-15 Windows NT Add LAN Tool
NFS File Attributes
You can assign File access rights using the NFS Attribute property sheet, accessed
from the file or folder’s Properties menu.
Chapter 5 File Sharing Administration 107
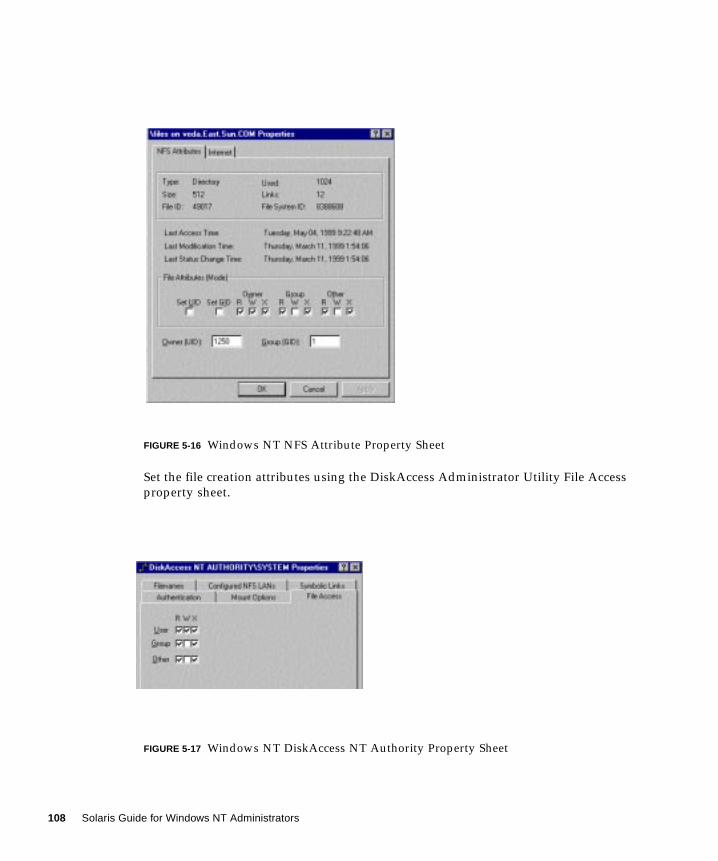
FIGURE 5-16 Windows NT NFS Attribute Property Sheet
Set the file creation attributes using the DiskAccess Administrator Utility File Access
property sheet.
FIGURE 5-17 Windows NT DiskAccess NT Authority Property Sheet
108 Solaris Guide for Windows NT Administrators

FIGURE 5-17 shows the default permissions for file and folder creation. In this
example the owner has read, write, and execute permissions. Users belonging to the
owner’s group have read and execute permissions. Likewise, everyone else has read
and execute permission.
Note – Execute permission in Solaris software means that if the file is a program it
can be run, and if it is a folder, its content can be displayed
NFS Troubleshooting Tips
This section lists problems you may encounter with NFS and describes probable
causes and solutions.
Problem: Solaris Cannot Access Shared NFS Files
on Windows NT
Probable Cause
If a Solaris NFS client cannot access shared files on a Windows NT server, the
problem is usually caused by failure of the NFS service to start or failure to share the
NFS folders with the correct permissions. To see what folders are shared and what
access rights they were shared with use the Solaris showmount command, for
example:.
solaris# showmount -e bgatesexport list for bgates:/C/tom (everyone)/C/tomdir (everyone)/D/tomdir (everyone)/C/InetPub/wwwroot (everyone)/C/InetPub/ftproot (everyone)
Chapter 5 File Sharing Administration 109

Solution
If the showmount command comes back with a RPC Timed Out failure, then check
Services in the Control Panel to see if the NFS service is running. If it isn’t, try
starting it manually.
If the showmount command doesn’t display any shared folders, then use the
DiskShare Administration Tool to see what folders are being shared. If some folders
are being shared, try changing the access rights to everyone.
Problem: Accessing Files with /net Doesn’t Work
Probable Cause
This usually indicates that the automounter is not running on the Solaris system or
the /net entry in the /etc/auto_master is missing. To see if the automounter is
running, use the ps command, for example:
To see if /net is enabled, look at the /etc/auto_master file, for example:
Solution
If the automounter is not running, verify the /etc/auto_master file is correct then
try manually starting the automounter, for example:
solaris# ps -e | grep auto203? 0:11 automount
solaris# cat /etc/auto_master# Master map for automounter+auto_master/net -hosts -nosuid,nobrowse/home auto_home -nobrowse/xfn -xfn
solaris# /etc/init.d/autofs start
110 Solaris Guide for Windows NT Administrators

Problem: Windows NT NFS Clients Cannot
Access NFS Files on a Solaris Server
Probable Cause
This is usually occurs either because the NFS server failed to start or the folder being
accessed was shared with restrictive permissions. To see if the NFS server is running,
use the Solaris ps command, for example
The presence of the nfsd process shows that the NFS server is running To see what
folders are being shared and with what access rights, use the share command, for
example:
Solution
If the nfsd process is not running, start it manually, for example:
If no folders are displayed as being shared, create a new shared folder, for example:
solaris# ps -e | grep nfsd11356? 0:00 nfsd
solaris# /usr/sbin/share- /files rw ""- /var rw ""
solaris# /etc/init.d nfs.server start
solaris# /usr/sbin/share /var
Chapter 5 File Sharing Administration 111

112 Solaris Guide for Windows NT Administrators
CHAPTER 6
Printer Administration
Sharing printers between Windows NT and Solaris systems can be accomplished in
a couple of ways. One way is via the SMB (Server Message Block) protocol and the
other is via the TCP/IP protocol. The default in Windows NT is SMB for remote
printing, but TCP/IP printing is also available. Solaris software uses TCP/IP
printing by default, but can also act as an SMB print server with the addition of
TotalNet Advanced Server (TAS) software.
TCP/IP printing is perhaps the easiest method of sharing printers in a mixed Solaris
and Windows NT environment, but running TAS on Solaris systems may be
preferable if clients that only have SMB printing capability must be supported. This
chapter looks at both alternatives.
TCP/IP Printing
Solaris software supports two flavors of TCP/IP printing: lpr, which is derived
from BSD UNIX and lp , which came from System V UNIX. Windows NT only
supports the lpr flavor of TCP/IP. However, this does not present a problem since
Solaris servers will respond to either lpr or lp requests and Solaris clients can send
either lpr or lp print requests.
TCP/IP printers can be locally attached to either a Solaris or Windows NT server, or
attached directly to the network. Many high speed laser printers come with a
TCP/IP interface that supports the lpr protocol. While these networked printers can
accept print requests directly from either Solaris or Windows NT clients via the lprprotocol, it is a common practice to set up either a Solaris or Windows NT server as
a print spooler. The print spooler accepts print requests from clients, queues them up,
then forwards the print jobs to the networked printer.
111

Solaris TCP/IP Printing
Solaris systems can be configured as either print servers, print clients, or print
spoolers. Printer configuration can be performed either by using Solaris commands
or the graphical Admintool. The examples shown here use Admintool.
▼ To Configure a Locally Attached Printer on a Solaris Server
Printers can be directly attached to a Solaris machine via a serial or parallel port. The
following commands are used to bring up the printer property sheet:
1. Start Admintool.
2. To access the printer property sheet, choose Browse➤Printers.
3. To add printers, choose Edit➤Add.
FIGURE 6-1 Solaris Admintool: Add Local Printer Property Sheet
solaris# admintool
112 Solaris Guide for Windows NT Administrators

In many cases, printer manufacturers will supply installation scripts so running
admintool may be unnecessary. By default, a locally attached printer is made
accessible to all clients on the network. If this behavior is not desirable, client access
can be restricted to only clients in the User Access List.
Note – Solaris software supports PostScript as its Page Definition Language (PDL).
In general, PCL printers cannot be directly attached to Solaris servers.
▼ To Configure a Solaris Machine as a Print Spooler
One of the more popular TCP/IP printer interfaces is JetDirect from Hewlett
Packard. By installing software that supports the JetDirect interface, a Solaris server
can function as a print spooler for networked HP printers. The following steps show
how to obtain and install this software.
1. Download the JetAdmin software from the HP web site (http://www.hp.com ).
The software can be located on the Printer/Imaging page under Support/Drivers
and Network Printing. The download file is called SOLd412.PKG.
2. From the folder the file was downloaded to, run the following command:
3. Accept the defaults and answer yes to all questions.
4. Run the jetadmin utility to configure the HP printer.
5. Input the printer’s IP address and create a print queue (or spooler)
6. Start Admintool.
7. To view the newly added printer, choose Browse➤Printers.
solaris# pkgadd -d SOLd412.PKG .
solaris# /opt/hpnp/jetadmin
solaris# admintool
Chapter 6 Printer Administration 113

FIGURE 6-2 Solaris Admintool: Modify Printer Property Sheet
Note – If the printer’s IP address is listed in /etc/hosts or NIS, it may be
referenced by its hostname rather than its IP address. The printer may obtain its IP
address manually or via bootp . The DHCP server in Solaris 2.6 can be used to
supply the IP address in place of a bootp server.
▼ To Configure Solaris as a TCP/IP Print Client
Since TCP/IP is the default printing protocol used by Solaris, no additional
installation is required. You only need to specify the print server, which can be either
a Windows NT or Solaris server, and specify which print queue to use on that
system. The steps to do this are:
1. Start Admintool.
2. To bring up the printer screen, choose Browse➤Printers.
solaris# admintool
114 Solaris Guide for Windows NT Administrators

3. To access to a remote printer, choose Edit➤Add➤Access to Printer.
FIGURE 6-3 Solaris Admintool: Add Access to Printer Property Sheet
4. Print a test page.
Note – Solaris software sends the print job to the print server in RAW mode, which
is suitable for PostScript printers. EMF format, used by PCL printers, is not
supported.
Windows NT TCP/IP Printing
Remote printing, by default, on Windows NT uses the SMB protocol and not
TCP/IP. The default installation of Windows NT does not load the TCP/IP Printing
service, so it must either be specified during the installation or added after Windows
NT is installed.
▼ To Configure Windows NT as a TCP/IP Print Client
The following steps show how to enable TCP/IP Printing on Windows NT after the
operating system is installed.
1. To install the TCP/IP Printing service, chooseControl Panel➤Networking➤Services➤Add
solaris# lp -d printer_name filename
Chapter 6 Printer Administration 115

2. To configure an LPR port, choose Printers➤Add Printer➤My Computer➤AddPort➤LPR Port
FIGURE 6-4 Windows NT Printer Ports Window
3. Specify the Solaris print server and print queue name.
FIGURE 6-5 Windows NT Add LPR Compatible Printer Property Sheet
4. Choose a printer driver.
Note – Choosing Apple LaserWriter NTX as the printer driver works for most
PostScript printers
▼ To Configure Windows NT as a TCP/IP Print Server
Windows NT can be configured to accept lpr requests from Solaris systems by
enabling the TCP/IP Print Server and sharing it with the other systems on the
network.
1. To install TCP/IP Printing, choose Control Panel➤Networking➤Services➤Add.
2. To start the TCP/IP Print Server, choose Control Panel➤Services➤TCP/IP PrintServer➤Start.
116 Solaris Guide for Windows NT Administrators

3. To share the printer, choose Control Panel➤Printers➤(choose one)➤Properties.
SMB Printing
An alternative to TCP/IP for accessing printers attached to Solaris servers from
Windows NT is to run the SMB printing protocol on a Solaris system. SMB printing
for Solaris software is available with SAMBA or TotalNet Advanced Server (TAS).
SAMBA is public domain software that can be obtained from the SAMBA web site:
http://samba.anu.edu.au/samba . TAS is contained on the Solaris Server
Intranet Extensions CD-ROM and is fully supported by Sun Microsystems. Only the
TAS implementation is discussed in this section, although SAMBA can be used to
provide similar functionality.
▼ To Configure a Solaris Machine as an SMB Print Server
Before a printer can be shared using the SMB protocol, it must first be attached
locally to the Solaris system using the Solaris utilities as described in the previous
section. Once the printer is set up to work with Solaris TCP/IP printing, it can be
made available to SMB clients using the TAS Administration Tool, for example:
1. In a web browser, type http://solaris:7777.
2. Choose Browse➤Printers➤Edit➤Add.
The following screen appears:
Chapter 6 Printer Administration 117

FIGURE 6-6 TAS Administration Tool
Printer queues can be accessed by SMB and TCP/IP at the same time. Queues are
managed using Solaris utilities as described in the next section.
Administering Printing on SolarisServers
Printer administration can be performed using either the graphical Admintool and
Print Manager or through Solaris commands. The following illustration shows print
jobs queued up on a Solaris server.
118 Solaris Guide for Windows NT Administrators

FIGURE 6-7 Solaris Print Manager Window
The user who submitted the print job, or the Solaris administrator, root, can cancel
the print job. The equivalent functions that Print Manager provides can also be
performed using Solaris commands, for example:
● To check the print jobs in a print queue, use the lpstat command, for example:
The output of the lpstat command shows one print job in the queue, hp3si-102. To
purge that job from the print queue, use the cancel command, for example:
Note – The printer manager in Windows NT cannot be used to cancel print jobs on
a Solaris server. To cancel print jobs, the user can telnet to the Solaris server and
use the Solaris cancel command.
To limit access to a particular printer, use admintool to create an allow list of users.
To create a deny list or limit access to specified systems, use the lpadmin -ucommand. For more information, see the man page for lpadmin .
solaris# lpstat hp3sihp3si-102 veda!tom 1180 Jun 24 9:44:10
solaris# cancel hp3si-102
hostname% man lpadmin
Chapter 6 Printer Administration 119

● To see if a printer is enabled on a Solaris system, use the lpstat command.
● To start and restart the print service on a Solaris system:
Printer Troubleshooting Tips
This section lists some of the printer problems you might encounter and describes
probable causes and solutions.
Problem: lp:permission denied
Probable Cause
Permission problems encountered while printing from a Solaris system are usually
caused by the wrong access rights set in printer spool directories.
Solution
Check the permissions in the /var/spool/lp directories:
solaris# lpstat -p printer_name
solaris# /usr/sbin/lpshutsolaris# /usr/lib/lpsched
solaris# cd /var/spool/lp/requestssolaris# ls -ldrwxrwx--- 2 lp lp 512 Jun 23 16:30 bgatesdrwxrwx--- 2 lp lp 512 Jun 24 11:23 veda
120 Solaris Guide for Windows NT Administrators

CHAPTER 7
Email Administration
Exchanging electronic mail messages between Solaris and Windows NT systems can
be accomplished in several ways. Email clients that work with Solaris email servers
are available for Windows NT systems and email servers that interoperate with
Solaris email clients are available for Windows NT servers.
This chapter takes a look at the protocols that make email interoperability between
Solaris and Windows NT software possible and the email clients and servers that
implement those protocols. Although it is not the only email server available for
Windows NT, this chapter focuses on Microsoft Exchange. Other email programs,
most notably Lotus Domino, provide functionality similar to Exchange.
Email Protocols
Early versions of electronic mail systems for PCs such as MS Mail and CC:Mail were
based on file sharing. In these implementations, all email messages were stored in a
single file that was then exported to PC clients using PC file sharing protocols such
as LAN Manager or NetWare. These file based implementations are being replaced
by more sophisticated email servers that rely on proprietary messaging protocols
such as Microsoft’s MAPI.
Historically, UNIX email systems were based on store and forward technology. The
most prevalent implementation of this technology is the Simple Mail Transport
Protocol (SMTP), which Solaris software supports. The Post Office Protocol, version
3 (POP3) and Internet Mail Access Protocol, version 4 (IMAP4) were later designed
to make retrieving email messages easier.
Since SMTP, POP3, and IMAP4 are available on both Solaris and Windows NT, using
these protocols is the easiest way to interoperate between the two operating systems.
This section takes a look at how these protocols are implemented in Solaris and
Windows NT software and how to configure them to work together.
121

SMTP on Solaris Systems
The default protocol for sending email messages on a Solaris system is SMTP. The
SMTP implementation in Solaris software is sometimes referred to as sendmail,named after the program that actually runs the SMTP protocol. Each Solaris system
runs the sendmail program that is responsible for sending email messages to other
systems that are also running SMTP.
The sendmail program is also responsible for receiving email messages addressed to
the system it is running on and storing the messages in a file. A separate file, or
mailbox, is created for each user on the system the email message was addressed to.
The mailbox can be on a local disk or a remote file share. To read messages, a Solaris
user invokes a mail reader, such as DTMAIL, which displays the messages found in
the user’s mailbox.
Typical Solaris sendmail Configurations
Solaris systems can be configured so that email messages are sent directly to the
user’s system and stored on the system’s local disk. However, there are several
drawbacks to this approach:
■ Email messages are addressed to a user on a particular system, so they must be
retrieved on that system.
■ The user’s system must be running or email will bounce back to the sender.
■ If the user’s local disk fills up, email will bounce.
The alternative to storing mailboxes on the user’s system is to store them on an NFS
shared directory. A Solaris system that exports the shared directory is referred to as
a mail server.
▼ Configure a Solaris sendmail Mail Server
The only requirement of a Solaris sendmail mail server is that users have Solaris
accounts on that server and the /var/mail folder on the server is shared. The
easiest way to share an email directory on a Solaris server is to create a NIS map
entry in auto_direct . The email clients can then use the Solaris automounter to
locate the email mailboxes. To configure a Solaris server to share mailboxes, use the
following procedure:
122 Solaris Guide for Windows NT Administrators

1. Create a /var/mail directory if it doesn’t already exist.
2. Set up the folder to share:
3. Add the share function to the /etc/dfs/dfstab file.
4. Edit the auto-direct file.
Add the line:
5. Update the auto-direct file:
Note – These steps assume the site is running NIS and that the NIS master keeps
the ascii files used to generate the NIS maps in /etc .
▼ To Configure a Solaris sendmail Client
No change to a Solaris client is required if the mailboxes are stored in the default
location of /var/mail .
● To specify a different location, the MAIL environment variable is set in the user’s.profile or .cshrc startup file, for example:
solaris# mkdir /var/mail
solaris# share -F /var/mail
nis_master# textedit /etc/auto_direct
/var/mail -rw,hard,actimeo=0 servername:/var/mail
nis_master# ypmake auto_direct
setenv MAIL /mail/ servername/$USER
Chapter 7 Email Administration 123

Establishing Mailbox Aliases
The syntax for sending email messages via SMTP is username @maildomain. The
maildomain can be an actual system name or a DNS mail record. In larger networks,
not all Solaris user mailboxes will be maintained on the same server. Therefore, the
actual maildomain will be different for different users. To avoid having to specify
different maildomains for different users an email alias database can be set up that
maps the username to the system where the user’s mailbox resides. These email
aliases reside in a NIS map called mail.aliases and is created from the /etc/mail/aliases file.
▼ To Set up Solaris Email Aliases
1. Access the aliases file.
2. Add lines similar to the following:
3. Generate the new NIS aliases map.
Relay Mail Hosts
Mail relay hosts are Solaris systems that can act as a gateway between multiple SMTP
email domains. All the systems within a company can be part of the same mail
domain, or more commonly, a hierarchy of mail domains is established with each
geographic location belonging to a subdomain. For example, all systems within Sun
Microsystems can be accessed through the sun.com mail domain. However, within
the company, many subdomains such as east.sun.com and west.sun.com exist.
The function of a relay host is to route email messages to mail domains beyond the
local mail domain or to subdomains. In the SMTP sendmail environment, mail relay
hosts are called main machines and all other systems are called subsidiary machines.
To configure of these two different types of systems, modify the
/etc/mail/sendmail.cf file.
nis_master# textedit /etc/mail/aliases
tom: tom@mailserver1mary: mary@mailserver2jeanne: jeanne@mailserver1
nis_master# ypmake mail.aliases
124 Solaris Guide for Windows NT Administrators

▼ To Configure a Mail Relay Host
Configuring a relay host is far more complex than setting up a subsidiary machine.
Besides routing email messages to destinations outside the local email domain, a
sendmail relay host can, and usually does, rewrite the email message headers for
outgoing messages and filters incoming message headers.
An explanation of sendmail rewrite rules is beyond the scope of this document.
The following example illustrates how to set up a relay host using the default
rewrite rules. In this example, only the name of the relay host that this system will
route email messages is changed.
1. Copy the main.cf file to the sendmail.cf file.
2. Edit /etc/mail/sendmail.cf .
3. Halt the sendmail function.
4. Restart sendmail .
solaris# cp /etc/mail/main.cf /etc/mail/sendmail.cf
solaris# textedit /etc/mail/sendmail.cfchange the lines# major relay hostDRddn-gatewayCRddn-gatewayto# major relay hostDRnewserverCRnewserver
solaris# /etc/init.d/sendmail stop
solaris# /etc/init.d/sendmail start
Chapter 7 Email Administration 125

Configuring Subsidiary Machines
Three configuration files are contained in the /etc/mail folder: sendmail.cf,main.cf , and subsidiary.cf . The actual configuration file is sendmail.cf ,
which is created by modifying either the main.cf or subsidiary.cf . By default,
the sendmail.cf file is identical to the subsidiary.cf file.
Although, the format of the sendmail.cf file is very cryptic, in most cases only
two lines are significant for systems that are not email relay hosts. These two lines
are used to identify which relay host to use. By default, the system name mailhostis specified, for example:
■ DRmailhost
■ CRmailhost
The name mailhost could be changed to reflect the real hostname of the relay host,
but this would require modifying the sendmail.cf file on every Solaris system. An
easier alternative is to create an alias called mailhost for the relay host, for
example:
1. Edit the /etc/hosts file.
Using the texteditor, change the line
to:
2. Generate the new NIS hosts map.
nis_master# textedit /etc/hosts
129.148.220.1 server1
129.148.220.1 server1 mailhost
nis_master# ypmake hosts
126 Solaris Guide for Windows NT Administrators

Mail Domains in Solaris
It is common practice for Solaris system administrators to establish NIS domains in
addition to DNS domains, which are closely aligned with mail domains. Often there
is not a one to one mapping of NIS domain names to DNS domain names. In larger
companies, DNS domains are subdivided into multiple NIS domains.
For example, the top level DNS domain at Sun Microsystems is sun.com, which is
subdivided into east.sun.com, central.sun.com, etc. These DNS domains correspond
to the mail domains within Sun. However, each of these DNS domains contain
multiple NIS domains, for example, boston.east.sun.com, nyc.east.sun.com.
The way sendmail handles the coexistence of NIS and DNS domains is to strip off
the lowest level part of the NIS domain name. Hence, a user in the
boston.east.sun.com NIS domain would appear in the east.sun.com DNS domain.
Therefore, email messages are sent in the format [email protected] and not
Note – NIS and DNS can use identical domain names. If this is the case, then the
sendmail.cf can be modified so part of the domain name will not be stripped.
More information on this subject can be found at: http://docs.sun.com u nder
System Administration➤Mail Administration Guide.
SMTP on Windows NT
An SMTP implementation, such as sendmail in Solaris, is not part of the Windows
NT Server release. However, a SMTP implementation is part of Microsoft Exchange
5.x, which provides various connectors for exchanging email messages with other
email systems. One of these connectors is called the Internet Mail Service. Before
SMTP can be deployed on an Exchange server, the Internet Mail Service connector
must be configured as described in the following section.
▼ To Configure Internet Mail Service for Exchange
Once Exchange has been installed on a Windows NT server, the following procedure
is used to install the Internet Mail Service.
1. From the Microsoft Exchange Administrator, choose File➤New Other➤InternetMail Service
2. Follow the steps in the Install Wizard.
Chapter 7 Email Administration 127

3. After you have installed the Internet Mail Service connector, bring up theproperty sheet and modify it from the Microsoft Exchange Administrator.
FIGURE 7-1 Microsoft Exchange Administrator Window
4. Double click the Internet Mail Service line to invoke the property sheet.
.
FIGURE 7-2 Windows NT Internet Mail Services Property Sheet
The way SMTP is used in a typical Microsoft Exchange network is different from the
way it is used in Solaris networks. In the Solaris network, all systems use SMTP to
send email messages. In Microsoft Exchange networks, client systems typically run
128 Solaris Guide for Windows NT Administrators

the Exchange client program, which uses the MAPI protocol. The purpose of the
Exchange server is to route email messages addressed to systems outside the
Exchange network.
Using an Exchange Server as a SMTP Relay Host
A Microsoft Exchange server can interoperate with Solaris SMTP servers. That is,
email messages can be forwarded to a Solaris SMTP server and vice versa. There are
two ways outbound email messages can be forwarded to a Solaris server. One way is
to forward all messages to a specific Solaris server and the other is to perform a DNS
lookup to determine where email messages should be forwarded. This option is set
in the Internet Mail Service Connections property sheet.
Mail Domains in Windows NT
Similar to NIS in Solaris, Windows NT provides a directory service that is referred to
as LAN Manger or Windows NT domains. These domains are not the same as DNS
domains or the domain name used by SMTP. However, unlike NIS in Solaris, which
contains hostname to IP address mappings, Windows NT domains only contain user
account information. Therefore, there is no correlation between DNS and Windows
NT domains.
To provide smooth SMTP interoperation between Solaris servers and Microsoft
Exchange servers, it is good practice to include both Solaris and Windows NT
systems in the company’s DNS maps, since DNS entries can be used to determine
where email messages should be routed. By placing Solaris SMTP servers and
Exchange servers in different DNS subdomains, email routing is greatly simplified.
Instead of forwarding all email messages to a particular email relay host, DNS
lookups can be used to determine where to forward the email and the best path for
getting there.
POP3/IMAP4 Servers on Solaris
Solaris software supports a number of POP3 and IMAP4 server implementations.
These are available from public domain web sites and products from Sun
MIcrosystems and its partners. POP3 and IMAP4 clients are also available from
several sources, which run on both Solaris and Windows NT systems.
The POP3 and IMAP4 protocols are not a replacement for SMTP. A Mail Transport
Agent (MTA), such as sendmail is still required to deliver email messages, but
email clients can retrieve messages using these protocols.
Chapter 7 Email Administration 129

Benefits of POP3 and IMAP4
As discussed earlier in this chapter, a Solaris email server can be configured without
the POP3 and IMAP4 protocols. Mail readers in Solaris are capable of accessing
mailboxes using a NFS mounted directory such as /var/mail . However there are
two limitations with the /var/mail method:
■ Email clients require NFS access.
■ Email clients that support /var/mai l are not available for non-Solaris systems.
POP3 and IMAP4 are industry standard protocols that do not require file sharing.
Instead, email messages are transferred to the email client after the user logs into the
POP3 or IMAP4 server. In the POP3 implementation, the entire mailbox is
downloaded, while initially only email headers are downloaded in the IMAP4
implementation. The IMAP4 method uses less bandwidth than POP3, since only the
messages that the user is interested in reading are retrieved. However IMAP4
servers put a heavier load than POP3 servers on the system they are running on.
▼ To Configure a Solaris Server for POP3 or IMAP4
The simplest implementations of POP3 and IMAP4 servers for Solaris servers are
processes that import mailboxes from /var/mail and listen for POP or IMAP
requests. Solaris user accounts are used for client authentication.
1. Retrieve the POP3 and IMAP4 server software from a file called SUNWipop.tar.Zor SUNWimap.tar.Z .
2. Uncompress the file.
3. Untar the file.
4. Install the file using the pkgadd command.
hostname% uncompress SUNWipop.tar.Zhostname% uncompress SUNWimap.tar.Z
hostname% tar xvf SUNWipop.tarhostname% tar xvf SUNWimap.tar
solaris# pkgadd -d .
130 Solaris Guide for Windows NT Administrators

5. Reboot the system.
The Solstice Internet Mail Server (SIMS) from Sun Microsystems provides a
sophisticated implementation of POP3 and IMAP4. SIMS does not rely on sendmail
as a MTA (Message Transfer Agent) and maintains its own database of email users.
Installation and configuration guides for SIMS are available at
http://docs.sun.com .
POP3 and IMAP4 for Windows NTServers
POP3 and IMAP4 servers are automatically installed when the Internet Mail Service
connector is configured for Microsoft Exchange. Configuration of the POP and IMAP
services is performed through the Server➤Protocols property sheet of the Microsoft
Administration tool.
Authenticating Solaris Users
All users accessing the Exchange POP3 or IMAP4 service must have Exchange
accounts established. Authentication for these accounts is performed by a Windows
NT PDC/BDC, so a Solaris user must enter a Windows NT password. To assure
Solaris users can be authenticated, other methods besides NT Challenge/Response,
such as clear text, must be specified in the POP3/IMAP4 settings. To enable clear
text authentication, the Basic (Clear Text) option needs to be selected as shown in
Figure 7-3.
solaris# reboot
Chapter 7 Email Administration 131

FIGURE 7-3 IMAP4 (Mail) Settings Property Sheet
POP3 or IMAP4 Solaris Clients
The DTMAIL client that is part of the Solaris CDE desktop supports both
/var/mail and IMAP4. An alternative to DTMAIL is Netscape Communicator for
Solaris software, which supports both POP3 and IMAP4. This section shows how to
configure these two email clients to work with Microsoft Exchange.
Configuring DTMAIL on Solaris Systems
By default, DTMAIL looks at /var/mail or the folder specified in the MAIL
environment variable for mailboxes. To change the default, use the Mail Option
menu in DTMAIL to specify which IMAP4 server to attach to.
1. Specify the name of the IMAP4 server in the IMAP Inbox Server field.
132 Solaris Guide for Windows NT Administrators

FIGURE 7-4 DTMAIL Mail Options Property Sheet
The IMAP4 server specified can be a Solaris server or a Microsoft Exchange server
running the Internet Mail Service. In either case, the user is presented with a
dialogue box prompting for a user name and password.
2. Type the required information in the login dialog box, for example:
FIGURE 7-5 DTMAIL Login Dialogue Box
Chapter 7 Email Administration 133

▼ To Configure Netscape Communicator on Solaris
An alternative to using DTMAIL for accessing a mailbox on an IMAP4 server is to
use the IMAP4 client built into Netscape™ Communicator 4.x. The advantage of
Communicator over DTMAIL is that HTML can be displayed inside the email reader
and the Lightweight Directory Access Protocol (LDAP) can be used to access the
address book on a Microsoft Exchange server. Netscape Communicator for Solaris
software can be downloaded from the Netscape web site at
http://www.netscape.com .
1. Download the file, unzip, and untar it.
2. Install the program.
3. Netscape Communicator can now be started from the folder it was installed in.
4. Configure Communicator to access email on a Microsoft Exchange server:
a. From the main Netscape window select Communicator➤Messenger Mailbox.
b. From Messenger Mailbox select Edit➤Preferences.
c. Choose Mail Server and edit the preferences.
solaris# gzip -dc communicatorxxx | tar -xvf -
solaris# ./ns-install
solaris# ./netscape
134 Solaris Guide for Windows NT Administrators

FIGURE 7-6 Netscape Preferences Window
▼ To Access the Exchange Address Book
Netscape Communicator for Solaris software supports the LDAP, which Microsoft
Exchange also supports. Using LDAP you can peruse an address book that is located
on an Exchange server. The following steps show how to configure directory
lookups using Communicator:
1. On the main Netscape window select Edit➤Preferences.
2. Under Preferences select Mail&Groups➤Directory.
3. Press New and fill in Preferences.
Chapter 7 Email Administration 135

FIGURE 7-7 Solaris Netscape LDAP Server Preferences
4. Use the following steps to access the address book called Microsoft Exchange:
a. In the main Netscape window select Communicator➤Address Book.
b. Choose the address book called Microsoft Exchange.
FIGURE 7-8 Windows NT Communicator Address Book
136 Solaris Guide for Windows NT Administrators

POP3 or IMAP4 for Windows NT Clients
Microsoft Outlook Express is a POP3 or MAP4 client that comes with Internet
Explorer 4.x. You can use this email client to access mailboxes on Solaris POP or
IMAP servers.
Configuring Outlook Express
Use the Tools➤Accounts property sheet.
● Specify the name of a POP3 or IMAP4 server where the user’s mailbox is locatedby typing the name in the Incoming mail field, for example:
FIGURE 7-9 Accounts Property Sheet
Email Client Considerations
If Outlook Express is used to send email to users on Solaris systems, there are some
things to be aware of.
Chapter 7 Email Administration 137

HTML Content
Both Netscape Communicator and Outlook Express can send and receive email
message content as either plain text or HTML. DTMAIL, the default Solaris email
client, on the other hand, does not support HTML content. If an email message is
sent as HTML from Outlook Express and read by a DTMAIL client, a superfluous
email attachment will appear. The Tools➤Options➤Send property sheet in Outlook
Express can be changed to Plain Text to eliminate the HTML attachment.
Email Attachments
Email attachments can be interchanged between Solaris and Windows email clients
by using the MIME format. DTMAIL supports both MIME and Solaris style email
attachments, while some older Solaris email clients did not support MIME. If
DTMAIL is being used, make sure it is configured for MIME attachments, or else the
attachment won’t be readable by Windows email clients.
Solaris software supports email attachment types such as Microsoft Word,
PowerPoint, and Excel. Viewers for these applications are co-packaged in the latest
Solaris 2.6 release.
Providing Email Access from a WebBrowser
Microsoft Exchange 5.5 provides an extension to Internet Information Server (IIS)
that allows access to Exchange mailboxes and directories. This feature is called
Outlook Web Access. Solaris clients can access the Exchange server, running Outlook
Web Access, from a web browser by simply specifying a URL.
▼ To Enable Outlook Web Access
1. Turn on Access this Computer from the Network and Log on Locally for the groupEveryone.
2. Use clear text authentication for Anonymous.
138 Solaris Guide for Windows NT Administrators

Email Troubleshooting Tips
This section lists email problems you might encounter and describes probable causes
and solutions.
Problem: Email Messages Bounce
Probable Cause
If an email message sent from a Solaris system cannot reach the intended recipient, a
message from the MAILER-DAEMON will be returned. This error is usually caused
by an incorrect address or the recipient’s mail server is unreachable.
Solution
Additional information contained in the MAILER-DAEMON message can be viewed
by turning off the Abbreviated Headers option in DTMAIL. If the problem isn’t
obvious from the returned header message, then the sendmail program can be used
to verify the intended address, for example:
Problem: Mail Server Not Reachable
Probable Cause
This problem can occur because SMTP is not running on the target mail server or
mail relay host or gateway is not configured correctly.
hostname% /usr/lib/sendmail -v -bv jtrinity@bajtrinity . . . aliased to jeannejeanne . . . aliased to jtrinity@bajtrinity@ba . . . deliverable
Chapter 7 Email Administration 139

Solution
● To check connectivity to a Solaris SMTP mail server, use the mconnect command,for example:
● Use telnet to check the Windows NT SNMP server, for example::
Problem: Users Cannot Connect to POP3/IMAP4
Server
Probable Cause
If a user is getting a time out message when trying to retrieve email messages from
a POP3 or IMAP4 server, the services may not be running.
Solution
● To check the POP3 on a server running Windows NT software, use the followingcommand:
hostname% mconnect bgatesconnecting to host bgates (129.148.220.102), port 25connection open20 bgates.Sun.COM ESMTP Server (Microsoft Exchange Internet MailService 5.5.1960.3) ready
C:\> telnet mailserver 25220 mailserver.Sun.COM Sendmail SMI-SVR4 ready . . .hello250 mailserver.Sun.COM Hello bgates [129.148.220.103], pleased tomeet youquit
C:\> telnet mailserver 110+OK mailserver Solstice (tm) Internet Mail Server (tm) POP3 2.0 . .user tom+OK User name accepted, password please
140 Solaris Guide for Windows NT Administrators

● To check the POP3 on a server running Solaris software, use the followingcommand:
● To check the IMAP4 on a server running Windows NT software, use the followingcommand:
● To check the IMAP4 on a server running Solaris software, use the followingcommand:
Problem: POP3/IMAP4 Users Cannot Be
Authenticated
Probable Cause
If users can be authenticated from Windows NT clients but not Solaris clients, then
the server may be expecting the Windows NT Challenge/Response authentication.
Solution
In the Microsoft Exchange Internet Mail Service property sheet, enable clear text and
SSL authentication mode.
solaris# telnet bgates 110+OK Microsoft Exchange POP3 server version 5.5.1960.6 readyuser tom+OK
C:\> telnet mailserver 143* OK mailserver Solstice (tm) Internet Mail Server (tm) IMAP4service
solaris# telnet bgates 143* OK Microsoft Exchange IMAP4rev1 server version 5.5 . . .
Chapter 7 Email Administration 141

142 Solaris Guide for Windows NT Administrators

CHAPTER 8
Web Services Administration
One of the major benefits derived from the creation of the Internet was the
establishment of a standard protocol (HTTP) for retrieving documents and a
standard language (HTML) for composing documents. By providing web servers,
that support HTTP, and web browsers, that understand HTML, Solaris and Windows
NT systems can easily exchange documents.
Although all web servers are based on common protocols, the administration of, and
the tools for developing content varies between implementations. This chapter looks
at those differences and the tools that can be used to develop content for both Solaris
and Windows NT web servers.
Solaris Web Servers
Web servers and web browsers are now ubiquitous throughout any corporation or
educational institution. Just as customers came to expect file and print services to be
included as part of a network operating system, basic web services are assumed to
be included. Windows NT Server 4.0 includes Internet Information Server (IIS) as its
basic web server, and likewise, Solaris software includes Sun WebServer.
Since Solaris software was one of the platforms of choice for early web server
developers, there are also a number of public domain web servers that are available
at no cost. Perhaps the most popular of these servers is the Apache web server,
which along with Sun WebServer, will be covered in this section.
143

Differences between IIS and Solaris Web Servers
When serving static web pages, IIS, Sun WebServer, and Apache provide similar
functionality. All three web servers support virtual web hosting and the Secure
Socket Layer (SSL) protocol. The administration tools available for Sun WebServer
and IIS are similar, while Apache relies more on editing files manually. A look at
these tools is presented later.
Perhaps the most pronounced difference between Windows NT’s IIS and Solaris web
servers are the facilities available for handling dynamic web content. “Dynamic Web
Pages” on page 144 takes a look at how this dynamic content is produced.
Dynamic Web Pages
The original method web servers used to provide dynamic content via HTTP and
HTML was the Common Gateway Interface (CGI). This mechanism uses special tags
on HTML pages that trigger scripts on the web server. Based on the input data
supplied by the web browser, the web server generates output that is sent back to
the web browser. CGI scripts are generally written in a scripting language such as
PERL, which is available for both Solaris and Windows NT servers.
Since CGI scripts can be complicated to create and inefficient to run at times,
alternative methods for generating dynamic content were developed. Microsoft
employs two of these methods in IIS: Active Server Pages (ASP), and Internet Server
Application Programming Interface (ISAPI). ISAPI was first introduced in IIS 2.0. IIS
3.0, included in Windows NT 4.0 Service Pack 3, provides ASP support .
ASP allows scripts written in VBscript or Jscript, to be referenced on special web
pages that have an .ASP extension, then executed on the server. ISAPI requires
writing a C++ program, which makes calls to the ISAPI interface on IIS. Tools such
as FrontPage 98 and Visual InterDev assist in the development of ASP.
Solaris web servers do not support ASP or ISAPI. A similar interface called Netscape
Server Application Programming Interface (NSAPI) is available on Netscape server
for Solaris systems, but is not discussed in this chapter.
Configuring Sun WebServer
Sun WebServer is co-packaged with the Solaris 2.6 operating system and is installed
by running the install script which is located on the supplement CDROM. The install
script runs the pkgadd command and adds an entry in /etc/rc2.d which
automatically starts Sun WebServer each time the system boots.
144 Solaris Guide for Windows NT Administrators

● To manually start the Sun WebServer:
● To manually stop the Sun WebServer:
When Sun WebServer starts, a configuration file called httpd.conf , which resides
in the /etc/http folder, is read. The information in this file can be edited manually
or changed using the SWS Administration Tool. By default, the HTML content that
SWS publishes resides in the folder /var/http/demo/public , which is created
automatically when SWS is installed.
● To change the location of this folder edit the file as follows:
For the changes to take effect, stop and restart Sun WebServer.
● To manually start the Sun WebServer:
● To manually stop the Sun WebServer:
Other common configuration parameters in httpd.conf are:
solaris# /etc/init.d/httpd start
solaris# /etc/init.d/httpd stop
solaris# textedit /etc/http/httpd.confChange the line:doc_root “/var/http/demo/public”To:doc_root “/new_folder”
solaris# /etc/init.d/httpd start
solaris# /etc/init.d/httpd stop
default_file “index.html” [this is the default start page]log_prefix “/var/http/logs” [this is where log files are kept]
Chapter 8 Web Services Administration 145

Note – The above parameters in httpd.conf can also be modified by using the
Sun WebServer’s browser based administration tool.
Sun WebServer Administration Tool
Like IIS, Sun WebServer has a HTML based administration tool. To access this tool
remotely, first create an administration account.
▼ To Create an Administration Account
1. Go to the http directory.
2. Set up an administration account.
In this example, an administration account called admin was created.
3. To invoke the SWS administration tool from a web browser, type the URL:http://sws_server/admin/admin.html .
The following dialogue box will appear:
FIGURE 8-1 Solaris Sun WebServer Authentication Tool
Once the user is authenticated, the following tool is displayed:
hostname% cd /etc/http
solaris# /usr/bin/htpasswd swsadmin.pw admin
146 Solaris Guide for Windows NT Administrators
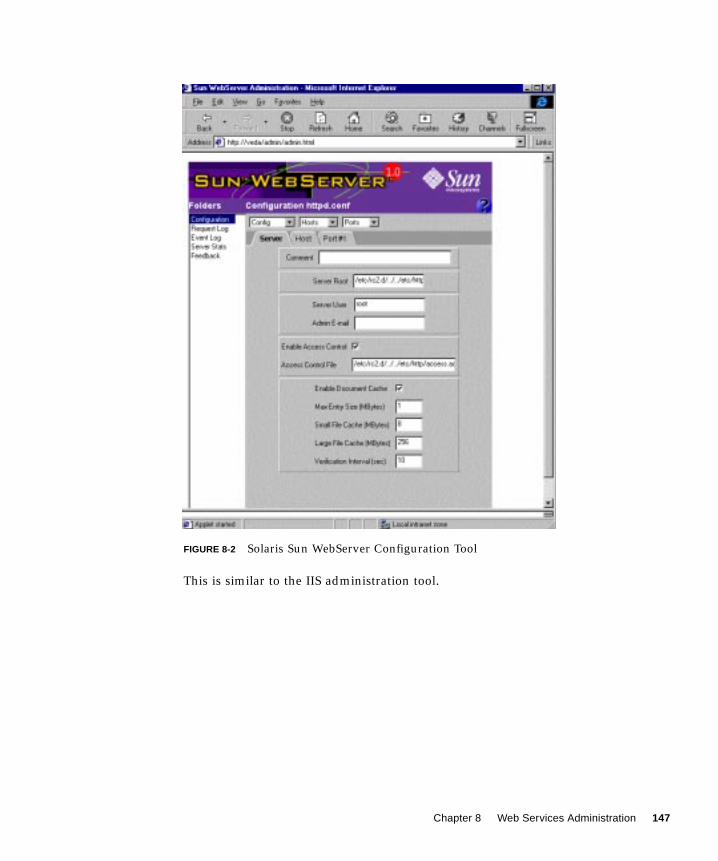
FIGURE 8-2 Solaris Sun WebServer Configuration Tool
This is similar to the IIS administration tool.
Chapter 8 Web Services Administration 147

FIGURE 8-3 Windows NT Internet Service Manager Tool
Note – To allow access to password protected HTML pages from Solaris web
browsers Basic authentication should be enabled in addition to Windows NT
Challenge/Response.
Apache Web Server for Solaris Software
The Apache web server accounts for 50 percent of all web servers in use on the
Internet today. Like other public domain software for UNIX, updates are being
continually produced and placed on the Apache official web site:
http://www.apache.org . While the latest version of the Apache web server is
148 Solaris Guide for Windows NT Administrators
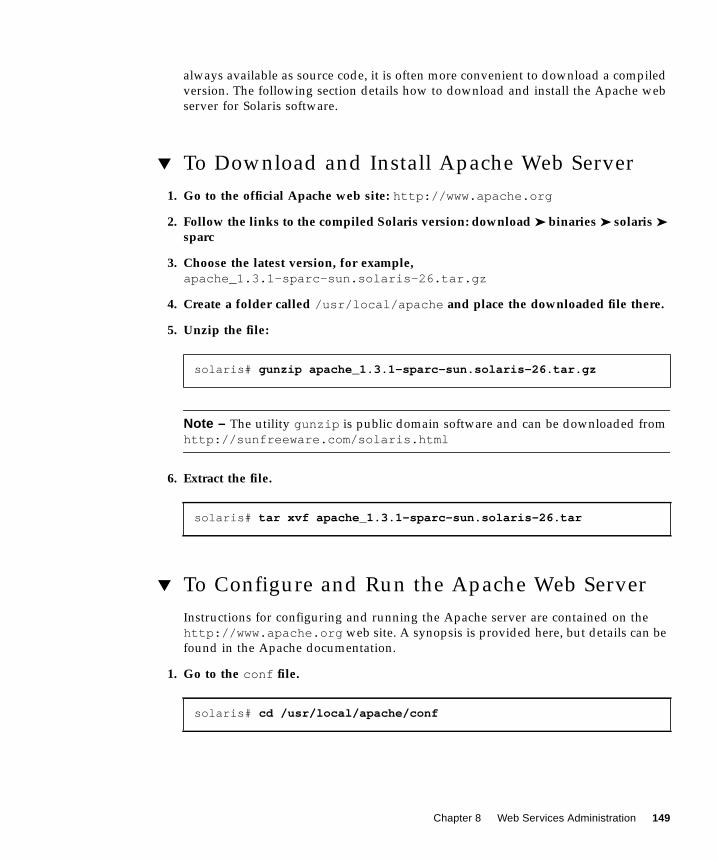
always available as source code, it is often more convenient to download a compiled
version. The following section details how to download and install the Apache web
server for Solaris software.
▼ To Download and Install Apache Web Server
1. Go to the official Apache web site: http://www.apache.org
2. Follow the links to the compiled Solaris version: download ➤ binaries ➤ solaris ➤
sparc
3. Choose the latest version, for example,apache_1.3.1-sparc-sun.solaris-26.tar.gz
4. Create a folder called /usr/local/apache and place the downloaded file there.
5. Unzip the file:
Note – The utility gunzip is public domain software and can be downloaded from
http://sunfreeware.com/solaris.html
6. Extract the file.
▼ To Configure and Run the Apache Web Server
Instructions for configuring and running the Apache server are contained on the
http://www.apache.org web site. A synopsis is provided here, but details can be
found in the Apache documentation.
1. Go to the conf file.
solaris# gunzip apache_1.3.1-sparc-sun.solaris-26.tar.gz
solaris# tar xvf apache_1.3.1-sparc-sun.solaris-26.tar
solaris# cd /usr/local/apache/conf
Chapter 8 Web Services Administration 149

2. Edit the conf file by adding the following:
3. Edit the /usr/local/apache/conf/httpd.conf file.
Some common edits are:
Starting and Stopping the Apache Web Server
● To start the server, run the httpd command:
● To stop the server, run the kill command:
solaris# cp httpd.conf-dist httpd.conf
ServerRoot /usr/local/apache [place where config files are kept]ServerName www.myserver.com [name of server to outside world]User adm [User ID which runs the server]Group adm [Group ID of user running server]ServerAdmin [email protected] [where email will be sent]
solaris# /usr/local/apache/httpd -f /usr/local/apache/conf/httpd.conf
solaris# kill -TERM ‘cat /usr/local/apache/logs/httpd.pid‘
150 Solaris Guide for Windows NT Administrators

Where Web Content is Stored
The default folder for web content, or web root folder, is
/usr/local/apache/htdocs .
● To change this llocation, modify the following line in the /usr/local/apache/conf/srm.conf file:
The default page, which is set to index.html , can be changed by modifying the
following line in the srm.conf file:
Web Content Development andManagement Tools
Many tools are available for creating web content on both Windows NT and Solaris
web servers. Some of these tools, such as Microsoft FrontPage, also provide some
level of web site management. FrontPage has become the standard for web content
development for IIS and is co-packaged with Windows NT 4.0.
FrontPage relies on programs, called extensions, that run on the web server for its
management capabilities. These extensions are not only available for IIS, but also
available for Solaris web servers. The following section explains how to install
FrontPage extensions.
▼ To Install the FrontPage Extensions on the
Apache Web Server
The software and documentation for installing the FrontPage extensions on an
Apache web server can be obtained from http://www.rtr.com/fpsupport/download.htm . Three basic components comprise the installation:
■ An installation script called fp_install.sh
DocumentRoot /usr/local/apache/htdocs
DirectoryIndex index.html
Chapter 8 Web Services Administration 151

■ A modified version of httpd
■ CGI programs contained in the file fp30.solaris.tar.Z
To run the install script:
1. Change to the frontpage directory:
2. Run the installation script:
Note – The file fp30.solaris.tar.Z has to be present in the /usr/local/frontpage folder before fp_install.sh is run.
3. Install the new Apache httpd program that contains support for FrontPage.
a. Change to the apache directory;
b. Backup the httpd file.
c. Change to the /frontpage/server directory.
d. Copy the httpd.SSol2 file to the httpd directory.
e. Stop the Apache Web Server.
solaris# cd /usr/local/frontpage
solaris# ./fp_install.sh
solaris# cd /usr/local/apache
solaris# cp httpd httpd.bak
solaris# cd /usr/local/frontpage/server
solaris# cp httpd.SSol2 /usr/local/apache/httpd
solaris# kill -TERM ‘cat /usr/local/apache/logs/httpd.pid‘
152 Solaris Guide for Windows NT Administrators

f. Restart the Apache Web Server:
Running FrontPage
● To start using FrontPage choose FrontPage➤More Webs➤server name➤List Webs
FIGURE 8-4 Open FrontPage Web Tool
FrontPage Limitations on Solaris
Certain features that require Active Server Pages will not work, since the Apache
Web Server does not support ASP. An example of this is using ASP to query a
database. Active elements such as Search Forms and Hit Counters, however, will
work.
Web Browsers
The two most prominent web browsers today are Netscape and Internet Explorer.
While Netscape runs on both Solaris and Windows NT platforms, Internet Explorer
ships with Windows NT and can be ported to Solaris. Both Netscape and Internet
Explorer also have companion email clients.
solaris# /usr/local/apache/httpd -f /usr/local/apache/conf/httpd.conf
Chapter 8 Web Services Administration 153

This section explains how to install and configure Internet Explorer and the Outlook
Express email client on Solaris systems.
▼ To Install Internet Explorer and Outlook Express
on Solaris Systems
1. In a web browser, go to http://www.microsoft.com/ie/download/unix.htm
2. Select Internet Explorer 4.0 (Solaris).
3. Download the file ie4setup.
4. Change permissions on the file.
5. Run ie4setup .
Note – The default folder where Internet Explorer and Outlook Express are installed
is /usr/local/microsoft . These programs could be placed in a different folder,
but references in this document will use the default.
Running Internet Explorer and Outlook Express
To run Internet Explorer or Outlook Express on Solaris systems:
● For Internet Explorer, log in as user and type the following command:
● For Outlook Express, log in as user and type the following command:
solaris# chmod +x ie4setup
solaris# ./ie4setup
hostname% /usr/local/microsoft/bin/iexplorer
user% /usr/local/microsoft/bin/oexpress
154 Solaris Guide for Windows NT Administrators

● To make Internet Explorer the default web browser for applications run on theCDE desktop, type:
Web Server Troubleshooting Tips
This section lists the prolems you might encounter using a web server and describes
probable causes and solutions.
Problem: Connecting to Sun Web Server Fails
Probable Cause
A couple of factors can cause this problem:
■ The httpd process is not running on the Solaris server
■ The web server is configured to use a non-default port
Solution
● To see if the httpd process is running on the Solaris server, use the ps command.
● If the process does not appear in the output, try restarting it.
solaris# cp /usr/local/microsoft/ie4/IE4.dt /etc/dt/appconfig/types/C/IE.dt
solaris# ps -e | grep httpd299 ? 0:00 httpd
solaris# /etc/init.d/httpd start
Chapter 8 Web Services Administration 155

● If the httpd process fails, check the httpd configuration file for errors.
Most configuration errors are caused by specifying the wrong document root or
other folder names.
● If the process is running on the Solaris server, but web browser cannot connect toit, check to see if the server is listening on the default IP port of 80.
On the Windows NT client, type:
On the Solaris server, use the snoop command:
If there is no output displayed by snoop , then the httpd process may be configured
to listen on a IP port number other than 80. Check the httpd.conf configuration
file.
solaris# more /etc/httpd/httpd.conf
C:\> telnet webserver 80
solaris# snoop webserver ntclient
156 Solaris Guide for Windows NT Administrators

Index
SYMBOLS/etc/hosts file, 54, 61
/etc/passwd authentication, 105
/etc/vfstab file., 105
/var/adm/messages file, 43, 77
Aaccess control lists, 21
account description, 28
Admintool, 34
anonymous ftp, 70
anonymous ftp server, 70
authentication, 105
authentication mode, changing, 106
automounter, 103
automounting, 28
auto-negotiation mode, 48
Bbackslash, 104
backup domain controllers, 24
Bourne shell, 29
browse list, 107
Ccomputer name, 58
C-shell, 29
Ddefault gateway, 56
dhcpconfig command, 57
DiskAccess, 105
DiskShare User Manager, 101
dmesg command, 42, 77
DNS, 63
DNS server, 56, 63
Eemail aliases, 126
Ethernet address, 68
Ethernet controllers, 48
FFile Explorer, 103, 104
file sharing protocols, 85
forward slash, 104
ftp client, 70
ftp proxy server, 72
ftp server, 70
Index 165

Full Duplex, 48
GGID, 28
guest and nobody Accounts, 26
HHalf Duplex, 48
home directory, 28
hostname, 58
hostname command, 54
hostname versus computer name, 58
httpd service, 38
Iifconfig command, 54
IP forwarding, 66
JJetDirect, 115
Kkill command, 39
killproc script, 40
Korn shell, 29
LLMHOST file, 60
login process for Solaris, 31
lpstat command, 121
MMAC address, 68
MAC address, assigning different, 68
mapping user names, 101
multihomed systems, 64
multiuser, 29
Nndd command, 50, 51
NetBEUI, 51
network, 48
Network File System (NFS), 85
network interface card (NIC), 48
NFS servers, browsing, 107
nfs.server command, 98
nfsd process, 111
NIC driver, 48
NIC drivers, 49
NIS, 63
NIS domains, 24
NIS map, 27, 55
NIS master server, 24
NIS slave server, 24
NT domains, 24
PPage Definition Language (PDL, 115
passwords, 27
pcnfsd authentication, 105
primary domain controllers, 24
Print Manager, 121
print spooler, 115
printer administration, 120
Process Indentifier, 40
Rrelay hosts, 126
Reverse Address Resolution Protocol (RARP)
server, 54
166 Solaris Guide for Windows NT Administrators
SServer Message Block (SMB), 85
setup.exe command, 100
shared files, 102
showmount command, 110
Solaris DNS server, 63
startup file, 29
subnet mask, 55
suid bit, 26
system messages, 42
sys-unconfig command, 54
TTCP/IP parameters, assigning, 52
TCP/IP stack, 51
telnet proxy server, 72
TotalNet Advanced Server (TAS), 85
UUID, 28
Universal Naming Convention (UNC), 28
User Manager for Domains, 35
user profiles, 30
username, 27
Index 167

168 Solaris Guide for Windows NT Administrators