solid surface material - prodes basic guideline is: always use sharp tools in good condition with...
TRANSCRIPT

2
SOLID SURFACE MATERIAL
FABRICATION, PROCESSING AND MAINTENANCE MANUAL
Technical Bulletin 03 (November 2005)

3
Index Page 1. Foreword . . . . . . . . . . . . . . . . . . . . . . . . . . . . . . . . . . . . . . . . . . . .. . . . . . . . . . . . . . . . . . 4 2. Product Description . . . . . . . . . . . . . . . . . . . . . . . . . . . . . . . . . . . . . . . . . . . . . . . . . . . . . . 4 3. Safety Guidelines . . . . . . . . . . . . . . . . . . . . . . . . . . . . . . . . . . . . . . . . . . . . . . . . . . . . . . . 4 4. Transport and Storage . . . . . . . . . . . . . . . . . . . . . . . . . . . . . . . . . . . . . . . . . . . . . . . . . . . . 5 5. Tools and Equipment . . . . . . . . . . . . . . . . . . . . . . . . . . . . . . . . . . . . . . . . . . . . . . . . . . . . . 6 6. Fabrication . . . . . . . . . . . . . . . . . . . . . . . . . . . . . . . . . . . . . . . . . . . . . . . . . . . . . . . . . . . . . 7
6.1 Mechanical Processes, (Sawing, Routing, Drilling) . . . . . . . . . . . . . . . . . . . . . . . . 7
6.2 Cutouts and Cook tops . . . . . . . . . . . . . . . . . . . . . . . . . . . . . . . . . . . . . . . . . . . . . 10
6.3 Glues/Adhesives . . . . . . . . . . . . . . . . . . . . . . . . . . . . . . . . . . . . . . . . . . . . . . . . . . 12 6.4 Joining Techniques . . . . . . . . . . . . . . . . . . . . . . . . . . . . . . . . . . . . . . . . . . . . . . .13 6.4.1 Surface Bonding . . . . . . . . . . . . . . . . . . . . . . . . . . . . . . . . . . . . . . . . . .13 6.4.2 Edge Bonding . . . . . . . . . . . . . . . . . . . . . . . . . . . . . . . . . . . . . . . . . . . . .14 6.4.3 Corner Joints . . . . . . . . . . . . . . . . . . . . . . . . . . . . . . . . . . . . . . . . . . . . . 14 6.4.4 Elements & Seam joints . . . . . . . . . . . . . . . . . . . . . . . . . . . . . . . . . . . . . 15 6.4.5 Folding Technique . . . . . . . . . . . . . . . . . . . . . . . . . . . . . . . . . . . . . . . . .17 6.5 Back splash Profile . . . . . . . . . . . . . . . . . . . . . . . . . . . . . . . . . . . . . . . . . . . . . . . . . 17 6.6 Shaped Product Installation . . . . . . . . . . . . . . . . . . . . . . . . . . . . . . . . . . . . . . . . . .18 6.7 Thermoforming . . . . . . . . . . . . . . . . . . . . . . . . . . . . . . . . . . . . . . . . . . . . . . . . . . . 19 7. Renew ability and Repair . . . . . . . . . . . . . . . . . . . . . . . . . . . . . . . . . . . . . . . . . . . . . . . . . . . .21 8. Vertical Applications . . . . . . . . . . . . . . . . . . . . . . . . . . . . . . . . . . . . . . . . . . . . . . . . . . . . . .21 9. Upkeep and Cleaning . . . . . . . . . . . . . . . . . . . . . . . . . . . . . . . . . . . . . . . . . . . . . . . . . . . . .22 10. Material Characteristics . . . . . . . . . . . . . . . . . . . . . . . . . . . . . . . . . . . . . . . . . . . . . . . . . .24 Product Data Sheet

4
1. Foreword These recommended techniques are based on the best methods and knowledge within the Industry. They take in to consideration all of the experiences known at the time of the publication of this document. The publication of these recommendations are not intended as endorsement of any product described and it is not intended to guarantee the characteristics of the product or the application of the material. The fabrication techniques and the description of the product are intended as a guide based on the minimum requirement and it can not be used for any legal procedures. Since the technical details are being continuously updated, it is recommended to contact the Manufacturer for specific details. It should be understood that during the manufacturing process, all safety regulations and environmental guidelines must be followed. 2. Product Description Solid Surface Materials are defined, based on current Market practices, in different categories Ø Mineral filled with acrylic resins Ø Mineral filled with polyester resin Ø Mineral filled with blended resin The production of the final product is achieved by using continuous or batch mixing processes. With the process the resin is being polymerized. A filler material, primarily Alumina Trihydrate (ATH ) is used with the addition of pigments. Solid Surface Materials are homogeneous throughout and are being offered in the Marketplace as sheets (standard type) with various thicknesses and cast products. 3 mm sheets (Veneer type ) can be laminated for stability to wood substrates without difficulty and can be fabricated further.
One of the outstanding characteristics of this material is the uniform color throughout the whole thickness of the product. Solid Surface Material is solid without pores, repairable and can be continuously fabricated with inconspicuous seams. Solid Surface Material has the appearance of a mineral product, looks elegant, rich and is comfortable and warm to the touch. In addition, the material is durable and easy to clean. This characteristic allows free design ability and thus the ideal material for functional and decorative internal applications, for kitchens, bath fixtures and furniture’s. Special qualities are also available for external applications. Detailed information of the characteristics, application and technical data are shown in the Product Data Sheet attached at the end of this document. 3. Safety Guidelines The manufacturer of this material reserves the right to change the formulation of the product described in this document without any prior public notification due to improved technologies. The published technical data and safety guidelines (as listed in the Product Data Sheet) shown in this document can also be updated with the MSDS published by the individual Manufacturers. All the listed Safety and Fabrication tips shown in this document do not excuse the user from not complying with any other published local and state issued regulations and environmental codes, as well as all of the safety and labour department guidelines. The use of glues/adhesives in the application of this product must be in strict compliance with the manufacturers published safety rules. Additional cleaning agents used in the fabrication process like chemicals and flammable materials must be stored in a

5
secured and well-ventilated area.
The use of safety glasses and hearing protection is recommended. By sanding and polishing operations, the use of a facemask and exhaust system for the equipment is needed. Proper ventilation must be available. The use of gloves should be a safety standard in all shops. All of the guidelines and manufacturing practices detailed in this document are based on the most current knowledge, experiences and practices used in the industry. Active patents, trademarks and licenses issued to manufacturers will remain in effect. The fabricators and customers of these products are responsible to gather all of the necessary information, tests and inspection documents to verify that the material is in compliance for the intended application and that it meets all of the applicable norms, regulations and disposal requirements. The producers of the material are not liable for any damage or liabilities arising out of the improper use or application of the material. All current codes and regulations must be followed. All manufacturers of Solid Surface Materials offer extensive workshops in the use and application of this material.
4. Transport and Storage The material listed in this document is a non-hazardous material and does not require any special marking. Transport Pallets used to deliver this material must be handled with fork trucks or other suitable lifting devises. If none of these units are available, two persons must handle the Solid Surface Sheets in a vertical position. Do not drag the sheets from the pallet to avoid surface scratches.
For lifting and to transport the sheets, equipment like a vacuum lift, carrying strap or sheet carriers are recommended. For manually transporting a sheet it is recommended to have the sheet in a vertical position. When transporting sheets in a horizontal position, adequate support must be provided to prevent cracking or breaking.
The use of safety gloves and shoes is stressed. Cast shapes must be handled with special care since they have been packaged to allow a variety of different transport options. Cast products are subject to damage from hard impact particularly at temperatures below 15 degree C. Storage Solid Surface sheets must be stored flat and have a continued support to prevent distortion or waviness. The sheets should not be stored directly on the floor. The storage area must be climate controlled, free of humidity and frost. The ideal temperature for storing is between 15 and 25 degree C.

6
The storage of material on pallets should be restricted to a height of not more than 6 pallets. When storing different size products, the smaller sheets should be stacked on the pallet in descending order with the smallest at the top.
Partial sheets can be stored in a vertical position with solid support on the back of the sheets.
To store cast formed products, the same basic guideline applies. The same handling care should also be practiced. The height for stacking cast products is dependent on the packaging, the strength of the boxes and the size of the product.
The 2 component glue systems used for the fabrication of the Solid Surface Material must be stored in a dark, cool and dry area to assure the expected shelf life given. Product not properly stored will loose its effectiveness. Surface glue and PVAC based glues must be protected from freezing. The items used in fabrication like sheets, cast products and glues should have the same temperature at time of fabrication. The manufacturer guideline must be followed to achieve the desired results. Quality control Solid Surface sheets and cast products are produced by following strict Quality Control Standards. Even by following this procedure the consumer should still be obligated to inspect the product when it is received and notify the manufacturer of any defect. Special attention should be paid to the color match of the individual sheets to be used in fabricating joint parts. 5. Tools and Equipment For the fabrication and processing of Solid Surface products, most of the tools and equipment in a standard wood working shop can be used.
A vast majority of tool and equipment suppliers have specialized and offer products for the fabrication of Solid Surface, including abrasives. It is recommended, prior to getting in to fabrication, to take advantage of the many training seminars offered by most of the Solid Surface producers. These seminars and on hand training sessions cover most of the known fabrication techniques used presently in the industry and inform about the characteristics of the Solid Surface material. The application and use of the equipment can vary widely between fabricators. It is important to follow the recommended guidelines and techniques of each individual manufacturer.

7
Basic guideline is: always use sharp tools in good condition with either hard tools steel (carbide tipped tools) or diamond tips. Following tools are the basic requirement and necessary for the fabrication of Solid Surface products. Veneer Press ( glue press when working with thin sheets (3mm) to be glued to a wood based substrate) glue applicator equipment with sponge or groove rollers. Table Router Hand held Router (1600 watt minimum output and variable speed control). Routers wich tool steel (carbide tiped) or diamond tips. Circular table or vertical saw. Saw blades with tapered tooth profile having tool steel (carbide tips) or diamond tips.
Polishing equipment with a variety of different grain grid papers.
Exhaust system to provide proper dust collection during fabrication.
Thermoform equipment. (Caution: do not use forced hot air units) Lever-, panel-locking-, parallel-, adjustable and spring loaded bar clamps are used. Glues/adhesives for surface and edge bonding processes, as recommended by the manufacturer (including two component cartridge systems). Clean, lint free light colored cloth. Self-adhesive aluminum insulation tape. Cleaning liquid like mineral spirit or acetone. Usual protection equipment ( gloves, goggles, breathing mask etc. ).
6. Fabrication Solid Surface sheets contain in addition to resin also mineral fillers. Normal wood working techniques can be applied for fabrication. The load on tools and equipment is similar to that of the wood working process, but it is recommended to use only tools with hardened steel (carbide) tips in sharp condition. Also the use of diamond tipped tools is recommended for some applications. Processing of sheets without substrate must be done on a solid and straight support. It is important to advance the material with a consistent and uniform motion and with a minimum vibration of the tool to avoid chipping and cracking that could result in spider web cracks due to the nature of the Solid Surface material. 6.1 Mechanical Processing Sawing Prior to cutting Solid Surface sheets that are being joint, a color match comparison must be made. Solid Surface sheets can be processed by using a table or hand held skill saw with side guides. A tapered tooth slitting saw blade with chip side clearance should be used for contour cuts. Only with a sharp saw blade a high quality cut can be achieved for a good joint resulting in inconspicuous seams. Guide line: The saw blade should extend past the sheet thickness by approx. 15 to 25 mm. The travel speed of the material during cutting should be between 40 to 60 m/s.

8
Saw blade diameter
in mm
Blade with Hole diameter
Number of teeth
200 2,8 30 64 250 3,2 30 80 300* 3,3 30 96 350 3,6 30 108 400 4,4 30 120 450 4,4 30 144 500 4,4 30 160
* for cutting blades with this blade diameter a cutting speed of 3000 to 4500 RPM/Min is recommended.
The table shown is given the recommended saw blade configuration for cutting Solid Surface sheets. Sanding or using a milling process can repair defects along the cutting edges. Saber saws or similar cutting tools must not be used to make cut outs or contour cuts at any time since they produce unsatisfactory cuts along the edges due to the characteristic of the Solid Surface material. Routing The use of routers has many advantages for processing Solid Surface sheets.
• The fabrication using routers has many advantages over saws (especially for folding techniques)
• A round end mill router (radius of 4mm minimum) prevents sharp corners, which will be present with saw cuts. Sharp corners will result in cracks over time. All stovetop cut outs should have rounded corners.
• Using routers for edge cutting will result in surfaces suitable for seaming without any additional operation.
Wood working cutting tools (tool steel tips, carbide tipped or hard metal) should be used for routing Solid Surface materials. The router can be equipped with stationary or index able cutting tips. The important requirement is that the tools are sharp.
Hand held routers or stationary router equipment should have a capacity of 1600 to 2000 watt – 3 to 5 KWH. A variable speed control must be used. For cutting to size and cut outs a 10 to 12 mm diameter end mill router should be used with the desired cutting profile. For profile and contour cuts, a router bit with guide roller and plastic sleeve must be used to protect the material surface. For cove cutting of backsplash joints, it is recommended to use a hollow mill router and a cutting radius of 6 to 14 mm. For this process, a special dedicated piece of equipment is needed. Caution: Burned or rough cuts will cause unsuitable joints or discoloration at the seam.

9
Drilling Solid Surface material can be drilled by using up to a 10 mm diameter drill with hard metal, titanium or diamond tips. For drilling, a hand or stationary drill press can be used. It is recommended to grind the drill tip to a 60-degree angle.
For diameters over 10 mm a hollow mill cutter with hard metal or diamond tips is recommended. Twist drills and fluted drills are not recommended for use on Solid Surface products. For circular outlet or other cut-outs, it is proper to use a hole saw with hard tipped cutting teeth.
Notice: Holes should be drilled by applying a minimum force to avoid breakout at the exit diameter of the hole. All holes, if possible, should be chamfered on both sides. Screwing The use of screw connections for Solid Surface products is limited, since many different guidelines must be taken in to consideration, to avoid damage in the future (mainly stress cracks). For screw connection in Solid Surface products, it is important to drill the hole always larger than the actual diameter of the screw being used. Do not use a flathead screw. It is recommended to use soft sleeve inserts, which will be slightly compresses when tightening the screw. The technique for connecting Solid Surface products to other materials, the same technique is being used as in fastening glass products.
Holes must be larger than screw shank at all times. Plastic anchors and rubber or silicon washers should be used between the material and the screw head. A screw connection of Solid Surface material glued to a substrate is also possible. For this application the manufacturer should be consulted. Solid Surface Material should never be threaded directly. Threaded inserts made out of plastic or knurled brass, must be used for any threaded connection required. Planning In some applications is it possible that using hand held planers or electric wood planers with

10
metal shoes and reversible blades could process Solid Surface materials. It is recommended to contact the manufacturer for the proper fabrication method. Sanding/Polishing After completing the fabrication process, it is practice to finish the Solid Surface material in order to achieve the finish required by the costumer. The surface can be finished to matte, semi gloss or high gloss appearance. It is important to consider the application of the products when determining the grade of the surface finish. For the determination of the finish, it is recommended to consult the manufacturer of the material since the differences in wear and appearance between of dark and light colour have a direct relationship to the matte and high gloss finish of the product.
Solid Surface material, with the use of the proper methods, are relatively easy to be sanded and polished. The preferred sanding process is the use of an hand held oscillating sander with exhaust system. Hand held rotary sanders are also being used. It is important to achieve a directional free, smooth and consistent surface finish.
The abrasive paper is usually a silicon carbide type product with various grit sizes from 120 to 1200 grit. Matte finishes are usually achieved by using 120 to 240 grit papers. Semi gloss finishes are between 240 and 600 grit and high gloss finishes take 600 to 1200 grit paper. Most often a hard and soft cloth-polishing wheel with compound is used to dress up this finish.
To achieve an acceptable and uniform finish, based on the recommendation of the manufacturer, various types of grit paper and grinding patterns must be applied. It is also important to clean the surface of the product between each change of grit paper with a damp cloth. A wet grinding and polishing process can also be applied to eliminate the grinding dust. A partial grinding of the surface at the joint only is not recommended since this could result in an uneven surface finish. Semi or high gloss finishes are not recommended to be used on products in high use applications of a work surface. For all sanding operations, a dusk face mask must be used and proper work space ventilation should be provided. 6.2 Cut outs and Cook top It is very important, by using Solid Surface materials, to stress the finish quality of the cut-outs in the application for cook tops and sinks. This is evenly important for warm and cold applications, as well as for the use of standard or veneer type sheets, which are applied to work surfaces or wood substrates. While adding reinforcements to the underside of the cut outs in standard Solid Surface sheets, which will add

11
strength to the area, it is evenly as important that the work surface joints are properly glued achieving a strong bond. The edges of the cut outs with wood carriers must be water proofed with water repellent materials ( Glue or lacquers or acceptable ). Special care must be taken for Standard Sheet cut outs that the inside corners do not develop stress points, which could develop in to cracks. By taking this in to consideration the following guidelines should be followed: • Multiple cut outs should only be made by
considering the minimum distance between other cuts. ( like corners of work surfaces) Minimum distances between cut outs can be found in the technical work instructions of the manufacturer.
• Cut outs should only be made by using a router template. The opening in the template should be such to allow the use of a router with larger diameter like 16 mm for example.
The use of a 16 mm router will forcibly leed to a radius of R=8 mm in the inside corners of the cut out. All cut outs must be made by using a router. Do not use a Saber Saw! • The router equipment should be rated for
1600 to 2000 watt minimum capacity. • The router should have a 45-degree
undercut. Following the completion of the cut out, the edges should be shaped to a 3 mm radius on the top and bottom edge of the opening ( the stress factor will be greatly reduced by adding this process ).
The same guidelines should be followed for Cook top cut outs. Caution: The use of certain cook tops can create some unexpected problems. It is recommended to contact the manufacturer for installation details.
The installation of heat reflection tape around the edges of the cut out must be made in order to prevent damage to the product from exposure to excessive heat. For use of continues warm cook tops, a multiple insulation strip arrangement must be used. Proper installation guidelines can be obtained from the manufacturer. Notice: An installation having direct contact between the cook top surface and the Solid Surface material must be avoided based on current technologies. Special installation techniques are available.
Special Router
Sanding of surface and edge
Approx. 3 mm
12
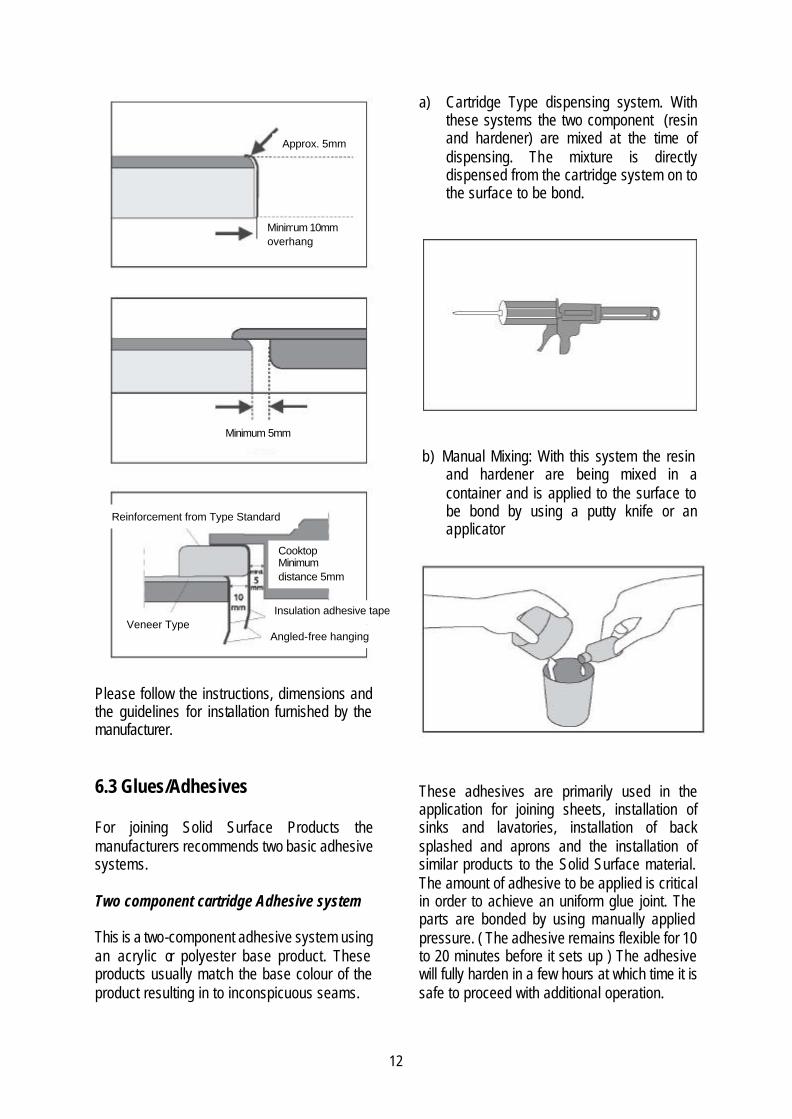
Please follow the instructions, dimensions and the guidelines for installation furnished by the manufacturer. 6.3 Glues/Adhesives For joining Solid Surface Products the manufacturers recommends two basic adhesive systems. Two component cartridge Adhesive system This is a two-component adhesive system using an acrylic or polyester base product. These products usually match the base colour of the product resulting in to inconspicuous seams.
a) Cartridge Type dispensing system. With these systems the two component (resin and hardener) are mixed at the time of dispensing. The mixture is directly dispensed from the cartridge system on to the surface to be bond.
b) Manual Mixing: With this system the resin
and hardener are being mixed in a container and is applied to the surface to be bond by using a putty knife or an applicator
These adhesives are primarily used in the application for joining sheets, installation of sinks and lavatories, installation of back splashed and aprons and the installation of similar products to the Solid Surface material. The amount of adhesive to be applied is critical in order to achieve an uniform glue joint. The parts are bonded by using manually applied pressure. ( The adhesive remains flexible for 10 to 20 minutes before it sets up ) The adhesive will fully harden in a few hours at which time it is safe to proceed with additional operation.
Approx. 5mmoverlap
Minimum 10mm overhang
Minimum 5mm
Veneer Type
Reinforcement from Type Standard
Angled-free hanging
Insulation adhesive tape
Cooktop Minimum distance 5mm

13
Surface Bonding Glue Due to the difference in the expansion factors of Solid Surface Sheets glued to wood substrates, used for applications in construction, a modified PVAC glue system is being utilized, or permanent elastic Silicon or PUR based products, which does maintain its flexibility over time. Note: Due to the variation of Solid Surface products available, the selection of the right type of glue/adhesive is very critical based on the technology used by the industry. Prior to the start of fabrication it is advisable to consult with the manufacturer of the different glue/adhesive systems under consideration. 6.4 Joining Techniques In order to achieve the production of a high quality end product or a complete system, a variety of sound joining techniques need to be applied by considering the characteristics of the materials to be joint. It is therefore very important to review and coordinate the use of the different glues/adhesives with the fabrication methods being applied. 6.4.1 Surface Bonding Solid Surface material, type Veneer This material is primarily used for the production of laminations. Substrate materials: ( examples ) Particle board as specified by DIN EN 309 Plywood as specified by DIN EN 313 MDF as specified by DIN EN 316 Minimum thickness each 20 mm Backing/Balancer Solid Surface material, type Veneer HPL in accordance with DIN EN 438. (Glued to the back of the wood based substrate) PVAc – Glues( D3 / D4 according to DIN EN 204 )
Bonding Glue application up to 200 grams/ m² Bonding pressure 30 – 80 N/ cm² Glue and curing time to be followed as specified by the supplier.
Solid Surface material, Type Standard This material type is due to its thickness not suitable to be bonded to a carrier/substrate for technological reasons. This material is generally self-supporting and is being used in practice only with the use of structural supports. Supporting Structures ( examples ) Frames made from particle board or MDF Solid Surface sheets (double layered ) Mineral filled under structures (gypsum board and alike) Bonding glue : Permanent elastic_ , fungal free and neutral cross-linking silicon or 1-K-PUR glue.

14
Bonding : Floating, glue joint thickness >= 1 mm (follow guidelines furnished by manufacturer). 6.4.2 Edge Bonding Edge bonding for Solid Surface Elements is usually applied for two reasons: For composite elements (with wooden material) the wood edge needs to be incorporated in the design consideration of the Solid Surface Edge. The exposed edges of the product can be shaped in to many different configurations. For the fabrication of edges, the gluing process of the butt or recess joint method is the most commonly used. Using these methods the combination of different materials must be taken in to consideration. (fabrication tips publish by the manufacture should be considered). a) For composite elements made up of Solid
Surface sheets and wood Edge material: Solid Surface sheets Type Standard or Veneer Glues:
• For bonding to Solid Surface material: Two component arcrylic or polyester based adhesive.
• For bonding to wood support: PVAc-glue, one component PUR glue, two component polyester or acrylic based adhesive.
b) For Solid Surface material, type standard
(as support structure ) Edge Components: Solid Surface Material type standard or veneer. Adhesive: Two component polyester or acrylic based adhesive 6.4.3 Corner Joints
For the fabrication of corner joints out of Solid Surface material components a special fabrication skill is required. Based on the demand of the costumer, detail planning prior to the start of fabrication is required. Aesthetics and appearance are the main consideration that must be evaluated. This review will determine the amount of preparation and fabrication work that will be required. Special consideration must be given to the transport of the bulky finished product and the degree of installation effort needed. (Assembly in the shop and at the job site) prior to the start of the project. For Solid Surface component assembly work the following fabrication sequence should be followed:
a) The components being routed by using a template and multiple cutting passes.
b) Guides and spring recesses must be
milled in to edges. To achieve a smooth surface transition the underside of the sheet needs to be prepared for the mounting of clamping blocks.
c) Now the adhesive is being applied to the edges, the sheets being carefully joint together and held in place on hand

15
of C-clamps applied to the joining blocks.
d) Excess glue must be removed from the
joint. In case of flexible joints (silicon) the top surface of the part needs to be cleaned. In case of permanent joints (two component adhesives) the glue line need to be sanded after hardening, to achieve an inconspicuous seam.
Two variations of joining systems are typically used:
• Permanent elastic joints: For this
process silicon glues are being applied resp. one component PUR sealant.
• Fixed bonds: At the narrow edges of
the wood frames use PVAc glues or the two component cartridge adhesive.
Solid Surface laminations: Two component cartridge type adhesive (polyester or acrylic based). Transparent or coloured materials are being applied. Caution: Prior to applying adhesive it is important to clean the surfaces of the components to be seamed with mineral spirit or acetone cleaners. For Solid Surface sheets, type standard, the routing, bonding and the finishing processes are the same as that for Solid Surface components and shapes. For all of the bonding processes the two component reactive cartridge type adhesive is being used.
General Information:
For the fabrication process of corner joints many different fabrication techniques and solutions are applied. Consult with the manufacturers who have many different possibilities shown in the technical HOW TO manuals. 6.4.4 Shaped Product and seam joints For the butt joint assembly process two variations of products are applicable and need to be considered. a) Solid Surface shaped product assemblies b) All connections are being preferably fabricated by having the Solid Surface areas prepared to allow for the reinforcement of the joints, were the design allows it, with the same material as the base material. This is being achieved by bonding and sanding the seam to have a non visible connection with the strength at the joint similar to the strength factor of the sheet. For a) Solid Surface Shaped Products: • The surface area of the shaped products to
be bond must be routed at right angles and without breakouts. The quality of the preparation process determines the final quality and appearance of the finished surface.

16
• plus side of the veneer sheet to be used as insert).
• On the underside of the parts to be joint recesses need to be routered out for the mounting of the connecting fixtures.
• In conjunction with the groove
measurements, a tongue manufactured out of Solid Surface Veneer Sheet Material, made out of the same colour as the Solid Surface Sheet, needs to be
prepared.
• Adhesive (two component reactive type polyester or acrylic, coloured to match the Solid Surface material) is being applied in to the groove and the wood edge. The tongue is being inserted and the components are being pushed together manually.
Radius at all inside corners
Seam No Seam
Maintain minimum distance between seam and corners
No seam in area of cut-outs
No seams above dishwasher
Keep minimum distance
Seam
Seam
Type veneer
Glueline Tongue
Spirit
17
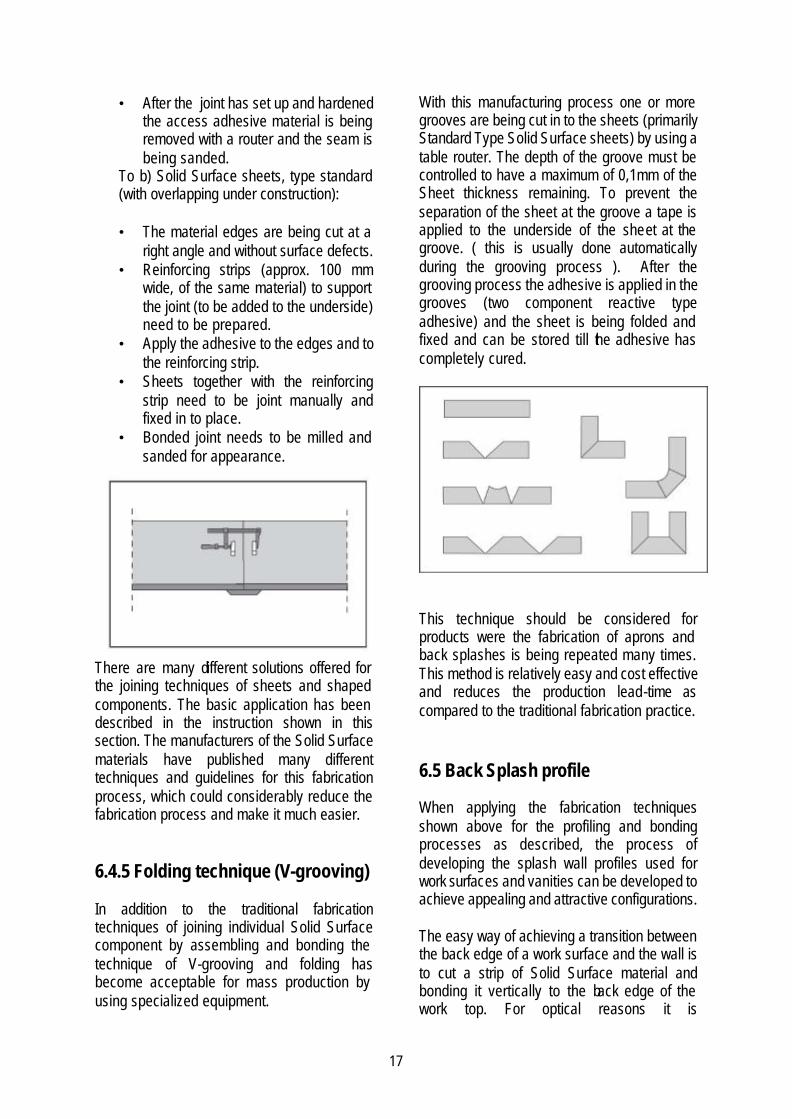
• After the joint has set up and hardened the access adhesive material is being removed with a router and the seam is being sanded.
To b) Solid Surface sheets, type standard (with overlapping under construction): • The material edges are being cut at a
right angle and without surface defects. • Reinforcing strips (approx. 100 mm
wide, of the same material) to support the joint (to be added to the underside) need to be prepared.
• Apply the adhesive to the edges and to the reinforcing strip.
• Sheets together with the reinforcing strip need to be joint manually and fixed in to place.
• Bonded joint needs to be milled and sanded for appearance.
There are many different solutions offered for the joining techniques of sheets and shaped components. The basic application has been described in the instruction shown in this section. The manufacturers of the Solid Surface materials have published many different techniques and guidelines for this fabrication process, which could considerably reduce the fabrication process and make it much easier. 6.4.5 Folding technique (V-grooving)
In addition to the traditional fabrication techniques of joining individual Solid Surface component by assembling and bonding the technique of V-grooving and folding has become acceptable for mass production by using specialized equipment.
With this manufacturing process one or more grooves are being cut in to the sheets (primarily Standard Type Solid Surface sheets) by using a table router. The depth of the groove must be controlled to have a maximum of 0,1mm of the Sheet thickness remaining. To prevent the separation of the sheet at the groove a tape is applied to the underside of the sheet at the groove. ( this is usually done automatically during the grooving process ). After the grooving process the adhesive is applied in the grooves (two component reactive type adhesive) and the sheet is being folded and fixed and can be stored till the adhesive has completely cured.
This technique should be considered for products were the fabrication of aprons and back splashes is being repeated many times. This method is relatively easy and cost effective and reduces the production lead-time as compared to the traditional fabrication practice. 6.5 Back Splash profile When applying the fabrication techniques shown above for the profiling and bonding processes as described, the process of developing the splash wall profiles used for work surfaces and vanities can be developed to achieve appealing and attractive configurations. The easy way of achieving a transition between the back edge of a work surface and the wall is to cut a strip of Solid Surface material and bonding it vertically to the back edge of the work top. For optical reasons it is

18
recommended to round off the front top edge of the strip. An often used fabrication practice for achieving this type of application is being described in detail in this section (see picture): • Grooving: The depth of the groove should
be 1 to 2 mm and the width should be 20 mm.
• An in advance fabricated profile strip is bond in to place (adhesive to a back up strip)
• Inside corners are routed ready for installation to the desired profiles and polished.
The bonded assembly of the vertical and horizontal Solid Surface components is required to achieve a small and inconspicuous seam. The profile of the inside corner router can be selected as desired.( it is recommended to use, based on standard router sizes, a cutting radius of 6 – 11 – 14 mm). For cutting the inside profile the router can be applied directly in the corner of the work piece. Guides assure for a uniform and smooth router travel.
6.6 Installation of shaped products Over time many different fabrication methods to install shaped Solid Surface products, like kitchen sinks and bathroom bowls in to countertops also manufactured out of Solid Surface materials have been developed. Most Manufacturers support the fabricators in this processes by furnishing detailed installation instructions. There are many critical steps to be followed before the end products can be delivered to the costumer in the specified colour and desired surface finish. The following guidelines can not be used as detailed installation instructions. They are intended only to give an overview of the current installation practices applied. Technical variations are: • Drop in flush mount
• V-form recessed mount
Profile router
Inside corner router
19
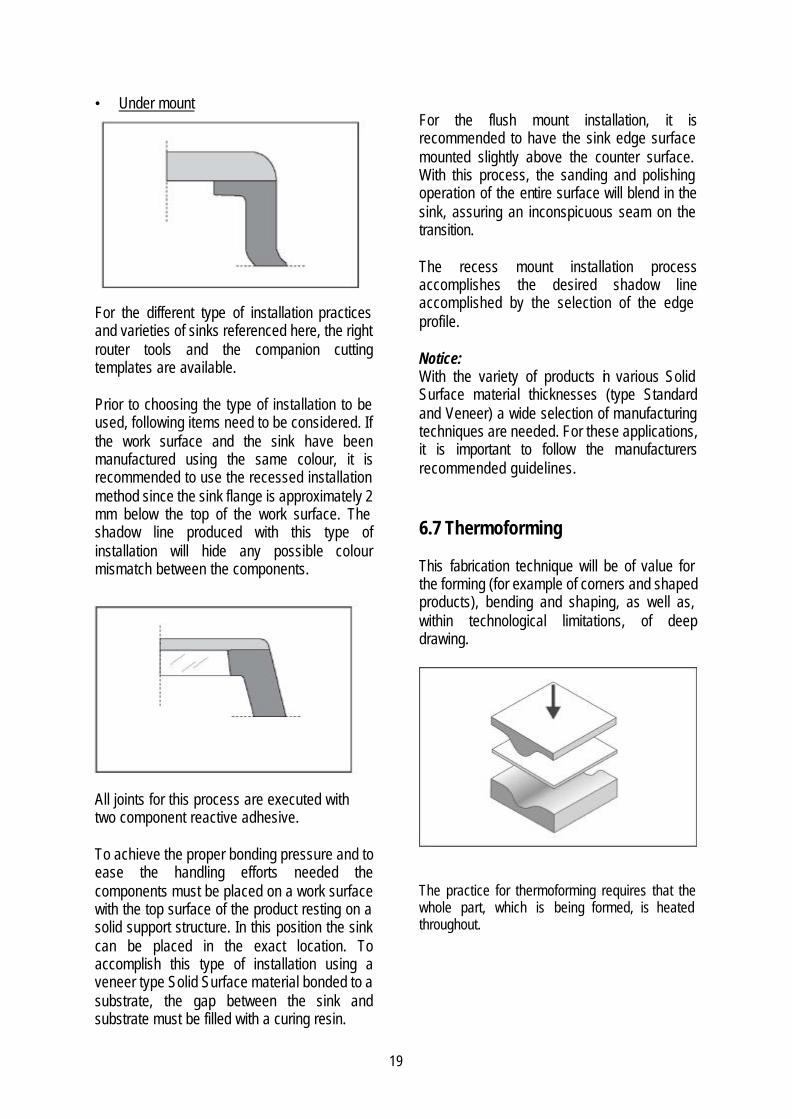
• Under mount
For the different type of installation practices and varieties of sinks referenced here, the right router tools and the companion cutting templates are available. Prior to choosing the type of installation to be used, following items need to be considered. If the work surface and the sink have been manufactured using the same colour, it is recommended to use the recessed installation method since the sink flange is approximately 2 mm below the top of the work surface. The shadow line produced with this type of installation will hide any possible colour mismatch between the components.
All joints for this process are executed with two component reactive adhesive. To achieve the proper bonding pressure and to ease the handling efforts needed the components must be placed on a work surface with the top surface of the product resting on a solid support structure. In this position the sink can be placed in the exact location. To accomplish this type of installation using a veneer type Solid Surface material bonded to a substrate, the gap between the sink and substrate must be filled with a curing resin.
For the flush mount installation, it is recommended to have the sink edge surface mounted slightly above the counter surface. With this process, the sanding and polishing operation of the entire surface will blend in the sink, assuring an inconspicuous seam on the transition. The recess mount installation process accomplishes the desired shadow line accomplished by the selection of the edge profile. Notice: With the variety of products in various Solid Surface material thicknesses (type Standard and Veneer) a wide selection of manufacturing techniques are needed. For these applications, it is important to follow the manufacturers recommended guidelines. 6.7 Thermoforming This fabrication technique will be of value for the forming (for example of corners and shaped products), bending and shaping, as well as, within technological limitations, of deep drawing.
The practice for thermoforming requires that the whole part, which is being formed, is heated throughout.

20
Heating and cooling • A heat crayon or temperature indicator strip
must be used to monitor the relevant temperatures.
• The recommended time for achieving the right temperature must be adhered to. Parts being too cold or hot will develop stress cracks, blisters and discoloration in the work area.
• Very small bending radii may not be possible with this material.
• After completing the forming process, the work piece needs to remain in the bending fixture till it has cooled down.
• Further fabrication must be done at room temperature.
Tips for Fabrication Techniques • To heat up work pieces mainly heating
tables have proven to be very suitable. Also electric convectors and systems using
infrared heating are in use. The use of forced hot air units for partial heating up of work pieces have proven to be unsuitable since internal stress develops in the border area of hot and cold which can create problems in fabrication or later use. The heating source used for heating up work pieces, should be capable to heat the total product uniformly.
• In some instances heat able veneer
presses are being used. • All cut edges must be free of shatter marks
to avoid stress points. This can be achieved by sanding.
• It is necessary that the radius has a slight over bend when thermoformed, since the product will have some spring back during the cooling process.
• During the forming process ( as example
aprons ) the parts need to remain fixed during the forming and cooling cycle. This is achieved by using forming templates,
Template for solid surface material strips
Guidelines for Thermoforming
Fabrication Parameter Polyester Resin Acrylic Resin Veneer 3mm Standard 10
to 13 mm Veneer 3mm Standard 10
to 13 mm Thermoform temperature 140 - 150 °C 90 - 120 °C 140 - 160 °C 130 - 160 °C Heating time 3 - 4 min 12 - 22 min 5 - 15 min 20 - 40 min Minimum bending Radius Approx.. 55 mm
* Approx.. 250 mm *
Approx. 20 mm * Approx. 75 mm *
Recovery Temperature 20 - 25 °C 20 - 25 °C Approx. 75 °C Approx. 75 °C
* depending on pattern and manufacturer

21
spring clips, straps, adhesive strips or c-clamps.
• Fabrication (bonding, etc.) of the base material and the formed part can continue, after proper cooling is achieved.
Fabrication recommendations: • With large work pieces, it is possible that
preheating the full sheets without forming eliminate inherent stress in the product, induced by manufacturing processes. After cooling down the fabrication process described above, can be followed.
• Heating time and minimum bending radius are depending upon the machine capacity, heat transfer capability and sheet colour (it is recommended to run tests prior to proceeding with the fabrication).
7. Renew ability and Repair Basically it is possible to repair Solid Surface products. Small repairs Fading, spots or other marks caused by normal wear – or even less minor defects – can be removed by using the necessary sanding/polishing processes, since the defects are only on the surface and not deep in the material. (Also review section 9. Upkeep and Cleaning) Small nicks and chipped out areas can be repair by patching and sanding. Repair of broken out sections For large damaged areas, which are caused due to fabrication mistakes, excessive heat exposure or improper installation, the area can be replaced by inserting new sections of material, which after sanding and polishing matches the existing surface without being noticeable. The damaged area is being cut out with a 45-degree angle cut. The replacement part, cut at a slightly larger dimension than the area being replaced (cut at a 45 degree) is being fabricated in advance. The surfaces to be bonded are being sanded and polished smooth. After applying the proper amount of adhesive to
the edges, the part is set in to place. After the adhesive has hardened, the seam is being sanded and polished to match the existing surface finish. Repair to damage in the Surface To repair a damaged area in the surface, it is recommended to use a template for cutting out the area. The template should be slightly larger than the area to be replaced. A 15 degree tapered router should be used for fabrication. The damaged area is being removed by using a router. The replacement part is fabricated in advance using the proper cutting angle and matching the current surface. After applying the adhesive, the part is being inserted. When the adhesive has hardened, the excess adhesive is being routed off and polished to match the existing surface. Repair of large damage For this process, a triangular shaped section is being manufactured; using a 15-degree routed edge profile. The damaged piece is being cut out (also using the 15-degree profile cut) It is recommended to check the fit up prior to installation. The bonding and finishing process remains the same as shown in the preceding sections. Caution: All repairs must be made with care. After the seams have fully cured, the entire product surface must be finished. Only by using this procedure, can it be assured that the replaced area uniformly matches the original surface. 8. Vertical Application Due to the outstanding surface qualities of the Solid Surface materials, vertical applications for vanity and shower walls and other functional vertical wall cladding have been developed. Colour selections and the thermoform capabilities of this material are usually the determining factors for the selection of this product. For renovations in the building industry, these materials are of interest to the contractors since the product is installed on top of existing tiled walls.

22
Both material types (type standard and veneer) are suitable for these applications. For uneven walls, it is recommended to use a suitable substrate like plywood, particleboard or MDF to glue the veneer type sheets to, prior to installation. The following individual installation tips should be followed: • The glue to be used for vertical installations
should be the plyable material like silicon or polyurethane based. ( other glue systems are also being used ) Expansion joints should be used. Avoid the use of interlocking joints. For full wall coverings, the glue should be applied intermittently or with a roller.
• The distance of the material in relationship to the existing wall _ should be between 3 to 6 mm.
• In general, the glue is not being applied to the Solid Surface Sheets.
• Pressing the full sheet in place, using rollers is done for the installation of the sheets to the wall.
• To assure proper adhesion of the sheet to the wall it is customary to apply a double application of glue to the perimeter of the sheet.
• It is also recommended to apply a double coat of glue around the edges of the cut-outs. In some applications a backing is being installed behind the cut-outs.
• Corner joint configurations can be developed as needed. The use of corner mouldings is also being applied.
• Seams and corners must be sealed with a plyable sealer.
If the installation requires that the Solid Surface sheets are being installed by fastening the sheets with screws to the wall, it is required to have the screw holes 2mm larger than the screw shanks. In case the installation covers large areas it is recommended to increase the hole size to allow for expansion (as example slotted holes) A slip ring is installed between the screw and the sheet.
Caution: The fabrication of cut outs (for fixtures and receptacles) must be made with a router. All edges must get a 2 mm radius. For all of the listed processes the guideline for fabrication given by the manufacturer must be considered. 9. Upkeep and Cleaning The renew ability of Solid Surface material is one of its biggest advantages. This is the main difference, which sets this material apart from other surface materials. No surface material can withstand daily use without showing some sign of surface wear. Because of this, clean ability and renew ability are of great value in this material. The long lasting durability of this modern material group is a deciding factor for selecting this material. Simple Maintenance Generally, periodic cleaning by wiping down the material with a sponge cloth, water and a grease cutting detergent (do not use lubricating liquids) should be adequate.
Vertical Wall Joints On top
At side
Inside Corner
Corner molding type standard
Plyable adhesive
Basic Wall

23
Solid Surfaces The Solid Surface material surfaces have great characteristics of clean ability. With soap solution, water and a sponge, most spots can be removed without leaving a mark (wipe dry after cleaning). For weekly cleaning calcium deposits in Lavatories and Kitchen Sinks, as well as slight discoloration caused by food products, standard household cleaning products (including vinegar) have proven to be very effective. Stubborn stains like cigarette burns must be removed by using an abrasive cleaning solution and a scotch brite™ pad. By applying this process it is possible that the finish of the surface may be effected. For the removal of strong stains caused by tea, coffee, hair colouring or iodine solutions, liquid bleach agents have proven to be effective (like chlorax). Scratches Avoid cutting and the use of sharp objects on the Solid Surface material surface (cutting boards should be used). Scratches and wear patterns that show up on the surface over time with normal use, can be removed by using sand paper (also fine steel wool). It is advisable to do this process periodically to reduce the effort needed, if a long time is between cleaning. Depending up on the severity of the damage (like deep scratches and gauges) a multi step sanding process must be used by using grit size 180, 240 , 320 , 400 . After each change of grit size the surface must be wiped off by using a damp cloth to remove the loose sanding residue. To achieve a uniform finish, the entire surface must be polished. This process does require good fabrication skills and should be done by an experienced fabricator. Heat damage Short periods of heat exposure of 180 degree C will not effect the surface characteristics but could result in discoloration of the finished surface. The repair to this area can be accomplished by applying the polishing process
as shown in the section covered for scratches. To avoid this damage, items like frying pans, pots and baking sheets should never be placed directly on the Solid Surface work area. Also pots and pans extending past the cooking surface should also not being used.

24
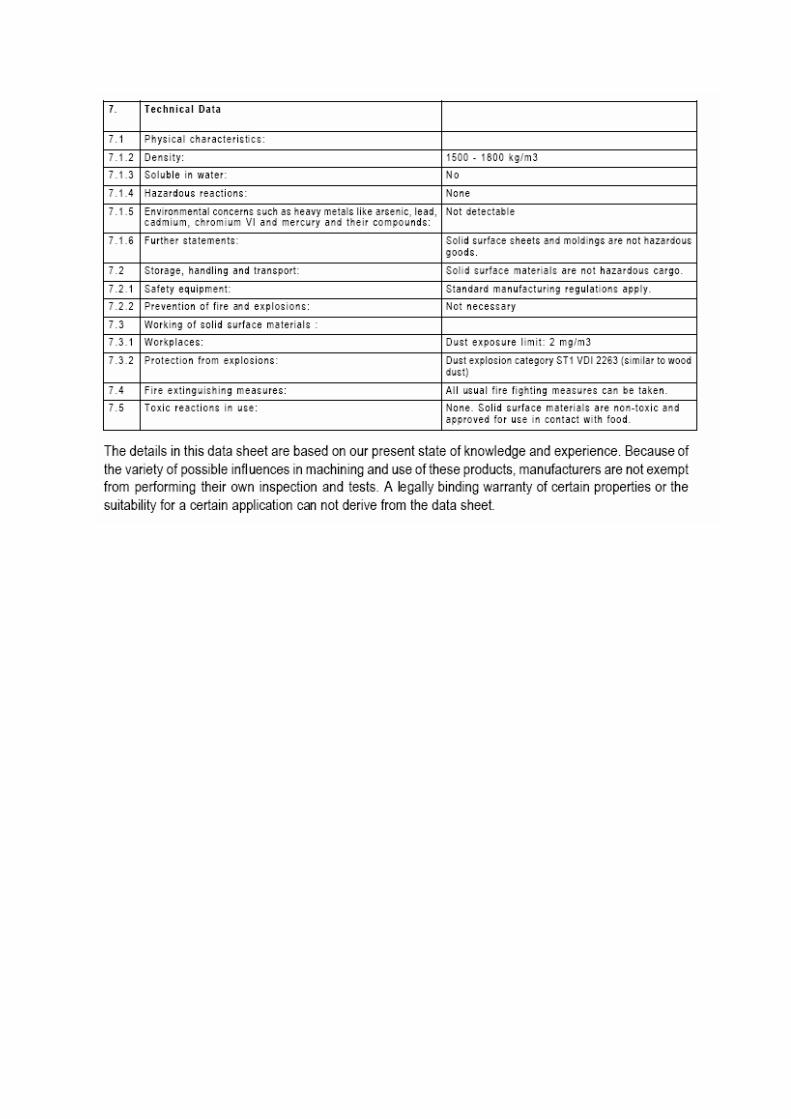
10. Material Characteristics
Material Characteristic Results Values Test Methods Density 1.500 - 1.800 kg/m³ EN 310 Elasticity 5.000 - 9.000 MPa EN 310 Flexibility 50 - 100 MPa EN 310 Tensile strength 25 - 60 MPa DIN EN ISO 527 Hardness (Barcol) 50 - 70 DIN EN 59 Ball indetation 170 - 280 MPa DIN ISO 2039 Impact toughness 1,5 - 6,5 kJ/m² DIN EN ISO 179 Heat expansion ratio 3,5 - 5,6 x 10⁻⁵ K-1 DIN 53752 Dry heat resistance Category 3 DIN EN 438 (180 °C) Cigarette stain 6 D DIN 68861-6 Water absorption ca. 0,04 % DIN 53495 / ASTM D 570 Color fastness Blue scale 6 – 7 DIN EN ISO 4892 Grey scale 4 – 5 Thermo shock resistance 250 cycles 90 °C / 90 sec In reference to No damage 15 °C / 90 sec DIN EN13310 Bacterial and fungal resistance No effect ISO 846 A/C
Calorific value ca. 10 MJ/kg DIN 51900 Flammability B2 DIN 4102 Also B1 possible Chemical resistance 1A resp. 1B DIN 68861-1 Abrasion resistance Solid Surface surfaces are renewable Scratch resistance
Visible scratches and normal wear patterns can be removed with normal processes. Refer to section 9 in this document
Food product compatibility Solid Surface material products are safe for contact with food
products.
Surface resistance ca. 1011 - 1012 Ohm DIN 51953 or ( shock safe ) DIN VDE 0303-3
Fachverband Bau -, Möbe l - u n d I n d u s t r i e h a l b z e u g e a u s K u n s t s t o f f i m G e s a m t v e r b a n d K u n s t s t o f f v e r a r b e i t e n d e I n d u str ie e . V .
Am Hauptbahnhof 12 . D-60329 Frankfur t am Main . Phone 069 - 2 71 05-29 . F a x 0 6 9 - 2 3 9 8 3 7 . h a l b z e u g e @ g k v . d e . w w w . g k v . d e
Technical Leaflet 01 . Sol id Surface Materials Working Group within Gesamtverband Kunststoffverarbeitende Industrie PRODUCT DATA SHEET SOLID SURFACE MATERIALS (SHEETS A N D M O L D I N G S ) (October 2004) This information describes the structure of solid surface materials and refers to their handling, processing, use and disposal. Solid s ur face mater ia ls are not hazardous substances and therefore do not requ i re spec ia l mark ing or a safety data sheet . 1. Descr ip t ion o f Ma te r ia l 1 . 1 Solid surface materials consist of polymerized monomers and resins; usually polyester and / or acrylic resins, mineral f i l lers
and p igments . Th is mater ia l is manufactured in sheets and mold ings o f varying dimensions. The fillers are mainly aluminium t r ihydra te (ATH) . So l id sur face mater ia ls are homogeneous without voids. The surface is renewable and can be fabricated i n to con t i nuous su r faces w i th i nconsp icuous seams , wh ich a l l ows des ign f l ex ib i l i t y . They are free of internal reinforcing fibe rs .
1 . 2 Mater ia l Var iat ions 1 . 2 . 1 S tandard Type Sheets of sol id surface materials of the standard type are suitable for horizontal, vert ical, damp and dry applications. For
hor izonta l app l ica t ions they requi re a subst ructure. 1 . 2 . 2 Veneer Type Veneer sheets of solid surface have the same structure as the sheets of the standard type. Due to their thickness, they are
no rma l l y bonded onto a subst ra te for both hor izonta l and ver t ica l appl icat ions. 1 . 2 . 3 So l id Sur face Mater ia ls Mold ings Mo ld ings ou t o f so l id sur face mater ia ls a l low v i r tua l l y l im i t less des igns fo r k i t chen, ba th and indus t ry . 2. Q u a l i t y C r i t e r i a So l id sur face mater ia ls possess the fo l lowing proper t ies :
• mois tu re res is tance (d ry /we t ) • res is tance to househo ld chemica ls and bo i l i ng water • shock res i s tance • ab i l i t y to be seamed • can be thermoformed • aesthe t ica l l y p leas ing • bacter ia l and fungal res is tant • co lo r s tab i l i t y • safe for food contact • thermal shock res is tan t • easy to c lean • resistant to c igaret te burns • s ur face i s renewab le
3. F i re Res is tance So l id sur face mater ia ls are d i f f icu l t to ign i te and have proper t ies that re tard f lame spread which a l low more t ime for
e v a c uation. They are also avai lable in specif ic f lame retardant qual i t ies. As with any other organic materials, the smoke from burn ing sol id surface materials can be toxic. Fires containing sol id surface materials can be extinguished using the same tec hn iques as w i th bu i ld ing mater ia ls conta in i ng wood .
4. T r a n s p o r t / S t o r a g e Transportat ion regulat i ons cons ider so l id sur face sheets and mold ings to be non-hazardous cargo. There is no special
mark ing neces s a r y . 5. H a n d l i n g / M a c h i n i n g The standard safety instruct ions regarding dust generat ion and f i re protect ion must be adhered to when handl ing and
proc ess ing so l i d sur face sheets and mold ings . Manufacturers and insta l lers must comply wi th both envi ronmenta l and safety regulat ions per t inent to the local area. 6. D isposa l 6 . 1 Inc inerat ion: Res idues o f so l id sur face mater ia ls can be burned in indust r ia l inc inera tors . 6 . 2 Storage Si te: Solid surface materials are environmentally neutral. They can be disposed of at storage sites according to
app l icab le nat iona l and/or reg iona l waste d isposa l regu la t ions .