solution composer - lexmarkpublications.lexmark.com/publications/lexmark... · overview solution...
TRANSCRIPT
Solution Composer
User's Guide
September 2011 www.lexmark.com
Lexmark and Lexmark with diamond design are trademarks of Lexmark International, Inc., registered in the United States and/or other countries.All other trademarks are the property of their respective owners.
© 2011 Lexmark International, Inc.All rights reserved.740 West New Circle RoadLexington, Kentucky 40550
Edition notice
September 2011
The following paragraph does not apply to any country where such provisions are inconsistent with local law: LEXMARK INTERNATIONAL,INC., PROVIDES THIS PUBLICATION “AS IS” WITHOUT WARRANTY OF ANY KIND, EITHER EXPRESS OR IMPLIED, INCLUDING, BUT NOT LIMITEDTO, THE IMPLIED WARRANTIES OF MERCHANTABILITY OR FITNESS FOR A PARTICULAR PURPOSE. Some states do not allow disclaimer ofexpress or implied warranties in certain transactions; therefore, this statement may not apply to you.
This publication could include technical inaccuracies or typographical errors. Changes are periodically made to the information herein; thesechanges will be incorporated in later editions. Improvements or changes in the products or the programs described may be made at anytime.
References in this publication to products, programs, or services do not imply that the manufacturer intends to make these available in allcountries in which it operates. Any reference to a product, program, or service is not intended to state or imply that only that product,program, or service may be used. Any functionally equivalent product, program, or service that does not infringe any existing intellectualproperty right may be used instead. Evaluation and verification of operation in conjunction with other products, programs, or services,except those expressly designated by the manufacturer, are the user’s responsibility.
For Lexmark technical support, visit support.lexmark.com.For information on supplies and downloads, visit www.lexmark.com.If you don't have access to the Internet, you can contact Lexmark by mail:Lexmark International, Inc.Bldg 004-2/CSC740 New Circle Road NWLexington, KY 40550USA
© 2011 Lexmark International, Inc.All rights reserved.
UNITED STATES GOVERNMENT RIGHTSThis software and any accompanying documentation provided under this agreement are commercial computer software and documentationdeveloped exclusively at private expense.
TrademarksLexmark, Lexmark with diamond design, and MarkVision are trademarks of Lexmark International, Inc., registered in the United States and/orother countries.All other trademarks are the property of their respective owners.
Contents
Edition notice...............................................................................................2
Overview.....................................................................................................5Understanding the basics..........................................................................................................................5
System recommendations.........................................................................................................................5
Building custom solutions............................................................................7Getting started..........................................................................................................................................7
Step 1: Creating a new project and adding tasks......................................................................................9
Step 2: Validating solutions (optional)......................................................................................................9
Step 3: Simulating solutions (optional)...................................................................................................10
Step 4: Saving projects............................................................................................................................10
Step 5: Deploying solutions.....................................................................................................................11
Sample solutions........................................................................................15Scenario 1: Scanning W‑4 forms to a corporate FTP site........................................................................15
Scenario 2: Scanning HR forms and saving an index file to a network....................................................17
Troubleshooting.........................................................................................20A solution has been deployed to a device, but it does not appear on the device home screen.............20
The Scan to Email or e‑mail actions cause the solution to fail................................................................21
The Scan to Email task fails to send an e‑mail.........................................................................................21
The Scan to Fax or fax actions cause the solution to fail.........................................................................21
Frequently asked questions........................................................................22
Appendix....................................................................................................24Licensing Solution Composer Agent........................................................................................................24
Properties for user prompts....................................................................................................................24
Properties for scan actions......................................................................................................................28
Properties for index files.........................................................................................................................43
Properties for confirmations...................................................................................................................46
Variable definitions.................................................................................................................................47
Contents 3

Notices.......................................................................................................55
Glossary.....................................................................................................65
Index..........................................................................................................66
Contents 4
OverviewSolution Composer is a user‑friendly program that lets you build custom workflow solutions for Lexmark multifunctionprinters (MFPs) running the Solution Composer Agent. These solutions can range from one‑ or two‑step processes tomore complex workflows involving multiple user prompts and index files.
Using a simple drag-and-drop interface, the program is designed to enable users to begin building solutions almostimmediately—no programming experience required.
Solutions built using Solution Composer can be deployed directly from the Solution Composer application, or as a filethat can be loaded onto a device from its Embedded Web Server or from the Lexmark Virtual Solution Center.
Understanding the basicsSolution Composer relies on four main components for producing solutions that will run on enabled devices:
• The main application window—This is where solutions are built. Using the different panes of the main window,users can select and configure the tasks that make up solutions.
The main application window is made up of three panes:
– Task Library—This pane contains the actions and prompts used to form the sequence of events in a solution.The Task Library includes four categories: User Prompts, Scan Actions, Index Files, and Confirmations.
– Design—This pane is where tasks are put in order and the sequence of events for a solution is determined.
– Task Properties—This pane is where properties are set for each individual task in the Design pane.
• Simulator—Accessible from the Solution Composer menu or toolbar, the simulator gives users a means of checkingthe basic look, flow, and syntax of a Solution Composer project.
• Solution Packages—All Solution Composer projects are deployed as solution packages. These can be installed onprinters running the Solution Composer Agent.
• Solution Composer Agent—This is an embedded application that makes it possible for solutions built using SolutionComposer to be installed and run on a printer. Solution Composer Agent is a licensed application. To learn moreabout licensing, see “Licensing Solution Composer Agent” on page 24.
The process of developing solutions in Solution Composer follows a basic formula:
1 Adding tasks, such as Scan to Network, or user prompts
2 Configuring properties for each task
3 Validating the solution (optional)
4 Simulating the solution to check its overall flow (optional)
5 Deploying the solution to enabled devices (also involves naming and configuring solution properties)
System recommendationsSolution Composer will run best on a system that includes:
• Windows XP SP3 or Windows 7
• Java version 1.6 or later
• 1GB or more of RAM
Overview 5

• 1.8GHz or faster processor
• PDF reader (for Help files)
Overview 6
Building custom solutions
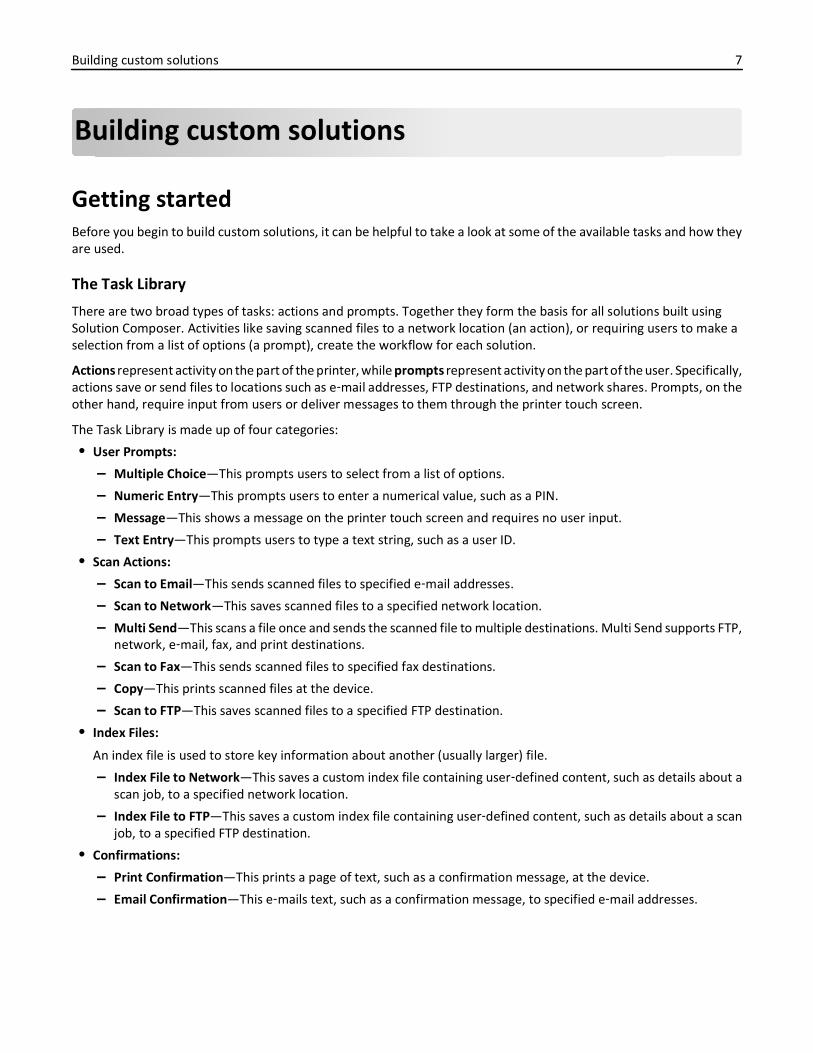
Getting startedBefore you begin to build custom solutions, it can be helpful to take a look at some of the available tasks and how theyare used.
The Task Library
There are two broad types of tasks: actions and prompts. Together they form the basis for all solutions built usingSolution Composer. Activities like saving scanned files to a network location (an action), or requiring users to make aselection from a list of options (a prompt), create the workflow for each solution.
Actions represent activity on the part of the printer, while prompts represent activity on the part of the user. Specifically,actions save or send files to locations such as e‑mail addresses, FTP destinations, and network shares. Prompts, on theother hand, require input from users or deliver messages to them through the printer touch screen.
The Task Library is made up of four categories:
• User Prompts:
– Multiple Choice—This prompts users to select from a list of options.
– Numeric Entry—This prompts users to enter a numerical value, such as a PIN.
– Message—This shows a message on the printer touch screen and requires no user input.
– Text Entry—This prompts users to type a text string, such as a user ID.
• Scan Actions:
– Scan to Email—This sends scanned files to specified e‑mail addresses.
– Scan to Network—This saves scanned files to a specified network location.
– Multi Send—This scans a file once and sends the scanned file to multiple destinations. Multi Send supports FTP,network, e‑mail, fax, and print destinations.
– Scan to Fax—This sends scanned files to specified fax destinations.
– Copy—This prints scanned files at the device.
– Scan to FTP—This saves scanned files to a specified FTP destination.
• Index Files:
An index file is used to store key information about another (usually larger) file.
– Index File to Network—This saves a custom index file containing user‑defined content, such as details about ascan job, to a specified network location.
– Index File to FTP—This saves a custom index file containing user‑defined content, such as details about a scanjob, to a specified FTP destination.
• Confirmations:
– Print Confirmation—This prints a page of text, such as a confirmation message, at the device.
– Email Confirmation—This e‑mails text, such as a confirmation message, to specified e‑mail addresses.
Building custom solutions 7
Putting tasks in order
When creating a workflow, you must arrange tasks in the order in which they will be needed in the finished solution.For example, if you want to include a Text Entry User Prompt asking users to log in, and then use that text entry as avariable for the “Username” property for a Scan to Network task, then the Text Entry User Prompt must appear beforethe Scan to Network task in the workflow. There are two ways to arrange tasks:
• Plan the flow of actions and prompts in advance, and then add them to the workflow in order (in the Design pane).
• Click and drag workflow tasks already inside the Design pane to arrange them as needed.
Task properties
The Task Properties pane is used to configure various attributes for each task you add to a workflow. Configuring taskproperties may involve filling in a text field, selecting options from a drop‑down menu, or inserting predefined variables.The Task Properties pane consists of the following data input options:
• Text boxes
– Single‑line text boxes—These generally require a small string of text. Specify values in these boxes by clickinganywhere in the text field and typing.
– Multi‑line text boxes—These allow for longer blocks of text. Specify values in these boxes by clicking the ellipsisbutton and then typing text in the dialog that appears.
Note: Text boxes can also be populated with one or more variables. These variables can be inserted bythemselves or embedded within text. For more information about using variables, see the following section.
• Drop‑down boxes—These contain a set of choices specific to a particular field.
• Check boxes—Select these boxes to enable a specific feature. Clear the boxes to make the feature unavailable.
• Numerical entry boxes—These allow for customized numeric entries.
Notes:
– Asterisks indicate required fields.
– Solutions cannot be deployed until all required fields have been populated. However, you can save solutionswithout populating all required fields.
Using variablesVariables can be added to any task property field where text can be typed. Variables represent data that is dynamicallyupdated based on conditions at the time a solution is run. For example, if you select a system variable such as “MFP IPAddress” or “Date and Time,” then that information will be gathered from the printer when the solution is run.
Variables can also come from previously added workflow tasks, such as a User Prompt. For example, if you add a TextEntry User Prompt to the workflow asking users to enter their login credentials, then the response variable from thattext entry can be selected as a variable for the “Username” property in a Scan task.
To see the list of variables available for a particular property, click inside the text entry field for that property, and then
click { } on the Task Properties toolbar. You can also right‑click inside the text entry field for the property, and thenselect Insert Variable. For a complete list of the variables available in Solution Composer, see “Variable definitions” onpage 47.
Building custom solutions 8

Step 1: Creating a new project and adding tasks1 To create a new project, open Solution Composer, or do one of the following:
• From the file menu, click File > New.
• From the toolbar, click .
2 From the Task Library pane, select one of the four task categories, and then double‑click a task icon, or click anddrag it into the Design pane.
3 In the text box beneath the task icon, type a descriptive name for the task (optional).
Notes:
• Task names are for user reference only and do not affect the workflow.
• You can rename a task in the Design pane by double‑clicking its name and then typing a new name.
4 From the Task Properties pane, configure the properties for the task.
Notes:
• To access the properties for a task, select its icon in the Design pane.
• For a comprehensive list of the properties available for each task, see “Appendix” on page 24.
• If you add a new task to the workflow before correctly configuring the required properties of an existingtask, then a red exclamation point appears next to the existing task. Mouse over the task icon to show adialog listing the configuration problems.
Deleting tasks from a workflow
1 From the Design pane, select a task.
2 Do one of the following:
• Right‑click the task, and then select Delete Task.
• Select the task, and then press Delete on your keyboard.
Step 2: Validating solutions (optional)Solution Composer projects are saved and deployed as solution packages. Validating a solution before saving ordeploying it is optional, but can help identify errors that need to be corrected while you are still working on the solution.Solutions are automatically checked for errors when they are deployed.
1 With the project open, from the file menu, click Tools > Validate.
Note: You can also click on the toolbar.
2 From the Validation Summary dialog that appears, take note of any errors, and then click Close.
3 Correct the noted errors.
4 Repeat step 1 through step 3 until the Validation Summary reports “No Problems Found.”
Note: All errors must be corrected before a solution can be deployed.
Building custom solutions 9
Step 3: Simulating solutions (optional)Before saving or deploying a solution in Solution Composer, you can use Simulate to check the basic look, flow, andsyntax of a project. Simulate can approximate how a solution will look after it has been deployed to a device. It cannotshow exactly how the solution will look on a specific device.
Notes:
• Make sure all task properties in your solution are configured correctly before you use Simulate. If you do notconfigure all required task properties or if properties are configured incorrectly, then you will not be able tosimulate the solution or parts of the solution. The simulation will stop as soon as Simulate reaches the first taskthat contains errors.
• If certain task property values are not available during the simulation, then an “Information not currentlyavailable” message will appear.
1 With the project open, from the file menu, click Tools > Simulate.
Note: You can also click on the toolbar.
A generic representation of the printer home screen appears, showing only the icon for your solution.
2 Click the icon for the solution.
3 Navigate through the screens by clicking Next, Back, or Home, and by responding to user prompts on the simulatedprinter touch screen.
Notes:
• Use the computer keyboard to type data for prompts that require text input.
• You can view the settings for the task properties on a particular screen by clicking Show details. In theDetails pane, you can expand and collapse the lists of task properties for the screen you are viewing. Toclose the Details pane, click Hide details.
• You cannot modify task properties settings from the Details pane. If you want to modify settings, then closethe Simulator dialog, and then modify the settings from the Task Properties pane.
4 Click Next on the final screen to return to the home screen.
Step 4: Saving projectsYou can save Solution Composer projects as .lwfs files that can be opened and edited later using Solution Composer.These files represent saved work, not completed solutions, and .lwfs files cannot be deployed to a device.
Projects can be saved with or without a password. A generic encryption key is used when savingnon‑password‑protected projects, but those projects can be opened by any Solution Composer user. To restrict accessto a project, save the file using the Save As...With Password option.
Saving projects without a password
1 From the file menu, click File > Save.
Note: You can also click on the toolbar.
2 Browse to the location where you want to save the file, and then name the file.
3 Click Save.
Building custom solutions 10
Saving projects with a password
1 From the file menu, click File > Save As...With Password.
Note: You can also click the arrow next to on the toolbar, and then select Save As...With Password.
2 Browse to the location where you want to save the file, and then name the file.
3 Click Save.
4 Type a password in the dialog, and then click OK.
When you attempt to open the file, you will be prompted for this password.
Step 5: Deploying solutionsYou can deploy valid Solution Composer projects two different ways: as a saved deploy file, or directly to devices fromSolution Composer:
• Deploying to a file—This is useful if you need to save the solution package to a network location for others to installon multiple devices, or if a network is not available for direct deployment at a particular time, such as when youare working remotely.
• Deploying directly to a device—This lets you deploy directly to a device from within Solution Composer. Whendeploying directly to a device, you will need the device IP address or host name. If you need to deploy to multipledevices, then you must deploy to each one individually.
Deploying solutions to a fileSolutions can be saved as .lwfd files that can be installed using the Solution Composer Agent on the device EmbeddedWeb Server or using the Lexmark Virtual Solution Center.
1 With the project open, from the file menu, click Tools > Deploy Solution to File.
2 In the Deploy Solution to File dialog, fill in the following fields:
Solution Properties
The solution properties define the basic information that will be available about a solution both on the device andfrom the device Embedded Web Server.
Notes:
– Asterisks indicate required fields.
– Solutions cannot be deployed until all required fields have been populated.
• Name—Type the name that will appear above the solution icon on the printer home screen.
Building custom solutions 11
Notes:
– This name will also be used to represent the solution in the list of Installed Solutions on the deviceEmbedded Web Server.
– Solutions installed on the same device should each have a unique name. If you install a solution using theSolution Composer Agent on the Embedded Web Server and there is already a solution on the devicewith the same name, then either the existing installed solution will be overwritten, or the EmbeddedWeb Server will show an error message. If an error message is shown, then uninstall the existing solutionbefore installing the new solution.
• Version—Enter the version number of the solution.
Notes:
– Only numbers and periods can be used in the Version field. (Example: 2.0.0)
– Version numbers cannot start with a period or contain two or more consecutive periods.
– The version number is used for reference only. An existing version of a solution will be automaticallyoverwritten if another instance is deployed.
• Image—Click Browse to locate the image that will represent the solution on the printer home screen.
Notes:
– Use a PNG, GIF, JPG, or BMP file. Images will be automatically resized to fit the icon.
– Solution Composer will use a default icon for the custom solution if no image is specified.
• Description—Type the description that will appear on the solution Information tab on the device EmbeddedWeb Server.
Support Information
Because solutions built using Solution Composer may require technical support, the support information must befilled out completely and correctly.
Notes:
– Asterisks indicate required fields.
– Solutions cannot be deployed until all required fields have been populated.
– Support information can be accessed from the device Embedded Web Server by clicking Applications >Solution Composer > [solution name].
• Name—Type the name of the company responsible for supporting the solution.
• Phone—Enter the phone number of the company responsible for supporting the solution.
• Website—Type the Web site URL of the company responsible for supporting the solution.
• Email—Type the e‑mail address of the company responsible for supporting the solution.
3 Click Deploy, and then use the Save dialog to name and save the file to a location of your choice.
Note: The Deploy button will not be enabled until all required fields have been populated.
Building custom solutions 12
Deploying solutions directly to a device1 With the project open, from the file menu, click Tools > Deploy Solution to Device.
Note: You can also click on the toolbar.
2 In the “Deploy Solution to Device” dialog, type the IP address or host name of the destination device in the DeviceAddress field.
Note: You can deploy solutions to one device at a time. Multiple devices must be handled separately.
3 Fill in the following fields:
Solution Properties
The solution properties define the basic information that will be available about a solution both on the device andfrom the device Embedded Web Server.
Notes:
– Asterisks indicate required fields.
– Solutions cannot be deployed until all required fields have been populated.
• Name—Type the name that will appear above the solution icon on the printer home screen.
Notes:
– This name will also be used to represent the solution in the list of Installed Solutions on the deviceEmbedded Web Server.
– Solutions installed on the same device should each have a unique name. If you deploy a solution directlyto a device and there is already a solution on the device with the same name, then the existing installedsolution will be overwritten.
• Version—Enter the version number of the solution.
Notes:
– Only numbers and periods can be used in the Version field. (Example: 2.0.0)
– Version numbers cannot start with a period or contain two or more consecutive periods.
– The version number is used for reference only. An existing version of a solution will be automaticallyoverwritten if another instance is deployed.
• Image—Click Browse to locate the image that will represent the solution on the printer home screen.
Notes:
– Use a PNG, GIF, JPG, or BMP file. Images will be automatically resized to fit the icon.
– Solution Composer will use a default icon for the custom solution if no image is specified.
• Description—Type the description that will appear on the solution Information tab on the device EmbeddedWeb Server.
Support Information
Because solutions built using Solution Composer may require technical support, the support information must befilled out completely and correctly.
Building custom solutions 13

Notes:
– Asterisks indicate required fields.
– Solutions cannot be deployed until all required fields have been populated.
– Support information can be accessed from the device Embedded Web Server by clicking Applications >Solution Composer > [solution name].
• Name—Type the name of the company responsible for supporting the solution.
• Phone—Enter the phone number of the company responsible for supporting the solution.
• Website—Type the Web site URL of the company responsible for supporting the solution.
• Email—Type the e‑mail address of the company responsible for supporting the solution.
4 Click Deploy. A status indicator appears, followed by a confirmation message indicating whether the solutiondeployed successfully.
Note: The Deploy button will not be enabled until all required fields have been populated.
Building custom solutions 14
Sample solutionsThe following two scenarios are designed to demonstrate how Solution Composer might be used to build solutions thataccomplish real‑world tasks. For information about specific properties or settings, see “Appendix” on page 24.
Scenario 1: Scanning W‑4 forms to a corporate FTP siteIn this scenario, a simple solution is created that enables franchise retail stores to scan W‑4 forms for new employeesto a corporate FTP site. The solution first scans both sides of the form into a single file, which is then saved to a locationon the corporate FTP site using a specified file name that users cannot change. After the scan is complete, the solutionshows a message on the printer touch screen reminding the user to file the W‑4 form in the employee's personnel file.
Notes:
• For step‑by‑step instructions on creating a Solution Composer project, see “Building custom solutions” onpage 7.
• For a comprehensive list of task properties and variables available in Solution Composer, see “Appendix” onpage 24.
Building the solution in Solution Composer
1 To create a new project, open Solution Composer, or do one of the following:
• From the file menu, click File > New.
• From the toolbar, click .
2 In the Task Library pane, under User Prompts, double‑click Message or click and drag it into the Design pane, andthen give it a descriptive name, such as “Load forms.”
3 In the Task Properties pane, click the ellipsis button next to the Message field to open a text entry box. Use the textentry box to instruct users to load the W‑4 form onto the scanner glass or into the automatic document feeder.
4 From the Task Library pane, click Scan Actions, double‑click Scan to FTP or click and drag it into the Design panebelow the Message prompt, and then give it a descriptive name, such as “Scan document.”
5 In the Task Properties pane, do the following:
• Clear the Prompt at Runtime check box so that users will not be able to change settings when running thesolution.
• Provide the URL and credentials needed to connect to the FTP destination.
• In the Output section, configure the “Scan filename” setting:a Type w4_from_mfp_ in the text entry box.b Right‑click inside the text entry box after the text you entered.c Select Insert Variable to show the Variable Selection dialog.
Sample solutions 15
d In the Variable Selection dialog, click System Variables > MFP IP Address > OK.e In the “Scan filename” text entry box, type the _ symbol after the “MFP IP Address” variable. When you are
finished, the contents of the text box should look like “w4_from_mfp_System Variables.MFP IP Address_”.When documents are scanned to the corporate FTP destination using this solution, file names will reflectthe IP address of the printer from which they were sent. Verify that Append timestamp is selected to ensurethat multiple files sent from the same printer will not be overwritten. The resulting file name will looksomething like “w4_from_mfp_192.168.1.57_2011_06_23_10_33_26_050.pdf.”
• In the “Scan Settings (Basic)” section, select Duplex in the “Original Sides (Duplex)” field.
6 From the Task Library pane, click User Prompts, click and drag Message into the Design pane below the Scan toFTP action, and then give it a descriptive name, such as “File completed forms.”
7 In the Task Properties pane, use the Message field to remind users to file the W‑4 form properly after scanning.
8 Check the solution for errors by doing one of the following:
• From the file menu, click Tools > Validate.
• From the toolbar, click .
9 Take note of any errors reported in the Validation Summary dialog, correct the errors, and then validate again.
10 After validating, check the overall flow of the solution by doing one of the following:
• From the file menu, click Tools > Simulate.
• From the toolbar, click .
11 Do one of the following:
• Use the “Deploy Solution to File” option on the Tools menu to set solution properties and support information,save the script, and then send the file to individual stores with instructions for installing the solution on Lexmarkdevices running the Solution Composer Agent.
• Use the “Deploy Solution to Device” option on the Tools menu to set solution properties and supportinformation, and then install the solution on Lexmark devices running the Solution Composer Agent. To deploydirectly to devices, you must be on the same network as the target devices, and you will need the IP address orhost name of each device.
What users see when using the solution
1 From the printer home screen, the user touches the icon for the solution.
2 The printer prompts the user to load the W‑4 form onto the scanner glass or into the automatic document feeder.
3 The user loads the document, and then touches Next.
4 The printer shows a message while it scans the document to the appropriate FTP folder.
5 The printer shows the custom message reminding the user to file the W‑4 form in the employee's folder.
6 The user touches Next and returns to the printer home screen.
Sample solutions 16
Scenario 2: Scanning HR forms and saving an index file to anetworkIn this scenario, a more complex solution is created that prompts users to select the type of document they want toscan, scans the document to a network location, and then saves an index file to the same location. Such a scenariocould be used by the same franchise stores as in the first scenario, only this time they can scan many different typesof HR forms to a specified location on the corporate network. This solution will use variables based on user input topopulate the index file.
Notes:
• For step‑by‑step instructions on creating a Solution Composer project, see “Building custom solutions” onpage 7.
• For a comprehensive list of task properties and variables available in Solution Composer, see “Appendix” onpage 24.
Building the solution in Solution Composer
1 Create a new Solution Composer project.
2 In the Task Library pane, under User Prompts, double‑click Multiple Choice or click and drag it into the Design pane,and then give it a descriptive name, such as “Choose document.”
3 In the Task Properties pane, do the following:
• Use the Prompt field to instruct users to select the type of document they want to scan.
• Click the ellipsis button next to the Choices field to show the Choices dialog. To create document types fromwhich users can select:a In the Choices dialog, click Add.b Type Administration in the Label field. The Value field is automatically populated with this label.c Click Add.d Type Benefits in the Label field of the second entry.e Click Add.f Type Employment Application in the Label field of the third entry.g Verify that the Allow multiple selections check box is cleared.h Click OK to save the list and return to the main window for this task.
4 In the Task Library pane, under User Prompts, double‑click Message or click and drag it into the Design pane belowthe Multiple Choice prompt, and then give it a descriptive name, such as “Load document.”
5 In the Task Properties pane, use the Message field to instruct users to load the document onto the scanner glassor into the automatic document feeder.
6 From the Task Library pane, click Scan Actions, double‑click Scan to Network or click and drag it into the Designpane below the Message prompt, and then give it a descriptive name, such as “Scan document.”
7 In the Task Properties pane, do the following:
• Clear the Prompt at Runtime check box so that users will not be able to change settings when running thesolution.
• Provide the URL and credentials needed to connect to the network destination.
Sample solutions 17
• In the Output section, configure the “Scan file name” setting:a Right‑click inside the text entry box, and then select Insert Variable to show the Variable Selection dialog.b In the Variable Selection dialog, click Choose document > Selected Text List > OK.c In the “Scan file name” text entry box, type the _ symbol after the “Selected Text List” variable.d Right‑click inside the text entry box at the end of the entry, and then select Insert Variable to show the
Variable Selection dialog.e In the Variable Selection dialog, click System Variables > MFP IP Address > OK. When you are finished, the
contents of the text box should look like “Choose document.Selected Text List_System Variables.MFP IPAddress.”When a document is scanned to the network destination using this solution, the file name will include thetype of document scanned (as selected by the user) and the IP address of the printer from which thedocument was sent. Verify that Append timestamp is selected to ensure that multiple files sent from thesame printer will not be overwritten. The resulting filename will look something like “EmploymentApplication_192.168.1.57_2011_06_23_10_33_26_050.pdf.”
• In the “Scan Settings (Basic)” section, select Duplex in the “Original Sides (Duplex)” field.
8 From the Task Library pane, click Index Files, and then double‑click Index File to Network or click and drag it intothe Design pane below the Scan to Network action.
9 In the Task Properties pane, do the following:
• Provide the URL and credentials needed to connect to the network destination.
• In the Output section, configure the “Base filename” setting:a Right‑click inside the text entry box, and then select Insert Variable to show the Variable Selection dialog.b In the Variable Selection dialog, click Choose document > Selected Text List > OK.c In the “Base filename” text entry box, type the _ symbol after the “Selected Text List” variable.d Right‑click inside the text entry box at the end of the entry, and then select Insert Variable to show the
Variable Selection dialog.e In the Variable Selection dialog, click System Variables > MFP IP Address > OK.f In the ”Base filename” text entry box, type _index after the “MFP IP Address” variable. When you are
finished, the contents of the text box should look like “Choose document.Selected Text List_SystemVariables.MFP IP Address_index.”When a document is scanned to the network destination using this solution, the file name will include thetype of document scanned (as selected by the user) and the IP address of the printer from which thedocument was sent. Verify that Append timestamp is selected to ensure that multiple files sent from thesame printer will not be overwritten. The resulting file name will look something like “EmploymentApplication_192.168.1.57_index_2011_06_23_10_33_26_050.txt.”
• Click the ellipsis button next to Content Text to show the Content Text dialog, and then do the following:a On the first line, type Date:.b Right‑click next to “Date:,” and then select Insert Variable. In the Variable Selection dialog, click System
Variables > Date and Time > OK.c On the second line, type File:.d Right‑click next to “File:,” and then select Insert Variable. In the Variable Selection dialog, click Choose
document > Selected Text List > OK.e On the third line, type User:.f Right‑click next to “User:,” and then select Insert Variable. In the Variable Selection dialog, click Scan
document > Username > OK.g Click OK to save your selection. When the index file is created, it will contain the text and variables specified
in the Content Text dialog.
Sample solutions 18
10 Check the solution for errors by doing one of the following:
• From the file menu, click Tools > Validate.
• From the toolbar, click .
11 Take note of any errors reported in the Validation Summary dialog, correct the errors, and then validate again.
12 After validating, check the overall flow of the solution by doing one of the following:
• From the file menu, click Tools > Simulate.
• From the toolbar, click .
13 Do one of the following:
• Use the “Deploy Solution to File” option on the Tools menu to set solution properties and support information,save the script, and then send the file to individual stores with instructions for installing the solution on Lexmarkdevices running the Solution Composer Agent.
• Use the “Deploy Solution to Device” option on the Tools menu to set solution properties and supportinformation, and then install the solution on Lexmark devices running the Solution Composer Agent. To deploydirectly to devices, you must be on the same network as the target devices, and you will need the IP address orhost name of each device.
What users see when using the solution
1 From the printer home screen, the user touches the icon for the solution.
2 The printer prompts the user to select the type of HR document they want to scan from a list of choices.
The user makes a selection, and then touches Next.
3 The printer prompts the user to load the document onto the scanner glass or into the automatic document feeder.
4 The user loads the document, and then touches Next.
5 The printer shows a message while the scan file is being saved to the network destination.
6 The printer shows a message while the index file is being saved to the network destination.
Note: In some cases, the scan or index file is saved to the network destination quickly enough that this messageappears briefly or not at all.
7 The solution automatically returns the user to the printer home screen.
Sample solutions 19
Troubleshooting
A solution has been deployed to a device, but it does notappear on the device home screenTry one or more of the following:
LICENSE AND RESTART SOLUTION COMPOSER AGENT
If one or more solutions were deployed before Solution Composer Agent was licensed on a device, then you will needto restart Solution Composer Agent after licensing to enable the deployed solutions.
1 Obtain the printer IP address:
• From the printer home screen
• From the TCP/IP section in the Network/Ports menu
• By printing a network setup page or menu settings page, and then finding the TCP/IP section
Note: An IP address appears as four sets of numbers separated by periods, such as 123.123.123.123.
2 Open a Web browser, and then type the printer IP address in the address field.
3 From the Embedded Web Server, click Settings or Configuration.
4 Click Device Solutions > Solutions (eSF), or click Embedded Solutions.
5 Select the Solution Composer Agent check box in the Installed Solutions list.
6 Click Stop.
The screen reloads showing Solution Composer Agent in a Stopped state.
7 Select the Solution Composer Agent check box, and then click Start.
The screen reloads showing Solution Composer Agent in a Running state.
Previously deployed solutions packages now appear on the device home screen.
Note: For information about licensing Solution Composer Agent on a device, see “Licensing Solution ComposerAgent” on page 24.
REDEPLOY THE SOLUTION
The solution may not have installed successfully on the device, and it may need to be redeployed. For instructionson deploying solutions, see “Step 5: Deploying solutions” on page 11.
INSTALL THE SOLUTION FROM THE DEVICE EMBEDDED WEB SERVER
If the solution cannot be deployed directly to the device, then try deploying it to a file and then installing it using theSolution Composer Agent application on the device Embedded Web Server. Solution Composer Agent can bedeployed to devices from the Lexmark Virtual Solution Center. For information about the Virtual Solution Center,contact your solutions provider.
Troubleshooting 20
To access the Solution Composer Agent solution management page from the Embedded Web Server, clickApplications > Solution Composer.
The Scan to Email or e‑mail actions cause the solution to fail
MAKE SURE THE E‑MAIL SETTINGS ARE CONFIGURED CORRECTLY ON THE PRINTER
For the e‑mail tasks in a solution to work properly, the e‑mail settings on the printer running the solution must beconfigured correctly. For more information on configuring e‑mail settings, see the documentation that came withthe printer.
The Scan to Email task fails to send an e‑mail
CHECK THE REPLY ADDRESS FIELD IN THE PRINTER E‑MAIL SETTINGS
If you selected Use Printer Setting in the From field of the Scan to Email task, then make sure the Reply Address fieldin the printer e‑mail settings contains a valid e‑mail address.
1 Obtain the printer IP address:
• From the printer home screen
• From the TCP/IP section in the Network/Ports menu
• By printing a network setup page or menu settings page, and then finding the TCP/IP section
Note: An IP address appears as four sets of numbers separated by periods, such as 123.123.123.123.
2 Open a Web browser, and then type the printer IP address in the address field.
3 From the Embedded Web Server, click Settings or Configuration.
4 Click E‑mail/FTP Settings > E‑mail Settings > Setup E‑mail Server.
5 Make sure the Reply Address field contains a valid e‑mail address.
6 Click Submit.
The Scan to Fax or fax actions cause the solution to fail
MAKE SURE THE FAX SETTINGS ARE CONFIGURED CORRECTLY ON THE PRINTER
For the fax tasks in a solution to work properly, the fax settings on the printer running the solution must be configuredcorrectly. For more information on configuring fax settings, see the documentation that came with the printer.
Troubleshooting 21
Frequently asked questions
Will solutions built using Solution Composer work on myLexmark device?Yes, if the device is a multifunction printer running the Solution Composer Agent.
Notes:
• Solution Composer Agent must be licensed on the device in order to run solutions.
• A hard drive must be installed on the device in order to run solutions containing Multi Send tasks.
Do solutions built using Solution Composer requirecertification?No, Solution Composer is designed to produce solutions that can be used immediately, without the need forcertification.
How do I rename a task in the Design pane?Double‑click the name of the task beneath the icon, and then type a new name.
Will later versions of solutions overwrite earlier ones?Solution Composer does not check the version of previously deployed solutions. If a solution is deployed to a devicethat is already running another version of that solution, then the version being deployed will replace the existing one.
Why aren't the scan settings that I set in the Task Propertiesworking on my device?Scan settings are device‑ and situation‑specific, so not all scan settings are available on all devices in all situations. Ifyou have selected scan settings in your solution that are not supported by a particular device, then the default scansettings for that device will be used. See the User's Guide that came with the device for a complete list of available scansettings.
Do I have to save a project before validating or simulating?No, you can validate or test projects using Simulate before saving or deploying them.
Frequently asked questions 22
Do I have to validate or simulate a project before saving ordeploying it?No, you can save or deploy projects without validating or simulating them first, but running one or both of these checkscan help ensure you have a working solution before you load it to a device.
Note: Solutions are automatically validated as part of the deployment process.
Frequently asked questions 23

Appendix
Licensing Solution Composer AgentThe Solution Composer Agent is offered with a 30‑day trial license that allows you to deploy fully functioning solutionsbuilt using Solution Composer. To continue using the Solution Composer Agent on your printers after the trial period,you must obtain a full license.
For more information about purchasing application licenses, contact your solutions provider.
Obtaining a license
1 Obtain the printer IP address:
• From the printer home screen
• From the TCP/IP section in the Network/Ports menu
• By printing a network setup page or menu settings page, and then finding the TCP/IP section
Note: An IP address appears as four sets of numbers separated by periods, such as 123.123.123.123.
2 Open a Web browser, and then type the printer IP address in the address field.
3 From the Embedded Web Server, click Settings or Configuration.
4 Click Device Solutions > Solutions (eSF), or click Embedded Solutions.
5 Click System.
6 Record the host ID (serial number).
Record only the string that appears after Serial=.
7 Contact your solutions provider and provide the host ID to obtain the license file.
Installing the license
1 Open a Web browser, and then type the printer IP address in the address field.
2 From the Embedded Web Server, click Settings or Configuration.
3 Click Device Solutions > Solutions (eSF), or click Embedded Solutions.
4 Under Installed Solutions, click Solution Composer Agent > License > Update License.
5 Make sure Local is selected, and then browse to locate the license file.
6 Click Update License.
Properties for user prompts
Multiple Choice propertiesThe following are the settings available for the Multiple Choice prompt. Use Multiple Choice to prompt users to selectfrom a list of options.
Appendix 24
Notes:
• Asterisks indicate required fields.
• To add a variable to any text field, click the text entry portion of the field, and then click { } on the TaskProperties toolbar. You can also right‑click the text entry portion of the field, and then select Insert Variable. Fora comprehensive list of all variables available in Solution Composer, see “Variable definitions” on page 47.
General
• Prompt—Type a prompt that will guide users in making a selection from the list of choices. This appears above thelist and gives users context for the choices available in the list. For example, Select a department.
• Choices—Click the ellipsis button next to the field to populate the list of choices that will be available for users toselect from. In the Choices dialog, select Allow multiple selections to allow users to select more than one choicefrom the list.
To add a choice to the list:
1 Click Add.A new choice appears in the list.
2 Configure the following fields:
– Default—Select a check box to set a default choice for users.
– Order—This is a numeric value that indicates where a choice will appear in the list. This field cannot bechanged.
– Label—Type the choice that users will see and select on the printer touch screen.
Note: The text typed in the Label field does not wrap on the printer touch screen. Instead, the size ofthe text will shrink to fit the touch screen.
– Value—Type the value associated with the user's choice. This is not an option that users will see. By default,the value is the same as the label, and the text you type in the Label field is automatically duplicated in theValue field as you type. You can change the value so that it can be used in a Selected Value List variable inanother task. The Selected Value List variable will contain the value associated with the choice the userselected.For example, a company might have users who need to scan different types of documents and have themrouted to a particular department based on the document type. In this scenario, you could type a departmentname in the Label field (for example, Human Resources), and then type the e‑mail address of a person inthe department in the Value field. The e‑mail address would be included in the Selected Value List variable.The Selected Value List variable could then be used in a Scan to Email task to e‑mail scanned documents tothe appropriate department based on the user’s selection.
That scenario might look something like this:a A user has an employment application that needs to be scanned and sent to Human Resources.b The user touches the icon for the solution and is prompted to select a department from a list of choices.
Appendix 25
c The user chooses Human Resources from the list.If the Value field for the “Human Resources” label is populated with the e‑mail address of a person inHuman Resources, then you can insert a Selected Value List variable in the “To” field of a Scan to Emailtask. The variable will contain the e‑mail address specified in the Value field, and the Scan to Email taskwill send the scanned document to this address. The Selected Value List variable can be found underthe Multiple Choice prompt heading in the Variable Selection dialog for the Scan to Email “To” field.
d The user scans the employment application, and it is automatically routed to the appropriate person inHuman Resources.
Note: If users are allowed to select multiple choices, then the Selected Value List variable willcontain all e‑mail addresses associated with the user’s choices. Make sure the “Selected valueseparator” property for your Multiple Choice prompt is set to either Comma or Semicolon. Thisenables the list of e‑mail addresses to be processed correctly in a Scan to Email task.
3 Click OK.
To delete a choice from the list:
1 Click the ellipsis button next to the Choices field.
2 Select a choice from the list.
3 Click Delete > OK.
• Selection Required—Select this option to require users to make a selection before proceeding to the next task.
• Help Text—Click the ellipsis button next to the field to type help text that will be available to users when they touchthe question mark icon in the lower left corner of the printer touch screen.
Note: The question mark icon appears only if you specify text in this field.
Miscellaneous
• Selected value separator—If the prompt is configured to allow multiple selections, then click the ellipsis buttonnext to the field to choose how to separate the list of selections (comma, colon, semicolon, or custom) when thelist is used in a variable. This is used with the Selected Text List, Selected Value List, and Selected Index List variables.
Notes:
– If the Selected Value List variable contains multiple e‑mail addresses, then select Comma or Semicolon. Thisenables the list of e‑mail addresses to be processed correctly in a Scan to Email task.
– If the Selected Value List variable contains multiple fax numbers, then select Semicolon.
Numeric Entry propertiesThe following are the settings available for the Numeric Entry prompt. Use Numeric Entry to prompt users to enter anumerical value, such as a PIN.
Notes:
• To add a variable to any text field, click the text entry portion of the field, and then click { } on the TaskProperties toolbar. You can also right‑click the text entry portion of the field, and then select Insert Variable. Fora comprehensive list of all variables available in Solution Composer, see “Variable definitions” on page 47.
• Where applicable, click Use Printer Setting to access the available choices for a setting or to type text for asetting. You can return to the default setting for the printer by clicking the setting value you entered, and then
clicking on the Task Properties toolbar. You can also right-click the setting value you entered, and thenselect Use Printer Setting.
Appendix 26
General
• Prompt—Type a prompt that will explain the Numeric Entry prompt to users. This will appear above the keypad onthe printer touch screen and will explain to users what is expected of them. (Example: Enter your departmentnumber)
• Default—Enter a default numeric value for the prompt response. Users can keep this response or modify it.
• Error Msg—Click the ellipsis button next to the field to type an error message that will appear if the values usersenter do not meet the size restrictions specified in the Min Value and Max Value fields.
• Help Text—Click the ellipsis button next to the field to type help text that will be available to users when they pressthe question mark icon in the lower left corner of the printer touch screen.
Note: The question mark icon appears only if you specify text in this field.
Restrictions
• Text Visible—Select this option to show numbers as they are entered. If this check box is cleared, then asterisksappear for each number entered.
• Min Value—Enter the minimum numeric value users can enter in the prompt response. This field cannot be leftempty. Enter 0 or leave the value set to Use Printer Setting if you do not want to specify a minimum value.
• Max Value—Enter the maximum numeric value users can enter in the prompt response.
Message propertiesThe following are the settings available for the Message prompt. Use Message to show users a message on the printertouch screen. This prompt requires no user input other than touching Next.
Notes:
• Asterisks indicate required fields.
• To add a variable to any text field, click the text entry portion of the field, and then click { } on the TaskProperties toolbar. You can also right‑click the text entry portion of the field, and then select Insert Variable. Fora comprehensive list of all variables available in Solution Composer, see “Variable definitions” on page 47.
General
• Title—Type the text that will appear as a title above the message text in the prompt.
• Message—Click the ellipsis button next to the field to type the message that will be shown to users. It can containany alphanumeric characters. The text in the message will wrap on the printer touch screen, and scroll bars willappear for longer messages.
• Justify—Select Center, Left, or Right to specify how the message will be justified on the printer touch screen.
• Help Text—Click the ellipsis button next to the field to type help text that will be available to users when they touchthe question mark icon in the lower left corner of the printer touch screen.
Note: The question mark icon appears only if you specify text in this field.
Text Entry propertiesThe following are the settings available for the Text Entry prompt. Use Text Entry to prompt users to type a text string,such as a user ID.
Appendix 27
Notes:
• To add a variable to any text field, click the text entry portion of the field, and then click { } on the TaskProperties toolbar. You can also right‑click the text entry portion of the field, and then select Insert Variable. Fora comprehensive list of all variables available in Solution Composer, see “Variable definitions” on page 47.
• Where applicable, click Use Printer Setting to access the available choices for a setting or to type text for asetting. You can return to the default setting for the printer by clicking the setting value you entered, and then
clicking on the Task Properties toolbar. You can also right-click the setting value you entered, and thenselect Use Printer Setting.
General
• Prompt—Type a prompt that will explain the Text Entry prompt to users. This will appear above the keyboard onthe printer touch screen and will explain to users what is expected of them. (Example: Enter your user name)
• Default—Type a default value for the prompt response. Users can keep this response or type their own.
• Error Msg—Click the ellipsis button next to the field to type an error message that will appear if the text users typedoes not meet the size restrictions specified in the Min Length and Max Length fields.
• Help Text—Click the ellipsis button next to the field to type help text that will be available to users when they pressthe question mark icon in the lower left corner of the printer touch screen.
Note: The question mark icon appears only if you specify text in this field.
Restrictions
• Text Visible—Select this option to show text as it is typed. If this check box is cleared, then asterisks appear foreach character typed.
• Min Length—Specify the minimum number of characters users are required to type in the prompt response. Enter0 to set no minimum and allow users to leave the prompt response empty.
• Max Length—Specify the maximum number of characters users can type in the prompt response. Leave the fieldempty to set no maximum.
Properties for scan actions
Scan to Email propertiesThe following are the settings available for the Scan to Email action. Use Scan to Email to send scanned files to specifiede‑mail addresses.
Appendix 28

Notes:
• Some scan settings may not be available on certain printers or in certain situations. See the User’s Guide thatcame with the printer for a complete list of available scan settings.
• Asterisks indicate required fields.
• Scan to Email can be implemented only if the e‑mail settings on the printer have been configured properly. Seethe User’s Guide that came with the printer for more information on configuring e‑mail settings.
• To add a variable to any text field, click the text entry portion of the field, and then click { } on the TaskProperties toolbar. You can also right‑click the text entry portion of the field, and then select Insert Variable. Fora comprehensive list of all variables available in Solution Composer, see “Variable definitions” on page 47.
• Where applicable, click Use Printer Setting to access the available choices for a setting or to type text for asetting. You can return to the default setting for the printer by clicking the setting value you entered, and then
clicking on the Task Properties toolbar. You can also right-click the setting value you entered, and thenselect Use Printer Setting.
• Prompt at Runtime—Select this option to let users change settings. If this option is selected, then users will havethe option to override the settings specified here. If this option is cleared, then each scan job will use the settingsspecified here, and users will not have the option to change them.
• To—Click the ellipsis button next to the field to type one or more e‑mail addresses, separated by commas orsemicolons.
Note: Entries should follow standard SMTP protocol for e-mail addresses. (Example: [email protected])
• Cc—Click the ellipsis button next to the field to type one or more e‑mail addresses to copy, separated by commasor semicolons.
• Bcc—Click the ellipsis button next to the field to type one or more e‑mail addresses to blind copy, separated bycommas or semicolons.
• From—Type the e‑mail address of the person sending the Scan to Email job.
• Subject—Type the subject line of the e‑mail.
• Message—Click the ellipsis button next to the field to type the body of the e‑mail.
• Newline Separator—Select the character sequence to use for new lines (DOS/Windows or Unix/MacOS X).
• Scan filename—Type the default base file name for the scanned image.
Note: File names must begin with a valid character (no white space). The following characters cannot be used:^ : / * ” ? + [ ] < >
• Append timestamp—Select this option to add a time signature to the file name when e‑mailing a file.
Scan Settings (Basic)
• Original Size—Specify the paper size of the original document.
• Original Sides (Duplex)—Select whether to let users scan one‑sided or two‑sided documents. Select Simplex toscan one‑sided original documents. Select Duplex to scan two‑sided original documents.
• Orientation—Specify whether the original document is in portrait or landscape orientation. Select Portrait if theheight of the page is greater than the width. Select Landscape if the width of the page is greater than the height.
• Binding—Specify whether the original document is bound on the long-edge or short-edge side. Binding applies onlyif Original Sides (Duplex) is set to Duplex.
Appendix 29

• Resolution—Adjust the quality of the scanned document. If users are scanning a photograph, a drawing with finelines, or a document with very small text, then increase the resolution setting.
Note: Higher resolution settings result in larger files.
• File Format—Specify the output for the scanned image:
– TIFF—This creates multiple files or a single file. The file size is usually larger than an equivalent JPEG.
Note: If multi-page TIFF is turned off in the Settings menu of the printer Embedded Web Server, then thisoption saves one page in each file.
– JPEG—This creates and attaches a separate file for each page of the original document, viewable by most Webbrowsers and graphics programs.
– PDF—This creates a single file with multiple pages, viewable with a PDF reader.
– Secure PDF—This creates an encrypted PDF file that protects the file contents from unauthorized access. Theuser is prompted to define a password at runtime.
– XPS—This creates a single XPS file with multiple pages, viewable using an Internet Explorer–hosted viewer andthe .NET Framework, or by downloading a third‑party standalone viewer.
• Content—To enhance scan quality, specify the content type of the original document:
– Text—Use this for original documents that are mostly text or line art.
– Mixed—Use this for original documents that are a mixture of text and graphics or pictures.
– Photo—Use this for original documents that are high-quality photographs or inkjet prints.
• Color—Specify whether the document will be scanned in color or black and white.
Scan Settings (Advanced)
• Custom Job—Select this option to let users scan documents of mixed paper sizes into a single file.
• Scan Preview—Select this option to show a scan preview for each scan job. Multiple‑page scans will show a previewof only the first page.
• Darkness—Adjust the darkness of scans in relation to the original document. You can specify darkness from 1 (verylight) to 100 (very dark).
• Scan Edge To Edge—Select this option to specify that the original document will be treated as borderless and willbe scanned edge to edge.
• Sharpness—Adjust the sharpness of scans in relation to the original document. You can specify sharpness from 1to 100.
Miscellaneous
• File name separator—Click the ellipsis button next to the field to select how to separate the list of files scanned toan e‑mail destination (comma, colon, semicolon, or custom).
Scan to Network propertiesThe following are the settings available for the Scan to Network action. Use Scan to Network to save scanned files toa specified network location.
Appendix 30

Notes:
• Some scan settings may not be available on certain printers or in certain situations. See the User’s Guide thatcame with the printer for a complete list of available scan settings.
• Asterisks indicate required fields.
• To add a variable to any text field, click the text entry portion of the field, and then click { } on the TaskProperties toolbar. You can also right‑click the text entry portion of the field, and then select Insert Variable. Fora comprehensive list of all variables available in Solution Composer, see “Variable definitions” on page 47.
• Where applicable, click Use Printer Setting to access the available choices for a setting or to type text for asetting. You can return to the default setting for the printer by clicking the setting value you entered, and then
clicking on the Task Properties toolbar. You can also right-click the setting value you entered, and thenselect Use Printer Setting.
Connection to Share
• Prompt at Runtime—Select this option to let users change settings. If this option is selected, then users will havethe option to override the settings specified here. If this option is cleared, then each scan job will use the settingsspecified here, and users will not have the option to change them.
• URL—Type the IP address or server name of the network folder in the format \\server\share.
Examples:
– \\192.168.1.57\
– \\servername\
– \\192.168.1.57\groupfolder
– \\companyserver1\groupfolder
Note: URL entries must begin with a valid character (no white space). The following characters cannot be used:^ : / * ” ? + [ ] < > |
• Authentication—Click the ellipsis button next to the field to specify how users will authenticate with the networkshare:
– Credentials Provided By—Select how to authenticate users:
• Guest/Anonymous—This does not require users to authenticate.
• MFP—This uses the credentials that have already been stored on the printer.
Note: If the same credentials are used to access both the printer and the remote network destination,then the solution will pass these credentials to the remote destination at runtime. For informationabout setting up user credentials on the printer, see the Embedded Web Server Administrator's Guidefor your printer.
• Static—This uses fixed credentials, which can either be a set value such as one user name shared by all users,or the value of a variable such as a text prompt that asks for a user name. If you select this option, then thefollowing options are enabled for you to configure:
– Username—Type the user name needed to access the network share.
Note: You can also add a variable based on a previous prompt input to this field. Right‑click thefield, and then select Insert Variable. For more information about how to use variables, see“Variable definitions” on page 47.
– Use the password entered here—Type the password associated with the user name needed to accessthe network share.
Appendix 31
– Get the password from a variable—Select a variable that will provide the password while the solutionis running.
Output
• Scan file name—Type the default base file name for files scanned to the network destination.
Note: File names must begin with a valid character (no white space). The following characters cannot be used:^ : / * ” ? + [ ] < >
• Overwrite existing file—Select this option to automatically replace existing files of the same name.
Note: This is supported only if the user name provided to access the network share is allowed to overwrite files.
• Append timestamp—Select this option to add a time signature to the file name when saving a file.
• Create index file—Select whether the printer will create a standard index file that lists details about the scan job.The index file is saved to the destination folder.
Select one of the following:
– None—The printer will not create an index file in the destination folder.
– XML—The printer generates a basic XML index file.
– CSV—The printer generates a basic CSV index file that the administrator can use in a spreadsheet or database.
Notes:
– The index file will share the same base file name as the scanned document, but its extension (.xml or .csv)will be determined by the selection made here.
– The data included in these index files cannot be customized. Use an “Index File to Network” or “Index File toFTP” action to create custom index files. For more information, see “Index File to Network properties” onpage 43 or “Index File to FTP properties” on page 44.
Scan Settings (Basic)
• Original Size—Specify the paper size of the original document.
• Original Sides (Duplex)—Select whether to let users scan one‑sided or two‑sided documents. Select Simplex toscan one‑sided original documents. Select Duplex to scan two‑sided original documents.
• Orientation—Specify whether the original document is in portrait or landscape orientation. Select Portrait if theheight of the page is greater than the width. Select Landscape if the width of the page is greater than the height.
• Binding—Specify whether the original document is bound on the long-edge or short-edge side. Binding applies onlyif Original Sides (Duplex) is set to Duplex.
• Resolution—Adjust the quality of the scanned document. If users are scanning a photograph, a drawing with finelines, or a document with very small text, then increase the resolution setting.
Note: Higher resolution settings result in larger files.
• File Format—Specify the output for the scanned image:
– TIFF—This creates multiple files or a single file. The file size is usually larger than an equivalent JPEG.
Note: If multi-page TIFF is turned off in the Settings menu of the printer Embedded Web Server, then thisoption saves one page in each file.
– JPEG—This creates a separate file for each page of the original document, viewable by most Web browsers andgraphics programs.
– PDF—This creates a single file with multiple pages, viewable with a PDF reader.
Appendix 32
– Secure PDF—This creates an encrypted PDF file that protects the file contents from unauthorized access.
– XPS—This creates a single XPS file with multiple pages, viewable using an Internet Explorer–hosted viewer andthe .NET Framework, or by downloading a third‑party standalone viewer.
• Content—To enhance scan quality, specify the content type of the original document:
– Text—Use this for original documents that are mostly text or line art.
– Mixed—Use this for original documents that are a mixture of text and graphics or pictures.
– Photo—Use this for original documents that are high-quality photographs or inkjet prints.
• Color—Specify whether the document will be scanned in color or black and white.
Scan Settings (Advanced)
• Custom Job—Select this option to let users scan documents of mixed paper sizes into a single file.
• Scan Preview—Select this option to show a scan preview for each scan job. Multiple‑page scans will show a previewof only the first page.
• Darkness—Adjust the darkness of scans in relation to the original document. You can specify darkness from 1 (verylight) to 100 (very dark).
• Scan Edge To Edge—Select this option to specify that the original document will be treated as borderless and willbe scanned edge to edge.
• Sharpness—Adjust the sharpness of scans in relation to the original document. You can specify sharpness from 1to 100.
Miscellaneous
• Message during file transfer—Click the ellipsis button next to the field to type a message that users will see on theprinter touch screen while sending documents to the network destination.
Note: To include variables as part of the message, right‑click anywhere in the “Message during file transfer”dialog, and then select Insert Variable. For more information about variables, see “Variable definitions” onpage 47.
• File name separator—Click the ellipsis button next to the field to select how to separate the list of files scanned toa network destination (comma, colon, semicolon, or custom).
Multi Send propertiesThe following are the settings available for the Multi Send action. Use Multi Send to scan a file once and send thescanned file to multiple destinations. Multi Send supports FTP, network, e‑mail, fax, and print destinations.
Appendix 33
Notes:
• You must add at least one destination to your Multi Send task.
• Some scan settings may not be available on certain printers or in certain situations. See the User’s Guide thatcame with the printer for a complete list of available scan settings.
• Multi Send requires a hard drive to be installed on the printer. Make sure the printer that will host your MultiSend solution has a hard drive. A message reminding you about this requirement will appear when you add thefirst Multi Send task to the Design pane for a solution. The message will not appear again if you add additionalMulti Send tasks to the same solution.
• Asterisks indicate required fields.
• To add a variable to any text field, click the text entry portion of the field, and then click { } on the TaskProperties toolbar. You can also right‑click the text entry portion of the field, and then select Insert Variable. Fora comprehensive list of all variables available in Solution Composer, see “Variable definitions” on page 47.
• Where applicable, click Use Printer Setting to access the available choices for a setting or to type text for asetting. You can return to the default setting for the printer by clicking the setting value you entered, and then
clicking on the Task Properties toolbar. You can also right-click the setting value you entered, and thenselect Use Printer Setting.
Adding a Multi Send destination
1 Click on the Task Properties toolbar, or right‑click the Multi Send task in the Design pane, and then select AddDestination.
2 Select the type of destination you want to add.
The destination appears in the Destinations section of the Task Properties pane.
3 Double‑click the default destination name in the Task Properties pane, and then type a name for the destination.Each destination in a Multi Send task must have a unique name. When you are finished typing, press Enter to savethe destination name.
4 Configure the destination properties as described in the following section.
To delete a destination, select the destination from the Task Properties pane, and then click on the Task Propertiestoolbar.
Destinations
FTP Destination
• FTP Connection
– URL—Type the IP address or host name of the FTP server.
Examples:
• ftp://192.168.1.57/
• ftp://servername/
• ftp://192.168.1.57/foldername
• ftp://ftp.company.com/
Note: URL entries must begin with a valid character (no white space). The following characters cannot beused: ^ : / * ” ? + [ ] < > |
Appendix 34
– Username—Type the user name needed to access the FTP server (not required by all servers).
Note: You can also add a variable based on a previous prompt input to this field. Right‑click the field, andthen select Insert Variable. For more information about how to use variables, see “Variable definitions” onpage 47.
– Password—Click the ellipsis button next to the field, and then provide the password associated with the username needed to access the FTP server (not required by all servers):
• Use the password entered here—Type the password.
• Get the password from a variable—Select a variable that will provide the password while the solution isrunning.
• Output
– Scan filename—Type the default base file name for files scanned to the FTP destination.
Note: File names must begin with a valid character (no white space). The following characters cannot beused: ^ : / * ” ? + [ ] < >
– Overwrite existing file—Select this option to automatically replace existing files of the same name.
Note: This is supported only if the user name provided to access the FTP destination is allowed to overwritefiles.
– Append timestamp—Select this option to add a time signature to the file name when saving a file.
• Miscellaneous
– File name separator—Click the ellipsis button next to the field to select how to separate the list of files scannedto an FTP destination (comma, colon, semicolon, or custom).
Network Destination
• Connection to Share
– URL—Type the IP address or server name of the network folder in the format \\server\share.
Examples:
• \\192.168.1.57\
• \\servername\
• \\192.168.1.57\groupfolder
• \\companyserver1\groupfolder
Note: URL entries must begin with a valid character (no white space). The following characters cannot beused: ^ : / * ” ? + [ ] < > |
– Authentication—Click the ellipsis button next to the field to specify how users will authenticate with the networkshare:
• Credentials Provided By—Select how to authenticate users:
– Guest/Anonymous—This does not require users to authenticate.
– MFP—This uses the credentials that have already been stored on the printer.
Note: If the same credentials are used to access both the printer and the remote networkdestination, then the solution will pass these credentials to the remote destination at runtime.For information about setting up user credentials on the printer, see the Embedded Web ServerAdministrator's Guide for your printer.
Appendix 35
– Static—This uses fixed credentials, which can either be a set value such as one user name shared by allusers, or the value of a variable such as a text prompt that asks for a user name. If you select this option,then the following options are enabled for you to configure:
• Username—Type the user name needed to access the network share.
Note: You can also add a variable based on a previous prompt input to this field. Right‑clickthe field, and then select Insert Variable. For more information about how to usevariables, see “Variable definitions” on page 47.
• Use the password entered here—Type the password associated with the user name needed toaccess the network share.
• Get the password from a variable—Select a variable that will provide the password while the solutionis running.
• Output
– Scan file name—Type the default base file name for files scanned to the network destination.
Note: File names must begin with a valid character (no white space). The following characters cannot beused: ^ : / * ” ? + [ ] < >
– Overwrite existing file—Select this option to automatically replace existing files of the same name.
Note: This is supported only if the user name provided to access the network share is allowed to overwritefiles.
– Append timestamp—Select this option to add a time signature to the file name when saving a file.
• Miscellaneous
– File name separator—Click the ellipsis button next to the field to select how to separate the list of files scannedto a network destination (comma, colon, semicolon, or custom).
Email Destination
– To—Click the ellipsis button next to the field to type one or more e‑mail addresses, separated by commas orsemicolons.
Note: Entries should follow standard SMTP protocol for e-mail addresses. (Example: [email protected])
– Cc—Click the ellipsis button next to the field to type one or more e‑mail addresses to copy, separated by commasor semicolons.
– Bcc—Click the ellipsis button next to the field to type one or more e‑mail addresses to blind copy, separated bycommas or semicolons.
– From—Type the e‑mail address of the person sending the e‑mail.
– Subject—Type the subject line of the e‑mail.
– Message—Click the ellipsis button next to the field to type the body of the e‑mail.
– Newline Separator—Select the character sequence to use for new lines (DOS/Windows or Unix/MacOS X).
– Scan filename—Type the default base file name for the scanned image.
Note: File names must begin with a valid character (no white space). The following characters cannot beused: ^ : / * ” ? + [ ] < >
– Append timestamp—Select this option to add a time signature to the file name when e‑mailing a file.
• Miscellaneous
– File name separator—Click the ellipsis button next to the field to select how to separate the list of files scannedto an e‑mail destination (comma, colon, semicolon, or custom).
Appendix 36
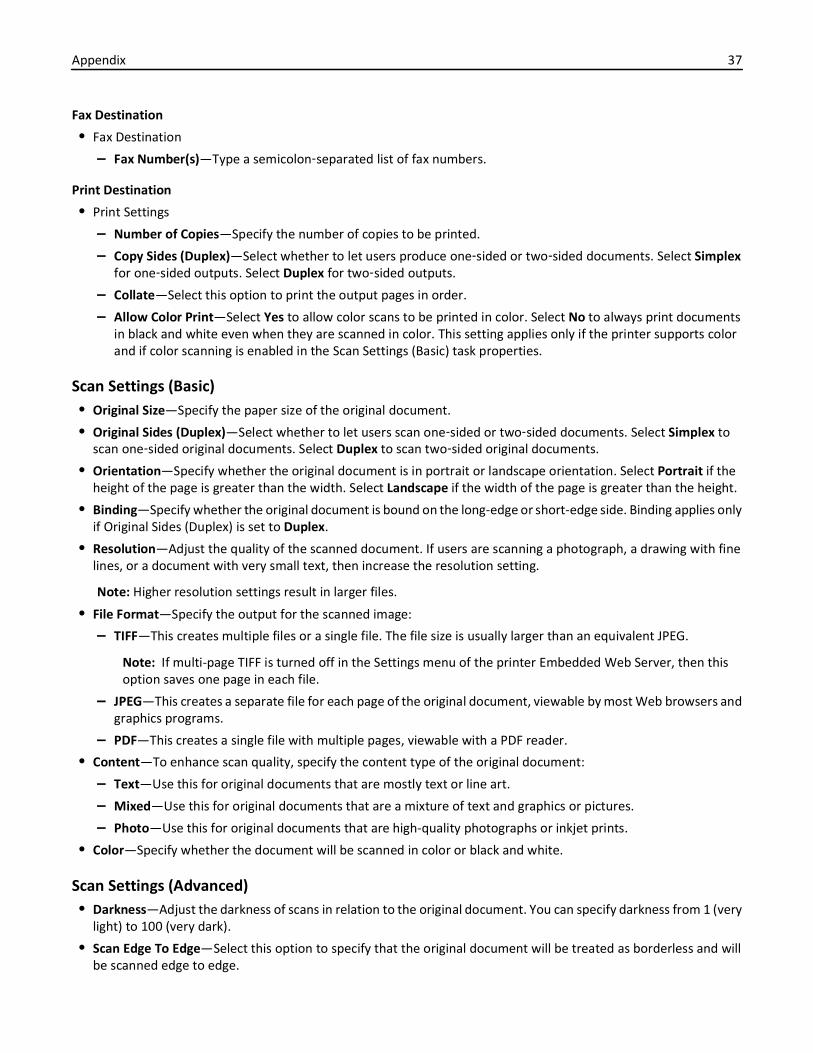
Fax Destination
• Fax Destination
– Fax Number(s)—Type a semicolon‑separated list of fax numbers.
Print Destination
• Print Settings
– Number of Copies—Specify the number of copies to be printed.
– Copy Sides (Duplex)—Select whether to let users produce one‑sided or two‑sided documents. Select Simplexfor one‑sided outputs. Select Duplex for two‑sided outputs.
– Collate—Select this option to print the output pages in order.
– Allow Color Print—Select Yes to allow color scans to be printed in color. Select No to always print documentsin black and white even when they are scanned in color. This setting applies only if the printer supports colorand if color scanning is enabled in the Scan Settings (Basic) task properties.
Scan Settings (Basic)• Original Size—Specify the paper size of the original document.
• Original Sides (Duplex)—Select whether to let users scan one‑sided or two‑sided documents. Select Simplex toscan one‑sided original documents. Select Duplex to scan two‑sided original documents.
• Orientation—Specify whether the original document is in portrait or landscape orientation. Select Portrait if theheight of the page is greater than the width. Select Landscape if the width of the page is greater than the height.
• Binding—Specify whether the original document is bound on the long-edge or short-edge side. Binding applies onlyif Original Sides (Duplex) is set to Duplex.
• Resolution—Adjust the quality of the scanned document. If users are scanning a photograph, a drawing with finelines, or a document with very small text, then increase the resolution setting.
Note: Higher resolution settings result in larger files.
• File Format—Specify the output for the scanned image:
– TIFF—This creates multiple files or a single file. The file size is usually larger than an equivalent JPEG.
Note: If multi-page TIFF is turned off in the Settings menu of the printer Embedded Web Server, then thisoption saves one page in each file.
– JPEG—This creates a separate file for each page of the original document, viewable by most Web browsers andgraphics programs.
– PDF—This creates a single file with multiple pages, viewable with a PDF reader.
• Content—To enhance scan quality, specify the content type of the original document:
– Text—Use this for original documents that are mostly text or line art.
– Mixed—Use this for original documents that are a mixture of text and graphics or pictures.
– Photo—Use this for original documents that are high-quality photographs or inkjet prints.
• Color—Specify whether the document will be scanned in color or black and white.
Scan Settings (Advanced)• Darkness—Adjust the darkness of scans in relation to the original document. You can specify darkness from 1 (very
light) to 100 (very dark).
• Scan Edge To Edge—Select this option to specify that the original document will be treated as borderless and willbe scanned edge to edge.
Appendix 37
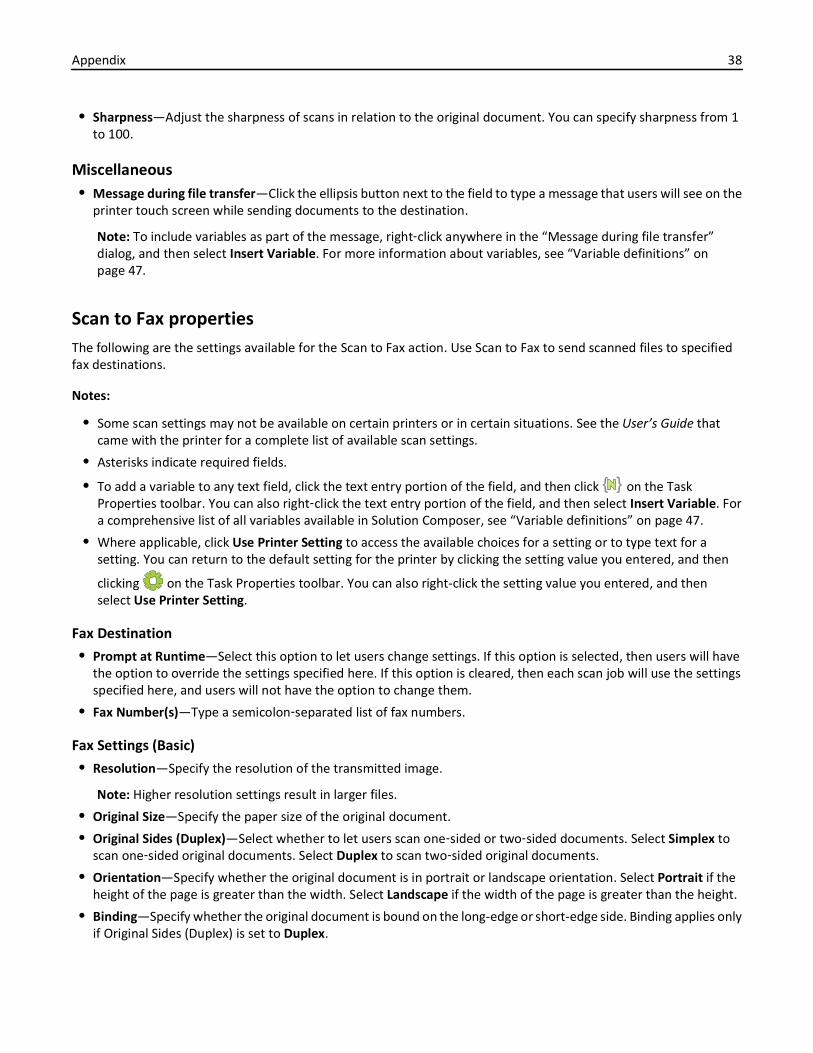
• Sharpness—Adjust the sharpness of scans in relation to the original document. You can specify sharpness from 1to 100.
Miscellaneous• Message during file transfer—Click the ellipsis button next to the field to type a message that users will see on the
printer touch screen while sending documents to the destination.
Note: To include variables as part of the message, right‑click anywhere in the “Message during file transfer”dialog, and then select Insert Variable. For more information about variables, see “Variable definitions” onpage 47.
Scan to Fax propertiesThe following are the settings available for the Scan to Fax action. Use Scan to Fax to send scanned files to specifiedfax destinations.
Notes:
• Some scan settings may not be available on certain printers or in certain situations. See the User’s Guide thatcame with the printer for a complete list of available scan settings.
• Asterisks indicate required fields.
• To add a variable to any text field, click the text entry portion of the field, and then click { } on the TaskProperties toolbar. You can also right‑click the text entry portion of the field, and then select Insert Variable. Fora comprehensive list of all variables available in Solution Composer, see “Variable definitions” on page 47.
• Where applicable, click Use Printer Setting to access the available choices for a setting or to type text for asetting. You can return to the default setting for the printer by clicking the setting value you entered, and then
clicking on the Task Properties toolbar. You can also right-click the setting value you entered, and thenselect Use Printer Setting.
Fax Destination
• Prompt at Runtime—Select this option to let users change settings. If this option is selected, then users will havethe option to override the settings specified here. If this option is cleared, then each scan job will use the settingsspecified here, and users will not have the option to change them.
• Fax Number(s)—Type a semicolon‑separated list of fax numbers.
Fax Settings (Basic)
• Resolution—Specify the resolution of the transmitted image.
Note: Higher resolution settings result in larger files.
• Original Size—Specify the paper size of the original document.
• Original Sides (Duplex)—Select whether to let users scan one‑sided or two‑sided documents. Select Simplex toscan one‑sided original documents. Select Duplex to scan two‑sided original documents.
• Orientation—Specify whether the original document is in portrait or landscape orientation. Select Portrait if theheight of the page is greater than the width. Select Landscape if the width of the page is greater than the height.
• Binding—Specify whether the original document is bound on the long-edge or short-edge side. Binding applies onlyif Original Sides (Duplex) is set to Duplex.
Appendix 38
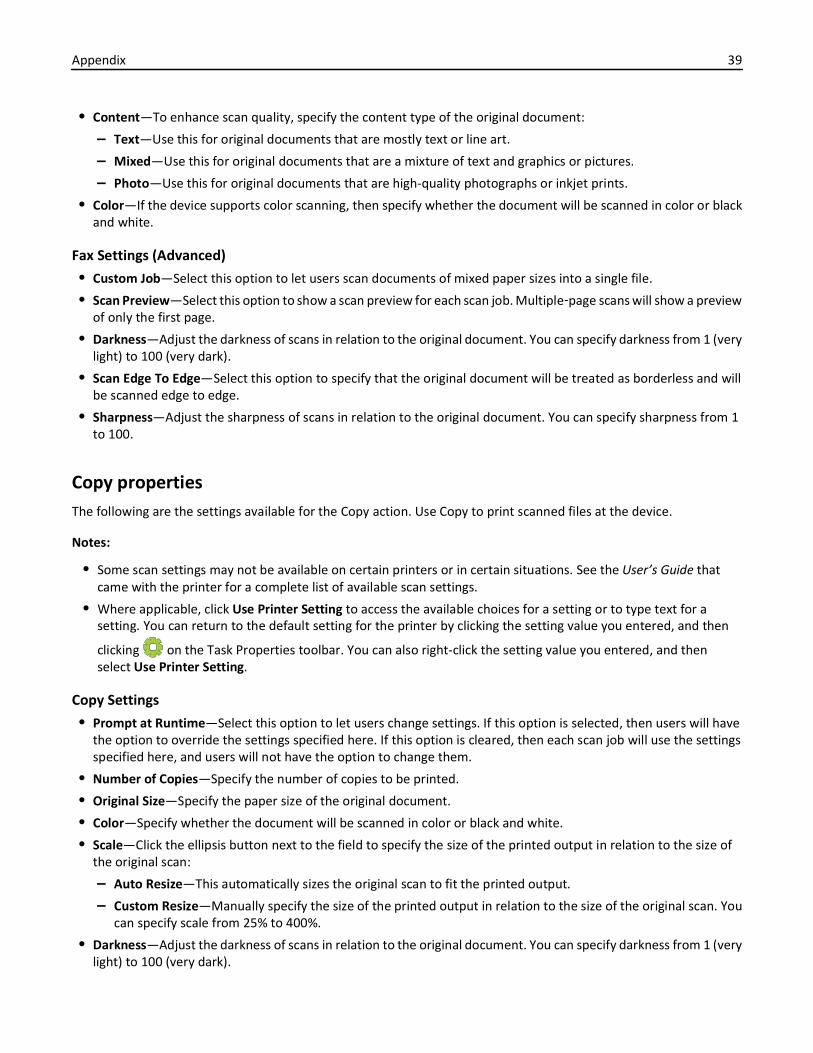
• Content—To enhance scan quality, specify the content type of the original document:
– Text—Use this for original documents that are mostly text or line art.
– Mixed—Use this for original documents that are a mixture of text and graphics or pictures.
– Photo—Use this for original documents that are high-quality photographs or inkjet prints.
• Color—If the device supports color scanning, then specify whether the document will be scanned in color or blackand white.
Fax Settings (Advanced)
• Custom Job—Select this option to let users scan documents of mixed paper sizes into a single file.
• Scan Preview—Select this option to show a scan preview for each scan job. Multiple‑page scans will show a previewof only the first page.
• Darkness—Adjust the darkness of scans in relation to the original document. You can specify darkness from 1 (verylight) to 100 (very dark).
• Scan Edge To Edge—Select this option to specify that the original document will be treated as borderless and willbe scanned edge to edge.
• Sharpness—Adjust the sharpness of scans in relation to the original document. You can specify sharpness from 1to 100.
Copy propertiesThe following are the settings available for the Copy action. Use Copy to print scanned files at the device.
Notes:
• Some scan settings may not be available on certain printers or in certain situations. See the User’s Guide thatcame with the printer for a complete list of available scan settings.
• Where applicable, click Use Printer Setting to access the available choices for a setting or to type text for asetting. You can return to the default setting for the printer by clicking the setting value you entered, and then
clicking on the Task Properties toolbar. You can also right-click the setting value you entered, and thenselect Use Printer Setting.
Copy Settings
• Prompt at Runtime—Select this option to let users change settings. If this option is selected, then users will havethe option to override the settings specified here. If this option is cleared, then each scan job will use the settingsspecified here, and users will not have the option to change them.
• Number of Copies—Specify the number of copies to be printed.
• Original Size—Specify the paper size of the original document.
• Color—Specify whether the document will be scanned in color or black and white.
• Scale—Click the ellipsis button next to the field to specify the size of the printed output in relation to the size ofthe original scan:
– Auto Resize—This automatically sizes the original scan to fit the printed output.
– Custom Resize—Manually specify the size of the printed output in relation to the size of the original scan. Youcan specify scale from 25% to 400%.
• Darkness—Adjust the darkness of scans in relation to the original document. You can specify darkness from 1 (verylight) to 100 (very dark).
Appendix 39
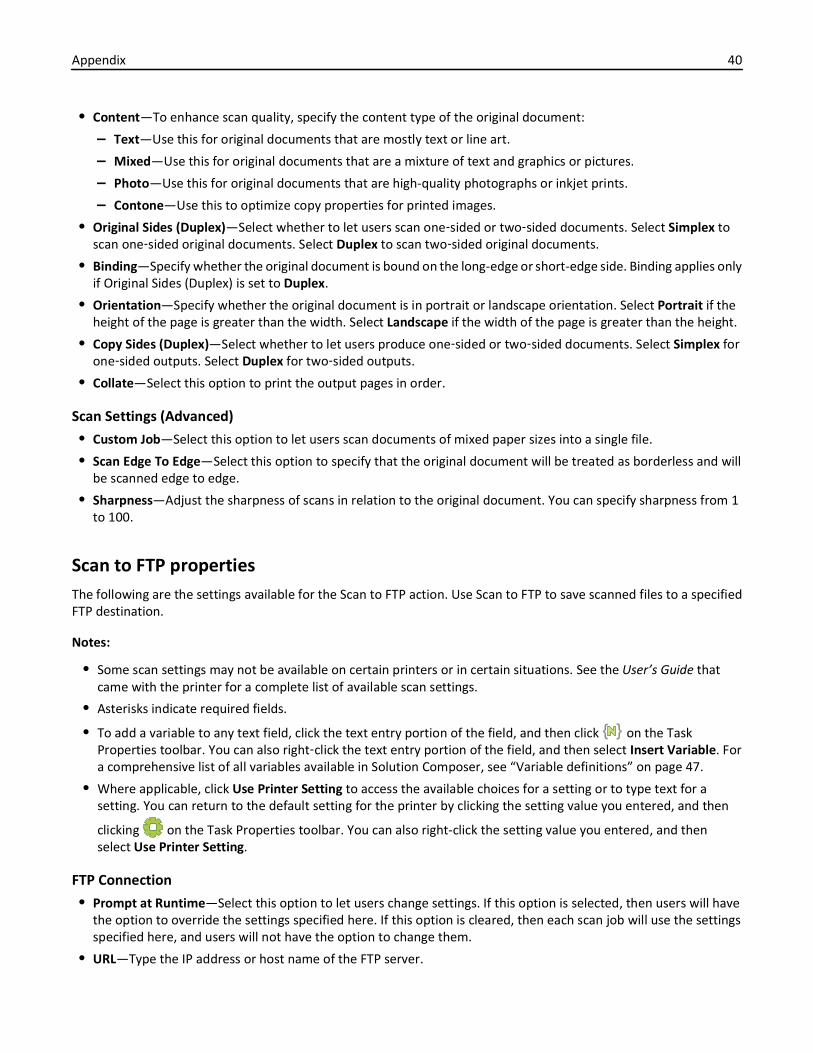
• Content—To enhance scan quality, specify the content type of the original document:
– Text—Use this for original documents that are mostly text or line art.
– Mixed—Use this for original documents that are a mixture of text and graphics or pictures.
– Photo—Use this for original documents that are high-quality photographs or inkjet prints.
– Contone—Use this to optimize copy properties for printed images.
• Original Sides (Duplex)—Select whether to let users scan one‑sided or two‑sided documents. Select Simplex toscan one‑sided original documents. Select Duplex to scan two‑sided original documents.
• Binding—Specify whether the original document is bound on the long-edge or short-edge side. Binding applies onlyif Original Sides (Duplex) is set to Duplex.
• Orientation—Specify whether the original document is in portrait or landscape orientation. Select Portrait if theheight of the page is greater than the width. Select Landscape if the width of the page is greater than the height.
• Copy Sides (Duplex)—Select whether to let users produce one‑sided or two‑sided documents. Select Simplex forone‑sided outputs. Select Duplex for two‑sided outputs.
• Collate—Select this option to print the output pages in order.
Scan Settings (Advanced)
• Custom Job—Select this option to let users scan documents of mixed paper sizes into a single file.
• Scan Edge To Edge—Select this option to specify that the original document will be treated as borderless and willbe scanned edge to edge.
• Sharpness—Adjust the sharpness of scans in relation to the original document. You can specify sharpness from 1to 100.
Scan to FTP propertiesThe following are the settings available for the Scan to FTP action. Use Scan to FTP to save scanned files to a specifiedFTP destination.
Notes:
• Some scan settings may not be available on certain printers or in certain situations. See the User’s Guide thatcame with the printer for a complete list of available scan settings.
• Asterisks indicate required fields.
• To add a variable to any text field, click the text entry portion of the field, and then click { } on the TaskProperties toolbar. You can also right‑click the text entry portion of the field, and then select Insert Variable. Fora comprehensive list of all variables available in Solution Composer, see “Variable definitions” on page 47.
• Where applicable, click Use Printer Setting to access the available choices for a setting or to type text for asetting. You can return to the default setting for the printer by clicking the setting value you entered, and then
clicking on the Task Properties toolbar. You can also right-click the setting value you entered, and thenselect Use Printer Setting.
FTP Connection
• Prompt at Runtime—Select this option to let users change settings. If this option is selected, then users will havethe option to override the settings specified here. If this option is cleared, then each scan job will use the settingsspecified here, and users will not have the option to change them.
• URL—Type the IP address or host name of the FTP server.
Appendix 40
Examples:
– ftp://192.168.1.57/
– ftp://servername/
– ftp://192.168.1.57/foldername
– ftp://ftp.company.com/
Note: URL entries must begin with a valid character (no white space). The following characters cannot be used:^ : / * ” ? + [ ] < > |
• Username—Type the user name needed to access the FTP server (not required by all servers).
Note: You can also add a variable based on a previous prompt input to this field. Right‑click the field, and thenselect Insert Variable. For more information about how to use variables, see “Variable definitions” on page 47.
• Password—Click the ellipsis button next to the field, and then provide the password associated with the user nameneeded to access the FTP server (not required by all servers):
– Use the password entered here—Type the password.
– Get the password from a variable—Select a variable that will provide the password while the solution is running.
Output
• Scan filename—Type the default base file name for files scanned to the FTP destination.
Note: File names must begin with a valid character (no white space). The following characters cannot be used:^ : / * ” ? + [ ] < >
• Overwrite existing file—Select this option to automatically replace existing files of the same name.
Note: This is supported only if the user name provided to access the FTP destination is allowed to overwritefiles.
• Append timestamp—Select this option to add a time signature to the file name when saving a file.
• Create index file—Select whether the printer will create a standard index file that lists details about the scan job.The index file is saved to the destination folder.
Select one of the following:
– None—The printer will not create an index file in the destination folder.
– XML—The printer generates a basic XML index file.
– CSV—The printer generates a basic CSV index file that the administrator can use in a spreadsheet or database.
Notes:
– The name of the generated index file will be the same each time the solution runs. If index files are notconsumed or cleaned out of the FTP location each time, then the solution will fail and an error message willbe shown on the printer touch screen.
– The index file will share the same base file name as the scanned document, but its extension (.xml or .csv)will be determined by the selection made here.
– The data included in these index files cannot be customized. Use an “Index File to Network” or “Index File toFTP” action to create custom index files. For more information, see “Index File to Network properties” onpage 43or “Index File to FTP properties” on page 44.
Appendix 41
Scan Settings (Basic)
• Original Size—Specify the paper size of the original document.
• Original Sides (Duplex)—Select whether to let users scan one‑sided or two‑sided documents. Select Simplex toscan one‑sided original documents. Select Duplex to scan two‑sided original documents.
• Orientation—Specify whether the original document is in portrait or landscape orientation. Select Portrait if theheight of the page is greater than the width. Select Landscape if the width of the page is greater than the height.
• Binding—Specify whether the original document is bound on the long-edge or short-edge side. Binding applies onlyif Original Sides (Duplex) is set to Duplex.
• Resolution—Adjust the quality of the scanned document. If users are scanning a photograph, a drawing with finelines, or a document with very small text, then increase the resolution setting.
Note: Higher resolution settings result in larger files.
• File Format—Specify the output for the scanned image:
– TIFF—This creates multiple files or a single file. The file size is usually larger than an equivalent JPEG.
Note: If multi-page TIFF is turned off in the Settings menu of the printer Embedded Web Server, then thisoption saves one page in each file.
– JPEG—This creates a separate file for each page of the original document, viewable by most Web browsers andgraphics programs.
– PDF—This creates a single file with multiple pages, viewable with a PDF reader.
– Secure PDF—This creates an encrypted PDF file that protects the file contents from unauthorized access.
– XPS—This creates a single XPS file with multiple pages, viewable using an Internet Explorer–hosted viewer andthe .NET Framework, or by downloading a third‑party standalone viewer.
• Content—To enhance scan quality, specify the content type of the original document:
– Text—Use this for original documents that are mostly text or line art.
– Mixed—Use this for original documents that are a mixture of text and graphics or pictures.
– Photo—Use this for original documents that are high-quality photographs or inkjet prints.
• Color—Specify whether the document will be scanned in color or black and white.
Scan Settings (Advanced)
• Custom Job—Select this option to let users scan documents of mixed paper sizes into a single file.
• Scan Preview—Select this option to show a scan preview for each scan job. Multiple‑page scans will show a previewof only the first page.
• Darkness—Adjust the darkness of scans in relation to the original document. You can specify darkness from 1 (verylight) to 100 (very dark).
• Scan Edge To Edge—Select this option to specify that the original document will be treated as borderless and willbe scanned edge to edge.
• Sharpness—Adjust the sharpness of scans in relation to the original document. You can specify sharpness from 1to 100.
Miscellaneous
• File name separator—Click the ellipsis button next to the field to select how to separate the list of files scanned toan FTP destination (comma, colon, semicolon, or custom).
Appendix 42
Properties for index files
Index File to Network propertiesThe following are the settings available for the Index File to Network task. Use Index File to Network to save a customindex file containing user‑defined content, such as details about a scan job, to a specified network location.
Notes:
• Asterisks indicate required fields.
• To add a variable to any text field, click the text entry portion of the field, and then click { } on the TaskProperties toolbar. You can also right‑click the text entry portion of the field, and then select Insert Variable. Fora comprehensive list of all variables available in Solution Composer, see “Variable definitions” on page 47.
Connection to Share
• URL—Type the IP address or host name of the network share, including folder names, if necessary.
Examples:
– \\192.168.1.57\
– \\servername\
– \\192.168.1.57\groupfolder
– \\companyserver1\groupfolder
Note: URL entries must begin with a valid character (no white space). The following characters cannot be used:^ : / * ” ? + [ ] < > |
• Authentication—Click the ellipsis button next to the field to specify how users will authenticate with the networkshare:
– Credentials Provided By—Select how to authenticate users:
• Guest/Anonymous—This does not require users to authenticate.
• MFP—This uses the credentials that have already been stored on the printer.
Note: If the same credentials are used to access both the printer and the remote network destination,then the solution will pass these credentials to the remote destination at runtime. For informationabout setting up user credentials on the printer, see the Embedded Web Server Administrator's Guidefor your printer.
• Static—This uses fixed credentials, which can either be a set value such as one user name shared by all users,or the value of a variable such as a text prompt that asks for a user name. If you select this option, then thefollowing options are enabled for you to configure:
– Username—Type the user name needed to access the network share.
Note: You can also add a variable based on a previous prompt input to this field. Right‑click thefield, and then select Insert Variable. For more information about how to use variables, see“Variable definitions” on page 47.
– Use the password entered here—Type the password associated with the user name needed to accessthe network share.
– Get the password from a variable—Select a variable that will provide the password while the solutionis running.
Appendix 43
Output
• Base filename—Type the default base file name for the index file that will be saved to the network destinationfolder.
Note: File names must begin with a valid character (no white space). The following characters cannot be used:^ : / * ” ? + [ ] < >
• File name extension—Type the extension for the file name. The extension should not contain a period.
• Append timestamp—Select this option to add a time signature to the file name when saving a file.
• Overwrite existing file—Select this option to automatically replace existing files of the same name.
Note: This is supported only if the user name provided to access the network share is allowed to overwrite files.
• Content Text—Click the ellipsis button next to the field to type the text that will be included in the index file.
Note: To include variables as part of the content text, right‑click anywhere in the Content Text dialog, and thenselect Insert Variable. For more information about variables, see “Variable definitions” on page 47.
• Newline Separator—Select the character sequence to use for new lines (DOS/Windows or Unix/MacOS X).
• Use XML format—Select this option if the content text is XML. This ensures that the content text will be run throughan XML‑safe filter. Ampersands will be replaced by &, quotation marks will be replaced by ", and so on.
Miscellaneous
• Message during file transfer—Click the ellipsis button next to the field to type the message that users will see onthe printer touch screen while index files are being saved to the network destination folder.
Notes:
– Depending on how quickly the file transfer takes place, users may not see a file transfer message.
– To include variables as part of the message text, right‑click anywhere in the “Message during file transfer”dialog, and then select Insert Variable. For more information about variables, see “Variable definitions” onpage 47.
Index File to FTP propertiesThe following are the settings available for the Index File to FTP task. Use Index File to FTP to save a custom index filecontaining user‑defined content, such as details about a scan job, to a specified FTP destination.
Notes:
• Asterisks indicate required fields.
• To add a variable to any text field, click the text entry portion of the field, and then click { } on the TaskProperties toolbar. You can also right‑click the text entry portion of the field, and then select Insert Variable. Fora comprehensive list of all variables available in Solution Composer, see “Variable definitions” on page 47.
FTP Connection
• URL—Type the IP address or host name of the FTP server, including folder names, if necessary.
Examples:
– ftp://192.168.1.57/
– ftp://servername/
Appendix 44
– ftp://192.168.1.57/foldername
– ftp://ftp.company.com/
Note: URL entries must begin with a valid character (no white space). The following characters cannot be used:^ : / * ” ? + [ ] < > |
• Username—Type the user name needed to access the FTP server (not required by all servers).
Note: You can also add a variable based on a previous prompt input to this field. Right‑click the field, and thenselect Insert Variable. For more information about how to use variables, see “Variable definitions” on page 47.
• Password—Click the ellipsis button next to the field, and then provide the password associated with the user nameneeded to access the FTP server (not required by all servers):
– Use the password entered here—Type the password.
– Get the password from a variable—Select a variable that will provide the password while the solution is running.
Output
• Base filename—Type the default base file name for the index file that will be saved to the FTP destination folder.
Note: File names must begin with a valid character (no white space). The following characters cannot be used:^ : / * ” ? + [ ] < >
• File name extension—Type the extension for the file name. The extension should not contain a period.
• Append timestamp—Select this option to add a time signature to the file name when saving a file.
• Overwrite existing file—Select this option to automatically replace existing files of the same name.
Note: This is supported only if the user name provided to access the FTP destination is allowed to overwritefiles.
• Content Text—Click the ellipsis button next to the field to type the text that will be included in the index file.
Note: To include variables as part of the content text, right‑click anywhere in the Content Text dialog, and thenselect Insert Variable. For more information about variables, see “Variable definitions” on page 47.
• Newline Separator—Select the character sequence to use for new lines (DOS/Windows or Unix/MacOS X).
• Use XML format—Select this option if the content text is XML. This ensures that the content text will be run throughan XML‑safe filter. Ampersands will be replaced by &, quotation marks will be replaced by ", and so on.
Miscellaneous
• Message during file transfer—Click the ellipsis button next to the field to type the message that users will see onthe printer touch screen while index files are being saved to the FTP destination folder.
Notes:
– Depending on how quickly the file transfer takes place, users may not see a file transfer message.
– To include variables as part of the message text, right‑click anywhere in the “Message during file transfer”dialog, and then select Insert Variable. For more information about variables, see “Variable definitions” onpage 47.
Appendix 45
Properties for confirmations
Print Confirmation propertiesThe following are the settings available for the Print Confirmation task. Use Print Confirmation to print a page of text,such as a confirmation message, at the device. For example, you could use a Print Confirmation task after a Scan toEmail task to print a list of the e‑mail addresses to which the scan was sent.
Note: Asterisks indicate required fields.
General
• Content Text—Click the ellipsis button next to the field to type the text that will be printed on the confirmationpage.
Note: To include variables as part of the content text, right‑click anywhere in the Content Text dialog, and thenselect Insert Variable. For more information about variables, see “Variable definitions” on page 47.
• Message during print—Click the ellipsis button next to the field to type the message that users will see on theprinter touch screen while the page is printing.
Note: To include variables as part of the message, right‑click anywhere in the “Message during print” dialog, andthen select Insert Variable. For more information about variables, see “Variable definitions” on page 47.
Email Confirmation propertiesThe following are the settings available for the Email Confirmation task. Use Email Confirmation to e‑mail text, such asa confirmation message, to specified e‑mail addresses. For example, you could use an Email Confirmation task after aScan to Network task to e‑mail a list of the files that were scanned to the network destination.
Notes:
• Asterisks indicate required fields.
• Email Confirmation can be implemented only if the e‑mail settings on the printer have been configuredproperly. See the User’s Guide that came with the printer for more information on configuring e‑mail settings.
• To add a variable to any text field, click the text entry portion of the field, and then click { } on the TaskProperties toolbar. You can also right‑click the text entry portion of the field, and then select Insert Variable. Fora comprehensive list of all variables available in Solution Composer, see “Variable definitions” on page 47.
• Where applicable, click Use Printer Setting to access the available choices for a setting or to type text for asetting. You can return to the default setting for the printer by clicking the setting value you entered, and then
clicking on the Task Properties toolbar. You can also right-click the setting value you entered, and thenselect Use Printer Setting.
• To—Click the ellipsis button next to the field to type one or more e‑mail addresses, separated by commas orsemicolons. You must type at least one e‑mail address.
Note: Entries should follow standard SMTP protocol for e-mail addresses. (Example: [email protected])
• Cc—Click the ellipsis button next to the field to type one or more e‑mail addresses to copy, separated by commasor semicolons.
Appendix 46
• Bcc—Click the ellipsis button next to the field to type one or more e‑mail addresses to blind copy, separated bycommas or semicolons.
• From—Type the e‑mail address of the person sending the e‑mail confirmation.
• Subject—Type the subject line of the e‑mail.
• Message—Click the ellipsis button next to the field to type the body of the e‑mail.
• Newline Separator—Select the character sequence to use for new lines (DOS/Windows or Unix/MacOS X).
• Message during file transfer—Click the ellipsis button next to the field to type the message that users will see onthe printer touch screen while the e‑mail confirmation is sending.
Note: To include variables as part of the message, right‑click anywhere in the “Message during file transfer”dialog, and then select Insert Variable. For more information about variables, see “Variable definitions” onpage 47.
Variable definitionsVariables can be added to any Task Property field where custom text can be specified. You can access the list of variables
available for a particular text field by clicking the field, and then clicking { } on the Task Properties toolbar. You canalso right‑click the field, and then select Insert Variable. The information represented by the selected variable orvariables will be included among the properties for that particular field.
System variablesThe following are the system variables available in Solution Composer.
• MFP IP Address—This is the current TCP/IP address of the printer running Solution Composer.
• MFP Hostname—This is the current host name of the printer running Solution Composer.
• MFP Model—This is the model number of the printer running Solution Composer.
• Date and Time—This is the date and time a particular job is initiated. The date and time are pulled from the currentvalues found on the printer.
User Prompt variablesThe following are the variables available for User Prompts in Solution Composer.
Multiple Choice prompt
• Selected Text List—This is the text typed in the Label field of the chosen item.
• Selected Value List—This is the text typed in the Value field of the chosen item.
• Selected Index List—This lists the index numbers of the selected entries.
• Prompt—This is the text typed in the Prompt field of the Multiple Choice prompt.
Note: If the prompt is configured to allow multiple selections, then the data returned by the variables will be a list ofvalues separated by the method selected in the “Selected value separator” field for that prompt.
Numeric Entry prompt
• Response—This is the number the user entered in response to the prompt.
• Prompt—This is the text typed in the Prompt field of the Numeric Entry prompt.
Appendix 47
Message prompt
• Message—This is the text typed in the Message dialog of the chosen item.
Text Entry prompt
• Response—This is the text the user typed in response to the prompt.
• Prompt—This is the text typed in the Prompt field of the Text Entry prompt.
Scan to Email variablesThe following are the Scan to Email variables available in Solution Composer.
Note: Some scan settings may not be available on certain printers or in certain situations. See the User’s Guide thatcame with the printer for a complete list of available scan settings.
• Output File List—This is a comma‑separated list of the files that were attached to the e‑mail.
• Page Sides Scanned—This indicates the number of page sides that were scanned.
• To—This lists the e‑mail addresses of the recipients of a Scan to Email job.
• Cc—This lists the e‑mail addresses of copied recipients of a Scan to Email job.
• Bcc—This lists the e‑mail addresses of blind‑copied recipients of a Scan to Email job.
• From—This is the person sending a Scan to Email job.
• Subject—This is the subject line of the e‑mail sent during a Scan to Email job.
• Original Size—This is the paper size of the original scanned document.
• Original Sides (Duplex)—This indicates whether users scanned one‑sided or two‑sided documents. Simplexindicates one‑sided original documents. Duplex indicates two‑sided original documents.
• Orientation—This indicates whether the original document was in portrait or landscape orientation. Portrait meansthe height of the page is greater than the width. Landscape means the width of the page is greater than the height.
• Binding—This indicates whether the original document was bound on the long-edge or short-edge side. Bindingapplies only if Original Sides (Duplex) is set to Duplex.
• Resolution—This is the resolution of the scanned document.
• File Format—This is the output for the scanned image:
– TIFF—This creates multiple files or a single file.
Note: If multi-page TIFF is turned off in the Settings menu of the printer Embedded Web Server, then thisoption saves one page in each file.
– JPEG—This creates and attaches a separate file for each page of the original document, viewable by most Webbrowsers and graphics programs.
– PDF—This creates a single file with multiple pages, viewable with a PDF reader.
– Secure PDF—This creates an encrypted PDF file that protects the file contents from unauthorized access.
– XPS—This creates a single XPS file with multiple pages, viewable using an Internet Explorer–hosted viewer andthe .NET Framework, or by downloading a third‑party standalone viewer.
• Content—This is the content type of the original document:
– Text—This is for original documents that are mostly text or line art.
– Mixed—This is for original documents that are a mixture of text and graphics or pictures.
– Photo—This is for original documents that are high-quality photographs or inkjet prints.
• Color—This indicates whether the document was scanned in color or black and white.
Appendix 48

• Custom Job—This indicates whether a job included mixed paper sizes.
• Scan Preview—This indicates whether a scan preview was shown for a scan job. Multiple‑page scans will show apreview of only the first page.
• Darkness—This indicates the darkness of a scan in relation to the original document. This ranges from 1 (very light)to 100 (very dark).
• Scan Edge To Edge—This indicates whether the original document was treated as borderless and was scanned edgeto edge.
• Sharpness—This indicates the sharpness of a scan in relation to the original document. This ranges from 1 to 100.
Scan to Network variablesThe following are the Scan to Network variables available in Solution Composer.
Note: Some scan settings may not be available on certain printers or in certain situations. See the User’s Guide thatcame with the printer for a complete list of available scan settings.
• Output File List—This is a comma‑separated list of the files that were scanned to the network destination.
• Page Sides Scanned—This indicates the number of page sides that were scanned.
• URL—This is the server name or IP address of the network destination.
• Username—This is the user name needed to access the network destination.
• Password—This is the password associated with the user name needed to access the network destination.
• Original Size—This is the paper size of the original scanned document.
• Original Sides (Duplex)—This indicates whether users scanned one‑sided or two‑sided documents. Simplexindicates one‑sided original documents. Duplex indicates two‑sided original documents.
• Orientation—This indicates whether the original document was in portrait or landscape orientation. Portrait meansthe height of the page is greater than the width. Landscape means the width of the page is greater than the height.
• Binding—This indicates whether the original document was bound on the long-edge or short-edge side. Bindingapplies only if Original Sides (Duplex) is set to Duplex.
• Resolution—This is the resolution of the scanned document.
• File Format—This is the output for the scanned image:
– TIFF—This creates multiple files or a single file.
Note: If multi-page TIFF is turned off in the Settings menu of the printer Embedded Web Server, then thisoption saves one page in each file.
– JPEG—This creates a separate file for each page of the original document, viewable by most Web browsers andgraphics programs.
– PDF—This creates a single file with multiple pages, viewable with a PDF reader.
– Secure PDF—This creates an encrypted PDF file that protects the file contents from unauthorized access.
– XPS—This creates a single XPS file with multiple pages, viewable using an Internet Explorer–hosted viewer andthe .NET Framework, or by downloading a third‑party standalone viewer.
• Content—This is the content type of the original document:
– Text—This is for original documents that are mostly text or line art.
– Mixed—This is for original documents that are a mixture of text and graphics or pictures.
– Photo—This is for original documents that are high-quality photographs or inkjet prints.
• Color—This indicates whether the document was scanned in color or black and white.
Appendix 49
• Custom Job—This indicates whether a job included mixed paper sizes.
• Scan Preview—This indicates whether a scan preview was shown for a scan job. Multiple‑page scans will show apreview of only the first page.
• Darkness—This indicates the darkness of a scan in relation to the original document. This ranges from 1 (very light)to 100 (very dark).
• Scan Edge To Edge—This indicates whether the original document was treated as borderless and was scanned edgeto edge.
• Sharpness—This indicates the sharpness of a scan in relation to the original document. This ranges from 1 to 100.
Multi Send variablesThe following are the Multi Send variables available in Solution Composer.
Note: Some scan settings may not be available on certain printers or in certain situations. See the User’s Guide thatcame with the printer for a complete list of available scan settings.
• Page Sides Scanned—This indicates the number of page sides that were scanned.
• Original Size—This is the paper size of the original scanned document.
• Original Sides (Duplex)—This indicates whether users scanned one‑sided or two‑sided documents. Simplexindicates one‑sided original documents. Duplex indicates two‑sided original documents.
• Orientation—This indicates whether the original document was in portrait or landscape orientation. Portrait meansthe height of the page is greater than the width. Landscape means the width of the page is greater than the height.
• Binding—This indicates whether the original document was bound on the long-edge or short-edge side. Bindingapplies only if Original Sides (Duplex) is set to Duplex.
• Resolution—This is the resolution of the scanned document.
• File Format—This is the output for the scanned image:
– TIFF—This creates multiple files or a single file.
Note: If multi-page TIFF is turned off in the Settings menu of the printer Embedded Web Server, then thisoption saves one page in each file.
– JPEG—This creates a separate file for each page of the original document, viewable by most Web browsers andgraphics programs.
– PDF—This creates a single file with multiple pages, viewable with a PDF reader.
• Content—This is the content type of the original document:
– Text—This is for original documents that are mostly text or line art.
– Mixed—This is for original documents that are a mixture of text and graphics or pictures.
– Photo—This is for original documents that are high-quality photographs or inkjet prints.
• Color—This indicates whether the document was scanned in color or black and white.
• Darkness—This indicates the darkness of a scan in relation to the original document. This ranges from 1 (very light)to 100 (very dark).
• Scan Edge To Edge—This indicates whether the original document was treated as borderless and was scanned edgeto edge.
• Sharpness—This indicates the sharpness of a scan in relation to the original document. This ranges from 1 to 100.
Appendix 50
FTP Destination variables
• File List—This is a comma‑separated list of the files that were scanned to the FTP destination.
• URL—This is the server name or IP address of the FTP destination.
• Username—This is the user name needed to access the FTP destination.
• Password—This is the password associated with the user name needed to access the FTP destination.
Network Destination variables
• File List—This is a comma‑separated list of the files that were scanned to the network destination.
• URL—This is the server name or IP address of the network destination.
• Username—This is the user name needed to access the network destination.
• Password—This is the password associated with the user name needed to access the network destination.
Email Destination variables
• File List—This is a comma‑separated list of the files that were attached to the e‑mail.
• To—This lists the e‑mail addresses of the recipients of the e‑mail.
• Cc—This lists the e‑mail addresses of copied recipients of the e‑mail.
• Bcc—This lists the e‑mail addresses of blind copied recipients of the e‑mail.
• From—This is the person sending the e‑mail.
• Subject—This is the subject line of the e‑mail.
Fax Destination variables
• Number List—This lists the fax numbers of the recipients of the fax job.
Print Destination variables
• Number of Copies—This indicates the number of copies that were printed.
• Copy Sides (Duplex)—This indicates whether users produced one‑sided or two‑sided documents. Simplex indicatesone‑sided outputs. Duplex indicates two‑sided outputs.
• Collate—This indicates whether the output pages were printed in order.
• Allow Color Print—This indicates whether color scans could be printed in color (Yes) or in black and white only (No).
Scan to Fax variablesThe following are the Scan to Fax variables available in Solution Composer.
Note: Some scan settings may not be available on certain printers or in certain situations. See the User’s Guide thatcame with the printer for a complete list of available scan settings.
• Page Sides Scanned—This indicates the number of page sides that were scanned.
• Number List—This lists the fax numbers of the recipients of a Scan to Fax job.
• Resolution—This is the resolution of the transmitted image.
• Original Size—This is the paper size of the original scanned document.
• Original Sides (Duplex)—This indicates whether users scanned one‑sided or two‑sided documents. Simplexindicates one‑sided original documents. Duplex indicates two‑sided original documents.
• Orientation—This indicates whether the original document was in portrait or landscape orientation. Portrait meansthe height of the page is greater than the width. Landscape means the width of the page is greater than the height.
Appendix 51
• Binding—This indicates whether the original document was bound on the long-edge or short-edge side. Bindingapplies only if Original Sides (Duplex) is set to Duplex.
• Content—This is the content type of the original document:
– Text—This is for original documents that are mostly text or line art.
– Mixed—This is for original documents that are a mixture of text and graphics or pictures.
– Photo—This is for original documents that are high-quality photographs or inkjet prints.
• Color—This indicates whether the document was scanned in color or black and white.
• Custom Job—This indicates whether a job included mixed paper sizes.
• Scan Preview—This indicates whether a scan preview was shown for a scan job. Multiple‑page scans will show apreview of only the first page.
• Darkness—This indicates the darkness of a scan in relation to the original document. This ranges from 1 (very light)to 100 (very dark).
• Scan Edge To Edge—This indicates whether the original document was treated as borderless and was scanned edgeto edge.
• Sharpness—This indicates the sharpness of a scan in relation to the original document. This ranges from 1 to 100.
Copy variablesThe following are the Copy variables available in Solution Composer.
Note: Some scan settings may not be available on certain printers or in certain situations. See the User’s Guide thatcame with the printer for a complete list of available scan settings.
• Page Sides Scanned—This indicates the number of page sides that were scanned.
• Page Sides Printed—This indicates the number of page sides that were printed.
• Number of Copies—This indicates the number of copies that were printed.
• Original Size—This is the paper size of the original scanned document.
• Color—This indicates whether the document was scanned in color or black and white.
• Scale—This indicates the size of the printed output in relation to the size of the original scan.
– Auto Resize—This automatically sizes the original scan to fit the printed output.
– Custom Resize—This is used to manually specify the size of the printed output in relation to the size of theoriginal scan. This ranges from 25% to 400%.
• Darkness—This indicates the darkness of a scan in relation to the original document. This ranges from 1 (very light)to 100 (very dark).
• Content—This is the content type of the original document:
– Text—This is for original documents that are mostly text or line art.
– Mixed—This is for original documents that are a mixture of text and graphics or pictures.
– Photo—This is for original documents that are high-quality photographs or inkjet prints.
– Contone—This optimizes copy properties for printed images.
• Original Sides (Duplex)—This indicates whether users scanned one‑sided or two‑sided documents. Simplexindicates one‑sided original documents. Duplex indicates two‑sided original documents.
• Binding—This indicates whether the original document was bound on the long-edge or short-edge side. Bindingapplies only if Original Sides (Duplex) is set to Duplex.
Appendix 52
• Orientation—This indicates whether the original document was in portrait or landscape orientation. Portrait meansthe height of the page is greater than the width. Landscape means the width of the page is greater than the height.
• Copy Sides (Duplex)—This indicates whether users produced one‑sided or two‑sided documents. Simplex indicatesone‑sided outputs. Duplex indicates two‑sided outputs.
• Collate—This indicates whether the output pages were printed in order.
• Custom Job—This indicates whether a job included mixed paper sizes.
• Scan Edge To Edge—This indicates whether the original document was treated as borderless and was scanned edgeto edge.
• Sharpness—This indicates the sharpness of a scan in relation to the original document. This ranges from 1 to 100.
Scan to FTP variablesThe following are the Scan to FTP variables available in Solution Composer.
Note: Some scan settings may not be available on certain printers or in certain situations. See the User’s Guide thatcame with the printer for a complete list of available scan settings.
• Output File List—This is a comma‑separated list of the files that were scanned to the FTP destination.
• Page Sides Scanned—This indicates the number of page sides that were scanned.
• URL—This is the server name or IP address of the FTP destination.
• Username—This is the user name needed to access the FTP destination.
• Password—This is the password associated with the user name needed to access the FTP destination.
• Original Size—This is the paper size of the original scanned document.
• Original Sides (Duplex)—This indicates whether users scanned one‑sided or two‑sided documents. Simplexindicates one‑sided original documents. Duplex indicates two‑sided original documents.
• Orientation—This indicates whether the original document was in portrait or landscape orientation. Portrait meansthe height of the page is greater than the width. Landscape means the width of the page is greater than the height.
• Binding—This indicates whether the original document was bound on the long-edge or short-edge side. Bindingapplies only if Original Sides (Duplex) is set to Duplex.
• Resolution—This is the resolution of the scanned document.
• File Format—This is the output for the scanned image:
– TIFF—This creates multiple files or a single file.
Note: If multi-page TIFF is turned off in the Settings menu of the printer Embedded Web Server, then thisoption saves one page in each file.
– JPEG—This creates a separate file for each page of the original document, viewable by most Web browsers andgraphics programs.
– PDF—This creates a single file with multiple pages, viewable with a PDF reader.
– Secure PDF—This creates an encrypted PDF file that protects the file contents from unauthorized access.
– XPS—This creates a single XPS file with multiple pages, viewable using an Internet Explorer–hosted viewer andthe .NET Framework, or by downloading a third‑party standalone viewer.
• Content—This is the content type of the original document:
– Text—This is for original documents that are mostly text or line art.
– Mixed—This is for original documents that are a mixture of text and graphics or pictures.
– Photo—This is for original documents that are high-quality photographs or inkjet prints.
Appendix 53
• Color—This indicates whether the document was scanned in color or black and white.
• Custom Job—This indicates whether a job included mixed paper sizes.
• Scan Preview—This indicates whether a scan preview was shown for a scan job. Multiple‑page scans will show apreview of only the first page.
• Darkness—This indicates the darkness of a scan in relation to the original document. This ranges from 1 (very light)to 100 (very dark).
• Scan Edge To Edge—This indicates whether the original document was treated as borderless and was scanned edgeto edge.
• Sharpness—This indicates the sharpness of a scan in relation to the original document. This ranges from 1 to 100.
Index File to Network variablesThe following are the Index File to Network variables available in Solution Composer.
• Output File List—This is a comma‑separated list of index files that were written.
• URL—This is the server name or IP address of the network destination.
• Username—This is the user name needed to access the network destination.
• Password—This is the password associated with the user name needed to access the network destination.
• File name extension—This is the extension specified for the index file.
• Content Text—This is the text contained in the index file.
Index File to FTP variablesThe following are the Index File to FTP variables available in Solution Composer.
• Output File List—This is a comma‑separated list of index files that were written.
• URL—This is the server name or IP address of the FTP destination.
• Username—This is the user name needed to access the FTP destination.
• Password—This is the password associated with the user name needed to access the FTP destination.
• File name extension—This is the extension specified for the index file.
• Content Text—This is the text contained in the index file.
Email Confirmation variablesThe following are the Email Confirmation variables available in Solution Composer.
• To—This lists the e‑mail addresses of the recipients of the e‑mail.
• Cc—This lists the e‑mail addresses of copied recipients of the e‑mail.
• Bcc—This lists the e‑mail addresses of blind copied recipients of the e‑mail.
• From—This is the person sending the e‑mail.
• Subject—This is the subject line of the e‑mail.
Appendix 54
Notices
LEXMARK SOFTWARE LICENSE AGREEMENT
PLEASE READ CAREFULLY BEFORE INSTALLING AND/OR USING THIS SOFTWARE: This Software License Agreement("License Agreement") is a legal agreement between you (either an individual or a single entity) and LexmarkInternational, Inc. ("Lexmark") that, to the extent your Lexmark product or Software Program is not otherwise subjectto a written software license agreement between you and Lexmark or its suppliers, governs your use of any SoftwareProgram installed on or provided by Lexmark for use in connection with your Lexmark product. The term "SoftwareProgram" includes machine-readable instructions, audio/visual content (such as images and recordings), and associatedmedia, printed materials and electronic documentation.
BY USING AND/OR INSTALLING THIS SOFTWARE, YOU AGREE TO BE BOUND BY ALL THE TERMS AND CONDITIONS OFTHIS LICENSE AGREEMENT. IF YOU DO NOT SO AGREE, DO NOT INSTALL, COPY, DOWNLOAD, OR OTHERWISE USE THESOFTWARE PROGRAM. IF YOU DO NOT AGREE WITH THE TERMS OF THIS LICENSE AGREEMENT, PROMPTLY RETURNTHE PRODUCT UNUSED AND REQUEST A REFUND OF THE AMOUNT YOU PAID. IF YOU ARE INSTALLING THIS SOFTWAREPROGRAM FOR USE BY OTHER PARTIES, YOU AGREE TO INFORM THE USERS THAT USE OF THE SOFTWARE PROGRAMINDICATES ACCEPTANCE OF THESE TERMS.
1 STATEMENT OF LIMITED WARRANTY. Lexmark warrants that the media (e.g., diskette or compact disk) on whichthe Software Program (if any) is furnished is free from defects in materials and workmanship under normal useduring the warranty period. The warranty period is ninety (90) days and commences on the date the SoftwareProgram is delivered to the original end-user. This limited warranty applies only to Software Program mediapurchased new from Lexmark or an Authorized Lexmark Reseller or Distributor. Lexmark will replace the SoftwareProgram should it be determined that the media does not conform to this limited warranty.
2 DISCLAIMER AND LIMITATION OF WARRANTIES. EXCEPT AS PROVIDED IN THIS LICENSE AGREEMENT AND TO THEMAXIMUM EXTENT PERMITTED BY APPLICABLE LAW, LEXMARK AND ITS SUPPLIERS PROVIDE THE SOFTWAREPROGRAM "AS IS" AND HEREBY DISCLAIM ALL OTHER WARRANTIES AND CONDITIONS, EITHER EXPRESS OR IMPLIED,INCLUDING, BUT NOT LIMITED TO, TITLE, NON-INFRINGEMENT, MERCHANTABILITY AND FITNESS FOR APARTICULAR PURPOSE, AND ABSENCE OF VIRUSES, ALL WITH REGARD TO THE SOFTWARE PROGRAM. ThisAgreement is to be read in conjunction with certain statutory provisions, as that may be in force from time to time,that imply warranties or conditions or impose obligations on Lexmark that cannot be excluded or modified. If anysuch provisions apply, then to the extent Lexmark is able, Lexmark hereby limits its liability for breach of thoseprovisions to one of the following: replacement of the Software Program or reimbursement of the price paid forthe Software Program.
3 LICENSE GRANT. Lexmark grants you the following rights provided you comply with all terms and conditions of thisLicense Agreement:
a Use. You may Use one copy of the Software Program. The term "Use" means storing, loading, installing,executing, or displaying the Software Program. If Lexmark has licensed the Software Program to you forconcurrent use, you must limit the number of authorized users to the number specified in your agreement withLexmark. You may not separate the components of the Software Program for use on more than one computer.You agree that you will not Use the Software Program, in whole or in part, in any manner that has the effect ofoverriding, modifying, eliminating, obscuring, altering or de-emphasizing the visual appearance of anytrademark, trade name, trade dress or intellectual property notice that appears on any computer display screensnormally generated by, or as a result of, the Software Program.
b Copying. You may make one (1) copy of the Software Program solely for purposes of backup, archiving, orinstallation, provided the copy contains all of the original Software Program's proprietary notices. You may notcopy the Software Program to any public or distributed network.
Notices 55
c Reservation of Rights. The Software Program, including all fonts, is copyrighted and owned by LexmarkInternational, Inc. and/or its suppliers. Lexmark reserves all rights not expressly granted to you in this LicenseAgreement.
d Freeware. Notwithstanding the terms and conditions of this License Agreement, all or any portion of theSoftware Program that constitutes software provided under public license by third parties ("Freeware") islicensed to you subject to the terms and conditions of the software license agreement accompanying suchFreeware, whether in the form of a discrete agreement, shrink-wrap license, or electronic license terms at thetime of download. Use of the Freeware by you shall be governed entirely by the terms and conditions of suchlicense.
4 TRANSFER. You may transfer the Software Program to another end-user. Any transfer must include all softwarecomponents, media, printed materials, and this License Agreement and you may not retain copies of the SoftwareProgram or components thereof. The transfer may not be an indirect transfer, such as a consignment. Prior to thetransfer, the end-user receiving the transferred Software Program must agree to all these License Agreement terms.Upon transfer of the Software Program, your license is automatically terminated. You may not rent, sublicense, orassign the Software Program except to the extent provided in this License Agreement.
5 UPGRADES. To Use a Software Program identified as an upgrade, you must first be licensed to the original SoftwareProgram identified by Lexmark as eligible for the upgrade. After upgrading, you may no longer use the originalSoftware Program that formed the basis for your upgrade eligibility.
6 LIMITATION ON REVERSE ENGINEERING. You may not alter, reverse engineer, reverse assemble, reverse compileor otherwise translate the Software Program, except as and to the extent expressly permitted to do so by applicablelaw for the purposes of inter-operability, error correction, and security testing. If you have such statutory rights,you will notify Lexmark in writing of any intended reverse engineering, reverse assembly, or reverse compilation.You may not decrypt the Software Program unless necessary for the legitimate Use of the Software Program.
7 ADDITIONAL SOFTWARE. This License Agreement applies to updates or supplements to the original SoftwareProgram provided by Lexmark unless Lexmark provides other terms along with the update or supplement.
8 LIMITATION OF REMEDIES. To the maximum extent permitted by applicable law, the entire liability of Lexmark, itssuppliers, affiliates, and resellers, and your exclusive remedy shall be as follows: Lexmark will provide the expresslimited warranty described above. If Lexmark does not remedy defective media as warranted, you may terminateyour license and your money will be refunded upon the return of all of your copies of the Software Program.
9 LIMITATION OF LIABILITY. To the maximum extent permitted by applicable law, for any claim arising out of Lexmark'slimited warranty, or for any other claim whatsoever related to the subject matter of this Agreement, Lexmark'sliability for all types of damages, regardless of the form of action or basis (including contract, breach, estoppel,negligence, misrepresentation, or tort), shall be limited to the greater of $5,000 or the money paid to Lexmark orits authorized remarketers for the license hereunder for the Software Program that caused the damages or that isthe subject matter of, or is directly related to, the cause of action.
IN NO EVENT WILL LEXMARK, ITS SUPPLIERS, SUBSIDIARIES, OR RESELLERS BE LIABLE FOR ANY SPECIAL, INCIDENTAL,INDIRECT, EXEMPLARY, PUNITIVE, OR CONSEQUENTIAL DAMAGES (INCLUDING BUT NOT LIMITED TO LOST PROFITSOR REVENUES, LOST SAVINGS, INTERRUPTION OF USE OR ANY LOSS OF, INACCURACY IN, OR DAMAGE TO, DATAOR RECORDS, FOR CLAIMS OF THIRD PARTIES, OR DAMAGE TO REAL OR TANGIBLE PROPERTY, FOR LOSS OF PRIVACYARISING OUT OR IN ANY WAY RELATED TO THE USE OF OR INABILITY TO USE THE SOFTWARE PROGRAM, OROTHERWISE IN CONNECTION WITH ANY PROVISION OF THIS LICENCE AGREEMENT), REGARDLESS OF THE NATUREOF THE CLAIM, INCLUDING BUT NOT LIMITED TO BREACH OF WARRANTY OR CONTRACT, TORT (INCLUDINGNEGLIGENCE OR STRICT LIABILITY), AND EVEN IF LEXMARK, OR ITS SUPPLIERS, AFFILIATES, OR REMARKETERS HAVEBEEN ADVISED OF THE POSSIBILITY OF SUCH DAMAGES, OR FOR ANY CLAIM BY YOU BASED ON A THIRD-PARTYCLAIM, EXCEPT TO THE EXTENT THIS EXCLUSION OF DAMAGES IS DETERMINED LEGALLY INVALID. THE FOREGOINGLIMITATIONS APPLY EVEN IF THE ABOVE-STATED REMEDIES FAIL OF THEIR ESSENTIAL PURPOSE.
10 TERM. This License Agreement is effective unless terminated or rejected. You may reject or terminate this licenseat any time by destroying all copies of the Software Program, together with all modifications, documentation, andmerged portions in any form, or as otherwise described herein. Lexmark may terminate your license upon noticeif you fail to comply with any of the terms of this License Agreement. Upon such termination, you agree to destroy
Notices 56
all copies of the Software Program together with all modifications, documentation, and merged portions in anyform.
11 TAXES. You agree that you are responsible for payment of any taxes including, without limitation, any goods andservices and personal property taxes, resulting from this Agreement or your Use of the Software Program.
12 LIMITATION ON ACTIONS. No action, regardless of form, arising out of this Agreement may be brought by eitherparty more than two years after the cause of action has arisen, except as provided under applicable law.
13 APPLICABLE LAW. This Agreement is governed non-exclusively by the laws of the country in which you acquired theSoftware Program (or, if that country has a federal system of government, then this Agreement will be governedby the laws of the political subdivision in which you acquired the Software). If you acquired the Software in theUnited States, the laws of the Commonwealth of Kentucky shall govern. No choice of law rules in any jurisdictionwill apply.
14 UNITED STATES GOVERNMENT RESTRICTED RIGHTS. The Software has been developed entirely at private expenseand is provided with RESTRICTED RIGHTS. Use, duplication and disclosure by the Government is subject torestrictions as set forth in subparagraph (c) (1) (ii) of the Rights in Technical Data and Computer Software clause atDFARS 252.227-7013 and in similar FAR provisions (or any equivalent agency regulation or contract clause).
15 CONSENT TO USE OF DATA. You agree that Lexmark, its affiliates, and agents may collect and use information youprovide in relation to support services performed with respect to the Software Program and requested by you.Lexmark agrees not to use this information in a form that personally identifies you except to the extent necessaryto provide such services.
16 EXPORT RESTRICTIONS. You may not (a) acquire, ship, transfer, or reexport, directly or indirectly, the SoftwareProgram or any direct product therefrom, in violation of any applicable export laws or (b) permit the SoftwareProgram to be used for any purpose prohibited by such export laws, including, without limitation, nuclear, chemical,or biological weapons proliferation.
17 CAPACITY AND AUTHORITY TO CONTRACT. You represent that you are of the legal age of majority in the place yousign this License Agreement and, if applicable, you are duly authorized by your employer or principal to enter intothis contract.
18 ENTIRE AGREEMENT. This License Agreement (including any addendum or amendment to this License Agreementthat is included with the Software Program) is the entire agreement between you and Lexmark relating to theSoftware Program. Except as otherwise provided for herein, these terms and conditions supersede all prior orcontemporaneous oral or written communications, proposals, and representations with respect to the SoftwareProgram or any other subject matter covered by this License Agreement (except to the extent such extraneousterms do not conflict with the terms of this License Agreement, any other written agreement signed by you andLexmark relating to your Use of the Software Program). To the extent any Lexmark policies or programs for supportservices conflict with the terms of this License Agreement, the terms of this License Agreement shall control.
Apache License Version 2.0, January 2004http://www.apache.org/licenses/
TERMS AND CONDITIONS FOR USE, REPRODUCTION, AND DISTRIBUTION
1 Definitions.
"License" shall mean the terms and conditions for use, reproduction, and distribution as defined by Sections 1through 9 of this document.
"Licensor" shall mean the copyright owner or entity authorized by the copyright owner that is granting the License.
"Legal Entity" shall mean the union of the acting entity and all other entities that control, are controlled by, or areunder common control with that entity. For the purposes of this definition, "control" means (i) the power, director indirect, to cause the direction or management of such entity, whether by contract or otherwise, or (ii) ownershipof fifty percent (50%) or more of the outstanding shares, or (iii) beneficial ownership of such entity.
Notices 57
"You" (or "Your") shall mean an individual or Legal Entity exercising permissions granted by this License.
"Source" form shall mean the preferred form for making modifications, including but not limited to software sourcecode, documentation source, and configuration files.
"Object" form shall mean any form resulting from mechanical transformation or translation of a Source form,including but not limited to compiled object code, generated documentation, and conversions to other media types.
"Work" shall mean the work of authorship, whether in Source or Object form, made available under the License,as indicated by a copyright notice that is included in or attached to the work (an example is provided in the Appendixbelow).
"Derivative Works" shall mean any work, whether in Source or Object form, that is based on (or derived from) theWork and for which the editorial revisions, annotations, elaborations, or other modifications represent, as a whole,an original work of authorship. For the purposes of this License, Derivative Works shall not include works that remainseparable from, or merely link (or bind by name) to the interfaces of, the Work and Derivative Works thereof.
"Contribution" shall mean any work of authorship, including the original version of the Work and any modificationsor additions to that Work or Derivative Works thereof, that is intentionally submitted to Licensor for inclusion inthe Work by the copyright owner or by an individual or Legal Entity authorized to submit on behalf of the copyrightowner. For the purposes of this definition, "submitted" means any form of electronic, verbal, or writtencommunication sent to the Licensor or its representatives, including but not limited to communication on electronicmailing lists, source code control systems, and issue tracking systems that are managed by, or on behalf of, theLicensor for the purpose of discussing and improving the Work, but excluding communication that is conspicuouslymarked or otherwise designated in writing by the copyright owner as "Not a Contribution."
"Contributor" shall mean Licensor and any individual or Legal Entity on behalf of whom a Contribution has beenreceived by Licensor and subsequently incorporated within the Work.
2 Grant of Copyright License. Subject to the terms and conditions of this License, each Contributor hereby grants toYou a perpetual, worldwide, non-exclusive, no-charge, royalty-free, irrevocable copyright license to reproduce,prepare Derivative Works of, publicly display, publicly perform, sublicense, and distribute the Work and suchDerivative Works in Source or Object form.
3 Grant of Patent License. Subject to the terms and conditions of this License, each Contributor hereby grants to Youa perpetual, worldwide, non-exclusive, no-charge, royalty-free, irrevocable (except as stated in this section) patentlicense to make, have made, use, offer to sell, sell, import, and otherwise transfer the Work, where such licenseapplies only to those patent claims licensable by such Contributor that are necessarily infringed by theirContribution(s) alone or by combination of their Contribution(s) with the Work to which such Contribution(s) wassubmitted. If You institute patent litigation against any entity (including a cross-claim or counterclaim in a lawsuit)alleging that the Work or a Contribution incorporated within the Work constitutes direct or contributory patentinfringement, then any patent licenses granted to You under this License for that Work shall terminate as of thedate such litigation is filed.
4 Redistribution. You may reproduce and distribute copies of the Work or Derivative Works thereof in any medium,with or without modifications, and in Source or Object form, provided that You meet the following conditions:
a (a) You must give any other recipients of the Work or Derivative Works a copy of this License; and
b (b) You must cause any modified files to carry prominent notices stating that You changed the files; and
c (c) You must retain, in the Source form of any Derivative Works that You distribute, all copyright, patent,trademark, and attribution notices from the Source form of the Work, excluding those notices that do not pertainto any part of the Derivative Works; and
d (d) If the Work includes a "NOTICE" text file as part of its distribution, then any Derivative Works that Youdistribute must include a readable copy of the attribution notices contained within such NOTICE file, excludingthose notices that do not pertain to any part of the Derivative Works, in at least one of the following places:within a NOTICE text file distributed as part of the Derivative Works; within the Source form or documentation,if provided along with the Derivative Works; or, within a display generated by the Derivative Works, if andwherever such third-party notices normally appear. The contents of the NOTICE file are for informational
Notices 58

purposes only and do not modify the License. You may add Your own attribution notices within Derivative Worksthat You distribute, alongside or as an addendum to the NOTICE text from the Work, provided that suchadditional attribution notices cannot be construed as modifying the License.
You may add Your own copyright statement to Your modifications and may provide additional or different licenseterms and conditions for use, reproduction, or distribution of Your modifications, or for any such Derivative Worksas a whole, provided Your use, reproduction, and distribution of the Work otherwise complies with the conditionsstated in this License.
5 Submission of Contributions. Unless You explicitly state otherwise, any Contribution intentionally submitted forinclusion in the Work by You to the Licensor shall be under the terms and conditions of this License, without anyadditional terms or conditions. Notwithstanding the above, nothing herein shall supersede or modify the terms ofany separate license agreement you may have executed with Licensor regarding such Contributions.
6 Trademarks. This License does not grant permission to use the trade names, trademarks, service marks, or productnames of the Licensor, except as required for reasonable and customary use in describing the origin of the Workand reproducing the content of the NOTICE file.
7 Disclaimer of Warranty. Unless required by applicable law or agreed to in writing, Licensor provides the Work (andeach Contributor provides its Contributions) on an "AS IS" BASIS, WITHOUT WARRANTIES OR CONDITIONS OF ANYKIND, either express or implied, including, without limitation, any warranties or conditions of TITLE, NON-INFRINGEMENT, MERCHANTABILITY, or FITNESS FOR A PARTICULAR PURPOSE. You are solely responsible fordetermining the appropriateness of using or redistributing the Work and assume any risks associated with Yourexercise of permissions under this License.
8 Limitation of Liability. In no event and under no legal theory, whether in tort (including negligence), contract, orotherwise, unless required by applicable law (such as deliberate and grossly negligent acts) or agreed to in writing,shall any Contributor be liable to You for damages, including any direct, indirect, special, incidental, or consequentialdamages of any character arising as a result of this License or out of the use or inability to use the Work (includingbut not limited to damages for loss of goodwill, work stoppage, computer failure or malfunction, or any and allother commercial damages or losses), even if such Contributor has been advised of the possibility of such damages.
9 Accepting Warranty or Additional Liability. While redistributing the Work or Derivative Works thereof, You maychoose to offer, and charge a fee for, acceptance of support, warranty, indemnity, or other liability obligationsand/or rights consistent with this License. However, in accepting such obligations, You may act only on Your ownbehalf and on Your sole responsibility, not on behalf of any other Contributor, and only if You agree to indemnify,defend, and hold each Contributor harmless for any liability incurred by, or claims asserted against, such Contributorby reason of your accepting any such warranty or additional liability.
END OF TERMS AND CONDITIONS
APPENDIX: How to apply the Apache License to your work.
To apply the Apache License to your work, attach the following boilerplate notice, with the fields enclosed by brackets"[]" replaced with your own identifying information. (Don't include the brackets!) The text should be enclosed in theappropriate comment syntax for the file format. We also recommend that a file or class name and description of purposebe included on the same "printed page" as the copyright notice for easier identification within third-party archives.
Copyright [yyyy] [name of copyright owner]
Licensed under the Apache License, Version 2.0 (the "License"); you may not use this file except in compliance with theLicense. You may obtain a copy of the License at
http://www.apache.org/licenses/LICENSE-2.0
Unless required by applicable law or agreed to in writing, software distributed under the License is distributed on an"AS IS" BASIS, WITHOUT WARRANTIES OR CONDITIONS OF ANY KIND, either express or implied. See the License for thespecific language governing permissions and limitations under the License.
Notices 59
Java SNMP Package, copyright 2005, Jonathan Sevy, Drexel University <[email protected]>
Project home: http://gicl.cs.drexel.edu/people/sevy/snmp/snmp_package.html
THIS SOFTWARE IS PROVIDED BY THE AUTHOR ``AS IS'' AND ANY EXPRESS OR IMPLIED WARRANTIES, INCLUDING, BUTNOT LIMITED TO, THE IMPLIED WARRANTIES OF MERCHANTABILITY AND FITNESS FOR A PARTICULAR PURPOSE AREDISCLAIMED. IN NO EVENT SHALL THE AUTHOR BE LIABLE FOR ANY DIRECT, INDIRECT, INCIDENTAL, SPECIAL,EXEMPLARY, OR CONSEQUENTIAL DAMAGES (INCLUDING, BUT NOT LIMITED TO, PROCUREMENT OF SUBSTITUTEGOODS OR SERVICES; LOSS OF USE, DATA, OR PROFITS; OR BUSINESS INTERRUPTION) HOWEVER CAUSED AND ON ANYTHEORY OF LIABILITY, WHETHER IN CONTRACT, STRICT LIABILITY, OR TORT (INCLUDING NEGLIGENCE OR OTHERWISE)ARISING IN ANY WAY OUT OF THE USE OF THIS SOFTWARE, EVEN IF ADVISED OF THE POSSIBILITY OF SUCH DAMAGE.
Launch4j (http://launch4j.sourceforge.net/)
Cross-platform Java application wrapper for creating Windows native executables.
Copyright (c) 2004, 2008 Grzegorz Kowal
All rights reserved.
Redistribution and use in source and binary forms, with or without modification, are permitted provided that thefollowing conditions are met:
* Redistributions of source code must retain the above copyright notice, this list of conditions and the followingdisclaimer.
* Redistributions in binary form must reproduce the above copyright notice, this list of conditions and the followingdisclaimer in the documentation and/or other materials provided with the distribution.
* Neither the name of the Launch4j nor the names of its contributors may be used to endorse or promote productsderived from this software without specific prior written permission.
THIS SOFTWARE IS PROVIDED BY THE COPYRIGHT HOLDERS AND CONTRIBUTORS "AS IS" AND ANY EXPRESS OR IMPLIEDWARRANTIES, INCLUDING, BUT NOT LIMITED TO, THE IMPLIED WARRANTIES OF MERCHANTABILITY AND FITNESS FORA PARTICULAR PURPOSE ARE DISCLAIMED. IN NO EVENT SHALL THE COPYRIGHT OWNER OR CONTRIBUTORS BE LIABLEFOR ANY DIRECT, INDIRECT, INCIDENTAL, SPECIAL, EXEMPLARY, OR CONSEQUENTIAL DAMAGES (INCLUDING, BUT NOTLIMITED TO, PROCUREMENT OF SUBSTITUTE GOODS OR SERVICES; LOSS OF USE, DATA, OR PROFITS; OR BUSINESSINTERRUPTION) HOWEVER CAUSED AND ON ANY THEORY OF LIABILITY, WHETHER IN CONTRACT, STRICT LIABILITY, ORTORT (INCLUDING NEGLIGENCE OR OTHERWISE) ARISING IN ANY WAY OUT OF THE USE OF THIS SOFTWARE, EVEN IFADVISED OF THE POSSIBILITY OF SUCH DAMAGE.
Apache Commons Net
Copyright 2001-2008 The Apache Software Foundation
This product includes software developed by The Apache Software Foundation (http://www.apache.org/).
Apache Commons Codec
Copyright 2002-2009 The Apache Software Foundation
This product includes software developed by The Apache Software Foundation (http://www.apache.org/).
--------------------------------------------------------------------------------
src/test/org/apache/commons/codec/language/DoubleMetaphoneTest.java contains test data fromhttp://aspell.sourceforge.net/test/batch0.tab.
Copyright (C) 2002 Kevin Atkinson ([email protected]). Verbatim copying and distribution of this entire article is permittedin any medium, provided this notice is preserved.
--------------------------------------------------------------------------------
Notices 60
© 2010 Google
Apache log4j
Copyright 2007 The Apache Software Foundation
This product includes software developed at The Apache Software Foundation (http://www.apache.org/).
SLF4J
Copyright (c) 2004-2008 QOS.ch
All rights reserved.
Permission is hereby granted, free of charge, to any person obtaining a copy of this software and associateddocumentation files (the "Software"), to deal in the Software without restriction, including without limitation the rightsto use, copy, modify, merge, publish, distribute, sublicense, and/or sell copies of the Software, and to permit personsto whom the Software is furnished to do so, subject to the following conditions:
The above copyright notice and this permission notice shall be included in all copies or substantial portions of theSoftware.
THE SOFTWARE IS PROVIDED "AS IS", WITHOUT WARRANTY OF ANY KIND, EXPRESS OR IMPLIED, INCLUDING BUT NOTLIMITED TO THE WARRANTIES OF MERCHANTABILITY, FITNESS FOR A PARTICULAR PURPOSE AND NONINFRINGEMENT.IN NO EVENT SHALL THE AUTHORS OR COPYRIGHT HOLDERS BE LIABLE FOR ANY CLAIM, DAMAGES OR OTHER LIABILITY,WHETHER IN AN ACTION OF CONTRACT, TORT OR OTHERWISE, ARISING FROM, OUT OF OR IN CONNECTION WITH THESOFTWARE OR THE USE OR OTHER DEALINGS IN THE SOFTWARE.
The Independent JPEG Group's software".
The authors make NO WARRANTY or representation, either express or implied, with respect to this software, its quality,accuracy, merchant ability, or fitness for a particular purpose. This software is provided "AS IS", and you, its user, assumethe entire risk as to its quality and accuracy.
This software is copyright (C) 1991-1998, Thomas G. Lane.
All Rights Reserved.
PuTTY is copyright 1997-2010 Simon Tatham.
Portions copyright Robert de Bath, Joris van Rantwijk, Delian Delchev, Andreas Schultz, Jeroen Massar, Wez Furlong,Nicolas Barry, Justin Bradford, Ben Harris, Malcolm Smith, Ahmad Khalifa, Markus Kuhn, Colin Watson, and CORE SDIS.A.
Permission is hereby granted, free of charge, to any person obtaining a copy of this software and associateddocumentation files (the "Software"), to deal in the Software without restriction, including without limitation the rightsto use, copy, modify, merge, publish, distribute, sublicense, and/or sell copies of the Software, and to permit personsto whom the Software is furnished to do so, subject to the following conditions:
The above copyright notice and this permission notice shall be included in all copies or substantial portions of theSoftware.
THE SOFTWARE IS PROVIDED "AS IS", WITHOUT WARRANTY OF ANY KIND, EXPRESS OR IMPLIED, INCLUDING BUT NOTLIMITED TO THE WARRANTIES OF MERCHANTABILITY, FITNESS FOR A PARTICULAR PURPOSE AND NONINFRINGEMENT.IN NO EVENT SHALL SIMON TATHAM BE LIABLE FOR ANY CLAIM, DAMAGES OR OTHER LIABILITY, WHETHER IN ANACTION OF CONTRACT, TORT OR OTHERWISE, ARISING FROM, OUT OF OR IN CONNECTION WITH THE SOFTWARE ORTHE USE OR OTHER DEALINGS IN THE SOFTWARE.
In particular, anybody (even companies) can use PuTTY without restriction (even for commercial purposes) and owenothing to me or anybody else. Also, apart from having to maintain the copyright notice and the licence text in derivativeproducts, anybody (even companies) can adapt the PuTTY source code into their own programs and products (even
Notices 61

commercial products) and owe nothing to me or anybody else. And, of course, there is no warranty and if PuTTY causesyou damage you're on your own, so don't use it if you're unhappy with that.
In particular, note that the MIT licence is compatible with the GNU GPL. So if you want to incorporate PuTTY or piecesof PuTTY into a GPL program, there's no problem with that.
Eclipse Public License - v 1.0
THE ACCOMPANYING PROGRAM IS PROVIDED UNDER THE TERMS OF THIS ECLIPSE PUBLIC LICENSE ("AGREEMENT").ANY USE, REPRODUCTION OR DISTRIBUTION OF THE PROGRAM CONSTITUTES RECIPIENT'S ACCEPTANCE OF THISAGREEMENT.
1. DEFINITIONS
"Contribution" means:
a) in the case of the initial Contributor, the initial code and documentation distributed under this Agreement, and
b) in the case of each subsequent Contributor:
i) changes to the Program, and
ii) additions to the Program;
where such changes and/or additions to the Program originate from and are distributed by that particular Contributor.A Contribution 'originates' from a Contributor if it was added to the Program by such Contributor itself or anyone actingon such Contributor's behalf. Contributions do not include additions to the Program which: (i) are separate modulesof software distributed in conjunction with the Program under their own license agreement, and (ii) are not derivativeworks of the Program.
"Contributor" means any person or entity that distributes the Program.
"Licensed Patents" mean patent claims licensable by a Contributor which are necessarily infringed by the use or saleof its Contribution alone or when combined with the Program.
"Program" means the Contributions distributed in accordance with this Agreement.
"Recipient" means anyone who receives the Program under this Agreement, including all Contributors.
2. GRANT OF RIGHTS
a) Subject to the terms of this Agreement, each Contributor hereby grants Recipient a non-exclusive, worldwide, royalty-free copyright license to reproduce, prepare derivative works of, publicly display, publicly perform, distribute andsublicense the Contribution of such Contributor, if any, and such derivative works, in source code and object code form.
b) Subject to the terms of this Agreement, each Contributor hereby grants Recipient a non-exclusive, worldwide, royalty-free patent license under Licensed Patents to make, use, sell, offer to sell, import and otherwise transfer theContribution of such Contributor, if any, in source code and object code form. This patent license shall apply to thecombination of the Contribution and the Program if, at the time the Contribution is added by the Contributor, suchaddition of the Contribution causes such combination to be covered by the Licensed Patents. The patent license shallnot apply to any other combinations which include the Contribution. No hardware per se is licensed hereunder.
c) Recipient understands that although each Contributor grants the licenses to its Contributions set forth herein, noassurances are provided by any Contributor that the Program does not infringe the patent or other intellectual propertyrights of any other entity. Each Contributor disclaims any liability to Recipient for claims brought by any other entitybased on infringement of intellectual property rights or otherwise. As a condition to exercising the rights and licensesgranted hereunder, each Recipient hereby assumes sole responsibility to secure any other intellectual property rightsneeded, if any. For example, if a third party patent license is required to allow Recipient to distribute the Program, itis Recipient's responsibility to acquire that license before distributing the Program.
Notices 62
d) Each Contributor represents that to its knowledge it has sufficient copyright rights in its Contribution, if any, to grantthe copyright license set forth in this Agreement.
3. REQUIREMENTS
A Contributor may choose to distribute the Program in object code form under its own license agreement, providedthat:
a) it complies with the terms and conditions of this Agreement; and
b) its license agreement:
i) effectively disclaims on behalf of all Contributors all warranties and conditions, express and implied, includingwarranties or conditions of title and non-infringement, and implied warranties or conditions of merchantability andfitness for a particular purpose;
ii) effectively excludes on behalf of all Contributors all liability for damages, including direct, indirect, special, incidentaland consequential damages, such as lost profits;
iii) states that any provisions which differ from this Agreement are offered by that Contributor alone and not by anyother party; and
iv) states that source code for the Program is available from such Contributor, and informs licensees how to obtain itin a reasonable manner on or through a medium customarily used for software exchange.
When the Program is made available in source code form:
a) it must be made available under this Agreement; and
b) a copy of this Agreement must be included with each copy of the Program.
Contributors may not remove or alter any copyright notices contained within the Program.
Each Contributor must identify itself as the originator of its Contribution, if any, in a manner that reasonably allowssubsequent Recipients to identify the originator of the Contribution.
4. COMMERCIAL DISTRIBUTION
Commercial distributors of software may accept certain responsibilities with respect to end users, business partnersand the like. While this license is intended to facilitate the commercial use of the Program, the Contributor who includesthe Program in a commercial product offering should do so in a manner which does not create potential liability forother Contributors. Therefore, if a Contributor includes the Program in a commercial product offering, such Contributor("Commercial Contributor") hereby agrees to defend and indemnify every other Contributor ("IndemnifiedContributor") against any losses, damages and costs (collectively "Losses") arising from claims, lawsuits and other legalactions brought by a third party against the Indemnified Contributor to the extent caused by the acts or omissions ofsuch Commercial Contributor in connection with its distribution of the Program in a commercial product offering. Theobligations in this section do not apply to any claims or Losses relating to any actual or alleged intellectual propertyinfringement. In order to qualify, an Indemnified Contributor must: a) promptly notify the Commercial Contributor inwriting of such claim, and b) allow the Commercial Contributor to control, and cooperate with the CommercialContributor in, the defense and any related settlement negotiations. The Indemnified Contributor may participate inany such claim at its own expense.
For example, a Contributor might include the Program in a commercial product offering, Product X. That Contributoris then a Commercial Contributor. If that Commercial Contributor then makes performance claims, or offers warrantiesrelated to Product X, those performance claims and warranties are such Commercial Contributor's responsibility alone.Under this section, the Commercial Contributor would have to defend claims against the other Contributors related tothose performance claims and warranties, and if a court requires any other Contributor to pay any damages as a result,the Commercial Contributor must pay those damages.
5. NO WARRANTY
Notices 63

EXCEPT AS EXPRESSLY SET FORTH IN THIS AGREEMENT, THE PROGRAM IS PROVIDED ON AN "AS IS" BASIS, WITHOUTWARRANTIES OR CONDITIONS OF ANY KIND, EITHER EXPRESS OR IMPLIED INCLUDING, WITHOUT LIMITATION, ANYWARRANTIES OR CONDITIONS OF TITLE, NON-INFRINGEMENT, MERCHANTABILITY OR FITNESS FOR A PARTICULARPURPOSE. Each Recipient is solely responsible for determining the appropriateness of using and distributing the Programand assumes all risks associated with its exercise of rights under this Agreement , including but not limited to the risksand costs of program errors, compliance with applicable laws, damage to or loss of data, programs or equipment, andunavailability or interruption of operations.
6. DISCLAIMER OF LIABILITY
EXCEPT AS EXPRESSLY SET FORTH IN THIS AGREEMENT, NEITHER RECIPIENT NOR ANY CONTRIBUTORS SHALL HAVE ANYLIABILITY FOR ANY DIRECT, INDIRECT, INCIDENTAL, SPECIAL, EXEMPLARY, OR CONSEQUENTIAL DAMAGES (INCLUDINGWITHOUT LIMITATION LOST PROFITS), HOWEVER CAUSED AND ON ANY THEORY OF LIABILITY, WHETHER IN CONTRACT,STRICT LIABILITY, OR TORT (INCLUDING NEGLIGENCE OR OTHERWISE) ARISING IN ANY WAY OUT OF THE USE ORDISTRIBUTION OF THE PROGRAM OR THE EXERCISE OF ANY RIGHTS GRANTED HEREUNDER, EVEN IF ADVISED OF THEPOSSIBILITY OF SUCH DAMAGES.
7. GENERAL
If any provision of this Agreement is invalid or unenforceable under applicable law, it shall not affect the validity orenforceability of the remainder of the terms of this Agreement, and without further action by the parties hereto, suchprovision shall be reformed to the minimum extent necessary to make such provision valid and enforceable.
If Recipient institutes patent litigation against any entity (including a cross-claim or counterclaim in a lawsuit) allegingthat the Program itself (excluding combinations of the Program with other software or hardware) infringes suchRecipient's patent(s), then such Recipient's rights granted under Section 2(b) shall terminate as of the date such litigationis filed.
All Recipient's rights under this Agreement shall terminate if it fails to comply with any of the material terms or conditionsof this Agreement and does not cure such failure in a reasonable period of time after becoming aware of suchnoncompliance. If all Recipient's rights under this Agreement terminate, Recipient agrees to cease use and distributionof the Program as soon as reasonably practicable. However, Recipient's obligations under this Agreement and anylicenses granted by Recipient relating to the Program shall continue and survive.
Everyone is permitted to copy and distribute copies of this Agreement, but in order to avoid inconsistency theAgreement is copyrighted and may only be modified in the following manner. The Agreement Steward reserves theright to publish new versions (including revisions) of this Agreement from time to time. No one other than the AgreementSteward has the right to modify this Agreement. The Eclipse Foundation is the initial Agreement Steward. The EclipseFoundation may assign the responsibility to serve as the Agreement Steward to a suitable separate entity. Each newversion of the Agreement will be given a distinguishing version number. The Program (including Contributions) mayalways be distributed subject to the version of the Agreement under which it was received. In addition, after a newversion of the Agreement is published, Contributor may elect to distribute the Program (including its Contributions)under the new version. Except as expressly stated in Sections 2(a) and 2(b) above, Recipient receives no rights or licensesto the intellectual property of any Contributor under this Agreement, whether expressly, by implication, estoppel orotherwise. All rights in the Program not expressly granted under this Agreement are reserved.
This Agreement is governed by the laws of the State of New York and the intellectual property laws of the United Statesof America. No party to this Agreement will bring a legal action under this Agreement more than one year after thecause of action arose. Each party waives its rights to a jury trial in any resulting litigation.
Notices 64
GlossaryEmbedded Web Server The Web interface for Lexmark devices. It is accessed by typing the IP address or
DNS host name of a device into the address field of a Web browser.
Index file Can contain data gathered from both individual workflow tasks, as well as theoverall solution. Generic index files can be created as part of certain tasks (suchas Scan To FTP), or they can be customized as part of the Index File to FTP andIndex File to Network tasks.
Simulate Provides users with a means of checking the basic look, flow, and syntax of aSolution Composer project before deploying it
Solution Used synonymously with "solution package" to refer to the finished applicationsbuilt using Solution Composer
Solution Composer Agent An embedded application that allows Solution Composer scripts to be installedand run on Lexmark devices. The Solution Composer Agent must be licensed onthe device in order to run installed solutions.
Solution package Used synonymously with "solution" to refer to the finished applications builtusing Solution Composer
Solution properties The overall properties for the solution. They determine such things as the nameof the solution and the image that will be used for the solution icon on the printerhome screen.
Task properties Determine the behavior of the individual tasks (actions and prompts) in a SolutionComposer project
Validate Provides users with a means of checking a Solution Composer project for errors.Solution packages are validated automatically when deployed to a file or device.
Variables Represent data drawn from the device itself (such as its IP address) or from userinput (such as which choice a user made from a list of options). Variables areavailable as a right-click option in most text fields in the Task Properties pane,and they are used as a dynamic means of gathering data to report back on systemconditions and user choices.
Workflow Refers to the sequence of events created by the group of tasks that make up aSolution Composer project
Glossary 65
Index
Aactions
Copy 39Multi Send 33Scan to Email 28Scan to Fax 38Scan to FTP 40Scan to Network 30
Bbasic concepts 5, 7before getting started 7building solutions 9
deploying solutions to a device 13deploying solutions to a file 11saving projects 10simulating solutions 10validating solutions 9
Cconfirmations
e‑mail 46print 46
Copy properties 39
Copy variables descriptions 52
creating a new project 9
Ddeploying
solutions to a device 13solutions to a file 11
destinations adding 33deleting 33
EEmail Confirmation
properties 46Email Confirmation variables
descriptions 54e‑mail does not send 21e‑mail solution failure 21
FFAQs 22fax solution failure 21
Hhardware
recommendations 5
IIndex File to FTP
properties 44Index File to FTP variables
descriptions 54Index File to Network
properties 43Index File to Network variables
descriptions 54index files
FTP 44network 43
Llicensing
Solution Composer Agent 24
MMessage prompt
properties 27variables 47
Message prompt variables descriptions 47
Multi Send properties 33
Multi Send destinations adding 33deleting 33
Multi Send variables descriptions 50
Multiple Choice prompt properties 24variables 47
Multiple Choice prompt variables descriptions 47
Nnotices 2
Numeric Entry prompt properties 26variables 47
Numeric Entry prompt variables descriptions 47
Ooverview 5
PPrint Confirmation
properties 46projects
saving 10prompts
Message 27Multiple Choice 24Numeric Entry 26Text Entry 27
properties Copy 39Email Confirmation 46Index File to FTP 44Index File to Network 43Message prompt 27Multi Send 33Multiple Choice prompt 24Numeric Entry prompt 26Print Confirmation 46Scan to Email 28Scan to Fax 38Scan to FTP 40Scan to Network 30Text Entry prompt 27
Ssaving projects 10Scan to Email
properties 28Scan to Email or e‑mail actionscause solution to fail 21Scan to Email task fails to send ane‑mail 21Scan to Email variables
descriptions 48Scan to Fax
properties 38
Index 66
Scan to Fax or fax actions causesolution to fail 21Scan to Fax variables
descriptions 51Scan to FTP
properties 40Scan to FTP variables
descriptions 53Scan to Network
properties 30Scan to Network variables
descriptions 49scenarios
prompt, scan to, and save indexfile 17
scan to and prompt 15Simulate
using to check solutions 10software
recommendations 5Solution Composer
FAQs 22overview 5system recommendations 5understanding tasks 7understanding the basics 5
Solution Composer Agent licensing 24
solution does not appear ondevice 20solution packages
validating 9solutions
adding support information 13checking with Simulate 10deploying to a device 13deploying to a file 11sample 15, 17scenario, prompt, scan to, and
save index file 17scenario, scan to and prompt 15
support information adding to a solution 13
system recommendations Solution Composer 5
system variables descriptions 47
TTask Library 7task properties
input options 7
tasks adding 9deleting 9selecting 9
Text Entry prompt properties 27variables 47
Text Entry prompt variables descriptions 47
troubleshooting e‑mail does not send 21e‑mail solution failure 21fax solution failure 21Scan to Email or e‑mail actions
cause solution to fail 21Scan to Email task fails to send an
e‑mail 21Scan to Fax or fax actions cause
solution to fail 21solution does not appear on
device 20
Vvalidating
solution packages 9variables
Copy 52Email Confirmation 54Index File to FTP 54Index File to Network 54Message prompt 47Multi Send 50Multiple Choice prompt 47Numeric Entry prompt 47Scan to Email 48Scan to Fax 51Scan to FTP 53Scan to Network 49system 47Text Entry prompt 47using 7
Index 67