sonicator - wolflabs€¦ · 1 rev. 6-12 sonicator ultrasonic processor part no. q700 operation...
TRANSCRIPT

Rev. 6-12 1
Sonicator
ULTRASONIC PROCESSOR
Part No. Q700
OPERATION MANUAL
53 Church Hill Road, Newtown, CT 06470 U.S.A
Phone: 203.426.0101 · 1.877.338.9636
Fax: 203.426.7026
Web: www.sonicator.com · E-mail: [email protected]

Rev. 6-12 2
Rev. 6-12 3
Table of Contents
Section Page No.
1. Warranty 4
2. Warnings 5
3. Specifications 6-7
4. Principles of Operation 8-9
5. Description of Components / Functions of Controls 10-12
6. Preparation for Use 13
7. Operating Instructions (Getting Started) 14-23
8. Maintenance 24-26
9. Troubleshooting 27
10. Service / Return of Equipment 28
11. Service Safety Certification form 29

Rev. 6-12 4
1. Warranty
Your Ultrasonic Processor is warranted and backed by the manufacturer for a period of two
years from the date of shipment against defects in material and w orkmanship under normal
use as described in this instruct ion manual. During the warranty period, the manufacturer
w ill, at its option, as the exclusive remedy, either repair or replace w ithout charge for
material and labor, the part(s) which prove to be defect ive, provided the unit is returned to
us properly packed w ith all transportat ion charges prepaid.
Ultrasonic probes are guaranteed against defects for a period of one year from date of
shipment. A defect ive probe w ill be replaced once w ithout charge, if failure occurs w ithin
the warranty period. Wear result ing from cavitat ion erosion is a normal consequence of
ultrasonic processing, and is not covered by this warranty.
The manufacturer neither assumes nor authorizes any person to assume for it any other
obligat ions or liability in connection w ith the sale of its products. The manufacturer hereby
disclaims any warranty of either merchantability or f itness for a part icular purpose. No
person or company is authorized to change, modify, or amend the terms of this warranty in
any manner or fashion whatsoever. Under no circumstances shall the manufacturer be
liable to the purchaser or any other person for any incidental or consequential damages or
loss of goodw ill, production, or prof it result ing f rom any malfunction or failure of its
product.
This warranty does not apply to equipment that has been subject to unauthorized repair,
misuse, abuse, negligence or accident. Equipment which, shows evidence of having been
used in violat ion of operating instruct ions, or w hich has had the serial number altered or
removed, w ill be ineligible for service under this warranty.
All probes are manufactured to exacting specif icat ions and are tuned to vibrate at a
specif ic frequency. Using an out -of-tune probe w ill cause damage to the equipment and
may result in warranty nullif icat ion. The manufacturer assumes no responsibility for probes
fabricated by another party or for consequential damages result ing from their usage.
The aforementioned provisions do not extend the original warranty period of any product
that has either been repaired or replaced by the manufacturer.

Rev. 6-12 5
2. Warnings
Please read the manual in its entirety. Necessary instruction and guidance are provided to help
ensure the successful operation of this device.
Your new Ultrasonic Liquid Processor has been designed, built and tested to assure maximum
operator safety. How ever, no design can completely protect against improper use that may lead to
bodily injury and/or property damage. For total safety and equipment protect ion, read the
instruct ion manual carefully before attempting to operate this equipment. Observe the follow ing
WARNINGS:
High voltage is present in the generator (pow er supply), converter and high frequency cable. There are no
user-serviceable parts inside any of these devices. Do NOT attempt to remove the generator cover or
converter case.
Do NOT touch any open cable connect ions on the unit while the pow er is turned ON.
Do NOT operate generator w ith converter disconnected from high voltage cable. High voltage is present in
the cable and may pose a shock hazard.
Do NOT attempt to disconnect the converter high voltage cable w hile the unit is running.
The generator must be properly grounded w ith a 3 -prong plug. Test electrical out let for proper grounding
before plugging in unit.
Install the ult rasonic processor in an area free from excessive dust, dirt , explosive or corrosive fumes and
protected from extremes in temperature and humidity. Do not place the Generator w ithin a Fume Hood.
Hearing protect ion is highly recommended. It is recommended that a sound abating enclosure or ear
protect ion be used w hen operat ing the Ultrasonic Processor
NEVER immerse the converter in liquids of any kind, or let condensed moisture or liquid drip into the
converter.
NEVER grasp an act ivated horn or probe. It can cause severe burns and t issue damage.
NEVER allow a probe to vibrate in air.
NEVER hold or clamp the converter by the front driver or by the horn itself . This can cause permanent
damage to the system. Support the converter by only clamping around t he converter housing (upper
port ion).
If needed air cool the convertor w ith dry compressed air.
Do NOT allow the t ip of a vibrat ing horn or probe to touch the counter top or any other hard surface. It
could damage the probe, overload the generator, or damage the surface.
Avoid touching the bottom or sides of a glass or plast ic container w ith an activated probe. It could crack
or shatter the glass or melt the plast ic.
Turn OFF the pow er sw itch, unplug the generator and disconnect the pow er cord from the back of the
generator before attempting to replace the fuses.
Inspect high frequency cable for cracks in the protect ive outer jacket.
Do not operate unit w ith a damaged cable. Doing so may cause serious injury.
In case of AC pow er loss, wait 3 minutes minimum before reapplying pow er.
Do not turn off AC mains pow er w hile running a horn. Stop sonicat ion via touch screen prior to stopping
pow er.
Rev. 6-12 6
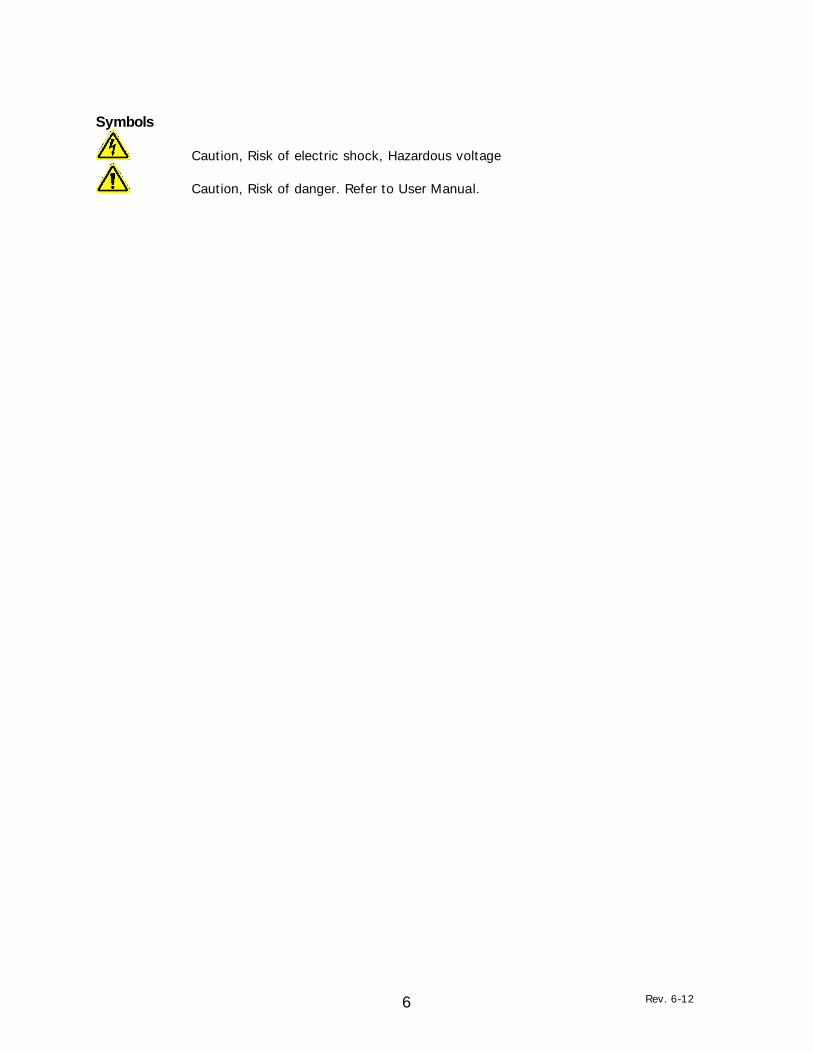
Symbols
Caution, Risk of electric shock, Hazardous voltage
Caution, Risk of danger. Refer to User Manual.

Rev. 6-12 7
3. Specifications
Generator
Input Voltage
100 VAC – 120 VAC @ 50/60 Hz
220 VAC – 240 VAC @ 50/60
Hz Rated Current
12 Amps max. 6 Amps max.
Fuse Rating
15 Amps*
8 Amps*
Weight
16 lbs. (7.3 Kg) Dimensions
8"W x 15.25"L x 8.5"H
203 mm x 387 mm x 216 mm Output Voltage
1000 V rms (max.)
Output Frequency
20 KHz
Converter
Weight
2 lbs. (900 g)
Dimensions
7.25" L x 2.5" Dia.
(183 mm x 63.5 mm) Materials
Aluminum Alloy
Standard ½ ” Horn
Weight
0.75 lbs. (340 g)
Dimensions
5.375" L x .5" Dia.
(136 mm x 13 mm) Materials
Titanium Alloy

Rev. 6-12 8
Environmental
Pollut ion Degree
2
Installat ion Category
II
Operat ing Limits
Shipping/Storage
Temperature: 41 - 104ºF (5 - 40ºC)
Relat ive Humidity 10 - 95% (Non Condensing)
Alt itude: 6,651 f t. (2000 m)
Temperature: 35 -120 oF (2 - 49 oC)
Relat ive Humidity 10 - 95% (Non Condensing)
Ambient Pressure Extremes: 40,000 f t . (12,192 m)
Restrict ion of
Hazardous
Substances (ROHS)
Relat ive humidity Maximum relat ive humidity 80% for temperatures up to 31ºC decreasing
linearly to 50% relat ive humidity to 40ºC
Other For indoor use only
* Only use IEC approved Fast act ing fuses, Cooper Bussman series S500.
The Power Cord supplied with the ultrasonic processor must be used. If the 220V plug is not
conf igured to match the w all receptacle, a properly grounded universal AC socket adapter must be
added.
Important: Universal adapters do not convert voltage or frequency. The manufacturer is not
responsible for damage caused by the use of an improper pow er cord or adapter. Transformers are
not recommended.
WEEE Statement
This product contains electrical or electronic materials. The presence of these materials may, if not disposed of properly, have potential adverse effects on the environment and human health. Presence of this label on the product means it should not be disposed of as unsorted waste and must be collected separately. As a consumer, you are responsible for ensuring that this product is disposed of properly. To find out how to properly dispose of this product contact Customer Service.
Rev. 6-12 9
4. Principles of Operation
The ultrasonic electronic generator transforms AC line pow er to a 20 KHz signal that drives a
piezoelectric converter/transducer. This electrical signal is converted by the transducer to a
mechanical vibrat ion due to the characterist ics of the internal piezoelectric crystals.
The vibrat ion is amplif ied and transmitted down the length of the horn/probe w here the t ip
longitudinally expands and contracts. The distance the t ip travels is dependent on the amplitude
selected by the user through the touch screen pad. As you increase the amplitude sett ing the
sonicat ion intensity w ill increase w ithin your sample.
In liquid, the rapid vibrat ion of the t ip causes cavitation, the formation and violent collapse of
microscopic bubbles. The collapse of thousands of cavitat ion bubbles releases tremendous energy
in the cavitat ion f ield. The erosion and shock effect of the collapse of the cavitat ion bubble is the
primary mechanism of f luid processing.
The probe t ip diameter dictates the amount of sample that can be effect ively processed. Smaller t ip
diameters (Microt ip probes) deliver high intensity sonicat ion but the energy is focused w ithin a
small, concentrated area. Larger t ip diameters can process larger volumes, but offer low er intensity.
The choices of a generator and horns/probes are matched to the volume, viscosity and other
parameters of the part icular applicat ion. Horns are available for both direct and indirect sonicat ion.
The Accessories sect ion has more information on this subject.
Please consult w ith a product specialist for assistance w ith select ing a probe for your applicat ion.
Relationship of Amplitude and Wattage
Sonicat ion pow er is measured in w atts. Amplitude is a measurement of the excursion of the t ip of
the probe (probe is also know n as a horn).
Some ultrasonic processors have a w attage display. During operat ion, the wattage displayed is the
energy required to drive the radiat ing face of a probe, at that specif ic amplitude sett ing against a
specif ic load, at that part icular moment. For example, the unit experiences a higher load when
processing viscous samples then w hen compared to aqueous samples.
The speed /cruise control on an automobile, can, to a certain extent, be compared to an Ultrasonic
Processor. The speed/cruise control is designed to ensure that the vehicle maintains a constant rate
of travel. As the terrain elevat ions change, so do the pow er requirements. The cruise control
senses these requirements, and automatically adjusts the amount of pow er delivered by the engine
in order to compensate for these ever changing condit ions. The greater the terrain rate of incline
and greater the resistance to the movement of the vehicle, the greater the amount of pow er that
w ill be delivered by the engine to overcome that resistance and maintain a constant speed.
The ultrasonic processor w as designed to deliver constant amplitude, to your liquid sample,
regardless of these changes in load (much like the vehicle’s cruise control described above). As a
liquid is processed, the load on the probe w ill vary due to changes in the liquid sample (i.e.
viscosity, concentrat ion, temperature, etc.). As the resistance to the movement of the probe
increases (increased load on the probe), addit ional pow er w ill be delivered by the power supply to
ensure that the excursion at the probe t ip remains constant. The displayed w attage readings w ill
vary as the load changes, how ever the amplitude w ill remain the same.
The resistance to the movement of the probe determines how much pow er w ill be delivered to

Rev. 6-12 10
maintain amplitude. For example, a ½ ” probe at 100% amplitude w ill require approximately 5 w atts
to operate in air. The amplitude of this probe is approximately 120um. Insert the probe in w ater
and the w attage reading w ill increase to approximately 90 w atts. The w attage required to operate
the probe w ill increase as the load increases but the amplitude remains the same.
The AMPLITUDE control allow s the ultrasonic vibrat ions at the probe t ip to be set to any desired
level. Although the degree of cavitat ion/ultrasonic energy required to process the sample can
readily be determined by visual observat ion, the amount of power required cannot be predetermined.
A sensing netw ork cont inuously monitors the output requirements, and automatically adjusts the
pow er to maintain the amplitude at the preselected level. The greater the resistance to the
movement of the probe due to higher viscosity, deeper immersion of the probe into the sample,
larger probe diameter or higher pressure, the greater the amount of pow er that w ill be delivered to
the probe. Sett ing the AMPLITUDE control to its maximum w ill not cause the maximum power
rat ing of the unit to be delivered to the sample. The maximum power (700 w atts) that the
Ultrasonic Processor is capable of delivering w ill only be delivered w hen the resistance to t he
movement of the probe is high enough to draw maximum w attage.
It is the intensity of cavitat ion that measures the effect iveness of the sonicat ion, not the total
pow er applied to the system. Intensity is direct ly related to the amplitude of the radiat ing face of
the t ip or horn. It is amplitude that must be provided, maintained, and monitored. The unit provides
controlled amplitude under varying load condit ions in order to give reproducible results.

Rev. 6-12 11
5. Description of Components / Functions of Controls
The Model # Q700 includes a standard 1/2” diameter probe (#4220).
5a. Q700 Front Panel
5b. Q700 Rear Panel
½” Horn with
replaceable tip
Converter
Cable
Generator
Converter
Power Cord
Connector
Converter Cable
Connector
On/Off
Switch
Temperature Probe
Connector
Footswitch
Jack
Cooling Fan
Fuses

Rev. 6-12 12
FUNCTIONS OF KEYS, CONTROLS, INDICATORS, AND CONNECTORS
FRONT PANEL
Touch screen display
Displays prompts and control parameters including:
• Amplitude selected
• Output pow er delivered to the probe in w atts
• Selected durat ion of processing
• Actual processing t ime
• Elapsed t ime
• Set and read temperature
• Pulse on/off durat ion
• Accumulated amount of energy in Joules delivered to the probe
0 – 9 key Input digits for programming screens
EXIT
key Moves to previous screen
ENT
key Completes parameter entry on programming screens
CLR
key Deletes selected parameter entry
RUN
key To proceed to program run screen
SAVE
key
Stores a program to the selected memory number. Up to 10
programs (0-9) can be stored.
START/STOP
key Starts or stops the ultrasonics.
PAUSE
key
Suspends operation, w ithout clearing program/run totals. Press
pause again to resume program/run and cont inue accumulat ing
run data.
▲ ▼
key
Used to set the amplitude of vibrat ion at the probe tip. Also used
to increase or decrease the amplitude in small increments w hile
the unit is runnng.
For explanations of each screen and button on the ultrasonic processor and complete programming instructions please see Section 7 of this manual.

Rev. 6-12 13
REAR PANEL
On / Off Sw itch Turns the pow er supply on and off .
Footsw itch Connector Connects to the footsw itch cable.
Temperature Probe
Connector Connects to the Temperature monitoring probe or thermocouple
Converter Cable
Connector (Output) Connects to the converter.
Pow er Supply Connector Connects to the electrical line cord and encases the fuse(s).

Rev. 6-12 14
6. Preparation for Use
INSPECTION
Prior to installing the ultrasonic processor, perform a visual inspection to detect any
evidence of damage, w hich might have occurred during shipment. Before disposing of any
packaging material, check it carefully for small items.
The ultrasonic processor was carefully packed and thoroughly inspected before leaving our
factory. The carrier, upon acceptance of the shipment, assumed responsibility for its safe
delivery. Claims for loss or damage sustained in transit must be submitted to the carrier.
If damage has occurred, contact your carrier w ithin 48 hours of the delivery date. DO NOT
OPERATE DAMAGED EQUIPMENT. Retain all packing materials for future shipment.
ELECTRICAL REQUIREMENTS
The ultrasonic processor requires a fused, single phase 3-terminal grounding type
electrical outlet. For power requirements, check the label on the back of the unit .
INSTALLING THE ULTRASONIC PROCESSOR
The ultrasonic processor should be installed in an area that is free from excessive dust,
dirt , explosive and corrosive fumes, and extremes of temperature and humidity. If
processing f lammable liquids, use an approved fume hood and do not place the power
supply in the fume hood.
When posit ioning the unit , be sure to leave adequate space behind the unit so that all
connections can be easily disconnected.
WARNING
For your personal safety, do not, under any circumstances, defeat the grounding feature of the power cord by removing the grounding prong.

Rev. 6-12 15
7. Operating Instructions (Getting Started)
CAUTION
Do not operate the pow er supply unless it is connected to the converter.
Never allow liquid to spill into the converter.
Do not allow a Microt ip to vibrate in air.
Do not allow the vibrat ing Microt ip to contact anything but the sample.
Never place a washer between the converter, probe or horn.
Never apply grease to the mat ing surfaces or threads of the converter, probe or
Microt ip.
Should it become necessary to remove a probe, use the w renches supplied. Never
attempt to remove the probe by tw ist ing the converter housing or holding it in a
vice, as this may damage the electrical connections w ithin the housing.
CAUTION
LOW SURFACE TENSION LIQUIDS – ORGANIC SOLVENTS
The probes (solid or w ith a replaceable t ip) are tuned elements that resonate at a specif ic frequency.
If the replaceable t ip is removed or isolated from the rest of the probe, the element w ill no longer
resonate at that frequency, and the pow er supply w ill fail. Unlike aqueous (w ater based) solut ions
w hich rarely cause problems, solvents and low surface tension liquids are problematic. These liquids
penetrate the
probe/replaceable t ip interface, and force the part iculates into the threaded sect ion isolat ing the t ip
from the probe. When processing low surface tension liquids, ALWAYS use a solid probe.
Set-up:
1. Connect the power cord into the receptacle on the rear of the ultrasonic processor.
2. Make sure the unit is sw itched off. Plug the electrical line cord into the electrical
outlet .
3. If the optional foot sw itch is used, insert the plug into the jack located on the rear
panel.
4. For best results it is crit ical to use the appropriate size and type of accessory to
process your sample. If you are not sure that you have the proper horn for your sample
volume please refer to the Accessories section of this manual or call the manufacturer
for assistance.
5. Horns/Probes must be properly tightened. Depending on the accessories purchased,
often the horn and the f lat t ip are attached to the converter at the factory. Check the
tightness of the horn and flat tip by using the wrench set. Please refer to images in the
Maintenance section of this manual. A loose horn or t ip may cause damage to the
generator circuitry or parts of the converter and horn. A loose horn may also show a

Rev. 6-12 16
f luctuation in wattage readings. Always use the wrenches supplied with the unit.
6. If you w ill be using a Microt ip or extender, remove the f lat t ip on the end of the
replaceable t ip probe, then attached the Microt ip or extender in its place.
7. Horns and probe t ips w ear after normal usage. Using a severely worn probe t ip can
damage internal generator components.
8. If using a laboratory stand, mount the convertor /probe assembly using a clamp. Be
sure to secure the clamp to the upper section of the convertor housing only. Never
secure the clamp to any other port ion of the convertor/probe assembly. If you are using
an acoustic enclosure mount the convertor properly in the convertor collar.
9. Connect the converter cable to the power supply and then to the top of the convertor.
Push the connectors in and turn the chrome rings clockwise ¼ turn to secure the connectors.
10. If applicat ion or procedure instructs that the unit be run for a period of t ime that w ill
allow the probe/convertor assembly to be warm to the touch, it is recommended that
the convertor be air cooled w ith dry compressed air. Never run the convertor and horn
assembly if it becomes hot. Connect either one of the air fittings on top of the
converter to a source of dry compressed air. This will cool the convertor so that it can
function normally under load for an extended duration without becoming too hot.
Operation:
Your new ultrasonic processor has been designed w ith a color LCD user interface w ith
touch screen capabilit ies. All program and run functions are controlled through the touch
screen panel.
This is the f irst screen that appears after Ultrasonic processor is sw itched On.
1. Answer the Microt ip Question, Yes or No.
When using a Microt ip, the YES button must be selected.

Rev. 6-12 17
* If you are not familiar w ith the microt ips and need assistance, please call your
representat ive for help.
Warning: Improper select ion may result in t ip damage or poor sonication. Damage caused
by not follow ing this step is not covered under the warranty.
After answering the Microt ip question, the follow ing screen appears:
This screen allows the user to select Manual mode, Program menu or Options screen.
2. Select the Mode of Operation or access Options screen.
a. Manual Mode: Select ing Manual Run allows the user to set the unit output
level manually (sett ing 1 – 100%). Start ing and stopping the ultrasound
output is also manually performed.
b. Program Mode: Allows the user to create a program w ith specif ic On / Off
t imes and output sett ing. The ability to save up to 10 programs and
sequence several individual programs together can also be performed in this
mode.
c. Options: Allows the user to change display contrast, and select either ºC or
ºF if temperature monitoring is enabled. Footsw itch and temperature probes
are optional items and are not shipped unless specif ically ordered w ith the
unit .
To Manual Mode
To Option Screen
To Program Menu
To Previous
Screen

Rev. 6-12 18
The follow ing screen displays the Manual Mode.
A. Microt ip Mode – Indicates that the unit is set for use w ith microt ips only. This mode
should not be used w ith standard probes or horns (1/2” or larger). See page 15 for
information on select ing YES or NO at the “ Are you using a M icrot ip screen” .
B. Amplitude (intensity) sett ing - Output amplitude may be set between 1-100%.
C. Power displayed in Watts.
D. Energy displayed in Joules.
E. Elapsed Time – Total t ime of act ive sonication.
F. Temperature probe measurement (note: if “ OPN” appears, it indicates temperature
monitoring has been activated but the probe is not connected).
G. Temperature probe On/Off indicator. Touch the box to act ivate temperature
monitoring. A check mark w ill appear indicating that temperature monitoring is act ivated.
Select the appropriate Amplitude (intensity sett ing) for your sample by touching the Up or
Down arrow . Touch Start to begin sonication. Touch Pause to pause sonication.
Manual and Program modes both show the Start, Pause and Exit buttons. After touching
the Start button and act ivat ing sonication, the Start button becomes a Stop button. After
touching the Pause button, the Pause button becomes the Resume button.
If sonication is stopped, Energy and Elapsed Time values remain on display. If the Start
button is touched again, the values are reset. If sonication is Paused and Resumed, the
Energy and Elapsed t ime data w ill resume counting from the point at w hich it was paused.
The Temperature Probe option can be selected if you w ish to monitor the temperature of
the sample being processed.
B
D
E
G
C
F
A

Rev. 6-12 19
Program Menu
The unit can be programmed to sonicate at specif ic, user-selected t ime intervals including
pulse mode.
Select/Modify a Program – Create, select or modify up to 10 dif ferent programs.
Select/Modify Sequence 1 & 2 – Select a sequence of programs for the unit to run in
succession. A maximum of 6 programs can be sequenced at one t ime.
Option Screen - The Option menu enables the select ion of Temperature units, Footsw itch
operational mode and Display contrast.
To Program
Screen
To Sequence 2 Screen
To Sequence 1 Screen
To Previous Screen
To Option Screen

Rev. 6-12 20
Programming Screen
How To Create a Program
The ultrasonic processor has the ability to save up to 10 programs.
1. Select a program number from the keypad, the program number w ill appear above the
Amplitude box.
For each of the following steps: After touching a f ield, the background w ill change to yellow
indicat ing an act ive f ield. After entering data, the ent ry is completed by touching Enter (ENT),
touching the f ield a second t ime or by touching a new f ield.
2. Program a value into the Amplitude f ield.
3. Program total Process Time (total act ive sonication t ime).
4. Program Pulse On t ime – If no data is entered (00hr:00min:00sec), the unit w ill run
cont inuously w ithout pulsing.
5. Program Pulse Off t ime – If no data is entered, the unit w ill run cont inuously w ithout pulsing.
Process Time, Pulse On and Pulse Off t imes are measured in Hours: Minutes: Seconds format .
6. Act ivate Temperature Monitoring (if necessary).
7. Program a Shutdow n Temperature (if necessary). Enter a temperature value.
During sonicat ion, if the temperature reaches the Shutdow n value, the unit w ill pause
sonicat ion. The unit w ill remain paused unt il the temperature drops below the pre-set value.
Once the temperature drops below the value, sonicat ion can be manually resumed.
8. Touch Save to store the program to the memory number selected in step 1.
9. Touch Run to proceed to the follow ing screen.
10. Touch Start to begin the program.
Program Progress
Total time of active sonication that has occurred during the current program. Rest or Off time is not included in this value.
Total programmed time of active sonication. Rest or Off time is not included in this value.

Rev. 6-12 21
How To Run A Saved Program
From the program screen (see image at top of previous page), touch the program number on the
right side of the screen and the selected program sett ings w ill appear.
Follow steps 9 and 10 from the previous page.
This Run screen is an example of a sample program in progress.
The Temperature Monitoring and Shutdow n Temperature opt ion have been selected during this
example program.
Program Progress is displayed by a bar graph. This displays the progress of the current program
including both the On and Off t ime combined.
Total programmed time of active sonication. Rest or Off time is not included in this value.
Total time of active sonication that has occurred during the current program. Rest or Off time is not included in this value.
Program
Progress

Rev. 6-12 22
Sequencing
After select ing Sequence 1 or 2 from the Program Menu, the follow ing screen w ill appear:
Sequence Programming Screen
After creat ing mult iple programs, a sequence of those programs may be selected. Select the
Program Number and the amount of t ime desired betw een Programs. Save the sett ings and touch
Run to begin the sequence of programs.
How to Create a Sequence
1. Touch the Program (PGM) f ield, select the appropriate program number and touch ENT.
2. Enter each desired program number in order, in the PGM f ields.
3. If a delay or rest t ime betw een programs is desired, touch the Delay After f ield. Enter the
appropriate t ime frame.
4. Unused PGM f ields should have a dash (-). Select unsused programs, touch CLR and ENT if
necessary.
5. The last Delay After f ield as w ell as any unused f ields should be cleared to 00:00:00 as
displayed in NUM 3, PGM 2 as show n above. Select unsused f ields, touch CLR and ENT if
necessary.
6. Touch Save to store the sequence.
How to Run a Sequence
From the Sequence Program Screen, touch Run, the follow ing screen w ill appear:
Program Number Selected
Delay Field

Rev. 6-12 23
Sequence Progress Bar – The measure of the total of all programs in the sequence including
On, Off and Delay After t imes.
The follow ing Option Screen can be accessed from either Menu Screen.
The Option menu enables the select ion of Temperature units and Footswitch operational
mode.
Option Screen
Temperature Units – A temperature probe (Part# 4102 or 4103) is required for use of this
option.
The Temperature Probe option can be selected if you w ish to monitor the temperature of
the sample being processed.
The temperature probe must be plugged into the back of the ultrasonic processor and the
probe t ip must be in the liquid sample. If the init ial sample temperature is above the set
point, sonication w ill not turn on. During sonication, if the temperature reaches the
Shutdown value, the unit w ill pause sonication. The unit w ill remain paused until the
temperature drops below the pre-set temperature limit , at which t ime sonication can be
manually resumed.
Footswitch Operation – A footsw itch (# FS-3) is required for use of this option. After
sett ing up a program, the footsw itch can be used to remotely act ivate the unit .
Exit – The Exit button w ill save changes and return to the previous screen.

Rev. 6-12 24
Techniques for Optimizing Results
Probe Depth
Immerse the probe t ip 1.5 t imes the t ip diameter into the solut ion, w ithout touching the
bottom. For example, the ½ ” horn should be immersed ¾ ” below the l iquid surface.
Immersion depth can be less for larger horns and may have to be more for smaller probes
used at higher intensity.
Foaming and Aerosoling
Aerosoling and foaming generally occur when the t ip is not immersed far enough into the
solut ion. Lowering the t ip in the solut ion, decreasing power, and reducing solut ion
temperature w ill normally prevent foaming. Lowering the power and increasing sonication
t ime w ill usually reduce aerosoling; in severe cases, use an aerosol cap or sealed
atmosphere treatment chamber. In organic materials, protein release from cell material
acts like a wett ing agent and tends to promote foaming. For severe foaming:
Use a narrower processing vessel
Use a vessel w ith an irregular inner surface
Increase effect ive viscosity by concentrat ion or by adding glass beads.
Once foaming occurs, shut off power or reduce it below cavitat ion level before proceeding.
It may be necessary to use a centrifuge or high vacuum to reduce tenacious foam. If foam
persists, the sample may have to be discarded. If foaming continues to be a problem, an
indirect sonication device (such as a Cup Horn) may be a better option.
Viscosity Limitations
Viscous solut ions and highly concentrated liquids can be dif f icult to sonicate. If the liquid
is so thick that it w ill not pour or circulate easily it is too thick and cannot be processed
effect ively.
Keeping Samples Cool
Intense ultrasonic processing causes the liquid temperature to elevate especially w ith small
volumes. High temperatures reduce cavitat ion so the liquid should be kept as cold as
possible. This can be accomplished by immersing the sample vessel in an ice-salt-water-
alcohol bath, or by using a water-jacketed processing vessel w ith cold water circulat ion. To
minimize temperature elevation, use a pulse mode.
Free Radical Information
Trace free radicals produced by ultrasonics w ill usually have lit t le or no enzyme activity.
The free radicals may be H2O2, O3 as well as many other molecules and ions produced from
air or water. If this kind of reaction is suspected, it can easily be avoided by using CO2 or
N2 atmosphere. A CO2 atmosphere is quickly obtained by placing a pellet of dry ice in the
solut ion before processing and let it " bubble out" . A CO2 atmosphere stops luminescence
in the cavitat ion bubble for the same reason it prevents it in a vacuum tube. It is this
luminescence which causes the water and air molecules to break up producing the radicals.
This CO2 procedure, as simple as it is, again is ordinarily unnecessary.

Rev. 6-12 25
9. Maintenance
It is recommended to periodically inspect the unit , both visually and physically, to insure
optimum and safe performance. This inspection should be scheduled as a routine
maintenance procedure, done w ith the unit power OFF and w ith the unit unplugged from
the AC power source.
Long exposure to acids or caustics results in corrosion of metal parts or components. Check
the generator, converter, and cables periodically for any signs of rust or discolorat ion. If
discolorat ion is found, move the ultrasonic processor away from the source of the
contaminant.
Examine the condit ion of the high voltage cable that attaches the converter to the
generator. Inspect the w ire insulat ion for damage, such as wear, burning from hot plate
contact or breakage from extended use or rough handling. In general use, the cable
assembly should not be used to carry the converter or pull it toward the user. Make certain
the cable always has slack and is never tensioned. If necessary, move the generator or
converter assembly closer to one another to accomplish this. If this is not possible, contact
your Customer Service Representat ive to obtain a longer cable. WARNING: Do not use a
cable with broken end connections, exposed wires or frayed insulation. High voltage is
present in the cable and will pose a shock hazard. Do not touch the converter assembly
until the power switch is off and the unit is unplugged.
Microtip/ Probe Maintenance
Ultrasonic processors create high intensity vibrat ion w hich puts stress on the converter and
horn assembly. The sides and end of the probe must never be allowed to come in contact
w ith anything but the solut ion. When using a Microt ip, the stress result ing at the point of
contact w ith the vessel could cause the Microt ip to fracture.
Proper care of the probe is essential for dependable operation. The intense cavitat ion w ill,
after usage for period of t ime, cause the t ip to erode, and the power output to decrease.
The smoother and shinier the t ip, the more power w ill be t ransmitted into the sample. The
vibrat ions may also cause the probe t ip to loosen over t ime or the threaded connection to
accumulate debris. Note: A loose probe w ill usually generate a loud piercing or squealing
sound.
For that reason, it is recommended that a preventative maintenance schedule be adopted
to examine the unit at regular intervals. The schedule should depend on frequency of use.
Weekly maintenance schedules are recommended for units used frequently or monthly for
those used infrequently. The t ip must be examined for excessive wear and to ensure that
the threaded connection is clean and attached properly to the convertor. Use a cotton
swab and alcohol (i.e. ethanol, isopropyl, etc.) to clean the threaded mating surfaces.
When excessive wear (corrosion/pitting of the probe tip) is detected the probe should be
replaced with a new one.
WARNING: Never hand tighten probes or horns onto the convertor; properly tighten them
with the appropriate Wrench Set. Steps for attaching and detaching microt ip probes:
Rev. 6-12 26
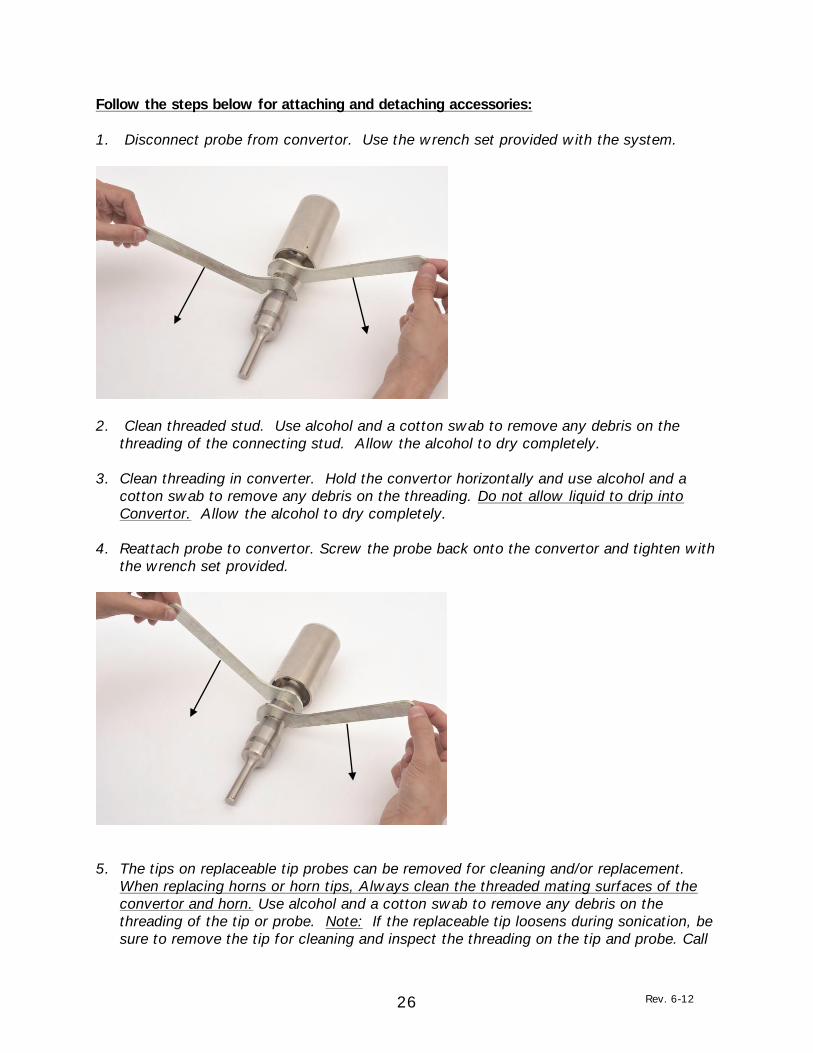
Follow the steps below for attaching and detaching accessories:
1. Disconnect probe from convertor. Use the w rench set provided w ith the system.
2. Clean threaded stud. Use alcohol and a cotton swab to remove any debris on the
threading of the connecting stud. Allow the alcohol to dry completely.
3. Clean threading in converter. Hold the convertor horizontally and use alcohol and a
cotton swab to remove any debris on the threading. Do not allow liquid to drip into
Convertor. Allow the alcohol to dry completely.
4. Reattach probe to convertor. Screw the probe back onto the convertor and t ighten w ith
the w rench set provided.
5. The t ips on replaceable t ip probes can be removed for cleaning and/or replacement.
When replacing horns or horn t ips, Always clean the threaded mating surfaces of the
convertor and horn. Use alcohol and a cotton swab to remove any debris on the
threading of the t ip or probe. Note: If the replaceable t ip loosens during sonication, be
sure to remove the t ip for cleaning and inspect the threading on the t ip and probe. Call

Rev. 6-12 27
the manufacturer for assistance if the threading is chipped or damaged in anyway.
Replacement Tip Removal Replacement Tip Tightening
Replacement Tip Removal Replacement Tip Tightening
* Note: When t ightening a Microt ip the t ip must not be in contact w ith the work surface.
Always have the t ip extending off of the table or w ork surface to minimize stress to the
t ip.
System Cleaning Instructions
The generator and converter may be cleaned using an acid-free cleaning solut ion (i.e. glass
cleaner).
Probes should be cleaned using isopropyl alcohol. Probes are made from t itanium and can
be autoclaved (the converter is an electrical part and cannot be sterilized in this manner).
Before each procedure place the probe t ip in w ater or alcohol and turn the power on for a
few seconds to remove residue. The t ip also can be sterilized using alcohol w ith the power
on.

Rev. 6-12 28
9. Troubleshooting
Your Ultrasonic Processor was designed to provide you w ith years of safe and dependable
service. Nevertheless, because of component failure or improper usage, the possibility does
exist that it might not perform as it should, shut dow n or stop working all together. The
most probable causes for malfunction are listed below and should be investigated.
A connector or cable is damaged.
The unit was plugged into an electrical outlet that provides a dif ferent voltage from
that required. See Electrical Requirements.
The horn, probe, booster or microt ip is not t ightened properly w ith the w renches
provided.
The convertor and/or microt ip has been dropped.
A microt ip being operated is damaged or worn past its useful life.
A fuse(s) has failed.
OVERLOAD CONDITION
If the Ultrasonic Processor stops w orking, and an OVERLOAD indication is displayed on the
screen, check for possible causes as outlined in the above paragraph. Then press the OFF
key to sw itch the unit off , and the ON key to sw itch the unit back on to restart the
equipment.
If the problem persists after inspecting all of these, please contact Customer Service for
additional assistance or to replace a worn microtip or damaged part.
Note: Most faults can be solved by cleaning all mating and threaded surfaces using
isopropyl alcohol and properly re-assembling t ight ly together using the appropriate
w renches.
Note: If the display freezes, sw itch Off main power, wait 5 seconds and sw itch back On.
Note: If you touch Start and sonication does not occur, sw itch Off main power, wait 5
seconds and sw itch back On.
If these steps do not solve your problem, please contact a Customer Service
Representative.

Rev. 6-12 29
10. Return of Equipment
It is suggested that an Ultrasonic Processor in need of repair be sent back to the factory.
In order to receive prompt service; always contact your Customer Service Representat ive
before returning any instrument. Include date of purchase, model number and serial
number.
Please obtain a Return Authorization Number prior to returning the instrument.
Care should be exercised to provide adequate packing to insure against possible damage in
shipment. The Ultrasonic Processor should be sent to the “ Service Department” w ith all
transportat ion charges prepaid and return of shipment indicated.
Important
The user must cert ify that the ultrasonic processor and/or the accessories returned for
repair are free of any biohazardous or radioactive material and are safe for handling. Please
complete the “ Safety Cert if icat ion” form on the next page and send it in w ith your
equipment.
Do not return any equipment unless such a certification can be made.

Rev. 6-12 30
SAFETY CERTIFICATION FORM
Items being returned:
______________________________________________________________________________
______________________________________________________________________________
______________________________________________________________________________
______________________________________________________________________________
____________________________________________________________________
Please check only one item below :
___ The equipment w as never used or exposed to any radiological, biological or
chemical agents and is safe to handle, use or dispose of.
___ The equipment w as used but not in conjunction w ith or exposed to any
radiological, geological or chemical agents and is safe to handle, use, or dispose of.
___The equipment w as used in conjunction w ith or exposed to radiological,
biological, or chemical agents and has been decontaminated, rendering it safer for
handling, use, or disposal.
Authorization
By accepting authorizat ion to return the equipment listed above, the undersigned
assumes all responsibility and liability for radiological, biological and chemical
decontamination. Delivery of the equipment can be refused if necessary
documentation is not provided or w here it is determined that the equipment has not
been properly decontaminated. If it is determined that the equipment w as not
properly decontaminated, the Authorized Repair Facility reserves the right to bill the
customer for any and all costs associated w ith the decontamination and/or
appropriate disposal of the equipment. In the event the equipment has been
exposed to radiological contamination, the signature of the Radioactive Safety
Off icer is required.
Print name: ___________________________________ RA # ___________________
Signature: ____________________________________ Date: __________________