sophos endpoint security and control helpassets.drupal.ku.edu/.../files/docs/sesc_102_heng.pdf ·...
TRANSCRIPT
Sophos Endpoint Securityand ControlHelp
10.2Product version:June 2013Document date:
Contents
1 About Sophos Endpoint Security and Control.......................................................................................3
2 About the Home page...............................................................................................................................4
3 Sophos groups...........................................................................................................................................5
4 Sophos Anti-Virus.....................................................................................................................................8
5 Sophos Application Control...................................................................................................................50
6 Sophos Device Control...........................................................................................................................51
7 Sophos Data Control..............................................................................................................................53
8 Sophos Web Control...............................................................................................................................55
9 Sophos Client Firewall............................................................................................................................56
10 Sophos AutoUpdate..............................................................................................................................86
11 Sophos Tamper Protection...................................................................................................................89
12 Troubleshooting....................................................................................................................................94
13 Glossary...............................................................................................................................................102
14 Technical support................................................................................................................................108
15 Legal notices........................................................................................................................................109
2
1 About Sophos Endpoint Security and Control
Sophos Endpoint Security and Control, version 10.2 is an integrated suite of security software.
Sophos Anti-Virus detects and cleans up viruses, Trojans, worms, and spyware, as well as adwareand other potentially unwanted applications. Our HIPS (Host Intrusion Prevention System)technology can also protect your computer from suspicious files and rootkits.
Sophos Behavior Monitoring uses our HIPS technology to protect Windows 2000 and latercomputers from unidentified or "zero-day" threats and suspicious behavior.
Sophos Live Protection improves detection of new malware without the risk of unwanteddetections. This is achieved by doing an instant lookup against the very latest known malware.When new malware is identified, Sophos can send out updates within seconds.
Sophos Web Protection provides enhanced protection against web threats by preventing accessto locations that are known to host malware. It blocks endpoints access to such sites by performinga real-time lookup against Sophos's online database of malicious websites.
Sophos Application Control blocks unauthorized applications such as Voice over IP, instantmessaging, file sharing, and game software.
Sophos Device Control blocks unauthorized external storage devices and wireless connectiontechnologies.
Sophos Data Control prevents the accidental leakage of personally-identifiable information frommanaged computers.
Sophos Web Control provides protection, control, and reporting for computers that are located,or roam, outside the corporate network.
Sophos Client Firewall prevents worms, Trojans, and spyware from stealing and distributingsensitive information, and also prevents intrusion from hackers.
Sophos AutoUpdate offers fail-safe updating and can throttle bandwidth when updating overlow-speed network connections.
Sophos Tamper Protection prevents unauthorized users (users with limited technical knowledge)and known malware from uninstalling Sophos security software or disabling it through the SophosEndpoint Security and Control interface.
3
Help
2 About the Home page
The Home page is displayed in the right-hand pane when you open the Sophos Endpoint Securityand Control window. It enables you to configure and use the software.
As you use Sophos Endpoint Security and Control, the content of the right-hand pane will change.To return to the Home page, click the Home button on the toolbar.
4
Sophos Endpoint Security and Control
3 Sophos groups
3.1 About Sophos groups
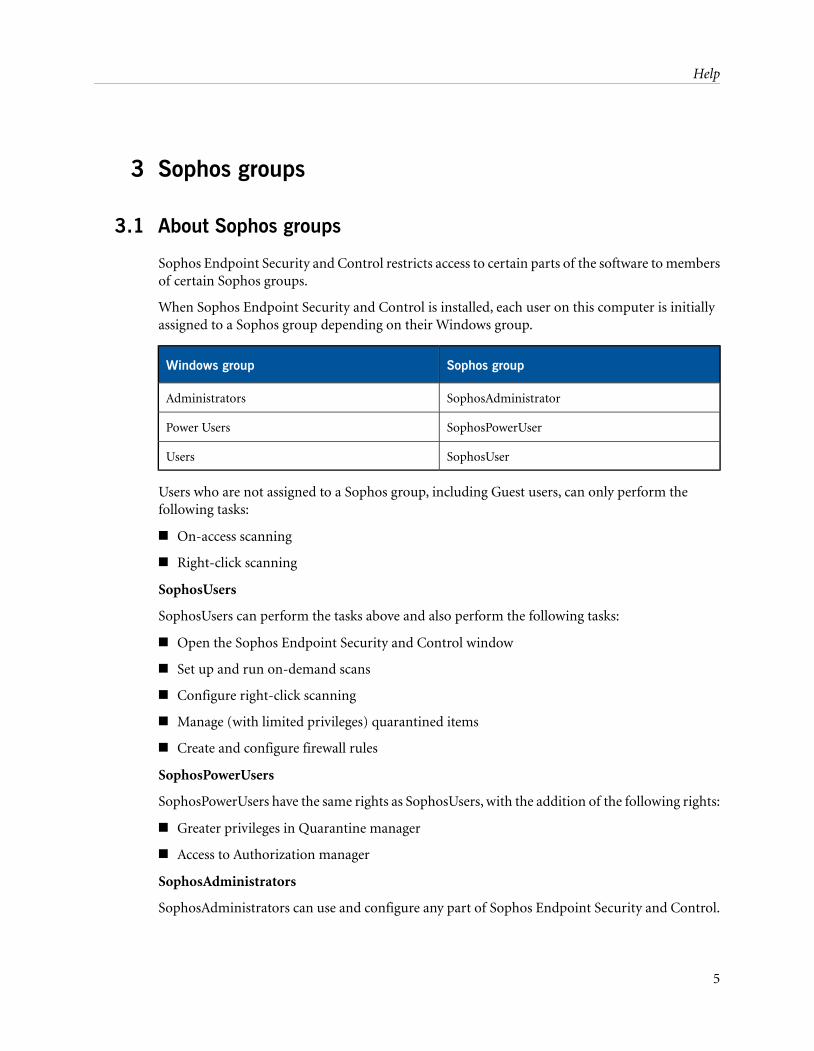
Sophos Endpoint Security and Control restricts access to certain parts of the software to membersof certain Sophos groups.
When Sophos Endpoint Security and Control is installed, each user on this computer is initiallyassigned to a Sophos group depending on their Windows group.
Sophos groupWindows group
SophosAdministratorAdministrators
SophosPowerUserPower Users
SophosUserUsers
Users who are not assigned to a Sophos group, including Guest users, can only perform thefollowing tasks:
■ On-access scanning
■ Right-click scanning
SophosUsers
SophosUsers can perform the tasks above and also perform the following tasks:
■ Open the Sophos Endpoint Security and Control window
■ Set up and run on-demand scans
■ Configure right-click scanning
■ Manage (with limited privileges) quarantined items
■ Create and configure firewall rules
SophosPowerUsers
SophosPowerUsers have the same rights as SophosUsers, with the addition of the following rights:
■ Greater privileges in Quarantine manager
■ Access to Authorization manager
SophosAdministrators
SophosAdministrators can use and configure any part of Sophos Endpoint Security and Control.
5
Help

Note: If tamper protection is enabled, a SophosAdministrator must know the tamper protectionpassword to perform the following tasks:
■ Configure on-access scanning.
■ Configure suspicious behavior detection.
■ Disable tamper protection.
For more information, see About tamper protection on this computer (section 11.1).
3.2 Add a user to a Sophos group
If you are a domain administrator or a member of the Windows Administrators group on thiscomputer, you can change the Sophos group in which a user has membership. You would typicallydo this in order to change their access rights to Sophos Endpoint Security and Control.
To add a user to a Sophos group:
1. Using Windows, open Computer Management.
2. In the console tree, click Users.
3. Right-click the user's account, and then click Properties.
4. On the Member Of tab, click Add.
5. In Enter the object names to select, type one of the Sophos group names:
■ SophosAdministrator■ SophosPowerUser■ SophosUser
6. If you want to validate the Sophos group name, click Check Names.
When the user next logs on to the computer, they will find that their access rights to SophosEndpoint Security and Control have changed.
Notes
■ To open Computer Management, click Start, and then click Control Panel. Double-clickAdministrative Tools, and then double-click Computer Management.
■ To remove the user from a Sophos user group, on the Member Of tab, select the group inMember of, and then click Remove.
3.3 Configure user rights for Quarantine manager
If you are a member of the SophosAdministrator group, you can configure the user rights forQuarantine manager.
1. Click Home > Anti-virus and HIPS > Configure anti-virus and HIPS > Configure > Userrights for Quarantine manager.
6
Sophos Endpoint Security and Control
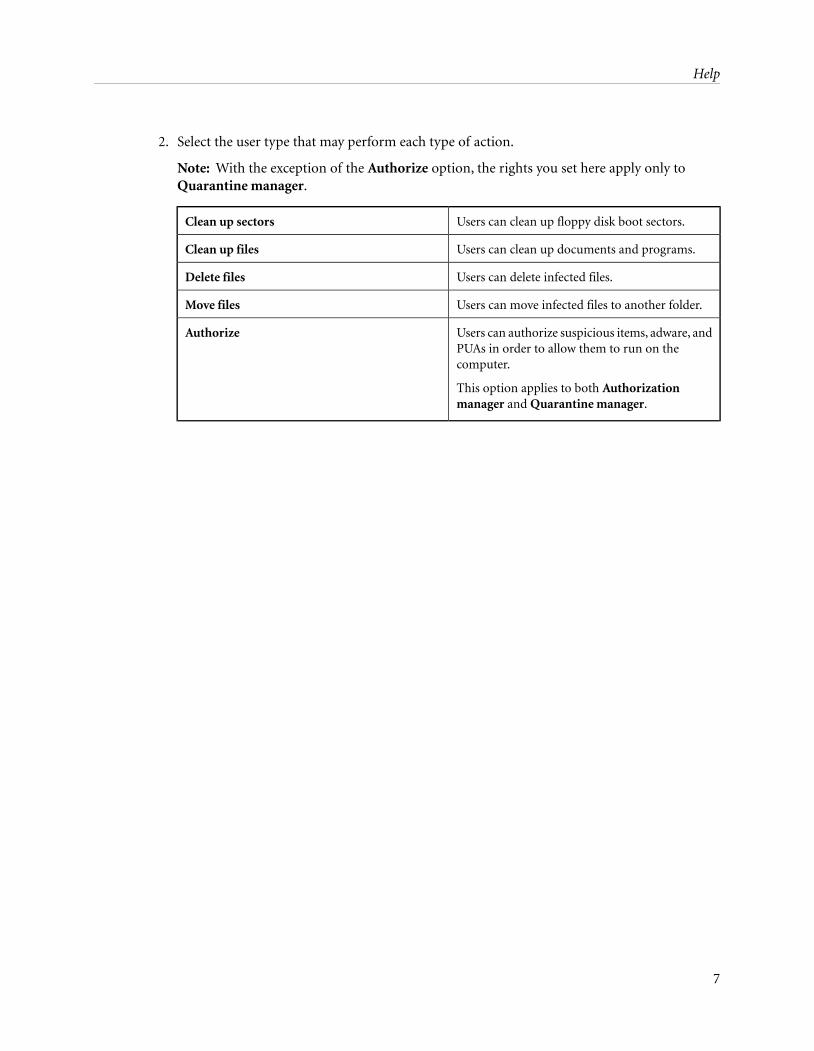
2. Select the user type that may perform each type of action.
Note: With the exception of the Authorize option, the rights you set here apply only toQuarantine manager.
Users can clean up floppy disk boot sectors.Clean up sectors
Users can clean up documents and programs.Clean up files
Users can delete infected files.Delete files
Users can move infected files to another folder.Move files
Users can authorize suspicious items, adware, andPUAs in order to allow them to run on thecomputer.
This option applies to both Authorizationmanager and Quarantine manager.
Authorize
7
Help
4 Sophos Anti-Virus
4.1 About on-access and on-demand scanning
On-access scanning
On-access scanning is your main method of protection against viruses and other threats.
Whenever you copy, move, or open a file, Sophos Anti-Virus scans the file and grants access to itonly if it does not pose a threat to your computer or has been authorized for use.
Sophos Administrators may additionally specify that files must be scanned when they are saved,created, or renamed.
For more information, see Configure on-access scanning (section 4.2.2) .
On-demand scanning
On-demand scans provide additional protection. As the name suggests, you initiate an on-demandscan. You can scan anything from a single file to your entire computer.
For more information, see Types of on-demand scan (section 4.3.1).
4.2 On-access scanning
4.2.1 About on-access scanning best practice
This section contains recommendations to help you get the best from on-access scanning.
We recommend that you use the default on-access scan settings, as they represent the best balancebetween protecting your computer against threats and overall system performance. For informationabout the recommended on-access scan settings, see Sophos support knowledgebase article 114345(http://www.sophos.com/en-us/support/knowledgebase/114345.aspx).
4.2.2 Configure on-access scanning
Caution: On-access scanning may not detect viruses if certain encryption software is installed.Change the startup processes to ensure that files are decrypted when on-access scanning begins.For more information on how to use anti-virus and HIPS policy with encryption software, seeSophos support knowledgebase article 12790http://www.sophos.com/support/knowledgebase/article/12790.html.
Important: If a management console is used to administer Sophos Endpoint Security and Controlon this computer, it may override any changes you make here.
8
Sophos Endpoint Security and Control
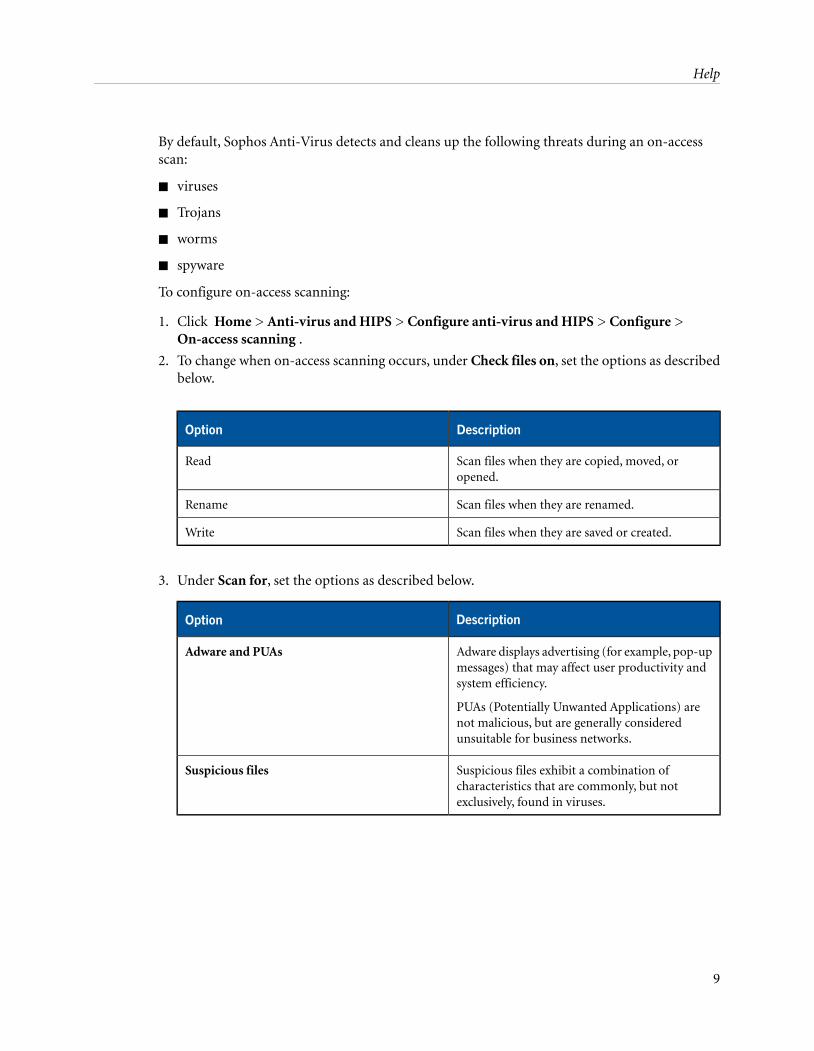
By default, Sophos Anti-Virus detects and cleans up the following threats during an on-accessscan:
■ viruses
■ Trojans
■ worms
■ spyware
To configure on-access scanning:
1. Click Home > Anti-virus and HIPS > Configure anti-virus and HIPS > Configure >On-access scanning .
2. To change when on-access scanning occurs, under Check files on, set the options as describedbelow.
DescriptionOption
Scan files when they are copied, moved, oropened.
Read
Scan files when they are renamed.Rename
Scan files when they are saved or created.Write
3. Under Scan for, set the options as described below.
DescriptionOption
Adware displays advertising (for example, pop-upmessages) that may affect user productivity andsystem efficiency.
PUAs (Potentially Unwanted Applications) arenot malicious, but are generally consideredunsuitable for business networks.
Adware and PUAs
Suspicious files exhibit a combination ofcharacteristics that are commonly, but notexclusively, found in viruses.
Suspicious files
9
Help
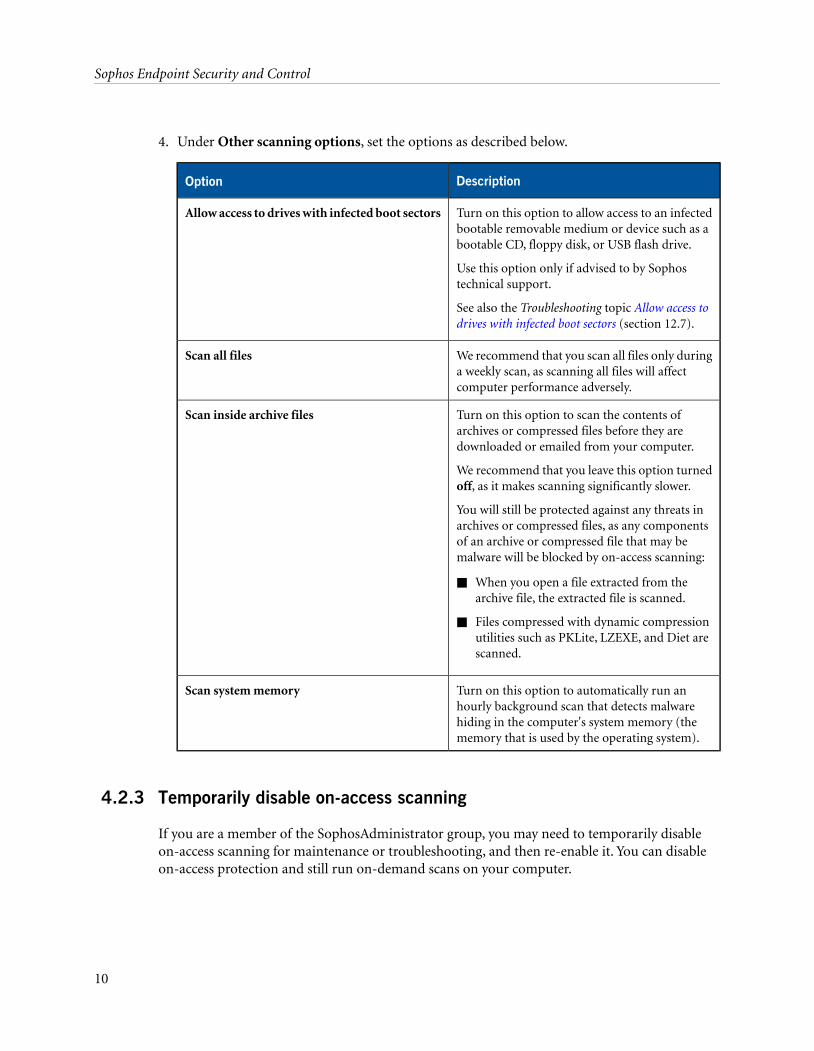
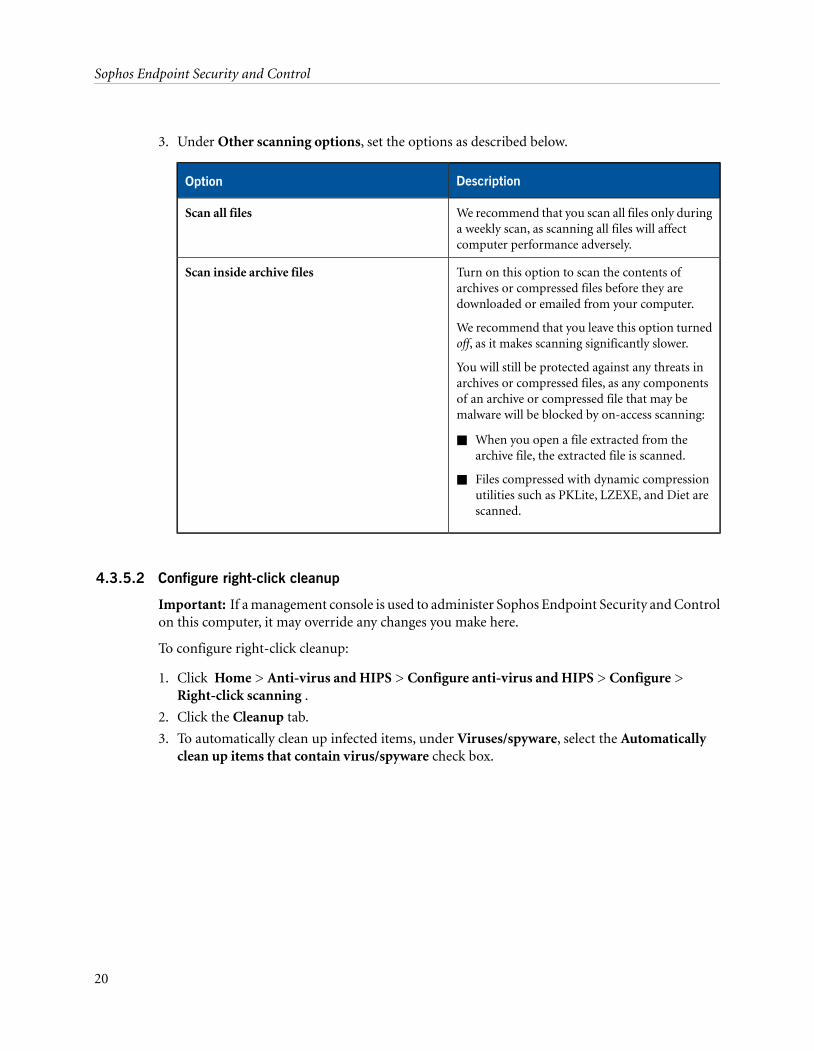
4. Under Other scanning options, set the options as described below.
DescriptionOption
Turn on this option to allow access to an infectedbootable removable medium or device such as abootable CD, floppy disk, or USB flash drive.
Use this option only if advised to by Sophostechnical support.
See also the Troubleshooting topic Allow access todrives with infected boot sectors (section 12.7).
Allow access to drives with infected boot sectors
We recommend that you scan all files only duringa weekly scan, as scanning all files will affectcomputer performance adversely.
Scan all files
Turn on this option to scan the contents ofarchives or compressed files before they aredownloaded or emailed from your computer.
We recommend that you leave this option turnedoff, as it makes scanning significantly slower.
You will still be protected against any threats inarchives or compressed files, as any componentsof an archive or compressed file that may bemalware will be blocked by on-access scanning:
Scan inside archive files
■ When you open a file extracted from thearchive file, the extracted file is scanned.
■ Files compressed with dynamic compressionutilities such as PKLite, LZEXE, and Diet arescanned.
Turn on this option to automatically run anhourly background scan that detects malwarehiding in the computer's system memory (thememory that is used by the operating system).
Scan system memory
4.2.3 Temporarily disable on-access scanning
If you are a member of the SophosAdministrator group, you may need to temporarily disableon-access scanning for maintenance or troubleshooting, and then re-enable it. You can disableon-access protection and still run on-demand scans on your computer.
10
Sophos Endpoint Security and Control
Sophos Endpoint Security and Control retains the settings you make here, even after you restartyour computer. If you disable on-access scanning, your computer is unprotected until you re-enableit.
1. Click Home > Anti-virus and HIPS > Configure anti-virus and HIPS > Configure >On-access scanning .
2. Clear the Enable on-access scanning for this computer check box.
4.2.4 Configure on-access cleanup
Important: If a management console is used to administer Sophos Endpoint Security and Controlon this computer, it may override any changes you make here.
To configure on-access cleanup:
1. Click Home > Anti-virus and HIPS > Configure anti-virus and HIPS > Configure >On-access scanning .
2. Click the Cleanup tab.
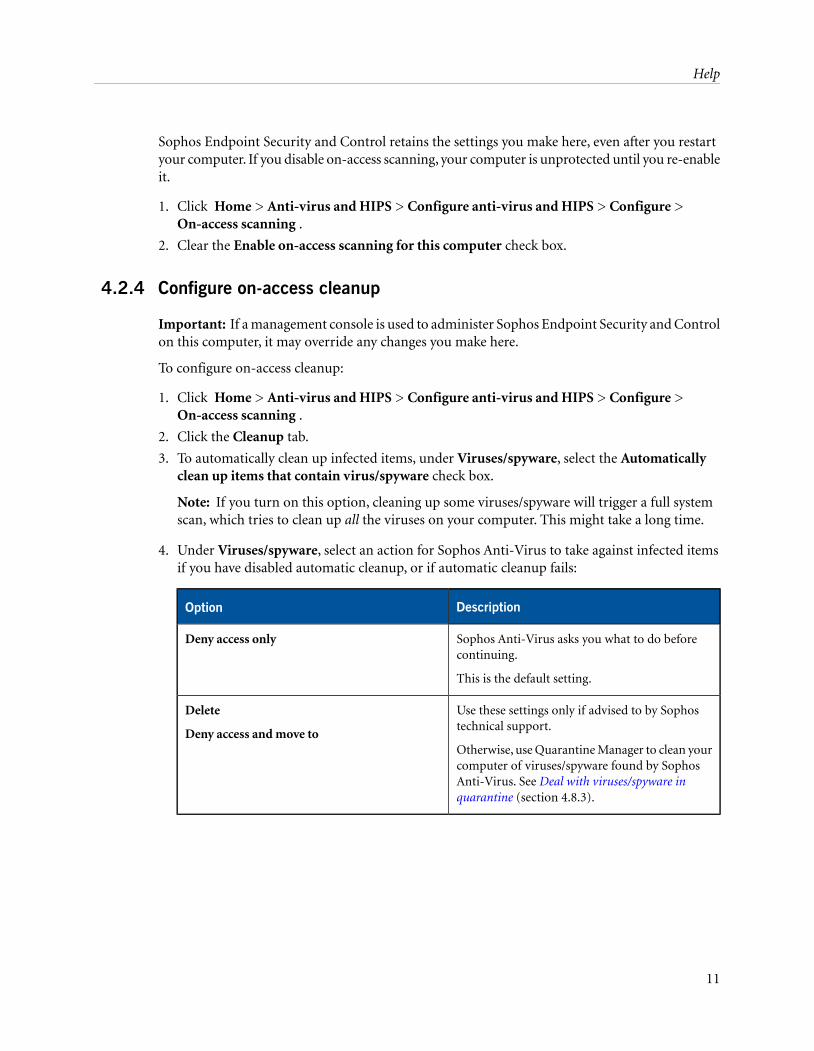
3. To automatically clean up infected items, under Viruses/spyware, select the Automaticallyclean up items that contain virus/spyware check box.
Note: If you turn on this option, cleaning up some viruses/spyware will trigger a full systemscan, which tries to clean up all the viruses on your computer. This might take a long time.
4. Under Viruses/spyware, select an action for Sophos Anti-Virus to take against infected itemsif you have disabled automatic cleanup, or if automatic cleanup fails:
DescriptionOption
Sophos Anti-Virus asks you what to do beforecontinuing.
This is the default setting.
Deny access only
Use these settings only if advised to by Sophostechnical support.
Otherwise, use Quarantine Manager to clean yourcomputer of viruses/spyware found by SophosAnti-Virus. See Deal with viruses/spyware inquarantine (section 4.8.3).
Delete
Deny access and move to
11
Help

5. Under Suspicious files, select an action for Sophos Anti-Virus to take when it finds filescontaining code that is commonly used in malware:
DescriptionOption
Sophos Anti-Virus asks you what to do beforecontinuing.
This is the default setting.
Deny access
Use these settings only if advised to by Sophostechnical support.
Instead, use Quarantine Manager to clean yourcomputer of suspicious files found by SophosAnti-Virus. See Deal with suspicious files inquarantine (section 4.8.5).
Delete
Deny access and move to
4.2.5 Reset scanned file checksums
The list of scanned file checksums is reset when a Sophos Anti-Virus update occurs, or when yourestart your computer. The list is then rebuilt with new data as files are scanned by SophosAnti-Virus.
You can reset the list of scanned file checksums from within Sophos Endpoint Security and Controlif you do not want to restart your computer.
To reset scanned file checksums:
1. Click Home > Anti-virus and HIPS > Configure anti-virus and HIPS > Configure >On-access scanning .
2. On the Scanning tab, click Purge cache.
4.2.6 Specify on-access scanning file extensions
Important: If a management console is used to administer Sophos Endpoint Security and Controlon this computer, it may override any changes you make here.
You can specify which file extensions are scanned during on-access scanning.
1. Click Home > Anti-virus and HIPS > Configure anti-virus and HIPS > Configure >On-access scanning .
12
Sophos Endpoint Security and Control

2. Click the Extensions tab, set the options as described below.
Scan all files
Click this to enable scanning of all files, regardless of the filename extension.
Allow me to control exactly what is scanned
Click this to restrict scanning to only files with a particular filename extension, specified in theextension list.
Caution: The extension list includes file types that we recommend are scanned. Be careful ifyou alter the list as explained below.
To add a filename extension to the list, click Add. You can use the wildcard ? to match anysingle character.
To remove a filename extension from the list, select the extension and click Remove.
To change a filename extension in the list, select the extension and click Edit.
When you select Allow me to control exactly what is scanned, Scan files with no extensionis selected by default. To disable scanning of files with no filename extension, deselect Scanfiles with no extension.
4.2.7 Add, edit, or delete on-access scanning exclusions
Important: If a management console is used to administer Sophos Endpoint Security and Controlon this computer, it may override any changes you make here.
To edit the list of files, folders, and drives that are excluded from on-access scanning:
1. Click Home > Anti-virus and HIPS > Configure anti-virus and HIPS > Configure >On-access scanning .
2. Click the Exclusions tab, and then choose one of the following options.
■ To specify a file, folder, or drive that should be excluded from on-access scanning, clickAdd.
■ To delete an exclusion, click Remove.■ To change an exclusion, click Edit.
3. To add or edit an excluded item, in the Exclude item dialog box, select the Item type.
The All remote files item type is for excluding files that are not stored on local drives. Youmight select this if you want to increase speed of access to such files and you trust the availableremote file locations.
13
Help
4. Specify the Item name by using the Browse button or typing in the text box.
Note: If you work on a 64-bit platform, the Browse button will not be visible in the Excludeitem dialog.
For more information on specifying item names, see Specifying file names and paths of scanningexclusion items (section 4.2.8).
4.2.8 Specifying file names and paths of scanning exclusion items
Standard naming conventions
Sophos Anti-Virus validates the paths and file names of scanning exclusion items against standardWindows naming conventions. For example, a folder name may contain spaces but may notcontain only spaces.
Exclude a specific file
Specify both the path and file name to exclude a specific file. The path can include a drive letteror network share name:
C:\Documents\CV.doc
\\Server\Users\Documents\CV.doc
Note: To make sure that exclusions are always applied correctly, add both the long and8.3-compliant file and folder names:
C:\Program Files\Sophos\Sophos Anti-Virus
C:\Progra~1\Sophos\Sophos~1
For more information, see http://www.sophos.com/en-us/support/knowledgebase/13045.aspx.
Exclude all files with the same name
Specify a file name without a path to exclude all files with that name wherever they are located inthe file system:
spacer.gif
Exclude everything on a drive or network share
Specify a drive letter or network share name to exclude everything on that drive or network share:
C:
\\Server
Exclude a specific folder
Specify a folder path including a drive letter or network share name to exclude everything in thatfolder and below:
14
Sophos Endpoint Security and Control
D:\Tools\logs
Exclude all folders with the same name
Specify a folder path without a drive letter or network share name to exclude everything from thatfolder and below on any drive or network share. For example, \Tools\logs excludes the followingfolders:
C:\Tools\logs
\\Server\Tools\logs
Note: You must specify the entire path up to the drive letter or network share name. In the exampleabove, specifying \logs would not exclude any files.
The ? and * wildcards
Use the ? wildcard in a file name or extension to match any single character.
At the end of a file name or extension, the ? wildcard matches any single character or no characters:For example, file??.txt matches file.txt, file1.txt, and file12.txt, but not file123.txt.
Use the * wildcard in a file name or extension, in the form [file name].* or *.[extension]:
Correct
file.*
*.txt
Incorrect
file*.txt
file.txt*
file.*txt
Multiple file extensions
File names with multiple extensions are treated as if the last extension is the extension and the restare part of the file name:
MySample.txt.doc = file name MySample.txt + extension .doc.
4.3 On-demand scanning
4.3.1 Types of on-demand scan
Right-click scan
Scan a file, folder, or drive in Windows Explorer at any time.
■ Run a right-click scan (section 4.3.5.3)
15
Help
Custom scan
Scan specific sets of files or folders. You can either manually run a custom scan or schedule it torun unattended.
■ Run a custom scan (section 4.3.6.6)
■ Schedule a custom scan (section 4.3.6.5)
Full computer scan
Scan your entire computer, including the boot sector and system memory, at any time.
■ Run a full computer scan (section 4.3.7)
4.3.2 Specify on-demand scanning file extensions
Important: If a management console is used to administer Sophos Endpoint Security and Controlon this computer, it may override any changes you make here.
You can specify which file extensions are scanned during on-demand scanning.
1. On the Configure menu, click On-demand extensions and exclusions.
2. Click the Extensions tab, set the options as described below.
Scan all files
Click this to enable scanning of all files, regardless of the filename extension.
Allow me to control exactly what is scanned
Click this to restrict scanning to only files with a particular filename extension, specified in theextension list.
Caution: The extension list includes file types that we recommend are scanned. Be careful ifyou alter the list as explained below.
To add a filename extension to the list, click Add. You can use the wildcard ? to match anysingle character.
To remove a filename extension from the list, select the extension and click Remove.
To change a filename extension in the list, select the extension and click Edit.
When you select Allow me to control exactly what is scanned, Scan files with no extensionis selected by default. To disable scanning of files with no filename extension, deselect Scanfiles with no extension.
16
Sophos Endpoint Security and Control
4.3.3 Add, edit, or delete on-demand scanning exclusions
Important: If a management console is used to administer Sophos Endpoint Security and Controlon this computer, it may override any changes you make here.
The procedure described below applies to all on-demand scans. For information on excludingspecific items from a custom scan, see Create a custom scan (section 4.3.6.1).
To edit the list of files, folders, and drives that are excluded from on-demand scanning:
1. Click Home > Anti-virus and HIPS > Configure anti-virus and HIPS > Configure >On-demand extensions and exclusions.
2. Click the Exclusions tab, and then choose one of the following options.
■ To specify a file, folder, or drive that should be excluded from on-demand scanning, clickAdd.
■ To delete an exclusion, click Remove.■ To change an exclusion, click Edit.
3. To add or edit an excluded item, in the Exclude item dialog box, select the Item type.
4. Specify the Item name by using the Browse button or typing in the text box.
Note: If you work on a 64-bit platform, the Browse button will not be visible in the Excludeitem dialog.
For more information on specifying item names, see Specifying file names and paths of scanningexclusion items (section 4.2.8).
4.3.4 Specifying file names and paths of scanning exclusion items
Standard naming conventions
Sophos Anti-Virus validates the paths and file names of scanning exclusion items against standardWindows naming conventions. For example, a folder name may contain spaces but may notcontain only spaces.
Exclude a specific file
Specify both the path and file name to exclude a specific file. The path can include a drive letteror network share name:
C:\Documents\CV.doc
\\Server\Users\Documents\CV.doc
Note: To make sure that exclusions are always applied correctly, add both the long and8.3-compliant file and folder names:
C:\Program Files\Sophos\Sophos Anti-Virus
17
Help
C:\Progra~1\Sophos\Sophos~1
For more information, see http://www.sophos.com/en-us/support/knowledgebase/13045.aspx.
Exclude all files with the same name
Specify a file name without a path to exclude all files with that name wherever they are located inthe file system:
spacer.gif
Exclude everything on a drive or network share
Specify a drive letter or network share name to exclude everything on that drive or network share:
C:
\\Server
Exclude a specific folder
Specify a folder path including a drive letter or network share name to exclude everything in thatfolder and below:
D:\Tools\logs
Exclude all folders with the same name
Specify a folder path without a drive letter or network share name to exclude everything from thatfolder and below on any drive or network share. For example, \Tools\logs excludes the followingfolders:
C:\Tools\logs
\\Server\Tools\logs
Note: You must specify the entire path up to the drive letter or network share name. In the exampleabove, specifying \logs would not exclude any files.
The ? and * wildcards
Use the ? wildcard in a file name or extension to match any single character.
At the end of a file name or extension, the ? wildcard matches any single character or no characters:For example, file??.txt matches file.txt, file1.txt, and file12.txt, but not file123.txt.
Use the * wildcard in a file name or extension, in the form [file name].* or *.[extension]:
Correct
file.*
*.txt
Incorrect
file*.txt
18
Sophos Endpoint Security and Control
file.txt*
file.*txt
Multiple file extensions
File names with multiple extensions are treated as if the last extension is the extension and the restare part of the file name:
MySample.txt.doc = file name MySample.txt + extension .doc.
4.3.5 Right-click scanning
4.3.5.1 Configure right-click scanning
Important: If a management console is used to administer Sophos Endpoint Security and Controlon this computer, it will notoverride any changes you make here.
By default, Sophos Anti-Virus detects and cleans up the following threats during a right-click scan:
■ viruses
■ Trojans
■ worms
■ spyware
■ adware and other Potentially Unwanted Applications (PUAs)
To configure right-click scanning:
1. Click Home > Anti-virus and HIPS > Configure anti-virus and HIPS > Configure >Right-click scanning .
2. Under Scan for, set the options as described below.
DescriptionOption
Adware displays advertising (for example, pop-upmessages) that may affect user productivity andsystem efficiency.
PUAs (Potentially Unwanted Applications) arenot malicious, but are generally consideredunsuitable for business networks.
Adware and PUAs
Suspicious files exhibit a combination ofcharacteristics that are commonly, but notexclusively, found in viruses.
Suspicious files
19
Help
3. Under Other scanning options, set the options as described below.
DescriptionOption
We recommend that you scan all files only duringa weekly scan, as scanning all files will affectcomputer performance adversely.
Scan all files
Turn on this option to scan the contents ofarchives or compressed files before they aredownloaded or emailed from your computer.
We recommend that you leave this option turnedoff, as it makes scanning significantly slower.
You will still be protected against any threats inarchives or compressed files, as any componentsof an archive or compressed file that may bemalware will be blocked by on-access scanning:
Scan inside archive files
■ When you open a file extracted from thearchive file, the extracted file is scanned.
■ Files compressed with dynamic compressionutilities such as PKLite, LZEXE, and Diet arescanned.
4.3.5.2 Configure right-click cleanup
Important: If a management console is used to administer Sophos Endpoint Security and Controlon this computer, it may override any changes you make here.
To configure right-click cleanup:
1. Click Home > Anti-virus and HIPS > Configure anti-virus and HIPS > Configure >Right-click scanning .
2. Click the Cleanup tab.
3. To automatically clean up infected items, under Viruses/spyware, select the Automaticallyclean up items that contain virus/spyware check box.
20
Sophos Endpoint Security and Control
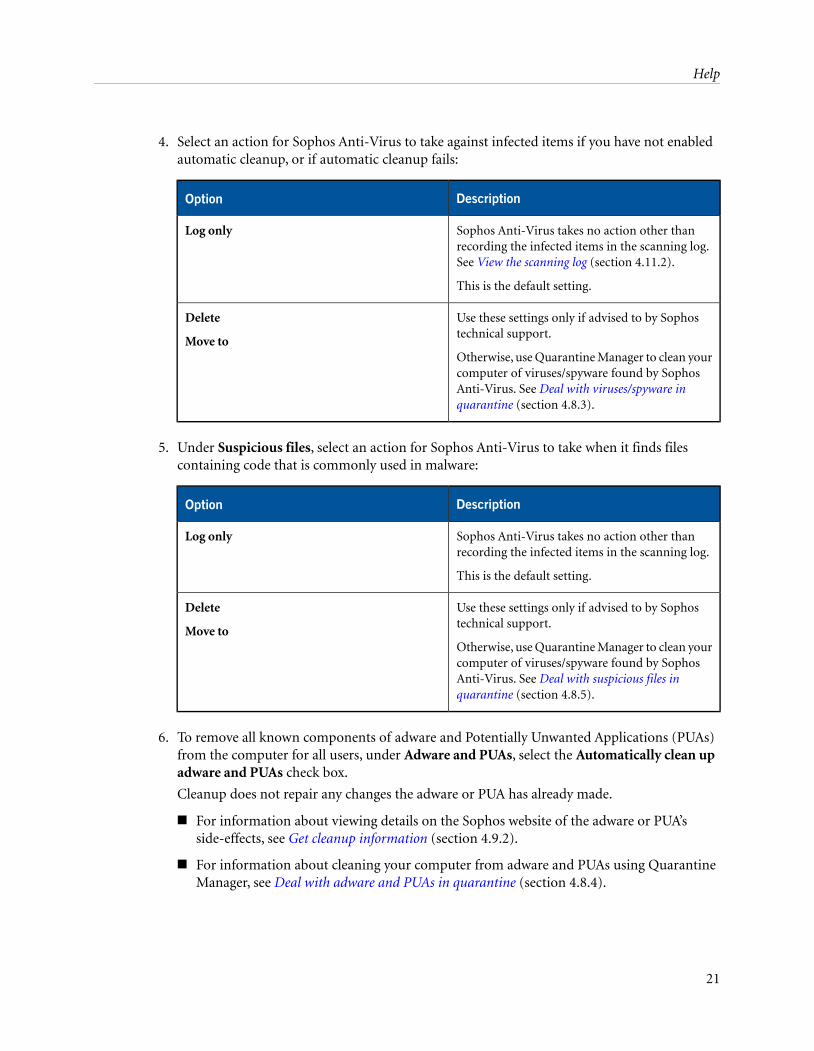
4. Select an action for Sophos Anti-Virus to take against infected items if you have not enabledautomatic cleanup, or if automatic cleanup fails:
DescriptionOption
Sophos Anti-Virus takes no action other thanrecording the infected items in the scanning log.See View the scanning log (section 4.11.2).
This is the default setting.
Log only
Use these settings only if advised to by Sophostechnical support.
Otherwise, use Quarantine Manager to clean yourcomputer of viruses/spyware found by SophosAnti-Virus. See Deal with viruses/spyware inquarantine (section 4.8.3).
Delete
Move to
5. Under Suspicious files, select an action for Sophos Anti-Virus to take when it finds filescontaining code that is commonly used in malware:
DescriptionOption
Sophos Anti-Virus takes no action other thanrecording the infected items in the scanning log.
This is the default setting.
Log only
Use these settings only if advised to by Sophostechnical support.
Otherwise, use Quarantine Manager to clean yourcomputer of viruses/spyware found by SophosAnti-Virus. See Deal with suspicious files inquarantine (section 4.8.5).
Delete
Move to
6. To remove all known components of adware and Potentially Unwanted Applications (PUAs)from the computer for all users, under Adware and PUAs, select the Automatically clean upadware and PUAs check box.
Cleanup does not repair any changes the adware or PUA has already made.
■ For information about viewing details on the Sophos website of the adware or PUA’sside-effects, see Get cleanup information (section 4.9.2).
■ For information about cleaning your computer from adware and PUAs using QuarantineManager, see Deal with adware and PUAs in quarantine (section 4.8.4).
21
Help
4.3.5.3 Run a right-click scan
You can scan files, folders and drives from Windows Explorer or the desktop by running aright-click scan.
1. Using Windows Explorer, or on the desktop, select the file, folder or disk drive you want toscan.
You can select multiple files and folders.
2. Right-click the selection, and then click Scan with Sophos Anti-Virus.
If any threats or controlled applications are found, click More, and then refer to the Managingquarantine items section of this Help file.
4.3.6 Custom scans
4.3.6.1 Create a custom scan
1. On the Home page, under Anti-virus and HIPS, click Scans.
For information about the Home page, see About the Home page (section 2).
2. Click Set up a new scan.
3. In the Scan name box, type a name for the scan.
4. In the Items to scan panel, select the drives and folders you want to scan. To do this, select thecheck box to the left of each drive or folder. To learn about the icons that appear in the checkboxes, refer to Representation of items to scan (section 4.3.6.2).
Note: Drives or folders that are unavailable (because they are offline or have been deleted) aredisplayed in a strikethrough font. They are removed from the Items to scan panel if they aredeselected or if there is a change in the selection of their parent drive or folder(s).
5. To configure the scan further, click Configure this scan. (Refer to Configure a custom scan(section 4.3.6.3) for more information.)
6. To schedule the scan, click Schedule this scan. (Refer to Schedule a custom scan (section 4.3.6.5)for more information.)
7. Click Save to save the scan or Save and start to save and run the scan.
4.3.6.2 Representation of items to scan
In the Items to scan panel, different icons are displayed in the check box next to each item (driveor folder), depending on which items will be scanned. These icons are shown below withexplanations.
22
Sophos Endpoint Security and Control
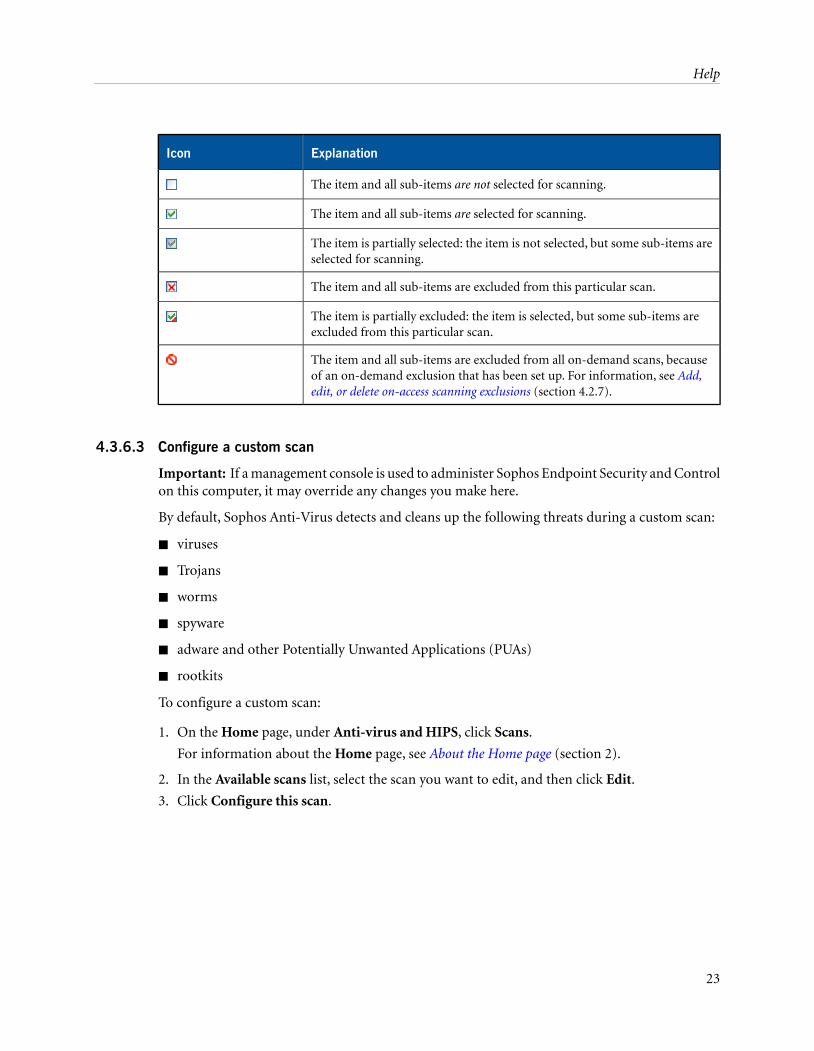
ExplanationIcon
The item and all sub-items are not selected for scanning.
The item and all sub-items are selected for scanning.
The item is partially selected: the item is not selected, but some sub-items areselected for scanning.
The item and all sub-items are excluded from this particular scan.
The item is partially excluded: the item is selected, but some sub-items areexcluded from this particular scan.
The item and all sub-items are excluded from all on-demand scans, becauseof an on-demand exclusion that has been set up. For information, see Add,edit, or delete on-access scanning exclusions (section 4.2.7).
4.3.6.3 Configure a custom scan
Important: If a management console is used to administer Sophos Endpoint Security and Controlon this computer, it may override any changes you make here.
By default, Sophos Anti-Virus detects and cleans up the following threats during a custom scan:
■ viruses
■ Trojans
■ worms
■ spyware
■ adware and other Potentially Unwanted Applications (PUAs)
■ rootkits
To configure a custom scan:
1. On the Home page, under Anti-virus and HIPS, click Scans.
For information about the Home page, see About the Home page (section 2).
2. In the Available scans list, select the scan you want to edit, and then click Edit.
3. Click Configure this scan.
23
Help
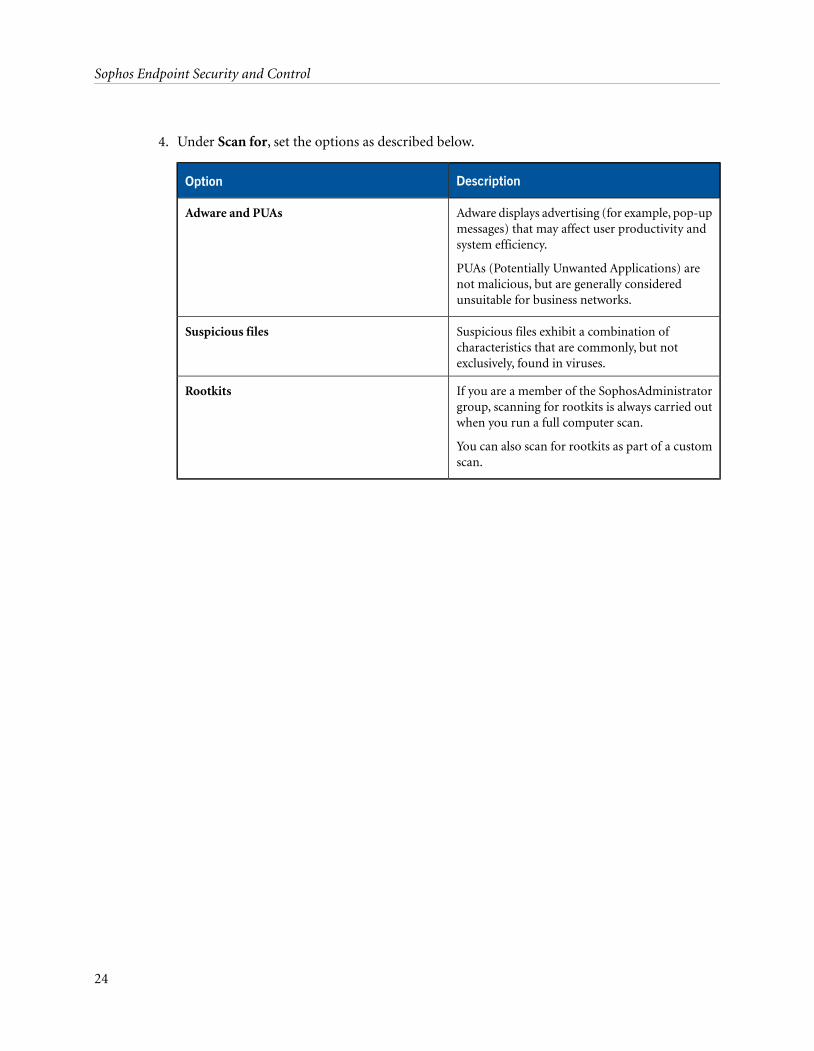
4. Under Scan for, set the options as described below.
DescriptionOption
Adware displays advertising (for example, pop-upmessages) that may affect user productivity andsystem efficiency.
PUAs (Potentially Unwanted Applications) arenot malicious, but are generally consideredunsuitable for business networks.
Adware and PUAs
Suspicious files exhibit a combination ofcharacteristics that are commonly, but notexclusively, found in viruses.
Suspicious files
If you are a member of the SophosAdministratorgroup, scanning for rootkits is always carried outwhen you run a full computer scan.
You can also scan for rootkits as part of a customscan.
Rootkits
24
Sophos Endpoint Security and Control
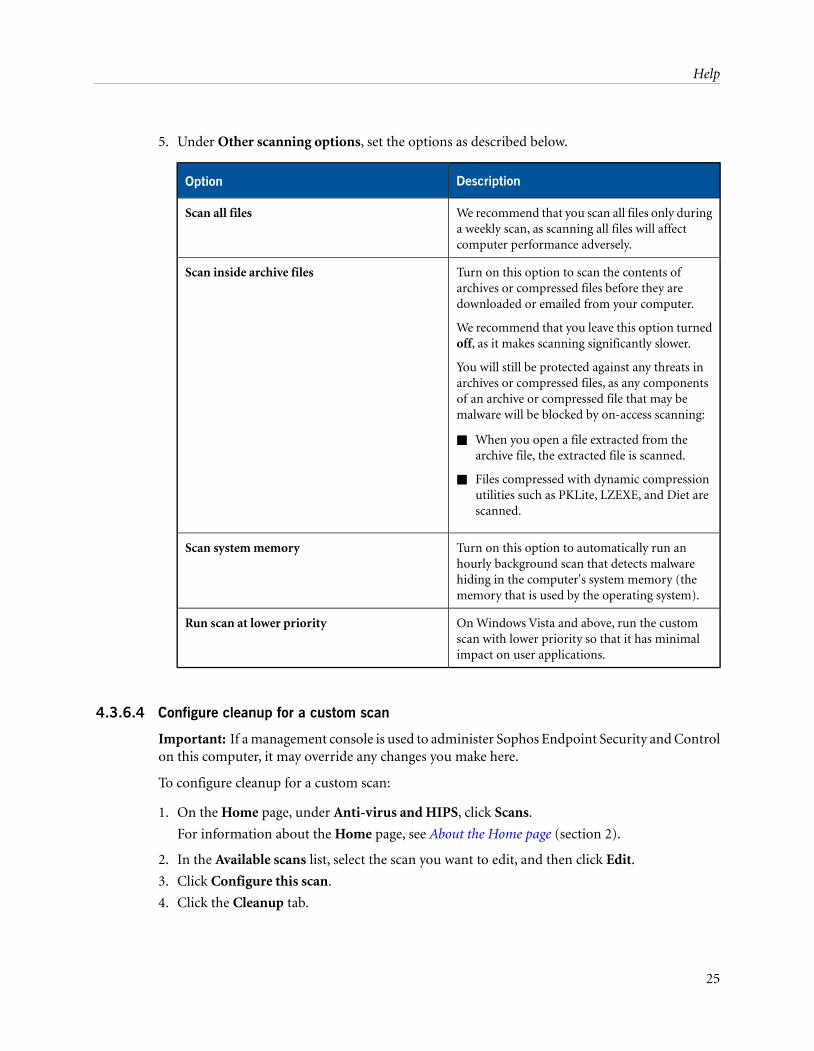
5. Under Other scanning options, set the options as described below.
DescriptionOption
We recommend that you scan all files only duringa weekly scan, as scanning all files will affectcomputer performance adversely.
Scan all files
Turn on this option to scan the contents ofarchives or compressed files before they aredownloaded or emailed from your computer.
We recommend that you leave this option turnedoff, as it makes scanning significantly slower.
You will still be protected against any threats inarchives or compressed files, as any componentsof an archive or compressed file that may bemalware will be blocked by on-access scanning:
Scan inside archive files
■ When you open a file extracted from thearchive file, the extracted file is scanned.
■ Files compressed with dynamic compressionutilities such as PKLite, LZEXE, and Diet arescanned.
Turn on this option to automatically run anhourly background scan that detects malwarehiding in the computer's system memory (thememory that is used by the operating system).
Scan system memory
On Windows Vista and above, run the customscan with lower priority so that it has minimalimpact on user applications.
Run scan at lower priority
4.3.6.4 Configure cleanup for a custom scan
Important: If a management console is used to administer Sophos Endpoint Security and Controlon this computer, it may override any changes you make here.
To configure cleanup for a custom scan:
1. On the Home page, under Anti-virus and HIPS, click Scans.
For information about the Home page, see About the Home page (section 2).
2. In the Available scans list, select the scan you want to edit, and then click Edit.
3. Click Configure this scan.
4. Click the Cleanup tab.
25
Help
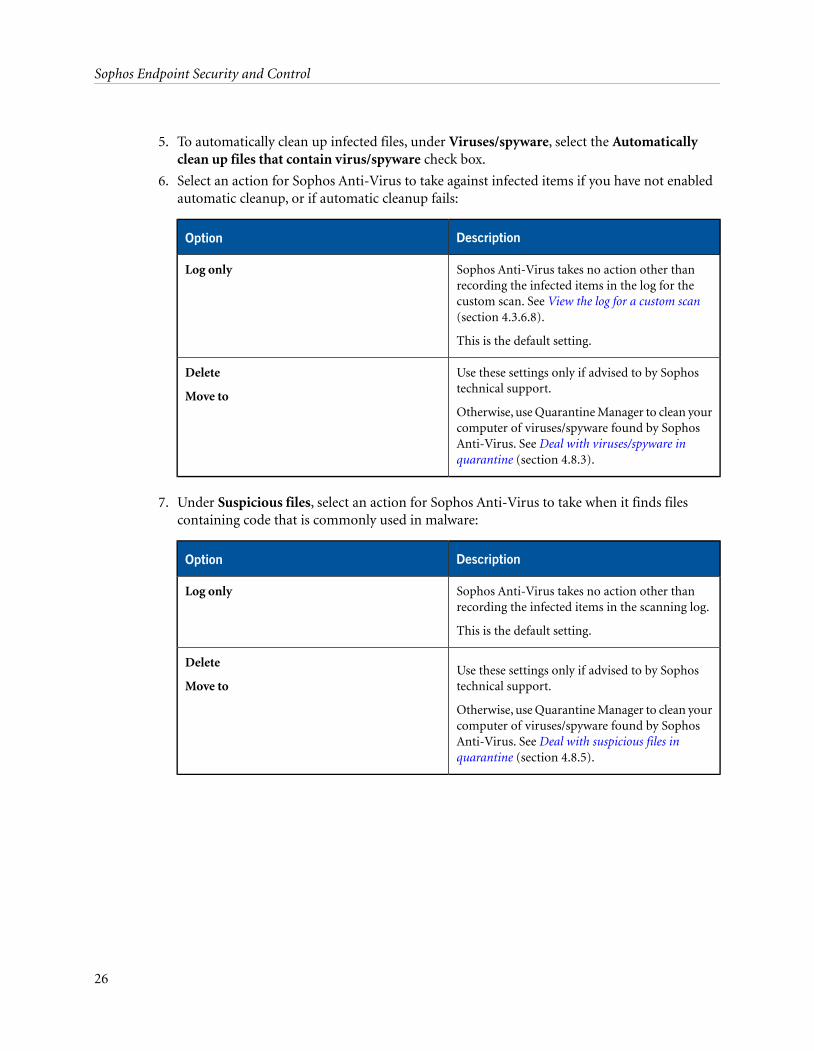
5. To automatically clean up infected files, under Viruses/spyware, select the Automaticallyclean up files that contain virus/spyware check box.
6. Select an action for Sophos Anti-Virus to take against infected items if you have not enabledautomatic cleanup, or if automatic cleanup fails:
DescriptionOption
Sophos Anti-Virus takes no action other thanrecording the infected items in the log for thecustom scan. See View the log for a custom scan(section 4.3.6.8).
This is the default setting.
Log only
Use these settings only if advised to by Sophostechnical support.
Otherwise, use Quarantine Manager to clean yourcomputer of viruses/spyware found by SophosAnti-Virus. See Deal with viruses/spyware inquarantine (section 4.8.3).
Delete
Move to
7. Under Suspicious files, select an action for Sophos Anti-Virus to take when it finds filescontaining code that is commonly used in malware:
DescriptionOption
Sophos Anti-Virus takes no action other thanrecording the infected items in the scanning log.
This is the default setting.
Log only
Use these settings only if advised to by Sophostechnical support.
Otherwise, use Quarantine Manager to clean yourcomputer of viruses/spyware found by SophosAnti-Virus. See Deal with suspicious files inquarantine (section 4.8.5).
Delete
Move to
26
Sophos Endpoint Security and Control
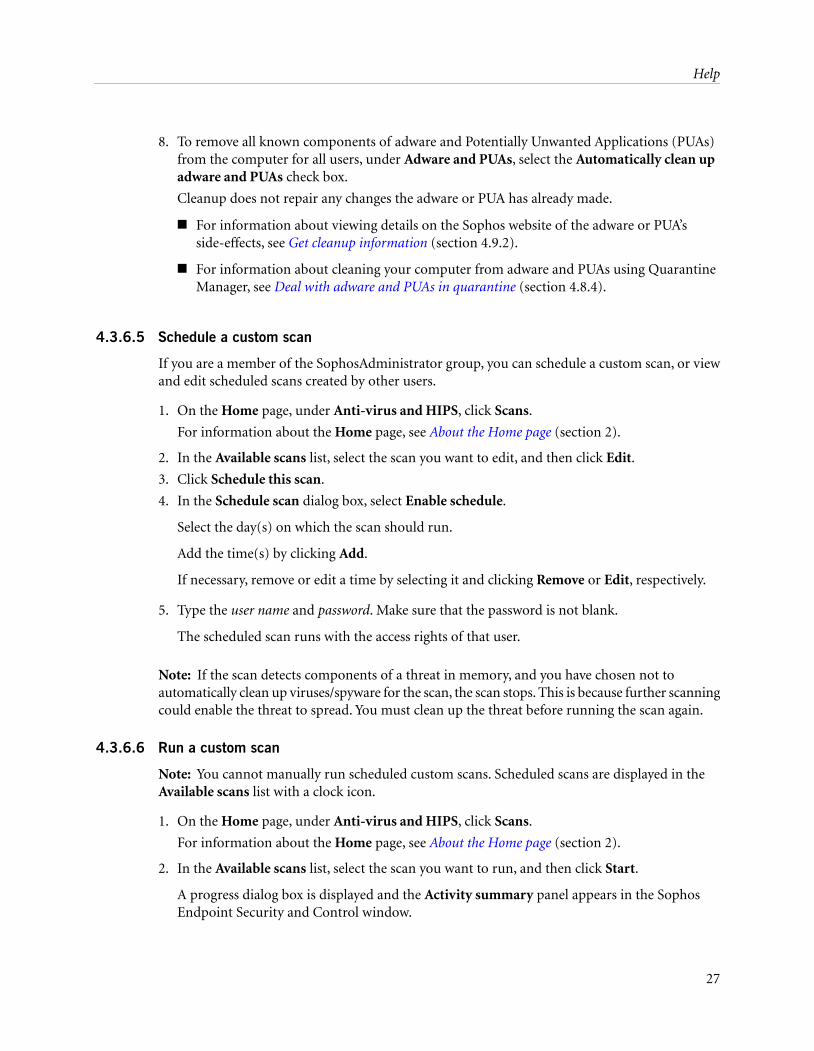
8. To remove all known components of adware and Potentially Unwanted Applications (PUAs)from the computer for all users, under Adware and PUAs, select the Automatically clean upadware and PUAs check box.
Cleanup does not repair any changes the adware or PUA has already made.
■ For information about viewing details on the Sophos website of the adware or PUA’sside-effects, see Get cleanup information (section 4.9.2).
■ For information about cleaning your computer from adware and PUAs using QuarantineManager, see Deal with adware and PUAs in quarantine (section 4.8.4).
4.3.6.5 Schedule a custom scan
If you are a member of the SophosAdministrator group, you can schedule a custom scan, or viewand edit scheduled scans created by other users.
1. On the Home page, under Anti-virus and HIPS, click Scans.
For information about the Home page, see About the Home page (section 2).
2. In the Available scans list, select the scan you want to edit, and then click Edit.
3. Click Schedule this scan.
4. In the Schedule scan dialog box, select Enable schedule.
Select the day(s) on which the scan should run.
Add the time(s) by clicking Add.
If necessary, remove or edit a time by selecting it and clicking Remove or Edit, respectively.
5. Type the user name and password. Make sure that the password is not blank.
The scheduled scan runs with the access rights of that user.
Note: If the scan detects components of a threat in memory, and you have chosen not toautomatically clean up viruses/spyware for the scan, the scan stops. This is because further scanningcould enable the threat to spread. You must clean up the threat before running the scan again.
4.3.6.6 Run a custom scan
Note: You cannot manually run scheduled custom scans. Scheduled scans are displayed in theAvailable scans list with a clock icon.
1. On the Home page, under Anti-virus and HIPS, click Scans.
For information about the Home page, see About the Home page (section 2).
2. In the Available scans list, select the scan you want to run, and then click Start.
A progress dialog box is displayed and the Activity summary panel appears in the SophosEndpoint Security and Control window.
27
Help
Note: If the scan detects components of a threat in memory, and you have chosen not toautomatically clean up viruses/spyware for the scan, the scan stops. This is because further scanningcould enable the threat to spread. You must clean up the threat before running the scan again.
If any threats or controlled applications are found, click More and refer to Managing quarantineitems.
4.3.6.7 Rename a custom scan
1. On the Home page, under Anti-virus and HIPS, click Scans.
For information about the Home page, see About the Home page (section 2).
2. In the Available scans list, select the scan you want to edit, and then click Edit.
3. In the Scan name box, type the new name for the scan.
4.3.6.8 View the log for a custom scan
1. On the Home page, under Anti-virus and HIPS, click Scans.
For information about the Home page, see About the Home page (section 2).
2. In the Available scans list, click Summary for the custom scan.
3. In the Summary dialog box, click the link at the bottom.
From the log page, you can copy the log to the clipboard, or email, or print the log.
To find specific text in the log, click Find and enter the text you want to find.
4.3.6.9 View the summary of a custom scan
1. On the Home page, under Anti-virus and HIPS, click Scans.
For information about the Home page, see About the Home page (section 2).
2. In the Available scans list, click Summary for the custom scan.
4.3.6.10 Delete a custom scan
1. On the Home page, under Anti-virus and HIPS, click Scans.
For information about the Home page, see About the Home page (section 2).
2. In the Available scans list, select the scan you want to delete, and then click Delete.
4.3.7 Run a full computer scan
To scan your entire computer system, including the boot sector and system memory:
■ On the Home page, under Anti-virus and HIPS, click Scan my computer.
For information about the Home page, see About the Home page (section 2).
28
Sophos Endpoint Security and Control
A progress dialog box is displayed and the Activity summary appears in the Sophos EndpointSecurity and Control window.
Note: If the scan detects components of a threat in memory, the scan stops. This is because furtherscanning could enable the threat to spread. You must clean up the threat before running the scanagain.
If any threats or controlled applications are found, click More and refer to the Managing quarantineitems section.
4.4 Sophos Behavior Monitoring
4.4.1 About behavior monitoring
As part of on-access scanning, Sophos Behavior Monitoring protects Windows computers fromunidentified or "zero-day" threats and suspicious behavior.
Runtime detection can intercept threats that cannot be detected before execution. Behaviormonitoring uses the following runtime detection methods to intercept threats:
■ Malicious and suspicious behavior detection
■ Buffer overflow detection
Malicious and suspicious behavior detection
Suspicious behavior detection uses Sophos’s Host Intrusion Prevention System (HIPS) todynamically analyze the behavior of all programs running on the computer to detect and blockactivity that appears to be malicious. Suspicious behavior may include changes to the registry thatcould allow a virus to run automatically when the computer is restarted.
Suspicious behavior detection watches all system processes for signs of active malware, such assuspicious writes to the registry or file copy actions. It can be set to warn the administrator and/orblock the process.
Malicious behavior detection dynamically analyses all programs running on the computer to detectand block activity that is known to be malicious.
Buffer overflow detection
Buffer overflow detection is important for dealing with zero-day exploits.
It dynamically analyzes the behavior of programs running on the system in order to detect whenan attempt is made to exploit a running process using buffer overflow techniques. It will catchattacks targeting security vulnerabilities in both operating system software and applications.
29
Help
4.4.2 Enable behavior monitoring
Important: If a management console is used to administer Sophos Endpoint Security and Controlon this computer, it may override any changes you make here.
If you are a member of the SophosAdministrator group, you can enable behavior monitoring.
1. Click Home > Anti-virus and HIPS > Configure anti-virus and HIPS > Configure > Behaviormonitoring .
2. In the Configure Behavior Monitoring dialog box, select the Enable behavior monitoringcheck box.
4.4.3 Block malicious behavior
Important: If a management console is used to administer Sophos Endpoint Security and Controlon this computer, it may override any changes you make here.
Malicious behavior detection is the dynamic analysis of all programs running on the computer todetect and block activity that is known to be malicious.
If you are a member of the SophosAdministrator group, you can change the settings for detectingand reporting malicious behavior:
1. Click Home > Anti-virus and HIPS > Configure anti-virus and HIPS > Configure > Behaviormonitoring .
2. In the Configure Behavior Monitoring dialog box, select the Enable behavior monitoringcheck box.
3. To alert the administrator and block malicious behavior, select the Detect malicious behaviorcheck box.
4.4.4 Prevent suspicious behavior
Important: If a management console is used to administer Sophos Endpoint Security and Controlon this computer, it may override any changes you make here.
Suspicious behavior detection watches all system processes for signs of active malware, such assuspicious writes to the registry or file copy actions. It can be set to warn the administrator and/orblock the process.
If you are a member of the SophosAdministrator group, you can change the settings for detectingand reporting suspicious behavior:
1. Click Home > Anti-virus and HIPS > Configure anti-virus and HIPS > Configure > Behaviormonitoring .
2. In the Configure Behavior Monitoring dialog box, select the Enable behavior monitoringcheck box.
30
Sophos Endpoint Security and Control
3. Select the Detect malicious behavior check box.
4. To alert the administrator and block suspicious processes, select the Detect suspicious behaviorcheck box.
5. To alert the administrator, but not block suspicious processes, select the Alert only, do notblock suspicious behavior check box.
For the strongest protection, we advise you to scan for suspicious files. For more information, seethe following topics:
■ Configure on-access scanning (section 4.2.2)
■ Configure right-click scanning (section 4.3.5.1)
■ Configure a custom scan (section 4.3.6.3)
4.4.5 Prevent buffer overflows
Important: If a management console is used to administer Sophos Endpoint Security and Controlon this computer, it may override any changes you make here.
Buffer overflow detection dynamically analyzes the behavior of programs running on the systemin order to detect when an attempt is made to exploit a running process using buffer overflowtechniques.
If you are a member of the SophosAdministrator group, you can change the settings for detectingand reporting buffer overflows:
1. Click Home > Anti-virus and HIPS > Configure anti-virus and HIPS > Configure > Behaviormonitoring .
2. In the Configure Behavior Monitoring dialog box, select the Enable behavior monitoringcheck box.
3. To alert the administrator and block buffer overflows, select the Detect buffer overflows checkbox.
4. To alert the administrator, but not block buffer overflows, select the Alert only, do not blockcheck box.
4.5 Sophos Live Protection
4.5.1 About Sophos Live Protection
Sophos Live Protection decides whether a suspicious file is a threat and, if it is a threat, takesimmediate action as specified in the Sophos Anti-Virus cleanup configuration.
Sophos Live Protection improves detection of new malware without the risk of unwanted detections.This is achieved by doing an instant lookup against the very latest known malware. When newmalware is identified, Sophos can send out updates within seconds.
31
Help
Sophos Live Protection uses the following options:
■ Enable Live Protection
If the anti-virus scan on an endpoint computer has identified a file as suspicious, but cannotfurther identify it as either clean or malicious based on the threat identity (IDE) files storedon the computer, certain file data (such as its checksum and other attributes) is sent to Sophosto assist with further analysis.
The in-the-cloud checking performs an instant lookup of a suspicious file in the SophosLabsdatabase. If the file is identified as clean or malicious, the decision is sent back to the computerand the status of the file is automatically updated.
■ Automatically send sample files to Sophos
If a file is considered suspicious, but cannot be positively identified as malicious based on thefile data alone, you can allow Sophos to request a sample of the file. If this option is enabled,and Sophos does not already hold a sample of the file, the file will be submitted automatically.
Submitting sample files helps Sophos to continuously enhance detection of malware withoutthe risk of false positives.
4.5.2 Turn Sophos Live Protection options on or off
Important: If a management console is used to administer Sophos Endpoint Security and Controlon this computer, it may override any changes you make here.
If you are a member of the SophosAdministrator group, you can turn the Sophos Live Protectionoptions on or off:
1. Click Home > Anti-virus and HIPS > Configure anti-virus and HIPS > Configure > SophosLive Protection.
2. In the Sophos Live Protection dialog box:
■ To turn the sending of file data to Sophos on or off, select or clear the Enable Live Protectioncheck box.
■ To turn the sending of file samples to Sophos on or off, select or clear the Automaticallysend sample files to Sophos check box.
This option is available only if you have already selected Enable Live Protection.
Note
When a file sample is sent to Sophos for online scanning, the file data is always sent with thesample.
32
Sophos Endpoint Security and Control
4.5.3 View the log for Sophos Live Protection
The file data sent to Sophos for online scanning and file status updates after the scanning is completeare recorded in the scanning log for this computer.
If Sophos Live Protection is enabled, the log shows:
■ The path of each file for which data was sent to Sophos.
■ The time when the data was sent.
■ The reason for failure (if known) if sending the data failed.
■ The current status of the file (for example, “virus/spyware” if the file has been identified asmalicious).
To view the scanning log:
■ On the Home page, under Anti-virus and HIPS, click View anti-virus and HIPS log.
For information about the Home page, see About the Home page (section 2).
From the log page, you can copy the log to the clipboard, or email, or print the log.
To find specific text in the log, click Find and enter the text you want to find.
4.6 Sophos Web Protection
4.6.1 About Sophos Web Protection
Sophos Web Protection provides enhanced protection against web threats. It works by lookingup website URLs in the Sophos online database of infected websites, and then blocking access toany websites that are known to host malware.
The following browsers support web protection:
■ Internet Explorer
■ Firefox
■ Google Chrome
■ Safari
■ Opera
When access to a malicious website is blocked, the event is recorded in the scanning log. Forinformation about viewing the scanning log, see View the scanning log (section 4.11.2).
33
Help
4.6.2 Unblock access to malicious websites
Important: If a management console is used to administer Sophos Endpoint Security and Controlon this computer, it may override any changes you make here.
To unblock access to malicious websites:
1. Click Home > Anti-virus and HIPS > Configure anti-virus and HIPS > Configure > Webprotection .
2. In the Block access to malicious websites list, click Off.
For information on how to authorize a website that is classified as malicious, see Authorize awebsite for use (section 4.7.5).
3. In the Download scanning list, click Off, On or As on access scanning.
The As on access scanning setting will preserve your existing on-access scan settings.
4.7 Authorizing items for use
4.7.1 Authorize adware and PUAs
Important: If a management console is used to administer Sophos Endpoint Security and Controlon this computer, it may override any changes you make here.
If you want to run adware or an application that Sophos Anti-Virus has classified as potentiallyunwanted, you can authorize it.
To authorize adware and PUAs:
1. Click Home > Anti-virus and HIPS > Configure anti-virus and HIPS > Configure >Authorization.
2. On the Adware or PUAs tab, in the Known adware or PUAs list, select the adware or PUA.
3. Click Add.
The adware or PUA appears in the Authorized adware or PUAs list.
Note: You can also authorize adware and PUAs in Quarantine manager. For information on howto do this, see Deal with adware and PUAs in quarantine (section 4.8.4).
4.7.2 Block authorized adware and PUAs
To prevent currently-authorized adware and PUAs from running on your computer:
1. Click Home > Anti-virus and HIPS > Configure anti-virus and HIPS > Configure >Authorization.
34
Sophos Endpoint Security and Control
2. On the Adware or PUAs tab, in the Authorized adware or PUAs list, select the adware or PUAyou want to block.
3. Click Remove.
4.7.3 Authorize suspicious items
Important: If a management console is used to administer Sophos Endpoint Security and Controlon this computer, it may override any changes you make here.
If you want to allow an item that Sophos Anti-Virus has classified as suspicious, you can authorizeit as follows.
1. Click Home > Anti-virus and HIPS > Configure anti-virus and HIPS > Configure >Authorization.
2. Click the tab for the type of item that has been detected (for example, Buffer overflow).
3. In the Known list, select the suspicious item.
4. Click Add.
The suspicious item appears in the Authorized list.
Note: You can also authorize suspicious items in Quarantine manager. For information on howto do this, see the following topics:
■ Deal with suspicious files in quarantine (section 4.8.5)
■ Deal with suspicious behavior in quarantine (section 4.8.6)
4.7.4 Pre-authorize suspicious items
If you want to allow an item that Sophos Endpoint Security and Control has not yet classified assuspicious, you can pre-authorize it.
To pre-authorize a suspicious item:
1. Click Home > Anti-virus and HIPS > Configure anti-virus and HIPS > Configure >Authorization.
2. Click the tab for the type of item that has been detected (for example, Buffer overflow).
3. Click New entry.
4. Locate the suspicious item, and then double-click it.
The suspicious item appears in the Authorized list.
4.7.5 Authorize a website for use
Important: If a management console is used to administer Sophos Endpoint Security and Controlon this computer, it may override any changes you make here.
35
Help
If you want to unblock a website that Sophos has classified as malicious, you can add it to the listof authorized sites. Authorizing a website will prevent URLs from that website being verified withSophos online web filtering service.
Caution: Authorizing a website that has been classified as malicious could expose you to threats,so make sure that it is safe to access the website before you authorize it.
To authorize a website for use:
1. Click Home > Anti-virus and HIPS > Configure anti-virus and HIPS > Configure >Authorization.
2. Click the Websites tab.
3. Click Add.
4. Type the domain name or IP address.
The website appears in the Authorized websites list.
4.8 Managing quarantine items
4.8.1 About Quarantine manager
Quarantine manager enables you to deal with the items found by scanning that were not eliminatedautomatically during scanning. Each item is here for one of the following reasons.
■ No cleanup options (clean up, delete, move) were chosen for the type of scan that found theitem.
■ A cleanup option was chosen for the type of scan that found the item but the option failed.
■ The item is multiply-infected and still contains additional threats.
■ The threat has only been partially detected, and a full computer scan is needed to fully detectit. To find out how to do this, refer to Run a full computer scan (section 4.3.7).
■ The item exhibits suspicious behavior.
■ The item is a controlled application.
Note: Adware, PUAs, and multi-component infections detected during on-access scanning arealways listed in Quarantine manager. Automatic cleanup of adware, PUAs, and multi-componentinfections is not available for on-access scanning.
A cleanup option may have failed because of insufficient access rights. If you have greater rights,you can use Quarantine manager to deal with the item(s).
Threats that are detected during web page scanning are not listed in Quarantine manager becausethe threats are not downloaded to your computer. Therefore, there is no need to take any action.
36
Sophos Endpoint Security and Control
4.8.2 Quarantine Manager layout
Quarantine Manager lists all the items that have been detected by scanning and enables you todeal with them. The elements of the Quarantine Manager window are shown below.
Click the Show list to filter the type of items that are displayed.
The identity of the item, including a link to its analysis on the Sophos website.
The file name and location of the item.
If the item is associated with a rootkit, it is displayed as Hidden.
If a more link is displayed next to the filename, this means that the item is infected with amulti-component infection. Click the link to see the list of other components that are part of theinfection. If some components are associated with a rootkit, the dialog box indicates that they arehidden.
The action that you can take to deal with the item.
Unless the item is hidden, there are three actions: Clean up, Delete, and Move.
If you click one of the actions, the action is performed on the item immediately, followingconfirmation. Hidden files can only be cleaned up.
The list of items that have been detected.
To sort the items, click one of the column headings.
37
Help
Click Select all to perform the same action on all the items.
To deselect an item, clear its check box in the Type column.
If you have selected all the items and then want to clear the selection, click Deselect all.
To select an item, click its check box in the Type column.
Click Clear from List to remove selected items from the list without dealing with them.
This action does not delete the items from disk.
Click Perform action to display a list of actions that you can perform on the selected items.
4.8.3 Deal with viruses/spyware in quarantine
Note: Virus here is used to refer to any virus, worm, Trojan, or other malicious software.
1. On the Home page, under Anti-virus and HIPS, click Manage quarantine items.
For information about the Home page, see About the Home page (section 2).
2. In the Show list, click Viruses/spyware.
Information about each item is shown in the columns.
Name displays the identity that Sophos Anti-Virus has detected. To learn more about thevirus/spyware, click the identity, and Sophos Anti-Virus connects you to the analysis of thevirus/spyware on the Sophos website.
Details displays the name and location of the item. If the item is associated with a rootkit, it isdisplayed as “Hidden”. If a more link is displayed next to the filename, this means that the itemis infected with a multi-component infection. Click the link to see the list of other componentsthat are part of the infection. If any of the components are associated with a rootkit, the dialogbox indicates that some components are hidden.
Available actions displays actions that you can perform on the item. Unless the item is hidden,there are three actions: Clean up, Delete, and Move, described below. If you click one of the actions,the action is performed on the item, following confirmation. Hidden files can only be cleaned up.
Dealing with the infected items
To deal with the viruses/spyware, use the buttons described below.
Select all/Deselect all
Click these buttons to select or deselect all the items. This enables you to perform the same actionon a group of items. To select or deselect a particular item, select the check box to the left of theitem type.
Clear from list
38
Sophos Endpoint Security and Control
Click this to remove selected items from the list, if you are sure that they do not contain a virusor spyware. This does not delete the items from disk, however.
Perform action
Click this to display a list of actions that you can perform on the selected items.
■ Click Clean up to remove a virus or item of spyware from the selected items. Cleanup ofdocuments does not repair any side-effects of the virus in the document.
Note: To fully clean some viruses/spyware consisting of several components from yourcomputer, or to clean up hidden files, you will need to restart the computer. If this is the case,you will be given an option to restart your computer immediately or later. The final cleanupsteps will be performed after the computer is restarted.
Note: Cleanup of some viruses causes a full system scan to be run, which tries to clean up allthe viruses. This might take a long time. The available action changes to Cleaning up until thescan has finished.
■ Click Delete to delete the selected items from your computer. Use this function with care.
■ Click Move to move the selected items to another folder. The items are moved to the folderthat was specified when cleanup was set up. Moving an executable file reduces the likelihoodof it being run. Use this function with care.
Caution: Sometimes, if you delete or move an infected file, your computer may stop workingproperly because it cannot find the file. Also, an infected file may only be part of a multipleinfection, in which case deleting or moving this particular file will not clean the infection fromyour computer. In this case, contact Sophos technical support to get assistance in dealing with theitems.
For information about contacting technical support, see Technical support (section 14).
To configure what action you can perform, refer to Configure user rights for Quarantine manager(section 3.3).
4.8.4 Deal with adware and PUAs in quarantine
1. On the Home page, under Anti-virus and HIPS, click Manage quarantine items.
For information about the Home page, see About the Home page (section 2).
2. In the Show list, click Adware or PUAs.
Information about each item is shown in the columns.
Name displays the identity that Sophos Anti-Virus has detected. To learn more about the adwareor PUA, click the identity, and Sophos Anti-Virus connects you to the analysis of the adware orPUA on the Sophos website.
Details displays the subtype of the adware or PUA. If the item is associated with a rootkit, it isdisplayed as “Hidden”. If a more link is displayed next to the subtype, this means that the item is
39
Help
a multi-component item of adware or PUA. Click the link to see the list of other components thatare part of the adware or PUA. If any of the components are associated with a rootkit, the dialogbox indicates that some components are hidden.
Available actions displays actions that you can perform on the item. There are two actions:Authorize and Clean up, described below. If you click one of the actions, the action is performedon the item, following confirmation.
Dealing with the adware and PUAs
To deal with the adware and PUAs, use the buttons described below.
Select all/Deselect all
Click these buttons to select or deselect all the items. This enables you to perform the same actionon a group of items. To select or deselect a particular item, select the check box to the left of theitem type.
Clear from list
Click this to remove selected items from the list, if you trust them. This does not delete the itemsfrom disk, however.
Perform action
Click this to display a list of actions that you can perform on the selected items.
■ Click Authorize to authorize the selected items on the computer, if you trust them. This addsthe items to the list of authorized adware and PUAs so that Sophos Anti-Virus does not preventthem from running on your computer.
■ Click Clean up to remove all known components of selected items from the computer for allusers. To clean adware and PUAs from the computer, you must be a member of both WindowsAdministrators and SophosAdministrator groups.
Note: To fully clean some adware and PUAs consisting of several components from your computer,or to clean up hidden files, you will need to restart the computer. If this is the case, you will begiven an option to restart your computer immediately or later. The final cleanup steps will beperformed after the computer is restarted.
To configure what actions you can perform, refer to Configure user rights for Quarantine manager(section 3.3).
To see the list of known and authorized adware and PUAs, click Configure authorization.
4.8.5 Deal with suspicious files in quarantine
A suspicious file is a file that exhibits a combination of characteristics that are commonly, but notexclusively, found in viruses.
1. On the Home page, under Anti-virus and HIPS, click Manage quarantine items.
For information about the Home page, see About the Home page (section 2).
40
Sophos Endpoint Security and Control
2. In the Show list, click Suspicious files.
Information about each item is shown in the columns.
Name displays the identity that Sophos Anti-Virus has detected. To learn more about the suspiciousfile, click the identity, and Sophos Anti-Virus connects you to the analysis of the suspicious fileon the Sophos website.
Details displays the name and location of the item. If the item is associated with a rootkit, it isdisplayed as “Hidden”.
Available actions displays actions that you can perform on the item. Unless the item is hidden,there are three actions: Authorize, Delete and Move, described below. If you click one of theactions, the action is performed on the item, following confirmation. Hidden files can only beauthorized.
Dealing with the suspicious files
To deal with the suspicious files, use the buttons described below.
Select all/Deselect all
Click these buttons to select or deselect all the items. This enables you to perform the same actionon a group of items. To select or deselect a particular item, select the check box to the left of theitem type.
Clear from list
Click this to remove selected items from the list, if you trust them. This does not delete the itemsfrom disk, however.
Perform action
Click this to display a list of actions that you can perform on the selected items.
■ Click Authorize to authorize the selected items on the computer, if you trust them. This addsthe items to the list of authorized suspicious items so that Sophos Anti-Virus does not preventthem from being accessed.
■ Click Delete to delete the selected items from your computer. Use this function with care.
■ Click Move to move the selected items to another folder. The items are moved to the folderthat was specified when cleanup was set up. Moving an executable file reduces the likelihoodof it being run. Use this function with care.
Caution: Sometimes, if you delete or move an infected file, your computer may stop workingproperly because it cannot find the file.
To configure what actions you can perform, refer to Configure user rights for Quarantine manager(section 3.3).
To see the list of authorized suspicious files, click Configure authorization.
41
Help
4.8.6 Deal with suspicious behavior in quarantine
Suspicious behavior is activity that appears to be malicious.
1. On the Home page, under Anti-virus and HIPS, click Manage quarantine items.
For information about the Home page, see About the Home page (section 2).
2. In the Show list, click Suspicious behavior.
Information about each item is shown in the columns.
Name displays the identity that Sophos Anti-Virus has detected. To learn more about the behavior,click the identity, and Sophos Anti-Virus connects you to the analysis of the behavior on theSophos website.
Details displays the name and location of the item.
Available actions displays actions that you can perform on the item. If you have enabled blockingof suspicious behavior, there is one action: Authorize, described below. If you click the action, theaction is performed on the item, following confirmation.
Dealing with the suspicious behavior
To deal with the suspicious behavior, use the buttons described below.
Select all/Deselect all
Click these buttons to select or deselect all the items. This enables you to perform the same actionon a group of items. To select or deselect a particular item, select the check box to the left of theitem type.
Clear from list
Click this to remove selected items from the list, if you trust them. This does not delete the itemsfrom disk, however.
Perform action
Click this to display a list of actions that you can perform on the selected items.
■ Click Authorize to authorize the selected items on the computer, if you trust them. This addsthe items to the list of authorized suspicious items so that Sophos Anti-Virus does not preventthe behavior.
To configure what actions you can perform, refer to Configure user rights for Quarantine manager(section 3.3).
To see the list of authorized suspicious behavior, click Configure authorization.
42
Sophos Endpoint Security and Control
4.8.7 Deal with controlled applications in quarantine
A controlled application is an application that is prevented from running on your computer byyour organisation's security policy.
1. On the Home page, under Anti-virus and HIPS, click Manage quarantine items.
For information about the Home page, see About the Home page (section 2).
2. In the Show list, click Controlled applications.
Information about each item is shown in the columns.
Name displays the identity that Sophos Anti-Virus has detected. To learn more about the controlledapplication, click the identity, and Sophos Anti-Virus connects you to the analysis of the controlledapplication on the Sophos website.
Details displays the subtype of the controlled application. If a more link is displayed next to thesubtype, click it to see the list of other components that are part of the controlled application.
Available actions displays actions that you can perform on the item. However, there are no actionsavailable for controlled applications apart from clearing the item from the list, described below.
Dealing with the controlled applications
To deal with the controlled applications, use the buttons described below.
Select all/Deselect all
Click these buttons to select or deselect all the items. This enables you to perform the same actionon a group of items. To select or deselect a particular item, select the check box to the left of theitem type.
Clear from list
Click this to remove selected items from the list. This does not delete the items from disk, however.Controlled applications must be authorized by the central console before you can use them.
4.9 Cleaning up
4.9.1 About cleanup
Cleanup eliminates threats on your computer by doing one of the following:
■ Removing the virus/spyware from floppy disk boot sectors, documents, programs, and anythingelse that is selected for scanning
■ Moving or deleting the suspicious file
■ Deleting the item of adware or PUA
43
Help
When Sophos Anti-Virus automatically cleans up items that contain virus/spyware, it will deleteany items that are purely malware and will try to disinfect any items that have been infected. Thesedisinfected files should be considered permanently damaged, as the virus scanner cannot knowwhat the file contained before it was damaged.
Cleaning up documents
Cleaning up documents does not repair any side-effects of the virus/spyware in the document.See Get cleanup information (section 4.9.2) to find out how to view details on the Sophos websiteof the virus/spyware’s side-effects.
Cleaning up programs
Cleaning up programs should be used only as a temporary measure. You should subsequentlyreplace cleaned programs from the original disks or a clean backup.
Cleaning up web page threats
Cleanup is not required for threats that are detected by web page scanning, because the threatsare not downloaded to your computer.
Note: Cleaning up a threat might not be able to undo all the actions the threat has taken on thiscomputer. For example, if the threat changed the value of a setting, the cleanup process might notknow the original setting. You might have to verify the computer's configuration. Cleaning up aninfected document does not repair any changes the threat has made to the document.
4.9.2 Get cleanup information
When a threat is found on your computer, it is very important that you check the threat analysison the Sophos website for information on the threat and cleanup advice. You can do this fromthe following places:
■ The desktop alert (on-access scanning)
■ The scan progress dialog box (custom and right-click scanning)
■ Quarantine manager (all scanning types)
Get information via the desktop alert
If on-access scanning is enabled on your computer, Sophos Anti-Virus displays a desktop alertwhen a threat is found.
In the message box, click the name of the threat that you want to find out about. Sophos Anti-Virusconnects you to the analysis of the threat on the Sophos website.
Get information via the scan progress dialog box
For custom and right-click scans, in the log that is displayed in the scan progress dialog box (orscan summary dialog box, displayed after the scan has finished), click the name of the threat thatyou want to find out about.
44
Sophos Endpoint Security and Control
Sophos Anti-Virus connects you to the analysis of the threat on the Sophos website.
Get information via Quarantine manager
1. On the Home page, under Anti-virus and HIPS, click Manage quarantine items. Forinformation about the Home page, see About the Home page (section 2).
2. In the Name column, click the name of the threat that you want to find out about.
Sophos Anti-Virus connects you to the analysis of the threat on the Sophos website.
4.10 Configuring alerts
4.10.1 Configure anti-virus desktop messaging
Important: If a management console is used to administer Sophos Endpoint Security and Controlon this computer, it may override any changes you make here.
To enable Sophos Anti-Virus to display desktop messages when a threat is found, do as follows.This applies only to on-access scanning.
1. Click Home > Anti-virus and HIPS > Configure anti-virus and HIPS > Alerting > Messaging.
2. In the Messaging dialog box, click the Desktop messaging tab. Set the options as describedbelow.
Enable desktop messaging
Select this to enable Sophos Anti-Virus to display desktop messages when a threat is found.
Messages to send
Select the events for which you want Sophos Anti-Virus to display desktop messages.
User-defined message
In this text box, you can type a message that will be added to the end of the standard message.
4.10.2 Configure anti-virus email alerting
Important: If a management console is used to administer Sophos Endpoint Security and Controlon this computer, it may override any changes you make here.
To enable Sophos Anti-Virus to send email alerts when a threat is found or an error occurs, do asfollows. This applies to on-access, on-demand and right-click scanning.
1. Click Home > Anti-virus and HIPS > Configure anti-virus and HIPS > Alerting > Messaging.
45
Help
2. In the Messaging dialog box, click the Email alerting tab. Set the options as described below.
Enable email alerting
Select this to enable Sophos Anti-Virus to send email alerts.
Messages to send
Select the events for which you want Sophos Anti-Virus to send email alerts. Scanning errorsinclude instances when Sophos Anti-Virus is denied access to an item that it attempts to scan.
Sophos Anti-Virus does not send email alerts for threats that are detected by web page scanningbecause the threats are not downloaded to your computer. Therefore, there is no need to takeany action.
Recipients
Click Add or Remove to add or remove, respectively, email addresses to which email alertsshould be sent. Click Edit to change an email address you have added.
Configure SMTP
Click this to change the settings for the SMTP server and the language of the email alerts. (Referto the table below.)
Configure SMTP settings
In the text box, type the host name or IP address of the
SMTP server. Click Test to test that a connection to the
SMTP server
SMTP server can be made. (This does not send a test
email.)
In the text box, type an email address to which bounces
and non-delivery reports can be sent.
SMTP ‘sender’ address
As email alerts are sent from an unattended mailbox, you
can type in the text box an email address to which replies
to email alerts can be sent.
SMTP ‘reply to’ address
Click the drop-down arrow, and select the language in
which email alerts should be sent.
Language
4.10.3 Configure anti-virus SNMP messaging
Important: If a management console is used to administer Sophos Endpoint Security and Controlon this computer, it may override any changes you make here.
46
Sophos Endpoint Security and Control
To enable Sophos Anti-Virus to send SNMP messages when a threat is found or an error occurs,do as follows. This applies to on-access, on-demand and right-click scanning.
1. Click Home > Anti-virus and HIPS > Configure anti-virus and HIPS > Alerting > Messaging.
2. In the Messaging dialog box, click the SNMP messaging tab. Set the options as describedbelow.
Enable SNMP messaging
Select this to enable Sophos Anti-Virus to send SNMP messages.
Messages to send
Select the events for which you want Sophos Anti-Virus to send SNMP messages. Scanningerrors include instances when Sophos Anti-Virus is denied access to an item that it attemptsto scan.
Sophos Anti-Virus does not send SNMP messages for threats that are detected by web pagescanning because the threats are not downloaded to your computer. Therefore, there is noneed to take any action.
SNMP trap destination
In the text box, type the IP address or name of the computer to which alerts are sent.
SNMP community name
In the text box, type the SNMP community name.
Test
Click this to send a test SNMP message to the SNMP trap destination you have specified.
4.10.4 Configure anti-virus event logging
To enable Sophos Anti-Virus to add alerts to the Windows 2000 or later event log when a threatis found or an error occurs, do as follows. This applies to on-access, on-demand and right-clickscanning.
1. Click Home > Anti-virus and HIPS > Configure anti-virus and HIPS > Alerting > Messaging.
47
Help
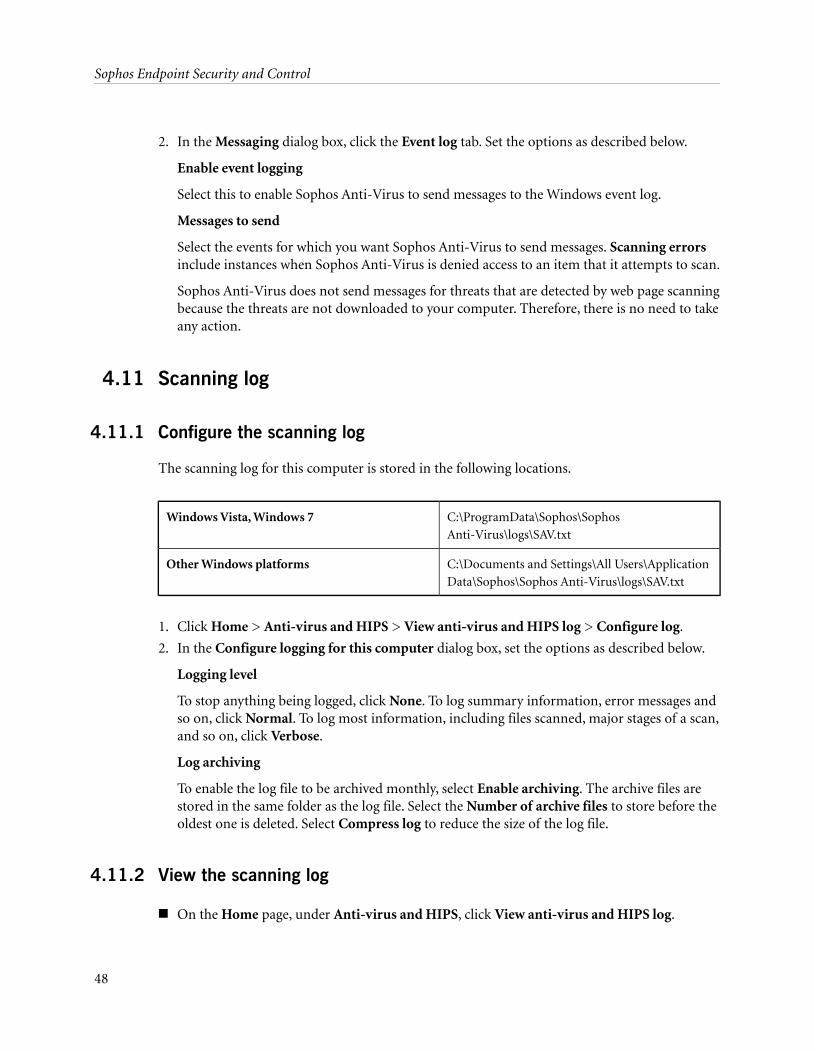
2. In the Messaging dialog box, click the Event log tab. Set the options as described below.
Enable event logging
Select this to enable Sophos Anti-Virus to send messages to the Windows event log.
Messages to send
Select the events for which you want Sophos Anti-Virus to send messages. Scanning errorsinclude instances when Sophos Anti-Virus is denied access to an item that it attempts to scan.
Sophos Anti-Virus does not send messages for threats that are detected by web page scanningbecause the threats are not downloaded to your computer. Therefore, there is no need to takeany action.
4.11 Scanning log
4.11.1 Configure the scanning log
The scanning log for this computer is stored in the following locations.
C:\ProgramData\Sophos\Sophos
Anti-Virus\logs\SAV.txt
Windows Vista, Windows 7
C:\Documents and Settings\All Users\Application
Data\Sophos\Sophos Anti-Virus\logs\SAV.txt
Other Windows platforms
1. Click Home > Anti-virus and HIPS > View anti-virus and HIPS log > Configure log.
2. In the Configure logging for this computer dialog box, set the options as described below.
Logging level
To stop anything being logged, click None. To log summary information, error messages andso on, click Normal. To log most information, including files scanned, major stages of a scan,and so on, click Verbose.
Log archiving
To enable the log file to be archived monthly, select Enable archiving. The archive files arestored in the same folder as the log file. Select the Number of archive files to store before theoldest one is deleted. Select Compress log to reduce the size of the log file.
4.11.2 View the scanning log
■ On the Home page, under Anti-virus and HIPS, click View anti-virus and HIPS log.
48
Sophos Endpoint Security and Control
For information about the Home page, see About the Home page (section 2).
From the log page, you can copy the log to the clipboard, or email, or print the log.
To find specific text in the log, click Find and enter the text you want to find.
49
Help
5 Sophos Application Control
5.1 About scanning for controlled applications
A controlled application is an application that is prevented from running on your computer byyour organisation's security policy.
Scanning for controlled applications is enabled or disabled by a management console as part ofan application control policy, and is included as part of on-access scanning.
For information about on-access scanning, see About on-access and on-demand scanning (section4.1).
5.2 Disable scanning for controlled applications
Important: If a management console is used to administer Sophos Endpoint Security and Controlon this computer, it may override any changes you make here.
If scanning for controlled applications is enabled, it might prevent you from uninstalling someapplications. If you are a member of the SophosAdministrator group, you can temporarily disablescanning for controlled applications on this computer.
To disable scanning for controlled applications:
1. On the Configure menu, click Application control.
2. Clear the Enable on-access scanning check box.
50
Sophos Endpoint Security and Control
6 Sophos Device Control
6.1 About device control on this computer
Sophos Device Control blocks unauthorized external storage devices and wireless connectiontechnologies.
Note: This feature is not included with all licenses. If you want to use it, you might need to changeyour license.
If a management console is not used to administer Sophos Endpoint Security and Control on thiscomputer, the device control functionality is not included.
Device control is enabled or disabled by a management console. If device control is enabled, itmight prevent you from connecting a device to this computer for maintenance or troubleshooting.If this is the case, you can temporarily disable device control on this computer. For information,see Temporarily disable device control (section 6.3).
6.2 What types of device are controlled?
Device control blocks or allows three types of device on this computer: storage, network, and shortrange.
Storage
■ Removable storage devices (for example, USB flash drives, PC Card readers, and external harddisk drives)
■ Optical media drives (CD-ROM/DVD/Blu-ray drives)
■ Floppy disk drives
■ Secure removable storage devices (for example, hardware-encrypted USB flash drives)
Network
■ Modems
■ Wireless (Wi-Fi interfaces, 802.11 standard)
The device control policy for this computer may be in Block bridged mode, which disables wirelessor modem network adapters when the computer is connected to a physical network (typicallythrough an Ethernet connection). Once the computer is disconnected from the physical network,the wireless or modem network adapters are seamlessly re-enabled.
Short range
■ Bluetooth interfaces
51
Help
■ Infrared (IrDA infrared interfaces)
6.3 Temporarily disable device control
Important: If a management console is used to administer Sophos Endpoint Security and Controlon this computer, it may override any changes you make here.
If you are a member of the SophosAdministrator group and you want to connect a device to thiscomputer for maintenance or troubleshooting (for example, to install software from a CD), youcan temporarily disable device control.
To disable device control on this computer:
1. On the Configure menu, click Device control.
2. Clear the Enable Sophos Device Control check box.
6.4 Configure the device control log
1. On the Configure menu, click Device control.
2. Under Logging level, select one of the options:
■ Click None to stop anything being logged.■ Click Normal to log summary information, error messages, and so on.■ Click Verbose to provide information on many more activities than usual. Use this setting
only when you need detailed logging for troubleshooting, since the log will grow in sizerapidly.
3. Under Log archiving, follow the instructions on the screen.
6.5 View the device control log
■ On the Home page, under Device control, click View device control log.
For information about the Home page, see About the Home page (section 2).
From the log page, you can copy the log to the clipboard, or email, or print the log.
To find specific text in the log, click Find and enter the text you want to find.
52
Sophos Endpoint Security and Control
7 Sophos Data Control
7.1 About data control on this computer
Sophos Data Control prevents the accidental leakage of personally-identifiable information frommanaged computers.
Note: This feature is not included with all licenses. If you want to use it, you might need to changeyour license.
If a management console is not used to administer Sophos Endpoint Security and Control on thiscomputer, the data control functionality is not included.
Data control is enabled or disabled by a policy issued by a management console. However, if youare a member of the SophosAdministrator group, you can temporarily disable data control onthis computer for maintenance or troubleshooting. For information, see Temporarily disable datacontrol (section 7.2).
7.2 Temporarily disable data control
Important: If a management console is used to administer Sophos Endpoint Security and Controlon this computer, it may override any changes you make here.
If you are a member of the SophosAdministrator group, you can temporarily disable data controlon this computer for maintenance or troubleshooting:
1. On the Configure menu, click Data control.
2. Clear the Enable Sophos Data Control check box.
7.3 How do I add a file to a storage device?
If data control is enabled on this computer, the data control policy may block any attempt to adda file to a monitored storage device using the following methods:
■ Saving data from within a program
■ Using the DOS copy command
■ Creating a new file on the device using Windows Explorer
If you see a desktop alert that warns you about this, you should save the file to your hard disk orto a network drive, and then use Windows Explorer to copy it to the storage device.
53
Help
7.4 Configure the data control log
1. On the Configure menu, click Data control.
2. Under Logging level, select one of the options:
■ Click None to stop anything being logged.■ Click Normal to log summary information, error messages, and so on.■ Click Verbose to provide information on many more activities than usual. Use this setting
only when you need to test new data control rules, since the log will grow in size rapidly.
3. Under Log archiving, follow the instructions on the screen.
7.5 View the data control log
■ On the Home page, under Data control, click View data control log.
For information about the Home page, see About the Home page (section 2).
From the log page, you can copy the log to the clipboard, or email, or print the log.
To find specific text in the log, click Find and enter the text you want to find.
54
Sophos Endpoint Security and Control
8 Sophos Web Control
8.1 About web control on this computer
Sophos Web Control provides protection, control, and reporting for computers that are located,or roam, outside the corporate network.
Note: This feature is not included with all licenses. If you want to use it, you might need to changeyour license.
If a management console is not used to administer Sophos Endpoint Security and Control on thiscomputer, the web control functionality is not included.
Web control is enabled or disabled by a policy issued by a management console. However, if youare a member of the SophosAdministrator group, you can temporarily disable web control on thiscomputer. For information on how to do this, see Temporarily disable web control (section 8.2).
8.2 Temporarily disable web control
Important: If a management console is used to administer Sophos Endpoint Security and Controlon this computer, it may override any changes you make here.
If you are a member of the SophosAdministrator group, you may need to temporarily disable webcontrol for maintenance or troubleshooting, and then re-enable it.
To disable web control on this computer:
1. On the Configure menu, click Web control.
2. Clear the Enable web control check box.
55
Help
9 Sophos Client Firewall
9.1 Getting started with the firewall
When the firewall is first installed, you may need to configure it. Whether you need to do thisdepends on how it has been installed. There are two types of installation:
■ Installed on a network computer and managed from a management console
■ Installed on a standalone computer and managed from the computer
Firewall managed from a management console
If the firewall is installed and managed from a management console, it allows or blocks applicationsand traffic according to rules set by policy.
Unless the policy has put the firewall into interactive mode (see below), you will not be promptedwith any messages and do not need to configure the firewall in any way.
Firewall managed from this computer
If the firewall is managed on this computer, we recommend that you start by creating rules toallow network access for common applications and services such as Web browsers and emailclients.
For information on creating rules, see About configuring the firewall (section 9.2.1).
The firewall will also initially be in interactive mode (see below). Leave the firewall in interactivemode for a period of time so that you can allow or block other applications and services you use.
Once you have configured the firewall, and it recognizes the applications you commonly use, werecommend that you change to one of the non-interactive modes.
For information, see Change to a non-interactive mode (section 9.3.3).
What's interactive mode?
In interactive mode, the firewall prompts you to allow or block any applications and traffic forwhich it does not have a rule.
For information about how to deal with messages from the firewall, see About interactive mode(section 9.3.1).
56
Sophos Endpoint Security and Control
9.2 Configuring the firewall
9.2.1 About configuring the firewall
You can configure the firewall in many different ways and then enable it. However, if a managementconsole is used to administer Sophos Endpoint Security and Control on this computer, it mayoverride any changes you make.
A few common functions are listed below:
■ Enable interactive mode (section 9.3.2)
■ Filter ICMP messages (section 9.2.13)
■ Allow all traffic on a LAN (section 9.2.6)
■ Allow FTP downloads (section 9.2.5)
■ Create a global rule (section 9.5.4.2)
■ Allow an application (section 9.2.10)
■ Allow applications to launch hidden processes (section 9.5.5.7)
■ Allow applications to use rawsockets (section 9.5.5.8)
■ Use checksums to authenticate applications (section 9.5.5.9)
9.2.2 Temporarily disable the firewall
If you are a member of the SophosAdministrator group, you may need to temporarily disable thefirewall for maintenance or troubleshooting, and then re-enable it.
Sophos Endpoint Security and Control retains the settings you make here, even after you restartyour computer. If you disable the firewall, your computer is unprotected until you re-enable it.
1. On the Home page, under Firewall, click Configure firewall.
For information about the Home page, see About the Home page (section 2).
2. Under Configurations, select the Allow all traffic check box next to the primary or secondarylocation.
9.2.3 Allow email
Important: If a management console is used to administer Sophos Endpoint Security and Controlon this computer, it may override any changes you make here.
1. On the Home page, under Firewall, click Configure firewall.
For information about the Home page, see About the Home page (section 2).
57
Help

2. Under Configurations, click Configure next to the location that you want to configure.
3. Click the Applications tab.
4. Click Add, locate the email application, and then double-click it.
The email application is allowed as a trusted application.
Trusted applications are allowed full and unconditional network access, including access to theinternet. For greater security, you can apply the preset rules supplied by Sophos:
1. In the list of allowed applications, click the email application.
2. Click Custom > Add rules from preset > Email Client.
9.2.4 Allow the use of a web browser
Note: If you allow the use of a web browser, you also allow FTP access.
1. On the Home page, under Firewall, click Configure firewall.
For information about the Home page, see About the Home page (section 2).
2. Under Configurations, click Configure next to the location that you want to configure.
3. Click the Applications tab.
4. Click Add, locate the web browser application, and then double-click it.
The web browser application is allowed as a trusted application.
Trusted applications are allowed full and unconditional network access, including access to theinternet. For greater security, you can apply the preset rules supplied by Sophos:
1. In the list of allowed applications, click the web browser application.
2. Click Custom > Add rules from preset > Browser.
9.2.5 Allow FTP downloads
Note: If you have allowed the use of a web browser which can access FTP servers, you do not needto allow FTP downloads as well.
1. On the Home page, under Firewall, click Configure firewall.
For information about the Home page, see About the Home page (section 2).
2. Under Configurations, click Configure next to the location that you want to configure.
3. Click the Applications tab.
4. Click Add, locate the FTP application, and then double-click it.
The FTP application is allowed as a trusted application.
Trusted applications are allowed full and unconditional network access, including access to theinternet. For greater security, you can apply the preset rules supplied by Sophos:
58
Sophos Endpoint Security and Control
1. In the list of allowed applications, click the FTP application.
2. Click Custom > Add rules from preset > FTP Client.
9.2.6 Allow all traffic on a LAN
To allow all traffic between computers on a LAN (Local Area Network):
1. On the Home page, under Firewall, click Configure firewall.
For information about the Home page, see About the Home page (section 2).
2. Under Configurations, click Configure next to the location that you want to configure.
3. On the LAN tab, do one of the following:
■ Click Detect to detect the LAN that your computer is on and add it to the list of networkaddresses.
■ Click Add. In the Select address dialog box, select the Address format, type the domainname or IP address, and then click Add.
Note: If you select Local network (detected automatically), you do not need to typeanything. For information about local network detection, see About local network detection(section 9.5.3).
4. Click OK to close the Select address dialog box.
5. In the LAN settings list, select the Trusted check box for a network.
Note
■ If you allow all traffic between the computers on a LAN, you also allow file and printer sharingon it.
9.2.7 Allow all file and printer sharing on a LAN
Note: If you have already allowed all traffic between computers on a LAN (Local Area Network),you do not need to allow file and printer sharing as well.
To allow all file and printer sharing on a LAN:
1. On the Home page, under Firewall, click Configure firewall.
For information about the Home page, see About the Home page (section 2).
2. Under Configurations, click Configure next to the location that you want to configure.
3. On the LAN tab, do one of the following:
■ Click Detect to detect the LAN that your computer is on and add it to the list of networkaddresses.
59
Help
■ Click Add. In the Select address dialog box, select the Address format, type the domainname or IP address, and then click Add.
Note: If you select Local network (detected automatically), you do not need to typeanything. For information about local network detection, see About local network detection(section 9.5.3).
4. Click OK to close the Select address dialog box.
5. In the LAN settings list, select the NetBIOS check box for a LAN to allow file and printersharing on it.
For information on how to block or allow file and printer sharing on other LANs than those inthe LAN settings list, see the following topics:
■ Block unwanted file and printer sharing (section 9.2.9)
■ Allow flexible control of file and printer sharing (section 9.2.8)
For information on how to allow all traffic on a LAN, see Allow all traffic on a LAN (section 9.2.6).
9.2.8 Allow flexible control of file and printer sharing
If you want more flexible control of file and printer sharing on your networks (for example,uni-directional NetBIOS traffic), you can do the following:
1. Allow file and printer sharing on other LANs (Local Area Networks) than those in the LANsettings list. This allows NetBIOS traffic on those LANs to be processed by the firewall rules.
2. Create high-priority global rules which allow communication to/from hosts with the appropriateNetBIOS ports and protocols. We recommend that you create global rules to explicitly blockall unwanted file and printer sharing traffic rather than let it be handled by the default rule.
To allow file and printer sharing on other LANs than those in the LAN settings list:
1. On the Home page, under Firewall, click Configure firewall.
For information about the Home page, see About the Home page (section 2).
2. Under Configurations, click Configure next to the location that you want to configure.
3. On the LAN tab, clear the Block file and printer sharing for other networks check box.
9.2.9 Block unwanted file and printer sharing
To block file and printer sharing on LANs other than those specified in the LAN settings list onthe LAN tab:
1. On the Home page, under Firewall, click Configure firewall.
For information about the Home page, see About the Home page (section 2).
2. Under Configurations, click Configure next to the location that you want to configure.
60
Sophos Endpoint Security and Control
3. On the LAN tab, select the Block file and printer sharing for other networks check box.
9.2.10 Allow an application
1. On the Home page, under Firewall, click Configure firewall.
For information about the Home page, see About the Home page (section 2).
2. Under Configurations, click Configure next to the location that you want to configure.
3. Click the Applications tab.
4. Click Add, locate the application, and then double-click it.
The application is allowed as trusted.
Trusted applications are allowed full and unconditional network access, including access to theinternet. For greater security, you can apply one or more application rules to specify the conditionsunder which the application can run.
■ Create an application rule (section 9.5.5.2)
■ Apply preset application rules (section 9.5.5.1)
9.2.11 Block an application
1. On the Home page, under Firewall, click Configure firewall.
For information about the Home page, see About the Home page (section 2).
2. Under Configurations, click Configure next to the location that you want to configure.
3. Click the Applications tab.
4. If the application is not in the list, click Add, locate the application, and then double-click it.
5. Select the application in the list, and then click Block.
9.2.12 Turn blocking of modified processes on or off
Malware may attempt to evade the firewall by modifying a process in memory that has beeninitiated by a trusted program, and then using the modified process to access the network on itsbehalf.
You can configure the firewall to detect and block processes that have been modified in memory.
To turn blocking of modified processes on or off:
1. On the Home page, under Firewall, click Configure firewall.
For information about the Home page, see About the Home page (section 2).
2. Under Configurations, click Configure next to the location that you want to configure.
61
Help
3. On the General tab, under Blocking, clear the Block processes if memory is modified byanother application check box to turn blocking of modified processes off.
To turn blocking of modified processes on, select the check box.
If the firewall detects that a process has been modified in memory, it adds rules to prevent themodified process from accessing the network.
Notes
■ We do not recommend that you turn blocking of modified processes off permanently. Youshould turn it off only when you need to.
■ Blocking of modified processes is not supported on 64-bit versions of Windows.
■ Only the modified process is blocked. The modifying program is not blocked from accessingthe network.
9.2.13 Filter ICMP messages
Internet Control Message Protocol (ICMP) messages allow the computers on a network to shareerror and status information. You can allow or block specific types of incoming or outgoing ICMPmessage.
You should only filter ICMP messages if you are familiar with networking protocols. Forexplanations of the ICMP message types, see Explanation of ICMP message types (section 9.2.14).
To filter ICMP messages:
1. On the Home page, under Firewall, click Configure firewall.
For information about the Home page, see About the Home page (section 2).
2. Under Configurations, click Configure next to the location that you want to configure.
3. On the ICMP tab, select the In or Out check box to allow incoming or outgoing messages ofthe specified type.
9.2.14 Explanation of ICMP message types
Used to test destination accessibility and status. A host sends anEcho Request and listens for a corresponding Echo Reply. Thisis most commonly done using the ping command.
Echo Request, Echo Reply
Sent by a router when it cannot deliver an IP datagram. Adatagram is the unit of data, or packet, transmitted in a TCP/IPnetwork.
Destination Unreachable,Echo Reply
Sent by a host or router if it is receiving data too quickly for it tohandle. The message is a request that the source reduce its rateof datagram transmission.
Source Quench
62
Sophos Endpoint Security and Control
Sent by a router if it receives a datagram that should have beensent to a different router. The message contains the address to
Redirect
which the source should direct future datagrams. This is used tooptimize the routing of network traffic.
Allow hosts to discover the existence of routers. Routersperiodically broadcast their IP addresses via Router
Router Advertisement,Router Solicitation
Advertisement messages. Hosts may also request a router addressby broadcasting a Router Solicitation message to which a routerwill reply with a Router Advertisement.
Sent by a router if the datagram has reached the maximum limitof routers through which it can travel.
Time Exceeded for aDatagram
Sent by a router if a problem occurs during the transmission ofa datagram such that it cannot complete processing. One potentialsource of such a problem is invalid datagram header.
Parameter Problem for aDatagram
Used to synchronize the clocks between hosts and to estimatetransit time.
Timestamp Request,Timestamp Reply
Obsolete. These messages were used earlier by hosts to determinetheir inter-network addresses, but are now considered outdatedand should not be used.
Information Request,Information Reply
Used to find the mask of the subnet (i.e. what address bits definethe network). A host sends an Address Mask Request to a routerand receives an Address Mask Reply in return.
Address Mask Request,Address Mask Reply
9.2.15 Restore the firewall default settings
1. On the Home page, under Firewall, click Configure firewall.
For information about the Home page, see About the Home page (section 2).
2. Under Managing configuration, click Restore defaults.
9.3 Working in interactive mode
9.3.1 About interactive mode
In interactive mode, the firewall displays a learning dialog each time an unknown application orservice requests network access. The learning dialog asks you whether to allow the traffic once,block it once, or whether to create a rule for that type of traffic.
63
Help
In interactive mode, you will see the following types of learning dialog:
■ Hidden process learning dialogs (section 9.3.4)
■ Protocol learning dialogs (section 9.3.6)
■ Application learning dialogs (section 9.3.7)
■ Rawsocket learning dialogs (section 9.3.8)
■ Checksum learning dialogs (section 9.3.10)
9.3.2 Enable interactive mode
1. On the Home page, under Firewall, click Configure firewall.
For information about the Home page, see About the Home page (section 2).
2. Under Configurations, click Configure next to the location that you want to configure.
3. On the General tab, under Working mode, click Interactive.
9.3.3 Change to a non-interactive mode
There are two non-interactive modes:
■ Allow by default
■ Block by default
In the non-interactive modes, the firewall deals with network traffic automatically using yourrules. Network traffic which has no matching rule is either all allowed (if it is outbound) or allblocked.
To change to a non-interactive mode:
1. On the Home page, under Firewall, click Configure firewall.
For information about the Home page, see About the Home page (section 2).
2. Under Configurations, click Configure next to the location that you want to configure.
3. On the General tab, under Working mode, click Allow by default or Block by default.
9.3.4 Hidden process learning dialogs
A hidden process is when one application launches another one to perform some network accessfor it. Malicious applications sometimes use this technique to evade firewalls: they launch a trustedapplication to access the network rather than doing it themselves.
The hidden process learning dialog displays information about the hidden process and theapplication that launched it.
■ Enable hidden process learning dialogs (section 9.3.5)
64
Sophos Endpoint Security and Control
9.3.5 Enable hidden process learning dialogs
If you are using interactive mode, the firewall can display a learning dialog when it detects a newlauncher.
If you are using interactive mode and this option is not selected, new launchers are blocked fromlaunching hidden processes.
To enable hidden process learning dialogs:
1. On the Home page, under Firewall, click Configure firewall.
For information about the Home page, see About the Home page (section 2).
2. Under Configurations, click Configure next to the location that you want to configure.
3. Click the Processes tab.
4. Select the Warn about new launchers check box.
9.3.6 Protocol learning dialogs
If the firewall detects network activity by the system that it cannot relate to a specific application,it prompts for the creation of a protocol rule.
The protocol learning dialog displays information about the unrecognized network activity, i.e.the protocol and remote address.
9.3.7 Application learning dialogs
If the firewall detects an application attempting to access the network in a way that is not coveredby any existing rule, it prompts for the creation of an application rule.
The application learning dialog displays information about the unrecognized network activity,i.e. the remote service and the remote address.
9.3.8 Rawsocket learning dialogs
Rawsockets allow processes to control all aspects of the data they send over the network and canbe used for malicious purposes.
If the firewall detects a rawsocket attempting to access the network in a way that is not covered byany existing rule, it prompts for the creation of a rawsocket rule.
The rawsocket learning dialog displays information about the rawsocket.
■ Enable rawsocket learning dialogs (section 9.3.9)
65
Help
9.3.9 Enable rawsocket learning dialogs
If you are using interactive mode, the firewall can display a learning dialog when it detects arawsocket attempting to access the network in a way that is not covered by any existing rule.
If you are using interactive mode and this option is not selected, rawsockets are blocked fromaccessing the network.
To enable rawsocket learning dialogs:
1. On the Home page, under Firewall, click Configure firewall.
For information about the Home page, see About the Home page (section 2).
2. Under Configurations, click Configure next to the location that you want to configure.
3. Click the Processes tab.
4. Select the Warn about the use of rawsockets check box.
9.3.10 Checksum learning dialogs
If the firewall detects a new or modified application, it displays a checksum learning dialog.
If you want to allow the application to access the network, you must add its checksum (a uniqueidentifier) to the list of recognized checksums.
Select one of the following options:
■ Add the checksum to existing checksums for this application allows multiple versions of thisapplication.
■ Replace any existing checksum for this application replaces all existing checksums for theapplication with the one requesting access, and thereby allows only the latest version of thisapplication.
■ Block this application until it is restarted blocks the application on this occasion.
9.3.11 Enable checksum learning dialogs
If you are using interactive mode, the firewall can display a learning dialog when it detects a newor modified application.
If you are using interactive mode and this option is not selected, applications are blocked fromaccessing the network.
To enable checksum learning dialogs:
1. On the Home page, under Firewall, click Configure firewall.
For information about the Home page, see About the Home page (section 2).
2. Under Configurations, click Configure next to the location that you want to configure.
66
Sophos Endpoint Security and Control

3. Under Blocking, select the Use checksums to authenticate applications check box.
9.4 Firewall configuration files
9.4.1 About firewall configuration files
Sophos Client Firewall enables you to export the firewall general settings and rules as a configurationfile. You can use this feature to do the following:
■ Back up and restore your entire firewall configuration.
■ Save a general settings configuration and install it on multiple computers.
■ Create rules for applications on one computer and export them for use on other computersrunning the same set of applications.
■ Use the management console to merge configurations created on several different computersto create a policy that is valid for all computers on the network.
9.4.2 Export a firewall configuration file
1. On the Home page, under Firewall, click Configure firewall.
For information about the Home page, see About the Home page (section 2).
2. Click Export.
3. Give your configuration file a name and location, and then click Save.
9.4.3 Import a firewall configuration file
1. On the Home page, under Firewall, click Configure firewall.
For information about the Home page, see About the Home page (section 2).
2. Click Import.
3. Select a configuration file and click Open.
4. Follow the instructions on the screen.
9.5 Firewall rules
9.5.1 About firewall rules
Global rules
Global rules apply to all network communications and to applications even if they have applicationrules.
67
Help
Application rules
You can have one or more rules for an application. You can either use preset rules created bySophos or create custom rules to give you fine control over the access allowed for an application.
9.5.2 About the order in which rules are applied
For connections that use rawsockets, only the global rules are checked.
For connections that do not use rawsockets, various rules are checked, depending on whether theconnection is to a network address that is listed on the LAN tab or not.
If the network address is listed on the LAN tab, the following rules are checked:
■ If the address has been marked as Trusted, all traffic on the connection is allowed with nofurther checks.
■ If the address has been marked as NetBIOS, file and printer sharing on any connection thatmeets the following criteria is allowed:
RangePortConnection
137-139 or 445RemoteTCP
137-139 or 445LocalTCP
137 or 138RemoteUDP
137 or 138LocalUDP
If the network address is not listed on the LAN tab, other firewall rules are checked in the followingorder:
1. Any NetBIOS traffic that has not been allowed using the LAN tab is dealt with according tothe setting of the Block file and printer sharing for other networks check box:
■ If the check box is selected, the traffic is blocked.
■ If the check box is cleared, the traffic is processed by the remaining rules.
2. The high-priority global rules are checked, in the order in which they are listed.
3. If the connection has not already had rules applied to it, the application rules are checked.
4. If the connection has still not been handled, the normal-priority global rules are checked, inthe order in which they are listed.
5. If no rules have been found to handle the connection:
■ In Allow by default mode, the traffic is allowed (if it is outbound).
■ In Block by default mode, the traffic is blocked.
68
Sophos Endpoint Security and Control
■ In Interactive mode, the user is asked to decide.
Note: If you have not changed the working mode, the firewall will be in Block by default mode.
9.5.3 About local network detection
You can assign the local network for this computer to firewall rules.
The firewall determines this computer's local network when it starts, and then monitors for anychanges whilst it is running. If any change is detected, the firewall updates any local network ruleswith the new local network address range.
Caution: We strongly advise caution when using local network rules as part of configurationsthat may be used in "out of office" locations. For more information, see Create a secondaryconfiguration (section 9.6.4).
9.5.4 Global rules
9.5.4.1 Default global rule settings
This topic describes the conditions and actions for the default global rules. Use these settings ifyou want to create a new default global rule.
Allow DNS Resolving (TCP)
■ Protocol: TCP
■ Direction: Outbound
■ Remote port: DOMAIN
■ Action: Allow
Allow DNS Resolving (UDP)
■ Protocol: UDP
■ Direction: Outbound
■ Remote port: DNS
■ Action: Allow Stateful inspection
Allow Outgoing DHCP
■ Protocol: UDP
■ Local port: BOOTPS,BOOTPC,546,547
■ Action: Allow
69
Help
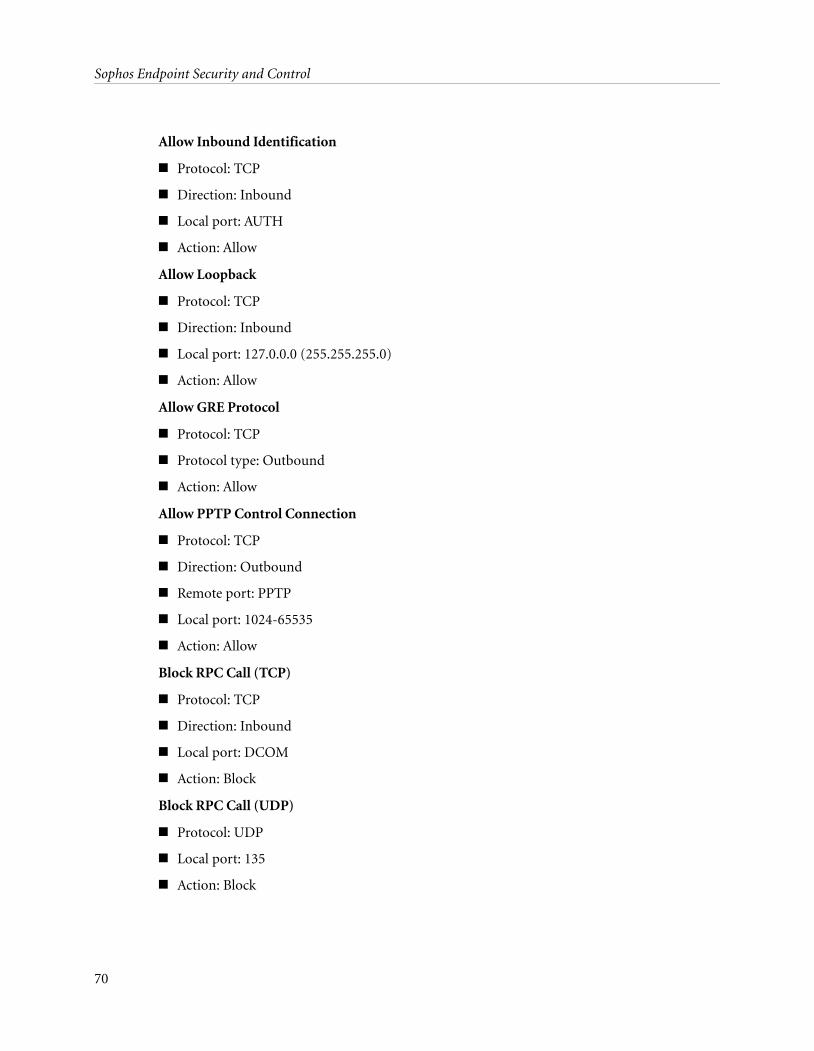
Allow Inbound Identification
■ Protocol: TCP
■ Direction: Inbound
■ Local port: AUTH
■ Action: Allow
Allow Loopback
■ Protocol: TCP
■ Direction: Inbound
■ Local port: 127.0.0.0 (255.255.255.0)
■ Action: Allow
Allow GRE Protocol
■ Protocol: TCP
■ Protocol type: Outbound
■ Action: Allow
Allow PPTP Control Connection
■ Protocol: TCP
■ Direction: Outbound
■ Remote port: PPTP
■ Local port: 1024-65535
■ Action: Allow
Block RPC Call (TCP)
■ Protocol: TCP
■ Direction: Inbound
■ Local port: DCOM
■ Action: Block
Block RPC Call (UDP)
■ Protocol: UDP
■ Local port: 135
■ Action: Block
70
Sophos Endpoint Security and Control
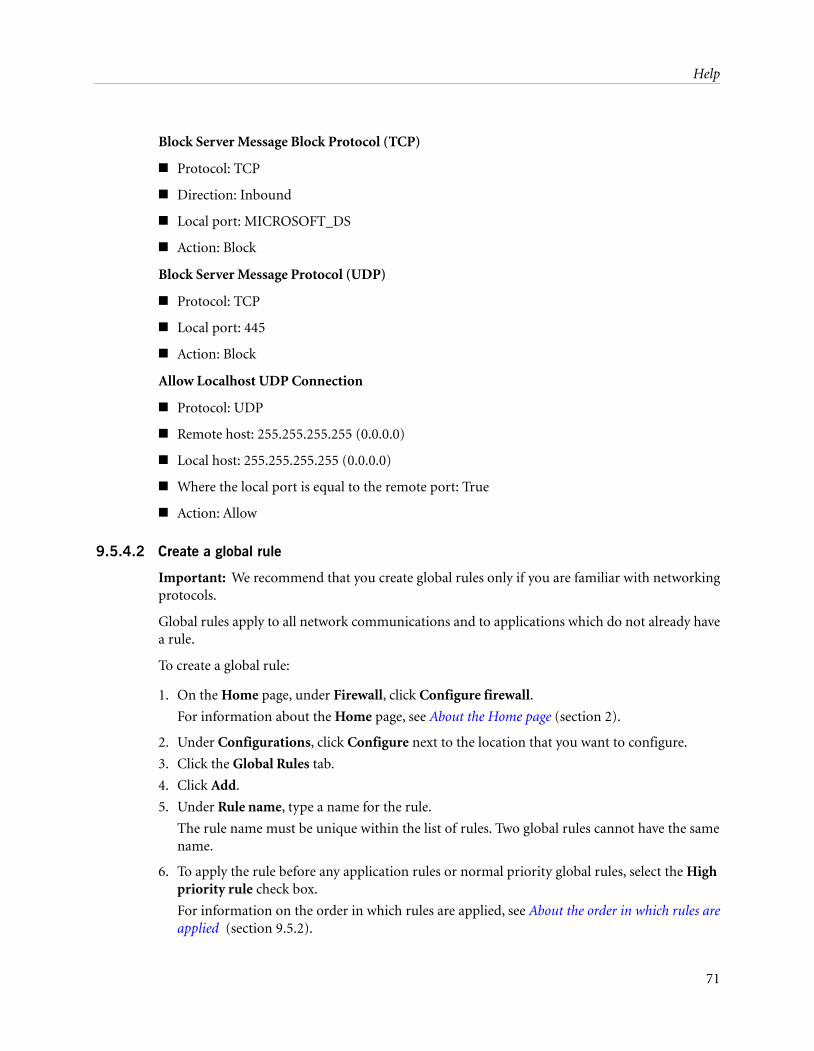
Block Server Message Block Protocol (TCP)
■ Protocol: TCP
■ Direction: Inbound
■ Local port: MICROSOFT_DS
■ Action: Block
Block Server Message Protocol (UDP)
■ Protocol: TCP
■ Local port: 445
■ Action: Block
Allow Localhost UDP Connection
■ Protocol: UDP
■ Remote host: 255.255.255.255 (0.0.0.0)
■ Local host: 255.255.255.255 (0.0.0.0)
■ Where the local port is equal to the remote port: True
■ Action: Allow
9.5.4.2 Create a global rule
Important: We recommend that you create global rules only if you are familiar with networkingprotocols.
Global rules apply to all network communications and to applications which do not already havea rule.
To create a global rule:
1. On the Home page, under Firewall, click Configure firewall.
For information about the Home page, see About the Home page (section 2).
2. Under Configurations, click Configure next to the location that you want to configure.
3. Click the Global Rules tab.
4. Click Add.
5. Under Rule name, type a name for the rule.
The rule name must be unique within the list of rules. Two global rules cannot have the samename.
6. To apply the rule before any application rules or normal priority global rules, select the Highpriority rule check box.
For information on the order in which rules are applied, see About the order in which rules areapplied (section 9.5.2).
71
Help
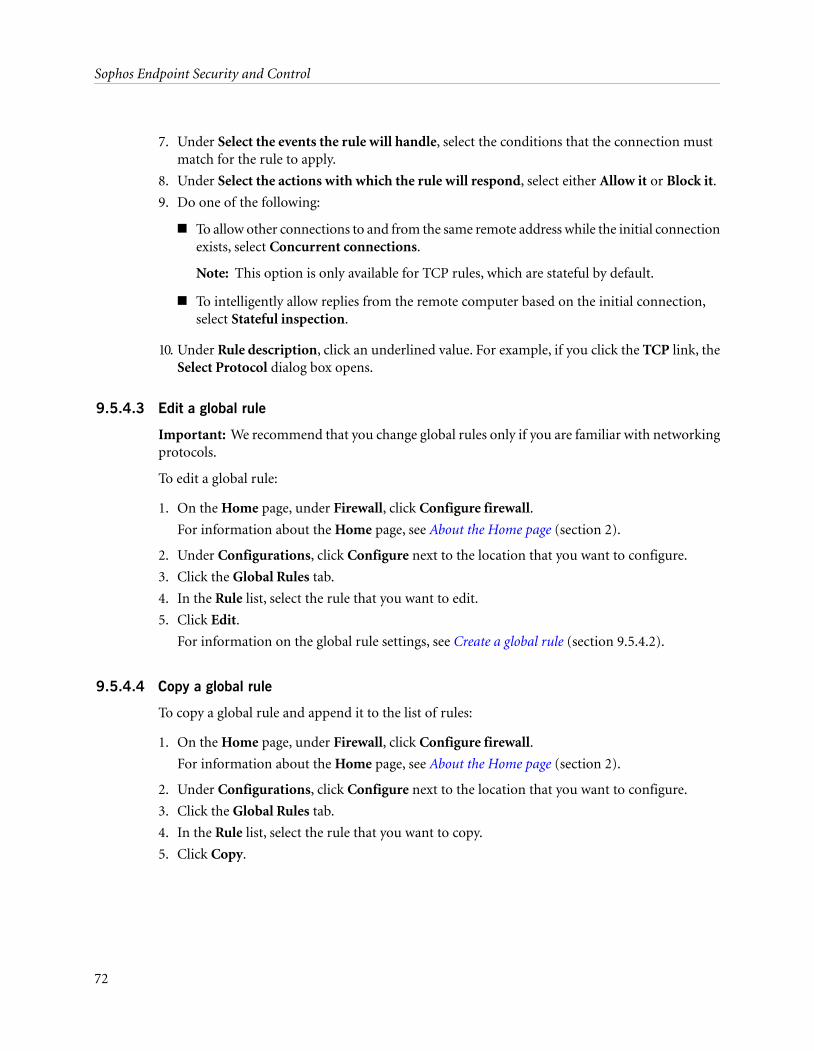
7. Under Select the events the rule will handle, select the conditions that the connection mustmatch for the rule to apply.
8. Under Select the actions with which the rule will respond, select either Allow it or Block it.
9. Do one of the following:
■ To allow other connections to and from the same remote address while the initial connectionexists, select Concurrent connections.
Note: This option is only available for TCP rules, which are stateful by default.
■ To intelligently allow replies from the remote computer based on the initial connection,select Stateful inspection.
10. Under Rule description, click an underlined value. For example, if you click the TCP link, theSelect Protocol dialog box opens.
9.5.4.3 Edit a global rule
Important: We recommend that you change global rules only if you are familiar with networkingprotocols.
To edit a global rule:
1. On the Home page, under Firewall, click Configure firewall.
For information about the Home page, see About the Home page (section 2).
2. Under Configurations, click Configure next to the location that you want to configure.
3. Click the Global Rules tab.
4. In the Rule list, select the rule that you want to edit.
5. Click Edit.
For information on the global rule settings, see Create a global rule (section 9.5.4.2).
9.5.4.4 Copy a global rule
To copy a global rule and append it to the list of rules:
1. On the Home page, under Firewall, click Configure firewall.
For information about the Home page, see About the Home page (section 2).
2. Under Configurations, click Configure next to the location that you want to configure.
3. Click the Global Rules tab.
4. In the Rule list, select the rule that you want to copy.
5. Click Copy.
72
Sophos Endpoint Security and Control
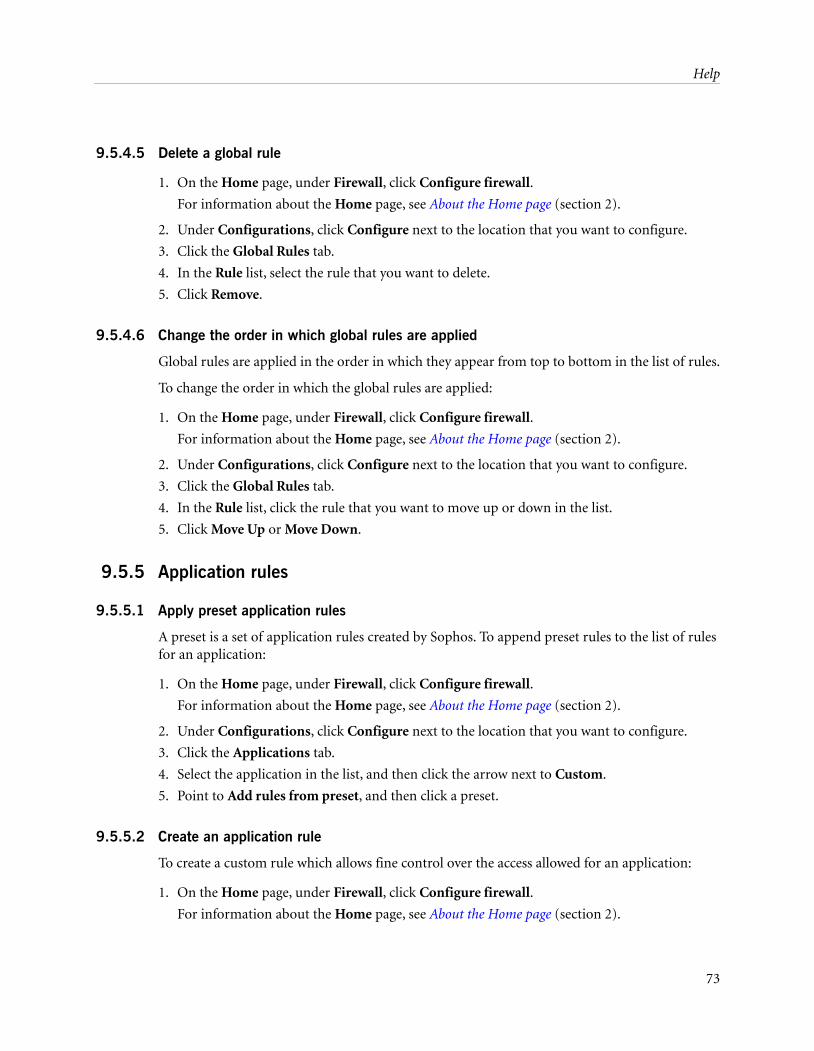
9.5.4.5 Delete a global rule
1. On the Home page, under Firewall, click Configure firewall.
For information about the Home page, see About the Home page (section 2).
2. Under Configurations, click Configure next to the location that you want to configure.
3. Click the Global Rules tab.
4. In the Rule list, select the rule that you want to delete.
5. Click Remove.
9.5.4.6 Change the order in which global rules are applied
Global rules are applied in the order in which they appear from top to bottom in the list of rules.
To change the order in which the global rules are applied:
1. On the Home page, under Firewall, click Configure firewall.
For information about the Home page, see About the Home page (section 2).
2. Under Configurations, click Configure next to the location that you want to configure.
3. Click the Global Rules tab.
4. In the Rule list, click the rule that you want to move up or down in the list.
5. Click Move Up or Move Down.
9.5.5 Application rules
9.5.5.1 Apply preset application rules
A preset is a set of application rules created by Sophos. To append preset rules to the list of rulesfor an application:
1. On the Home page, under Firewall, click Configure firewall.
For information about the Home page, see About the Home page (section 2).
2. Under Configurations, click Configure next to the location that you want to configure.
3. Click the Applications tab.
4. Select the application in the list, and then click the arrow next to Custom.
5. Point to Add rules from preset, and then click a preset.
9.5.5.2 Create an application rule
To create a custom rule which allows fine control over the access allowed for an application:
1. On the Home page, under Firewall, click Configure firewall.
For information about the Home page, see About the Home page (section 2).
73
Help

2. Under Configurations, click Configure next to the location that you want to configure.
3. Click the Applications tab.
4. Select the application in the list, and then click Custom.
You can also double-click the application in the list.
5. In the Application Rules dialog box, click Add.
6. Under Rule name, type a name for the rule.
The rule name must be unique within the list of rules. Two application rules cannot have thesame name, but two applications can each have a rule with the same name.
7. Under Select the events the rule will handle, select the conditions that the connection mustmatch for the rule to apply.
8. Under Select the actions with which the rule will respond, select either Allow it or Block it.
9. To intelligently allow replies from the remote computer based on the initial connection, selectStateful inspection.
10. Under Rule description, click an underlined value. For example, if you click the TCP link, theSelect Protocol dialog box opens.
9.5.5.3 Edit an application rule
1. On the Home page, under Firewall, click Configure firewall.
For information about the Home page, see About the Home page (section 2).
2. Under Configurations, click Configure next to the location that you want to configure.
3. Click the Applications tab.
4. Select the application in the list, and then click Custom.
You can also double-click the application in the list.
5. In the Application Rules dialog box, click Edit.
6. Under Rule name, type a name for the rule.
The rule name must be unique within the list of rules. Two application rules cannot have thesame name, but two applications can each have a rule with the same name.
7. Under Select the events the rule will handle, select the conditions that the connection mustmatch for the rule to apply.
8. Under Select the actions with which the rule will respond, select either Allow it or Block it.
9. To intelligently allow replies from the remote computer based on the initial connection, selectStateful inspection.
10. Under Rule description, click an underlined value. For example, if you click the TCP link, theSelect Protocol dialog box opens.
74
Sophos Endpoint Security and Control
9.5.5.4 Copy an application rule
To copy an application rule and append it to the list of rules:
1. On the Home page, under Firewall, click Configure firewall.
For information about the Home page, see About the Home page (section 2).
2. Under Configurations, click Configure next to the location that you want to configure.
3. Click the Applications tab.
4. Select the application in the list, and then click Custom.
You can also double-click the application in the list.
5. In the Application Rules dialog box, click Copy.
9.5.5.5 Delete an application rule
1. On the Home page, under Firewall, click Configure firewall.
For information about the Home page, see About the Home page (section 2).
2. Under Configurations, click Configure next to the location that you want to configure.
3. Click the Applications tab.
4. Select the application in the list, and then click Custom.
5. In the Application Rules dialog box, click Remove.
9.5.5.6 Change the order in which application rules are applied
Application rules are applied in the order in which they appear from top to bottom in the list ofrules.
To change the order in which the application rules are applied:
1. On the Home page, under Firewall, click Configure firewall.
For information about the Home page, see About the Home page (section 2).
2. Under Configurations, click Configure next to the location that you want to configure.
3. Click the Applications tab.
4. Select the application in the list, and then click Custom.
You can also double-click the application in the list.
5. In the Rule list, click the rule that you want to move up or down in the list.
6. Click Move Up or Move Down.
9.5.5.7 Allow applications to launch hidden processes
An application sometimes launches another hidden process to perform some network access forit.
75
Help

Malicious applications can use this technique to evade firewalls: they launch a trusted applicationto access the network rather than doing so themselves.
The firewall sends an alert to the management console, if one is being used, the first time a hiddenprocess is detected.
To allow applications to launch hidden processes:
1. On the Home page, under Firewall, click Configure firewall.
For information about the Home page, see About the Home page (section 2).
2. Under Configurations, click Configure next to the location that you want to configure.
3. Click the Processes tab.
4. In the upper area, click the Add button.
5. Locate the application, and then double-click it.
If you are using interactive mode, the firewall can display a learning dialog when it detects a newlauncher.
■ Enable interactive mode (section 9.3.2)
■ Enable hidden process learning dialogs (section 9.3.5)
9.5.5.8 Allow applications to use rawsockets
Some applications can access a network through rawsockets, which gives them control over allaspects of the data they send over the network.
Malicious applications can exploit rawsockets by faking their IP address or send deliberatelycorrupt messages.
The firewall sends an alert to the management console, if one is being used, the first time a rawsocketis detected.
To allow applications to access the network through rawsockets:
1. On the Home page, under Firewall, click Configure firewall.
For information about the Home page, see About the Home page (section 2).
2. Under Configurations, click Configure next to the location that you want to configure.
3. Click the Processes tab.
4. In the lower area, click the Add button.
5. Locate the application, and then double-click it.
If you are using interactive mode, the firewall can display a learning dialog when a rawsocket isdetected.
■ Enable interactive mode (section 9.3.2)
■ Enable rawsocket learning dialogs (section 9.3.9)
76
Sophos Endpoint Security and Control
9.5.5.9 Use checksums to authenticate applications
Each version of an application has a unique checksum. The firewall can use this checksum todecide whether an application is allowed or not.
By default, the firewall checks the checksum of each application that runs. If the checksum isunknown or has changed, the firewall blocks it or (in interactive mode) asks the user what to do.
The firewall also sends an alert to the management console, if one is being used, the first time anew or modified application is detected.
To add a checksum to the list of allowed checksums:
1. On the Home page, under Firewall, click Configure firewall.
For information about the Home page, see About the Home page (section 2).
2. Under Configurations, click Configure next to the location that you want to configure.
3. Click the Checksums tab.
4. Click Add.
5. Locate the application, and then double-click it.
If you are using interactive mode, the firewall can display a learning dialog when it detects a newor modified application.
■ Enable interactive mode (section 9.3.2)
■ Enable hidden process learning dialogs (section 9.3.5)
9.6 Location awareness
9.6.1 About location awareness
Location awareness is a feature of Sophos Client Firewall that assigns a firewall configuration toeach network adapter on your computer, depending on the current location of the network adapter.
The most common scenario in which this feature is used is where you have a company laptop andyou work from home. You are using two network connections simultaneously:
■ For work use, you connect to your office network through a VPN client and a virtual networkadapter.
■ For personal use, you connect to your ISP through a network cable and a physical networkadapter.
In this scenario, you need the office configuration to be applied to the virtual office connectionand the non-office, generally more restrictive, configuration to be applied to the non-office ISPconnection.
77
Help
Note: The non-office configuration will require sufficient rules to allow the "virtual" officeconnection to be established.
9.6.2 Set up location awareness
1. Define the list of gateway MAC addresses or domain names of your primary locations. Typically,these are your office networks.
2. Create the firewall configuration that will be used for your primary locations. Typically, thisconfiguration is less restrictive.
3. Create a secondary firewall configuration. Typically, this configuration is more restrictive.
4. Choose a configuration to apply.
Depending on the detection method you are using, the firewall obtains the DNS or gateway addressfor each of your computer's network adapters, and then matches it against your list of addresses.
■ If any of the addresses in your list matches the address of a network adapter, the adapter isassigned the configuration for the primary location.
■ If none of the addresses in your list matches the address of a network adapter, the adapter isassigned the policy for the secondary location.
The active location is displayed in the Status panel in the Sophos Endpoint Security and Controlwindow. If both configurations have been applied, Active = Both.
Important: The secondary configuration switches from Interactive mode to Block by defaultmode when both the following conditions are met:
■ Both locations are active.
■ The primary configuration is not interactive.
9.6.3 Define your primary locations
1. On the Home page, under Firewall, click Configure firewall.
For information about the Home page, see About the Home page (section 2).
2. Click the Location detection tab.
3. Under Detection method, click Configure next to the method that you want to use to defineyour primary locations:
You create a list of domain names and expectedIP addresses that correspond to your primarylocations.
Identify location by DNS
You create a list of gateway MAC addresses thatcorrespond to your primary locations.
Identify location by gateway MAC address
4. Follow the instructions on the screen.
78
Sophos Endpoint Security and Control
9.6.4 Create a secondary configuration
The firewall uses your secondary configuration when it detects that you are not connected to yourprimary location.
1. On the Home page, under Firewall, click Configure firewall.
For information about the Home page, see About the Home page (section 2).
2. Select the Add configuration for a second location check box.
Now set up the configuration for your secondary location. For information on how to do this, seeAbout configuring the firewall (section 9.2.1) and the other topics in the Configuring the firewallsection.
Caution: If this computer is a laptop, and it is used out of the office, it may connect to an unknownlocal network. If this happens, firewall rules in the secondary configuration that use the localnetwork as an address may inadvertently allow unknown traffic. For that reason, we strongly advisecaution when using local network rules as part of secondary configurations.
9.6.5 Choose a configuration to apply
1. On the Home page, under Firewall, click Configure firewall.
For information about the Home page, see About the Home page (section 2).
2. On the General tab, under Applied location, click one of the following options:
DescriptionOption
The firewall applies either the primary orsecondary configuration to each networkconnection according to the detection settings forlocation awareness (as described in Set up locationawareness (section 9.6.2)).
Apply the configuration for the detected location
The firewall applies the primary configuration toall network connections.
Apply the configuration for the primary location
The firewall applies the secondary configurationto all network connections.
Apply the configuration for the secondarylocation
79
Help
9.7 Firewall reporting
9.7.1 About firewall reporting
By default, the firewall reports state changes, events, and errors to the management console.
Firewall state changes
The firewall regards the following as state changes:
■ Changes to the working mode
■ Changes to the software version
■ Changes to whether the firewall is configured to allow all traffic
■ Changes to whether the firewall complies with policy
When you are working in interactive mode, your firewall configuration may deliberately differfrom the policy applied by the management console. In that case, you can choose not to send"differs from policy" alerts to the management console when you make changes to certain partsof your firewall configuration.
For more information, see Turn reporting of local changes on or off (section 9.7.2).
Firewall events
An event is when an unknown application on your computer, or your computer's operating system,tries to communicate with another computer over a network connection.
You can prevent the firewall from reporting events to the management console.
For more information, see Turn off reporting of unknown network traffic (section 9.7.3)
9.7.2 Turn reporting of local changes on or off
If your firewall configuration differs from policy, you can turn reporting of local changes off.
Turning reporting of local changes off stops the firewall sending "differs from policy" alerts to themanagement console about changes made to the global rules, applications, processes, or checksums.You may want to do this, for example, when you are working in interactive mode, since these aresettings that can be changed by using the learning dialogs.
If the firewall configuration on this computer is intended to conform to policy, you should turnreporting of local changes on.
To turn reporting of local changes off:
1. On the Home page, under Firewall, click Configure firewall.
For information about the Home page, see About the Home page (section 2).
80
Sophos Endpoint Security and Control
2. Under Configurations, click Configure next to the location that you want to configure.
3. On the General tab, under Reporting, clear the Display an alert in the management consoleif local changes are made to the global rules, applications, processes or checksums check boxto turn reporting of local changes off.
To turn reporting of local changes on, select the check box.
9.7.3 Turn off reporting of unknown network traffic
You can prevent the firewall from reporting unknown network traffic to the management console.The firewall regards traffic as unknown if there is no rule for it.
To prevent the firewall from reporting unknown network traffic to the management console:
1. On the Home page, under Firewall, click Configure firewall.
For information about the Home page, see About the Home page (section 2).
2. Under Configurations, click Configure next to the location that you want to configure.
3. On the General tab, under Blocking, select the Use checksums to authenticate applicationscheck box.
4. Under Reporting, clear the Report unknown applications and traffic to the managementconsole check box.
9.7.4 Turn off reporting of firewall errors
Important: We do not recommend that you turn off reporting of firewall errors permanently.You should turn off reporting only when you need to.
To prevent the firewall from reporting errors to the management console:
1. On the Home page, under Firewall, click Configure firewall.
For information about the Home page, see About the Home page (section 2).
2. Under Configurations, click Configure next to the location that you want to configure.
3. On the General tab, under Reporting, clear the Report errors to the management consolecheck box.
9.7.5 Configure desktop messaging
You can control what messages the firewall displays on the desktop using balloon tips.
Unknown applications and traffic balloon tips are not shown in interactive mode since the sameinformation is displayed in the learning dialogs.
1. On the Home page, under Firewall, click Configure firewall.
For information about the Home page, see About the Home page (section 2).
81
Help
2. Under Configurations, click Configure next to the location that you want to configure.
3. On the General tab, under Desktop messaging, do one of the following:
■ To display balloon tips for firewall warnings and errors, select the Show warnings anderrors check box.
■ To display balloon tips for unknown applications and traffic, select the Show unknownapplications and traffic check box.
9.8 Firewall logging
9.8.1 About the firewall log viewer
The Sophos Client Firewall log viewer enables you to view, filter, and save details of the following:
■ All connections
■ Connections that have been allowed or blocked
■ Firewall events
■ The system log
9.8.2 Open the firewall log viewer
■ On the Home page, under Firewall, click View Firewall log.
For information about the Home page, see About the Home page (section 2).
9.8.3 Configure firewall logging
To manage the size and contents of the firewall's event log database:
1. On the Home page, under Firewall, click Configure firewall.
For information about the Home page, see About the Home page (section 2).
2. Click the Log tab.
3. To manage the size of the firewall's event log database, select one of the following options:
■ To allow the database to grow without limit, click Keep all records.■ To clear out old records, click Delete old records, and then configure the Log cleanup
settings.
4. Under Log cleanup settings, select one or more of the following options:
■ Click the Delete records after check box, and then enter or select a figure in the Days box.
82
Sophos Endpoint Security and Control

■ Click the Keep no more than check box, and then enter or select a figure in the Recordsbox.
■ Click the Keep size under check box, and then enter or select a figure in the MB box.
9.8.4 Change how the firewall log viewer looks
1. On the Home page, under Firewall, click View firewall log.
For information about the Home page, see About the Home page (section 2).
2. On the View menu, click Layout.
3. In the Customize View dialog box, select items to hide or display:
■ The Console tree is displayed in the left pane.■ The Toolbar is displayed at the top of the firewall log viewer.■ The Description bar is displayed above the data in the right pane.■ The Status bar is displayed at the bottom of the firewall log viewer.
9.8.5 Customize the data format
You can change the format used to display the following items of data in the firewall logs:
■ Display ports as a number or a name, for example HTTP or 80.
■ Display applications as icons, file paths, or both.
■ Specify the size of unit that is used to display the data transfer speed, for example KBytes orMBytes.
■ Hide or display the gridlines.
To customize the data format:
1. On the Home page, under Firewall, click View firewall log.
For information about the Home page, see About the Home page (section 2).
2. On the View menu, click Customize.
3. Select the options you want.
9.8.6 Hide or display columns in the firewall log viewer
1. On the Home page, under Firewall, click View firewall log.
For information about the Home page, see About the Home page (section 2).
2. Click an item in the console tree that displays columns in the details pane.
3. On the View menu, select Add/Remove Columns.
You can also right-click any of the column headings.
83
Help
4. In the Columns dialog box, do one of the following:
■ To hide a column, clear its check box.■ To display a column, select its check box.
9.8.7 Reorder columns in the firewall log viewer
1. On the Home page, under Firewall, click View firewall log.
For information about the Home page, see About the Home page (section 2).
2. Click an item in the console tree that displays columns in the details pane.
3. On the View menu, select Add/Remove Columns.
You can also right-click any of the column headings.
4. In the Columns dialog box, click a column name, and then click Move Up or Move Down tochange the position of the column.
Notes
■ You can also reorder columns in the details pane by using a mouse to drag a column headingto the left or right of its original position. As you drag a column, highlighting between thecolumn headings indicates the new position of the column.
■ You can resize columns by using the mouse to drag column headings.
9.8.8 Filter records in a firewall log
You can sort the firewall log records by creating a filter.
To filter the firewall log records:
1. On the Home page, under Firewall, click View firewall log.
For information about the Home page, see About the Home page (section 2).
2. In the console tree, select a log.
3. On the Action menu, click Add filter.
4. Follow the instructions in the Filter wizard.
The filter appears in the console tree immediately below the node for the log you want to filter.
9.8.9 Export all records from a firewall log
To export all the records from the firewall log to a text or CSV file:
1. On the Home page, under Firewall, click View firewall log.
For information about the Home page, see About the Home page (section 2).
84
Sophos Endpoint Security and Control
2. In the console tree, select a log.
3. Right-click the record list, and then click Export All Records.
4. In the File name box, type a name for the file.
5. In the Save as type list, click the file type that you want.
9.8.10 Export selected records from a firewall log
To export selected records from a firewall log to a text or CSV file:
1. On the Home page, under Firewall, click View firewall log.
For information about the Home page, see About the Home page (section 2).
2. In the console tree, select a log.
3. Select the records you want to export.
If the records update rapidly, on the View menu, clear the Auto refresh check box.
4. On the Action menu, click Export Selected Records.
5. In the File name box, type a name for the file.
6. In the Save as type list, click the file type that you want.
85
Help
10 Sophos AutoUpdate
10.1 Update immediately
By default, Sophos AutoUpdate is scheduled to update every 10 minutes if you are permanentlyconnected to your company network, or every 60 minutes if you are permanently connected tothe internet.
If you are on a dial-up connection, Sophos AutoUpdate is scheduled to update when you connectto the internet or your network, and every 60 minutes after that.
To update immediately:
■ Right-click the Sophos Endpoint Security and Control system tray icon, and then click Updatenow.
10.2 Schedule updates
Important: If a management console is used to administer Sophos Endpoint Security and Controlon this computer, it may override any changes you make here.
You can specify when or how often Sophos AutoUpdate updates.
1. On the Configure menu, click Updating.
2. Click the Schedule tab.
3. Select Enable automatic updates, and then enter the frequency (in minutes) with which SophosAutoUpdate will update.
If the updated files are downloaded from your company network, updates are every 10 minutesby default.
If the updated files are downloaded over the internet from the Sophos server, SophosAutoUpdate cannot update more frequently than every 60 minutes.
10.3 Set a source for updates
If you want Sophos AutoUpdate to update automatically, you must specify where it downloadsupdates from.
1. On the Configure menu, click Updating.
2. Click the Primary location tab.
3. In the Address list, enter the UNC path or web address of the update server.
To download updates directly from Sophos via the internet, select Sophos in the Address list.
86
Sophos Endpoint Security and Control
4. In the User name box, type the user name for the account that will be used to access the updateserver.
If the user name needs to be qualified to indicate the domain, use the form domain\username.
5. In the Password box, type the password for the account that will be used to access the updateserver.
10.4 Set an alternative source for updates
You can set an alternative source for updates. If Sophos AutoUpdate cannot update from its usualsource, it will attempt to update from the alternative source.
1. On the Configure menu, click Updating.
2. Click the Secondary location tab.
3. In the Address list, enter the UNC path or web address of the update server.
To download updates directly from Sophos via the internet, select Sophos in the Address list.
4. In the User name box, type the user name for the account that will be used to access the updateserver.
If the user name needs to be qualified to indicate the domain, use the form domain\username.
5. In the Password box, type the password for the account that will be used to access the updateserver.
10.5 Update via a proxy server
If Sophos AutoUpdate updates via the internet, you must enter details of any proxy server that itmust use to connect to the internet.
1. On the Configure menu, click Updating.
2. Click the Primary location or Secondary location tab.
3. Click Proxy Details.
4. Select the Access the location via a proxy check box.
5. Enter the proxy server Address and Port number.
6. Enter a User name and Password that grant access to the proxy server.
If the user name needs to be qualified to indicate the domain, use the form domain\username.
10.6 Update via a dial-up connection
To update via a dial-up connection to the internet:
1. On the Configure menu, click Updating.
2. Click the Schedule tab.
87
Help
3. Select Check for updates on dial-up.
Sophos AutoUpdate will update whenever you connect to the internet.
10.7 Limit the bandwidth used for updating
To prevent Sophos AutoUpdate from using all your bandwidth when you need it for other purposes(such as downloading your email), you can limit the amount of bandwidth it uses.
1. On the Configure menu, click Updating.
2. Click the Primary location or Secondary location tab.
3. Click Advanced.
4. Select the Limit amount of bandwidth used check, and move the slider to specify the amountof bandwidth Sophos AutoUpdate uses.
Note: If you specify more bandwidth than is available, Sophos AutoUpdate uses all thebandwidth.
10.8 Log updating activity
You can configure Sophos AutoUpdate to record updating activity in a log file.
1. On the Configure menu, click Updating.
2. Click the Logging tab.
3. Select the Log Sophos AutoUpdate activity check box.
4. In the Maximum log size box, type or select the maximum size in MB for the log.
5. In the Log level list, select Normal or Verbose logging.
Verbose logging provides information on many more activities than usual, so the log will growfaster. Use this option only when you need a detailed log for troubleshooting.
10.9 View the updating log file
1. On the Configure menu, click Updating.
2. Click the Logging tab.
3. Click View Log File.
88
Sophos Endpoint Security and Control
11 Sophos Tamper Protection
11.1 About tamper protection on this computer
Tamper protection enables you to prevent unauthorized users (users with limited technicalknowledge) and known malware from uninstalling Sophos security software or disabling it throughthe Sophos Endpoint Security and Control interface.
Note: Tamper protection is not designed to protect against users with extensive technicalknowledge. It will not protect against malware which has been specifically designed to subvert theoperation of the operating system to avoid detection. This type of malware will only be detectedby scanning for threats and suspicious behavior. (For more information, see the section “UsingSophos Anti-Virus.”)
What does tamper protection mean for users of this computer?
SophosUsers and SophosPowerUsers
Tamper protection does not affect members of the SophosUser and SophosPowerUser groups.When tamper protection is enabled, they will be able to perform all tasks that they are usuallyauthorized to perform, without the need to enter the tamper protection password.
SophosUsers or SophosPowerUsers cannot enable or disable tamper protection.
For more information about the tasks that each Sophos group is authorized to perform, see AboutSophos groups (section 3.1).
SophosAdministrators
Members of the SophosAdministrator group can enable or disable tamper protection.
If a management console is used to administer Sophos Endpoint Security and Control on thiscomputer, the tamper protection policy set up in the console determines the tamper protectionconfiguration and password. If tamper protection is enabled from the console, ask your consoleadministrator for a password if you need to perform any of the tasks mentioned below.
If you are a member of the SophosAdministrator group and if tamper protection is enabled, youmust know the tamper protection password to perform the following tasks:
■ Re-configure on-access scanning or suspicious behavior detection settings. For moreinformation, see Enter the tamper protection password to configure the software (section 11.6).
■ Disable tamper protection. For more information, see Disable tamper protection (section 11.3).
■ Uninstall Sophos Endpoint Security and Control components (Sophos Anti-Virus, SophosClient Firewall, Sophos AutoUpdate, Sophos Remote Management System) using ControlPanel.
■ Uninstall Sophos SafeGuard Disk Encryption using Control Panel.
89
Help
A SophosAdministrator who does not know the password will be able to perform all other tasksexcept for the ones mentioned above.
If tamper protection is disabled, but the tamper protection password has been set previously, youmust use the Authenticate user option to authenticate yourself before you can re-enable tamperprotection. All other configuration options available to the SophosAdministrators group areenabled when tamper protection is disabled. For more information about re-enabling tamperprotection, see Re-enable tamper protection (section 11.4).
11.2 Enable tamper protection
Important: If a management console is used to administer Sophos Endpoint Security and Controlon this computer, it may override any changes you make here.
When Sophos Endpoint Security and Control is first installed, tamper protection is disabled. Ifyou are a SophosAdministrator, you can enable tamper protection.
To enable tamper protection:
1. On the Home page, under Tamper protection, click Configure tamper protection.
For information about the Home page, see About the Home page (section 2).
2. In the Tamper Protection Configuration dialog box, select the Enable tamper protectioncheck box.
3. Click Set under the Password box. In the Tamper Protection Password dialog box, enter andconfirm the password.
Tip: The password must be at least eight characters long, and must contain numbers and upperand lower-case letters.
11.3 Disable tamper protection
Important: If a management console is used to administer Sophos Endpoint Security and Controlon this computer, it may override any changes you make here.
If you are a member of the SophosAdministrator group, you can disable tamper protection.
To disable tamper protection:
1. If you haven’t already authenticated yourself, and the Configure tamper protection optionon the Home page is unavailable, follow the instructions in Enter the tamper protection passwordto configure the software (section 11.6) before proceeding to step 2.
2. On the Home page, under Tamper protection, click Configure tamper protection.
For information about the Home page, see About the Home page (section 2).
3. In the Tamper Protection Configuration dialog box, clear the Enable tamper protectioncheck box and click OK.
90
Sophos Endpoint Security and Control
11.4 Re-enable tamper protection
Important: If a management console is used to administer Sophos Endpoint Security and Controlon this computer, it may override any changes you make here.
If you are a member of the SophosAdministrator group, you can re-enable tamper protection.
To re-enable tamper protection:
1. On the Home page, under Tamper protection, click Authenticate user.
For information about the Home page, see About the Home page (section 2).
2. In the Tamper Protection Authentication dialog box, enter the tamper protection passwordand click OK.
3. On the Home page, under Tamper protection, click Configure tamper protection.
4. In the Tamper Protection Configuration dialog box, select the Enable tamper protectioncheck box.
11.5 About the tamper protection password
When tamper protection is enabled, you must enter the tamper protection password if you wantto configure on-access scanning, configure suspicious behavior detection, or disable tamperprotection. You must be a member of the SophosAdministrator group to do this.
You need to enter the tamper protection password only once after you open Sophos EndpointSecurity and Control. If you close Sophos Endpoint Security and Control and then open it again,you will need to enter the password again.
If you want to uninstall any of the Sophos Endpoint Security and Control components, you mustenter the tamper protection password before you can disable tamper protection and then uninstallthe software.
If tamper protection is disabled but the tamper protection password has been set previously, youmust enter the password before you can re-enable tamper protection.
You will need to enter the tamper protection password to enable tamper protection if:
■ You have previously enabled tamper protection, created a tamper protection password, andthen disabled tamper protection.
■ A tamper protection password has been created in the management console, but tamperprotection is not enabled.
11.6 Enter the tamper protection password to configure the software
If you are a member of the SophosAdministrator group, you can authenticate yourself by enteringthe tamper protection password.
91
Help
To authenticate yourself:
1. On the Home page, under Tamper protection, click Authenticate user.
For information about the Home page, see About the Home page (section 2).
2. In the Tamper Protection Authentication dialog box, enter the tamper protection passwordand click OK.
11.7 Change the tamper protection password
Important: If a management console is used to administer Sophos Endpoint Security and Controlon this computer, it may override any changes you make here.
You must be a member of the SophosAdministrator group to change the tamper protectionpassword.
To change the tamper protection password:
1. If you haven’t already authenticated yourself, and the Configure tamper protection optionon the Home page is unavailable, follow the instructions in Enter the tamper protection passwordto configure the software (section 11.6) before proceeding to step 2.
2. On the Home page, under Tamper protection, click Configure tamper protection.
For information about the Home page, see About the Home page (section 2).
3. In the Tamper Protection Configuration dialog box, click Change under the Password box.
4. In the Tamper Protection Password dialog box, enter and confirm a new password.
Tip: The password should be at least eight characters long and contain numbers and mixed-caseletters.
11.8 Uninstall Sophos security software
If you are a member of the SophosAdministrator group, you can uninstall the Sophos securitysoftware using Control Panel:
■ Sophos Endpoint Security and Control components (Sophos Anti-Virus, Sophos Client Firewall,Sophos AutoUpdate, Sophos Remote Management System)
■ Sophos SafeGuard Disk Encryption
To uninstall Sophos security software when tamper protection is enabled:
1. On the Home page, under Tamper protection, click Authenticate user.
For information about the Home page, see About the Home page (section 2).
2. In the Tamper Protection Authentication dialog box, enter the tamper protection passwordand click OK.
3. On the Home page, under Tamper protection, click Configure tamper protection.
92
Sophos Endpoint Security and Control
4. In the Tamper Protection Configuration dialog box, clear the Enable tamper protectioncheck box and click OK.
Tamper protection is disabled.
5. In Control Panel, open Add or Remove Programs, locate the software you want to removeand click Change/Remove or Remove. Follow the instructions on screen for uninstalling thesoftware.
11.9 View the tamper protection log
The tamper protection log shows two types of event:
■ Successful tamper protection authentication events, showing the name of the authenticateduser and the time of authentication.
■ Failed attempts to tamper, showing the name of the targeted Sophos product or component,the time of the attempt, and the details of the user responsible for the attempt.
You must be a member of the SophosAdministrator group to view the tamper protection log.
To view the tamper protection log:
■ On the Home page, under Tamper protection, click View tamper protection log.
For information about the Home page, see About the Home page (section 2).
From the log page, you can copy the log to the clipboard, or email, or print the log.
To find specific text in the log, click Find and enter the text you want to find.
93
Help
12 Troubleshooting
12.1 Updating has failed
12.1.1 About update failures
To find out more about an update failure, look at the update log: for information on how to dothis, see View the updating log file (section 10.9).
The sections below explain why updating may fail, and how you can change the settings to correctthe problem.
■ Sophos Endpoint Security and Control contacts the wrong source for updates (section 12.1.2)
■ Sophos Endpoint Security and Control cannot use your proxy server (section 12.1.3)
■ Automatic updating is not correctly scheduled (section 12.1.4)
■ The source for updates is not being maintained (section 12.1.5)
12.1.2 Sophos Endpoint Security and Control contacts the wrong source forupdates
1. On the Configure menu, click Updating.
2. On the Primary location tab, check that the address and account details are those supplied byyour administrator.
For information on configuring the Primary location tab, see Set a source for updates (section10.3).
12.1.3 Sophos Endpoint Security and Control cannot use your proxy server
If Sophos Endpoint Security and Control updates itself via the internet, you must make sure thatit can use your proxy server (if there is one).
1. On the Configure menu, click Updating.
2. On the Primary location tab, click Proxy Details.
3. Ensure that the proxy server address, the port number, and the account details are correct.
For information on entering proxy details, see Update via a proxy server (section 10.5).
94
Sophos Endpoint Security and Control
12.1.4 Automatic updating is not correctly scheduled
1. On the Configure menu, click Updating.
2. Click the Schedule tab. (For information on the Schedule tab, see Schedule updates (section10.2).)
3. If your computer is networked, or if you update via a broadband internet connection, selectEnable automatic updates and enter the updating frequency. If you update via a dial-upconnection, select Check for updates on dial-up.
12.1.5 The source for updates is not being maintained
Your company may have moved the directory (on the network or on a web server) from whichyou should update. Alternatively, they may not be maintaining the directory.
If you think this may be the case, contact your network administrator.
12.2 Threat not cleaned
If Sophos Anti-Virus has not cleaned a threat from your computer, it may be because of thefollowing.
Automatic cleanup is disabled
If Sophos Anti-Virus has not attempted cleanup, check that automatic cleanup has been enabled.For information on enabling automatic cleanup, see the following topics:
■ Configure on-access cleanup (section 4.2.4)
■ Configure right-click cleanup (section 4.3.5.2)
■ Configure cleanup for a custom scan (section 4.3.6.4)
Automatic cleanup of adware and PUAs is not available for on-access scanning.
Cleanup failed
If Sophos Anti-Virus could not clean a threat ("Cleanup failed"), it may be that it cannot cleanthat type of threat, or you have insufficient access rights.
Full computer scan is required
You may need to run a full computer scan to determine all components of a multi-componentthreat, or to detect a threat in files that were previously hidden, before Sophos Anti-Virus canclean it from your computer.
1. To scan all disk drives, including boot sectors, on the computer, run the Scan my computerscan. For information, see Run a full computer scan (section 4.3.7).
95
Help
2. If the threat has still not been fully detected, it may be because you have insufficient accessrights, or some drives or folders on the computer, containing the threat’s components, areexcluded from scanning. For information, see Add, edit, or delete on-access scanning exclusions(section 4.2.7). Check the list of the items excluded from scanning. If there are some items onthe list, remove them from the list and scan your computer again.
Removable medium is write-protected
If dealing with a removable medium (e.g. floppy disk, CD), make sure that it is not write-protected.
NTFS volume is write-protected
If dealing with files on an NTFS volume (Windows 2000 or later), make sure that it is notwrite-protected.
Virus/spyware fragment has been reported
Sophos Anti-Virus does not clean a virus/spyware fragment because it has not found an exactvirus/spyware match. Refer to Virus/spyware fragment reported (section 12.3).
12.3 Virus/spyware fragment reported
If a virus/spyware fragment is reported, do the following:
1. Update your protection immediately, so that Sophos Anti-Virus has the latest virus identityfiles.
2. Run a full computer scan.
■ Update immediately (section 10.1)
■ Run a full computer scan (section 4.3.7)
If virus/spyware fragments are still reported, contact Sophos technical support for advice.
■ Technical support (section 14)
The report of a virus/spyware fragment indicates that part of a file matches part of a virus or itemof spyware. There are three possible causes:
Variant of a known virus or item of spyware
Many new viruses or items of spyware are based on existing ones, so that code fragments typicalof a known virus or item of spyware may appear as part of a new one. If a virus/spyware fragmentis reported, it is possible that Sophos Anti-Virus has detected a new virus or item of spyware,which could become active.
Corrupted virus
Many viruses contain bugs in their replication routines that cause them to infect target filesincorrectly. An inactive portion of the virus (possibly a substantial part) may appear within thehost file, and this is detected by Sophos Anti-Virus. A corrupted virus cannot spread.
96
Sophos Endpoint Security and Control
Database containing a virus or item of spyware
When running a full computer scan, Sophos Anti-Virus may report that there is a virus/spywarefragment in a database file. If this is the case, do not delete the database. Contact Sophos technicalsupport for advice.
For information about contacting technical support, see Technical support (section 14).
12.4 Threat partially detected
To scan all disk drives, including boot sectors, on the computer, run a full computer scan.
■ Run a full computer scan (section 4.3.7)
If the threat has still not been fully detected, it may be because some drives or folders on thecomputer, containing the threat’s components, are excluded from scanning. If there are some ofthese items on the exclusion list, remove them, and then scan your computer again.
■ Add, edit, or delete on-demand scanning exclusions (section 4.3.3)
If the threat has still not been fully detected, it may be because you have insufficient access rights.
Sophos Anti-Virus may not be able to fully detect or remove threats with components installedon network drives.
12.5 Adware or PUA disappeared from quarantine
If an item of adware or PUA detected by Sophos Anti-Virus has disappeared from Quarantinemanager without you taking any action, the adware or PUA might have been authorized or cleanedup from the management console or by another user. Check the list of authorized adware andPUAs to see if it has been authorized. To find out how to do this, refer to Authorize adware andPUAs (section 4.7.1).
12.6 Computer becomes slow
If your computer has become very slow, it may be that you have a PUA running on and monitoringyour computer. If you have on-access scanning enabled, you may also see many desktop alertswarning about a PUA. To solve the problem, do the following.
1. Run the Scan my computer scan to detect all components of the PUA. For information, seeRun a full computer scan (section 4.3.7).
Note: If after the scan the PUA is partially detected, refer to Threat partially detected (section12.4), step 2.
2. Clean the adware or PUA from your computer. To find out how to do this, refer to Deal withadware and PUAs in quarantine (section 4.8.4).
97
Help
12.7 Allow access to drives with infected boot sectors
Important: If a management console is used to administer Sophos Endpoint Security and Controlon this computer, it may override any changes you make here.
By default, Sophos Anti-Virus prevents access to removable disks whose boot sectors are infected.
To allow access (for example, to copy files from a floppy disk infected with a boot sector virus):
1. Click Home > Anti-virus and HIPS > Configure anti-virus and HIPS > Configure >On-access scanning .
2. On the Scanning tab, select Allow access to drives with infected boot sectors check box.
Important: As soon as you have finished accessing the disk, clear the check box, and then removethe disk from the computer so that it cannot try to re-infect the computer on restart.
12.8 Unable to access areas of Sophos Endpoint Security and Control
If you are unable to use or configure particular areas of Sophos Endpoint Security and Control itmight be because access to these areas is restricted to members of particular Sophos user groups.
For more information about Sophos user groups, see About Sophos groups (section 3.1).
12.9 Recovering from virus side-effects
Recovery from virus infection depends on how the virus infected the computer.
Virus side-effects
Some viruses leave you with no side-effects to deal with, others may have such extreme side-effectsthat you have to restore a hard disk in order to recover.
Some viruses gradually make minor changes to data. This type of corruption can be hard to detect.
What to do
It is very important that you read the threat analysis on the Sophos website, and check documentscarefully after cleanup. Refer to Get cleanup information (section 4.9.2) to find out how to viewdetails on the Sophos website of the virus’s side-effects.
Sound backups are crucial. If you did not have them before you were infected, start keeping themin case of future infections.
Sometimes you can recover data from disks damaged by a virus. Sophos can supply utilities forrepairing the damage caused by some viruses.
Contact Sophos technical support for advice.
For information about contacting technical support, see Technical support (section 14).
98
Sophos Endpoint Security and Control
12.10 Recovering from adware and PUA side-effects
Removing adware and PUAs may have some side-effects that cannot be eliminated during cleanup.
Operating system has been modified
Some items of adware and PUAs modify the Windows operating system, for example, change yourinternet connection settings. Sophos Anti-Virus cannot always restore all settings to the valuesthey had before installation of the adware or PUA. If, for example, an item of adware or PUAchanged the browser home page, then Sophos Anti-Virus cannot know what the previous homepage setting was.
Utilities not cleaned
Some items of adware and PUAs can install utilities, such as .dll or .ocx files, on your computer.If a utility is harmless (that is, it does not possess the qualities of adware and PUAs), for example,a language library, and is not integral to the adware or PUA, Sophos Anti-Virus may not detect itas part of the adware or PUA. In this case, the file is not removed from your computer even afterthe adware or PUA that installed the file has been cleaned from the computer.
Adware or PUA is part of a program you need
Sometimes an item of adware or PUA is part of a program that you intentionally installed, andneeds to be there for the program to run. If you remove the adware or PUA, the program maystop running on your computer.
What to do
It is very important that you read the threat analysis on the Sophos website. Refer to Get cleanupinformation (section 4.9.2) to find out how to view details on the Sophos website of the adwareor PUA’s side-effects.
To be able to recover your system and its settings to their previous state, you should maintainregular backups of your system. You should also make backup copies of the original executablefiles of the programs you want to use.
For more information or advice on recovering from adware and PUA side-effects, contact Sophostechnical support.
For information about contacting technical support, see Technical support (section 14).
12.11 Password error reported
If you are trying to schedule a custom scan, and an error message is displayed about the password,make sure of the following:
■ The password is correct for the user account
■ The password is not blank
99
Help
To make sure that the password is correct, check the properties of the user account in UserAccounts in Control Panel.
12.12 "Service failure" error message
Symptoms
You see one of the following error messages in the notification area:
■ Anti-virus and HIPS: service failure
■ Firewall: service failure
Causes
One of the Sophos Endpoint Security and Control services on your computer has failed, and needsto be restarted.
Resolve the problem
1. Using Windows, open Services.
2. Do one of the following:
■ If you see an Anti-virus and HIPS: service failure error message, right-clickSophos Anti-Virus, and then click Restart.
■ If you see a Firewall: service failure error message, right-click Sophos ClientFirewall Manager, and then click Restart.
Notes
■ To open Services, click Start, click Control Panel, double-click Administrative Tools, andthen double-click Services.
12.13 Firewall log database is corrupted
Symptom
Whilst using the firewall log viewer, you see the error message "The current Sophos Client Firewalllog database is corrupted."
Cause
The firewall's event log database has become corrupted and needs to be recreated.
Resolve the problem
You need to be a member of the Windows Administrators group on this computer to do this.
1. Using Windows, open Services.
100
Sophos Endpoint Security and Control

2. Right-click Sophos Client Firewall Manager, and then click Stop.
3. Using Windows Explorer, navigate to C:\Documents and Settings\All Users\ApplicationData\Sophos\Sophos Client Firewall\logs.
To view this hidden folder, you may need to display hidden files and folders in WindowsExplorer.
4. Delete op_data.mdb.
5. In Services, right-click Sophos Client Firewall Manager, and then click Restart.
Notes
■ To open Services, click Start, click Control Panel, double-click Administrative Tools, andthen double-click Services.
101
Help
13 Glossary
Adware displays advertising, for example, pop-up messages, whichaffects user productivity and system efficiency. A potentially unwanted
adware and PUAs
application (PUA) is an application that is not inherently maliciousbut is generally considered unsuitable for the majority of businessnetworks.
A rule that applies only to packets of data transferred over the networkto or from a particular application.
application rule
The module that enables you to authorize adware and PUAs, suspiciousfiles, and applications that exhibit suspicious behavior and bufferoverflows.
Authorizationmanager
Cleanup that is performed without any intervention or acceptance byyou.
automatic cleanup
A status showing that applications (including hidden processes),connections, protocols, ICMP messages, and so on have been refusednetwork access.
blocked
Detects buffer overflow attacks.buffer overflowdetection
Each version of an application has a unique checksum. The firewallcan use this checksum to decide whether an application is allowed ornot.
checksum
Cleanup eliminates threats on your computer by removing a virusfrom a file or boot sector, moving or deleting a suspicious file, or
cleanup
deleting an item of adware or PUA. It is not available for threats thatare detected by web page scanning because the threats are notdownloaded to your computer. Therefore, there is no need to take anyaction.
A set of conditions that specify file content, for example, credit or debitcard numbers, or bank account details near to other forms of personally
Content Control List(CCL)
identifiable information. There are two types of Content Control List:SophosLabs Content Control List and custom Content Control List.
A rule that contains one or more Content Control Lists and specifiesthe action that is taken if the user attempts to transfer data that matchesall the Content Control Lists in the rule to the specified destination.
content rule
102
Sophos Endpoint Security and Control
An application that is prevented from running on your computer byyour organisation's security policy.
controlledapplication
A rule created by the user to specify the circumstances under which anapplication is allowed to run.
custom rule
A feature to reduce accidental data loss from workstations. It worksby taking action when a workstation user tries to transfer a file that
data control
meets criteria defined in the data control policy and rules. For example,when a user attempts to copy a spreadsheet containing a list of customerdata to a removable storage device or upload a document marked asconfidential into a webmail account, data control will block the transfer,if configured to do so.
The view that displays different data depending on the item selectedin the tree view.
data view
A bar in the log viewer which appears above the data view and containsthe name of the currently selected item in the tree view.
description bar
A feature to reduce accidental data loss from workstations and restrictintroduction of software from outside of the network. It works by
device control
taking action when a workstation user tries to use an unauthorizedstorage device or networking device on their workstation.
Scans every part of every file.extensive scanning
A situation that occurs when an unknown application, or the operatingsystem, on one computer tries to communicate with another computer
firewall event
over a network connection in a way that was not specifically requestedby the applications running on the other computer.
The settings issued by the management console which the firewall usesto monitor the computer's connection to the internet and othernetworks.
firewall policy
Rules that are applied to all network connections and applicationswhich do not already have a rule. They take lower priority than the
global rules
rules set on the LAN page. They also take lower priority than applicationrules (unless the user specifies otherwise).
103
Help
An application sometimes launches a hidden process to perform somenetwork access for it. Malicious applications may use this technique
hidden process
to evade firewalls: they launch a trusted application to access thenetwork rather than doing so themselves.
A rule that is applied before any other global or application rule.high-priority globalrule
Overall term for pre-execution behavior analysis and runtime behavioranalysis.
Host IntrusionPrevention System(HIPS)
Abbreviation for "Internet Control Message Protocol." A network-layerinternet protocol that provides error correction and other informationrelevant to IP packet processing.
ICMP
The settings that specify which types of network managementcommunication are allowed.
ICMP settings
A category of controlled applications that includes instant messagingclient applications (e.g. MSN).
instant messaging
The mode in which the firewall displays one or more learning dialogswhen it detects network traffic for which it has no rule.
interactive mode
A dialog box that asks the user to choose whether to allow or blocknetwork activity when an unknown application requests network access.
learning dialog
The settings that control when records are deleted.log cleanup settings
A form where users can view details from the event database, such asconnections that have been allowed or blocked, the system log and anyalerts that have been raised.
log viewer
Cleanup that is performed by using special disinfectors or utilities, orby deleting files manually.
manual cleanup
Equal the content that is defined in a Content Control List.match
Abbreviation for "Network Basic Input/Output System." Software thatprovides an interface between the operating system, the I/O bus, andthe network. Nearly all Windows-based LANs are based on NetBIOS.
NetBIOS
104
Sophos Endpoint Security and Control
A set of rules or standards designed to enable computers to connectwith one another over a network and to exchange information with aslittle error as possible.
network protocol
The mode in which the firewall either blocks or allows all networktraffic for which it has no rule.
non-interactive mode
Scans only those parts of each file that are likely to be infected with avirus.
normal scanning
Your main method of protection against threats. Whenever you copy,move, or open a file, or start a program, Sophos Anti-Virus scans the
on-access scan
file or program and grants access to it only if it does not pose a threatto your computer or has been authorized for use.
A scan that you initiate. You can use an on-demand scan to scananything from a single file to everything on your computer that youhave permission to read.
on-demand scan
The firewall configuration used for the corporate network that the userconnects to for their day-to-day business.
primaryconfiguration
The settings that specify whether modified or hidden processes shouldbe allowed network access.
process settings
The module that enables you to view and deal with items that havebeen quarantined.
Quarantine manager
Rawsockets allow processes to control all aspects of the data they sendover the network and can be used for malicious purposes.
rawsocket
A scan of file(s) in Windows Explorer or on the desktop that you runusing the shortcut menu.
right-click scan
A Trojan or technology that is used to hide the presence of a maliciousobject (process, file, registry key, or network port) from the computeruser or administrator.
rootkit
Dynamic analysis performed by suspicious behavior detection andbuffer overflow detection.
runtime behavioranalysis
An error in scanning a file, e.g. access denied.scanning error
105
Help
A scan of your computer, or parts of your computer, that runs at settimes.
scheduled scan
The firewall configuration used when users are not connected to themain corporate network, but to another network such as a hotel orairport wireless network or another corporate network.
secondaryconfiguration
A program that installs itself onto a user’s computer by stealth,subterfuge, or social engineering, and sends information from thatcomputer to a third party without the user’s permission or knowledge.
spyware
A feature that uses in-the-cloud technology to instantly decide whethera suspicious file is a threat and take action specified in the Sophosanti-virus cleanup configuration.
Sophos LiveProtection
Firewall technology that keeps a table of active TCP and UDP networkconnections. Only packets matching a known connection state will beallowed by the firewall; others will be rejected.
stateful inspection
Removable storage devices (for example, USB flash drives, PC Cardreaders, and external hard disk drives), CD/DVD drives, floppy disk
storage device
drives, and secure removable storage devices (for example, SanDiskCruzer Enterprise, Kingston Data Traveller, IronKey Enterprise, andIronKey Basic USB flash drives with hardware encryption).
Dynamic analysis of the behavior of all programs running on the systemin order to detect and block activity which appears to be malicious.
suspicious behaviordetection
A file that exhibits a combination of characteristics that are commonly,but not exclusively, found in viruses.
suspicious file
The memory that acts as a bridge between applications and the actualdata processing done at the hardware level. It is used by the operatingsystem.
system memory
A rule that will be applied to all applications and will allow or blocklow-level system network activity.
system rule
A feature that prevents unauthorized users (local administrators andusers with limited technical knowledge) and known malware from
tamper protection
uninstalling Sophos security software or disabling it through the SophosEndpoint Security and Control interface.
Detection or disinfection of a threat.threat event
106
Sophos Endpoint Security and Control
The view that controls what data the log viewer displays in its dataview.
tree view
The file type that is ascertained by analyzing the structure of a file asopposed to the filename extension. This is a more reliable method.
true file type
An application that is allowed full and unconditional access to thenetwork.
trusted application
A virus for which there is no specific identity.unidentified virus
A form of network access by an application or service for which thefirewall has no rule.
unknown traffic
A file that enables Sophos Anti-Virus to detect and disinfect a particularvirus, Trojan, or worm.
virus identity file(IDE)
A category of controlled applications that includes Voice over IP clientapplications.
Voice over IP
A feature that allows you to set and enforce web access policies for yourorganization, and to view reports on web browsing usage. You can
web control
allow or block user access to certain categories of websites, and userscan also be warned whether visiting a website will violate your policies.
A feature that detects threats in web pages. This feature blocks sitesthat have hosted malicious content in the past and also prevents
web protection
malicious downloads. Web protection is part of the anti-virus andHIPS policy.
The setting that determines whether the firewall applies actions withinput from the user (interactive mode) or automatically (thenon-interactive modes).
working mode
107
Help
14 Technical support
You can find technical support for Sophos products in any of these ways:
■ Visit the SophosTalk community at community.sophos.com/ and search for other users who areexperiencing the same problem.
■ Visit the Sophos support knowledgebase at www.sophos.com/en-us/support.aspx.
■ Download the product documentation at www.sophos.com/en-us/support/documentation/.
■ Send an email to [email protected], including your Sophos software version number(s),operating system(s) and patch level(s), and the text of any error messages.
108
Sophos Endpoint Security and Control
15 Legal notices
Copyright © 1989–2013 Sophos Limited. All rights reserved. No part of this publication may bereproduced, stored in a retrieval system, or transmitted, in any form or by any means, electronic,mechanical, photocopying, recording or otherwise unless you are either a valid licensee where thedocumentation can be reproduced in accordance with the license terms or you otherwise havethe prior permission in writing of the copyright owner.
Sophos, Sophos Anti-Virus and SafeGuard are registered trademarks of Sophos Limited, SophosGroup and Utimaco Safeware AG, as applicable.All other product and company names mentionedare trademarks or registered trademarks of their respective owners.
Apache
The Sophos software that is described in this document may include some software programs thatare licensed (or sublicensed) to the user under the Apache License. A copy of the license agreementfor any such included software can be found at http://www.apache.org/licenses/LICENSE-2.0
Common Public License
The Sophos software that is referenced in this document includes or may include some softwareprograms that are licensed (or sublicensed) to the user under the Common Public License (CPL),which, among other rights, permits the user to have access to the source code. The CPL requiresfor any software licensed under the terms of the CPL, which is distributed in object code form,that the source code for such software also be made available to the users of the object code form.For any such software covered under the CPL, the source code is available via mail order bysubmitting a request to Sophos; via email to [email protected] or via the web athttp://www.sophos.com/en-us/support/contact-support/contact-information.aspx. A copy of thelicense agreement for any such included software can be found athttp://opensource.org/licenses/cpl1.0.php
ConvertUTF
Copyright 2001–2004 Unicode, Inc.
This source code is provided as is by Unicode, Inc. No claims are made as to fitness for anyparticular purpose. No warranties of any kind are expressed or implied. The recipient agrees todetermine applicability of information provided. If this file has been purchased on magnetic oroptical media from Unicode, Inc., the sole remedy for any claim will be exchange of defectivemedia within 90 days of receipt.
Unicode, Inc. hereby grants the right to freely use the information supplied in this file in thecreation of products supporting the Unicode Standard, and to make copies of this file in any formfor internal or external distribution as long as this notice remains attached.
dtoa.c
The author of this software is David M. Gay.
109
Help
Copyright © 1991, 2000 by Lucent Technologies.
Permission to use, copy, modify, and distribute this software for any purpose without fee is herebygranted, provided that this entire notice is included in all copies of any software which is or includesa copy or modification of this software and in all copies of the supporting documentation for suchsoftware.
THIS SOFTWARE IS BEING PROVIDED "AS IS", WITHOUT ANY EXPRESS OR IMPLIEDWARRANTY. IN PARTICULAR, NEITHER THE AUTHOR NOR LUCENT MAKES ANYREPRESENTATION OR WARRANTY OF ANY KIND CONCERNING THE MERCHANTABILITYOF THIS SOFTWARE OR ITS FITNESS FOR ANY PARTICULAR PURPOSE.
ICU
ICU version 1.8.1 or later
COPYRIGHT AND PERMISSION NOTICE
Copyright © 1995–2008 International Business Machines Corporation and others
All rights reserved.
Permission is hereby granted, free of charge, to any person obtaining a copy of this software andassociated documentation files (the "Software"), to deal in the Software without restriction,including without limitation the rights to use, copy, modify, merge, publish, distribute, and/orsell copies of the Software, and to permit persons to whom the Software is furnished to do so,provided that the above copyright notice(s) and this permission notice appear in all copies of theSoftware and that both the above copyright notice(s) and this permission notice appear insupporting documentation.
THE SOFTWARE IS PROVIDED "AS IS", WITHOUT WARRANTY OF ANY KIND, EXPRESSOR IMPLIED, INCLUDING BUT NOT LIMITED TO THE WARRANTIES OFMERCHANTABILITY, FITNESS FOR A PARTICULAR PURPOSE AND NONINFRINGEMENTOF THIRD PARTY RIGHTS. IN NO EVENT SHALL THE COPYRIGHT HOLDER OR HOLDERSINCLUDED IN THIS NOTICE BE LIABLE FOR ANY CLAIM, OR ANY SPECIAL INDIRECTOR CONSEQUENTIAL DAMAGES, OR ANY DAMAGES WHATSOEVER RESULTING FROMLOSS OF USE, DATA OR PROFITS,WHETHER IN AN ACTION OF CONTRACT, NEGLIGENCEOR OTHER TORTIOUS ACTION, ARISING OUT OF OR IN CONNECTION WITH THE USEOR PERFORMANCE OF THIS SOFTWARE.
Except as contained in this notice, the name of a copyright holder shall not be used in advertisingor otherwise to promote the sale, use or other dealings in this Software without prior writtenauthorization of the copyright holder.
All trademarks and registered trademarks mentioned herein are the property of their respectiveowners.
IEEE Software Taggant Library
This software was developed by The Institute of Electrical and Electronics Engineers, Incorporated(IEEE), through the Industry Connections Security Group (ICSG) of its Standards Association.
110
Sophos Endpoint Security and Control
Portions of it include software developed by the OpenSSL Project for use in the OpenSSL Toolkit(http://www.openssl.org/), and those portions are governed by the OpenSSL Toolkit License.
IEEE License
Copyright (c) 2012 IEEE. All rights reserved.
Redistribution and use in source and binary forms, with or without modification, are permittedprovided that the following conditions are met:
1. Redistributions of source code must retain the above copyright notice, this list of conditionsand the following disclaimer.
2. Redistributions in binary form must reproduce the above copyright notice, this list of conditionsand the following disclaimer in the documentation and/or other materials provided with thedistribution.
3. All advertising materials mentioning features or use of this software must display the followingacknowledgment:
"This product includes software developed by the IEEE Industry Connections Security Group(ICSG)".
4. The name "IEEE" must not be used to endorse or promote products derived from this softwarewithout prior written permission from the IEEE Standards Association ([email protected]).
5. Products derived from this software may not contain "IEEE" in their names without priorwritten permission from the IEEE Standards Association ([email protected]).
6. Redistributions of any form whatsoever must retain the following acknowledgment:
"This product includes software developed by the IEEE Industry Connections Security Group(ICSG)".
THIS SOFTWARE IS PROVIDED "AS IS" AND "WITH ALL FAULTS." IEEE AND ITSCONTRIBUTORS EXPRESSLY DISCLAIM ALL WARRANTIES AND REPRESENTATIONS,EXPRESS OR IMPLIED, INCLUDING, WITHOUT LIMITATION: (A) THE IMPLIEDWARRANTIES OF MERCHANTABILITY AND FITNESS FOR A PARTICULAR PURPOSE; (B)ANY WARRANTY OF NON-INFRINGEMENT; AND (C) ANY WARRANTY WITH RESPECTTO THE QUALITY, ACCURACY, EFFECTIVENESS, CURRENCY OR COMPLETENESS OFTHE SOFTWARE.
IN NO EVENT SHALL IEEE OR ITS CONTRIBUTORS BE LIABLE FOR ANY DIRECT,INDIRECT, INCIDENTAL, SPECIAL, EXEMPLARY, OR CONSEQUENTIAL DAMAGES,(INCLUDING, BUT NOT LIMITED TO, PROCUREMENT OF SUBSTITUTE GOODS ORSERVICES; LOSS OF USE, DATA, OR PROFITS; OR BUSINESS INTERRUPTION) HOWEVERCAUSED AND ON ANY THEORY OF LIABILITY, WHETHER IN CONTRACT, STRICTLIABILITY, OR TORT (INCLUDING NEGLIGENCE OR OTHERWISE) ARISING IN ANY WAYOUT OF THE USE OF THIS SOFTWARE, EVEN IF ADVISED OF THE POSSIBILITY OF SUCHDAMAGE AND REGARDLESS OF WHETHER SUCH DAMAGE WAS FORESEEABLE.
THIS SOFTWARE USES STRONG CRYPTOGRAPHY, WHICH MAY BE SUBJECT TO LAWSAND REGULATIONS GOVERNING ITS USE, EXPORTATION OR IMPORTATION. YOU ARESOLELY RESPONSIBLE FOR COMPLYING WITH ALL APPLICABLE LAWS AND
111
Help
REGULATIONS, INCLUDING, BUT NOT LIMITED TO, ANY THAT GOVERN YOUR USE,EXPORTATION OR IMPORTATION OF THIS SOFTWARE. IEEE AND ITS CONTRIBUTORSDISCLAIM ALL LIABILITY ARISING FROM YOUR USE OF THE SOFTWARE IN VIOLATIONOF ANY APPLICABLE LAWS OR REGULATIONS.
Info-ZIP
Copyright © 1990–2005 Info-ZIP. All rights reserved.
For the purposes of this copyright and license, “Info-ZIP” is defined as the following set ofindividuals:
Mark Adler, John Bush, Karl Davis, Harald Denker, Jean-Michel Dubois, Jean-loup Gailly, HunterGoatley, Ed Gordon, Ian Gorman, Chris Herborth, Dirk Haase, Greg Hartwig, Robert Heath,Jonathan Hudson, Paul Kienitz, David Kirschbaum, Johnny Lee, Onno van der Linden, IgorMandrichenko, Steve P. Miller, Sergio Monesi, Keith Owens, George Petrov, Greg Roelofs, KaiUwe Rommel, Steve Salisbury, Dave Smith, Steven M. Schweda, Christian Spieler, Cosmin Truta,Antoine Verheijen, Paul von Behren, Rich Wales, Mike White
This software is provided “as is,” without warranty of any kind, express or implied. In no eventshall Info-ZIP or its contributors be held liable for any direct, indirect, incidental, special orconsequential damages arising out of the use of or inability to use this software.
Permission is granted to anyone to use this software for any purpose, including commercialapplications, and to alter it and redistribute it freely, subject to the following restrictions:
1. Redistributions of source code must retain the above copyright notice, definition, disclaimer,and this list of conditions.
2. Redistributions in binary form (compiled executables) must reproduce the above copyrightnotice, definition, disclaimer, and this list of conditions in documentation and/or other materialsprovided with the distribution. The sole exception to this condition is redistribution of astandard UnZipSFX binary (including SFXWiz) as part of a self-extracting archive; that ispermitted without inclusion of this license, as long as the normal SFX banner has not beenremoved from the binary or disabled.
3. Altered versions—including, but not limited to, ports to new operating systems, existing portswith new graphical interfaces, and dynamic, shared, or static library versions—must be plainlymarked as such and must not be misrepresented as being the original source. Such alteredversions also must not be misrepresented as being Info-ZIP releases—including, but not limitedto, labeling of the altered versions with the names “Info- ZIP” (or any variation thereof,including, but not limited to, different capitalizations), “Pocket UnZip,”“WiZ” or “MacZip”without the explicit permission of Info-ZIP. Such altered versions are further prohibited frommisrepresentative use of the Zip-Bugs or Info-ZIP e-mail addresses or of the Info-ZIP URL(s).
4. Info-ZIP retains the right to use the names “Info-ZIP,”“Zip,”“UnZip,”“UnZipSFX,”“WiZ,”“Pocket UnZip,”“Pocket Zip,” and “MacZip” for its own source and binary releases.
112
Sophos Endpoint Security and Control
Lua
The Sophos software that is described in this document may include some software programs thatare licensed (or sublicensed) to the user under the Lua License. A copy of the license agreementfor any such included software can be found at http://www.lua.org/copyright.html
mt19937ar.c
Copyright (c) 1997–2002 Makoto Matsumoto and Takuji Nishimura. All rights reserved.
Redistribution and use in source and binary forms, with or without modification, are permittedprovided that the following conditions are met:
1. Redistributions of source code must retain the above copyright notice, this list of conditionsand the following disclaimer.
2. Redistributions in binary form must reproduce the above copyright notice, this list of conditionsand the following disclaimer in the documentation and/or other materials provided with thedistribution.
3. The names of its contributors may not be used to endorse or promote products derived fromthis software without specific prior written permission.
THIS SOFTWARE IS PROVIDED BY THE COPYRIGHT HOLDERS AND CONTRIBUTORS"AS IS" AND ANY EXPRESS OR IMPLIED WARRANTIES, INCLUDING, BUT NOT LIMITEDTO, THE IMPLIED WARRANTIES OF MERCHANTABILITY AND FITNESS FOR APARTICULAR PURPOSE ARE DISCLAIMED. IN NO EVENT SHALL THE COPYRIGHTOWNER OR CONTRIBUTORS BE LIABLE FOR ANY DIRECT, INDIRECT, INCIDENTAL,SPECIAL, EXEMPLARY, OR CONSEQUENTIAL DAMAGES (INCLUDING, BUT NOT LIMITEDTO, PROCUREMENT OF SUBSTITUTE GOODS OR SERVICES; LOSS OF USE, DATA, ORPROFITS; OR BUSINESS INTERRUPTION) HOWEVER CAUSED AND ON ANY THEORYOF LIABILITY, WHETHER IN CONTRACT, STRICT LIABILITY, OR TORT (INCLUDINGNEGLIGENCE OR OTHERWISE) ARISING IN ANY WAY OUT OF THE USE OF THISSOFTWARE, EVEN IF ADVISED OF THE POSSIBILITY OF SUCH DAMAGE.
OpenSSL cryptographic toolkit
The OpenSSL toolkit stays under a dual license, i.e. both the conditions of the OpenSSL Licenseand the original SSLeay license apply to the toolkit. See below for the actual license texts. Actuallyboth licenses are BSD-style Open Source licenses. In case of any license issues related to OpenSSLplease contact [email protected].
OpenSSL license
Copyright © 1998–2011 The OpenSSL Project. All rights reserved.
Redistribution and use in source and binary forms, with or without modification, are permittedprovided that the following conditions are met:
1. Redistributions of source code must retain the above copyright notice, this list of conditionsand the following disclaimer.
113
Help
2. Redistributions in binary form must reproduce the above copyright notice, this list of conditionsand the following disclaimer in the documentation and/or other materials provided with thedistribution.
3. All advertising materials mentioning features or use of this software must display the followingacknowledgment:
“This product includes software developed by the OpenSSL Project for use in the OpenSSLToolkit. (http://www.openssl.org/)”
4. The names “OpenSSL Toolkit” and “OpenSSL Project” must not be used to endorse or promoteproducts derived from this software without prior written permission. For written permission,please contact [email protected].
5. Products derived from this software may not be called “OpenSSL” nor may “OpenSSL” appearin their names without prior written permission of the OpenSSL Project.
6. Redistributions of any form whatsoever must retain the following acknowledgment:
“This product includes software developed by the OpenSSL Project for use in the OpenSSLToolkit (http://www.openssl.org/)”
THIS SOFTWARE IS PROVIDED BY THE OpenSSL PROJECT “AS IS” AND ANY EXPRESSEDOR IMPLIED WARRANTIES, INCLUDING, BUT NOT LIMITED TO, THE IMPLIEDWARRANTIES OF MERCHANTABILITY AND FITNESS FOR A PARTICULAR PURPOSE AREDISCLAIMED. IN NO EVENT SHALL THE OpenSSL PROJECT OR ITS CONTRIBUTORS BELIABLE FOR ANY DIRECT, INDIRECT, INCIDENTAL, SPECIAL, EXEMPLARY, ORCONSEQUENTIAL DAMAGES (INCLUDING, BUT NOT LIMITED TO, PROCUREMENT OFSUBSTITUTE GOODS OR SERVICES; LOSS OF USE, DATA, OR PROFITS; OR BUSINESSINTERRUPTION) HOWEVER CAUSED AND ON ANY THEORY OF LIABILITY, WHETHERIN CONTRACT, STRICT LIABILITY, OR TORT (INCLUDING NEGLIGENCE OR OTHERWISE)ARISING IN ANY WAY OUT OF THE USE OF THIS SOFTWARE, EVEN IF ADVISED OF THEPOSSIBILITY OF SUCH DAMAGE.
This product includes cryptographic software written by Eric Young ([email protected]). Thisproduct includes software written by Tim Hudson ([email protected]).
Original SSLeay license
Copyright © 1995–1998 Eric Young ([email protected]) All rights reserved.
This package is an SSL implementation written by Eric Young ([email protected]). Theimplementation was written so as to conform with Netscape’s SSL.
This library is free for commercial and non-commercial use as long as the following conditionsare adhered to. The following conditions apply to all code found in this distribution, be it the RC4,RSA, lhash, DES, etc., code; not just the SSL code. The SSL documentation included with thisdistribution is covered by the same copyright terms except that the holder is Tim Hudson([email protected]).
Copyright remains Eric Young’s, and as such any Copyright notices in the code are not to beremoved. If this package is used in a product, Eric Young should be given attribution as the author
114
Sophos Endpoint Security and Control
of the parts of the library used. This can be in the form of a textual message at program startupor in documentation (online or textual) provided with the package.
Redistribution and use in source and binary forms, with or without modification, are permittedprovided that the following conditions are met:
1. Redistributions of source code must retain the copyright notice, this list of conditions and thefollowing disclaimer.
2. Redistributions in binary form must reproduce the above copyright notice, this list of conditionsand the following disclaimer in the documentation and/or other materials provided with thedistribution.
3. All advertising materials mentioning features or use of this software must display the followingacknowledgement:
“This product includes cryptographic software written by Eric Young ([email protected])”
The word “cryptographic” can be left out if the routines from the library being used are notcryptographic related :-).
4. If you include any Windows specific code (or a derivative thereof) from the apps directory(application code) you must include an acknowledgement:
“This product includes software written by Tim Hudson ([email protected])”
THIS SOFTWARE IS PROVIDED BY ERIC YOUNG “AS IS” AND ANY EXPRESS OR IMPLIEDWARRANTIES, INCLUDING, BUT NOT LIMITED TO, THE IMPLIED WARRANTIES OFMERCHANTABILITY AND FITNESS FOR A PARTICULAR PURPOSE ARE DISCLAIMED. INNO EVENT SHALL THE AUTHOR OR CONTRIBUTORS BE LIABLE FOR ANY DIRECT,INDIRECT, INCIDENTAL, SPECIAL, EXEMPLARY, OR CONSEQUENTIAL DAMAGES(INCLUDING, BUT NOT LIMITED TO, PROCUREMENT OF SUBSTITUTE GOODS ORSERVICES; LOSS OF USE, DATA, OR PROFITS; OR BUSINESS INTERRUPTION) HOWEVERCAUSED AND ON ANY THEORY OF LIABILITY, WHETHER IN CONTRACT, STRICTLIABILITY, OR TORT (INCLUDING NEGLIGENCE OR OTHERWISE) ARISING IN ANY WAYOUT OF THE USE OF THIS SOFTWARE, EVEN IF ADVISED OF THE POSSIBILITY OF SUCHDAMAGE.
The license and distribution terms for any publically available version or derivative of this codecannot be changed. i.e. this code cannot simply be copied and put under another distributionlicense [including the GNU Public License.]
Simple ECMAScript Engine
Copyright © 2003, 2004, 2005, 2006, 2007 David Leonard. All rights reserved.
Redistribution and use in source and binary forms, with or without modification, are permittedprovided that the following conditions are met:
1. Redistributions of source code must retain the above copyright notice, this list of conditionsand the following disclaimer.
115
Help
2. Redistributions in binary form must reproduce the above copyright notice, this list of conditionsand the following disclaimer in the documentation and/or other materials provided with thedistribution.
3. Neither the name of David Leonard nor the names of its contributors may be used to endorseor promote products derived from this software without specific prior written permission.
THIS SOFTWARE IS PROVIDED BY THE COPYRIGHT HOLDERS AND CONTRIBUTORS“AS IS” AND ANY EXPRESS OR IMPLIED WARRANTIES, INCLUDING, BUT NOT LIMITEDTO, THE IMPLIED WARRANTIES OF MERCHANTABILITY AND FITNESS FOR APARTICULAR PURPOSE ARE DISCLAIMED. IN NO EVENT SHALL THE COPYRIGHTOWNER OR CONTRIBUTORS BE LIABLE FOR ANY DIRECT, INDIRECT, INCIDENTAL,SPECIAL, EXEMPLARY, OR CONSEQUENTIAL DAMAGES (INCLUDING, BUT NOT LIMITEDTO, PROCUREMENT OF SUBSTITUTE GOODS OR SERVICES; LOSS OF USE, DATA, ORPROFITS; OR BUSINESS INTERRUPTION) HOWEVER CAUSED AND ON ANY THEORYOF LIABILITY, WHETHER IN CONTRACT, STRICT LIABILITY, OR TORT (INCLUDINGNEGLIGENCE OR OTHERWISE) ARISING IN ANY WAY OUT OF THE USE OF THISSOFTWARE, EVEN IF ADVISED OF THE POSSIBILITY OF SUCH DAMAGE.
strcasestr.c
Copyright © 1990, 1993 The Regents of the University of California. All rights reserved.
This code is derived from software contributed to Berkeley by Chris Torek.
Redistribution and use in source and binary forms, with or without modification, are permittedprovided that the following conditions are met:
1. Redistributions of source code must retain the above copyright notice, this list of conditionsand the following disclaimer.
2. Redistributions in binary form must reproduce the above copyright notice, this list of conditionsand the following disclaimer in the documentation and/or other materials provided with thedistribution.
3. Neither the name of the University nor the names of its contributors may be used to endorseor promote products derived from this software without specific prior written permission.
THIS SOFTWARE IS PROVIDED BY THE REGENTS AND CONTRIBUTORS “AS IS” ANDANY EXPRESS OR IMPLIED WARRANTIES, INCLUDING, BUT NOT LIMITED TO, THEIMPLIED WARRANTIES OF MERCHANTABILITY AND FITNESS FOR A PARTICULARPURPOSE ARE DISCLAIMED. IN NO EVENT SHALL THE REGENTS OR CONTRIBUTORSBE LIABLE FOR ANY DIRECT, INDIRECT, INCIDENTAL, SPECIAL, EXEMPLARY, ORCONSEQUENTIAL DAMAGES (INCLUDING, BUT NOT LIMITED TO, PROCUREMENT OFSUBSTITUTE GOODS OR SERVICES; LOSS OF USE, DATA, OR PROFITS; OR BUSINESSINTERRUPTION) HOWEVER CAUSED AND ON ANY THEORY OF LIABILITY, WHETHERIN CONTRACT, STRICT LIABILITY, OR TORT (INCLUDING NEGLIGENCE OR OTHERWISE)ARISING IN ANY WAY OUT OF THE USE OF THIS SOFTWARE, EVEN IF ADVISED OF THEPOSSIBILITY OF SUCH DAMAGE.
116
Sophos Endpoint Security and Control
Unicode
UNICODE, INC. LICENSE AGREEMENT – DATA FILES AND SOFTWARE
Unicode Data Files include all data files under the directories http://www.unicode.org/Public/,http://www.unicode.org/reports/, and http://www.unicode.org/cldr/data/. Unicode Softwareincludes any source code published in the Unicode Standard or under the directorieshttp://www.unicode.org/Public/, http://www.unicode.org/reports/, andhttp://www.unicode.org/cldr/data/.
NOTICE TO USER: Carefully read the following legal agreement. BY DOWNLOADING,INSTALLING, COPYING OR OTHERWISE USING UNICODE INC.'S DATA FILES ("DATAFILES"), AND/OR SOFTWARE ("SOFTWARE"), YOU UNEQUIVOCALLY ACCEPT, ANDAGREE TO BE BOUND BY, ALL OF THE TERMS AND CONDITIONS OF THIS AGREEMENT.IF YOU DO NOT AGREE, DO NOT DOWNLOAD, INSTALL, COPY, DISTRIBUTE OR USETHE DATA FILES OR SOFTWARE.
COPYRIGHT AND PERMISSION NOTICE
Copyright © 1991–2007 Unicode, Inc. All rights reserved. Distributed under the Terms of Use inhttp://www.unicode.org/copyright.html.
Permission is hereby granted, free of charge, to any person obtaining a copy of the Unicode datafiles and any associated documentation (the "Data Files") or Unicode software and any associateddocumentation (the "Software") to deal in the Data Files or Software without restriction, includingwithout limitation the rights to use, copy, modify, merge, publish, distribute, and/or sell copiesof the Data Files or Software, and to permit persons to whom the Data Files or Software arefurnished to do so, provided that (a) the above copyright notice(s) and this permission noticeappear with all copies of the Data Files or Software, (b) both the above copyright notice(s) andthis permission notice appear in associated documentation, and (c) there is clear notice in eachmodified Data File or in the Software as well as in the documentation associated with the DataFile(s) or Software that the data or software has been modified.
THE DATA FILES AND SOFTWARE ARE PROVIDED "AS IS", WITHOUT WARRANTY OFANY KIND, EXPRESS OR IMPLIED, INCLUDING BUT NOT LIMITED TO THE WARRANTIESOF MERCHANTABILITY, FITNESS FOR A PARTICULAR PURPOSE ANDNONINFRINGEMENT OF THIRD PARTY RIGHTS. IN NO EVENT SHALL THE COPYRIGHTHOLDER OR HOLDERS INCLUDED IN THIS NOTICE BE LIABLE FOR ANY CLAIM, ORANY SPECIAL INDIRECT OR CONSEQUENTIAL DAMAGES, OR ANY DAMAGESWHATSOEVER RESULTING FROM LOSS OF USE, DATA OR PROFITS, WHETHER IN ANACTION OF CONTRACT, NEGLIGENCE OR OTHER TORTIOUS ACTION, ARISING OUTOF OR IN CONNECTION WITH THE USE OR PERFORMANCE OF THE DATA FILES ORSOFTWARE.
Except as contained in this notice, the name of a copyright holder shall not be used in advertisingor otherwise to promote the sale, use or other dealings in these Data Files or Software withoutprior written authorization of the copyright holder.
117
Help
UnRAR
The source code of UnRAR utility is freeware. This means:
1. All copyrights to RAR and the utility UnRAR are exclusively owned by the author - AlexanderRoshal.
2. The UnRAR sources may be used in any software to handle RAR archives without limitationsfree of charge, but cannot be used to re-create the RAR compression algorithm, which isproprietary. Distribution of modified UnRAR sources in separate form or as a part of othersoftware is permitted, provided that it is clearly stated in the documentation and sourcecomments that the code may not be used to develop a RAR (WinRAR) compatible archiver.
3. The UnRAR utility may be freely distributed. It is allowed to distribute UnRAR inside of othersoftware packages.
4. THE RAR ARCHIVER AND THE UnRAR UTILITY ARE DISTRIBUTED “AS IS”. NOWARRANTY OF ANY KIND IS EXPRESSED OR IMPLIED. YOU USE AT YOUR OWN RISK.THE AUTHOR WILL NOT BE LIABLE FOR DATA LOSS, DAMAGES, LOSS OF PROFITSOR ANY OTHER KIND OF LOSS WHILE USING OR MISUSING THIS SOFTWARE.
5. Installing and using the UnRAR utility signifies acceptance of these terms and conditions ofthe license.
6. If you don’t agree with terms of the license you must remove UnRAR files from your storagedevices and cease to use the utility.
Thank you for your interest in RAR and UnRAR.
Alexander L. Roshal
118
Sophos Endpoint Security and Control
Index
Aaccess rights 5, 98accessing disks 8, 98adding users to Sophos groups 6adware 8, 19–20, 23, 25, 34, 97, 99
authorizing 34automatic cleanup 20, 25scanning for 8, 19, 23
adware in quarantine, dealing with 39all files, scanning 8, 19, 23allowing 57–61, 75–76
applications 61email 57file and printer sharing 59–60FTP downloads 58hidden processes 75LAN traffic 59rawsockets 76web browsers 58
analyses of threats 44anti-virus 45–47
configuring desktop messaging 45configuring email alerting 45configuring event logging 47configuring SNMP messaging 46
applications 61, 77allowing 61blocking 61using checksums to authenticate 77
archive files, scanning 8, 19, 23authenticate applications, using checksums to 77authorized adware, blocking 34authorized PUAs, blocking 34authorizing 34–35, 42–43
adware 34buffer overflows 35, 42controlled applications 43PUAs 34
authorizing (continued)
suspicious behavior 35, 42suspicious files 35websites 35
automatic cleanup 11, 20, 25adware 20, 25PUAs 20, 25spyware 11, 20, 25suspicious files 11, 20, 25viruses 11, 20, 25
Bbandwidth used for updating, limiting 88behavior monitoring 29–30
enabling 30blocking 34, 60–61
applications 61authorized adware 34authorized PUAs 34file and printer sharing 60malicious websites 34
buffer overflows 31, 35, 42authorizing 35, 42detecting 31
Ccentral reporting, configuring 80checksum learning dialogs 66
enabling 66interactive mode 66
checksums, using to authenticate applications 77cleanup 43, 95
about 43troubleshooting 95
configuring 6, 8, 19, 23, 45–48, 80, 82central reporting 80anti-virus desktop messaging 45anti-virus email alerting 45
119
Help
configuring (continued)
anti-virus event logging 47anti-virus SNMP messaging 46custom scans 23firewall logging 82on-access scanning 8right-click scanning 19scanning log 48user rights for Quarantine manager 6
controlled applications 43, 50authorizing 43dealing with 43scanning for 50
creating custom scans 22custom scan log 28
viewing 28custom scans 22–23, 27–28
configuring 23creating 22deleting 28renaming 28running 27scheduling 27
Ddata control, temporarily disabling 53dealing with adware in quarantine 39dealing with controlled applications 43dealing with PUAs in quarantine 39dealing with spyware in quarantine 38dealing with suspicious behavior in quarantine 42dealing with suspicious files in quarantine 40dealing with viruses in quarantine 38default global rules 69
further information 69deleting custom scans 28detecting buffer overflows 31detecting malicious behavior 30detecting suspicious behavior 30device control 51–52
blocking network bridging 51controlled devices 51
disabling on-access scanning 10disabling scanning 52disabling scanning for controlled applications 50
disabling the firewall 57disabling web control 55disinfection 95
Eemail, allowing 57enabling checksum learning dialogs 66enabling on-access scanning 10encryption software 8
on-access scanning 8, 10, 12–13excluding items from on-access scanning 13excluding items from on-demand scanning 17exporting firewall configuration files 67exporting records from firewall log viewer 84–85
Ffile and printer sharing, allowing 59–60file and printer sharing, blocking 60file sharing, allowing 59–60file sharing, blocking 60filtering ICMP messages 62filtering log records 84firewall 57
disabling 57firewall configuration files 67
exporting 67importing 67
firewall log viewer 84–85exporting records 84–85
firewall logging 82configuring 82
fragment 95fragment reported, troubleshooting 96FTP downloads, allowing 58full computer scans, running 28
Ggetting cleanup information 44getting started 56
what to do first 56global rules 71, 73, 75
setting 71, 73, 75
120
Sophos Endpoint Security and Control
Hhidden processes, allowing 75HIPS 29Home page 4Host Intrusion Prevention System 29
IICMP messages 62
filtering 62information about 62
icons 22items to scan 22
immediate updating 86importing firewall configuration files 67in-the-cloud technology 31infected boot sector 8, 98information on cleanup 44interactive mode 64–66
application messages 65checksum learning dialogs 66hidden process messages 64protocol messages 65rawsocket messages 65
interactive mode, about 63interactive mode, enabling 64
LLAN traffic, allowing 59limiting bandwidth used for updating 88location awareness 77–79
about 77creating secondary configurations 79defining primary locations 78using two network adapters 77
log records 84filtering 84
log viewer 82about 82
logging updates 88
MMac viruses, scanning for 8
malicious behavior 30detecting 30
malicious websites 34protection 34
Nnon-interactive mode, changing to a 64
Oon-access and on-demand scanning, difference 8on-access scanning 8, 10, 12–13
configuring 8disabling 10enabling 10excluding items from 13specifying file extensions 12
on-demand scanning 16–17excluding items from 17specifying file extensions 16
on-demand scans, types of 15
Ppartial detection 97password error 99pre-authorizing suspicious items 35primary locations 78
defining 78primary server 86printer sharing, allowing 59–60printer sharing, blocking 60priority, scanning 23proxy server 87PUAs 8, 19–20, 23, 25, 34, 97, 99
authorizing 34automatic cleanup 20, 25scanning for 8, 19, 23
PUAs in quarantine, dealing with 39
QQuarantine manager 36
121
Help
Rrawsockets, allowing 76recovering from side-effects 99renaming custom scans 28resetting scanned file checksums 12right-click scanning 22right-click scanning, configuring 19right-click scans, running 22rootkits, scanning for 23rule 72–73
set 72–73rule priority 68run scan at lower priority 23running custom scans 27running full computer scans 28running right-click scans 22runtime behavior analysis 30
Sscanned file checksums, resetting 12scanning all files 8, 19, 23scanning archive files 8, 19, 23scanning for adware and PUAs 8, 19, 23scanning for controlled applications 50scanning for controlled applications, disabling 50scanning for Mac viruses 8scanning for rootkits 23scanning for suspicious files 8, 19, 23scanning log 48
configuring 48viewing 48
scanning single items 22scanning system memory 8, 23scheduling a scan 99scheduling custom scans 27scheduling updates 86secondary configurations 79
creating 79secondary server 87security information 44setting a rule 72–73setting global rules 71, 73, 75side-effects 99
single item scanning 22slow computer, troubleshooting 97Sophos Endpoint Security and Control 3Sophos groups 5–6
adding users to 6Sophos Live Protection 31–33
disabling 32enabling 32in-the-cloud technology 31log 33overview 31turning off 32turning on 32
specifying on-access scanning file extensions 12spyware 11, 20, 25
automatic cleanup 11, 20, 25spyware in quarantine, dealing with 38suspending scanning 52suspicious behavior 30, 35, 42
authorizing 35, 42detecting 30
suspicious behavior in quarantine, dealing with 42suspicious files 8, 11, 19–20, 23, 25, 35
authorizing 35automatic cleanup 11, 20, 25scanning for 8, 19, 23
suspicious files in quarantine, dealing with 40suspicious items, pre-authorizing 35system memory scanning 8, 23system tray icon 94
Ttamper protection 89–93
authenticating user 91changing password 92configuring the software 91disabling 90enabling 90entering password 91log 93overview 89re-enabling 91turning off 90turning on 90uninstalling Sophos Endpoint Security and Control 92
122
Sophos Endpoint Security and Control

tamper protection (continued)
uninstalling Sophos security software 92threat partially detected 97two network adapters 77
using 77types of on-demand scan 15
Uuninstalling Sophos security software 92updating 86, 88, 94updating via dial-up connection 86user groups 5, 98user rights 5, 98user rights for Quarantine manager, configuring 6
Vviewing 28, 48
custom scan log 28
viewing (continued)
scanning log 48viruses 11, 20, 25, 98
automatic cleanup 11, 20, 25recovering from side-effects 98
viruses in quarantine, dealing with 38
Wweb browsers, allowing 58web control 55
disabling 55overview 55
web protection 33overview 33
websites 35authorizing 35
working mode, changing to interactive 64
123
Help