sound editor - freelenhutho.free.fr/roxio easy media creator home/program files/roxio... · sound...
TRANSCRIPT

Sound Editor
User Guide

2
Contents
1 Getting Started 4
Welcome to Sound Editor . . . . . . . . . . . . . . . . . . . . . . . . . . . . . . . 5Starting Sound Editor . . . . . . . . . . . . . . . . . . . . . . . . . . . . . . . . . . . 5Getting to know Sound Editor . . . . . . . . . . . . . . . . . . . . . . . . . . . . 5
2 Recording from analog sources 9
Recording audio from analog sources . . . . . . . . . . . . . . . . . . . . . 10Connecting to your audio source. . . . . . . . . . . . . . . . . . . . . . . . . 10Setting recording level. . . . . . . . . . . . . . . . . . . . . . . . . . . . . . . . . 11Recording audio . . . . . . . . . . . . . . . . . . . . . . . . . . . . . . . . . . . . . 12Removing silences from your recording. . . . . . . . . . . . . . . . . . . . 13Adding track breaks to your recording. . . . . . . . . . . . . . . . . . . . . 14

Contents3
3 Editing audio and applying effects 15
Introduction . . . . . . . . . . . . . . . . . . . . . . . . . . . . . . . . . . . . . . . . 16Choosing file save/encoding options . . . . . . . . . . . . . . . . . . . . . . 16Using the waveform to edit . . . . . . . . . . . . . . . . . . . . . . . . . . . . . 18Enhancing your audio with effects. . . . . . . . . . . . . . . . . . . . . . . . 18Choosing audio effects . . . . . . . . . . . . . . . . . . . . . . . . . . . . . . . . 19
Index 22
Sound Editor User Guidewww.roxio.com

4
Getting Started
In this chapter
Welcome to Sound Editor 5
Starting Sound Editor 5
Getting to know Sound Editor 5
Getting StartedWelcome to Sound Editor 5
Welcome to Sound EditorSound Editor lets you record, preview, and modify any supported and non-licensed digital audio file format (including MP3, WAV, OGG, and WMA). Additionally, you can use Sound Editor to capture (record) audio from analog sources, including LP records and cassettes, then apply any of the included audio effects to improve and enhance your recorded audio. Finally, you can save your audio tracks for use in other Roxio projects and burning to disc!
Starting Sound EditorYou can start Sound Editor from the Roxio Home, or from the Windows Start menu.
Choose one of the following ways to start Sound Editor:
■ From Home, click Launch Sound Editor.
■ Choose Start > All Programs > Roxio > Sound Editor.
To exit Sound Editor:
■ Choose File > Exit.
Getting to know Sound EditorThis section describes the Sound Editor window and its components. The Sound Editor window provides graphical display and controls for recording, editing, previewing, saving, and burning your audio.
Sound Editor User Guidewww.roxio.com

Getting StartedGetting to know Sound Editor 6
Waveform Display/Peak Level Meters
This area displays a visual representation of your recorded or open audio tracks as a waveform. When editing your audio or applying audio effects, you will use this display to select portions of your audio. The waveform, shown in green, displays relative sound amplitude (volume) over the duration of the audio file. The decibel scale to the right and the peak level meters to the left let you monitor and set recording levels. For more information, see Setting recording level on page 11.
Tip You can right-click the dB scale to the right of the waveform to change the scale to show Sample Values.
Sound Editor User Guidewww.roxio.com

Getting StartedGetting to know Sound Editor 7
An audio time scale and scroll bar is provided below the waveform to indicate track position and let you move the currently shown region of the audio file.
Zoom Controls
These controls let you zoom the waveform display to your selected area only, or zoom the entire waveform in or out.
Transport and Volume/Mute Controls
Use the transport controls to play/pause/record (when record mode is enabled), go to the previous track break or rewind, fast forward or go to the next track break. To adjust playback volume, drag the volume slider. To mute or un-mute the sound, click the speaker button to the right of the volume slider
Record Controls
Use these controls, when recording audio from your selected source in real-time, to enable record mode and adjust the recording level. When record mode is enabled, the microphone button glows red and the Play button turns to a Record button.
Zoom In
Zoom Out
Zoom to Selection
Rewind / Previous Track
Play/Pause(or Record/Pause when
record mode is enabled) Stop
Fast Forward / Next Track
Volume
Mute/Un-Mute
Sound Editor User Guidewww.roxio.com

Getting StartedGetting to know Sound Editor 8
Track Position / Repeat Mode
To advance audio playback to a new position on the playing track, drag the track position slider. Click the button to to the right of the slider to enable repeat mode. When repeat mode is enabled, your current selection is automatically repeated during playback.
Drag slider to setrecording level
Click to enable/disable record mode
Drag slider to move track position Click to enable/disable repeat mode
Sound Editor User Guidewww.roxio.com

9
Recording from analogsources
In this chapter
Recording audio from analog sources 10
Connecting to your audio source 10
Setting recording level 11
Recording audio 12
Removing silences from your recording 13
Adding track breaks to your recording 14

Recording from analog sourcesRecording audio from analog sources 10
Recording audio from analog sourcesWith Sound Editor, you can easily capture (record) audio from analog sources (such as LPs or cassettes), via connection from your audio equipment to your computer’s sound input. With the resulting digital audio file, you can define track breaks, name tracks, and then save your recording as individual digital audio files. You can also use audio effects, such as “de-clicking” and equalization, to bring out the best in your audio. After editing, you can then use your recording in your other Roxio projects!
Note For the best representation of your audio source, audio recorded in Sound Editor is initially encoded in uncompressed WAV format. WAV files require a substantial amount of free disk space/memory—approximately 10MB is required for each minute of recorded sound.
Connecting to your audio sourceFollow this procedure to make a connection between your audio source (for example, your stereo receiver/amplifier, cassette player or microphone) and your computer.
To connect your audio source to your computer:
Tip If recording from a turntable, you will need to also use an amplifier/receiver with a Phono input. A turntable alone cannot provide enough signal strength.
1 Use appropriate cabling to connect the equipment playing your analog source (your stereo receiver or amplifier) to the Line In connection on your computer. In many cases, an RCA-to-stereo 1/8-inch cable will be the best solution, however this may vary depending on your audio equipment and computer hardware.
Warning To prevent possible equipment damage, determine the appropriate source and line out connections by referring to the manuals that came with your audio equipment.
2 Open Sound Editor.
Sound Editor User Guidewww.roxio.com
Recording from analog sourcesSetting recording level 11
3 In Sound Editor, choose your Recording Device from the Tools menu. If your sound device is listed, select it to let Sound Editor directly control the device. If you experience problems with this setting or want to use the sound mixer provided by Windows or your sound device, select Default Mapper Device.
4 If not using the Default Mapper Device as described above, choose Tools > Recording Source, and select the source to record. For example, if recording from the Line In connector on your computer, choose Line In.
Setting recording levelBefore recording you will need to adjust the recording level to ensure that your audio is not recorded too high or low. Recording at a level that is too high can cause your audio to sound distorted. If you record at a level that is too low, your audio will sound less than optimal.
To set recording level:
1 In the Sound Editor, click the Enable Record Mode button. When Record Mode is enabled, this button turns red and the Play/Pause button changes to a red Record button.
2 To set recording level, start playing your audio source (your record LP, cassette, etc.). If possible, play a selection on the source that you think has the loudest audio.
3 Verify that the Sound Editor is receiving a signal from your analog source. You should hear audio from your computer speakers and see the L (left) and R (right) meters in Sound Editor “light up” to indicate peak level.
Tip If you are using the Default Mapper Device as your Recording Device, you can adjust recording levels in the Windows Volume Mixer or the custom mixer for your audio device.
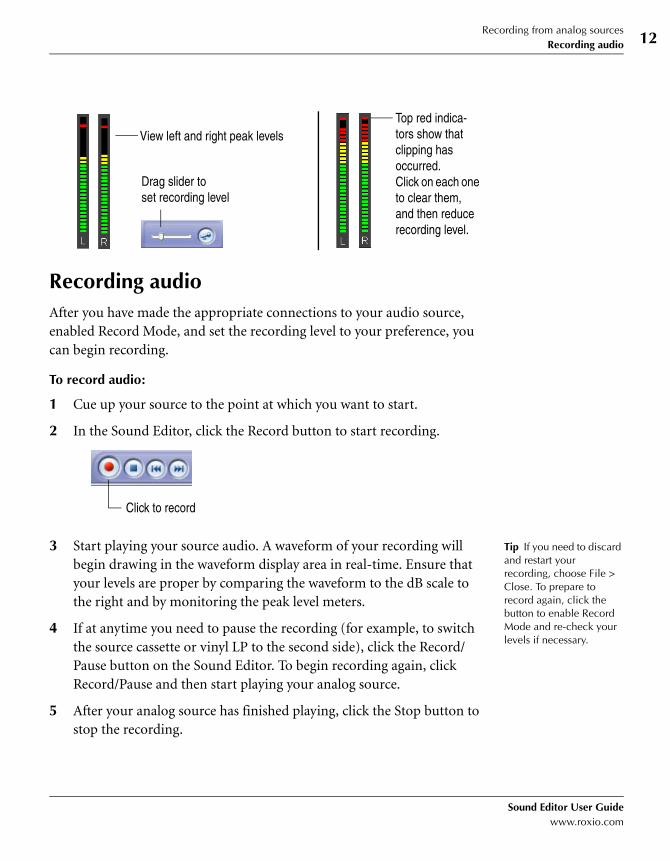
4 Adjust your recording level so that the meters indicate green with occasional peaks in yellow and few in red. A persistent red indicator at the top of the meters stay lit if the level has past the zero dB clipping point and is too “hot”— if this occurs, reduce your recording level.
Sound Editor User Guidewww.roxio.com
Recording from analog sourcesRecording audio 12
Recording audioAfter you have made the appropriate connections to your audio source, enabled Record Mode, and set the recording level to your preference, you can begin recording.
To record audio:
1 Cue up your source to the point at which you want to start.
2 In the Sound Editor, click the Record button to start recording.
Tip If you need to discard and restart your recording, choose File > Close. To prepare to record again, click the button to enable Record Mode and re-check your levels if necessary.
3 Start playing your source audio. A waveform of your recording will begin drawing in the waveform display area in real-time. Ensure that your levels are proper by comparing the waveform to the dB scale to the right and by monitoring the peak level meters.
4 If at anytime you need to pause the recording (for example, to switch the source cassette or vinyl LP to the second side), click the Record/Pause button on the Sound Editor. To begin recording again, click Record/Pause and then start playing your analog source.
5 After your analog source has finished playing, click the Stop button to stop the recording.
Drag slider toset recording level
View left and right peak levelsTop red indica-tors show that clipping has occurred.Click on each one to clear them, and then reduce recording level.
Click to record
Sound Editor User Guidewww.roxio.com

Recording from analog sourcesRemoving silences from your recording 13
6 Immediately after recording, choose File > Save and then enter your file name, choose your file type and then choose your encoding options.
Note If you plan to make further edits to your recording later, it is recommended to save your recording in WAV format to retain full audio fidelity. After making any edits and enhancements later, you can consider using one of the compressed formats (OGG, WMA, MP3) and then deleting the original WAV file to save on file size.
Removing silences from your recordingYou may have unwanted silences in your recording that you want to remove—for example, at the beginning and the end. You can easily delete these silences to further refine your recorded audio.
To remove silences:
Tip To fine tune your selection area, right-click on the selected area and then choose any of the move selection options. You can also manually select a range by clicking and dragging your mouse over the selection.
1 If not already open, open the your recorded audio file: choose File > Open, and then select the file name.
2 To delete silences at the beginning or the end of your recording, choose Edit and then select Select Leading Silence or Select Trailing Silence. To view the selection more closely, use the Zoom buttons. Click Play to listen to the selection to confirm that you want to delete it. To delete the selection, choose Edit > Delete, or press Delete on your keyboard.
3 To delete other unwanted silences (for example, that which occurs between the sides of your recorded album), locate the silent area and then select it by clicking and dragging from the start of the silent area to the end. Click the Play button to listen to the selection to confirm that you want to delete it. To delete the selection, choose Edit > Delete.
4 To save your changes, choose File > Save.
Sound Editor User Guidewww.roxio.com

Recording from analog sourcesAdding track breaks to your recording 14
Adding track breaks to your recordingIf you intend to play your recording as a playlist, or burn it to a disc, you will want to easily identify the tracks and navigate them with your player. You can use Sound Editor to automatically find and add track breaks to your recording, or you can add them yourself.
To add track breaks:
Tip To make editing easier, maximize the Sound Editor Window for a higher resolution display of your audio waveform.
1 If not already open, open the your recorded audio file: choose File > Open, and then select the file name.
2 To let Sound Editor scan your recording for silent areas which to insert track markers, choose Tools > Auto Locate Tracks.
3 If you have recordings with tracks that do not have silence between them, or if just want to add more track markers, you can add them manually. To do this, play your recording to determine where you want to place a track marker, click the waveform at that location, and then choose Tools > Insert Track Break.
Tip To quickly move your cursor to the beginning, press Ctrl+Home on your keyboard.
4 To check the placement of your markers, listen to your recording by playing it from the beginning, and then clicking the Next Track button to advance to the next track break.
5 If you have a track break that is not where you want it, you can reposition it by dragging the track break flag to move it earlier or later in the recording. To delete an extraneous break, right-click the marker flag, and then click Delete Track Break.
6 When you are satisfied with the position of your track breaks, rename each break to its associated track name. To rename a track break, right-click the track break flag, select Edit Track Name, type the new name, and then press Enter.
7 To save your changes, choose File > Save. If you have split your recording into two or more than tracks by adding track breaks, you will be prompted to enter a file name for each track.
Sound Editor User Guidewww.roxio.com

15
Editing audio and applyingeffects
In this chapter
Introduction 16
Choosing file save/encoding options 16
Using the waveform to edit 18
Enhancing your audio with effects 18
Choosing audio effects 19
Editing audio and applying effectsIntroduction 16
IntroductionYou can use Sound Editor to make changes to your recorded audio or any supported audio file. Not only will Sound Editor let you save your recorded audio to any other supported file format (similar to converting audio file formats), it will also let you edit and enhance your audio through the available audio effects and editing tools. This chapter describes the file saving/encoding options available and how to edit audio and apply effects.
Choosing file save/encoding optionsWhen you save a recorded audio file or an audio file that you have recently edited in Sound Editor, you can choose any file format and encoding option provided. Understanding which file format and encoding option to use is an important consideration when editing the audio file and when saving your edited file to a final format for use in other Roxio projects.
The file encoding settings are presented to you whenever you attempt to save a file that you have open in Sound Editor for the first time.
■ Audio Encoder:
■ File Format: Select from compressed audio formats, including
MP3, WMA, and OGG; or choose WAV, an uncompressed
format. Depending on the source audio used, and the encoder
settings selected, your audio quality and file sizes will vary. In
general, the compressed formats provide high-quality audio while
keeping your file sizes manageable. Choosing WAV, delivers audio
files that sound identical to the source material, at the expense of
larger file sizes.
■ Encoder: The encoder specifies how the file is saved and which
settings and compression options are available. Depending on the
file format selected, you may be provided with one or more
encoding options.
■ Audio format:
■ Stereo or Mono: With encoders that support this option, you can
choose to encode in a single channel (Mono) or two channels
Sound Editor User Guidewww.roxio.com

Editing audio and applying effectsChoosing file save/encoding options 17
(Stereo). Best for recording from mono sources, encoding in
mono can save disk space required for the audio file, while
improving overall quality for the bit rate selected. Some encoders
will only encode in stereo.
■ Sample Rate: This option lets you set the rate at which the audio
source is sampled per second (in KHz). Higher sample rates
generally produce better quality because the source is sampled
more frequently (more information about the audio is stored).
■ Bits per sample: This option, configurable with some encoders, lets
you set the sample size to a maximum of 16 bits. Using a lower
sample size reduces file size, however it can potentially
compromise sound quality.
■ Compression settings: These options will vary based on the selected encoder.
■ Constant Bit Rate / Variable Bit Rate: This setting is available with
some audio encoders. Variable Bit Rate (VBR) can produce a
better sounding audio file than a Constant Bit Rate recording
because VBR lets the encoder adjust the bit rate when necessary—
increasing it for complex audio and reducing it for simpler audio.
■ Size vs. quality (bit rate/compression factor): This option,
available with audio encoders that use compression, lets you set
the bit rate for the audio file. Depending on your personal
preference, choose a bit rate based on your desire for smaller file
sizes, better quality, or an acceptable compromise between the
two.
■ Options: This option, available with some encoders, lets you select
between normal and joint stereo. Selecting the joint option lets the
encoder take advantage of redundancies between the left and right
channels of most stereo recordings to increase the amount of data
allocated to unique information, thereby potentially increasing the
sound quality at lower bit rates.
Sound Editor User Guidewww.roxio.com

Editing audio and applying effectsUsing the waveform to edit 18
Using the waveform to editTo edit or add audio effects to your audio file, you must first use the playback buttons and/or the Zoom In and Zoom Out tool buttons to identify the region of the waveform you want to edit. After locating the region that you want to edit, you can use either a click-and-drag mouse movement to select the region, or you can use any of the right-click menu commands.
You can choose to apply an edit or effect on your entire waveform or track or a smaller isolated region of the waveform.
To select the entire waveform or track:
■ Choose Edit > Select All or, of you have more than one track and want to select only one track, choose Edit > Select Track and the choose the track you want.
To select an isolated region of the waveform:
1 Click and drag your mouse cursor from the beginning of your desired selection to the end. Your selection will appear highlighted on the waveform.
2 To preview your selected area, click the Play button. Sound Editor will play only the selected area.
3 If you want to adjust your selection, you can right-click the selected area to access zoom features to better view the selection and then use any of the move selection commands to adjust selection start or end.
Enhancing your audio with effectsIn Sound Editor you can apply any one or more audio effects to your audio file—to selected areas only, individual tracks, or the entire track.
Note Among the audio effects included in Sound Editor are many that are useful in improving audio recorded from analog sources, including Equalizer, DeClick, and Enhancer. To see the list of available effects, see Choosing audio effects on page 19.
Sound Editor User Guidewww.roxio.com

Editing audio and applying effectsChoosing audio effects 19
To enhance audio with effects:
1 Select the portion of the audio to which want to apply an effect.
Tip You can also right-click the selection on the waveform to apply an effect.
2 Choose Tools > Apply Effect to Selection, and then select the name of the effect that you want to apply.
3 Play the selection so you can hear the change in sound as you adjust the audio effect’s properties in the following step.
Note Because the audio effects are “layered” on top of each other as you apply them, it’s best to complete any settings for each effect to your satisfaction before applying another effect.
4 To undo any changes, choose File > Undo. To save your changes, choose File > Save.
Sound Editor lets you apply a wide range of audio effects to enhance your audio files. You can choose to enhance your audio in many ways, including by adjusting equalization, adjusting bass, brightening the sound, or applying “de-clicking” effects to clean up audio recorded from scratchy vinyl LPs.
Choosing audio effectsThe following audio effects are available in Sound Editor and can be applied to any of your audio files, as described in Enhancing your audio with effects on page 18.
Invert
Choose this effect to invert the positive and negative offsets of the selected audio region.
Reverse
Choose this effect to reverse the selected audio. That is, the effect will adjust the selected audio so that it plays backwards or vice-versa.
Sound Editor User Guidewww.roxio.com

Editing audio and applying effectsChoosing audio effects 20
Fade In
Choose this effect to apply a fade-in of audio from zero volume, at the beginning of your selection, to its full volume at the end of your selection. The length of the fade in is determined by the size of your selection.
Fade Out
Choose this effect to apply a fade-out of audio from its full volume, at the beginning of your selection, to zero at the end of your selection. The length of the fade out is determined by the size of your selection.
Normalize
Choose Normalize to level the volume peaks over your selection. This effect is useful when you have recorded multiple tracks that may have been originally at various volume levels, for example on a “mix” cassette.
Alienizer
For a pure fun and dramatic effect, try the alienizer. Adjust the Alpha and Beta controls in combination for a range of metallic, and, yes—alien effects! See also, Robotizer on page 21.
DeClick
This effect helps remove noise from audio files recorded from vinyl records. Set DeClick to remove distinct clicks, and DeCrackle to lessen “crackling” sounds common to records. For more information about recording from vinyl LPs, see Recording audio on page 12.
DeTuner
This effect lets you adjust the pitch of the audio without affecting the speed. Adjusting the overall tone higher or lower, by adjusting Pitch or Demi-tone values.
Enhancer
This effect lets you enhance sound in any one of three areas: Bass Boost, the amount of amplitude (volume) increase of low frequency sounds; Brighten, the amount of amplitude increase in high frequency sounds; and Stereo Width, the amount of perceived separation between left and right channels of a stereo signal.
Sound Editor User Guidewww.roxio.com

Editing audio and applying effectsChoosing audio effects 21
If you want to apply more than one of the enhancer effects (for example, Bass Boost and Stereo Width), add a second instance of the Enhancer effect to add your second enhancement choice.
Equalizer (10-band) with Master Volume
This equalizer lets you boost or cut the amplitude (volume) for ten bands of sound frequencies. Working with the equalizer is mostly trial and error, unless you know the frequencies of the sounds you want to adjust. It may be easier to notice your changes when adjusting one frequency at a time. The Equalizer effect also includes a master volume control to let you increase or decrease overall sound output level.
Maturizer
This effect simulates the sound of older, “mature,” analog recordings, such as scratchy LPs or noisy audio tapes played from vintage audio equipment. Apply settings in any one or more of five areas: Noise, Hum, Crackle, Click, and Bandlimit.
Parametric Equalizer (4-band) with Master Volume
This equalizer lets you boost or cut the amplitude (volume) for four frequency bands. You can also adjust the bandwidth (Q) and the center frequency of each of the four bands. This effect also includes a master volume control to let you increase or decrease overall output level.
Robotizer
Similar to the Alienizer, the Robotizer also adds an interesting processed sound to your audio. Adjust Alpha and Beta settings to lend a decidedly robotic flavor to your playlist. Click Broaden Stereo to increase the perceived separation of the robotizer effect between the left and right channels of a stereo signal.
Room Simulator
This effect uses various levels of sound reverberation and echo to simulate your music being played in an enclosed venue. Select Box, Room, Church, or Space to simulate any of these environments. Adjust Reverb Time and Echo Level to further customize the sound in your “room.”
Sound Editor User Guidewww.roxio.com

22
Index
AAlienizer 20analog audio capturing 10audio effects
Alienizer 20DeClick 20DeTuner 20Enhancer 20Equalizer 21Fade In 20Fade Out 20in Sound Editor 18included in Sound Editor 19Maturize 21Normalize 20Parametric Equalizer 21Reverse 19Robotizer 21Room Simulator 21
auto locate track breaks 14
Ccabling needed for analog sources 10capturing
audio from analog sources 10cassettes, recording 10clipping indicators 11
DDeClick 20DeTuner 20
EEnhancer 20equalization
in Sound Editor 18Equalizer 21
FFade In 20Fade Out 20

Index 23
MMaturize 21
NNormalize 20
PParametric Equalizer 21peak level meters 6, 11
Rrecord mode
in Sound Editor 7recording
from vinyl LPs and cassettes 10in Sound Editor 12
recording device 10recording level 7
in Sound Editor 11recording source 10removing noise from recordings 20repeat mode
Sound Editor 8Reverse 19Robotizer 21Room Simulator 21
SSound Editor
adding track breaks 14
audio effects 18enabling record mode 11equalization 18peak level meters 6, 11playing your edited recording 7record mode 7recording audio 12recording device 10recording level 7, 11recording source 10removing silences 13repeat mode 8track position 8transport controls 7volume control 7waveform display 6zoom controls 7
Ttrack breaks 14tracks
in Sound Editor 14
Vvinyl LPs, recording 10volume control
in Sound Editor 7volume leveling 20
WWAV files
recording in Sound Editor 10waveform display 6
Sound Editor User Guidewww.roxio.com