space cadets: away missions - tabletopia
TRANSCRIPT

SPACE CADETS: AWAY MISSIONS
Space Cadets: Away Missions is a cooperative game for 1–6 players inspired by the Golden Age of Science Fiction. In it, players take on the roles of Rocketeers, the adventurous human members of the Rocket Patrol, who explore UFOs, acquire alien technology, and fight hostile extraterrestrials. The enemy aliens are controlled by the game system itself.
The game’s basic system of movement, combat, and discovery is used for all of its scenarios. Each scenario has a unique mission objective that the Rocket Patrol must accomplish to win, and some scenarios also add special rules.
Space Cadets: Away Missions is played in turns. First the Rocketeers go, with each player taking an individual turn with his or her character. During his or her turn, the Rocketeer generally takes three Actions (such as moving or attacking), rolling dice as necessary to determine success.
Then the Aliens take their turn, with each Alien figure following simple movement and attack protocols. The game continues until the Rocketeers complete their mission (all players win) or any Rocketeer dies (all players lose).
1. Introduction pg. 12. Game Components pg. 23. Dice, Success, and Overkills pg. 34. Rocketeer Overview pg. 45. Alien Overview pg. 56. Elements of a Scenario pg. 67. The Game Turn pg. 78. Rocketeer Turn pg. 89. Alien Turn pg. 1110. Line of Sight and Range pg. 1311. Items pg. 1412. Optional Rules pg. 1613. Extended Examples of Play pg. 1714. Reference Lists pg. 26
Long before the threat of the Nemesis, before the perils of warp drive or the founding of our own Space Academy, humanity experienced a Golden Age of space exploration. The mineral riches of the thriving Moon colony inspired legions of hearty Earth citizens to seek their fortunes in space.
Humble rockets probed the farthest reaches of the solar system in an eager quest for resources, and brave colonists forged homes wherever they could survive. Pioneer life was hard, but the men and women who worked and raised their families on those planets and asteroids had much to be proud of.
Then the rumors began…
Whispered tales of frontier abductions and sightings of mysterious creatures. By the time the secret invasion was exposed, the aliens were everywhere. Families had been stolen away by slavers from the stars, and the peace-loving survivors had no choice but to arm themselves and fight. Fight to stop the alien attacks! Fight to free the helpless victims! Fight to throw the aggressors back into space and forever end their power to threaten humanity!
Thus was born the Rocket Patrol—an organization of fearless heroes dedicated to defending humanity and taking the fight to the alien menace from the stars.
1. IntroductIoncontents

In addition to this Rulebook and one Scenario Booklet, each copy of Space Cadets: Away Missions includes the following components:
35 Rocketeer tokens
2. Game components
1 double-sided Rocketeer/Alien reference sheet
1 Overkill reference sheet
33 Standard Map tiles 15 Scenario Map tiles
18 Scenario tile markers
26 Discovery tokens 12 Alert tokens34 Alien Tokens
12 Hatch markers
6 Rocketeer figures 96 Alien figures6 Rocketeer character sheets
28 Action Point markers 6 Order/Scan markers
37 Rocketeer Item cards 14 Alien Discovery cards
6 Alien Schematic cards 8 Alien reference cards
5 Dominated Brain-in-a-Jar cards
10 Rescued Thrall cards
14 Wire/Alien Blood markers
36 Red HP cubes
22 Blue O2 cubes
36 Green charge cubes
8 Ten-sided dice (four matched pairs)
6 plastic Rocketeer bases
Before your first play, attach the bases to the Rocketeer figures. The yellow base is for the Captain figure, orange base is for the First Officer, etc., per the colors shown on the Rocketeer character sheets.

Space Cadets: Away Missions uses ten-sided dice (d10s) to determine success and failure. A die counts as a success if it reads 1 , 2, or 3 (“0” is always read as “10”). Any other result has no effect.
Game effects that modify a dice roll only change the number of dice rolled, not the result of the roll.
For example, a +2 effect means “roll two more dice than usual,” not “add two to the result of a die roll.”
Multiple dice are often rolled when taking an Action, but only a single success on the dice is required to accomplish the Action. Each extra success after the first is called an Overkill.
For example, if an attack dice roll results in 3 successes, it does not equal 3 hits, it equals 1 hit and 2 Overkills.
Each Overkill can then be “spent” to provide special immediate benefits known as Overkill Options.
Each Rocketeer, Weapon, and Alien has a distinctive Overkill Option. When rolling for a Rocketeer Action, Overkills may be spent on the following Overkill Options, in any combination:
Multiple Overkills may be spent on the same Overkill Option without restriction. An exception to this is when subduing aliens (see page 10)
Each Alien has an Overkill Effect. When an Alien rolls, it may only use Overkills on its Overkill Effect. A Rocketeer may never spend Overkills on an Alien Overkill Effect.
• The character’s personal Overkill Option
• The Overkill Option of the Weapon being used for that Action
• The Overkill Option of the Alien being attacked by that Action
Example: The Chief uses his Atomic Rifle to attack an Alien Sentinel at a range of 2, which allows him to roll five dice. The rolls are 2, 2, 3, 7, and 9, yielding three successes (2, 2, 3). The first success inflicts 1 hit on the Sentinel. The second and third successes do not inflict hits on the Sentinel. Instead, they give the Chief two Overkills, which he can spend on any combination of three available Overkill options:
(1) The Chief’s personal Overkill Option (Strafe) allows him to inflict 1 hit on another Alien on an adjacent tile.
(2) The Atomic Rifle’s Overkill Option (Dislodge) allows the Chief to move any Alien figure within range and in line of sight by one tile, subject to its movement restrictions.
(3) The Sentinel’s Overkill Option allows the Chief to Stagger the Sentinel, reducing the number of attack dice the Sentinel will roll during the upcoming Alien Turn.
The Chief may use the same Overkill Option twice or he can use two different Overkill Options. He cannot use the Overkills to inflict more hits on the Sentinel.
3. dIce, success, and overkIlls

Each player controls an individual Rocketeer represented by a figure and character sheet with the following features:
Order Assigned/Scan Completed: An Order/Scan # marker is placed in this box once it is determined when that Rocketeer takes his or her turn in the sequence. After they have completed their Scanning Phase, they slide that marker into the Scan Completed slot to help keep track.
Hit Points (HP): The Rocketeer’s vitality and endurance. As a Rocketeer loses and recovers HP, adjust the number of red cubes in the HP box on the character sheet. A Rocketeer can never gain HP above his or her starting amount.
Ø If a Rocketeer’s HP is reduced to 0, he or she dies and all players immediately lose the game.
Action Point (AP) markers: The three AP graphics on the character sheet specify which types of Actions the Rocketeer can perform each turn, one Action per AP spent. Each Rocketeer gets two standard APs, which may be spent to perform any Actions, plus an additional AP which may have restricted use: a Combat AP can only be spent to perform a Combat Action, and a Non-Combat AP can only be spent to perform a Non-Combat Action. APs may be spent in any order.When a Rocketeer spends an AP, slide the appropriate AP marker from the Available slot to the Spent slot of the character sheet. It remains there until the Cleanup Phase, when it is returned to the Available slot.
IQ: The Rocketeer’s smarts and resourcefulness. During play, a Rocketeer may perform IQ Actions to heal other Rocketeers, analyze Alien items, and perform other feats. The Rocketeer’s IQ determines how many dice are rolled when performing an IQ Action. Bonuses and penalties to IQ from cards or effects are always cumulative.
Mind Control Box: One of the perils of combat against the Aliens is the constant threat of Mind Control. If an Alien attack results in Mind Control, the targeted Rocketeer slides one of his or her AP markers from the Spent slot of the Action Points box into the Mind Control Box. It remains there until the Cleanup Phase, when it is returned to the Spent slot.
Oxygen: Each Rocketeer starts with 2–6 oxygen cubes (known as O2) in his or her air-tank, depending on the number of Rocketeers. This O2 is not used for normal life-support, but for special emergency circumstances. As a Rocketeer loses and recovers O2, adjust the number of blue cubes in the O2 box of the character sheet.
A Rocketeer can hold an unlimited amount of O2 and can trade it freely with other Rocketeers on the same tile.
Once per turn, a Rocketeer may use (discard) one O2 cube to take one extra Action. Additionally, once per turn, the Rocketeer may also be forced to discard one O2 due to Panic (see Combat Effect List, pg. 33).
Ø If a Rocketeer’s O2 is reduced to zero, he or she dies and all players immediately lose the game.
Overkill Option: Each Rocketeer has a special power that only he or she can use. If a Rocketeer achieves any Overkills on any roll, he or she may always elect to spend them on this Option to activate its power, once per Overkill spent. In addition, once per Game Turn, a Rocketeer may spend one AP of any type to activate his or her personal Overkill Option directly without rolling dice; this is known as a Talent Action.
Order Assigned/Scan Completed
Hit Points
Action Points
IQ
Mind Control Box
Oxygen
Overkill Option
4. rocketeer overvIew

There are seven types of Aliens. Each type of Alien has a reference card, which shows the following features:
Sentience Order Number: During the Alien Turn, all Aliens act in order of sentience: Brains-in-a-Jar (1st), Leaders (2nd), Saucermen (3rd), Sentinels (4th), Thralls (5th), Space Leeches (6th), and Bugs (7th).
Move: The maximum number of map tiles that the Alien can move in one turn.
Attack Dice: Most Aliens attack the Rocketeers by rolling attack dice. The first success on an Alien attack roll inflicts 1 hit on the target Rocketeer. Overkills achieved on its attack rolls automatically trigger the Alien’s Overkill Effect.
Attack Range: The maximum distance in map tiles that an Alien can attack. Count the target tile, but not the Alien tile.
Overkill Effect: Some Aliens have an Overkill Effect. If an Alien achieves any Overkills when attacking a Rocketeer, it automatically spends those Overkills on its Overkill Effect, resolving its effects once per Overkill spent. A Rocketeer may never spend an Overkill on an Alien’s Overkill Effect.
Overkill Option: Every Alien has an Overkill Option. When a Rocketeer achieves any Overkills on an Attack roll against an Alien, he or she may spend any of them on that Alien’s Overkill Option. An Alien may never spend an Overkill on its own Overkill Option, only its Overkill Effect.
HP (Hit Points): If an Alien’s HP is reduced to 0, it dies and its figure is removed from the map. Most Aliens have only 1 HP. If an Alien with more than 1 HP takes damage, track its remaining HP by placing red cubes next to its figure.
Combat Effects: These are summaries of Combat Effects that the Alien can inflict on Rocketeers or that Rocketeers can inflict upon it, often from Overkill Options and Effects (see Combat Effect List, pg. 33).
Sentience Order number
Move
Attack Dice
Attack Range
Overkill Effect
Overkill Option
Hit Points
Combat Effects
5. alIen overvIew
Thralls
Historically, the war with the aliens erupted once humanity discovered that citizens of the solar system were being kidnapped and transformed into tragic Thralls: human slaves, gripped by a terrible “mind wire” installed to control their every action.
While Thralls are considered to be Alien figures for all game purposes, every Rocketeer knows that the hopeless slaves may one day be rescued and revived. To that end, the Oath of the Rocket Patrol declares that Rocketeers will never attack Thralls.

The Game MapEvery scenario in Space Cadets: Away Missions takes place on a human or alien spacecraft. The scenario map is assembled using hexagonal tiles according to the diagram and instructions in the Scenario Booklet. Tokens and markers that represent various Aliens, scenario objectives, events, and items will be placed on certain tiles, according to the scenario setup instructions.
Map TilesThere are two types of map tiles: Standard tiles and Scenario tiles. Scenario tiles are specific to particular scenarios, and are distinguished by the name of their shipboard function (e.g. Airlock) or the alien “boss” who inhabits the tile (e.g. the Hive Queen). Most Scenario tiles have special effects, described in the Scenario Booklet.
During scenario setup, the Standard tiles are shuffled and placed face-down to build the map. Scenario tiles are either placed in fixed locations or hidden by using mixed Scenario tile markers and Decoy tile markers as indicated in the scenario setup. During play, one map tile is flipped face-up at the beginning of every Rocketeer’s turn during the Scanning Phase (see pg. 8).
A tile can hold an unlimited number of Rocketeers, Aliens, items, or other markers.
Rocketeer Starting TileAt the start of each scenario, place the Rocketeer Starting Tile face-up. All Rocketeer figures begin the game on this tile. The scenario Special Rules will specify which Starting Tile to use and where to place it. Certain scenarios feature the Rocketeers arriving on the map via Shuttlecraft. In this case, the players may decide its starting location.
Directional Arrow & Inventory Number: Each tile shows a directional arrow and an inventory number. At the start of the game, the first player chooses which direction to orient the Rocketeer Starting Tile. When a face-down tile is flipped face-up during play, orient it so its directional arrow points in the same direction as the arrow on the Starting Tile. The inventory number is only used to regulate Alien movement.
Hatches: Each map tile edge is either open or shows a hatch. Where two tiles meet, that edge is considered to be a hatch if either or both tiles show a hatch on that edge. It is considered to be open only if neither tile shows a hatch on that edge. An edge where one tile shows a hatch is functionally the same as an edge where both tiles show hatches.
A hatch is always considered to be closed unless it is opened by a Rocketeer (or by a Special Rule listed in the scenario). Closed hatches block movement and line of sight for all Rocketeers and some (but not all) Aliens (see Line of Sight, pg. 13).
A Rocketeer can open a hatch from either side by performing an Open Hatch Action. An open hatch is marked with a Hatch Open marker, and is considered to be an open edge until it is closed again.
The Professor’s Overkill Option (Override) allows a hatch to be locked. A locked hatch is marked with a Hatch Locked marker and blocks movement and line of sight for all Aliens until it is unlocked at the end of the Game Turn during the Cleanup Step.
The Heat Ray Discovery item allows a hatch to be destroyed or sealed. A Destroyed hatch is marked with a Hatch Destroyed marker and is considered to be an open edge for the remainder of the game. A sealed hatch is marked with a Hatch Sealed marker and cannot be opened for the remainder of the game.
Vents: Some map tiles have a printed vent symbol. These tiles are used to determine the placement of Alien Bugs. Vents have no other effect.
6. elements of a scenarIo
Directional Arrow/Inventory Number
Vent
Name (Scenario Tiles Only)
Hatch

TokensThe game uses four types of tokens: Alien tokens, Discovery tokens, Rocketeer tokens, and Alert tokens. These are placed face-down on tiles during scenario setup. When a map tile is flipped face-up, any tokens on it are immediately revealed. Revealed Alien and Alert tokens are immediately removed and replaced with the Alien(s) specified on the token (if any).
Discovery and Rocketeer tokens remain in place until picked up by a Rocketeer, at which time the token is discarded and the Rocketeer player takes the corresponding item card or component.
All scenarios use Alien tokens, most use Discovery tokens, and some use Alert tokens and Rocketeer tokens. (For details, see Rocketeer Turn, pg. 8.)
Starting ItemsBefore starting most scenarios, each Rocketeer chooses four Rocketeer item cards, only two of which can be large items. With limited exceptions, all Rocketeer items are available in every scenario. (For a complete list, see pages 29-30). Recommendations for starting Rocketeer items are also listed in the Scenario Booklet.
Space Cadets: Away Missions is played in Game Turns, each following this sequence of play. Game turns are described in more detail in the Rocketeer Turn and Alien Turn chapters.
Rocketeer Turn1) Order Phase: Players choose one Rocketeer to take his or
her turn. That player takes the lowest numbered Order/Scan marker available (starting with Rocketeer 1).
2) Scanning Phase: The acting Rocketeer must scan one of the nearest face-down map tiles. Flip that tile and all tokens on it, triggering the effects of Alien or Alert tokens. If no tiles are available to scan, begin the Red Alert Stage.
3) Actions Phase: The acting Rocketeer spends his or her Action Points (APs) to perform Actions. At no AP cost, he or she may trade with other Rocketeers on the same tile, pick up Discovery items on the same tile, and use Gear. Once during this Phase, the Rocketeer may spend one O2 to perform an additional Action.
Repeat Phases 1–3 for the next Rocketeer (Rocketeer 2, Rocketeer 3, etc.) until all Rocketeers have taken a turn. If the scenario victory conditions are met at any time during a Rocketeer Turn and all Rocketeers are still alive, the players instantly win.
Alien TurnAll Aliens act in order of sentience: Brains-in-a-Jar first, then Leaders, Saucermen, Sentinels, Thralls, Space Leeches, and Bugs. All Aliens of one type act before any Aliens of the next type, one Alien at a time, according to their Movement and Attack Protocols.
CleanupAll Stunned Aliens recover. Remove all Hatch Open markers, Hatch Locked markers, and Staggered markers. Reset all Rocketeers’ AP markers from their Spent slots to their Available slots, then move any AP markers from their Mind Control slots to their Spent slots. Collect the Order/Scan markers and set them aside for the next Rocketeer Turn.
7. tHe Game turn

After determining player order in the Orders Phase, each Rocketeer Turn then has a mandatory Scanning Phase followed by an Action Phase.
Order PhaseThe sequence in which the Rocketeers take their individual turns is determined by the players every Game Turn. It is a group decision, and the sequence may change turn by turn. Players may see the results of one Rocketeer’s turn before deciding which Rocketeer will go next. Once the first player is chosen, that player takes the Rocketeer 1 Order/Scan marker and places it on his or her character sheet in the Order Assigned slot. When that player’s turn is finished, the next Rocketeer to go takes the next highest numbered Order/Scan marker and places it on his or her Order Assigned slot, and so on.
Scanning PhaseA Rocketeer must scan the nearest face-down map tile, regardless of distance or line of sight. If multiple tiles are equidistant, the player may choose which to scan. Scanning does not use AP. To scan a tile, flip it face-up and orient it so that its directional arrow aligns with the arrow on the Rocketeer Starting Tile, then reveal any tokens and markers on the tile and trigger their effects.
When a Scenario tile marker is revealed during scanning, replace the newly revealed Standard tile on which it was located with the Scenario tile matching the tile marker and consult the scenario to determine any Special Rules associated with that tile.
If a Scenario tile has an illustrated marker box, place the Scenario tile marker face-up in the box. A Scenario tile’s Special Rule generally remains in effect until the Rocketeer can remove the marker by satisfying the conditions described in the scenario.
When a Decoy marker is revealed, discard it with no effect.
After scanning, slide the scanning Rocketeer’s Order/Scan marker to the Scan Complete side of the character sheet. The marker remains on the character sheet until it’s collected during the cleanup step to be reassigned on the next Game Turn.
Tokens
Alien tokens: When an Alien token is revealed, place the listed Alien figures on the scanned tile and discard the token. Exception: A Bug is not necessarily placed in the newly scanned tile but instead always appears in the tile with a vent that is nearest to the scanning Rocketeer. If multiple tiles with vents are equidistant, a Bug will be placed in the one with the lowest inventory number. Some Alien tokens also list an Event that is resolved immediately after placing the Aliens listed on the token.
Discovery tokens: These represent Alien items. Once revealed, these tokens remain in place, face-up, until picked up by a Rocketeer (see Discovery Items, pg. 31).
Alert tokens: When revealed, an Alert token will either place Aliens or have no effect. As noted on the token face, Alert tokens that bring Aliens into play require the acting player to draw an Alien token from the unused supply and place figures for the listed Aliens on the Muster tile specified in the scenario rules, with bugs placed on the vent nearest the scanning Rocketeer as normal. After resolving this token, discard it.
Red Alert StageIf there are no face-down map tiles available to scan at the beginning of any Rocketeer’s Scanning Phase, the game immediately and permanently enters the Red Alert Stage, which has effects described in the scenario rules. Some scenarios do not have a Red Alert Stage, in which case there is no effect.
8. rocketeer turn
Events• Cosmic Radiation: Each Rocketeer loses 1 HP.• Power Out: Rocketeers cannot use Discovery items for the
rest of the current Game Turn.• Time Distortion: Immediately assign an Order/Scan marker
to all Rocketeers without one. All Aliens (including those listed on this token) immediately take a full move using their normal Movement Protocol. This event does not allow Aliens to attack.
• Unnatural Growth: All damaged Aliens in play fully recover their HP, including alien “bosses” who inhabit Scenario map tiles (for example, the Hive Queen).
• Unreasonable Fear: All Rocketeers suffer Panic (lose one O2). Ignore this event in games with more than four Rocketeers.
Actions Phase In this phase, a Rocketeer can perform Actions by spending Action Points (APs) in any order. APs are spent to move, open hatches, attack, heal, analyze alien items, or subdue certain Aliens.
Standard APs can be spent on any type of Action. Combat AP can only be spent on Combat Actions; Non-Combat AP can only be spent on Non-Combat Actions.
Any time during his or her Actions Phase, a Rocketeer may perform the following tasks at no AP cost:
• Pick up Discovery items on the same tile, taking the matching card and discarding the token. There is no limit to the number of items a Rocketeer can carry.
• Use Gear (non-Weapon items), a maximum of once per Game Turn per Gear item. If the Gear has charges, remove 1 green charge cube from its card. If the Gear item runs out of charges, it cannot be used until it is recharged.
• Spend one O2 to take one Standard Action, a maximum of once per Rocketeer Turn.
• Trade items, O2, Rescued Thrall cards, and Dominated Brain cards with other Rocketeers on the same tile.
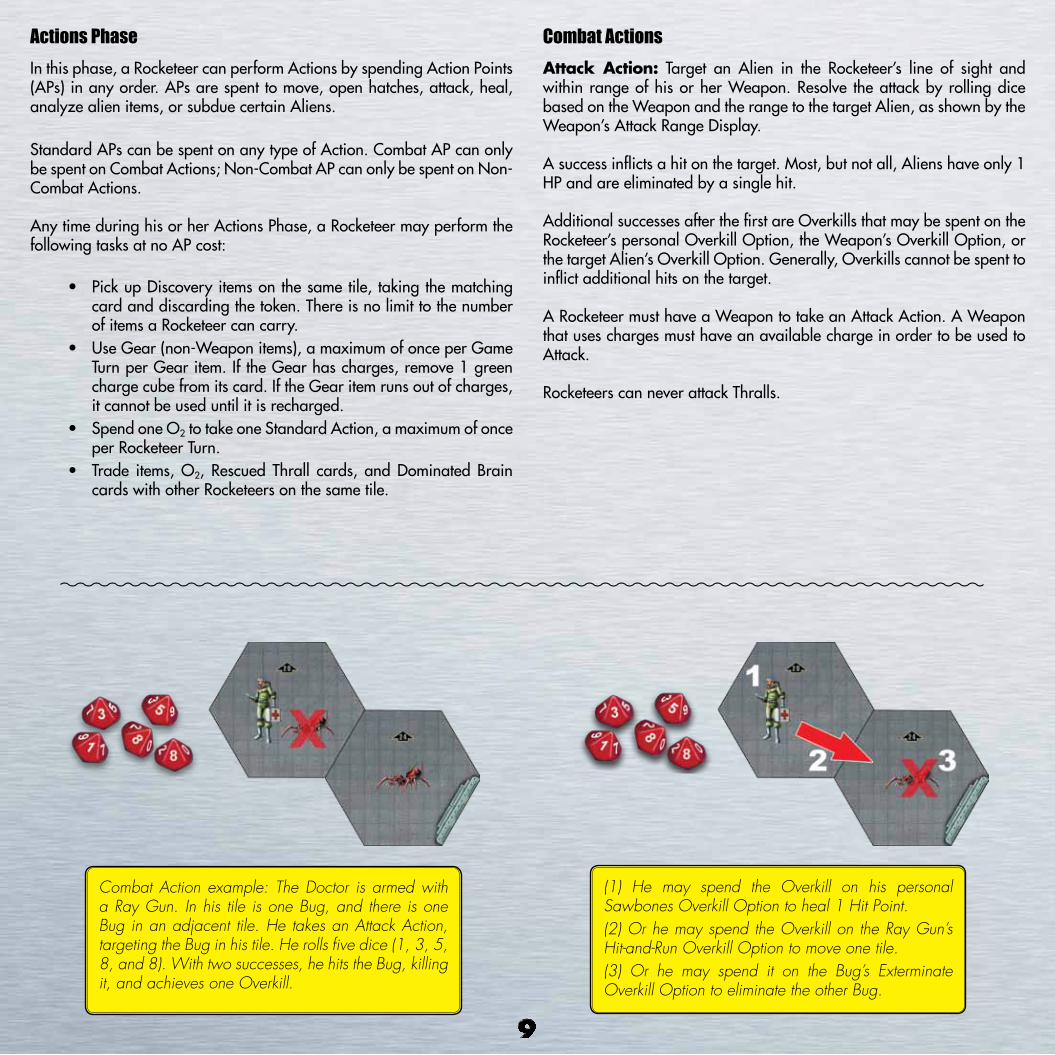
Combat ActionsAttack Action: Target an Alien in the Rocketeer’s line of sight and within range of his or her Weapon. Resolve the attack by rolling dice based on the Weapon and the range to the target Alien, as shown by the Weapon’s Attack Range Display.
A success inflicts a hit on the target. Most, but not all, Aliens have only 1 HP and are eliminated by a single hit.
Additional successes after the first are Overkills that may be spent on the Rocketeer’s personal Overkill Option, the Weapon’s Overkill Option, or the target Alien’s Overkill Option. Generally, Overkills cannot be spent to inflict additional hits on the target.
A Rocketeer must have a Weapon to take an Attack Action. A Weapon that uses charges must have an available charge in order to be used to Attack.
Rocketeers can never attack Thralls.
Combat Action example: The Doctor is armed with a Ray Gun. In his tile is one Bug, and there is one Bug in an adjacent tile. He takes an Attack Action, targeting the Bug in his tile. He rolls five dice (1, 3, 5, 8, and 8). With two successes, he hits the Bug, killing it, and achieves one Overkill.
(1) He may spend the Overkill on his personal Sawbones Overkill Option to heal 1 Hit Point. (2) Or he may spend the Overkill on the Ray Gun’s Hit-and-Run Overkill Option to move one tile. (3) Or he may spend it on the Bug’s Exterminate Overkill Option to eliminate the other Bug.

Non-Combat Actions Move Action: Enter an adjacent face-up tile across an open edge. Rocketeers cannot move through closed, locked, or sealed hatches or into un-scanned tiles.
Open Hatch Action: Select a closed (not locked or sealed) hatch on an edge of the Rocketeer’s current tile and mark it with a Hatch Open marker. An edge is considered to be a hatch if either tile sharing that edge shows a hatch symbol. This hatch can be opened from either side, regardless of which tile(s) actually shows the illustration. When two adjacent tiles both have hatches along their shared edges, it is considered to be a single hatch for all game purposes and only requires one Action to open.
IQ Actions: The Rocketeer performs a feat of science. There are three different IQ Actions. Each is resolved by rolling a number of dice equal to the Rocketeer’s IQ.
• Heal Action: The first success allows the acting Rocketeer to restore one HP to him or herself or to another Rocketeer on the same tile. Overkills can only be spent to use the acting Rocketeer’s personal Overkill Option.
• Analyze Discovery Item Action: Most Discovery Items can be used the instant they are picked up by a Rocketeer. However, if a Discovery item card has an Analyze icon (pictured on right), it is so exotic that it is unusable until the Rocketeer carrying it takes a successful Analyze Action. Until such an item has been Analyzed, players should rotate the card sideways as a reminder.The first success allows the item to be used for the rest of the game by any Rocketeer who carries it. Place green charge cubes on the card as indicated by the card’s charge icon. Overkills from this action can be spent to add extra charge cubes to the item (+1 cube per Overkill spent) or to use the acting Rocketeer’s personal Overkill Option. Failing this Action simply means that the Discovery item remains unusable; it has no other effect. This does not prevent Rocketeers from trying to Analyze the same item again.
• Subdue Thrall or Brain-in-a-Jar: These two Alien types are vulnerable to human science, and can be removed from play with an IQ Action performed by a Rocketeer on the same tile. Subduing has the following effects on these Aliens:
Thrall: The first success subdues the Thrall, removing its figure from play and giving the acting Rocketeer one Wire component marker (acquired from the dismantled Alien control hardware). Overkills can be spent to use the Rocketeer’s personal Overkill Option or to Rescue the Thrall.
When a thrall is rescued, draw a random Rescued Thrall card, which functions exactly like an item card. A Rocketeer cannot
ignore a Subdue Thrall roll with a single success in hopes of rolling an Overkill on a subsequent roll (unless he or she uses the Time Warp Discovery item).
Brain-in-a-Jar: A Brain-in-a-Jar cannot be subdued until it has suffered 1 hit. The first success subdues the Brain-in-a-Jar, removing its figure from play and giving the acting Rocketeer one Alien Blood component marker (acquired while detaching the brain from its housing). Overkills can be spent to use the Rocketeer’s personal Overkill Option or to Dominate the Brain.
When a Brain is dominated, remove its figure from play and take a Dominated Brain-in-a-Jar card, which gives +1 IQ to the Rocketeer carrying it and can be traded exactly like an item card.
Talent ActionsOnce per Rocketeer Turn, the acting Rocketeer may spend any AP to use his or her Overkill Option as an Action. No dice roll is required. In effect, the Rocketeer is automatically rolling one Overkill.
For example, using a Talent Action would allow the Chief to Strafe, letting him apply 1 hit to any Alien in line of sight and in range of a Weapon he is carrying.

There are seven types of Aliens. All Aliens of one type act before any Aliens of the next type, and each Alien within its type moves and attacks before the next Alien begins its turn.
Instead of using Action Points, each Alien follows a set of Movement and Attack Protocols once per Alien Turn. Aliens act in order of sentience, one figure at a time within each type, as show in the box to the right.
Bugs move and attack differently from other Aliens (see Bugs and Swarms, pg. 12).
Movement ProtocolsThe acting Alien moves toward the nearest Rocketeer with the goal of reaching a tile from which it can attack (see Line of Sight and Range, pg. 13). An Alien that begins its turn in such a tile does not move.
If multiple Rocketeers are equidistant from the acting Alien, the Alien moves toward the Rocketeer with the highest numbered Order marker (for example, if Rocketeers 1, 2, and 3 are equidistant, the Alien will move toward Rocketeer 3).
Aliens move toward the nearest Rocketeer by the shortest legal movement path (not necessarily the shortest direct distance), regardless of line of sight. The path may include scanned or un-scanned tiles. Whenever two adjacent tiles could be considered part of the shortest path, the Alien will move into the tile with the lower inventory number. (If one tile is scanned and the other is un-scanned, the Alien will move into the scanned tile; if both tiles are un-scanned, randomly determine which tile the Alien will enter.)
Determining the shortest path for an Alien is primarily based on its ability to move through hatches. Locked hatches and sealed hatches block all Alien movement. All Aliens treat un-scanned tiles as having no hatches. (An edge shared by an un-scanned tile and a scanned tile that shows a hatch on that edge is considered to have a hatch.)
• Leaders and Saucermen control hatches with psychic energy, letting them move through closed hatches without restriction—in effect, they instantaneously open, move through, and then re-close any closed hatch in their path. For these Aliens, the shortest path will usually be the most direct path.
• Sentinels, Thralls, and Leeches cannot move through closed hatches. For these Aliens, the shortest path can never include a closed hatch, so their movement path is more likely to require detours.
When determining the nearest Rocketeer for an Alien, only Rocketeers against whom the Alien could potentially achieve an attack position are considered. When making this determination, imagine the Alien has unlimited movement and account for the current status of all hatches and tiles. (Aliens re-evaluate the nearest Rocketeer and the path to him or her every turn. A newly opened hatch may allow an Alien to consider a previously inaccessible Rocketeer as the nearest in the current turn. This can cause to-and-fro moves from one turn to the next as hatches open and close.)
If an Alien cannot reach, given unlimited movement distance, a position from which it could attack any Rocketeer because of closed, locked, and/or sealed hatches, it does not move that turn.
9. alIen turn
Order of Sentience1. Brains-in-a-Jar
2. Leaders
3. Saucermen
4. Sentinels
5. Thralls
6. Space Leeches
7. Bugs

Attack Protocols An Alien will attack the closest Rocketeer it can target, rolling the number of attack dice listed on its reference card.
A Rocketeer is an eligible target if it is within the Alien’s attack range and is in line of sight of the Alien.
Whenever an Alien has multiple equidistant Rocketeer targets, it will always attack the Rocketeer with the highest numbered Order marker (for example, if Rocketeer 1, 2, and 3 are all eligible targets, it will attack Rocketeer 3).
The first success inflicts 1 hit on the target Rocketeer, and Overkills will trigger the Overkill Effect of the attacking Alien, once for each Overkill.
Special Alien Attack Rules • Brains-in-a-Jar simultaneously attack all Rocketeers within range
2 with the Mind Control combat effect. The attack ignores line of sight and does not require a dice roll.
• Thralls cannot move and attack on the same turn; they can only attack if they start their turn in the same tile as a Rocketeer.
• Because un-scanned tiles do not block Alien line of sight, Leaders and Saucermen on an un-scanned tile can attack a Rocketeer on an adjacent tile. (Note that locked and sealed hatches between the un-scanned tile and the target still block line of sight.)
Bugs and SwarmsMovement Protocols A solitary Bug can move one tile. Multiple Bugs in the same tile are considered a Swarm, which can move one tile for each Bug in it. (For example, a Swarm of three Bugs can move three tiles.) Bugs can move through closed hatches, but not locked or sealed hatches.
Bugs have unique movement priorities that affect their use of the standard Alien Protocols.
• Their first priority is to form a single Swarm with all other Bugs on the map. The moves made to achieve this will use the standard Movement Protocol but the target tile is one occupied by the closest other Bug, rather than a Rocketeer. Moving Bugs ignore Stunned Bugs and Rocketeers when trying to Swarm.
• Their second priority (once a single Swarm is formed that contains all non-Stunned Bugs currently on the map) is to move toward the nearest Rocketeer.
The first priority means that a Bug starting the Alien Turn in the same tile as a Rocketeer may move out of that tile rather than stay and attack the Rocketeer (as it attempts to form a single Swarm with other Bugs on the map).
Bugs form Swarms as they move. As Bugs are added to a Swarm, they immediately increase that Swarm’s movement. (For example, if two Bugs
start the turn in adjacent tiles, one will enter the other Bug’s tile, forming a Swarm of two Bugs. This Swarm may then immediately move one more tile (because a Swarm of two Bugs can move two tiles, but one move was already used to form the Swarm).
Bugs (both solitary and in Swarms) on separate tiles should be moved so they end the turn on the fewest possible number of tiles and, if a single Swarm can be formed, such that the Swarm can make the maximum number of attacks possible.
Attack Protocols
Each Bug attacks with 1 die. Bugs have an attack range of 0.
When the only un-Stunned Bug or Swarm on the map starts the Alien Turn on the same tile as a Rocketeer, the Bug or Swarm will attack without moving.
A Bug that moves or contributes a move to its Swarm cannot attack in the same turn. In effect, the number of Bugs in a Swarm that attack is equal to the number of Bugs in the Swarm minus the number of tiles the Swarm moved that turn.
Bug Figure LimitWhen setting up the game, include 5 Bug figures for every Rocketeer in play, up to 20 Bug figures. Return Bug figures exceeding this limit to the game box during setup. During play, if all Bug figures are in play when an Alien token calls for a new Bug to be placed, remove the Bug farthest from the new Bug’s placement tile and use its figure for the new Bug. If two Bugs are equidistant, remove the figure on the tile with the lowest inventory number.
Fig.1
Fig.2
Fig.3
Example: A Swarm of six Bugs is two tiles away from the target Rocketeer. (Fig.1)
One of the Bugs moves the entire swarm one tile (Fig.2)
A second bug moves the entire swarm another tile (Fig.3), so that all six bugs now occupy the target tile.
Once the Swarm enters the target tile, the remaining four Bugs attack the Rocketeer with one die each, for a total of four separate attacks.
(A large Swarm of Bugs is the most dangerous Alien since it can inflict the most hits in one turn.)

Line of sight (sometimes abbreviated LOS) is the ability to see a target.
It is required to perform attacks as well as to use some items and Overkill Options.
Figures that occupy the same tile always have line of sight to each other.
To determine line of sight between figures occupying different tiles, trace a straight line from the center of the current tile to the center of the target tile.
Rocketeer Line of SightFor Rocketeers, line of sight is blocked by closed hatches, locked and sealed hatches, and un-scanned tiles. Though the hatch graphic might suggest otherwise, the line can be traced along tile edges (see example). If the line passes through a closed hatch, the line of sight is blocked.
When tracing Rocketeer line of sight, an un-scanned tile is treated as a tile with a closed hatch on all six of its sides. Note that effects that do not require line of sight (such as the Neuronic Hyperbolizer) can target Aliens in un-scanned tiles.
Alien Line of SightFor Aliens, line of sight is not blocked by closed hatches or un-scanned tiles. It is only blocked by locked and sealed hatches. Aliens can always trace line of sight into, out of, and through un-scanned tiles (in effect, all Aliens with ranged attacks use psychic energy to quickly open and close hatches as they fire their weapons).
RangeRange is the number of tiles from the tile occupied by the acting figure (the “current tile”) to the target tile, not counting the current tile. While line of sight is traced in a straight line, range is counted along a path of tiles that may not be straight.
When counting range, always trace the shortest possible path that does not cross any tile edges that block line of sight.
10. lIne of sIGHt and ranGe
Range 0 = current tile only.
Range 1 = adjacent to current tile.
Range 2 = 2 tiles from the current tile.
Range 3 = 3 tiles from the current tile.

The Rocketeers use a multitude of human and alien items to accomplish their goals. Human items (known as Rocketeer items) are generally only available at the start of a scenario. Alien items (known as Discovery items) are found as the Rocketeers explore alien vessels. At the start of most scenarios, players can select four Rocketeer items for each Rock-eteer, limiting each Rocketeer to no more than two large items. Once a scenario starts, however, a Rocketeer may collect and carry an unlimited number of items. For full lists of Rocketeer and Discovery items, see the Rocketeer Item List and Discovery Item List (pgs. 29-32).
Aliens never pick up or use items, not even Discovery items.
Using ItemsThere are two general types of items: Weapons and Gear.
Weapons are the most important items: a Rocketeer lacking a Weapon cannot attack Aliens in any way, and Weapons are the most common source of useful Overkills. A Weapon can be used by spending an AP to perform an Attack Action. A single Rocketeer can use the same Weapon for multiple Attack Actions on a single Game Turn, spending one AP each time he or she does so.
In contrast, Gear (non-Weapon items) can only be used once per Game Turn at no AP cost, any time during a Rocketeer’s Actions Phase.
Four of the Gear items are Rocketeer Personal Items (Head-Set, Med-Pack, Soft-Focus Lens, and Tele-Radio). These provide unique enhancements to their owner. Like Weapons, Personal Items may also be used multiple times per Game Turn.
Each item can only be used by a single Rocketeer per Game Turn. (For example, if a Rocketeer uses a Ray Gun and then gives it to another Rocketeer in the same tile, the second Rocketeer cannot use the Ray Gun until the next Game Turn).
Many items have a finite number of charges, which represent the number of times an item may be used in play (for example, Space Bandages). If an item card has this
icon, place green charge cubes on it as indicated by the icon. Each time such an item is used, remove one green charge cube from its card. When such an item is out of charges, it cannot be used.
If an item card does not have such an icon (for example, the Ray Gun), there are no restrictions on the number of times it may be used.
Discovery ItemsDiscovery items enter play as Discovery tokens, distributed face-down on the map during setup. A Rocketeer in the same tile as a Discovery token may pick it up at no AP cost, taking the matching Discovery card and discarding the token.
Rocketeers can use most Discovery items from the moment they are picked up. However, all items marked with an Analyze icon (the Force Field Belt and the Schematics) must be analyzed with a successful Analyze Discovery Item Action before they can be used by any Rocketeer.
Once an item has been successfully Analyzed, it can be used by any Rocketeer for the rest of the game.
Rotate the cards of un-Analyzed Force Field Belts and Schematics sideways as a reminder that they are not yet usable. Note that each individual item must be analyzed (for example, if two Force Field Belts come into play, each must be successfully analyzed before it can be used).
Note: Mysterium and Thrall Oxygen Tanks have no matching cards. For Mysterium, simply keep the Discovery token. For Thrall Oxygen Tanks, discard the Discovery token and add three O2 cubes to the Rocketeer’s character sheet.
11. Items
Item Name
Size
Overkill Option
Attack Range DisplayAt range 0, roll five dice
At range 1, roll three dice

Schematics and ComponentsSchematics are special Discovery items that contain the most obscure secrets of Alien science. They have two alternate uses:
1. Inspiration: A Rocketeer may discard any (unassembled) Schematic during his or her Actions Phase to immediately perform any IQ Action without spending an AP. Or,
2. The Schematic may be assembled to create a powerful high-technology item. First, the Rocketeer must acquire the necessary components listed on the Schematic card. Then, he or she must succeed on an IQ Analyze Action, after which the components are discarded and the Schematic being Analyzed becomes functional (add green charge cubes as indicated by the charge icon on the Schematic card). Failing this Action simply means that the Alien science has not been deciphered. The Schematic and components are unaffected.
Each Schematic card specifies which two of the game’s three components it requires:
• Mysterium is a new crystal xeno-element. It is acquired as a Discovery token; there is no matching Discovery card. It has two uses: as a component for certain Schematics, and as a universal charge for any Discovery item. During his or her Action Phase, a Rocketeer may discard a Mysterium token to replace one spent charge on a Discovery item he or she holds.
• Alien Blood is a biological sample of alien tissue. Rocketeers acquire an Alien Blood marker each time they successfully Subdue a Brain-in-a-Jar, or attack using the Air Knife Rocketeer item or the Proton Blade Discovery item. Alien Blood is only used as a component for certain Schematics.
• Wire is the remnants of hardware used to enslave humans and turn them into unwilling Thralls. Rocketeers acquire a Wire marker each time they succeed on a Subdue Thrall Action. Wire is only used as a component for certain Schematics.
EXAMPLE OF ASSEMBLING A SCHEMATIC:
In this example, the Professor’s Teleporter Schematic card is rotated sideways because it is not yet functional (fig. 1).
To attempt to assemble it, the Professor must have the listed components. With Wire and Mysterium in his possession, the Professor spends an AP to take an IQ Analyze Action (fig. 2).
His IQ is 5, so he rolls 5 dice. His dice roll has two successes, so the Teleporter is completed and rotated upright, the Wire and Mysterium are discarded, and the Professor places two green charge cubes on the Teleporter card (fig. 3).
He chooses to use his Overkill to place another charge cube. He may then use it to teleport himself and any other Rocketeers in his tile to any other scanned tile in the game, spending one charge cube if he does so.
As with all Gear, using the Teleporter does not require him to spend an AP.
Fig.1
Fig.3
Fig.2

Alternative Player OrderPlayer order determination is one of the few points in the game when all players actively participate in the decision-making process. As a result, some groups may find it inordinately difficult or time-consuming.
To expedite matters, such groups should consider having the Rocketeers take their turns in order of Hit Points, from the fewest to most. That way, Aliens will tend to target the least vulnerable Rocketeer. If multiple Rocketeers have the same number of Hit Points, they should take their turns in the following sequence:
Captain, Professor, First Officer, Doctor, Yeoman, Chief
Difficulty ScalingScaling for difficulty is useful for players who find the game too easy or too challenging.
Space Cadet ModeTo play Space Cadets: Away Missions in the easier Space Cadet mode, ignore the third Alien listed on Alien tokens: deploy only the first two Aliens listed. The reduced number of hostiles should help inexperienced players significantly.
Commodore ModeFor players seeking a greater challenge than the standard rules, we suggest using Commodore mode. At the end of each Alien Turn, add 1 Saucerman to every scanned tile that still has a Discovery token on it. Deploying this extra hostile should increase the danger level significantly.
(When playing the Sleeper Ship or Trilon scenarios, these extra Saucermen are placed in addition to any War Thralls or Space Leeches added by the scenario special rules.)
Admiral ModeTo play the game in the even more difficult Admiral mode, use the extra Alien deployment rule from Commodore Mode and add the following rule: a Rocketeer entering a tile containing a non-Stunned Alien cannot spend a Move Action to leave the tile without first spending an Action either to attack or make an IQ Action roll against an Alien.
The Attack Action may be made against any Alien in line of sight, not just against the one in the same tile. This rule models blocking and suppression, preventing the Rocketeers from racing through enemy lines without impediment.
Galactic Overlord ModeFor the truly ambitious space adventurer, we offer Galactic Overlord mode. Such thrill-seeking players will use the rules for Admiral mode, but during the Red Alert Stage they draw Alien tokens instead of Alert tokens.
12. optIonal rules

This example of play explains all the steps of the Professor’s turn.
During the Order Phase, the players decide that the Professor will take the first Rocketeer Turn, for three reasons:
1. He has fewer Hit Points than the Chief and Aliens prioritize targets that move later in the turn;
2. The Professor’s Override Overkill Option might allow the Chief to avoid wasting an AP to open a hatch;
3. The Chief is best at destroying Aliens, it’s wise to save his turn for last to give him maximum targets.
The Professor takes the Order/Scan 1 marker, and commences his Scanning Phase. As he must scan the nearest face-down tile, he can choose either tile B or tile F.
He chooses to scan B.
The tile and both tokens are flipped over to reveal the Alien token and Discovery token depicted in the picture to the right.
Aliens, except for Bugs, are always placed on the scanned tile. Bugs are always placed in the nearest tile with a vent.
In this case, the 2 Saucermen are placed on tile B, and the Bug is placed on tile A.
The revealed Unreasonable Fear Event means all Rocketeers in play Panic, and must lose one O2.
The Heat Ray Discovery token remains on tile B.
13. extended examples of play

The Professor takes his first Action, spending one of his two Standard APs to perform an Attack Action.
He uses his Ray Gun to attack the Bug in his tile. Using the Ray Gun at range 0, he rolls 5 attack dice. The results are 1, 3, 3, 7, 0: three successes.
The first success inflicts one hit on the Bug, and the remaining two are Overkills.
Before spending his two Overkills, the Professor decides to give the other Rocketeer in his tile two O2 cubes.
This leaves the Professor with only one O2… but he sees where he can replenish his O2 supply.
The Professor spends his first Overkill on his Override Overkill Option to open the hatch between tile A and tile C; he places a Hatch Open marker along the edge between the two tiles to mark this.
He spends his second Overkill on the Ray Gun’s Hit-and-Run Overkill Option, which allows him to move one tile—in this case, from tile A to tile C.
When he gets to tile C, he picks up the Thrall Oxygen Tank Discovery token and immediately adds three O2 cubes to his supply, discarding the Thrall Oxygen Tank token.
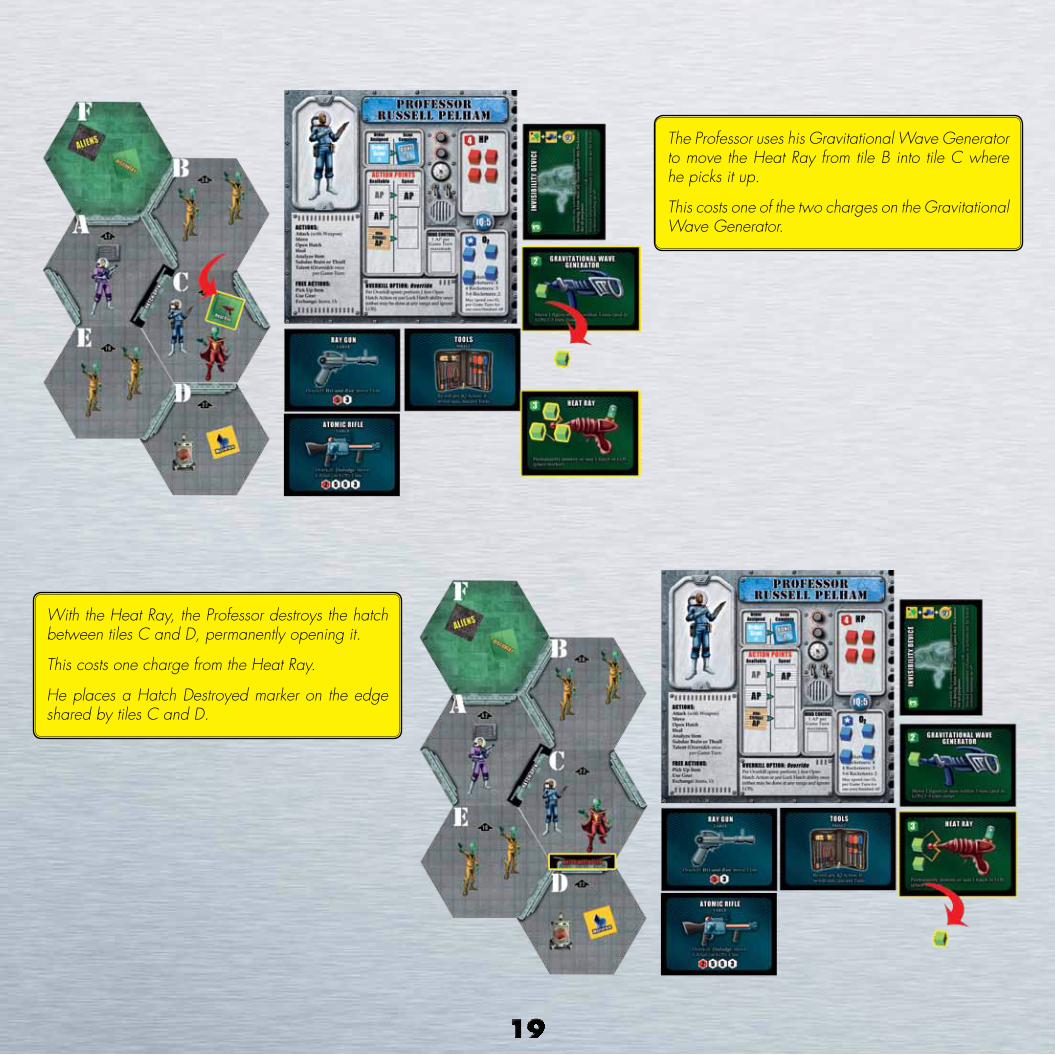
The Professor uses his Gravitational Wave Generator to move the Heat Ray from tile B into tile C where he picks it up.
This costs one of the two charges on the Gravitational Wave Generator.
With the Heat Ray, the Professor destroys the hatch between tiles C and D, permanently opening it.
This costs one charge from the Heat Ray.
He places a Hatch Destroyed marker on the edge shared by tiles C and D.

Now that he has a line of sight into tile D, the Professor spends his second Standard AP to perform another Attack Action.
He fires his Atomic Rifle at the Brain-in-a-Jar in tile D. (He chose not to use his Ray Gun this time because at long range it rolls fewer dice.)
Using the Atomic Rifle at range 1, he rolls 5 attack dice. The results are 1, 3, 3, 8, 8: three successes.
The first success inflicts a hit on the Brain, which is marked with a red Hit Point cube to show how many Hit Points it has remaining. The remaining two successes are Overkills.
The Professor spends the first Overkill on the Brain’s Psychic Scream Overkill Option, which stuns all Aliens in or adjacent to the Brain’s tile.
This places the Leader on tile C and the two Saucermen on tile E on their sides.
The Professor spends the second Overkill on the Atomic Rifle’s Dislodge Overkill Option, choosing to move the damaged Brain from tile D into tile C.

The Professor spends his third AP, a Non-Combat AP, on the Subdue Brain-in-a-Jar Action.
Having 5 IQ, he rolls 5 dice. The roll is 4, 5, 6, 8, 9, and is a failure.
He uses his Tools to re-roll the Action.
Unfortunately, he rolls 7, 7, 8, 8, 0. Not only does he fail to subdue the damaged Brain, but he breaks his Tools and must discard them.
Weighing his options, the Professor determines that the Invisibility Device Schematic he is carrying is best used for a free IQ roll.
He discards the Schematic to perform a free Subdue Brain-in-a-Jar Action, this time rolling 1, 1, 7, 8, 0: two successes.
The first success subdues the Brain and removes it from play (giving the Professor an Alien Blood component marker). He spends the Overkill to dominate the Brain, which entitles him to draw and keep a Dominated Brain card (which provides +1 IQ).

Before his turn ends, the Professor scrutinizes the situation and determines that the Chief (in tile A) might need some help.
The Chief must start his turn by scanning the nearest un-scanned tile (tile F), and will likely want to open the hatch between tiles A and F in order to gain line of sight.
Because the Chief specializes in combat, the Professor decides to open the hatch for him.
The Professor spends one O2 cube to perform an additional Standard Action, which he uses to perform his Override Talent Action to open the hatch between tiles A and F.

Extended Alien Turn example: This is an extended example of an Alien Turn. Aliens always take their turns in order of sentience.
First, the Brain-in-a-Jar in tile E acts.
The Brain cannot move on its own; it only attacks. It performs an automatic Mind Control attack at a range of 2 that does not require line of sight.
This inflicts Mind Control on the Captain and the Yeoman in tile A, who then both slide an AP from the Spent slot on their character sheets to the Mind Control slot.
Second, the Leader in tile C acts. Normally, he would move directly toward the nearest Rocketeer.
However, the locked hatch forces him into a detour. In order to move toward the Rocketeer, he must first move to tile E.
From tile E, he could move to either tile B or tile D to get closer to his target.
Because tile D has the lower tile inventory number (26), he will move there, ignoring the hatch between E and D as he does so.
Because Leaders gather up their troops while moving, the Leader will pick up the Saucerman in tile C and move him to tile D. While there are two Rocketeers in range, the Leader attacks the Captain and not the Yeoman because the Captain has the higher Order/Scan marker number.
Closed hatches do not block line of sight for Leaders, so the Leader attacks, rolling 4 attack dice.
The results are 1, 3, 7, and 8: two successes. The first success inflicts a hit on the Captain, who loses 1 Hit Point.
The second success is an Overkill, which automatically inflicts the Leader’s Panic Overkill Effect on the Captain, forcing the Captain to discard one O2 cube.

Third, the two Saucermen act.
Neither the Saucerman in tile B nor the Saucerman in tile D move because both are already in range of a Rocketeer in tile A.
(Note that even if the Saucerman in tile D was not in range, he would not move again because he was already moved by the Leader this turn.)
Like the Leader, Saucermen’s line of sight extends through closed hatches, and like the Leader, both Saucermen attack the Captain and not the Yeoman because the Captain has the higher Order/Scan marker number.
Each Saucerman attacks with two dice. The first Saucerman rolls 7 and 8: both misses. The second fires at the Captain with 2 attack dice, getting a 1 and 3: two successes. The first success inflicts a hit on the Captain, who loses another Hit Point.
The second success is an Overkill, which automatically activates the Saucerman’s Mind Control Overkill Effect. Because the Captain already suffered Mind Control this turn from the Brain’s attack, the Saucerman’s Overkill Effect is cancelled. (Tip: even though each Alien acts individually, it is sometimes possible to roll a group of Saucermen attacks simultaneously by matching pairs of dice together to ensure that second successes are read as Overkills and not Hits.)
Fourth, the Sentinel acts. Unlike Leaders and Saucermen, it cannot move through closed hatches. However, tile F is un-scanned, which means the Sentinel can move through that tile and into tile A.
Normally, when a Sentinel enters a tile with a Rocketeer, the Rocketeer suffers Panic. But because the Captain already suffered Panic this turn during the Leader’s attack, he is immune. The Yeoman, however, is not, and must lose one O2 cube.
Now the Sentinel attacks, rolling 6 attack dice. He gets 1, 1, 7, 8, 8, 0: two successes. The first success inflicts a hit on the poor Captain, who loses another Hit Point.
The second success in an Overkill, which automatically activates the Sentinel’s Terror Overkill Option.
Consulting the Terror chart, the player rolls a die and gets a 3, which forces the Captain to move into tile D. However, that move is blocked by a hatch, inflicting another hit on the Captain, who loses a Hit Point.
(This is the fourth hit he’s taken this turn—two more hits and he dies, causing all the players to lose the game.)

Seventh, the Bugs act. The first priority for Bugs is to form a single Swarm with all other non-Stunned Bugs.
One of the Bugs in tile C is Stunned, so it will not move, nor will it affect the movement of the other Bugs. If the hatch between tile B and C were not locked, the Bug in tile C could move into tile B, and the Bug in tile B could then move both of them into tile A, where the Bug in tile A would then attack the Captain.
However, the hatch between tile B and C is locked, so the closest the Bug in tile C can get to the other Bugs is tile E.
Because the first priority for all Bugs is to form a single Swarm, the Bug in tile A moves into tile B and forms a Swarm with the Bug there.
Now the Bug starting in tile B acts, moving itself and the rest of its Swarm (in this case, the one Bug from tile A) into tile E, where they form a Swarm of three Bugs. Because all the Bugs moved this turn, they cannot attack, even if they did have a target to attack in their tile, which they do not.
Fifth, the Thrall in tile C acts. Because all hatches between him and his target are closed or locked, there is no open path from his tile to his target, so the Thrall does not move.
There are no Rocketeers in the Thrall’s tile, so he does not attack.
Sixth, the Space Leech acts. Like the Thrall, the Space Leech cannot move through closed hatches and has no way of reaching a Rocketeer, so it does not move at all, nor does it attack.

Rocketeer List
Captain Ben Riggs: 6 HP, 3 IQ, 3 Standard AP.
Overkill Option: Command. Spend an Overkill to give a bonus Command AP marker to a Rocketeer in the same tile (or anywhere if the Captain is carrying the Tele-Radio). The Command AP is a Standard AP but more flexible: it can be saved between Game Turns, and may be spent at any time during any Rocketeer’s turn.
The Captain can give only 1 Command AP to each Rocketeer per Game Turn, and each Rocketeer can only hold 1 Command AP in his or her Available slot and 1 Command AP in his or her Spent slot. During the Cleanup Phase, spent Command AP’s are returned to the Captain.
First Officer Annie Fletcher: 4 HP, 4 IQ, 2 Standard AP, 1 Non-Combat AP.
Overkill Option: Move Out. Spend an Overkill to give an immediate Move Action to herself or to one Rocketeer in the same tile (or anywhere if she has the Head-Set). Unlike the Captain’s Command AP, this Move Action cannot be saved—it must be used immediately.
Doctor Hugo Garcia: 5 HP, 4 IQ, 2 Standard AP, 1 Non-Combat AP.
Overkill Option: Sawbones. Spend an Overkill to restore 1 HP to himself or to one Rocketeer in the same tile (or an adjacent tile in his line of sight if he has the Med-Pack).
Professor Russell Pelham: 4 HP, 5 IQ, 2 Standard AP, 1 Non-Combat AP.
Overkill Option: Override. Spend an Overkill to open or lock any hatch on the map, regardless of line of sight. (This is the only way to lock hatches.) Locked hatches block all movement and line of sight for Rocketeers and Aliens. Note that the Professor cannot use Override to place a Hatch marker on the edge between two tiles, one of which is scanned and the other un-scanned, unless there is a hatch on the scanned tile’s edge.
Chief Lance DeSoto: 6 HP, 2 IQ, 2 Standard AP, 1 Combat AP.
Overkill Option: Strafe. Spend an Overkill to inflict 1 hit on any Alien in LOS and in range of a weapon. If the Overkill was obtained from an Attack, the Alien must be in range of the Weapon used, and the first Alien targeted by Strafe must occupy a tile adjacent to the original target. When multiple Overkills from a single dice roll are spent to Strafe, each target must occupy a different tile, and each tile must be adjacent to at least one other targeted tile.
Yeoman Cookie Hannah: 5 HP, 3 IQ, 2 Standard AP, 1 Non-Combat AP.
Overkill Option: Sway. Spend an Overkill to Stun one Alien on the same tile (or any tile in line of sight if she has the Soft-Focus Lens). The target Alien must have only 1 HP (which includes Sentinels and Brains-in-a-Jar reduced to 1 HP).
14. reference lIsts

Alien List (in order of sentience)
Brains-in-a-Jar:Movement Summary: Brains-in-a-Jar cannot move themselves during the Alien Turn. They can only be moved in the following ways:
• Moved by a Rocketeer (using the Atomic Rifle’s Dislodge Overkill Option or certain Discovery items)• Carried by a War Thrall that starts the Alien Turn in the same tile. (War Thralls only appear in some scenarios.)
Attack Summary: Instead of rolling attack dice, Brains-in-a-Jar automatically inflict the combat effect Mind Control on every Rocketeer within 2 tiles (ignoring line of sight).
Overkill Effect: Not applicable. As they do not roll dice to attack, Brains-in-a-Jar cannot achieve Overkills.
Overkill Option: The attacking Rocketeer may inflict a Psychic Burst combat effect.
Hit Points: 2. When reduced to 1 HP they can be targeted by a Subdue Brain-in-a-Jar IQ Action.
Leaders: Movement Summary: Leaders move 2 tiles. They can move through closed hatches, but not locked or sealed hatches.
If a Leader enters or starts in a tile occupied by any Saucermen, move the Saucermen with him. Saucermen moved by a Leader do not move again during the current Alien Turn, and they attack during their Attack Protocol, not the Leader’s.
Attack Summary: Leaders may attack on the same turn that they move. They may attack through closed hatches.
• Range 1: Roll 4 attack dice.First Success: Inflict 1 hit on the target Rocketeer.
Overkill Effect: Inflict the Panic combat effect on the target Rocketeer.
Overkill Option: The attacking Rocketeer may inflict a Psychic Scream combat effect.
Hit Points: 1
Saucermen:Movement Summary: Saucermen move 1 tile. They can move through closed hatches, but not locked or sealed hatches.
Attack Summary: Saucermen may attack on the same turn that they move. They may attack through closed hatches.
• Range 1: Roll 2 attack dice. (Note: Because of the large numbers of attacking Saucermen, players may sometimes find it easiest to resolve their attacks by rolling several matched pairs of dice at once. Matched pairs of dice will allow players to check for Overkills on their attacks.)
First Success: Inflict 1 hit on the target Rocketeer.
Overkill Effect: Inflict the Mind Control combat effect on the target Rocketeer.
Overkill Option: The attacking Rocketeer may inflict the Psychic Scream combat effect.
Hit Points: 1

Sentinels:Movement Summary: These giant brutes move 2 tiles. They cannot move through closed hatches. When a Sentinel enters a tile with any Rocketeers, all Rocketeers on that tile suffer the Panic combat effect.
Attack Summary: Sentinels can move and attack on the same turn.
• Range 0: Roll 6 attack dice.First Success: Inflict 1 hit on the target Rocketeer.
Overkill Effect: Inflict the Terror combat effect on the target Rocketeer.
Overkill Option: Stagger. The attacking Rocketeer may reduce the Sentinel’s attack dice by two for the rest of the Game Turn. Use a spare die as a Staggered marker to denote the number of attack dice the Sentinel has remaining. The Staggered marker is removed during Cleanup at the end of the Game Turn. A Sentinel may be staggered multiple times by a single Attack Action.
Hit Points: 4
Thralls:Movement Summary: These poor enslaved humans move 1 tile. They cannot move through closed hatches.
Attack Summary: Thralls cannot move and attack in the same turn. To attack, they must begin the Alien Turn on the same tile as a Rocketeer.
• Range 0: Roll 1 attack die.First Success: Inflict 1 hit on the target Rocketeer.
Overkill Effect: Not applicable. As they roll only 1 attack die, Thralls cannot achieve Overkills.
Overkill Option: Not applicable. They cannot be attacked.
Hit Points: Not applicable. They cannot be attacked.
Special Notes: Even though Thralls are actually enslaved humans, they are considered Aliens for all game effects. A Thrall can never be attacked directly or indirectly (for example, by Weapons that affect all Aliens in a tile, such as the Demo Charge or Flame Gun). Some scenarios use War Thralls, an enhanced Thrall, which are described in the Scenario Booklet.
Space Leeches:Movement Summary: These hideous Aliens move 1 tile. They cannot move through closed hatches.
Attack Summary: Space Leeches can move and attack on the same turn.
• Range 0: Roll 3 attack dice.First Success: Inflict 1 hit on the target Rocketeer.
Overkill Effect: Each Overkill causes the disgusting creature to Spawn. Immediately add a new Space Leech to the current tile and attack with it. The new Space Leech can also Spawn by achieving Overkills; there is no limit to this chain reaction!
Overkill Option: Revulsion. The Space Leech is so vile it inspires a furious response. At no AP cost, the attacking Rocketeer may attack any other Leech in the Rocketeer’s line of sight and in range of the Weapon used. Overkills achieved on this free attack can be spent normally (including on Revulsion again).
Hit Points: 1
Special Effect: IQ Reduction. Each Space Leech in a Rocketeer’s tile reduces the Rocketeer’s IQ by 1, to a minimum of 0. All Rocketeers in the tile are affected. The effect only applies while the Leech(es) and Rocketeer(s) occupy the same tile.

Rocketeer Weapons (L) = Large item
Bugs:Placement Summary: Bug must appear on the tile with a vent closest to the scanning Rocketeer. If multiple vents are equidistant, the Bug will appear on whichever one of them has the lowest inventory number.
Movement Summary: A single Bug moves 1 tile. A Swarm of Bugs moves 1 tile per Bug in the Swarm, including Bugs added during the current Game Turn. Bugs can move through closed hatches, but not locked or sealed hatches. Bugs will not move toward a Rocketeer unless only one Swarm (or Bug) exists on the map.
Attack Summary: A Bug that moves or contributes a move to a Swarm cannot attack during the same Game Turn.
• Range 0: Roll 1 attack die per Bug in the Swarm, subtracting 1 attack die for each tile the Swarm moved during this Game Turn.
First Success: Inflict 1 hit on the target Rocketeer.
Overkill Effect: Not Applicable. As each Bug only rolls 1 attack die, Bugs cannot achieve Overkills.
Overkill Option: Exterminate. The attacking Rocketeer may inflict 1 hit on another Bug in line of sight and in range of the Weapon used.
Hit Points: 1
Figure Limit: Each scenario only uses 5 Bugs per Rocketeer in play, up to 20 Bugs. Return excess Bugs to the game box before play.
Weapons are distinguished from Gear by the Attack Range Display at the bottom of their cards. To use any Weapon, a Rocketeer must spend 1 AP to perform a Combat Action. Unlike Gear, Weapons can be used multiple times per turn, at a cost of 1 AP per use.
Atomic Rifle (L): Long-range weapon; targets a single Alien.• Range 0 (same tile): Roll 2 attack dice.• Range 1–2: Roll 5 attack dice.• Range 3: Roll 3 attack dice.
First Success: Inflict 1 hit on target.Overkill Option: Dislodge: Move any Alien in range and line of sight one tile in any direction, obeying normal Alien movement restrictions. Multiple Overkills may be spent to move an Alien multiple tiles, even pushing it onto an un-scanned tile. This Overkill Option can move the normally immobile Brain-in-a-Jar, though closed hatches prevent such movement.
Ray Gun (L): Short-range weapon; targets a single Alien.• Range 0 (same tile): Roll 5 attack dice.• Range 1: Roll 3 attack dice.
First Success: Inflict 1 hit on target.
Overkill Option: Hit-and-Run: Move the attacking Rocketeer one tile in any direction, following normal Rocketeer movement rules.
Air Knife: Close-combat weapon; targets a single Alien.• Range 0 (same tile): Roll 3 attack dice.
First Success: Inflict 1 hit on target and gain 1 Alien Blood marker.Overkill Option: Extract: Take 1 extra Alien Blood marker per Overkill spent.
Demo Charge: One-use explosive; targets a single Alien. Cannot attack at range 0 and cannot attack a tile occupied by a Rocketeer or Thrall.
• Range 1 only: Roll 10 attack dice. First Success: Inflict 1 hit on target.Overkill Option: Shrapnel: Inflict 1 hit on any Alien, including the original target, in the target tile per Overkill spent. (This is an exception to the standard rule prohibiting Overkills from being used to hit a target multiple times.)
Flame-Gun (L): Short-range weapon; targets every Alien on target tile. Cannot attack at range 0 and cannot attack a tile occupied by a Rocketeer or Thrall.
• Range 1 only: Roll 2 attack dice against each Alien in the target tile.
First Success: Inflict 1 hit on target.Overkill Option: Inflict Terror on one Alien in the target tile per Overkill spent.

Rocketeer Gear (L) = Large item
Accelerator Hypo: 1 charge. The Rocketeer using the Hypo loses 1 HP and immediately resets any APs in his or her Spent slot to the Available slot.
Electro-Mine: 1 charge. During his or her Actions Phase, a Rocketeer may place the Electro-Mine token in his or her current tile at no AP cost.
When a Sentinel enters that tile, it inflicts Panic on any Rocketeers there normally, but then the Mine detonates, killing that Sentinel and removing the Electro-Mine.
Any time before the Electro-Mine detonates, it may be picked up by a Rocketeer.
First Aid Kit: The Rocketeer holding the First Aid Kit rolls +2 dice when performing IQ Heal Actions.
Flag: 1 charge. All Rocketeers, in any order, within line of sight of the Rocketeer using the Flag may immediately perform any one Action.
Food Pills and Powdered Juice: 2 charges. The Rocketeer using this item heals 2 HP per charge spent.
Head-Set (L): Personal Item. Usable only by the First Officer. Allows her to offer her Move Out Overkill Option (giving a free Move Action) to a Rocketeer anywhere on the map (not just to one in her current tile).
Holster: Gives the Ray Gun +1 die for its first attack each Game Turn.
Med-Pack (L): Personal Item. Usable only by the Doctor. He gains +1 die when performing IQ Heal Actions. Also allows him to heal Rocketeers at range 1 in line of sight (instead of just range 0).
Oxygen Tank: Adds two O2 to the Rocketeer’s supply. Discard the Oxygen Tank after use.
Reference Book: 3 charges. Gives the Rocketeer +1 IQ for one roll.
Soft-Focus Lens: Personal Item. Usable only by the Yeoman. Allows her to use her Sway Overkill Option on any Aliens with 1 HP in her line of sight (instead of just her current tile).
Space-Bandages: 3 charges. Allows the Rocketeer to perform an IQ Heal Action without spending an AP.
Stun Pellet: 1 charge. Automatically Stun all Aliens in the Rocketeer’s current tile or in an adjacent tile in line of sight.
Note that like all gear, the Stun Pellet is not a weapon and does not require the Rocketeer to spend an AP to use it.
Tape Recorder: Allows a Rocketeer to “store” one unspent non-Combat Overkill (i.e., an Overkill achieved on any Action except a Combat Action) for later use.
When an unspent Overkill is stored, place a green cube on the “Recording” space. When the Overkill is spent, remove the cube.
The Tape Recorder can be re-used any number of times, but can only store one Overkill at a time.
Tele-Radio (L): Personal Item. Usable only by the Captain. Allows him to give a Command AP to a Rocketeer anywhere on the map (not just to one on his current tile).
Tools: Allows the Rocketeer to re-roll an IQ Action once. If the re-roll has no successes, the Tools break and its card is discarded.

Discovery ItemsWeaponsProton Blade: 2 charges. A weapon that allows a Rocketeer to spend a Combat Action to attack at close range. It targets a single Alien.
• Range 0: Roll 6 attack dice.First Success: Inflict 1 hit on the target and gain 1 Alien Blood marker.
Overkill Option: Slash: For each Overkill spent, inflict 1 hit on any Alien in the target tile or gain 1 Alien Blood marker. This is an exception to the rule prohibiting Overkills from being used to hit a target multiple times.
GearAlien Blood: Component used to assemble Schematics. Can only be gained by Subduing a Brain-in-a-Jar or attacking Aliens with an Air Knife or Proton Blade.
Force Field Belt: 3 charges. Requires an Analyze action to function. Instead of losing 1 HP when hit by an Alien, the Rocketeer may choose to instead lose 1 charge from the Force Field Belt. This item may be used multiple times in one turn
Gravitational Wave Generator: 2 charges. Allows the Rocketeer to move one figure or item within 3 tiles and in line of sight by 1, 2, or 3 tiles toward the Rocketeer.
Heat Ray: 2 charges. Choose one hatch in line of sight of the Rocketeer. This hatch becomes permanently closed (sealed) or open (destroyed). Place a Sealed Hatch or Destroyed Hatch marker on it. The Heat Ray cannot seal a destroyed hatch or vice versa.
Impossible Cube: 3 charges. The Rocketeer rolls 5 dice. Successes may be spent on the Rocketeer’s personal Overkill Option.
Ionoscope: 2 charges. Gives the Rocketeer an additional success on any IQ Action roll. The charge must be spent before making the roll.
Mentality Helmet: 2 charges. The Rocketeer may ignore Panic or Mind Control.
Mysterium: Component used to assemble Schematics. The Rocketeer may instead discard the Mysterium token to replace one spent charge on any Discovery card he or she holds.
It has no matching Discovery card; Rocketeers use the Mysterium token itself.
Replicator: 2 charges. The Rocketeer can duplicate one component (Alien Blood, Mysterium, or Wire) he or she is carrying, gaining an extra token or marker of that component.

Sonic Repulsor: 3 charges. Push one Alien, Rocketeer, or item in line of sight away from the user until it leaves the Rocketeer’s line of sight or reaches a closed hatch or the map edge. The target need not be pushed in a straight line.
Strangely Glowing Orb: 3 charges. When performing an IQ Action, the Rocketeer gains +1 IQ for that roll. Must be used before rolling the IQ Action.
Telepathy Band: 2 charges. Allows a Rocketeer to access the personal Overkill Option of another Rocketeer in play. The Telepathy Band can be used either as part of a Talent Action, or when spending Overkills after a single roll of the dice. (For example, spending 3 Overkills and 1 charge of the Telepathy Band allows the Rocketeer to use a partner’s Overkill Option three times.)
Thrall Oxygen Tank: The Rocketeer gains three O2. This item is represented by a token; it does not have a corresponding card. (The Oxygen Tank, available as a Rocketeer item, is a distinct item that only adds two O2 cubes, not three.)
Time Warp: 2 charges. After any dice roll, the Rocketeer may re-roll any number of dice once.
Wire: Component used to assemble certain Schematics. Can only be gained by succeeding on a Subdue Thrall Action.
X-Ray Goggles: 3 charges. The Rocketeer can ignore one closed hatch when tracing line of sight.
Schematics:Schematics can be used in one of two ways:
1. Inspiration: Any unassembled Schematic may be discarded during the Actions Phase to immediately perform any IQ Action without spending an AP. Or,
2. If a Rocketeer holds the two components listed on a Schematic card, he or she may perform an Analyze Discovery Item IQ Action to assemble the Schematic (discarding both components if successful).
Thereafter, any Rocketeer carrying the assembled Schematic may use its printed effect, but may no longer discard it for the free IQ Action.
Invisibility Device: 2 charges. Analyze. This item is used at any point during the Alien Turn. During that Alien turn, all Aliens completely ignore the Rocketeer.
Neuronic Hyperbolizer: 2 charges. Analyze. Stun all Aliens in any one scanned tile. This does not require line of sight.
Reality Inverter: 2 charges. Analyze. A Rocketeer uses this item after rolling the dice. Instead of successes on die rolls of 1–3, the rolled dice succeed on 8–10. This is an exception to the standard rule.
Stasis Box: 2 charges. Analyze. Allows the Rocketeer to sort through all un-used Rocketeer item card and gain one of them.
Tantalus Projector: 1 charge. Analyze. Allows the Rocketeer to immediately eliminate any 1 Alien figure anywhere on the map, regardless of Hit Points or line of sight.
Teleporter: 2 charges. Analyze. Transport the Rocketeer plus any other Rocketeers in the same tile to any one scanned tile.

Combat Effects List:Exterminate: Inflict 1 hit on a Bug in line of sight and range of the attacking Rocketeer’s Weapon.
Grapple: The affected Rocketeer cannot leave the grappling War Thrall’s tile by spending an AP to take a Move Action. Tip its figure over as a reminder.
He or she may exit the tile in other ways (e.g., an Overkill using the Ray Gun, the First Officer’s Move Out Overkill Option), or may end the effect in other ways (Subdue Thrall, moving the War Thrall out with the Atomic Rifle’s Dislodge Overkill Option, etc.).
Mind Control: The affected Rocketeer loses use of 1 AP during the next Game Turn.
To record this, slide one AP marker from the Spent slot to the Mind Control slot.
Note: Rocketeers can never lose more than 1 AP per turn to any combination of causes.
Panic: The affected Rocketeer loses one O2. If this reduces the Rocketeer’s O2 to zero, the Rocketeer dies and all Rocketeers lose the game immediately.
Note: A Rocketeer can never lose more than one O2 per Game Turn to Panic.
Psychic Burst: Stun all other Aliens within one tile of the affected Brain-in-a-Jar, regardless of line of sight. The Brain-in-a-Jar that caused the Psychic Burst is not stunned.
Psychic Scream: Stun one Leader or Saucerman anywhere on the map, regardless of line of sight.
Spawn: Immediately add a new Space Leech to the current tile and attack with it.
Stagger: Each Stagger result inflicted on a Sentinel reduces its attack dice by two for the rest of the Game Turn. For example, a Sentinel that incurred three Stagger results could not attack at all, though it would still inflict Panic normally. Use a spare die as a Staggered marker to denote the number of attack dice the Sentinel has remaining.
Stun: A stunned Alien does nothing during the current Game Turn. Tip its figure over as a reminder. Stunned Aliens recover (stand the figures up) during the Cleanup Step at the end of the Game Turn.
Terror: Roll 1 die per Overkill achieved by the attacking Sentinel or Flame Gun, and resolve the corresponding effect:
• 1–6: Move the affected Rocketeer or Alien one tile based on the die roll. On a roll of 1, move in the direction of the tile’s arrow. On a roll of 2, move in the direction of the next tile clockwise, and so forth. If the move is prohibited,* then the victim remains in place and takes 1 hit.
• 7–8: Move the affected Rocketeer or Alien one tile in a direction of the player’s choice, following normal movement rules.
• 9–10: No effect * Prohibited moves for Rocketeers are through closed or sealed hatches, into un-scanned tiles, or off the map. Prohibited moves for Aliens are through closed hatches (if that Alien type is prohibited from moving through hatches), through sealed hatches, or off the map.

Rescued Thralls List:Rocketeers draw a random Rescued Thrall card if they spend an Overkill on a Subdue Thrall action. Note that only one Overkill may be spent in this manner.
Rocketeers use Rescued Thrall cards exactly like Gear items.
Boy: The active and nimble Boy allows the Rocketeer to pick up one item in an adjacent tile in line of sight.
Bus Driver: The loudmouth Bus Driver is full of hot air; the first Rocketeer to acquire him immediately gains two O2.
Co-Ed: 2 charges. The grateful college Co-Ed gives the Rocketeer a good-luck kiss, granting +2 dice for any Action.
Cowboy: To show his appreciation, the Cowboy grants the Rocketeer one free Attack per turn. He rolls 1 attack die at a single target at range 0–1 and in line of sight.
Football Player: This sturdy athlete grants the Rocketeer a free Open Hatch Action every turn.
Girl: Inspired to protect the rescued Girl from danger, the Rocketeer may ignore Panic.
Hobo: 2 charges. The unsuspecting Aliens are lulled by the musical strains from his harmonica. The Rocketeer may Stun all Aliens in his or her tile.
Long-Lost Brother: 2 charges. The estranged brother of a Rocketeer interposes himself when danger strikes. He takes 1 hit instead of the Rocketeer.
Sarge: The gung-ho military man offers tactical advice, granting +1 die to one Attack Action per turn.
Scientist: 2 charges. The inside knowledge of the ingenious scientist grants +1 Overkill on any successful IQ Action. The Rocketeer may spend the charge after rolling the dice.
CREDITS
Game & Scenario Design: Dan Raspler & Al Rose
Illustrations & Graphic Design: William Bricker (www.kavoc.com)
Rules & Scenario text: Dan Raspler
Creative Consultant: Garry Haggerty
Project Manager: Stephen M. Buonocore
Rulebook Layout: Paul Grogan, Gaming Rules! & William Bricker
Proofreader: Josh Yearsley
Playtesters: Morgan Dontanville, Geoff Gambil, Chris Greenfield, Scott Haggerty, Stan Hilinsky, Jay Kleinman, Josh Look, Matt Loter, Jeff Luce, Clan Marmour, Chad Mekash, Scott Muldoon, Lance Myxter, Saul Naschsen, Pete Putnam, Shellie Uba Rose, Aaron Silverman, Payton Silveman, Britt Strickland, J.R. Tracy.
And special thanks to Shellie Uba Rose at Fortress: Ameritrash (FortressAT.com) for her boundless patience and support!
(c) 2015 Stronghold Games LLC, a Delaware USA Limited Liability Company. All Rights Reserved.
If you have any questions, please email us at: [email protected] us on Facebook: www.facebook.com/StrongholdGamesFOLLOW us on Twitter: @StrongholdGamesTo see our other great games and to sign up for our Newsletter to find out about future games, visit Stronghold Games on the web at:
www.StrongholdGames.com

The Game TurnRocketeer Turn
1) Order Phase: Players choose one Rocketeer to take his or her turn. That player takes the lowest numbered Order/Scan marker available (starting with Rocketeer 1).
2) Scanning Phase: The acting Rocketeer must scan one of the nearest face-down tiles. Flip that tile and all tokens on it, triggering the effects of Alien or Alert tokens. If no tiles are available to scan, begin the Red Alert Stage.
3) Actions Phase: The acting Rocketeer spends his or her 3 Action Points (APs) to perform 3 Actions. At no AP cost, he or she may trade with others on the same tile, pick up Discovery items on the same tile, and use Gear. Once during this Phase, the Rocketeer may spend 1 O2 to perform an additional Action.
Repeat Steps 1–3 for the next Rocketeer (Rocketeer 2, Rocketeer 3, etc.) until all Rocketeers have taken a turn. If the scenario victory conditions are met at any time during a Rocketeer turn and all Rocketeers are still alive, the players instantly win.
Alien Turn:
All Aliens act in order of sentience according to their Movement and Attack Protocols:
(1) Brains-in-a-Jar (2) Leaders (3) Saucermen (4) Sentinels (5) Thralls (6) Space Leeches(7) Bugs
Cleanup:
All Stunned Aliens recover.
Remove all Hatch Open markers, Hatch Locked markers, and Staggered markers (Sentinels).
Reset all Rocketeers’ AP markers from their Spent slot to their Available slot, and from their Mind Control slot to their Spent slot.
Collect the Order/Scan markers and set them aside for the Order Phase of the next Rocketeer Turn.