spearman's rank calculations
TRANSCRIPT

How and why to use Spearman’s Rank…
If you have done scattergraphs, Spearman’s Rank offers you the opportunity to use a statistical test to get a value which can determine the strength of the relationship between two sets of data…
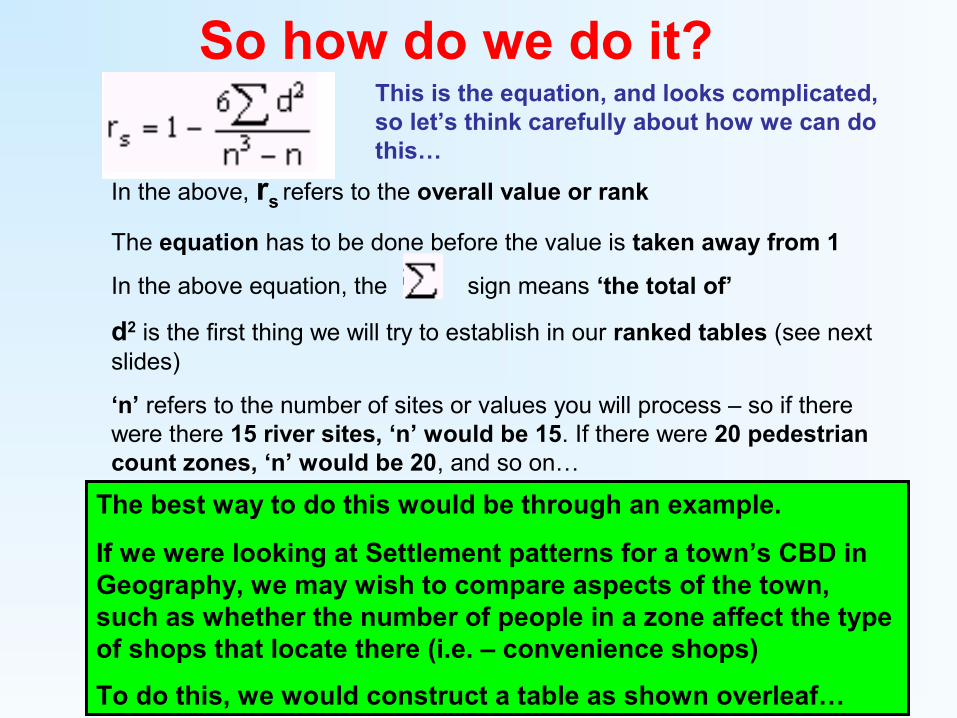
So how do we do it?This is the equation, and looks complicated, so let’s think carefully about how we can do this…
The best way to do this would be through an example.
If we were looking at Settlement patterns for a town’s CBD in Geography, we may wish to compare aspects of the town, such as whether the number of people in a zone affect the type of shops that locate there (i.e. – convenience shops)
To do this, we would construct a table as shown overleaf…
In the above, rs refers to the overall value or rank
The equation has to be done before the value is taken away from 1
In the above equation, the sign means ‘the total of’
d2 is the first thing we will try to establish in our ranked tables (see next slides)
‘n’ refers to the number of sites or values you will process – so if there were there 15 river sites, ‘n’ would be 15. If there were 20 pedestrian count zones, ‘n’ would be 20, and so on…
Zone Pedestrians Rank Convenience shops
Rank (r)
Difference (d)D2
1 40 8
2 8 2
3 25 5
4 60 15
5 12 7
6 18 3
7 19 4
8 27 8
9 24 7
10 21 6
11 64 19
12 70 22
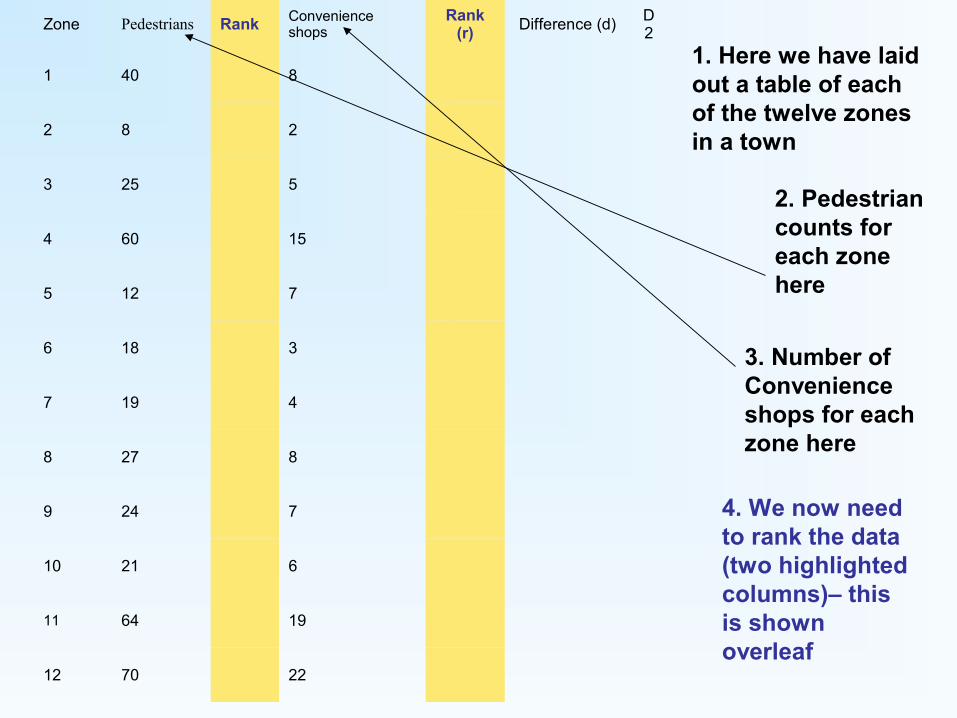
1. Here we have laid out a table of each of the twelve zones in a town
2. Pedestrian counts for each zone here
3. Number of Convenience shops for each zone here
4. We now need to rank the data (two highlighted columns)– this is shown overleaf
Zone Pedestrians Rank Convenience shops
Rank (r)
Difference (d)D2
1 40 4 8
2 8 12 2
3 25 6 5
4 60 3 15
5 12 11 7
6 18 10 3
7 19 9 4
8 27 5 8
9 24 7 7
10 21 8 6
11 64 2 19
12 70 1 22
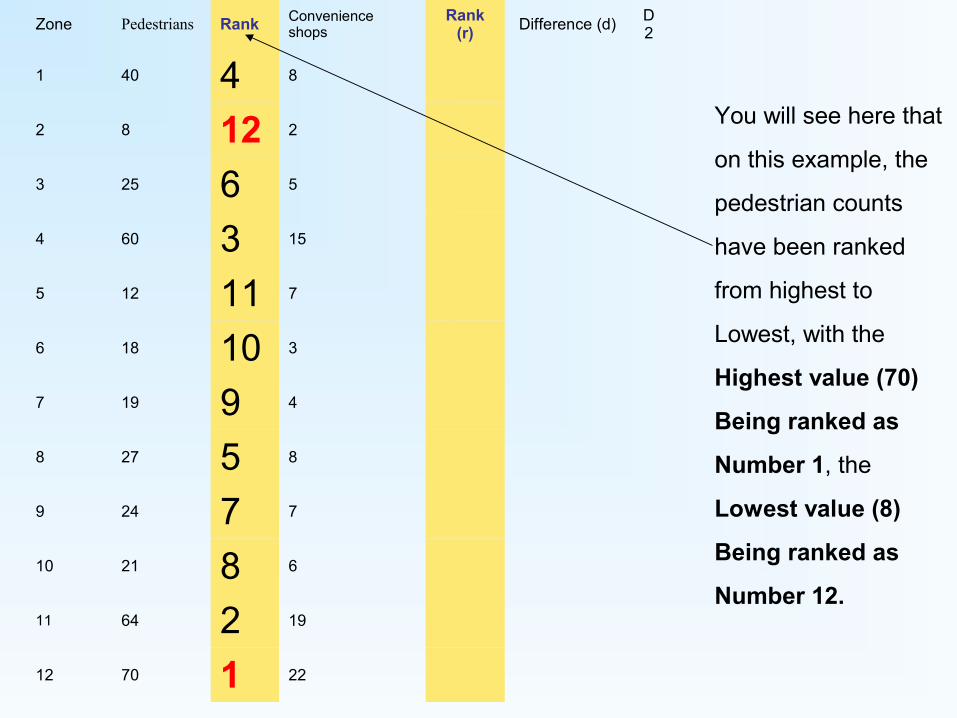
You will see here that
on this example, the
pedestrian counts
have been ranked
from highest to
Lowest, with the
Highest value (70)
Being ranked as
Number 1, the
Lowest value (8)
Being ranked as
Number 12.
Zone Pedestrians Rank Convenience shops
Rank (r)
Difference (d)D2
1 40 4 8
2 8 12 2
3 25 6 5
4 60 3 15 35 12 11 7
6 18 10 3
7 19 9 4
8 27 5 8
9 24 7 7
10 21 8 6
11 64 2 19 212 70 1 22 1
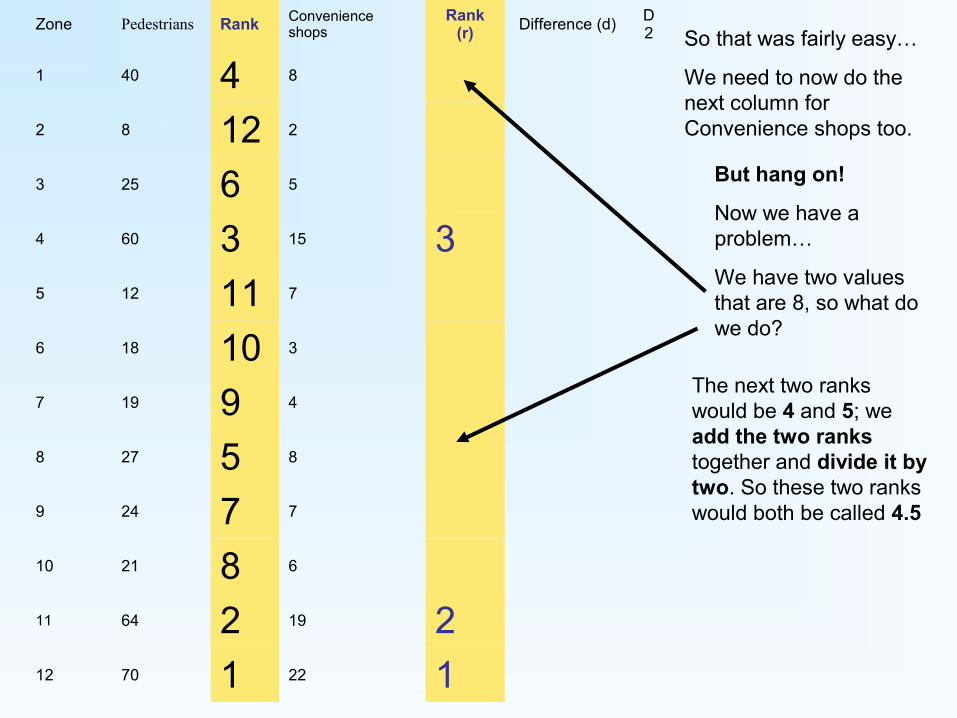
So that was fairly easy…
We need to now do the next column for Convenience shops too.
But hang on!
Now we have a problem…
We have two values that are 8, so what do we do?
The next two ranks would be 4 and 5; we add the two ranks together and divide it by two. So these two ranks would both be called 4.5

Zone Pedestrians Rank Convenience shops
Rank (r)
Difference (d)D2
1 40 4 8 4.52 8 12 2
3 25 6 5
4 60 3 15 35 12 11 7 6.56 18 10 3
7 19 9 4
8 27 5 8 4.59 24 7 7 6.510 21 8 6
11 64 2 19 212 70 1 22 1
This is normally the point where one of the biggest mistakes is made. Having gone from 4.5, students will often then rank the next value as 5.
But they can’t! Why not?
Because we have already used rank number 5! So we would need to go to rank 6
This situation is complicated further by the fact that the next two ranks are also tied.
So we do the same again – add ranks 6 and 7 and divide it by 2 to get 6.5

RankRank
(r)
4 4.5
12 12
6 9
3 3
11 6.5
10 11
9 10
5 4.5
7 6.5
8 8
2 2
1 1
Having ranked both sets of data we now need to work out the difference (d) between the two ranks. To do this we would take the second rank away from the first.
This is demonstrated on the next slide

Zone Pedestrians Rank Convenience shops
Rank (r)
Difference (d)
1 40 4 8 4.5 -0.52 8 12 2 12 03 25 6 5 9 -34 60 3 15 3 05 12 11 7 6.5 4.56 18 10 3 11 -17 19 9 4 10 -18 27 5 8 4.5 0.59 24 7 7 6.5 0.510 21 8 6 8 011 64 2 19 2 012 70 1 22 1 0
The difference between the two ranks has now been established
So what next? We need to square each of these d values…
Don’t worry if you have any negative values here – when we square them (multiply them by themselves) they will become positives

Zone Pedestrians Rank Convenience shops
Rank (r)
Difference (d)
1 40 4 8 4.5 -0.52 8 12 2 12 03 25 6 5 9 -34 60 3 15 3 05 12 11 7 6.5 4.56 18 10 3 11 -17 19 9 4 10 -18 27 5 8 4.5 0.59 24 7 7 6.5 0.510 21 8 6 8 011 64 2 19 2 012 70 1 22 1 0
D2
0.25
0
9
0
20.25
1
1
0.25
0.25
0
0
0
So, the first value squared would be 0.25 (-0.5 x -0.5)

So what do we with these ‘d2’ figures?
First we need to add all of the figures in this d2 column together
This gives us…. 32Now we can think about doing the actual equation!

Firstly, let’s remind ourselves of the equation...
In this equation, we know the total of d2, which is 32
So the top part of our equation is…
6 x 32
We also know what ‘n’ is (the number of sites or zones - 12 in this case), so the bottom part of the equation is…
(12x12x12) - 12

We can now do the equation…
6 x 32
123 - 12
192
1716
OK – so this gives us a figure of 0.111888111888

This is the equation, which we will by now be sick of!
I have circled the part of the equation that we have done…
Remember that we need to take this value that we have calculated away from 1. Forgetting to do this is probably the second biggest mistake that people make!
So…
1 – 0. 111888111888 = 0.888
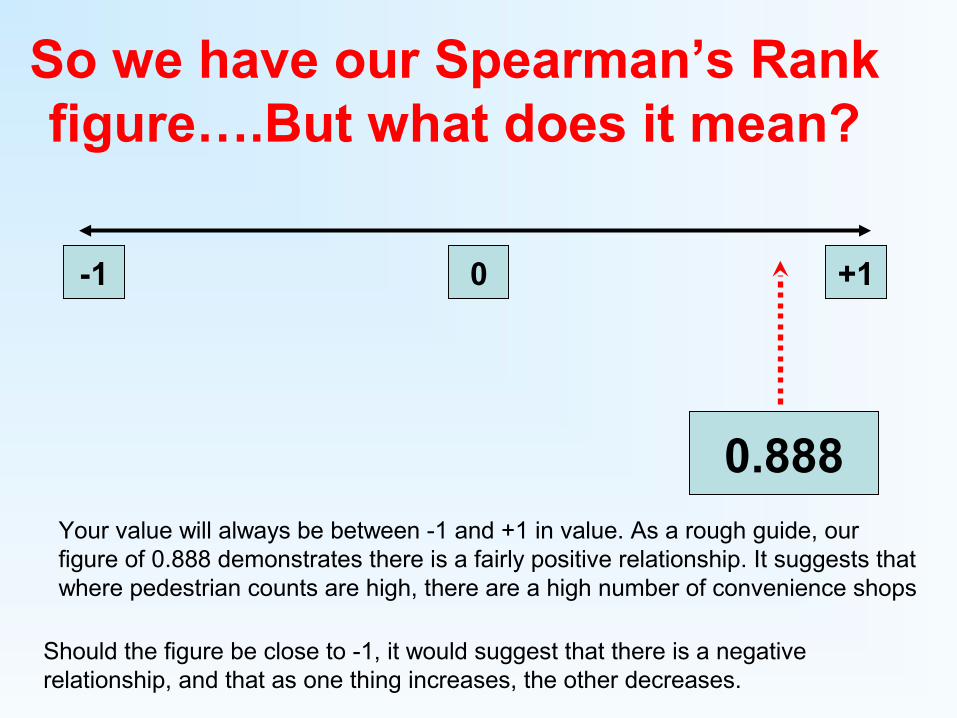
So we have our Spearman’s Rank figure….But what does it mean?
-1 0 +1
0.888Your value will always be between -1 and +1 in value. As a rough guide, our figure of 0.888 demonstrates there is a fairly positive relationship. It suggests that where pedestrian counts are high, there are a high number of convenience shops
Should the figure be close to -1, it would suggest that there is a negative relationship, and that as one thing increases, the other decreases.

However…
Just looking at a line and making an estimation isn’t particularly scientific. To be more sure, we need to look in critical values tables to see the level of significance and strength of the relationship. This is shown overleaf…
N0.05 level 0.01 level
12 0.591 0.777
14 0.544 0.715
16 0.506 0.665
18 0.475 0.625
20 0.45 0.591
22 0.428 0.562
24 0.409 0.537
26 0.392 0.515
28 0.377 0.496
30 0.364 0.478
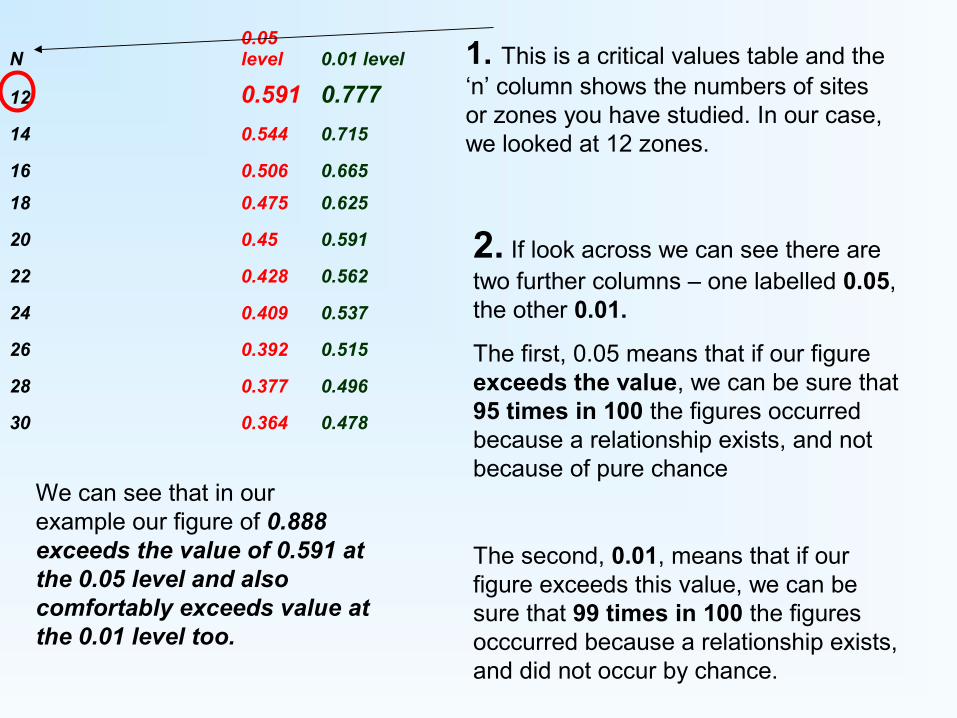
1. This is a critical values table and the ‘n’ column shows the numbers of sites or zones you have studied. In our case, we looked at 12 zones.
2. If look across we can see there are two further columns – one labelled 0.05, the other 0.01.
The first, 0.05 means that if our figure exceeds the value, we can be sure that 95 times in 100 the figures occurred because a relationship exists, and not because of pure chance
The second, 0.01, means that if our figure exceeds this value, we can be sure that 99 times in 100 the figures occcurred because a relationship exists, and did not occur by chance.
We can see that in our example our figure of 0.888 exceeds the value of 0.591 at the 0.05 level and also comfortably exceeds value at the 0.01 level too.
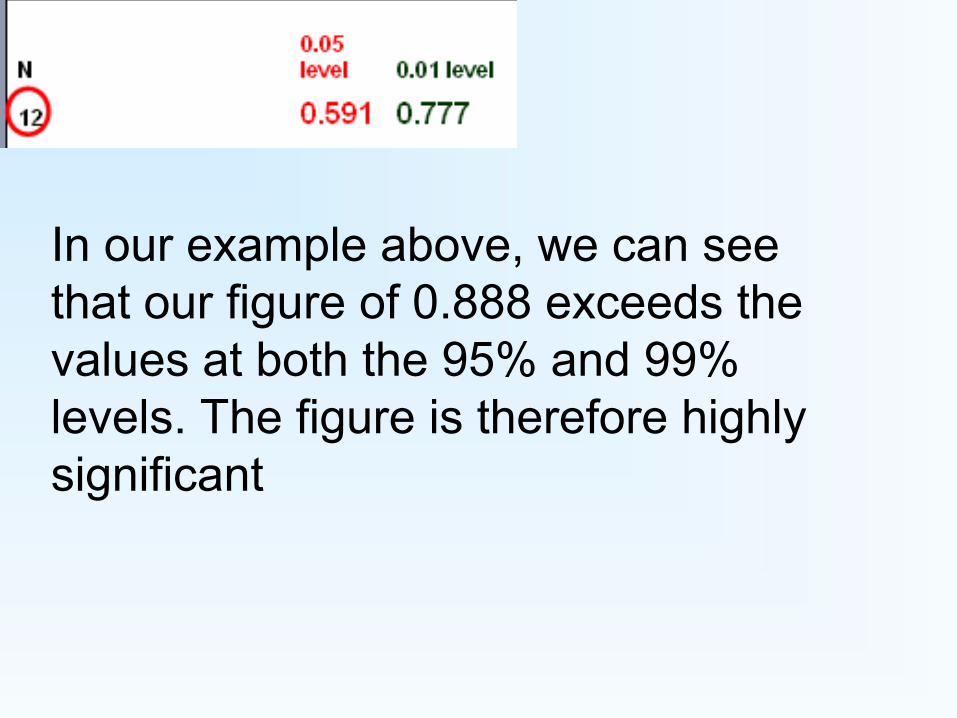
In our example above, we can see that our figure of 0.888 exceeds the values at both the 95% and 99% levels. The figure is therefore highly significant

Finally…You need to think how you can use this
yourself…I would advise that you do scattergraphs for the same sets of data so that you have a direct comparison