speed • max conquest -...
TRANSCRIPT

User instruction manual
Fill pressure: 200 bar (approximately 2,900 psi)
Speed • MaxConquest
Conquest
Speed
Read this entire manual beforefilling, loading or shooting your gun!
Max

Contents
Not a toy. Adult supervision required. Misuse or careless use may cause serious injury or death. May be dangerous up to 1,000 yards.
This airgun is intended for use by those 18 years of age or older.
WARNING:
2
Note: Your air rifle does not come with open sights. You must mount an optical sight before use. Use a good quality mount for best accuracy and proper alignment.
Rules of safe shooting ..................................................3
Battery facts .................................................................4
Charging the batteries ..................................................5
Inserting the batteries ...................................................6
Breech parts ................................................................7
Using high-pressure air ................................................8
Filling your rifle ......................................................9-10
Loading your magazine ........................................11-13
Inserting your magazine ............................................14
Retracting the bolt to insert/remove your mag ............15
Maintenance tips .......................................................16
Maintenance ........................................................17-18
Warranty ...................................................................19
Warnings ..............................................................20-21
Warranty registration & warranty card .......................22

Rules of safe shooting• Never point a gun at anyone or anything, even if you think the gun is
unloaded.• Wear safety glasses where appropriate and ensure those around you do,
too.• Always keep your gun's power switch set to OFF and the gun on SAFE
until you are ready to shoot safely.• Always use a safe backstop in a safe location in case the backstop should
fail or any pellets pass through it.• Never load your gun until you are ready to shoot and it is safe to do so.• Never shoot at hard surfaces, water or anything else that may cause a
ricochet.• Always ensure the gun is on SAFE and power switch is OFF and the gun
is unloaded when receiving or giving the gun to someone else. Many accidents are caused by people handling guns that they thought were unloaded and safe!
• Never put a gun away loaded or cocked. Turn your gun's power switch to OFF and put the gun on SAFE when you are not shooting or are done shooting.
• Always be sure of your target and what lies beyond it in case you miss.• Never re-use ammunition.• Ensure you always use the correct caliber and type of ammunition
suitable for your gun.• Never rely solely on the power switch or the safety. YOU are the most
important safety feature!• Always treat a gun as if it is loaded and with the respect any loaded gun
commands.• Always read and follow the manufacturer’s manual and instructions.• Always make sure you understand how to use any gun before using it.• Always keep your finger off the trigger and clear of the triggerguard until
you are ready to shoot and it is safe to do so.• Always store the gun in a safe place, unloaded and uncocked, and out of
reach of children and unauthorized users.• Always store ammunition separately from the gun.• Always abide by laws and regulations that apply to airguns.• Always use the correct and recommended lubricants; failure to do so
may cause injury or damage and will void the manufacturer's warranty.
Shooting is one of the safest sports in the world, but misuse and careless use of guns can cause serious injury or death.
ASK, LISTEN, THINK—IF IN DOUBT—DON’T!3

4
Battery factsEnclosed with your gun is a 7-cell NiMH battery pack, a charger and 4 AC adapters.
Your gun is powered by high-pressure air, but the action is run by a motor that's powered by a battery pack.
WARNING:Before using your gun, you MUST fully charge the battery pack. The first charging will take 8 hours.
NEVER fully discharge the battery pack. When you notice that the battery is low (gun's action slows down), stop shooting, charge the battery pack or replace it with a fully charged replacement battery pack.
If you allow the battery pack to drain too low, it will overheat the motor, which will void the manufacturer's warranty.
You can expect up to 500 useful shots from a fully charged battery pack. The number of shots also depends on the ambient temperature (colder temps reduce the battery's efficiency). Also, shooting the gun on full-auto reduces the number of shots you get from the battery.
Do NOT remove the clear plastic sleevethat holds the 7 batteries.
Leave them in the clear packaging with the2 wires coming out of the end.

Charging the batteriesAttach the connector (indicated) to the ends of the wires coming out of the battery pack (black wire to black wire, red wire to red wire).
Connect the white plug from the charger to the white plug you now have attached to the battery pack.
Charge the battery initially for 8 consecutive hours. Charging it for fewer hours may reduce its capacity. Charging it for more hours will not hurt it.
5

Inserting the batteriesThe charged battery pack is inserted into the buttstock of the gun. To get access, remove the rubber buttpad by unscrewing it. Once the screw is loosened, you should be able to slide it off.
You'll see a red wire and a black wire.
6
Disconnect the battery pack from the charger, remove the white cap that attached the pack to the charger.
Attach the battery pack wires to the wires in the gun stock (black wire to black wire, red wire to red wire).
Insert the attached battery pack into the buttstock, slide the buttpad onto the end of the buttstock. Position the buttpad to the right position for your shooting needs and tighten the screw.

Breech parts
7
Conquest is shown, but the Speed & Max are identical. Power switch
Fire selector:full-auto or semi-auto
Flip the fire selector switch up to point at the single dot to shoot semi-auto
Flip the fire selector switch forward to point at the 3 white dots to shoot full-autoSafety: Switch
is shown on SAFE
Left side of gun shown above. The power switch turns the gun on and off. The trigger will not function when the power switch is OFF.
Do not activate the power switch until the gun is pointed in a safe direction and you're ready to shoot.
WARNING:
Keep your finger off the trigger until the gun is pointed in a safe direction and you're ready to shoot.
WARNING:Right side of gun shown above.

Use only compressed air in your Evanix airgun. Use no other gases—in-cluding oxygen, which can cause a fire or explosion that may result in serious injury or death.
Disconnecting the fill hose from the airgun without FIRST bleeding the air may result in injury from hose whip as a result of pressure in the fill hose.
Do not attempt to repair the airgun or to disassemble to correct an over fill or valve lock. Parts can fly from the airgun at dangerous speeds when it is disassembled while pressurized.
Slowly fill your rifle to a MAXIMUM of 200 bar (approximately 2,900 psi) pressure.
Filling the rifle too fast is unsafe and creates excess heat that may result in a low or inaccurate fill pressure.
Do not overfill, as this will damage your gun and result in low power. Such damage is not covered under warranty.
When filling is complete, bleed the excess air using the bleed screw on your fill device. Only then can you safely remove the adapter from the rifle.
WARNING:
Using high-pressure air
8
Read this entire manual beforefilling, loading or shooting your gun!

Filling your rifle: ConquestSee the next page for directions to fill the Speed or Max.
9
Attach the hose from your fill device to the Conquest's adapter.
Slowly fill the gun to 2900 psi (approx. 200 bar).
The Conquest uses a fill adapter (included). Do not use any other type of adapter other than the one included with the gun!
Attach the adapter to the nipple, located on the belly of the forearm.
When you reach 2900 psi, turn off the valve from your fill device and exhaust the moisture and air from the hose. Disconnect the hose and fill adapter from the gun.
Do NOT let the pressure in your reservoir drop below 75 bar (approx. 1,087 psi) because there may not be enough pressure to close the bolt valve, and all remaining air will leak out. The gun will have to be sent in for repair.
WARNING:
You can also attach the adapter to the hose for the fill device andthen attach it to the gun's nipple.

10
Filling your rifle: Speed/MaxSee the previous page for directions to fill the Conquest.
Attach the hose from your fill device to the Speed's probe.
Slowly fill the gun to 2900 psi (approx. 200 bar).
The Speed and Max use a fill probe (included). Do not use any other type of probe other than the one included with the gun.
Rotate the front of the gun's air tank to allow access. Insert the probe in the hole.
When you reach 2900 psi, turn off the valve from your fill device and exhaust the moisture and air from the hose. Remove the hose and probe from the gun.
Do NOT let the pressure in your reservoir drop below 50 bar (approx. 725 psi) because there may not be enough pressure to close the bolt valve, and all remaining air will leak out. The gun will have to be sent in for repair.
WARNING:

Loading your magazine
11
Image 1: When you load your magazine, the center hole may have a small black tab hanging down into the hole (arrow). If it does, go to step 2.
1
2
3
Image 2: Using the tip of a ballpoint pen, push the tab up to unlock the circular clip. The spring will rotate the clip to the next hole. Repeat until the tab no longer shows. The mag is now unwound.
Image 3: This shows the magazine with the spring completely at rest. Notice that the tab does not show.
This circular magazine operates under spring tension. As you load it, you also wind it counterclockwise to tension the spring. If the mag isn't completely unwound when you start to load it, you won't be able to load all the pellets.
(As the rifle fires, the mag unwinds clockwise, bringing the next pellet in line with the bolt.)

Loading your magazineYour rifle comes with two magazines:.177 cal.=13 rounds per mag.22 cal.=11 rounds per mag.25 cal.=10 rounds per mag9mm=10 rounds per mag
Back of mag shown. You'll be inserting pellets into the hole on the lower left, as shown by the arrow.
Image 1: Insert a pellet into the hole on the lower left.
Image 2: Pellet inserted but not properly seated.
1
2
3Image 3: Press the tip of a ballpoint pen into pellet's skirt to properly seat it.
12

Loading your magazine
Image 4: First pellet has been inserted & properly seated.
Image 5: After seating pellet, turn mag so pellet appears in center hole and left hole is ready to accept another pellet. Repeat steps 1-5 until mag is filled.
4 5
Do not inhale dust from lead pellets or put lead pellets in the mouth. Wash hands after handling lead. Lead pellets contain lead, a chemical known to the State of California to cause cancer and birth defects (or other reproductive harm).
Use the correct pellet size for your Evanix rifle model. Never reuse pellets. The use of any other kind of ammunition can cause injury to you or damage to your rifle.
WARNINGS:
.177-cal. mags are 10mm deep
.22-cal. mags are 10mm deep
.25-cal. mags are 10mm deep9mm mags are 11mm deep
Using pellets that are longer than the depth of the magazine will result in jams. Use the above chart to select pellets that do not exceed the stated length of magazine caliber for your Evanix rifle.
13

Inserting your magazine
From the right side of the gun, slide the loaded mag into the breech until it "clicks." Failure to properly seat the mag could cause the gun to jam.
When your mag is empty, push it to the left side of the gun to remove it.
WARNING:Keep your fingers out of the mag loading slot at all times. Make sure you are not touching the trigger when inserting or removing a mag. If you pull the trigger while removing/inserting a mag, the gun will jam and require disassembly.
There is extremely high pressure behind the bolt. If it should go forward when your finger or hand is in the mag loading slot and no mag is in place, it could cause serious injury.
14

Retracting the bolt to insert/remove your mag
If you cannot insert/remove a mag, the bolt needs to be retracted:
1. Point the gun in a safe direction.2. Flip the switch to semiauto mode.3. Pull the trigger to shoot the gun—and HOLD on to the trigger blade for
about a second instead of immediately releasing it.4. Visually check to see if the bolt is retracted (if there's no mag in the
slot).5. If there's a mag in the slot, try to remove it.
If the bolt has not retracted, repeat steps 1-5. Generally speaking, the bolt retracts after the first shot.
Bolt isextended
Bolt isretracted
WARNING:Keep your fingers out of the mag loading slot at all times. Make sure you are not touching the trigger when inserting or removing a mag. If you pull the trigger while removing/inserting a mag, the gun will jam and require disassembly.
15

Maintenance tipsClean your rifle's exterior with a good-quality silicone product. Apply the silicone to a lint-free cloth and then wipe down the rifle's exterior.
Do NOT leave the air filler hole exposed. Always rotate the protective cover when not filling the gun with air. This applies to the Speed, only.
Do NOT rely solely on the safety to provide guaranteed safety. YOU are the ulti-mate safety for your gun.
Do NOT leave pellets loaded in the breech of the rifle. Always remove the maga-zine from the rifle when you are done shooting. Always put the rifle on SAFE and turn the power switch OFF.
Do NOT fill the rifle quickly with air. If it is charged too quickly, it can dislodge the valve from its seat, cause excess heat buildup and give inaccurate fill pressure readings.
Do NOT overfill the rifle beyond the fill pressure stated on the front of this manual. Overfilling the gun could be dangerous, damage the rifle, deliver substandard per-formance and cause it to malfunction.
Do NOT use mineral-based oils or greases.
Do NOT use petroleum-based oils or greases.
16

On the right side of the receiver, you will see the above window. The Allen screw (arrow) indicates the correct position when the bolt is retracted. If
you do not have a mag in the mag slot, the slot will show the bolt flush with the back of the slot (image lower left). If you have a mag in the slot, you will be able to remove the mag.
TroubleshootingRetracting the bolt to insert/remove your mag
If you cannot insert/remove a mag, the bolt needs to be retracted:
1. Point the gun in a safe direction.2. Flip the switch to semiauto mode.3. Pull the trigger to shoot the gun—and HOLD on to the trigger blade for
about a second instead of immediately releasing it.4. Visually check to see if the bolt is retracted (if there's no mag in the
slot).5. If there's a mag in the slot, try to remove it.
If the bolt has not retracted, repeat steps 1-5. Generally speaking, the bolt retracts after the first shot. Lubricating the bolt may also be necessary. Directions are on the next page.
Bolt isextended
Bolt isretracted
WARNING:Keep your fingers out of the mag loading slot at all times. Make sure you are not touching the trigger when inserting or removing a mag. If you pull the trigger while removing/inserting a mag, the gun will jam and require disassembly.
17
In the unlikely event your rifle malfunctions or exhibits reduced performance, DO NOT attempt to fix the problem yourself. Please call Air Venturi so we can address any issues or have you return the gun for repair.
Air Venturi service line: 216-220-1180
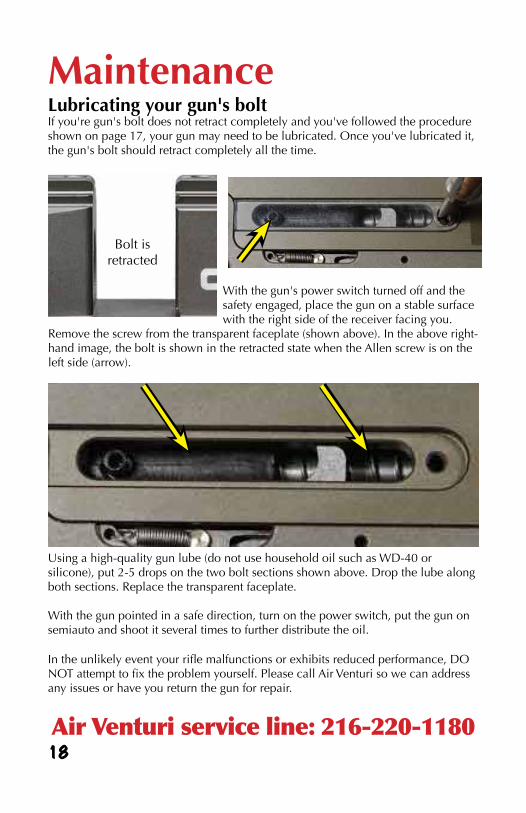
MaintenanceLubricating your gun's boltIf you're gun's bolt does not retract completely and you've followed the procedure shown on page 17, your gun may need to be lubricated. Once you've lubricated it, the gun's bolt should retract completely all the time.
Using a high-quality gun lube (do not use household oil such as WD-40 or silicone), put 2-5 drops on the two bolt sections shown above. Drop the lube along both sections. Replace the transparent faceplate.
With the gun pointed in a safe direction, turn on the power switch, put the gun on semiauto and shoot it several times to further distribute the oil.
Bolt isretracted
With the gun's power switch turned off and the safety engaged, place the gun on a stable surface with the right side of the receiver facing you.
Remove the screw from the transparent faceplate (shown above). In the above right-hand image, the bolt is shown in the retracted state when the Allen screw is on the left side (arrow).
18

One-year limited warranty
This product is warranted to the retail consumer for one year from date of retail purchase against defects in material and workmanship and is transferable.
What is covered:Replacement parts and labor. Transportation charges to consumer for repaired product.
What is NOT covered:• Transportation charges to Air Venturi for defective products.• Damages caused by abuse or failure to perform normal maintenance.• Any other expense.• Parts subject to normal wear and tear.• Consequential damages, incidental damages or incidental expenses including
damage to property.
NOTE: Some states do not allow the exclusion or limitation of incidental or consequential damages, so the above limitation or exclusion may not apply to you.
Warranty claims:Warranty claims for U.S. and Canadian Customers:Warranty card must be completed and mailed to Air Venturi within 28 days of purchase. Please return product to Air Venturi. Call Air Venturi at 216-220-1180 before returning any product.
Implied warranties:Any implied warranties, including the implied warranties of merchantability and fitness for a particular purpose, are limited in duration to one year from date of retail purchase.
NOTE: Some states do not allow limitations on how long an implied warranty lasts, so the above limitation may not apply to you.
To the extent any provision of this warranty is prohibited by federal, state or municipal law which cannot be preempted, it shall not be applicable. This warranty gives you specific legal rights, and you may also have other rights which vary from state to state and country to country.
Illustrations and photographs are for information purposes only and may not show the exact model purchased.
Completed warranty card (page 11) must be returned by retail customer to Air Venturi within 28 days of purchase.
Keep your purchase receipt, as warranty service will not be provided without it.
Warranty
19

Not a toy. Adult supervision required. Misuse or careless use may cause serious injury or death. May be dangerous up to 1,000 yards.
This airgun is intended for use by those 18 years of age or older.
Do not inhale dust from lead pellets or put lead pellets in the mouth. Wash hands after handling lead. Lead pellets contain lead, a chemical known to the State of California to cause cancer and birth defects (or other reproductive harm).
Use only dry, filtered compressed air in this gun. Use no other gas, including oxygen, which can cause a fire or explosion that may result in serious injury or death.
Keep the air rifle on SAFE until you're ready to shoot, then push the safety OFF.
Keep your finger off the trigger while cocking the air rifle.
Keep your fingers out of the magazine notch in the receiver.
Use the correct pellet size for your Evanix rifle model. Never reuse pellets. The use of any other kind of ammunition can cause injury to you or damage to your rifle.
Do not assume your gun is unloaded if it fails to fire properly!
Never leave your airgun loaded.
WARNINGS:
20

When filling the compressed air cylinder, the compressed air must NOT contain oil, water or any other contaminant.
Compressed air cylinders must NEVER be opened or modified mechanically by unauthorized specialists.
The compressed air cylinder must be protected from forceful impacts.
Compressed air cylinders are NOT intended for transport of other gases.
Do NOT exceed maximum fill pressure of 200 bar at room temperature!
Use only compressed air in this airgun. Use no other gases—including oxygen, which can cause a fire or explosion that may result in serious injury or death.
Danger of explosion!
Overfilled compressedair cylinder
Disconnecting the fill hose from the airgun without bleeding the air first may result in injury from hose whip as a result of pressure in the fill hose.
Do not attempt to repair the airgun or to disassemble to correct an over-fill or valve lock. Parts can fly from the airgun at dangerous speeds when it is disassembled while pressurized.
WARNINGS:
21

Warranty registrationEvanix rifles are manufactured to the highest possible standards, using the finest materi-als to give a lifetime of service. In the unlikely event of there being any defects in materi-als or workmanship in the first twelve (12) months after retail purchase, we will repair or replace the rifle under warranty.
Note—The warranty will be invalid if:• The rifle has been disassembled and/or incorrectly reassembled.• The rifle is found to have lubrication not recommended by Evanix.• The rifle has been fitted with non-Evanix parts.• The rifle has been misused or abused• The warranty card was not returned within 28 days of retail purchase and/or the
original purchase receipt cannot be presented.
Note—The warranty does NOT cover:• Any damage or faults caused by owner misuse or action.• Shipment damage of the rifle to or from Air Venturi.
This warranty is in addition to your statutory rights. To register your warranty, the card below must be completed and returned to Air Venturi within 28 days of purchase. Retain your sales receipt as proof of purchase.
Complete the following warranty card and mail to Air Venturi, 18370 South Miles Road, Warrensville Heights, OH 44128.
Serial Number:....................................Date of Purchase:..................................
Caliber:...................... Stock:...............................................
Where purchased:................................................................................................
Your name:............................................................................................................
Your address:
.................................................................................................................................
.................................................................................................................................
Your phone:...........................................................................................................
Evanix Conquest, Speed & Max warranty card
22

336U BLK
Air Venturi18370 South Miles Road
Warrensville Heights, OH 44128216-220-1180
Copyright ©2012 Air Venturi. All rights reserved. 06-27-12