speedstack 2016 : changing layer functionality / count of a stack up without removing structures –...
TRANSCRIPT

Speedstack 2016 : Changing layer functionality / count of a stack up without removing structures – Preview
Dec 2015 - Richard Attrill (Rev 1)
Polar Logo & Pixelated stripe device Copyright Polar Instruments Ltd (c) 2015

2
Changing layer functionality / count of a stack up without removing structures
Copyright Polar Instruments Ltd (c) 2015
Overview
An enhancement that is often requested for Speedstack is to be able to change the electrical layer count without removing structures. Some users would like to base a new design on an existing known stack up and then add / remove electrical layers to create the new stack, leaving the previous existing structures intact.
There is also a requirement to switch between layer types (Signal, Plane, Mixed, Hatched), again without removing structures.
With Speedstack 2016 it is now possible to retain and re-allocate structures when changes are made to the electrical layers of the stack up. New Structure Layer Properties and Structure Validation toolbar options have been introduced to the Controlled Impedance tab, the following slides provide a walk-through / introduction to this new functionality.

3
Changing layer functionality / count of a stack up without removing structures
Copyright Polar Instruments Ltd (c) 2015
Switching layer types and re-allocating structures – Step 1
Starting with the ‘Eval Imperial’ sample stack up that is supplied with Speedstack, switch layer 2 to a Plane and layer 3 to a Signal.
A warning is displayed indicating that continuing with the change will require the existing structures to be re-allocated. Selecting ‘Yes’ will make the change to the stack up.
4
Changing layer functionality / count of a stack up without removing structures
Copyright Polar Instruments Ltd (c) 2015
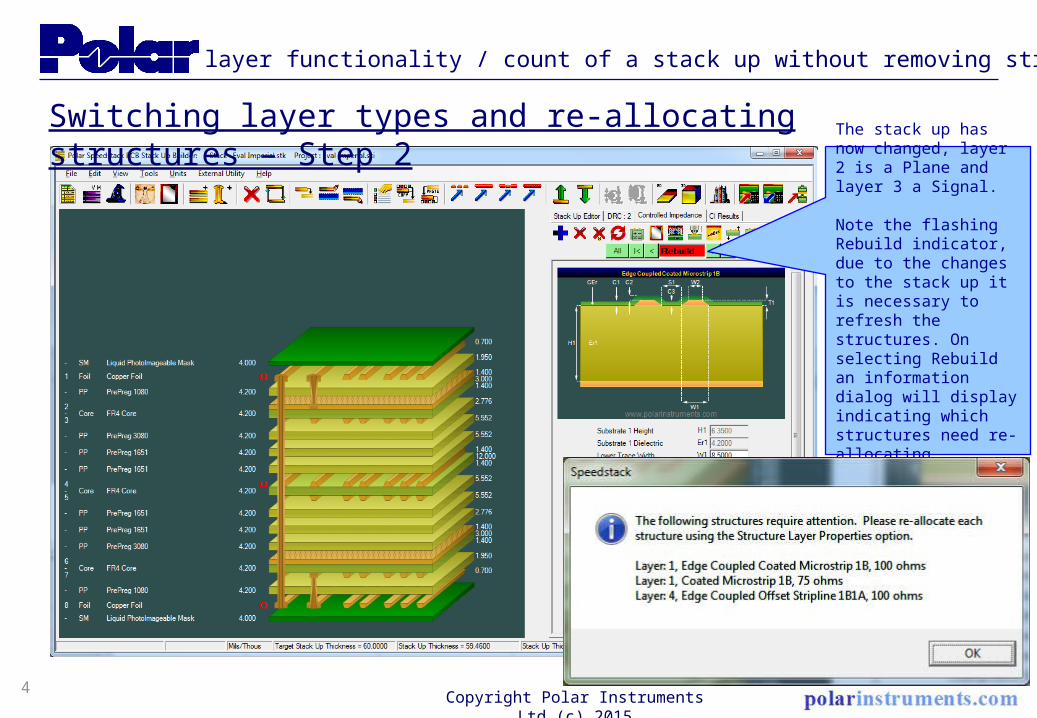
Switching layer types and re-allocating structures – Step 2The stack up has now changed, layer 2 is a Plane and layer 3 a Signal.
Note the flashing Rebuild indicator, due to the changes to the stack up it is necessary to refresh the structures. On selecting Rebuild an information dialog will display indicating which structures need re-allocating.

5
Changing layer functionality / count of a stack up without removing structures
Copyright Polar Instruments Ltd (c) 2015
Switching layer types and re-allocating structures – Step 3
The new Structure Layer Properties toolbar option will allow the structure(s) to be re-allocated to the correct Signal and Plane layers
The Current column shows the Signal / Plane stack up layers currently assigned to the structure before the stack up was changed
The New column allows the structure to be re-allocated to reflect the new stack up layer types. In this case notice the Upper Plane Layer is now 2
In many cases multiple structures will have the same Signal / Plane layer assignments. This is indicated here, selecting Move All will re-allocate all matching structures in a single operation

6
Changing layer functionality / count of a stack up without removing structures
Copyright Polar Instruments Ltd (c) 2015
Switching layer types and re-allocating structures – Step 4
In the case of stripline structures the New column allows the Upper and Lower Plane Layers to be reassigned.
The Structure Layer Properties option can now be used to re-allocate the stripline structure on layer 4
7
Changing layer functionality / count of a stack up without removing structures
Copyright Polar Instruments Ltd (c) 2015
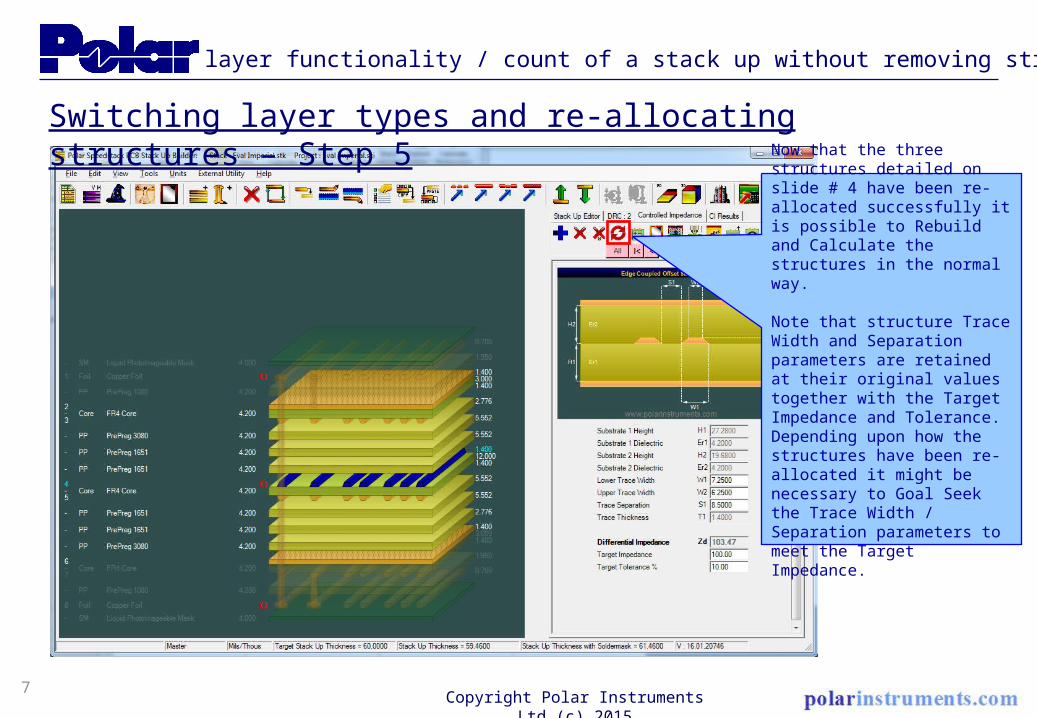
Switching layer types and re-allocating structures – Step 5
Now that the three structures detailed on slide # 4 have been re-allocated successfully it is possible to Rebuild and Calculate the structures in the normal way.
Note that structure Trace Width and Separation parameters are retained at their original values together with the Target Impedance and Tolerance. Depending upon how the structures have been re-allocated it might be necessary to Goal Seek the Trace Width / Separation parameters to meet the Target Impedance.

8
Changing layer functionality / count of a stack up without removing structures
Copyright Polar Instruments Ltd (c) 2015
Increasing the layer count by adding a core – Step 1
Starting back with the original ‘Eval Imperial’ 8-layer sample stack up, add another core between layers 5 and 6.
Once again a warning is displayed indicating that continuing with the change will require the existing structures to be re-allocated.
9
Changing layer functionality / count of a stack up without removing structures
Copyright Polar Instruments Ltd (c) 2015
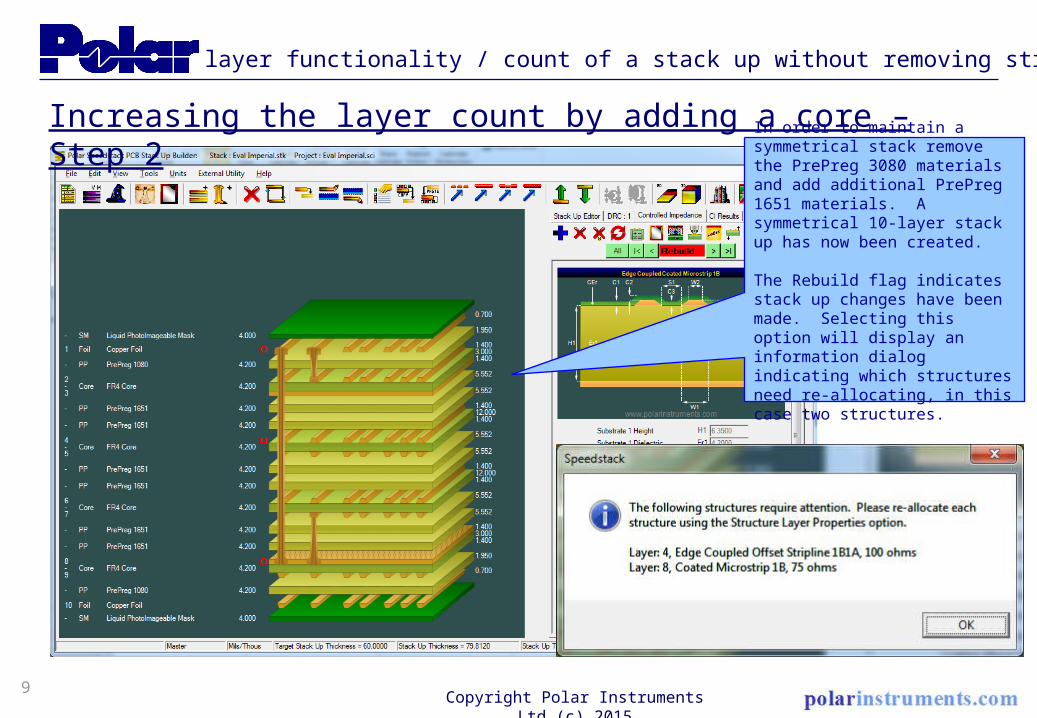
Increasing the layer count by adding a core – Step 2In order to maintain a symmetrical stack remove the PrePreg 3080 materials and add additional PrePreg 1651 materials. A symmetrical 10-layer stack up has now been created.
The Rebuild flag indicates stack up changes have been made. Selecting this option will display an information dialog indicating which structures need re-allocating, in this case two structures.
10
Changing layer functionality / count of a stack up without removing structures
Copyright Polar Instruments Ltd (c) 2015
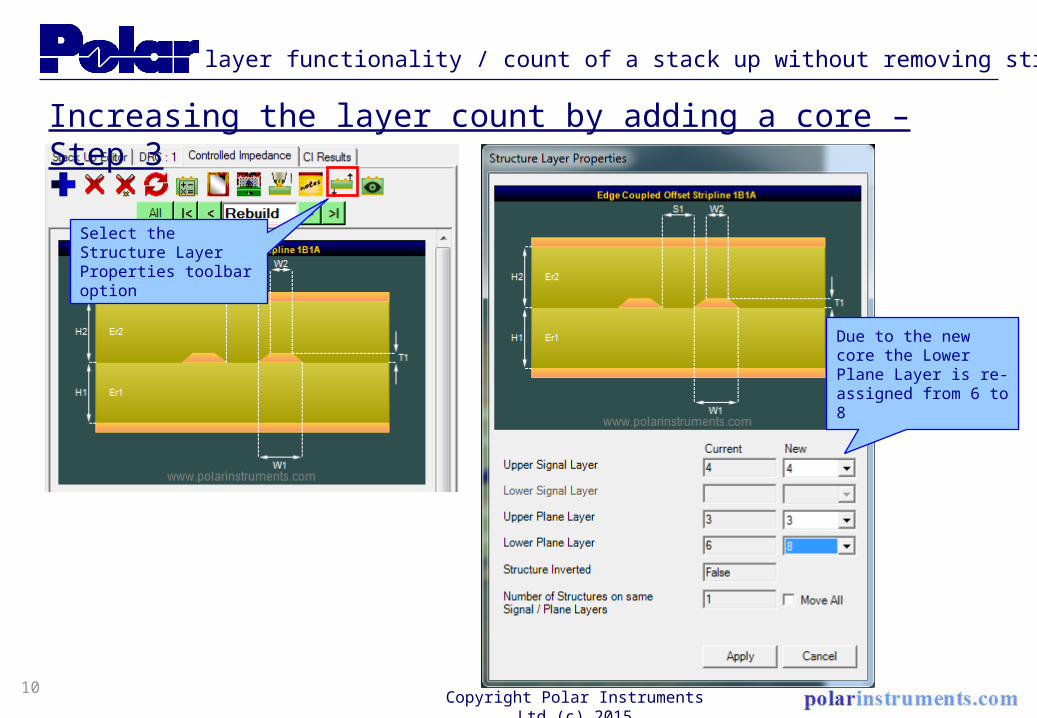
Increasing the layer count by adding a core – Step 3
Select the Structure Layer Properties toolbar option
Due to the new core the Lower Plane Layer is re-assigned from 6 to 8
11
Changing layer functionality / count of a stack up without removing structures
Copyright Polar Instruments Ltd (c) 2015
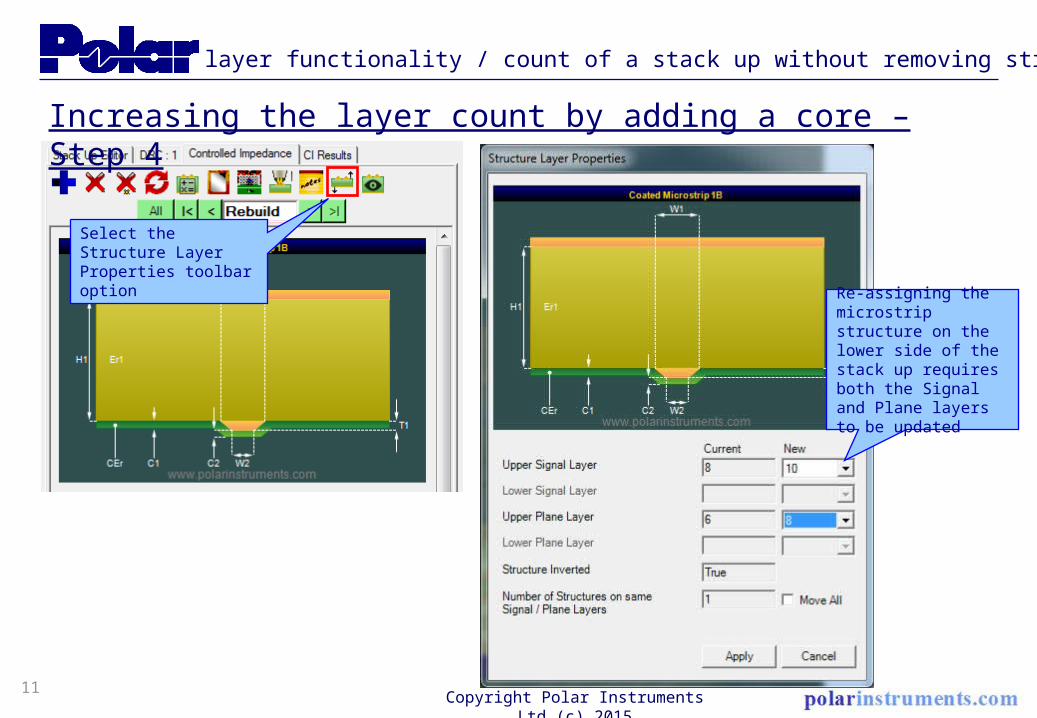
Increasing the layer count by adding a core – Step 4
Select the Structure Layer Properties toolbar option
Re-assigning the microstrip structure on the lower side of the stack up requires both the Signal and Plane layers to be updated

12
Changing layer functionality / count of a stack up without removing structures
Copyright Polar Instruments Ltd (c) 2015
Increasing the layer count by adding a core – Step 5
Now that the two structures detailed on slide # 9 have been re-allocated successfully it is now possible to Rebuild and Calculate the structures in the normal way.
Editing the Drill Properties completes the stack up changes, the four existing structures from the original 8-layer stack up have been re-allocated to the 10-layer design

13
Changing layer functionality / count of a stack up without removing structures
Copyright Polar Instruments Ltd (c) 2015
Summary
It is now possible to retain and re-allocate structures when changes are made to the electrical layers of the stack up. This allows the user to re-allocate structures after the following stack up changes:
o Add foil / core – increase layer count
o Delete foil / core – reduce layer count
o Move foil / core up and down, beyond another copper layer – maintain layer count but perhaps to swap two different thickness cores within the stack up
o Copy / paste foil or core – increase layer count

14
Changing layer functionality / count of a stack up without removing structures
Copyright Polar Instruments Ltd (c) 2015
Summary
o Change layer type – signal to plane, plane to signal, mixed to signal or plane, signal to hatch, hatch to signal.
o Delete rigid core and add flex core – to maintain layer count but swap material type
o Delete a rigid core and add two foils – to maintain layer count but switch to an HDI type build

Thank you
Polar Logo & Pixelated stripe device Copyright Polar Instruments Ltd (c) 2015

For more information:
Contact Polar now: Phone
USA / Canada / MexicoKen Taylor ( 503) 356 5270Asia / PacificTerence Chew +65 6873 7470
UK / EuropeNeil Chamberlain +44 23 9226 9113
Germany / Austria / Switzerland Hermann Reischer +43 7666 20041-0
www.polarinstruments.com
Polar Logo & Pixelated stripe device Copyright Polar Instruments Ltd (c) 2015