splitting tilings. - the bridges archivearchive.bridgesmathart.org/2012/bridges2012-111.pdf ·...
TRANSCRIPT
Splitting Tilings.
Rinus Roelofs
Sculptor
Lansinkweg 28
7553AL Hengelo
The Netherlands
E-mail: [email protected]
www.rinusroelofs.nl
Abstract
In this paper I will investigate some properties of a special group of tilings. Namely those tiling’s that can be coloured
with only two different colours in such a way that every set of two tiles which have a common edge have a different
colour. In the works of M.C. Escher these tiling’s play an important role. In his book Regelmatige Vlakverdeling [1]
M.C. Escher writes about the foreground-background phenomenon of this group of tilings. In fact these 2-colorable
tilings can be seen as a compound of two groups of tiles. And so we can split a 2-colorable tiling in two sets of tiles and
we can concentrate on only one of these sets.
1. Introduction
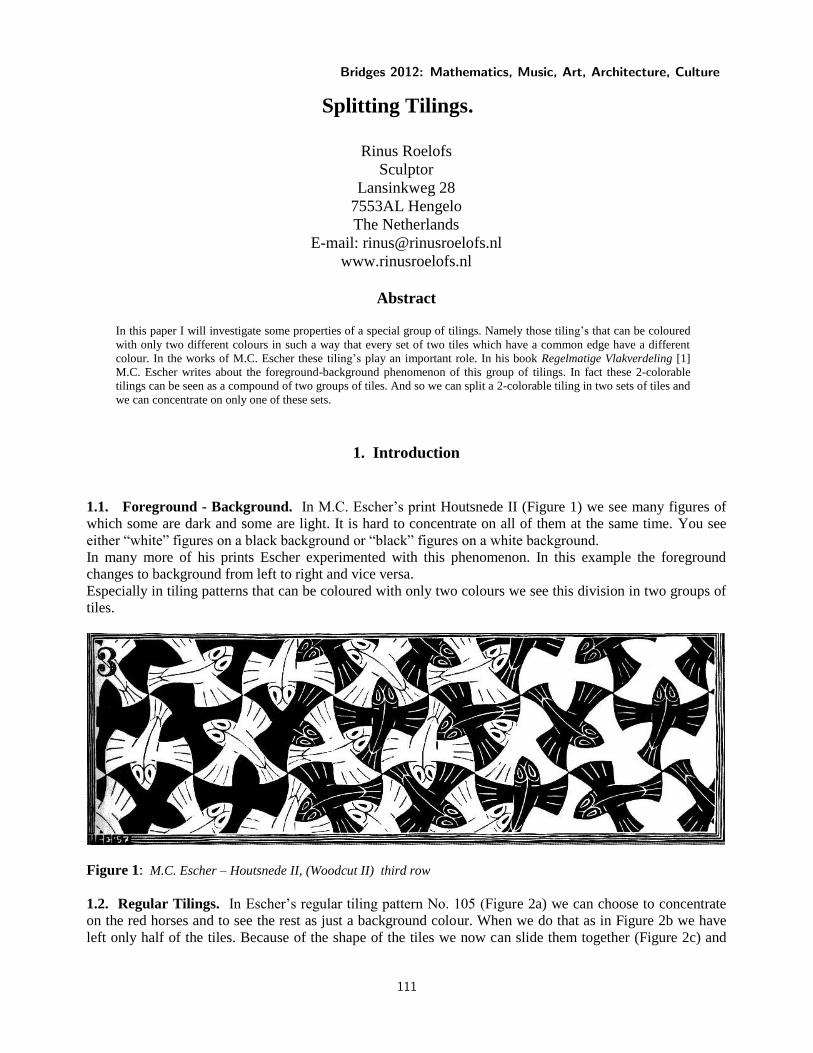
1.1. Foreground - Background. In M.C. Escher’s print Houtsnede II (Figure 1) we see many figures of
which some are dark and some are light. It is hard to concentrate on all of them at the same time. You see
either “white” figures on a black background or “black” figures on a white background.
In many more of his prints Escher experimented with this phenomenon. In this example the foreground
changes to background from left to right and vice versa.
Especially in tiling patterns that can be coloured with only two colours we see this division in two groups of
tiles.
Figure 1: M.C. Escher – Houtsnede II, (Woodcut II) third row
1.2. Regular Tilings. In Escher’s regular tiling pattern No. 105 (Figure 2a) we can choose to concentrate
on the red horses and to see the rest as just a background colour. When we do that as in Figure 2b we have
left only half of the tiles. Because of the shape of the tiles we now can slide them together (Figure 2c) and
Bridges 2012: Mathematics, Music, Art, Architecture, Culture
111
they will nicely fit together again. The final result is exactly the same tiling but now with one colour and
only half as much tiles.
Figure 2a: M.C. Escher Figure 2b: Red horses Figure 2c: Sliding together Figure 2d: Original tiling
2. Moving the Tiles
2.1. Black and White. Let us try to understand what is happening during this sliding transformation.
In Figure 3 we start with a simple square pattern of which we slide the tiles away from each other.
Figure 3a: Square pattern Figure 3b: Sliding Figure 3c: Sliding Figure 3d: Square pattern
After we have done this so far that we reach the situation of Figure 3d we again have a square pattern in
which the shapes of the openings (which is in fact the background) are squares of the same size as the
original tiles. So now we can fill in these holes with new square tiles. The result is again a simple square
pattern but we have made it twice as big as the starting pattern.
Figure 4a: Open pattern Figure 4b: Filling in Figure 4c: Filling in Figure 4d: Square pattern
The question now is: is it really twice as big? In principal a tiling pattern is an infinite pattern. So an infinite
number of tiles. And two times infinity is again just infinity.
2.2. Hilbert’s Hotel. What is happening with the tiles is similar to what is happening in Hilbert’s paradox
of the Grand Hotel. At Wikipedia we can find the following description: “Consider a hypothetical hotel
Roelofs
112

with countably infinitely many rooms, all of which are occupied – that is to say every room
contains a guest. One might be tempted to think that the hotel would not be able to accommodate
any newly arriving guests, as would be the case with a finite number of rooms. Suppose a new
guest arrives and wishes to be accommodated in the hotel. Because the hotel has infinitely many
rooms, we can move the guest occupying room 1 to room 2, the guest occupying room 2 to room 3
and so on, and fit the newcomer into room 1. By repeating this procedure, it is possible to make
room for any finite number of new guests.”
Figure 5a: Hilbert’s Hotel Figure 5b: One new guest
It is also possible to accommodate a countably infinite number of new guests: just move the person
occupying room 1 to room 2, the guest occupying room 2 to room 4, and in general room n to room 2n, and
all the odd-numbered rooms will be free for the new guests.
Figure 6a: Hilbert’s Hotel Figure 6b: Infinite number of new guests
And the next step is to expand this to two directions.
Figure 7a: Hilbert’s Hotel Figure 7b: Extra space for new guests Figure 7a: Occupied
3. Different Transformations
3.1. Sliding. When we slide the tiles away from each other as in Section 2.1 it looks like we end up with
twice the number of tiles. When you see this in an animation, and especially when the animation is set in a
continuous loop, more and more tiles seem to come up out of nowhere. There are more ways of moving the
tiles to create this intriguing effect.
3.2. Sliding – 2 directions. The first one is also based on sliding, but now in two directions.
Splitting Tilings
113

Figure 8a: Square pattern Figure 8b: Sliding Figure 8c: Sliding Figure 8d: Square pattern
3.3. Rotating. Another way of moving the tiles is the use of rotation. This movement of the tiles seems to
have been published first independently by Duncan Stuart and Ron Resch (see ref. [2], p. 117) and it can also
be recognized as the Buckminster Fuller Jitterbug transformation which we will discuss later on in Section
5.1.
Figure 9a: Square pattern Figure 9b: Rotating Figure 9c: Rotating Figure 9d: Square pattern
3.4. Truncating. When we also allow that the shape of the tiles changes during the transformation a few
more possibilities can be added. One of them can be called truncation. An operation we all know from the
field of polyhedra.
Figure 10a: Square pattern Figure 10b: Truncating Figure 10c: Truncating Figure 10d: Square pattern
3.5. Stellating. Also stellation is an operation more known as an operation on polyhedra. But we can use it
on tilings as well.
Figure 11a: Square pattern Figure 11b: Stellating Figure 11c: Stellating Figure 11d: Square pattern
Roelofs
114

All these transformations have resulted in interesting animations.
4. Other Tiling’s
4.1. Archimedean. Of course we can start with many other basic tilings. When we limit ourselves to the
Archimedean two colourable tiling’s there are four basic patterns that can be used.
Figure 12a: 4,4,4,4 Figure 12b: 3,3,3,3,3,3 Figure 12a: 3,6,3,6 Figure 12b: 3,4,6,4
4.2. Polyhedra. But besides tiling patterns on the plane we can also start with tiling patterns on the sphere.
In Figure 13a the five 2-colorable regular/semi-regular polyhedra are shown. Figure 13b is a drawing made
by Wentzel Jamnitzer [4] in which you can see how you can generate a polyhedron with more faces using
truncation. Starting with the dodecahedron Jamnitzer creates the icosidodecahedron (Figure 13b, first row,
right) and from there the rhombicosidodecahedron (Figure 13b, first row, left). He even takes a next step by
again truncating each of the faces (Figure 13b, second row, right). The result is not a semi-regular
polyhedron anymore but it shows that you can go on with the process of truncation.
Figure 13a: 2-colorable polyhedra Figure 13b: Jamnitzer [3] Figure 13b: Third truncation
5. Jitterbug
5.1. Jitterbug. Another transformation that can be used to create a serie of polyhedra is Buckminster
Fuller’s Jitterbug transformation [4].
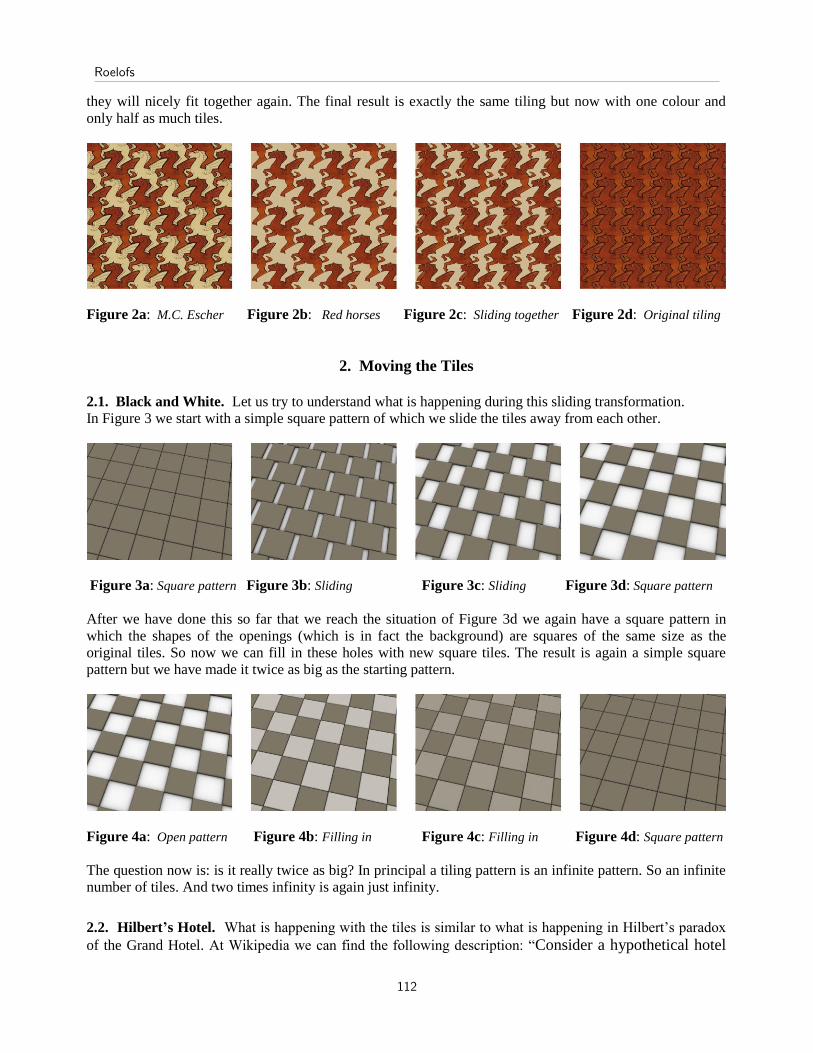
Starting with the octahedron the Jitterbug transformation brings us to the situation of Figure 14c in which the
shape of the holes is exactly a square. At this point we can fill in those holes with square faces to get the
cuboctahedron. An on this polyhedron we can again apply the Jitterbug transformation.
Splitting Tilings
115
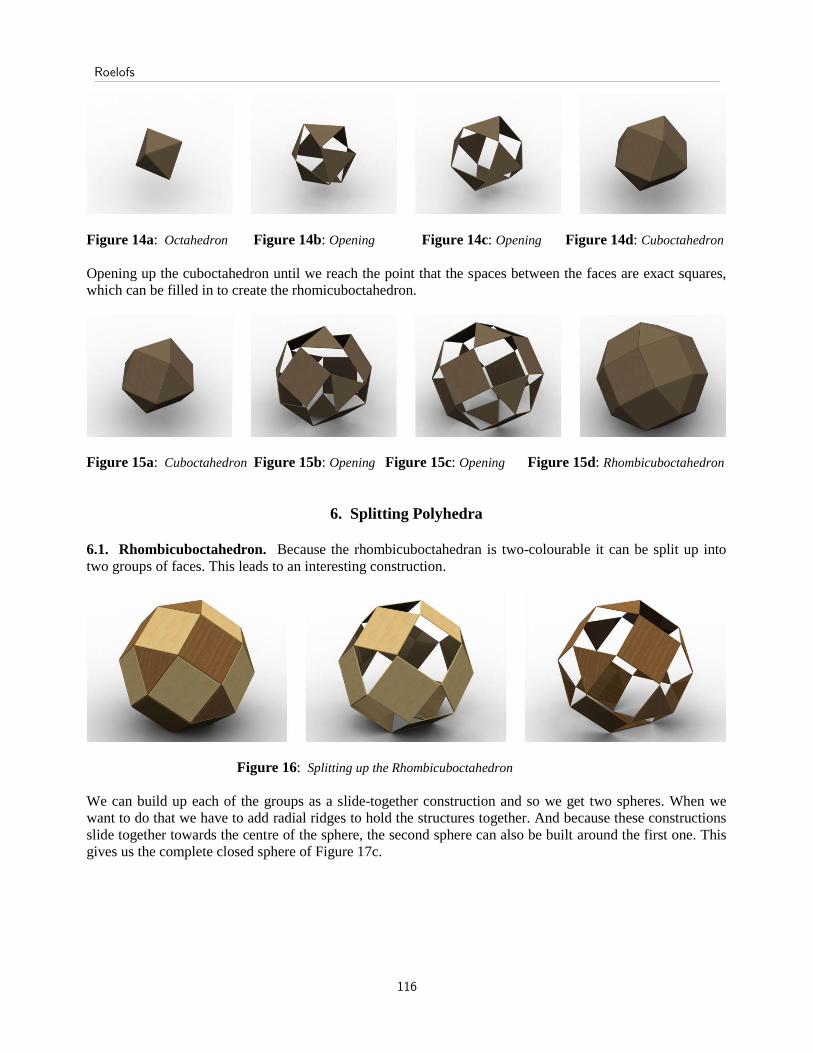
Figure 14a: Octahedron Figure 14b: Opening Figure 14c: Opening Figure 14d: Cuboctahedron
Opening up the cuboctahedron until we reach the point that the spaces between the faces are exact squares,
which can be filled in to create the rhomicuboctahedron.
Figure 15a: Cuboctahedron Figure 15b: Opening Figure 15c: Opening Figure 15d: Rhombicuboctahedron
6. Splitting Polyhedra
6.1. Rhombicuboctahedron. Because the rhombicuboctahedran is two-colourable it can be split up into
two groups of faces. This leads to an interesting construction.
Figure 16: Splitting up the Rhombicuboctahedron
We can build up each of the groups as a slide-together construction and so we get two spheres. When we
want to do that we have to add radial ridges to hold the structures together. And because these constructions
slide together towards the centre of the sphere, the second sphere can also be built around the first one. This
gives us the complete closed sphere of Figure 17c.
Roelofs
116

Figure 17a: First part Figure 17b: Second part Figure 17b: Complete polyhedron
It seems to be the only way to get all the pieces together to make this final construction. And this method can
be applied on all the other 2-colorable polyhedra as can be seen in the next example.
6.2. Rhombicosidodecahedron. When we split up this polyhedron in two groups of faces we get one
sphere with only the square faces and another with the triangular and pentagonal faces. In Figure 18 you can
see how the real model is put together. We start building up the first part of the sphere by connecting the
triangle and the pentagonal faces with the radial ridges (Figure 18a). After the first part is finished (Figure
18b) we can start building up the second part (Figure 18c, 18d). We can build up the second around the first
part and after we have put in the final pieces we can just squeeze the second part together to complete the
construction.
Figure 18a: Starting to build the sphere Figure 18b: First part Figure 18c: Adding the second part
Figure 18d: Second part Figure 18e: Almost finished Figure 18f: Complete polyhedron
Splitting Tilings
117
The model is build up during the Gathering for Gardner Conference (G4G10) in Atlanta in 2012.
Some of the pictures were taken by Doris Schattschneider (18a, 18b and 18e).
7. Johnson Polyhedra
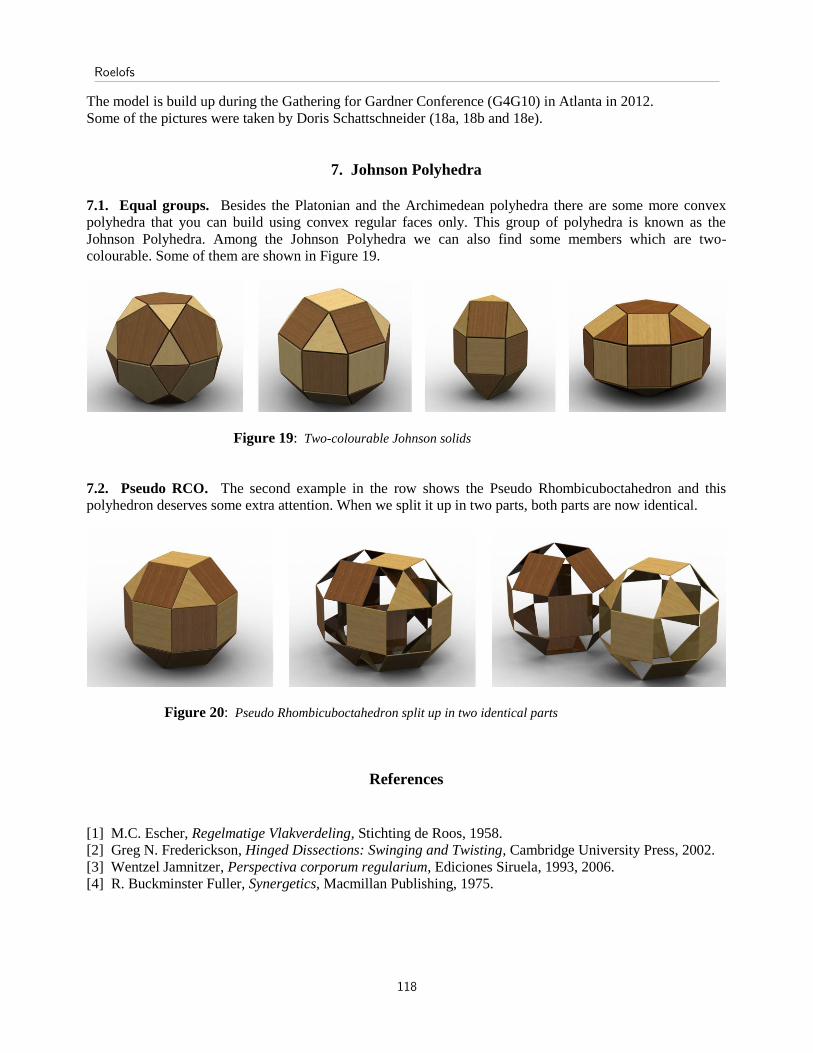
7.1. Equal groups. Besides the Platonian and the Archimedean polyhedra there are some more convex
polyhedra that you can build using convex regular faces only. This group of polyhedra is known as the
Johnson Polyhedra. Among the Johnson Polyhedra we can also find some members which are two-
colourable. Some of them are shown in Figure 19.
Figure 19: Two-colourable Johnson solids
7.2. Pseudo RCO. The second example in the row shows the Pseudo Rhombicuboctahedron and this
polyhedron deserves some extra attention. When we split it up in two parts, both parts are now identical.
Figure 20: Pseudo Rhombicuboctahedron split up in two identical parts
References
[1] M.C. Escher, Regelmatige Vlakverdeling, Stichting de Roos, 1958.
[2] Greg N. Frederickson, Hinged Dissections: Swinging and Twisting, Cambridge University Press, 2002.
[3] Wentzel Jamnitzer, Perspectiva corporum regularium, Ediciones Siruela, 1993, 2006.
[4] R. Buckminster Fuller, Synergetics, Macmillan Publishing, 1975.
Roelofs
118