sql server 2016 failover clustered instance on windows ...€¦ · sql server 2016 failover...
TRANSCRIPT
______________________________________________________________________
Installing and Configuring a
SQL Server 2016 Failover Clustered Instance
on Windows Server 2016
______________________________________________________________________
Edwin M Sarmiento
Applies to:
• SQL Server 2016
• Windows Server 2016

Copyright
This document is provided “as-is”. Information and views expressed in this document, including URL
and other Internet Web site references, may change without notice. You bear the risk of using it.
Examples depicted herein are fictitious and provided for illustration only. No real association or
connection is intended or should be inferred.
You may use this document for your internal, reference purposes. You may NOT copy, alter or reuse
this document or any portions of it for other than the original purpose without the written consent of the
author.
© 2017 Copyright. All rights reserved.
Contents Introduction ................................................................................................. 4
Assumptions ................................................................................................ 4
Cluster Configuration Details ....................................................................... 4
Preparing Shared Storage ............................................................................ 5
Adding the Failover Clustering Feature ........................................................ 6
Running the Failover Cluster Validation Wizard ........................................... 8
Creating the Windows Server 2016 Failover Cluster .................................. 12
Renaming Shared Storage Resources ......................................................... 16
Renaming Cluster Network Resources ....................................................... 19
Installing a SQL Server 2016 Failover Clustered Instance (FCI) ................ 22
SQL Server 2016 Failover Cluster Instance Installation - Install Secondary
(Failover) Cluster Node .............................................................................. 33
About The Author ....................................................................................... 40
Introduction
This guide is intended for experienced Windows Server system administrators, IT professionals and
SQL Server database administrators who need to install and configure a 2-node Windows Server 2016
Failover Cluster (WSFC) that will host a SQL Server 2016 failover clustered instance (FCI).
Assumptions
When using this guide, a few assumptions have been made:
• Windows Server 2016 is installed on each server that will be used for the failover cluster
and that they are joined to the same Active Directory domain.
• Installation and configuration of the shared storage used for the cluster is outside the scope
of this document. Enlist the assistance of your storage vendors and engineers to accomplish
this task.
• You have decided which quorum model will be used by the WSFC. This document will use a
disk witness as the quorum model.
Cluster Configuration Details
Prior to building your WSFC, it is important to have all the details in place to make sure that
installation and configuration will go smoothly. The following details will be used to build and
configure a SQL Server 2016 FCI.
• Active Directory Domain Name: TESTDOMAIN.COM
• Cluster Nodes: WSFC2016-NODE1 & WSFC2016-NODE2
• Cluster Disks: W:\, H:\, I:\ & J:\
• Windows Server Failover Cluster Name and IP Address: WIN2K16CLUSTER
(172.16.0.33)
• SQL Server Failover Cluster Virtual Server Name and IP Address: SQL2016FCI
(172.16.0.35)
• SQL Server Service Account: TESTDOMAIN\sqlservice
Preparing Shared Storage
It is assumed that the underlying shared storage has already been physically attached to all of the
WSFC nodes and that the hardware meets the requirements defined in the Microsoft TechNet article
Failover Clustering Hardware Requirements and Storage Options.
Managing shared storage requires an understanding of your specific storage product which is
outside the scope of this document. Consult your storage vendor for more information.
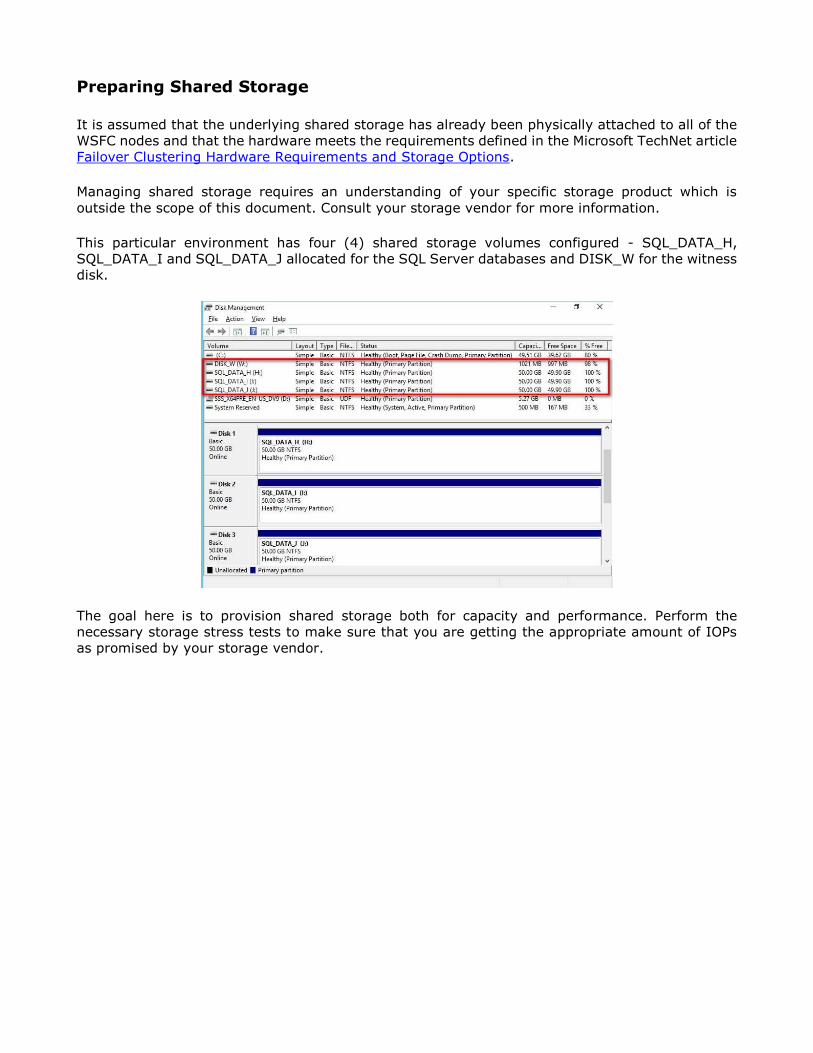
This particular environment has four (4) shared storage volumes configured - SQL_DATA_H,
SQL_DATA_I and SQL_DATA_J allocated for the SQL Server databases and DISK_W for the witness
disk.
The goal here is to provision shared storage both for capacity and performance. Perform the
necessary storage stress tests to make sure that you are getting the appropriate amount of IOPs
as promised by your storage vendor.
Adding the Failover Clustering Feature
In this section, the Failover Clustering feature is added to create and configure the WSFC:
NOTE: Perform these steps on all of the servers that you intend to join in your WSFC.
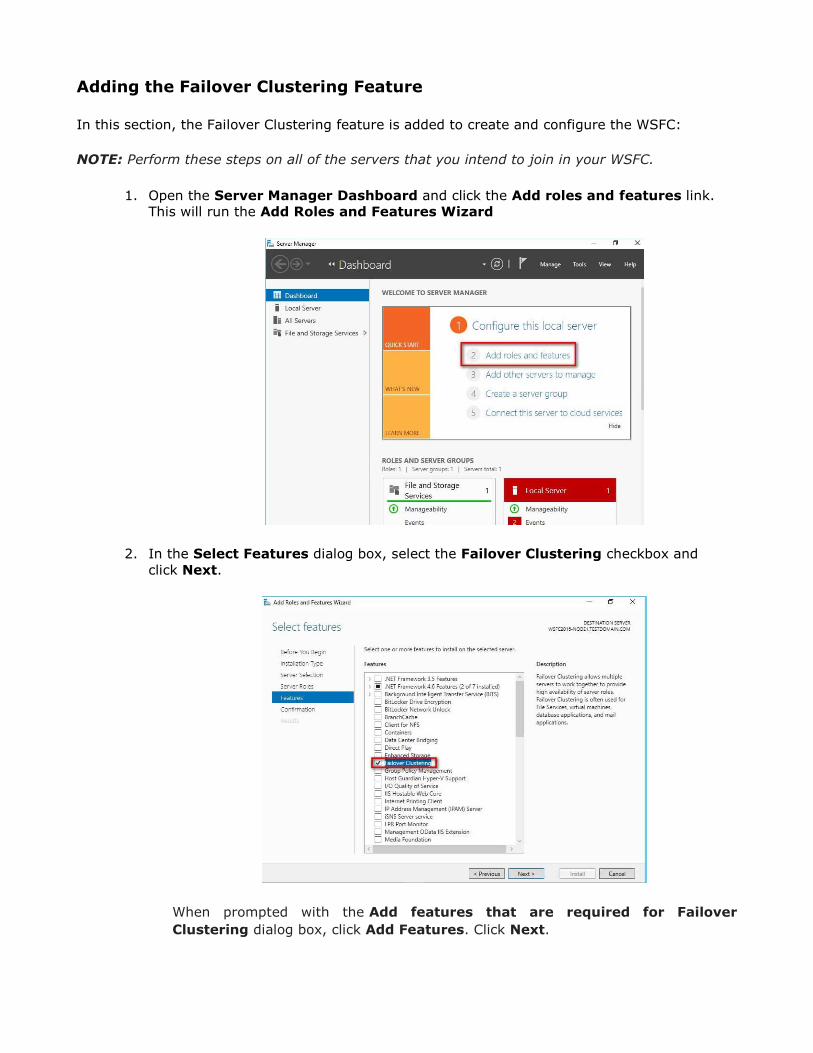
1. Open the Server Manager Dashboard and click the Add roles and features link.
This will run the Add Roles and Features Wizard
2. In the Select Features dialog box, select the Failover Clustering checkbox and
click Next.
When prompted with the Add features that are required for Failover
Clustering dialog box, click Add Features. Click Next.
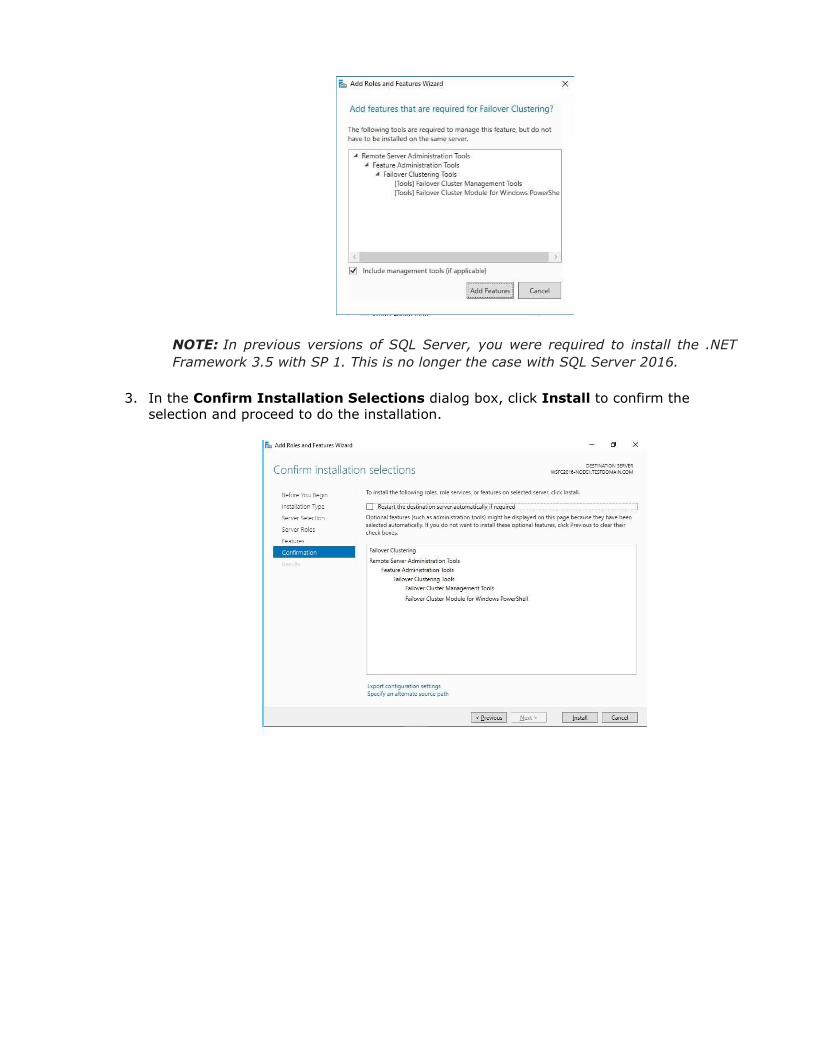
NOTE: In previous versions of SQL Server, you were required to install the .NET
Framework 3.5 with SP 1. This is no longer the case with SQL Server 2016.
3. In the Confirm Installation Selections dialog box, click Install to confirm the
selection and proceed to do the installation.

Running the Failover Cluster Validation Wizard
In this section, you will run the Failover Cluster Validation Wizard from the Failover Cluster
Management console. You can launch the tool from the Server Manager dashboard, under Tools
and select Failover Cluster Manager.
NOTE: These steps can be performed on any of the servers that will act as nodes in your failover cluster. The
steps below are performed on WSFC2016-NODE1.
1. In the Failover Cluster Management console, under the Management section, click the
Validate Configuration link. This will run the Validate a Configuration Wizard.
2. In the Select Servers or a Cluster dialog box, enter the hostnames of the nodes that you
want to add as members of your WSFC. Click Next.
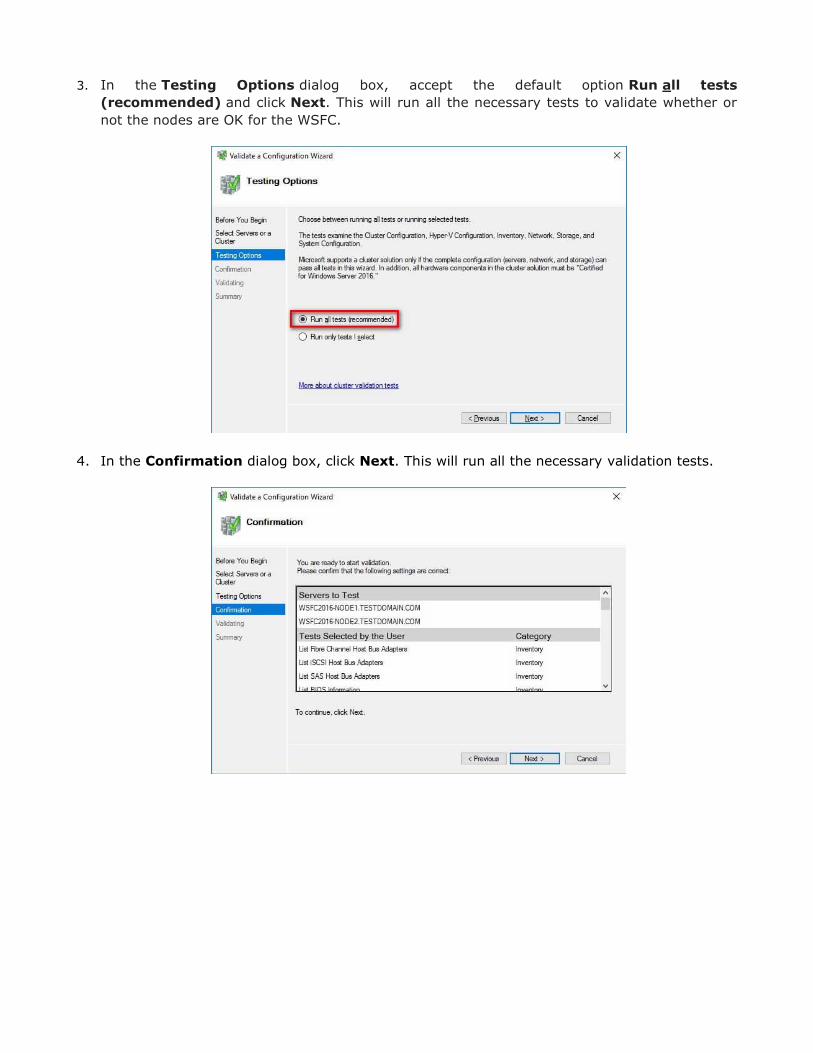
3. In the Testing Options dialog box, accept the default option Run all tests
(recommended) and click Next. This will run all the necessary tests to validate whether or
not the nodes are OK for the WSFC.
4. In the Confirmation dialog box, click Next. This will run all the necessary validation tests.
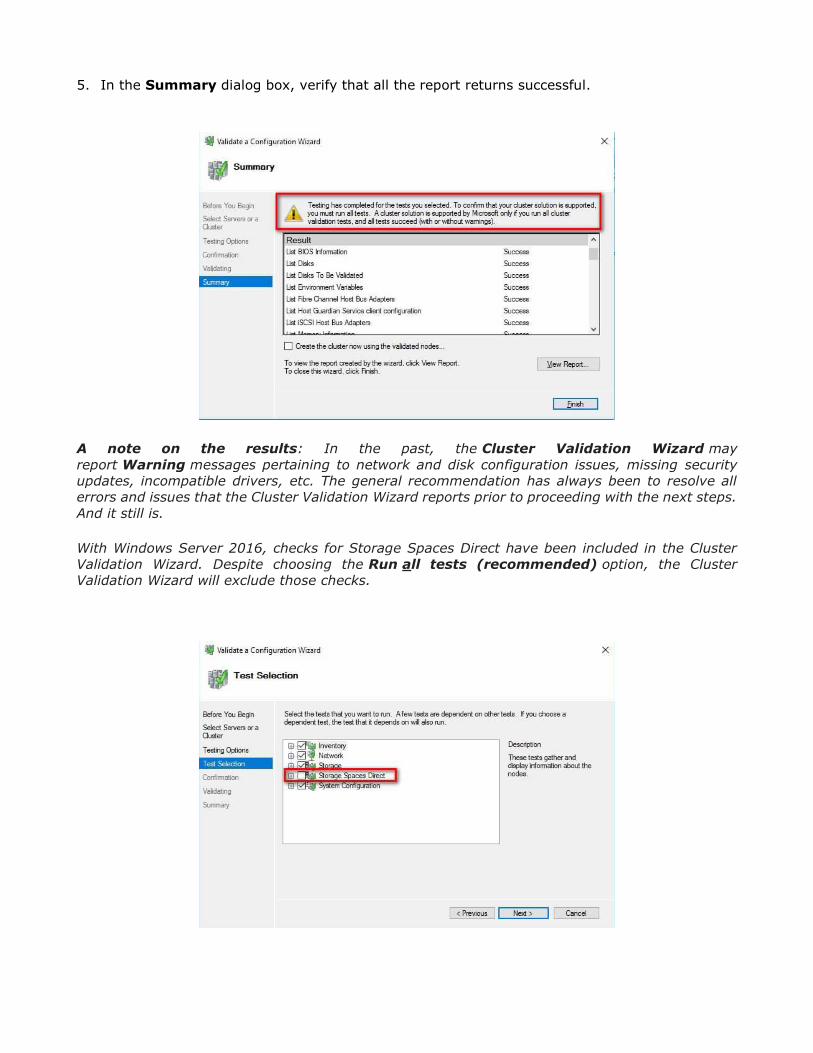
5. In the Summary dialog box, verify that all the report returns successful.
A note on the results: In the past, the Cluster Validation Wizard may
report Warning messages pertaining to network and disk configuration issues, missing security
updates, incompatible drivers, etc. The general recommendation has always been to resolve all
errors and issues that the Cluster Validation Wizard reports prior to proceeding with the next steps.
And it still is.
With Windows Server 2016, checks for Storage Spaces Direct have been included in the Cluster
Validation Wizard. Despite choosing the Run all tests (recommended) option, the Cluster
Validation Wizard will exclude those checks.
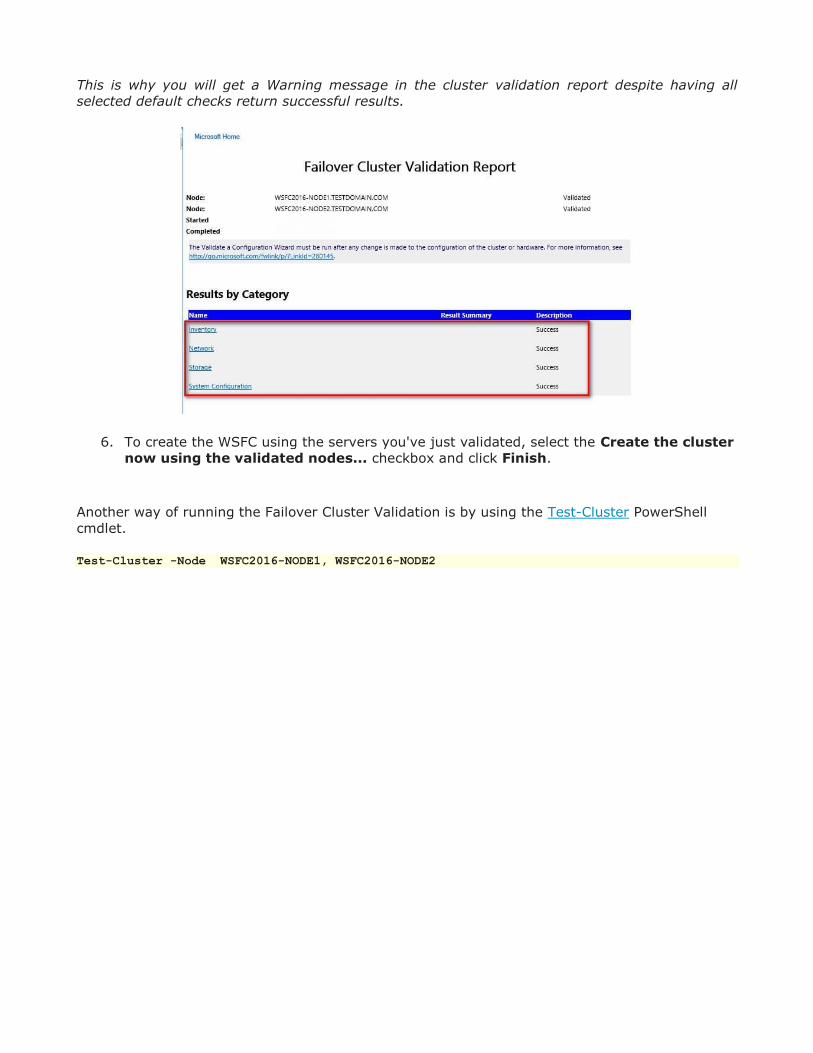
This is why you will get a Warning message in the cluster validation report despite having all
selected default checks return successful results.
6. To create the WSFC using the servers you've just validated, select the Create the cluster
now using the validated nodes... checkbox and click Finish.
Another way of running the Failover Cluster Validation is by using the Test-Cluster PowerShell
cmdlet.
Test-Cluster -Node WSFC2016-NODE1, WSFC2016-NODE2
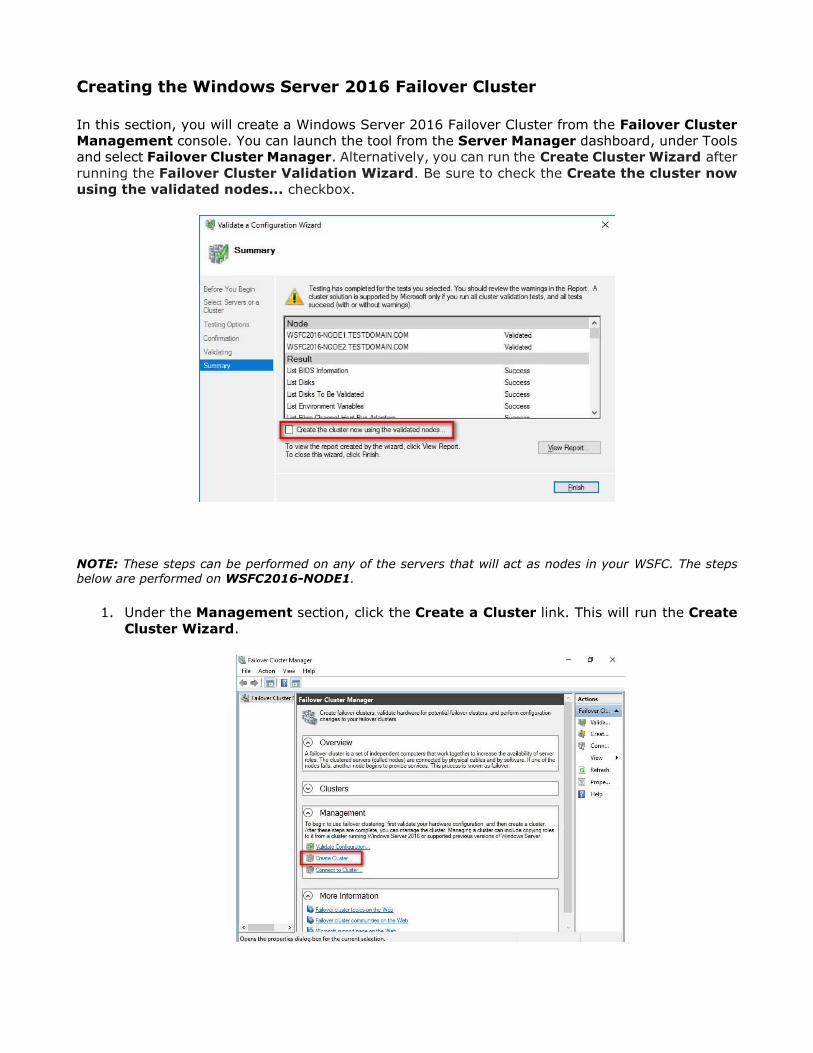
Creating the Windows Server 2016 Failover Cluster
In this section, you will create a Windows Server 2016 Failover Cluster from the Failover Cluster
Management console. You can launch the tool from the Server Manager dashboard, under Tools
and select Failover Cluster Manager. Alternatively, you can run the Create Cluster Wizard after
running the Failover Cluster Validation Wizard. Be sure to check the Create the cluster now
using the validated nodes... checkbox.
NOTE: These steps can be performed on any of the servers that will act as nodes in your WSFC. The steps
below are performed on WSFC2016-NODE1.
1. Under the Management section, click the Create a Cluster link. This will run the Create
Cluster Wizard.
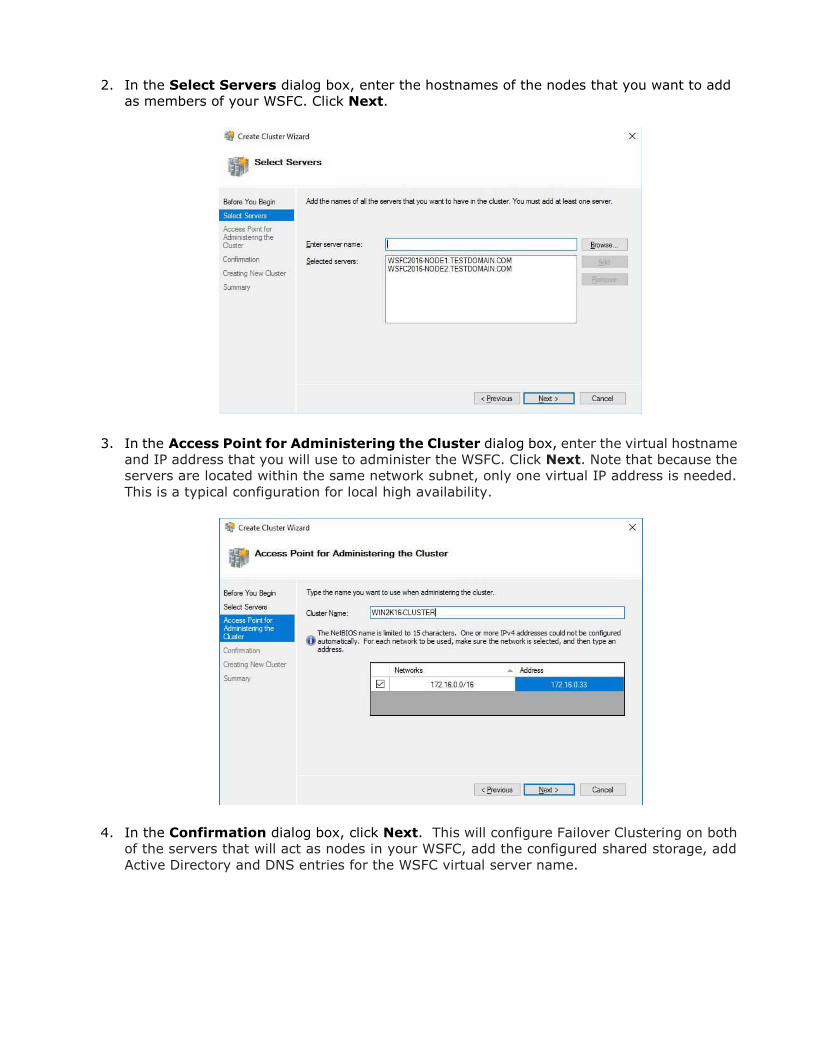
2. In the Select Servers dialog box, enter the hostnames of the nodes that you want to add
as members of your WSFC. Click Next.
3. In the Access Point for Administering the Cluster dialog box, enter the virtual hostname
and IP address that you will use to administer the WSFC. Click Next. Note that because the
servers are located within the same network subnet, only one virtual IP address is needed.
This is a typical configuration for local high availability.
4. In the Confirmation dialog box, click Next. This will configure Failover Clustering on both
of the servers that will act as nodes in your WSFC, add the configured shared storage, add
Active Directory and DNS entries for the WSFC virtual server name.
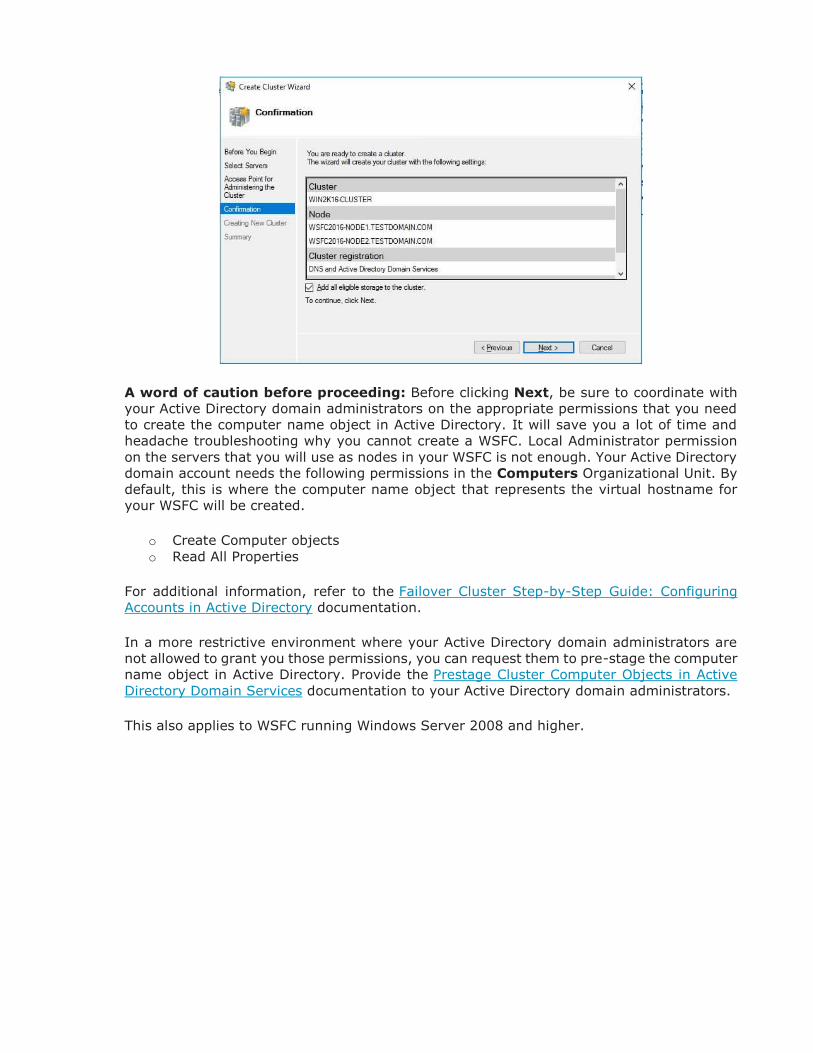
A word of caution before proceeding: Before clicking Next, be sure to coordinate with
your Active Directory domain administrators on the appropriate permissions that you need
to create the computer name object in Active Directory. It will save you a lot of time and
headache troubleshooting why you cannot create a WSFC. Local Administrator permission
on the servers that you will use as nodes in your WSFC is not enough. Your Active Directory
domain account needs the following permissions in the Computers Organizational Unit. By
default, this is where the computer name object that represents the virtual hostname for
your WSFC will be created.
o Create Computer objects
o Read All Properties
For additional information, refer to the Failover Cluster Step-by-Step Guide: Configuring
Accounts in Active Directory documentation.
In a more restrictive environment where your Active Directory domain administrators are
not allowed to grant you those permissions, you can request them to pre-stage the computer
name object in Active Directory. Provide the Prestage Cluster Computer Objects in Active
Directory Domain Services documentation to your Active Directory domain administrators.
This also applies to WSFC running Windows Server 2008 and higher.
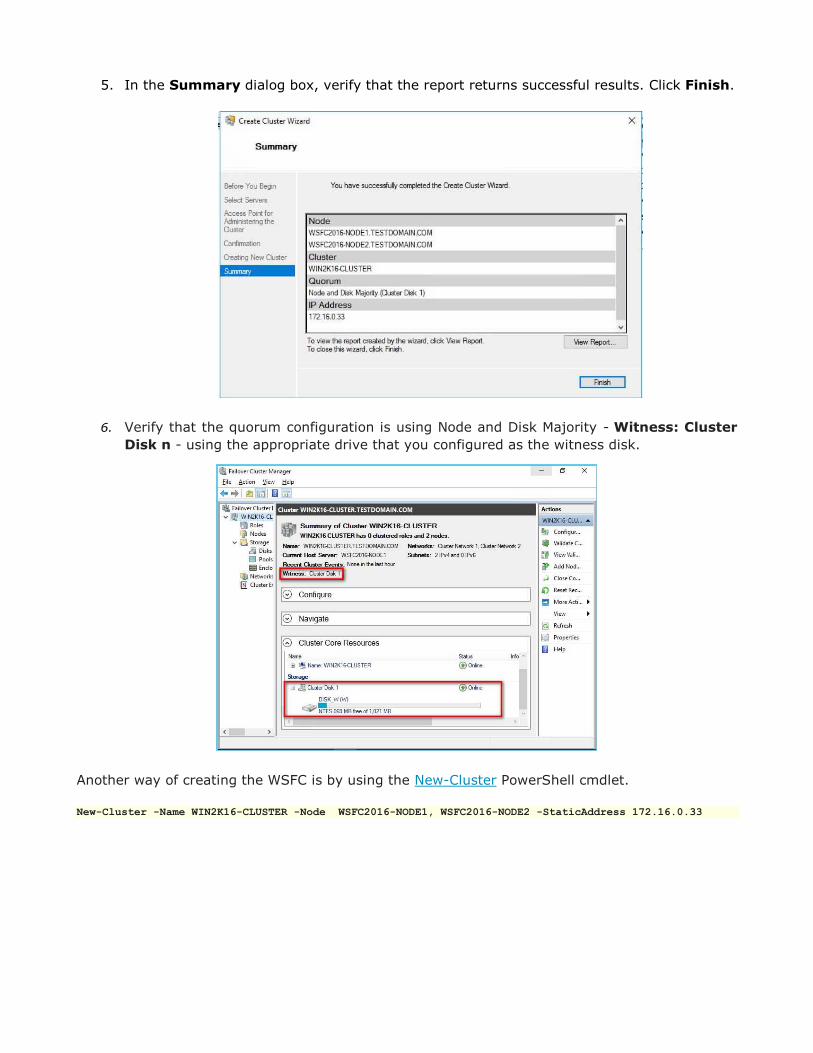
5. In the Summary dialog box, verify that the report returns successful results. Click Finish.
6. Verify that the quorum configuration is using Node and Disk Majority - Witness: Cluster
Disk n - using the appropriate drive that you configured as the witness disk.
Another way of creating the WSFC is by using the New-Cluster PowerShell cmdlet.
New-Cluster -Name WIN2K16-CLUSTER -Node WSFC2016-NODE1, WSFC2016-NODE2 -StaticAddress 172.16.0.33
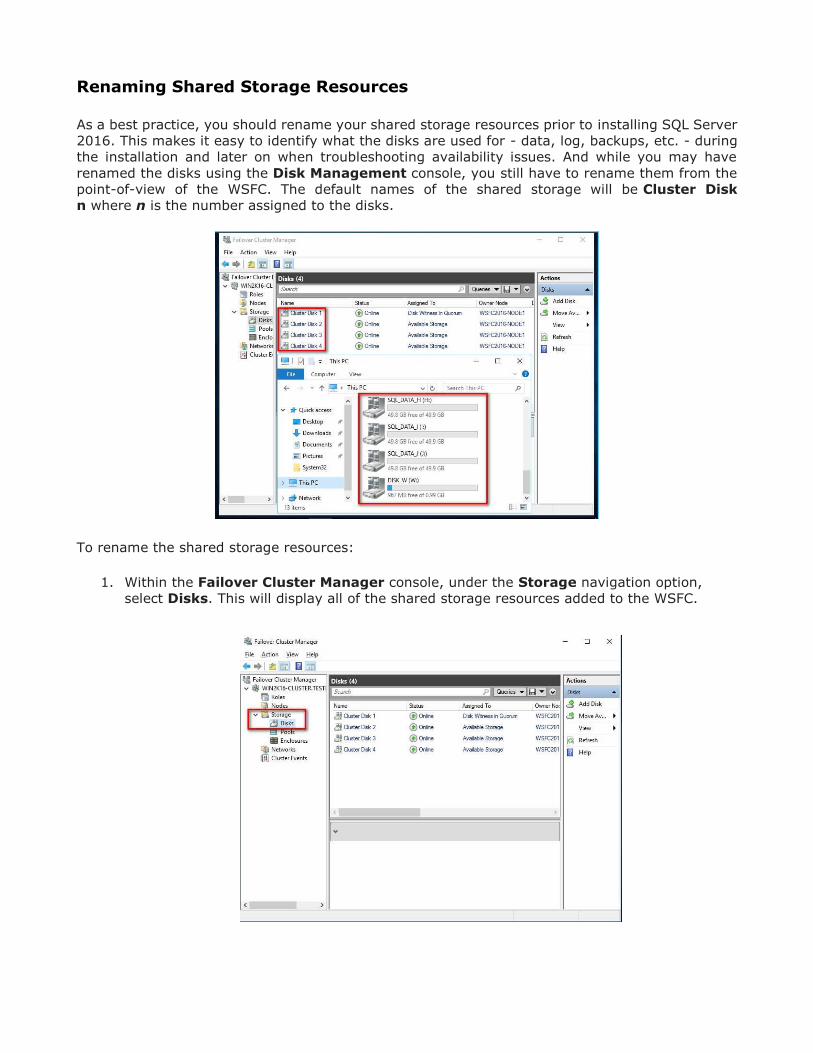
Renaming Shared Storage Resources
As a best practice, you should rename your shared storage resources prior to installing SQL Server
2016. This makes it easy to identify what the disks are used for - data, log, backups, etc. - during
the installation and later on when troubleshooting availability issues. And while you may have
renamed the disks using the Disk Management console, you still have to rename them from the
point-of-view of the WSFC. The default names of the shared storage will be Cluster Disk
n where n is the number assigned to the disks.
To rename the shared storage resources:
1. Within the Failover Cluster Manager console, under the Storage navigation option,
select Disks. This will display all of the shared storage resources added to the WSFC.
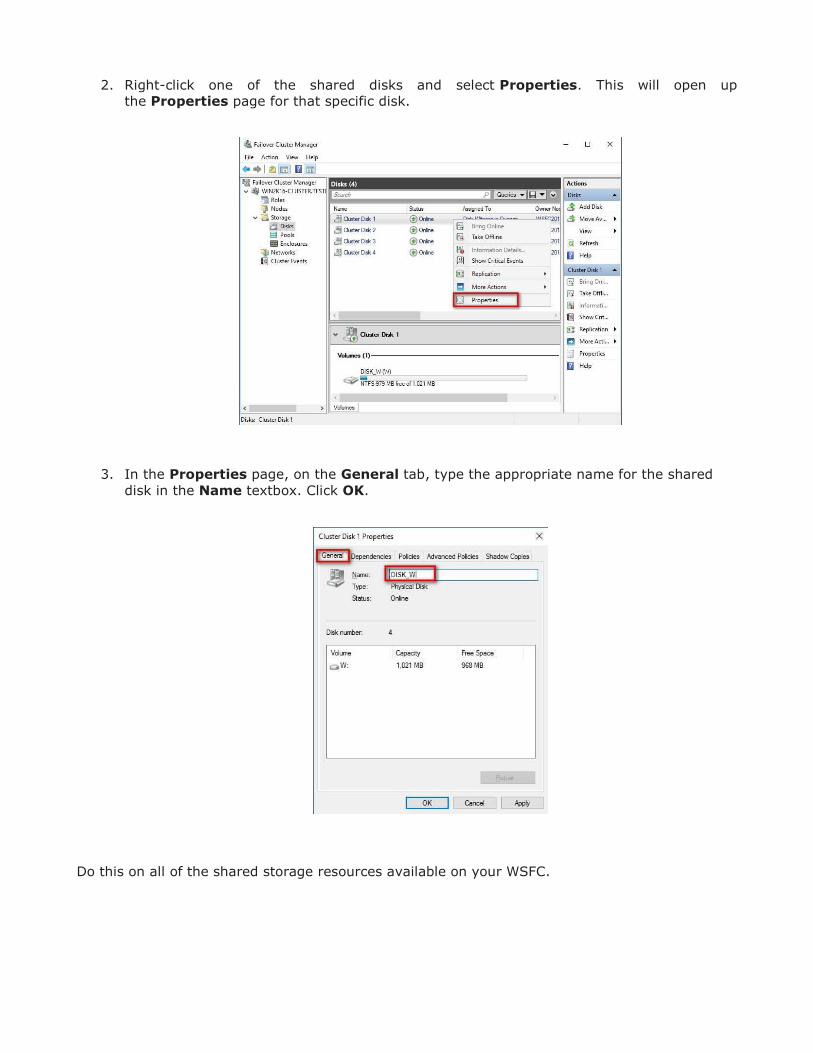
2. Right-click one of the shared disks and select Properties. This will open up
the Properties page for that specific disk.
3. In the Properties page, on the General tab, type the appropriate name for the shared
disk in the Name textbox. Click OK.
Do this on all of the shared storage resources available on your WSFC.

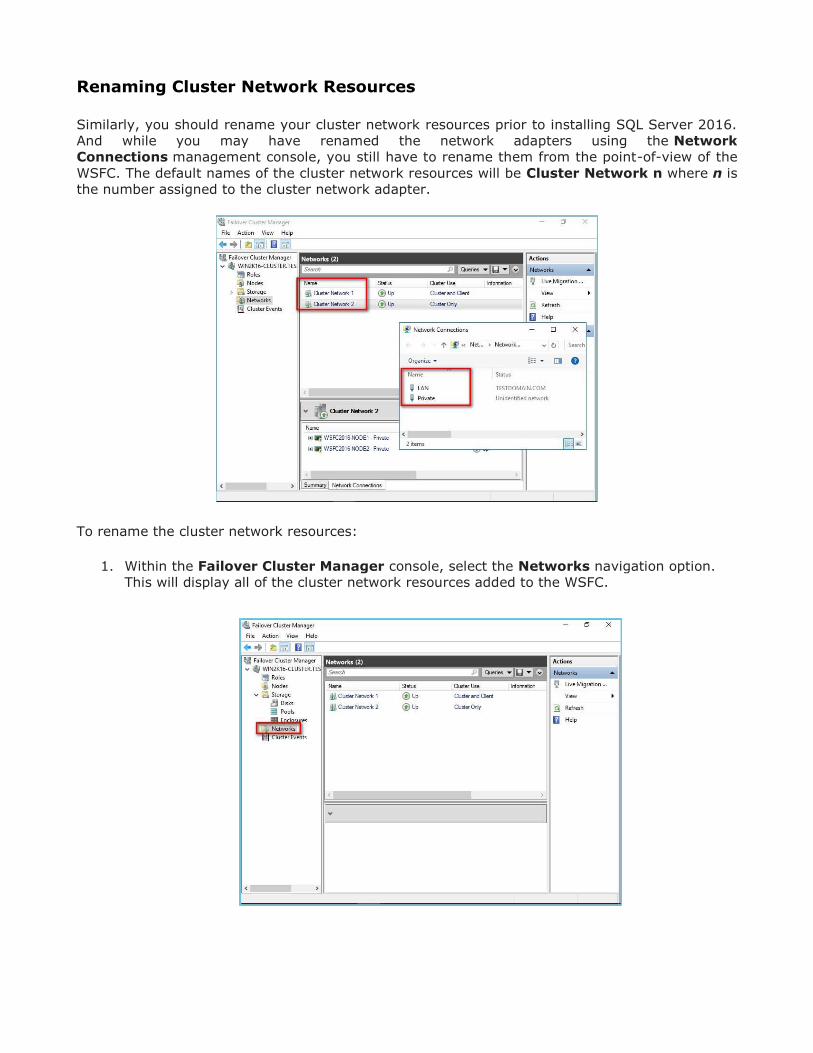
Renaming Cluster Network Resources
Similarly, you should rename your cluster network resources prior to installing SQL Server 2016.
And while you may have renamed the network adapters using the Network
Connections management console, you still have to rename them from the point-of-view of the
WSFC. The default names of the cluster network resources will be Cluster Network n where n is
the number assigned to the cluster network adapter.
To rename the cluster network resources:
1. Within the Failover Cluster Manager console, select the Networks navigation option.
This will display all of the cluster network resources added to the WSFC.
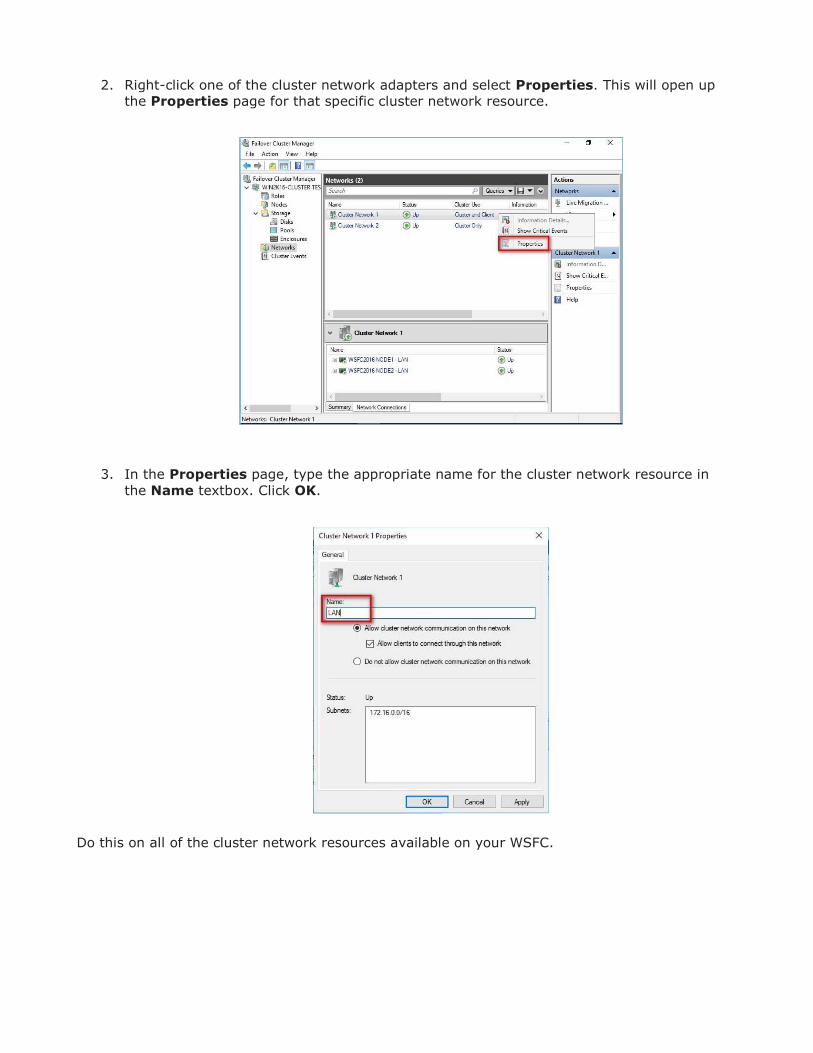
2. Right-click one of the cluster network adapters and select Properties. This will open up
the Properties page for that specific cluster network resource.
3. In the Properties page, type the appropriate name for the cluster network resource in
the Name textbox. Click OK.
Do this on all of the cluster network resources available on your WSFC.
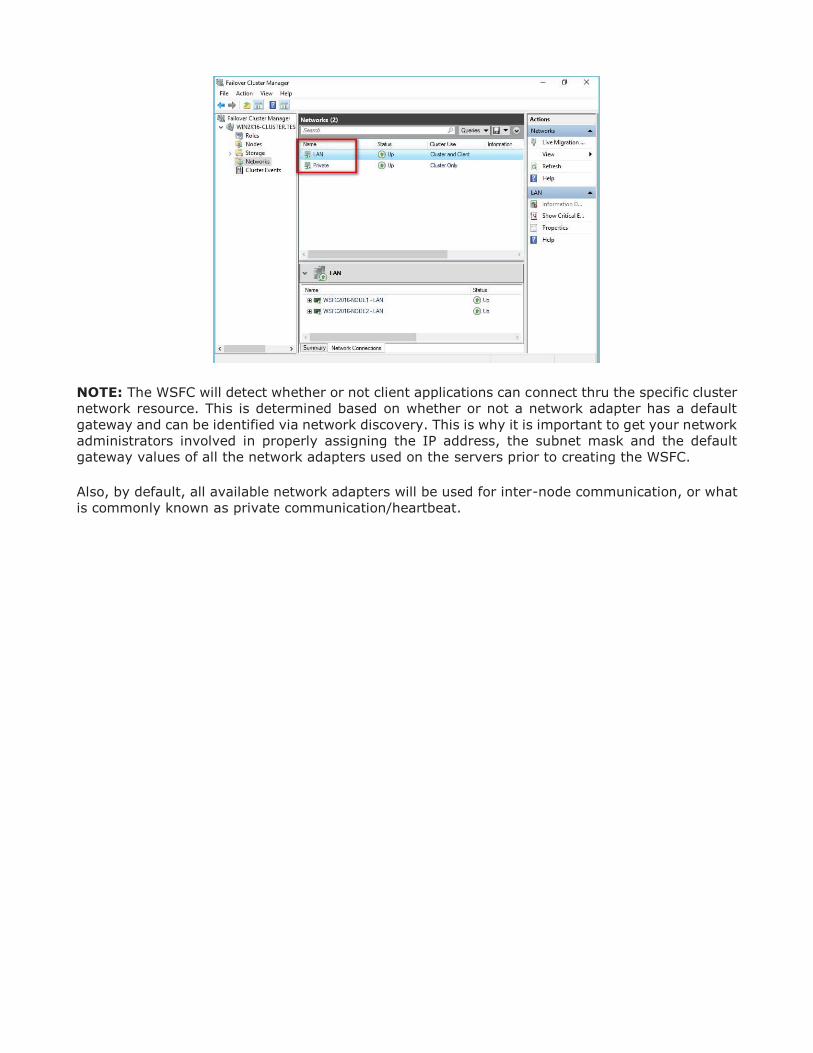
NOTE: The WSFC will detect whether or not client applications can connect thru the specific cluster
network resource. This is determined based on whether or not a network adapter has a default
gateway and can be identified via network discovery. This is why it is important to get your network
administrators involved in properly assigning the IP address, the subnet mask and the default
gateway values of all the network adapters used on the servers prior to creating the WSFC.
Also, by default, all available network adapters will be used for inter-node communication, or what
is commonly known as private communication/heartbeat.
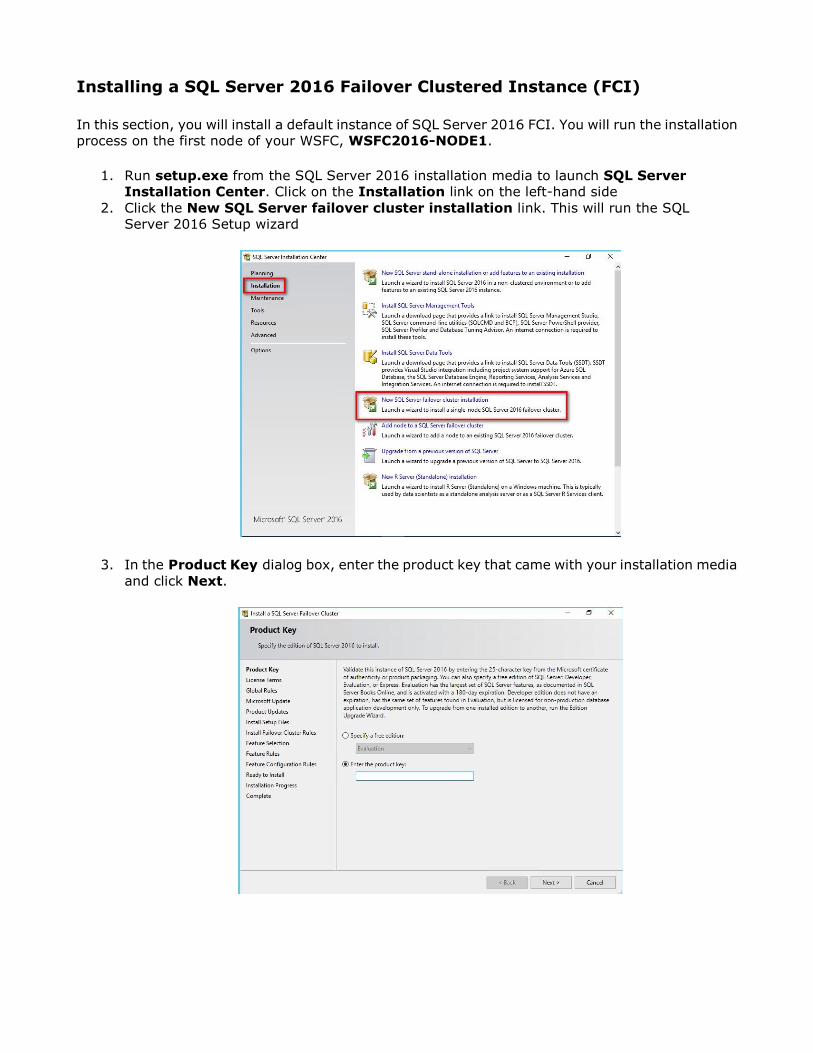
Installing a SQL Server 2016 Failover Clustered Instance (FCI)
In this section, you will install a default instance of SQL Server 2016 FCI. You will run the installation
process on the first node of your WSFC, WSFC2016-NODE1.
1. Run setup.exe from the SQL Server 2016 installation media to launch SQL Server
Installation Center. Click on the Installation link on the left-hand side
2. Click the New SQL Server failover cluster installation link. This will run the SQL
Server 2016 Setup wizard
3. In the Product Key dialog box, enter the product key that came with your installation media
and click Next.
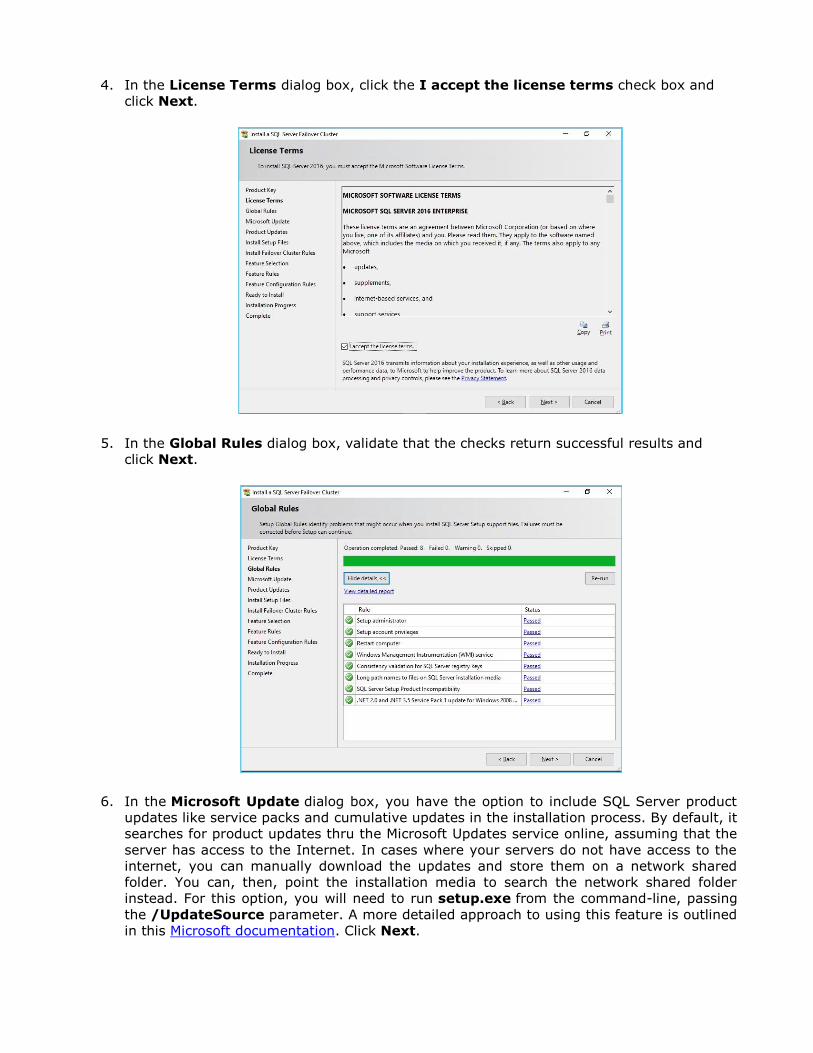
4. In the License Terms dialog box, click the I accept the license terms check box and
click Next.
5. In the Global Rules dialog box, validate that the checks return successful results and
click Next.
6. In the Microsoft Update dialog box, you have the option to include SQL Server product
updates like service packs and cumulative updates in the installation process. By default, it
searches for product updates thru the Microsoft Updates service online, assuming that the
server has access to the Internet. In cases where your servers do not have access to the
internet, you can manually download the updates and store them on a network shared
folder. You can, then, point the installation media to search the network shared folder
instead. For this option, you will need to run setup.exe from the command-line, passing
the /UpdateSource parameter. A more detailed approach to using this feature is outlined
in this Microsoft documentation. Click Next.
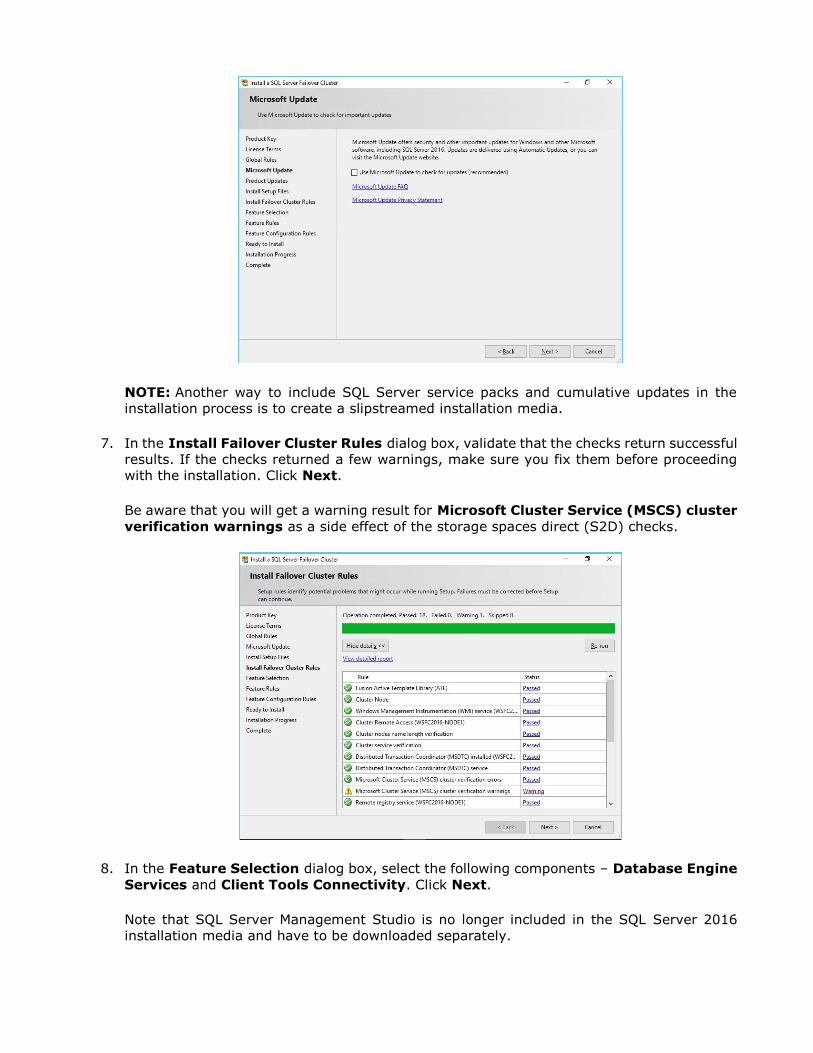
NOTE: Another way to include SQL Server service packs and cumulative updates in the
installation process is to create a slipstreamed installation media.
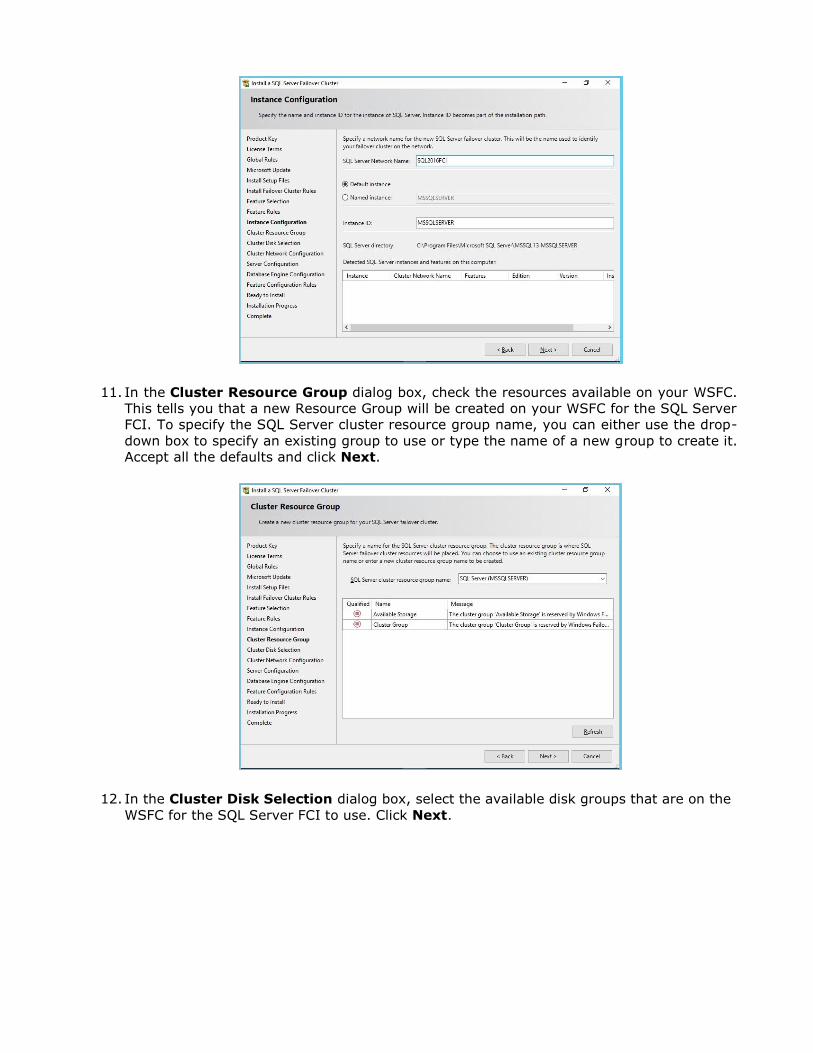
7. In the Install Failover Cluster Rules dialog box, validate that the checks return successful
results. If the checks returned a few warnings, make sure you fix them before proceeding
with the installation. Click Next.
Be aware that you will get a warning result for Microsoft Cluster Service (MSCS) cluster
verification warnings as a side effect of the storage spaces direct (S2D) checks.
8. In the Feature Selection dialog box, select the following components – Database Engine
Services and Client Tools Connectivity. Click Next.
Note that SQL Server Management Studio is no longer included in the SQL Server 2016
installation media and have to be downloaded separately.

9. In the Feature Rules dialog box, verify that all the rules have passed. If the rules returned
a few warnings, make sure you fix them before proceeding with the installation. Click Next.
10. In the Instance Configuration dialog box, enter the SQL Server Network Name. This is
the name that the client applications will use to connect to this server. A couple of things
need highlighting in this section. By default, the instance name is used as the Instance ID.
This is used to identify installation directories and registry keys for this specific instance of
SQL Server - very helpful when you want to run multiple instances in a WSFC. It applies to
both the default instance and named instances. For a default instance, the instance name
and instance ID would be MSSQLSERVER. To use a non-default instance ID, you should
specify a value in the Instance ID box. Click Next.
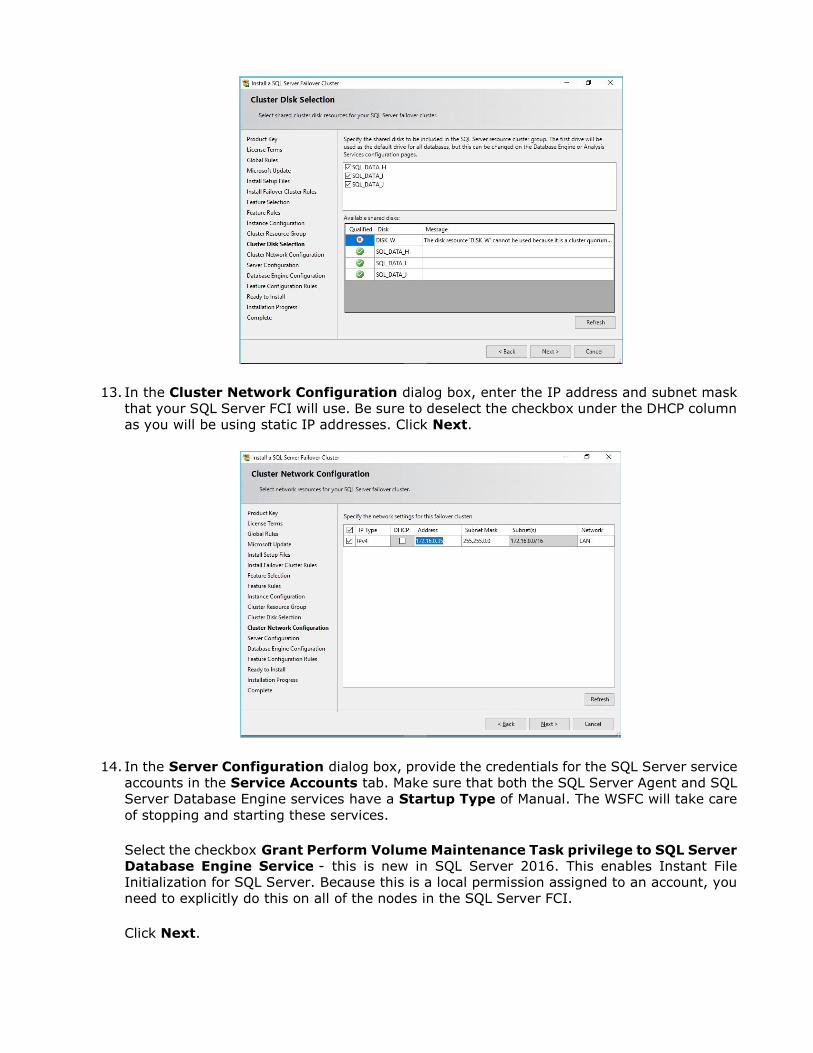
11. In the Cluster Resource Group dialog box, check the resources available on your WSFC.
This tells you that a new Resource Group will be created on your WSFC for the SQL Server
FCI. To specify the SQL Server cluster resource group name, you can either use the drop-
down box to specify an existing group to use or type the name of a new group to create it.
Accept all the defaults and click Next.
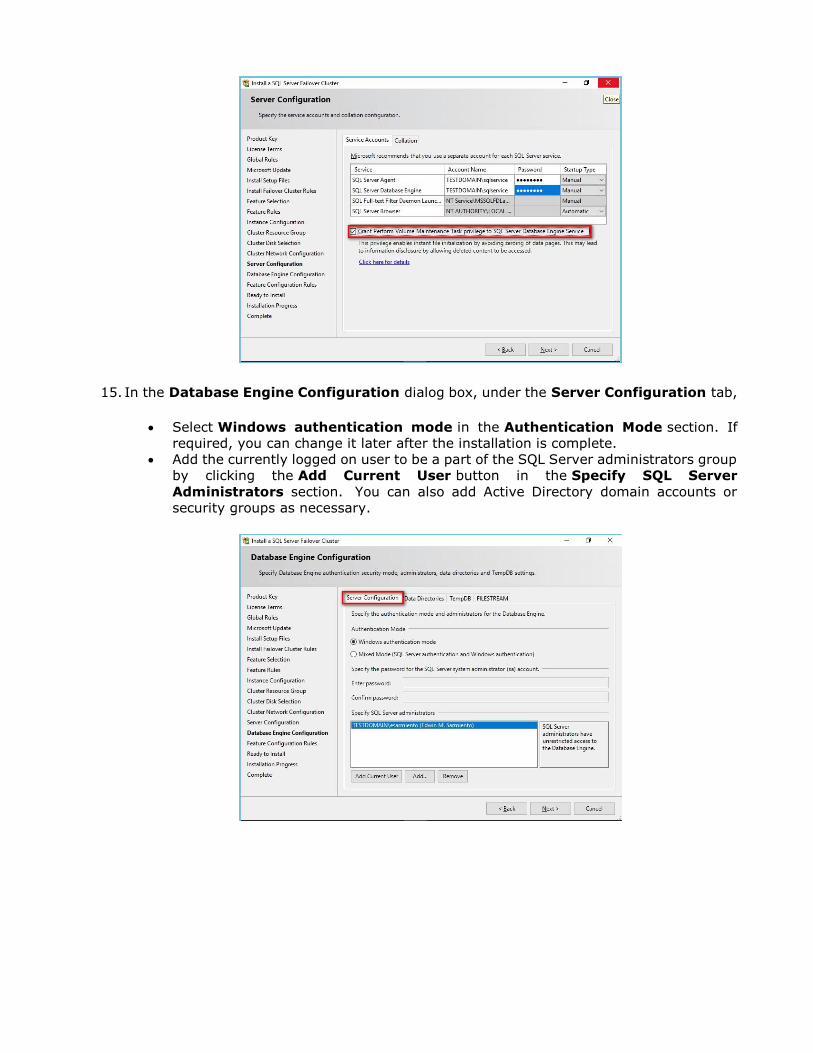
12. In the Cluster Disk Selection dialog box, select the available disk groups that are on the
WSFC for the SQL Server FCI to use. Click Next.
13. In the Cluster Network Configuration dialog box, enter the IP address and subnet mask
that your SQL Server FCI will use. Be sure to deselect the checkbox under the DHCP column
as you will be using static IP addresses. Click Next.
14. In the Server Configuration dialog box, provide the credentials for the SQL Server service
accounts in the Service Accounts tab. Make sure that both the SQL Server Agent and SQL
Server Database Engine services have a Startup Type of Manual. The WSFC will take care
of stopping and starting these services.
Select the checkbox Grant Perform Volume Maintenance Task privilege to SQL Server
Database Engine Service - this is new in SQL Server 2016. This enables Instant File
Initialization for SQL Server. Because this is a local permission assigned to an account, you
need to explicitly do this on all of the nodes in the SQL Server FCI.
Click Next.
15. In the Database Engine Configuration dialog box, under the Server Configuration tab,
• Select Windows authentication mode in the Authentication Mode section. If
required, you can change it later after the installation is complete.
• Add the currently logged on user to be a part of the SQL Server administrators group
by clicking the Add Current User button in the Specify SQL Server
Administrators section. You can also add Active Directory domain accounts or
security groups as necessary.
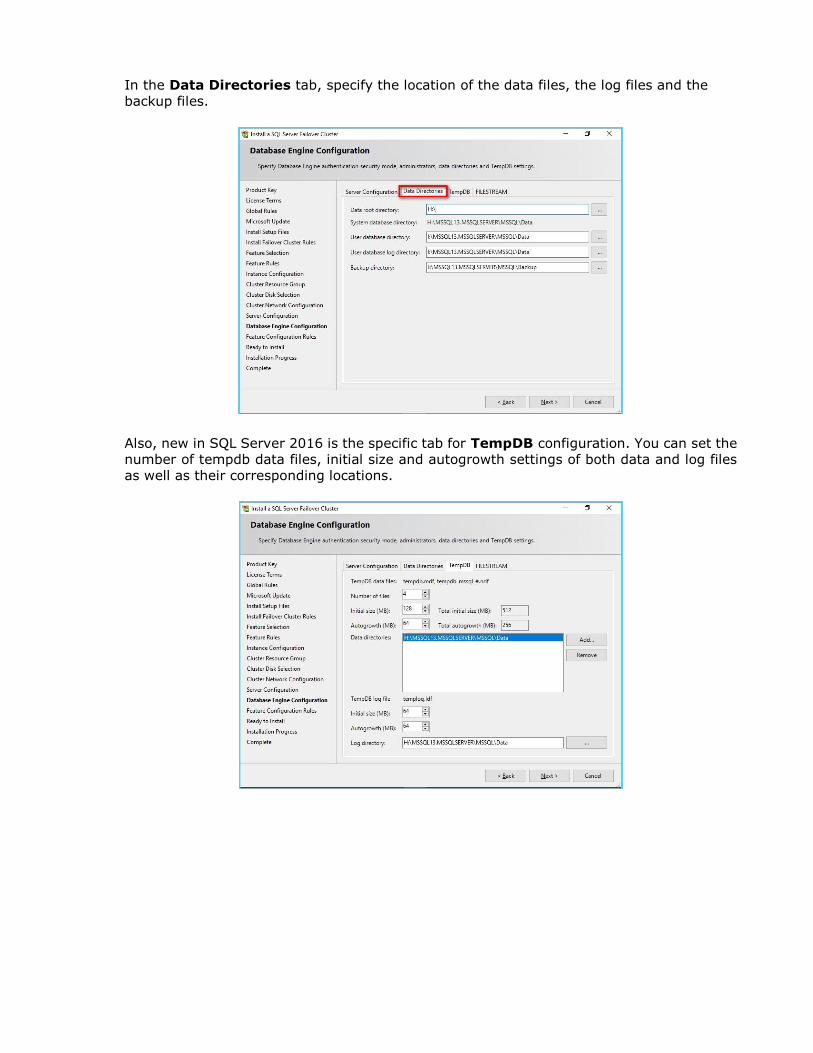
In the Data Directories tab, specify the location of the data files, the log files and the
backup files.
Also, new in SQL Server 2016 is the specific tab for TempDB configuration. You can set the
number of tempdb data files, initial size and autogrowth settings of both data and log files
as well as their corresponding locations.

Note that, starting with SQL Server 2012, you have the option to store your tempdb
database files on a local disk in a WSFC. You can still choose to host the tempdb database
on shared storage like the one provided in this example. Should you decide to store tempdb
on a local disk, you will get prompted to make sure that all of the nodes in the WSFC contain
the same directory structure and that the SQL Server service account has read/write
permissions on those folders.
16. In the Feature Configuration Rules dialog box, verify that all checks are successful.
Click Next.
17. In the Ready to Install dialog box, verify that all configuration settings are correct.
Click Install to proceed with the installation.
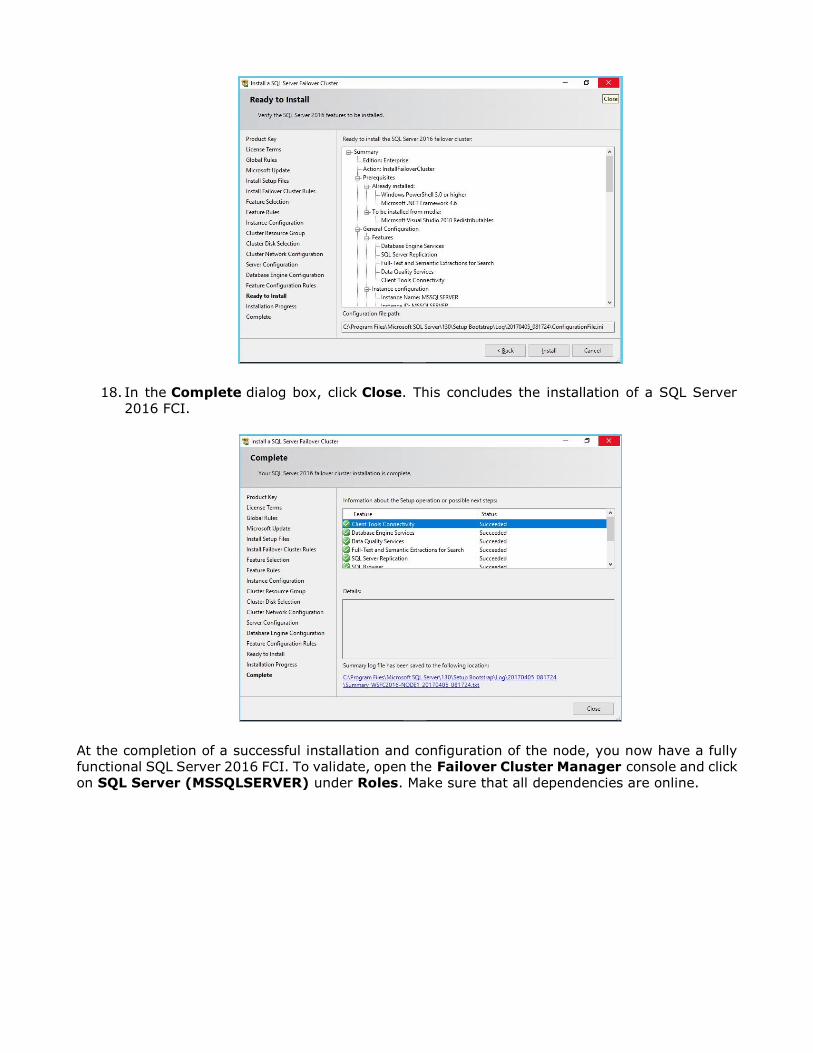
18. In the Complete dialog box, click Close. This concludes the installation of a SQL Server
2016 FCI.
At the completion of a successful installation and configuration of the node, you now have a fully
functional SQL Server 2016 FCI. To validate, open the Failover Cluster Manager console and click
on SQL Server (MSSQLSERVER) under Roles. Make sure that all dependencies are online.

Also new in SQL Server 2016 FCI is the additional cluster resource named SQL Server CEIP
(MSSQLSERVER) or the Local Audit for SQL Server Usage Feedback Collection feature. This
additional cluster resource/role inside the SQL Server cluster resource group does not directly
impact the SQL Server FCI. By default, failure of this resource does not cause a failover of the entire
SQL Server cluster resource group. However, you still need to monitor whether this resource is
online or not.
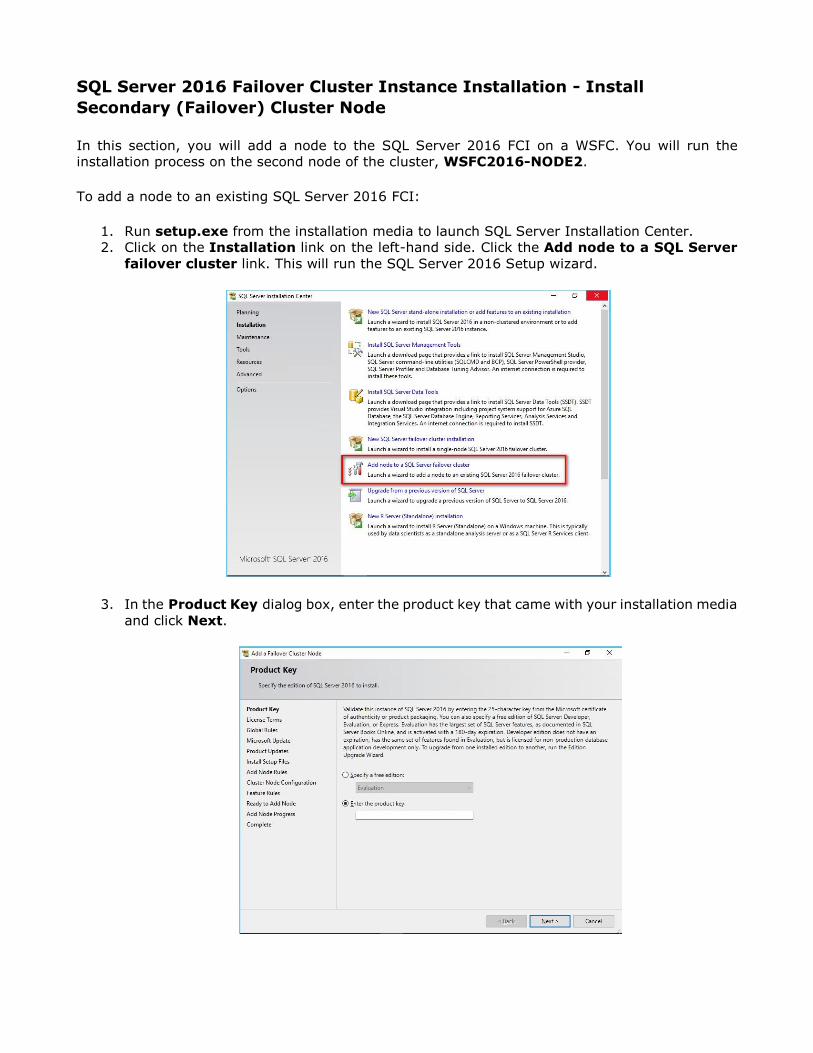
SQL Server 2016 Failover Cluster Instance Installation - Install
Secondary (Failover) Cluster Node
In this section, you will add a node to the SQL Server 2016 FCI on a WSFC. You will run the
installation process on the second node of the cluster, WSFC2016-NODE2.
To add a node to an existing SQL Server 2016 FCI:
1. Run setup.exe from the installation media to launch SQL Server Installation Center.
2. Click on the Installation link on the left-hand side. Click the Add node to a SQL Server
failover cluster link. This will run the SQL Server 2016 Setup wizard.
3. In the Product Key dialog box, enter the product key that came with your installation media
and click Next.
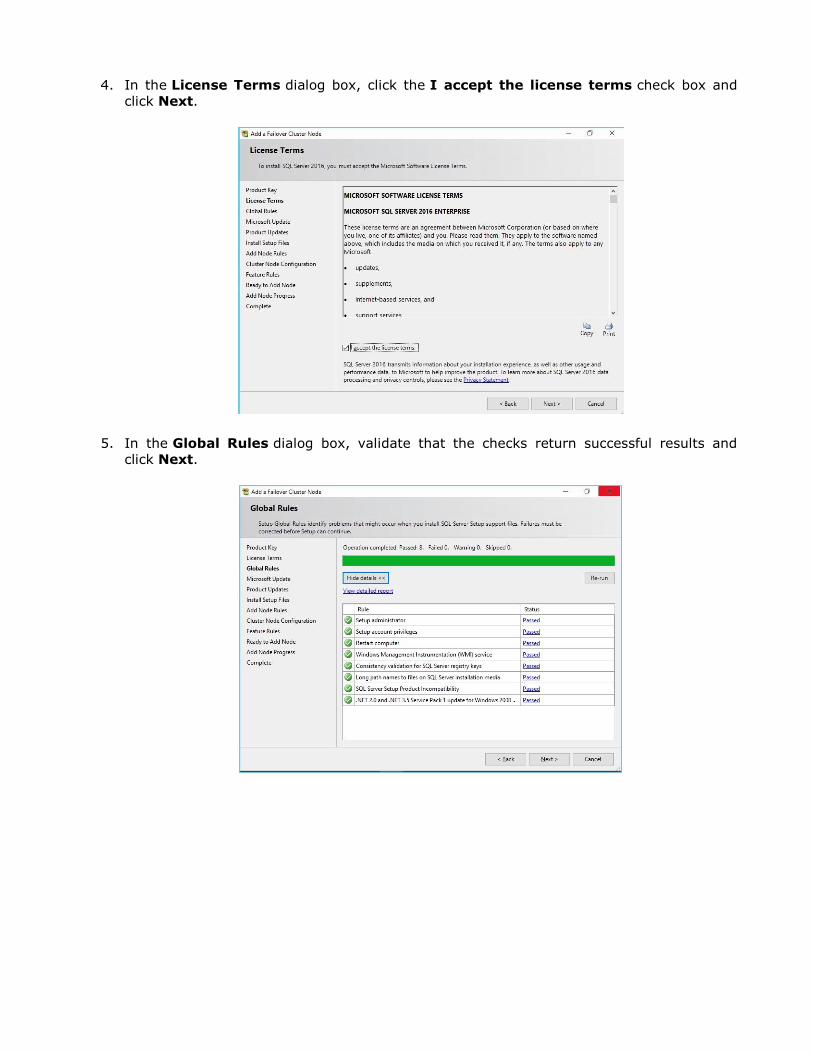
4. In the License Terms dialog box, click the I accept the license terms check box and
click Next.
5. In the Global Rules dialog box, validate that the checks return successful results and
click Next.

6. In the Microsoft Update dialog box, click Next.
7. In the Add Node Rules dialog box, validate that the checks return successful results. If the
checks returned a few warnings, make sure you fix them before proceeding with the
installation. Click Next.
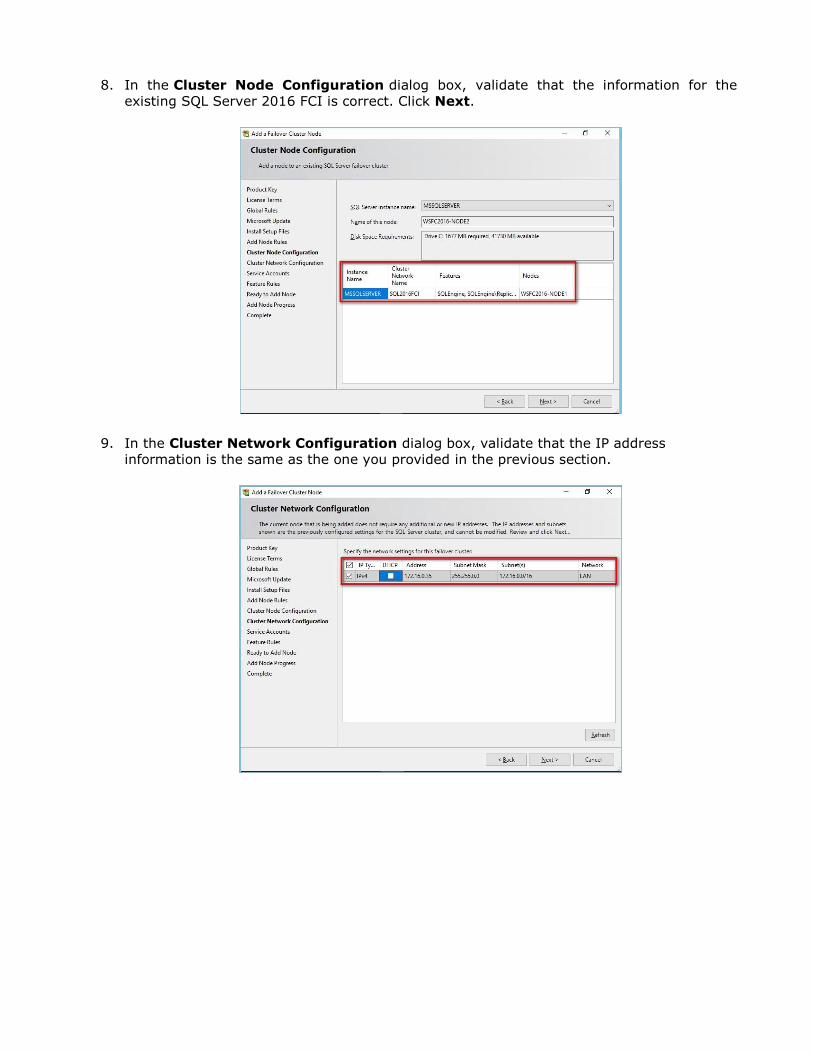
8. In the Cluster Node Configuration dialog box, validate that the information for the
existing SQL Server 2016 FCI is correct. Click Next.
9. In the Cluster Network Configuration dialog box, validate that the IP address
information is the same as the one you provided in the previous section.
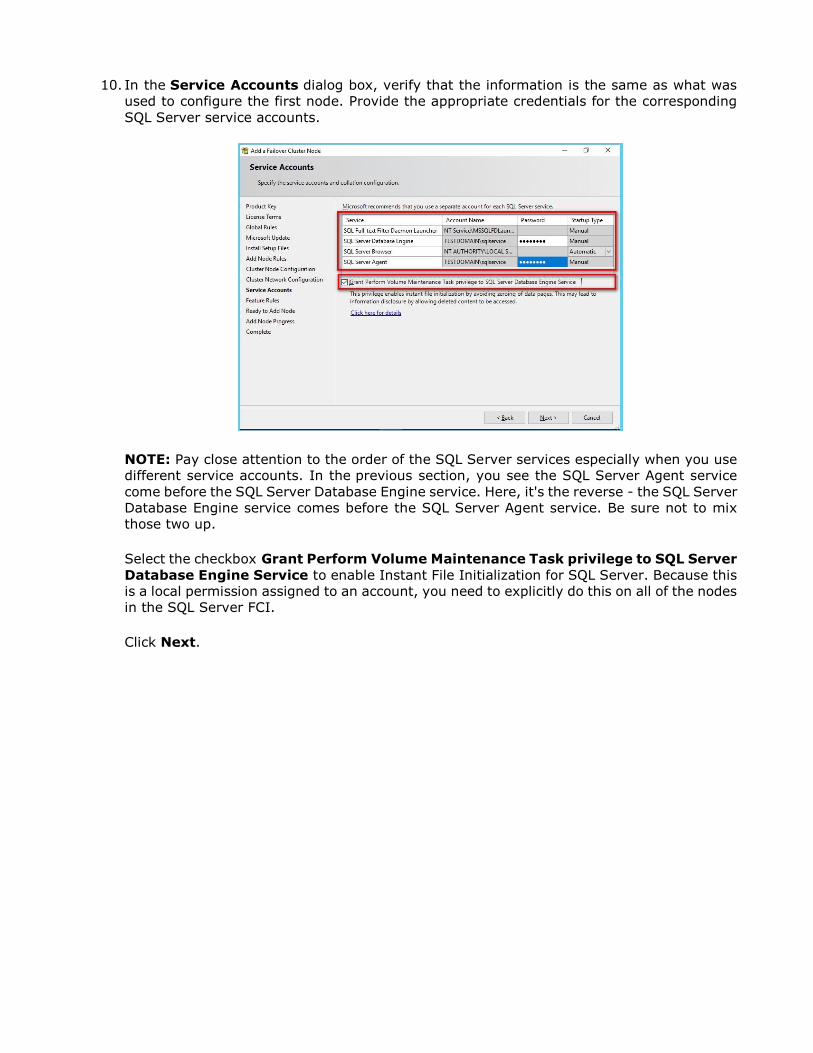
10. In the Service Accounts dialog box, verify that the information is the same as what was
used to configure the first node. Provide the appropriate credentials for the corresponding
SQL Server service accounts.
NOTE: Pay close attention to the order of the SQL Server services especially when you use
different service accounts. In the previous section, you see the SQL Server Agent service
come before the SQL Server Database Engine service. Here, it's the reverse - the SQL Server
Database Engine service comes before the SQL Server Agent service. Be sure not to mix
those two up.
Select the checkbox Grant Perform Volume Maintenance Task privilege to SQL Server
Database Engine Service to enable Instant File Initialization for SQL Server. Because this
is a local permission assigned to an account, you need to explicitly do this on all of the nodes
in the SQL Server FCI.
Click Next.
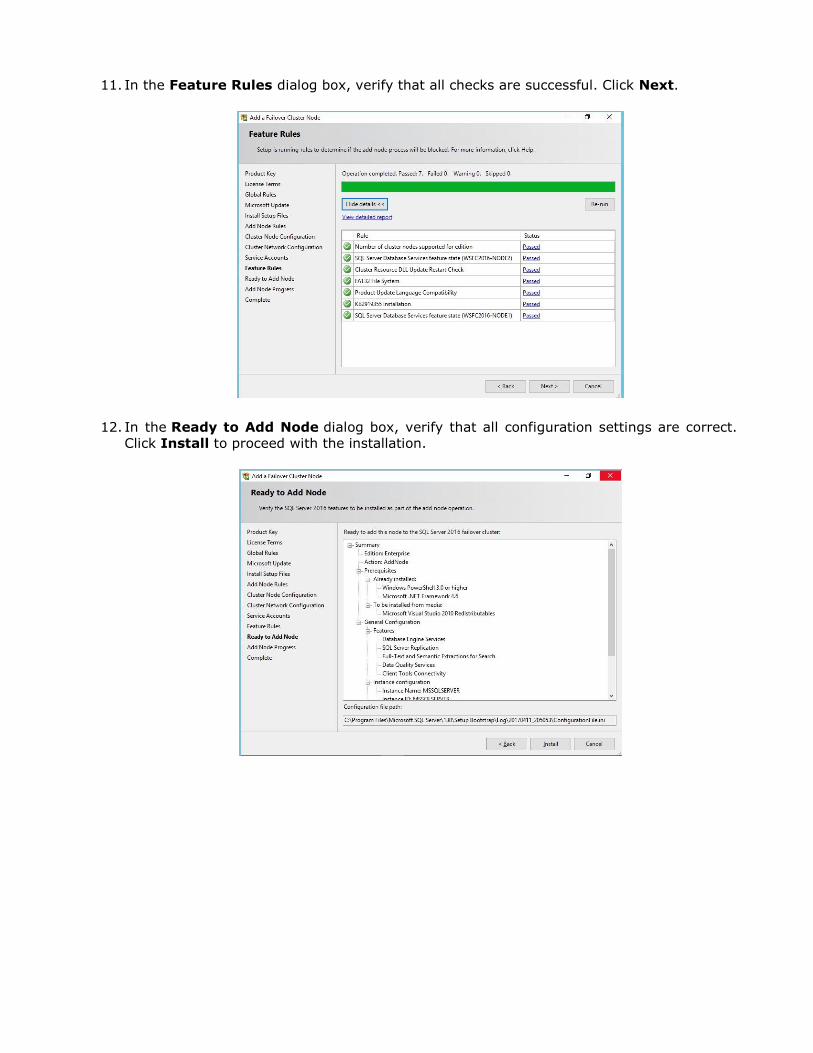
11. In the Feature Rules dialog box, verify that all checks are successful. Click Next.
12. In the Ready to Add Node dialog box, verify that all configuration settings are correct.
Click Install to proceed with the installation.
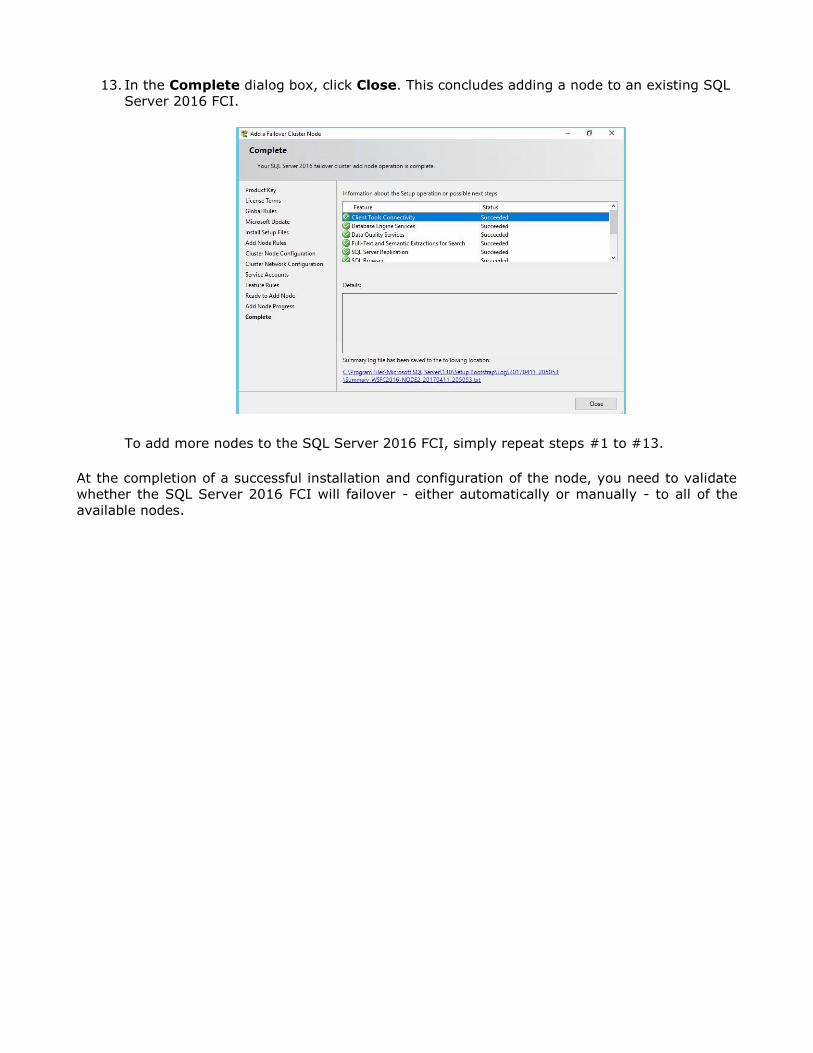
13. In the Complete dialog box, click Close. This concludes adding a node to an existing SQL
Server 2016 FCI.
To add more nodes to the SQL Server 2016 FCI, simply repeat steps #1 to #13.
At the completion of a successful installation and configuration of the node, you need to validate
whether the SQL Server 2016 FCI will failover - either automatically or manually - to all of the
available nodes.

About The Author
Did this document help you? Send feedback, comments and suggestions to: [email protected]
Interested in requesting the author for training, consulting, solutions architecture, whiteboard sessions
or team mentoring, send an email to: [email protected]
Edwin M Sarmiento is a Microsoft SQL Server MVP and
Microsoft Certified Master from Ottawa, Canada specializing in
high availability, disaster recovery and system infrastructures
running on the Microsoft server technology stack - ranging from
Active Directory to SharePoint and anything in between. He is very
passionate about technology but has interests in music,
professional and organizational development, leadership and
management matters when not working with databases. He lives
up to his primary mission statement – “To help people grow and
develop their full potential as God has planned for them."
He wants the whole world to know that the FILIPINO is a world-
class citizen and brings JESUS CHRIST to the world.
http://www.EdwinMSarmiento.com
@EdwinMSarmiento
http://ca.linkedin.com/in/EdwinMSarmiento