sql server protection - windows server backup, …...sql server protection requires the sql add-on...
TRANSCRIPT
SQL Server Protection
User guide
SQL Server Protection © Cortex I.T. 2001-2015 Whitepaper: Version April 21 2016
1
Contents
1. Introduction ..................................................................................................................................... 2
Documentation .................................................................................................................................................................. 2
Licensing ............................................................................................................................................................................... 2
Requirements ...................................................................................................................................................................... 2
2. SQL Protection overview ................................................................................................................ 3
Backup destinations ......................................................................................................................................................... 3
Transaction logs ................................................................................................................................................................. 3
Hyper-V backups ............................................................................................................................................................... 4
SQL database restores .................................................................................................................................................... 4
Best Practice backups ...................................................................................................................................................... 5
3. Database types ................................................................................................................................ 5
User databases ................................................................................................................................................................... 5
System databases .............................................................................................................................................................. 5
4. Remote SQL Server configuration ................................................................................................. 6
5. Creating an SQL Server Protection backup .................................................................................. 8
6. Restoring an SQL Server Protection backup ............................................................................. 12
7. SQL Server Protection backup management ............................................................................ 17
Manually running a backup job................................................................................................................................ 17
SQL Servers ....................................................................................................................................................................... 17
Scheduling ........................................................................................................................................................................ 17
Concurrent backup ........................................................................................................................................................ 18
8. Support and Resources ................................................................................................................ 18
References ......................................................................................................................................................................... 18
SQL Server Protection © Cortex I.T. 2001-2015 Whitepaper: Version April 21 2016
2
1. Introduction
BackupAssist’s SQL Add-on provides SQL Server protection
for both local and remote SQL servers. Back up complete
servers, selected databases and perform point-in-time
restores.
The SQL Add-on enables comprehensive protection by unlocking two powerful features, the SQL
Server Protection backup and the SQL Restore tool.
These features support the following backup types and restore options:
A daily backup of an SQL Server or selected databases. You can use this backup to restore
selected databases or the full SQL Server.
A transaction backup of selected databases that runs throughout the day (at 5 minute or greater
intervals). These backups can be used to perform point-in-time restores of an SQL database.
Remote backups and restores so you can protect any number of remote SQL servers (on the
same domain) in addition to the local SQL Server, using one Add-on license.
This table compares the SQL Server support provided by the SQL Add-on and BackupAssist’s standard
backup types: System Protection, File Protection and File Archiving.
SQL protection SQL Add-on Standard backup types
Full Server backup
Selected database backup
Continuous transaction level backups
Full Server restores
Selected database restores
Point-in-time restores
Remote SQL Server backup and restores
Documentation
This user guide can be used in conjunction with other BackupAssist guides available from our online
documentation page.
Licensing
Contact your BackupAssist reseller or distributor for pricing information or visit www.BackupAssist.com.
SQL Server Protection requires the SQL Add-on license, once the initial trial period has expired.
Requirements
Windows 7, 8, Server 2008/R2 or Server 2012/R2 operating system.
SQL Server Protection can be used for Microsoft SQL Server 2005, 2008/R2, 2012 and 2014.
(Including variants: SQL Express and MSDE).
SQL Server Protection © Cortex I.T. 2001-2015 Whitepaper: Version April 21 2016
3
2. SQL Protection overview
BackupAssist’s SQL Add-on enables the SQL Protection backup. This backup technology can be used
to create two types of backup jobs. A Basic (daily) backup job of the SQL Server or a Transaction
backup job that will run throughout the day. These backup types are selected as scheduling options,
and therefore referred to as the Basic schedule and Transaction schedule.
SQL Backup type Backup process Restore options
Basic schedule
Daily
A daily backup of selected SQL
databases or the complete SQL Server
(by selecting all of the databases) that
is the run at the time specified.
Any SQL databases in a backup can
be restored from the time the backup
was run. If all databases were backed
up, the SQL Server can be restored.
Transactional schedule
Continuous
The backup job creates transaction
level backups throughout the day.
These continuous backups can occur
at intervals of 5 minutes or greater.
Select a point in time, and the restore
tool will display the backups closest to
that point that you can restore the
selected databases from.
Backup destinations
SQL Protection backups are stored in a folder on the local SQL Server. You will not be asked to define
a destination media, but you will be asked to provide a directory path.
The default path is C:\ProgramData\BackupAssist <version>\temp\sql\
This location is used for both Basic and Transaction schedule backups of the local SQL Server, as well
as any remote SQL servers that were selected. The files are saved locally because the scheduling is tied
to the Basic and Transactional backup types, rather than different destinations and media rotations.
However, you can create a File Archiving or File Protection backup job to move the SQL backup to
another destination. This also allows you to use additional backup schemes to create archive backups
that can be moved to secure location, using whatever destination is supported by the backup type.
Transaction logs
SQL uses transaction logs to record all database changes. These logs grow and when they are backed
up, all committed transactions are removed. A Transactional backup job will create a full backup then
update that backup at user-defined intervals. New information is added to the logs as the databases
change. When the first interval backup runs, the log is backed up and cleared again. A complete set of
transaction logs are maintained, reaching back to your most recent full backup. The full backup and
the subsequent transaction backups can be used to restore a database to a point in time by restoring
the database and applying all the changes that took place, up to the point required.
The transaction log supports the following operations:
Recovery of individual transactions
Recovery of all incomplete transactions when an SQL Server is started
Rolling a restored database, file, file group or page forward to the point of failure
Transaction log backups of SQL Server databases are only possible if the databases are configured using the
full or bulk Logged recovery models option. For additional in-depth information on SQL database recovery
models, please refer to http://msdn.microsoft.com/en-us/library/ms175477.aspx.
SQL Server Protection © Cortex I.T. 2001-2015 Whitepaper: Version April 21 2016
4
Hyper-V backups
BackupAssist with the SQL Continuous Add-on can be used to backup SQL Servers that are running on
guests (VMs) in Hyper-V environments.
Backing up SQL from the guest
BackupAssist and the SQL Continuous Add-on should be installed on the guest VM that is running the
SQL Server.
Backing up SQL from the host
It is best practice to not run applications on the Hyper-V host because any problems or performance
overheads could affect all of the guests, and software updates could require a server reboot, causing
an outage for all of your guests and the services they provide.
If your Hyper-V Server is running multiple SQL servers on separate guests (VMs) it is possible to install
BackupAssist and the SQL Continuous Add-on on the Hyper-V host and back up each guest, but this is
not recommended.
If you want to back up from a host that is a part of a workgroup, we suggest proceeding as follows:
a) Create a domain user with the appropriate backup rights. You need to create a Windows domain
user that has sufficient permissions to back up SQL databases from the SQL server.
b) Configure a Backup User Identity on the Hyper-V Host. Once you have created a domain user with
the appropriate permissions, create a user on the Hyper-V Host with the following properties:
The same username and password as the user created for the domain in Step 1.
Be a member of both the Administrators and the Backup Operators groups.
Warning, if you back SQL Server up from host that is part of a workgroup you may encounter errors
such as this error. If you do have problems backing up from the host then you will be required to
install an instance of BackupAssist on the guest where you can activate the SQL Add-on along with
BackupAssist license.
If you want to back up from a host that is a part of same domain, then there would be no permission
related issues.
SQL database restores
Most SQL restores will be for SQL databases used by your business, but an SQL restore can also be
used to restore an SQL Server. It is important to understand the difference.
An SQL database restore, is when you use the SQL Restore tool to restore business databases that
are used to manage your information. These database restores can be for local or remote SQL servers.
To perform a database restore, you tick Selected database in the Select restore type step in the SQL
Restore tool.
An SQL Server restore, is when you restore the master database to a local SQL Server. The master
database is composed of important system tables and catalogues that are required to rebuild your
SQL Server. If you are restoring after a disaster or performing a new installation, you should restore the
master database before restoring any other databases. To perform a database restore, you tick Master
database recovery in the Select restore type step in the SQL Restore tool.
SQL Server Protection © Cortex I.T. 2001-2015 Whitepaper: Version April 21 2016
5
A full SQL Server restore can only be performed on the local server, and the backup must contain the
master and system databases. If you need to restore the master database to a remote SQL Server, you
should install BackupAssist on the remote server. The installation does not need to be licensed if you
run SQLRestore.exe from the BackupAssist installation directory. For information on what databases are
system databases, see the System Databases section.
Best Practice backups
These suggestions will help you select the best set of BackupAssist technologies to protect your SQL
Server. Your decisions should reflect your backup, restore and recovery requirements.
The SQL Add-on creates two types of backups: a database backup at the end of each day (Basic
schedule) and a transactional backup throughout the day. At a minimum, you should have a daily
database backup. Transactional backups should be used if you have databases that are often changing
and critical to your business.
If your Windows Server’s operating system will not start, or the physical server is lost or damaged, you
can rebuilt the server and its operating system, and then restore the SQL Server, but best practice is to
have an image backup so you can perform a bare-metal recovery. For this reason, you should include a
System Protection backup of the Window Server that SQL Server runs on, as part of your backup plan.
The SQL Add-on saves the backup on the local SQL Server. It is best practice to have archive backups
in a secure location that are retained for extended periods. For example, weekly and monthly backups
using remote or removable media. This can be done using File Protection for File Archiving.
3. Database types
When you create a backup job, you will be asked to select the SQL databases that you want to back
up. This initial step is the same, where you are planning to create a Basic or Transactional backup job.
This section explains the types of databases in SQL, and any requirements or limitations that apply to
the backup and restoration of each database type.
User databases
User databases contain the information that you have used SQL to store and manage. This is the
business data, that is backed up to protect your company’s information. This information should be
backed up on a regular basis so that it can be recovered in the event of data loss or corruption.
System databases
SQL system databases are the databases used by the SQL Server itself. These need to be backed up in
addition to the user databases, so that the entire SQL Server can be rebuilt in the event of system or
database failure. The system databases vary depending on the version of SQL you are running, but
generally include the following:
Master Records all the system-level information for an SQL Server. The master database is
composed of system tables and catalogs, and is critical to your SQL Server. If you are
restoring your SQL Server after a disaster or new installation, it is advised that you
restore the master database before restoring any other database.
SQL Server Protection © Cortex I.T. 2001-2015 Whitepaper: Version April 21 2016
6
The BackupAssist SQL Restore tool can be used to restore all other databases remotely
but not the master database. If you need to restore the master database to a remote
SQL Server, you must install BackupAssist on the server running SQL.
You can only perform full backups of the master database. Transactional log, differential
or file group backups of the master database are not allowed.
Msdb Used by the SQL Server agent for scheduling alerts and jobs. The msdb database is used
to store data, including scheduled job information, backup and restore history
information and DTS packages (data transmission services). Usually the msdb database is
rather small, therefore full database backups provide a fast alternative to transaction log
backups of the database.
Model The model database is a template used by Microsoft SQL Server when creating other
databases, such as tempdb or user databases. When a new database is created, the
entire contents of the model database is copied to the new database. If the master or
msdb databases are rebuilt, the model database is also rebuilt and any changes are lost.
Resource A read-only database containing system objects included with SQL Server 2005. The
database makes upgrading to a new version of SQL Server an easier and faster. Because
the resource database file contains all system objects, an upgrade can be accomplished
by copying the single resource database file to the local server. Similarly, rolling back
system object changes in a service pack only requires overwriting the current version of
the resource database with the older version.
Tempdb A workspace for holding temporary objects or intermediate results sets. It is important
to have regular backups of these system databases, however, it is not necessary to back
up the tempdb system database because it is rebuilt each time SQL Server is started.
When SQL Server is shut down, any data in tempdb is deleted permanently. For this
reason, do not store any application specific data in the tempdb database. Leave it
exclusively for the SQL Server to use.
4. Remote SQL Server configuration
The BackupAssist SQL Add-on can back up both local and remote SQL servers that are on the same
domain. When the backup job is created, the first step is to select the local and remote SQL servers
whose databases you want to include in that backup job. Before you can select a remote SQL Server,
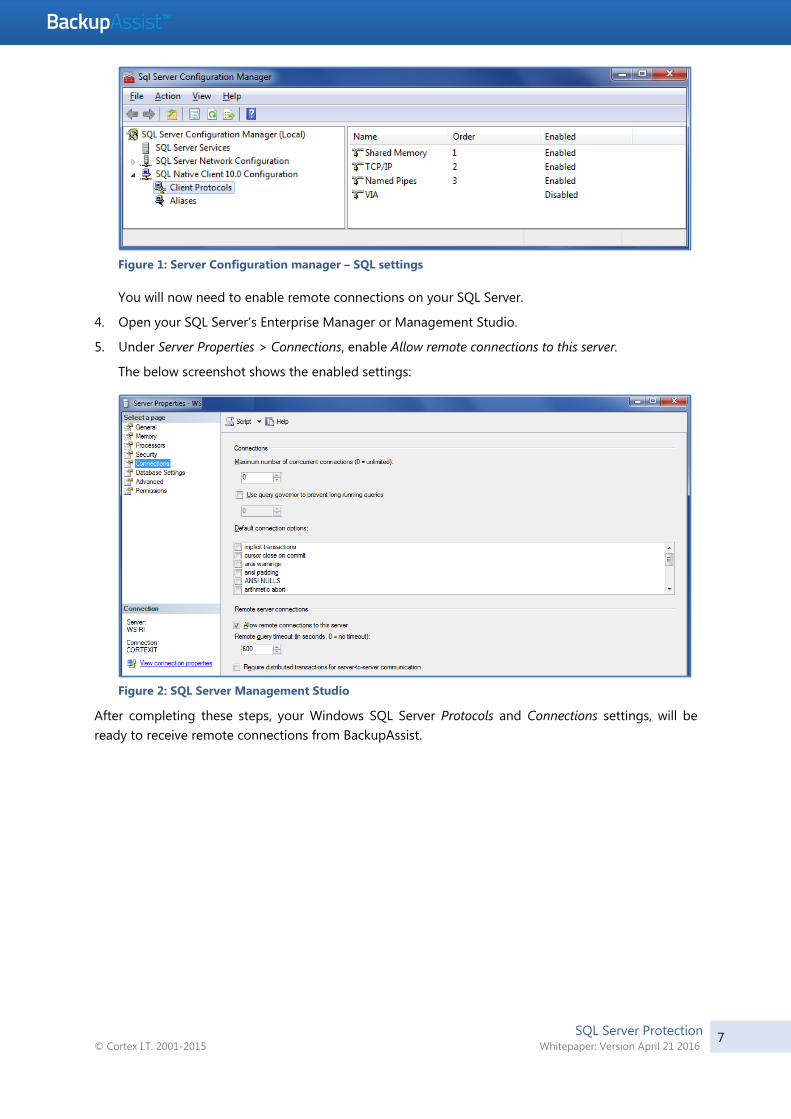
you need to make sure that the SQL Server accepts remote TCP/IP connections.
These steps explain how to enable remote TCP/IP connections on a remote SQL Server:
1. Go to Start > All Programs > SQL Server.
2. Select the SQL Server Configuration Manager.
3. Enable TPC/IP and Named Pipes for both Client protocols and Protocols for MSSQLSERVER.
The below screenshot shows the enabled settings:
SQL Server Protection © Cortex I.T. 2001-2015 Whitepaper: Version April 21 2016
7
Figure 1: Server Configuration manager – SQL settings
You will now need to enable remote connections on your SQL Server.
4. Open your SQL Server’s Enterprise Manager or Management Studio.
5. Under Server Properties > Connections, enable Allow remote connections to this server.
The below screenshot shows the enabled settings:
Figure 2: SQL Server Management Studio
After completing these steps, your Windows SQL Server Protocols and Connections settings, will be
ready to receive remote connections from BackupAssist.
SQL Server Protection © Cortex I.T. 2001-2015 Whitepaper: Version April 21 2016
8
5. Creating an SQL Server Protection backup
SQL Server Protection will back up selected SQL databases on local and remote SQL
servers. If you want to be able to perform a full SQL Server restore, you will need to include
the master database and all of the system databases in the backup job.
To create an SQL Server backup job:
1. Select the Backup tab, and click Create a new backup Job
2. Select SQL Server Protection
If this is the first time you have created a backup job, you will be asked to provide a Backup user
identity if one has not been defined. See the section above, BackupAssist settings, for guidance.
3. Selections
The selections screen is used to locate your SQL servers, authenticate them and select the
databases to be backed up.
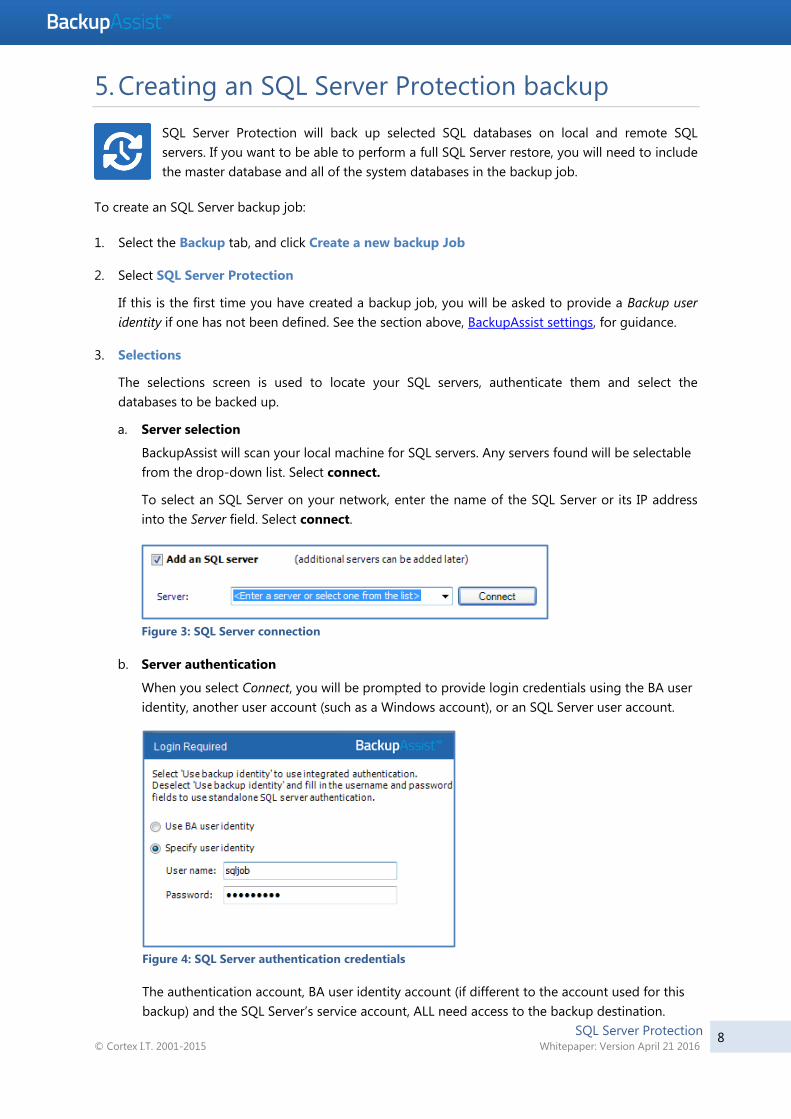
a. Server selection
BackupAssist will scan your local machine for SQL servers. Any servers found will be selectable
from the drop-down list. Select connect.
To select an SQL Server on your network, enter the name of the SQL Server or its IP address
into the Server field. Select connect.
Figure 3: SQL Server connection
b. Server authentication
When you select Connect, you will be prompted to provide login credentials using the BA user
identity, another user account (such as a Windows account), or an SQL Server user account.
Figure 4: SQL Server authentication credentials
The authentication account, BA user identity account (if different to the account used for this
backup) and the SQL Server’s service account, ALL need access to the backup destination.
SQL Server Protection © Cortex I.T. 2001-2015 Whitepaper: Version April 21 2016
9
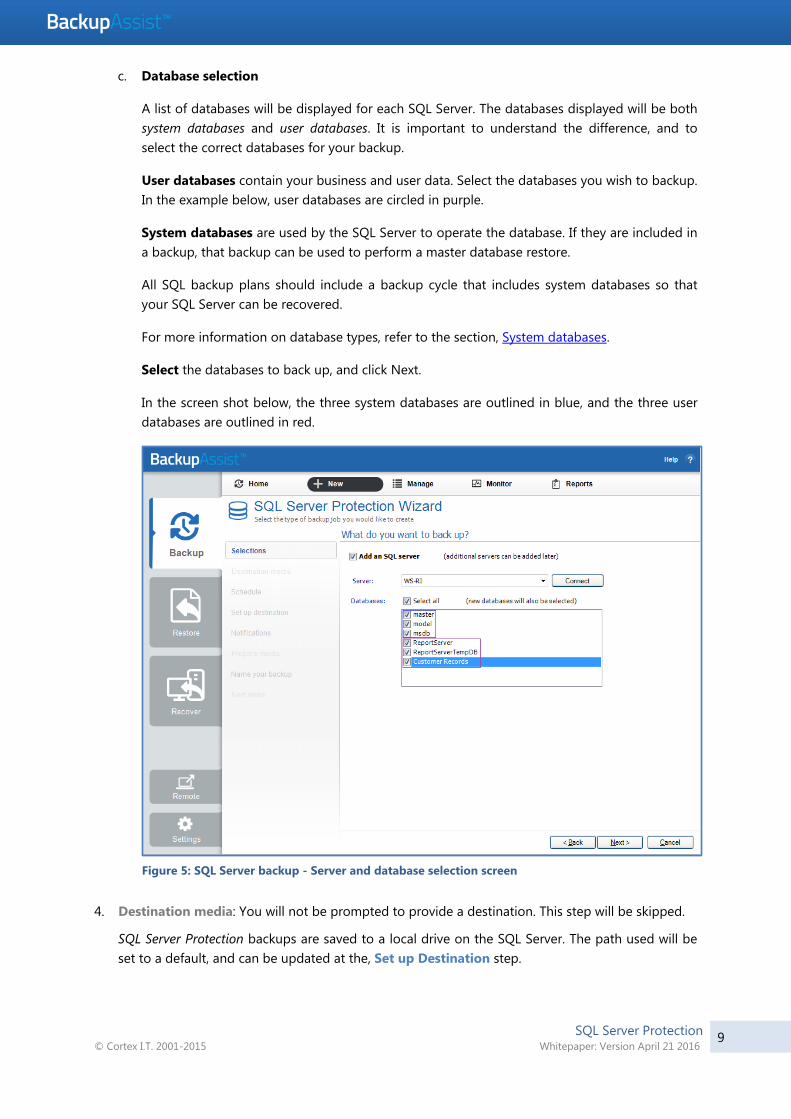
c. Database selection
A list of databases will be displayed for each SQL Server. The databases displayed will be both
system databases and user databases. It is important to understand the difference, and to
select the correct databases for your backup.
User databases contain your business and user data. Select the databases you wish to backup.
In the example below, user databases are circled in purple.
System databases are used by the SQL Server to operate the database. If they are included in
a backup, that backup can be used to perform a master database restore.
All SQL backup plans should include a backup cycle that includes system databases so that
your SQL Server can be recovered.
For more information on database types, refer to the section, System databases.
Select the databases to back up, and click Next.
In the screen shot below, the three system databases are outlined in blue, and the three user
databases are outlined in red.
Figure 5: SQL Server backup - Server and database selection screen
4. Destination media: You will not be prompted to provide a destination. This step will be skipped.
SQL Server Protection backups are saved to a local drive on the SQL Server. The path used will be
set to a default, and can be updated at the, Set up Destination step.
SQL Server Protection © Cortex I.T. 2001-2015 Whitepaper: Version April 21 2016
10
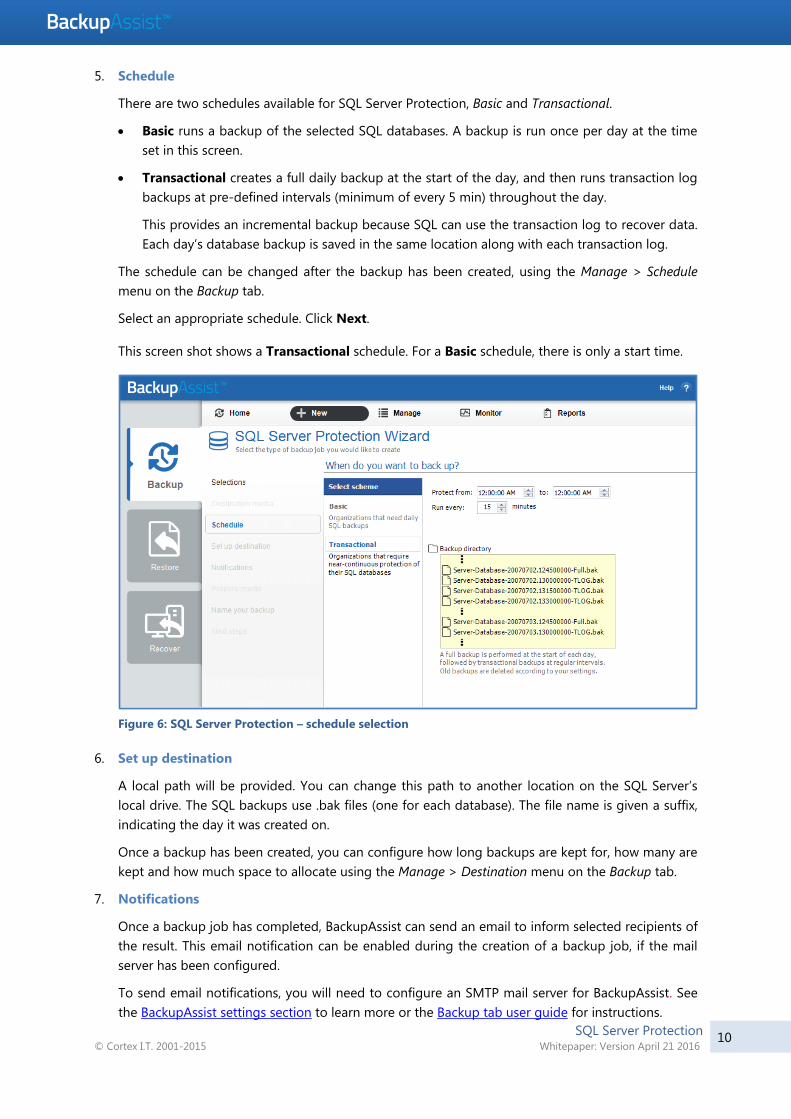
5. Schedule
There are two schedules available for SQL Server Protection, Basic and Transactional.
Basic runs a backup of the selected SQL databases. A backup is run once per day at the time
set in this screen.
Transactional creates a full daily backup at the start of the day, and then runs transaction log
backups at pre-defined intervals (minimum of every 5 min) throughout the day.
This provides an incremental backup because SQL can use the transaction log to recover data.
Each day’s database backup is saved in the same location along with each transaction log.
The schedule can be changed after the backup has been created, using the Manage > Schedule
menu on the Backup tab.
Select an appropriate schedule. Click Next.
This screen shot shows a Transactional schedule. For a Basic schedule, there is only a start time.
Figure 6: SQL Server Protection – schedule selection
6. Set up destination
A local path will be provided. You can change this path to another location on the SQL Server’s
local drive. The SQL backups use .bak files (one for each database). The file name is given a suffix,
indicating the day it was created on.
Once a backup has been created, you can configure how long backups are kept for, how many are
kept and how much space to allocate using the Manage > Destination menu on the Backup tab.
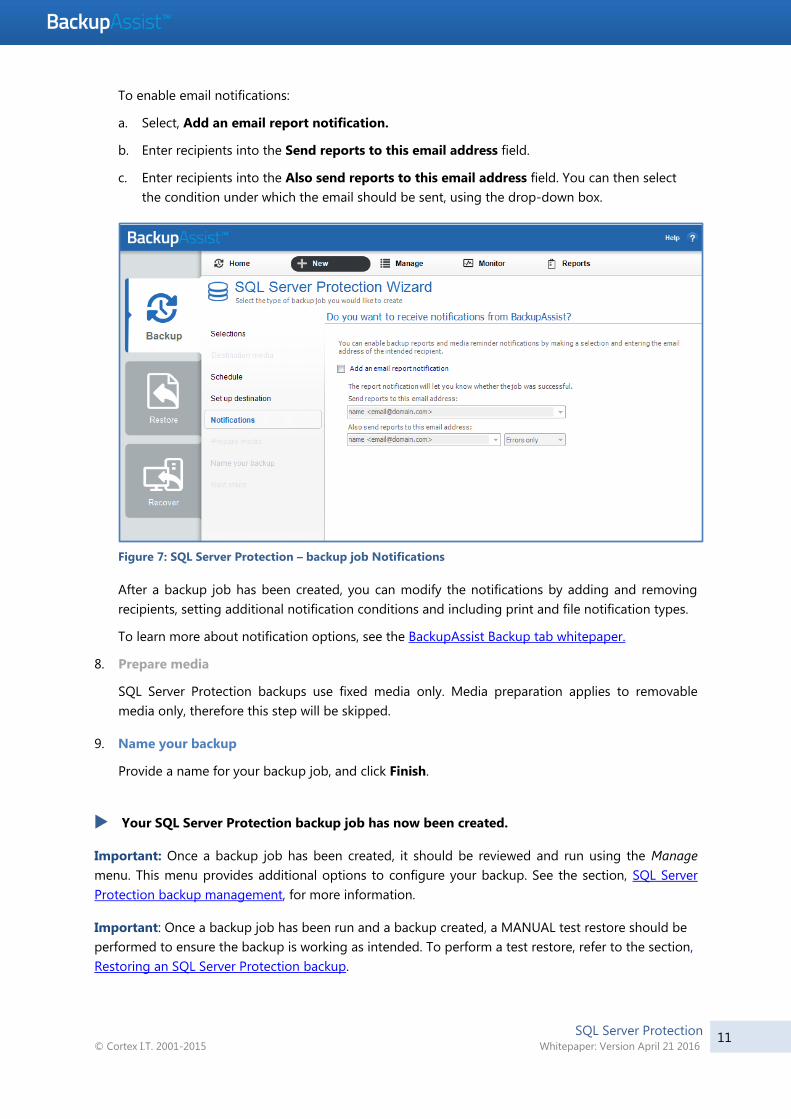
7. Notifications
Once a backup job has completed, BackupAssist can send an email to inform selected recipients of
the result. This email notification can be enabled during the creation of a backup job, if the mail
server has been configured.
To send email notifications, you will need to configure an SMTP mail server for BackupAssist. See
the BackupAssist settings section to learn more or the Backup tab user guide for instructions.
SQL Server Protection © Cortex I.T. 2001-2015 Whitepaper: Version April 21 2016
11
To enable email notifications:
a. Select, Add an email report notification.
b. Enter recipients into the Send reports to this email address field.
c. Enter recipients into the Also send reports to this email address field. You can then select
the condition under which the email should be sent, using the drop-down box.
Figure 7: SQL Server Protection – backup job Notifications
After a backup job has been created, you can modify the notifications by adding and removing
recipients, setting additional notification conditions and including print and file notification types.
To learn more about notification options, see the BackupAssist Backup tab whitepaper.
8. Prepare media
SQL Server Protection backups use fixed media only. Media preparation applies to removable
media only, therefore this step will be skipped.
9. Name your backup
Provide a name for your backup job, and click Finish.
Your SQL Server Protection backup job has now been created.
Important: Once a backup job has been created, it should be reviewed and run using the Manage
menu. This menu provides additional options to configure your backup. See the section, SQL Server
Protection backup management, for more information.
Important: Once a backup job has been run and a backup created, a MANUAL test restore should be
performed to ensure the backup is working as intended. To perform a test restore, refer to the section,
Restoring an SQL Server Protection backup.
SQL Server Protection © Cortex I.T. 2001-2015 Whitepaper: Version April 21 2016
12
6. Restoring an SQL Server Protection backup
BackupAssist provides an inbuilt SQL restore tool that can be used to restore SQL
databases to both local and remote SQL servers. If the backup used a transactional
schedule, the databases can be restored to a specific point in time.
Before you begin a restore, it is important to know what kind of restore you want to perform. A restore
of your databases or a restore of the SQL Server. The option is presented in the Select Type step in the
SQL Restore tool.
Only a backup that includes all of the system databases, including the master database, can be used to
restore the full SQL Server, also known as a Master database restore. The master database is
composed of system tables and catalogues required to rebuild an SQL Server. You must select these
system databases from the database list when your backup is made. This can only be performed on
the local SQL Server
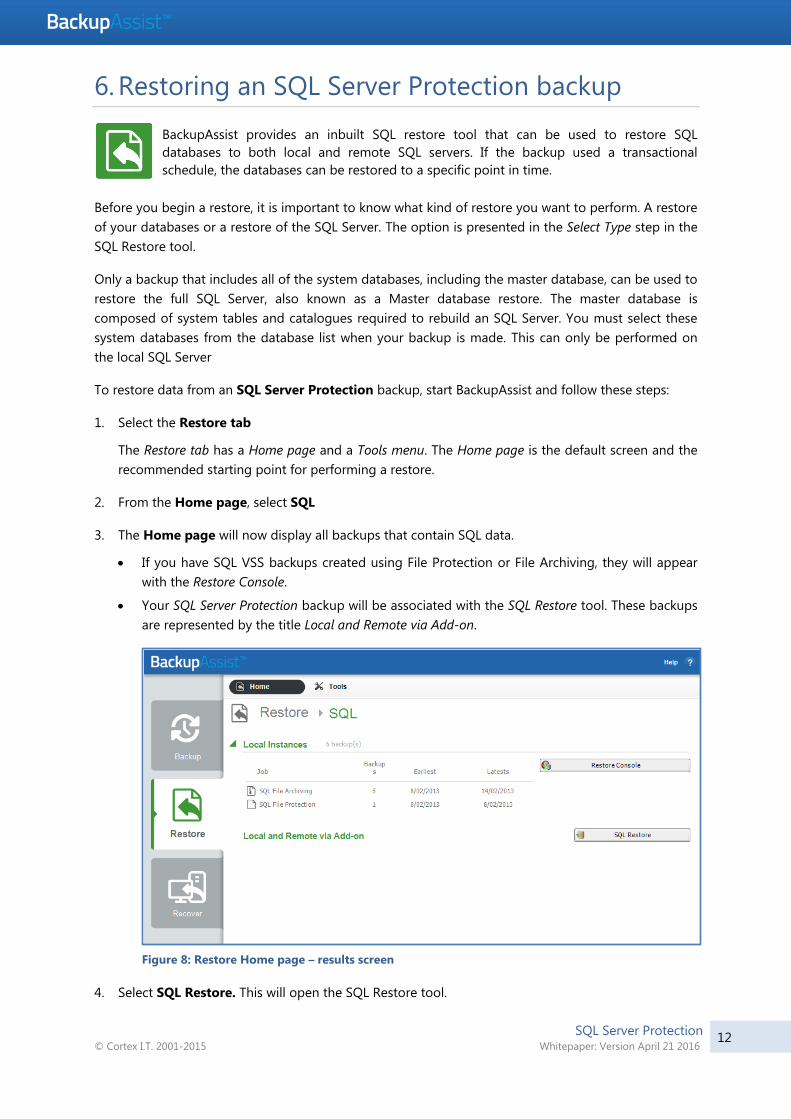
To restore data from an SQL Server Protection backup, start BackupAssist and follow these steps:
1. Select the Restore tab
The Restore tab has a Home page and a Tools menu. The Home page is the default screen and the
recommended starting point for performing a restore.
2. From the Home page, select SQL
3. The Home page will now display all backups that contain SQL data.
If you have SQL VSS backups created using File Protection or File Archiving, they will appear
with the Restore Console.
Your SQL Server Protection backup will be associated with the SQL Restore tool. These backups
are represented by the title Local and Remote via Add-on.
Figure 8: Restore Home page – results screen
4. Select SQL Restore. This will open the SQL Restore tool.
SQL Server Protection © Cortex I.T. 2001-2015 Whitepaper: Version April 21 2016
13
5. Select Server
This screen is used to locate and authenticate the SQL Server that you will restore to.
The databases you wish to restore must already exist on the SQL Server. If they do not, you can
choose to either restore the master database first, which will result in recreating all databases on
the server, or to manually recreate each database you wish to restore. If you are restoring your SQL
Server after a disaster or new installation, it is advised that you restore the master database before
restoring any other databases.
a. Server selection: Select the SQL Server to restore to.
Restore a local Server: The console will display a list of the SQL servers on your local machine.
If an SQL Server is present but not running, you can click Start. Any servers that cannot be
started may indicate a fault with the server itself. You can only restore to SQL servers that are
running.
Restore a remote server: Any remote SQL servers detected will appear in the drop down list.
If the server is not shown, select the Restore a remote server button, and enter the name of the
SQL Server or its IP address.
Select the SQL Server to restore to and click Next.
Figure 9: SQL Restore tool – server selection
b. Server authentication
When you select Next, and you will be prompted to provide logon credentials.
Use integrated authentication: Backup user identity.
Specify user identity: Another user account (such as a Windows account) or an SQL Server
user account.
The authentication account, the BA account (if different to the account used for this
backup) and the SQL Server’s service account, all need access to the backup destination.
Some SQL servers are configured to accept only SQL authentication.
SQL Server Protection © Cortex I.T. 2001-2015 Whitepaper: Version April 21 2016
14
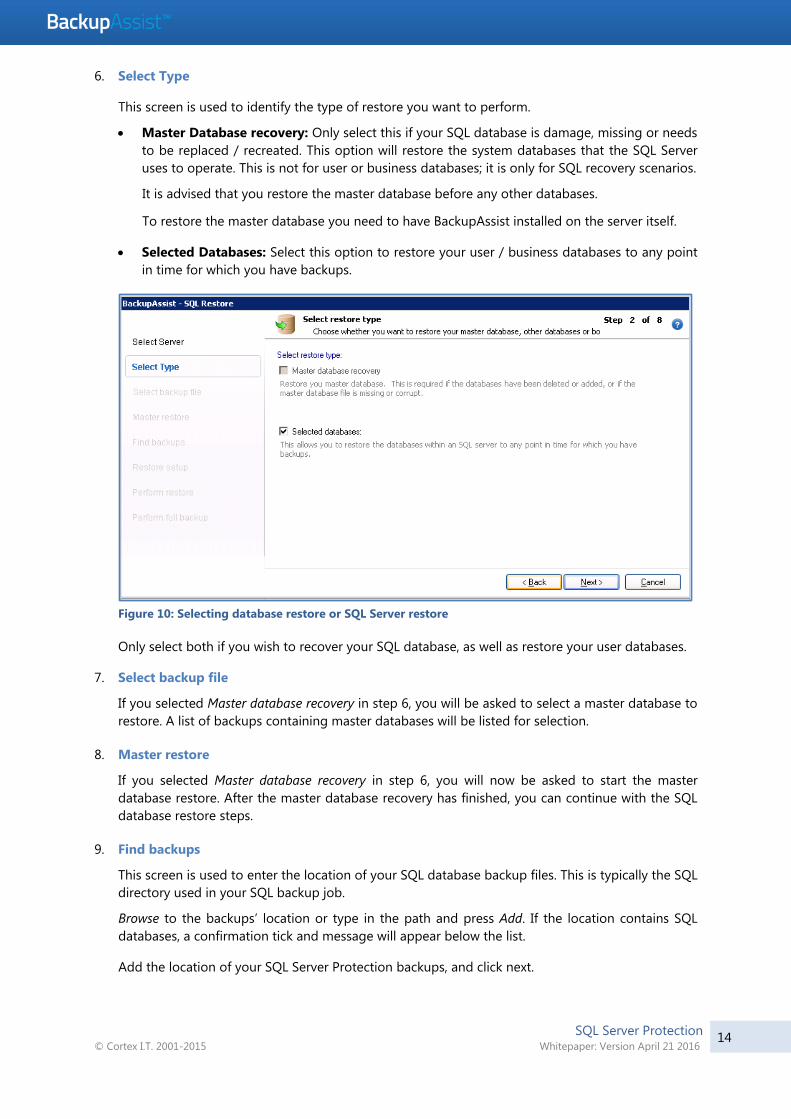
6. Select Type
This screen is used to identify the type of restore you want to perform.
Master Database recovery: Only select this if your SQL database is damage, missing or needs
to be replaced / recreated. This option will restore the system databases that the SQL Server
uses to operate. This is not for user or business databases; it is only for SQL recovery scenarios.
It is advised that you restore the master database before any other databases.
To restore the master database you need to have BackupAssist installed on the server itself.
Selected Databases: Select this option to restore your user / business databases to any point
in time for which you have backups.
Figure 10: Selecting database restore or SQL Server restore
Only select both if you wish to recover your SQL database, as well as restore your user databases.
7. Select backup file
If you selected Master database recovery in step 6, you will be asked to select a master database to
restore. A list of backups containing master databases will be listed for selection.
8. Master restore
If you selected Master database recovery in step 6, you will now be asked to start the master
database restore. After the master database recovery has finished, you can continue with the SQL
database restore steps.
9. Find backups
This screen is used to enter the location of your SQL database backup files. This is typically the SQL
directory used in your SQL backup job.
Browse to the backups’ location or type in the path and press Add. If the location contains SQL
databases, a confirmation tick and message will appear below the list.
Add the location of your SQL Server Protection backups, and click next.
SQL Server Protection © Cortex I.T. 2001-2015 Whitepaper: Version April 21 2016
15
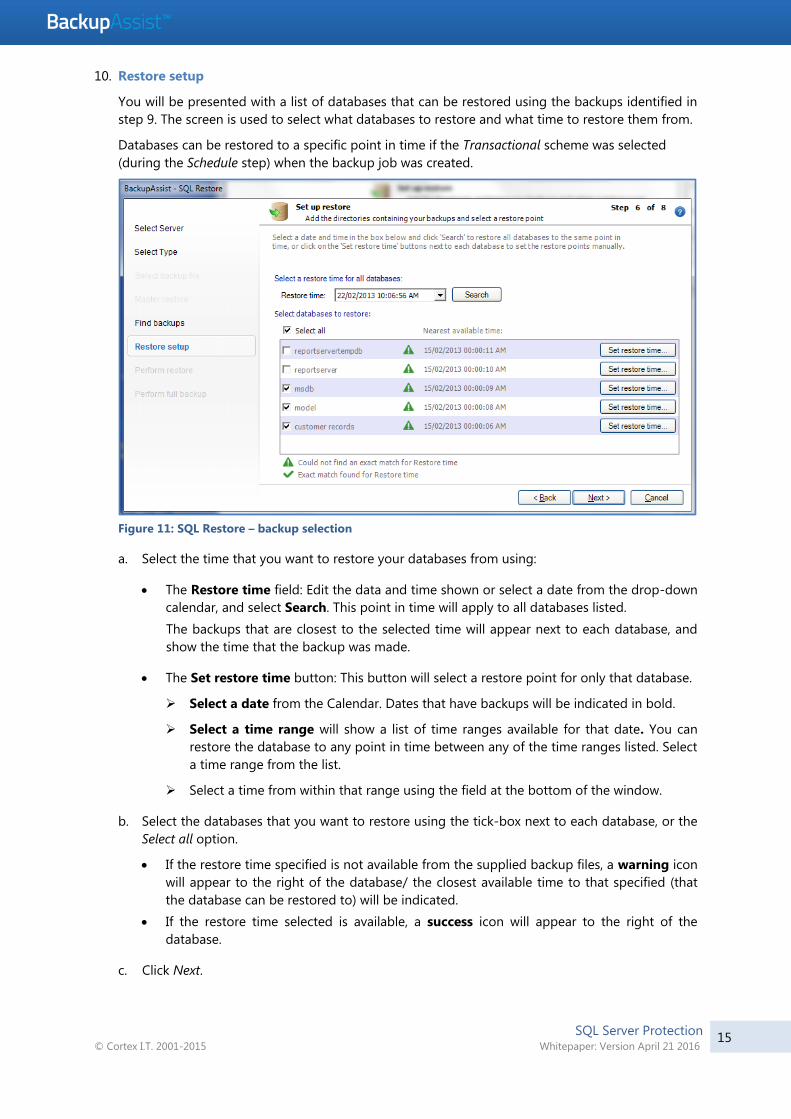
10. Restore setup
You will be presented with a list of databases that can be restored using the backups identified in
step 9. The screen is used to select what databases to restore and what time to restore them from.
Databases can be restored to a specific point in time if the Transactional scheme was selected
(during the Schedule step) when the backup job was created.
Figure 11: SQL Restore – backup selection
a. Select the time that you want to restore your databases from using:
The Restore time field: Edit the data and time shown or select a date from the drop-down
calendar, and select Search. This point in time will apply to all databases listed.
The backups that are closest to the selected time will appear next to each database, and
show the time that the backup was made.
The Set restore time button: This button will select a restore point for only that database.
Select a date from the Calendar. Dates that have backups will be indicated in bold.
Select a time range will show a list of time ranges available for that date. You can
restore the database to any point in time between any of the time ranges listed. Select
a time range from the list.
Select a time from within that range using the field at the bottom of the window.
b. Select the databases that you want to restore using the tick-box next to each database, or the
Select all option.
If the restore time specified is not available from the supplied backup files, a warning icon
will appear to the right of the database/ the closest available time to that specified (that
the database can be restored to) will be indicated.
If the restore time selected is available, a success icon will appear to the right of the
database.
c. Click Next.
SQL Server Protection © Cortex I.T. 2001-2015 Whitepaper: Version April 21 2016
16
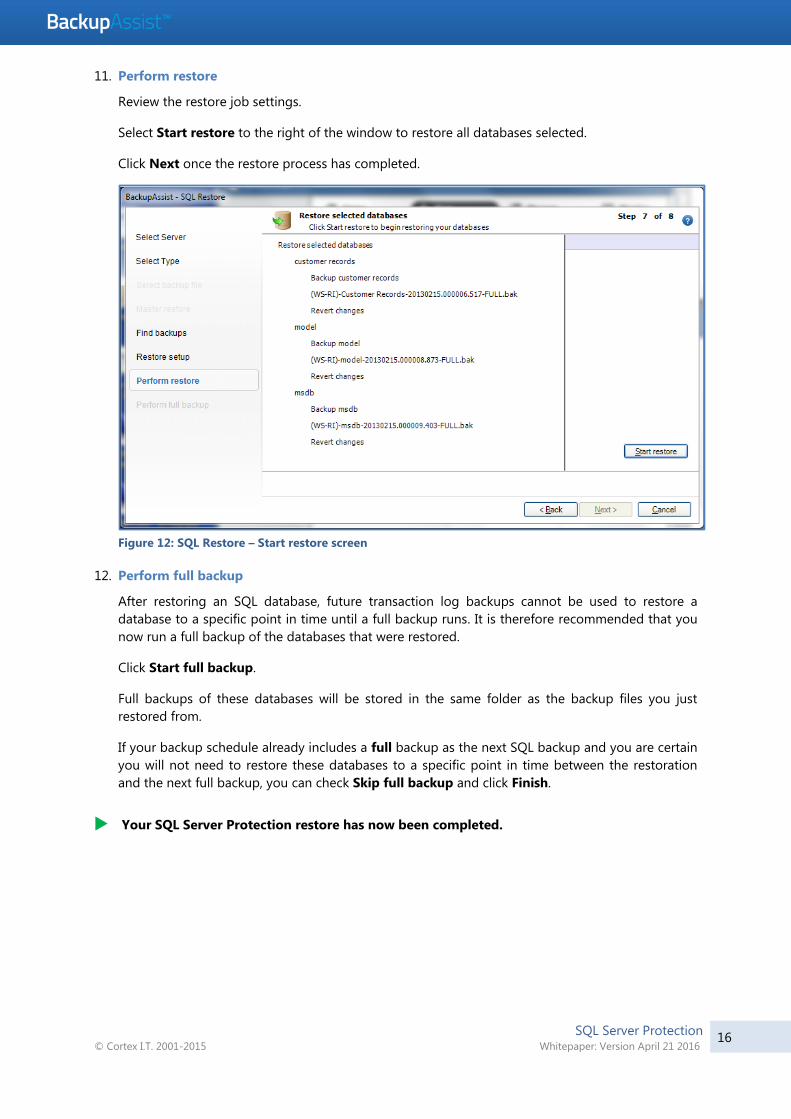
11. Perform restore
Review the restore job settings.
Select Start restore to the right of the window to restore all databases selected.
Click Next once the restore process has completed.
Figure 12: SQL Restore – Start restore screen
12. Perform full backup
After restoring an SQL database, future transaction log backups cannot be used to restore a
database to a specific point in time until a full backup runs. It is therefore recommended that you
now run a full backup of the databases that were restored.
Click Start full backup.
Full backups of these databases will be stored in the same folder as the backup files you just
restored from.
If your backup schedule already includes a full backup as the next SQL backup and you are certain
you will not need to restore these databases to a specific point in time between the restoration
and the next full backup, you can check Skip full backup and click Finish.
Your SQL Server Protection restore has now been completed.
SQL Server Protection © Cortex I.T. 2001-2015 Whitepaper: Version April 21 2016
17
7. SQL Server Protection backup management
Once you have created a backup job, you can modify the settings and access advanced
configuration options using the Manage menu.
To access the backup management screen:
1. Select the BackupAssist, Backup tab.
2. Select Manage from the top menu. A list of all backup jobs will be displayed.
3. Select the backup job you want to modify, and select Edit.
4. Select the required configuration item on the left. Key configurations are described below.
To learn more about the backup management options, see the Backup tab whitepaper.
Manually running a backup job
All new and modified backup jobs should be manually run to ensure they work as intended.
1. Select the backup job, and select Run.
2. You will be prompted to Rerun a past backup or to Run a future backup now.
3. When the backup job starts, the screen will change to the Monitor view.
4. Once the backup has been completed, select the Report button and review the results.
SQL Servers
Use this screen to change the databases that have been selected for backup, and to remove and add
SQL servers.
Scheduling
Selecting Scheduling will display your Scheduling options. You can use this screen to change the
default time and days of your scheme’s daily backups. If you are running a transactional scheme, you
can also modify the Time between backups. The default time is every 15 minutes.
Select a new Schedule: This will display the Basic and Transactional backup schemes that you chose
from during the creation of your backup job. You can change the current scheme using this option.
Basic: Runs a full daily backup of your SQL databases. A backup is run once per day at the time set
in this screen.
Transactional: Creates a full daily backup at the start of the day, and then runs transaction log
backups at pre-defined intervals (minimum of every 5 min) throughout the day.
This provides the functionality of an incremental backup because SQL can use the transaction log
to recover data. Each day’s database backup is saved in the same location along with each
transaction log.
For additional information on the Scheduling screen, please refer to the Backup tab whitepaper.
SQL Server Protection © Cortex I.T. 2001-2015 Whitepaper: Version April 21 2016
18
Concurrent backup
This feature allows two backup jobs to run at the same time.
Concurrent backup combinations:
Two File Archiving backup jobs can run at the same time if both have ‘Enable concurrent backup’
selected.
An SQL Protection or Mailbox Protection backup job, with ‘Enable concurrent backup’ selected, can
run concurrently with a System Protection, File Protection or File Archiving backup job. The File
Archiving backup job does not need to have ‘Enable concurrent backup’ selected. (System
Protection and File Protection do not have an ‘Enable concurrent backup’ option).
An SQL Protection and a Mailbox Protection backup job can run at the same time, in any
combination, if both have ‘Enable concurrent backup’ selected.
In all cases, only two backup jobs can run concurrently.
Concurrent backup considerations:
If two concurrent backups are scheduled to start at the same time, one backup will start first and
begin preparing the job. Once the preparation phase has completed, the second backup will start
If a third scheduled backup job has 'Enable concurrent backup' selected, it will be queued and run
once one of the two existing concurrent backup jobs has finished.
Concurrent backup limitations:
Only two backup jobs can run concurrently.
Concurrent backups cannot write to the same destination device (e.g. local drive, NAS, RDX etc.).
If another backup job is already running when the concurrent backups are scheduled to start, then
one of the concurrent backups will start if it meets the criteria defined in the concurrent
combinations section.
A backup job cannot run concurrently if it is backing up a Hyper-V environment or an Exchange
server using VSS (VSS enabled).
8. Support and Resources
References
For additional information regarding recovering your SQL databases to a certain point in time,
and creation of multiple recovery points, refer the following Microsoft Knowledge Base article:
http://msdn.microsoft.com/en-us/library/ms175078.aspx
Tips for scheduling and testing SQL Server backups:
http://searchsqlserver.techtarget.com/tip/0,289483,sid87_gci1307822,00.html?asrc=SS_CLA_30132
6&psrc=CLT_87
SQL system databases explanations:
http://vyaskn.tripod.com/sql_server_administration_best_practices.htm
MSDN knowledge base on recovery paths:
http://msdn.microsoft.com/en-us/library/ms175078.aspx