square dance finished quilt size 71” x 80” yardagedance+instructions.pdfmix and match 2 ½” x...
TRANSCRIPT
Cutting: Create 3 stacks of 10” squares-
Stack 1: 28 squares-from each square cut● [1] 5 ½” x 9 ½” for block A (28 total 5 ½” x 9 ½” ) and ● [1] 2 ½” x 9 ½” for block B (28 total 2 ½” x 9 ½” )
Stack 2: 14 squares-from each square cut ● [2] 4 ½” x 9 ½” for block B (28 total 4 ½” x 9 ½”)
Stack 3: 28 squares-reserve for applique
Lt. weight fusible web-● reserve for applique
Background-● cut [14] 2 ½” x WOF strips
sub-cut [56] 2 ½” x 9 ½” for block A● cut [7] 3 ½” x WOF strips
sub-cut [28] 3 ½” x 9 ½” for block B● cut [8] 4 ½” x WOF strips for borders
Binding-● cut [8] 2 ½” x WOF strips
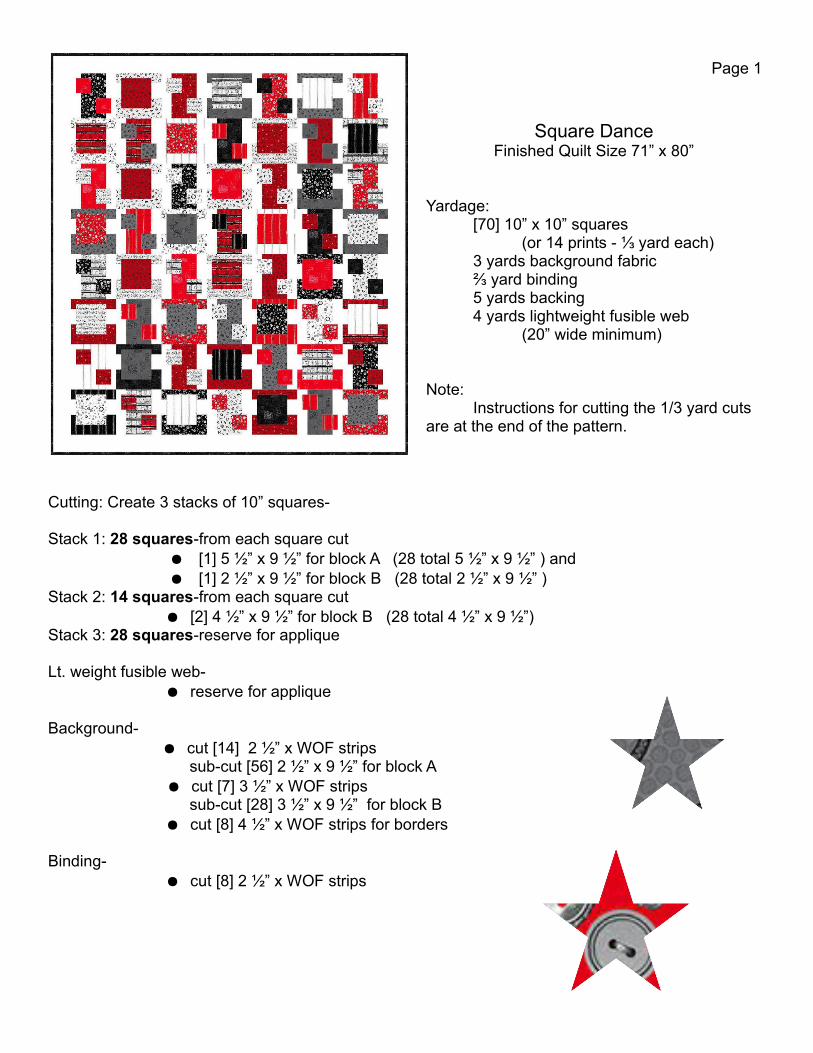
Page 1
Square DanceFinished Quilt Size 71” x 80”
Yardage:[70] 10” x 10” squares
(or 14 prints - ⅓ yard each)3 yards background fabric⅔ yard binding5 yards backing4 yards lightweight fusible web (20” wide minimum)
Note:Instructions for cutting the 1/3 yard cuts
are at the end of the pattern.
Note: Use 1/4” seams throughout unless otherwise noted. Page 2
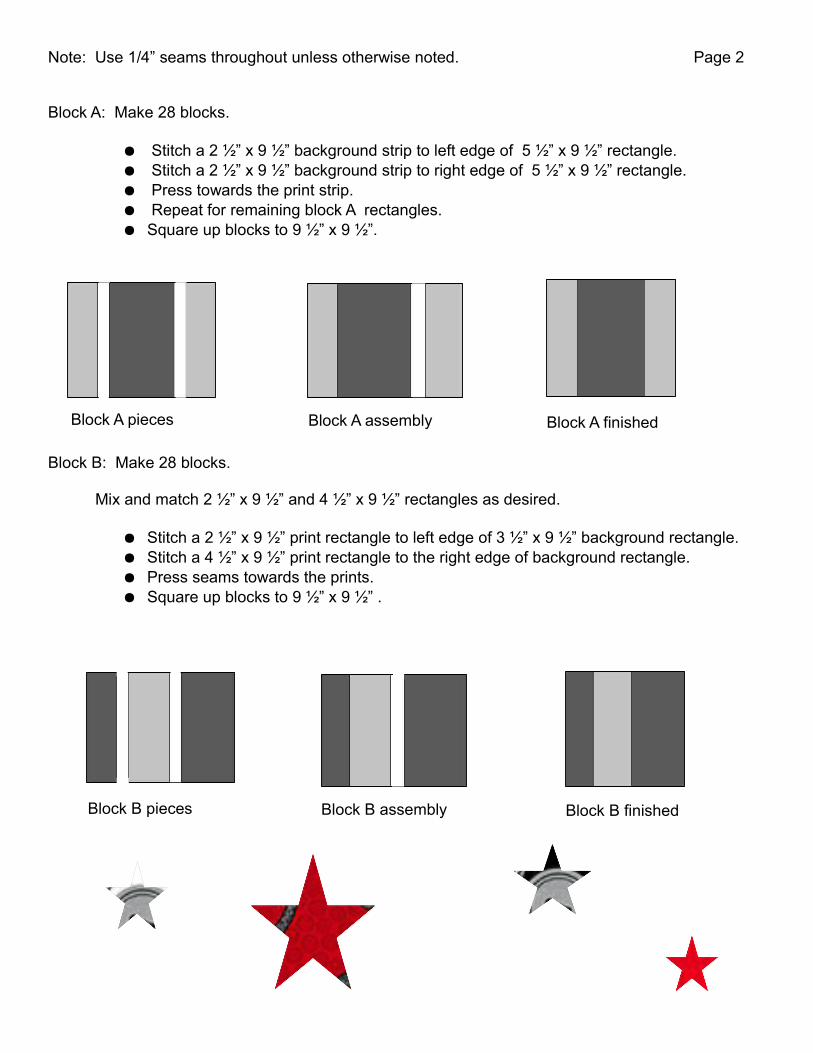
Block A: Make 28 blocks.
● Stitch a 2 ½” x 9 ½” background strip to left edge of 5 ½” x 9 ½” rectangle.● Stitch a 2 ½” x 9 ½” background strip to right edge of 5 ½” x 9 ½” rectangle.● Press towards the print strip.● Repeat for remaining block A rectangles.● Square up blocks to 9 ½” x 9 ½”.
Block B: Make 28 blocks.
Mix and match 2 ½” x 9 ½” and 4 ½” x 9 ½” rectangles as desired.
● Stitch a 2 ½” x 9 ½” print rectangle to left edge of 3 ½” x 9 ½” background rectangle.● Stitch a 4 ½” x 9 ½” print rectangle to the right edge of background rectangle.● Press seams towards the prints.● Square up blocks to 9 ½” x 9 ½” .
Block A pieces Block A assembly Block A finished
Block B pieces Block B assembly Block B finished
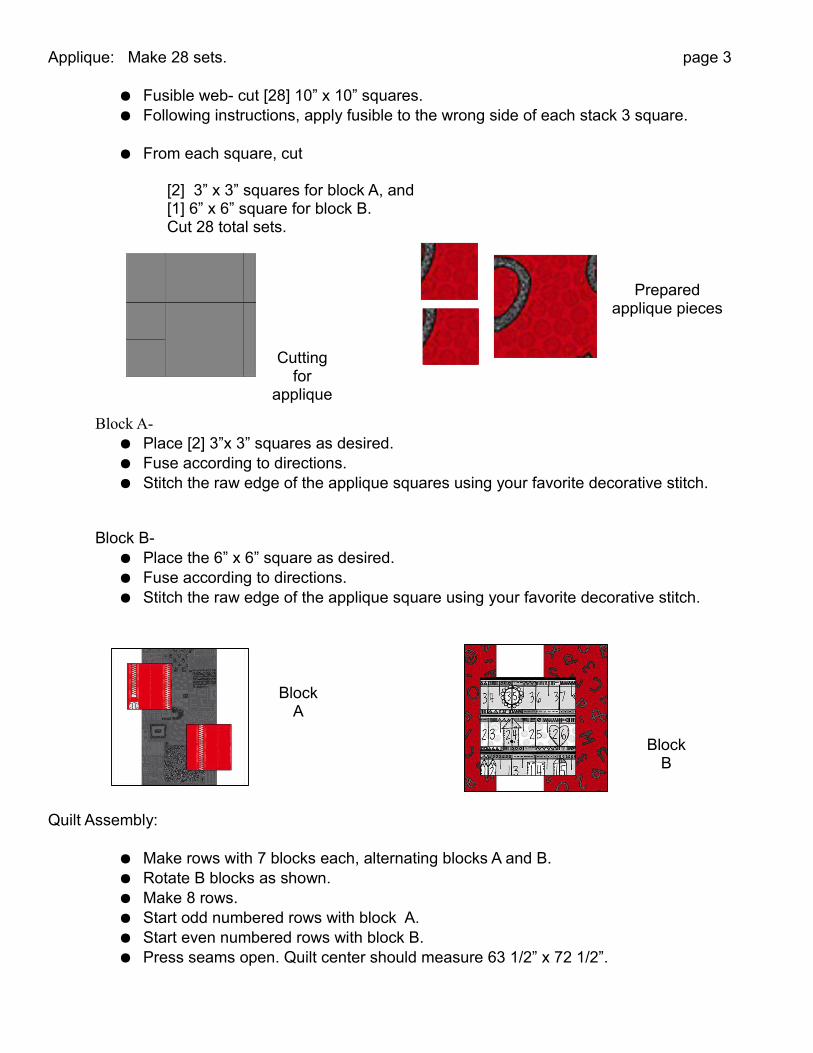
Applique: Make 28 sets. page 3
● Fusible web- cut [28] 10” x 10” squares.● Following instructions, apply fusible to the wrong side of each stack 3 square.
● From each square, cut
[2] 3” x 3” squares for block A, and[1] 6” x 6” square for block B.Cut 28 total sets.
Block A- ● Place [2] 3”x 3” squares as desired. ● Fuse according to directions. ● Stitch the raw edge of the applique squares using your favorite decorative stitch.
Block B- ● Place the 6” x 6” square as desired. ● Fuse according to directions. ● Stitch the raw edge of the applique square using your favorite decorative stitch.
Quilt Assembly:
● Make rows with 7 blocks each, alternating blocks A and B.● Rotate B blocks as shown. ● Make 8 rows. ● Start odd numbered rows with block A. ● Start even numbered rows with block B.● Press seams open. Quilt center should measure 63 1/2” x 72 1/2”.
BlockA
BlockB
Preparedapplique pieces
Cuttingfor
applique
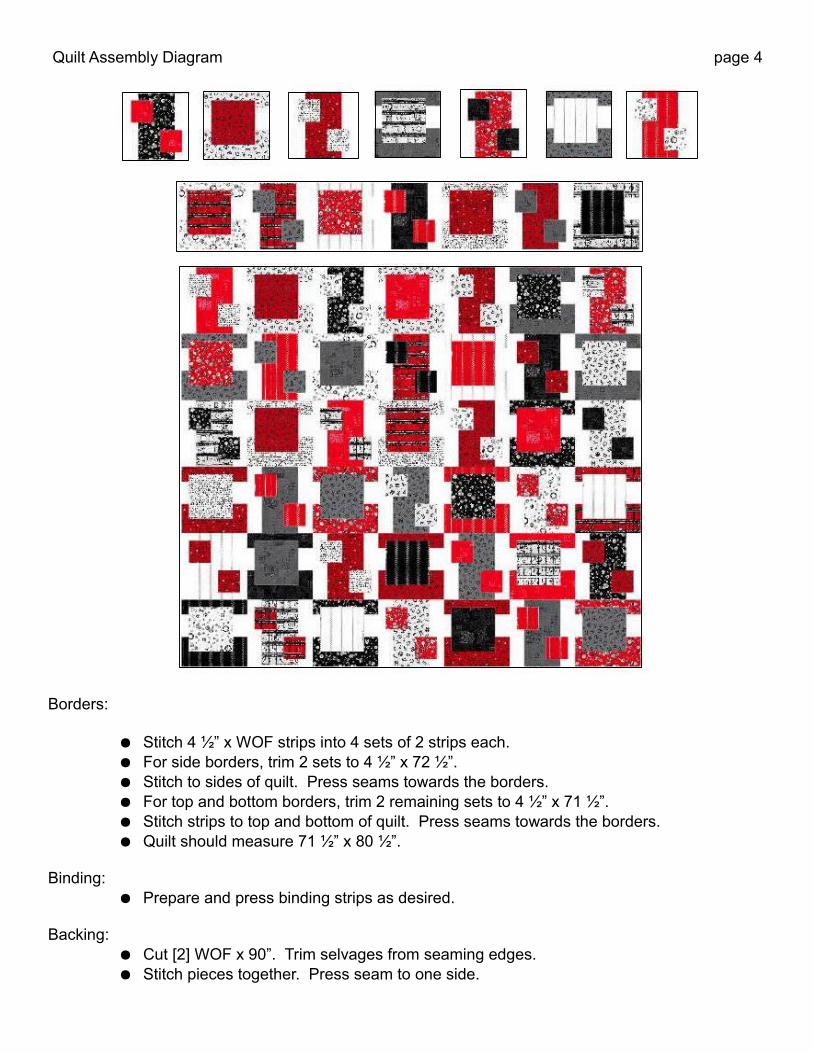
Quilt Assembly Diagram page 4
Borders:
● Stitch 4 ½” x WOF strips into 4 sets of 2 strips each.● For side borders, trim 2 sets to 4 ½” x 72 ½”. ● Stitch to sides of quilt. Press seams towards the borders.● For top and bottom borders, trim 2 remaining sets to 4 ½” x 71 ½”. ● Stitch strips to top and bottom of quilt. Press seams towards the borders. ● Quilt should measure 71 ½” x 80 ½”.
Binding:● Prepare and press binding strips as desired.
Backing:● Cut [2] WOF x 90”. Trim selvages from seaming edges.● Stitch pieces together. Press seam to one side.

Bonus! Cutting for optional yardage: page 5
● From each ⅓ yard print, cut [1] 10” x 12”rectangle. Reserve for applique.
● Trim remaining piece to 9 ½” x 30”.
● From 9 1/2” strip cut [2] 5 ½” x 9 ½” for block A. (28 total 5 ½” x 9 ½”)
[2] 2 ½” x 9 ½” for block B. (28 total 2 ½” x 9 ½” ) and [2] 4 ½” x 9 ½” for block B. (28 total 4 ½” x 9 ½” )
● From fusible web cut[14] 10” x 12” rectangles.
● Following instructions, apply fusible to wrong side of each 10” x 12” fabric piece.
Applique:
● From each 10” x 12” rectangle cut
● [1] 3” x 12” strip.Sub cut [4] 3” x 3” squares for block A. [56] total 3” x 3” squares.
● [1] 6” x 12” strip. Sub cut [2] 6” x 6” squares for block B. [28] total 6” x 6” squares.