ss exosure notes - meetupfiles.meetup.com/1381309/april 2015 exposure notes.pdf8 photographing...
TRANSCRIPT

Exposure NotesT h e M o n t h l y N e w s l e t t e r o f t h e S o u t h e a s t e r n P h o t o g r a p h i c S o c i e t yA p r i l 2 0 1 5
Southeast Photographic Society
SPSINSIDE THIS ISSUE
1, 2, 7 How to Create Your
Own Lightroom Presets
2 Club Contacts
3 Color Winners
4 Black & White Winners
5 Digital Winners
6 Member Spotlight
6 New Products
7 Complimentary Colors
8 Photographing Atlanta /
Competitions Themes for
2015
9 How to Submit Your
Images to Monthly Com-
petitions
10 Directions and Things
To Do
C O M I N G E V E N T S April 17-19 St. Augustine
FL Alligator Farm
April 26 Roswell Criterium
Cyclist Race
April 28 Trainspotting Mike
Boatright
May 1 Monthly Meeting
and Disappearing Technol-
ogies Competition
May 16 Battle of Resa-
ca-Civil War Renactment
Check our Meetup site for
more details
How to Create Your Own Lightroom Presets by Andrew Gibson
http://digital-photography-school.com/how-to-create-your-own-lightroom-presets/
The same photo with Profile set to Landscape, lens corrections applied, chromatic aberrations removed and white balance set to auto. This is what you would see after importing the photo into Lightroom if you ap-plied an import preset similar to the one that I show you how to make in this article. The biggest benefit is that it saves you time. There are mundane tasks in Lightroom that you carry out on almost every photo you import. You can save time by creating Develop Presets to per-form these jobs automatically upon import, so that you don’t have to do them later.
There are mundane tasks in Lightroom that you carry out on almost every photo you import. You can save time by creating Develop Presets to perform these jobs automatically upon import, so that you don’t have to do them later.
Here’s an example of how I created a Devel-op Preset to use when I import photos taken with my Fujifilm X-T1 camera. The idea was to create a preset that takes me to a neutral starting point from where I can process the file. You can follow along to create an import Develop Preset for your own camera. I’ll explain what I’m doing at each step and suggest some variations you can try.
Start by selecting a photo taken with the cam-era that you are going to create the Develop Pre-set for and open it in the Develop module. Zero all the settings by pressing the Reset button at the bottom (you may find it helpful to make a Virtual Copy of the photo first so you don’t undo any ed-its you have already made).
1. Camera Calibration panel
I set Process to 2012 (Current) the most recent, and Profile to Classic Chrome (the Film Simula-tion setting I use most often). The Profile options
available to you vary depending on the camera.
Possible variation: You can create a different Develop Preset for each Profile that you regularly use.
2. Lens Corrections panel
Import presets LightroomI don’t have to do anything here for the X-T1 continued on page 2
Established 1974
A straight out of the camera Raw file from an EOS 5D Mark II, without any corrections applied in Lightroom. This is the sort of thing you see when you import imag-es into Lightroom without applying a Develop Preset at the import stage.

SPS BOARD MEMBER AND COMMITTEE CHAIR CONTACT
President
Elton Saulsberry [email protected]
Vice President
Cherie Truesdell [email protected]
Secretary
Stan Kalisch [email protected]
Treasurer
Pat Pickwick [email protected]
Competitions Ray Davis [email protected]
Jim Morgenthaler [email protected]
Facilities
Tony Thaxton [email protected]
Programs
Jack Martin [email protected]
Membership
Laura Kresmin [email protected] [email protected]
Social Media Caitlyn Barron [email protected]
NewsletterAnne Nettles [email protected]
How to Create Your Own Lightroom Presets by Andrew Gibson Continued from page 1
as lens corrections are carried out by the camera, saved within the Raw file, and automatically ap-plied by Lightroom.
Most cameras don’t do this, so if this applies to you then go to the Basic tab and tick the En-able Profile Corrections and Remove Chromatic Aberration boxes. Then go to the Profile tab and set Setup to Auto so that Lightroom adjusts the settings according to what lens is mounted on the camera.
3. Basic Panel
Set White Balance to As Shot and make sure all the other sliders are zeroed.
Possible variation #1: Tick the Auto Tone box to have Lightroom automatically set the Expo-sure, Contrast, Highlights, Shadows, Whites and Blacks sliders. This is a matter of preference, I don’t do this as I prefer to set them myself.
Possible variation #2: Create one preset for colour photos, and another for those you intend to convert to black and white by setting Treatment to Black & White.
Creating the Preset
Go to the Develop Preset panel (on the left side) and click the Create New Preset icon (the plus sign at the top, to the right of the word “Presets”).
This brings up the New Develop Preset window. Give the Preset a name and select a folder to save it in (User Presets is a good one). Click the Check All button and press Create when you are ready to save the Preset.
That’s it! It’s a simple process that doesn’t take very long and can save you a lot of time when you import your photos.
Applying Develop Presets upon Import
Import presets LightroomTo apply the Develop Preset you just created, launch the Import Win-dow and go to the Apply During Import panel.
Set Develop Settings to the appropriate preset. This is where creating several presets helps saves time, as you can pick the most appropriate one for the photos you are importing. When you click the Import button Lightroom applies the settings in the selected preset, and renders a preview that includes those settings.
Adding Copyright Info
While you’re in the Import Window, it’s worth setting up another Preset to automatically add
continued on page 7

SPS
TH
EM
EM
ac
ro
Da
vid
Fo
st
er
JU
DG
E
1ST
3RD
HM
HM
2ND
4TH
HM
Color Winners April 2015 page 3
Carl Fredrickson “Globes”
Greg Comstock “Mamma’s Favorites”
Mikki Root Dillon “Mysterious Trail”
Stephen Weiss “What’s The Point”
Emmanuel Petkas “Sibley Cen-ter”
No Photo Given
SPS
TH
EM
EM
ac
ro
Da
vid
Fo
st
er
JU
DG
E
1ST
3RD
HM
HM
2ND
4TH
HM
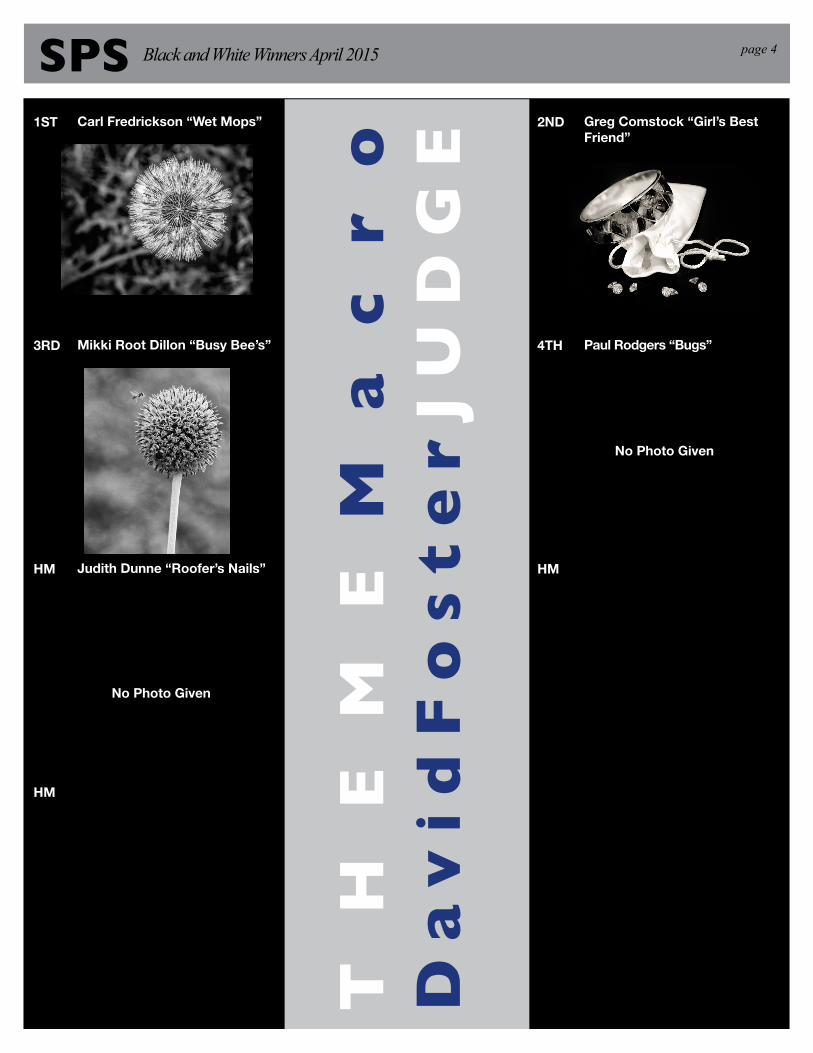
page 4Black and White Winners April 2015
Greg Comstock “Girl’s Best Friend”
Paul Rodgers “Bugs”
Carl Fredrickson “Wet Mops”
Mikki Root Dillon “Busy Bee’s”
Judith Dunne “Roofer’s Nails”
No Photo Given
No Photo Given

SPS
TH
EM
EM
ac
ro
Da
vid
Fo
st
er
JU
DG
E
1ST
3RD
HM
HM
2ND
4TH
HM
Digital Winners April 2015 page 5
Armetrice Cabine “Eye Feel Pretty
John McGinn “Liquid Man”
Carl Fredrickson “Beanery”
Jeff Milsteen “Poppy and Pod”
Nancy Cutrer “Liquid Demons”
Greg Comstock “Ruby Butterfly Rock”

Member Spotlight ~ Vicki Smith
New Products
1.Where do you live in? Loganville
2.What is your profession? Retired educator, Severe Emotional and Behavioral Disorders
3.How long have you been a member of SPS? 2 years
4. How long have you been into photography, and how did you get started? I have been interested in photography for as long as I can remember. I was always the family member not in the photo, as I was taking the picture. Back in the non-digital age, I had a Minolta SLR film camera, which is still around somewhere. It was always my goal to really learn how to use it, but I never had the time due to family and work commitments. But I always had a re-ally good film camera handy for family events and travel. It wasn’t until I retired from DeKalb County School System that I became actively involved in photography. I purchased my Nikon D7000 as a retirement gift to myself, and started taking photography class-es at Showcase School of Photography.
6. What is your favorite subject/what inspires you? I most enjoy photographing nature (bids, animals, flowers, etc.), landscapes, and travel photography. I could sit for hours at my kitchen window photographing the wild birds feeding at the many feeders outside my window. I especially enjoy photographing the many wonderful gardens and parks in and around the Atlanta area. Photography trip to Maine, New Mexico, and Yosemite National Park truly inspired me to plan more time to see the USA, as well as travel overseas - particularly Europe and Australia.
7. If you do your own post-production work, what software are you using? I edit most of my photographs in Lightroom, with some special effects done through Photoshop. I particularly enjoy the effects found with Nik software and Topaz software. I prefer to use Photomatix to process HDR composites.
8. Do you do your own printing? What type of printer do you use? I send my photographs out to a professional lab for printing.
9. Anything else you’d like to share about yourself or your photography? My favorite part about the hobby of photography is getting to know, spend time with, and learn from other wonderful photography friends!
10. What photographers inspire you? Any photographer whose images catch my eye inspire me. I love to look at how other photographers, professional as well as hobbyists, “see” the world around us and capture it with their camera.
M&M Travel Photography Vest
The Vest Guy-500016
$199.95 Reg Price: $239.95
Product Description:
The MM Photo Travel Photo Vest was Designed by the guys from M&M Photo Tours (http://www.mmphototours.com/). They have been doing Worldwide Travel for over 25 years, and they designed this vest for photographers to help you carry every-thing you need, whether youre doing local street photography or traveling around the world. This Vest has 12 Pockets (14 if you choose the inside zipper pockets). The vest can be customized in many ways, starting with six sizes, from Small to 3XL. Choose either breathable mesh (several colors available), or a dozen solid fabric colors. It comes standard with one camera sling, with the option to purchase another. Also standard is a Hydration Sleeve that fits most 2-3 Liter Hydration Systems. The MM Photo Travel Photo Vest has a convenient carry handle and has the option to add Velcro-brand closures front and back for your personal and/or business name or website. The two lower cargo pockets are 10 X 3.5 X 7 inches, and both contain zipper pockets inside and outside. The upper pocket (camera right) is 6 X 6 inches and has a zipper for thinner items with a zipper/hook and loop? and elastic inside thats great for batteries, memory cards or a cell phone. A D Ring and a Key Clip are also inside to attach items to, such as keys. On the opposite side (camera left) is a 6 X 6 X 1.5 inch utility
pocket that contains inside and outside Zipper Pockets. This vest is built with over 21 years of experience manufacturing vests for Police, Military, Emergency Services, and the companys owner has been a wildlife photographer for more than 20 years (http://RobsWildlife.com/). Like all of our vests, they are Made in the USA and can be custom ordered and made to your specifications. *Durable * Breathable * Lifetime Warranty * USA Made *
http://www.thevestguy.com/product/500016/m-m-travel-pho-tography-vest
V i c k i S m i t h
May
COMPETITION
THEME
DISAPPEARING
TECHNOLOGIES
Old technology nev-
er dies; it just gets
tossed in a drawer.
With some much of
our lives immersed
in a high-tech world,
transform us, through
your photograph, to
simpler days gone
by.
All images must have
been taken in the last
12 months.
How to Create Your Own Lightroom Presets by Andrew Gibson Continued from page 2
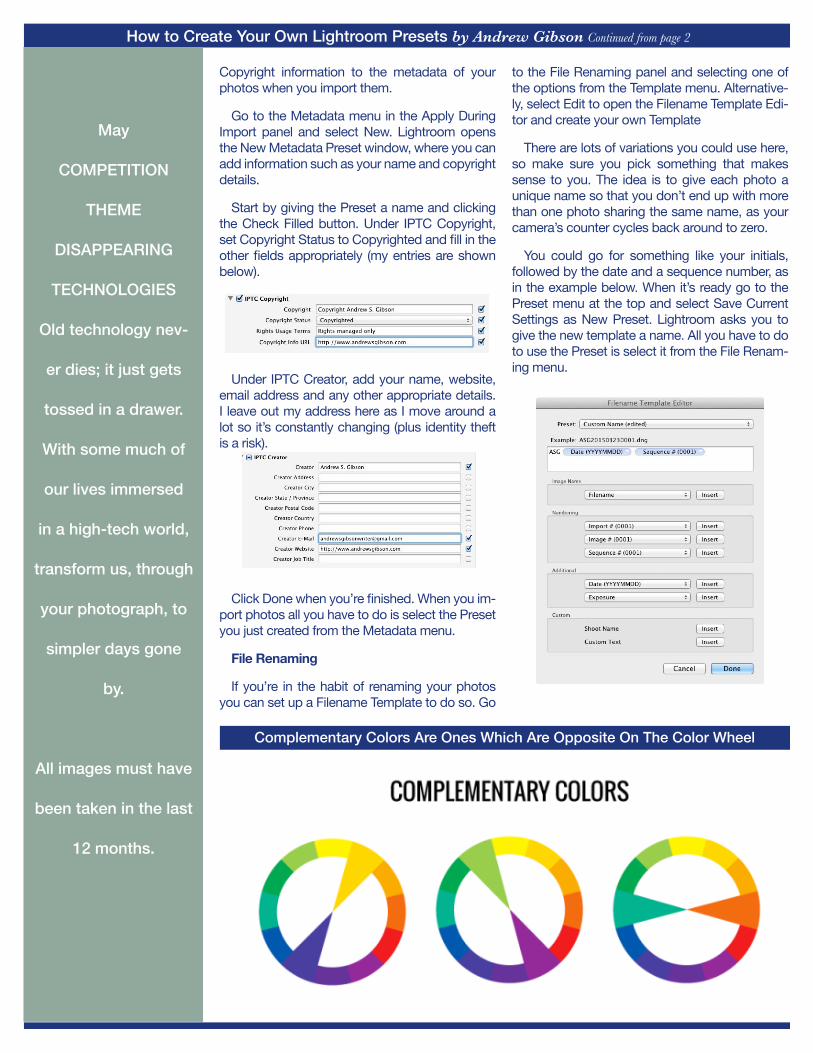
Copyright information to the metadata of your photos when you import them.
Go to the Metadata menu in the Apply During Import panel and select New. Lightroom opens the New Metadata Preset window, where you can add information such as your name and copyright details.
Start by giving the Preset a name and clicking the Check Filled button. Under IPTC Copyright, set Copyright Status to Copyrighted and fill in the other fields appropriately (my entries are shown below).
Under IPTC Creator, add your name, website, email address and any other appropriate details. I leave out my address here as I move around a lot so it’s constantly changing (plus identity theft is a risk).
Click Done when you’re finished. When you im-port photos all you have to do is select the Preset you just created from the Metadata menu.
File Renaming
If you’re in the habit of renaming your photos you can set up a Filename Template to do so. Go
to the File Renaming panel and selecting one of the options from the Template menu. Alternative-ly, select Edit to open the Filename Template Edi-tor and create your own Template
There are lots of variations you could use here, so make sure you pick something that makes sense to you. The idea is to give each photo a unique name so that you don’t end up with more than one photo sharing the same name, as your camera’s counter cycles back around to zero.
You could go for something like your initials, followed by the date and a sequence number, as in the example below. When it’s ready go to the Preset menu at the top and select Save Current Settings as New Preset. Lightroom asks you to give the new template a name. All you have to do to use the Preset is select it from the File Renam-ing menu.
Complementary Colors Are Ones Which Are Opposite On The Color Wheel

PHOTOGRAPHING ATLANTA
May - Disappearing Technologies Old technology never dies; it just gets tossed in a drawer. With some much of our lives immersed in a high-tech world, transform us, through your photograph, to simpler days gone by.
June - Animals Show us your fauna (preferably not the human kind).
July- Reflections The idea here is to get creative reflections as a key element of your image. This may be a subject captured in a reflection (window, water, mirror, etc.) or clever use of reflections as the subject itself.
August -Flowers Show us your flora (preferably the blooming kind).
September - Morning Morning is the period of time between dawn and noon. Morning precedes afternoon, evening, and night in the sequence of a day. Your images should give us a sense of morning. Yaaaaawwwwwwn!
October - Travel The image must be distinctive and evoke a strong sense of place outside of metro Atlanta.
November - Rural America In general, a rural area is a geographic area that is located outside cities and towns. The U.S. Department of Health and Human Services defines the word “rural” as encompassing “...all population, housing, and territory not included within an urban area. Whatever is not urban is considered rural.December - Member’s Choice Show us your best image from the last 12 months whether you’ve already had it in competition or not. Digital submission only – no prints – and one image per person.
Please see submission rules at http://www.meetup.com/SPS-Meetup/pages/Complete_Competition_Rules/
SPS MONTHLY COMPETITION THEMES FOR REMAINDER OF 2015
http://wayinto.com/atlanta/photographing-atlanta/
Photographers love Georgia landscapes from the North Geor-gia mountains to the coast and Okefenokee Swamp. But there’s plenty of urban landscapes in Atlanta. For in town visuals, take a closer look at these top ten Hotlanta hotspots…*
1) Oakland Cemetery – one of Atlanta’s oldest spots Oakland is a photographer’s paradise. Capture the striking rows of Con-federate graves or individual style mausoleums – the Austell tomb is the most photogenic. Colors are most vibrant just after sum-mer rain and if you’re there over Halloween you might see some spooky costumes amongst the graves
2) Jackson Street Bridge – this quintessential Atlanta view was used on season 1’s promotional poster for The Walking Dead. Wait for great clouds or sunset to make a better backdrop. Take a tripod for slow shutter speed shots at night of streaming traffic lights. Park in nearby Martin Luther King Jr Historic Site car park off John Wesley Dobbs Ave NE and buddy up if you’re coming at night
3) Krog Street Tunnel – graffiti heaven between Inman Park and Cabbagetown. Wear something bright and mind the traffic – cars and bikes. Use a tripod and long exposures with a keen eye on perspective
4) Lake Clara Meer – Midtown seen from across Lake Clara Meer in Piedmont Park is another famous Atlanta view. Bring a tripod and catch a dusk reflection of the skyline. Great in the fall when the autumn leaves turn orange and red
5) Atlanta Botanical Garden – overlooks Piedmont Park from on high, great for spring blooms and, with a tripod, on a Decem-ber night when the spectacular Christmas lights are shining. The Fuqua Orchid Center is a favorite with nature lovers experimenting with shallow depth of field
6) Fernbank Museum of Natural History – take a low angle to exaggerate the size of those huge dinosaurs out the front, a favor-ite of HDR lovers. Take a wide angle lens for the gigantic dinosaur skeletons which dominate the light space inside
7) Little Five Points – a quirky, bohemian neighborhood in east Atlanta full of New Age shops decorated in psychedelic whirls. Focus in on details with a longer lens and don’t miss the outland-ish Vortex restaurant’s gaping façade. October’s Little Five Points Halloween Parade adds another layer of visual bizarre
8) Georgia Aquarium – perfect for catching silhouettes of onlookers as they watch whale sharks and other creatures of the deep swim past in the world’s largest tank. It’s low-lit and tripods are not permitted so ramp up the ISO and hold the camera steady for those mesmerizing jellyfish. Look out for signs – flash is not allowed in some areas
9) Atlanta BeltLine – at weekends, a constant flow of human traffic on the Eastside Trail mixed with quirky art installations make for a colorful outdoors scene. Use a slow shutter speed to blur movement of boarders at the Historic Fourth Ward Skatepark near the intersection with Freedom Parkway
10) Centennial Olympic Park’s Fountain of Rings – use a fast shutter speed to freeze the action of people moving in and out of the park’s pop-jet fountains. The fountains are in the shape of the five Olympic rings and special shows set to music are usually on at 12.30pm, 3.30pm, 6.30pm and 9.00pm. If using a tripod, apply for a permit at least 24 hours beforehand from the Centennial Park site.
* These tips are for non-commercial photography only. Check in with venues beforehand for use of flash, tripod and permissions.
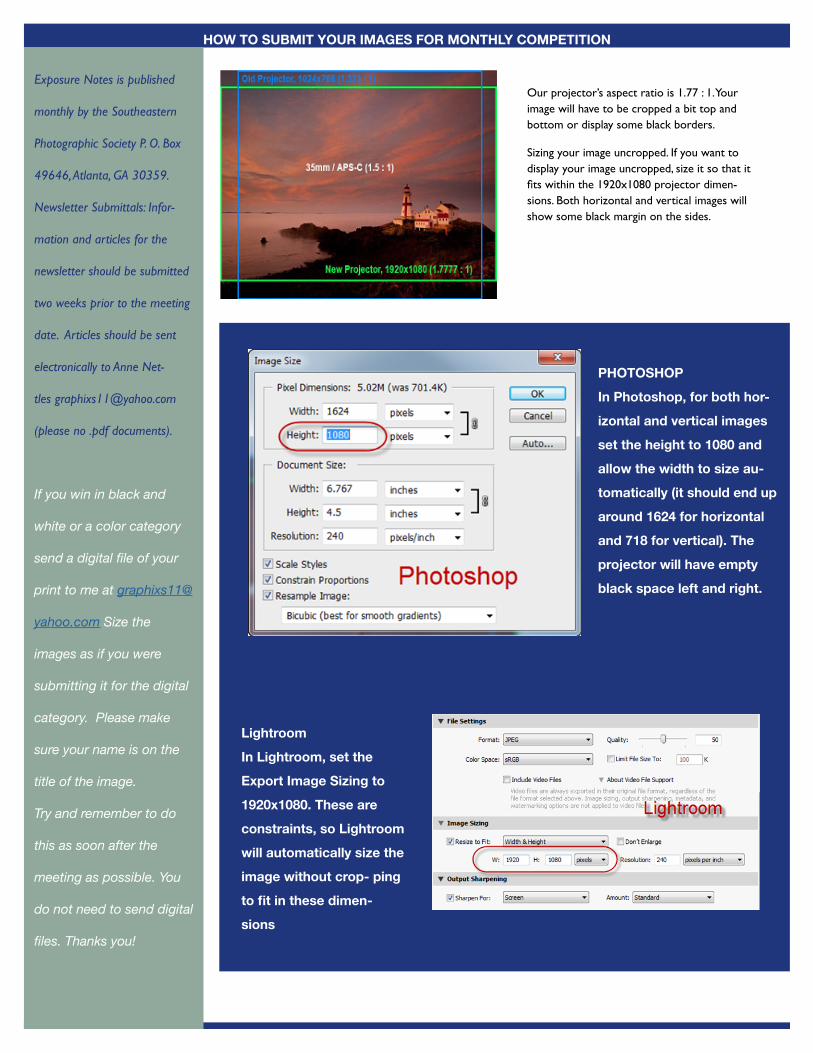
Our projector’s aspect ratio is 1.77 : 1. Your image will have to be cropped a bit top and bottom or display some black borders.
Sizing your image uncropped. If you want to display your image uncropped, size it so that it fits within the 1920x1080 projector dimen-sions. Both horizontal and vertical images will show some black margin on the sides.
HOW TO SUBMIT YOUR IMAGES FOR MONTHLY COMPETITION
Exposure Notes is published
monthly by the Southeastern
Photographic Society P. O. Box
49646, Atlanta, GA 30359.
Newsletter Submittals: Infor-
mation and articles for the
newsletter should be submitted
two weeks prior to the meeting
date. Articles should be sent
electronically to Anne Net-
tles [email protected]
(please no .pdf documents).
If you win in black and
white or a color category
send a digital file of your
print to me at graphixs11@
yahoo.com Size the
images as if you were
submitting it for the digital
category. Please make
sure your name is on the
title of the image.
Try and remember to do
this as soon after the
meeting as possible. You
do not need to send digital
files. Thanks you!
PHOTOSHOP
In Photoshop, for both hor-
izontal and vertical images
set the height to 1080 and
allow the width to size au-
tomatically (it should end up
around 1624 for horizontal
and 718 for vertical). The
projector will have empty
black space left and right.
Lightroom
In Lightroom, set the
Export Image Sizing to
1920x1080. These are
constraints, so Lightroom
will automatically size the
image without crop- ping
to fit in these dimen-
sions

Heading South on Clairmont toward N. Druid Hills (from I-85 and Clair-mont; from prior meeting location, Briarcliff Baptist Church—approximately 2 miles)Proceed on Clairmont, turn right onto N. Druid Hills, turn right onto Azalea Circle, and then right again into the lot.
Heading South on N. Druid Hills (toward the intersection with Clairmont)Turn left on Azalea Circle (just north of the N. Druid Hills and Clairmont Roads intersection) and then turn right into the lot.
Heading North on Clairmont toward N. Druid HillsTurn left on N. Druid Hills, then right onto Azalea Circle, and then right again into the lot.
Heading North on N. Druid Hills (toward the intersection with Clairmont)Nearly immediately after the intersection with Clairmont, turn right onto Azalea Circle, and then right again into the lot.
Note: One can access the church’s parking from Clairmont via Azalea Circle, but this route is not recommended due to extensive speed bumps and nar-row driving circles.
Recommended access to parking is off N. Druid Hills (not Clairmont). For parking enter from N. Druid Hills Road, directly across from ‘Reg-gie’s’ Hair Salon sign adjacent to the gas station. There is a turn onto Azalea Circle, which has two entrances to the church parking lot. There is one large lot in front of Milligan.
Directions to Clairmont Presbyterian Church
JACKSON FINE ART GALLERY3115 East Shadowlawn AvenueAtlanta, GA 30305 404.233.3739www.jacksonfineart.com
LUMIERE GALLERY425 Peachtree Hills AvenueNortheast Atlanta #29404.261.6100www.lumieregallery.net
THE HAGDORNE FOUNDATION425 Peachtree Hills Ave. #5Northeast Atlanta 404.492.7718www.hfgallery.org
THE HIGH MUSEUM1280 Peachtree Street, N.E.Atlanta, GA 30309 404.733.4444www.high.org
BOOTH WESTERN ART MUSEUM 501 Museum DrivePhone: 770-387-1300http://boothmuseum.org
ATLANTA PHOTOGRAPHY GROUP GALLERY75 Bennett St. NWAtlanta, GA 30309www.apgphoto.org
JENIFER SCHWARTZ GALLERY1000 Marietta StreetSuite 112Atlanta, GA 30318(404) 885-1080www.jenniferschwartzgallery.com
PHOTOGRAPHY GALLERIES AND THINGS TO DO AROUND ATLANTA
If you have any other
shows you would like to
see listed here, please
email Anne Nettles at
graphixs11@yahoo.
com
We meet on the first Friday of Every Month at 7:30 PMOur learnshops meet the 4th Tuesday of the month unless otherwise noted*
Some Exceptions for holidays. Check the Meetup Site for Details