ssc-scripting guidefrederickhiggins.com/celestia/ssc-script_guide.pdfcelestia will, by default, try...
TRANSCRIPT
Manual for .SSC-files in Celestia
Page 1 of 28
Ulrich Dickmann�s and
Bob Hegwood�s
SSC-Scripting Guide for
Celestia
http://www.shatters.net/celestia/
Version 1.0 (english) This is a shortened version of the German original version. © by Ulrich �Adirondack� Dickmann & Bob Hegwood, May 2004 http://www.celestia.de.vu/ http://home.earthlink.net/~bobhegwood/
Manual for .SSC-files in Celestia
Page 2 of 28
Table of contents Introduction................................................................................................................. 3 What is an .SSC-file?.................................................................................................. 3 SSC-file layout............................................................................................................ 5 Elements of an SSC file.............................................................................................. 6
�Name�, �Star�, �Planet� and �Moon�.................................................................... 6 Class ................................................................................................................... 7 Mesh.................................................................................................................... 7 MeshCenter......................................................................................................... 8 Texture ................................................................................................................ 8 Emissive .............................................................................................................. 9 NightTexture........................................................................................................ 9 OverlayTexture.................................................................................................... 9 BumpMap ............................................................................................................ 9 BumpHeight....................................................................................................... 10 Color.................................................................................................................. 10 SpecularTexture ................................................................................................ 10 SpecularColor.................................................................................................... 11 SpecularPower .................................................................................................. 11 HazeColor ......................................................................................................... 11 HazeDensity ...................................................................................................... 12 Radius ............................................................................................................... 12 Oblateness ........................................................................................................ 12 Beginning .......................................................................................................... 13 Ending ............................................................................................................... 13 InfoURL ............................................................................................................. 14 Atmosphere ....................................................................................................... 14 EllipticalOrbit ..................................................................................................... 15 RotationPeriod................................................................................................... 22 Obliquity ............................................................................................................ 22 LongOfRotationAxis........................................................................................... 22 RotationOffset ................................................................................................... 22 PrecessionRate ................................................................................................. 23 Orientation......................................................................................................... 23 EquatorAscendingNode..................................................................................... 23 Albedo ............................................................................................................... 24 Rings ................................................................................................................. 24
.SSC-Locations-files ................................................................................................. 25 Elements of a location-file ..................................................................................... 26
Location............................................................................................................. 26 LongLat ............................................................................................................. 26 Size ................................................................................................................... 26 Importance ........................................................................................................ 26 Type .................................................................................................................. 26
How to define your city as location........................................................................ 28 Location-files as Add-Ons..................................................................................... 28
Credits ...................................................................................................................... 28
Manual for .SSC-files in Celestia
Page 3 of 28
Introduction by Ulrich Dickmann Does a Celestia user actually need some knowledge of SSC files? You might say that Celestia authors and offerers of Add-Ons should have to provide their own functioning SSC files. But what if the offerer of an Add-On only indicates, that a certain SSC file (e.g. solarsys.ssc) must be edited? Or, what do you do if the enclosed SSC file does not function with your Celestia installation or the SSC file is incorrect? Thus some Add-Ons made by Frank Gregorio ("Educational Activities") require modifications in the file solarsys.ssc. Or perhaps you would like to arrange the behavior of some objects differently. Maybe you'd like to write your own Add-On and need an appropriate SSC file for it. Then it is very helpful to know what is contained in the SSC files. You need to know what can be changed, and what effects your changes will have. Sometimes - with changes in the SSC files - one can improve (especially on weaker PC's) the performance of the computer! (For example, by switching off "SpecularTextures" and/or "BumpMaps"). What is an .SSC-file? by Ulrich Dickmann The file extension .ssc stands for "Solar System Catalog" (original meaning: Solar System Construction) and the file contains data for setting up a solar system (with planets, moons, etc). One absolutely necessary SSC-file is the file solarsys.ssc, which you'll find in your Program Files\Celestia\data directory. Without this file Celestia will not function. All the necessary data for our solar system are contained in this file. All planets, moons, satellites and some spaceships (e.g. ISS and MIR) and their positions in space are defined there. Presumably the solarsys.ssc is no longer the main-file in further versions (starting with 1.3.2). The data records of solarsys.ssc are then divided into the following separate files: asteroid.ssc, comets.ssc, outersys.ssc and spacecraft.ssc. Apart from this "main-file" there are further SSC Files (e.g. provided by add-ons). Further SSC-files supplement and extend the information found in the solarsys.ssc. So you could put the contents of further files into solarsys.ssc. But this wouldn�t be a good idea. In order to prevent confusion, it is much better to save further SSC-files into the directory Celestia\extras\ or in its sub-folders. All defined objects appear on the listing of Celestia�s solar system browser. But some SSC-files just contain locations (cities, landing sites and so on). These locations do not appear on the listing of the solar system browser! More about these locations-files later. All information and data within the SSC-files are stored in plain-text. So you can edit these files with a text editor (e.g. Notepad). Make sure to save these files with the extension .ssc.

Manual for .SSC-files in Celestia
Page 4 of 28
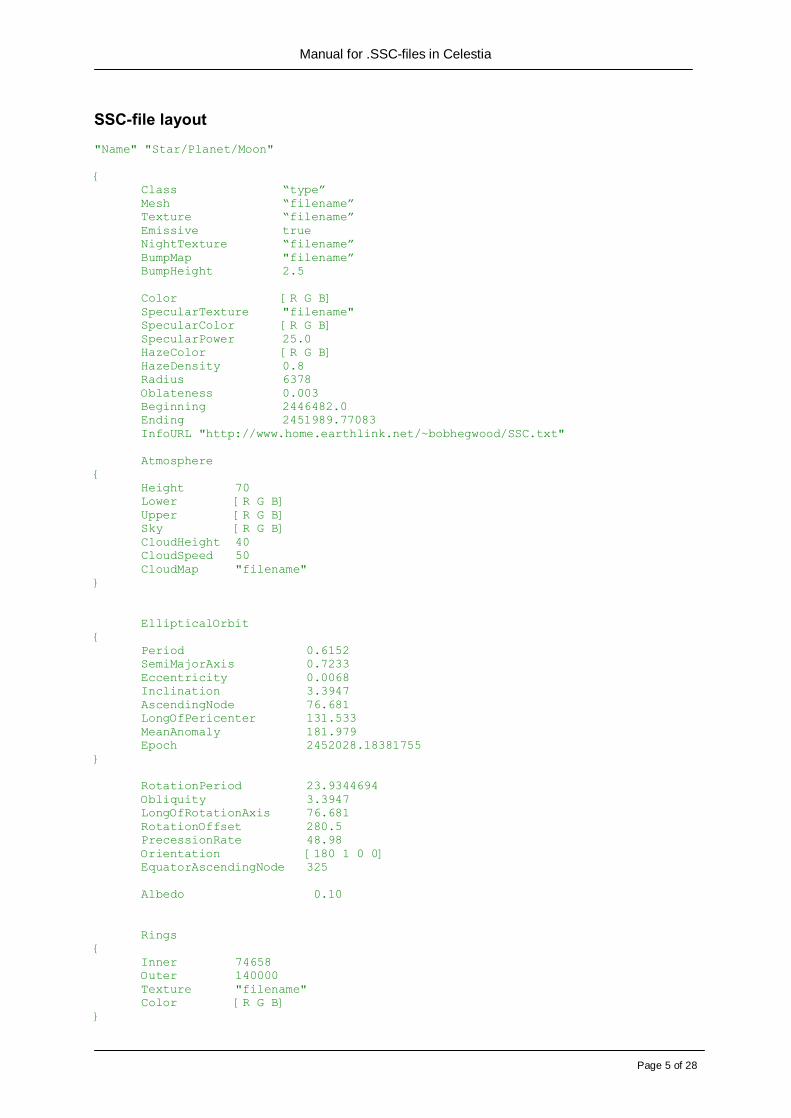
The following shows a typical SSC file layout, including the necessary brackets and braces in their proper locations. Please note that the braces and brackets MUST be utilized in pairs. If a left-hand brace "{" is found to begin an argument, Celestia expects to find the matching right-hand brace "}" to close the argument. This applies also to brackets " [ ] ". We'll examine all of the SSC elements in detail on the next pages. Please note that Bob has experimented with these elements using his simple Gateway PC which is equipped with Windows XP, an 800x600 display, 256 Meg of memory, and no special graphics card other than the Intel 82815 graphics controller which came with the machine. If an element works on Bob�s machine, it will work on yours. ;-)
Manual for .SSC-files in Celestia
Page 5 of 28
SSC-file layout "Name" "Star/Planet/Moon" { Class �type� Mesh �filename� Texture �filename� Emissive true NightTexture �filename� BumpMap "filename� BumpHeight 2.5 Color [R G B] SpecularTexture "filename" SpecularColor [R G B] SpecularPower 25.0 HazeColor [R G B] HazeDensity 0.8 Radius 6378 Oblateness 0.003 Beginning 2446482.0 Ending 2451989.77083 InfoURL "http://www.home.earthlink.net/~bobhegwood/SSC.txt" Atmosphere { Height 70 Lower [R G B] Upper [R G B] Sky [R G B] CloudHeight 40 CloudSpeed 50 CloudMap "filename" } EllipticalOrbit { Period 0.6152 SemiMajorAxis 0.7233 Eccentricity 0.0068 Inclination 3.3947 AscendingNode 76.681 LongOfPericenter 131.533 MeanAnomaly 181.979 Epoch 2452028.18381755 } RotationPeriod 23.9344694 Obliquity 3.3947 LongOfRotationAxis 76.681 RotationOffset 280.5 PrecessionRate 48.98 Orientation [180 1 0 0] EquatorAscendingNode 325 Albedo 0.10 Rings { Inner 74658 Outer 140000 Texture "filename" Color [R G B] }
Manual for .SSC-files in Celestia
Page 6 of 28
Elements of an SSC file by Bob Hegwood with additions by Ulrich Dickmann
�Name�, �Star�, �Planet� and �Moon� "Name" "Star" or "Name" "Star/Planet" or "Name" "Star/Planet/Moon" "Name" = The name of the object you wish to view. The name of the object must be placed within the quotation marks and may reference a planet, a moon, an asteroid, a comet, or any other object which can be found within the Celestia system. Example: "Borelly" In this example, the Comet Borelly has been selected. "Star" = The name of the star around which the object orbits. Note: This can be ANY of the star's names. Alpheratz, Sirrah, ALF And, 21 And, DEL Peg, HD 358, HIP 677 will ALL reference the same star. Example 1: "Borelly" "Sol" In example-1, the Comet Borelly has been selected, and Sol (our Sun) is the star around which the comet orbits. Example 2: "Earth" "Sol" In example-2, the planet Earth has been selected. Our Sun is the star around which it orbits. To view moons, satellites, or other planet-orbiting objects in Celestia, you must add the /Planet option as follows: Example 1 : "Europa" "Sol/Jupiter" In example-1, the moon Europa has been selected. Jupiter is the planet around which it orbits, and our Sun is the star around which Jupiter orbits. Example 2: "ISS" "Sol/Earth" In example-2, the International Space Station has been selected. Earth is the planet around which it orbits, and our Sun is the star around which the Earth orbits.
Manual for .SSC-files in Celestia
Page 7 of 28
To view satellites or other moon-orbiting objects, you may add the /Moon option as follows: Example: "Discovery" "Sol/Jupiter/Io" In this example, the Discovery space ship from "2001 - A Space Odyssey" has been selected. Jupiter is the planet around which Io orbits, and Io is the moon around which the spacecraft orbits. Note: Discovery is NOT included in the Celestia basic-version!
Class Class = The type of object you've selected. Your choices are planet, moon, comet, asteroid, or spacecraft. Please note that this element is optional since Celestia may determine an object's class by interpreting its radius. One interesting use for this element, however, involves the ability to display an object's orbit. If you'd like to see the orbit of a spacecraft, for example, you can change its class to "moon" in order to display its path around a planet. Example: Class "spacecraft" In this example, the author has defined the selected the object as a spacecraft.
Mesh Mesh = The 3D model file used to render objects like satellites and spacecraft. Irregular bodies like small moons, asteroids and comets can also be rendered using a mesh. The possible mesh file extensions are: 3DS, CMS and CMOD. These files should reside in the Celestia\models directory. Example: Mesh "iss.3ds" In this example, the author is using the file iss.3ds to render the International Space Station. NOTE: Textures and Meshes CAN be used together to apply different textures to irregular objects and to spherical objects you wish to render in a different way. Keep in mind, however, that models are created with their own textures already intact. One interesting use of this feature can be found in the example below. Example: Mesh "asteroid.3ds" Texture "comet3.jpg" In this example, the author has combined the 3d model "asteroid.3ds" with the texture "comet3.jpg" in order to display the Comet Hale-Bopp with a more realistic texture. Many thanks to Paul Roberts, a.k.a. "Darkmiss" for creating the comet texture I'm using. Note: This texture is NOT included in Celestia basic-version!
Manual for .SSC-files in Celestia
Page 8 of 28
MeshCenter (since Version 1.3.1) MeshCenter = Defines the center of the model within its extent range. Celestia puts the model into an invisible box while rendering. By default, the center of this box is also the center of the model. But some objects (e.g. moons, asteroids or spacecraft) have their own center of gravity and they can deviate from the center of this imaginary box. If such an object rotates around the wrong axis, locations will be rendered at the wrong positions and �goto� commands will take you to the wrong position in space. To prevent this, you can set the center of the model within the box using the -x, -y and -z axis. Your modelling software will tell you the coordinates you need.
Texture Texture = The graphics file used to display the object you've selected. The possible texture file extensions are jpg, bmp, tga, dds, or png. I would NOT recommend using Windows bitmap (i.e.- bmp) files since they take up much more memory and disk space than comparable jpg or png files and Celestia performance will suffer. Remember too, that all texture graphic files must be formatted so that they are sized in multiples of 2. Acceptable file sizes are 512x256, 1024x512, 2048x1024, etc. Please be aware that if you try to use a file which is NOT formatted in this manner, you'll only see featureless, plain white spheres on your screen. Celestia will, by default, try to access your texture files first from the Celestia\textures\medres directory. If the specified filename cannot be found there, Celestia will then look to the \textures\lores directory, and finally to the \textures\hires directory. If you have three different textures for the same object, and these textures are formatted in three different resolutions, you should save them as follows:
Texture with medium resolution: Celestia\textures\medres Texture with lowest resolution: Celestia\textures\lores Texture with highest resolution: Celestia\textures\hires
If you want to switch the texture-resolution while Celestia is running ( [ Shift + R ] and [ R ] ), the filenames in each directory must be the same! Example: Texture "Mars.png" In this example, the author is using the file Mars.png to render the planet Mars.
Manual for .SSC-files in Celestia
Page 9 of 28
Emissive Emissive = A light and color element. With this line set to true, the object is considered as a light source whose color depends on the original colors of the object. Please note that this element is optional and the default value is false. This is an interesting element in that it can be used to view a planet without any interference from the night-side rotation. In other words, you can view the object from any side or angle and still see the details as if they were in full sunlight. Try using it on Pluto to see the planet in its full glory. Example : Texture "pluto.jpg" Emissive true In this example, the author is using the file pluto.jpg to render the surface of Pluto so that it is visible from any direction. With the Emissive set to true, no darkness occurs because the planet has rotated into its night side.
NightTexture NightTexture = The graphics file used to display a night-time texture of the object being viewed. The possible NightTexture file extensions are jpg, bmp, tga, dds, or png. These textures will appear progressively as the surface of the object revolves away from the Sun. Please note that the same Texture element file restrictions apply here. (See The Texture element above) Example: NightTexture "earthnight.jpg" In this example, the author is using the file earthnight.jpg to render the night-time surface of the planet Earth. This will display many city lights as they'd be seen from the viewing location.
OverlayTexture OverlayTexture = The graphics file which is used to overlay another texture. Note: An alpha layer must exist in the texture! Example: OverlayTexture "4k-CloudShadowMap.dds"
BumpMap BumpMap = The graphics file which is used to simulate a planet or moon's relief. Black and white images depict the altitude at different points on the object. Apparently, these files are only useful if your system is equipped with an Nvidia-like video card. After much experimentation, Bob found that these files simply have NO effect on his Windows XP, Intel 82815 800x600 graphics display, so he deleted all references to BumpMaps in his SSC files in order to conserve resources.

Manual for .SSC-files in Celestia
Page 10 of 28
After some further research it seems that BumpMap files - if they ARE used - may be limited to a resolution of 2048x1024. The possible BumpMap file extensions are jpg, bmp, tga, or png. Example: BumpMap "mercurybump.jpg" In this example, the author is trying to render Mercury more accurately by using the relief map named mercurybump.jpg.
BumpHeight BumpHeight = The height used to interpret the BumpMap element as described above. Assuming that your system can make USE of a BumpMap, then BumpHeight will allow you to set the altitude of the planet�s relief. Please note that this element is optional since the default BumpHeight value is 2. Example: BumpMap "mercurybump.jpg" BumpHeight 2.5 In this example, the author is trying to render Mercury more accurately by using the relief map named mercurybump.jpg. By using a BumpHeight value of 2.5, the author is also trying to render the surface with a bit more detail.
Color Color = The colors assigned to an object (i.e. - Planet, Moon, etc.) when either seen from afar, or when viewed from nearby with no texture element specified in the SSC. The Color element is coded using 3 numbers which represent the values for Red, Green, and Blue. Note: The brackets [ ] are REQUIRED in order to specify the RGB values. Each value must be specified from between 0 and 1 for each of the RGB components. Example 1: Color [1.0 0 0] In example-1, the author has defined a red planet since the R value is equal to 1.0, and the Green and Blue values are equal to zero. Example 2: Color [0.85 0.85 1.0] In example-2, the author has defined a multicolored planet with a definite tinge of Blue since since the R value is equal to 0.85, the Green value is also equal to 0.85, and the Blue value is equal to one. Welcome to Planet Earth!
SpecularTexture SpecularTexture = The graphics file used to display the colors reflected from a watery surface on the object you've selected. The possible texture file extensions are dds or png. As with the BumpMap element, these files are apparently useful ONLY if your system is equipped with a powerful graphics card.
Manual for .SSC-files in Celestia
Page 11 of 28
After further experimentation, Bob found that specular definitions simply have NO effect on his Windows XP, Intel 82815 800x600 graphics display. He has therefore deleted all SpecularTexture, SpecularColor and SpecularPower references from his SSC files in order to conserve resources. Example: SpecularTexture "earth-spec.png" In this example, the author is using earth-spec.png to display the Earth's specular reflections.
SpecularColor SpecularColor = The colors assigned to the reflections of a light source on the surface of an object. The object is usually a planet or a moon, and the light source is normally a star. This element is coded exactly like the Color element described above, using the Red, Green and Blue values from between 0 and 1. Again, the brackets [ ] are REQUIRED. These reflections are conditional since the presence of an alpha layer must exist in the texture of the object's surface. Realistic reflections - I believe - are applicable only to those planet/moon surfaces contain water or ice. Example: SpecularColor [0.05 0.5 0.55] In this example, the author has assigned a bluish tinge to the Earth's specular reflections.
SpecularPower SpecularPower = A number between 0 and 100 which assigns the importance of an object's specular reflections. This number is applied to any luminous area that exists on the surface of an object, and is used to define the amount of reflection. A number of 0 is used to reflect the entire luminous area, and 100 is used to restrict the reflection to a bare minimum. Example: SpecularPower 25.0 In this example, the author has assigned a power of 25 to the Earth's specular reflections.
HazeColor HazeColor = This is apparently a color defined using RGB values within the brackets. It must also be used to manage an atmospheric effect. Again, my non-graphically enhanced Windows XP machine simply cannot make use of it. This element apparently only works on machines with more powerful graphics cards. Example: HazeColor [0.05 0.5 0.55] In this example, the author has defined the haze color with a bluish tint.
Manual for .SSC-files in Celestia
Page 12 of 28
HazeDensity HazeDensity = This is apparently a number from between 0 and 1, and is apparently used to define the density associated with the HazeColor element. Once again, this element serves NO purpose on my machine, since it's graphically challenged. Please note that I can STILL view some of the more spectacular Celestial displays even without a graphics card, so I'm NOT complaining. Example: HazeDensity 0.8
Radius Radius = The radius of an object, in kilometers. For use with models. 3DS files define the object to be displayed, and the radius determines the object's relative size when viewed in Celestia. Please note that this element is optional. It would NOT normally be used for a model such as the Hubble Space Telescope. Example 1: Mesh "iss.3ds" In example-1, the author is using the file iss.3ds to render the International Space Station. Note that NO radius need be assigned. Example 2: Mesh "amalthea.3ds" Radius 124 In example-2, the author is using the file amalthea.3ds to render one of Jupiter's moons. This object has been defined as having a radius of 124 kilometers. Note: On occasion, different versions of Celestia may feature different radii for planetary objects like moons and planets. Just be aware that these values may change from one release to another!
Oblateness Oblateness = A number which is used to identify the relative "flatness" of an object. It is determined using the following formula: O=1-(RP/RE) RP=An object's Radius in kilometers at the pole RE=An object's radius in kilometers at the equator A perfectly round (i.e. - Spherical object) would have an oblateness equal to zero. A flat disk would have an oblateness of one. Please note that any planetary atmosphere definitions are NOT associated with this element, and will NOT be affected by its use. In other words, it's possible to define a flat planet which displays a spherical atmosphere! Interesting effect, yes? Example: Oblateness 0.003 In this example, the Earth's spherical shape has been defined.
Manual for .SSC-files in Celestia
Page 13 of 28
Beginning Beginning = A number which represents the Julian date upon which an object (usually a satellite or spacecraft) began its orbit or mission. This number is important if you wish to view an object in space ONLY when it was actually there. If the user has Celestia set at a date PRIOR to the object's beginning date, it will NOT be visible in space. NOTE: The use of this element is entirely optional. Normally, it only ensures accuracy. Example: Beginning 2446482.0 In this example, the author has defined the Julian launch date of the MIR space station. MIR was launched on February 20th, 1986. Please note that MIR will NOT be visible in Celestia when viewing space prior to this date. You find a converter here:
http://aa.usno.navy.mil/data/docs/JulianDate.html
Since Celestia 1.3.1 you don�t have to insert the date as Julian date, because Celestia now converts the date into Julian date itself. Beginning and Ending times may be specified with date strings of the form "YYYY MM DD hh:mm:ss". Either the seconds or the entire hour/minutes/seconds portion may be omitted. For example, the definition of Galileo in solarsys.ssc contains the following:
Beginning "1989 10 19 02:47" # Launch Ending "2003 9 21 10:44" # Crash into Jupiter
Ending Ending = A number which represents the Julian date upon which an object (usually a satellite) ended its orbit. This number is again important only if you wish to view an object in space when it is actually there. If the user has Celestia set at a date AFTER the object's ending date, it will NOT be visible in space. NOTE: The use of this element is again entirely optional. If you get tired of having to reset the date in Celestia in order to view a specific satellite, please be aware that you CAN simply delete the ending date element so that an object is ALWAYS visible in space. This is NOT realistic or accurate, but makes it a lot easier for a novice Celestia user to view the object of his/her choice. Example: Ending 2451989.77083 In this example, the author has defined the Julian date of the MIR space station's re-entry into the Earth's atmosphere. MIR re-entered Earth's atmosphere on March 21st, 2001. Please note that the MIR space station will NOT be visible in Celestia AFTER this date since it is no longer in orbit.
Manual for .SSC-files in Celestia
Page 14 of 28
InfoURL InfoURL = An InterNet link which may be used to provide further information concerning the selected object. The user has only to right-click on an object in order bring up Celestia's available object options menu. On that menu, the user can simply click the "Info" tab in order to visit the object's informational web page. Please NOTE that the user must either be connected to the internet while running Celestia, or he/she must have a copy of the web page available off-line in order to use this feature. Example: InfoURL "http://www.nineplanets.org/pluto.html#Charon"
Atmosphere Atmosphere = The set of elements used to describe the atmosphere of an object. The collection of elements listed under the Atmosphere heading MUST be defined between a set of braces as shown below:
Atmosphere { Height 60 Lower [0.30 0.52 0.65] Upper [0.26 0.47 0.84] Sky [0.30 0.48 0.82] CloudHeight 7 CloudSpeed 65 CloudMap "earth-clouds.png" } In this example, the author has defined the Earth's atmosphere using the values assigned as described below:
Height = The thickness of the atmosphere in kilometers.
Lower = The color of the atmosphere near the surface of the object. This color is defined using the Red, Green, and Blue values as described under the Color element. Please remember that the leading and trailing brackets MUST be used to define these color elements.
Upper = The color of the atmosphere at the upper edge of the atmosphere. Again, use RGB values to select the colors of your choice. Note that it is possible to create gradient blends from the surface of the object to its outer atmosphere using these values.
Sky = The color of the sky as seen from somewhere below the point defined in the Height element. This color is again defined using RGB values.
Manual for .SSC-files in Celestia
Page 15 of 28
CloudHeight = The altitude at which the objects clouds are located, in kilometers.
CloudSpeed = The speed at which the clouds are moving through the
atmosphere, in kilometers per hour.
CloudMap = The graphics file used to display the texture of the clouds in the object's atmosphere. This file should be a PNG or DDS file since an alpha layer allows transparency. If you wish to view the surface of the planet through the atmosphere, an alpha layer MUST be used. Note: DDS files do NOT work on my simple Windows machine, but there are a multitude of various freeware programs available on the internet which will allow you to convert files from DDS to transparent PNG files. Try the Gimp 2.0 for best results.
EllipticalOrbit EllipticalOrbit = The set of elements used to describe the orbit of an artificial satellite. The collection of elements listed under the EllipticalOrbit heading MUST be defined between a set of braces as shown below. EllipticalOrbit { Period 0.6152 SemiMajorAxis 0.7233 Eccentricity 0.0068 Inclination 3.3947 AscendingNode 76.681 LongOfPericenter 131.533 MeanLongitude 181.979 (also: MeanAnomaly) Epoch 2451545.0 } In this example, the author has defined the elliptical orbit of Venus using the values as described below. For more information concerning orbital elements, visit NASA's website at http://spaceflight.nasa.gov/realdata/elements/ Orbital elements remain a mystery to most people. This is due I think first to the aversion many people (including Bob and me) have to thinking in three dimensions, and second to the horrible names the ancient astronomers gave these seven simple numbers and a few related concepts. To make matters worse, sometimes several different names are used to specify the same number. Vocabulary is the hardest part of celestial mechanics! A �satellite� could be any object (planet, moon or an artificial satellite) that orbits another object (sun, planet or moon). The following explanations describe the correlation �Satellite � Earth�. But it could be �Earth � Sun� or �Phobos � Mars� as well. So the descriptions are not only valid for a satellite that orbits the earth, but for any object that orbits another object.
Manual for .SSC-files in Celestia
Page 16 of 28
Period = The time it takes for an object to orbit its host.
Planetary periods are defined in terms of years, while satellite orbits are defined in days. The Period element MUST be defined. Period is simply the reciprocal of Mean Motion and so a satellite with 2 revolutions per day, for example, has a period of 12 hours.
Kepler's third law of orbital motion gives us a precise relationship between the speed of the satellite and its distance from the earth (or the speed of a planet and its distance from the sun). Satellites (or any other objects) that are close to the earth (or any other objects) orbit very quickly. Satellites far away orbit slowly. This means that we could accomplish the same thing by specifying either the speed at which the satellite is moving, or its distance from the earth!
Satellites in circular orbits travel at a constant speed. Simple. We just specify that speed, and we're done. Satellites in non-circular (i.e., eccentricity > 0) orbits move faster when they are closer to the earth, and slower when they are farther away. The common practice is to average the speed. You could call this number "average speed", but astronomers call it the "Mean Motion". Mean Motion is usually given in units of revolutions per day. In this context, a revolution or period is defined as the time from one perigee to the next. Typically, artificial satellites have Mean Motions in the range of 1 rev/day to about 16 rev/day. SemiMajorAxis = A number which identifies half of the large axis of the object's orbit.
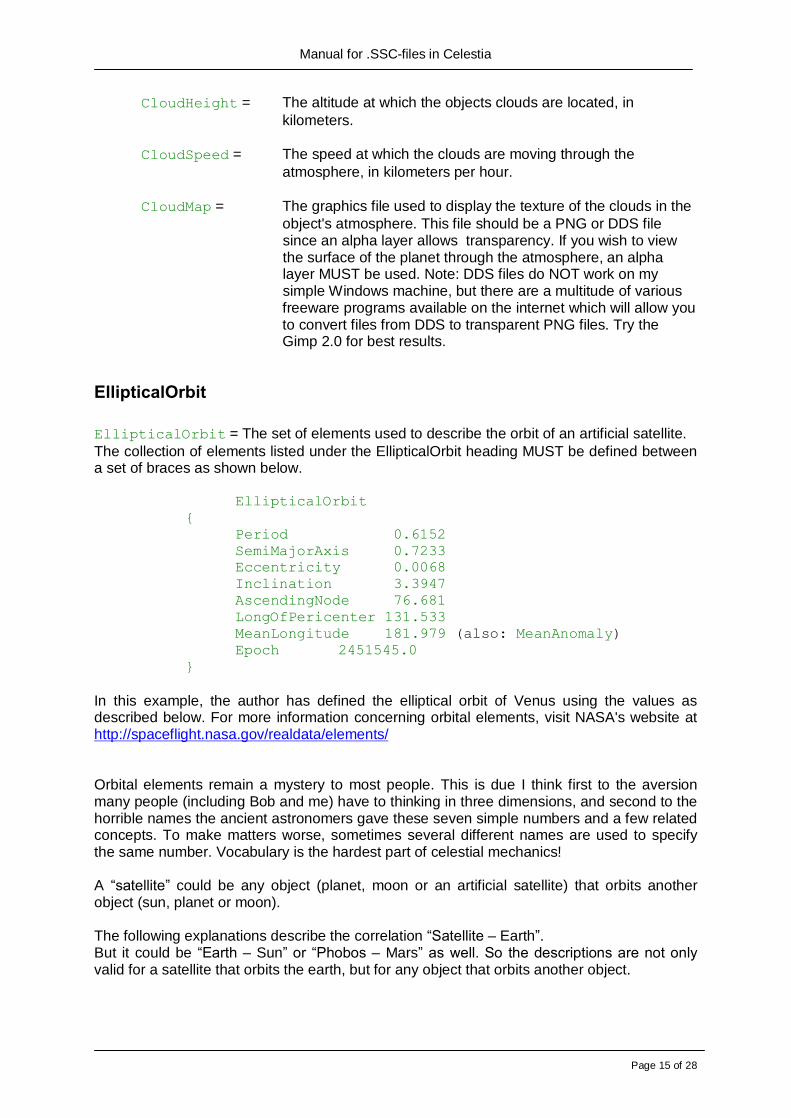
Generally speaking, the SemiMajorAxis is also the average distance from a planet to its primary. The element is defined in terms of Astronomical Units (AU) for planets, and in Kilometers (Km) for satellites. Note: One AU = approximately 150 Million Kilometers. The SemiMajorAxis element MUST be defined.
The major axis (marked as "Apsidenlinie�) runs from "A� to the point "P�. In that diagram, the orbit is a circle (not an ellipse), so the distance from the center to "A� is the same as from center to "P�.
On elliptical orbits, the semi major axis is always the longer line, that points to "A� (apogee).
Orbital plane = Bahnebene
SemiMajorAxis is one-half the length (measured the long way) of the orbit ellipse, and is directly related to mean motion by a simple equation.
Eccentricity = A number between 0.0 and 1.0 which defines the circularity of the
object's orbit. A perfectly circular orbit would have an Eccentricity value which is equal to zero. A radically eccentric orbit would have an Eccentricity value of one. This element is optional, but should be used if you desire accuracy.
Manual for .SSC-files in Celestia
Page 17 of 28
This one is simple. In the Keplerian orbit model, the satellite orbit is an ellipse. Eccentricity tells us the "shape" of the ellipse. When eccentricity=0, the ellipse is a circle. When eccentricity is very near 1, the ellipse is very long and skinny.
(To be precise, the Keplerian orbit is a conic section, which can be either an ellipse, which includes circles, a parabola, a hyperbola, or a straight line! But in Celestia, we are only interested in elliptical orbits. The other kinds of orbits are not used for satellites.
Note: An eccentricity of 1 describes a parabola! An eccentricity > 1 is a hyperbola. Inclination = A number which defines the plane of the object's orbit in comparison to
the plane of the terrestrial equator. This element is optional, but should be used for accuracy.
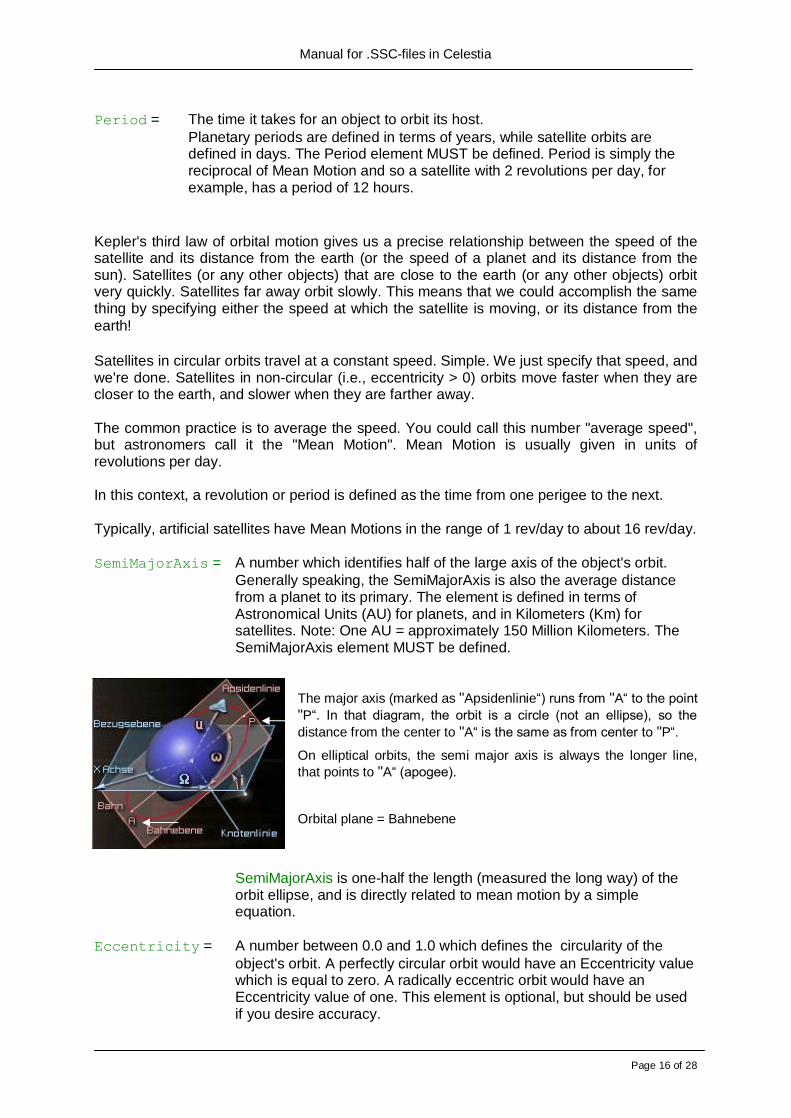
The orbit ellipse lies in a plane known as the orbital plane (see �Bahnebene�). The orbital plane always goes through the center of the earth, but may be tilted at any angle relative to the equator. Inclination is the angle between the orbital plane (red) and the equatorial plane (blue). By convention, inclination is a number between 0 and 180 degrees.
Some vocabulary: Orbits with an inclination near 0 degrees are called equatorial orbits (because the satellite stays nearly over the equator). Orbits with inclination near 90 degrees are called polar (because the satellite orbits over the north and south poles). The intersection of the equatorial plane and the orbital plane is a line which is called the line of nodes. More about that later.
AscendingNode = A number which defines the right ascension of the ascending node in
degrees. It determines the orientation of the axis of the nodes compared to the direction of reference (i.e.- the Vernal Point). In practice, one often positions the plane of the orbit starting from the longitude of the ascending node on a given date. The ascending node is the point of intersection of the orbit with the plane of the equator when a satellite travels from the southern hemisphere towards the
northern hemisphere. Or, in other words: The ascending node is where the Orbit crosses the Ecliptic.
So far the theory. The complete designation �right ascension of ascending node� (RAAN) wins the prize for most horribly named orbital element. So we take a closer look at this stuff: Two numbers orient the orbital plane in space. The first number was Inclination. This is the second. After we've specified inclination, there are still an infinite number of orbital planes possible. The line of nodes can poke out the anywhere along the equator. If we specify where along the equator the line of nodes pokes out, we will have the orbital plane fully specified. The line of nodes pokes out two places, of course. We only need to specify one of
Manual for .SSC-files in Celestia
Page 18 of 28
them. One is called the ascending node (where the satellite crosses the equator going from south to north). The other is called the descending node (where the satellite crosses the equator going from north to south). By convention, we specify the location of the ascending node. Now, the earth is spinning. This means that we can't use the common latitude/longitude coordinate system to specify where the line of nodes points. Instead, we use an astronomical coordinate system, known as the right ascension / declination coordinate system, which does not spin with the earth. Right ascension is another fancy word for an angle, in this case, an angle measured in the equatorial plane from a reference point in the sky where right ascension is defined to be zero. Astronomers call this point the vernal equinox. Vernal equinox? What�s that? We�ll talk about it later� Finally, "right ascension of ascending node" is an angle, measured at the center of the earth, from the vernal equinox to the ascending node.
At the diagram the reference point (vernal equinox) is marked by the (blue) arrow (see "X Achse�) at the x-axis on the equatorial plane (see �Bezugsebene�). The angle ("Ù�) is measured from the ascending node (see "Knotenlinie�) to the x-axis (see "X Achse�), that points to the vernal equinox.
Perhaps another diagram makes the situation more understandable:
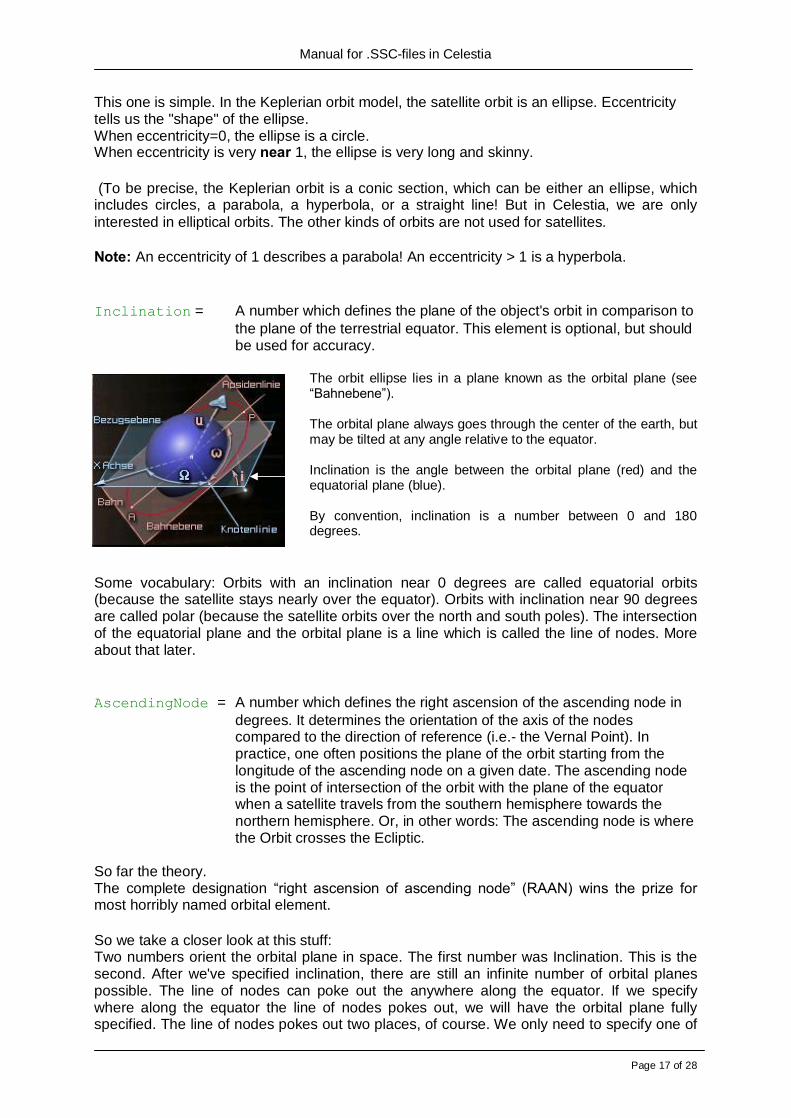
This is a diagram of the original German-speaking version of this guide. So here some translations of the words:
Stern = star Erdachse = Rotation axis of the earth Himmelsäquator = Celestial equator Erde = earth
Manual for .SSC-files in Celestia
Page 19 of 28
Frühlingspunkt = Vernal equinox The Vernal Equinox: Teachers have told children for years that the vernal equinox is "the place in the sky where the sun rises on the first day of Spring". Wow! Great! This is a horrible definition. Most teachers, and students, have no idea what the first day of spring is (except a date on a calendar), and no idea why the sun should be in the same place in the sky on that date every year. You now have enough astronomy vocabulary to get a better definition: Consider the orbit of the sun around the earth. I know in school they told you the earth orbits around the sun, but the math is equally valid either way, and it suits our needs at this instant to think of the sun orbiting the earth. The orbit of the sun has an inclination of about 23.5 degrees. (Astronomers don't usually call this 23.5 degree angle an 'inclination', by the way. They use an infinitely more obscure name: The Obliquity of The Ecliptic.) The orbit of the sun is divided (by humans) into four equally sized portions called seasons. The one called Spring begins when the sun pops up past the equator. In other words, the first day of Spring is the day that the sun crosses through the equatorial plane going from South to North. We have a name for that! It's the ascending node of the Sun's orbit. So finally, the vernal equinox is nothing more than the ascending node of the Sun's orbit. The Sun's orbit has RAAN = 0 simply because we've defined the Sun's ascending node as the place from which all ascending nodes are measured. The RAAN of your satellite's orbit is just the angle (measured at the center of the earth) between the place the Sun's orbit pops up past the equator, and the place your satellite's orbit pops up past the equator.
LongOfPericenter = The argument of the perigee in degrees which defines the position of the ellipse axis compared to the equatorial plane. It moves the angle, in the plane of the orbit, between the line of the node (which belongs to the plane of the equator) and the large axis of the ellipse.
Alternately you can use this element: ArgOfPericenter = Angle from "Node" to Pericenter (in degrees). ArgOfPericenter is yet another fancy word for angle. Now that we've oriented the orbital plane in space, we need to orient the orbit ellipse in the orbital plane. We do this by specifying a single angle known as �argument of perigee�. A few words about elliptical orbits:
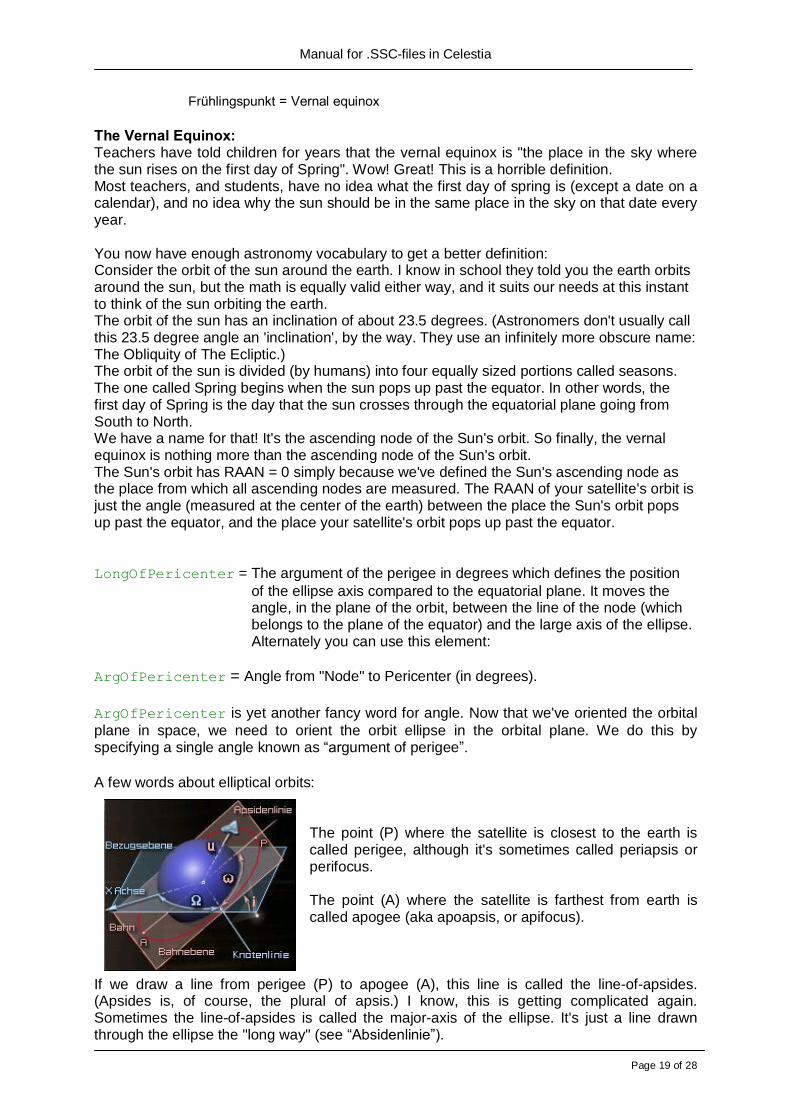
The point (P) where the satellite is closest to the earth is called perigee, although it's sometimes called periapsis or perifocus. The point (A) where the satellite is farthest from earth is called apogee (aka apoapsis, or apifocus).
If we draw a line from perigee (P) to apogee (A), this line is called the line-of-apsides. (Apsides is, of course, the plural of apsis.) I know, this is getting complicated again. Sometimes the line-of-apsides is called the major-axis of the ellipse. It's just a line drawn through the ellipse the "long way" (see �Absidenlinie�).
Manual for .SSC-files in Celestia
Page 20 of 28
The line-of-apsides passes through the center of the earth. We've already identified another line passing through the center of the earth: the line of nodes.
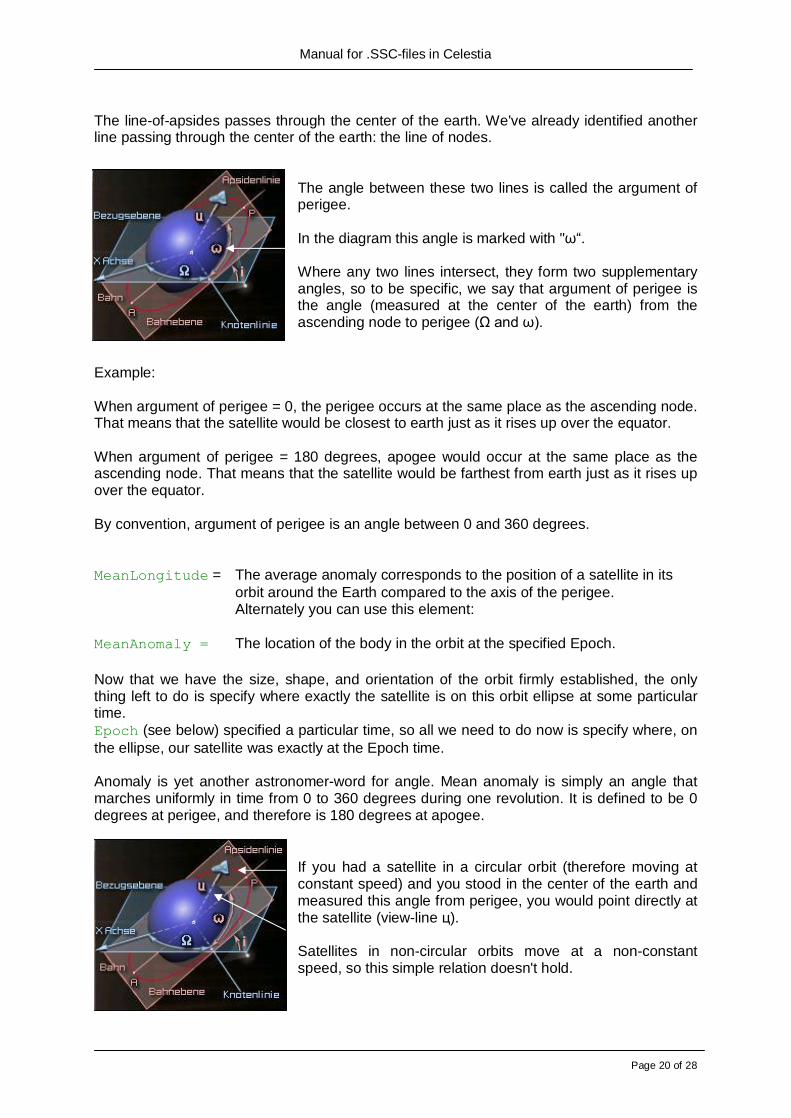
The angle between these two lines is called the argument of perigee. In the diagram this angle is marked with "ù�. Where any two lines intersect, they form two supplementary angles, so to be specific, we say that argument of perigee is the angle (measured at the center of the earth) from the ascending node to perigee (Ù and ù).
Example: When argument of perigee = 0, the perigee occurs at the same place as the ascending node. That means that the satellite would be closest to earth just as it rises up over the equator. When argument of perigee = 180 degrees, apogee would occur at the same place as the ascending node. That means that the satellite would be farthest from earth just as it rises up over the equator. By convention, argument of perigee is an angle between 0 and 360 degrees. MeanLongitude = The average anomaly corresponds to the position of a satellite in its
orbit around the Earth compared to the axis of the perigee. Alternately you can use this element: MeanAnomaly = The location of the body in the orbit at the specified Epoch. Now that we have the size, shape, and orientation of the orbit firmly established, the only thing left to do is specify where exactly the satellite is on this orbit ellipse at some particular time. Epoch (see below) specified a particular time, so all we need to do now is specify where, on the ellipse, our satellite was exactly at the Epoch time. Anomaly is yet another astronomer-word for angle. Mean anomaly is simply an angle that marches uniformly in time from 0 to 360 degrees during one revolution. It is defined to be 0 degrees at perigee, and therefore is 180 degrees at apogee.
If you had a satellite in a circular orbit (therefore moving at constant speed) and you stood in the center of the earth and measured this angle from perigee, you would point directly at the satellite (view-line ö). Satellites in non-circular orbits move at a non-constant speed, so this simple relation doesn't hold.
Manual for .SSC-files in Celestia
Page 21 of 28
This relation does hold for two important points on the orbit, however, no matter what the eccentricity. Perigee always occurs at MA = 0, and apogee always occurs at MA = 180 degrees. Epoch = A number which represents the desired time frame. This number is
normally defined in terms of Julian Dates, but I believe that Universal Time may also be used. Please note that this element is optional and should NOT be used unless you wish the user's initial view of an object's orbit to ALWAYS be at the same time. It is defined in terms of days and decimal fractions of days. In the example above, the author is describing Venus' orbit as of January 1, 2000 at noon. Be aware that January 1st, 2000 is Celestia's (Version 1.3.x) current default epoch value. A set of orbital elements is a snapshot, at a particular time, of the orbit of a satellite. Epoch is simply a number which specifies the time at which the snapshot was taken.
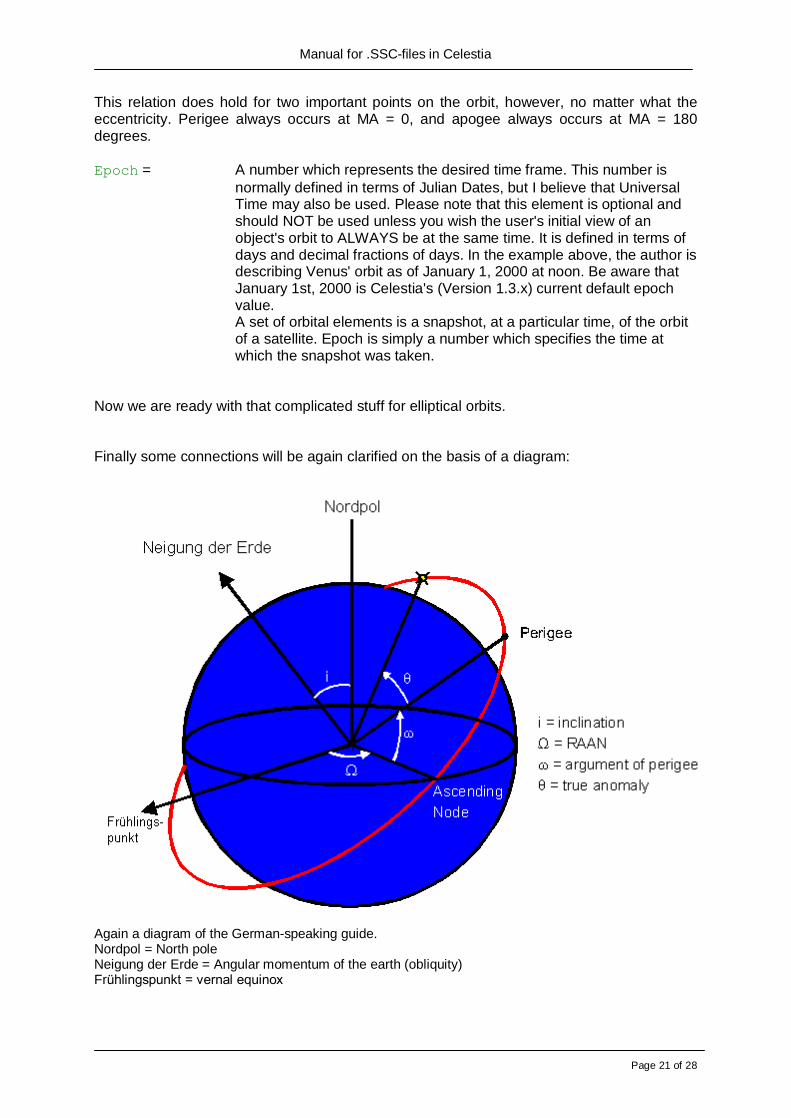
Now we are ready with that complicated stuff for elliptical orbits. Finally some connections will be again clarified on the basis of a diagram:
Again a diagram of the German-speaking guide. Nordpol = North pole Neigung der Erde = Angular momentum of the earth (obliquity) Frühlingspunkt = vernal equinox
Manual for .SSC-files in Celestia
Page 22 of 28
RotationPeriod RotationPeriod = A number which defines the amount of time it takes for the selected object to fully rotate once around its axis. This value is defined in terms of hours. Example: RotationPeriod 23.9344694 In this example, the author has defined Earth's rotation period (23 hrs / 56 min / 4,09 sec).
Obliquity Obliquity = A number which defines the slant of the object's axis of rotation. This number can be defined with either a positive or a negative value. Example: Obliquity -23.45 In this example, the author has defined the slant of Earth's axis as -23.45 The Obliquity-parameter tilts a planet or moon through the specified number of degrees relative to the local reference plane (ecliptic for planets, planet equatorial plane for moons). But this tilt is always made in the plane of the local coordinate 0 (zero), whereas - of course - planets and moons have their axes tilted in all sorts of directions. So Obliquity does not define the direction of the tilt. To do so, we need the element EquatorAscendingNode (see next page). Think of an object's equator as being a circular orbit, and the point where its prime meridian crosses the equator as being the location of some imaginary satellite. In that case, Obliquity works like the Inclination-parameter (see element EllipticalOrbit).
LongOfRotationAxis LongOfRotationAxis = A number which defines the Longitude of the axis of rotation
projected on the orbital level. The rotation of the object is related to the time period defined by the Epoch-element. LongOfRotationAxis is no longer used in Celestia - the name was replaced with EquatorAscendingNode.
RotationOffset RotationOffset = Rotation of the object, related to the time period defined by the epoch element. Celestia sets up moons and planets with their prime meridians aligned with the local coordinate 0 (zero) at the time specified by Epoch. This generally means that they're facing in the wrong direction compared with reality. So RotationOffset specifies the number of degrees through which the planet or moon must be rotated to align it correctly. In general, you use RotationOffset to rotate an object anticlockwise around its rotation axis by the given number of degrees.
Manual for .SSC-files in Celestia
Page 23 of 28
Think of an object's equator as being a circular orbit, and the point where its prime meridian crosses the equator as being the location of some imaginary satellite. In that case, RotationOffset is analogous to MeanAnomaly (see element EllipticalOrbit).
PrecessionRate PrecessionRate = A number which defines the rate of precession of the axis of rotation in rad/days.
Orientation Orientation = Defines the orientation of an object (.3ds, .cms or .cmod) within Celestia�s universal coordinatesystem. Syntax: Orientation [ Angle x-axis y-axis z-axis ] Example: Orientation [180 1 0 0] The values x-axis, y-axis and z-axis actually define a vector, which is the axis around which the object is rotated through angle degrees. They can take any value, but it's unusual to set them to more than 1 or less than -1.
The most common forms of syntax are: Orientation [ angle 1 0 0 ] (rotates around x axis) Orientation [ angle 0 1 0 ] (rotates around y axis) Orientation [ angle 0 0 1 ] (rotates around z axis)
Rotation is clockwise around the following axes:
y = the north rotational pole of the object x = the direction opposite the prime meridian when Celestia time = Epoch, and
RotationOffset = 0 z = at right angles to the above, forming a left-handed coordinate system
Setting the axis negative reverses the direction of rotation.
EquatorAscendingNode EquatorAscendingNode = Rotates the tilted object in the reference plane through the specified number of degrees. We have defined the tilt of an object with the element Obliquity, but not the direction of the tilt. So EquatorAscendingNode rotates the tilted object in the reference plane through
Manual for .SSC-files in Celestia
Page 24 of 28
the specified number of degrees - effectively, it twists it around to point its tilted axis in the right direction. Think of an object's equator as being a circular orbit, and the point where its prime meridian crosses the equator as being the location of some imaginary satellite. In that case the EquatorAscendingNode works like the orbital parameter AscendingNode (see ElliptcalOrbit).
Albedo Albedo = A number which defines the selected object's luminosity. This number must be from 0 to one, and is used to determine how much light will be reflected from the surface of the object. Zero defines an object which has NO luminosity and therefore reflects no light, and one defines an object with 100% luminosity. In Celestia this value can be used to enhance the visibility of an object. If you'd like a satellite to be visible from further away than 10 kilometers, for example, you can simply increase the value of its Albedo.
Rings Rings = The set of elements used to describe the ring system of an object. The collection of elements listed under the Rings heading MUST be defined between a set of braces as shown below: Example: Rings { Inner 74000 Outer 141000 Texture "saturn-rings_8k.png" Color [1.0 0.88 0.82] } In this example, the author has defined the rings of Saturn using the values as described below. Inner = A number which defines the distance of the inner edge of the rings from the
host object. This measurement is defined in terms of Kilometers. Outer = A number which defines the distance of the outer edge of the rings from the
host object. This measurement is defined in terms of Kilometers. Texture = The graphics file used to display the object's rings. This file must be formatted
as a PNG or DDS file if transparency is to be used between rings. The texture file is simply a flat cross-section of the rings, and will be rendered by Celestia into a full circular representation around the host object.
Color = The colors assigned to the rings in terms of Red, Green and Blue. The values
should be from between 0.0 and 1.0 and MUST be described within the brackets as shown above.
Manual for .SSC-files in Celestia
Page 25 of 28
.SSC-Locations-files by Ulrich Dickmann Since Celestia 1.3.1 there are special SSC-files which contain only locations. For information about using the locations-feature of Celestia please read the user�s guide by Frank Gregorio (http://www.shatters.net/celestia/documentation.html). The contents of this files are coded in another way and with other elements. The basic-package of Celestia 1.3.1 contains the following locations-files, you can find in the Celestia\data\ directory: solsys_locs.ssc locations on planets etc. within solar system world-capitals.ssc locations on earth The following set of data defines a location (here: Kepler Dorsum) on the mars-moon Phobos (data fragment of marsmoons.ssc, not included in basic-package):
Location "Kepler Dorsum" "Sol/Mars/Phobos" { LongLat [ -210 -30 0 ] Size 3 Type "DO" }
Data fragment of world-capitals.ssc: Location "Berlin" "Sol/Earth" {
LongLat [ 13.4 52.5166 0 ] Importance 465.79 Type "City"
} And a data fragment of solsys_locs.ssc looks like this: Location "Caloris Planitia" "Sol/Mercury" { LongLat [ -189.8 30.5 0 ] Size 1300 Type "PL" } Location "Beethoven" "Sol/Mercury" { LongLat [ -123.6 -20.8 0 ] Size 643 Type "AA" } You see, the argument Size can be replaced by Importance. Why and when is explained later.
Manual for .SSC-files in Celestia
Page 26 of 28
Elements of a location-file by Ulrich Dickmann Each set of data begins with the element Location, followed by the name of the location and where this location is. As you see, the syntax is equal to the beginning of a �normal� SSC-file. You just have to add Location before the �name� and �star/planet/moon� arguments.
Location Syntax: Location "Name" "star/planet/moon"
Example: Location "Berlin" "Sol/Earth"
LongLat Longlat = Defines the longitude and latitude and altitude of the location. Example: LongLat [ 13.4 52.5166 0 ] The first value describes the longitude, the second one describes the latitude. The third value defines the altitude. For locations on the surface of an object this value is 0 (Zero). There are occasions when you might want to label a location that's above the surface of a planet. For example, you could place locations to mark the various rings and gaps in Saturn's rings (e.g. for the outer ring: 141000).
Size Size = Defines the diameter of the location and is used to determine how close to the
location the camera needs to be before a label should be rendered. Example: Size 3
Importance Importance = Can be used to override size for small locations that you still want
visible from a distance, like a lunar landing/crash site. Example: Importance 465.79
Type Type = Defines the type of location. Type USGS Definition ---- ---------------------------------------------------------------------------- AA Crater, craters A circular depression AS Astrum, astra Radial-patterned features on VENUS CA Catena, catenae Chain of craters CH Chaos, Distinctive area of broken terrain CM Chasma, chasmata A deep, elongated, steep-sided depression CR Corona, coronae Ovoid-shaped feature DO Dorsum, dorsa Ridge FE Flexus, A very low curvilinear ridge with a scalloped pattern
Manual for .SSC-files in Celestia
Page 27 of 28
FL Fluctus, Flow terrain FO Fossa, fossae Long, narrow, shallow depression FR Farrum, farra Pancake-like structure, or a row of such structures LF LandingSite, Lunar features at or near APOLLO LANDING SITES LI Linea, lineae A dark or bright elongate marking, may be curved or straight ME Mare, maria "Sea"; large circular plain (MOON only) MN Mensa, mensae A flat-topped prominence with cliff-like edges MO Mons, montes Mountain PE Patera, paterae An irregular crater, or complex one with scalloped edges PL Planitia, planitiae Low plain PM Planum, plana Plateau or high plain RE Regio, regiones A large area marked by reflectivity or color distinctions from adjacent areas, or a broad geographic region RI Rima, rimae Fissure (MOON only) RT Reticulum, reticula reticular (netlike) pattern on VENUS RU Rupes, Scarp TA Terra, terrae Extensive land mass TE Tessera, tesserae Tile-like, polygonal terrain UN Undae, Dunes VA Vallis, valles Valley Additional Celestia Types ------------------------- XX = Other City Observatory More feature types here: http://planetarynames.wr.usgs.gov/append5.html Examples:
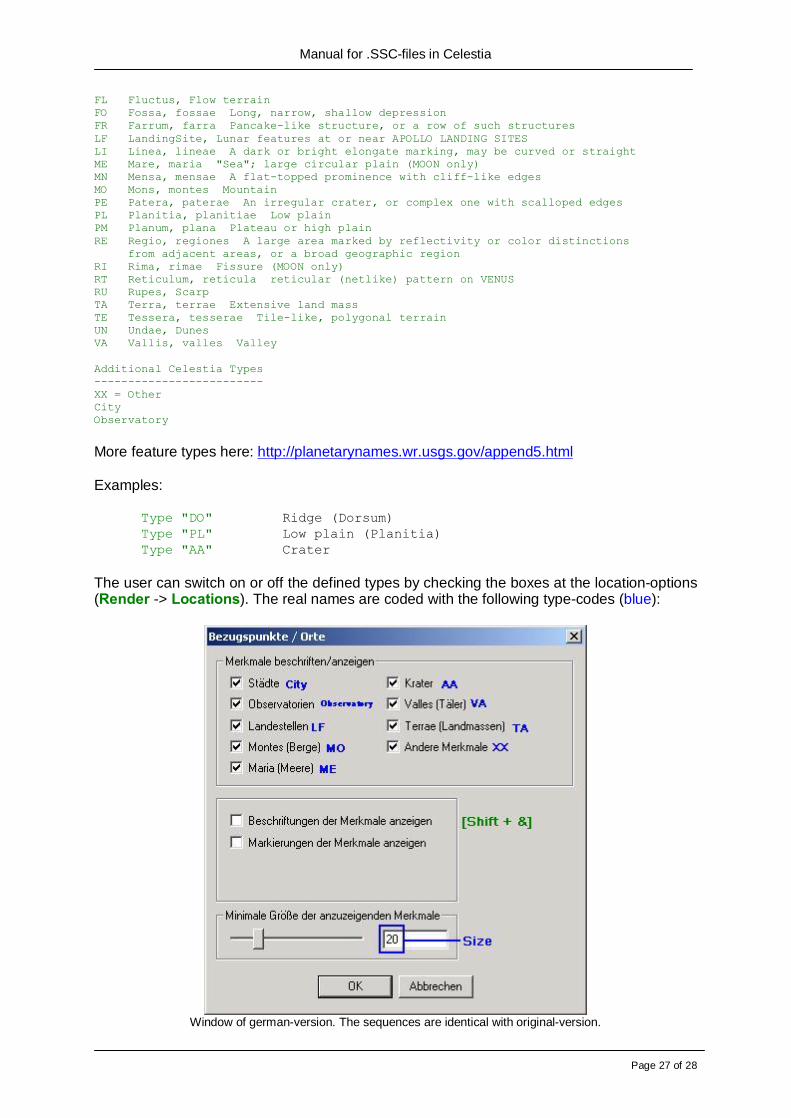
Type "DO" Ridge (Dorsum) Type "PL" Low plain (Planitia) Type "AA" Crater The user can switch on or off the defined types by checking the boxes at the location-options (Render -> Locations). The real names are coded with the following type-codes (blue):
Window of german-version. The sequences are identical with original-version.
Manual for .SSC-files in Celestia
Page 28 of 28
How to define your city as location by Ulrich Dickmann As described above, you can define every place on an object with the element LongLat. So it is easy to define your city in Celestia, if you know the correct coordinates. If you do not know the longitude and latitude of your hometown, maybe google.com can help you. The following search words should help: �longitude latitude <NameofTown>�. Then open the file world-capitals.ssc with Notepad (or any other texteditor) and write a set of data for your hometown: Location "Name of your town" "Sol/Earth" {
LongLat [ Velue of Longitude Value of Latitude 0 ] Importance 500 Type "City"
} Save the file and restart Celestia. Hit the <Enter>-key and type in the name of your hometown like this: Earth/Berlin. Press <Enter> once more and then [G] (=Goto). The camera will move to your hometown and hover over it. Your hometown is right in the center of the screen. Now press [Shift + &] and your hometown will be displayed.
Location-files as Add-Ons Take a look at the following websites for more locations-files: http://www.shatters.net/~t00fri/earth.ssc.zip (Fridger�s Earth Locations, 500 precise locations on Earth) http://www.shatters.net/~t00fri/earth-UNECE.ssc.zip (Fridger�s Earth Locations, large file (8200 locations!), converted from UN ECE data) http://www.shatters.net/~claurel/celestia/files/locations/ (Location files for Eros, Jupiter Moons, Mars, Mercury, Moon, Neptune Moons, Saturn Moons, Uranus Moons, and Venus) http://www.bt.homepage.btinternet.co.uk/Files/Celestia/Earth-Citys.ssc (Major Earth cities by Paul Roberts) Credits My first thanks for the description of most SSC elements go to Bob Hegwood, without whose very good preliminary work this manual would not have been possible. Thank you Bob, and remember: We�re just brain-dead in some astronomical and celestial cases! Further thanks go to:
Grant Hutchison Thomas Guilpain
Selden Ball Don Goyette
Paul Williamson
Thank you for your support! Merci beaucoup pour votre soutien !