stalingrad scenariotactics - spi gamesspigames.net/movesscans/moves20/witestaling.pdf · stalingrad...
TRANSCRIPT

8
STALINGRAD SCENARIO TACTICSThe Stalingrad Scenario of War in the Easthas a number of advantages which make itan excellent vehicle for discussing the game,as well as the most exciting of the scenarios.
First, it is the one scenario whose VictoryConditions reflect "real world" victory -that is, it is the only scenario which gives theGermans (Axis) a bona fide chance to "win"the war.
Second, the scenario has a reasonablebalance of forces to objectives, and a balanceof action - both Players have solid attackingopportunities and must make use of them,and both must playa sound defensive gameto win.
Third, the "problems" of the War in the Eastgame system are not evident - this is thekind of action that the game system isdesigned to best reflect; and the scenariobrings in all of the units found in the game.
As in all scenarios (and the Campaign Game)of War in the East, Players will findthemselves working with both strategy andtactics. Such strategic tasks as establishmentof objectives, assignment of forces, allocationof supply, etc., are mixed with the tacticaldetails of conducting attacks with variedattacking and defending unit types, ex-ploiting breakthroughs, defending positions,etc. Since the strategic considerations relatesolely to the Stalingrad Scenario, while thetactical notes are applicable to the wholegame, they will be discussed separately.
AXIS STRATEGYYou, as the Axis Commander, must take andhold eight (8) additional Personnel Centers(P.C.'s), besides those that you hold atthestart. Due to their proximity to the start line,you will usually have to take Leningrad's twoP.C.'s, and Voronezh, Voroshilov, andRostov. Your initial and main strategicdecision will then be either to take Moscowor Stalingrad, Krasnodar, and Sevastopol.
History, and the initial absence of fortifiedunits, might lead you to choose the southernobjectives, but my own estimation is that theMoscow objective is the optimum plan.Moscow, as an objective, has the followingadvantages:
1. The P.c. objectives are concentrated,allowing their defense to be concentrated.
2. The Objectives are well within the Axissupply radius, and several river lines areavailable for defense just to the east of theobjectives.
3. The Objective is close to the front; theSoviets will have to fight for it, and it is better
by Jerrold Thomasto have a large battle now while the Axis havea great tactical edge.
4. The objective is centrally located,allowing attacks to be directed towards itfrom many widely separated points.
Once having (let us assume) opted forMoscow, you must consider the startingpoints and direction(s) of your attacks. Oneeffective method is a kind of "underhand"approach. This approach utilizes a strongarmored thrust north-east from Orel. Thethrust has, as an intermediate objective, theRR hexes at SW0925-1024. [These hexes arethe "rail connections" mentioned in thePlayer's Notes.J
Their seizure has a dual impact; first, itsevers north-south rail communications,placing the Soviet Player on exterior lines;second, it effectively divides the Soviet force,and allows the Axis to advance in either ofthree directions while still pursuing theirobjectives. They can go further east to isolateMoscow, turn directly north to Moscow, orturn southeast for Stalingrad.
Because Moscow is so vital containing threeP.C.'s, and so close to the front, the Axismust expect and plan for slow and costlygoing in the initial turns. The Soviet Playercan make a good portion of his line immuneto high-odds Axis attacks, and this portionwill usually be around Moscow. But thestiffness of the defense can actually be to theAxis' advantage, as it provides opportunitiesfor attritioning the Soviet Corps. Attrition,normally the Axis' enemy, is actually a friendin this scenario. The Axis has 100+ GermanInfantry and 27+ German MechanizedDivisions, plus replacements, versus 56Soviet Infantry and 14 Soviet MechanizedCorps. Since the strategic position, and theCRT differential, give the Axis an unchal-lengable initiative, the effect of mutualattrition is to weaken the defense long beforethe attack is affected. Also, attrition of theSoviet Corps is essential because it is thesecorps, both infantry and mechanized, whichwill power the eventual Soviet counter-attacks.
Because attrition and the ability to strikeweak points are essential to Axis success, theAxis must adopt a broad-front attack policy.Single thrusts, no matter how strong, are fartoo easily blocked or channeled, and theyprovide no defensive security.
Some other attacks, (besides the "underhandapproach", "make" themselves in mostgames. Usually the seizure of Leningrad willrelease strong German-Finnish forces; thesemust drive east, flanking Moscow from the
north. Even if they do not actually take thecity, their presence will provide flankprotection for the force that does, and onemore threat which the Soviet Player mustcounter.
Also, the need to take and hold Rostov andVoroshilov will usually cause a force to bepresent here, which should take any oppor-tunities for attacks - if you can seize morethan eight additional P.C.'s, then that addsto the number the Soviets must recover.Beware, however, of overextension of your linein the south; remember "where a Germansoldier stands, he will not retreat" and itshistorical consequences.
It pays to plan for attacks on other sectors aswell. Though you do not have sufficientstrength to assault every position, you canmake limited attacks in all sectors to causeattrition and pin reserves.
DeployingAs the Axis, your basic strategic vehicle isyour deployment, but in this you arehandicapped by not knowing the enemy'sdispositions, except for his fortified units,when you deploy your forces, especially yourinfantry. The most effective counter to thisstrategic "lack of intelligence" is to avoidoverconcentration of your German Infantry.They should be deployed in several separatedgroups of attacking size, so that the defensecannot concentrate in one sector. Axis alliesand K.G.'s can fill in the gaps.
You choice of objectives will also determineyour allocation of supply. In this scenario youwill generally operate in supply with noproblems" unless you are going south, inwhich case supply heads must go forwardrapidly. Generally, I will place one RRRepair unit north of Moscow, two south of it,and one initially in the Crimea. The RRthrough Orel is an excellent one to pushforward, as is the one near the DemtanskSalient. The others should be advanced foronly a short time, and then turned to buildlateral lines, unless, again, you have southernobjectives in mind.
Your mechanized forces are your finalinstrument of initiative, and their placementcan be crucial. Even though they deploy last,plans for their first turn use must be flexible,as the Soviets get to move first. Attentionmust be paid to the location of the Soviet ATbrigades; a careless placement can havethem suddenly appearing in front of yourPanzers, nullifying them. Your armor shouldalways be deployed with infantry to precludesuch an even tuali ty.

Though your armor should generally bedeployed in accordance with a specific plan,if a solid breakthrough opportunity, con-sidering the Soviet first turn move, presentsitself, go for it. But wherever you put them,use them; you have no time to waste and youmust be prepared for losses in armor.
The Air Unit situation is very "iffy" in thisscenario. Generally, the Soviets will lay low,but you may want to put a few (4-5) Points inthe Air Superiority box just to keep themhonest. You will only rarely be making morethan 8 to 10 attacks per turn initially, exceptfor sacrifice units, so you will likely havethem to spare.
SOVIET STRATEGYYou, as the Soviet Commander, must see to itthat the Axis end the game with no morethan 12, and hopefully less than 11, P.C.'s.Your actions in this regard are notindependent, however. You are in anunfortunate position because your abysmalCRT rating all but precludes even minortactical initiatives. To win, you must react,only, for IS turns, and then act.
Your only independent action is your deploy-ment, since by your deployment you canaffect how the attack will be made. Once it ismade, you can only counter it in a passivemanner.
In the short run, no matter how well youdeploy, you must expect to take a beating. Ifthe Axis objective is Moscow, there is no'room to run. With a southern strategy on thepart of the Axis, you can, for a few turns,duplicate the actual strategy of withdrawal.The Axis Mechanized forces will still hit you,but the Infantry will not. After that, thingswill get rough in the south, too, because youcan't dig in while you're running.
While vou're being roughly handled, youmust keep an eye on the weather. A few turnsbefore "Mud' you must attempt to get someof your better Corps together, since Mudfinds the Axis at their most vulnerable, andyou can do important damage in the Mudturns.
In the winter, the Axis defense will bestronger, but so will your attack, especiallydue to the Artillery brigades. Their unfor-tunate movement sequence can leave youhitting at air, however, unless they are placedstrategically. Like the Axis, the Moscow frontis your best target. You have a few goodattacking units, and Moscow makes a goodplace to concentrate them - massed artillerycan still break any Axis defense. If the Axisdo not have Moscow, you should haveopportunities to attack the stretched-outline, but remember that the enemy lines andsupplies are secondary to taking those P.C.'s.
Also in winter, your Air Unit picture shouldhave brightened considerably - since youare only on CRT #2, you will need that AirSupport.
A common error for the Soviet Player is togive up once Moscow has fallen. This is quiteoften premature. Unless the Red Army is
terribly decimated, and the Axis takesMoscow very early (turns 63-66), there will bea chance for a successful counterattack.Usually any extreme decimation in the RedArmy will be reflected in attrition in the Axisarmies as well, which should provideopportunities.
When the Soviets turn to counterattackcomes, they must not be hasty. They have 15turns from the start of Mud, and should planon taking all of them.
DeployingThe Soviet's find themselves in a ticklish spotwith regard to deployment. Generally, theyhave enough material to form a strongdefensive line, or provide for strong reserves,but not both. I generally opt for the strongline with weak reserves, since any weaknessin the line tends to produce immediateattrition, which is favorable to the Axis.
As the "Player's Notes" indicate, maximumuse must be made of terrain, especially theriverlines. Only through a combination ofriver lines and fort units can the Axiseffectively be stopped. Fortunately, theVolkhov, Don and Volga (northwesternportion) are excellently placed for yourpurposes. To make maximum use of theselines, you must be prepared to abandon yoursalient north of Vyazma, and the landbetween the Don and the Donets. Defendingthe Donets in force is a path to near certaindefeat. A proper retreat to the Don will allowit to be almost wholly fortified, or stronglydefended where not fortified.
In front of Moscow you cannot afford to yieldmuch territory, so make use of the forestsfirst, then the rivers. The immediate vicinityof Moscow is usually the only place meritingfort units beyond the first line - you simplydon't have enough 1-4's.
Like the Axis, you deploy in ignorance, but inyour case you will have a move to correct anyglaring deficiencies, and can be a little"faster and looser" in your set-up. Someunits, particularly the AT brigades and the3-s's and 2-s's, should be set up behind thelines so that they can move to particularlythreatened sectors. The only problem withthis is allowing for the woods in front ofMoscow.
Fort units are generally deployed in a singleline from Ladoga to Orel, and then east tothe Don, cutting off the salient north ofVyazma, and following the river lines asmuch as possible. Sufficient 1-4's must beleft in the south to provie for fortifying theDon.
In deploying, you must watch the Railroads,both yours and the Axis. Watch the AxidsRR units to determine his supply limits -while not as crucial here as in Barbarossa,their presence can be a saviour when the Axismake a breakthrough, if the breakthroughcan be forced wide enough to go beyond thesupply limit - this will depend on where it isin relation to the RR units. Watch your ownRR's, because the one thing that can really
9
threaten you is severence of supply, and inseveral places the supply of your line runsnearly parallel to it; if cut, you can besmashed with a suddenness that is appalling.
AXIS TACTICS"The Baker's Dozen"This is my basis for deploying GermanInfantry units. It is based on the followingpremises:1. That ordinarily twelve units (or threestacks; is the maximum which you will beable to employ (or which you should need toemploy) against anyone target hex.
2. That infantry attackers will probably betaking losses regularly for the first turns.
Initially, the Axis Player has 72 GermanInfantry divisions (of his 85 total, 4 arein Finland, 7 are in the Crimea, and 2 mustgarrison Riga and Minsk). The optimumdivision of these units, under premise (1) isinto six 12-unit groups. But in light ofpremise (2), such a division leaves the groupsrather brittle, with no loss absorbers. Tocounteract this I deploy I, 2 or 3 InfantryK.G.'s with each 12-unit group (thus theBaker's Dozen) - when the attackers have ahigh probability of loss, these K.G. can bebuilt up on the turn of the attack, so as to beready to fill in for any losses. When 3 K.G.deploy with the "Dozen", a new division canbe created by combining, even when draftpoints are not available that turn. This allowsa group of only twelve divisions to sustainitself in combat without requiring additionalfull-strength units.
I will generally deploy these "dozens" asfollows - Leningrad front, 1 to 2; CentralMoscow Front, 1 to 2; Orel-Kharkov, 1 to 3,Stalino, 1 or 2 - depending on the Sovietinitial placement, and my objectives. All ofthe listed fronts always get at least one group,for reasons previously noted.
German K. G. - "36 or 3 or J"One of the main errors in the "Player'sNotes" is that admonition about it being "awaste of material to resort to combiningKampfgruppen". In point of fact, it is awaste of material not to combine K.G.! Lookat it this way, three K.G. equal three factorswhich take up three units of stacking, andleave nothing if eliminated; combined, theyequal six factors in one unit, with one K.G.left if they are eliminated.
The only excuse for not combining K.G.would be the need for continuous line units,or the expectation that you could rebuildthem all from draft points. In the StalingradScenario, the Germans get 48 Infantry Draftpoints total, and they begin with 53 InfantryK.G. Obviously, they are never going to beable to build up those K.G., as combat losseswill usually exceed draft replacements. In theKursk and DAGC Scenarios, the need for theAxis to combine K.G. is even greater, as thenumber of K.G. is greater and so is thedisparity between K.G. and available draftpoints.

10
The astute Axis Player, then, can create awhole new "Dozen" out of the previouslyuseless K.G. The effect of this new force canbe significant, since they will usually appearwhere there was no force before:
A good place to create this new "Dozen" isaround the Soviet salient north of Vyazma,since he will usually be abandoning it, andsince you have to put a number of units thereanyway to fulfill the ZOC/startline require-ments. I will usually put 36 K.G. therestacked in threes, and convert them on TurnOne. As the "Player's Notes" do say, youcan't waste time.
Armor [10-8 & 8-8]These units I also split into two "Dozens",with a few 8-8's lefr'over. The extras go eitherto beef up one of the Dozens with aparticularly difficult or important mission, orto a separate sector to create some exploita-tion ability; often this is near Leningrad.
Again, if your armor losses mount, thinkabout combininz vour K.G. It usually pays tocombine the 8-8 K.G. at least, becauseusually the Panzers will use up all of theDraft points. If you are not taking any armorlosses then you are not attacking hardenough.
In deploying the armored formations, I willusually place them behind the infantry fortwo reasons: One, the infantry need to be asclose as possible to allow them to advanceand attack, or to compel the Soviet Player toretreat further to avoid them; and, two, itshields the armor from a common Soviettactic; that is, placing a 3 factor unit or unitsadjacent to the armor stack(s) to limit theirmobility on Turn One.
Axis Allies [2-4 & 1-6]These units have two main purposes indeployment: One, garrisoning P.C.'s - theycan initially garrison three cities, but this canincrease by three to five more, allowing theseunits to be used to maximum efficiency; two,fulfilling the continuous line and startline/ZOC requirements; "filler" in the purestsense.
Finns [4-5]This is the one scenario where you will beable to use the Finns. The Soviet deploymentrestrictions make it certain that Leningradwill fall, and communications will beestablished with Finland. Therefore, as manyof the Finns and Germans as possible shouldbe deployed near Leningrad, so as to be ableto help with the pocket once the line ofcommunications is established. Later, Fin-nish units mixed with Germans to absorb thelosses can greatly increase the striking powerof the forces in this area.
"Odds" and EndsObviously, you would like to attack at 12-1all the time, but you must settle for less, oftenfar less. Below is a chart showing theprojected outcomes for attacks at selectedodds, with -1, 0, and +1 die roll modifi-cations, and followed by some direction as towhen to use each odds in light of your ends.
1-1 - Ae: 50%, 330/0, 16%; AEx: 33%;Br: 16%, 33%, 50%. Use only in utterdesperation, and then only with air support.You should expect to lose your shirt at theseodds, and should always have mechanizedunits nearby to follow up a "Br" result.
2-1 - Ae: 33%, 16%, 0%; AEx 33%;Br: 33%; Dr 0%, 16%, 33%. Costly odds,rarely used without air support, and usedonly against key positions where dislocationis necessary; for example, forts behind rivers.Always have infantry available to soak uplosses, and mechanized units to follow up a"Br" result.
3-1 - AEx: 50%, 33%, 16%; Br: 33%;Dr: 16%,33%,50%. Unfortunately, the Axiswill have to attack at these odds quite oftenin the early going. Air support makes itacceptable odds where position or Fort unitsare involved, but the earlier admonitionsabout infantry and mechanized availabilitystill hold - here you have a decent chance toget the position without them, but not a surething.
4-1 - AEx: 33%, 16%, 0%; Br: 16%;Dr: 33%; Ex: 16%, 33%, 50%. This is thefirst odds which you should freely use. Thekey is the ability to avoid the AEx resultswith air, and the chance for exchanges,which are nothing but good. Usually you caneither only get 3-1, or you can go to 5 or 6-1;basically because the Soviet is trying to avoidexchanges too, except where he has nochoice, and then he is apt to take out his bestunits and put in something more expendable.5-1 - Br: 33%, 16%,0%; Dr: 16%; Ex: 33%;1/2Ex: 16%, 33%, 50%. This is whollyacceptable. It produces heavy attrition,which is usually at a rate favorable to theAxis. From here on out, odds should beincreased only as units are available withnothing else to do - it is better to take two5-1's than one 10-1. The Axis battle will be toopen the Sovietfront up to the point that 5-1'scan be achieved, from there attrition willrapidly increase. Again, don't hesitate to riskyour armor to get a 5-1 on a Soviet Corps;losing them hurts him more than you.
Attacking Defensive PositionsIllustration I shows three approaches toSoviet defensive positions typically encoun-tered. Attack "A" is all armor against ahigh-factor defense; Attack "B" is a mixedattack on the same defense; and Attack "C"is an infantry attack on an Anti-Tankdefense. Both "B" and "C" show a similartactic, the existance of a mechanized, butuninvolved, unit, to follow up a "Br" result.As shown in Illustration II, if the defensiveposition in question does not involve forest,swamp or river hexes, the follow up unit neednot be stacked with the attackers, allowingodds to increase in some cases. Also shown isthe proper follow-up for battle "C" - asecond 8-8 is brought up on the mechanizedphase to provide a retreat in case of counter-attack and to assure a 4-1 against either ofthe "corner" units on the next phase.Additional armor might be called for in othercases, but the essential point is that once the"corners" have been formed, they areindefensible; the Axis can place 72-120factors against the hex from three sides.Put in the armor if you can get an exchangethereby; the exchange forces the Soviet to useall new units to nluz the gap, rather than theold units less the forts.Initially you will be stuck with 3-1 battles,and maybe even a 2-1, but persevere, oncethe rivers and forts begin to go, the odds willpick up.
The Open PincersOne of the real strong points of this gamesystem is the ability to recreate the originalGuderian Pincer concept. To rehash, thisconcept did not envision the encirclement ofthe enemy forces, but rather, the penetrationof Armored forces which would disruptenemy rear-area communications andsupply, and would continue to thrust to therear, while the enemy front was disintegratedby a combination of frontal pressure andlack of communication. In the game, as inhistory, most armored breakthroughs areturned into encirclements, forfeiting theiradvantages.
Illustration II
The proper technique is to carefully avoidencircling bypassed units; rather, to severtheir supply lines while leaving them incommunication with the East Edge. Thishalves these units for defense, and having theSoviets halved for even a brief period canallow you to devastate them. The short (fourhex) Soviet supply radius makes it easier toeffect this unsupplied state. Also, your 3-8mechanized brigades, and any armor K.G.can be sent deep into the enemy rear to severrail lines; they will require a disproportionateeffort on the Soviet's part to track down andkill, while they destroy Railroads which canbe repaired only one hex at a time. In thesouth, the Allied 1-6 units are perfect for thisjob, as they can be sent to oblivion with noloss of effective strength.
One good tool for the Open Pincer attack isinfantry. If the supply can be severed on thefirst movement phase, the units will behalved for combat that turn. Often, the onlyway to do the cutting is with the 10Movement Factors and no terrain penaltiesof a forced marching infantry unit.
The use of forced marches is another"no-no" from the "Player's Notes" that youshould consider, and not just in regards tothe Open Pincers. This forced marching canprovide a considerable threat when abreakthrough is effected with infantry alone,because the rear areas may have beendenuded to meet your armored thrusts. Also,certain Soviet units, such as Fort units, A/Tunits, and most importantly, any entrainedunits, have no ZOC, so that forced marchersmay move adjacent and attack them.It sometimes pays to use forced marchingearly in the game (say to bring units backfrom the Crimea) just so your opponent willknow that you are prepared to forced march.He will then have to consider the possibility,and you will have created a threat in his mindeven if you never forced march again.
The Old "One- Two"This is my name for a pet tactic which falls inthe general area of taking advantage of therules, in this case the rules regardingretreats. It sometimes happens that a strongSoviet stack will be adjacent to a weak one,which is there to hold open a supply orretreat route, or maybe to screen the front. Inthese cases, you can sometimes opt for alower odds attack on the strong unit, force itto retreat onto the weaker unit, and attemptto eliminate the weaker unit. Since retreatedunits share the fate of the units in the hexthey are retreated to, they die as well. (Justonce I was able to do a "one-two-three",heaping two stacks on a weak one which wasthen destroyed.) Immoral, yes; unrealistic,yes; but legal. However, remember that theretreat priority is to vacant hexes, so thestrong stack(s) must have no alternative towhere you want them to be. [Ed. Note: Therules intend that the Players may employ thistactic.]
DefendingEven the Axis must be prepared to defend.He has some advantages in defending,
however, which are not available to the SovietPlayer. The most important of these are:1. When the Axis are at their weakest (MUDturns), the Soviet are halved in movement.
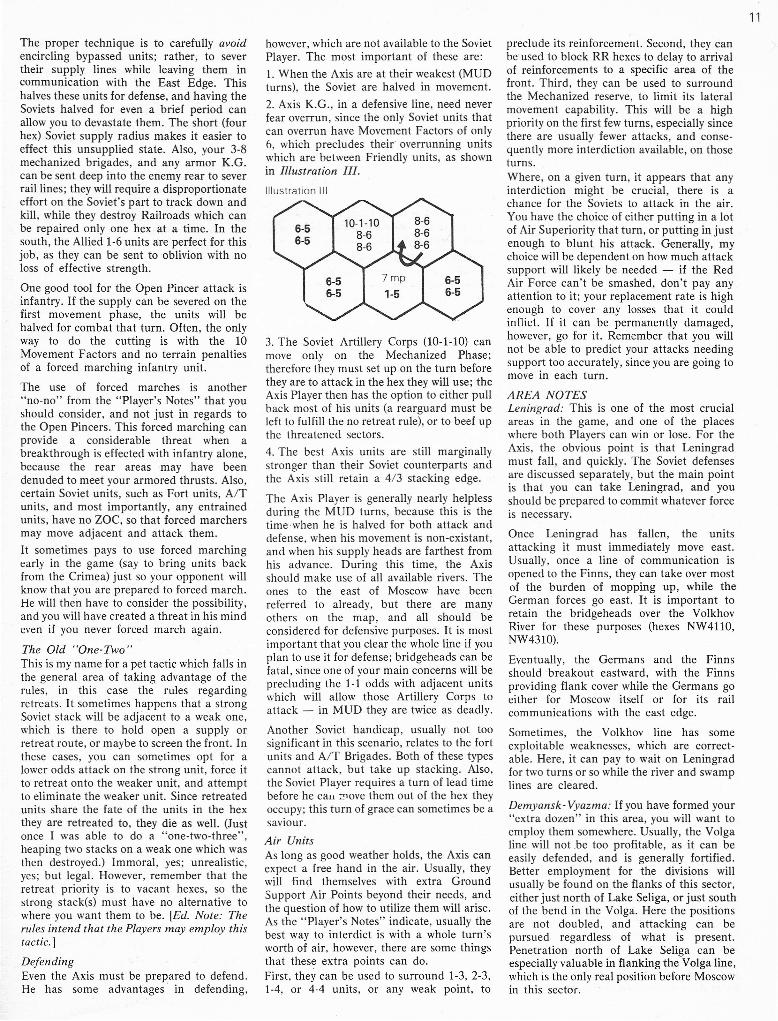
2. Axis K.G., in a defensive line, need neverfear overrun, since the only Soviet units thatcan overrun have Movement Factors of only6, which precludes their' overrunning unitswhich are between Friendly units, as shownin Illustration III.
Illustration III
3. The Soviet Artillery Corps (10-1-10) canmove only on the Mechanized Phase;therefore they must set up on the turn beforethey are to attack in the hex they will use; theAxis Player then has the option to either pullback most of his units (a rearguard must beleft to fulfill the no retreat rule), or to beef upthe threatened sectors.4. The best Axis units are still marginallystronger than their Soviet counterparts andthe Axis still retain a 4/3 stacking edge.
The Axis Player is generally nearly helplessduring the MUD turns, because this is thetime·when he is halved for both attack anddefense, when his movement is non-existant,and when his supply heads are farthest fromhis advance. During this time, the Axisshould make use of all available rivers. Theones to the east of Moscow have beenreferred to already, but there are manyothers on the map, and all should beconsidered for defensive purposes. It is mostimportant that you clear the whole line if youplan to use it for defense; bridgeheads can befatal, since one of your main concerns will beprecluding the 1-1 odds with adjacent unitswhich will allow those Artillery Corps toattack - in MUD they are twice as deadly.
Another Soviet handicap, usually not toosignificant in this scenario, relates to the fortunits and A/T Brigades. Both of these typescannot attack, but take up stacking. Also,the Soviet Player requires a turn of lead timebefore he call move them out of the hex theyoccupy; this turn of grace can sometimes be asaviour.
Air UnitsAs long as good weather holds, the Axis canexpect a free hand in the air. Usually, theywill find themselves with extra GroundSupport Air Points beyond their needs, andthe question of how to utilize them will arise.As the "Player's Notes" indicate, usually thebest way to interdict is with a whole turn'sworth of air, however, there are some thingsthat these extra points can do.First, they can be used to surround 1-3, 2-3,1-4, or 4-4 units, or any weak point, to
11
preclude its reinforcement. Second, they canbe used to block RR hexes to delay to arrivalof reinforcements to a specific area of thefront. Third, they can be used to surroundthe Mechanized reserve, to limit its lateralmovement capability. This will be a highpriority on the first few turns, especially sincethere are usually fewer attacks, and conse-quently more interdiction available, on thoseturns.Where, on a given turn, it appears that anyinterdiction might be crucial, there is achance for the Soviets to attack in the air.You have the choice of either putting in a lotof Air Superiority that turn, or putting in justenough to blunt his attack. Generally, mychoice will be dependent on how much attacksupport will likely be needed - if the RedAir Force can't be smashed, don't pay anyattention to it; your replacement rate is highenough to cover any losses that it couldinflict. If it can be permanently damaged,however, go for it. Remember that you willnot be able to predict your attacks needingsupport too accurately, since you are going tomove in each turn.
AREA NOTESLeningrad: This is one of the most crucialareas in the game, and one of the placeswhere both Players can win or lose. For theAxis, the obvious point is that Leningradmust fall, and quickly. The Soviet defensesare discussed separately, but the main pointis that you can take Leningrad, and youshould be prepared to commit whatever forceis necessary.
Once Leningrad has fallen, the unitsattacking it must immediately move east.Usually, once a line of communication isopened to the Finns, they can take over mostof the burden of mopping up, while theGerman forces go east. It is important toretain the bridgeheads over the VolkhovRiver for these purposes (hexes NW4110,NW4310).
Eventually, the Germans and the Finnsshould breakout eastward, with the Finnsproviding flank cover while the Germans goeither for Moscow itself or for its railcommunications with the east edge.
Sometimes, the Volkhov line has someexploitable weaknesses, which are correct-able. Here, it can pay to wait on Leningradfor two turns or so while the river and swamplines are cleared.
Demyansk- Vyazma: If you have formed your"extra dozen" in this area, you will want toemploy them somewhere. Usually, the Volgaline will not .be too profitable, as it can beeasily defended, and is generally fortified.Better employment for the divisions willusually be found on the flanks of this sector,either just north of Lake Seliga, or just southof the bend in the Volga. Here the positionsare not doubled, and attacking can bepursued regardless of what is present.Penetration north of Lake Seliga can beespecially valuable in flanking the Volga line,which is the only real position before Moscowin this sector.

12
Vyazma-Orel: Usually this will be the moststrongly defended sector of the front, allfortified with AIT brigades available. De-spite this, pressure must be applied here, orall those troops now manning the line will besomewhere else where you don't want themto be. You should not expect to destroy theunits here, but rather to pressurize them,knocking the corners off of positions, takinga hex or two towards Moscow, etc., andpreventing the removal of the strong units; orbreaking through if they are removed.
Orel-Kharkov: This is the area from whichyou-will most often be attacking whether youhave a northern or southern strategy. Despitethe rivers, this is the most open terrain, theplace where your mechanized advantagescome most into play. It is beneficial alsobecause it can be used to launch either asouthern or northern campaign. Its draw-back is that it is more remote from eitherMoscow or Stalingrad. Therefore, you mustbe prepared to accept casualties initially toopen up the front so your mechanized unitscan get going. Once they get rolling, goahead and forced march the infantry to keepup - continuous pressure is the only thingwhich can keep the Soviet forces fromreestablishing a sound defensive line.
Kharkov-Sea of Azov: Here you will need totake Rostov, Voroshilov, and Sevastopol,unless the Soviet reinforces Sevastopolheavily. If you are going for the southernP.c.'s, you must avoid overconcentration inthis sector; it can be a fast way to an eventualloss. Forces must start north of Kharkov tospread the defense, or outflank it if it is notspread. Every once in a while, you will have achance to take Stalingrad when it is not yourobjective. It will generally pay you to do so,but only as a "raid", not attempting toestablish your line there, but putting anisolated force there to draw Soviet attacks byacting as a threat to Soviet communicationsas well as by occupying a P.c.
SOVIET TACTICSWith the total strength odds 2-1 against you,(Axis 1000+ Combat Factors with 300 mech.factors; Soviet 540+ Combat Factors with200+ mech.), you must be thrifty in yourdeployment. The primary way you have toincrease your effective defensive strength isthrough fortification, both through its ownstrength and through its doubling effect forinfantry.
The Infantry/Fort CombinationBasically there are two kinds of InfantrylFort Combinations (henceforth called IF'sfor brevity). Depending on the type ofinfantry corps used, they will have 11(4-4Corps), or 13(5-5 Corps) Defense StrengthPoints. Many variations are possible throughadding various third units to the IF types.
The 11 Point IF has several unique andunfortunate vulnerabilities. If they areallowed for, however, the IF can still form abulwark of defense, and it must, as you have30 4-4's and only 25 5-5's. In looking at anySoviet defense, the following numbers must
be kept in mind - German infantry = 24factors per stack, German Armor = 40factors per stack.It's vulnerabilities are:1. Its infantry component cannot movethrough Zones of Control. This prevents theinfantry corps from pulling out whensurrounded, and makes it unable to shiftdown the line to fill a gap (see below). It istherefore easily trapped if placed on thecorners of positions, and it is not flexible inplugging gaps in the line.2. When used in an AIT role (with a 0-1-10unit), the combination has exactly 12 factors,exactly divisible by 24.
Normally, as in Illustration IV, these IF's arebest used in the reverse corners of lines, orbehind rivers in nearby unassailable posi-tions. Another place to use these IF's arehexes which you know will be attacked, sincethe vulnerabilities only relate to reactionability, not to defense ability. If you must loseIF's to exchanges, it is best to have them be11 Point IF's.
Where German infantry are around, youcan get acceptable results by adding a 2Point third unit, yielding 13 Points. Whenarmor units are present, a 3-5 third unit isessential, as 3 x 14 = 42, not 40. Wherepossible, the ideal combination to hold themain thrust would be an 8-6 or 9-6 for thethird unit; unfortunately, even the 9-6 leavesa total defense factor of 20, providing easyattainment of odds.
Another good use of these units is on theflanks of the Axis main drives. The units aretoo large to destroy easily,_ and yet theirZOC may be such an irritant that thisdiversion becomes necessary.
The 13 Point IF avoids most of thedifficulties of the 11 Point IF. The 13 PointIF with a 0-1-16 is a nearly optimumcombination. Where it is placed in a line soas to be assailable from only two hexes, thisunit can be attacked at no more than 3-1odds. I will usually use this combination inthe woods in front of Moscow, as it saves thelarge mobile units for use in the open.
Another place for the 13 Point IF is atcorners. If the position becomes compro-mised, the infantry can pull out, and theremaining fort unit will usually but the
Illustration IV
infantry corps a turn's grace to escape. Thisis an advantage common to all IF's - theirFort unit can be a 1 Turn shield allowing theinfantry to escape.The 13 Point IF does not especially benefitfrom a 2 or 3 factor helper, since these do notmaterially affect the odds which can beobtained on the IF. A 1 factor unit can behelpful against armor even if it is not an AITunit. Especially good is the effect of an 8-6 or9-6, both of which produce a stack with over20 factors, allowing armor no more than a3-1 from two hexes.The "mini" IF is composed of two Soviet1-4's, one of which is fortified. The usualreason for its existance is the fact that theSoviets get two 1-4's per turn, and often haveno other infantry to assist in digging in.However, there is benefit to using them thisway, since the most important thing that aFort unit lacks is a ZOC, and the infantrydivisions can give it that. Where there are noextra 1-4's, consider using something else, a1-3 or 2-3 for instance, so that thecombination will still have a ZOc. The Axisbreakthrough, when it comes, can be sudden,and it is beneficial for your rear area units tohave ZOC's to delay penetration, and toprevent forced marching infantry fromclosing with them.
The Mechanized Corps; [8-6 & 9-6]These are the only units able to stand up tothe Axis and survive. I generally committhem to screening on Turn One, and thendispatch them to particularly threatened IFpositions. You should be particularly carefulto avoid any situation where the Axis canachieve 4-1 or better on your mechanizedcorps. You have very few af them and noreplacements, so circumspection is indicated.You want, if possible, to save these units forthe counterattack, but you may have tocommit them piecemeal, or you may find itnecessary to make an early counterattack,which will involve these units almostcertainly.
The FillersUnfortunately there aren't enough infantrycorps to make all IF's in your line, and youare faced with providing fillers. The bestplaces for these small stacks are behindrivers where the attack can come from onlyone hex, or other places where only one hex isavailable to attack.

Single 0-3-0 Fort units also fall into the"Filler" category, but their unique vulner-ability to retreat results makes it inefficientto place them as fillers where they are likelyto be attacked. Conversely, their ability tobecome IF's when combined with an infantrycorps, can make them especially valuable asfillers in positions which have potential as IFsites.
The Anti-Tank Units: [0-1-10]These are also in limited supply, but theyhave the compensation of a high MovementAllowance and you get one per Turn asreinforcements. A useful tactic with the AITunits appearing as reinforcements is torailroad them up to a position and leavethem entrained if need be to get the extra RRMovement Points. The resultant halving oftheir single point is not so important ashalving those German 1O-8's and 8-8's.
Generally, the AIT units will be found infront of Moscow, and with the mechanizedscreening units on Turn One. As the gameprogresses, they will gravitate towards thethreatened sector, and if they have beenhusbanded, they will begin to take the stingout of the Axis armor. (They had better,because your line will probably be weaker atthis time.)
One problem with them is their unusualmovement sequence. The defensive effect ofthis has already been mentioned, as regardsretreats, but an additional problem relates tocounterattacking; you must plan in advanceto get the AIT units out of the way to put inunits that can attack, but you mustremember not to leave the hex that they haveleft too weak (generally only a mechanizedunit can fill in after them).
FRONT NOTESLeningrad-Finnish Border: The border northof Leningrad should be held as lightly aspossible; 1-3's below the winterline, and asmattering of 1-4's north of it, with one 4-4and a 0-3-0 in Murmansk. All units shouldspeedily pull out of "old Finland" topreclude any attacks by Finnish units.Eventually, the Finns will be released, butthere is little of value in the north except forMurmansk, and the weatherline is its bestdefense.
In this scenario, you cannot save Leningrad;the only question is how much to commit toits defense. The best you could do on hexNW3712 is one 13 Point IF plus a 0-1-10, orplus another 5-5. Hex 3812 is completelygone; any hex which the Axis can attackfrom four hexes is gone!
With the 0-1-10, you have 14 Points, whichthe Axis can attack easily at 2-1 withoutcommiting all of his infantry; even a Br willwin him the positicn, since the only unitwhich will be able to get back to the hex nextturn will be 0-1-10 (all of the units beingunsuplied, and all of the hexes in the pocketbeing in Enemy ZOC's).
With the extra 5-5, some Axis armor isneeded, but the result is exactly the same,
except that this time no Soviet units can getback in the hex.
Therefore, I usually will just put one 0-3-0 inhex NW3812, and an 11 IF in hex NW3713,with miscellaneous small units to fill out thepocket. The 11 IF will keep the Axis busyand has a chance for an AEx, but it ties upfewer of your good infantry corps.
Volkhov Front: This is a front all too oftengiven short shrift by the Soviet Player. Ifstoutly defended it can be a considerableobstacle, but if carelessly handled, it can berapidly penetrated. This penetration canhave severe effects, as there are no defenselines short of Moscow once the Volkhov andits swamps and forests have been pierced.The defensive situation is nearly optimum,with units able to benefit from both riversand swamps, which means that less thanwonderful units can be used to good effect.
This is perhaps the one area where theSoviets might attack early. Should the Axis'leave the bridgehead hexes very lightlydefended, say one or two factors, a high-oddsattack on them is indicated. I will sometimesplace one 8-6 in the area to power such anattack if it occurs.
The real weak point of this front is at itssouthern end, between Lake limen and LakeSeliga. Successful attacks here can roll upthe Volkhov line or outflank it, so care mustbe exercised - always remember to use the2-3 cavalry corps here rather than the 2-5's,because the absence of a ZOC in the woodscan be a critical defect for them. However,some of the 2-5's and 3-5's should beavailable behind this front if the Finns havemuch force near the Svir river line, toprevent its rapid collapse and the resultantoutflanking of the Volkhov from the north.North Moscow Front - Lake Seliga toSmolensk: This front contains the only directcorridor to Moscow which crosses no riverlines, and consequently it must receivecareful attention. Generally you should planon two lines of forts, at least, in this area,except for the Volga Line.
As previously noted, you should abandon thelarge salient which you hold in this front, asthe terrain is not valuable enough to offsetthe large amount of force required to hold it.Where possible, you should use units whichcan withdraw to the safety of the Volga line;don't hesitate to forced march them toaccomplish this.
Key terrain in this region is the forest in frontof Moscow. You should hold this as long aspossible, as it keeps the Axis armor out of thebattle; or, if it is committed, severely limitsits mobility. Generally, this area is defendedby IF's, with 13's in the forest and l1'sbehind the Volga. Should a major attack bemounted in this area, it is the most easilyreinforced part of the front, since Moscow'sexcellent rail network is so close.
South Moscow Front - Smolensk to Kursk:Here is where the Axis armor will often beencountered in force. Maximum use must bemade of the river lines in the absence of other
13
terrain. Fortification must be at the maxi-mum possible initially, and must be pursuedwith reinforcements as soon as they areavailable.
The comments about the rail hexes atSW0925-1024 for the Axis are worthy ofnote. If the Axis persists in inflexibly goingfor this one objective, he should be opposedby strong IF's and by mechanized forces withAIT protection. Your aim should not be somuch to hold the hexes indefinitely, as todelay the eventual Axis seizure of them.
Where the Axis forces, especially theirarmor, are attacking your strongpoints, youcan form a rough gauge of how well you aredoing by seeing how often the Axis isattacking at 4-1 or better odds. If the oddsare consistently 3-1 or less, he will not becausing you severe damage, though he maybe gaining ground.
In this area, channeling the offensive isespecially important because there are fewnatural channels once the Don River line isbreached. Astute use must be made of strongIF's and mechanized AIT forces on theshoulders of breakthroughs to keep themfrom expanding. In this area, also, if only oneside of the break can be held, make it thenorth side. The threat to Moscow's RRcommunications is always present, and youcannot afford to ignore it.
Ukraine Front - Kursk to the Sea of Azov:The only time a major push will be madehere is if the Axis have a southern strategy;otherwise you can expect only a subsidarypush. Here again you have some outstandingdefensive terrain, where both rivers in theextreme south will give at least one turn'snotice of Axis armored thrusts. The only flawin this sector is the gap between the Chir andDon Rivers (SW2222, 2122), but this isremote from Krasnodar, though on a linewith Stalingrad.
Should a major push come through thisregion, you should attempt to hold firm onthe lower Don (the swampy sector), and fallback from the Chir to the Don further north.With both Rivers and swamps, and no cornerpositions, you can make penetration beyondRostov very expensive, and you can hold upsupply for a drive on Krasnodar so that thewinter isolation of the Axis, if they take it,will be assured.Kerch and Sevastopol: These sectors aresomewhat "iffy"; often the Soviet Player canget by with very little here, and yet sometimesmuch more is indicated. Against a carelessAxis Player, you can sometimes move the 1-4out of Sevastopol on Turn One and ship inanother corps, precluding better than 1-1odds, and that not until Turn Four.
ATTACKINGThe Soviets generally have to attack; acompetent Axis commander will almostalways take enough P.C.'s to win; thequestion is whether he will be able to holdthem.The Soviets, because of their handicaps(discussed in the Axis notes) must be
[continued on page 17]

Stalin grad Tactics[continuedfrom page 13)
prepared to take chances. They must gettheir Forts and A/T units out of the sectorswhere the attacks will come as soon aspossible, even though this can increasevulnerability to attack. They must also gettheir RR repair units up to the front even if itis risky; with their short supply radius, theymust keep the rails repaired.
Another risk that is worth it is to place yourartillery corps on the "corners". This meansthat the Axis will have to pull back from fiveor more hexes to avoid its effect. Often,especially in MUD, this will not be possible,and you will have a choice of targets.
Aside from your 5 10-1-1O's, you haveeffective use of about 6 or 7 new 8-6's andmany 2-5's and 3-5's. All of these have rolesto play, along with whatever of your originalforce is left. [As regards your original force,don't throw away those 1-6 B.G.'s, they canhelp to combine with others to reform 8-6'sand keep your offensive going.] The smallunits can help in factoring up to odds, andare great loss absorbers. The larger unitssupply the power, and their B.G.'s canreform into new units - in this scenariothat's all they are good for, but it isimportant and often overlooked.
Your choice of odds will vary much morethan the Axis Player's, depending on thestate of your army; generally you will acceptexchanges more if you have the units toabsorb them, and less if you don't, butalmost always you'll accept 1/2Ex results. Youmust always remember that even in winteryou can be displaced by the Axis, so you needone hex beyond your objective to be sure of it,since the Axis Player goes last in the game.
Also, you must be more direct than the AxisPlayer; you lack the high mobility and theorganization to make grand encirclements,though you should always try to cut supply ifpossible. Often your attacks will procee.dalong RR lines, or parallel to them, and thiswill provide the Axis with clues; but by Turn70 or so he should not be able to massextensively without completely denuding hisline somwhere else.
Though they are often in non-strategicpositions, you should consider attacking theallies, primarily because they do not formK.G.'s, and can thus create an exploitablebreach suddenly.
Before the supply restrictions in Moves 17,an excellent tactic was to use your A/T unitsto exploit; they can still accompany yourother units exploiting, but usually not toofar. They are excellent units to use becausetheir loss is unimportant, and because the #4CRT is replete with exchanges at even thehigher odds.
SUMMARYThe best feature of this scenario is that eachPlayer gets to "do his thing" in the mannerthat marked the War in the East; each Playergets to utilize all of the types of forces that hewould have in the Campaign Game, and touse them under conditions ranging fromcomplete Axis ground and Air superioritythrough conditions just the reverse.
Overall, my experience gives the Axis a slightedge, mainly because they can adopt a morerational and strategically-minded campaignthan they did in actuality. However, thebalance is quite delicate, and only very smalladjustments can materially affect it.
One quick variant assumes that the Sovietshad more sense than to launch their MayIsum offensive, which played right into thehands of the Axis. In this scenario, the startis moved back to Turn 52, and all of the unitsappearing in the Soviet O.B. are consideredto be full-strength units; additionally, theAxis must select four RR hexes (the mostadvanced) and remove their railheads fromthem (they haven't been repaired yet). TheAxis receive no reinforcements or DraftPoints on Turn 52, while the Soviets get thesame as they normally get on Turn 53.
All in all, this is the best scenario to play toprepare for the Campaign Game, even if theCampaign Game itself produces nothing likeit. ••