standardized procedures for the measurements of … · localisation acuity involves discriminating...
TRANSCRIPT
1
VINCENZO DI SALVO
STANDARDIZED PROCEDURES FOR THE MEASUREMENTS OF VISUAL ACUITY AND
VISUAL ACUITY CHARTS
A REVIEW
CETAV CENTRO DEGLI STUDI PER IL TRATTAMENTO DELLE ANOMALIE DELLA VISTA

2
Vincenzo Di Salvo
STANDARDIZED PROCEDURES FOR THE MEASUREMENTS OF VISUAL ACUITY AND
VISUAL ACUITY CHARTS
A REVIEW
2006 - All Rights Reserved

3
INDEX Abstract 1. Introduction 2. Specification of Visual Acuity 2.1 Gradation and Range in Size of Optotypes (MAR and Snellen Notation) 2.2 Stimuli Types 3. Measurement Instrumentation: Eye Charts 3.1 Spacing of Optotypes 3.2 Number of Optotypes of a Given Size 3.3 Test Distance 3.4 Light Source, Luminance Level and Target Contrast 3.5 Standardized Eye Charts 4. Psychophysical procedures and Method of Scoring Appendix I – Geometric and Arithmetic Progression Bibliography

4
Abstract The author reviews the main aspects related to the standardized psychophysical procedures for the measurements of visual acuity and the design of visual acuity charts. The procedures for visual acuity level assessment, in both distance and near tests, the notation employed in optotype charts and the standardized eye charts are taken into account. 1. Introduction The measurement of visual efficiency is an essential part of the ophthalmologic examination. It represents the most common and useful test for assessing visual function. Visual acuity measurements serve many purpose. It may be used to determine the lens correction associated with ocular defects, to study the physiological status of the individual in order to investigate the effect of various stressors, to asses the effect of medical or surgical therapy. The specific need for standards is to perform a reliable and reproducible measure by more than one examiner in different places. Based on the physiology of the human eye it can be distinguished four fundamental types of visual acuities: DETECTION ACUITY. The task of the visibility acuity is to expresses only the possibility to perceive the existence of an aspect of the stimulus without necessarily recognize its shape. Because the existence of a dark object on a white background can be perceived it is necessary that at least one receptive retinic unit comes stimulated from a light intensity different from that distributed on the surrounding retina. This depends on two main factor. The light difference must be over the threshold of the contrast sensitivity and the object size should be comparable with the receptive retinic unit. Otherwise the presence of the object can not be perceived. Therefore a measure of the visibility acuity translates in a surveying of the retinal contrast. To the contrary the visibility of a white object on a dark background does not depend from the size of the objects but on theirs brightness. For this reason we can see the stars in the night.
(A) (B)
Figure 1. (A) Bright test object on a dark background. (B) Dark test object on a bright background.
RESOLUTION ACUITY expresses the possibility to detect a target having two or more parts (a pair of dots, a grating or a checkerboard) - figure 2. The optical factors that influence the resolution acuity can be better highlighted considering the width of the point spread function of two separated objects.
5
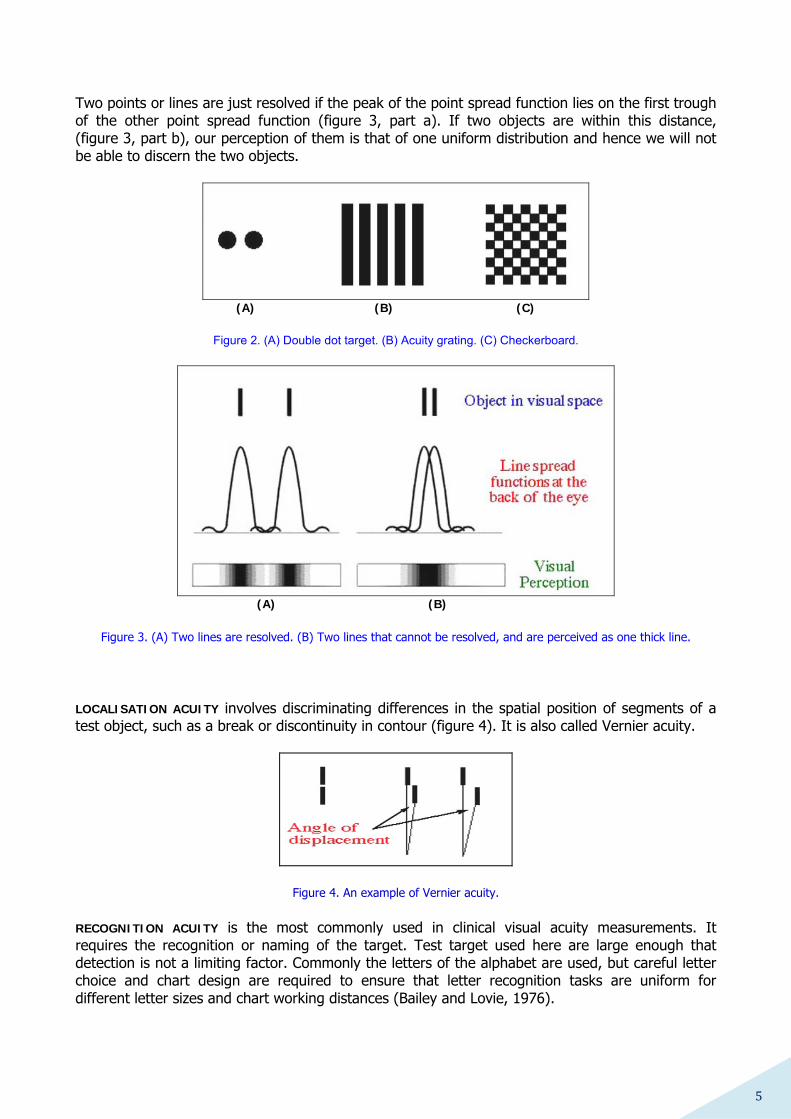
Two points or lines are just resolved if the peak of the point spread function lies on the first trough of the other point spread function (figure 3, part a). If two objects are within this distance, (figure 3, part b), our perception of them is that of one uniform distribution and hence we will not be able to discern the two objects.
(A) (B) (C)
Figure 2. (A) Double dot target. (B) Acuity grating. (C) Checkerboard.
(A) (B)
Figure 3. (A) Two lines are resolved. (B) Two lines that cannot be resolved, and are perceived as one thick line.
LOCALISATION ACUITY involves discriminating differences in the spatial position of segments of a test object, such as a break or discontinuity in contour (figure 4). It is also called Vernier acuity.
Figure 4. An example of Vernier acuity.
RECOGNITION ACUITY is the most commonly used in clinical visual acuity measurements. It requires the recognition or naming of the target. Test target used here are large enough that detection is not a limiting factor. Commonly the letters of the alphabet are used, but careful letter choice and chart design are required to ensure that letter recognition tasks are uniform for different letter sizes and chart working distances (Bailey and Lovie, 1976).
6
2. Specification of Visual Acuity In 1861 Donders defined visual efficiency as “the ratio between a subject’s performance and a standard performance” in distinguishing details of a specified test stimulus. The measure concept of visual acuity presupposes the presentation of some visual stimuli targets to the patient and the consequent recording of an answer that assesses the acknowledgment of the introduced stimulus. Attempts to specify visual efficiency in quantitative terms, it is need to define:
• a physical quantity • a unit • a reference sample
PHYSICAL QUANTITY - The physical quantity employed to measure the visual efficiency is the visual acuity. Because a subject with “standard” vision can resolve details of a specified test stimulus subtending a visual angle of 1' (minute of arc) at the viewing distance, the visual acuity is defined as:
visual acuity = 1/MAR at testing distance
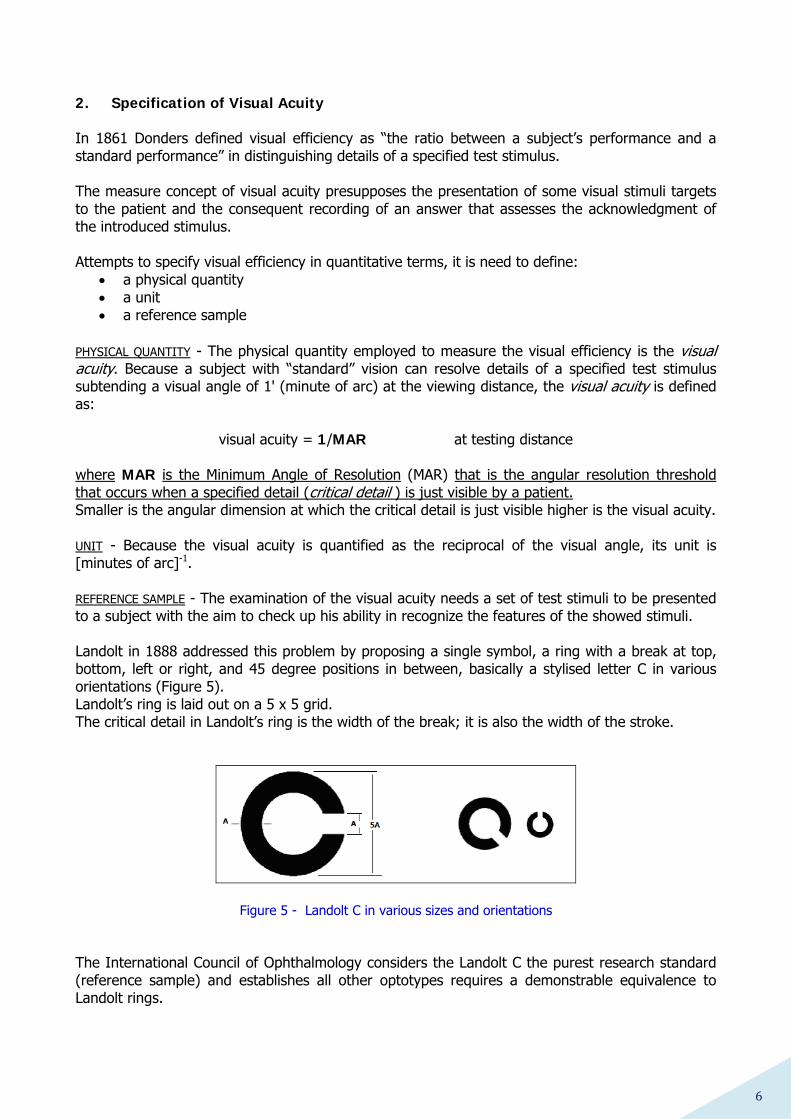
where MAR is the Minimum Angle of Resolution (MAR) that is the angular resolution threshold that occurs when a specified detail (critical detail ) is just visible by a patient. Smaller is the angular dimension at which the critical detail is just visible higher is the visual acuity. UNIT - Because the visual acuity is quantified as the reciprocal of the visual angle, its unit is [minutes of arc]-1. REFERENCE SAMPLE - The examination of the visual acuity needs a set of test stimuli to be presented to a subject with the aim to check up his ability in recognize the features of the showed stimuli. Landolt in 1888 addressed this problem by proposing a single symbol, a ring with a break at top, bottom, left or right, and 45 degree positions in between, basically a stylised letter C in various orientations (Figure 5). Landolt’s ring is laid out on a 5 x 5 grid. The critical detail in Landolt’s ring is the width of the break; it is also the width of the stroke.
Figure 5 - Landolt C in various sizes and orientations The International Council of Ophthalmology considers the Landolt C the purest research standard (reference sample) and establishes all other optotypes requires a demonstrable equivalence to Landolt rings.

7
2.1 Gradation and Range in size of optotypes From an operating point of view the measure of the visual acuity is addressed to give answer to the following question: « until which distance the patient sees ? ». In other words: « until which distance the patient is able in distinguishing details subtending a visual angle of 1 minute of arc ? ». Theoretically speaking, one single optotype (subtending 1 min. of arc at 4 meter that is the optical infinity for the human eye) shown at different distances would be sufficient in order to detect different angles of vision over which the vision losses (figure 6). Then apply the right correction.
Figure 6 – objects of same size subtend different visual angle Even if valid, this procedure is practically tedious and cumbersome because it needs of wide space. Clinically is more useful to vary the angular dimension of the optotypes and maintain a fixed distance for testing. To do this is necessary to compute in which way the linear and angular size of optotypes changes in between with distance. Giving a look at fig. 7, the formula:
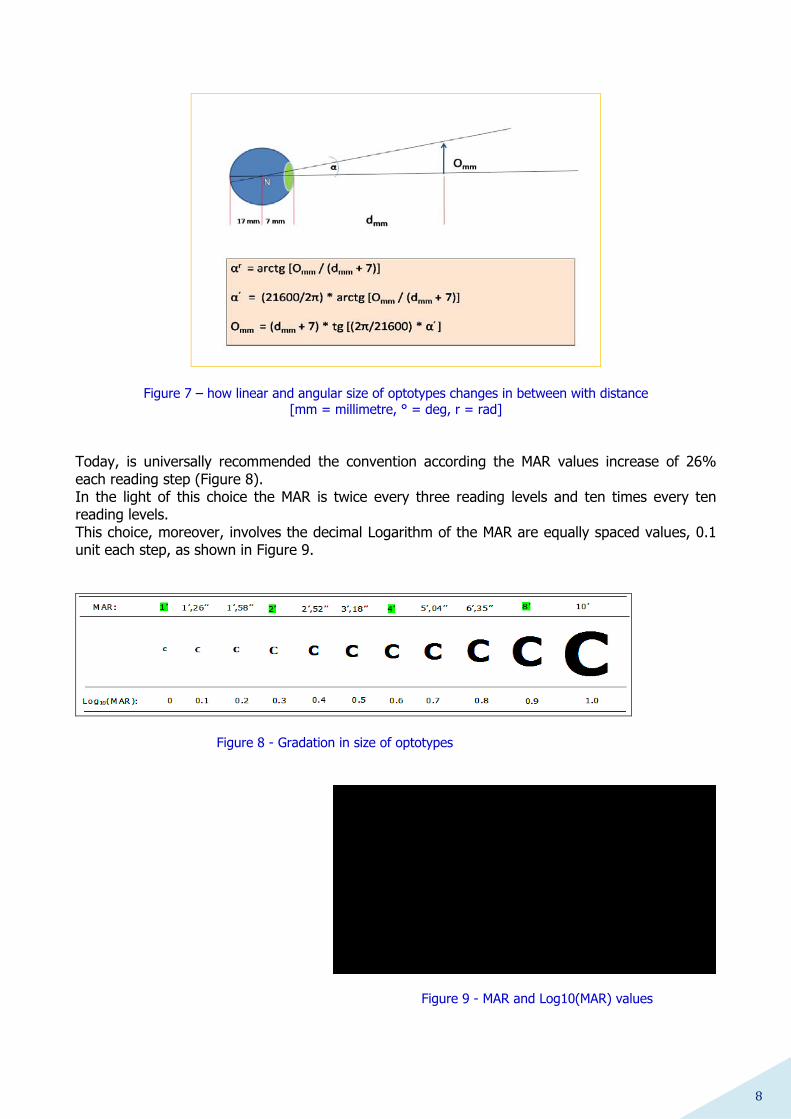
Omm = (dmm + 7) * tg [(2π/21600) * α‘ ] shows how the size of the optotype Omm varying with the tangent of the angle of resolution α‘ and is proportionally with the distance from the eye dmm. Fixed the distance dmm it gives the size of one optotype at several visual angles α‘. All the measure are in mm, α’ = 60° * α°, α° = (360/2π) * αr. At this point another question needs of an answer: in which sequence optotypes should be changed ? An universal assent exists today on the necessity that the MAR of two consecutive optotypes follows a constant ratio. In this way, the same psychological sensation is produced and the measure of visual acuity meets the Weber’s Law, which affirms that:
to obtain the same change of a psychological sensation is necessary that the entity of the stimulus proportionally changes with the stimulus itself.
8
Figure 7 – how linear and angular size of optotypes changes in between with distance [mm = millimetre, ° = deg, r = rad]
Today, is universally recommended the convention according the MAR values increase of 26% each reading step (Figure 8). In the light of this choice the MAR is twice every three reading levels and ten times every ten reading levels. This choice, moreover, involves the decimal Logarithm of the MAR are equally spaced values, 0.1 unit each step, as shown in Figure 9.
Figure 8 - Gradation in size of optotypes
00,20,40,60,8
11,2
0 5 10 15
Log10MAR
MAR
Figure 9 - MAR and Log10(MAR) values

9
visual acuity scale in decimal notation The visual acuity scale in decimal notation is shown in Figure 10. MAR: 1’ 1’,26’’ 1’,58’’ 2’ 2’,52’’ 3’,18’’ 4’,00’’ 5’,04’’ 6’,35’’ 8’,00’’ 10’,00’’
V.A. : 1 0,79 0,63 0.5 0.4 0.3 0.25 0.2 0.16 0.125 0.1 Log10(MAR): 0 0,1 0,2 0.3 0.4 0.5 0.6 0.7 0.8 0.9 1.0
Figure 10 - visual acuity scale in MAR notation
If V.A. = 1 is considered 100% visual efficiency, a person with V.A. = 0.5 reads details that are twice the size of the details at V.A. = 1. However, it does not mean 50% vision since 0.5 sounds like it is one half of 1. V.A. = 0.5 is the 70% efficient, as signalling by LogMAR scale. LogMAR measures visual acuity loss; large values indicate a vision loss, while small or negative values denote normal or better visual acuity. visual acuity scale in Snellen notation Snellen notation is the most widely used notation format in all English-speaking countries. Using the standard to express the visual acuity levels as the ratio between the test reading distance (m) and the distance at which the average eye can distinguish the width of the critical detail subtending 1 minute of arc (M):
and visual acuity is in [minutes of arc]-1 (Figure 11).
Figure 11 - distances at which the width of the critical detail subtends 1 minute of arc The visual acuity scale in Snellen notation is shown in Figure 12.

10
V.A.: 20/20 20/25 20/30 20/40 20/50 20/66 20/80 20/100 20/125 20/160 20/200
Figure 12 - visual acuity scale in Snellen notation
20/20 means that the eye being tested can read a detail which subtend a visual angle of 1' when it is 20 feet away. If a person sees 20/40, at 20 feet from the stimulus that person can read details that a person with 20/20 vision could read from 40 feet away. The 20/40 details are twice the size of 20/20 details. However it does not mean 50% vision loss. If 20/20 is considered 100% visual efficiency, 20/40 visual acuity is about 70% efficient.
Discussion. In Europe there is a strong tendency to convert the Snellen ratio to the decimal metric system (decimal acuity). So, 6/6 means that the eye being tested can read a detail that subtend a visual angle of 1' when it is 6 meter away. In Italy, a further approximation is carried out by transforming the decimal metric acuity into a decimal ratio, where 1 (10/10) means 6/6 (or 5/5 or 4/4 or 3/3, etc.) acuity, and 0.1 (1/10) means 6/60 (or 5/50 or 4/40 or 3/30, etc.). The Working Group 39 does not favour the use of decimal notation. Both the decimal acuity and the decimal ratio allow direct comparison of visual acuity results performed 3, 4, 5 and 6-meter away, but they represent an improper use of the Snellen ratio. Decimal acuity may be confused with both the Snellen&Sterling percentage of visual efficiency (performance) and the MAR values.
Figure 13 - Conversion for LogMAR, Snellen (ft), Snellen (m) and Decimal

11
2.2 Stimuli types Many test stimuli have been developed and are in use today. They are usually called optotypes and could be grouped in few category. The most common stimuli used in visual acuity measurement are the Roman alphabet letters, but Arabic digits and stylised symbols, such as gratings, are also diffused. In the case of letters, the critical detail is defined to be the width of the stroke. However, they present many flaws to be used as reference. Not all of them are equivalent in recognition difficulty. Many imponderable factors play an ambiguous role into the identification of a letter. In fact, some letters, such as A and L are relatively easy to recognize but there are more difficult ones such as B. Again, F and P can be mixed near the limits of resolution. Also D can be confused with G, O, Q. Thus, the recorded visual acuity depends on the difficulty of the letters. Louise Sloan in 1959 devised a set of 10 optotypes without serifs: C, D, K, H, N, Z, R, S, V, O which are laid out on a 5 x 5 grid (Figure 14).
Figure 14 – Specification for Sloan letters
Sloan optotypes are substantially equivalent to Landolt rings in terms of recognition difficulty. The degree of difficulty of Sloan letters is shown in Figure 15.
Figure 15 - Degree of difficulty of Sloan letters
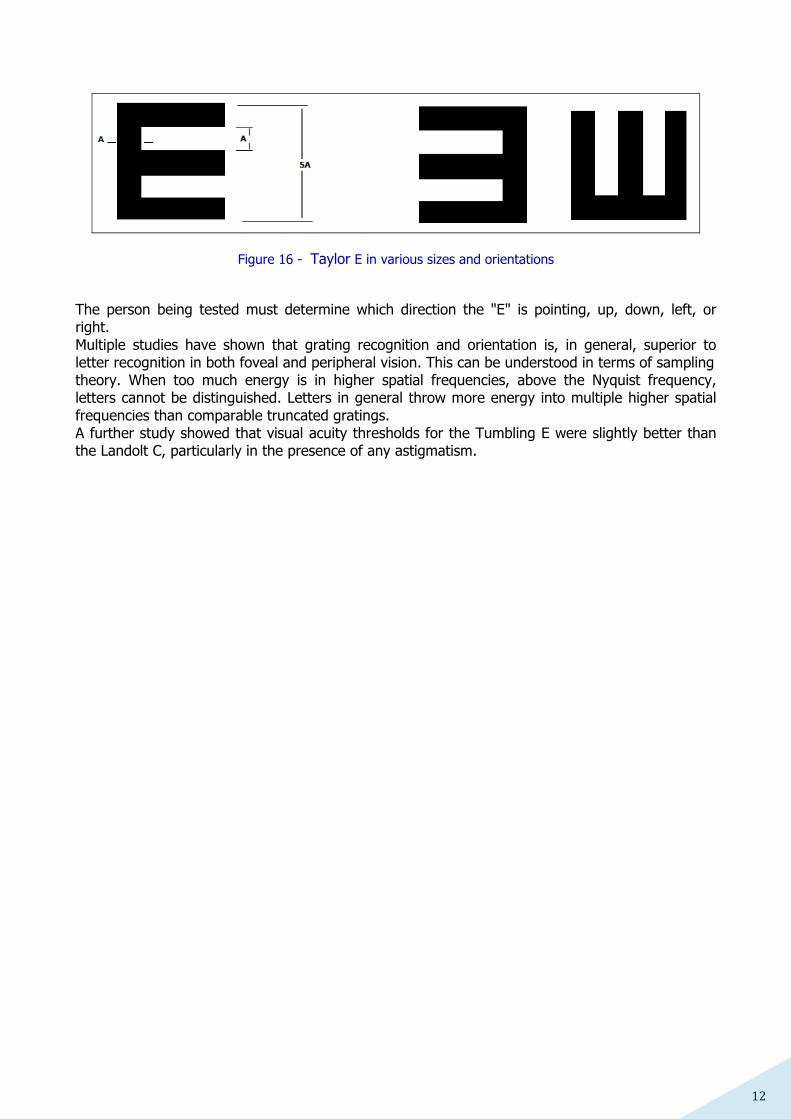
In 1968 a British Standard was approved by the Ophthalmic Standards Committee. For this the selection of non-serif letters is: D, E, F, H, N, P, R, U, V, Z, laid out on a 5 x 4 grid. In 1976 Taylor created and used a single optotype, a stylised letter E, in various orientations to test visual acuity of Australian Aborigines. This has become standard for testing of illiterates and populations not familiar with the Roman alphabet. Taylor’s E’s are basically a truncated grating with three bars laid out on a 5 x 5 grid (Figure 16).
12
Figure 16 - Taylor E in various sizes and orientations
The person being tested must determine which direction the "E" is pointing, up, down, left, or right. Multiple studies have shown that grating recognition and orientation is, in general, superior to letter recognition in both foveal and peripheral vision. This can be understood in terms of sampling theory. When too much energy is in higher spatial frequencies, above the Nyquist frequency, letters cannot be distinguished. Letters in general throw more energy into multiple higher spatial frequencies than comparable truncated gratings. A further study showed that visual acuity thresholds for the Tumbling E were slightly better than the Landolt C, particularly in the presence of any astigmatism.

13
3. Measurement Instrumentation To check up visual acuity eye charts has been devised. Eye charts consist of high contrast optotypes printed on white flat polystyrene panel and on consecutive rows, critical detail decreasing in dimension for each row. Today, lcd monitors or the visual field of a projector are also used. In 1862, a Dutch Ophthalmologist, Dr. Hermann Snellen, devised his eye chart. A copy of the Snellen chart is shown in Figure 8. The Snellen eye chart included only 9 letters with strong serifs: C, D, E, F, L, O, P, T, Z, with the largest at the top. As the person being tested reads down the chart, the letters gradually become smaller. In spite of its wide diffusion the chart organization shows several limitations for standard measurements. Snellen’s optotypes are easy to distinguish, although F and P can be mixed near the limits of resolution. Again, the irregular progression in letter size; the scale of the measure is not the same over the entire extension of the chart, so that the gain or loss of one line does not have the same value in different parts of the chart.
Figure 8 - Snellen Eye Chart

14
3.1 Spacing of Optotypes Optotypes must be quite far apart to avoid the «contour interaction», also called «crowding effect» or «border interference». Interaction free acuity may be measured with isolated characters. However, for practical reasons the optotypes are presented to patient, grouped on eye charts. Because the strength of the crowding effect varies as a function of the distance between the optotypes, NAS-NRC recommends that the acuity may be assumed equal to that measured with isolated characters if: • the distance between adjacent borders must not be less than the width of an optotype, • the distance between lines must not be less than the height of the larger of the two sets of
optotypes. The purpose of setting a lower limit to the spacing is to minimize the effect of contour interaction, however there may be instances in which it is desirable to show how the seeing of a patient is affected by such phenomena, but in this event special more appropriate tests are used. 3.2 Number of Optotypes of a Given Size NAS-NRC recommends ten optotypes divided into two rows of five. Because the different reading identification of letters, the set of letters used on each line of a chart should have similar average legibility and similar number of confusion pairs. 3.3 Test distance Adoption of 4-meter from the spectacle plane is recommended by Working Group as the standard testing distance. There are a number of reasons why this is preferable. • This choice helps examiners to easily find available space for exam. • The subtraction of 0.25 diopter from the spherical component of the refractive correction
found at 4-meter solves the problem of obtaining maximal acuity for distances approaching infinity.
3.4 Light Source, Luminance Level and Target Contrast The standard optotype are to be black on a white background. It is recommended that the with background extend at least 1° beyond the array of optotypes used in the test. It is desirable that the luminance be 85±5 cd/m2 and that the optotypes have a contrast of at least 0.85.
3.5 Standardised Eye Charts The Snellen Chart with Sloan optotypes

15
The modern versions of the Snellen chart use Sloan optotypes (Figure 9) and remains the common standard in schools, businesses and optometrists’ offices. The letter spacing on each row is equal to one letter width. Likewise, the row spacing is equal to the height of the letters below. This helps to ensure equal contour interaction. Each line is carefully arranged to have a mixture of letters containing the same average legibility. This could be shown determining the line-difficult score by averaging the letter-difficulty scores. Specification of size of optotypes and number of characters of each line are:
Figure 9 - Snellen Eye Chart with Sloan optotypes
The Bailey-Lovie and Ferris Charts Of all the alternative designs that have been proposed, a chart originally developed by two Australian optometrists, Ian Bailey and Jan Lovie-Kitchin, has emerged as the preferred alternative (figure 10a).

16
The Bailey-Lovie chart employs the letter set specified in the British Standard: the letters are laid out on a 4 x 5 grid. The letter spacing on each row is equal to one letter width. Likewise, the row spacing is equal to the height of the letters below. This helps to ensure equal contour interaction. The letter size follows a logarithmic progression, increasing in 0.1 logMAR steps.
* * * The chart introduced by Ferris (figure 10b), which modifies the Bailey & Lovie chart, shows five Sloan optotypes per row and a regular progression of the type size and spacing, following a logarithmic scale in steps of 0.1 log units. The use of five letters per line necessitated a choice of a combination of Sloan optotypes in order to obtain the same mean difficulty for each line (the same average legibility).
(a) Bailey-Lovie Chart (b) Ferris Chart with Sloan optotypes with British Standard optotypes
Figure 10
Optotypes are arranged on equal lines of 5. There are 252 possible line combinations using these letters. In fact, the number of combinations is the binomial coefficient

17
where n is the number of objects from which you can choose and r is the number to be chosen. Thus, if you have ten letters and wish to choose 5 you would have 10!/(5!(10−5)!) = 252 ways to choose. Each line is carefully arranged to have a mixture of letters containing a near equal score of difficulty. 28 lines giving intermediate and near equal difficulty have been used. The ETDRS Chart In 1982, a variant of this chart, the ETDRS chart (figure 11), employing the Sloan optotypes, has become the standard. Originally, this chart was developed for the Early Treatment of Diabetic Retinopathy Study (ETDRS).
Figure 11 - ETDRS Chart with Sloan optotypes The ETDRS chart represents the major effort to introduce a standardized chart based on the recommendations of NAS-NRC, the National Academy of Science - National Research Council.
18
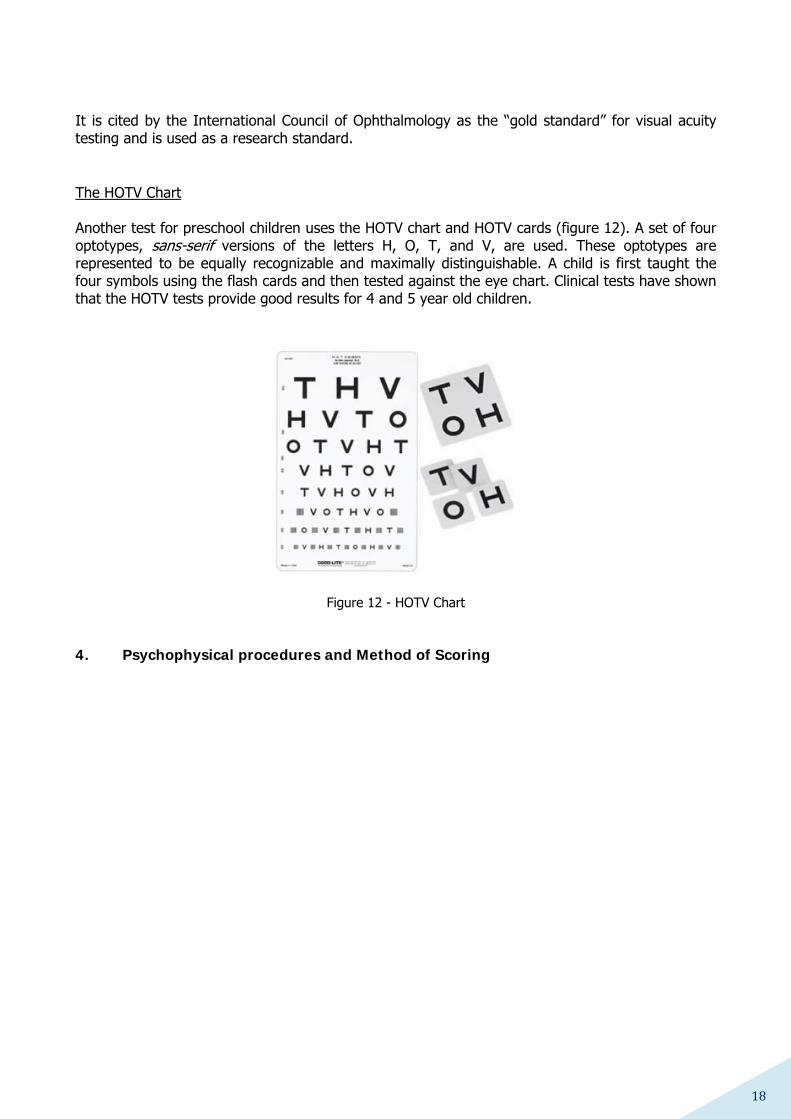
It is cited by the International Council of Ophthalmology as the “gold standard” for visual acuity testing and is used as a research standard. The HOTV Chart Another test for preschool children uses the HOTV chart and HOTV cards (figure 12). A set of four optotypes, sans-serif versions of the letters H, O, T, and V, are used. These optotypes are represented to be equally recognizable and maximally distinguishable. A child is first taught the four symbols using the flash cards and then tested against the eye chart. Clinical tests have shown that the HOTV tests provide good results for 4 and 5 year old children.
Figure 12 - HOTV Chart 4. Psychophysical procedures and Method of Scoring
19
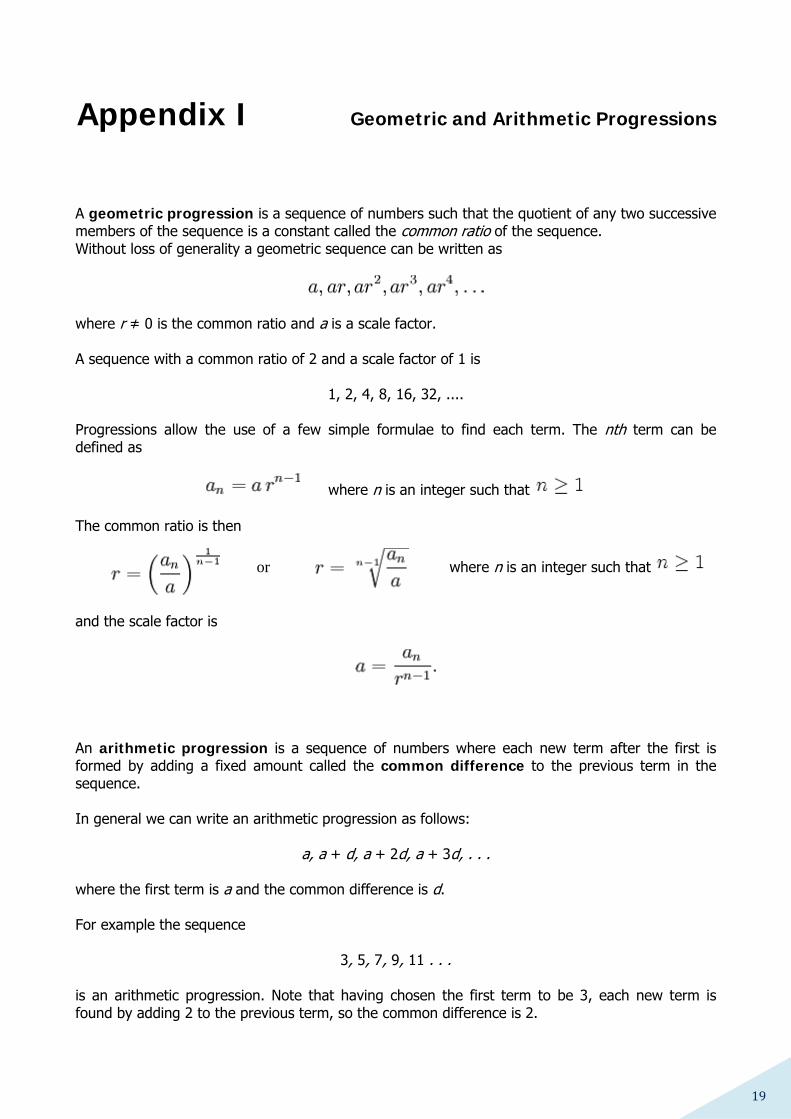
Appendix I Geometric and Arithmetic Progressions A geometric progression is a sequence of numbers such that the quotient of any two successive members of the sequence is a constant called the common ratio of the sequence. Without loss of generality a geometric sequence can be written as
where r ≠ 0 is the common ratio and a is a scale factor. A sequence with a common ratio of 2 and a scale factor of 1 is
1, 2, 4, 8, 16, 32, .... Progressions allow the use of a few simple formulae to find each term. The nth term can be defined as
where n is an integer such that The common ratio is then
or where n is an integer such that and the scale factor is
An arithmetic progression is a sequence of numbers where each new term after the first is formed by adding a fixed amount called the common difference to the previous term in the sequence. In general we can write an arithmetic progression as follows:
a, a + d, a + 2d, a + 3d, . . . where the first term is a and the common difference is d. For example the sequence
3, 5, 7, 9, 11 . . . is an arithmetic progression. Note that having chosen the first term to be 3, each new term is found by adding 2 to the previous term, so the common difference is 2.

20
The n-th term can be defined as
an = a + (n − 1)d. If a sequence of numbers is a geometric progression, the Log10 of its terms is an arithmetic progression. The MAR values can be obtained as values of a geometric progression with common ratio of
where n is the steps to obtain an optotype p times greater. If n = 3 and p =2
according with the convention that MAR values increase of 26% each reading steps.
21
Bybliography [1] G.P. Paliaga, L’esame del visus – Edizioni Minerva Medica
22
Vincenzo Di Salvo Master Degree in Telecommunications Engineering University of Pisa. From 2002 to 2008 he has been Associate Researcher at the Institute of Science and Information Technology of the National Research Council of Pisa ( ITALY ) where he investigated methods and techniques for optical holography devoted to analysis of the ocular disease. During this period he studied the relationships between ocular refraction anomalies and the neuro-semantic of the human vision, developing several optometric tests for the measure of diplopya, ambliopya and stereopsys disorders. From 2003 to 2007 he has been Contract Professor of Optical Spectrophotometry at the University of Pisa. In the 2005 he founded the CE.T.A.V. –Centro degli Studi per il Trattamento delle Anomalie della Vista- where he is Line Manager of ophtalmic equipment line.