star bright wardrobe l3939 - btx media€¦ · star bright wardrobe ... able to send you a...
TRANSCRIPT

1
Star Bright Wardrobe
A few important pointers before you start:
• Please read the instructions right through before you start, and check
separating all the hardware into piles makes it easier to be sure that everything is present and correct.
• Make sure you have the right tools. Allen keys are provided if required,
tools you need at the beginning of the instructions.
• It’s a good idea to build the unit in the room where you are going to be using it, to avoid the need to move it after it’s been assembled.
• Do not throw away any packing materials until assembly is complete, just in case you accidentally discard smaller parts or hardware.
L3939
15/07/2016
V2
easy - medium - hard two-person job
Thank you for shopping with GLTC, we hope you enjoy having this product in your home.
We know assembling furniture, toys or accessories is not everyone’s favourite way to spend their time, so we’ve tried to make assembling this item as quick and painless as possible.
Hopefully our efforts will have been worthwhile and you’ll sail through the whole process. But if it all feels a bit too much like hard work, then we do have an assembly company we can recommend: the Flatpack Construction Company offers a nationwide service and can be contacted on
2
Safety Warnings:
• Adult assembly required.
• Unassembled product contains small parts which may present a choking hazard.
• Children should be kept away from the product during assembly to avoid any possible risk of injury.
•
• DO NOT use power tools in the assembly of this product as there is a risk of over-tightening and consequently splitting of the wood.
• To avoid possible injury from tipping, DO NOT allow children to climb on the product.
• Always use the wall straps provided.
• suitable for the wall type. If in doubt, please seek professional advice.
•
• Please retain these instructions for future reference.
Customer Service:
• not begin assembly and do not use the item. Please contact GLTC Customer Services on 0344 848 6000 immediately.
• We do stock spare hardware packs at our warehouse, so we should be able to send you a replacement pack immediately if required.
Product Care:
• Wipe clean using a soft damp cloth followed by a dry cloth.
• Do NOT use cleaning products which contain ammonia, solvents or abrasive material.
• Do NOT expose the item to extremes of heat and humidity.
Could we do better?
If there is anything you think could be improved in these instructions or in the assembly of this product we’d be grateful if you could let us know; we’ll pass any helpful hints and tips on to other customers via our website and update the instructions.
All you need to do is drop us a line at [email protected]
Thank you

3
Component Check List Component Check List
A B
C
E
G
I
D
F
H
1x Upper RH Side Panel
1x Top Panel
1x LH Lower Side Panel
1x Base Panel
1x Upper LH Side Panel
2x Back Rails
1x Mid Panel
1x RH Lower Side Panel
1x Upper Back Panel
J
1x Middle Back Panel
K L
M
O
Q
S
N
P
R
1x LH Drawer Side
1x Drawer Front
1x Drawer Base
1x LH Door
1x Lower Back Panel
1x RH Drawer Side
1x Drawer Back
1x Hanging Rail
1x RH Door

4
Component Check List Component Check List
#11 #12
#13
#15
#14
#16
4x Screws25mmL
6x Hinge Base Plates
2x Runners
2x Collars
2x Anti Tip Straps
#1 #2
#3
#5
#7
#9
#4
#6
#8
24x Cam Locks14mm Diameter
16x Wooden Dowels20mmL
12x Threaded Bolts42mmL
16x Screws3.5mm Diameter x12mmL
24x Cam Dowels35mmL
2x Rail Mount PlatesNote: These plates may come connected to
Part #13, please unscrew to separate.
12x Barrel Nuts
24x Screws4mm Diameter x12mmL
26x Screws16mmL
#10
26x Screws16mmL
2x Runner Sides
1x Allen Key
Phillips Head Screwdriver
You will need (not supplied)
#17 #18
2x Screws3.5 Diameter x18mmL
6x Hinges

5
STEP 1:
Note: You will need plenty of space to build this unit as some of the panels are large.
Firstly, decide on the desired height of the hanging rail. There are two positions to choose from. The higher position offers 120cm of hanging space, the lower position offers 105cm. The illustration shows the use of the higher position.
Once the position is decided, attach the rail mounting plates to panels A & B.
Now, insert 4x cam dowels into the holes along the back edge of BOTH panels A & B.
STEP 2:
clear, the back edge of panels A & B have the groove cut out of them.
Position and connect 2x panel C with the prepared upper side panels A & B as shown.
Ensure the large drill holes on panels C are facing down so that you cannot see them.
a later stage.
TOP
BASE
B
BACK
A
BACK
C
C
Hardware for Step 1:
4x #8 12mmL Screws
2x #3 Rail Mount Plates
8x #1 Cam Dowels
#82x
#8 2x
#12x
#12x
#12x
#12x
#3
#3
A
B
TOP
TOP
BASE
BASE
BACK
BACK

6
TOP
BASE
STEP 4:
Taking the prepared top panel D, position over the top edges of Panels A & B using 4x wooden dowels (#4) and the push into place.
Insert 3x cam locks (#2) into the large drill holes of both panels A & B and turn clockwise to lock.
STEP 5:
Prepare the mid panel E.
Note the correct positions of this hardware - there are more drill holes here that will be used on the next stages.
A
4x #4 Wooden Dowels
Hardware for Step 4:
6x #2 Cam Locks
#4
#4
#4
D
B
#4
Hardware for Step 6:
6x #5 Barrel Nuts
6x #6 Bolts
4x #4 Wooden Dowels
E
#23x
#23x
Hardware for Step 5:
6x #1 Cam Dowels#13x
#13x
STEP 6:
Position mid panel E over the lower edges of panels A & B using 4x wooden dowels (#4) and then push into place.
When panel E is in place, insert 3x barrel nuts (#5) into the holes on the inside of BOTH panels A & B.
Now, insert 6x bolts (#6) into the drill holes in the outer corners and centre of panel E as shown. Tighten fully using the Allen key.
E
#53x
#53x
#63x
#63x
#4
#4
#4
#4
A
B
TOP
BASE
STEP 3:
Prepare the top panel D.
Note: The block on the underside of the panel indicates the front of the panel.
#1
#1
#1 #1
#1
#1
Hardware for Step 3:
6x #1 Cam Dowels
D
FRONTFRONT

7
STEP 7:
Prepare both of the lower side panels (G & F) by attaching the runner sides (#10). Insert the screws into the highlighted positions & ensure the stopper on the runner side is positioned at the back edge of the panels.
NOTE: The back edge of the panel is the one with the groove along it.
STEP 8:
Position the lower side panels F & G as shown using 4x wooden dowels (ensuring that the larger holes are placed over the cam dowels already in place on the mid panel E) and push into place.
Insert 3 x cam locks (#2) into these large holes on BOTH panels F & G and turn clockwise to lock.
2x #10 Runner Sides
Hardware for Step 7:
6x #8 12mmL Screws
#8
#8
#8
#8
#8
#8
#8
#8
#8
#10
#10
F
G
4x #4 Wooden Dowels
Hardware for Step 8:
6x #2 Cam Locks
#4
#4
#4
#4
#23x
#23x
E
F
G
FRONT
FRONT
FRONT
BACK
BACK
BACK

8
STEP 9:
Firstly position the base panel H using 4x wooden dowels (#4) and push into place.
Now insert 3x barrel nuts (#5) into the remaining holes on BOTH panels F & G.
Now insert the 6x bolts (#6) as shown and fully tighten using the Allen key.
F H
G
#53x
#53x
#63x
#63x
#4
#4
#4
#4
Hardware for Step 10:
6x #2 Cam Locks
STEP 10:
IMPORTANT: Two people are needed to complete the next step safely.
Carefully stand the unit upright.
Go to the back of the unit and insert 8x cam locks (#2) into the large drill holes on the two back panels (C). Turn clockwise to lock.
C
C
#22x
#22x
#22x
#22x
Hardware for Step 9:
6x #5 Barrel Nuts
6x #6 Bolts
4x #4 Wooden Dowels
A
B
B
G
9
BACK
FRONTHardware for Step 11:
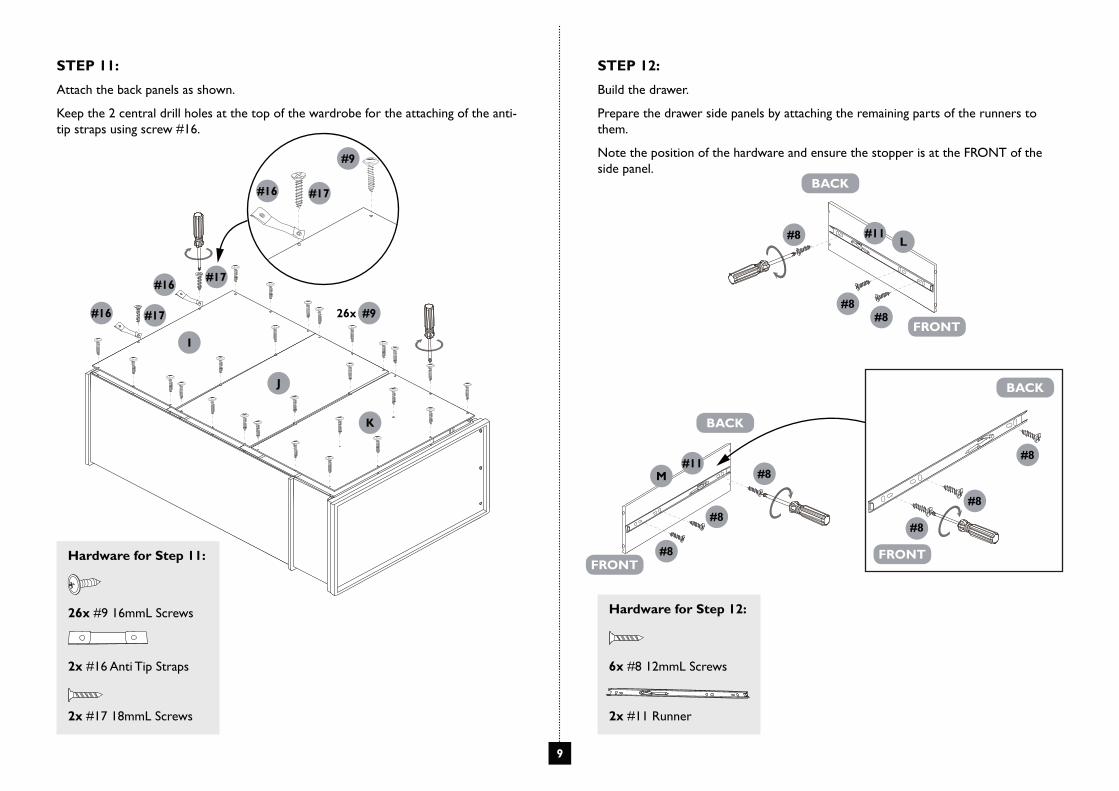
26x #9 16mmL Screws
STEP 12:
Build the drawer.
Prepare the drawer side panels by attaching the remaining parts of the runners to them.
Note the position of the hardware and ensure the stopper is at the FRONT of the side panel.
STEP 11:
Attach the back panels as shown.
Keep the 2 central drill holes at the top of the wardrobe for the attaching of the anti-tip straps using screw #16.
#17#16
J
K
I
M
2x #17 18mmL Screws
2x #16 Anti Tip Straps
#17#16 #926x
2x #11 Runner
Hardware for Step 12:
6x #8 12mmL Screws
L
#8
#8
#8
#8#8
#8
#11
#11
#8
#8
#8
#17 #16
#9
FRONT
BACK
BACK
FRONT

10
Hardware for Step 13:
4x #1 Cam Dowels
STEP 13:
Prepare the front drawer panel N.
STEP 15:
Line up the runners and slide drawer into the wardrobe.
4x #12 25mmL Screws
Hardware for Step 14:
4x #2 Cam Locks
#1#1
#1
#1N
STEP 14:
Create the drawer box by attaching the drawer side panels (L & M) to the drawer back panel (O) using 4x screws (#12). Keep the grooves on all three panels on the inside and lined up to complete this step.
Now slide in the drawer base panel P.
Finally, position the pre-prepared drawer front onto the front of the drawer, insert 4x cam locks (#2) and turn clock wise to lock.
N
P
M
L
#12
#12
#12
#12
O #22x
#22x

11
STEP 16:
Insert the hanging rail.
Thread the two collars (#13) onto the rail making sure the threaded ends are facing away from each other and towards each end of the rail itself. Insert one end of the rail into the mounting plate on the side panel and tighten, then position and tighten the remaining end to the remaining mounting plate.
Ensure the collars are fully tightened.
STEP 17:
Fitting the hinges.
Attach the 3x hinge base plate (#14) to both of the side panels. There are 3 hinges for each panel.
It is best to leave the screws slightly loose to allow for aligning the hinges when attaching the door.
2x #13 Collar
Hardware for Step 16:
#13Q
6x #14 Hinge Base Plates
Hardware for Step 17:
12x #7 12mmL Screws
#14
#13
#14
#14
#14
#14
#14
#72x
#72x
#72x
#72x
#72x
#72x
#13
#13
#14
#7
#7
#14
#7
#7

12
STEP 18:
Attach the 3x hinges to the back of the LH door R using 6x screws (#7).
Repeat for the RH door S.
STEP 19:
Attaching the doors.
Ensure that all the hinges are in the open position (as shown) on the RH Door S.
With the assistance of a second person to support the door, start at with the bottom hinge and locate the 2 hooks on the hinge onto the front of the hinge raised section of the hinge base plate (1). Once located in place, push down on the back of the hinge until you hear a click to denote the hinge is latched in place (2).
Repeat process for each hinge working up the door.
Once all hinges are installed you can check the alignment of the door and adjust as required. Once you are happy with
S
#72x
#72x
#72x
6x #15 Hinges
Hardware for Step 18:
12x #7 12mmL Screws
R
#72x
#72x
#72x
#15
#15
#15#15
#15
#15
12
S
#15
#15
#15#14
#14
#14
TOP
BASE

13
STEP 20:
Attaching the doors.
Repeat step 19 for the LH door R.
Once all hinges are installed you can check the alignment of the door and adjust as
R
#15
#15
#15
#14
#14
#14
Copyright© 2016 G.L.T.C. Ltd. All rights reserved.Great Little Trading Company and GLTC are registered trade marks of G.L.T.C. Limited.
STEP 21:
The anti-tip wall straps should now be attached to the wall using hardware that is suitable for the type of walls in your home (not provided).