starting a new company file in quickbooks qbi serieslibrary.reckon.com.au/library/pdf/qbi_new file...
TRANSCRIPT

1
Reckon Ltd
ACN 003 348 730 Locked Bag 15 PO Broadway
NSW 2007 Australia
“Please Note: While we try to provide you with the solution you need, we can’t promise that the information set out below is totally error free or will necessarily resolve any problem you may have.”
Starting a new company file in QuickBooks QBi series
The QBi series of QuickBooks based on an SQL database together with advances in computer technology,
means that you can now operate on a much larger company file than in pre-QBi editions of QuickBooks. But
eventually your company file will grow to a size where it becomes too large for efficient operation and you will
want to start a new file. This guide will lead you through the steps you need to take to setup a new file to continue on from your existing file.
How large is too large?
This is a question that is not easily answered as it depends on many variables like:
• Hardware capacity
• Health of your computer environment
• Number of programs running at the same time
• Number of users accessing the file
• The average number of transactions entered per day
• The complexity of the transactions
As a rough guide a file of size 300MB should be performing efficiently under any conditions. Beyond this size it will depend on the variables.
The best that can be said is after you have confirmed that
• your computer environment is free of faults and running efficiently,
• that your datafile is free of errors,
• in a network environment multi-user hosting is setup correctly, • your .tlg file is less than 10% of your .qbw size,
then if the performance of the company file is worse than you are used to, it is probably time for a new company file.
If your company file has experienced corruption on a large number of occasions then it may stop working
efficiently long before the 300MB level is reached. You should check with Technical Support and plan a new file.
Overview of creating a new company file
1. Choose an appropriate time for the changeover. The best time is at the start of a new financial year.
The next best time is the start of a new BAS reporting period. Keep in mind that Liability accounts
accumulate amounts from other processes, so it is best to have these accounts cleared before a new file is created.
2. Ensure your current company file is up to date;
3. Clean up your current company file;
4. Export your information;
5. Rename existing company file;
6. Create a new company file with no accounts;
7. Import your data.
2
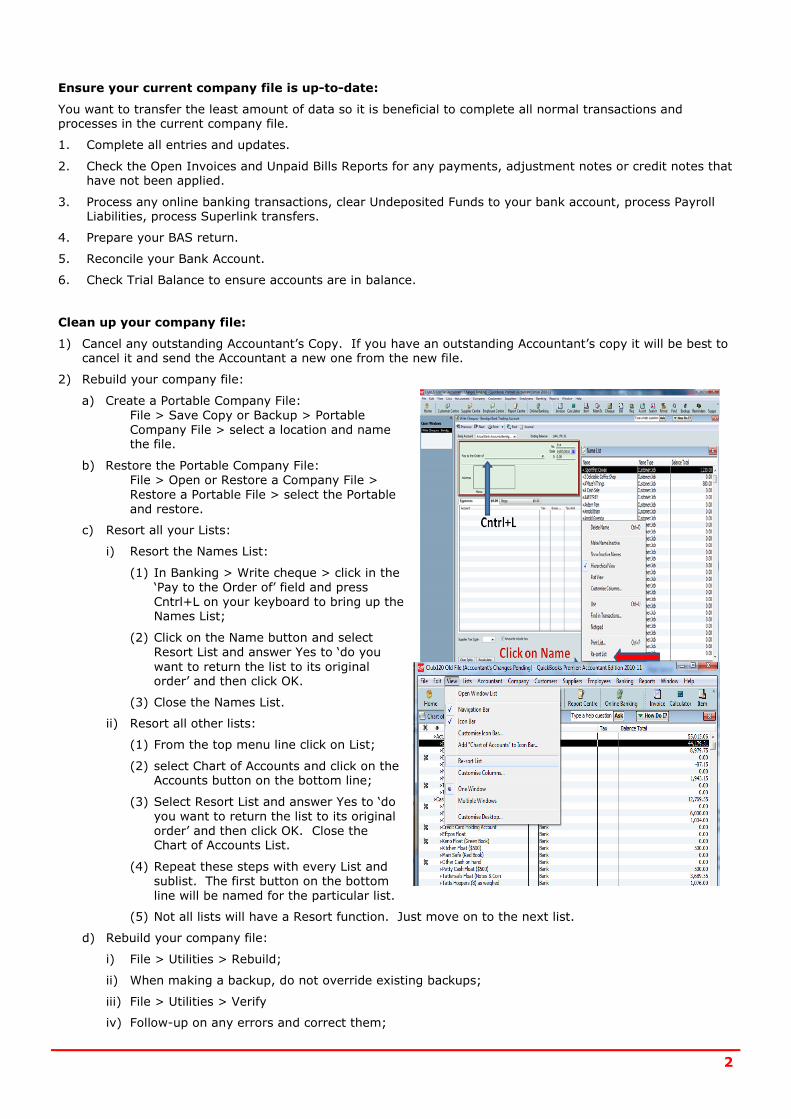
Ensure your current company file is up-to-date:
You want to transfer the least amount of data so it is beneficial to complete all normal transactions and processes in the current company file.
1. Complete all entries and updates.
2. Check the Open Invoices and Unpaid Bills Reports for any payments, adjustment notes or credit notes that have not been applied.
3. Process any online banking transactions, clear Undeposited Funds to your bank account, process Payroll Liabilities, process Superlink transfers.
4. Prepare your BAS return.
5. Reconcile your Bank Account.
6. Check Trial Balance to ensure accounts are in balance.
Clean up your company file:
1) Cancel any outstanding Accountant’s Copy. If you have an outstanding Accountant’s copy it will be best to cancel it and send the Accountant a new one from the new file.
2) Rebuild your company file:
a) Create a Portable Company File:
File > Save Copy or Backup > Portable
Company File > select a location and name the file.
b) Restore the Portable Company File:
File > Open or Restore a Company File >
Restore a Portable File > select the Portable
and restore.
c) Resort all your Lists:
i) Resort the Names List:
(1) In Banking > Write cheque > click in the
‘Pay to the Order of’ field and press
Cntrl+L on your keyboard to bring up the Names List;
(2) Click on the Name button and select
Resort List and answer Yes to ‘do you
want to return the list to its original order’ and then click OK.
(3) Close the Names List.
ii) Resort all other lists:
(1) From the top menu line click on List;
(2) select Chart of Accounts and click on the Accounts button on the bottom line;
(3) Select Resort List and answer Yes to ‘do
you want to return the list to its original
order’ and then click OK. Close the Chart of Accounts List.
(4) Repeat these steps with every List and
sublist. The first button on the bottom
line will be named for the particular list.
(5) Not all lists will have a Resort function. Just move on to the next list.
d) Rebuild your company file:
i) File > Utilities > Rebuild;
ii) When making a backup, do not override existing backups;
iii) File > Utilities > Verify
iv) Follow-up on any errors and correct them;

3
v) Continue until a verify returns a ‘no errors found’ message.
3) Printout the following reports:
a) Trial Balance
b) Balance Sheet
c) Profit & Loss
These reports will be used to verify the new company file shows the same financial position as the current company file.
4) Make a couple of backups; one for permanent storage. Label this permanent storage copy with the last
date of transactions and the version of QuickBooks used. You can find your version of QuickBooks by
pressing Cntrl+1; the Product Line will have at the end ‘QuickBooks 2010/11 R2’.
5) Restore the backup to another location to confirm that the backup is ‘good’. You will have to restore this
backup if in the future you need to check some detail.
Export information for the new file
1) Export Lists
a. File > Utilities > Export > Lists to IIF > and tick all boxes; save the file to your desktop;
b. Lists included will be your Chart of Accounts,
Customers, Suppliers, Employees, Items, Payroll information and other information.
2) Print out a Trial Balance Report for the day before
the start date of your new company file. These balances will serve as your opening balances.
3) If you will be processing the BAS for the last period
in the new file, open the Tax Summary Report for the BAS period and printout the report.
You will need to make a special entry for each tax code in the new file.
4) Printout the Open Invoices, Unpaid Bills Reports:
a. Reports > Customers & Receivables > Open Invoices; b. Reports > Suppliers & Payables > Unpaid Bills.
You can use this report to enter the opening balance for your Customers and Suppliers; If you want to input the unpaid invoices and bills, then print them out for the detail of each form.
Care: some invoices and bills may be partially paid
5) Printout the Employee Earning Summary Report for this financial year:
Reports > Payroll & Employees > Employee Earning Summary > modify dates to This Financial Year to date
You will need to enter a Year to Date Adjustment for each employee in the new file, or re-enter each pay.
6) Open a Custom Transactions Detail Report and filter for any transaction types that still need to be entered in the new file. Printout the report.
7) Printout your unreconciled bank transactions. For a list of unreconciled bank transactions take a ‘screen shot’ of the Bank – Reconcile screen:

4
Then print out unreconciled bank transactions.
8) Printout Open Sales Orders by Customer and Open Purchase Orders Reports:
a. Reports > Sales > Open Sales Orders by Customer
b. Reports > Purchases > Open Purchase Orders
Printout individual Sales Orders and Purchase Orders forms for the detail.
9) Printout an Inventory Valuation Summary Report for you inventory quantities, average costs and total
value:
Reports > Inventory > Inventory Valuation Summary
10) Review your customized templates.
a. remove unnecessary columns and fields;
b. printout samples of customized templates – screen and print forms;
c. replace large logos with and simpler ones;
d. export templates – Lists > Templates > right-click
template & export; save to desktop or transfer folder.
11) Review your customized reports.
a. printout samples of customized reports;
b. export memorized reports – Reports > Memorized
Reports > Memorized Reports List > right-click a report > export template;
12) Printout memorized Transaction List and all memorized transactions.
13) Go to Edit > Preferences and list all preference settings
that will be replicated in the new company file. You can take a screen shot of each preference window.

5
Rename the existing file.
By renaming this file you can use the company file name you are familiar with for the new file.
1) Rename your company file in Windows Explorer by adding a date – eg companyname30062010.qbw;
2) Delete the .nd and .tlg files located next to your company file.
Create the new company file
1) Create a new file:
• File > New company > Skip Interview >
• name your company file, select type of tax return, select first month of the financial year;
• Select No Accounts for the Industry type of accounts;
• When created click on Edit > Preferences and set preferences to those in the old company file.
• Backup your file – care: do not override existing backups.
2) Enter your data:
a. Import Lists: File > Utilities > Import > from IIF Files > select your IIF file;
i. The process will end with “Your data has imported successfully”
ii. Follow-up on any errors indicated
iii. Examine all your lists to confirm that information has been imported successfully
b. Update Opening Balances from your Trial Balance Report, using the date of the day before the file start date.
i. Care: you may need to adjust the balances on your reports for any open transactions and unreconciled bank transactions (see point i below) you wish to enter into this file.
ii. You can use a General Journal to enter the balances of your accounts. The other side of the transaction is Open Bal Equity.
iii. If you will be completing a BAS from this new company file for a period where the
detail is in the old company file, do not enter an opening balance of your Tax Payable
account. Follow the steps in the separate guide: Setting up the Tax Payable account in a new QuickBooks company file on page 7 below.
c. If you have multiple users, recreate those users.
d. If you use online banking, activate your bank account for online banking.
e. If you use other services, such as Payment Services, Reckon Tools Online Backup, enter details for these services.
f. Backup your file – care: do not override other backups.
g. Enter any payroll payments, either:
i. Employees > Set Up YTD amounts > follow the Wizard; or
ii. Redo the pay runs.
h. Input all other open transactions, Purchase Orders and Sales Orders from your printed reports and
forms;
i. Input uncleared bank transactions. There are two methods you can use:
i. Enter the bank transaction via a Write Cheque or Make Deposit with the Bank Account
selected as the account – that is, the transaction will make a debit and credit entry to
the bank account. Enter sufficient details in the Memo to identify the transaction.
Note: You will see a debit entry and a credit entry for the same amount on the Bank –
Reconcile screen. When the transaction appears for reconciliation you must tick both the debit and credit entries.
ii. Enter the original transaction and the bank transaction. You will need to adjust the
opening balances for the accounts involved to allow for these transactions.
j. Input Inventory quantities and average costs:
i. Suppliers > Inventory Activities > Adjust Quantity / Value on Hand
6
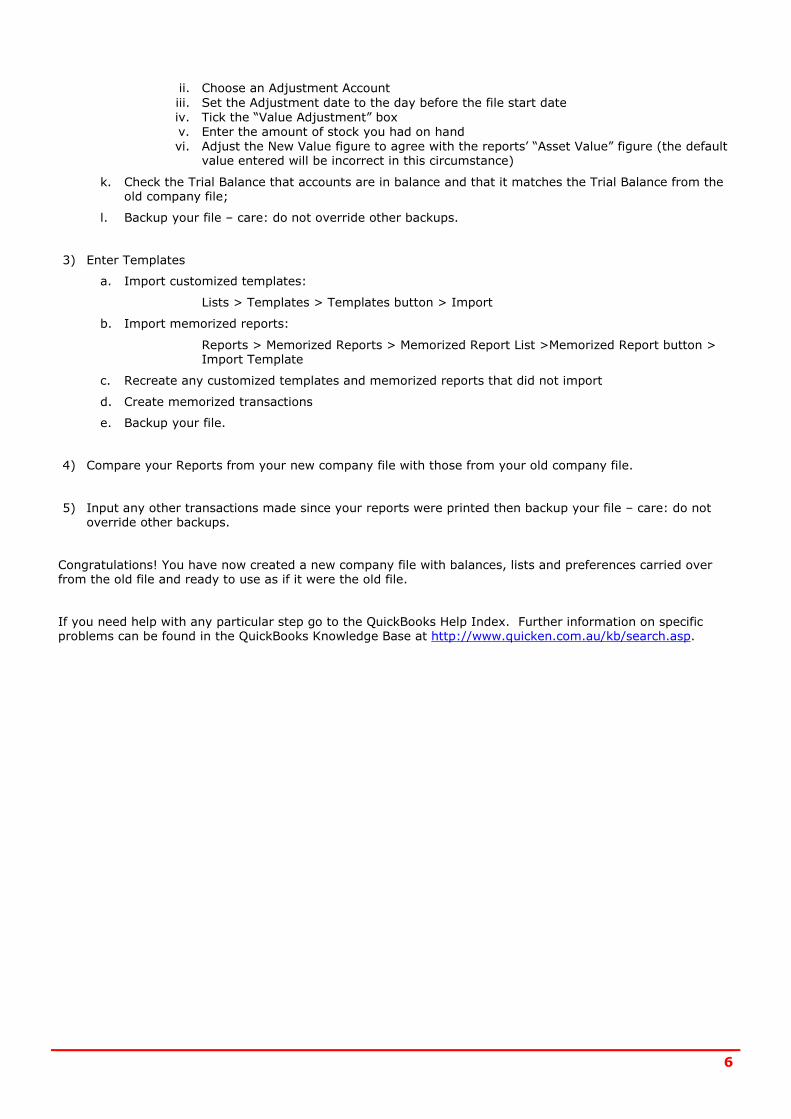
ii. Choose an Adjustment Account
iii. Set the Adjustment date to the day before the file start date
iv. Tick the “Value Adjustment” box
v. Enter the amount of stock you had on hand
vi. Adjust the New Value figure to agree with the reports’ “Asset Value” figure (the default value entered will be incorrect in this circumstance)
k. Check the Trial Balance that accounts are in balance and that it matches the Trial Balance from the old company file;
l. Backup your file – care: do not override other backups.
3) Enter Templates
a. Import customized templates:
Lists > Templates > Templates button > Import
b. Import memorized reports:
Reports > Memorized Reports > Memorized Report List >Memorized Report button > Import Template
c. Recreate any customized templates and memorized reports that did not import
d. Create memorized transactions
e. Backup your file.
4) Compare your Reports from your new company file with those from your old company file.
5) Input any other transactions made since your reports were printed then backup your file – care: do not override other backups.
Congratulations! You have now created a new company file with balances, lists and preferences carried over from the old file and ready to use as if it were the old file.
If you need help with any particular step go to the QuickBooks Help Index. Further information on specific problems can be found in the QuickBooks Knowledge Base at http://www.quicken.com.au/kb/search.asp.
7
Reckon Ltd
ACN 003 348 730 Locked Bag 15 PO Broadway
NSW 2007 Australia
“Please Note: While we try to provide you with the solution you need, we can’t promise that the information set out below is totally error free or will necessarily resolve any problem you may have.”
Setting up the Tax Payable account in a new QuickBooks company file.
At some point in time your company file will grow to a size where you will need to create a new company file.
Naturally you will want continuity with the old company file, so that working with the new company file is just an extension of the old company file.
The Tax Payable account provides some challenges in providing continuity in new company files. Tax details
are used by various reports and functions in QuickBooks, particularly the Business Activity Statement (BAS).
But to use the tax details, that detail must be entered through the standard QuickBooks input methods –
invoice, sales receipt, bill, write cheque and general journal . Entering an Open Balance at the start of a new company file will not make that information usable by BAS and other reports and functions.
New files should aim to re-input unpaid transactions with their original details so their information is accessible.
But it is impractical to re-input all transactions over a period that will be called upon. For instance, if you are
creating a new company file to start on the 1st of July - a new financial year and a new BAS reporting period -
and you will be doing the BAS return towards the end of July on the previous quarter, you will need to re-input
all the transactions of the previous quarter to have the BAS report correctly.
This document will show you how you can enter the Tax Payable opening balance in a way that all the
necessary information is available for BAS to report correctly.
To create a new company file, ask your Reckon Technical Support Representative for the guide to starting a new company file in QBi.
To be able to complete that first BAS in the new company file you will need to make entries for each tax code used through the standard input methods that the BAS report will recognize.
Before you start you will need to create the following accounts and items:
1) A dummy Other Income account – eg Tax Payable Sales
2) A dummy Other Expense account – eg Tax Payable Expenses
3) A dummy Bank Clearing account – Tax Payable Settlement
4) A dummy customer – eg Tax Payable Customer
5) A dummy supplier – eg Tax Payable Supplier
6) A dummy service item – eg Tax Payable Open Bal – linked to the dummy Other Income account
7) 0% Tax Items and Tax Codes for each tax code used:
a. 0GST for GST (zeroGST)
b. 0FRE for FRE
c. 0NCG for NCG
d. And so on....
e. Include any custom tax codes that you have used
f. Also, if you recently upgraded from a pre-QBi version, for any XXX-P and XXX-S type tax codes and items created by the upgrade process.
These accounts and items will be made inactive later.

8
Enter transactions for each of your tax codes:
1) Create a Tax Invoice for the sales side tax codes
a. Use the Tax Payable Customer and date it the last day of the last BAS period.
b. Enter the GST sales amount on the Tax Summary Report for the last BAS period from your old
company file using the dummy service item (Tax Payable Open Bal). Confirm that the correct tax amount is generated.
c. On the next line re-enter the first line with a Quantity of -1 (minus one) and the tax code 0GST. This line will reduce your sales total to zero and leave the tax amount in your register.
d. Repeat these steps with each of your sales side tax codes – FRE, EXP, INP and any other custom tax codes used .
e. At the end of the process your Sales Receipt total will consist only of the tax amounts. The
impact on your total Sales will be zero. The Chart of Accounts list will show this amount as the balance of the Tax Payable account.
f. You now have sales related tax code entries that the BAS can capture and use.
2) Create a Bill for the purchase side tax codes
a. Use the Tax Payable Supplier and date it the last day of the last BAS period.
b. Enter the NCG sales amount on the Tax Summary Report for the last BAS period from your old
company file using the dummy Other Expense (Tax Payable Expense). Confirm that the correct
tax amount is generated.
c. On the next line re-enter the first line with a Quantity of -1 (minus one) and the tax code
0NCG. This line will reduce your purchases total to zero and leave the tax amount in your register.
d. Repeat these steps with each of your purchase side tax codes – NCF, NCI, CAG, CAF, and any other custom tax code used.
e. At the end of the process your Bill total will consist only of the tax amounts. The impact on
your total purchases will be zero. The Chart of Accounts list will the balance of the Tax Payable account as the sales side tax code amount less the tax total of the bill.
f. You now have entries that the BAS can capture and use.
3) Create General Journals for other transactions not covered in steps 1) and 2) above.
4) Neutralize the Cash Flow using the last day of the last BAS period.
a. Receive Payment from Tax Payable Customer and bank to the dummy Bank Clearing Account.
b. Pay the bill to Tax Payable Supplier from the dummy Bank Clearing Account
c. Settle any other transactions from dummy General Journal entries through the dummy Bank Clearing Account.
d. Reduce the opening balance of your Bank account by the amount in the dummy Bank Clearing Account.
e. Transfer the balance from the dummy Bank Clearing Account to your Bank Account so that your Bank opening Balance returns to its original value.
5) When all transactions completed, check your Trial Balance that it is in balance. Open a Tax Detail Report
and check that these entries appear. Then make all dummy accounts, items, customers and suppliers , tax codes and items inactive.
Your Tax Payable Account should now have the correct balance and ready to be accessed by other QuickBooks functions.