state of north dakota - nd.gov · encompass correcting journal entries, interdepartmental billings...
TRANSCRIPT

State of North Dakota
Module 8 – General Ledger PeopleSoft Financials 9.0
Office of Management & Budget - Fiscal Management
01/01/2011

Introduction
The PeopleSoft Financials Training Guide was produced by using the User Productivity
Kit (UPK) / On Demand Training application. The Training Guide is comprised of 3
levels:
Module – PeopleSoft component
Lesson – Description level
Topic - Procedure
All levels are identified with the prefix “ST” for STATE.
PeopleSoft Financial Modules Training Guides are available on the Office of
Management & Budget website: www.nd.gov/fiscal/accounting/manuals.
The PeopleSoft Financials Module Online Tutorials and Job Aids are available by
clicking on the Help menu in PeopleSoft Financials.
Notice to Users:
All Training Guide content was recorded in the PeopleSoft Test environment
(NDFT). The NDFT logo will appear on the screen shots in this document;
however, this will not be seen in the Production environment.
The PeopleSoft Tools upgrade was implemented in October 2010. This change
does not affect the actual material represented in the Training Guides/Job Aids;
however, the main menu screens in the training material may look different than
the actual PeopleSoft Production environment.

Training Guide Module 8 – General Ledger
Page iii
Table of Contents ST Module 8 - General Ledger ........................................................................................ 1
ST Lesson 8.1 - Journal Entry .................................................................................................. 1 ST 8.1.1 - Creating a Journal Entry - Revenue ....................................................................................... 1 ST 8.1.2 - Creating a Journal Entry - Expenditure ................................................................................ 12 ST 8.1.3 - Deleting a Journal Entry ...................................................................................................... 22 ST 8.1.4 - Copying a Journal Entry ...................................................................................................... 32 ST 8.1.5 - Reversing a Journal Entry .................................................................................................... 48 ST 8.1.6 - Errors on a Journal Entry ..................................................................................................... 64 ST 8.1.7 - Spreadsheet Journal Import .................................................................................................. 70 ST 8.1.8 - Submitting a Journal Entry for Final Approval .................................................................... 90 ST 8.1.9 - Printing a Journal Entry ..................................................................................................... 100 ST 8.1.10 - Final Approval of Journal Entry from Worklist ............................................................... 111
ST Lesson 8.2 - InterDepartmental Billings ........................................................................ 116 ST 8.2.1 - Creating an InterDepartmental Billing/IDB ....................................................................... 116 ST 8.2.2 - Deleting an InterDepartmental Billing/IDB ....................................................................... 124 ST 8.2 3 - Copying an InterDepartmental Billing/IDB ....................................................................... 134 ST 8.2.4 - Reversing an InterDepartmental Billing/IDB .................................................................... 146 ST 8.2.5 - Printing an InterDepartmental Billing/IDB ........................................................................ 157 ST 8.2.6 - Creating an IDB SpeedType .............................................................................................. 168 ST 8.2.7 - Using an IDB SpeedType .................................................................................................. 172
ST Lesson 8.3 - Online Deposits ............................................................................................ 178 ST 8.3.1 - Creating an Online Deposit ................................................................................................ 178 ST 8.3.2 - Refund of Current Biennium Expenditure Deposit ............................................................ 190 ST 8.3.3 - Deleting an Online Deposit ................................................................................................ 200 ST 8.3.4 - Copying an Online Deposit ................................................................................................ 208 ST 8.3.5 - Printing an Online Deposit ................................................................................................. 218 ST 8.3.6 - Creating a Deposit SpeedType ........................................................................................... 229 ST 8.3.7 - Using a Deposit SpeedType ............................................................................................... 233
ST Lesson 8.4 - Reports, Inquiries and Queries .................................................................. 239 ST 8.4.1 - Itemized Transaction Register Report ................................................................................ 239 ST 8.4.2 - NDS Fund Balance - Statewide Report .............................................................................. 248 ST 8.4.3 - NDS_GL01 Itemized Query .............................................................................................. 254 ST 8.4.4 - Ledger Inquiry ................................................................................................................... 257 ST 8.4.5 - Trial Balance Report .......................................................................................................... 261
ST Lesson 8.5 - Open Items ................................................................................................... 269 ST 8.5.1 - Review Open Item Status................................................................................................... 269 ST 8.5.2 - Open Item Listing Report .................................................................................................. 275
ST Lesson 8.6 - Chartfields ................................................................................................... 283 ST 8.6.1 - Setting up a Fund ............................................................................................................... 283 ST 8.6.2 - Assigning a CFDA to a Fund ............................................................................................. 288


Training Guide Module 8 – General Ledger
Page 1
ST Module 8 - General Ledger General Ledger Module
General Ledger serves as the core of the PeopleSoft Financial Management System. Journals
encompass correcting journal entries, InterDepartmental Billings (IDB's) and online deposits;
they also represent transactions that are processed through the General Ledger and Posted to the
"Actuals" ledger.
To view or print the General Ledger Training Guide, click on OMB's training webpage:
(http://www.nd.gov/fiscal/accounting/manuals/)
ST Lesson 8.1 - Journal Entry Journal Entry
Journal Entries in General Ledger consist of Header and Line totals which uniquely identifies the
journal entry and records the monetary amount to the affected Chartfields.
The journal Header contains three attributes that uniquely identify the journal: Journal ID,
Journal Date, and Business Unit.
The journal Lines record the monetary and statistical amounts and ChartField values associated
with each line of the transaction.
A single journal entry can have many detail lines, but must have at least two, because the total
debits must equal the total credits.
ST 8.1.1 - Creating a Journal Entry - Revenue Creating a Journal Entry - Revenue
Navigation: General Ledger > Journals > Journal Entry > Create/Update Journal Entries
A journal entry to correct revenue must contain the correct chartfield account codes. A correcting
journal entry can contain both revenue and expenditure accounts; however, the cash account must
be used if moving between funds.
For a listing of PeopleSoft Revenue and Expenditure Accounts, click on the link below:
(http://www.nd.gov/fiscal/accounting/revenue/)

Page 2
Procedure
This topic shows how to Create a Revenue Journal Entry correction and the required information
associated with it.
NOTE: When correcting from fund to fund, cash lines must be included in the journal entry.
Step Action
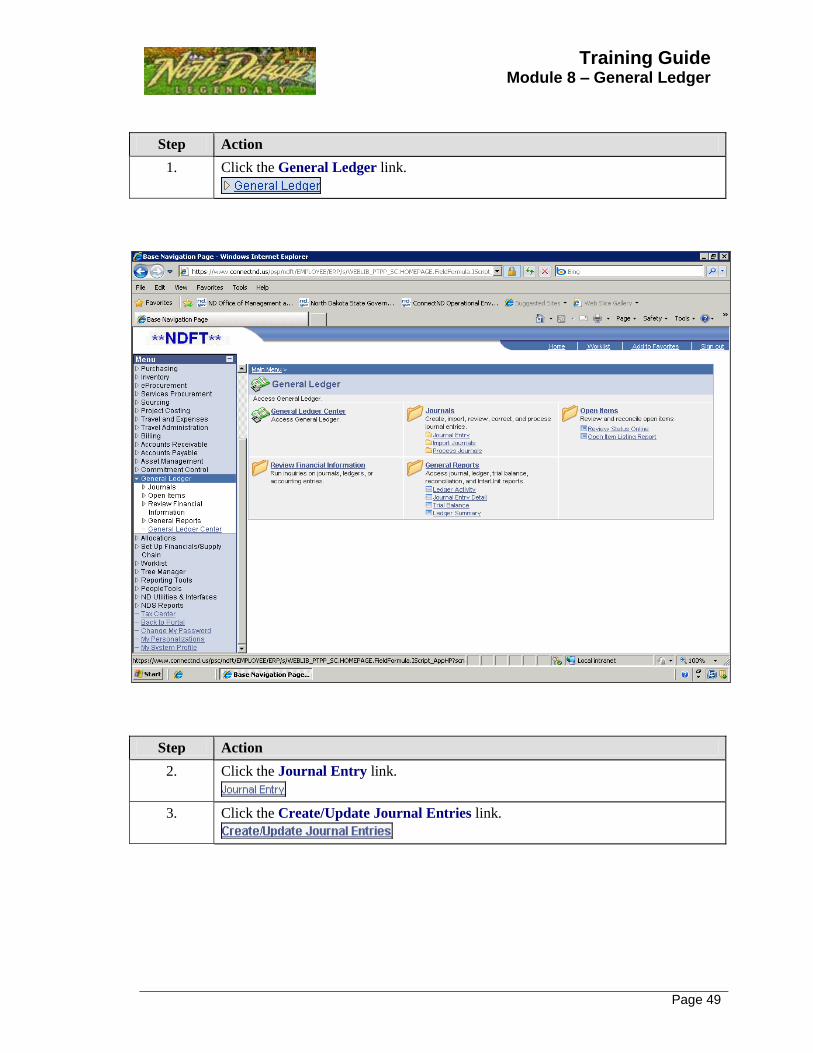
1. Click the General Ledger link.

Training Guide Module 8 – General Ledger
Page 3
Step Action
2. Click the Journal Entry link.
3. Click the Create/Update Journal Entries link.
4. The Business Unit will default based on the User's preferences.
Journal ID will default to NEXT. The system automatically assigns the next
available journal number to the Journal Entry.

Page 4
Step Action
5. Journal Date will always default to the current date or may be applied back to an
open accounting period (for example, when applying back a journal to prior
month/fiscal year, use 6/30/0000).
The entry cannot be back-dated to a closed accounting period.
Click the Choose a date (Alt+5) button to display the current calendar month. The
date can also be typed into the Journal Date field.
6. Select the date of the current month, or click on the left arrow to view the previous
month.
7. Click the desired date. If you want to apply to the prior month, select the
appropriate date.

Training Guide Module 8 – General Ledger
Page 5
Step Action
8. Note: The journal date cannot be changed after you Add the journal.
For example, if you want to apply the journal to the prior open month/accounting
period, it must be done on this screen.
9. Click the Add button.
Step Action
10. Enter the desired information into the Long Description field. Enter "Correction to
account".
Note: This field is useful for recording a detailed description regarding the journal.
The length of this field is 254 characters; however, only the first 30 will appear in
prompt lists for journals.
11. Enter the desired information into the Source field. Enter "ONL".

Page 6
Step Action
12. You will only need to populate the Long Description and Source fields on the
journal Header page.
13. Click the Lines tab.
Step Action
14. Enter the desired information into the Account field. Enter "482008".
15. Enter the desired information into the Fund field. Enter "790".
16. Enter the desired information into the Dept field. Enter "5500".
17. Project, Activity, and Analysis Type would be used at this point, if necessary.
Note: PC Business Unit field must be populated prior to adding project information.

Training Guide Module 8 – General Ledger
Page 7
Step Action
18. Enter the desired information into the Amount field. Enter "250.00".
Reminder: Positive amounts are debits and negative amounts are credits.
19. The Reference field is optional. It is a 10 character field used for transaction
descriptions.
Enter the desired information into the Reference field. Enter "correction".
20. This field is optional. It is a 30 character field used for transaction descriptions. If
left blank, this field will default to account code description.
Enter the desired information into the Journal Line Description field.
Enter "correction to account".
21. Click the Insert Lines button.
22. Chartfield values will populate from Line 1 into Line 2 except for Account Code,
Reference and Journal Line Description.
23. Enter the desired information into the Account field. Enter "472015".
24. Amount will populate into Line 2 as the appropriate corresponding accounting
entry.
Note: Positive amounts are debits and negative amounts are credits.
In this example on Line 2, a credit will increase the revenue account.
If additional coding is needed for the journal correction, add Lines with appropriate
coding and amount distributions.
If moving from fund to fund, cash lines must be included in the transaction or the
journal will be out of balance. Cash account code is 105251.
25. The Reference field is optional. It is a 10 character field used for transaction
descriptions.
Enter the desired information into the Reference field. Enter "correction".
26. This field is optional. It is a 30 character field used for transaction descriptions. If
left blank, this field will default to account code description.
Enter the desired information into the Journal Line Description field.
Enter "correction to account".
27. Click the Process button.

Page 8
Step Action
28. Click the OK button. After the journal is processed, a unique journal number will
be assigned to it.
Note: Journal Status and Budget Status must both be Valid (V) before journal will
post.

Training Guide Module 8 – General Ledger
Page 9
Step Action
29. Click the Process drop down list.

Page 10
Step Action
30. Click the Submit Journal list item. This will initiate the process to send the journal
to the Final Approver's work list.

Training Guide Module 8 – General Ledger
Page 11
Step Action
31. Click the Process button.
32. Click the OK button.
33. This topic showed how to Create a Revenue Journal Entry.
End of Procedure.

Page 12
ST 8.1.2 - Creating a Journal Entry - Expenditure Creating a Journal Entry - Expenditure
Navigation: General Ledger > Journals > Journal Entry > Create Update Journal Entries
A journal entry to correct an expenditure must contain the correct chartfield account codes. A
correcting journal entry can contain both revenue and expenditure accounts; however, the cash
account must be used if moving between funds.
For a listing of PeopleSoft Revenue and Expenditure Accounts, click on the link below:
(http://www.nd.gov/fiscal/accounting/revenue/)
Procedure
This topic shows how to Create an Expenditure Journal entry correction and the required
information associated with it.
NOTE: When correcting from fund to fund, cash lines must be included in the journal entry.

Training Guide Module 8 – General Ledger
Page 13
Step Action
1. Click the General Ledger link.
Step Action
2. Click the Journal Entry link.
3. Click the Create/Update Journal Entries link.
4. The Business Unit will default based on the User's preferences.
Journal ID will default to NEXT. The system automatically assigns the next
available journal number to the Journal Entry.

Page 14
Step Action
5. Journal Date will always default to the current date or may be applied back to an
open accounting period (for example, when applying back a journal to prior
month/fiscal year, use 6/30/0000).
The entry cannot be back-dated to a closed accounting period.
Click the Choose a date (Alt+5) button to display the current calendar month. The
date can also be typed into the Journal Date field.
6. Select date of the current month, or click on the left arrow to view the previous
month.
7. Click the desired date. If you want to apply to the prior month, select the
appropriate date.

Training Guide Module 8 – General Ledger
Page 15
Step Action
8. Note: The journal date cannot be changed after you Add the journal.
For example, if you want to apply the journal to the prior open month/accounting
period, it must be done on this screen.
9. Click the Add button.
Step Action
10. Enter the desired information into the Long Description field. Enter "Central
Services adjustment".
Note: This field is useful for recording a detailed description regarding the journal.
The length of this field is 254 characters; however, only the first 30 will appear in
prompt lists for journals.

Page 16
Step Action
11. Enter the desired information into the Source field. Enter "ONL".
12. You will only need to populate the Long Description and Source fields on the
journal Header page.
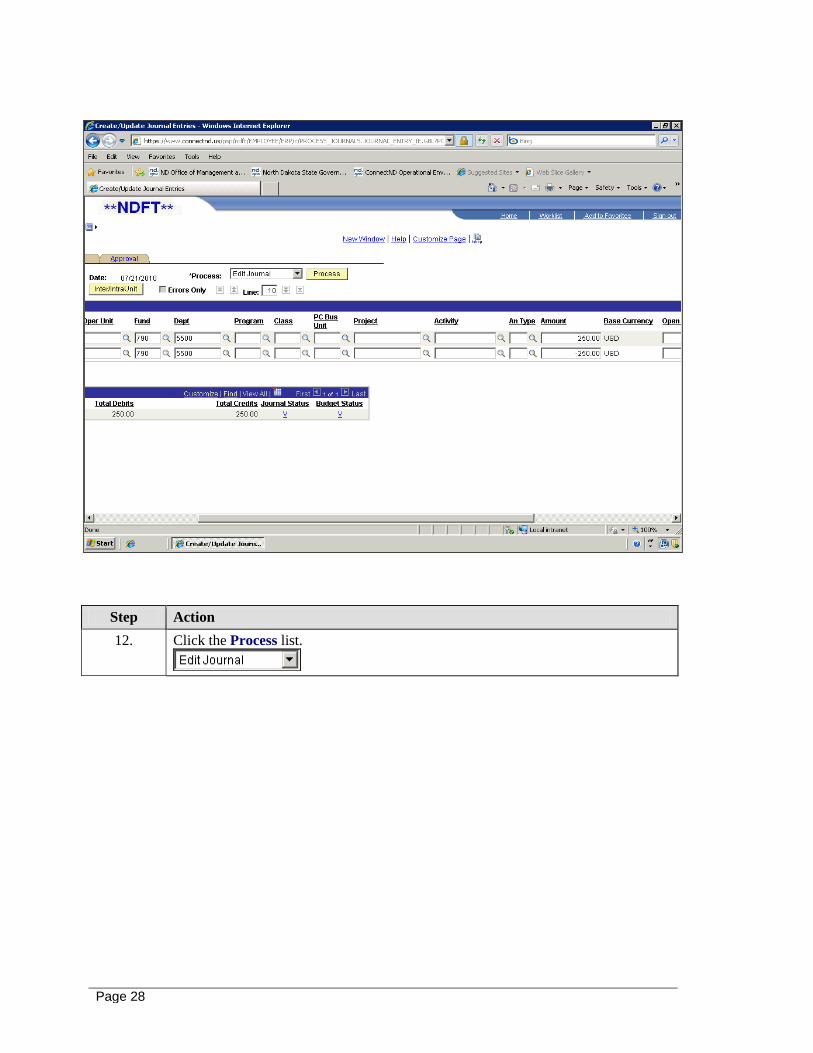
13. Click the Lines tab.
Step Action
14. Enter the desired information into the Account field. Enter "536035".
15. Enter the desired information into the Oper Unit field. Enter "110".
Operating Unit is a required chartfield when using an expenditure account.
16. Enter the desired information into the Fund field. Enter "790".
17. Enter the desired information into the Dept field. Enter "5300".

Training Guide Module 8 – General Ledger
Page 17
Step Action
18. Enter the desired information into the Class field. Enter "11030".
Class is a required chartfield when using an expenditure account.
19. Project, Activity, and Analysis Type would be used at this point, if necessary.
Note: PC Business Unit field must be populated prior to adding project information.
20. Enter the desired information into the Amount field. Enter "1500.00".
Reminder: Positive amounts are debits and negative amounts are credits.
21. The Reference field is optional. It is a 10 character field used for transaction
descriptions.
Enter the desired information into the Reference field. Enter "correction".
22. This field is optional. It is a 30 character field used for transaction descriptions. If
left blank, this field will default to account code description.
Enter the desired information into the Journal Line Description field.
Enter "correct account code-exp".
23. Click the Insert Lines button.
24. Chartfield values will populate from Line 1 into Line 2 except for Account Code,
Reference and Journal Line Description.
25. Enter the desired information into the Account field. Enter "535085".
26. Amount will populate into Line 2 as the appropriate corresponding accounting
entry.
Note: Positive amounts are debits and negative amounts are credits.
If additional coding is needed for the journal correction, add Lines with appropriate
coding and amount distributions.
If moving from fund to fund, cash lines must be included in the transaction or the
journal will be out of balance. Cash account code is 105251.
27. The Reference field is optional. It is a 10 character field used for transaction
descriptions.
Enter the desired information into the Reference field. Enter "correction".
28. This field is optional. It is a 30 character field used for transaction descriptions. If
left blank, this field will default to account code description.
Enter the desired information into the Journal Line Description field.
Enter "correct account code-exp".
Page 18
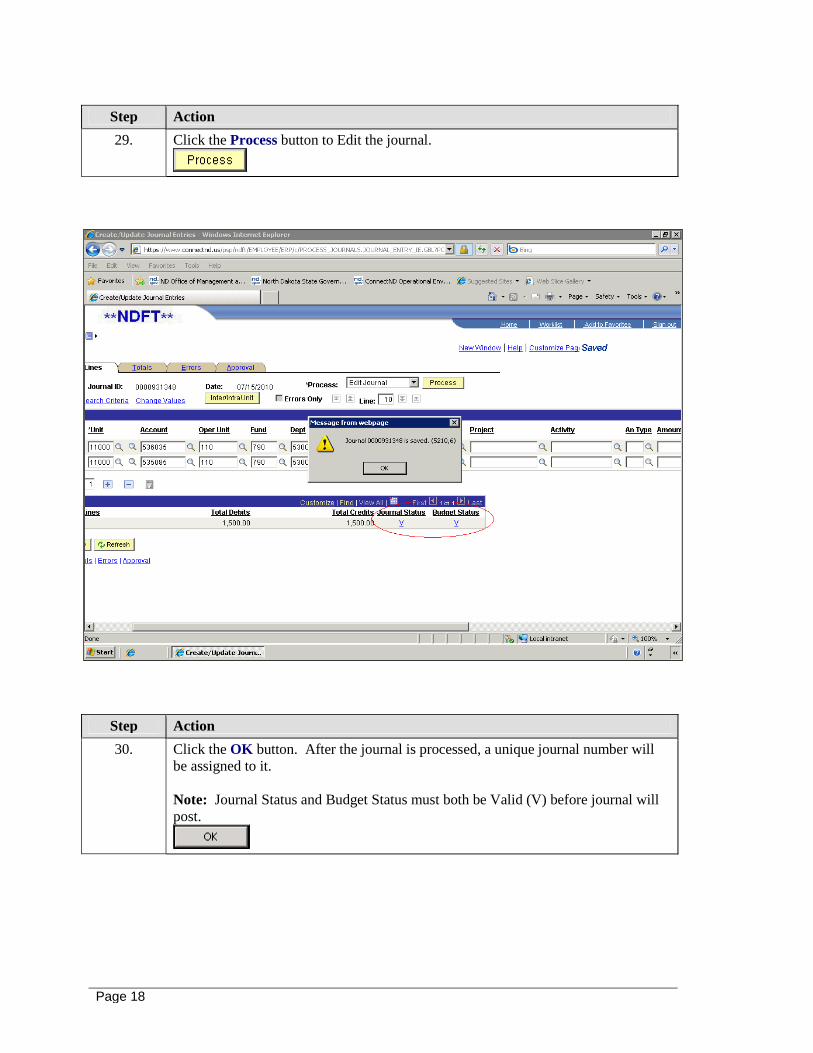
Step Action
29. Click the Process button to Edit the journal.
Step Action
30. Click the OK button. After the journal is processed, a unique journal number will
be assigned to it.
Note: Journal Status and Budget Status must both be Valid (V) before journal will
post.

Training Guide Module 8 – General Ledger
Page 19
Step Action
31. Click the Process drop down list.

Page 20
Step Action
32. Click the Submit Journal list item. This will initiate the process to send the journal
to the Final Approver's work list.

Training Guide Module 8 – General Ledger
Page 21
Step Action
33. Click the Process button.
34. Click the OK button.
35. This topic showed how to Create an Expenditure Journal Entry.
End of Procedure.

Page 22
ST 8.1.3 - Deleting a Journal Entry Deleting a Journal Entry
Navigation: General Ledger > Journals > Journal Entry > Create/Update Journal Entries
Journal Entries in General Ledger can only be deleted if they have not been posted. The system
makes no audit trail of the deletion because it assumes you are correcting a mistake.
Procedure
This topic shows how to delete a journal entry if the Journal Status is not Posted (P).
Step Action
1. Click the General Ledger link.

Training Guide Module 8 – General Ledger
Page 23
Step Action
2. Click the Journal Entry link.
3. Click the Create/Update Journal Entries link.

Page 24
Step Action
4. Click the Find an Existing Value tab.
5. Click the Journal Header Status list.

Training Guide Module 8 – General Ledger
Page 25
Step Action
6. Click the "blank" list item.

Page 26
Step Action
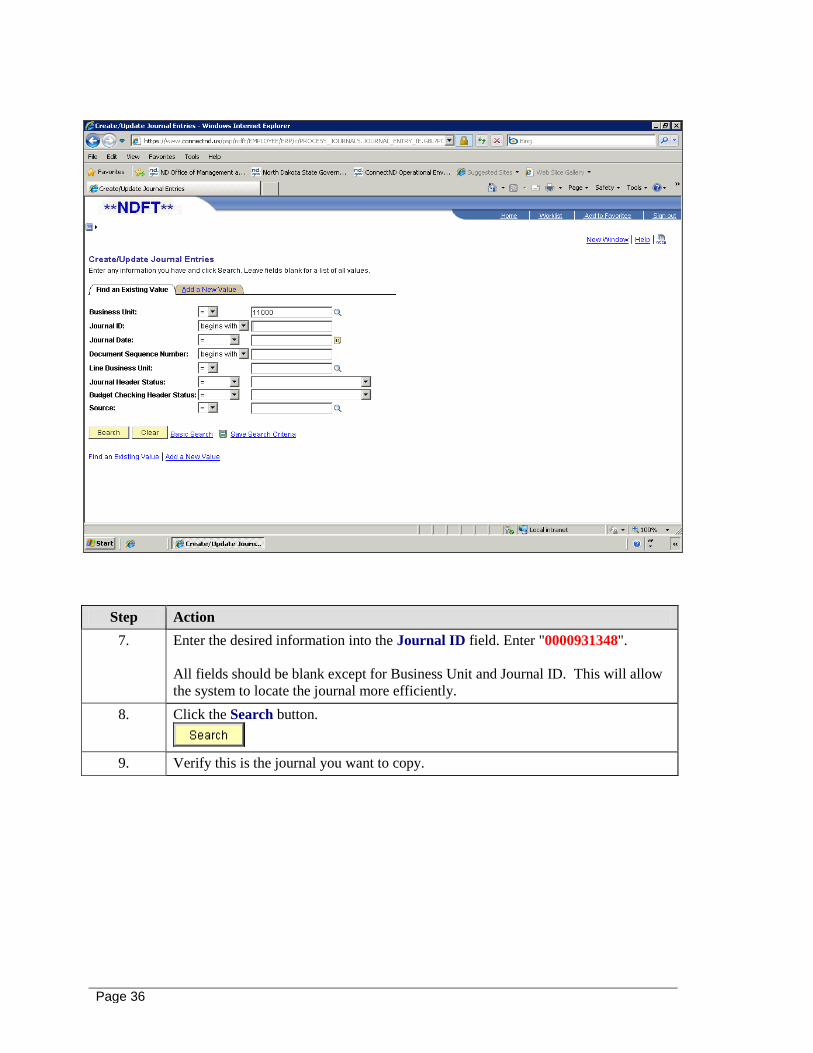
7. Enter the desired information into the Journal ID field. Enter "0000931358".
All fields should be blank except for Business Unit and Journal ID. This will allow
the system to locate the journal more efficiently.
8. Click the Search button.
9. Verify this is the journal you want to delete.

Training Guide Module 8 – General Ledger
Page 27
Step Action
10. Click the Lines tab.
11. Note: The Journal must be in Valid status (V) to be deleted. If the Journal Status is
posted (P), it cannot be deleted. A posted journal will have to be reversed. See
topic 8.1.5.
Page 28
Step Action
12. Click the Process list.

Training Guide Module 8 – General Ledger
Page 29
Step Action
13. Click the Delete Journal list item.

Page 30
Step Action
14. Click the Process button.
15. Click the Yes button.

Training Guide Module 8 – General Ledger
Page 31
Step Action
16. Click the OK button.
17. This topic showed how to Delete a Journal Entry.
End of Procedure.

Page 32
ST 8.1.4 - Copying a Journal Entry Copying a Journal Entry
Navigation: General Ledger > Journals > Journal Entry > Create/Update Journal Entries
General Ledger enables you to copy the information of an existing journal. Copying a journal
saves time as you can use an existing journal entry as the basis for the new one. You can copy
journals that are posted, unposted, or saved and then change the Header or Line information, as
desired.
Procedure
This topic shows how to copy a journal. The journal which you are copying from can have a
Journal Status of Valid (V) or Posted (P).
Copying a journal saves time as you can use an existing journal as the basis for a new journal
entry.

Training Guide Module 8 – General Ledger
Page 33
Step Action
1. Click the General Ledger link.
Step Action
2. Click the Journal Entry link.
3. Click the Create/Update Journal Entries link.

Page 34
Step Action
4. Click the Find an Existing Value tab.
5. Click the Journal Header Status list.

Training Guide Module 8 – General Ledger
Page 35
Step Action
6. Click the "blank" list item.
Page 36
Step Action
7. Enter the desired information into the Journal ID field. Enter "0000931348".
All fields should be blank except for Business Unit and Journal ID. This will allow
the system to locate the journal more efficiently.
8. Click the Search button.
9. Verify this is the journal you want to copy.

Training Guide Module 8 – General Ledger
Page 37
Step Action
10. Click the Lines tab.

Page 38
Step Action
11. Click the Process list.

Training Guide Module 8 – General Ledger
Page 39
Step Action
12. Click the Copy Journal list item.

Page 40
Step Action
13. Click the Process button.

Training Guide Module 8 – General Ledger
Page 41
Step Action
14. Journal Date will always default to the current date or may be applied back to an
open accounting period (for example, when applying back a journal to a prior
month/fiscal year, use 6/30/0000).
The entry cannot be back-dated to a closed accounting period.
Click the Choose a date (Alt+5) button to display the current calendar month. The
date can also be typed into the Journal Date field.
15. Click the previous month button.
16. Click the 30 link.
17. Click the OK button.

Page 42
Step Action
18. The new/copied journal description can be changed or modified. The only change in
this example will be an addition to the description.
Enter the desired information into the Long Description field. Enter " - July".
Training Guide Module 8 – General Ledger
Page 43
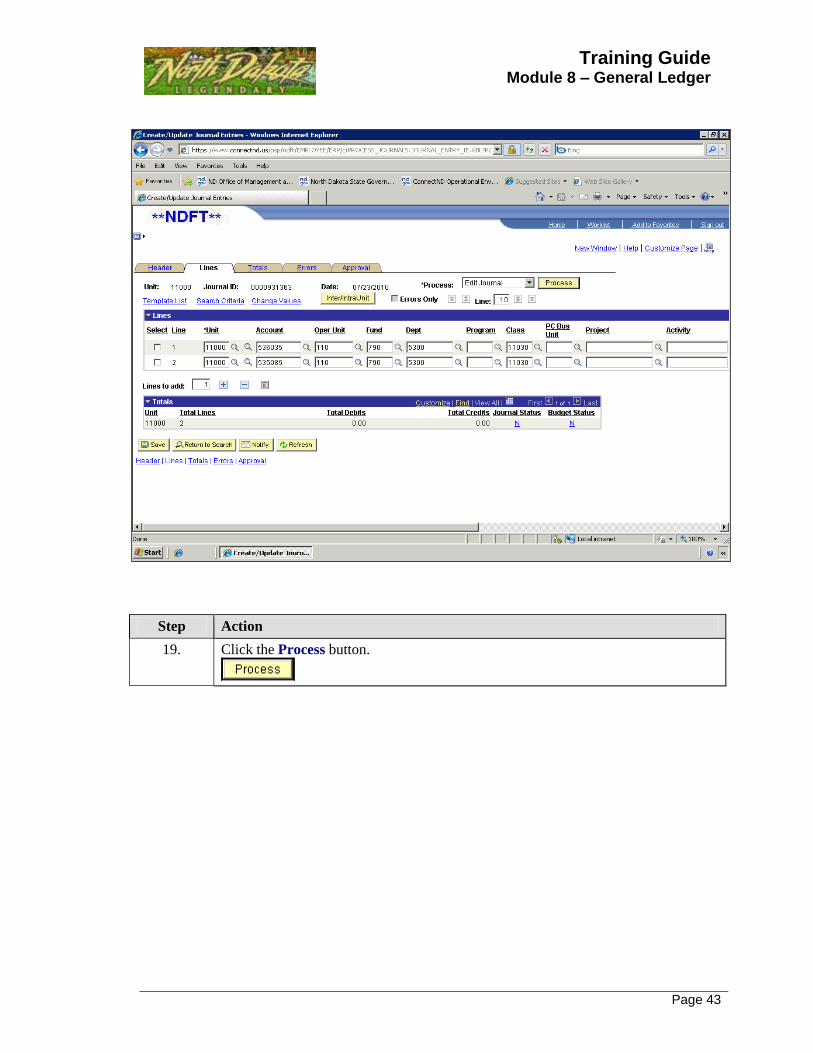
Step Action
19. Click the Process button.

Page 44
Step Action
20. Click the OK button. After the journal is processed, a unique journal number will be
assigned to it.
Note: Journal Status and Budget Status must both be Valid (V) before journal will
post.

Training Guide Module 8 – General Ledger
Page 45
Step Action
21. Click the Process list.

Page 46
Step Action
22. Click the Submit Journal list item.
Training Guide Module 8 – General Ledger
Page 47
Step Action
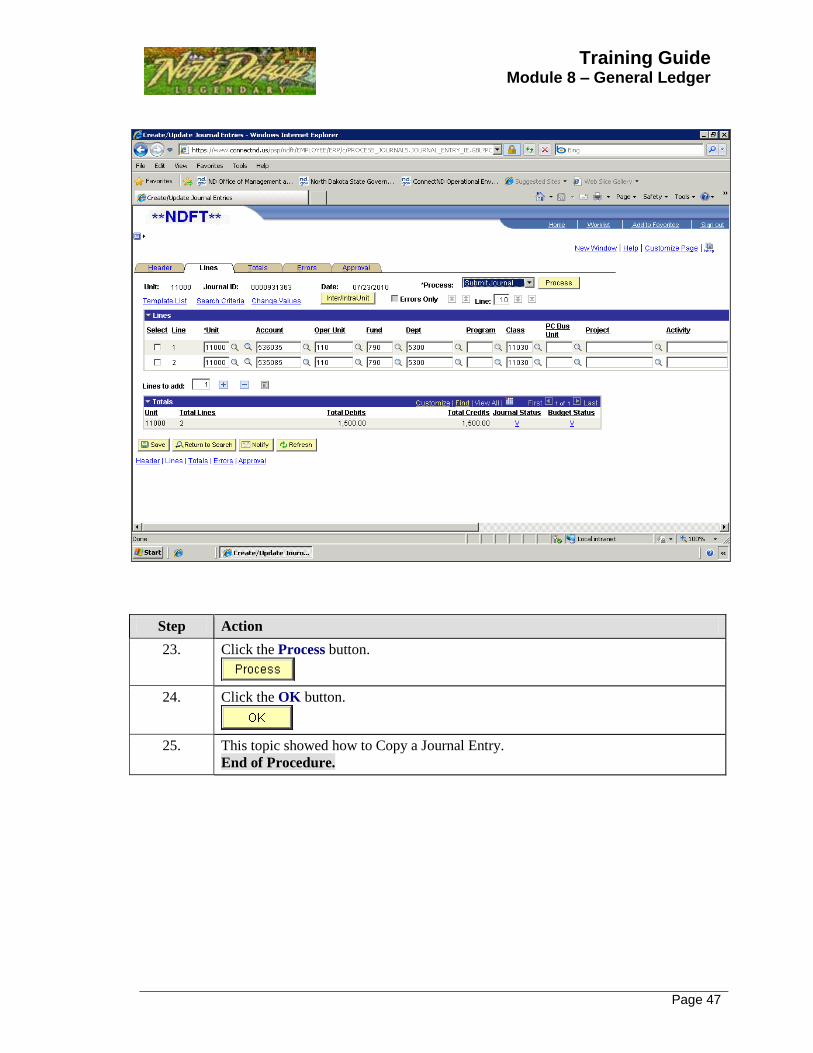
23. Click the Process button.
24. Click the OK button.
25. This topic showed how to Copy a Journal Entry.
End of Procedure.

Page 48
ST 8.1.5 - Reversing a Journal Entry Reversing a Journal Entry
Navigation: General Ledger > Journals > Journal Entry > Create/Update Journal Entries
A journal entry can be reversed by preparing a new journal with reversed accounting signs, or by
copying the original journal and reversing the accounting signs. This topic will show how to
copy the original journal and reverse the accounting signs.
Refer to ST 8.1.4 - Copying a Journal Entry, if necessary.
Procedure
This topic will show how to Reverse a Journal Entry by copying an existing journal and selecting
the Reverse Signs checkbox.
Training Guide Module 8 – General Ledger
Page 49
Step Action
1. Click the General Ledger link.
Step Action
2. Click the Journal Entry link.
3. Click the Create/Update Journal Entries link.

Page 50
Step Action
4. Click the Find an Existing Value tab.
5. Click the Journal Header Status list.

Training Guide Module 8 – General Ledger
Page 51
Step Action
6. Click the "blank" list item.

Page 52
Step Action
7. Enter the desired information into the Journal ID field. Enter "0000931348".
This is the journal from which you are going to copy from and reverse.
All fields should be blank except for Business Unit and Journal ID. This will allow
the system to locate the journal more efficiently.
8. Click the Search button.
9. Verify this is the correct journal to copy and reverse.

Training Guide Module 8 – General Ledger
Page 53
Step Action
10. Click the Lines tab.

Page 54
Step Action
11. Click the Process list.

Training Guide Module 8 – General Ledger
Page 55
Step Action
12. Click the Copy Journal list item.

Page 56
Step Action
13. Click the Process button.

Training Guide Module 8 – General Ledger
Page 57
Step Action
14. Click the Reverse Signs option.

Page 58
Step Action
15. Journal Date will always default to the current date or may be applied back to an
open accounting period (for example, when applying back a journal to prior
month/fiscal year, use 6/30/0000).
The entry cannot be back-dated to a closed accounting period.
Click the Choose a date (Alt+5) button to display the current calendar month. The
date can also be typed into the Journal Date field..
16. Select date of the current month, or click on the left arrow to view the previous
month.
17. Click the desired date. If you want to apply to the prior month, select the
appropriate date.

Training Guide Module 8 – General Ledger
Page 59
Step Action
18. You may want to apply back the reversal journal entry if the original entry was done
in the prior month, so the entries will offset each other within the same accounting
period.
19. Click the OK button.
20. Accounting entry amounts (signs) have been reversed.
Step Action
21. Click the Process button to Edit/Validate the journal.

Page 60
Step Action
22. Click the OK button.
Training Guide Module 8 – General Ledger
Page 61
Step Action
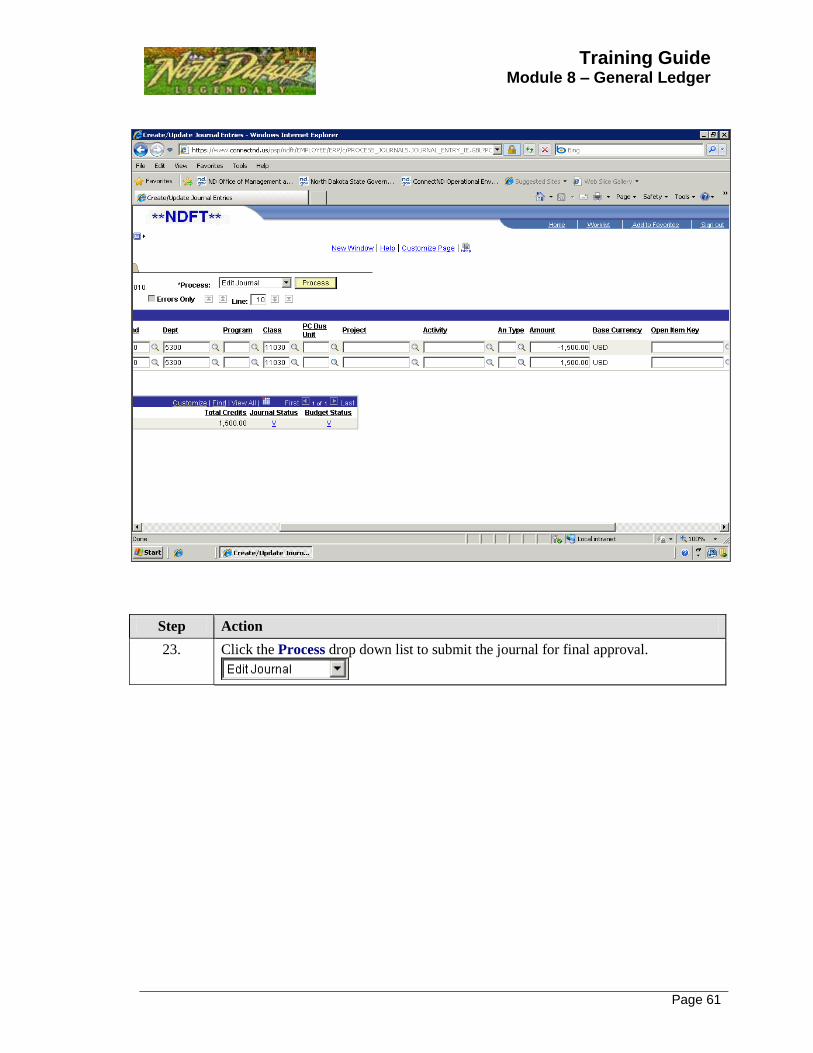
23. Click the Process drop down list to submit the journal for final approval.

Page 62
Step Action
24. Click the Submit Journal list item.

Training Guide Module 8 – General Ledger
Page 63
Step Action
25. Click the Process button.
26. Click the OK button.
27. This topic showed how to copy and Reverse a Journal Entry.
End of Procedure.

Page 64
ST 8.1.6 - Errors on a Journal Entry Errors on a Journal Entry
Navigation: General Ledger > Journals > Journal Entry > Create/Update Journal Entries
For any journal entry to post, the Journal Status and Budget Status must both be Valid (V), after
the journal is processed. If the Journal Status or Budget Status is in Error (E), the journal must be
corrected and re-processed.
Procedure
This topic shows how to correct Errors on a Journal Entry.

Training Guide Module 8 – General Ledger
Page 65
Step Action
1. Click the General Ledger link.
2. Click the Journals link.
3. Click the Journal Entry link.
4. Click the Create/Update Journal Entries link.
Step Action
5. Click the Find an Existing Value tab.

Page 66
Step Action
6. Click the Journal Header Status list.
Step Action
7. Click the "blank" list item.

Training Guide Module 8 – General Ledger
Page 67
Step Action
8. Enter the desired information into the Journal ID field. Enter "0000932213".
9. Click the Search button.

Page 68
Step Action
10. Click the Lines tab.
11. Journal Status is E (Error). Click on the error hyperlink for more information.
Note: In this example, the journal is missing the Fund chartfield on Line 1 and 2.

Training Guide Module 8 – General Ledger
Page 69
Step Action
12. Enter the desired information into the Fund field. Enter "790".
13. Enter the desired information into the Fund field. Enter "790".
14. Click the Process button.
15. This topic showed how to correct Errors on a Journal Entry.
End of Procedure.

Page 70
ST 8.1.7 - Spreadsheet Journal Import Spreadsheet Journal Import
Open JRNL_TEMPLATE.XLS <NEW>
The spreadsheet journal workbook allows you to enter journal information offline using Excel and
then import the journal into PeopleSoft.
Procedure
This topic shows how to create a Spreadsheet Journal Import.
Step Action
1. The journal template
JRNL_TEMPLATE.XLS and macro file is required for this upload process. Contact
OMB for these files.

Training Guide Module 8 – General Ledger
Page 71
Step Action
2. Once the template file is open, click the Options... button.
3. The Security Alert - Macros & ActiveX screen will default to:
Help protect me from unknown content (recommended).
The default must be changed.
Click the Enable this content option.
4. Click the OK button.
5. Click the New icon under Journal Sheets options.

Page 72
Step Action
6. Enter the desired information into the New Journal Sheet Name: field.
Enter "TESTOMBUPK".
Step Action
7. Click "OK".

Training Guide Module 8 – General Ledger
Page 73
Step Action
8. Click the + (plus) to enter New Journal Header Information.
9. Enter the desired information into the New Journal Header field. Enter "11000".
10. Enter the desired information into the New Journal Header field.
Enter "TESTOMBUPK".
This field cannot exceed 10 characters.
11. Click in the Journal Date: field to enter the desired journal date.
Note: This is where you apply back the journal date, if necessary.
12. Enter the desired information into the New Journal Header field. Enter "Test
Journal Upload".

Page 74
Step Action
13. Click the OK button.
14. Click the +... to add journal lines.
Note: This number will be the number of actual lines on the Excel spreadsheet, not
the line number.
15. Enter the desired information into the Insert Multiple Lines field. Enter "16".
Note: This information comes from the journal lines on the Excel spreadsheet
template.
16. Click the Insert button.
17. Once the Line fields are populated, click back to the original Excel journal
spreadsheet.
18. Toggle back to Excel spreadsheet file that you are copying from.
19. Copy selection from Business Unit (BU) to Class and down to last journal line.
Note: If you have project information, copy selection from Business Unit to Activity
and down to last journal line.
Do not copy Line # as this is already populated in the Journal Template.
Press [Ctrl+C].
20. Make sure the cursor is positioned at the Unit field and not Line # field.
21. Click the Paste Special... button.
22. Click the Values option.
23. Click the OK button.
24. This template must be saved as a different file name. If you click Save, it will save
over the Journal Template.
Note: Remember where the file is saved to, as you will need to retrieve it before the
upload.
Click the Save As (File Save As) button.

Training Guide Module 8 – General Ledger
Page 75
Step Action
25. Once "Save As" is selected, you will be prompted to name the new file.
Note: Make sure to select a name/location where all the upload files will be saved
together.
Click the Save button.
26. Click the Home object.
27. Click the Write File object.
28. Select the file that was currently saved.
Click the TESTOMBUPK list item.
Note: This is the Journal Sheet name from the template, not the Excel file you just
named.
29. Click the OK button.
30. Access PeopleSoft Financial's. If you are not already signed into PeopleSoft, do so
at this time.
Page 76
Step Action
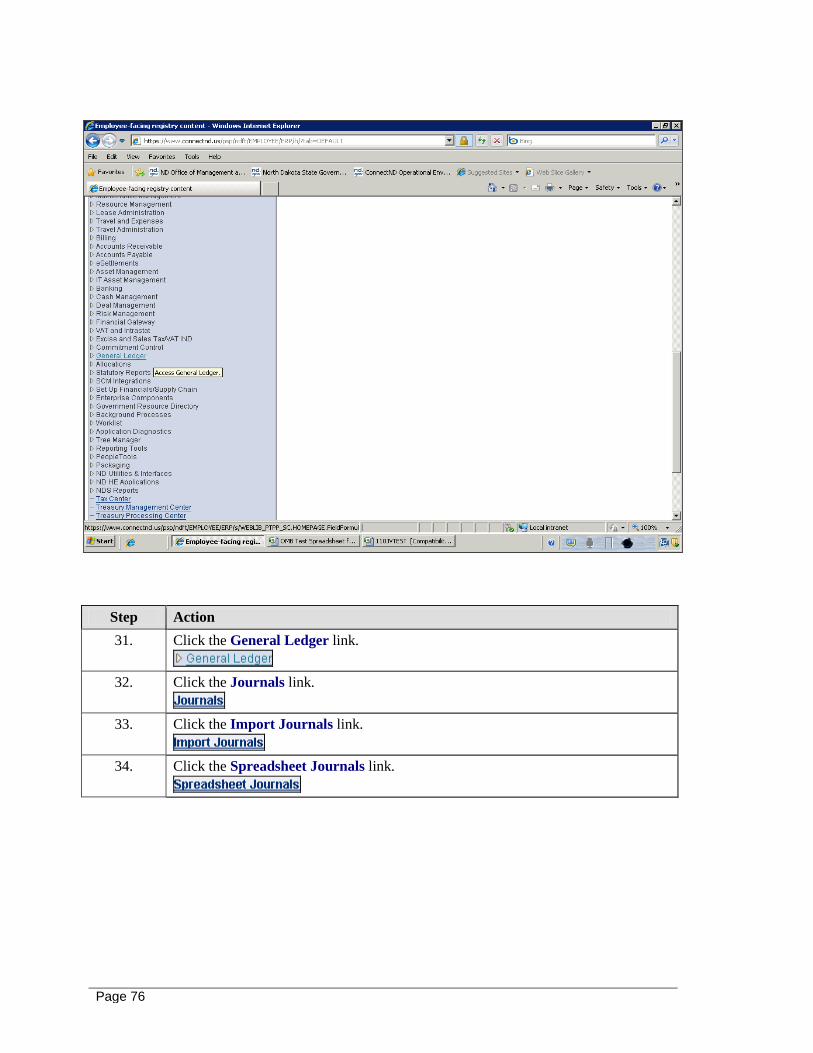
31. Click the General Ledger link.
32. Click the Journals link.
33. Click the Import Journals link.
34. Click the Spreadsheet Journals link.

Training Guide Module 8 – General Ledger
Page 77
Step Action
35. After navigating to the import screen, the user will be asked to enter a Run Control
ID:
The Run control is a database record that allows a user to define criteria for a
specific process. The Run Control is saved after it is created and can be used again,
or modified, the next time the same process is run. Run Controls are unique to a user
ID.
The first time a report is run you will need to Add a New Value. The Run Control
can be any alpha/numeric combination but cannot have spaces. Once the Run
Control is entered you will proceed to the parameters page.
Step Action
36. Click the Search button to select the Run Control.

Page 78
Step Action
37. The previously uploaded file must be deleted before the current file can be added,
unless this is the first time using this Run Control.
Click the Delete button.
38. Click the Add button.
39. Click the Browse... button.

Training Guide Module 8 – General Ledger
Page 79
Step Action
40. Locate the file you want to upload.
Double-click the 110JVTEST list item.

Page 80
Step Action
41. Click the Upload button.
42. Click the Run button.

Training Guide Module 8 – General Ledger
Page 81
Step Action
43. Click the OK button.

Page 82
Step Action
44. Click the Process Monitor link.

Training Guide Module 8 – General Ledger
Page 83
Step Action
45. The Process List tab shows the Run Status of the process. The process may run
through several status types before Success.
Click the Refresh button.
46. Click the Details link.

Page 84
Step Action
47. Click the View Log/Trace link.

Training Guide Module 8 – General Ledger
Page 85
Step Action
48. Click the AE_GL_EXCL_JRNL_5721544.stdout link.
49. The message will indicate that 1 journal was imported. If there was an error on the
import process, the message will indicate that 0 (Zero) journals were imported.
50. Click the Return button.
51. Return to the PeopleSoft Financial's Main Menu by clicking on Home.

Page 86
Step Action
52. Click the General Ledger link.
53. Click the Journals link.
54. Click the Journal Entry link.
55. Click the Create/Update Journal Entries link.

Training Guide Module 8 – General Ledger
Page 87
Step Action
56. Click the Find an Existing Value tab.
57. Click the Clear button or clear out the Journal Header Status.
58. Select current date or the date that was used for the journal.
Click the Choose a date (Alt+5) button.
59. Click the Search button.

Page 88
Step Action
60. Click the Lines tab.

Training Guide Module 8 – General Ledger
Page 89
Step Action
61. Enter the number of journal lines so they are all displayed.
Enter the desired information into the Line field. Enter "16".
62. Press [Enter].
This will display all lines of the uploaded journal.
63. Click the Process button.
Once the journal is in Valid state, it can be submitted for Final Approval.
64. This topic showed how to create a Spreadsheet Journal Import.
End of Procedure.

Page 90
ST 8.1.8 - Submitting a Journal Entry for Final Approval Submitting a Journal Entry for Final Approval
Navigation: General Ledger > Journals > Journal Entry > Create/Update Journal Entries
After the journal is processed and the Journal Status and Budget Status are Valid (V), it must be
entered into workflow to be final approved.
Procedure
This topic shows how to Submit a Journal Entry for Final Approval.
Step Action
1. Click the General Ledger link.

Training Guide Module 8 – General Ledger
Page 91
Step Action
2. Click the Journal Entry link.
3. Click the Create/Update Journal Entries link.

Page 92
Step Action
4. Click the Find an Existing Value tab.
5. Click the Journal Header Status list.

Training Guide Module 8 – General Ledger
Page 93
Step Action
6. Click the "blank" list item.

Page 94
Step Action
7. Enter the desired information into the Journal ID field. Enter "0000931436".
All fields should be blank except for Business Unit and Journal ID. This will allow
the system to locate the journal more efficiently.
8. Click the Search button.
9. Verify this is the journal you want to submit for final approval.

Training Guide Module 8 – General Ledger
Page 95
Step Action
10. Click the Lines tab.

Page 96
Step Action
11. Click the Process list.

Training Guide Module 8 – General Ledger
Page 97
Step Action
12. Click the Submit Journal list item.

Page 98
Step Action
13. Click the Process button.
14. Click the OK button.
15. Note: If you receive this message after you Submit Journal, the journal was already
submitted for approval.
Message from webpage: Approval at this authority level has already been
processed. No further approval is necessary at this level, nor is it necessary to
submit this to workflow again.

Training Guide Module 8 – General Ledger
Page 99
Step Action
16. Click the OK button.
17. This topic showed how to Submit a Journal Entry for Final Approval after the
journal was in Valid (V) status.
End of Procedure.
Page 100
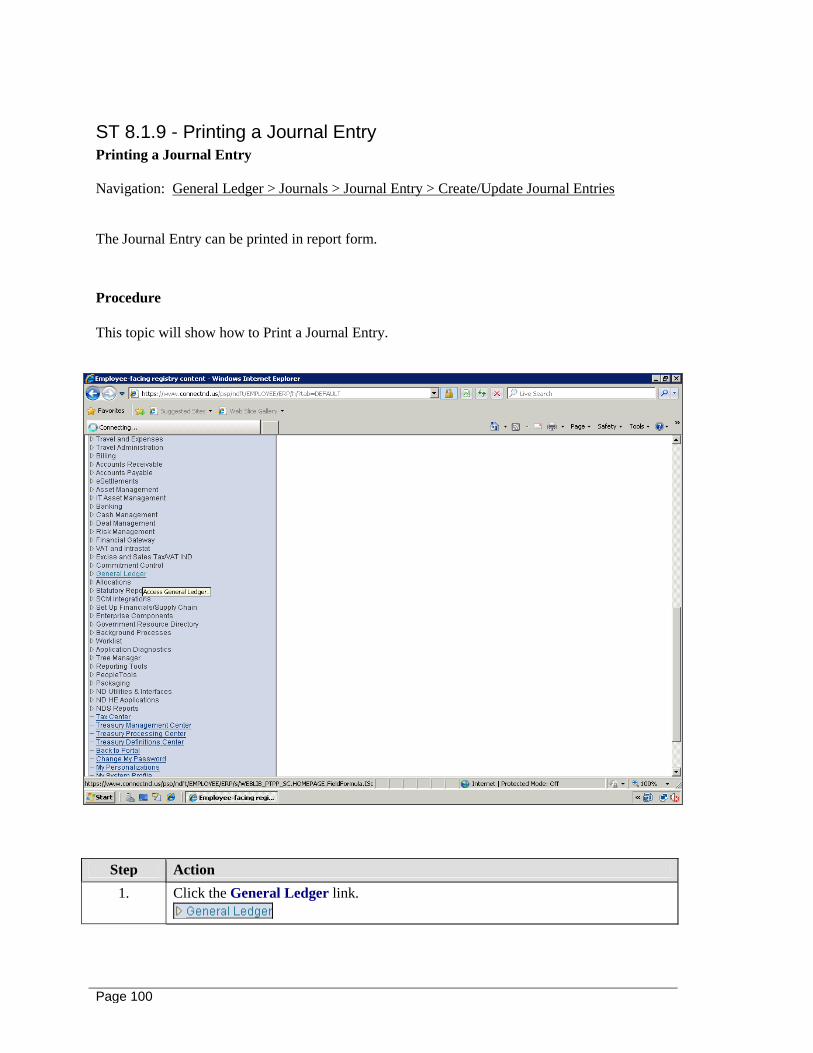
ST 8.1.9 - Printing a Journal Entry Printing a Journal Entry
Navigation: General Ledger > Journals > Journal Entry > Create/Update Journal Entries
The Journal Entry can be printed in report form.
Procedure
This topic will show how to Print a Journal Entry.
Step Action
1. Click the General Ledger link.

Training Guide Module 8 – General Ledger
Page 101
Step Action
2. Click the Journals link.
3. Click the Journal Entry link.
4. Click the Create/Update Journal Entries link.
Step Action
5. Click the Find an Existing Value tab.
6. Click the Journal Header Status list.

Page 102
Step Action
7. Click the "blank" list item.

Training Guide Module 8 – General Ledger
Page 103
Step Action
8. Enter the desired information into the Journal ID field. Enter "0000931363".
All fields should be blank except for Business Unit and Journal ID. This will allow
the system to locate the journal more efficiently.
9. Click the Search button.

Page 104
Step Action
10. Click the Lines tab.

Training Guide Module 8 – General Ledger
Page 105
Step Action
11. Click the Process list.

Page 106
Step Action
12. Click the Print Journal (Crystal) list item.

Training Guide Module 8 – General Ledger
Page 107
Step Action
13. Click the Process button.
14. Click the Process Monitor link.
Note: This link will open a new window.

Page 108
Step Action
15. The Process List tab shows the Run Status of the process. The process may run
through several status types before Success.
Click the Refresh button.
16. The process is complete when the Run Status is Success and Distribution Status is
Posted.
17. Click the Details link.

Training Guide Module 8 – General Ledger
Page 109
Step Action
18. Click the View Log/Trace link.

Page 110
Step Action
19. Click the GLC7501-_5721667.PDF link.
20. The Journal is now in PDF format and ready to print.
21. This topic showed how to Print a Journal Entry.
End of Procedure.
Training Guide Module 8 – General Ledger
Page 111
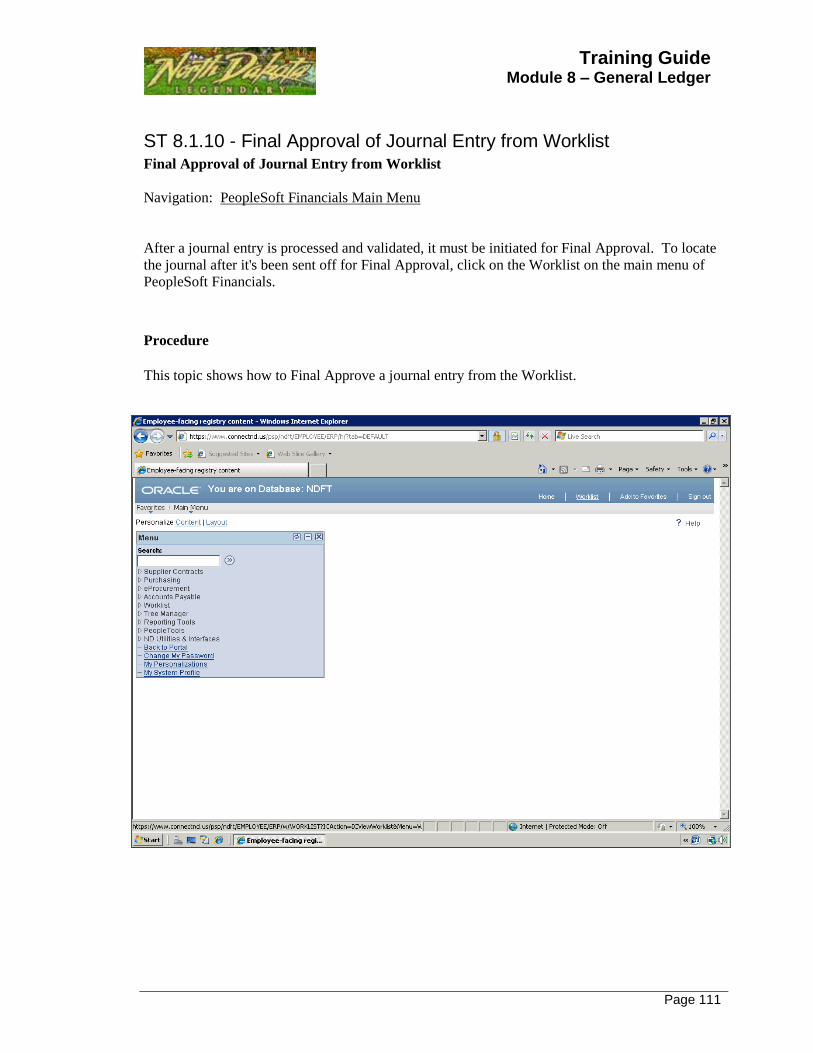
ST 8.1.10 - Final Approval of Journal Entry from Worklist Final Approval of Journal Entry from Worklist
Navigation: PeopleSoft Financials Main Menu
After a journal entry is processed and validated, it must be initiated for Final Approval. To locate
the journal after it's been sent off for Final Approval, click on the Worklist on the main menu of
PeopleSoft Financials.
Procedure
This topic shows how to Final Approve a journal entry from the Worklist.

Page 112
Step Action
1. Click the Worklist link.
Step Action
2. Click the 1010679, 11000, 0000932331, 2011-01-31, , 0, link.
Note: This link contains the business unit, journal number and date.
3. The link gives you direct access to the journal entry.

Training Guide Module 8 – General Ledger
Page 113
Step Action
4. Click the Process list.

Page 114
Step Action
5. Click the Submit Journal list item.

Training Guide Module 8 – General Ledger
Page 115
Step Action
6. Click the Process button.
7. Click the Approval tab.
8. The journal is approved.
9. This topic showed how to Final Approve a journal entry from a Worklist.
End of Procedure.

Page 116
ST Lesson 8.2 - InterDepartmental Billings InterDepartmental Billings
InterDepartmental Billings (IDB's) in General Ledger consist of Header and Line totals which
uniquely identifies the IDB and records the monetary amount to the affected Chartfields.
The journal Header contains three attributes that uniquely identify the journal: journal ID, journal
date, and Business Unit.
The journal Lines record the monetary and statistical amounts and ChartField values associated
with each line of the transaction.
An IDB can have many detail lines, but must have at least two, because the total debits must
equal the total credits.
ST 8.2.1 - Creating an InterDepartmental Billing/IDB Creating an InterDepartmental Billing/IDB
Navigation: General Ledger > Journals > Journal Entry > Create/Update Journal Entries
InterDepartmental Billing (IDB) entries in PeopleSoft must have an Open Item key when billing
another state agency. The Open Item key is the business unit to which you are billing and
coincides with the IDB receivable account code (131002).
Procedure
This topic shows how to create an InterDepartmental Billing/IDB. An IDB requires a business
unit in the Open Item field, which creates the AP voucher for the billed agency to pay.

Training Guide Module 8 – General Ledger
Page 117
Step Action
1. Click the General Ledger link.

Page 118
Step Action
2. Click the Journal Entry link.
3. Click the Create/Update Journal Entries link.
4. The Business Unit will default based on the User's preferences.
Journal ID will default to NEXT. The system automatically assigns the next
available journal number to the Journal Entry.

Training Guide Module 8 – General Ledger
Page 119
Step Action
5. Journal Date will always default to the current date or may be applied back to an
open accounting period (for example, when applying back a journal to prior
month/fiscal year, use 6/30/0000).
The entry cannot be back-dated to a closed accounting period.
Click the Choose a date (Alt+5) button to display the current calendar month. The
date can also be typed into the Journal Date field.
6. Select date of the current month, or click on the left arrow to view the previous
month.
7. Click the desired date. If you want to apply to the prior month, select the
appropriate date.

Page 120
Step Action
8. Note: The journal date cannot be changed after you Add the journal.
For example, if you want to apply the journal to the prior open month/accounting
period, it must be done on this screen.
9. Click the Add button.
Step Action
10. Enter the desired information into the Long Description field. Enter "Postage
Stamps for February 2010.".
Note: This field is useful for recording a detailed description regarding the journal.
The length of this field is 254 characters; however, only the first 30 will appear in
prompt lists for journals.
11. Enter the desired information into the Source field. Enter "IDB".
12. You will only need to populate the Long Description and Source fields.

Training Guide Module 8 – General Ledger
Page 121
Step Action
13. Click the Lines tab.
Step Action
14. Enter the Interdepartmental Receivable account into the Account field.
Enter "131002".
15. Enter the desired information into the Fund field. Enter "701".
16. Enter the desired information into the Dept field. Enter "8900".
17. Enter the desired information into the Amount field. Enter "44.00".
18. Enter the desired information into the Open Item Key field. Enter "72000".
Note: In this example, we are billing Game & Fish (Business Unit 72000). The
Open Item Key field is the Business Unit to be billed.
19. Account 131002 is the only line where the Open Item Key is entered.

Page 122
Step Action
20. The Reference field is optional. It is a 10 character field used for transaction
descriptions.
Enter the desired information into the Reference field. Enter "SLIP1713".
21. This field is optional. It is a 30 character field used for transaction descriptions. If
left blank, this field will default to account code description.
Enter the desired information into the Journal Line Description field.
Enter "postage".
22. Click the Insert Lines button.
23. Chartfield values will populate from Line 1 into Line 2 except for Account Code,
Reference and Journal Line Description.
24. Enter the Revenue Account into the Account field. Enter "462115".
25. The Reference field is optional. It is a 10 character field used for transaction
descriptions.
Enter the desired information into the Reference field. Enter "SLIP1713".
26. This field is optional. It is a 30 character field used for transaction descriptions. If
left blank, this field will default to account code description.
Enter the desired information into the Journal Line Description field.
Enter "postage".
27. Click the Process button.

Training Guide Module 8 – General Ledger
Page 123
Step Action
28. Click the OK button. After the journal is processed, a unique journal number will
be assigned to it.
Note: Journal Status and Budget Status must both be Valid (V) before the journal
will post in the nightly process.
29. This topic showed how to create an InterDepartmental Billing/IDB.
End of Procedure.
Page 124
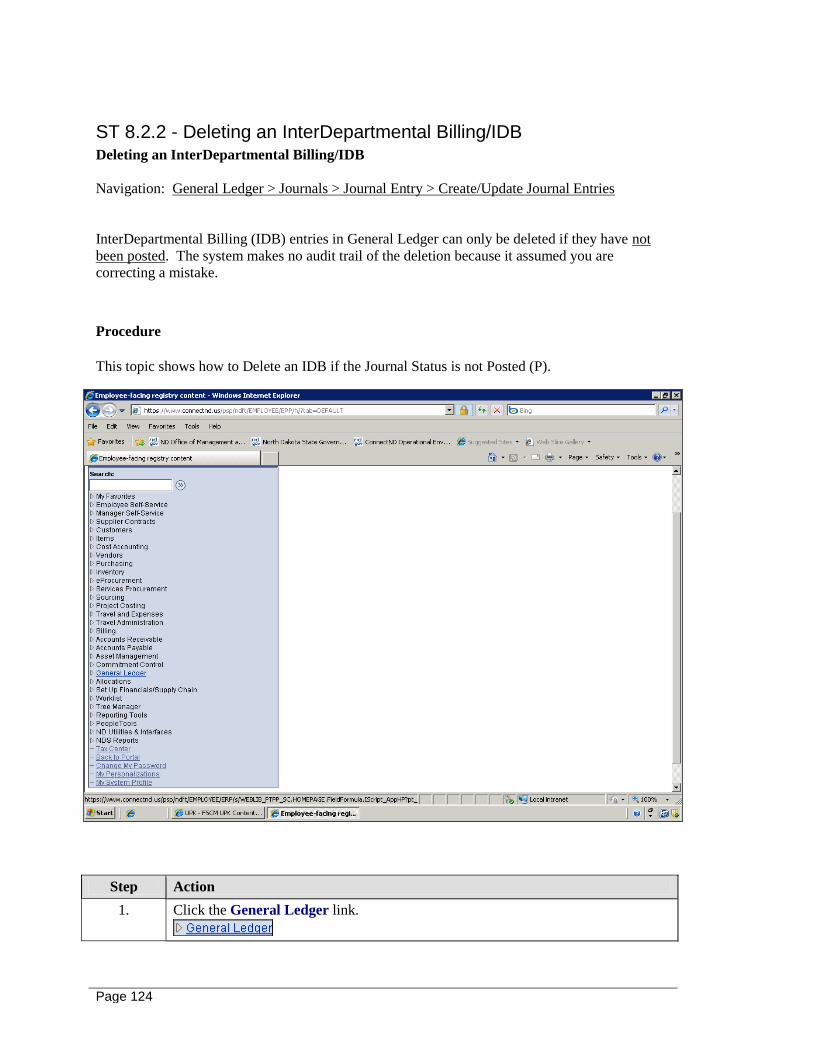
ST 8.2.2 - Deleting an InterDepartmental Billing/IDB Deleting an InterDepartmental Billing/IDB
Navigation: General Ledger > Journals > Journal Entry > Create/Update Journal Entries
InterDepartmental Billing (IDB) entries in General Ledger can only be deleted if they have not
been posted. The system makes no audit trail of the deletion because it assumed you are
correcting a mistake.
Procedure
This topic shows how to Delete an IDB if the Journal Status is not Posted (P).
Step Action
1. Click the General Ledger link.

Training Guide Module 8 – General Ledger
Page 125
Step Action
2. Click the Journal Entry link.
3. Click the Create/Update Journal Entries link.

Page 126
Step Action
4. Click the Find an Existing Value tab.
5. Click the Journal Header Status list.

Training Guide Module 8 – General Ledger
Page 127
Step Action
6. Click the "blank" list item.

Page 128
Step Action
7. Enter the desired information into the Journal ID field. Enter "0000931388".
All fields should be blank except for Business Unit and Journal ID. This will allow
the system to locate the journal more efficiently.
8. Click the Search button.
9. Verify this is the IDB you want to delete.

Training Guide Module 8 – General Ledger
Page 129
Step Action
10. Click the Lines tab.
11. Note: If the Journal Status is posted (P), it cannot be deleted. A posted journal will
have to be reversed. See topic 8.2.3.

Page 130
Step Action
12. Click the Process drop down list.

Training Guide Module 8 – General Ledger
Page 131
Step Action
13. Click the Delete Journal list item.

Page 132
Step Action
14. Click the Process button.
15. Click the Yes button.

Training Guide Module 8 – General Ledger
Page 133
Step Action
16. Click the OK button.
17. This topic showed how to Delete an InterDepartmental Billing/IDB.
End of Procedure.
Page 134
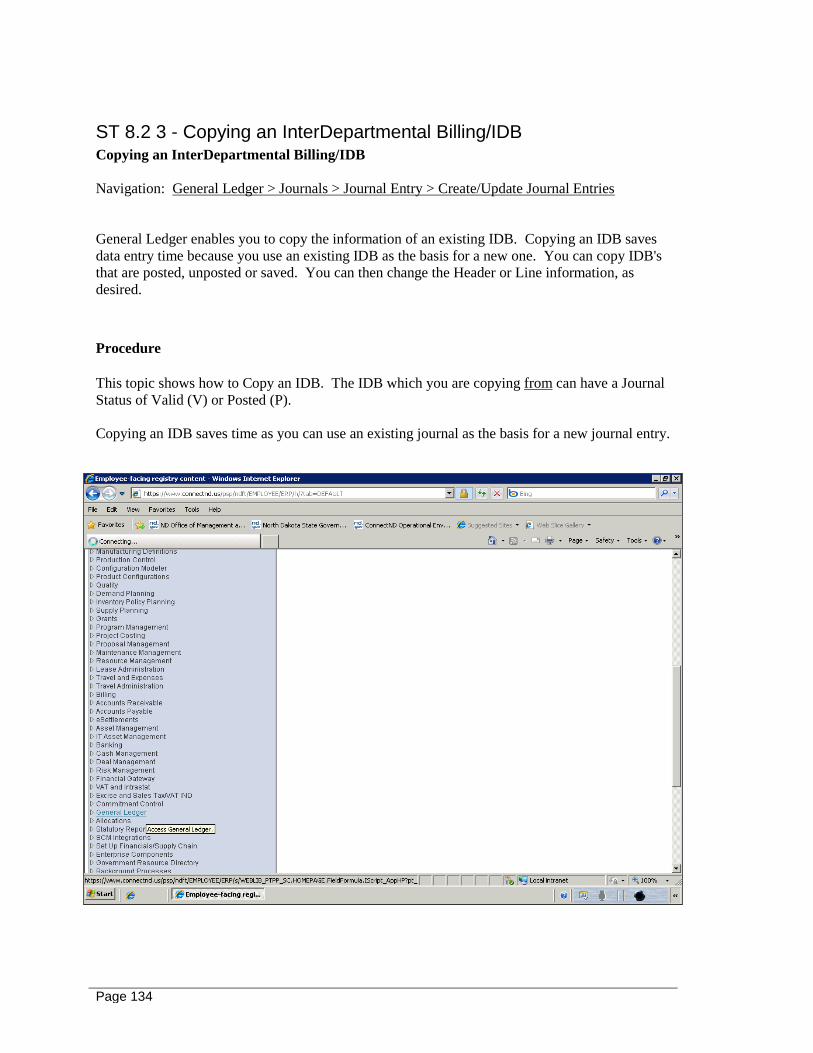
ST 8.2 3 - Copying an InterDepartmental Billing/IDB Copying an InterDepartmental Billing/IDB
Navigation: General Ledger > Journals > Journal Entry > Create/Update Journal Entries
General Ledger enables you to copy the information of an existing IDB. Copying an IDB saves
data entry time because you use an existing IDB as the basis for a new one. You can copy IDB's
that are posted, unposted or saved. You can then change the Header or Line information, as
desired.
Procedure
This topic shows how to Copy an IDB. The IDB which you are copying from can have a Journal
Status of Valid (V) or Posted (P).
Copying an IDB saves time as you can use an existing journal as the basis for a new journal entry.

Training Guide Module 8 – General Ledger
Page 135
Step Action
1. Click the General Ledger link.
2. Click the Journals link.
3. Click the Journal Entry link.
4. Click the Create/Update Journal Entries link.
Step Action
5. Click the Find an Existing Value tab.

Page 136
Step Action
6. Click the Journal Header Status list.
Step Action
7. Click the "blank" list item.

Training Guide Module 8 – General Ledger
Page 137
Step Action
8. Enter the desired information into the Journal ID field. Enter "0000931534".
All fields should be blank except for Business Unit and Journal ID. This will allow
the system to locate the journal more efficiently.
9. Click the Search button.
10. Verity this is the IDB you want to copy.

Page 138
Step Action
11. Click the Lines tab.

Training Guide Module 8 – General Ledger
Page 139
Step Action
12. Click the Process list.

Page 140
Step Action
13. Click the Copy Journal list item.

Training Guide Module 8 – General Ledger
Page 141
Step Action
14. Click the Process button.
15. Journal Date will always default to the current date or may be applied back to an
open accounting period (for example, when applying back a journal to prior
month/fiscal year, use 6/30/0000).
The entry cannot be back-dated to a closed accounting period.

Page 142
Step Action
16. Click the OK button.

Training Guide Module 8 – General Ledger
Page 143
Step Action
17. Click the Header tab.

Page 144
Step Action
18. The new/copied IDB description can be changed or modified. The only change in
this example will be the month.
Enter the desired information into the Long Description field. Enter "August".
19. Click the Lines tab.
20. Change the amounts and Open Item Key, if necessary.

Training Guide Module 8 – General Ledger
Page 145
Step Action
21. Enter the desired information into the Amount field. Enter "200.00".
22. Enter the desired information into the Amount field. Enter "-200.00".
23. Click the Process button.
24. Click the OK button. After the IDB is processed, a unique journal number will be
assigned to it.
Note: Journal Status and Budget Status must both be Valid (V) before journal will
post.
25. This topic showed how to Copy an InterDepartmental Billing/IDB.
End of Procedure.

Page 146
ST 8.2.4 - Reversing an InterDepartmental Billing/IDB Reversing an InterDepartmental Billing/IDB
Navigation: General Ledger > Journals > Journal Entry > Create/Update Journal Entries
IDB's can be reversed by preparing a new IDB with reversed accounting signs, or by copying the
original IDB and reversing the accounting signs. This topic will show how to copy the original
IDB and reverse the accounting signs.
Refer to ST 8.2.3 - Copying an InterDepartmental Billing/IDB, if necessary.
Procedure
This topic will show how to Reverse an IDB by copying an existing journal and selecting the
Reverse Signs checkbox.

Training Guide Module 8 – General Ledger
Page 147
Step Action
1. Click the General Ledger link.
2. Click the Journals link.
3. Click the Journal Entry link.
4. Click the Create/Update Journal Entries link.
Step Action
5. Click the Find an Existing Value tab.

Page 148
Step Action
6. Click the Journal Header Status list.
Step Action
7. Click the "blank" list item.

Training Guide Module 8 – General Ledger
Page 149
Step Action
8. Enter the desired information into the Journal ID field. Enter "0000931534".
This is the IDB from which you are going to copy from and reverse.
All fields should be blank except for Business Unit and Journal ID. This will allow
the system to locate the journal more efficiently.
9. Click the Search button.
10. Verify this is the correct journal to copy and reverse.

Page 150
Step Action
11. Click the Lines tab.
Step Action
12. Click the Process list.

Training Guide Module 8 – General Ledger
Page 151
Step Action
13. Click the Copy Journal list item.

Page 152
Step Action
14. Click the Process button.

Training Guide Module 8 – General Ledger
Page 153
Step Action
15. Click the Reverse Signs option.
16. Journal Date will always default to the current date or may be applied back to an
open accounting period (for example, when applying back a journal to prior
month/fiscal year, use 6/30/0000).
The entry cannot be back-dated to a closed accounting period.
17. Click the OK button.
18. Accounting entries (signs) have been reversed.

Page 154
Step Action
19. Click the Header tab.

Training Guide Module 8 – General Ledger
Page 155
Step Action
20. Enter the desired information into the Long Description field. Enter "REVERSE
931534".
It is recommended that the original IDB journal number is referenced on the reversal
Header description field.
21. Click the Lines tab.

Page 156
Step Action
22. Click the Process button.
23. Click the OK button.
24. This topic showed how to Reverse an IDB.
End of Procedure.

Training Guide Module 8 – General Ledger
Page 157
ST 8.2.5 - Printing an InterDepartmental Billing/IDB Printing an InterDepartmental Billing/IDB
Navigation: General Ledger > Journals > Journal Entry > Create/Update Journal Entries
The InterDepartmental Billing/IDB can be printed in report form.
Procedure
This topic will show how to print an InterDepartmental Billing/IDB.
Step Action
1. Click the General Ledger link.

Page 158
Step Action
2. Click the Journals link.
3. Click the Journal Entry link.
4. Click the Create/Update Journal Entries link.
Step Action
5. Click the Find an Existing Value tab.
6. Click the Journal Header Status list.

Training Guide Module 8 – General Ledger
Page 159
Step Action
7. Click the "blank" list item.

Page 160
Step Action
8. Enter the desired information into the Journal ID field. Enter "0000928401".
All fields should be blank except for Business Unit and Journal ID. This will allow
the system to locate the journal more efficiently.
9. Click the Search button.

Training Guide Module 8 – General Ledger
Page 161
Step Action
10. Click the Lines tab.

Page 162
Step Action
11. Click the Process list.

Training Guide Module 8 – General Ledger
Page 163
Step Action
12. Click the Print Journal (Crystal) list item.

Page 164
Step Action
13. Click the Process button.
14. Click the Process Monitor link.
Note: This link will open a new window.

Training Guide Module 8 – General Ledger
Page 165
Step Action
15. The Process List tab shows the Run Status of the process. The process may run
through several status types before Success.
Click the Refresh button.
16. The process is complete when the Run Status is Success and Distribution Status is
Posted.
17. Click the Details link.

Page 166
Step Action
18. Click the View Log/Trace link.
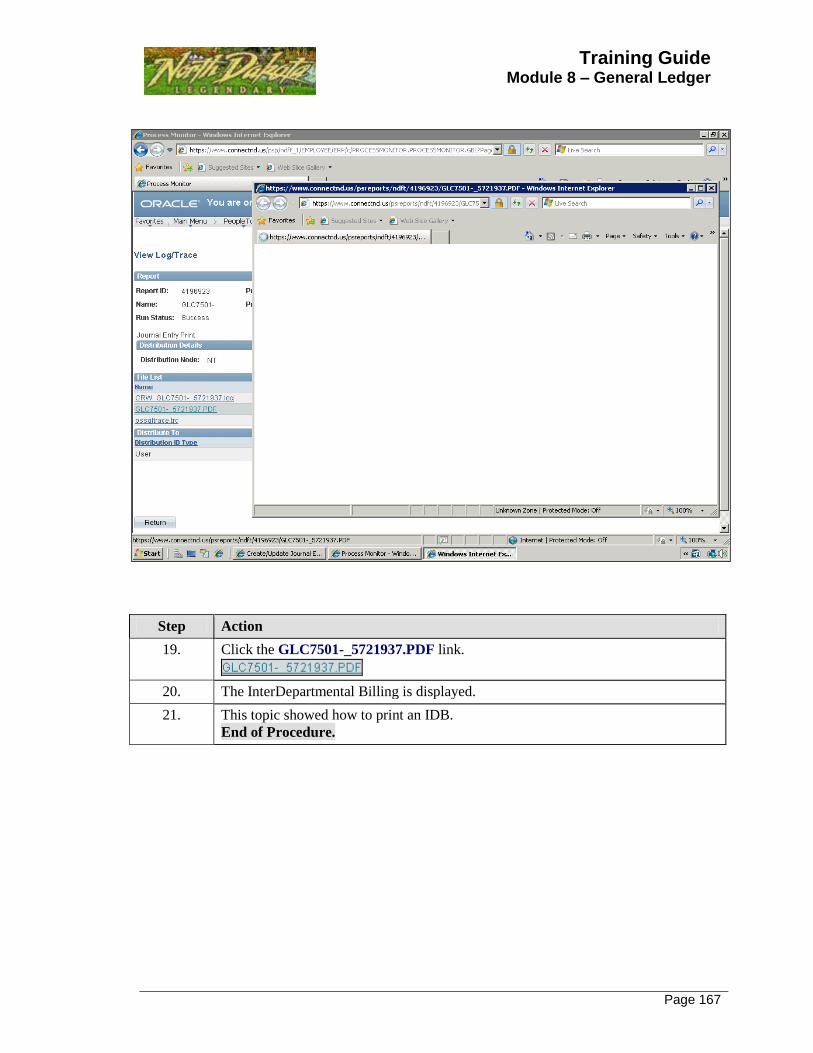
Training Guide Module 8 – General Ledger
Page 167
Step Action
19. Click the GLC7501-_5721937.PDF link.
20. The InterDepartmental Billing is displayed.
21. This topic showed how to print an IDB.
End of Procedure.

Page 168
ST 8.2.6 - Creating an IDB SpeedType Creating an IDB SpeedType
Navigation: Set Up Financials/Supply Chain > Common Definitions > Design Chartfields >
Define Values > SpeedTypes
SpeedTypes can be used in General Ledger when creating InterDepartmental Billings (IDB's).
They are similar to SpeedCharts in Accounts Payable when entering vouchers but do not have the
ability to split funds. A SpeedType can only create one accounting line of chartfields.
Procedure
This topic shows how to Create an IDB SpeedType.

Training Guide Module 8 – General Ledger
Page 169
Step Action
1. Click the Set Up Financials/Supply Chain link.
2. Click the Common Definitions link.
3. Click the Design ChartFields link.
4. Click the Define Values link.
5. Click the SpeedTypes link.
Step Action
6. Click the Add a New Value tab.

Page 170
Step Action
7. Enter the desired information into the SetID field. Enter "11000".
8. Enter the desired information into the SpeedType Key field. Enter "AR IDB".
9. Click the Add button.
Step Action
10. Enter the desired information into the Description field. Enter "ACCOUNTS
RECEIVABLE - IDB".
11. Enter the desired information into the Account field. Enter "131002".
12. Enter the desired information into the Fund Code field. Enter "730".
13. Enter the desired information into the Department field. Enter "4400".
14. Click the Save button.

Training Guide Module 8 – General Ledger
Page 171
Step Action
15. This topic showed how to Create an IDB Speed Type.
End of Procedure.

Page 172
ST 8.2.7 - Using an IDB SpeedType Using an IDB SpeedType
Navigation: General Ledger > Journals > Journal Entry > Create/Update Journal Entries
SpeedTypes can reduce redundant chartfield coding in an InterDepartmental Billing (IDB).
When the SpeedType is selected, it will populate the accounting chartfields that were identified in
the initial set up.
Procedure
This topic shows how to Use an IDB SpeedType.

Training Guide Module 8 – General Ledger
Page 173
Step Action
1. Click the General Ledger link.
2. Click the Journals link.
3. Click the Journal Entry link.
4. Click the Create/Update Journal Entries link.
Step Action
5. Click the Add button.

Page 174
Step Action
6. Enter the desired information into the Long Description field. Enter "Billing for 1-
28-2011.".
7. Enter the desired information into the Source field. Enter "idb".
8. Click the Lines tab.

Training Guide Module 8 – General Ledger
Page 175
Step Action
9. Click in the SpeedType field.
10. Click the Show SpeedType Prompt button.

Page 176
Step Action
11. Select the appropriate SpeedType you want to use for this IDB.
Click the Selected option.
12. Click the OK button.

Training Guide Module 8 – General Ledger
Page 177
Step Action
13. Enter the desired information into the Amount field. Enter "50.00".
14. Enter the desired information into the Open Item Key field. Enter "12500".
15. Click the Insert Lines button.
16. Enter the desired information into the Account field. Enter "463027".
17. Click the Process button.
18. Click the OK button.
19. This topic showed how to Use an IDB SpeedType.
End of Procedure.

Page 178
ST Lesson 8.3 - Online Deposits Online Deposits
Deposits in General Ledger consist of Header and Line totals which uniquely identifies the
deposit and records the monetary amount to the affected Chartfields.
The journal Header contains three attributes that uniquely identify the journal: journal ID, journal
date, and Business Unit.
The journal Lines record the monetary and statistical amounts and ChartField values associated
with each line of the transaction.
A deposit can have many detail lines, but must have at least two, because the total debits must
equal the total credits.
ST 8.3.1 - Creating an Online Deposit Creating an Online Deposit
Navigation: General Ledger > Journals > Journal Entry > Create/Update Journal Entries
Deposits are entered into General Ledger and released/posted by the State Treasurer's Office.
Procedure
This topic shows how to Create an Online Deposit.

Training Guide Module 8 – General Ledger
Page 179
Step Action
1. Click the Access General Ledger link.
2. Click the Journals link.
3. Click the Journal Entry link.
4. Click the Create/Update Journal Entries link.
5. The Business Unit will default based on the User's preferences.
Journal ID will default to NEXT. The system automatically assigns the next
available journal number to the Journal Entry.

Page 180
Step Action
6. Journal Date will always default to the current date or may be applied back to an
open accounting period (for example, when applying back a journal to prior
month/fiscal year, use 6/30/0000).
The entry cannot be back-dated to a closed accounting period.
Click the Choose a date (Alt+5) button to display the current calendar month. The
date can also be typed into the Journal Date field..
7. Select date of the current month, or click on the left arrow to view the previous
month.
Click the Previous Month button.

Training Guide Module 8 – General Ledger
Page 181
Step Action
8. Click the desired date. If you want to apply to the prior month, select the
appropriate date.
Click the 31 object.
9. Note: The journal date cannot be changed after you Add the journal.
For example, if you want to apply the journal to the prior open month/accounting
period, it must be done on this screen.
10. Click the Add button.

Page 182
Step Action
11. Enter the desired information into the Long Description field. Enter "Sale of
Salvage & Scrap".
Note: This field is useful for recording a detailed description regarding the journal.
The length of this field is 254 characters; however, only the first 30 will appear in
prompt lists for journals.
12. Enter the desired information into the Source field. Enter "DEP".
13. You will only need to populate the Long Description and Source fields.
14. Click the Lines tab.
15. The revenue account code is entered in the Entry Event field unless the deposit is a
refund (See Refund of Current Biennium Expenditure Deposit - ST 8.3.2).
Note: Once the Entry Event is entered, the Account field populates with the cash
account code (105251). This indicates that the cash lines will automatically be
created when the deposit is Processed.
Training Guide Module 8 – General Ledger
Page 183
Step Action
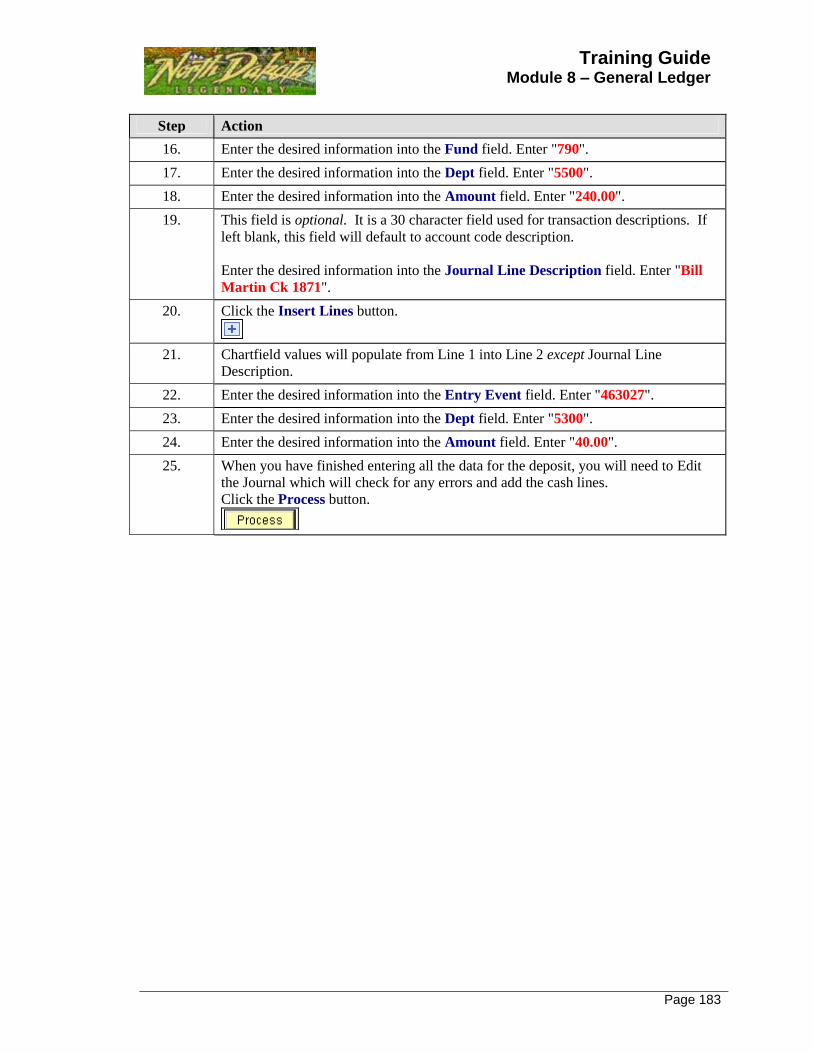
16. Enter the desired information into the Fund field. Enter "790".
17. Enter the desired information into the Dept field. Enter "5500".
18. Enter the desired information into the Amount field. Enter "240.00".
19. This field is optional. It is a 30 character field used for transaction descriptions. If
left blank, this field will default to account code description.
Enter the desired information into the Journal Line Description field. Enter "Bill
Martin Ck 1871".
20. Click the Insert Lines button.
21. Chartfield values will populate from Line 1 into Line 2 except Journal Line
Description.
22. Enter the desired information into the Entry Event field. Enter "463027".
23. Enter the desired information into the Dept field. Enter "5300".
24. Enter the desired information into the Amount field. Enter "40.00".
25. When you have finished entering all the data for the deposit, you will need to Edit
the Journal which will check for any errors and add the cash lines.
Click the Process button.

Page 184
Step Action
26. Click the OK button. After the journal is processed, a unique journal number will be
assigned to it.
Note: Journal Status and Budget Status must both be Valid (V) before deposit can
be posted by the State Treasurer's Office.

Training Guide Module 8 – General Ledger
Page 185
Step Action
27. A copy of the deposit or wire transfer must be printed and submitted (along with
checks/cash/currency) to the State Treasurer's Office for reconciliation/posting.
Click the Print Journal (Crystal) list item.

Page 186
Step Action
28. Click the Process button.
29. Click the Process Monitor link.
Note: This link will open a new window.

Training Guide Module 8 – General Ledger
Page 187
Step Action
30. The Process List tab shows the Run Status of the process. The process may run
through several status types before Success.
Click the Refresh button.
31. The process is complete when the Run Status is Success and Distribution Status is
Posted.
32. Click the Details link to access the Process Detail list.

Page 188
Step Action
33. Click the View Log/Trace link to access the File List.

Training Guide Module 8 – General Ledger
Page 189
Step Action
34. Click the GLC7501-_5241495.PDF link.
Note: The PDF link contains the Job Name (GLC7501), the Process Instance
(5241495), and the PDF file.
35. The Journal is now in PDF format and ready to print.
36. This process showed how to Create an Online Deposit.
End of Procedure.

Page 190
ST 8.3.2 - Refund of Current Biennium Expenditure Deposit Refund of Current Biennium Expenditure Deposit
Navigation: General Ledger > Journals > Journal Entry > Create/Update Journal Entries
For most deposit lines, agencies will use the Entry Event field. However, those are only used for
revenue accounts. The Account field must be used to record a refund of an expenditure.
Procedure
This topic will show how to deposit a Refund of a Current Biennium Expenditure.
Step Action
1. Click the General Ledger link.

Training Guide Module 8 – General Ledger
Page 191
Step Action
2. Click the Journals link.
3. Click the Journal Entry link.
4. Click the Create/Update Journal Entries link.
5. The Business Unit will default based on the User's preferences.
Journal ID will default to NEXT. The system automatically assigns the next
available journal number to the Journal Entry.

Page 192
Step Action
6. Journal Date will always default to the current date or may be applied back to an
open accounting period (for example, when applying back a journal to prior
month/fiscal year, use 6/30/0000).
The entry cannot be back-dated to a closed accounting period.
Click the Choose a date (Alt+5) button to display the current calendar month. The
date can also be typed into the Journal Date field.
7. Select date of the current month, or click on the left arrow to view the previous
month.
8. Note: The journal date cannot be changed after you Add the journal.
For example, if you want to apply the journal to the prior open month/accounting
period, it must be done on this screen.
9. Click the Add button.

Training Guide Module 8 – General Ledger
Page 193
Step Action
10. Enter the desired information into the Long Description field. Enter "Deposit -
Refund".
Note: This field is useful for recording a detailed description regarding the journal.
The length of this field is 254 characters; however, only the first 30 will appear in
prompt lists for journals.
11. Enter the desired information into the Source field. Enter "dep".
12. You will only need to populate the Long Description and Source fields.
13. Click the Lines tab.

Page 194
Step Action
14. Enter the desired information into the Account field. Enter"105251".
In this example, Line 1 is depositing Cash (debit).
Note: Do not use the Entry Event field for this type of deposit. That is only used
for regular deposits.
15. Enter the desired information into the Fund field. Enter "001".
16. Enter the desired information into the Dept field. Enter "1000".
17. Enter the desired information into the Amount field. Enter "275.00".
18. The Reference field is optional. It is a 10 character field used for transaction
descriptions.
Enter the desired information into the Reference field. Enter "Refund".
19. Journal Line Description field is optional. It is a 30 character field used for
transaction descriptions. If left blank, this field will default to the account code
description.

Training Guide Module 8 – General Ledger
Page 195
Step Action
20. Click the Insert Lines button.
21. Chartfield values will populate from Line 1 into Line 2 except for Account Code,
Reference and Journal Line Description.
22. Enter the desired information into the Account field. Enter "623005".
In this example, Line 2 is reversing the expenditure back into the correct account
code.
23. Enter the desired information into the Oper Unit field. Enter "110".
Note: Operating Unit is required on the expenditure line.
24. Enter the desired information into the Class field. Enter "11030".
Note: Class is required on the expenditure line.
25. The Reference field is optional. It is a 10 character field used for transaction
descriptions.
Enter the desired information into the Reference field. Enter "REFUND".
26. The Journal Line Description field is optional. It is a 30 character field used for
transaction descriptions. If left blank, this field will default to the account code
description.
27. Click the Process button.
28. Click the OK button. After the journal is processed, a unique journal number will be
assigned to it.
Note: Journal Status and Budget Status must both be Valid (V) before deposited
can be posted by the State Treasurer's Office.
29. Click the Process drop down list.

Page 196
Step Action
30. Click the Print Journal (Crystal) list item.

Training Guide Module 8 – General Ledger
Page 197
Step Action
31. Click the Process button.
32. Click the Process Monitor link.
Note: This link will open a new window.

Page 198
Step Action
33. The Process List tab shows the Run Status of the process. The process may run
through several status types before Success.
Click the Refresh button.
34. The process is complete when the Run Status is Success and Distribution Status is
Posted.
35. Click the Details link to access the Process Detail list.

Training Guide Module 8 – General Ledger
Page 199
Step Action
36. Click the GLC7501 - 5720727.PDF Name link.
Note: The PDF link contains the Job Name (GLC7501), the Process Instance
(5241495), and the PDF file.
37. Journal Entry Detail Report is displayed.
38. This topic showed how to prepare a Refund of Current Biennium Expenditure
Deposit.
End of Procedure.

Page 200
ST 8.3.3 - Deleting an Online Deposit Deleting an Online Deposit
Navigation: General Ledger > Journals > Journal Entry > Create/Update Journal Entries
Journal Entries/Deposits in General Ledger can only be deleted if they have not been posted. The
system makes no audit trail of the deletion because it assumes you are correcting a mistake.
Procedure
This topic shows how to delete a deposit if the Journal Status is not Posted (P).
Step Action
1. Click the General Ledger link.

Training Guide Module 8 – General Ledger
Page 201
Step Action
2. Click the Journals link.
3. Click the Journal Entry link.
4. Click the Create/Update Journal Entries link.
Step Action
5. Click the Find an Existing Value tab.
6. Click the Journal Header Status list.

Page 202
Step Action
7. Click the "blank" list item.

Training Guide Module 8 – General Ledger
Page 203
Step Action
8. Enter the desired information into the Journal ID field. Enter "0000932174".
All fields should be blank except for Business Unit and Journal ID. This will allow
the system to locate the journal more efficiently.
9. Click the Search button.
10. Verify this is the journal you want to delete.

Page 204
Step Action
11. Click the Lines tab.
12. Note: The Deposit must be in Valid status (V) to be deleted. If the Journal Status is
posted (P), it cannot be deleted. A posted deposit will have to be reversed. See
topic 8.1.5.

Training Guide Module 8 – General Ledger
Page 205
Step Action
13. Click the Process list.

Page 206
Step Action
14. Click the Delete Journal list item.

Training Guide Module 8 – General Ledger
Page 207
Step Action
15. Click the Process button.
16. Click the Yes button.
17. After you click OK, the journal will be deleted and will not show up in any Search
requests.
18. This topic showed how to Delete an Online Deposit.
End of Procedure.

Page 208
ST 8.3.4 - Copying an Online Deposit Copying an Online Deposit
Navigation: General Ledger > Journals > Journal Entry > Create/Update Journal Entries
General Ledger enables you to copy the information of an existing journal/deposit. Copying a
deposit saves time as you can use an existing journal entry/deposit as the basis for the new one.
You can copy journals that are posted, unposted, or saved and then change the Header or Line
information, as desired.
Procedure
This topic shows how to copy a deposit. The deposit which you are copying from can have a
Journal Status of Valid (V) or Posted (P).
Copying a deposit saves time as you can use an existing deposit as the basis for a new deposit.
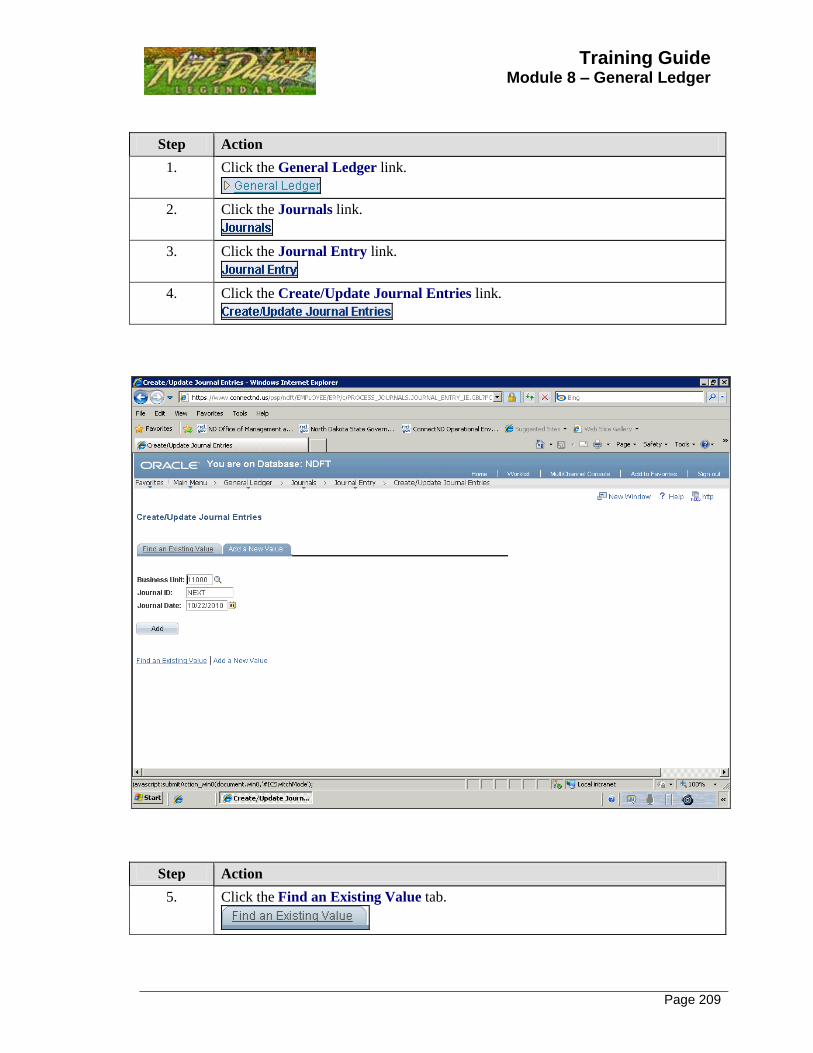
Training Guide Module 8 – General Ledger
Page 209
Step Action
1. Click the General Ledger link.
2. Click the Journals link.
3. Click the Journal Entry link.
4. Click the Create/Update Journal Entries link.
Step Action
5. Click the Find an Existing Value tab.

Page 210
Step Action
6. Click the Journal Header Status list.
Step Action
7. Click the "blank" list item.

Training Guide Module 8 – General Ledger
Page 211
Step Action
8. Enter the desired information into the Journal ID field. Enter "0000931537".
All fields should be blank except for Business Unit and Journal ID. This will allow
the system to locate the journal/deposit more efficiently.
9. Click the Search button.
10. Verify this is the deposit you want to copy.

Page 212
Step Action
11. Click the Lines tab.

Training Guide Module 8 – General Ledger
Page 213
Step Action
12. Click the Process list.

Page 214
Step Action
13. Click the Copy Journal list item.

Training Guide Module 8 – General Ledger
Page 215
Step Action
14. Click the Process button.

Page 216
Step Action
15. Journal Date will always default to the current date or may be applied back to an
open accounting period (for example, when applying back a deposit to a prior
month/fiscal year, use 6/30/0000).
The entry cannot be back-dated to a closed accounting period.
Click the Choose a date (Alt+5) button.
16. Click the Previous Month button.
17. Click the 30 link.
18. Click the OK button.

Training Guide Module 8 – General Ledger
Page 217
Step Action
19. Click the Process button.
20. Click the OK button.
21. This topic showed how to Copy an Online Deposit.
End of Procedure.

Page 218
ST 8.3.5 - Printing an Online Deposit Printing an Online Deposit
Navigation: General Ledger > Journals > Journal Entry > Create/Update Journal Entries
The Deposit can be printed in report form.
Procedure
This topic shows how to Print an Online Deposit.
Step Action
1. Click the General Ledger link.

Training Guide Module 8 – General Ledger
Page 219
Step Action
2. Click the Journals link.
3. Click the Journal Entry link.
4. Click the Create/Update Journal Entries link.
Step Action
5. Click the Find an Existing Value tab.
6. Click the Journal Header Status list.

Page 220
Step Action
7. Click the "blank" list item.

Training Guide Module 8 – General Ledger
Page 221
Step Action
8. Enter the desired information into the Journal ID field. Enter "0000932178".
All fields should be blank except for Business Unit and Journal ID. This will allow
the system to locate the journal more efficiently.
9. Click the Search button.

Page 222
Step Action
10. Click the Lines tab.
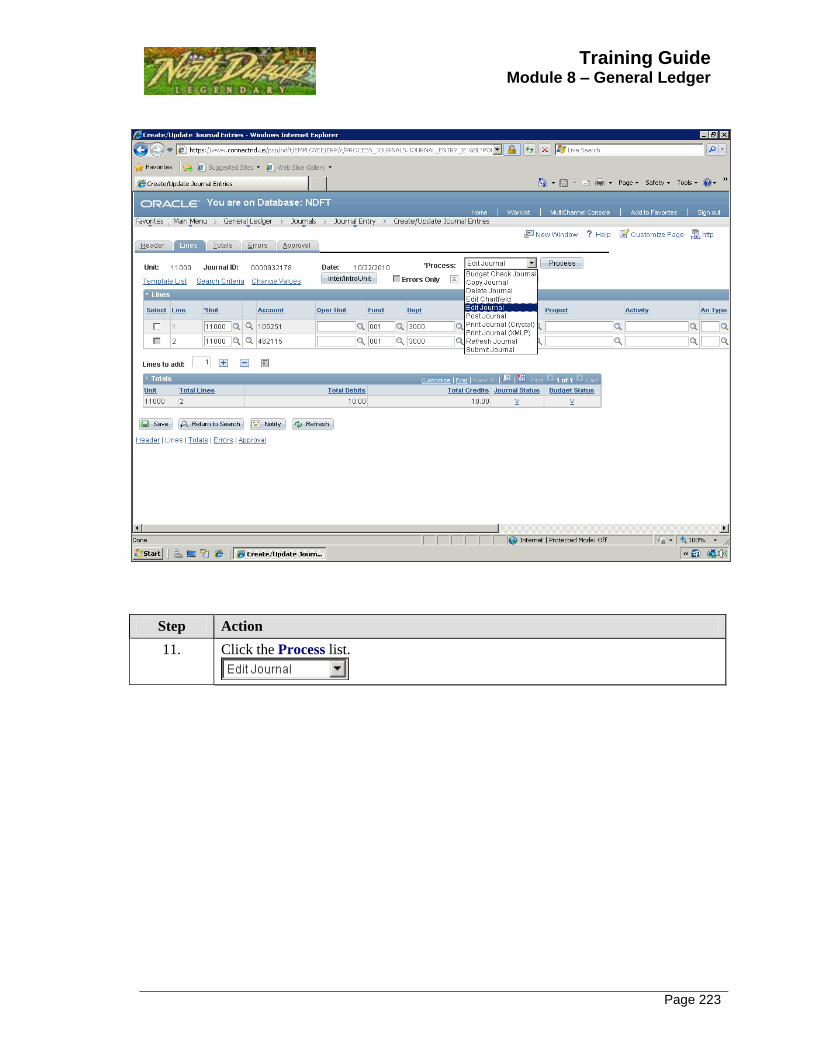
Training Guide Module 8 – General Ledger
Page 223
Step Action
11. Click the Process list.

Page 224
Step Action
12. Click the Print Journal (Crystal) list item.

Training Guide Module 8 – General Ledger
Page 225
Step Action
13. Click the Process button.
14. Click the Process Monitor link.
Note: This link will open a new window.

Page 226
Step Action
15. The Process List tab shows the Run Status of the process. The process may run
through several status types before Success.
Click the Refresh button.
16. The process is complete when the Run Status is Success and Distribution Status is
Posted.
17. Click the Details link.
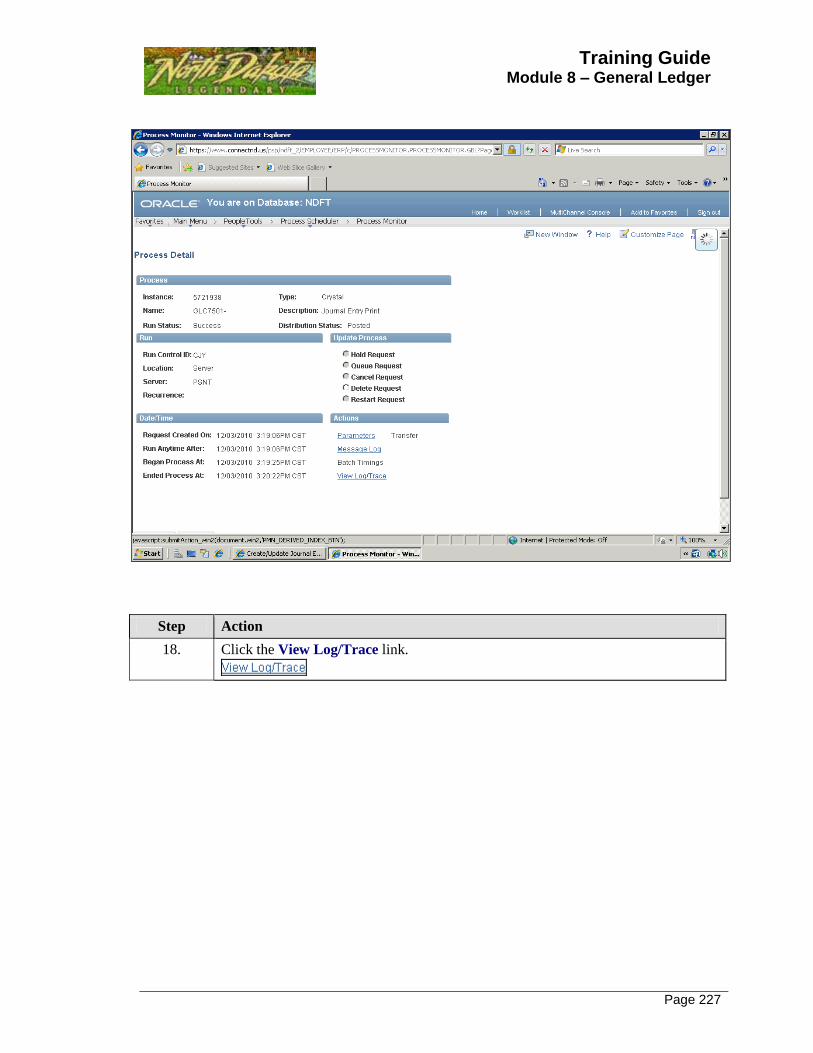
Training Guide Module 8 – General Ledger
Page 227
Step Action
18. Click the View Log/Trace link.

Page 228
Step Action
19. Click the PDF file.
20. The Journal Entry Detail Report is displayed.
21. This topic showed how to Print an Online Deposit.
End of Procedure.

Training Guide Module 8 – General Ledger
Page 229
ST 8.3.6 - Creating a Deposit SpeedType SpeedTypes
Navigation: Set Up Financials/Supply Chain > Common Definitions > Design Chartfields >
Define Values > SpeedTypes
SpeedTypes can be used in General Ledger when entering deposits. They are similar to
SpeedCharts used in Accounts Payable when entering vouchers but do not have the ability to split
funds. A SpeedType can only create one accounting line of chartfields.
Procedure
This shows how to set up a SpeedType.

Page 230
Step Action
1. Click the Set Up Financials/Supply Chain link.
2. Click the Common Definitions link.
3. Click the Design ChartFields link.
4. Click the Define Values link.
5. Click the SpeedTypes link.
Step Action
6. Click the Add a New Value tab.

Training Guide Module 8 – General Ledger
Page 231
Step Action
7. Enter the desired information into the SpeedType Key field. Enter "REVENUE
CD".
8. Click the Add button.
Step Action
9. Enter the desired information into the Description field. Enter "REVENUE -
CENTRAL DUP".
10. Enter the desired information into the Fund Code field. Enter "790".
11. Enter the desired information into the Department field. Enter "5300".
12. Enter the desired information into the Entry Event field. Enter "463027".
13. Click the Save button.

Page 232
Step Action
14. This topic showed how to create a SpeedType.
End of Procedure.

Training Guide Module 8 – General Ledger
Page 233
ST 8.3.7 - Using a Deposit SpeedType Using a Deposit SpeedType
Navigation: General Ledger > Journals > Journal Entry > Create/Update Journal Entries
SpeedTypes can reduce redundant chartfield coding in a deposit. When the revenue account code
is also an Entry Event, the deposit journal will populate the cash lines as well.
Procedure
This topic shows how to use a Deposit SpeedType.
Step Action
1. Click the General Ledger link.

Page 234
Step Action
2. Click the Journals link.
3. Click the Journal Entry link.
4. Click the Create/Update Journal Entries link.
Step Action
5. Click the Add button.

Training Guide Module 8 – General Ledger
Page 235
Step Action
6. Enter the desired information into the Long Description field. Enter "Deposit for 1-
28-2011".
7. Enter the desired information into the Source field. Enter "dep".
8. Click the Lines tab.

Page 236
Step Action
9. Click the Show SpeedType Prompt button.

Training Guide Module 8 – General Ledger
Page 237
Step Action
10. Press the left mouse button over the scrollbar and drag the mouse to the desired
location.
11. Click the View All link.
12. Click the Selected option.
13. Press the left mouse button over the scrollbar and drag the mouse to the desired
location.
14. Click the OK button.

Page 238
Step Action
15. Enter the desired information into the Amount field. Enter "500.00".
16. Click the Process button.
17. Click the OK button.
18. End of Procedure.

Training Guide Module 8 – General Ledger
Page 239
ST Lesson 8.4 - Reports, Inquiries and Queries Reports and Queries
A variety of reports and queries are available for end users. Most modules contain content
specific delivered reports. This module contains reports/queries non specific to a particular
financial's module. These reports retrieve data to accommodate agencies with data validation,
reconciliation, and preparation of other reports.
ST 8.4.1 - Itemized Transaction Register Report Itemized Transaction Register Report
Navigation: NDS Reports > General Ledger > ND State Transaction Register
Procedure
This topic shows how to run the Itemized Transaction Register Report.

Page 240
Step Action
1. Click the NDS Reports link.
2. Click the General Ledger link.
3. Click the ND State Transaction Register link.

Training Guide Module 8 – General Ledger
Page 241
Step Action
4. Click the Add a New Value tab.
5. After navigating to a report, the user will be asked to enter a Run Control ID:
The Run control is a database record that allows a user to define criteria for a
specific process. The Run Control is saved after it is created and can be used again,
or modified, the next time the same process is run. Run Controls are unique to a user
ID.
The first time a report is run you will need to Add a New Value. The Run Control
can be any alpha/numeric combination but cannot have spaces. Once the Run
Control is entered you will proceed to the parameters page.
6. Enter the desired information into the Run Control ID field.
Enter "Itemized_Test".

Page 242
Step Action
7. Select "Date From" range.
Click the Choose a date (Alt+5) button.
8. Select "Date To" range.
Click the Choose a date (Alt+5) button.
9. Click the Run button.

Training Guide Module 8 – General Ledger
Page 243
Step Action
10. Click the OK button.

Page 244
Step Action
11. Click the Process Monitor link.

Training Guide Module 8 – General Ledger
Page 245
Step Action
12. Click Refresh periodically to update the Run Status. Once the Status is Success and
the Distribution Status is Posted, click on the Details hyperlink.
Click the Refresh button.
13. Click the Details link.
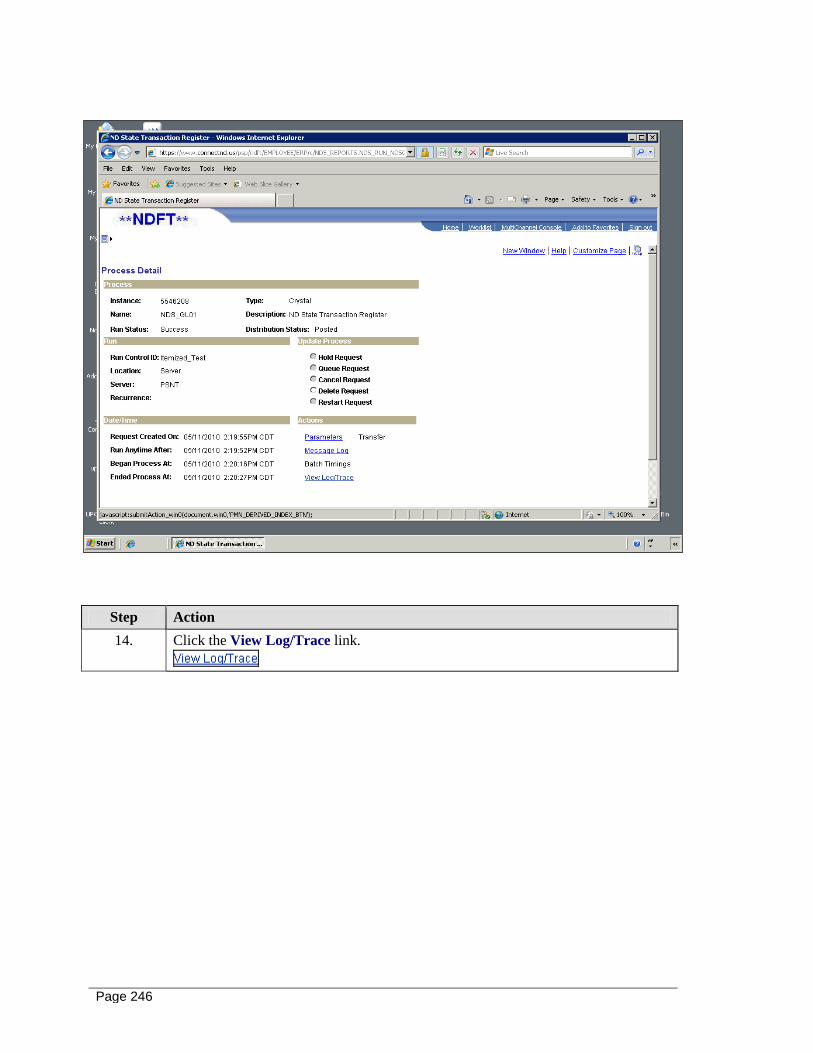
Page 246
Step Action
14. Click the View Log/Trace link.

Training Guide Module 8 – General Ledger
Page 247
Step Action
15. Click the NDS_GL01_5546208.PDF link.
16. This topic showed how to run the Itemized Transaction Register Report.
End of Procedure.

Page 248
ST 8.4.2 - NDS Fund Balance - Statewide Report NDS Fund Balance - Statewide Report
Navigation: NDS Reports > General Ledger > NDS Fund Balance Statewide
Procedure
This topic shows how to run the NDS Fund Balance Statewide Report.
Step Action
1. Click the NDS Reports link.
2. Click the General Ledger link.
3. Click the NDS Fund Balance Statewide link.
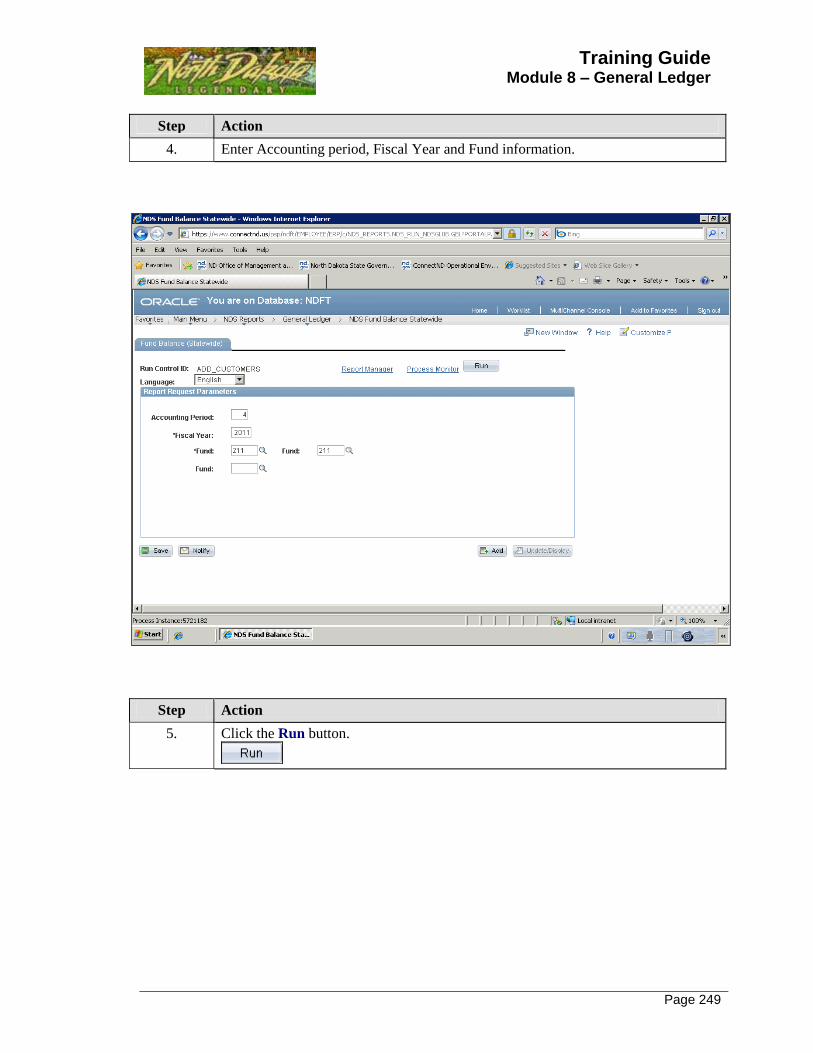
Training Guide Module 8 – General Ledger
Page 249
Step Action
4. Enter Accounting period, Fiscal Year and Fund information.
Step Action
5. Click the Run button.

Page 250
Step Action
6. Click the OK button.

Training Guide Module 8 – General Ledger
Page 251
Step Action
7. Click the Process Monitor link.

Page 252
Step Action
8. Click Refresh periodically to update the Run Status. Once the Status is Success and
the Distribution Status is Posted, click on the Details hyperlink.
Click the Refresh button.
9. Click the Details link.

Training Guide Module 8 – General Ledger
Page 253
Step Action
10. Click the View Log/Trace link.
11. To access the report, click on the PDF file.
12. This topic showed how to run the NDS Fund Balance Statewide Report.
End of Procedure.

Page 254
ST 8.4.3 - NDS_GL01 Itemized Query NDS_GL01 Itemized Query
Navigation: Reporting Tools > Query > Query Viewer
Procedure
This topic shows to run the NDS_GL01 Itemized Query.
Step Action
1. Click the Reporting Tools link.
2. Click the Query link.
3. Click the Query Viewer link.

Training Guide Module 8 – General Ledger
Page 255
Step Action
4. Enter the desired information into the begins with field. Enter "NDS_GL01".
Note: This is a search tool if you do not know the name of the Query.
5. Click the Search button.
6. Click the Excel link.
Note: This report can Run to HTML or Excel.
7. Enter the From Date or select dates from the calendar icon.
Click the Choose a date (Alt+5) button.

Page 256
Step Action
8. Enter the To Date or select dates from the calendar icon.
Click the Choose a date (Alt+5) button.
9. Click the View Results button.
Step Action
10. Click the Open button.
11. The Excel spreadsheet displays the results of the query.
12. This topic showed how to run the NDS_GL01 Itemized Query.
End of Procedure.

Training Guide Module 8 – General Ledger
Page 257
ST 8.4.4 - Ledger Inquiry Ledger Inquiry
Navigation: General Ledger > Review Financial Information > Ledger
Procedure
This topic shows how to run a Ledger Inquiry.
Step Action
1. Click the General Ledger link.
2. Click the Review Financial Information link.

Page 258
Step Action
3. Click the Ledger link.
Step Action
4. Click the Search button.

Training Guide Module 8 – General Ledger
Page 259
Step Action
5. Enter the desired information into the Unit field. Enter "11000".
6. Enter the desired information into the Fiscal Year field. Enter "2011".
7. Enter the desired information into the To Period field. Enter "12".
8. Click the Show Transaction Details option.
9. Enter the desired information into the Value field. Enter "131002".
10. Click the Look up Value (Alt+5) button.
11. Click the Interdepartmental Receivable link.
12. Click the Search button.

Page 260
Step Action
13. Click the View All link.
14. Detail is listed for the criteria selected.
15. This topic showed how to run a Ledger Inquiry.
End of Procedure.
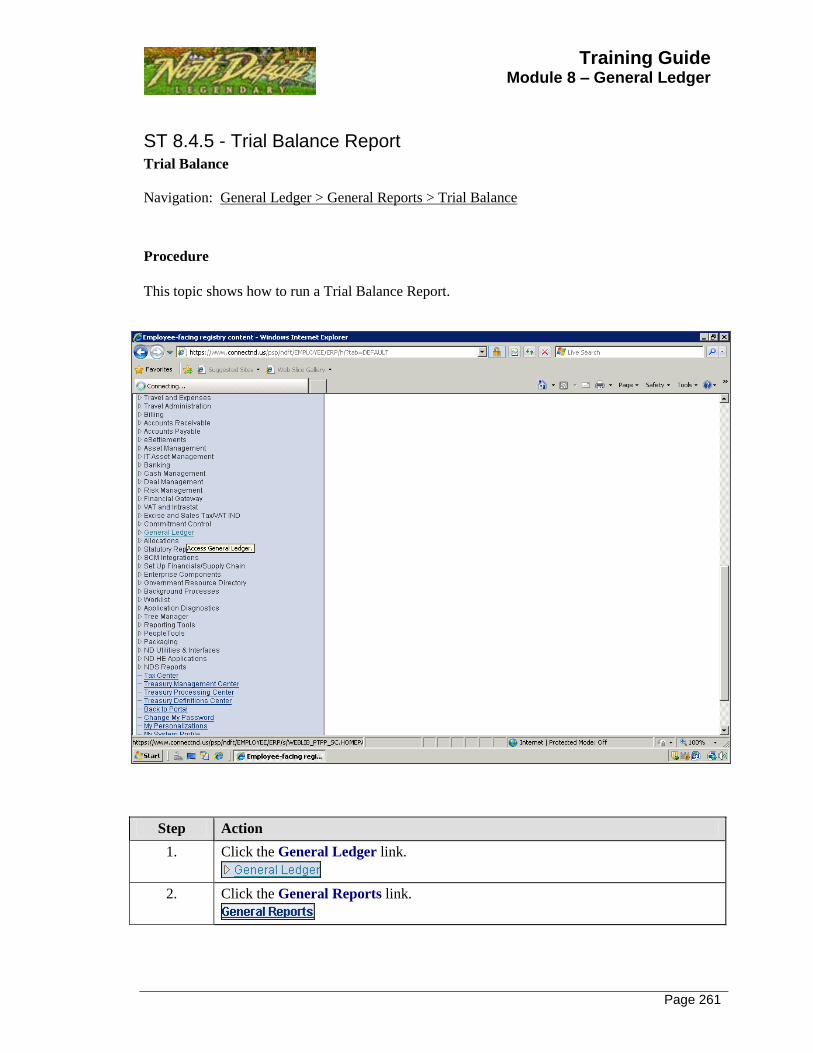
Training Guide Module 8 – General Ledger
Page 261
ST 8.4.5 - Trial Balance Report Trial Balance
Navigation: General Ledger > General Reports > Trial Balance
Procedure
This topic shows how to run a Trial Balance Report.
Step Action
1. Click the General Ledger link.
2. Click the General Reports link.

Page 262
Step Action
3. Click the Trial Balance link.
4. After navigating to a report, the user will be asked to enter a Run Control ID:
The Run control is a database record that allows a user to define criteria for a
specific process. The Run Control is saved after it is created and can be used again,
or modified, the next time the same process is run. Run Controls are unique to a user
ID.
The first time a report is run you will need to Add a New Value. The Run Control
can be any alpha/numeric combination but cannot have spaces. Once the Run
Control is entered you will proceed to the parameters page.
Step Action
5. Click the Search button.

Training Guide Module 8 – General Ledger
Page 263
Step Action
6. Click the trialbalance link.
Step Action
7. Enter the desired information into the Fiscal Year field. Enter "2010".
8. Enter the desired information into the Period field. Enter "6".
9. Click the Refresh button. This will re-sort the ChartField Selection section.
10. Select the Include CF, Descr, or Subtotal boxes as needed. This will provide a more
detailed breakdown.
11. Click the Run button.

Page 264
Step Action
12. Click the OK button.

Training Guide Module 8 – General Ledger
Page 265
Step Action
13. Click the Process Monitor link.

Page 266
Step Action
14. Click Refresh periodically to update the Run Status. Once the Status is Success and
the Distribution Status is Posted, click on the Details hyperlink.
Click the Refresh button.
15. Click the Details link.

Training Guide Module 8 – General Ledger
Page 267
Step Action
16. Click the View Log/Trace link.

Page 268
Step Action
17. Click the GLS7012_5721906.PDF link.
18. The Trial Balance report is displayed.
19. This topic showed how to run the Trial Balance Report.
End of Procedure.

Training Guide Module 8 – General Ledger
Page 269
ST Lesson 8.5 - Open Items Open Items
The Open Item feature in PeopleSoft allows you to monitor the balance of your Interdepartmental
receivable accounts by agency and fund.
ST 8.5.1 - Review Open Item Status Review Open Item Status
Navigation: General Ledger > Open Items > Review Status Online
Open Item Status inquiry displays open item billing, payment and balance information originating
from InterDepartmental Billings (IDB's) in General Ledger. Open item status, date range, and
business unit can be specified to isolate the results.
Procedure
This topic shows how to Review Open Item Status.

Page 270
Step Action
1. Click the General Ledger link.
2. Click the Open Items link.
3. Click the Review Status Online link.

Training Guide Module 8 – General Ledger
Page 271
Step Action
4. Click the Inquire drop down list.

Page 272
Step Action
5. Select the Open list item.
Note:
Open will only display Open status items.
Both will display Open and Closed status items.
Closed will only display Closed status items.
6. "Journal Date From To" dates will remain the same from the prior saved search.
These must be changed if you want current information or if a certain date range is
needed.

Training Guide Module 8 – General Ledger
Page 273
Step Action
7. A few options are available for the "To" field:
1) Keep previously saved date
2) Type in desired date
3) Choose a date from the calendar icon
Click the Choose a date (Alt+5) button.
8. Click the Current Date link.
9. For a specific business unit inquiry, enter the desired information into the Open
Item Key field. Enter "12500".
The Open Item Key field can also be left blank to display all business unit activity.
10. Click the Fetch Selection (Search) button.

Page 274
Step Action
11. Open Item Balances information is displayed.
Note: Only this status is displayed because the Inquire selection was Open.
12. Click the 12500 link.
13. This selection displays activity for the Open Item business unit.
14. This topic showed how to Review Open Item Status.
End of Procedure.

Training Guide Module 8 – General Ledger
Page 275
ST 8.5.2 - Open Item Listing Report Open Item Listing Report
Navigation: General Ledger > Open Items > Open Item Listing Report
The Open Item Listing Report displays a listing of outstanding balances per open item (business
unit). This report is beneficial in maintaining customer balances and activity.
Procedure
This topic shows how to run an Open Item Listing Report.
Step Action
1. Click the General Ledger link.

Page 276
Step Action
2. Click the Open Items link.
3. Click the Open Item Listing Report link.
4. After navigating to a report, the user will be asked to enter a Run Control ID:
The Run control is a database record that allows a user to define criteria for a
specific process. The Run Control is saved after it is created and can be used again,
or modified, the next time the same process is run. Run Controls are unique to a user
ID.
The first time a report is run you will need to Add a New Value. The Run Control
can be any alpha/numeric combination but cannot have spaces. Once the Run
Control is entered you will proceed to the parameters page.

Training Guide Module 8 – General Ledger
Page 277
Step Action
5. Click the Search button.
6. Click the openitemlisting link.
Step Action
7. Enter the desired information into the Unit field. Enter "11000".
8. A few options are available for the "As of Date:" field:
1) Keep currently saved date
2) Type in desired date
3) Choose a date from the calendar icon.
Click the Choose a date (Alt+5) button.

Page 278
Step Action
9. Click the Current Date link.
10. Select Include CF (Chartfield) boxes to be displayed in the report. The Sequence
field will sort them accordingly.
11. Click the Include CF (Chartfield) option.
12. Click the Descr option.
13. Enter the desired Account code in the Value field. Enter "131002"
(InterDepartmental Receivable account).
14. Click the Run button.

Training Guide Module 8 – General Ledger
Page 279
Step Action
15. Click the OK button.
Step Action
16. Click the Process Monitor link.

Page 280
Step Action
17. Click Refresh periodically to update the Run Status. Once the Status is Success and
the Distribution Status is Posted, click on the Details hyperlink.
Click the Refresh button.
18. Click the Details link.

Training Guide Module 8 – General Ledger
Page 281
Step Action
19. Click the View Log/Trace link.

Page 282
Step Action
20. Click the GLS3000_5720733.PDF link.
21. The Open Items Listing Report is displayed.
22. This topic showed how to run the Open Item Listing Report.
End of Procedure.

Training Guide Module 8 – General Ledger
Page 283
ST Lesson 8.6 - Chartfields ChartFields
PeopleSoft General Ledger defines the financial structure of an organization into structural
components called ChartFields. These fields classify accounts into the appropriate reporting
entities and expenditure categories for financial reporting.
ST 8.6.1 - Setting up a Fund Setting up a Fund
Navigation: Set Up Financials/Supply Chain > Common Definitions > Design ChartFields >
Define Values > ChartField Values > Fund Code
This component is for agencies authorized to set up their own funds.
Procedure
This topic shows how to Set up a Fund.

Page 284
Step Action
1. Click the Set Up Financials/Supply Chain link.
2. Click the Common Definitions link.
3. Click the Design ChartFields link.
4. Click the Define Values link.
5. Click the ChartField Values link.

Training Guide Module 8 – General Ledger
Page 285
Step Action
6. Click the Fund Code link.

Page 286
Step Action
7. Click the Add a New Value tab.
8. Enter the desired information into the Fund Code field. Enter "G1220".
9. Click the Add button.
10. The Effective Date will populate to the current date. The date can be changed, if
necessary.

Training Guide Module 8 – General Ledger
Page 287
Step Action
11. Enter the desired information into the Description field. Enter "FUND TEST".
12. Enter the desired information into the Short Description field. Enter "FUND
TEST".
13. Click the Save button.
14. This topic showed how to Set up a Fund.
End of Procedure.
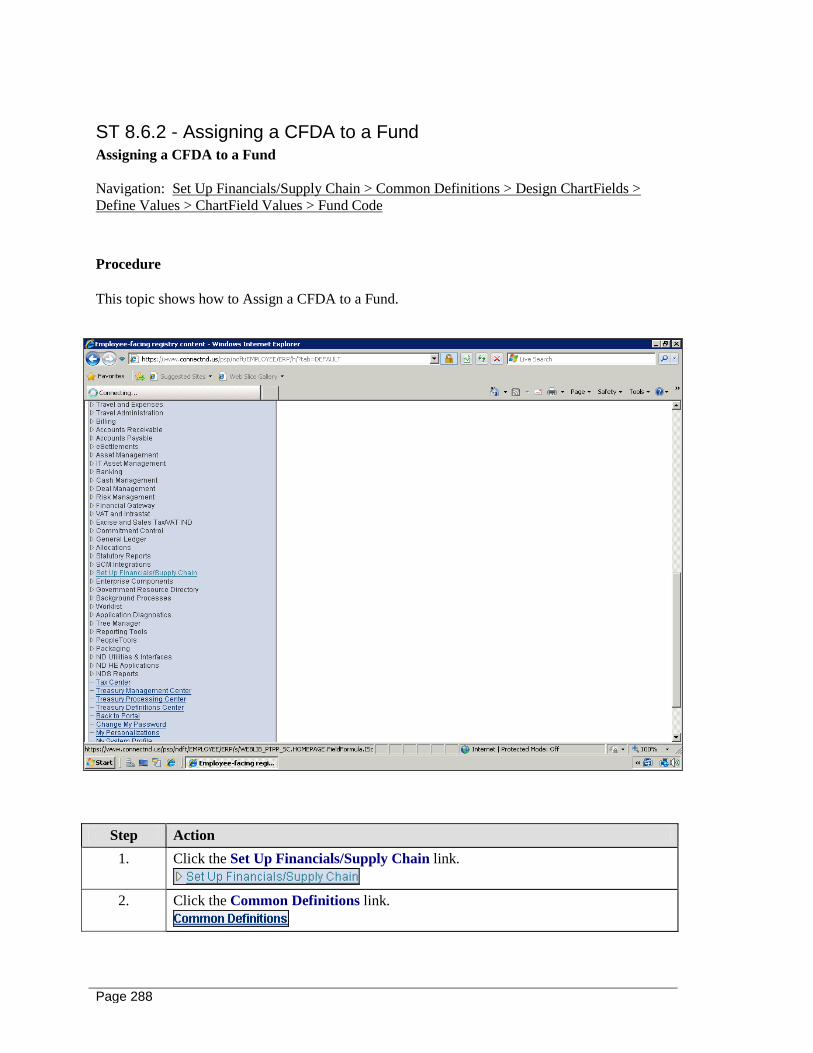
Page 288
ST 8.6.2 - Assigning a CFDA to a Fund Assigning a CFDA to a Fund
Navigation: Set Up Financials/Supply Chain > Common Definitions > Design ChartFields >
Define Values > ChartField Values > Fund Code
Procedure
This topic shows how to Assign a CFDA to a Fund.
Step Action
1. Click the Set Up Financials/Supply Chain link.
2. Click the Common Definitions link.

Training Guide Module 8 – General Ledger
Page 289
Step Action
3. Click the Design ChartFields link.
4. Click the Define Values link.
5. Click the ChartField Values link.
Step Action
6. Click the Fund Code link.

Page 290
Step Action
7. Enter the desired information into the Fund Code field. Enter "G1220".
8. Click the Search button.

Training Guide Module 8 – General Ledger
Page 291
Step Action
9. Click the Correct History button.
10. Click the Attributes link.

Page 292
Step Action
11. Enter the desired information into the ChartField Attribute field. Enter "CFDA".
12. Enter the desired information into the ChartField Attribute Value field. Enter
"10.216".
13. Click OK.

Training Guide Module 8 – General Ledger
Page 293
Step Action
14. Click the Save button.
15. This showed how to Assign a CFDA to a Fund.
End of Procedure.