status light camera id m6 port diagrams dc power: 5v dc, 2a power adapter (use official ibaby brand...
TRANSCRIPT

1
M6 port diagrams
DC Power: 5V DC, 2A power adapter (Use official iBaby brand power adapter only)
Status Light: Displays 3 unique patterns to show different modes. See FAQ page to review modes.
Camera ID: Printed on the bottom of each camera as shown above
USB port�For direct connection to your iOS device, during installation
RESET button�Resets iBaby Monitor M6 back to original factory settings
Downloading the App
1. Search for “iBaby Care” in the App Store under phone apps, or in Google Play for all Android devices.
Status Light
DC Power
Camera ID
USB Port
Reset Button

2
2. The app can be found under the iPhone apps (for both iPhone and iPad users).
Compatibility: the iBaby Care app requires iOS 6.0 or above
Here is an example of the iBaby Care app icon:
Installing the M6 for the first time:
Attention: During initial installation, your iBaby Monitor M6 must be installed with an iOS device. The Android version of the app can be used to connect after the device has been initialized.
In addition, your iOS device must be connected to the same Wi-Fi network as the iBaby Monitor M6, during initial installation. To ensure the strongest Wifi signal possible, we suggest performing the initial installation in close proximity (5-10 feet), to the Wifi router.
Please perform the following steps
1. Attach the power adapter to back of the iBaby Monitor M6 and plug into an electrical outlet.
2. After 30 seconds, the monitor will play a short musical tune to signal that the startup has been completed.
3. Connect the iOS device to the iBaby Monitor M6 by using the USB cable that came with your mobile device
4. Tap “allow” on the Share Wifi prompt that pops up, it should look like the one below
5. Tap “allow” on the iBaby Care cloud access prompt

3
6. Click “create an account” and fill out the form to create your iBaby cloud account.
7. Follow the onscreen prompts to continue the process of installing the Camera, by finding the Wifi connection, and establishing video feed.
8. After the live stream has been established, unplug the USB cable as prompted by the app.

4

5
Features:
Listen�listen to sounds around the monitor
Speak�speak to the baby through your monitor
Record�manually record a video that can be viewed through the media button

6
Play�play music for your baby through the camera’s built in speakers
Snapshot�manually take a photo that can be viewed through the media button
Media�view your photos and videos as well as the alert pictures and videos
Setting�Access the iBaby Monitor M6’s settings page
Note: Customers who have purchased the iBaby Monitor M6T model, will have the option of temperature and humidity, which will be displayed, along with the video feed.
Common problems to encounter during installation
Q: What do I do when it tells me that “This accessory may not be supported?”
A: Click “Dismiss” and continue to use your monitor as planned.
Common App-related issues:
Q: I cannot find the iPad app for the iBaby Monitor M6
A: The iBaby Care app has been optimized for usage with both the iPhone and the iPad. For this reason, you will find the downloadable app under iPhone apps, only.
7
Q: Why can’t I find the Android app for the iBaby Monitor M6?
A: Currently, the Android app is in development and will be available soon. Please check back at a later time.
Q: When manually recording a video, will sound also be recorded?
A: Yes. When recording video, the microphone will be switched on automatically, recording the audio as well.
Q: What are the sound and motion alerts?
A: Sound and Motion Alerts notify you of your baby’s actions, like excessive noise (crying), and excessive motion (crawling).
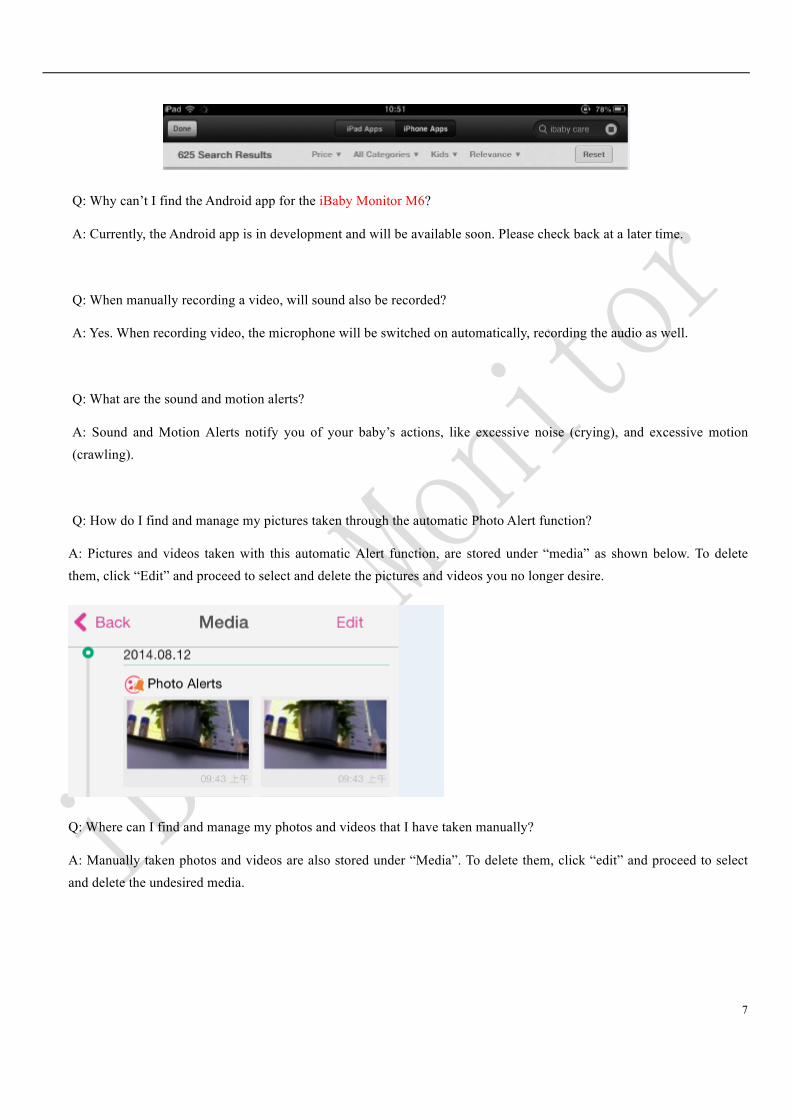
Q: How do I find and manage my pictures taken through the automatic Photo Alert function?
A: Pictures and videos taken with this automatic Alert function, are stored under “media” as shown below. To delete them, click “Edit” and proceed to select and delete the pictures and videos you no longer desire.
Q: Where can I find and manage my photos and videos that I have taken manually?
A: Manually taken photos and videos are also stored under “Media”. To delete them, click “edit” and proceed to select and delete the undesired media.

8
Q: What is the Sensitivity Level referring to?
A: The sensitivity settings allow you to assure the accuracy of the notifications. This will help to minimize false alerts.
9
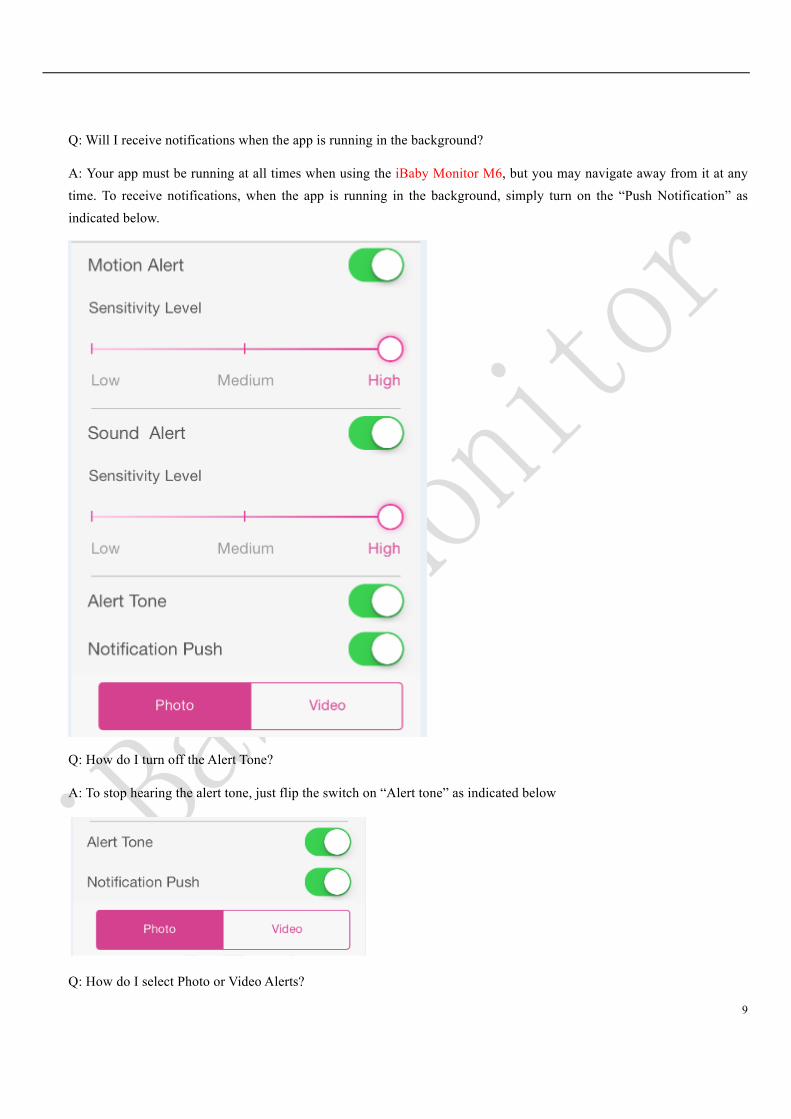
Q: Will I receive notifications when the app is running in the background?
A: Your app must be running at all times when using the iBaby Monitor M6, but you may navigate away from it at any time. To receive notifications, when the app is running in the background, simply turn on the “Push Notification” as indicated below.
Q: How do I turn off the Alert Tone?
A: To stop hearing the alert tone, just flip the switch on “Alert tone” as indicated below
Q: How do I select Photo or Video Alerts?

10
A: You can select Photo or Video (as shown below), to choose which type of media you prefer.
Q: How do I add new users to the camera so I can share it with other people?
A: Any family member can be added to your viewing list. To invite them, simply go to: Settings -> Add a new user, and enter their email address. They will be notified via email and will be able log in to their device to access and view within their own iBaby account.
NOTE: In order to view the device, your family member must register their email and be actively logged into an iBaby cloud account.
Q: How do I delete a user from my camera?
A: Proceed to the “User List”, tap “Edit”, and then use the red minus-sign buttons to remove users.
Frequently Asked Questions: Misc.

11
1�!What do the various status light combinations, on the back iBaby Monitor M6 mean?
The status light on the back of the monitor can output a total of three combinations with the following meanings:
Intermitting red and green lights flashing�The monitor is starting up or rebooting
Solid red light�startup successful, but the monitor is not connected to Wi-Fi
Solid green light�startup successful, and the monitor is now connected to Wi-Fi
2�!How may users can use the camera simultaneously?
The iBaby Monitor M6 can be accessed by as many members as you choose. However, only 4 users can access the camera at the same time.
3�!What is the viewing range at night using the night vision feature?
The optimal visual range of the night vision camera is approximately 4-6 meters (12-18 feet)
4�!When viewing the camera on my phone through 3G or 4G, the video feed is laggy. What do I do?
If the camera is connected to a slow network or if your phone is using a slow /4G network, the video feed may become slow and unresponsive. To fix this situation, please turn down the video quality in the camera settings to either “medium” or “low” as shown below.
5�!What is the difference between the iBaby Monitor M6 and the M6T?
Only the iBaby Monitor M6T offers temperature and humidity detection.
6�!How do I reset the camera to factory specifications?
Press and hold the reset button on the bottom of the camera until the light starts flashing both green and red. Wait 30
seconds and the iBaby Monitor M6 should be reset to factory settings.
If you have any other questions, please contact: http://support.ibabylabs.com/