step by step guide to using the whzan telehealth device
TRANSCRIPT

1
Whzan Telehealth Device / System Step by Step Guide. Version 2. September 2017.
Step by Step
Guide
to using the
Whzan
Telehealth
Device / System

2
Whzan Telehealth Device / System Step by Step Guide. Version 2. September 2017.
Step by Step Guide to using the Whzan Telehealth Device / System
Contents Page
Introduction and You Tube video 3
Part 1 – Using the System
System Login 4
Adding new users 5
Adding new patients 6 – 8
Viewing patient readings 9 – 12
Changing patient settings
Setting reading alerts 13 – 14
Setting days of the week when
readings are taken 14
Part 2 – Using the Device
Device Login 15 – 16
Taking blood pressure / pulse 17
Taking oxygen saturation / pulse 18
Taking temperature 19
Taking the NEWS questionnaire 20 – 22
Viewing patient readings on the device 23
Turning off the device 24

3
Whzan Telehealth Device / System Step by Step Guide. Version 2. September 2017.
Step by Step Guide to using the Whzan Telehealth Device / System
Introduction
NHS Nottingham City CCG has funded the Telehealth digital tablet as part of the Enhanced
Health in Care Homes Vanguard which aims to improve the health outcomes of the elderly
care home population. The technology works by allowing clinicians to set parameters for
clinical readings which are specific to the patient and act as a baseline. Readings which fall
outside these parameters will generate an alert. This is called a NEWS Score (National Early
Warning Score) which is a clinically recognised system. Firstly this will enable you to
determine to initiate the appropriate action for the patient depending on their condition, and
secondly the clinician the action is escalated to will recognise the score and the seriousness
level.
This guide is a Step by Step Guide to help the care homes and their staff to use the device
and system effectively and to minimise any nervousness around it. The Guide is in two
parts:-
Part 1 – using the System.
Part 2 – using the device.
This system and device has been very successfully implemented in care homes in
Sunderland. To listen to some care home staff talk about their system please watch this You
Tube video - https://www.youtube.com/watch?v=7TV0V7QCTAQ

4
Whzan Telehealth Device / System Step by Step Guide. Version 2. September 2017.
Step by Step Guide to using the Whzan Telehealth Device / System
Part 1 – Using the System
A username and password should have been created for you to access the Whzan System. (This is
also the username and password used to access the Device).
System Login
The website needed to log into the Whzan System is here https://whzan.com/Login.aspx . This will
bring up the login screen to input your username and password.
Once you have correctly logged in this will bring up the caseload you are registered to – i.e. your
care home which will have patients registered. As a Health Practitioner you will have access to
view patient readings and add new patients. As a Manager you will be able to set up new Health
Practitioners (Users), as well as accessing patient readings and setting up new patients.
Only the name of your care home will appear in the
Patients management list. You will only be able to view
patients on your care home list and add new patients
onto your list.

5
Whzan Telehealth Device / System Step by Step Guide. Version 2. September 2017.
Adding new users / Health Practitioners (Managers only)
To add new Health Practitioners in your care home who will able to take patient readings / add new
patients click on “Manage Users” on the home page. This will bring up a list of all people are
registered as users at your care home. To add a new user simply click the “Add New User” button.
Then fill out the “New User” details fields. The username and password are the details they will use
to login into the system and device. The email will be the usual care home email address. Click
whether the new user is a Manager or Health Practitioner then also tick the “Mobile Device” box
(which enables them to login to the device). Leave all “Visible Pages” ticked and tick the Caseload
box. Then click save.
Only your care home will appear in the Patient
Management list. You can also only view existing
patients in your care home and add new patients onto
your care home list.
To delete an existing user e.g. they no longer work at the care
home, simply unlick their “Enabled” box.
NB. Only your care home caseload will
appear here as an option to tick.
6
Whzan Telehealth Device / System Step by Step Guide. Version 2. September 2017.
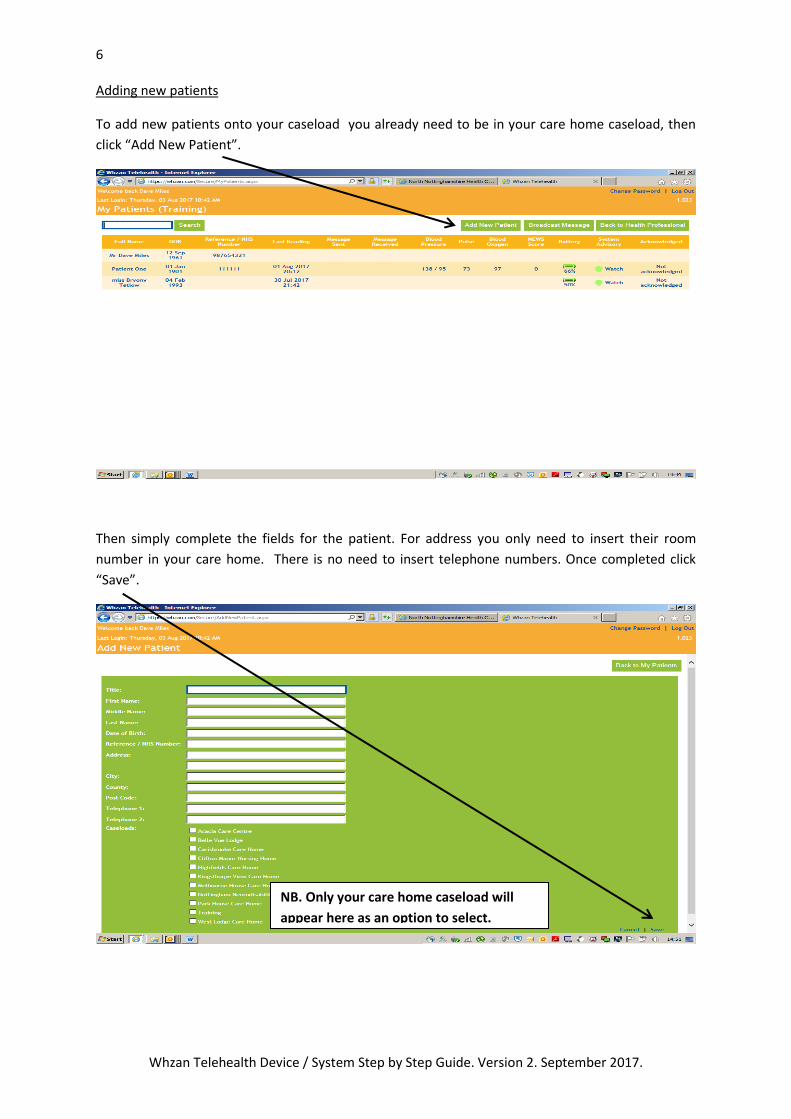
Adding new patients
To add new patients onto your caseload you already need to be in your care home caseload, then
click “Add New Patient”.
Then simply complete the fields for the patient. For address you only need to insert their room
number in your care home. There is no need to insert telephone numbers. Once completed click
“Save”.
NB. Only your care home caseload will
appear here as an option to select.

7
Whzan Telehealth Device / System Step by Step Guide. Version 2. September 2017.
Once you have added the new patient they will appear in your caseload. You then need to add in the
NEWS questionnaire. You do this by selecting Schedule and then clicking “Add”.
This then brings up a box up box allowing you to select “Events” (question sets). You just need to tick
“Questionnaire (NEWS)” (this will auto tick “Blood Oxygen”, “Blood Pressure”, and “Temperature”).
Then click “Add”.

8
Whzan Telehealth Device / System Step by Step Guide. Version 2. September 2017.
This then brings up this screen where you need to tick the newly added events and then click “Save”.
Now when you select the patient on the device the News questionnaire will be set up – taking blood
pressure, oxygen saturation and temperature readings first and secondly completing the rest of the
questionnaire to get the NEWS score.

9
Whzan Telehealth Device / System Step by Step Guide. Version 2. September 2017.
Viewing patient readings
To view patients readings click on your care home in the Patient Management section of the home
page.
Your list of registered patients will appear. (In this example only one test patient has been
registered so far). To view the full patient details click on the patients name.
When you click on the patients name their full details will appear and will also enable you to edit the
patients details.
NB. Only your care home caseload will
appear here as an option to select.
10
Whzan Telehealth Device / System Step by Step Guide. Version 2. September 2017.
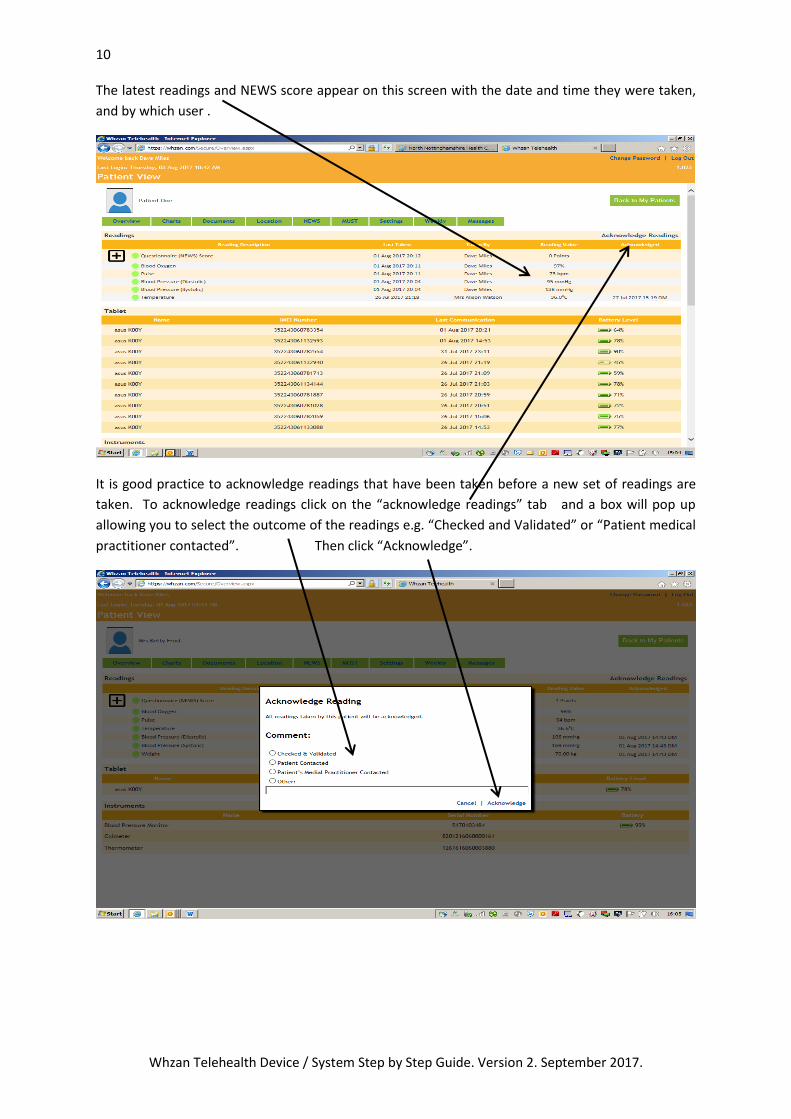
The latest readings and NEWS score appear on this screen with the date and time they were taken,
and by which user .
It is good practice to acknowledge readings that have been taken before a new set of readings are
taken. To acknowledge readings click on the “acknowledge readings” tab and a box will pop up
allowing you to select the outcome of the readings e.g. “Checked and Validated” or “Patient medical
practitioner contacted”. Then click “Acknowledge”.

11
Whzan Telehealth Device / System Step by Step Guide. Version 2. September 2017.
There are two options to view the patient readings in chart form.
The first option is to view the readings charts by selecting the “Charts” tab.
However the information is not very user friendly. See example below.
A much better way to view the information is in the NEWS chart by selecting the “NEWS” button.
An example of the chart is overleaf.

12
Whzan Telehealth Device / System Step by Step Guide. Version 2. September 2017.
The NEWS chart displays the range of the readings and NEWS questionnaires answers as well as the
NEWS score for the individual reading / answer, as well as the overall NEWS score at the bottom.
This chart can be downloaded as a PDF (select the “Download as PDF” button) and then either print
off or saved electronically.
It would be good practice to access this NEWS chart when contacting a health professional as
appropriate in case they wish for more details beyond the actual summary NEWS score.

13
Whzan Telehealth Device / System Step by Step Guide. Version 2. September 2017.
Changing patient settings.
There is the option to change an individual patients settings e.g. for alerts to be generated when
specific readings are high, or to specify days of the week readings should be taken.
Setting reading alerts
In order for an alert to be raised when a specific reading is high or high firstly click “settings”, and
then “Alarm limits”, and then “Add” when this comes on screen.
This will bring up a pop screen allowing you to select an alarm. Click the down arrow to bring up the
full list e.g. Questionnaire NEWS Score, or Blood Oxygen. Select the alarm type you want and then
click “Add”.

14
Whzan Telehealth Device / System Step by Step Guide. Version 2. September 2017.
You can then select the alarm limits by putting in the values in boxes.
You will also need to input the email address where the alerts will be sent. You do this by clicking the
“Send Email” box in the “Alarm Limits” tab but also by putting in the email address where you
want the alerts going by clicking the “Alarm Recipients” tab, then clicking “Add”. This brings up a
pop up box for you to insert the email address and then click “Add”. Then remember to select the
email address by clicking in the box.
Setting days of the week when readings are taken.
It may be that on occasions that a patients readings are needed on a more frequent basis than the
regular weekly or monthly readings. It is possible to select days of the week when a patients
readings are due to be taken.
To do this click on the “Schedule” tab and then click “Add”
A pop up box of all the readings appears and you then select the readings you want e.g.
temperature, blood pressure, and then click “Add”. The readings will appear as in the example
above. You then select the days of the week the readings are to be taken. You also have the option
to set alarms if the readings are not taken.
NB. It is advisable only to use the readings alarm and setting specific days of the week readings are
to be taken in discussion with the patients GP.

15
Whzan Telehealth Device / System Step by Step Guide. Version 2. September 2017.
Part 2 – Using the Device
A username and password should have been created for you to access the Whzan Device. (This is
also the username and password used to access the System).
Device Login
When the device is switched on the login screen will appear. The allocated username and password
needs to be entered and then click the “Login” box which will appear here.
Once you have logged in your caseload will be brought up on the next screen. This will only be the
name of your care home. (Unlike this example there are more than one). Select your care home.

16
Whzan Telehealth Device / System Step by Step Guide. Version 2. September 2017.
Once you have selected your care home your registered patients will appear. In order to do a set of
observations on a patient simply select that patients name.
Once the patient has been selected their name and a clock will appear on the screen. You are now
ready to do a set of readings / observations for that patient. To start the readings / observation
press the right arrow.
The first screen to appear will be the blood pressure screen with the most recent set of readings
taken, as in the example below.
NB. You don’t need to navigate to the relevant screen to take readings. You can simply just use the
peripheral e.g. blood pressure monitor and the readings will automatically be entered and shown.

17
Whzan Telehealth Device / System Step by Step Guide. Version 2. September 2017.
Taking blood pressure / pulse.
Take the patients blood pressures as normal using the monitor. The blood pressure and pulse rate
will appear on screen.
The readings should automatically transmit into the device and the readings be announced.
If for any reason the readings do not automatically transfer you can enter the readings manually by
clicking the “Manual” button.
This screen will then appear and you are able to manually enter the readings from the BP monitor
using the up and down arrows, then then selecting “Submit”.

18
Whzan Telehealth Device / System Step by Step Guide. Version 2. September 2017.
Taking oxygen saturation levels (SP02) / pulse
Take the patients oxygen levels as normal using the monitor. SP02 and pulse rate will appear on
screen.
The readings should automatically transmit into the device and the readings be announced.
If for any reason the readings do not automatically transfer you can enter the readings manually by
clicking the “Manual” button. This screen will then appear and you are able to manually enter the
readings from the SP02 monitor using the up and down arrows, then then selecting “Submit”.
19
Whzan Telehealth Device / System Step by Step Guide. Version 2. September 2017.
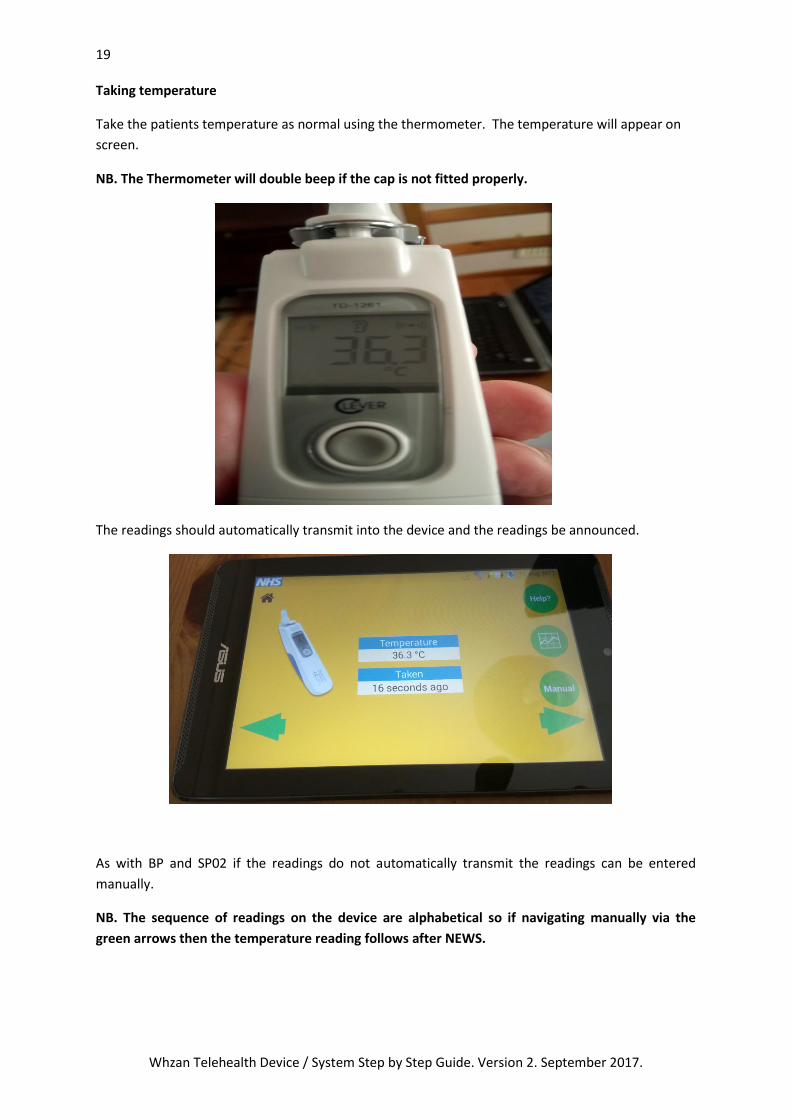
Taking temperature
Take the patients temperature as normal using the thermometer. The temperature will appear on
screen.
NB. The Thermometer will double beep if the cap is not fitted properly.
The readings should automatically transmit into the device and the readings be announced.
As with BP and SP02 if the readings do not automatically transmit the readings can be entered
manually.
NB. The sequence of readings on the device are alphabetical so if navigating manually via the
green arrows then the temperature reading follows after NEWS.

20
Whzan Telehealth Device / System Step by Step Guide. Version 2. September 2017.
Taking the NEWS questionnaire.
Once all the readings have been taken and entered you are ready to take the NEWS questionnaire.
To start this select the right green arrow on the device. This will bring up this screen with the
previously taken NEWS score. To start a new questionnaire again select the “Do Now” button.
If any readings i.e. BP, SP02, temperature, then this screen will appear and will ask you if you want to
proceed. Select YES.
If all readings have been taken then the first NEWS question will appear.
Select “No” if this is a routine weekly or monthly questionnaire, however select “Yes” if the
questionnaire is being taken because of concern for the patients health.

21
Whzan Telehealth Device / System Step by Step Guide. Version 2. September 2017.
You will firstly be asked to enter the patients respiration rate. Do this manually by using the up and
down arrows and then click “Continue”.
You will then be asked to say whether Supplemental Oxygen is being taken. Select “No” or “Yes”.
You will then be asked to state the Level of Consciousness the patient has. Select A, V, P or U
depending on whether the patient is Alert, is Responsive to verbal stimulus, Responsive to Pain or
Unresponsive.

22
Whzan Telehealth Device / System Step by Step Guide. Version 2. September 2017.
The NEWS questionnaire is now completed and the NEWS score will be displayed.
Click “Done” to close down the questionnaire.
You should refer to the “NEWS Clinical response for Nottingham City nursing homes” protocol to
take appropriate action in relation to frequency of follow up monitoring and clinical response.
NB. Remember when enacting a clinical response based on the NEWS score to take account of /
report if any of the readings were missed / not taken as this could affect the validity of the
score.
23
Whzan Telehealth Device / System Step by Step Guide. Version 2. September 2017.
Viewing patient readings on the device
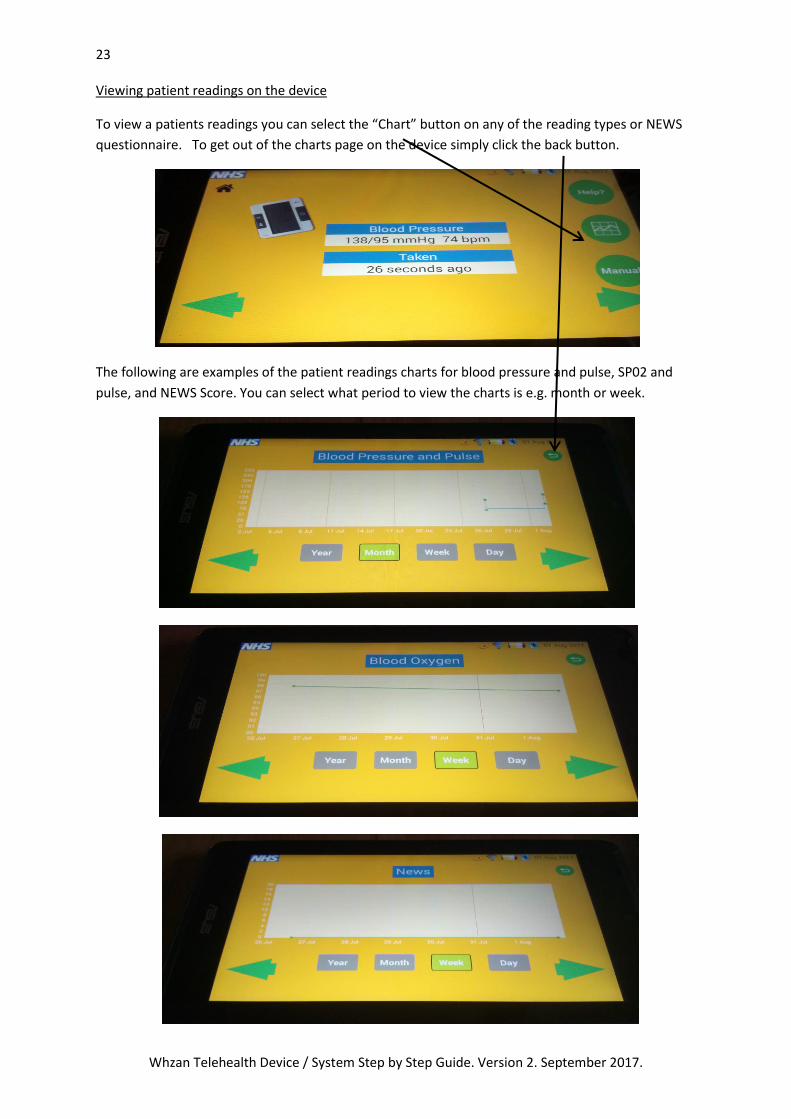
To view a patients readings you can select the “Chart” button on any of the reading types or NEWS
questionnaire. To get out of the charts page on the device simply click the back button.
The following are examples of the patient readings charts for blood pressure and pulse, SP02 and
pulse, and NEWS Score. You can select what period to view the charts is e.g. month or week.
24
Whzan Telehealth Device / System Step by Step Guide. Version 2. September 2017.
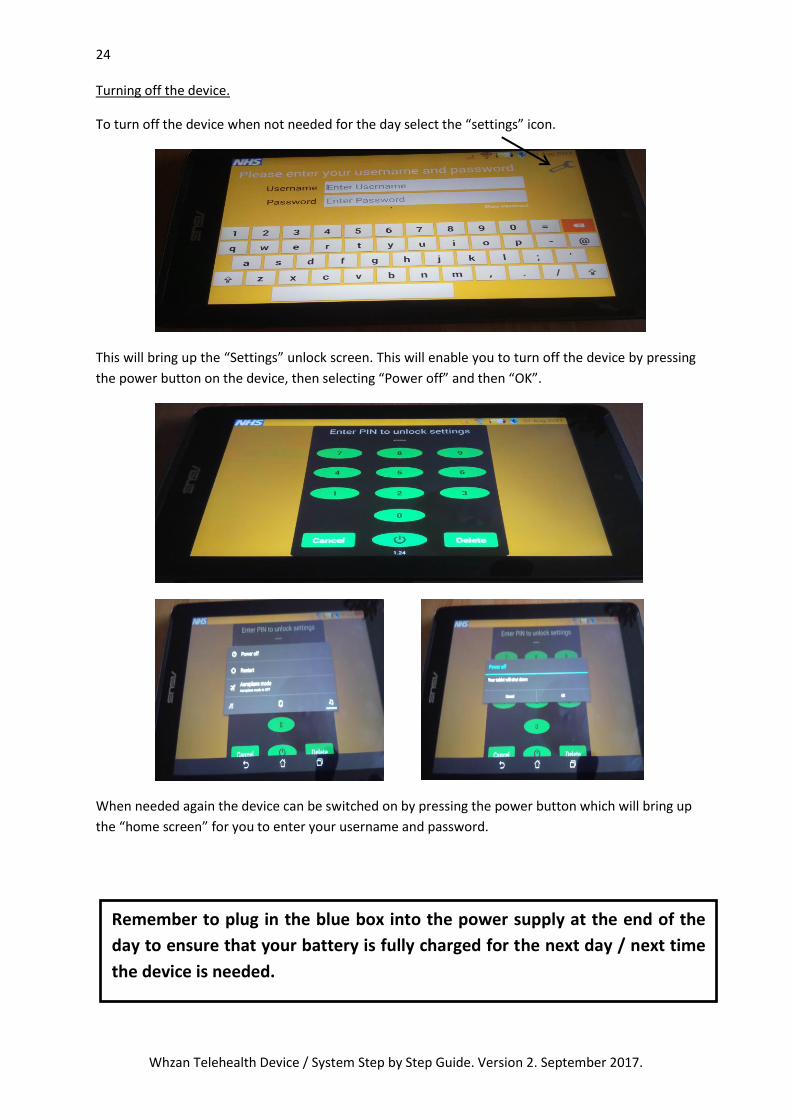
Turning off the device.
To turn off the device when not needed for the day select the “settings” icon.
This will bring up the “Settings” unlock screen. This will enable you to turn off the device by pressing
the power button on the device, then selecting “Power off” and then “OK”.
When needed again the device can be switched on by pressing the power button which will bring up
the “home screen” for you to enter your username and password.
Remember to plug in the blue box into the power supply at the end of the
day to ensure that your battery is fully charged for the next day / next time
the device is needed.