step-by-step install guide ubuntu 9.04 jaunty server
TRANSCRIPT
8/8/2019 Step-By-Step Install Guide Ubuntu 9.04 Jaunty Server
http://slidepdf.com/reader/full/step-by-step-install-guide-ubuntu-904-jaunty-server 1/29
8/8/2019 Step-By-Step Install Guide Ubuntu 9.04 Jaunty Server
http://slidepdf.com/reader/full/step-by-step-install-guide-ubuntu-904-jaunty-server 2/29
Global Open Versity ICT Labs Install Guide Linux Ubuntu 9.04 LTS Server v1.4
April 2007, Kefa Rabah, Global Open Versity, Vancouver Canada
www.globalopenversity.org ICT105 – Ubuntu Server Administration Training
1
Global Open VersityIT System Integration Hands-on Labs Training Manual
Step-By-Step Install Guide Ubuntu 9.04 Server
Kefa RabahGlobal Open Versity, Vancouver Canada
www.globalopenversity.org
Table of Contents Page No.
INSTALL GUIDE UBUNTU 9.04 SERVER 1
1.0 Introduction 1
Part 1: Install & Configure Ubuntu 9.04 LTS Server 2
Step 1: Getting Started & Hardware Pre-requisites 2 Step 2: Install Linux Ubuntu 9.04 LTS 2 Step 3: Update Ubuntu 9.04 Operating Systems 19
Part 2: Install Optional Additional Packages 20 Step 1: Install Desktop Environment 20
Part 3: Need More Training on Linux: 26 Ubuntu Server Administration Training 26
Part 4: Hands-on Labs Assignments 26
A GOV Open Access Technical Academic PublicationsEnhancing education & empowering people worldwide through eLearning in the 21st Century
8/8/2019 Step-By-Step Install Guide Ubuntu 9.04 Jaunty Server
http://slidepdf.com/reader/full/step-by-step-install-guide-ubuntu-904-jaunty-server 3/29
Global Open Versity ICT Labs Install Guide Linux Ubuntu 9.04 LTS Server v1.4
April 2007, Kefa Rabah, Global Open Versity, Vancouver Canada
www.globalopenversity.org ICT105 – Ubuntu Server Administration Training
1
Global Open VersityIT Systems Integration Hands-on Labs Training Manual
Step-By-Step Install Guide Ubuntu 9.04 Server
By Kefa Rabah, [email protected] Dec. 8, 2010 GTI Institute
1.0 Introduction
In this Hands-on Labs session, we’re going to lean how to install & configure the Linux Ubuntu 9.04 LTS
(Jaunty Jackalopes) server option.
The Ubuntu 9.04 Desktop and Server editions and Ubuntu Netbook Remix, which emphasized on the
continued Ubuntu's tradition of integrating the latest and greatest open source technologies into a high-
quality, easy-to-use Linux distribution.
Ubuntu is an operating system built by a worldwide team of expert developers. It contains all theapplications you need: a web browser, office suite, media apps, instant messaging and much more.
Ubuntu is an open-source alternative to Windows and Office.
Ubuntu 9.04 LTS Server Edition: Lean, fast and powerful – Ubuntu Server delivers services reliably,
predictably and economically - and easily integrates with your existing infrastructure. It has almost 100
open-source and proprietary application providers certifying their programs on Ubuntu Server Edition.
Ubuntu 9.04 includes Alfresco, Ingres, IBM, VMware, Yahoo and Zimbra. It also includes improved
installation and management tools for Ubuntu Enterprise Cloud (UEC) and Amazon EC2.
Ubuntu Server Edition enables businesses to deploy and manage their common workloads – web, print,
file, database and mail servers – more efficiently. Ubuntu 9.04 Server Edition integrates; stable Open
Source applications from across the community, packaged and ready for users to deploy. New
enhancements include improved virtualization with the latest KVM features, clustering support in Samba
file server and easier mail server setup with out-of-the-box Dovecot-Postfix integration.
Hands-on Labs
In this Hands-on Lab session, you’ll learn how to setup virtual network on VMware (you may also use any
other virtual machines like MS VirtualPC, Linux Xen, or VirtualBox from Oracle). In this lab session, we’ll
concentrate on installing Linux Ubuntu 9.04 LTS Server which you can then later use to install any other
applications as desired. You will learn how to pre-install DNS server, LAMP server, Mail server, OpenSSL
server, PostgreSQL database, Tomcat Java Server during the initial system installation. Once you
installed and updated the server, then you can use it install GNOME Desktop, LAMP; DNS server, Postfix
mail server with Dovecot for POP3/IMAP, Evolution mail client, and Webmin to help you with
administrating and configuring other application servers like Apache2, MySQL, FTP, DNS etc. You’ll also
have opportunity to learn some troubleshooting techniques and also do some lab assignments at the end
of the lab session.
8/8/2019 Step-By-Step Install Guide Ubuntu 9.04 Jaunty Server
http://slidepdf.com/reader/full/step-by-step-install-guide-ubuntu-904-jaunty-server 4/29
Global Open Versity ICT Labs Install Guide Linux Ubuntu 9.04 LTS Server v1.4
April 2007, Kefa Rabah, Global Open Versity, Vancouver Canada
www.globalopenversity.org ICT105 – Ubuntu Server Administration Training
2
Part 1: Install & Configure Ubuntu 9.04 LTS Server
Step 1: Getting Started & Hardware Pre-requisites
Ubuntu runs on inexpensive, commodity hardware. To support a small practice like OSCAR, web-server
etc., we recommend a minimum configuration of 200Gb Disk, 2Gb RAM, and a 2GHz Intel Dual Core
CPU. For maximum subsystem compatibility, we suggest that you install the 32bit version of Ubuntu. Ifyou are purchasing a computer to run OSCAR, one option is to order the machine with Ubuntu pre-
installed.
In this Hands-on Labs, it’s assumed that your target computer is connected to the internet. After installing
the operating system, log into your machine and ensure you perform software updates to bring your
systems up-to-date.
Step 2: Install Linux Ubuntu 9.04 LTS
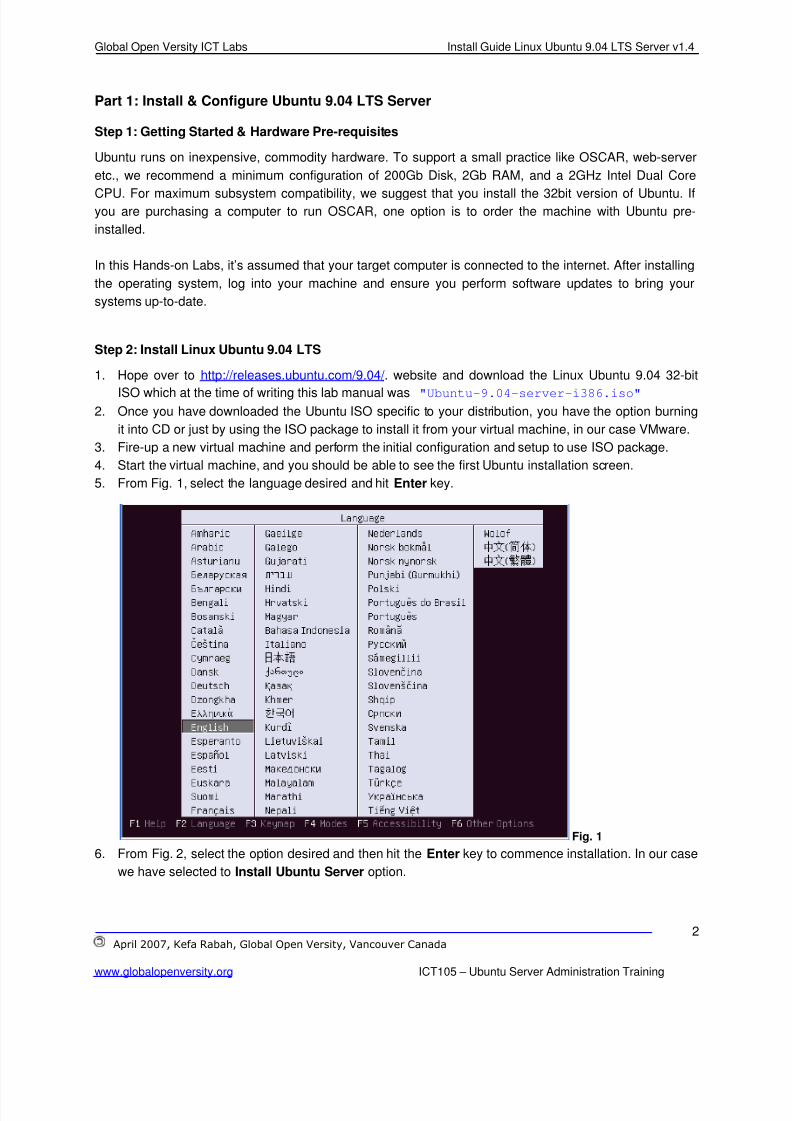
1. Hope over to http://releases.ubuntu.com/9.04/ . website and download the Linux Ubuntu 9.04 32-bit
ISO which at the time of writing this lab manual was "Ubuntu-9.04-server-i386.iso" 2. Once you have downloaded the Ubuntu ISO specific to your distribution, you have the option burning
it into CD or just by using the ISO package to install it from your virtual machine, in our case VMware.
3. Fire-up a new virtual machine and perform the initial configuration and setup to use ISO package.
4. Start the virtual machine, and you should be able to see the first Ubuntu installation screen.
5. From Fig. 1, select the language desired and hit Enter key.
Fig. 1
6. From Fig. 2, select the option desired and then hit the Enter key to commence installation. In our case
we have selected to Install Ubuntu Server option.

8/8/2019 Step-By-Step Install Guide Ubuntu 9.04 Jaunty Server
http://slidepdf.com/reader/full/step-by-step-install-guide-ubuntu-904-jaunty-server 5/29
Global Open Versity ICT Labs Install Guide Linux Ubuntu 9.04 LTS Server v1.4
April 2007, Kefa Rabah, Global Open Versity, Vancouver Canada
www.globalopenversity.org ICT105 – Ubuntu Server Administration Training
3
Fig. 2
7. From Fig. 3, Choose language screen, select English option, and hit the Enter key.
Fig. 3
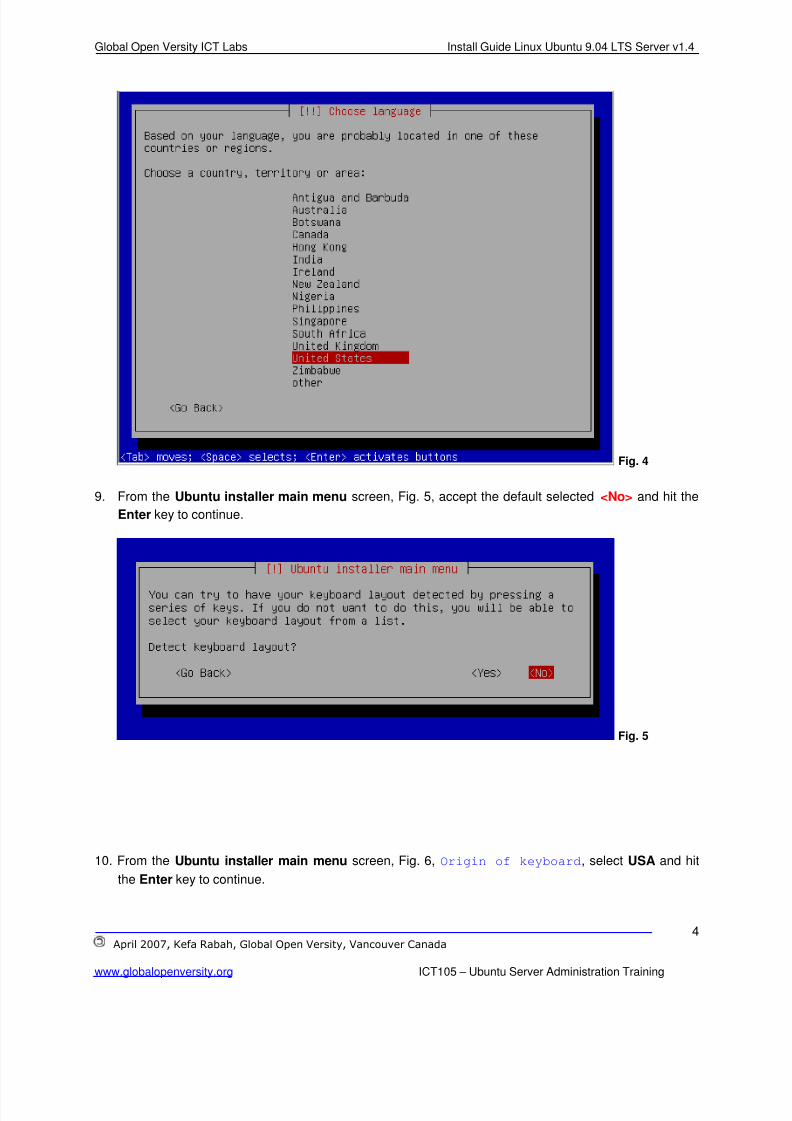
8. From Fig. 4, Choose language screen, Choose a country, select United States option, and hit Enter
8/8/2019 Step-By-Step Install Guide Ubuntu 9.04 Jaunty Server
http://slidepdf.com/reader/full/step-by-step-install-guide-ubuntu-904-jaunty-server 6/29
Global Open Versity ICT Labs Install Guide Linux Ubuntu 9.04 LTS Server v1.4
April 2007, Kefa Rabah, Global Open Versity, Vancouver Canada
www.globalopenversity.org ICT105 – Ubuntu Server Administration Training
4
Fig. 4
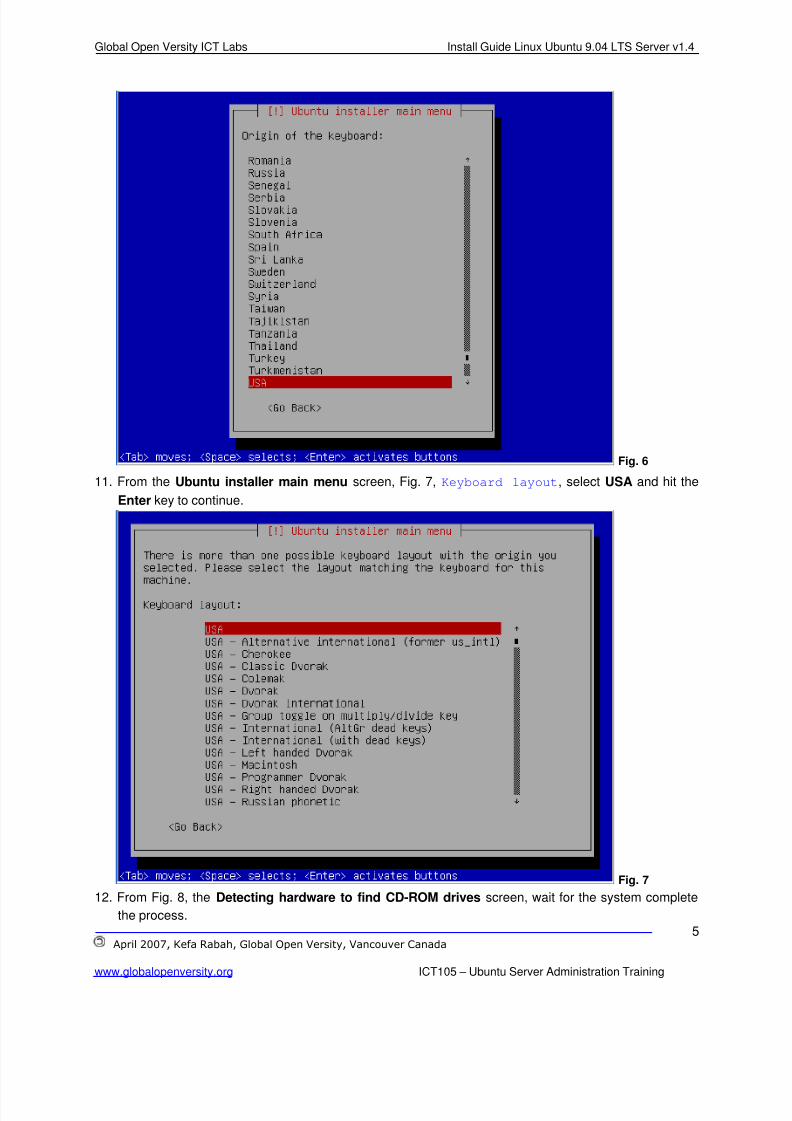
9. From the Ubuntu installer main menu screen, Fig. 5, accept the default selected <No> and hit the
Enter key to continue.
Fig. 5
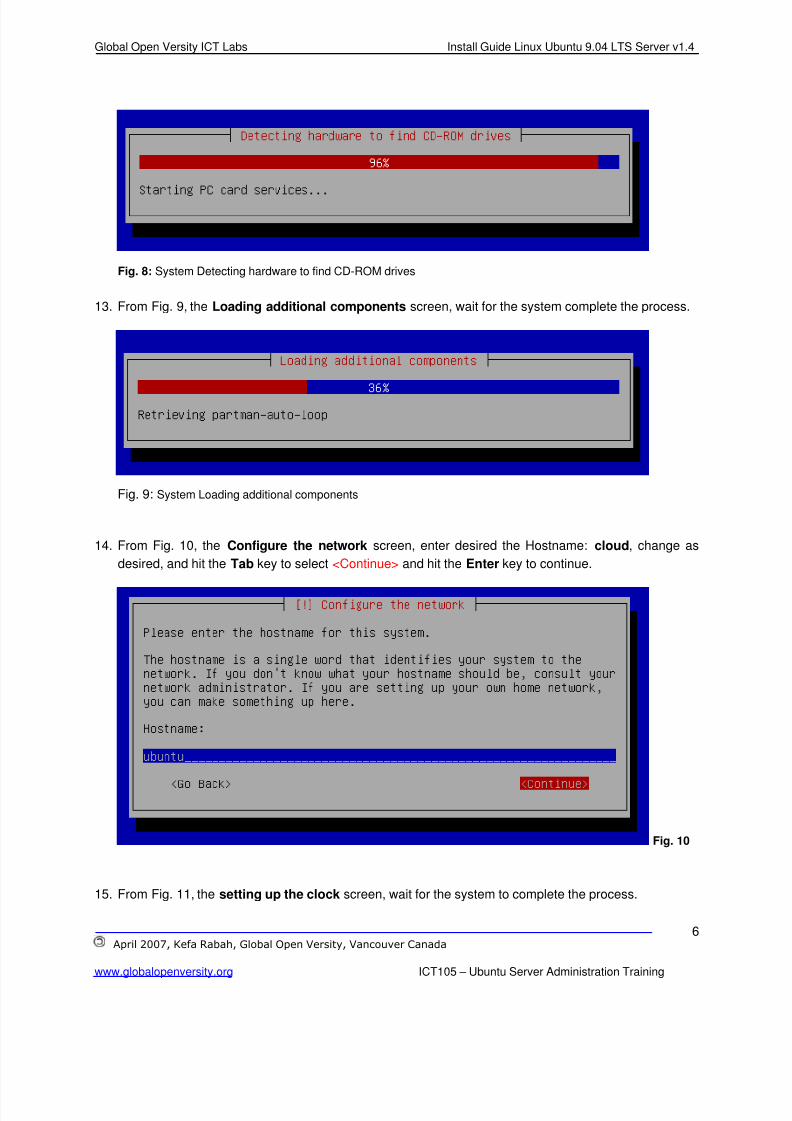
10. From the Ubuntu installer main menu screen, Fig. 6, Origin of keyboard, select USA and hit
the Enter key to continue.
8/8/2019 Step-By-Step Install Guide Ubuntu 9.04 Jaunty Server
http://slidepdf.com/reader/full/step-by-step-install-guide-ubuntu-904-jaunty-server 7/29
Global Open Versity ICT Labs Install Guide Linux Ubuntu 9.04 LTS Server v1.4
April 2007, Kefa Rabah, Global Open Versity, Vancouver Canada
www.globalopenversity.org ICT105 – Ubuntu Server Administration Training
5
Fig. 6
11. From the Ubuntu installer main menu screen, Fig. 7, Keyboard layout, select USA and hit the
Enter key to continue.
Fig. 7
12. From Fig. 8, the Detecting hardware to find CD-ROM drives screen, wait for the system complete
the process.
8/8/2019 Step-By-Step Install Guide Ubuntu 9.04 Jaunty Server
http://slidepdf.com/reader/full/step-by-step-install-guide-ubuntu-904-jaunty-server 8/29
Global Open Versity ICT Labs Install Guide Linux Ubuntu 9.04 LTS Server v1.4
April 2007, Kefa Rabah, Global Open Versity, Vancouver Canada
www.globalopenversity.org ICT105 – Ubuntu Server Administration Training
6
Fig. 8: System Detecting hardware to find CD-ROM drives
13. From Fig. 9, the Loading additional components screen, wait for the system complete the process.
Fig. 9: System Loading additional components
14. From Fig. 10, the Configure the network screen, enter desired the Hostname: cloud, change as
desired, and hit the Tab key to select <Continue> and hit the Enter key to continue.
Fig. 10
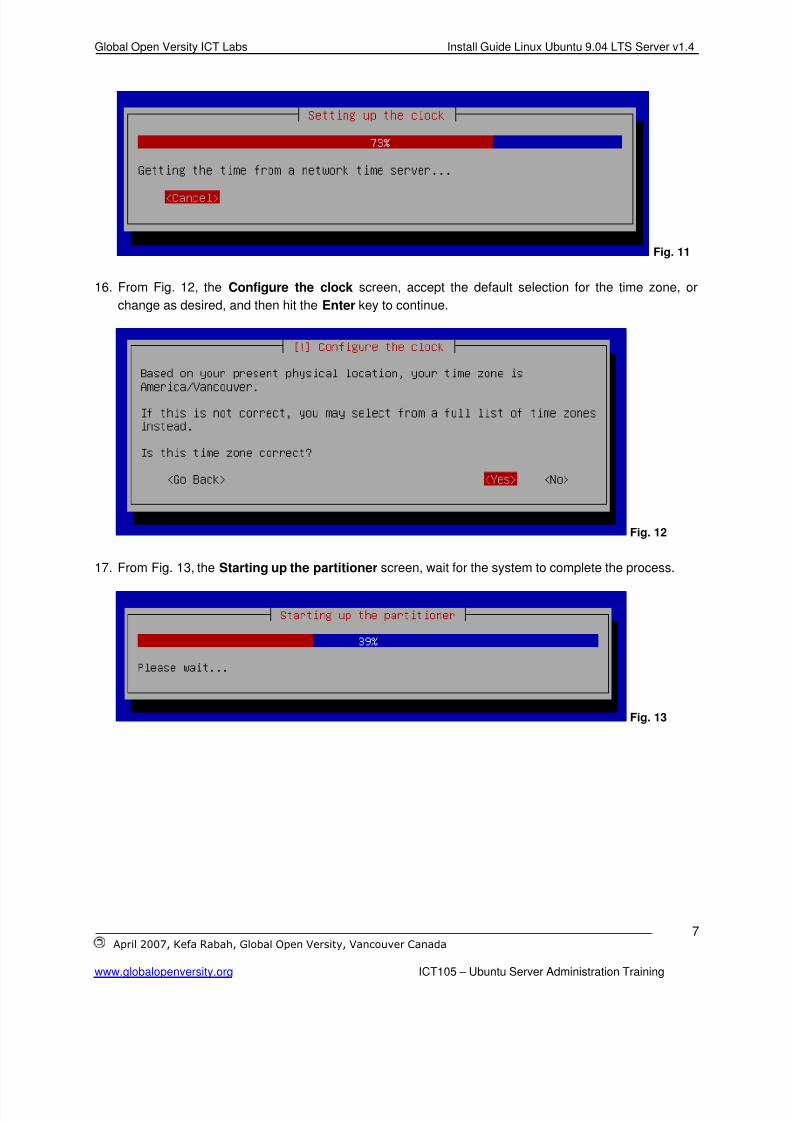
15. From Fig. 11, the setting up the clock screen, wait for the system to complete the process.
8/8/2019 Step-By-Step Install Guide Ubuntu 9.04 Jaunty Server
http://slidepdf.com/reader/full/step-by-step-install-guide-ubuntu-904-jaunty-server 9/29
Global Open Versity ICT Labs Install Guide Linux Ubuntu 9.04 LTS Server v1.4
April 2007, Kefa Rabah, Global Open Versity, Vancouver Canada
www.globalopenversity.org ICT105 – Ubuntu Server Administration Training
7
Fig. 11
16. From Fig. 12, the Configure the clock screen, accept the default selection for the time zone, or
change as desired, and then hit the Enter key to continue.
Fig. 12
17. From Fig. 13, the Starting up the partitioner screen, wait for the system to complete the process.
Fig. 13
8/8/2019 Step-By-Step Install Guide Ubuntu 9.04 Jaunty Server
http://slidepdf.com/reader/full/step-by-step-install-guide-ubuntu-904-jaunty-server 10/29
Global Open Versity ICT Labs Install Guide Linux Ubuntu 9.04 LTS Server v1.4
April 2007, Kefa Rabah, Global Open Versity, Vancouver Canada
www.globalopenversity.org ICT105 – Ubuntu Server Administration Training
8
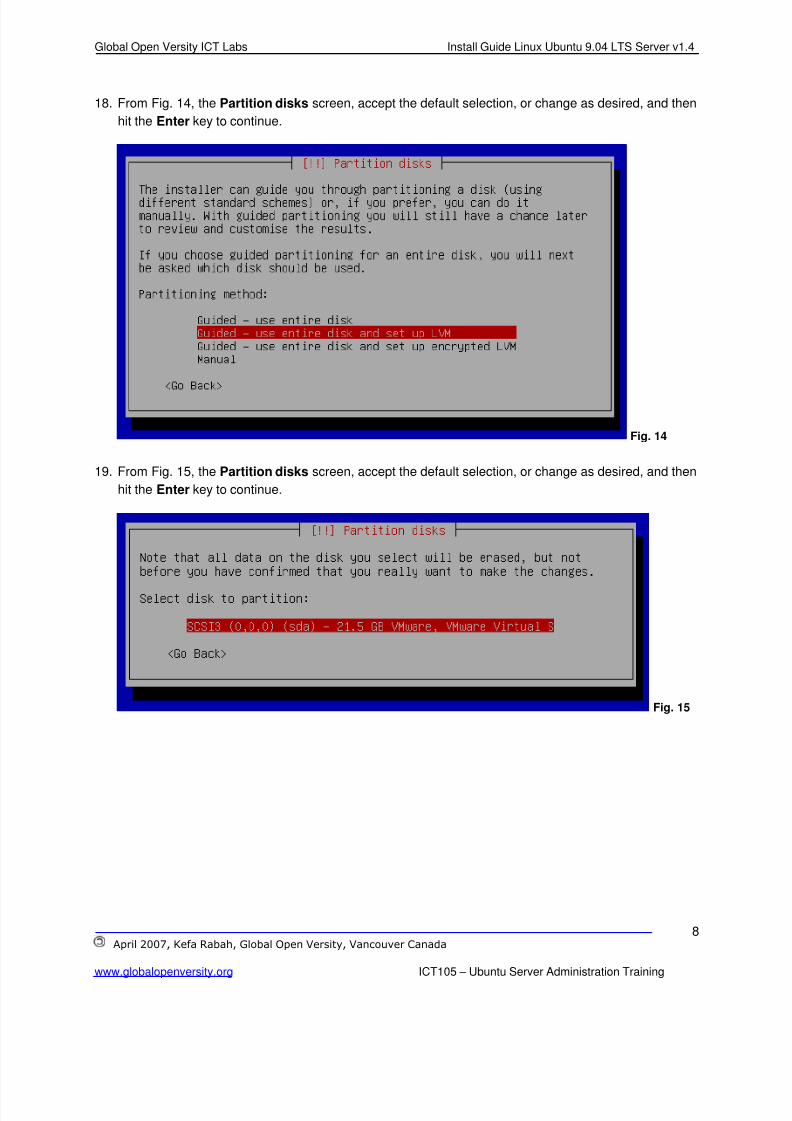
18. From Fig. 14, the Partition disks screen, accept the default selection, or change as desired, and then
hit the Enter key to continue.
Fig. 14
19. From Fig. 15, the Partition disks screen, accept the default selection, or change as desired, and then
hit the Enter key to continue.
Fig. 15

8/8/2019 Step-By-Step Install Guide Ubuntu 9.04 Jaunty Server
http://slidepdf.com/reader/full/step-by-step-install-guide-ubuntu-904-jaunty-server 11/29
Global Open Versity ICT Labs Install Guide Linux Ubuntu 9.04 LTS Server v1.4
April 2007, Kefa Rabah, Global Open Versity, Vancouver Canada
www.globalopenversity.org ICT105 – Ubuntu Server Administration Training
9
20. From Fig. 16, the Partition disks screen, select <Yes>, or change as desired, and then hit the Enter
key to continue.
Fig. 16
21. From Fig. 17, the Partition disks screen, accept the default selection of 21.2GB, or change as
desired, and then hit the Tab key to select <Continue> and hit the Enter key to continue.
Fig. 17
8/8/2019 Step-By-Step Install Guide Ubuntu 9.04 Jaunty Server
http://slidepdf.com/reader/full/step-by-step-install-guide-ubuntu-904-jaunty-server 12/29
Global Open Versity ICT Labs Install Guide Linux Ubuntu 9.04 LTS Server v1.4
April 2007, Kefa Rabah, Global Open Versity, Vancouver Canada
www.globalopenversity.org ICT105 – Ubuntu Server Administration Training
10
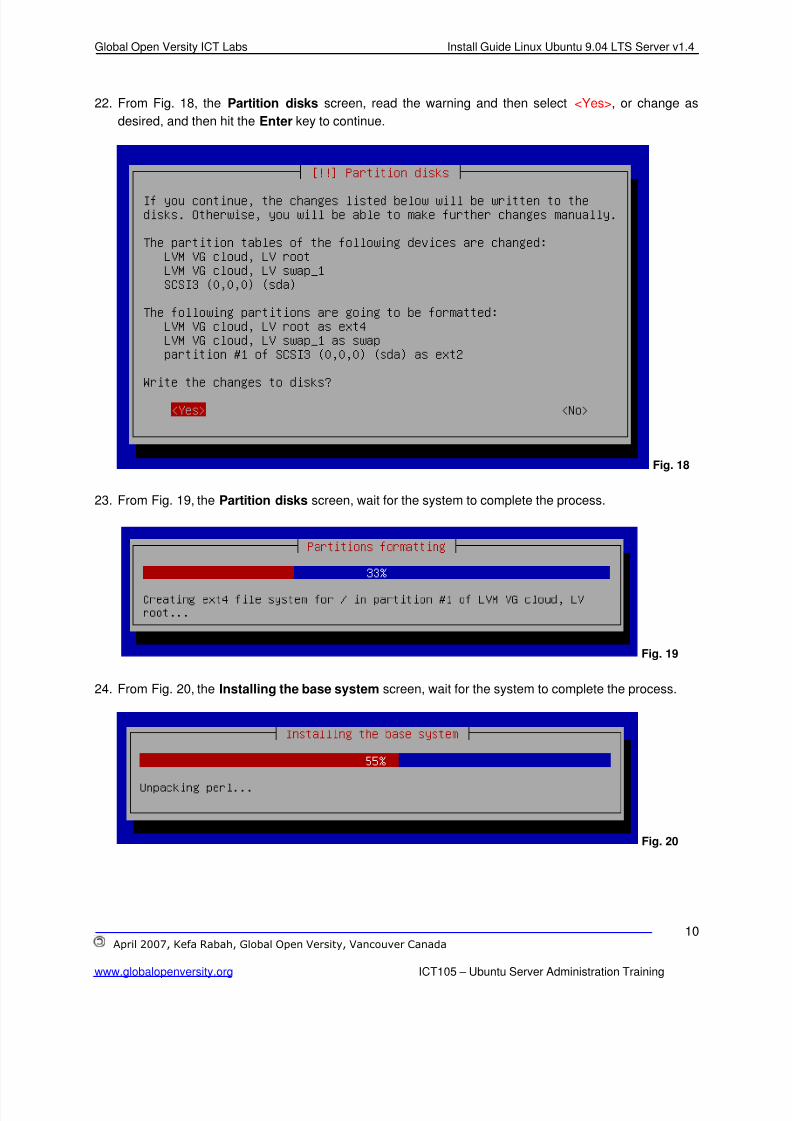
22. From Fig. 18, the Partition disks screen, read the warning and then select <Yes>, or change as
desired, and then hit the Enter key to continue.
Fig. 18
23. From Fig. 19, the Partition disks screen, wait for the system to complete the process.
Fig. 19
24. From Fig. 20, the Installing the base system screen, wait for the system to complete the process.
Fig. 20
8/8/2019 Step-By-Step Install Guide Ubuntu 9.04 Jaunty Server
http://slidepdf.com/reader/full/step-by-step-install-guide-ubuntu-904-jaunty-server 13/29
8/8/2019 Step-By-Step Install Guide Ubuntu 9.04 Jaunty Server
http://slidepdf.com/reader/full/step-by-step-install-guide-ubuntu-904-jaunty-server 14/29
Global Open Versity ICT Labs Install Guide Linux Ubuntu 9.04 LTS Server v1.4
April 2007, Kefa Rabah, Global Open Versity, Vancouver Canada
www.globalopenversity.org ICT105 – Ubuntu Server Administration Training
12
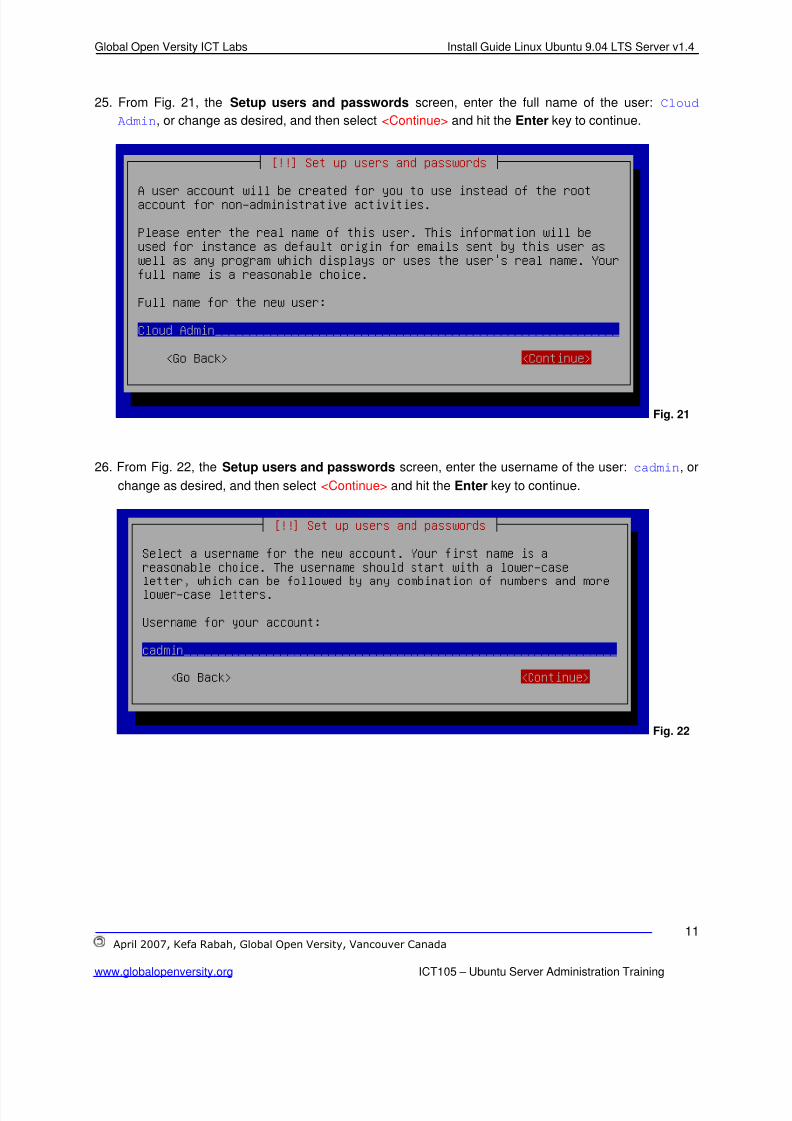
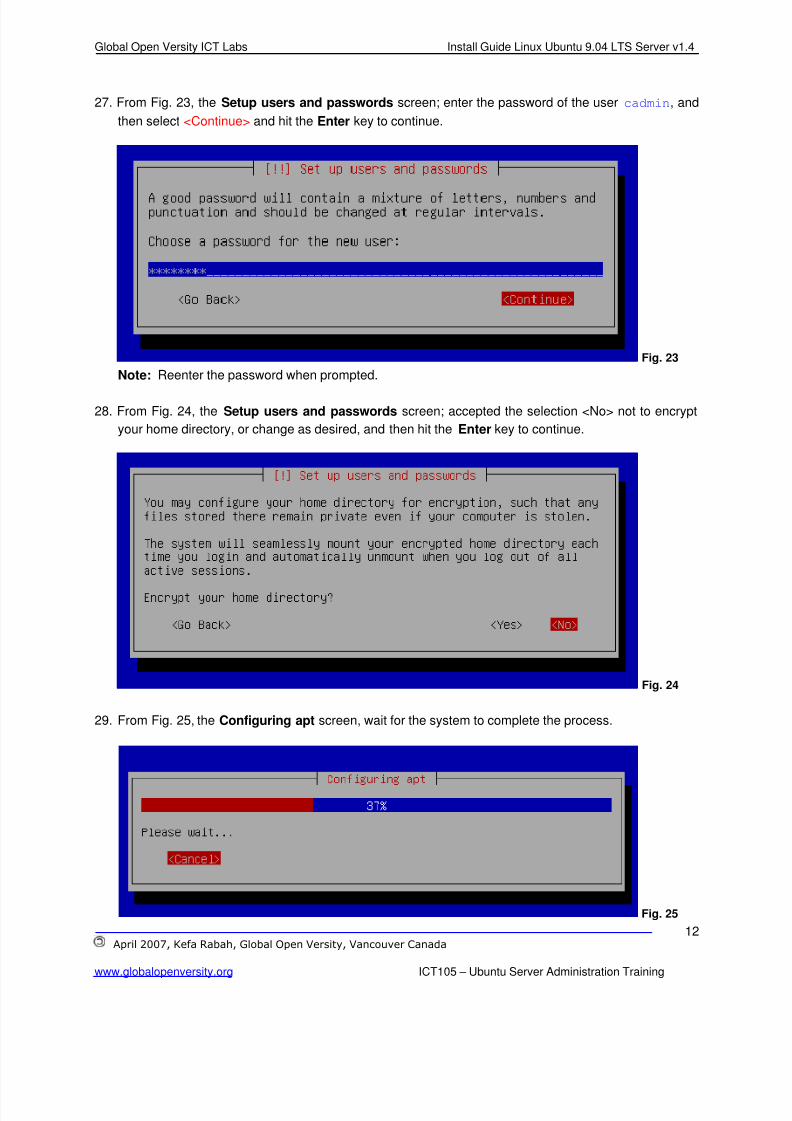
27. From Fig. 23, the Setup users and passwords screen; enter the password of the user cadmin, and
then select <Continue> and hit the Enter key to continue.
Fig. 23
Note: Reenter the password when prompted.
28. From Fig. 24, the Setup users and passwords screen; accepted the selection <No> not to encrypt
your home directory, or change as desired, and then hit the Enter key to continue.
Fig. 24
29. From Fig. 25, the Configuring apt screen, wait for the system to complete the process.
Fig. 25
8/8/2019 Step-By-Step Install Guide Ubuntu 9.04 Jaunty Server
http://slidepdf.com/reader/full/step-by-step-install-guide-ubuntu-904-jaunty-server 15/29
Global Open Versity ICT Labs Install Guide Linux Ubuntu 9.04 LTS Server v1.4
April 2007, Kefa Rabah, Global Open Versity, Vancouver Canada
www.globalopenversity.org ICT105 – Ubuntu Server Administration Training
13
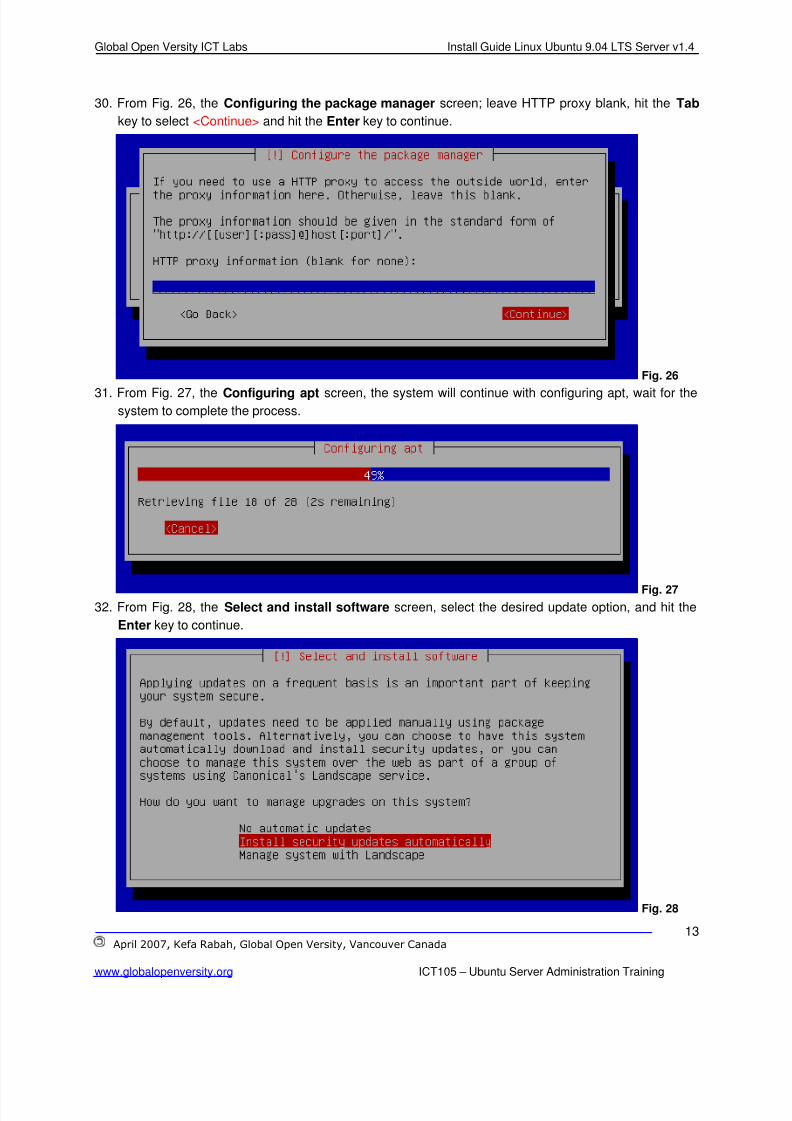
30. From Fig. 26, the Configuring the package manager screen; leave HTTP proxy blank, hit the Tab
key to select <Continue> and hit the Enter key to continue.
Fig. 26
31. From Fig. 27, the Configuring apt screen, the system will continue with configuring apt, wait for thesystem to complete the process.
Fig. 27 32. From Fig. 28, the Select and install software screen, select the desired update option, and hit the
Enter key to continue.
Fig. 28
8/8/2019 Step-By-Step Install Guide Ubuntu 9.04 Jaunty Server
http://slidepdf.com/reader/full/step-by-step-install-guide-ubuntu-904-jaunty-server 16/29
Global Open Versity ICT Labs Install Guide Linux Ubuntu 9.04 LTS Server v1.4
April 2007, Kefa Rabah, Global Open Versity, Vancouver Canada
www.globalopenversity.org ICT105 – Ubuntu Server Administration Training
14
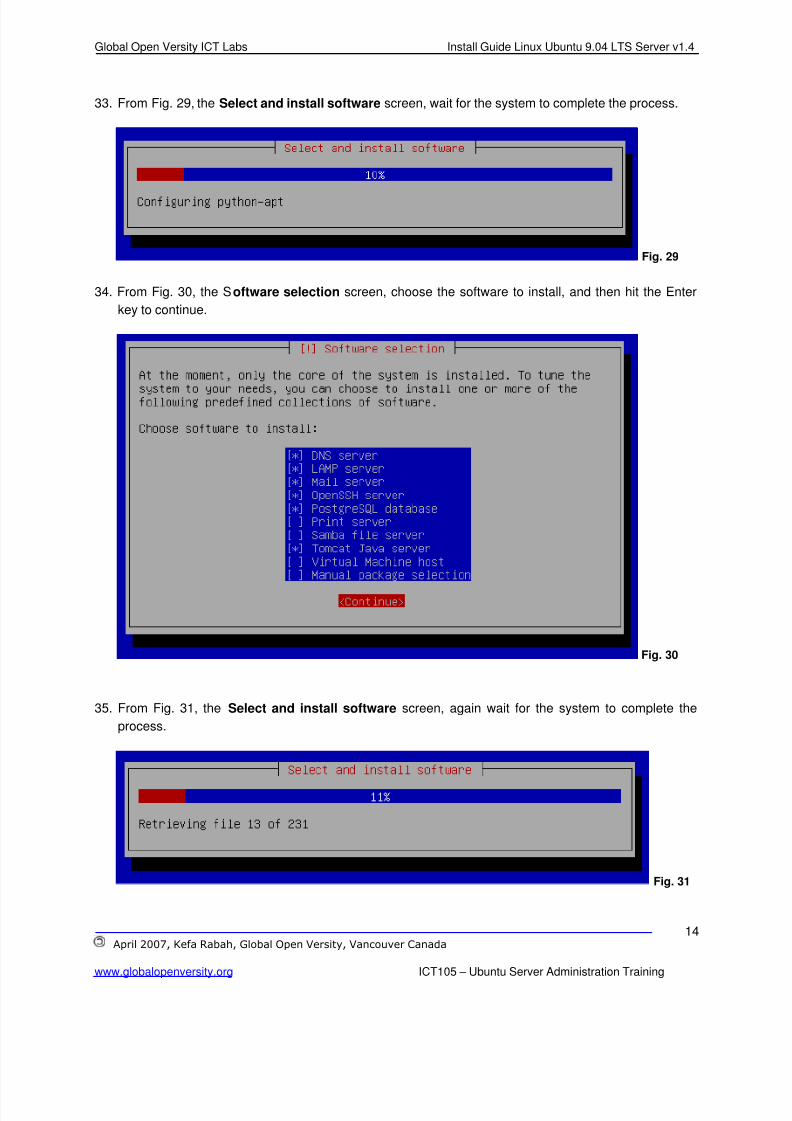
33. From Fig. 29, the Select and install software screen, wait for the system to complete the process.
Fig. 29
34. From Fig. 30, the Software selection screen, choose the software to install, and then hit the Enter
key to continue.
Fig. 30
35. From Fig. 31, the Select and install software screen, again wait for the system to complete the
process.
Fig. 31
8/8/2019 Step-By-Step Install Guide Ubuntu 9.04 Jaunty Server
http://slidepdf.com/reader/full/step-by-step-install-guide-ubuntu-904-jaunty-server 17/29
Global Open Versity ICT Labs Install Guide Linux Ubuntu 9.04 LTS Server v1.4
April 2007, Kefa Rabah, Global Open Versity, Vancouver Canada
www.globalopenversity.org ICT105 – Ubuntu Server Administration Training
15
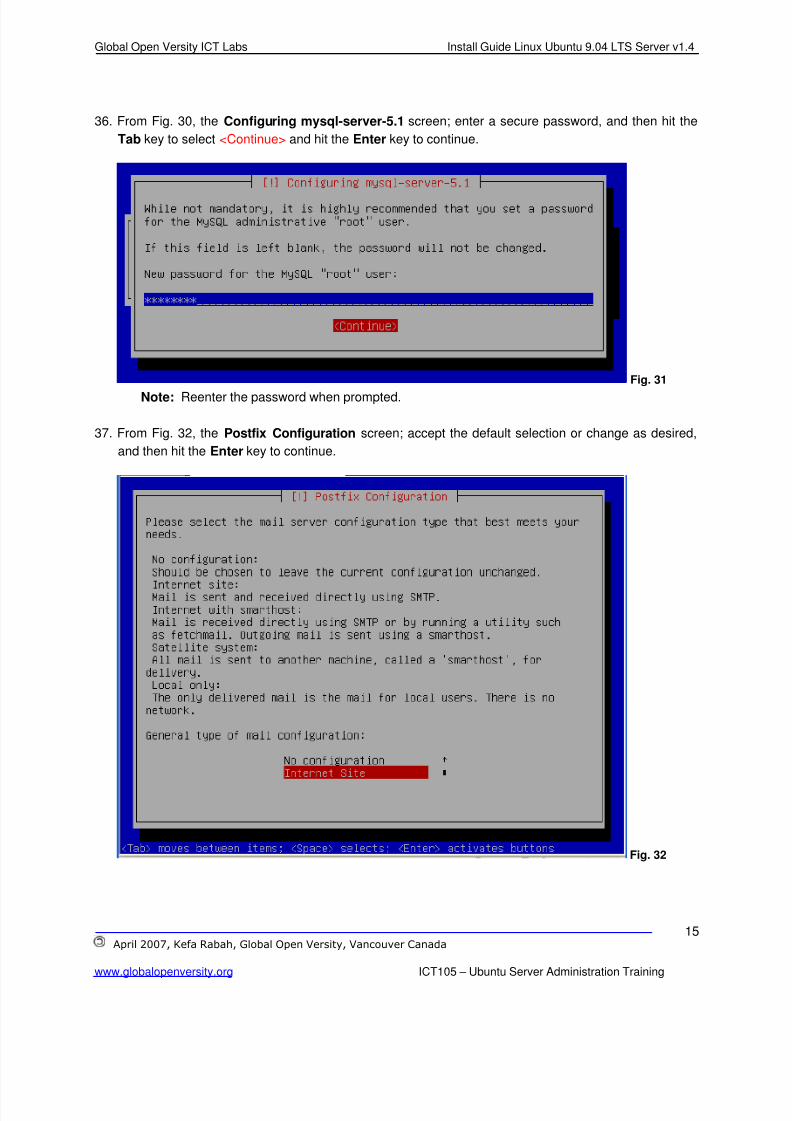
36. From Fig. 30, the Configuring mysql-server-5.1 screen; enter a secure password, and then hit the
Tab key to select <Continue> and hit the Enter key to continue.
Fig. 31
Note: Reenter the password when prompted.
37. From Fig. 32, the Postfix Configuration screen; accept the default selection or change as desired,
and then hit the Enter key to continue.
Fig. 32
8/8/2019 Step-By-Step Install Guide Ubuntu 9.04 Jaunty Server
http://slidepdf.com/reader/full/step-by-step-install-guide-ubuntu-904-jaunty-server 18/29
Global Open Versity ICT Labs Install Guide Linux Ubuntu 9.04 LTS Server v1.4
April 2007, Kefa Rabah, Global Open Versity, Vancouver Canada
www.globalopenversity.org ICT105 – Ubuntu Server Administration Training
16
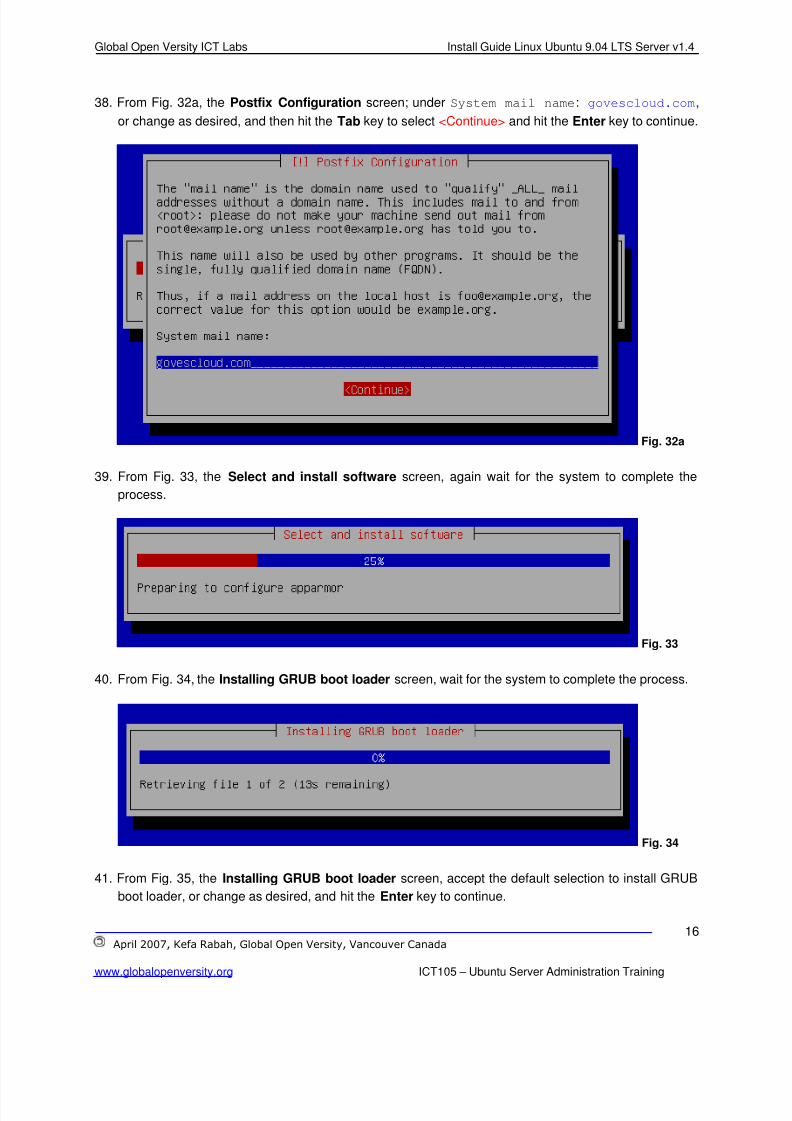
38. From Fig. 32a, the Postfix Configuration screen; under System mail name: govescloud.com,
or change as desired, and then hit the Tab key to select <Continue> and hit the Enter key to continue.
Fig. 32a
39. From Fig. 33, the Select and install software screen, again wait for the system to complete the
process.
Fig. 33
40. From Fig. 34, the Installing GRUB boot loader screen, wait for the system to complete the process.
Fig. 34
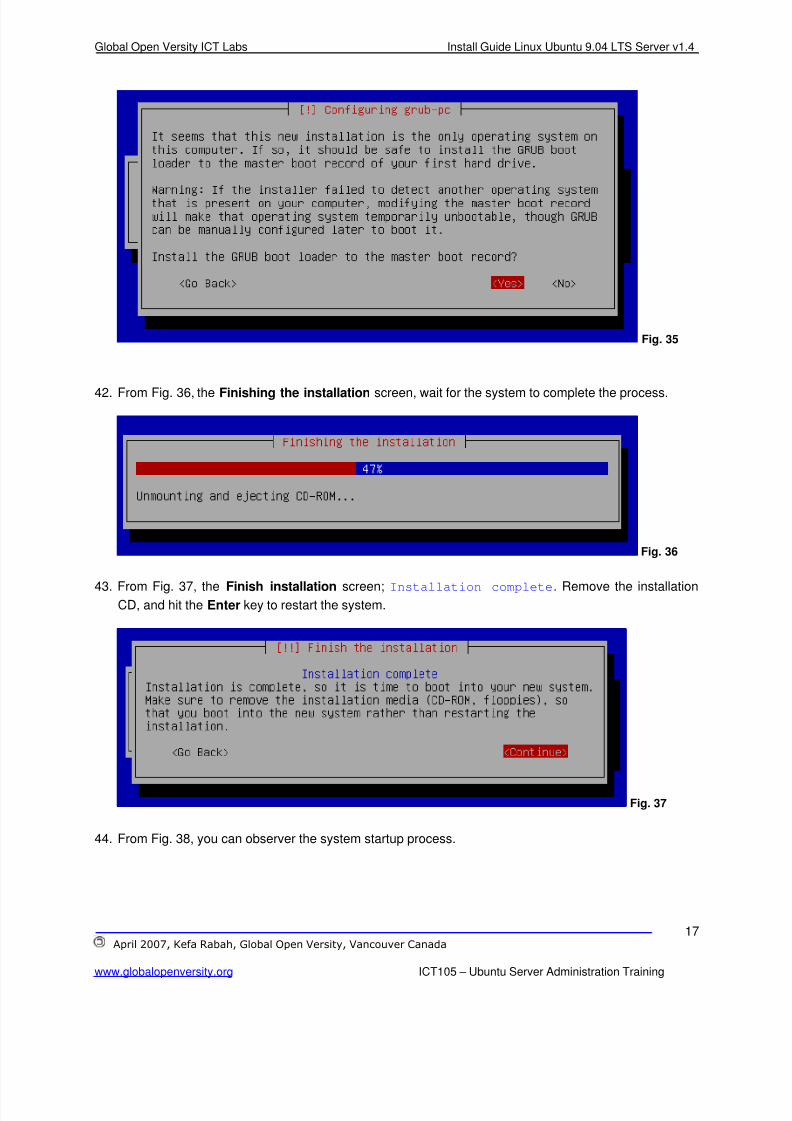
41. From Fig. 35, the Installing GRUB boot loader screen, accept the default selection to install GRUB
boot loader, or change as desired, and hit the Enter key to continue.
8/8/2019 Step-By-Step Install Guide Ubuntu 9.04 Jaunty Server
http://slidepdf.com/reader/full/step-by-step-install-guide-ubuntu-904-jaunty-server 19/29
Global Open Versity ICT Labs Install Guide Linux Ubuntu 9.04 LTS Server v1.4
April 2007, Kefa Rabah, Global Open Versity, Vancouver Canada
www.globalopenversity.org ICT105 – Ubuntu Server Administration Training
17
Fig. 35
42. From Fig. 36, the Finishing the installation screen, wait for the system to complete the process.
Fig. 36
43. From Fig. 37, the Finish installation screen; Installation complete. Remove the installationCD, and hit the Enter key to restart the system.
Fig. 37
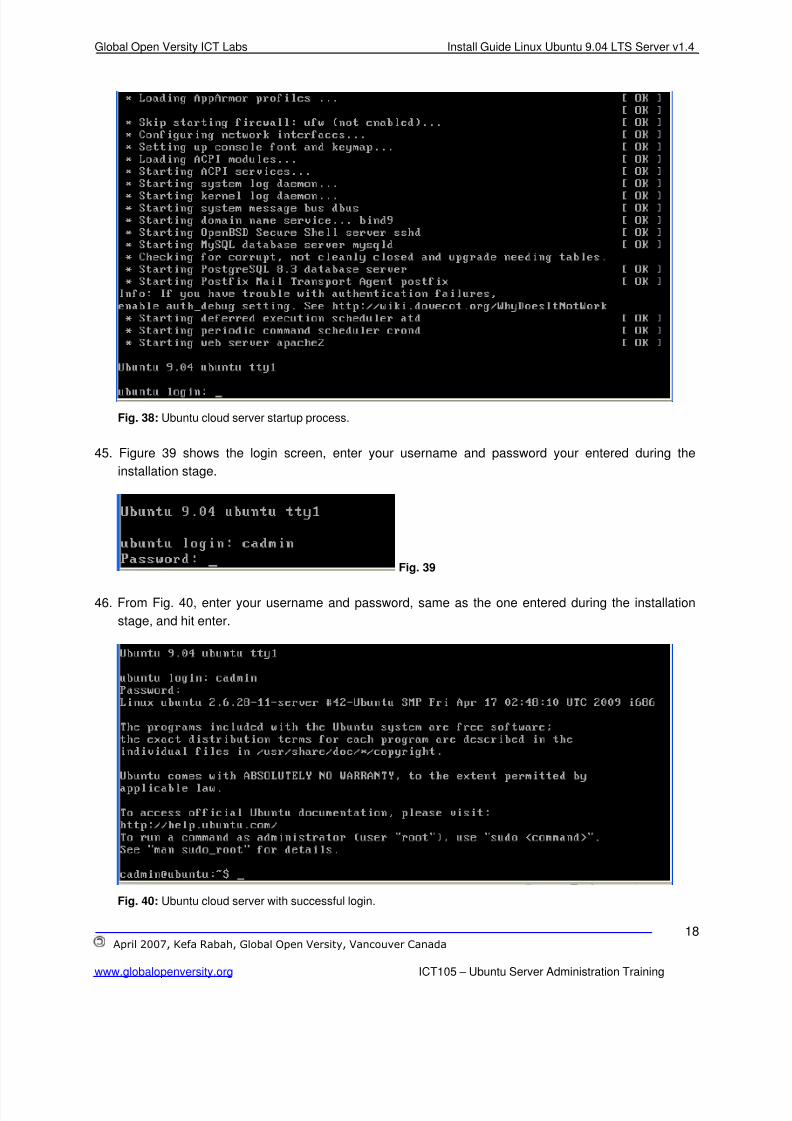
44. From Fig. 38, you can observer the system startup process.
8/8/2019 Step-By-Step Install Guide Ubuntu 9.04 Jaunty Server
http://slidepdf.com/reader/full/step-by-step-install-guide-ubuntu-904-jaunty-server 20/29
Global Open Versity ICT Labs Install Guide Linux Ubuntu 9.04 LTS Server v1.4
April 2007, Kefa Rabah, Global Open Versity, Vancouver Canada
www.globalopenversity.org ICT105 – Ubuntu Server Administration Training
18
Fig. 38: Ubuntu cloud server startup process.
45. Figure 39 shows the login screen, enter your username and password your entered during the
installation stage.
Fig. 39
46. From Fig. 40, enter your username and password, same as the one entered during the installation
stage, and hit enter.
Fig. 40: Ubuntu cloud server with successful login.
8/8/2019 Step-By-Step Install Guide Ubuntu 9.04 Jaunty Server
http://slidepdf.com/reader/full/step-by-step-install-guide-ubuntu-904-jaunty-server 21/29
Global Open Versity ICT Labs Install Guide Linux Ubuntu 9.04 LTS Server v1.4
April 2007, Kefa Rabah, Global Open Versity, Vancouver Canada
www.globalopenversity.org ICT105 – Ubuntu Server Administration Training
19
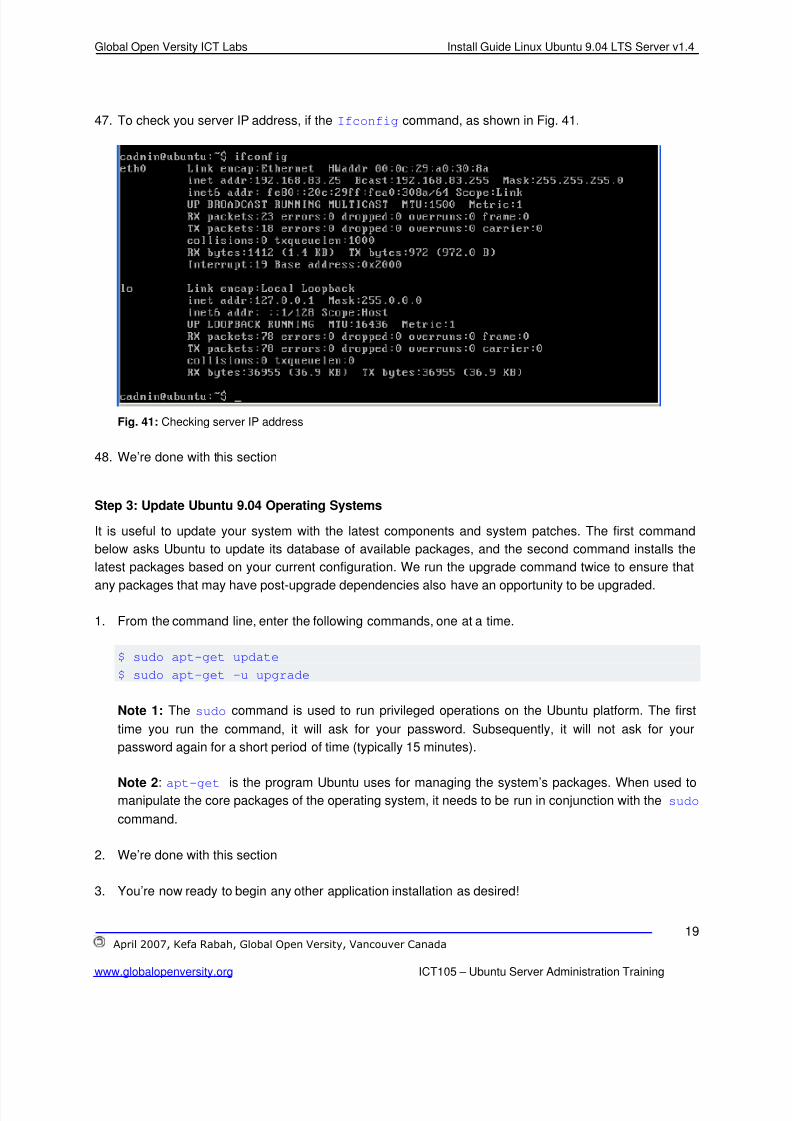
47. To check you server IP address, if the Ifconfig command, as shown in Fig. 41.
Fig. 41: Checking server IP address
48. We’re done with this section
Step 3: Update Ubuntu 9.04 Operating Systems
It is useful to update your system with the latest components and system patches. The first command
below asks Ubuntu to update its database of available packages, and the second command installs the
latest packages based on your current configuration. We run the upgrade command twice to ensure that
any packages that may have post-upgrade dependencies also have an opportunity to be upgraded.
1. From the command line, enter the following commands, one at a time.
$ sudo apt-get update
$ sudo apt-get -u upgrade
Note 1: The sudo command is used to run privileged operations on the Ubuntu platform. The first
time you run the command, it will ask for your password. Subsequently, it will not ask for your
password again for a short period of time (typically 15 minutes).
Note 2: apt-get is the program Ubuntu uses for managing the system’s packages. When used tomanipulate the core packages of the operating system, it needs to be run in conjunction with the sudo
command.
2. We’re done with this section
3. You’re now ready to begin any other application installation as desired!
8/8/2019 Step-By-Step Install Guide Ubuntu 9.04 Jaunty Server
http://slidepdf.com/reader/full/step-by-step-install-guide-ubuntu-904-jaunty-server 22/29
Global Open Versity ICT Labs Install Guide Linux Ubuntu 9.04 LTS Server v1.4
April 2007, Kefa Rabah, Global Open Versity, Vancouver Canada
www.globalopenversity.org ICT105 – Ubuntu Server Administration Training
20
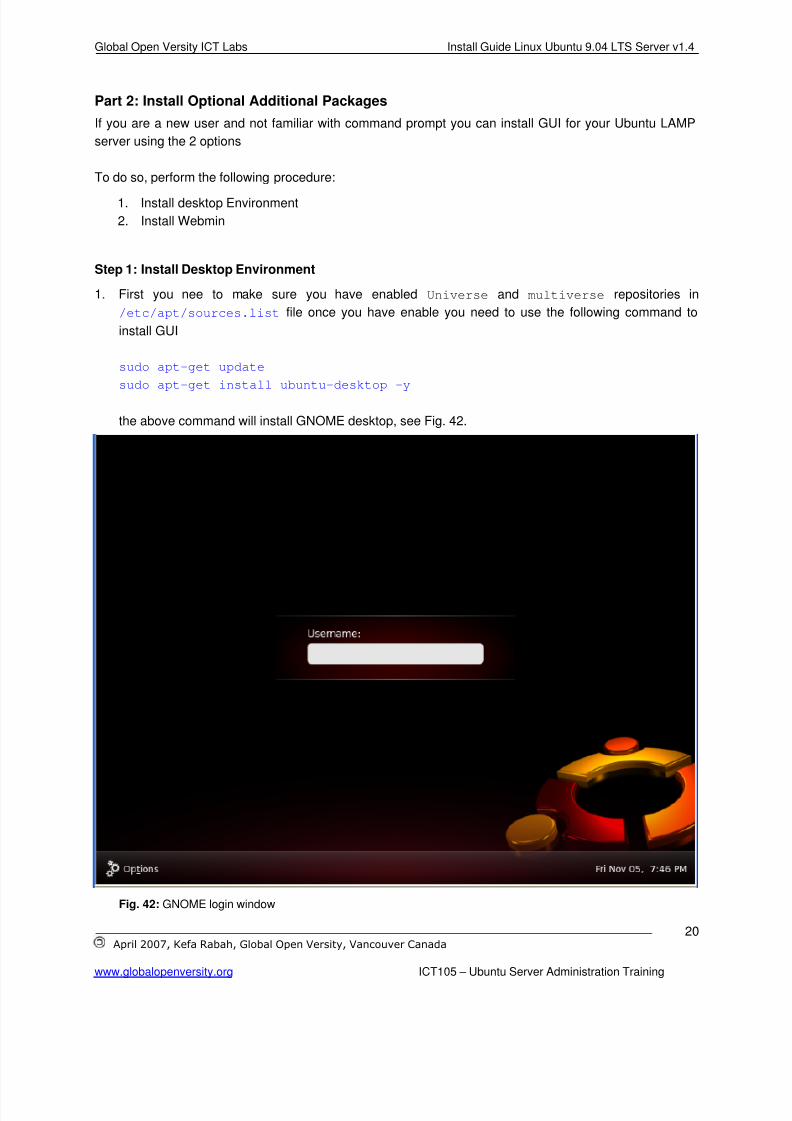
Part 2: Install Optional Additional Packages
If you are a new user and not familiar with command prompt you can install GUI for your Ubuntu LAMP
server using the 2 options
To do so, perform the following procedure:
1. Install desktop Environment
2. Install Webmin
Step 1: Install Desktop Environment
1. First you nee to make sure you have enabled Universe and multiverse repositories in
/etc/apt/sources.list file once you have enable you need to use the following command to
install GUI
sudo apt-get update
sudo apt-get install ubuntu-desktop -y
the above command will install GNOME desktop, see Fig. 42.
Fig. 42: GNOME login window
8/8/2019 Step-By-Step Install Guide Ubuntu 9.04 Jaunty Server
http://slidepdf.com/reader/full/step-by-step-install-guide-ubuntu-904-jaunty-server 23/29
Global Open Versity ICT Labs Install Guide Linux Ubuntu 9.04 LTS Server v1.4
April 2007, Kefa Rabah, Global Open Versity, Vancouver Canada
www.globalopenversity.org ICT105 – Ubuntu Server Administration Training
21
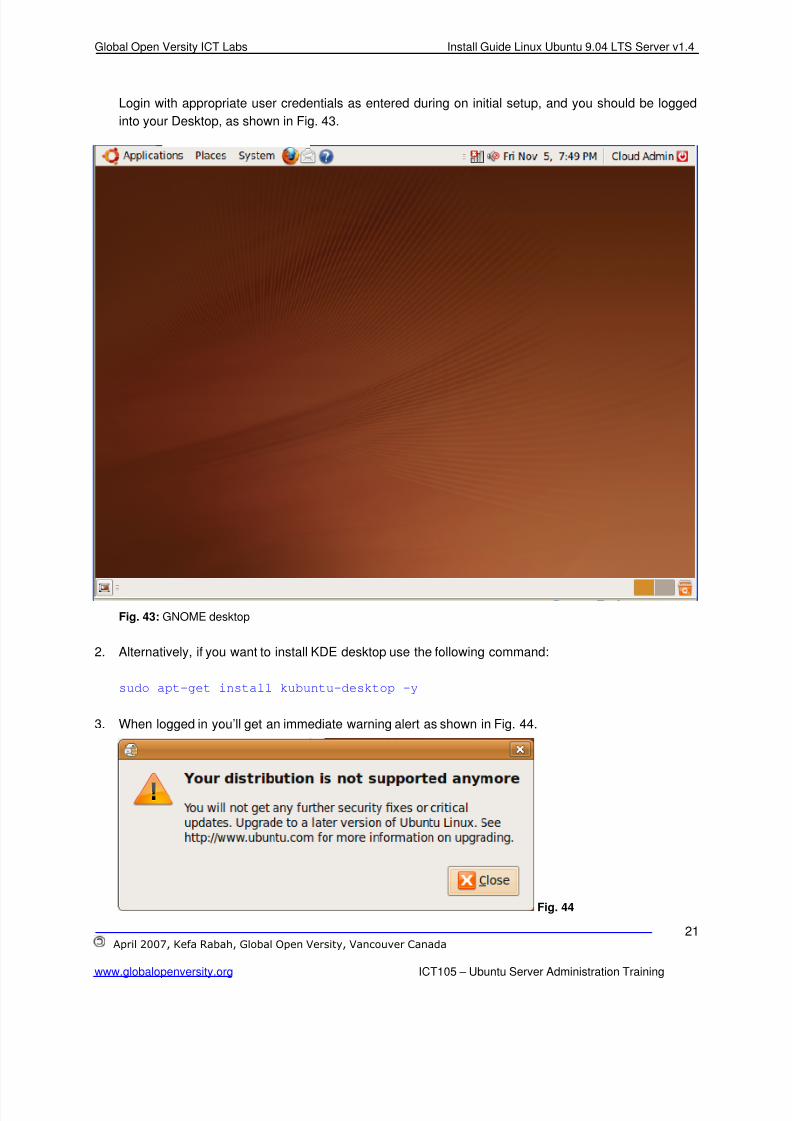
Login with appropriate user credentials as entered during on initial setup, and you should be logged
into your Desktop, as shown in Fig. 43.
Fig. 43: GNOME desktop
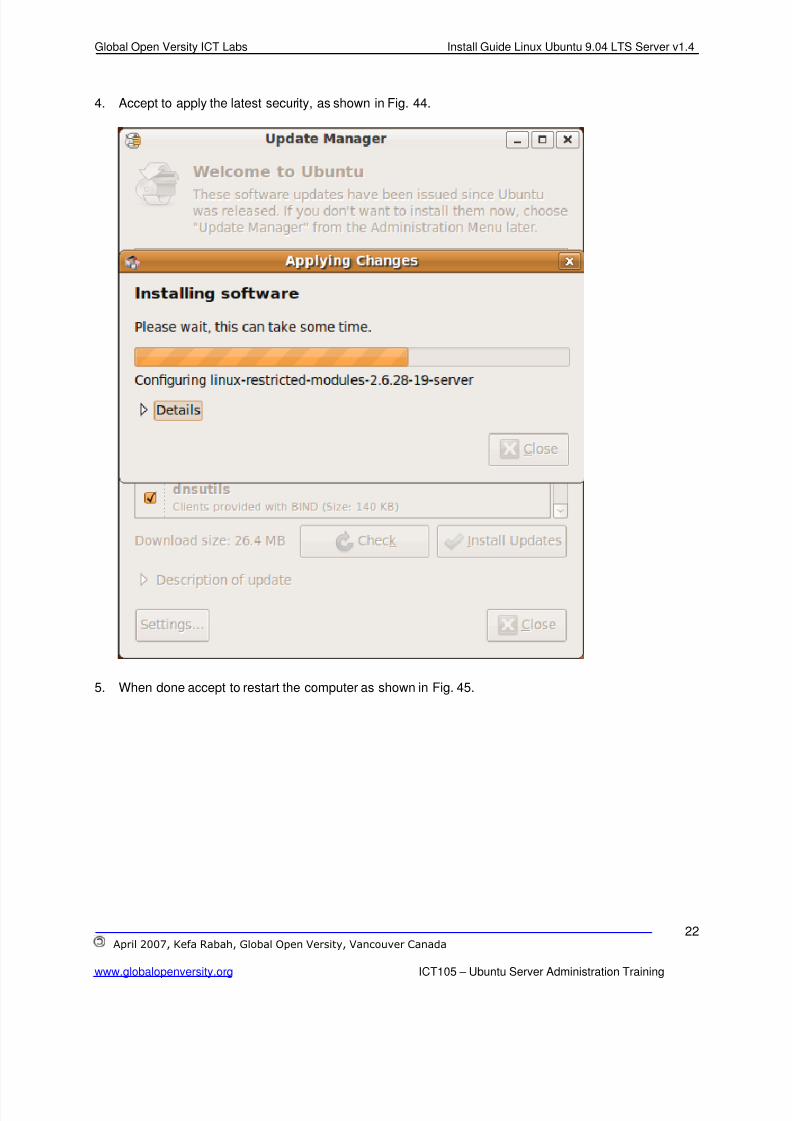
2. Alternatively, if you want to install KDE desktop use the following command:
sudo apt-get install kubuntu-desktop -y
3. When logged in you’ll get an immediate warning alert as shown in Fig. 44.
Fig. 44
8/8/2019 Step-By-Step Install Guide Ubuntu 9.04 Jaunty Server
http://slidepdf.com/reader/full/step-by-step-install-guide-ubuntu-904-jaunty-server 24/29
Global Open Versity ICT Labs Install Guide Linux Ubuntu 9.04 LTS Server v1.4
April 2007, Kefa Rabah, Global Open Versity, Vancouver Canada
www.globalopenversity.org ICT105 – Ubuntu Server Administration Training
22
4. Accept to apply the latest security, as shown in Fig. 44.
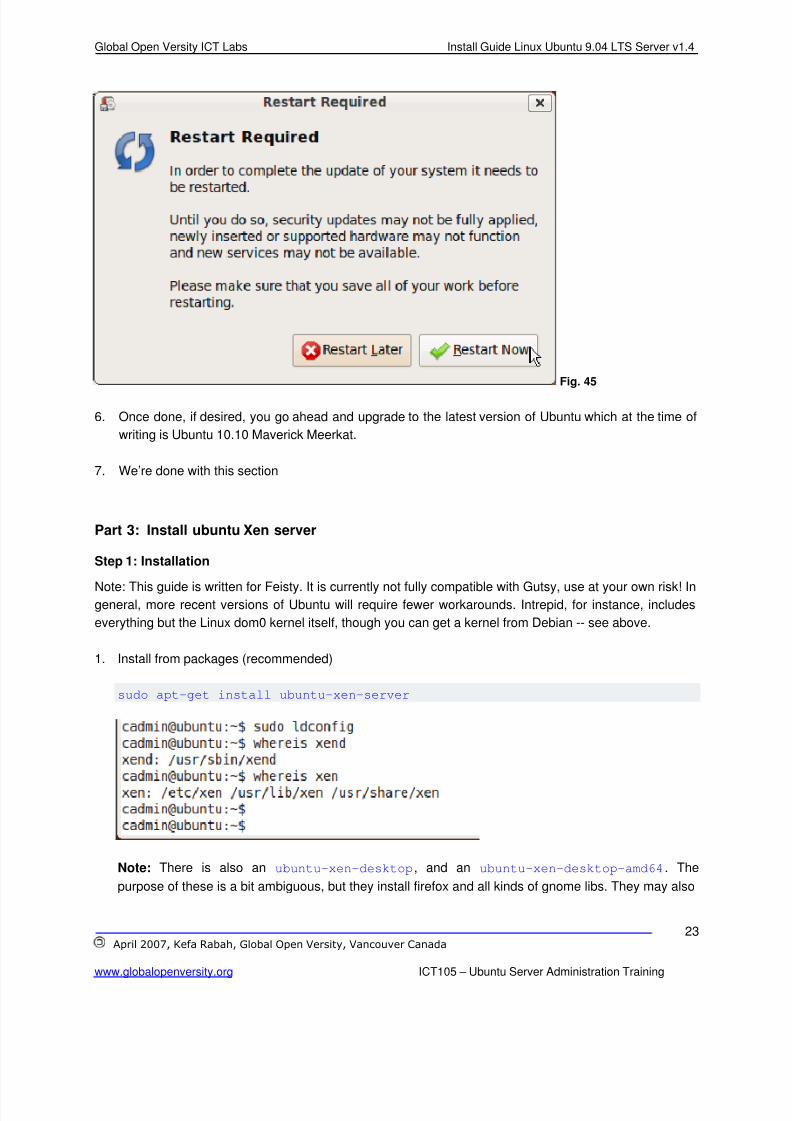
5. When done accept to restart the computer as shown in Fig. 45.
8/8/2019 Step-By-Step Install Guide Ubuntu 9.04 Jaunty Server
http://slidepdf.com/reader/full/step-by-step-install-guide-ubuntu-904-jaunty-server 25/29
Global Open Versity ICT Labs Install Guide Linux Ubuntu 9.04 LTS Server v1.4
April 2007, Kefa Rabah, Global Open Versity, Vancouver Canada
www.globalopenversity.org ICT105 – Ubuntu Server Administration Training
23
Fig. 45
6. Once done, if desired, you go ahead and upgrade to the latest version of Ubuntu which at the time of
writing is Ubuntu 10.10 Maverick Meerkat.
7. We’re done with this section
Part 3: Install ubuntu Xen server
Step 1: Installation
Note: This guide is written for Feisty. It is currently not fully compatible with Gutsy, use at your own risk! Ingeneral, more recent versions of Ubuntu will require fewer workarounds. Intrepid, for instance, includes
everything but the Linux dom0 kernel itself, though you can get a kernel from Debian -- see above.
1. Install from packages (recommended)
sudo apt-get install ubuntu-xen-server
Note: There is also an ubuntu-xen-desktop, and an ubuntu-xen-desktop-amd64. The
purpose of these is a bit ambiguous, but they install firefox and all kinds of gnome libs. They may also
8/8/2019 Step-By-Step Install Guide Ubuntu 9.04 Jaunty Server
http://slidepdf.com/reader/full/step-by-step-install-guide-ubuntu-904-jaunty-server 26/29
Global Open Versity ICT Labs Install Guide Linux Ubuntu 9.04 LTS Server v1.4
April 2007, Kefa Rabah, Global Open Versity, Vancouver Canada
www.globalopenversity.org ICT105 – Ubuntu Server Administration Training
24
not be PAE enabled... compiled for systems with more than 4GB of RAM. Even if you are on a 64 bit
system, you should still install ubuntu-xen-server.
2. Next you need to enable networking. [Gutsy: I had to reboot the xen kernel before I could run the
xend script]
vi /etc/xen/xend-config.sxp
#(network-script network-dummy)
(network-script network-bridge)
3. then restart xend:
sudo /etc/init.d/xend restart # for the change to take effect
4. Its also a good idea to increase the default number of loop mounts allowed. Not really needed if you
are going to use LVM, but it also wont break anything if you do it anyway.
vi /etc/modules
loop max_loop=64
5. This is probably a good point to reboot your machine so that you use the xen kernel.
Note: After reboot is a good chance to check your network and ensure it works. Both Feisty and
Gutsy may have network problems with certain hardware. If you are experiencing network problems,
check out this potential solution
Step 2: Installing a Kernel Dom0 that works
To get started you will need a Debian Dom0 Kernel. There kernel I used is this one: "linux-image-
2.6.26-2-xen-686_2.6.26-15_i386.deb"
6. Download from here:
Kernel: http://packages.debian.org/lenny/i386/linux-image-2.6.26-2-xen-686/download
Modules: http://packages.debian.org/lenny/i386/linux-modules-2.6.26-2-xen-686/download
Or use:
wget http://security.debian.org/debian-security/pool/updates/main/l/linux-
2.6/linux-image-2.6.26-2-xen-686_2.6.26-25lenny1_i386.deb
wget http://security.debian.org/debian-security/pool/updates/main/l/linux-
2.6/linux-modules-2.6.26-2-xen-686_2.6.26-25lenny1_i386.deb
8/8/2019 Step-By-Step Install Guide Ubuntu 9.04 Jaunty Server
http://slidepdf.com/reader/full/step-by-step-install-guide-ubuntu-904-jaunty-server 27/29
Global Open Versity ICT Labs Install Guide Linux Ubuntu 9.04 LTS Server v1.4
April 2007, Kefa Rabah, Global Open Versity, Vancouver Canada
www.globalopenversity.org ICT105 – Ubuntu Server Administration Training
25
7. Then install using, in one line:
sudo dpkg -i linux-image-2.6.26-2-xen-686_2.6.26-15lenny2_i386.deb linux-
modules-2.6.26-2-xen-686_2.6.26-15lenny2_i386.deb
Step 3: Configuring the bootloader
8. I use grub as my bootloader, so the entry in menu.lst to load and run Xen looks like this:
title Xen 3.3 / Ubuntu 9.04, kernel 2.6.26-2-xen-686
uuid bd2c08f6-e705-4c85-8fdb-aa884ca8a0b7
kernel /xen-3.3.gz
module /vmlinuz-2.6.26-2-xen-686 root=UUID=c397979f-01e0-4180-83eb-
8c9324fced1e ro console=tty0
module /initrd.img-2.6.26-2-xen-686quiet
Note: If you are lucky, when you install the kernel and modules using "dpkg -i", the utility grub-
update should automatically create the right menu entry. "root=" should be pointing to the correct
file system.
Step 4: Getting Dom0 networking running
9. The key to getting the network running is removing the Ubuntu network manager
sudo apt-get remove network-manager
10. then update the file /etc/network/interfaces to look like this:
auto lo
iface lo inet loopback
auto eth0
iface eth0 inet dhcp
Note: This should work fine for most people who have DHCP server running which is common in both
a corporate environment and an environment where you have an ADSL router running.
==============

8/8/2019 Step-By-Step Install Guide Ubuntu 9.04 Jaunty Server
http://slidepdf.com/reader/full/step-by-step-install-guide-ubuntu-904-jaunty-server 28/29
Global Open Versity ICT Labs Install Guide Linux Ubuntu 9.04 LTS Server v1.4
April 2007, Kefa Rabah, Global Open Versity, Vancouver Canada
www.globalopenversity.org ICT105 – Ubuntu Server Administration Training
26
Part 4: Need More Training on Linux:
Are you having trouble understanding or comprehending the working of Linux OS, if so, then check out
some of our introductory courses on Linux at: Global Open Versity, Vancouver Canada.
Ubuntu Server Administration Training
You can now register and take our superb Ubuntu Server Training course, covering Ubuntu 8.04, 9.04,
9.10, 10.04 and 10.10, EHCP and ISPConfig ISP hosting solutions, RESTORE backup, EJBCA PKI
solution and many more…
• ICT105 - Ubuntu Server Administration Training
Call us today:
Email: [email protected]: www.globalopenversity.org
Part 5: Hands-on Labs Assignments
1. Install and configure DNS servers
2. Install and configure a LAMP and messaging servers for your network infrastructure
3. Install Postfix mail server and Evolution mail client
4. Secure your email server using SSL
5. Lockdown your server by installing and configuring; Clamd, ClamAV and MailScanner.
Note 1: A good point to start from is to check out previous article on Postfix mail server on Linux
• Install Guide Postfix with MySQL & Dovecot on Linux v1.1
Note 1: Alternatively you may also be interested to install an alternative mail server: Sendmail mail
server is also open source messaging software
• Deploy Secure Messaging Solutions using Sendmail & Dovecot Servers with ClamAV on Linux
Other Related Articles & Hands-on Lab Manuals:
1. Building and Running Private Cloud With Eucalyptus Systems v1.0 2. Build Private Clouds With Ubuntu 10.10 LTS Enterprise Cloud Platform
3. Using Samba 3 Client Technology and Kerberos for Win2k8 AD-based identity management 4. Step-By-Step Build and Deploy Xen Hypervisor Virtualization on Linux OpenSUSE 11.3 Server
5. Build and Deploy Enterprise sipXecs Integration with Openfire
6. Build & Deploy a Private Cloud using OpenNebula Cloud Computing v1.2
7. Step-By Step Install Guide SugarCRM on PBX in a Flash
8. Step-By-Step Install Guide Linux OpenSUSE 11.3 Server v1.1 9. Using Webmin and Bind9 to Setup DNS Server on Linux 10. Step-by-step Install Guide Moodle on Linux with Sclipo Live Web Class

8/8/2019 Step-By-Step Install Guide Ubuntu 9.04 Jaunty Server
http://slidepdf.com/reader/full/step-by-step-install-guide-ubuntu-904-jaunty-server 29/29
Global Open Versity ICT Labs Install Guide Linux Ubuntu 9.04 LTS Server v1.4
27
11. Install Guide Secure Postfix Messaging Server with Dovecot and ClamAV on Linux v1.2 12. Deploy Secure Messaging Solutions using Sendmail & Dovecot Servers with ClamAV on Linux
13. Build your own ISP Hosting using EHCP on Ubuntu 10.04 LTS Server 14. Step-By-Step Install Guide DTC on Linux CentOS5 Server v1.0 15. Install Guide Secure mail with Dovecot & Roundcube Webmail v1.0Send 16. Build your Own Private Data Center Backup Solutions using Ubuntu Powered RESTORE Backup
Server v1.0 17. Install & Setup Astaro Security Gateway to Protect Corporate Network v1.1
-----------------------------------------------Kefa Rabah is the Founder of Global Technology Solutions Institute. Kefa is knowledgeable in severalfields of Science & Technology, Information Security Compliance and Project Management, andRenewable Energy Systems. He is also the founder of Global Open Versity, a place to enhance youreducating and career goals using the latest innovations and technologies.
Fellow us on Twitter: Global Open Versity and Kefa Rabah
A GOV Open Access Technical Academic PublicationsEnhancing education & empowering people worldwide through eLearning in the 21st Century