step by step instructions to make a reclining buttercream ... · pdf filestep by step...
TRANSCRIPT

Step by step instructions to make a reclining Buttercream Santa with fondant details
Supply List Diaper Bag
2 10x15(or 12x16), 2 9inch rounds,
1 7inch round cakes frozen
Fondant: 2-3 lbs, depending on your
accent details.
20 cups crusting butter cream
30x 28 or larger foil covered thick
MDF board.
1 6 inch round styro ball
11 inch tall wooden dowel at least ¾
inch thick
Screw
9 inch round cake board
PVC for dowels, or dowels...
Cake decorating supplies:
Rolling pin, cornstarch, xacto, pizza
cutter, quilting wheel, scissors, 2inch
round cutter, Piping bag w/coupler,
01 or 02 tip, cutter(optional), Small
offset spatula, large spatula,. Knife for
carving.
Airbrush and compressor.
Airbrush colors: red, skin,ivory, black.
Gold luster dust.
** whatever color you want the eyes

Make base board: screw dowel to
board 10 inches in from the left and back.
The Cake: TORTE ALL CAKES SO THEY ARE TWO LAYERS
1) Cut one of the 10x15 in half
2) Stack the 10x15, and then make a hole down the center with PVC then slide the cake down onto the
dowel
3) Cut the two corners off of the other 10x15, so it looks tapered.
4) Core the 7 inch round so a hole goes through the center with a
PVC pipe

5) Stack the round cake onto the dowel. This is the body. Place the tapered cake at an angle next to the
cakes to make the legs.
6) Drill or use a pvc pipe
to make hole in the
styro ball, so that it will
sit on the dowel.
I like to position it so the round ball looks like it is at a bit
of a tilt. This will give the angle of his head a jolly look-
instead of a stiff look!
Carving the Body:
1) Cut off the corners of bottom cakes to round out his body.
Remember that he is sitting so his rear will be larger at the
bottom.
Round out both sides and around the back

2) Cut a 9 inch round in half. Place one half in front of the “belly” area.
3)
Round off the edges of the chest area and shoulders
4) Round off the bottom cake. This is actually where the arms will be wrapped around
the belly.
5) Use the cut off pieces to fill in so the cakes “flow” over for his belly.

6) Carve the arms.
His arms should look
rounded like they are
wrapped around his
belly.
7) Round out his backside
8) Place a cake
behind your Santa.
Carve into his
backside so that it
looks like he is
leaning onto the
cake.
9) Carve off all the hard edges to give him a soft
look. Make sure he looks right from both sides.
You can take off the other cake for
now.

10) Carve in at the base of the cake that you tapered.
This is where his ankles will “cross” . Save an extra
chunk of cake to make his feet.
11) Build up his legs by adding long slivers of
cake- angle them like his legs would point. Now
that you have your basic shape, It is now time to
fill your cake. Take it apart, layer by layer being
careful to maintain the shapes.
F
Filling and Icing
1) Fill the bottom layer. Add the
top of the cakes.

2) Ice the top, and then add one more layer to the bottom of the rear
* There should
be 3 layers of
cake on the
dowel.
3) Stick a PVC pipe into the cake and mark the height. Cut 4 pipes to that measurement.
Ice the top of the cake. Insert the “dowels” evenly into the cake.
4) Cut a cake cardboard slightly smaller than the cake. Place it over the dowels. Ice over the board.
5) Add the top cake, and then “glue” the belly and arm sections on with frosting.
6) Blend all the edges by
rounding them out with a
knife.

Defining the Shape 1) Build his feet using the extra cake.
His feet will be crossed
at an angle, so one foot
will be up and one will
be down. Round it out
like the bottom of a
boot.
2) Using long slivers of cake, line them up across his thighs so they follow the shape of his legs. One leg
will be taller because it is crossed over the other one (in here, it is the chocolate cake)
You are ready to frost the cake!
Icing:

1) Using a bag with just a coupler, pipe icing over the cake- following the contours of the “body”
2) Gently smooth the tubes of icing together- making sure to follow the shape.
3) LET ICING
CRUST!!
Using a viva
paper towel,
smooth the
cake all over.
Pay attention
to the body
shape under
the icing.
Defining the Santa Suit

1) Pipe icing to build up where his pants “tuck” into his boots, and his arms. Go with the shape, so it will
flow like fabric. Place a viva paper towel over the new icing after it has lightly crusted.
2) Smooth the Viva into the “folds” allowing it to overlap a bit to create wrinkles in the icing.
Using your fingertips and to draw in wrinkles and folds, you
can create the look of flowing fabric. The folds should be
going up and down the legs and in toward where the legs are
crossed.
Remove the viva very slowly so it doesn’t pull the icing up.

3) Repeat process with the Arms. Smooth with a paper
towel.
4) Define the arms
5) Use a tool to create the wrinkles where the elbow
bends. Don’t go to deep, so the icing does not stick to
the Viva.
6) Remove the Paper towel slowly
7) Detail some “rolls” on his back the same method, and
he’s almost done!

Belts and Boots
1) Make a belt out of gray fondant. Cut a strip about 2 inches wide and 12 inches long. “Stitch” the belt
with a quilting wheel. Attach the belt along the back with a little bit of water.
2) Make his boots by adding an extra piece of cake for the toe. Ice it, and build up the icing so it is
rounded. Smooth it with Viva.
3) Cover the boots with gray/black fondant.
4) Follow the shape of the boot;
try not to smudge the “folds” in
his suit.
5) Airbrush the boots and belt
black.

Make it Red
1) Lightly spray black into the wrinkles and underside of the cake. This will create shadows and
dimension. Spray heavier on the boots, and where the cake meets the board.
2) Spray light coats of red. Allow it to dry between coats, and build up slowly. Red will turn brownish if
you spray too much, too quickly!

Santa’s Face
1) Mark where you want your eyes to go. Drill them out, or as I did, Burn them with a soldering iron.
2) Roll Fondant balls the size of large marbles, or use
medium white gumballs
Paint irises on them & insert them into the holes (make sure
they are looking the same direction!)
3) Make a brow line and bridge of nose with gum paste or
fondant.

4) Freehand cut upper and
lower eyelids with a Xacto knife.
5) Place the bottom eyelid first, then the top. Allow the edges to overlap the iris.
Finish both eyes- if the iris needs to be repositioned, you can stick a Pin into it, and move the eye into a
better position.

Making the Expressions
1) Pipe skin colored butter cream over the top portion of the face. Pipe a lump for the nose. There is no
need to pipe where the beard will cover. Smooth with a spatula and let crust.
2) Smooth with Viva, and create wrinkles and laugh lines just like you did the folds in his suit. Pipe ears
and smooth them with Viva.
3) Lightly mist his face in with a light pink on his cheeks and nose.

Make him Santa
Before you can pipe his beard, make a fondant collar out of white fondant.
1) Pipe white icing with the grass tip. ALLOW IT TO CRUST.
2) Smooth it with viva and shape it like you
did the wrinkles in the fabric.
3) Add details to his suit like a gold buckle and belt.
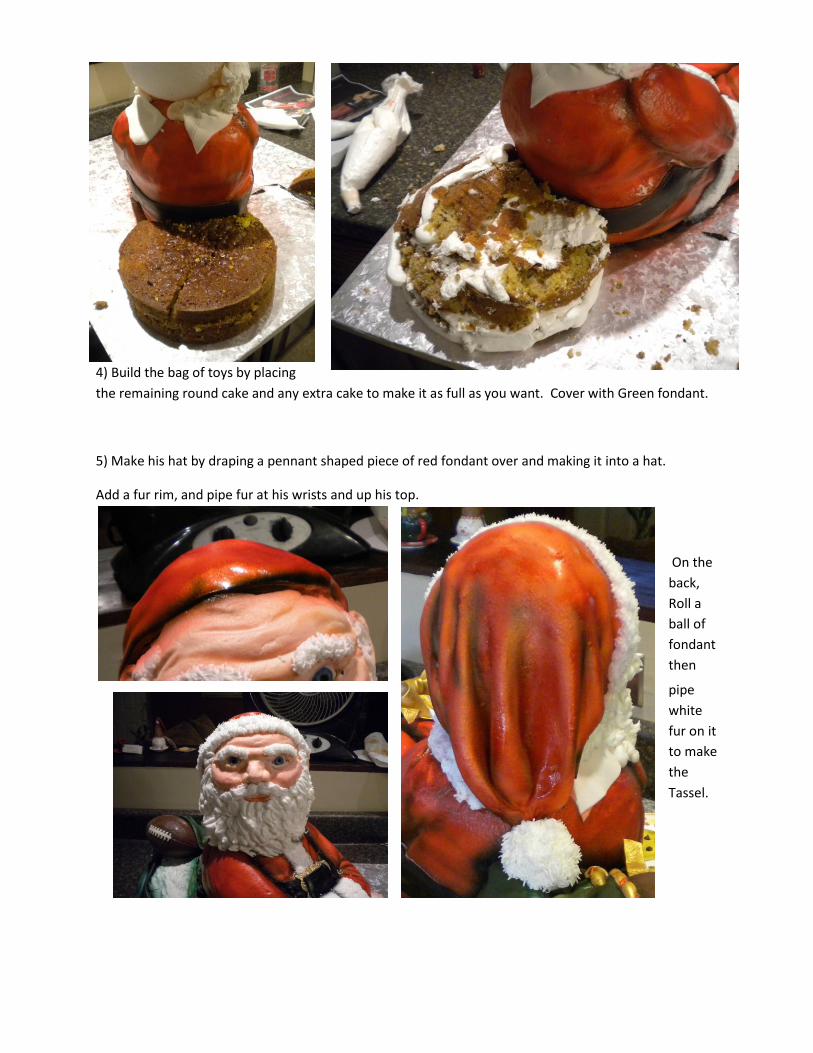
4) Build the bag of toys by placing
the remaining round cake and any extra cake to make it as full as you want. Cover with Green fondant.
5) Make his hat by draping a pennant shaped piece of red fondant over and making it into a hat.
Add a fur rim, and pipe fur at his wrists and up his top.
On the
back,
Roll a
ball of
fondant
then
pipe
white
fur on it
to make
the
Tassel.

Fill his bag with gifts, ribbons, candy, and toys! I like to put a plate of cookies on his belly- so he looks
like he has emptied his toy bag, and is sitting back relaxing and having his cookies! I like to add details
like gold buttons, and ribbons just to make him more festive!